Refer to your TV’s Quick Start Guide or other provided documentation to for modelspecific information about attaching the base or a wall mount and making connections to AC power and to your other audio/video devices. The following information applies to all Roku TV models.
Connecting an antenna, cable, or satellite box
If you are using an antenna, CATV cable without a set-top box, or a cable or satellite box that has only an antenna output, connect a 75-ohm coaxial cable (not provided) from the device to the ANT/CABLE input on the TV.
Tip: If you are using an antenna with a 300-ohm twin-lead cable, you need to use a 300-to-75-ohm adapter (not provided) to adapt the twin-lead cable to a connection that is compatible with the TV’s antenna input.
Tip: If you receive your TV stations through a set top box from a cable or satellite TV provider, connect it to the TV using the best connection method available. From most to least desirable:
HDMI® input – Digital HD and SD video
AV input – analog SD video
Antenna input – analog SD video using NTSC
Connecting external equipment with a composite AV video cable
If the best connection available on your device is AV or composite video output, connect it to the TV using a composite AV cable (not provided). Composite AV cables typically have three RCA-type plugs on each end, color coded as follows:
Yellow – Video
Red – Audio, right channel
White or black – Audio, left channel
Connect each plug to the corresponding connector on the device and on the TV.
Note: Select models have an AV Input that looks like a headphone jack. Use the breakout cable (included) to adapt this input to the three RCA-type plugs on your composite cable.
Connecting external equipment with an HDMI® cable
If possible, connect your devices using HDMI® cables (not provided). They help to provide the best video quality and also carry audio signals, so that only one cable is needed. For better picture quality, we recommend that you use cables designated as High Speed HDMI® Cables.
Tip: You might need to configure the device to send its signal through its HDMI® connector.
The connector labeled HDMI (ARC) or HDMI IN (ARC) has the additional ability to use the audio return channel to send digital audio to a receiver or sound bar, as explained in Connecting an AV receiver or digital sound bar.
Connecting headphones or analog sound bar
You can connect headphones or an analog sound bar (not provided) to the TV’s headphone jack.
Tip: Inserting a plug in the headphone jack disables the sound from the TV’s built-in speakers.
Warning: Loud noise can damage your hearing. When using headphones, use the lowest volume setting on your headphones that still lets you hear the sound.
Select models also have an audio line out connection that is not affected by TV volume or mute settings and does not disable the TV speakers. Use this connection when you want to use your amplifier or sound bar to control the TV volume. To turn off the TV’s built-in speakers, in the Home screen menu, navigate to Settings > Audio > TV speakers and change the setting.
Connecting headphones to the Roku Enhanced Voice Remote
Select Roku TVs come with the Roku Enhanced Voice Remote. On these models, you can connect headphones to the jack on the left side of the remote.
Tip: Inserting a plug in the remote’s headphone jack disables the sound from the TV’s built-in speakers or attached receiver or sound bar. The volume and mute controls on the right side of the remote adjust the volume level of the connected headphones.
Warning: Loud noise can damage your hearing. When using headphones, use the lowest volume setting on your headphones that still lets you hear the sound. You might notice that connecting headphones to your remote shortens the remote’s battery life somewhat
Connecting an AV receiver or digital sound bar
You can enjoy Dolby Audio™ multichannel sound from your TV if you connect a digital amplifier or sound bar (not provided) in either of two ways:
Digital optical audio out (S/PDIF) – Connect a TOSLINK optical cable (not provided) from the TV to the Optical input on your receiver or sound bar.
HDMI® ARC – Connect an HDMI® cable (not provided) from the HDMI (ARC) connector to the HDMI® input on your receiver or sound bar. This connection uses the Audio Return Channel (ARC) feature of the HDMI® specification to output sound from the TV to a compatible device. To use this feature, you must configure the TV to enable HDMI® ARC, as explained in Enable HDMI® ARC.
Preparing for Internet connectivity
If you want to watch streaming content and take advantage of the cool features of your Roku TV, connect it to the Internet through a wireless modem/router or a wireless access point (not provided). The TV has a built-in wireless LAN adapter.
Note: The TV supports only its internal wireless network adapter—it does not support the use of a USB network adapter.
Select 4K models have wired in addition to wireless network connectivity. To use the wired network connection, connect an RJ-45 Ethernet cable (not provided) from the jack on the back of your TV to your network router or switch. The wired connection supports both 10 Base-T and 100 Base-T Ethernet.
Roku TV remote
Use the following information to identify the buttons on your Roku remote.
Note: Certain remote buttons and features vary by model. Your remote might not have all buttons or features listed
• If your remote has a microphone button just below the purple pad, then you have a Roku Voice Remote.
• If your remote has a headphone jack on its left edge, then you have a Roku Enhanced Voice Remote.
Roku voice remotes have additional capabilities as noted in the following table.
Using your TV
Opting in to Smart TV experience (U.S. only)
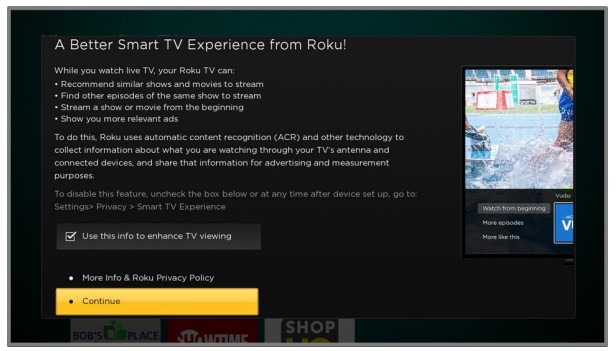
Only in connected mode in the United States, the first time you select Antenna TV, an HDMI input, or AV input, your TV offers to enable the Smart TV experience. If you decide to enable it at this time, you’re all set to enjoy its recommendations and features.
The Smart TV experience uses automatic content recognition (ACR) and other technology to collect information about what you watch through your Antenna TV, and on devices like media players and cable boxes connected to the HDMI or AV inputs. Opting in means that you give permission to analyze the programs you watch for the purpose of making recommendations, as well showing ads that are more relevant to you.
If you decide not to enable the Smart TV experience at this first opportunity, you can enable it later. Or, if you decide you’d rather not use the feature, you can disable it, but be aware that previously collected information is retained and not deleted.
Disable Smart TV experience
If you decide you want to disable Smart TV experience, follow these steps:
From the Home screen, go to Settings > Privacy > Smart TV experience.
Navigate to the right to highlight Use info from TV inputs.
Press OK on the remote to clear the check box.
Disable Auto Notifications
If you want to keep the Smart TV experience enabled, but you do not want to see notifications while you are watching shows, you can disable notifications. To do so, follow these steps:
From the Home screen, go to Settings > Privacy > Smart TV experience.
Navigate to the right to highlight Use info from TV inputs.
Press DOWN on the remote to highlight Enable auto notifications.
Press OK on the remote to clear the check box.
Note: These settings do not affect recommendations for More Ways to Watch that you see in the Smart Guide when watching Antenna TV channels. Those recommendations come from the Smart Guide and do not rely on ACR technology
Watching Antenna TV channels
Select the Antenna TV tile in the Home screen. Your TV remembers the last channel you watched and starts with that channel playing.
Changing channels
To change channels, you can do any of the following:
Press the UP arrow to change to the next higher channel.
Press the DOWN arrow to change to the next lower channel.
Press the LEFT arrow to display the channel list (in non-connected mode) or Smart Guide1 (in connected mode), and then press the arrow keys to select the channel or show you want to watch. Press REWIND and FAST FORWARD to move through the list one page at a time. When you’ve highlighted the channel or show you want to watch, press OK. (If you decide you don’t want to change channels, press the BACK button).
Only if Live TV Pause is not enabled, press to jump to the previous channel. Press again to return to the channel you were watching before you pressed
Favorite Channels in non-connected mode
You can quickly change from surfing among all channels or only your favorite channels. First, you have to mark one or more channels as your favorites.
Note: In the United States, in connected mode, favorite channels appear at the top of the Smart Guide automatically after several days of watching Antenna TV channels. For details, see Smart Guide.
Mark your favorite channels
In non-connected mode, you can make any channel a favorite whenever you’re watching Antenna TV channels.
1. Press the LEFT arrow to display the channel list. Notice that the words All channels appear at the top of the channel list.
2. Scroll up or down to highlight a channel that you want to make a favorite.
3. Press . At this point, you’ll see two options:
Add to favorites
Back
4. With Add to favorites highlighted, press OK. A symbol appears adjacent to the channel to indicate that it is now a favorite.
5. Repeat these steps to add more favorite channels.
Surf only your favorite channels
In non-connected mode, after you’ve marked one or more channels as favorites, you can switch to your favorite channels whenever you’re watching Antenna TV channels.
Press the LEFT arrow to display the channel list.
Press the LEFT or RIGHT arrow once to switch to Favorites. Notice that the word Favorites appears at the top of the channel list.
Highlight a channel and press OK to select one of the channels in the Favorites channel list, or wait a few moments until the channel list disappears.
Press the UP or DOWN arrow to change to the previous or next favorite channel. Each channel you select in this way is a favorite channel. Your channel surfing is limited to favorite channels only.
Your favorite channel list remains in effect even if you turn off or unplug your TV, until you switch back to all channels.
Note that when you press OK to view the program information banner while watching a show, a symbol appears below the channel number.
Surf all channels again
In non-connected mode, you can switch back to all channels whenever you’re watching Antenna TV channels.
Press the LEFT arrow to display the channel list.
Press the LEFT or RIGHT arrow once to switch to All channels. Notice that the words All channels appear at the top of the channel list.
Highlight a channel and press OK to select one of the channels in the All channels list, or wait a few moments until the channel list disappears.
Press the UP or DOWN arrow to change to the previous or next channel among all your available channels. You can surf among all channels in your channel list.
Remove a channel from your favorites
In non-connected mode, you can remove a channel from your favorites whenever you’re watching the Antenna TV input.
1. Press the LEFT arrow to display either channel list—All channels or Favorites.
2. Scroll up or down to highlight a favorite channel that you want to remove from your favorites.
3. Press on your remote. At this point, you’ll see two options:
Remove from favorites
Back
4. With Remove from favorites highlighted, press OK. The symbol adjacent to the channel disappears.
5. Repeat these steps to remove other channels from Favorites.
Regrettably, you are unable to connect to 5G WIFI.
#4 Does it have 110 / 220v power incase i want to use outside usa?
The TV power consumption is 120V.
#5 What is the Brightness (nits) rating of this TV?
This television has up to 300 nits of peak brightness
#6 Will TV allow me to stream live video from my iPhone to the TV?
The screen mirroring that lets you mirror your compatible smartphone or tablet on your TV. Share videos, photos, web pages, and more from compatible devices. Regrettably you are unable to screen mirror from a iPhone to the TV.

 just below the purple pad, then you have a Roku Voice Remote.


 to jump to the previous channel. Press again to return to the channel you were watching before you pressed
 . At this point, you’ll see two options:
 symbol appears adjacent to the channel to indicate that it is now a favorite.