WD ReadyView™
Surveillance System
User Manual: Basic Features

Table of Contents
1 Introduction ................................................................................... 4
Important Safety Instructions ................................................................................................................ 6
2 Setup ............................................................................................. 7
Kit Contents ........................................................................................................................................ 7
System Requirements ........................................................................................................................... 7
Compatibility ....................................................................................................................................... 7
Connecting the Unit ............................................................................................................................. 7
Quick Installation Guide ...................................................................................................................... 10
3 Installing the App ......................................................................... 13
Downloading and Installing the App .................................................................................................... 13
Login for Additional Mobile Devices ..................................................................................................... 13
Main Menu .......................................................................................................................................... 14
4 Live View ...................................................................................... 16
5 System Recordings ....................................................................... 18
6 My Snapshots ............................................................................... 21
7 Alert Manager .............................................................................. 23
8 Camera Manager ......................................................................... 24
Rename Cameras ............................................................................................................................... 24
Configure Motion Detection ................................................................................................................ 24
9 Config Manager ........................................................................... 28
Backup .............................................................................................................................................. 29
10 Firmware .................................................................................... 32
11 Help ............................................................................................ 33
Error Codes ....................................................................................................................................... 33
12 External Storage ......................................................................... 37
Connecting a Storage Device .............................................................................................................. 37
13 Regulatory Compliance .............................................................. 38

3WD ReadyView™ User Manual
FCC Class A Information ..................................................................................................................... 38
UL Statement ..................................................................................................................................... 38
Warranty Information ......................................................................................................................... 38
Obtaining Service ....................................................................................................................................................................... 38
Limited Warranty ........................................................................................................................................................................ 39
HDMI Certification .............................................................................................................................. 39
Third Party Notices ............................................................................................................................ 40
H.264 AVC: MPEG-LA .................................................................................................................................................................. 40
H.265 HEVC—HEVC Advance ............................................................................................................. 40

WD ReadyView™ User Manual 4
1 Introduction
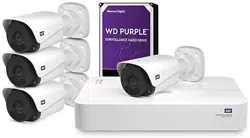
When you need quality surveillance, the WD ReadyView™ Surveillance System is the mobile-first,
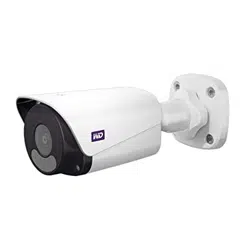
all-in-one solution with a simple NVR device setup.* This complete system includes four HD, dust-
and water-resistant** cameras with night vision and motion detection, the award-winning WD
Purple® drive storage that’s designed for 24/7 always-on surveillance systems, and no monthly
fees.
Easy Setup
Set up your NVR device in just four simple steps,* including downloading and connecting the
mobile app.
Bundle Up a Great Value
You’ll get everything you need to help secure your home or office quickly, including cameras,
storage and 100ft Cat 5 cables, and the ONVIF®-compliant system is robust enough to expand
with your needs as they grow.
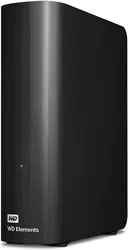
WD Purple
The trusted, award-winning WD Purple® drive comes in the box. It’s purpose-built for 24/7,
always-on surveillance systems, and keeping your footage on site means there are no additional
monthly fees.
Two Camera Bundles
There are two unique camera bundles that include four IP67 dust- and water-resistant rated, HD,
metal-encased cameras with night vision and motion detection, an NVR with a WD Purple drive for
video storage, and necessary Cat 5 cables. The cameras are Powered Over Ethernet (PoE) so your
placement isn't restricted by outlet availability.
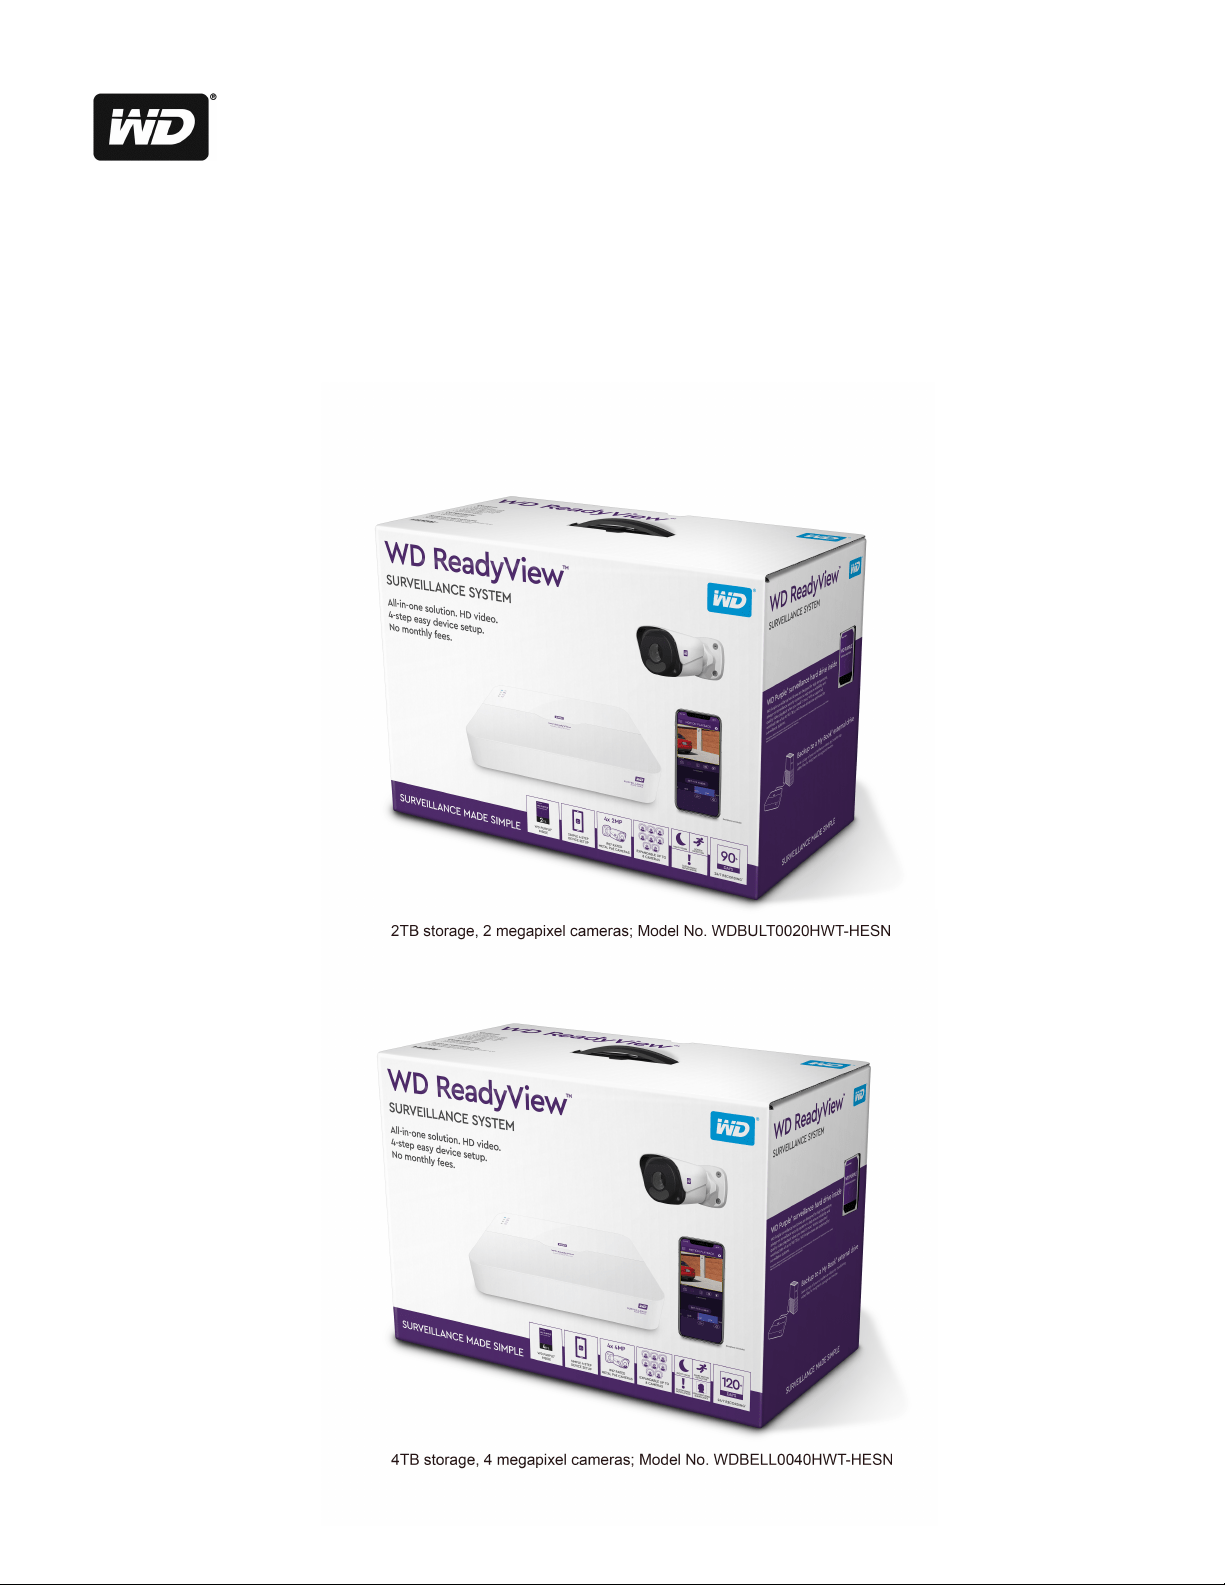
2MP Camera Bundle
Four, 2MP cameras that are IP67 dust- and water-resistant rated** and feature metal cases,
HD/1080p resolution, night vision and motion detection. This system can capture 90+ days of
continuous 24/7 recording.***
4MP Camera Bundle
Four, 4MP cameras that are IP67 dust- and water-resistant rated* and feature metal cases,
HD/1080p resolution, night vision and Intelligent Video Surveillance (IVS).
IVS includes intrusion, trip line and intelligent identification features. Any of these events will
trigger actions you define (recording, snapshot or alert notification):
• Intrusion allows you to set pre-defined virtual regions and specific advance parameters.
• Trip line defines a virtual line in the viewing area.
• Intelligent identification
This system can capture 120+ days of continuous 24/7 recording.‡

WD ReadyView™ User Manual 5
Features
2TB/2MP Kit
4TB/4MP Kit
Motion Detection
l
l
Trip Line
l
Scene Focus Change
l
Defocus
l
Area Detection
l
Mobile App
Get hand-held control of your powerful surveillance system. Using just your smartphone, you can
easily set up your complete system by scanning the QR code on the Quick Install Guide (the same
QR code is also available on the retail packaging and the bottom of the NVR). You’ll be able to
view live camera footage or even previously saved footage from anywhere in the world with an
internet connection. You can receive notifications when your cameras detect motion or other
smart interactions. The app allows you to control up to five (5) different WD ReadyView systems
and can be used on multiple mobile devices.
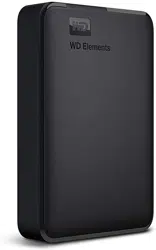
External Backup
To keep a separate or additional copy of your surveillance video, you can easily transfer system
recordings from the WD ReadyView™ Surveillance System by plugging in an external USB storage
drive such as the My Book® drive.
Expandable System
This ONVIF®-compliant system can expand up to 8 compatible cameras (4 are included) to grow
with your needs. The intelligent system is smart enough to recognize when additional WD
ReadyView™ 2MP or 4MP cameras have been added and installed to automatically upgrade and
provide the additional smart features. The easy-to-use app can deliver software updates to the
NVR and all the cameras straight from your smartphone. The system can be expanded up to 8
cameras with WD ReadyView 2MP or 4MP cameras.‡‡
*After Cat 5 wiring and cameras are installed.
**Cameras can be submerged in up to 1 meter of water for up to 30 minutes.
***Number of days of video that can be stored are provided for illustrative purposes only and are
based on recording 15% motion events at 1200 Kbps (average) and 85% static image at 120 Kbps
with four cameras at 1920x1080 HD @ 25fps, H.265. Your results will vary based on file format, file
size, amount of motion detected, resolution, settings, software and other factors.
‡Number of days of video that can be stored are provided for illustrative purposes only and are
based on recording 15% motion events at 1700 Kbps (average) and 85% static image at 180 Kbps
with four cameras at 1920x1080 HD @ 25fps, H.265. Your results will vary based on file format, file
size, amount of motion detected, resolution, settings, software and other factors.
‡‡ONVIF®-compliant cameras can be added; advanced features will be limited.

Important Safety Instructions
WD ReadyView™ User Manual 6
1.1 Important Safety Instructions
IMPORTANT: This device is designed and manufactured to assure personal safety. Improper
use can result in electric shock or fire hazard. The safeguards incorporated into this unit will
protect you if you observe the following procedures for installation, use, and servicing.
·
Follow all warnings and instructions marked on the product.
·
Unplug this product from the wall outlet before cleaning. Do not use liquid cleaners or
aerosol cleaners. Use a damp cloth for cleaning.
·
Do not use this product near any liquids.
·
Do not place this product on an unstable surface. The product may fall, causing serious
damage to the product.
·
Do not drop the product.
·
Do not block the slots and openings on the sides of the chassis; to ensure proper
ventilation and reliable operation of the product and to protect it from overheating,
these openings must not be blocked or covered. Making sure the unit is laying flat, with
the LEDs facing up, also helps prevent overheating.
·
Operate this product only from the type of power indicated on the marking label. If you
are not sure of the type of power available, consult your dealer or local power company.
·
Do not allow anything to rest on the power cord. Do not locate this product where
persons will walk on the cord.
·
If an extension cord is used with this product, make sure that the total ampere rating of
the equipment plugged into the extension cord does not exceed the extension cord
ampere rating. Also, make sure that the total rating of all products plugged into the wall
outlet does not exceed the fuse rating.
·
Never push objects of any kind into this product through the chassis slots as they may
touch dangerous voltage points or short out parts that could result in a fire or electric
shock.
·
Unplug this product from the wall outlet and refer servicing to qualified service personnel
under the following conditions:
o When the power cord or plug is damaged or frayed.
o If liquid has been spilled on the product.
o If the product has been exposed to rain or water.
o If the product does not operate normally when the operating instructions are
followed. Adjust only those controls that are covered by the operating instructions
since improper adjustment may result in damage and require extensive work to the
product by a qualified technician to restore the product to normal condition.
o If the product has been dropped or the chassis has been damaged.
o If the product exhibits a distinct change in performance, contact WD Customer
Support at support.wdc.com

WD ReadyView™ User Manual 7
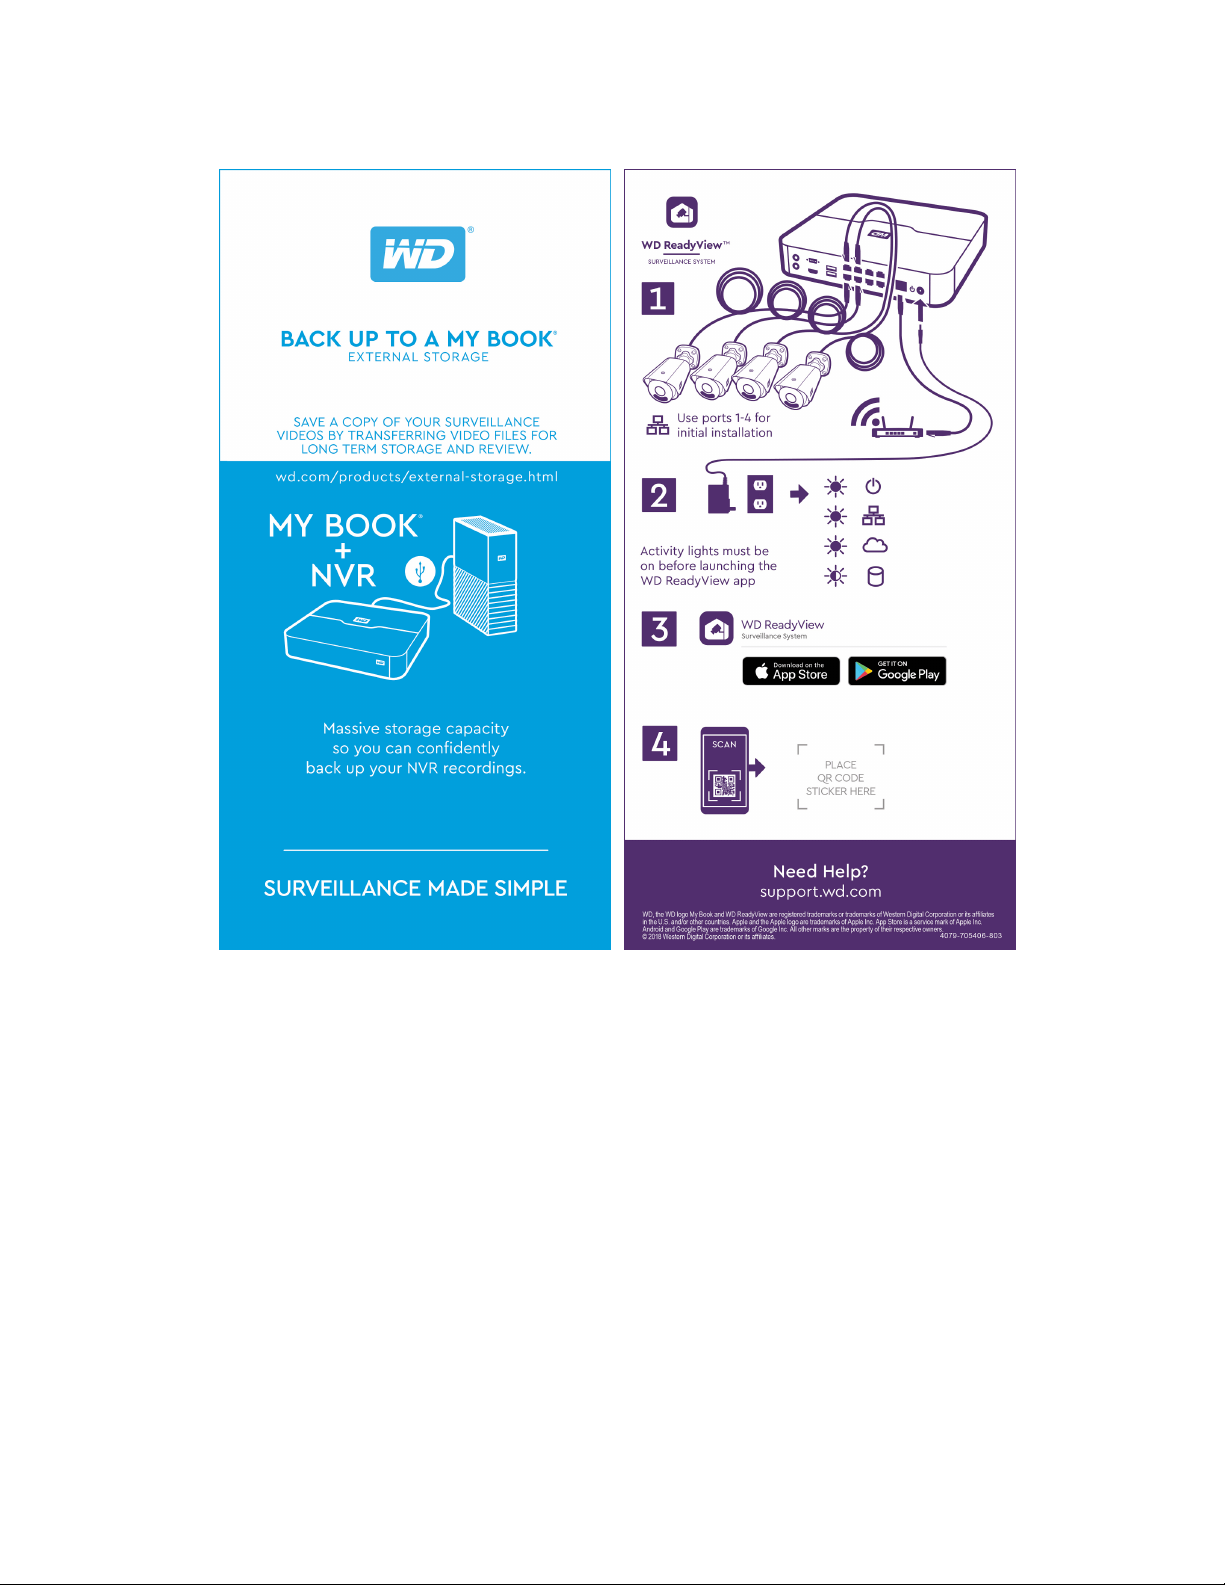
2 Setup
This chapter explains how to setup the WD ReadyView
ä
system.
2.1 Kit Contents
Your WD ReadyView™ kit includes the following items:
·
Network Video Recorder (NVR; either 2TB or 4TB)
·
AC adapter (US)
·
Four (4) PoE IP cameras (either 2MP or 4MP)
·
Four (4) 100 ft Cat 5 cables (each cable comes with a weather-resistant connector on one
end)
·
One (1) 6.5 ft Cat 5 cable
·
Quick Install Guide
·
Window stickers
2.2 System Requirements
·
Mobile device with iOS 9+ or Android 4.4+
·
Router with active Internet connection
2.3 Compatibility
·
H.265 and H.264
·
ONVIF
â
compliant
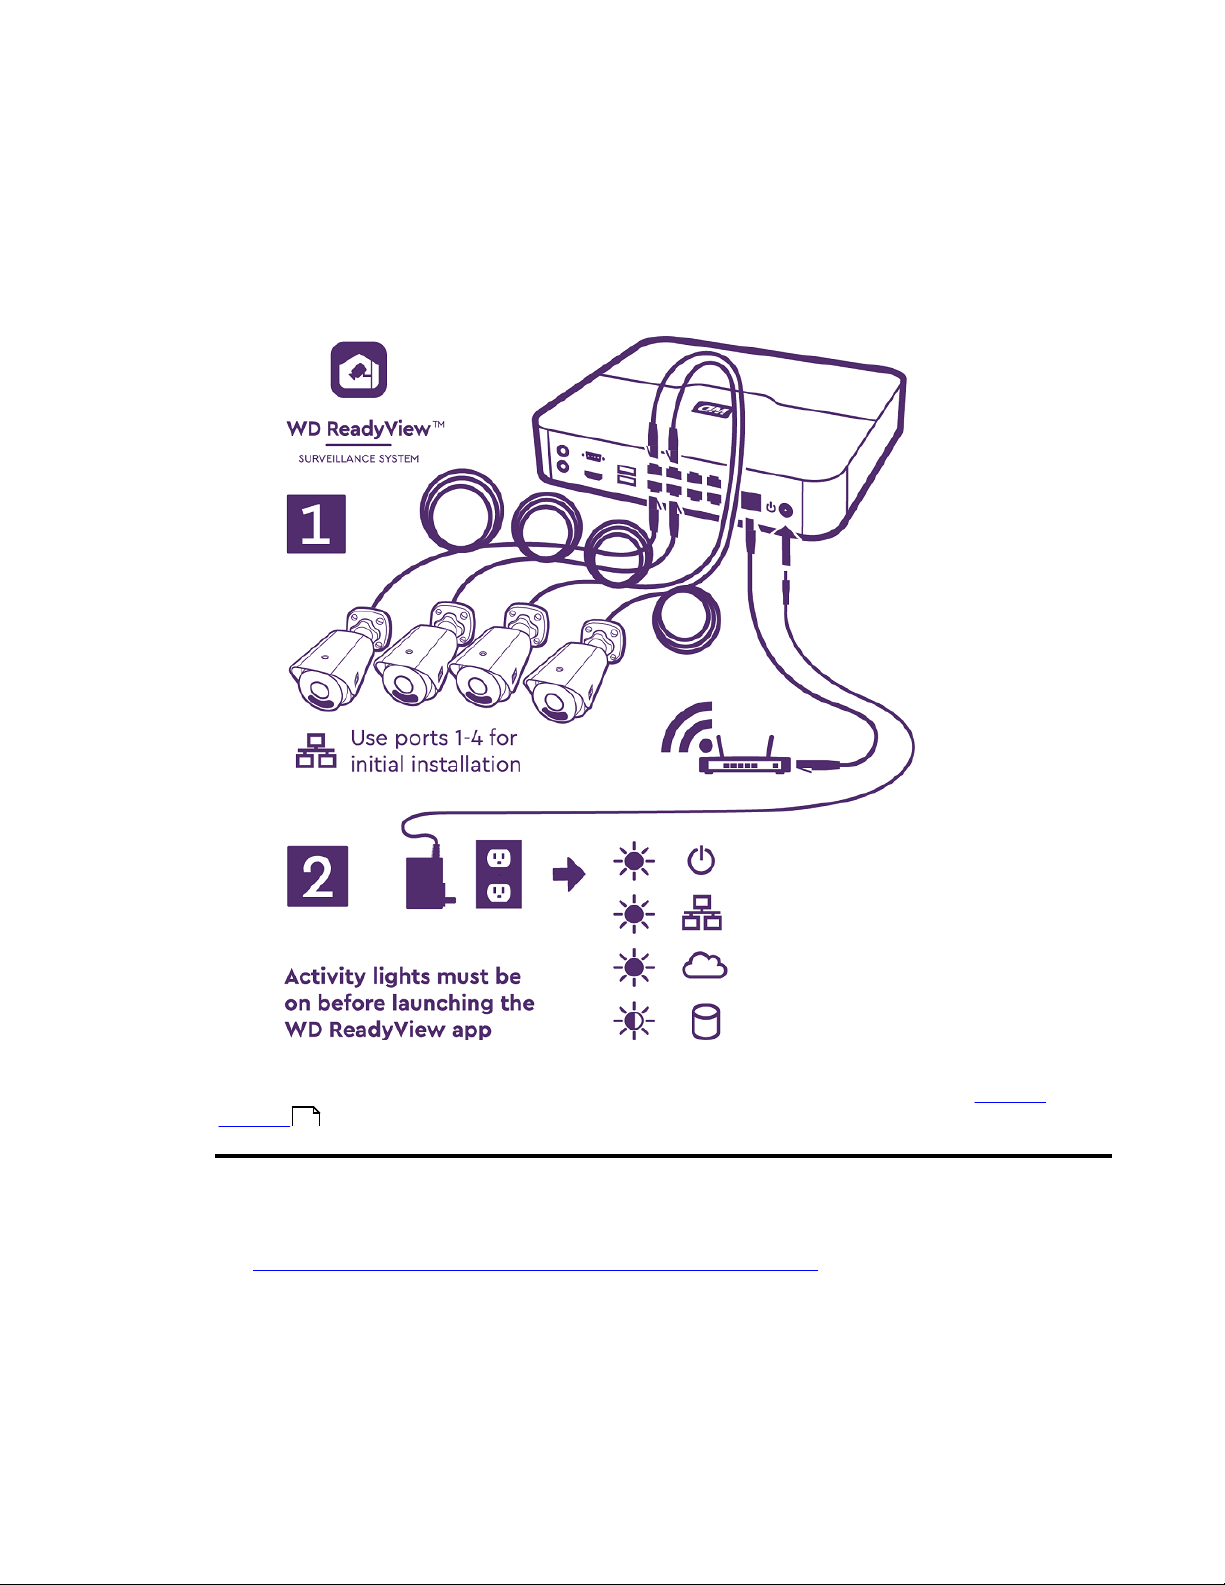
2.4 Connecting the Unit
Before final installation, the complete WD ReadyView™ system (NVR, cameras, cables, power
supply) should be connected for app installation and testing purposes. A desk or table near your
Wi-Fi router may be useful when assembling the system. Follow the steps below to connect the
system. The WD ReadyView Quick Install Guide also illustrates this process.
1. Connect the cameras, Cat 5 cables, and power to the NVR.
a. Using the 100 ft Cat 5 cables supplied with the WD ReadyView kit, connect the
cameras to the numbered PoE ports in sequence. For example, connect the first
camera to port #1. Connect the second camera to port #2, and so on. Failure to
connect the cameras in order will cause the first four cameras to be displayed on
two screens. Do not unspool the entire cable during testing; remove the outer
cellophane and extend a few feet from each end. Note that the weather-resistant
connector is designed to be connected to the camera.
Connecting the Unit
WD ReadyView™ User Manual 8
b. Plug one end of the 6.5 ft Cat 5 cable into the network port on the NVR.
c. Plug the other end of the 6.5 ft Cat 5 cable into a port on the router.
d. Plug the power supply cable into the NVR.
2. Plug the power supply into an AC outlet.
Once the system is placed in a permanent location, an optional storage device (e.g. a WD My
Book™) can be connected to one of the USB ports on the back of the NVR. See the External
Storage section for more information.
To use the cameras with a non-WD, ONVIF-conformant system or NVR, follow the steps below.
1. Download and install the WDRVTool on a Windows PC (not supported on macOS) (link:
https://support-en.wd.com/app/answers/detail/a_id/28866) or go to support.wdc.com
and search “28866”.
2. All settings on your camera applicable to your system must be changed while connected
through a PoE switch before connecting the camera to a non-WD, ONVIF-conformant NVR.
Note that your PoE switch needs to be connected to your router. Connect the WD ReadyView
camera to your PoE switch.
3. Open the WDRVTool from your PC or laptop. If no IP address appears, click Refresh in the
upper left corner.
37
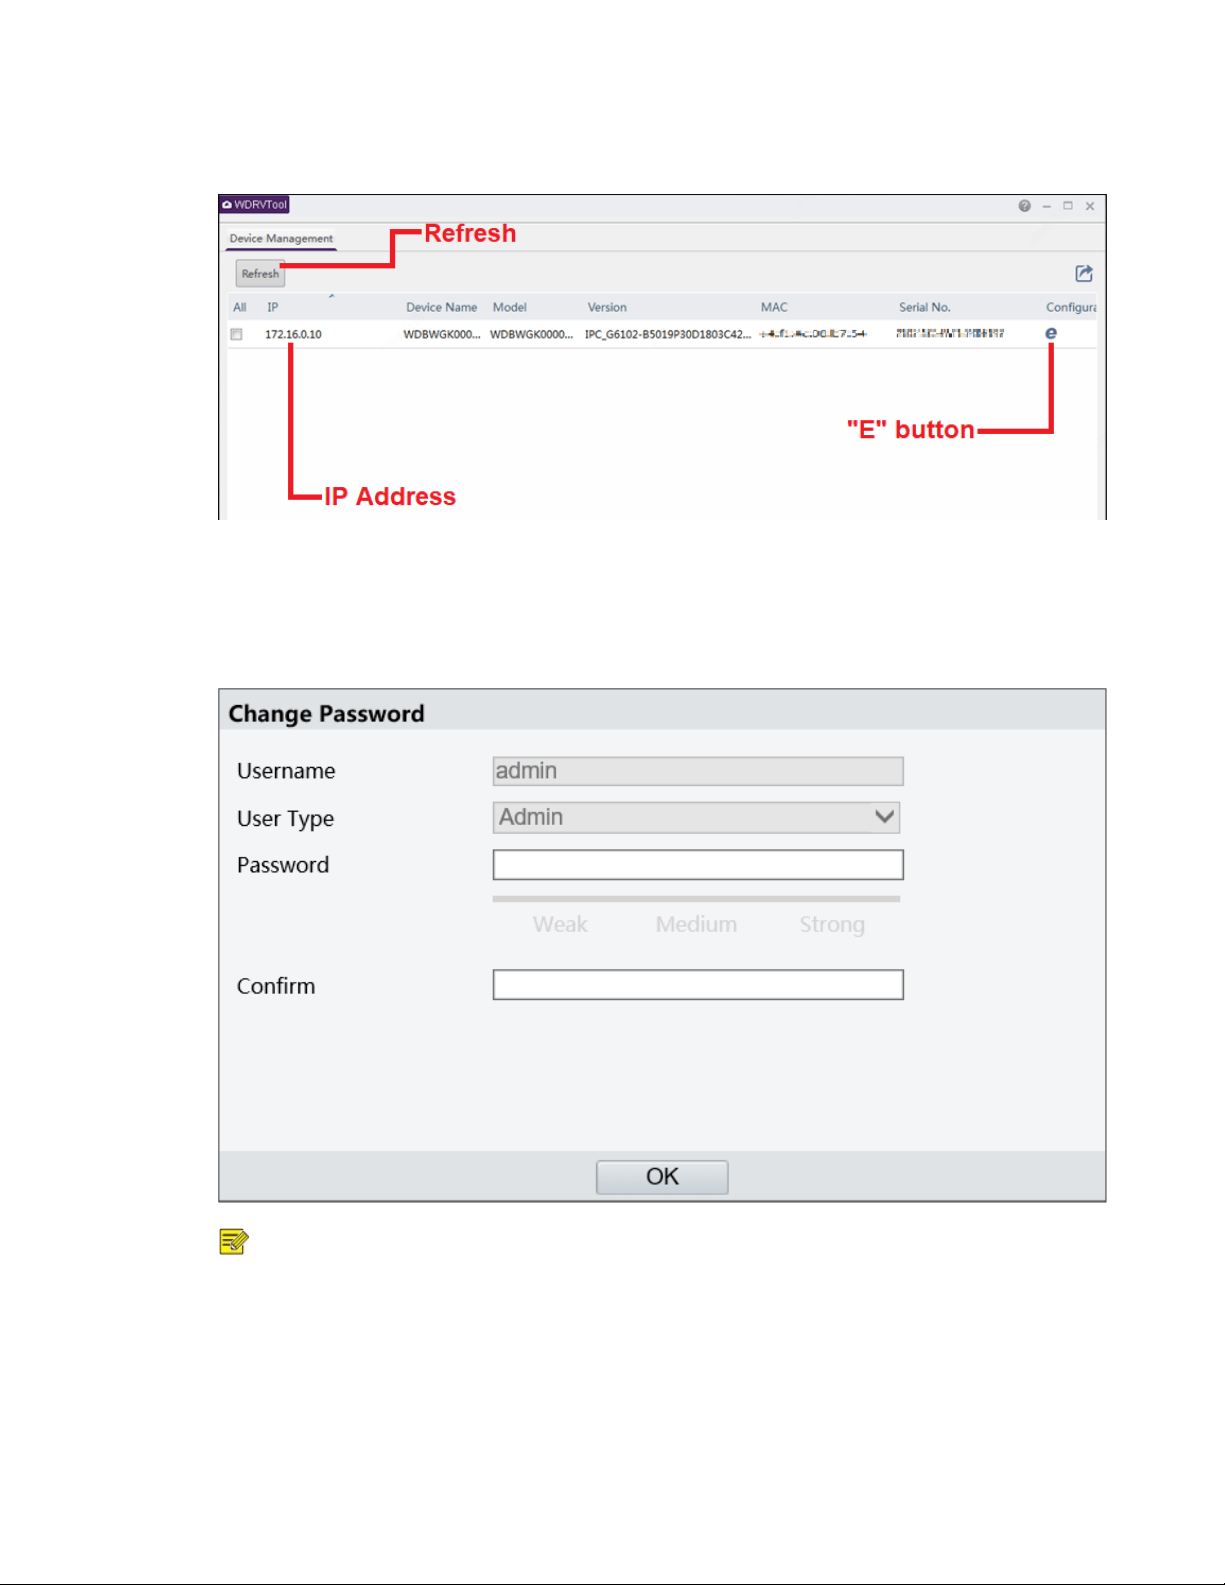
Connecting the Unit
WD ReadyView™ User Manual 9
4. Click the “E” button (in the Configuration column) at the far right; the camera’s browser
window will open.
5. Login using the camera username and password. The default username is admin; the default
password is Readyview123.
6. Complete the fields below to change your password.
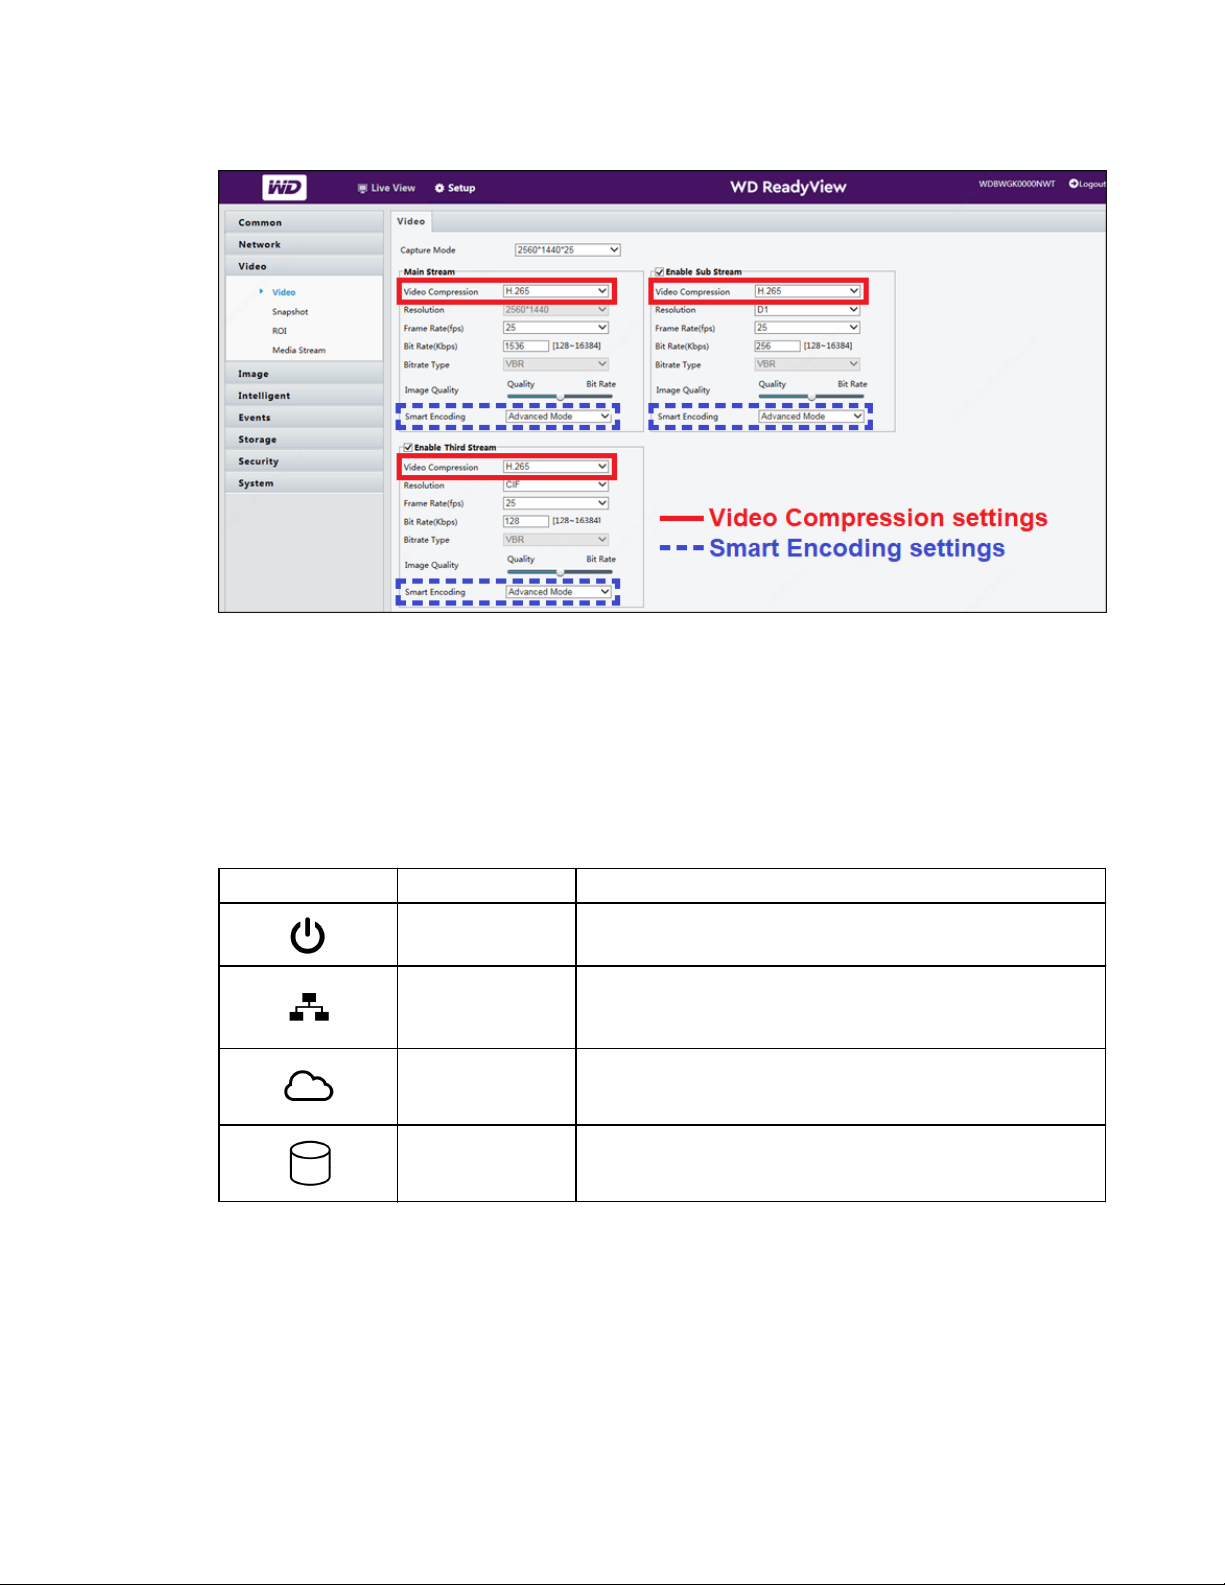
NOTE: Steps 7 and 8 below apply to our 8MP/4K cameras only. If you do not have an
8MP/4K camera, skip to step 9.
7. After login, click Setup > Video > Video. Change the main stream, sub stream, and third
stream settings.
Connecting the Unit
WD ReadyView™ User Manual 10
8. For each stream, change the video compression from H.265 to H.264, then change smart
encoding from Advanced Mode to Basic Mode.
9. The process is complete. You may click Logout in the upper right corner or close the window.
Status Lights
Four (4) LED status lights are located on the top of the NVR. A description of each LED is listed
below.
Icon
Function
Color and Description
Power
Steady blue LED; indicates the NVR is plugged into
an AC outlet.
Ethernet
Steady blue LED; indicates one end of the Cat 5
cable is connected to the Ethernet port on the
NVR and the other is connected to a router.
Internet
Steady blue LED; indicates the system is
connected to the Internet.
Recording
Flashing red LED; indicates the system is recording
(normal activity).
2.5 Quick Installation Guide
A Quick Installation Guide is included with the WD ReadyView system. This guide is a useful
reference when connecting and testing the system. The guide also contains a QR code on the
back page, which is required during the app installation process.

Quick Installation Guide
WD ReadyView™ User Manual 11
Quick Installation Guide
WD ReadyView™ User Manual 12

WD ReadyView™ User Manual 13
3 Installing the App
The WD ReadyView
ä
application is needed to install, configure, and maintain the system. The app
is available in Android and iOS versions.
3.1 Downloading and Installing the App
The WD ReadyView app can be downloaded from the Google Play Store (Android) or the Apple
App Store (iOS).
Downloading and Installing the App
1. Search for "WD ReadyView" in the appropriate store.
2. Once the app has been found, tap the Download button.
3. Tap Install.
4. Tap the WD ReadyView icon.
5. Tap OK when prompted to access the camera.
6. Tap Allow when prompted to access your location.
7. Tap Allow when prompted to allow notifications.
8. Read the End User License Agreement.
9. Tap the buttons next to the "I consent to the End User License Agreement" and "I
consent to the Privacy Statement".
10. Tap Agree to accept the terms.
11. Scan the QR code on the back of the Quick Install Guide. The same QR code is also
available on the retail packaging and the bottom of the NVR.
12. Tap Login.
13. Change the default password. IMPORTANT NOTE: It is critical that you record and store
the password in a safe place; should you forget or lose your password, you will need to
contact Support.
3.2 Login for Additional Mobile Devices
Once the app has been installed on an additional device, the login is the first screen that appears
after starting the app.
1. Enter the password created during the onboarding process to continue, then tap Login; the
app will open, and the Live View will be displayed.
Login for Additional Mobile Devices
WD ReadyView™ User Manual 14
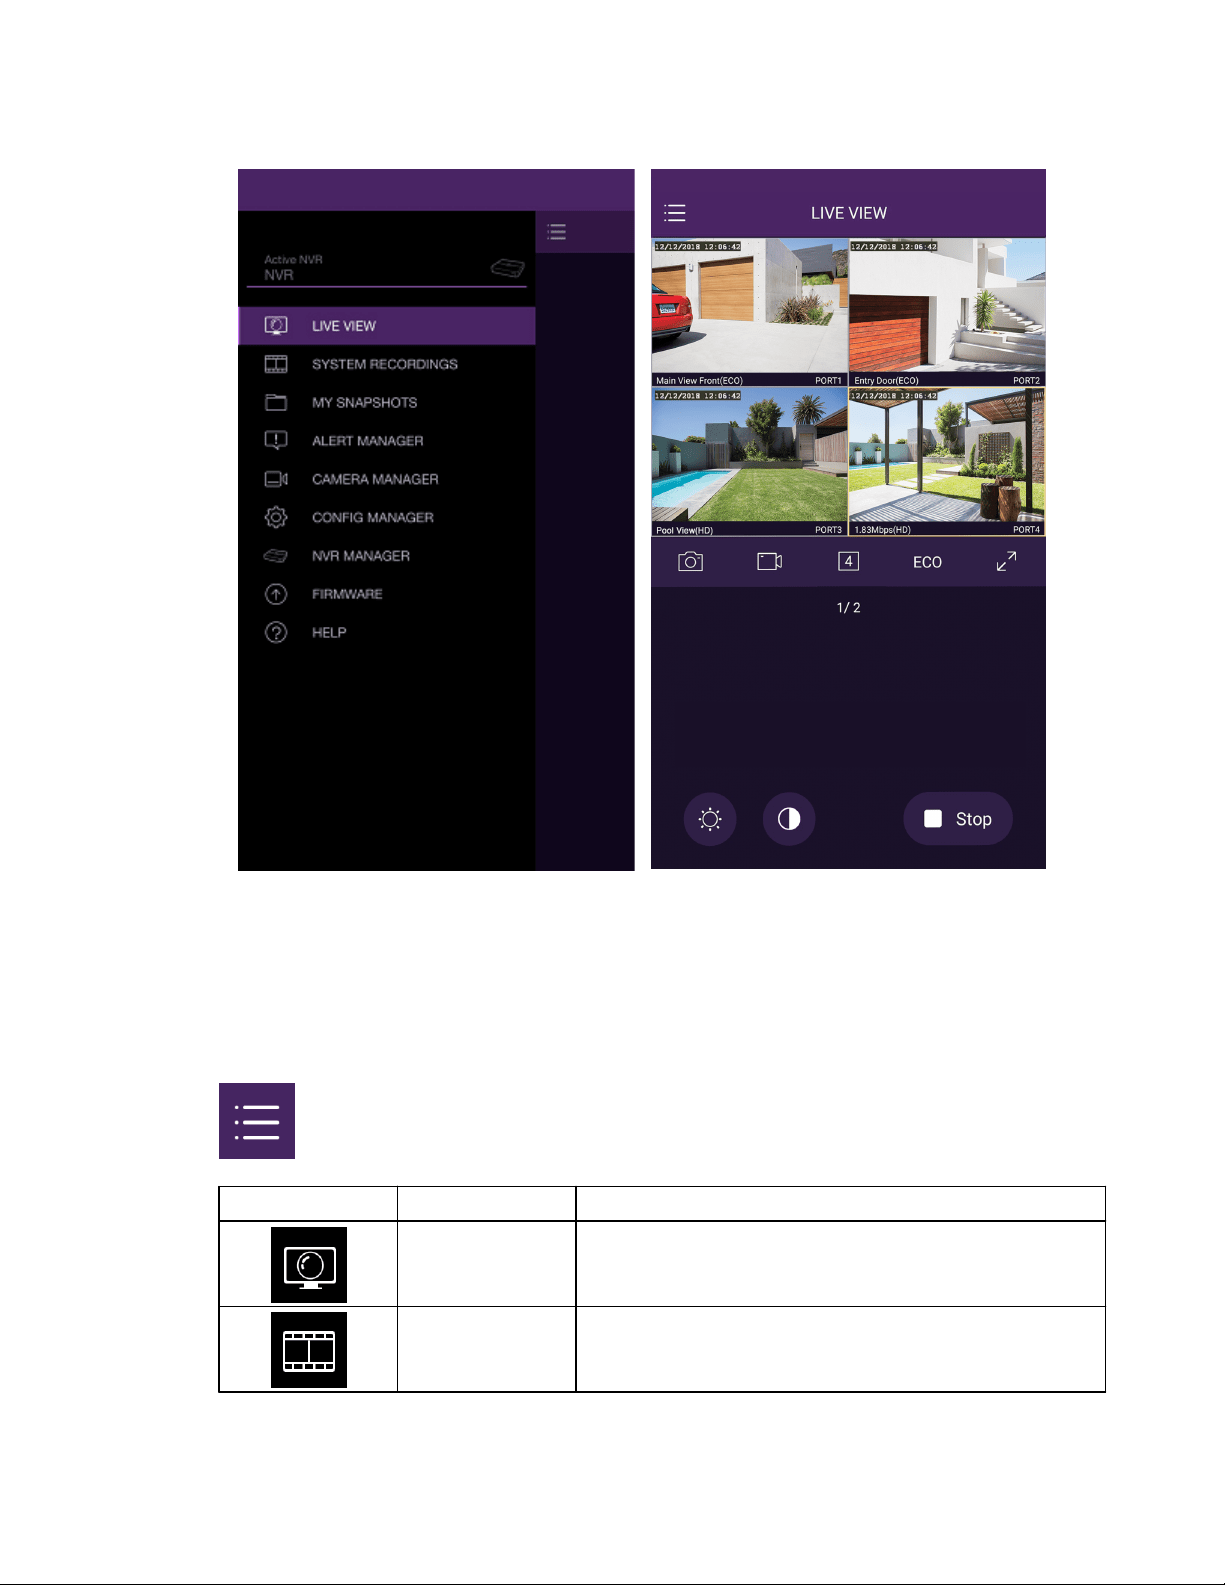
Main Menu
Live View
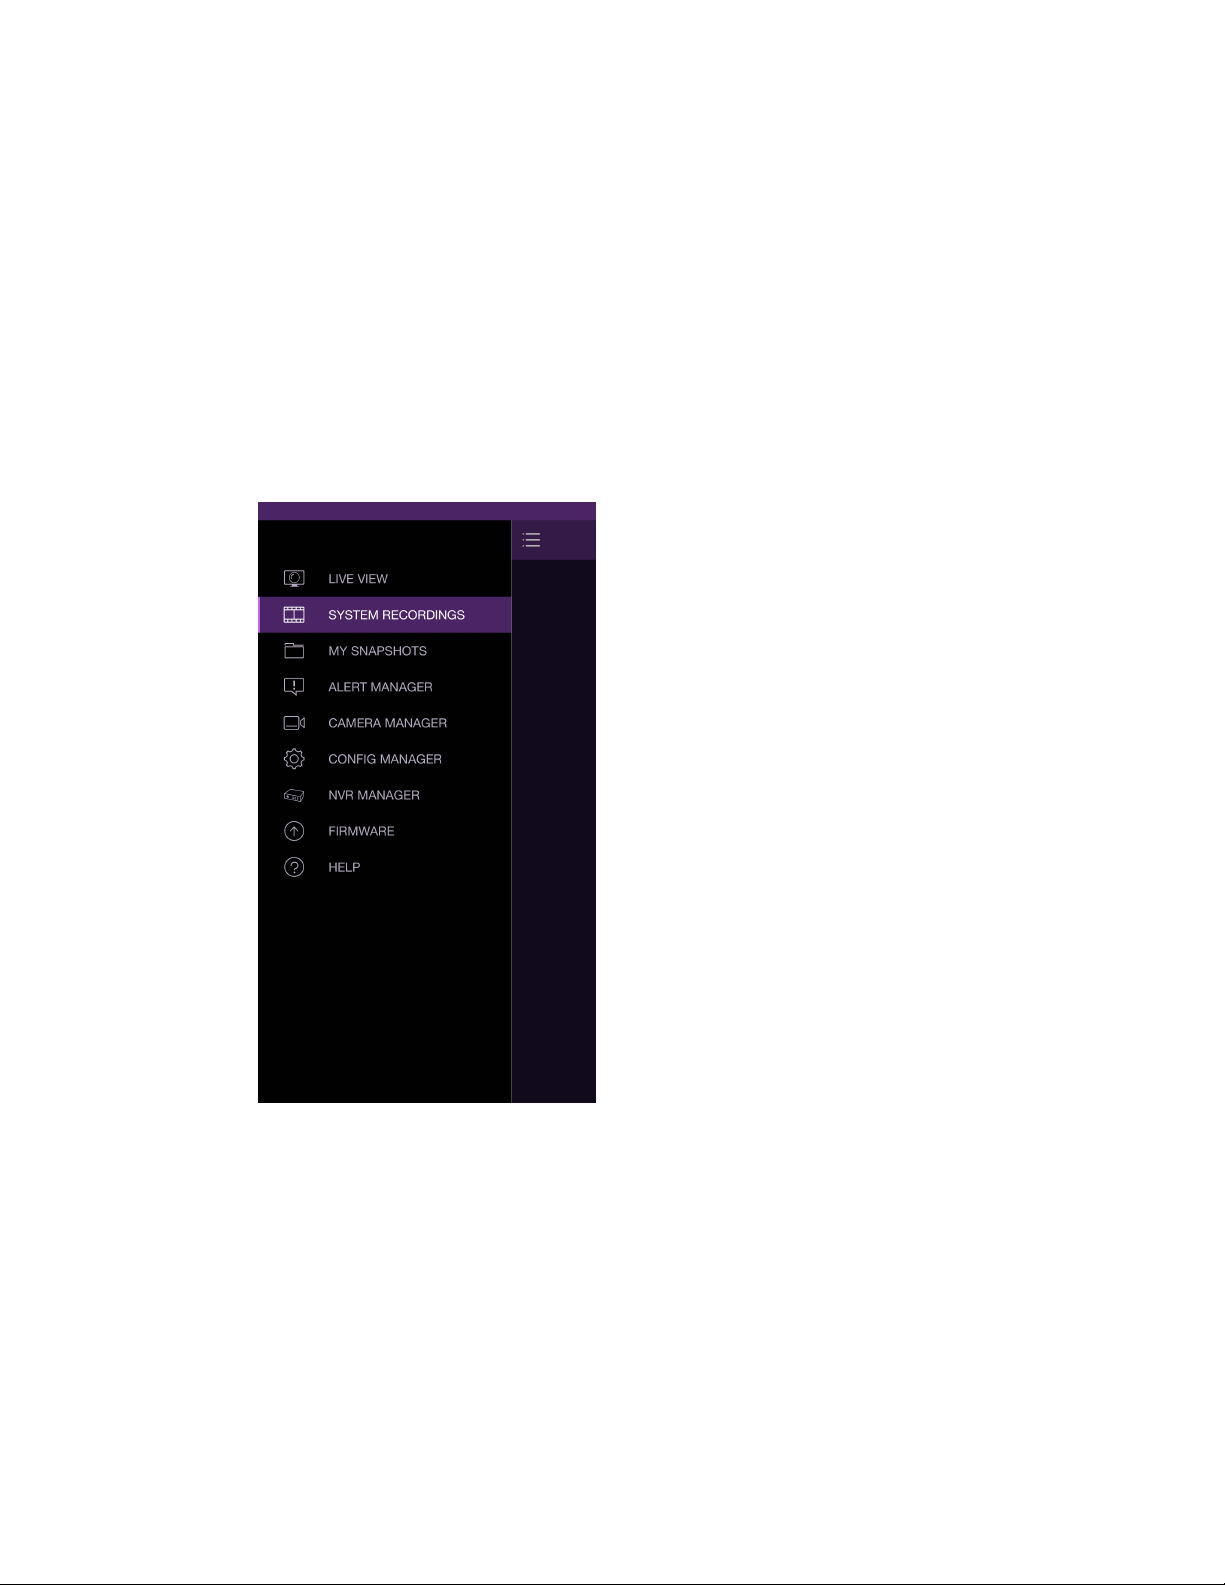
3.3 Main Menu
After login, the Live View will open. A number of other functions are available using the Main
Menu. Tap the Main Menu icon in the upper left-hand corner to open the menu. The menu options
are described in the following table.
(Main Menu) icon
Icon
Name
Description
LIVE
VIEW
Displays the live feed from one or more cameras.
This is the default view once the app opens.
SYSTEM
RECORDINGS
Used to review data recorded from the cameras.
Data is recorded by all cameras 24/7 by default.
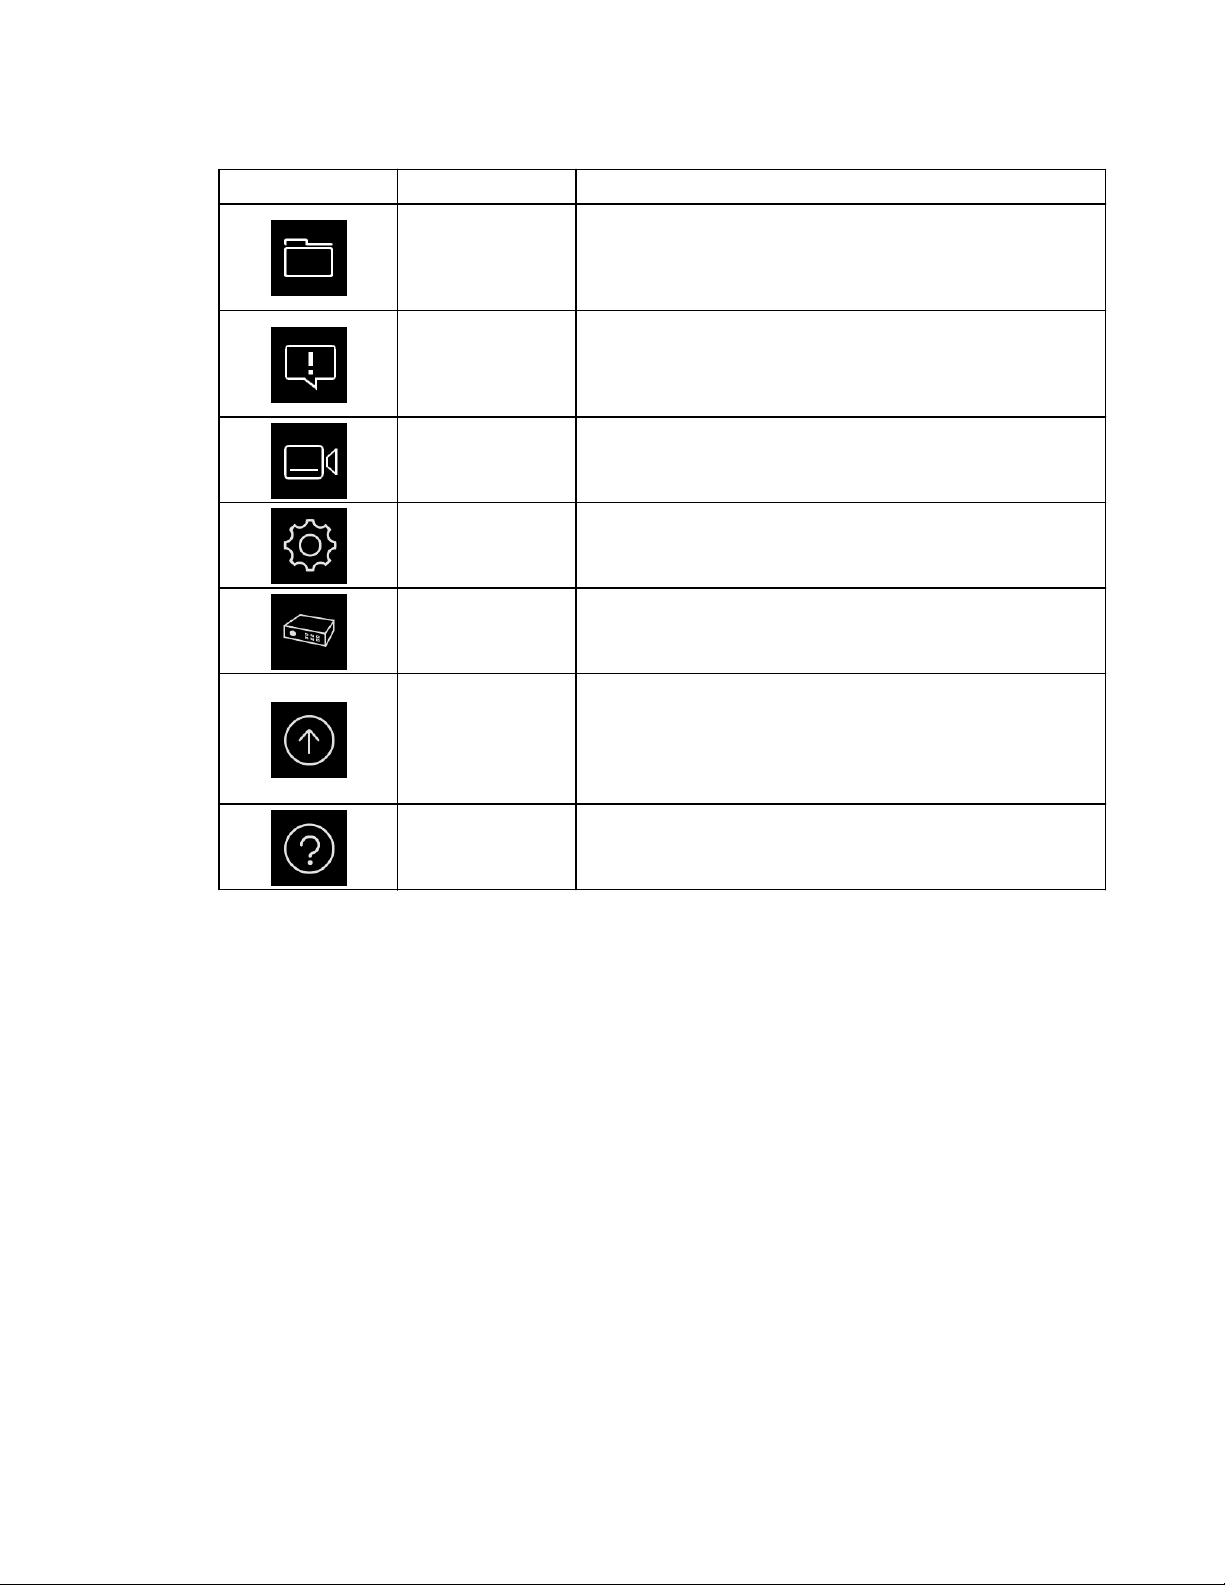
Main Menu
WD ReadyView™ User Manual 15
Icon
Name
Description
MY SNAPSHOTS
Used to capture video and still images on your
mobile device. By default, video and images stored
on your mobile device are in HD (high definition)
format.
ALERT
MANAGER
Alerts are used to notify users of a motion event.
Options include motion detection and other
features; the list of options may vary by kit
purchased or camera model.
CAMERA
MANAGER
Allows users to rename cameras or set motion
detection parameters.
CONFIG
MANAGER
Can be used to view or modify system settings,
including time/date, password, or storage.
NVR
MANAGER
Allows multiple NVRs to be viewed using a single
app. Note: there is a maximum of five (5) NVRs
that can be connected.
FIRMWARE
Displays the status of the NVR and camera
firmware. "Current" is defined as the version on
your mobile device; "Latest" is the most recent
version available. This option can also be used to
upgrade NVR or camera firmware.
HELP
Help topics are available for each function.
WD ReadyView™ User Manual 16
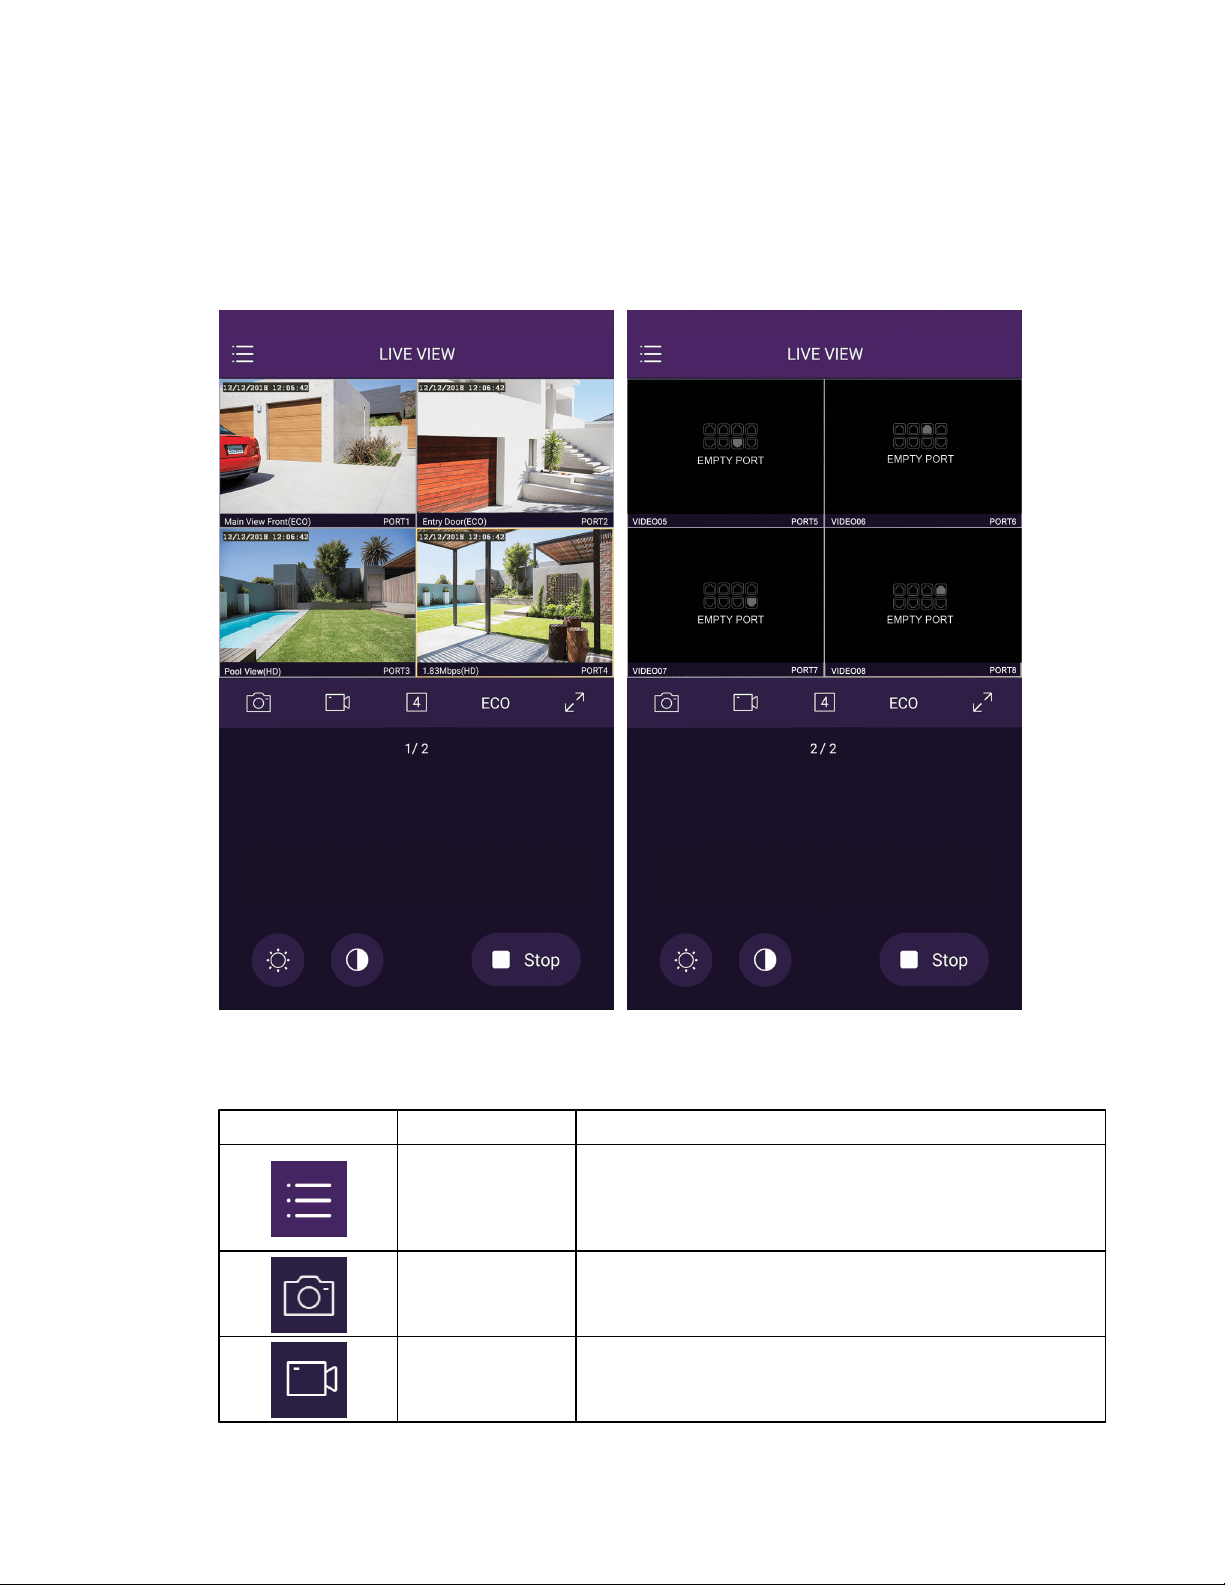
4 Live View
The Live View image displays the current feed in a single- or multi-camera view. This is the default
view once the app opens.
The following table lists the controls available on this screen. Tap an icon to start using the
control.
Icon
Name
Description
Main Menu
Switches between all app screens. Choices include
live view (default), system recordings, my
snapshots, alert manager, camera manager, config
manager, NVR manager, firmware, and help.
Snapshot
Used to capture a snapshot from the selected
camera to the WD ReadyView™ app on your
mobile device.
Video Capture
Used to capture video from the selected camera to
the WD ReadyView app on your mobile device.
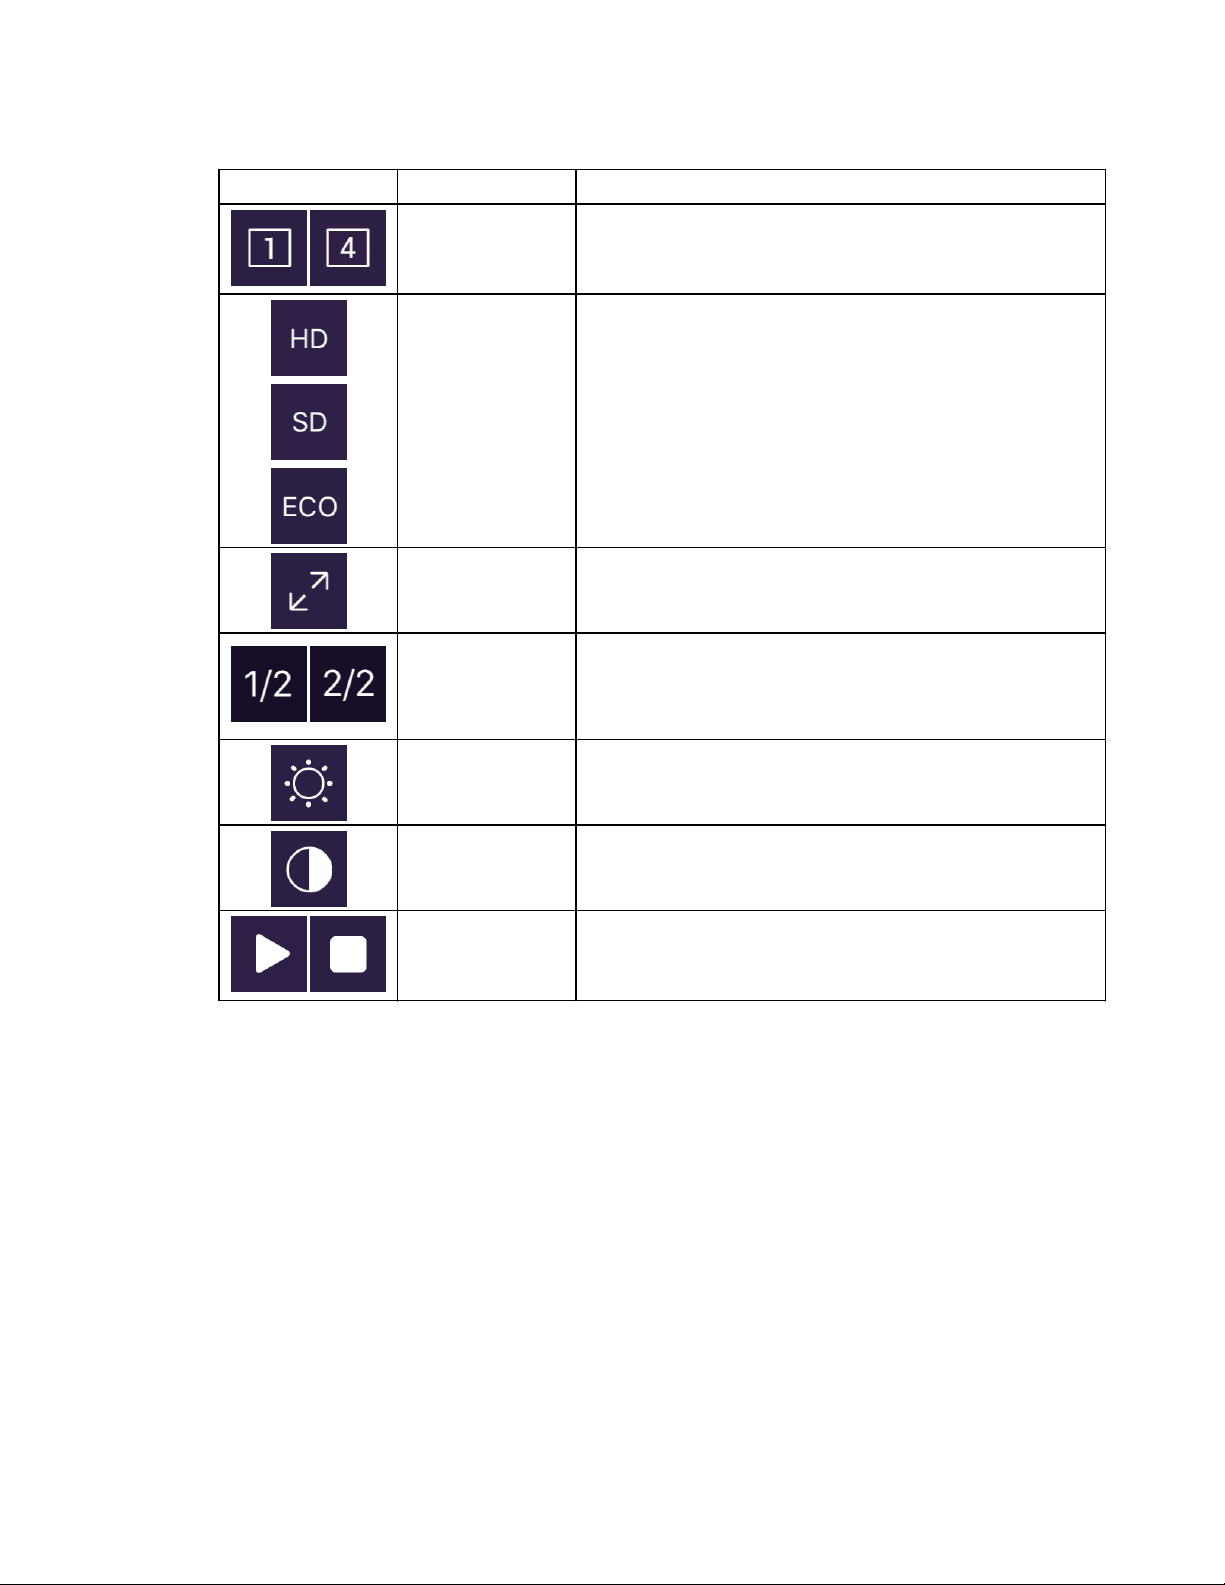
WD ReadyView™ User Manual 17
Icon
Name
Description
Number of
Cameras
Toggles between single-camera and multi-camera
views. Both views indicate the port number(s) on
the DVR.
Video Mode
Used to select display mode: HD (high definition),
SD (standard definition), and "Eco" (low
bandwidth). By default, video and images stored on
your mobile device are in HD (high definition)
format.
Full Screen
Displays one camera in full-screen view.
Page
Displays camera page (or groups of cameras). If
eight cameras are connected, for example, page 1
displays cameras 1 through 4, and page 2 displays
camera 5 through 8.
Brightness
Adjusts the brightness of the display.
Contrast
Adjusts the contrast of the display.
Play/Stop
Starts (or stops) streaming to your mobile device.
Note that the app is only streaming when the app is
open.
WD ReadyView™ User Manual 18
5 System Recordings
The System Recordings screen is used to playback or capture recordings from a camera. The start
and stop date/time can be selected using this screen. Files from one or more cameras can be
saved to internal (app) storage or downloaded to an external device.
View a Recording
System recordings can be viewed at any point in time when the system is running. To view a
recording, follow the steps below.
1. From the main menu, tap System Recordings.
2. Select a camera from the list.
3. Enter a start date and time.
4. Tap Load Period; the selected camera and time period will begin playback.
5. Move the timeline left or right to view an event.
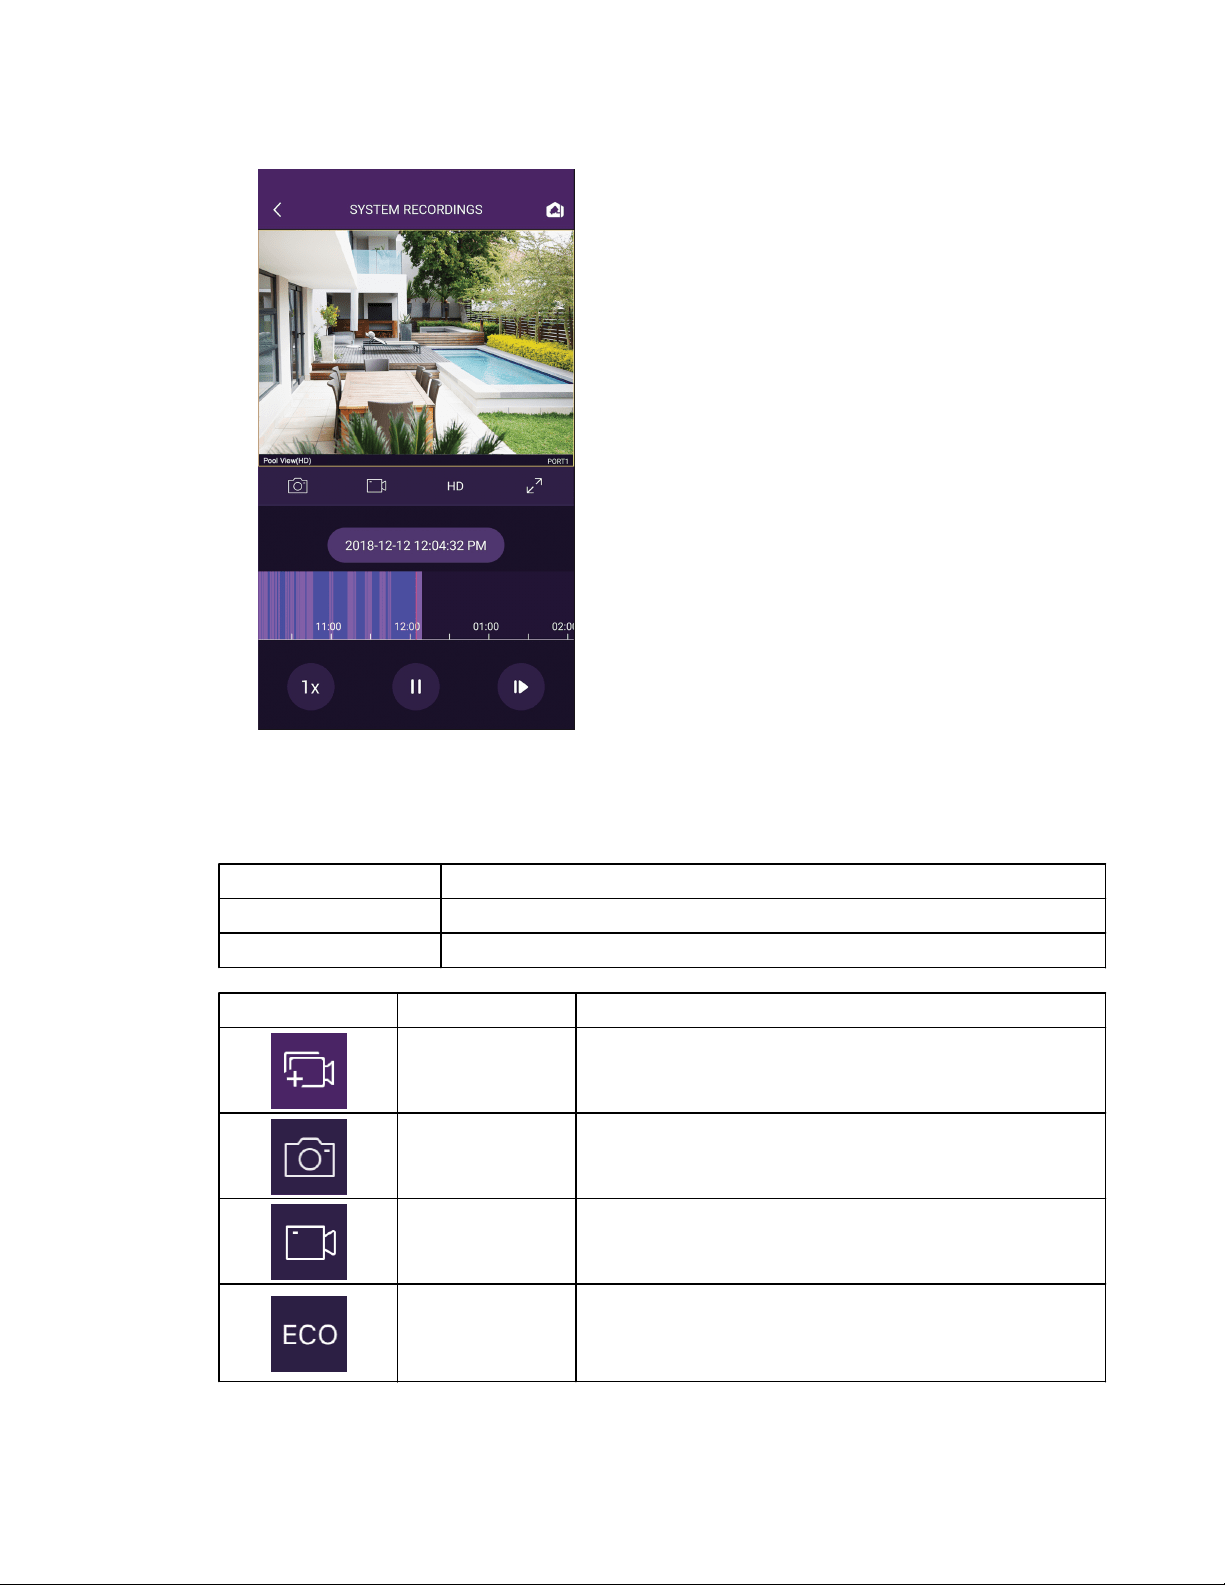
WD ReadyView™ User Manual 19
Vertical Lines and Controls
A number of vertical lines and controls are available on the System Recordings screen.
Vertical Line (Color)
Description
Red
A red line is the viewing reference point.
Purple
Purple lines are motion events.
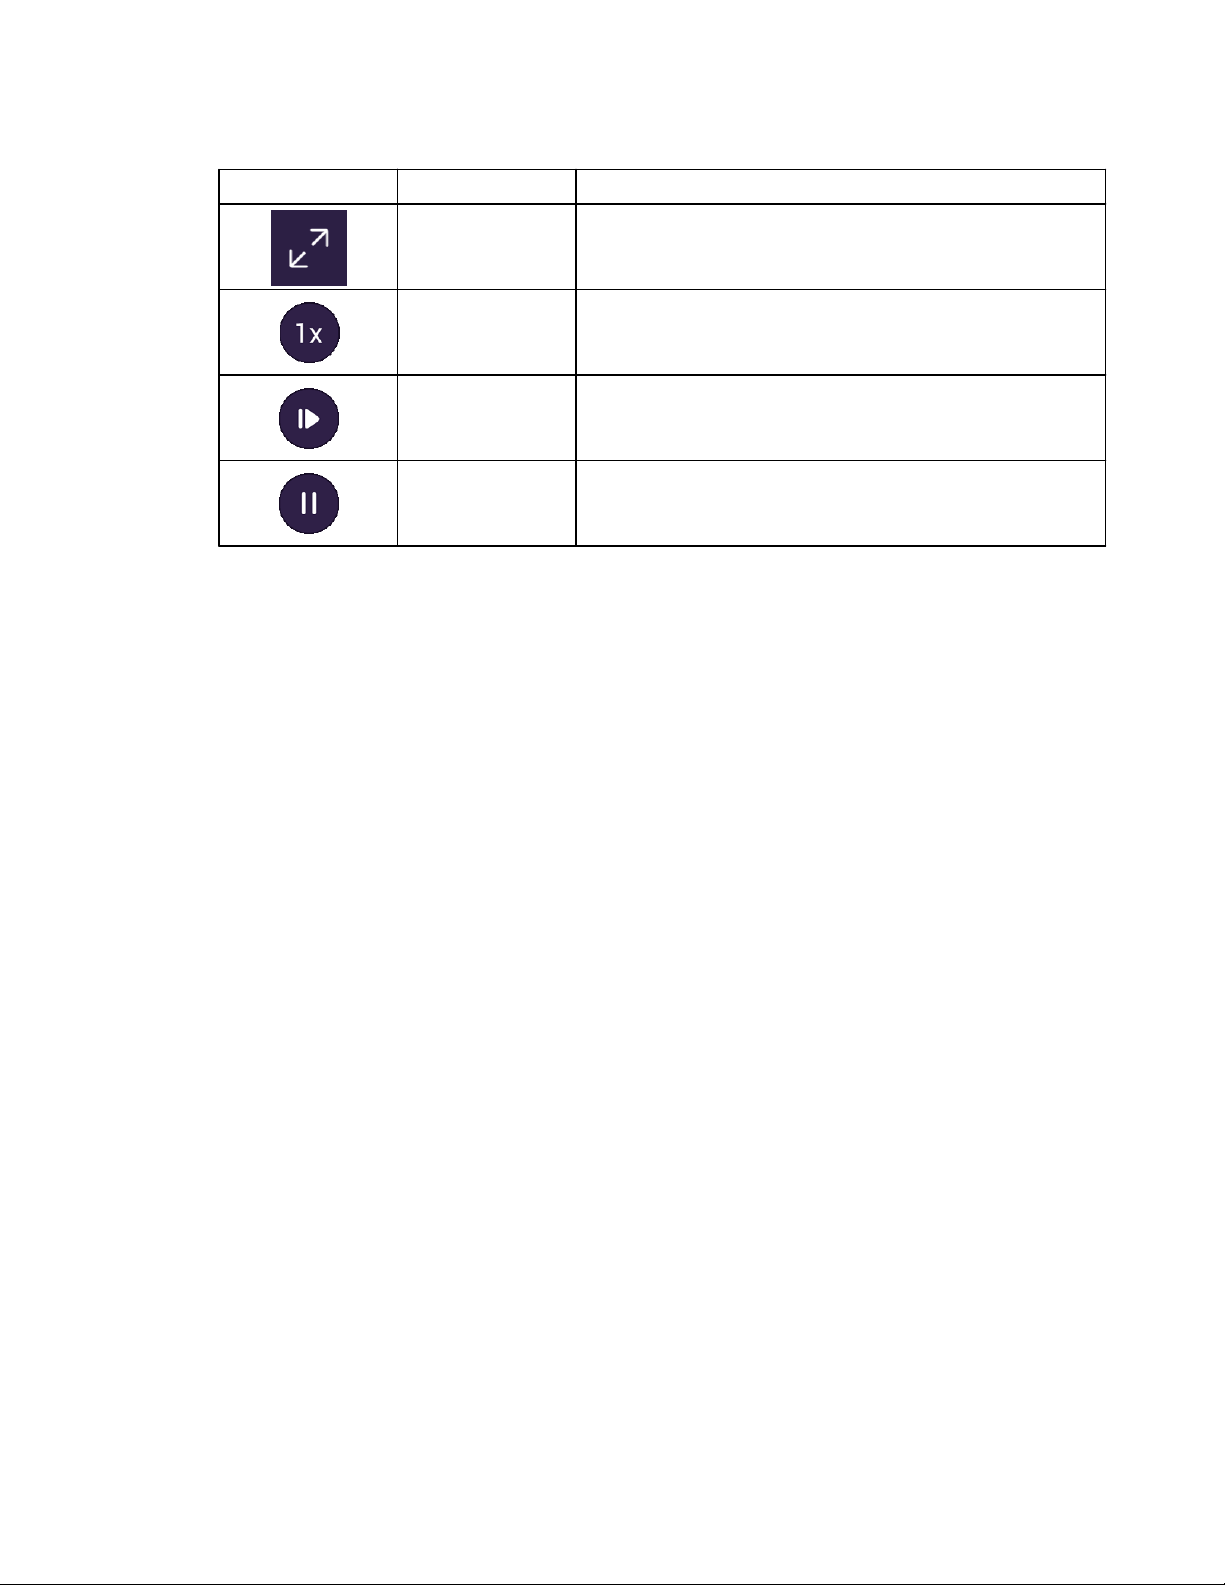
Icon
Function
Description
Select Camera
Selects a camera.
Snapshot
Takes a snapshot of the current view. The snapshot is
stored on the mobile device app.
Start/Stop
Starts (or stops) mobile device app recording of the
current view.
Video Mode
Used to select playback resolution: HD (high
definition), SD (standard definition), and "Eco" (low
bandwidth). By default, video is stored on your
mobile device in HD (high definition) format.
WD ReadyView™ User Manual 20
Icon
Function
Description
Full Screen
Toggles between portrait and landscape view.
Speed
Adjusts speed of playback up to 4X. A speed of 1X is
normal speed.
Frame Advance
(30fps)
Advances the video one frame at a time.
Pause
Pauses the current video playback.
WD ReadyView™ User Manual 21
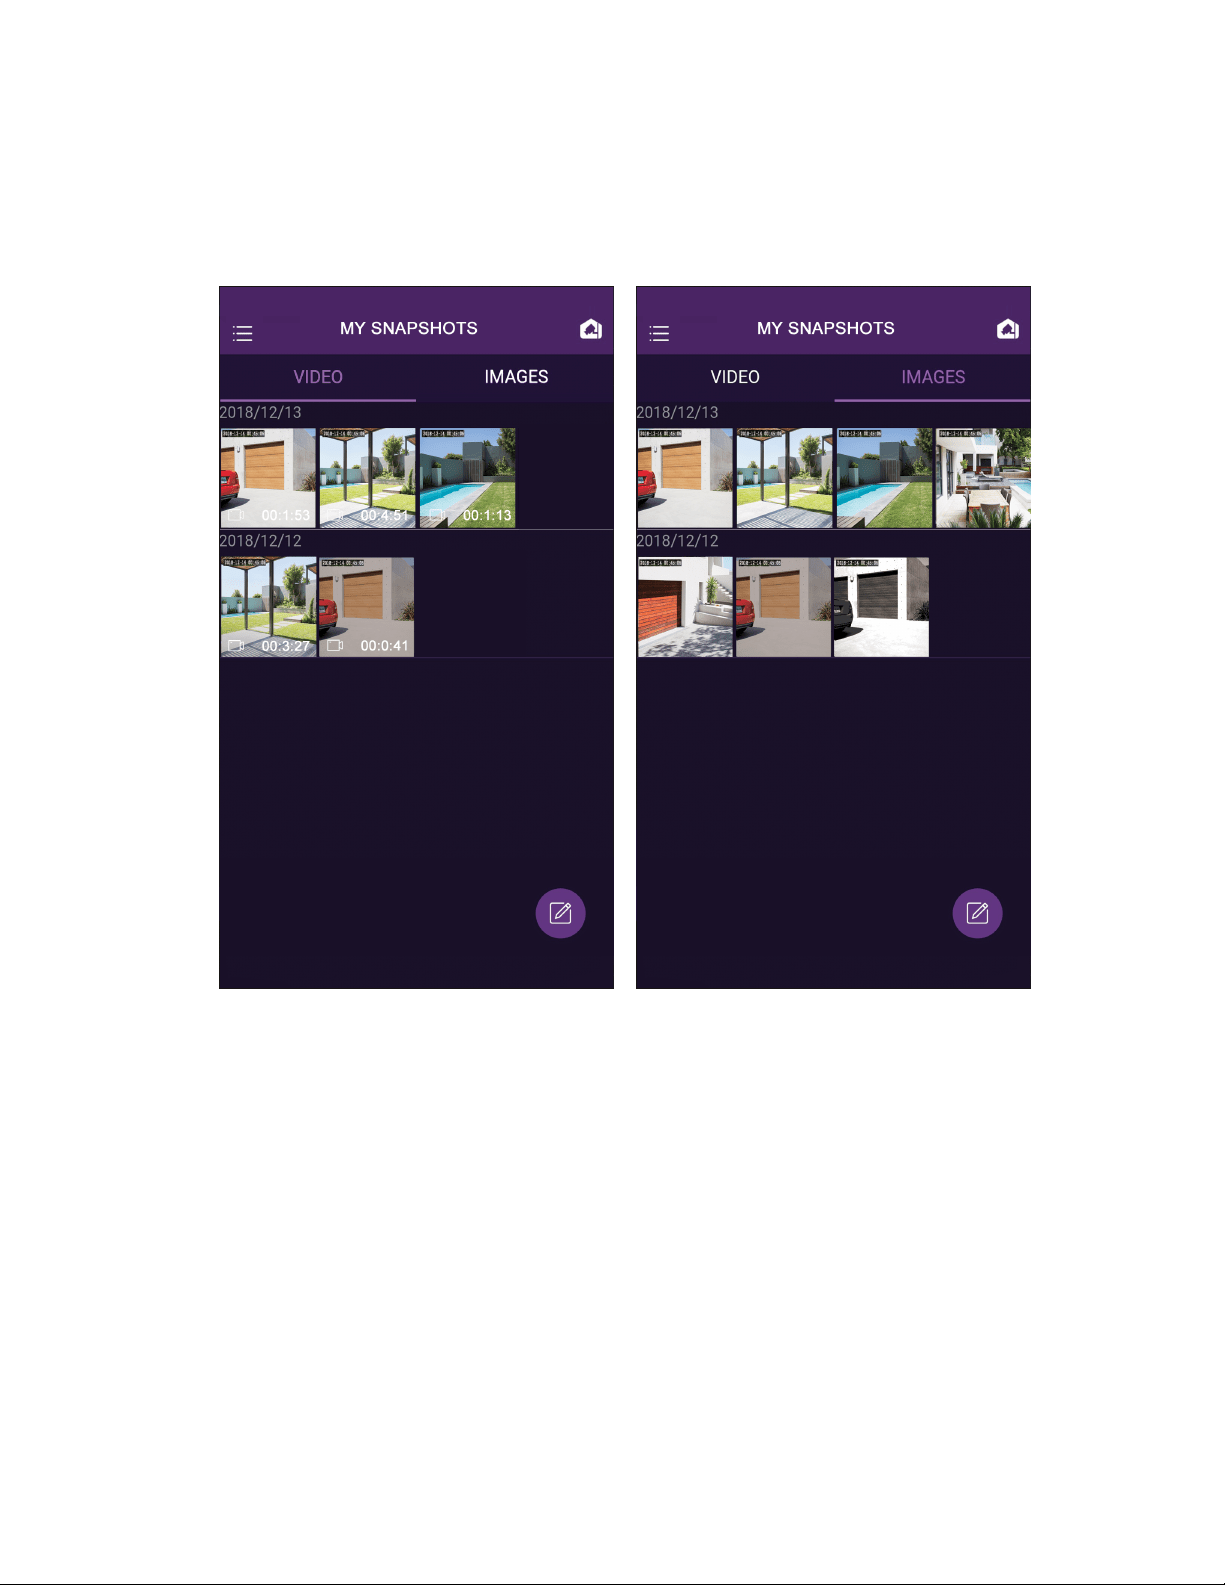
6 My Snapshots
The snapshot function captures video or still images for additional review.
To view a video or image snapshot, follow the steps below.
Review Snapshots
1. Tap the Main Menu.
2. Tap My Snapshots (the Images view is the default).
3. Tap the desired snapshot; a enlarged view of the video or image will open.
4. Select one of the controls at the bottom of the screen (enlarge, share, send, download or
delete).
5. Tap the left arrow at the top of the screen to return to My Snapshots.
Note that still images are saved in the mobile app and are not downloaded to the gallery on your
mobile device.
Controls
A number of controls are available on the My Snapshots screen.
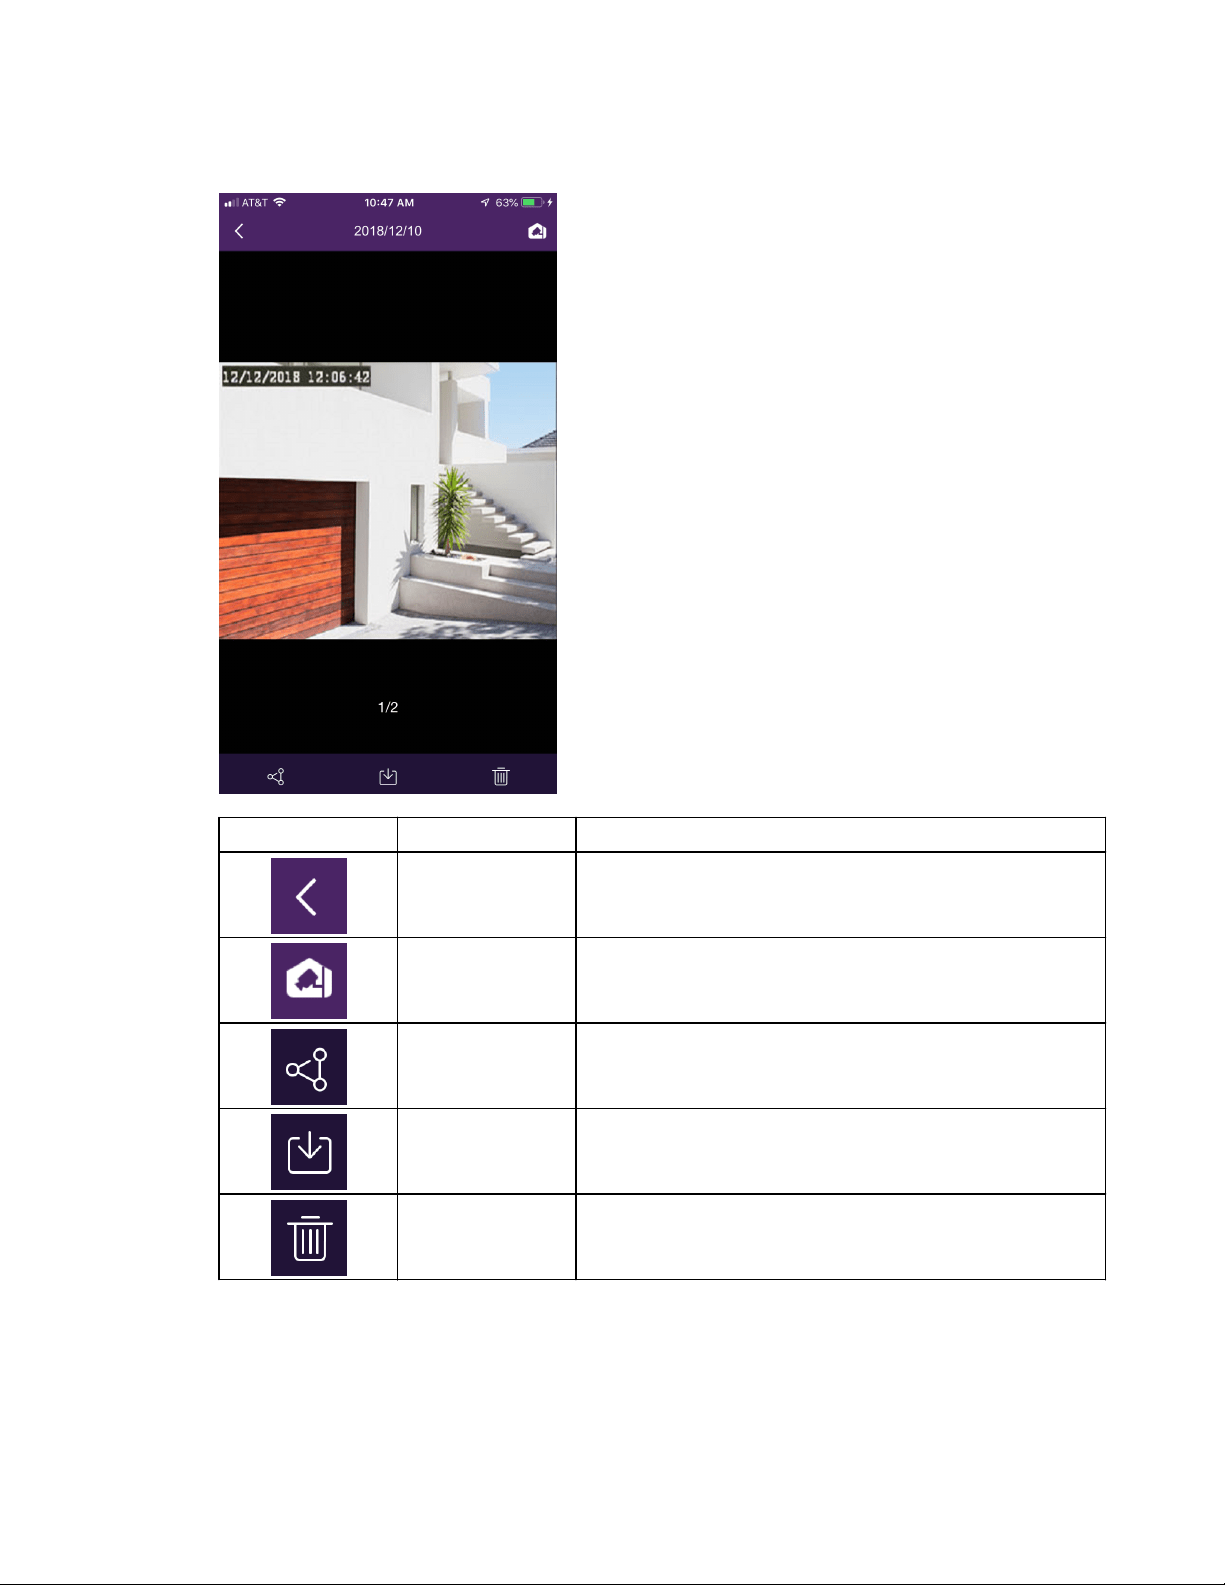
WD ReadyView™ User Manual 22
Icon
Function
Description
Back Button
Returns to the My Snapshots screen.
Live View
Returns to the Live View screen.
Share
Shares one or more snapshots or videos with
another user; select an app (mail, etc.) to determine
how the snapshot will be sent.
Send
Exports one or more snapshots or videos to the
photo gallery on your mobile device.
Delete
Deletes one or more snapshots from the app; note
that any snapshots saved to the photo gallery on
your mobile device are not deleted.
The system default for motion events is to record video for five (5) seconds before and thirty (30)
seconds after an event.
WD ReadyView™ User Manual 23
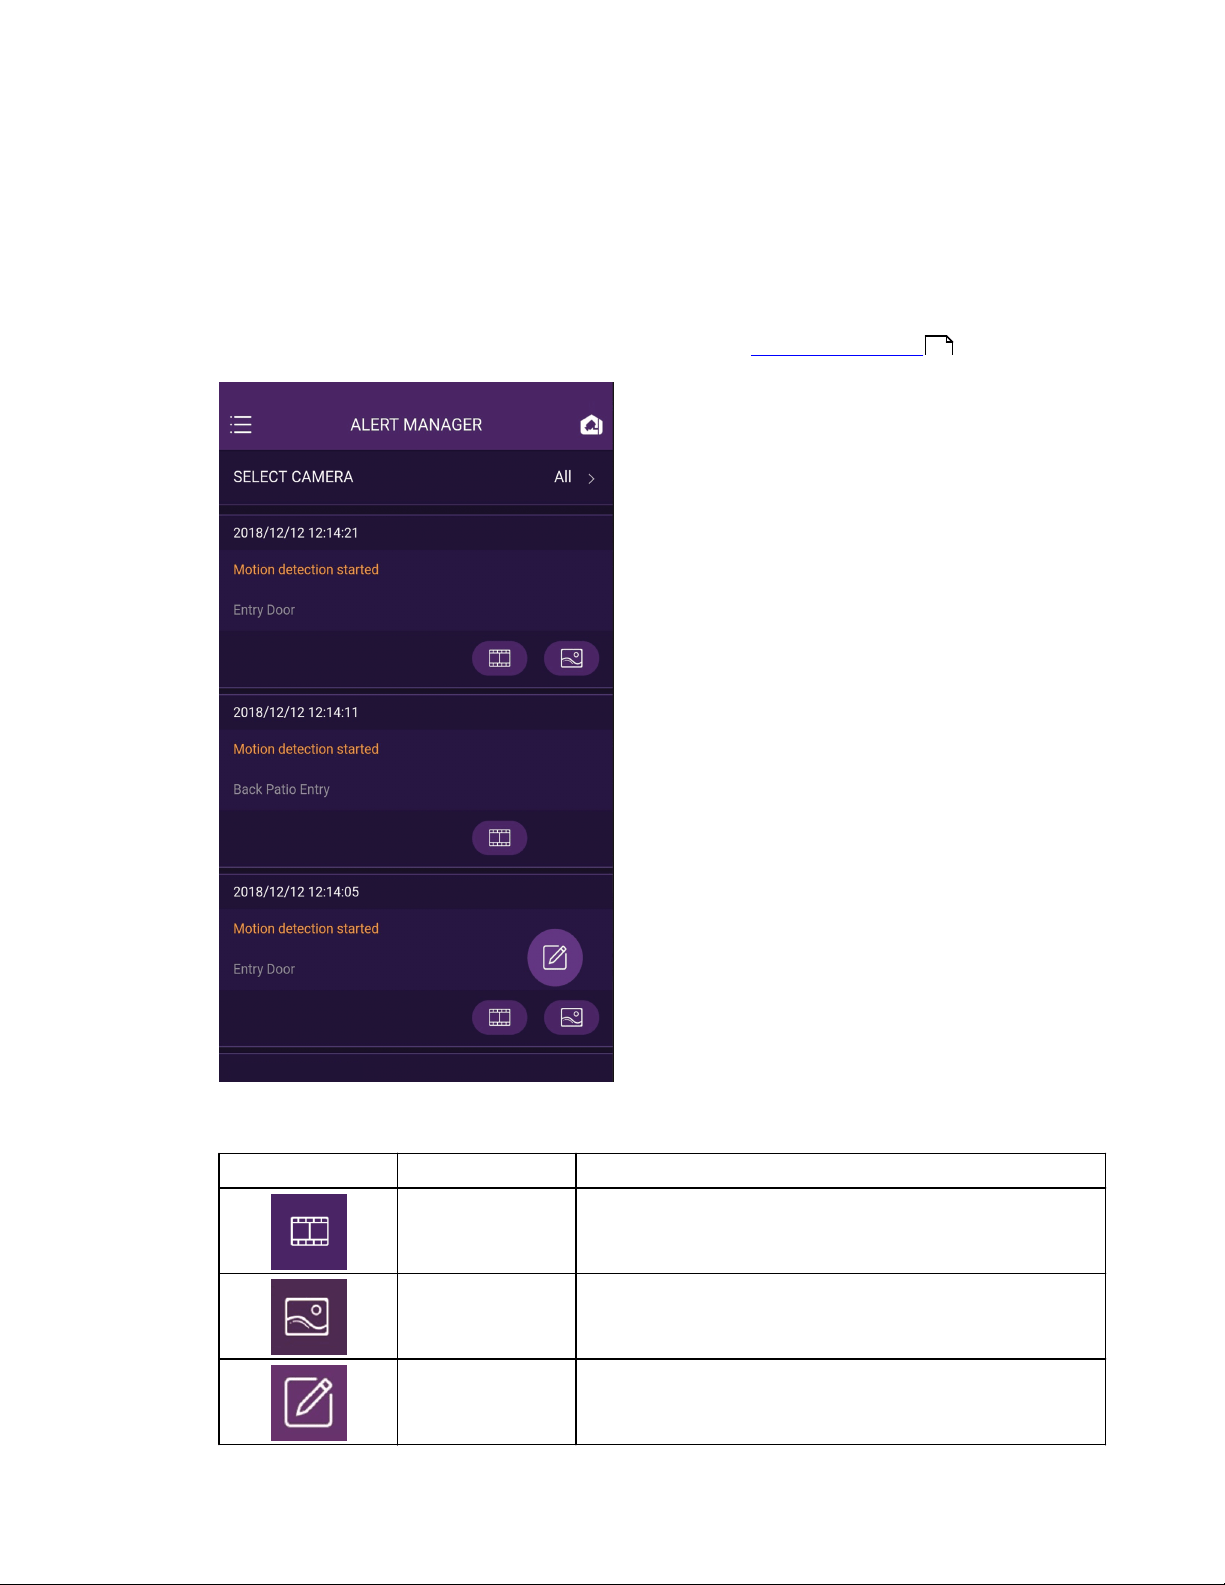
7 Alert Manager
This screen allows users to review and configure motion events. Users can: 1) view motion events,
and 2) set search criteria for a) all cameras, or b) a specific camera. As the system captures
motion events, messages are added to the Alert Manager. The newest message appears at the
top of the screen, and contains the date, time, type of alert, camera name, and a playback icon.
Once an alert is selected, the event can be reviewed in the System Recordings screen.
To view an alert, tap the View Alert Video button.
Icon
Name
Description
View Alert Video
Opens the alert in the System Recordings screen.
Snapshot
Opens the snapshot in the System Recordings screen.
Edit
Selects or clears all motion events.
18
WD ReadyView™ User Manual 24
8 Camera Manager
This feature allows users to rename WD ReadyView
ä
cameras or configure motion detection.
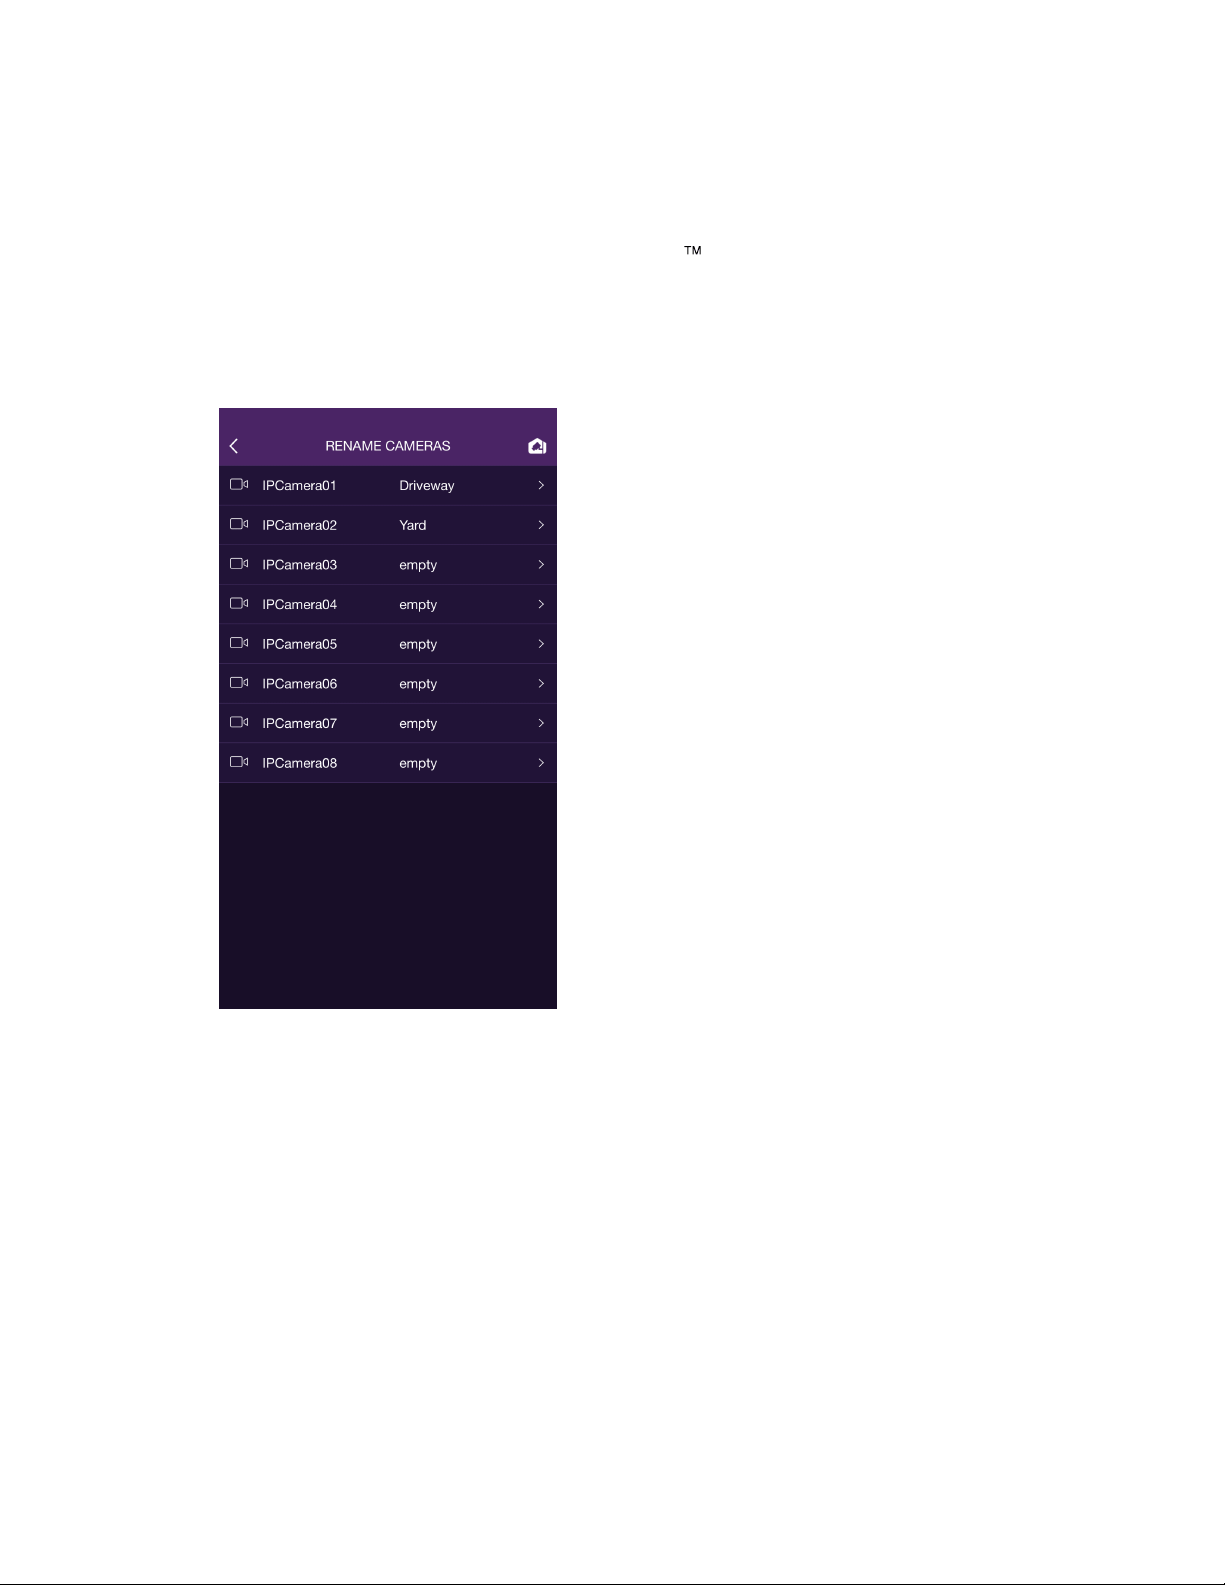
8.1 Rename Cameras
Camera names can be changed as needed. The following steps illustrate the naming procedure.
1. Tap the Main Menu.
2. Tap Camera Manager.
3. Tap Rename Cameras. The list of all system cameras will appear; if a camera is not
connected to a port, it will appear as "empty" and cannot be changed.
4. Tap a camera row; a RENAME CAMERAS text box will appear.
5. Enter the desired camera name and tap OK.
6. Tap the Live View icon in the top right-hand corner to return to Live View.
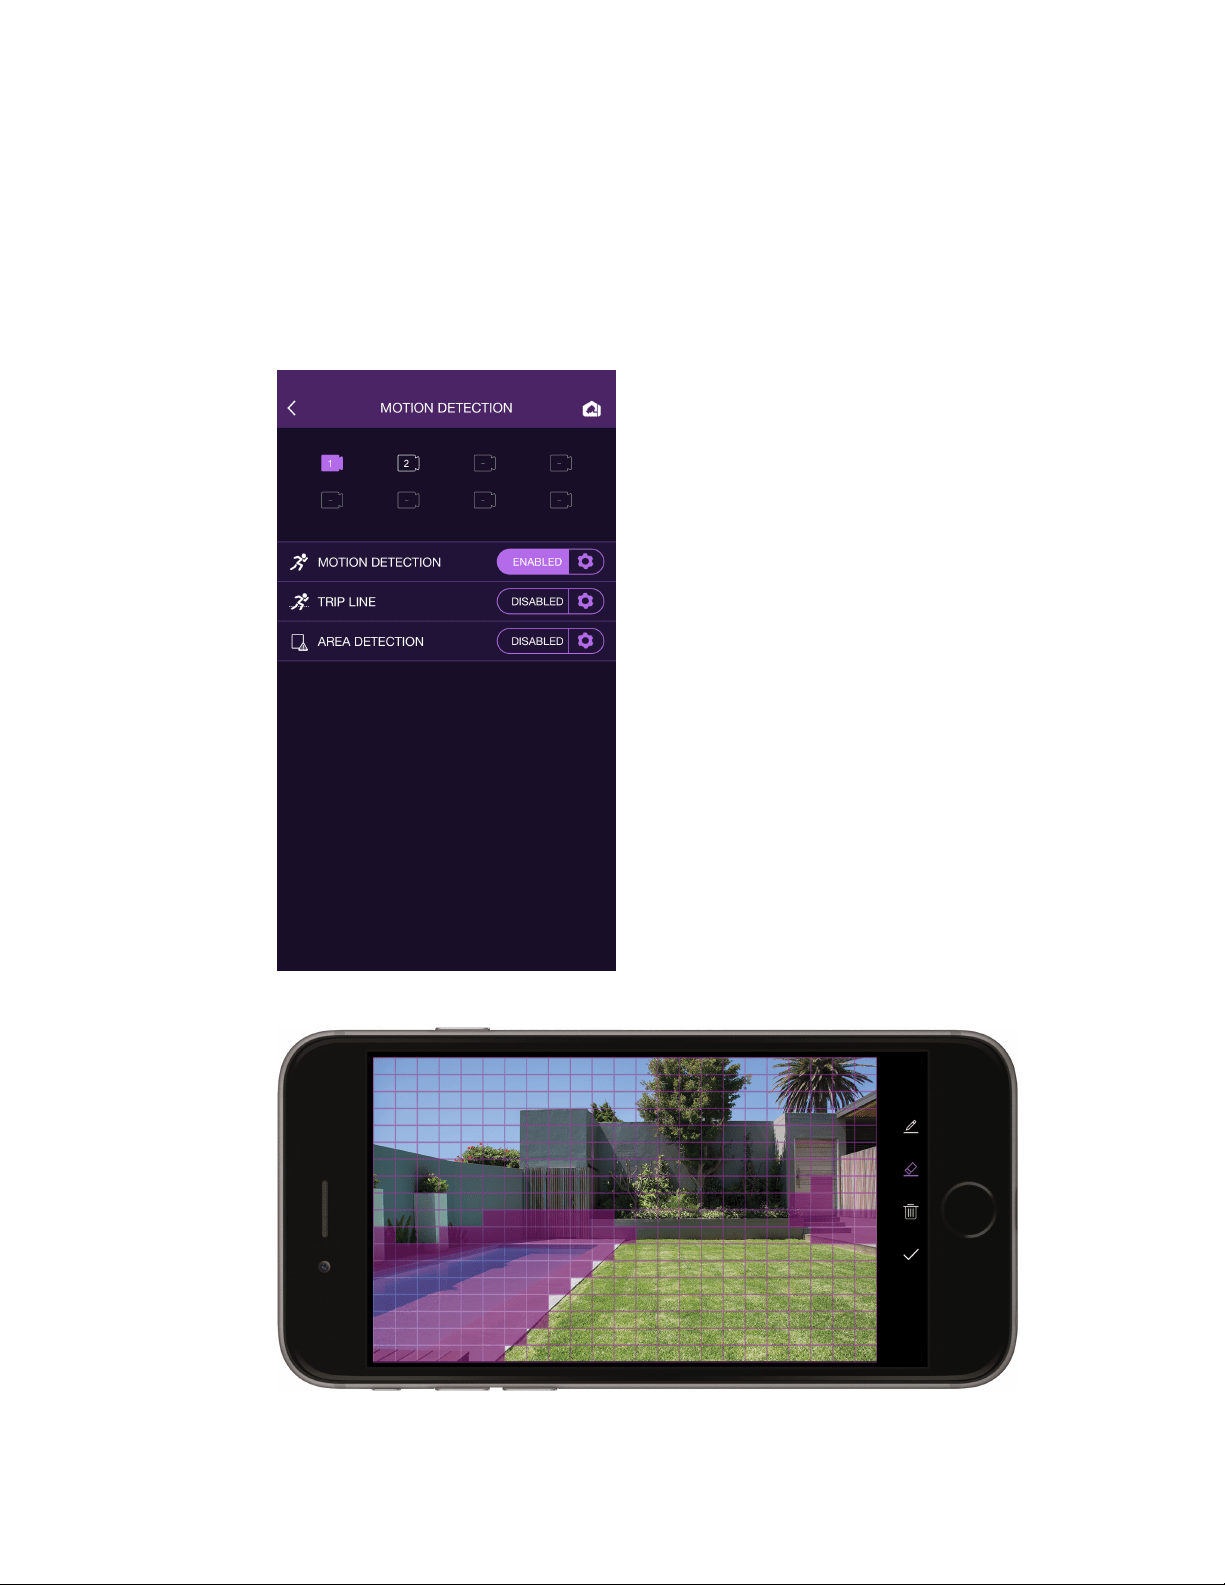
8.2 Configure Motion Detection
The WD ReadyView system includes motion detection features; other features may vary by
camera model and manufacturer. The following procedures illustrate how to use these features.
Select Main Menu > Camera Manager > Motion Detection to begin.
Configure Motion Detection
WD ReadyView™ User Manual 25
The system default for motion events is to record video for five (5) seconds before and thirty (30)
seconds after an event.
Motion Detection (both 2MP and 4MP kits)
1. Select a camera from the icons at the top of the screen.
2. Tap the Disabled setting on the Motion Detection row; the setting will changed to
"ENABLED."
3. Tap the gear icon to set the motion trigger area (purple-tinted squares are in the trigger
area, clear squares are not), snapshots, sensitivity, and detection time settings.
4. Tap Save.
Configure Motion Detection
WD ReadyView™ User Manual 26
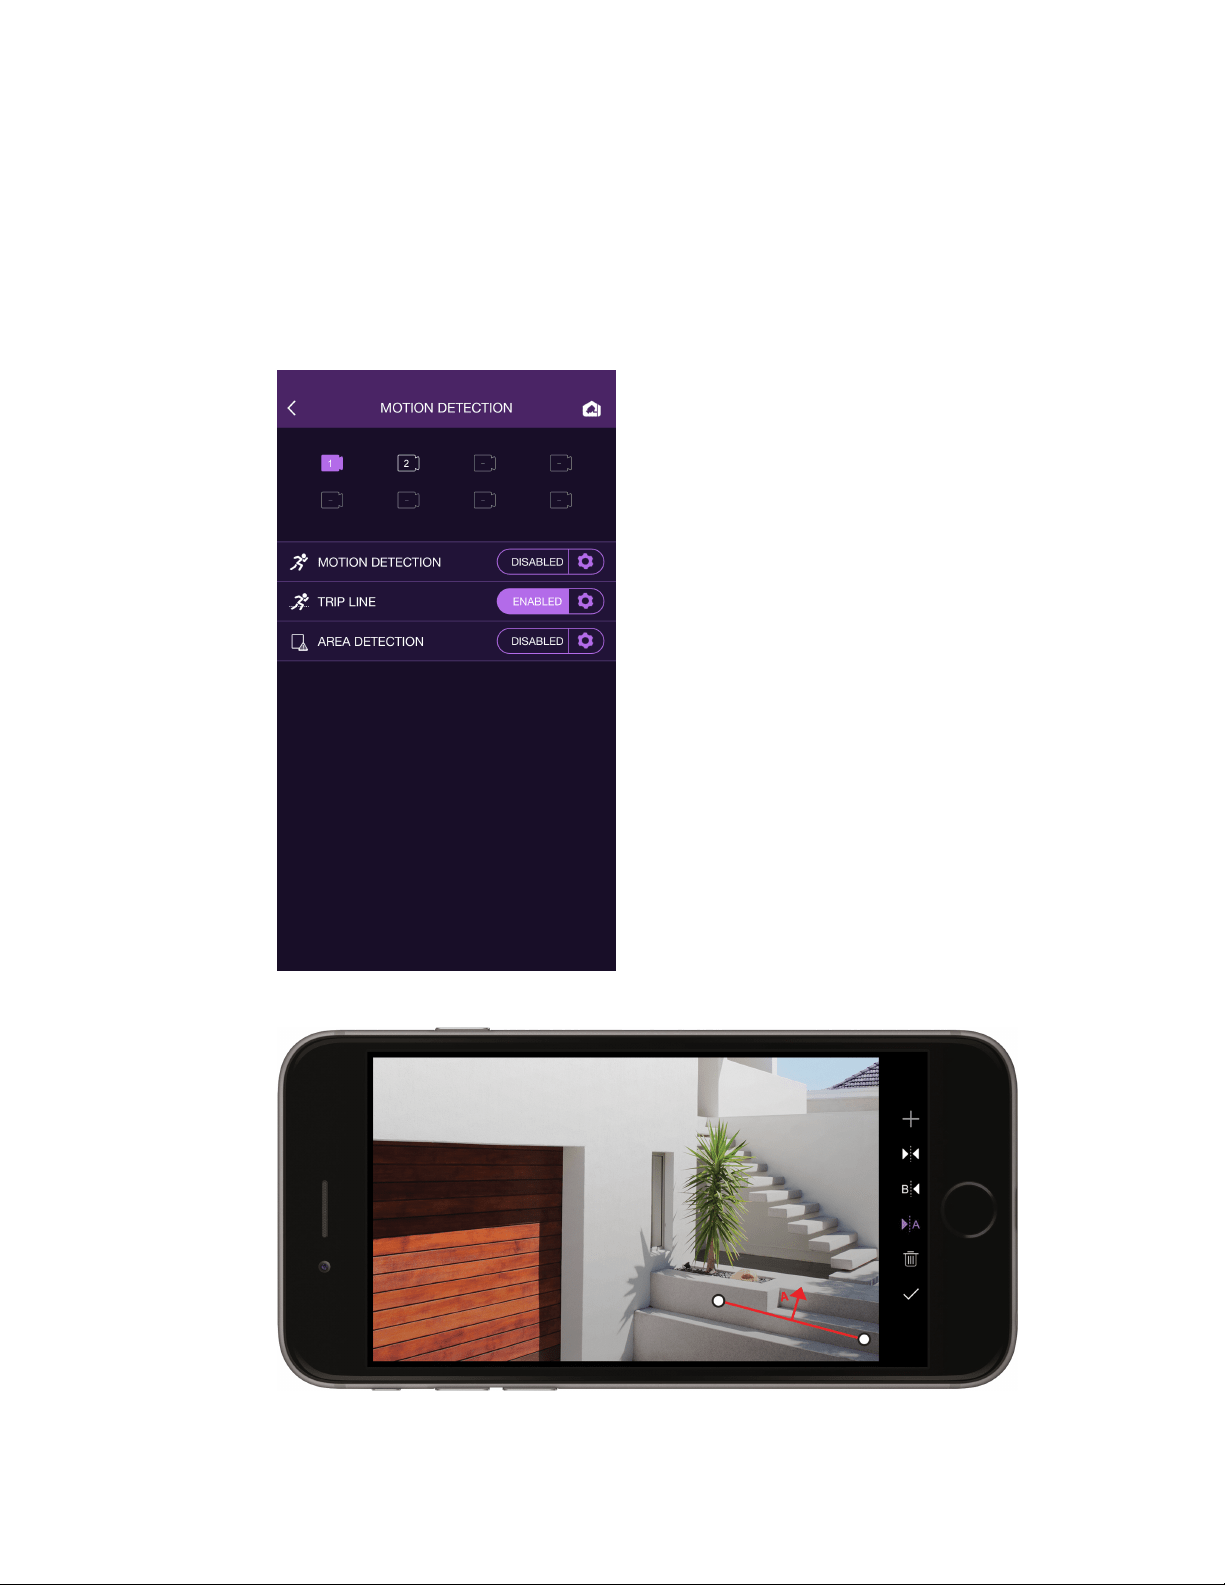
The following items are part of the Intelligent Video Surveillance (IVS) features.
Trip Line (4MP Kits Only)
Note that this feature is only available when using WD ReadyView 4MP (and certain third-party)
cameras and the 4MP kit.
1. Select a camera from the icons at the top of the screen.
2. Tap the Disabled setting on the Trip Line row; the setting will changed to "ENABLED."
3. Tap the gear icon to draw the trip line, set snapshots, sensitivity, and detection time
settings.
4. Tap Save.
Configure Motion Detection
WD ReadyView™ User Manual 27
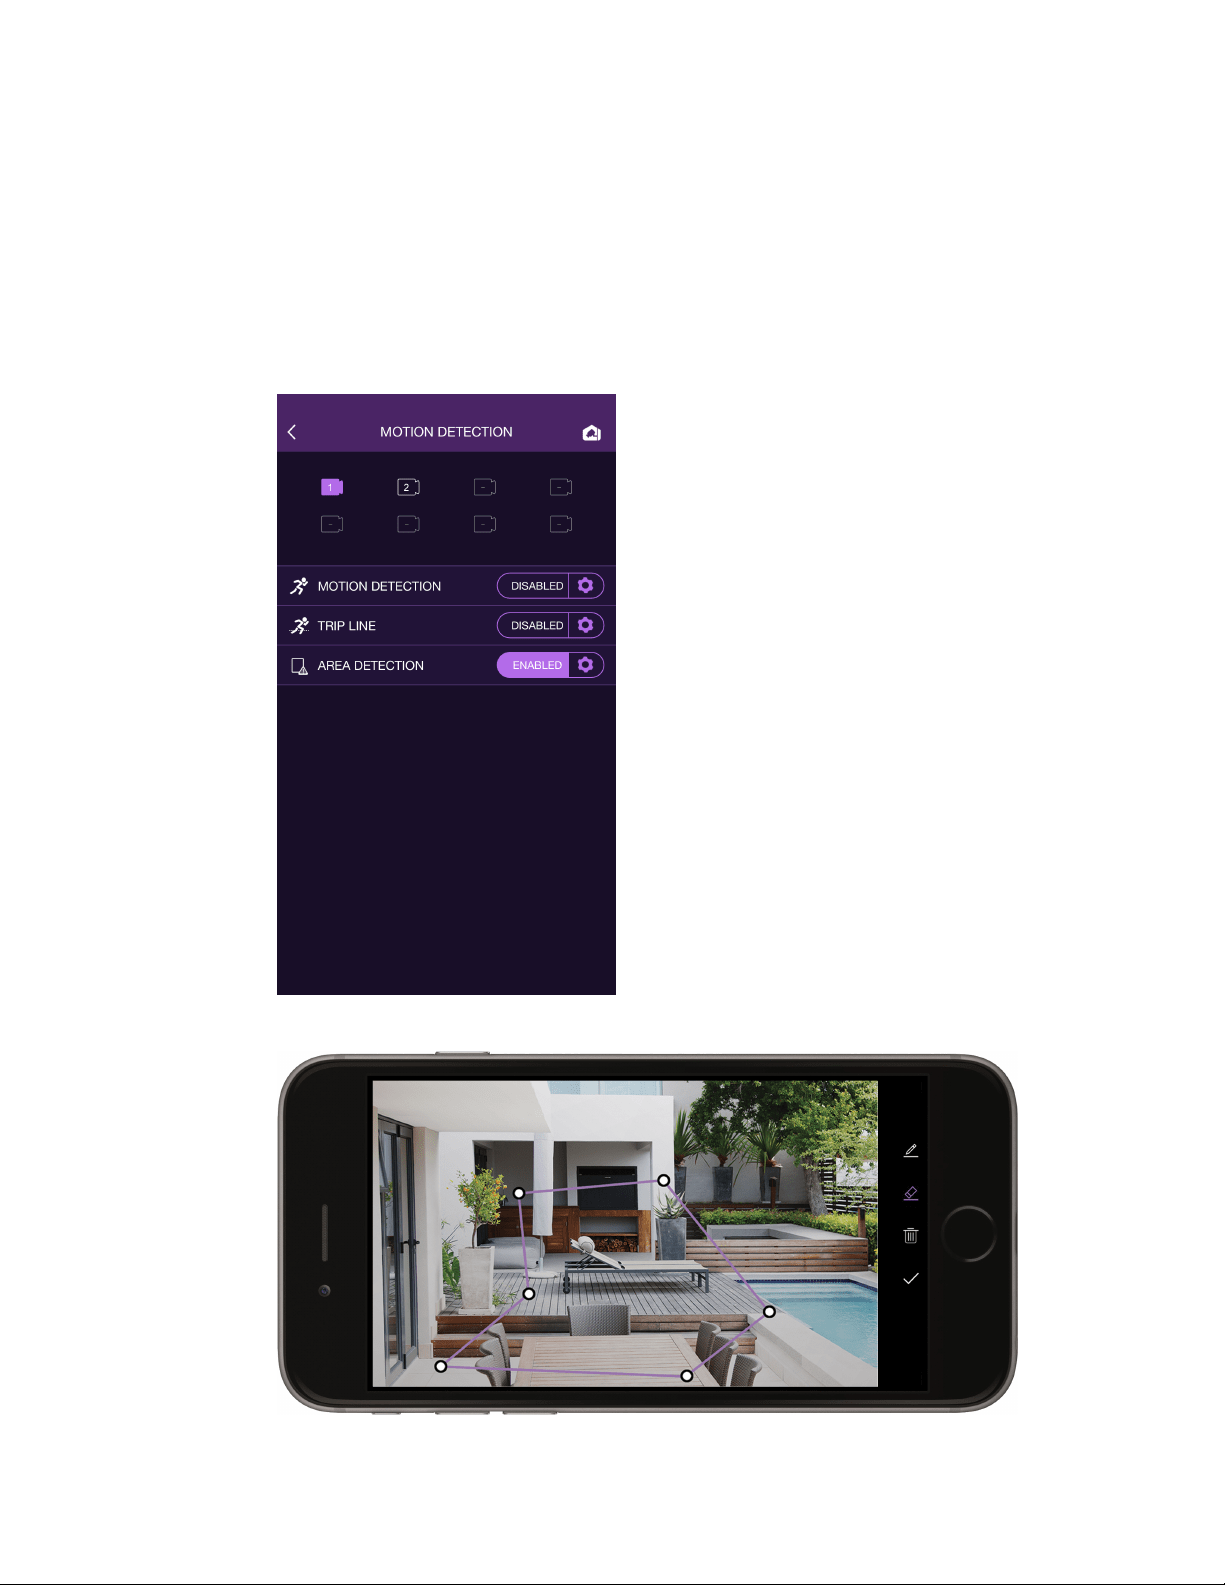
Area Detection (4MP Kits Only)
Note that this feature is only available when using WD ReadyView 4MP (and certain third-party)
cameras and the 4MP kit.
1. Select a camera from the icons at the top of the screen.
2. Tap the Disabled setting on the Area Detection row; the setting will changed to
"ENABLED."
3. Tap the gear icon to draw the shape of the detection area, set snapshots, sensitivity, and
detection time settings.
4. Tap Save.

WD ReadyView™ User Manual 28
9 Config Manager
The Config Manager settings are used to set various system parameters. Tap Main Menu > Config
Manager to begin.
Time and Date
This function is used to set the system time and date specific to your location.
1. From the Config Manager, tap TIME AND DATE.
2. Select a date format; either YYYY-MM-DD, MM-DD-YYYY, or DD-MM-YYYY
3. Tap Next.
4. Tap TIME FORMAT, and select either 12-hour or 24-hour.
5. Tap Next.
6. Tap TIME ZONE.
7. Select a time zone from the list.
8. Tap Next.
9. Tap DAYLIGHT SAVINGS, if appropriate. If selected, set the start time/date, end
time/date and bias (minutes adjustment, if any).
10. Tap SAVE.

WD ReadyView™ User Manual 29
Password Manager
For security reasons, a password is needed to login to the system. The Password Manager allows
users to change the system password.
1. From the Config Manager, tap PASSWORD MANAGER. The "eyelash" icon displays the
current password.
2. Type a new password.
3. Tap CHANGE PASSWORD. IMPORTANT NOTE: It is critical that you record and store the
password in a safe place; should you forget or lose your password, you will need to
contact Support.
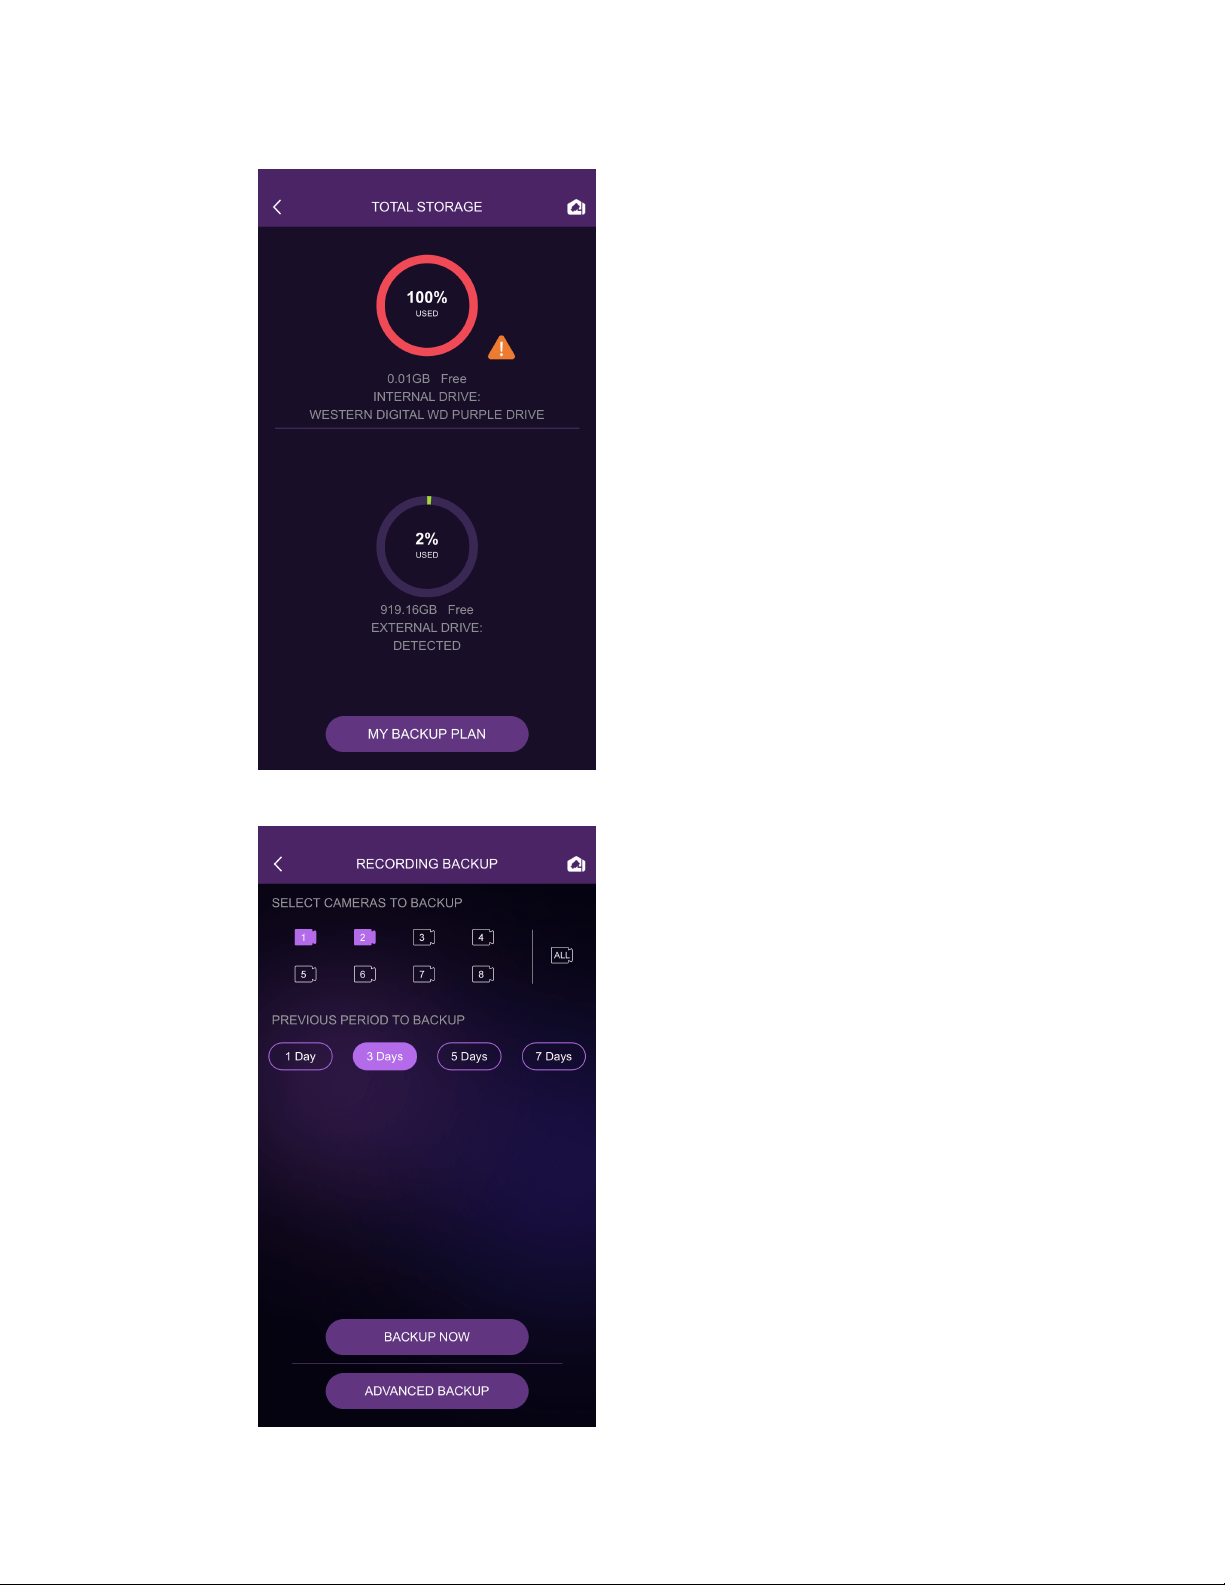
Total Storage
The amount of storage available to the WD ReadyView system can be viewed using this feature.
1. From the Config Manager, tap TOTAL STORAGE. The amount of storage, both internal
(NVR) and external (if any) will be displayed.
2. Tap MY BACKUP PLAN to display additional information.
9.1 Backup
Copies of recordings and snapshots can be saved to an external device for long-term storage and
review. The external device must be formatted using NTFS before connecting it to the WD
ReadyView system.
Backup Plan
A backup plan is needed to identify the camera, time period, and storage location for the backup
files; use the following steps to create a plan.
1. Tap Main Menu.
2. Tap CONFIG MANAGER.
3. Tap TOTAL STORAGE; the amount of storage used (in percent) and the amount of
internal and external storage available (in GB) will be displayed.
Backup
WD ReadyView™ User Manual 30
4. Tap MY BACKUP PLAN.

Backup
WD ReadyView™ User Manual 31
5. Tap one camera, multiple cameras, or all cameras.
6. Tap a time period (1 day, 3 days, 5 days, or 7 days.)
7. Tap either BACKUP NOW or ADVANCED BACKUP.
a. BACKUP NOW: Starts copying files to the external device immediately.
b. ADVANCED BACKUP: Allows users to select a unique backup period (specific
date/time) or a specific folder on the external device.
8. Tap OK when prompted to start backup.
9. A "Backup succeeded" message will appear when the back up is complete; tap I KNOW.
WD ReadyView™ User Manual 32
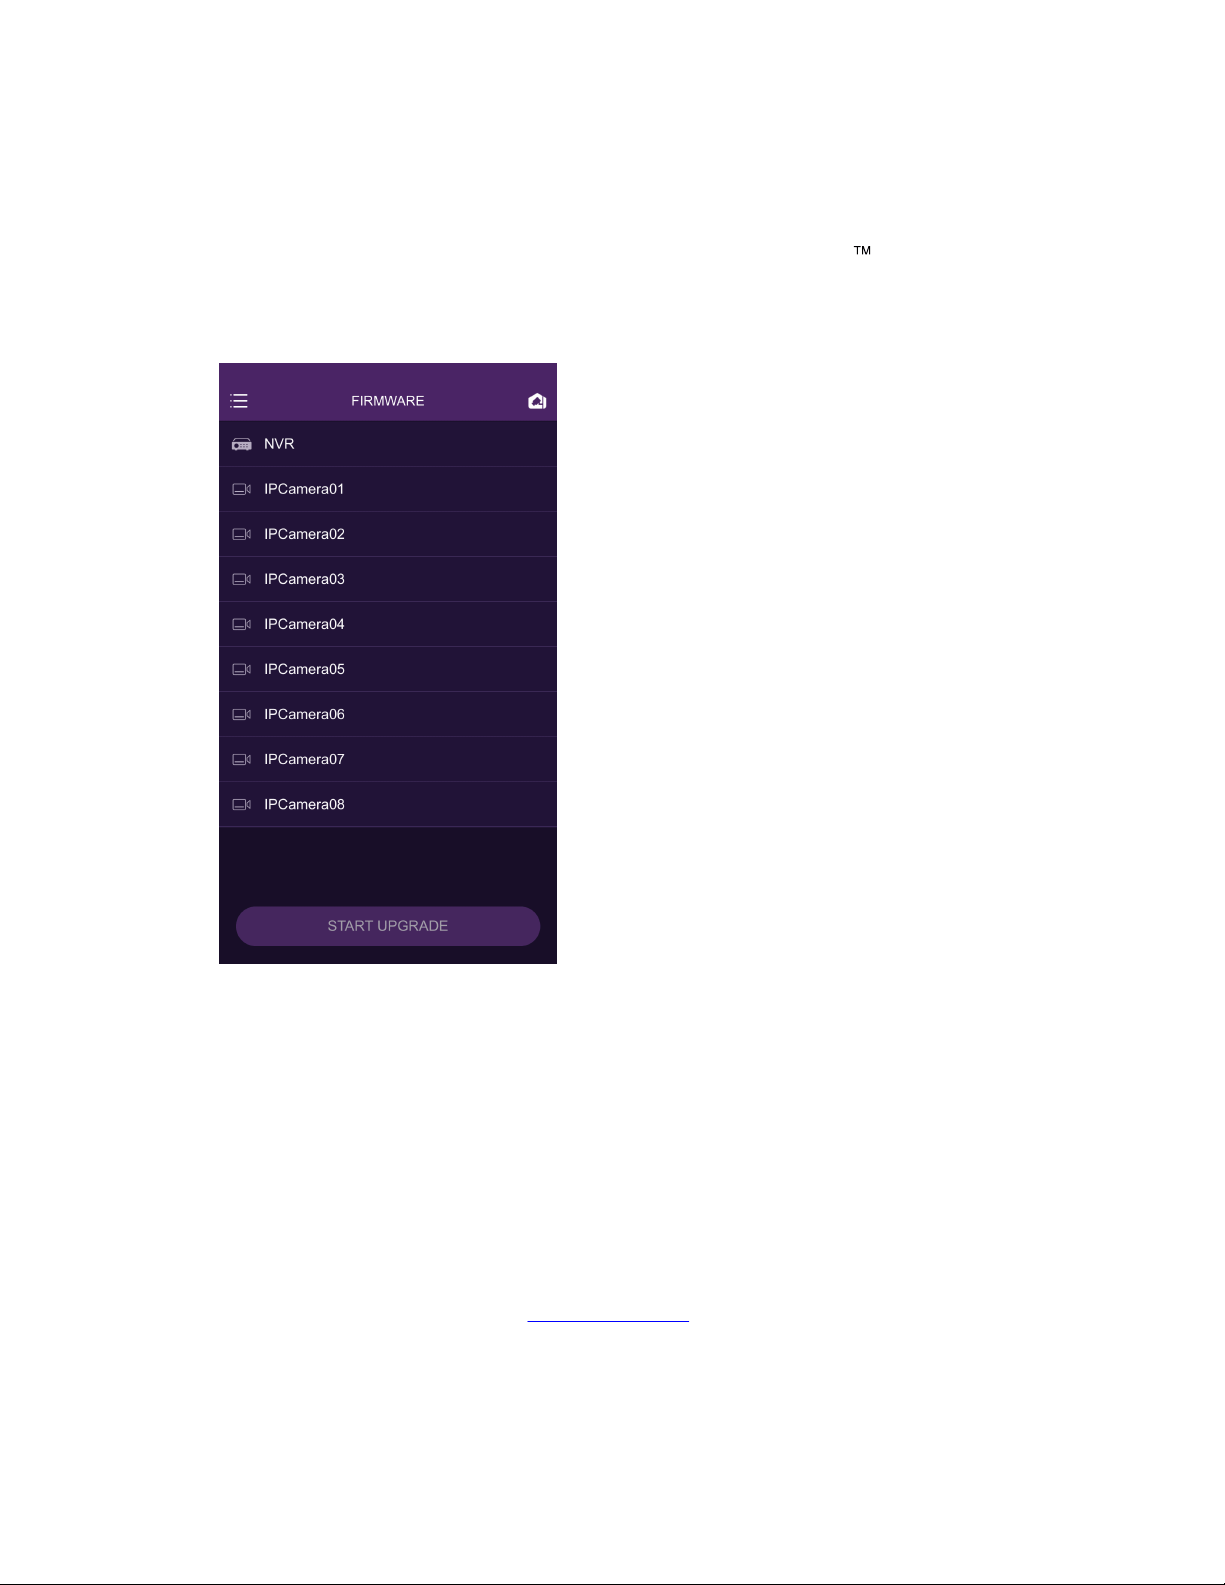
10 Firmware
This feature displays the status of the firmware for the WD ReadyView
ä
NVR and individual
cameras. Tap a device to see the status and full firmware version number; the system will display
the installed (identified as "Latest") version. In addition, the current version (if different from the
latest available version) will be displayed.
Firmware Upgrade
Using the following steps to upgrade the firmware of the NVR or one or more cameras. Note that
any row displaying "LATEST" cannot be upgraded.
1. Tap Main Menu.
2. Tap Firmware.
3. Tap the button at the right of the NVR and/or camera rows; a check mark will appear.
4. Tap START UPGRADE.
5. An "Upgrade the device(s)?" confirmation message will appear; tap OK. Firmware for the
selected devices will be upgraded to the latest version.
Check the Support website (support.wdc.com) for additional information and details about
firmware.
WD ReadyView™ User Manual 33
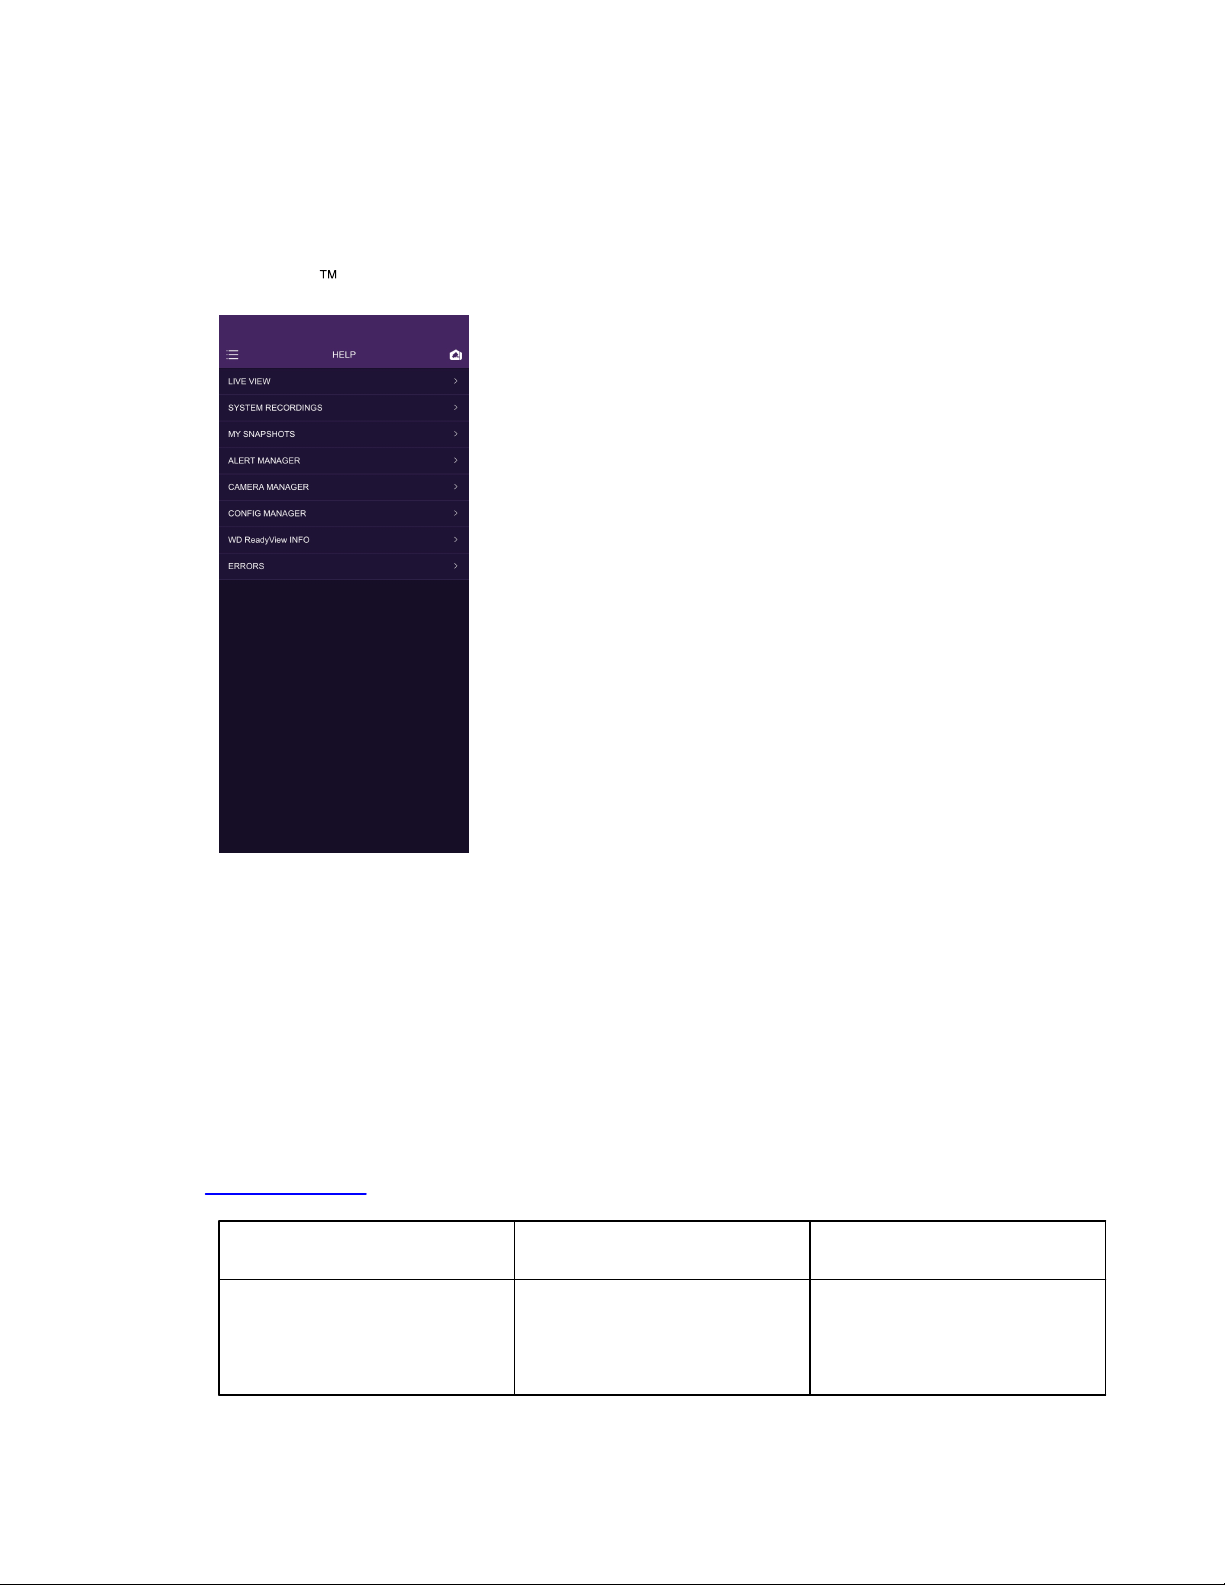
11 Help
On occasion, additional information may be needed to complete a task using the WD
ReadyView
ä
app. To view help information for a specific topic, follow the steps below.
View Help Topics
1. Tap the Main Menu.
2. Tap Help.
3. Tap one of the help topics; a list of all available options will appear.
4. Tap the left arrow at the top of the screen to return to the list of all topics.
11.1 Error Codes
The following list of error codes may be useful when resolving issues. Please refer to our support site
(support.wdc.com) for updates.
Error
Notification
Menu Where
Error Notification occurs
Cause of
Error Notification
Cannot add more than 5
NVRs.
Please delete NVR before
adding a new one.
NVR Manager Menu
User attempts to add a sixth
NVR.

Error Codes
WD ReadyView™ User Manual 34
Error
Notification
Menu Where
Error Notification occurs
Cause of
Error Notification
2X and 4X recordings may not
be functional due to phone
limitations.
System Recordings
Message appears when 2X
and 4X buttons are selected
as reminder to the user of
potential phone limitations.
Drive issue. May be unable to
record video. Refer to MAIN
MENU > HELP > ERRORS.
Live View
HDD failure
Purple=Trigger Area
Clear=Non Trigger Area
Motion Detection Menu
When accessing the draw line
page.
Please check that the
password:
1.Includes 8 to 20 characters.
2.Includes at least 3 types:
uppercase, lowercase, digit,
and symbol.
3.Does not include / \ : * ? '
"" < > | %
Password Manager Menu
New password entered does
not follow the listed rules.
Failed to backup.
Backup Menu
When the backup operation
fails.
Insufficient storage on the
external drive.
Backup Menu
External drive does not have
enough open storage to back
up the requested amount of
NVR data.
Cannot be empty.
Password Manager Menu
User attempts to leave the
password empty when
changing the password.
Cannot export for the video
compression format. Please
send to another location.
My Snapshots Menu
When exporting the H265
video to an album by using an
iPhone (iOS systems do not
support the H265
compression format, but that
video can be viewed in the
WD Readyview mobile app or
can be sent to another
location).
Failed to export the file.
My Snapshots Menu
When the export of video or
image operation failed.
Failed to save the settings.
Any setting with a "SAVE"
button
When the save operation fails.
Format failed.
Total Storage Menu
When formatting the external
HDD failed due to HDD failure.
Function not available on this
camera.
Motion Detection Menu
User attempts to enable the
trip line or area detection
function of the 2MP cameras

Error Codes
WD ReadyView™ User Manual 35
Error
Notification
Menu Where
Error Notification occurs
Cause of
Error Notification
(advanced function only
supported by 4MP cameras).
Incorrect password.
Login Menu
User enters incorrect
password during login.
Name change failed.
NVR Manager Menu
Changing the NVR name
operation failed. There are
multiple causes for this (e.g.
network not stable or out of
power).
Network error.
Occurs in multiple menus.
All issues related to network
connection.
No Event
Alert Manager Menu
User attempts to refresh the
alerts, but there is no result.
No File
My Snapshots Menu
User taps the edit button
while there is no video or
image available.
Please select one video at a
time.
My Snapshots Menu
User attempts to share more
than one video at the same
time. Mobile app is limited to
sharing one video at a time.
Please enable the function
first.
Motion Detection Menu
User taps the gear
(configuration button) while
the function is disabled.
Please enter 1 to 16
characters.
NVR Manager Menu
Number of characters in new
NVR name do not follow the 1
to 16 limits.
Cannot be empty.
Rename Cameras Menu
User attempts to leave the
camera name empty.
Please select a camera first.
Motion Detection Menu
User taps the gear
(configuration button) or
enable button without first
selecting a camera.
Please select at least one
camera.
Backup Menu
User tries to backup without
selecting a camera.
Please specify backup
location.
Backup Menu
When trying to backup before
selecting the location to save
the information to.
Camera(s) upgrading. Please
wait.
Occurs in multiple menus.
Attempting an operation with
a camera while that camera
has a firmware update in
progress.
Request timeout
Occurs in multiple menus.
Any operation where the time
expires for an interface
request.

Error Codes
WD ReadyView™ User Manual 36
Error
Notification
Menu Where
Error Notification occurs
Cause of
Error Notification
Cannot be empty.
Manual NVR Install Menu
User attempts to leave the
serial number blank.
The device is offline.
NVR Manager Menu
When the user swaps to an
NVR that is offline.
The new password must not
be the default password.
Password Manager Menu
User tries to change the
password to the default
password.
NVR upgrading. Please wait.
Firmware Menu
User selects the NVR while a
NVR upgrade is in progress.
The snapshot capacity has
reached the upper limit.
Motion Detection Menu
When trying to enable the
snapshot function while there
are already four cameras
enabled with snapshot.
The start month and the end
month of DAYLIGHT SAVINGS
must be different.
Time and Date Menu
When the start time and end
time of Daylight Savings is in
the same month.
The start time must not be
later than the end time.
Occurs in multiple menus.
For any operations which
need to set the start and end
time, when the start time is
later than the end time.
The two passwords do not
match. Please try again.
Password Manager Menu
When the new password and
the confirmation of new
password does not match.
This device already exists.
Please add another device.
NVR Manager Menu
User adds a device which
already exists in the WD
Readyview mobile app.
Backup time must be 7 or
fewer days, and the end time
must be later than the start
time.
Backup Menu
When the backup time is over
seven days or the start time
later than end time.
You are managing this device.
NVR Manager Menu
User tries to swap to a
system which is already
active.
WD ReadyView™ User Manual 37
12 External Storage
12.1 Connecting a Storage Device
A powered, external storage device can be used for saving video files and other data. A
WD My Book
ä
unit (not included with your WD ReadyView
ä
kit) is recommended. Connect an
external device to the system using the USB port on the back of the NVR. The device must be
formatted NTFS before connecting it to the WD ReadyView system. USB flash drives or external
storage without separate power supplies are not compatible with the WD ReadyView system.
Connecting the Device
1. Connect a USB cable (typically supplied with the external device) to an open USB port on
the back of the NVR.
2. Connect the other end of the USB cable to the device.
3. Connect the device to an AC outlet.
4. Tap the Main Menu icon.
5. Tap Config Manager.
6. Tap Total Storage; the amount of available storage for both internal (NVR) and external
devices will be displayed.

WD ReadyView™ User Manual 38
13 Regulatory Compliance
13.1 FCC Class A Information
Operation of this device is subject to the following conditions:
·
This device may not cause harmful interference.
·
This device must accept any interference received, including interference that may cause
undesired operation.
This device has been tested and found to comply with the limits for a Class B digital device,
pursuant to Part 15 of the FCC Rules. These limits are designed to provide reasonable protection
against harmful interference in a residential installation. This device generates, uses, and can
radiate radio frequency energy and, if not installed and used in accordance with the instructions,
may cause harmful interference to radio or television reception. However, there is no guarantee
that interference will not occur in a particular installation. If this equipment does cause harmful
interference to radio or television reception, which can be determined by turning the equipment
off and on, you are encouraged to try to correct the interference by one or more of the following
measures:
·
Reorient or relocate the receiving antenna.
·
Increase the separation between the equipment and the receiver.
·
Connect the equipment into an outlet on a circuit different from that to which the receiver is
connected.
·
Consult the dealer or an experienced radio/television technician for help.
Any changes or modifications not expressly approved by WD could void your authority to operate
this device.
13.2 UL Statement
Complies to UL 60950-1: Safety of Information Technology Equipment.
13.3 Warranty Information
13.3.1 Obtaining Service
WD values your business and always attempts to provide you the very best of service. Should you
encounter any problem, please give us an opportunity to address it before returning this Product.
Most technical support questions can be answered through our knowledge base or e-mail support
service at http://support.wdc.com. If the answer is not available or, if you prefer, please contact
WD at the applicable telephone number shown in the front of this document. If you wish to make
a claim, you should initially contact the dealer from whom you originally purchased the Product. If
you are unable to contact the dealer from whom you originally purchased the Product, please visit
our product support Web site at http://support.wdc.com for information on how to obtain
service or a Return Material Authorization (RMA). If it is determined that the Product may be
defective, you will be given an RMA number and instructions for Product return. An unauthorized
return (i.e., one for which an RMA number has not been issued) will be returned to you at your
expense. Authorized returns must be shipped in an approved shipping container, prepaid and
insured, to the address provided with your RMA number. If following receipt of a qualifying claim
under this warranty, WD or the dealer from whom you originally purchased the Product

Warranty Information
WD ReadyView™ User Manual 39
determines that your claim is valid, WD or such dealer shall, at its discretion, either repair or
replace the Product with an equivalent or better Product or refund the cost of the Product to you.
You are responsible for any expenses associated with a claim under this warranty. The benefits
provided to you under this warranty are in addition to other rights and remedies available to you
under the Australian Competition and Consumer Act or the New Zealand Consumer Guarantees
Act. Your original box and packaging materials should be kept for storing or shipping your WD
product. To conclusively establish the period of warranty, check the warranty expiration (serial
number required) via http://support.wdc.com.
13.3.2 Limited Warranty
WD warrants that the Product, in the course of its normal use, will for the term defined below, be
free from defects in material and workmanship and will conform to WD’s specification therefor.
The term of your limited warranty depends on the country in which your Product was purchased.
The term of your limited warranty is for 1 year in the North America region, unless otherwise
required by law. The term of your limited warranty period shall commence on the purchase date
appearing on your purchase receipt. WD may at its discretion make extended warranties available
for purchase. WD shall have no liability for any Product returned if WD determines that the
Product was stolen from WD or that the asserted defect a) is not present, b) cannot reasonably
be rectified because of damage occurring before WD receives the Product, or c) is attributable to
misuse, improper installation, alteration (including removing or obliterating labels and opening or
removing external enclosures, including the mounting frame, unless the product is on the list of
limited user-serviceable products and the specific alteration is within the scope of the applicable
instructions, as found at http://support.wd.com), accident or mishandling while in the possession
of someone other than WD. Subject to the limitations specified above, your sole and exclusive
warranty shall be, during the period of warranty specified above and at WD’s option, the repair or
replacement of the Product with an equivalent or better Product. The foregoing warranty of WD
shall extend to repaired or replaced Products for the balance of the applicable period of the
original warranty or ninety (90) days from the date of shipment of a repaired or replaced Product,
whichever is longer.
The foregoing limited warranty is WD's sole warranty and is applicable only to products sold as
new. The remedies provided herein are in lieu of a) any and all other remedies and warranties,
whether expressed, implied or statutory, including but not limited to, any implied warranty of
merchantability or fitness for a particular purpose, and b) any and all obligations and liabilities of
WD for damages including, but not limited to accidental, consequential, or special damages, or
any financial loss, lost profits or expenses, or lost data arising out of or in connection with the
purchase, use, or performance of the Product, even if WD has been advised of the possibility of
such damages. In the United States, some states do not allow exclusion or limitations of incidental
or consequential damages, so the limitations above may not apply to you. This warranty gives you
specific legal rights, and you may also have other rights which vary from state to state.
13.4 HDMI Certification

HDMI Certification
WD ReadyView™ User Manual 40
The HDMI Logo is a trademark or registered trademark of HDMI Licensing Administrator, Inc.
13.5 Third Party Notices
13.5.1 H.264 AVC: MPEG-LA
THIS PRODUCT IS LICENSED UNDER THE AVC PATENT PORTFOLIO LICENSE FOR THE PERSONAL
USE OF A CONSUMER OR OTHER USES IN WHICH IT DOES NOT RECEIVE REMUNERATION TO (i)
ENCODE VIDEO IN COMPLIANCE WITH THE AVC STANDARD (“AVC VIDEO”) AND/OR (ii) DECODE
AVC VIDEO THAT WAS ENCODED BY A CONSUMER ENGAGED IN A PERSONAL ACTIVITY AND/OR
WAS OBTAINED FROM A VIDEO PROVIDER LICENSED TO PROVIDE AVC VIDEO. NO LICENSE IS
GRANTED OR SHALL BE IMPLIED FOR ANY OTHER USE. ADDITIONAL INFORMATION MAY BE
OBTAINED FROM MPEG LA, L.L.C. SEE HTTP://WWW.MPEGLA.COM
13.6 H.265 HEVC—HEVC Advance

Western Digital, the Western Digital logo, WD, the WD logo, My Book, WD Purple and WD ReadyView are registered
trademarks or trademarks of Western Digital Corporation or its affiliates in the U.S. and/or other countries. Apple and the
Apple logo are trademarks of Apple Inc. App Store is a service mark of Apple Inc. iOS is a trademark of Cisco in the U.S. and
other countries and is used under license by Apple Inc. Android and Google Play are trademarks of Google Inc.
ONVIF is a trademark of Onvif, Inc. The terms HDMI, HDMI High-Definition Multimedia Interface, and the HDMI Logo are
trademarks or registered trademarks of HDMI Licensing Administrator, Inc. All other marks are the property of their respective
owners. Product specifications subject to change without notice. Pictures shown may vary from actual product and app
interface. App, services, and other features are subject to change, termination, and interruption at any time and may vary by
country, software version and device model.
© 2020 Western Digital Corporation or its affiliates. All rights reserved.
As used for storage capacity one terabyte (TB) = one trillion bytes. Total accessible capacity varies depending on operating
environment.
Western Digital
5601 Great Oaks Parkway
San Jose, California 95119 U.S.A.
4779-706007-A01