
Loading ...
Loading ...
Loading ...
About Heart Rate Zones
Many athletes use heart rate zones to measure and increase
their cardiovascular strength and improve their level of fitness. A
heart rate zone is a set range of heartbeats per minute. The five
commonly accepted heart rate zones are numbered from 1 to 5
according to increasing intensity. Generally, heart rate zones are
calculated based on percentages of your maximum heart rate.
Setting Your Heart Rate Zones
The device uses your user profile information from the initial
setup to determine your default heart rate zones. The device
has separate heart rate zones for running and cycling. For the
most accurate calorie data during your activity, you should set
your maximum heart rate. You can also set each heart rate
zone. You can manually adjust your zones on the device or
using your Garmin Connect account.
1
Press Menu.
2
Select Settings > User Profile > Heart Rate Zones.
3
Select Default to view the default values (optional).
The default values can be applied to running and cycling.
4
Select Running or Cycling.
5
Select Preference > Set Custom.
6
Select Max. HR, and enter your maximum heart rate.
7
Select a zone, and enter a value for each zone.
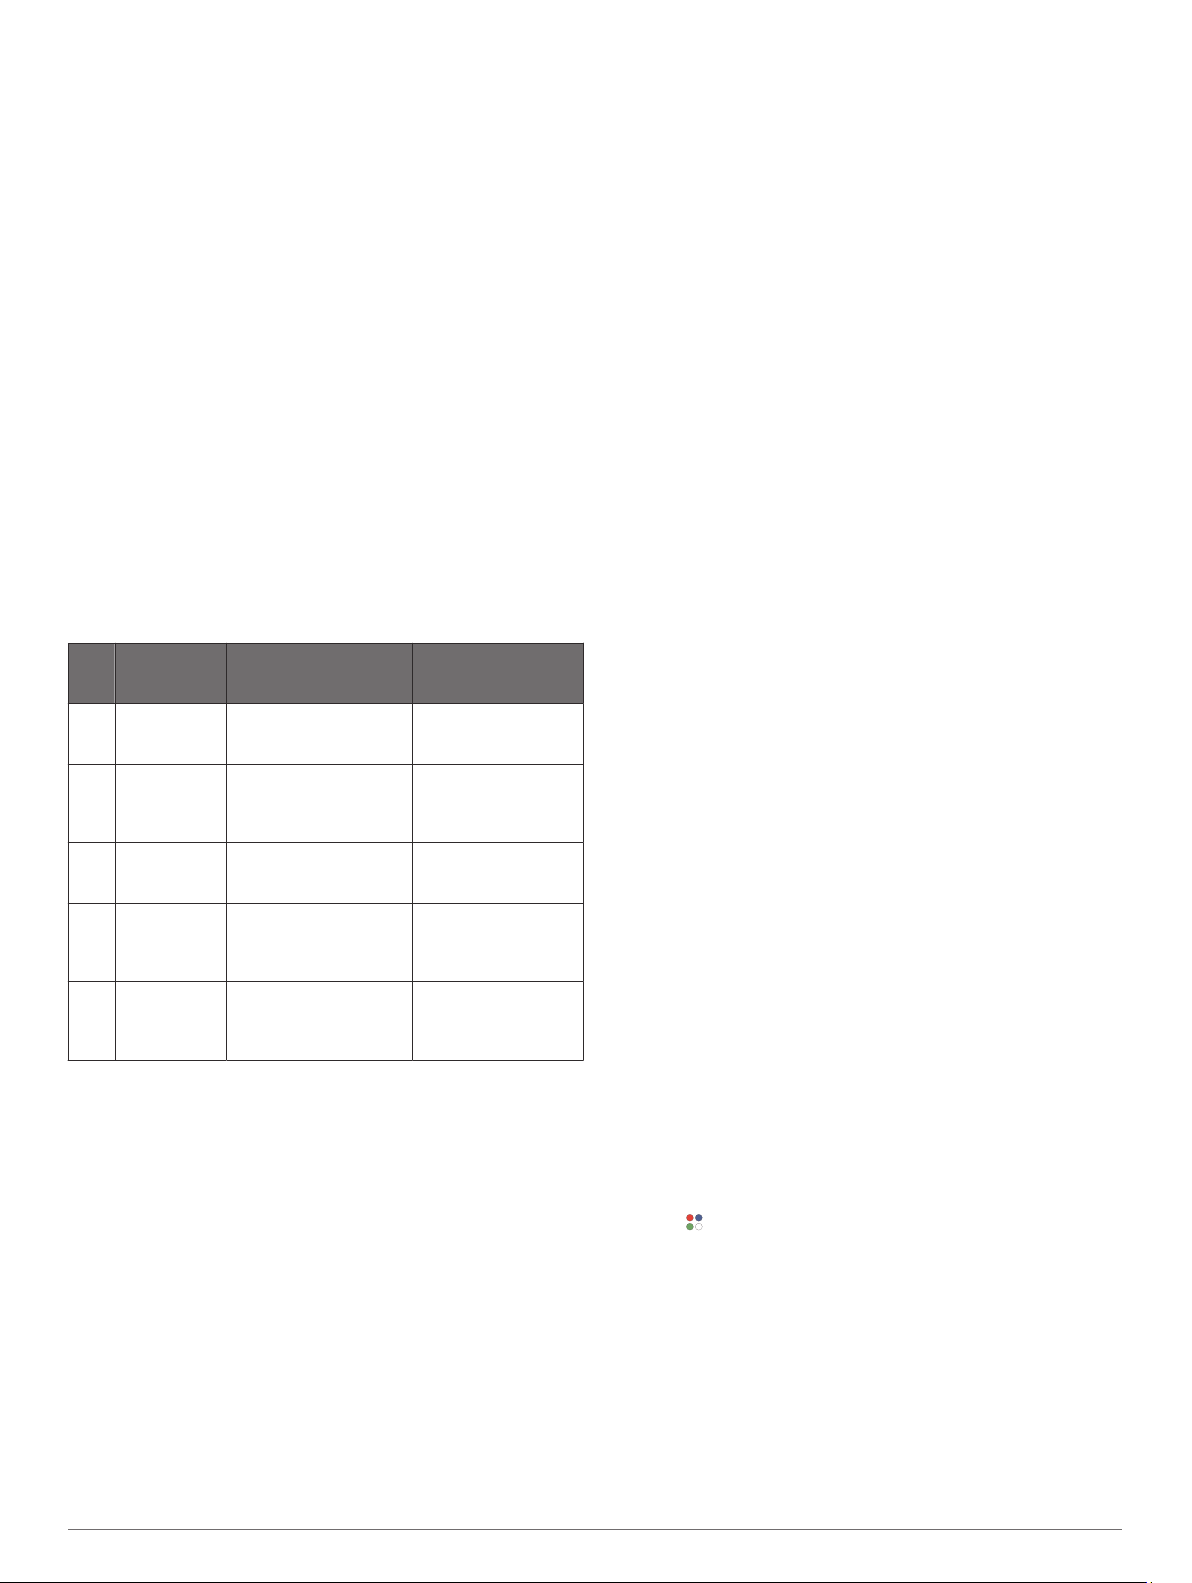
Heart Rate Zone Calculations
Zone % of
Maximum
Heart Rate
Perceived Exertion Benefits
1 50–60% Relaxed, easy pace,
rhythmic breathing
Beginning-level
aerobic training,
reduces stress
2 60–70% Comfortable pace,
slightly deeper
breathing, conversation
possible
Basic cardiovascular
training, good
recovery pace
3 70–80% Moderate pace, more
difficult to hold
conversation
Improved aerobic
capacity, optimal
cardiovascular training
4 80–90% Fast pace and a bit
uncomfortable, breathing
forceful
Improved anaerobic
capacity and
threshold, improved
speed
5 90–100% Sprinting pace,
unsustainable for long
period of time, labored
breathing
Anaerobic and
muscular endurance,
increased power
Pulse Oximeter
The Approach S62 device has a wrist-based pulse oximeter to
gauge the saturation of oxygen in your blood. Knowing your
oxygen saturation can help you determine how your body is
adapting to exercise and stress. Your device gauges your blood
oxygen level by shining light into the skin and checking how
much light is absorbed. This is referred to as SpO
2
.
On the device, your pulse oximeter readings appear as an SpO
2
percentage. On your Garmin Connect account, you can view
additional details about your pulse oximeter readings, including
trends over multiple days. For more information on pulse
oximeter accuracy, go to garmin.com/ataccuracy.
Getting Pulse Oximeter Readings
You can manually begin a pulse oximeter reading by viewing the
pulse oximeter widget. The accuracy of the pulse oximeter
reading can vary based on your blood flow, the device
placement on your wrist, and your stillness.
NOTE: You may need to add the pulse oximeter widget to the
widget loop.
1
While you are sitting or inactive, swipe up to view the pulse
oximeter widget.
2
Tap the widget to view more details and begin a pulse
oximeter reading.
3
Hold the arm wearing the device at heart level while the
device reads your blood oxygen saturation.
4
Keep still.
The device displays your oxygen saturation as a percentage,
and a graph of your pulse oximeter readings and heart rate
values for the last four hours.
Turning On Pulse Oximeter Sleep Tracking
You can set your device to continuously measure your blood
oxygen saturation while you sleep.
NOTE: Unusual sleep positions can cause abnormally low
sleep-time SpO2 readings.
1
Press Menu.
2
Select Settings > Sensors & Accessories > Pulse Ox
During Sleep.
Tips for Erratic Pulse Oximeter Data
If the pulse oximeter data is erratic or does not appear, you can
try these tips.
• Remain motionless while the device reads your blood oxygen
saturation.
• Wear the device above your wrist bone. The device should
be snug but comfortable.
• Hold the arm wearing the device at heart level while the
device reads your blood oxygen saturation.
• Use a silicone band.
• Clean and dry your arm before putting on the device.
• Avoid wearing sunscreen, lotion, and insect repellent under
the device.
• Avoid scratching the optical sensor on the back of the device.
• Rinse the device with fresh water after each workout.
Activities and Apps
Your device can be used for indoor, outdoor, athletic, and fitness
activities. When you start an activity, the device displays and
records sensor data. You can save activities and share them
with the Garmin Connect community.
You can also add Connect IQ activities and apps to your device
using the Connect IQ app (Connect IQ Features, page 7).
For more information about activity tracking and fitness metric
accuracy, go to garmin.com/ataccuracy.
Starting an Activity
When you start an activity, GPS turns on automatically (if
required).
1
Press the action button.
2
Select .
3
Select an activity.
4
If the activity requires GPS signals, go outside to an area with
a clear view of the sky, and wait until the device is ready.
The device is ready after it establishes your heart rate,
acquires GPS signals (if required), and connects to your
wireless sensors (if required).
5
Press the action button to start the activity timer.
The device records activity data only while the activity timer is
running.
10 Activities and Apps
Loading ...
Loading ...
Loading ...