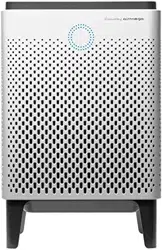
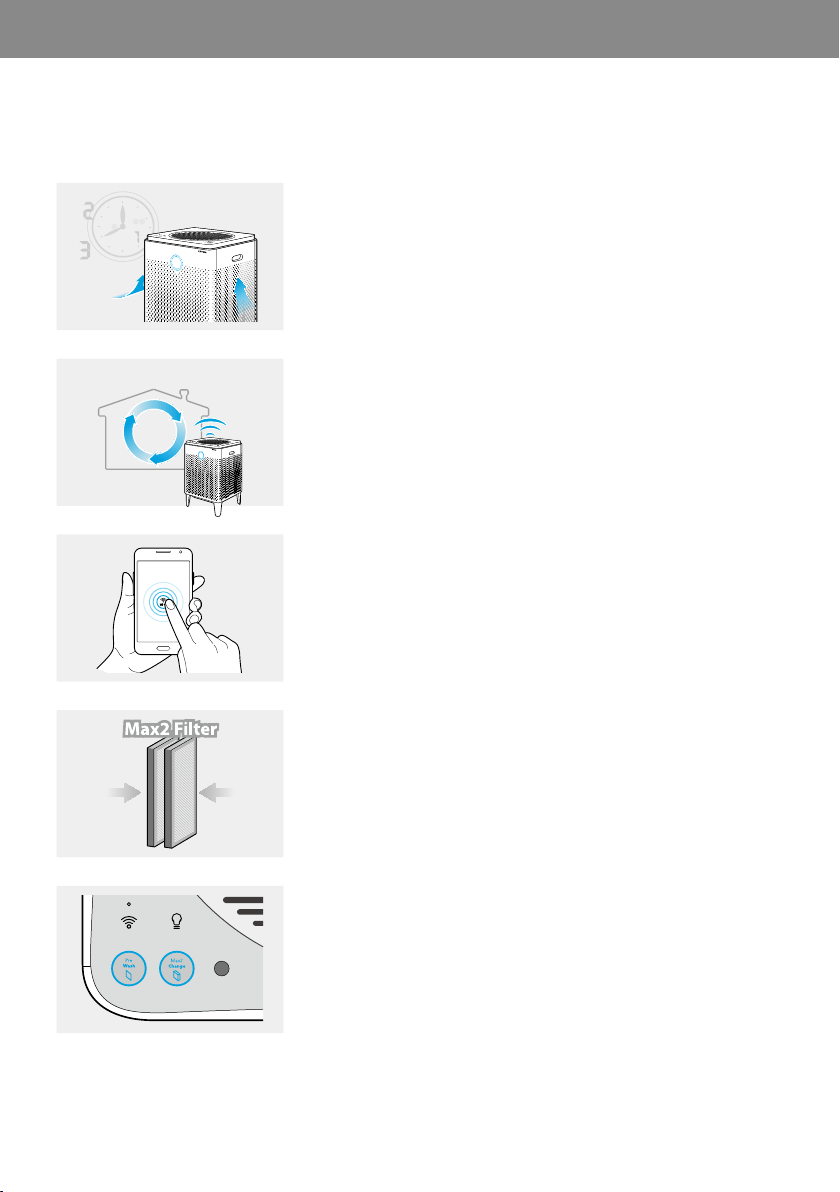
The following features are available for our Airmega Air Purifier.
Airmega’s pollution sensor tells you the indoor air quality in real-time.
The brightly colored LED ring lets you know if your indoor air is fresh or
unhealthy every minute of the day.
▶
AUTO
With Smart Mode, Airmega adapts to its surroundings. Fan speeds
automatically adjust based on the room’s air quality and room
conditions.
▶
With Airmega’s smartphone app, you can monitor the air quality inside
your home, see the status of the filters, schedule the timer, receive
real-time outdoor air quality updates, and even remotely activate the
Airmega. (400S and 300S only)
▶
The Max2 filter (an activated carbon filter plus Green True HEPA filter)
reduces more than 99% of volatile organic compounds (VOCs), odors
such as NH3, CH3CHO. It also captures and reduces up to 99.97 % of
airborne particles in the air such as pollen, pollution, and other allergens.
▶
With status alerts for the Max2 Filters and the Pre-filters, you’ll know
when it’s time to replace them. And because the Airmega gauges how
much air has traveled through it, you can be sure the notifications are
accurate.
▶
EN
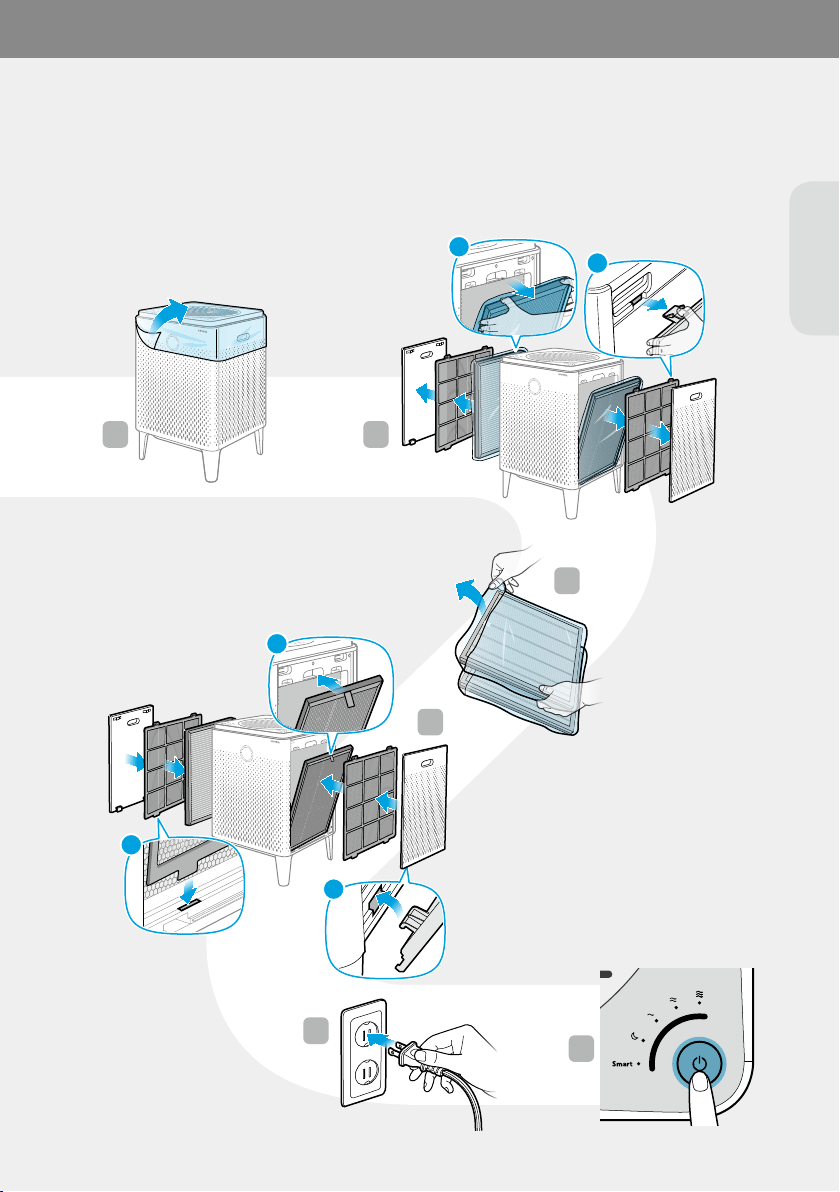
Before operating the product, you must remove the plastic wrapping of the inserted Max2 filters on both sides.
For details, see page 14.
1 2
3
4
5
6
FRONT/전면/前
FRONT/전면/前
1
2
1
2
3
2
1
4
568
7
3
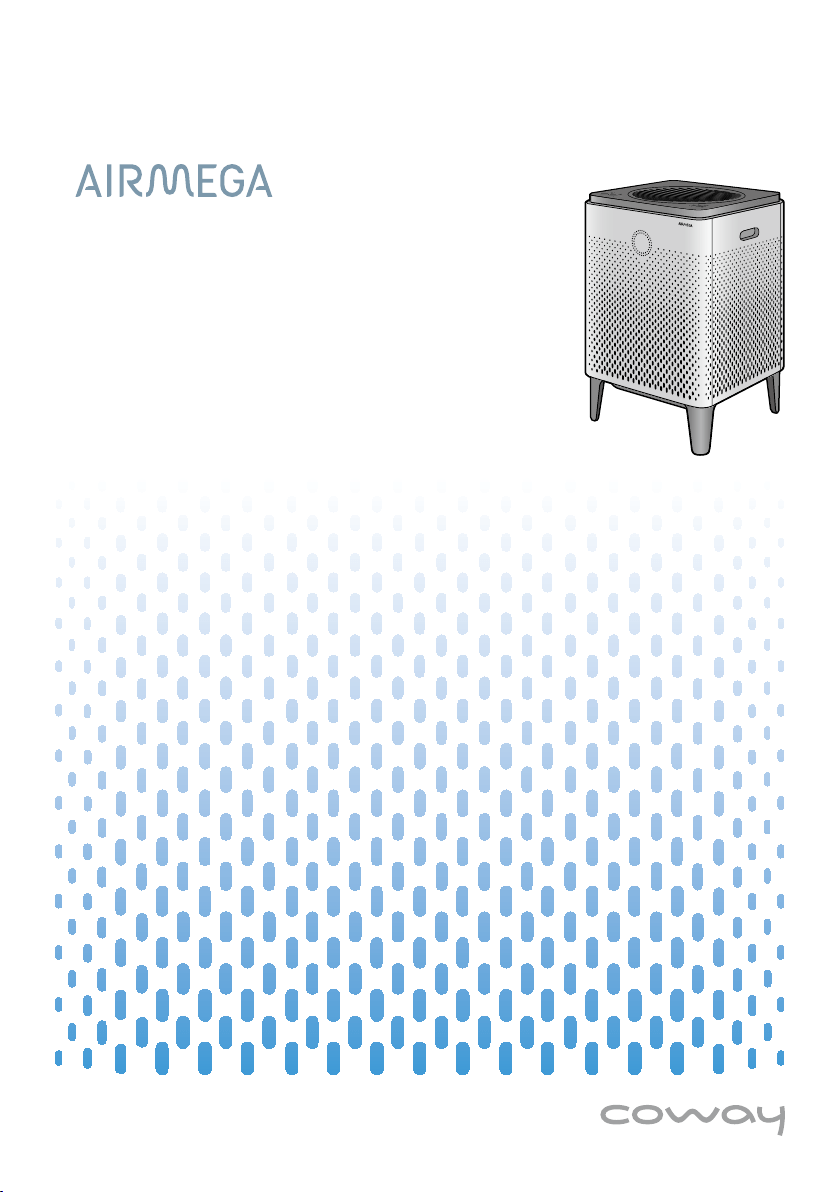
AIRMEGA
A
B
**
*
4
5
6
(400S/300S only)
Before connecting the air purifier and your smart phone, you must first download the Airmega App from Apple App
Store or Google Play Store. For more details, see page 16.
For Android, step 4, 5, and 6 will be proceeded automatically.
If the connection is completed
successfully,
the [Wi-Fi] indicator will be on.
* Advanced Settings to enter
the static IP address

EN
01 BEFOREUSINGTHEPRODUCT
02 PREPARATION
03 INSTALLATION
(400S/300S only)
04 OPERATION
05 MAINTENANCE
06 APPENDIX

The following symbols are used in this manual to explain procedures, restrictions, handling precautions, and
instructions that should be observed for safety.
WARNING
Warning indicates a potentially hazardous situation that may result in death or severe injury to the user or others.
CAUTION
Caution indicates a potentially hazardous situation that may result in injury to the user or others, or the loss of property.
NOTE
Note indicates useful tips or additional information for procedures and product use.
[ ]
This square bracket represents control buttons and indicators on the product.
e.g., [Power]
Illustrations used in this manual are of the 400S unless specified.
Read and follow all the safety tips and warnings before using the product.
01 BEFORE USING THE PRODUCT
WARNING
• Do not exceed the voltage and power rating of the power
outlet or connection device. This may generate excessive
heat and cause electric shock or fire.
• Only use the appropriate type of electric socket for the
product. Connecting the product to an incorrect socket
may result in damage.
• Do not immerse the product or any of its parts in water.
Operate the product only after a qualified technical
examines and replaces the parts that were under water.
• Do not touch the power plug with wet hands.
• If the electric outlet is wet, do not connect the power
plug of the product. Wait till the electric outlet dries
completely before use.
• Do not operate the product if the motor fan fails to
operate or is damaged.
• Disconnect the power plug from the electric outlet
if strange sounds, smells, or smoke come from
the product. Contact the customer service center
immediately for instructions.
• Disconnect the power plug from the electric outlet when
the product is not in use and before cleaning, inspecting,
or replacing parts.
• Use a dedicated electric outlet for the product. Do
not connect the product to a power strip that has
connections to several other products.
• Do not operate the product if the power plug or cords are
damaged.
• Do not forcibly bend, twist, pinch, or damage the power
cord.
• Do not force the power plug into an incorrect electric
outlet or into a loose electric outlet. Contact a qualified
technician to install a proper electric outlet.
• A damaged power plug or cord must be replaced by the
manufacturer or a qualified technician.

EN
• Remove the power plug from the electric outlet by
grasping the power plug and pulling it gently. Never
pull the cord to remove the power plug.
• Keep the electric cord away from heat sources.
• Do not repair the product unless this manual
recommends it. Doing so will void your warranty.
All repair work must be carried out by a qualified
technician.
• This product has a polarized plug (one blade is wider
than the other). To reduce the risk of electric shock, this
plug is intended to fit in a polarized outlet only one way.
If the plug does not fit fully in the outlet, reverse the
plug. If it still does not fit, contact a qualified electrician.
Do not attempt to defeat this safety feature.
• Do not use this product in industrial areas or factories
where oil, grease, or dust particles may be present. This
product is for household use only.
• Do not change the filter while the product is operating.
Always turn off the product and unplug the power plug
before accessing the components inside the product.
• Do not place the product near a humidifier or in humid
areas, such as bathrooms or laundry rooms, where the
product may come into contact with water.
• Do not place the product near flammable gases,
cigarettes, incense, and other combustible materials.
• Do not place the product on a bed or against soft
objects, such as curtains.
• Do not clean the product using detergents, paint
thinner, or other household solvents.
• Do not spray insecticides or other flammable materials
near the product.
• This product contains a chemical known to the State
of Califonia to cause cancer and birth defects or other
reproductive harm.
(California law requires this warning to be given to
customers in the State of California)
CAUTION
• This product should not be used by children under 8
without supervision.
• This product should not be used by persons with
reduced physical, sensory, or mental capabilities or
lack of experience without supervision or instruction
concerning to the use of the product in a safe way and
understand the hazards involved.
• Do not allow children to play with the plastic wrapping
and product.
• Do not use this product with any solid-state speed
control device, as it may result in electric shock or fire.
• Do not use an adapter or extension cord, as it may
cause fire, shock, or personal injury.
• Do not use attachments or filters not recommended by
the manufacturer.
• Exercise caution while removing the components from
the product. Ensure that your body parts do not get
stuck or scratched while servicing the product.
• Do not insert any objects or finger into the openings
of the product. If any objects fall into the openings,
immediately turn off the product and unplug the
power plug. Contact a qualified technician or the
manufacturer to remove the object.
• Do not wash or reuse the Max2 filters.
• Do not block the air outlet of the product. Doing so may
decrease the efficiency of the product and increase the
risk of injury.
• This product is for household use as described in this
manual. Using it in an industrial environment or any
other place not recommended by the manufacturer
and may result in electric shock, fire, and injury to
person.
• Do not place anything on top of the product.
• Do not run the power cord under carpets or cover it
with rugs.
• Change the filters at the recommended intervals so that
excess dust does not accumulate.
• Do not place the product where the both sides of
product are blocked.
• Do not place the product in direct sunlight.
• Do not place the product next to or on windows.
• Place the product on a firm, flat, and dry surface that
provides sufficient air circulation.
• Keep the product and its cord out of way, where it
cannot be stepped on or tripped over.
• The end user has to be informed to keep at least 20 cm
separation with the antenna while this end product is
installed and operated.
• Operation is subject to the following two conditions:
(1) this device may not cause harmful interference and
(2) this device must accept any interference received,
including interference that may cause undesired
operation.
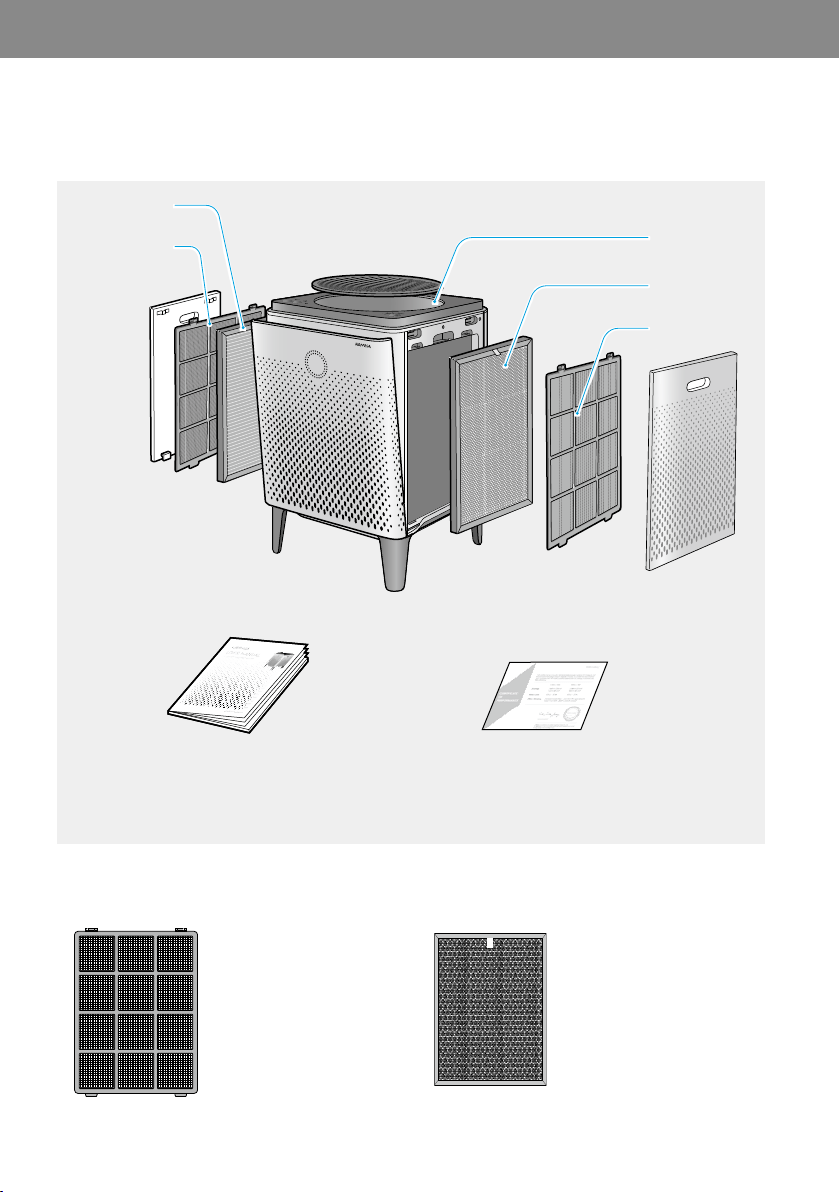
Before installing the air purifier, make sure all of the components are present. If any items are missing or damaged,
contact the customer service center.
02 PREPARATION
* These are installed in the main unit.
Captures large particles like
hair, fur, and dust by micro
mesh.
Captures and reduces more
than 99 % of VOCs and
odors such as NH3, CH3CHO.
It also captures and reduces
up to 99.97 % of airborne
particles, allergens, and
contaminants down to 0.3
microns in size.
EN
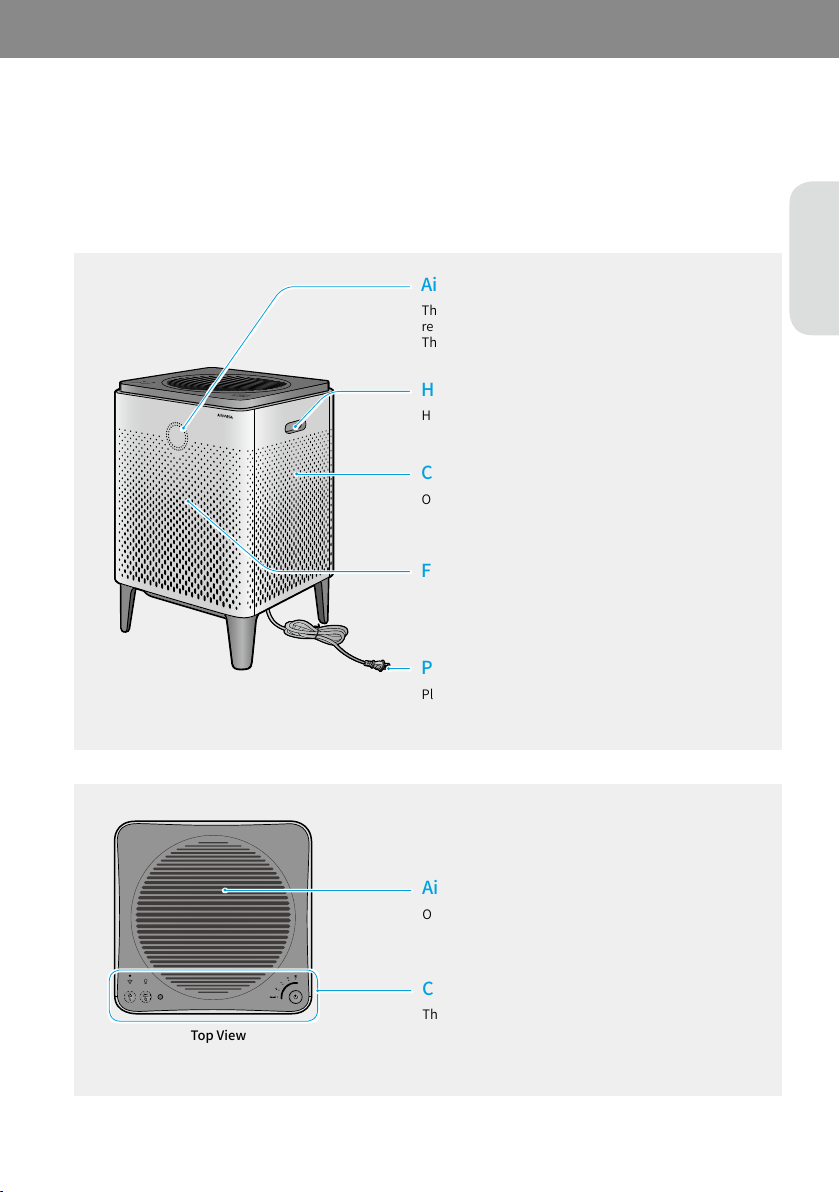
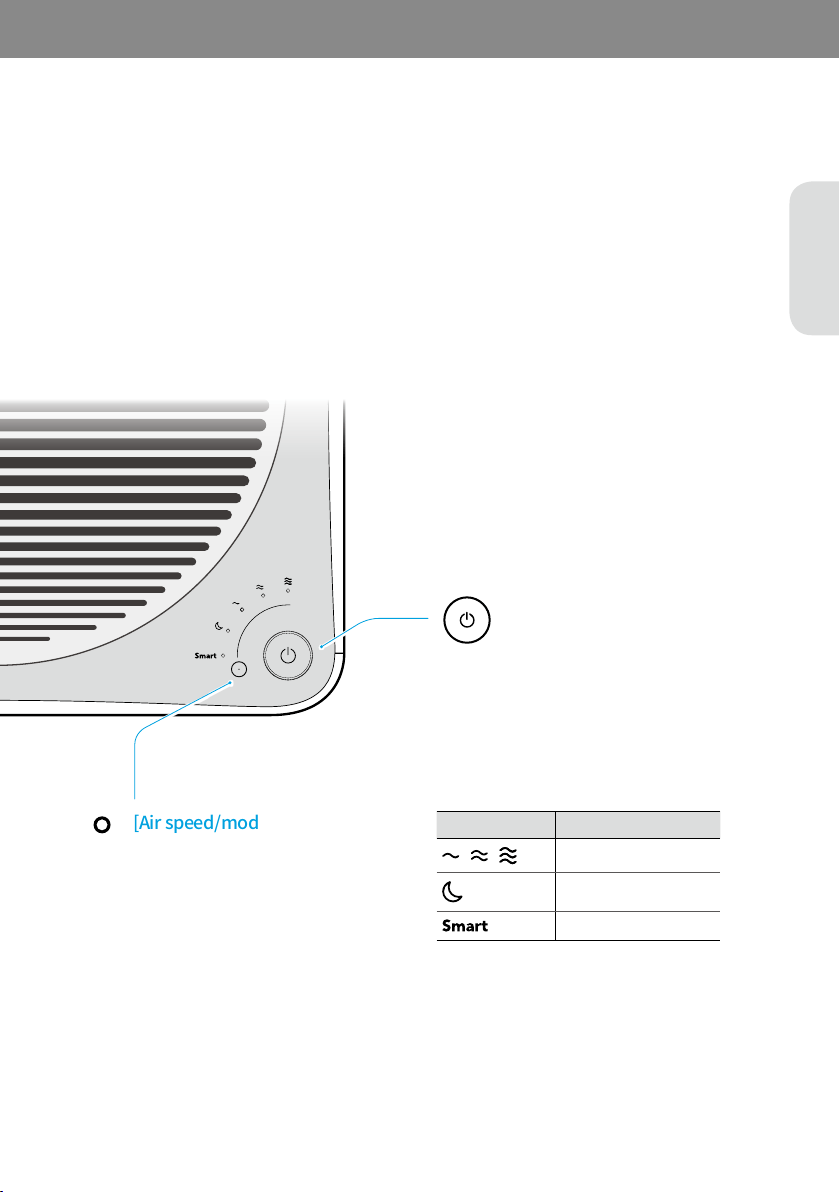
Check the parts of the product (exterior in the front and top view and control panel) and how they function.
Check the parts and functions of the exterior of the product.
This shows the air pollution level around the product in
real time.
The color changes depending on the pollution level.
Hold these handles to lift or transport the air purifier.
Open this cover when cleaning the pollution sensor.
Open these covers when cleaning or replacing the filters.
Plug the end of the power cord into a power outlet
(120 V~ 60 Hz).
Open this cover when removing any foreign objects fallen
and cleaning the air outlet.
These controls allow you to operate the product and
monitor the current operation status.
400S
Touch this button to connect to a Wi-Fi
network. When the Wi-Fi connection is
completed, the indicator is turned on.
* The status of Wi-Fi LED :
- Blinking : Not connected yet or in the
pairing process
- Constant LED: Wi-Fi connected
- LED off: Wi-Fi off
400
Touch this button to automatically turn
off after an hour, 4 hours, or 8 hours.
NOTE
For 400S users, you can set the timer
and scheduler using Airmega mobile
application.
Touch this button to turn the air
quality indicator and light on or off.
This sensor detects the intensity
of light. When the product is set to
Smart mode and it is dark,
for 3 minutes, the product enters
Sleep mode automatically.
However, if the air speed is set
manually or pollution level is
above normal (in Smart mode),
Sleep mode will not be activated
automatically.
Shows the pre-filter cleaning cycle at 5 levels
(100 %, 80 %, 60 %, 40 %, 20 %, 0 %). When the
letters on button is lit, it indicates that
the pre-filters need to be cleaned.
*Aftercleaningthepre-filters,touchandhold
thisbuttonfor2~3secondstoresettheindicator.
Shows the Max2 filter lifetime at 5 levels
(100 %, 80 %, 60 %, 40 %, 20 %, 0 %). When the
letters on button is lit, it indicates that the Max2
filters need to be replaced.
*AfterreplacingtheMax2filters,touchandhold
thisbuttonfor2~3secondstoresettheindicator.
EN
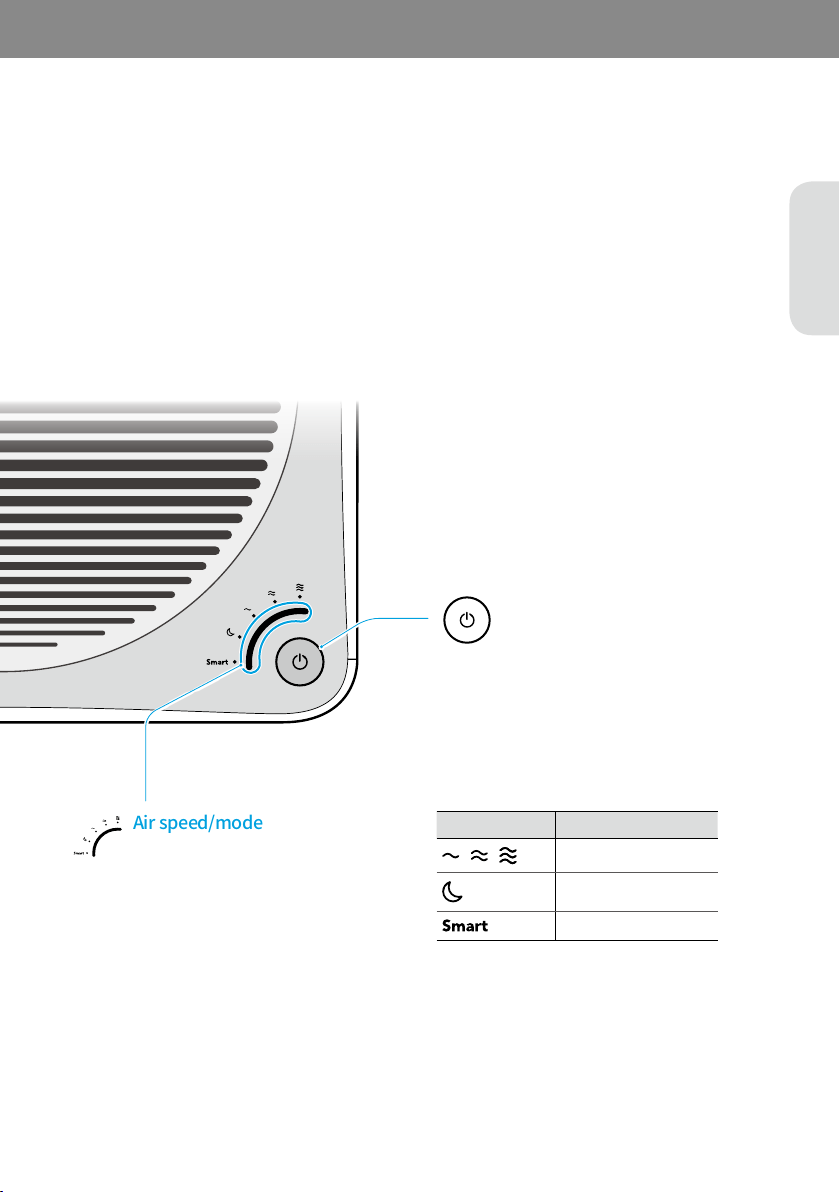
Air speed
Sleep mode
Smart mode
Touch this button to turn the product on.
Touch and hold this button for 2~3 seconds
to turn the product off.
Touch the sensor to select the air speed or set
the product to Smart mode or Sleep mode.
Touch this button to turn the air
quality indicator and light on or off.
300S
Touch this button to connect to a Wi-Fi
network. When the Wi-Fi connection is
completed, the indicator is turned on.
* The status of Wi-Fi LED :
- Blinking : Not connected yet or in the
pairing process
- Constant LED: Wi-Fi connected
- LED off: Wi-Fi off
300
Touch this button to automatically turn
off after an hour, 4 hours, or 8 hours.
NOTE
For 300S users, you can set the timer
and scheduler using Airmega mobile
application.
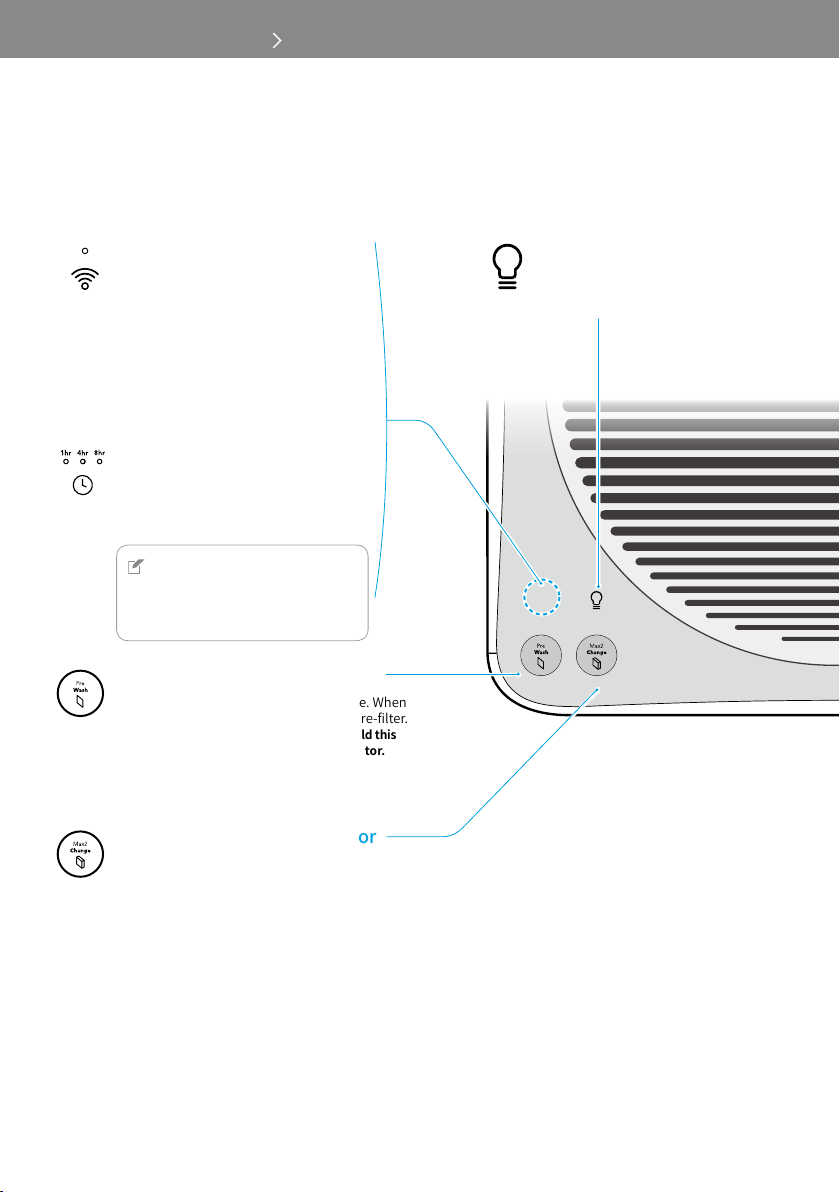
Shows the time of pre-filter cleaning cycle. When
the letters on the button is lit, clean the pre-filter.
*Aftercleaningthepre-filters,touchandholdthis
buttonfor2~3secondstoresettheindicator.
Shows the time of Max2 filter life. When the letters
on the button is lit, replace the Max2 filters.
*AfterreplacingtheMax2filters,touchandhold
thisbuttonfor2~3secondstoresettheindicator.
EN
Air speed
Sleep mode
Smart mode
Touch this button to turn the product on.
Touch and hold this button for 2~3 seconds
to turn the product off.
Touch this button to select the air speed
or set the product to Smart mode or Sleep
mode.
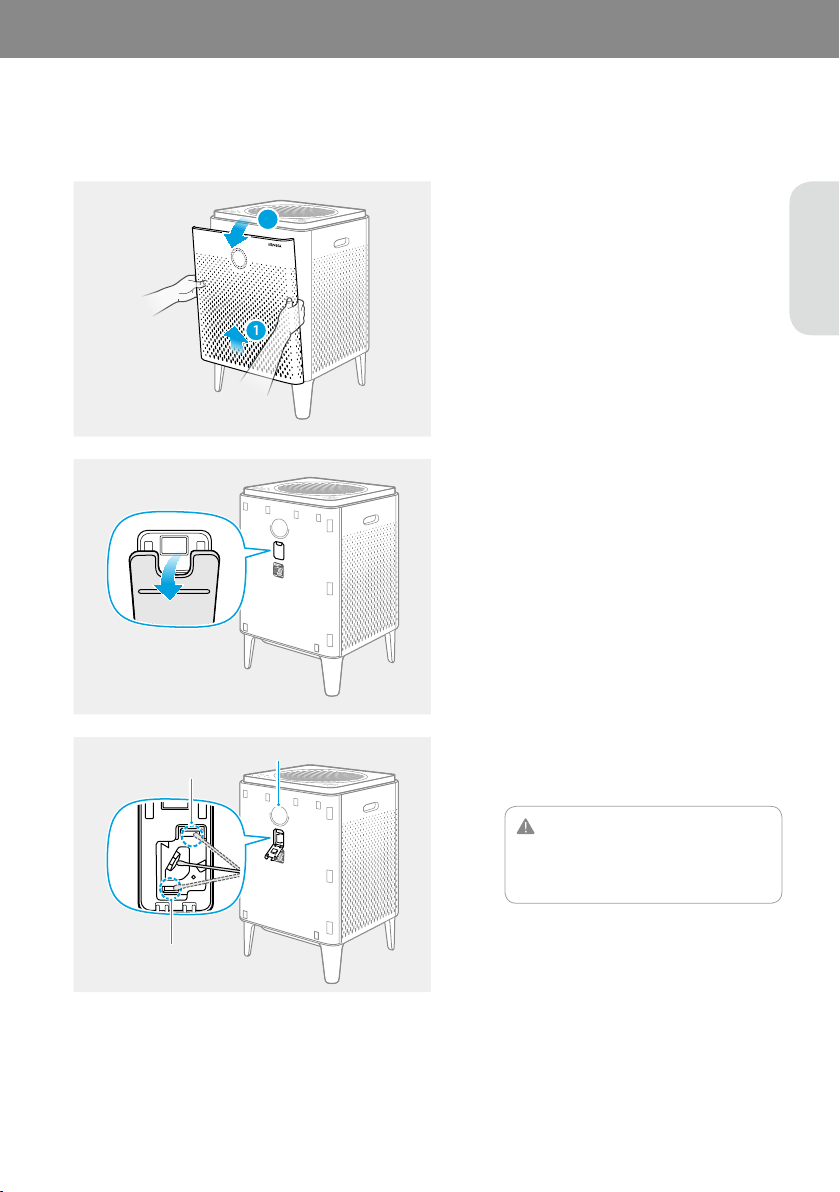
Before using the product, you must remove the plastic wrapping of the inserted Max2 filters on both sides.
03 INSTALLATION
CAUTION
Make sure that the power cord is unplugged before opening the covers.
1
Covers ▶ Pre-filters ▶ Max2 filters
FRONT/전면/前
FRONT/전면/前
2
Discard the plastic wrapping for Max2 filters.
CAUTION
•
When removing the plastic wrapping from
the filters, be careful not to damage the
surface of filters.
•
Do not allow children to play with the
plastic wrapping.
3
Max2 filters ▶ Pre-filters ▶ Covers
NOTE
•
Place the Max2 filters into the filter case
with the green side facing the product.
Reversed placement may affect the filter
lifetime.
•
The product will not turn on if the right and
left covers are installed incorrectly.
1
2
Max2 filter Pre-filter Cover
1
2
Max2 filter Pre-filter Cover
EN
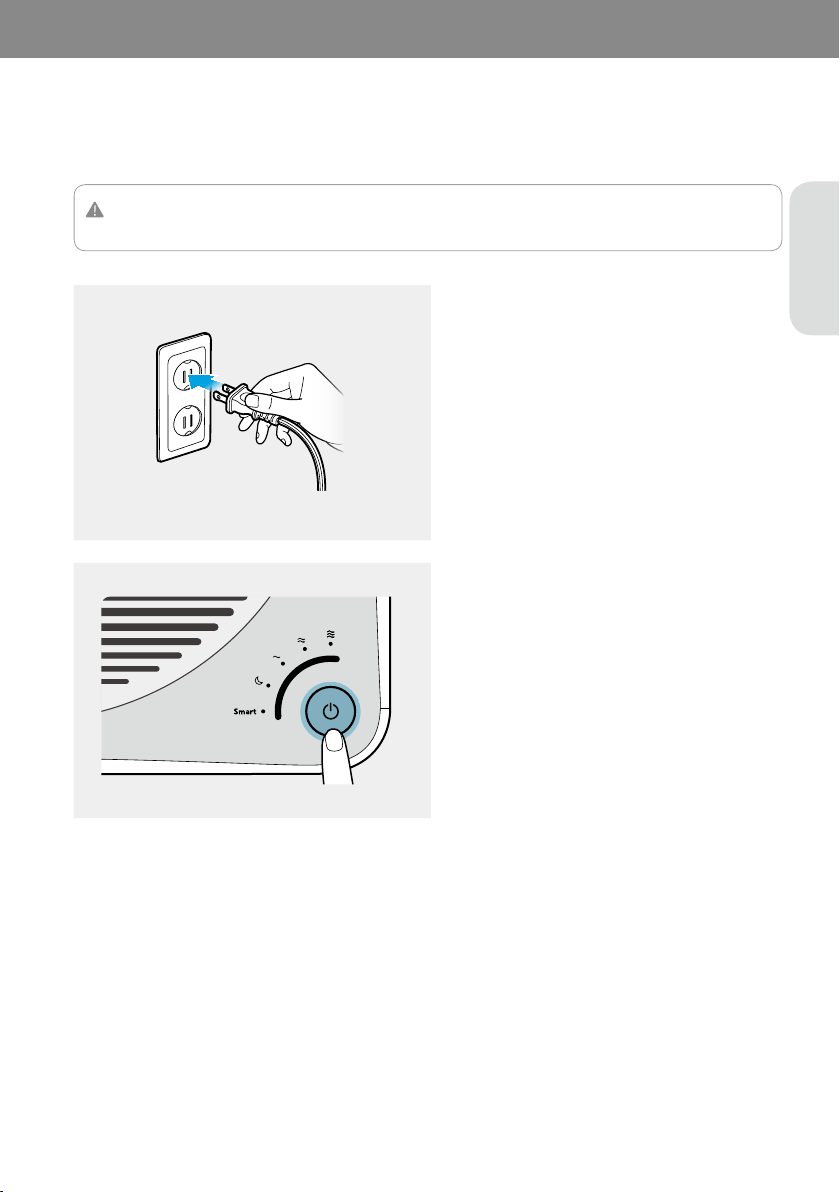
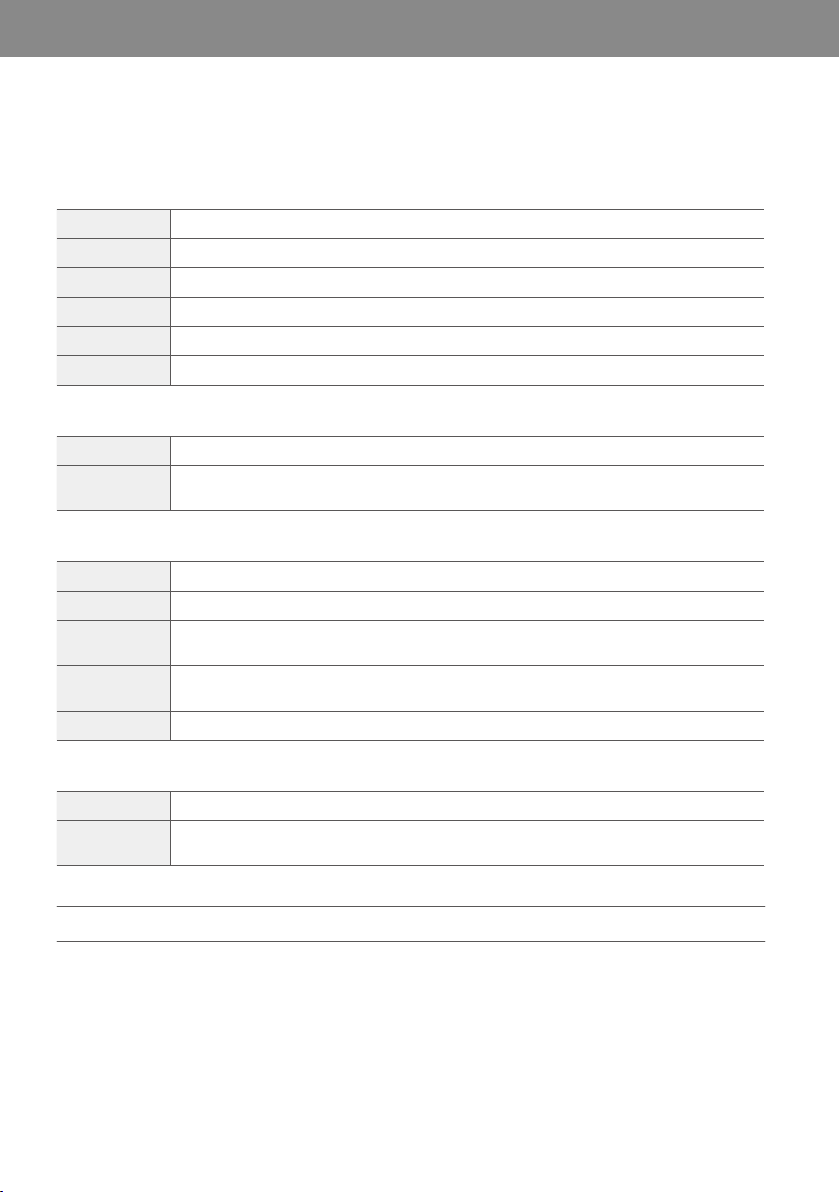
When your filters are prepared, connect the power and turn on the air purifier.
CAUTION
This product is for 120 V~ 60 Hz use only. Make sure your power supply meets these requirements.
1
The indicators on the air purifier will blink.
2
You will hear a chime sound when the air
purifier starts to operate.
(400S/300S only)
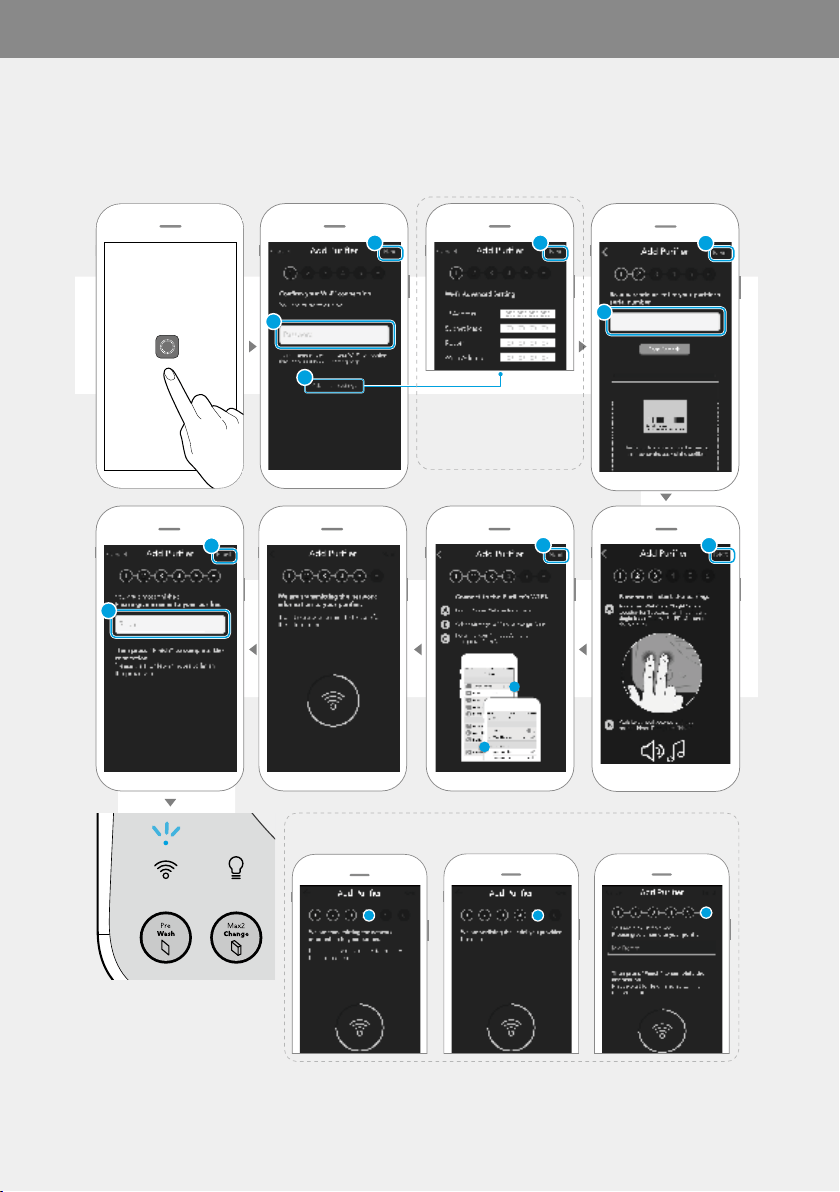
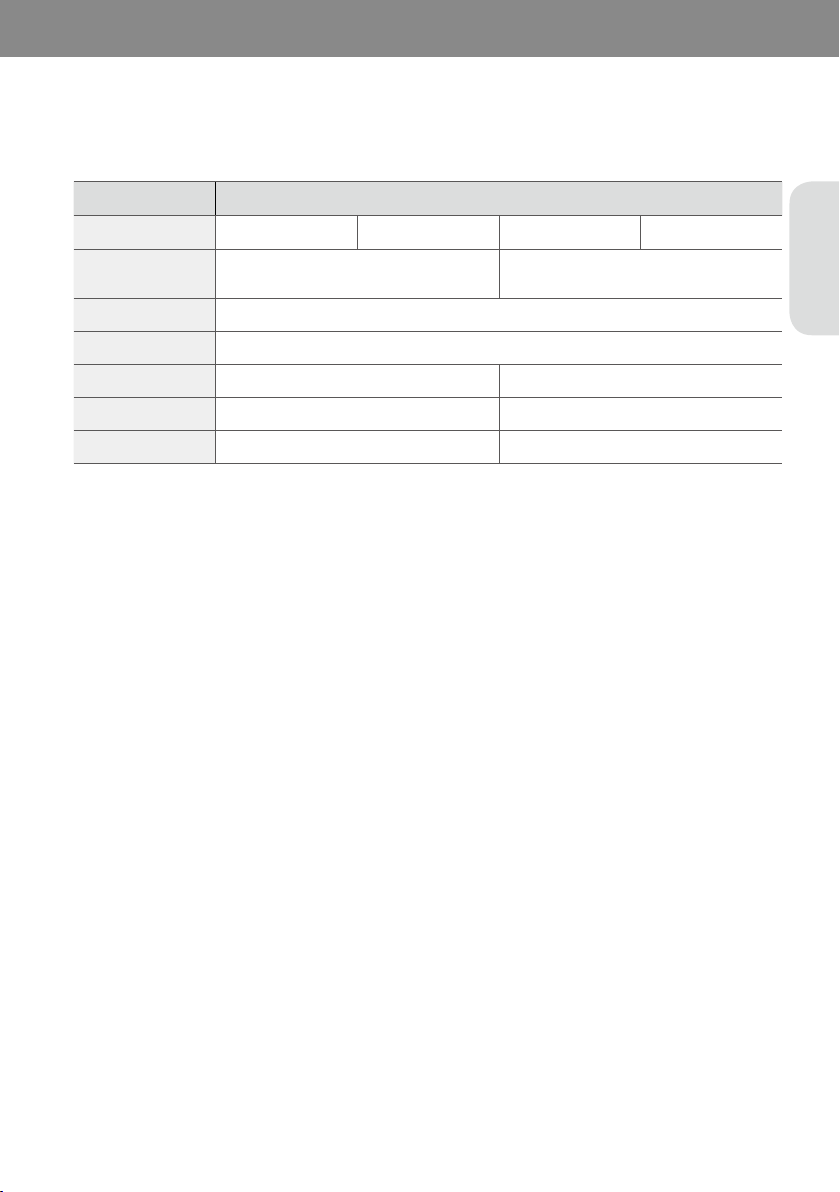
If your product is a Wi-Fi enabled models you can connect the product to your Wi-Fi network for monitoring air
quality and remotely operating the product using your smart phone application.
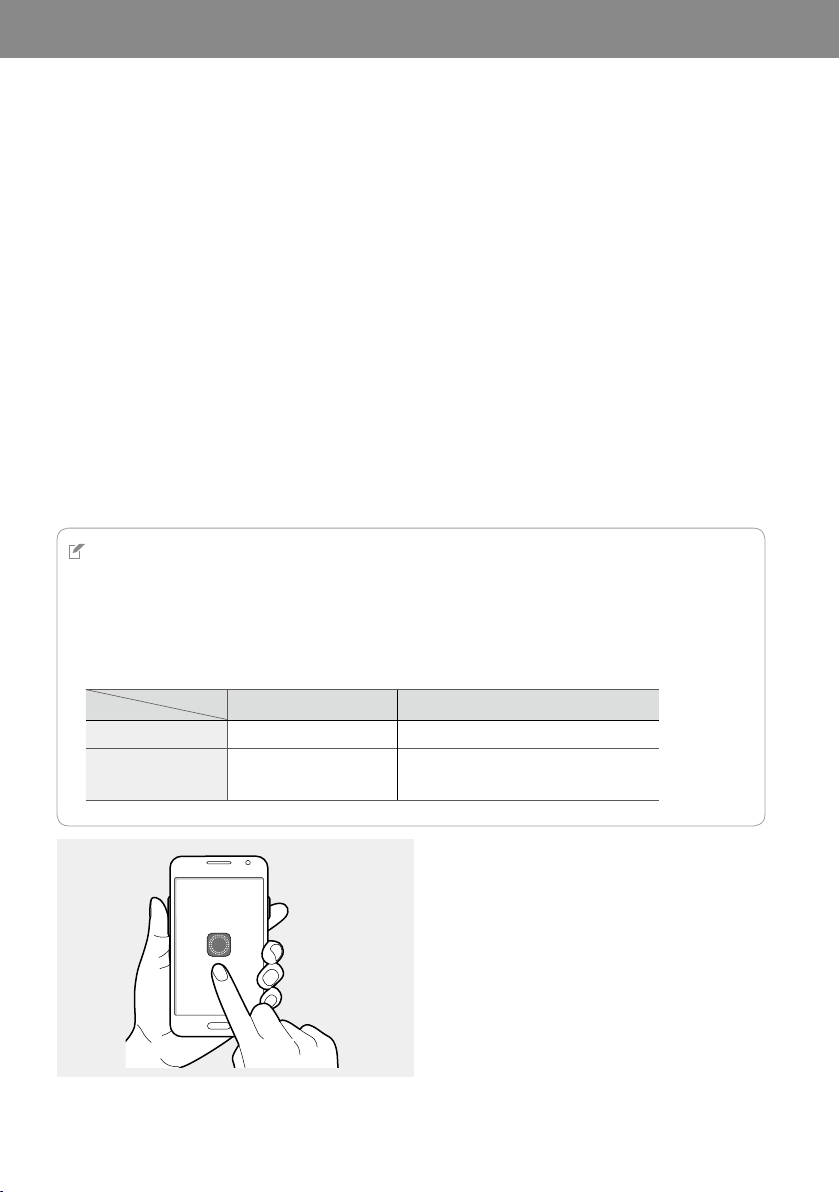
To use the Wi‐Fi function, you must first download and install the Airmega application to your smart phone. You can
download the Airmega application from Apple App Store or Google Play Store.
1
Launch the AppleAppStore or GooglePlayStore on your smart phone.
2
Enter AIRMEGA to search the Airmega application.
3
Tap Install to download the application on your smart phone.
The app-enabled Airmega air purifier can be controlled via smart phone, by pairing it with your smart phone.
NOTE
• The screens used in this manual are of the screens captured on iOS version unless specified.
• Your smart phone must be connected to a Wi-Fi network until pairing is complete.
• The application may not be operated properly, depending on your network connection (Wi-Fi, 3G, 4G). Some feature
responses and information transmissions may be delayed. In such cases, try again or refresh the screen after some
time.
• The Airmega app is optimized for the devices and specifications shown below:
iOS 8 or later Android 4 or later
iPhone 5, 5s, 6, 6+
•
Samsung: Galaxy S4, S5, S6, Galaxy Note 4
•
Google: Nexus 5
AIRMEGA
1
EN
2
1
2
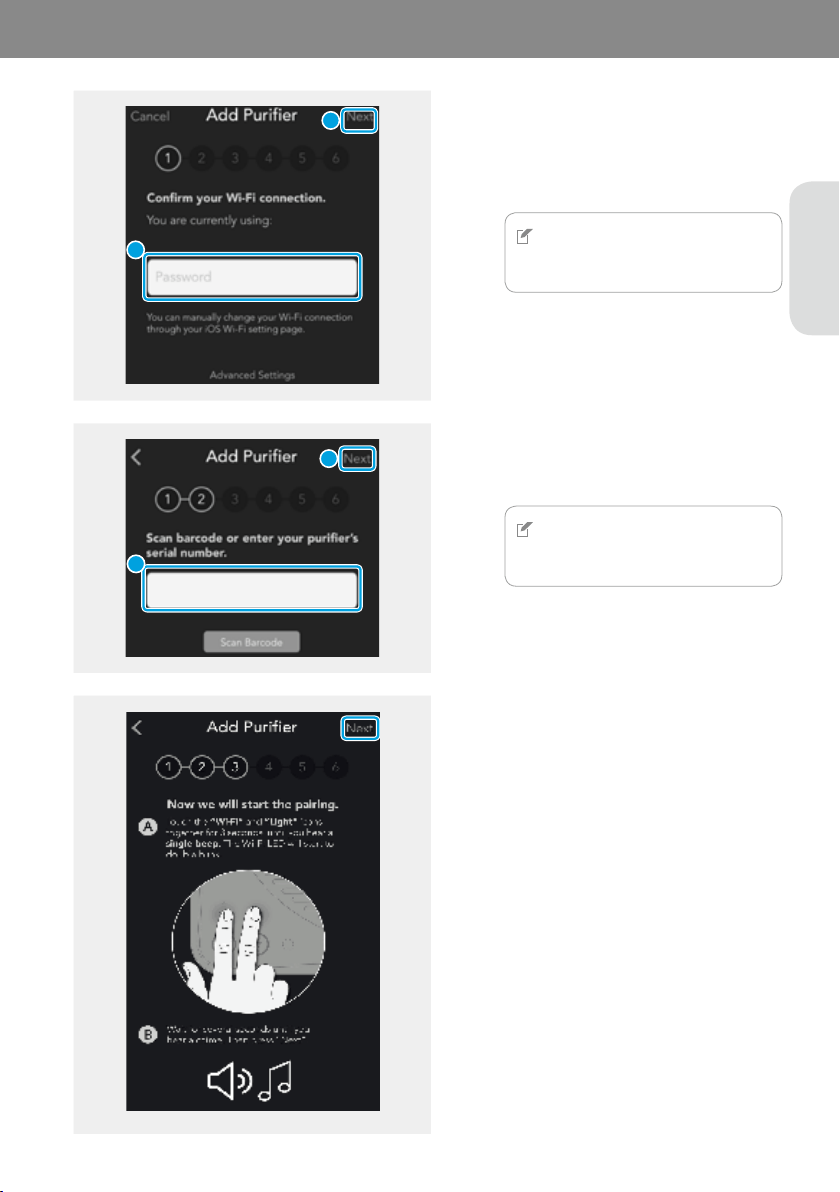
Next
If there is no password, tap Next without
entering the password.
NOTE
Tap AdvancedSettings to enter the static
IP address.
2
1
3
Next
NOTE
Tap ScanBarcode to read the barcode
automatically.
4
Next
5
ForAndroidusers
6
7
A
B
EN
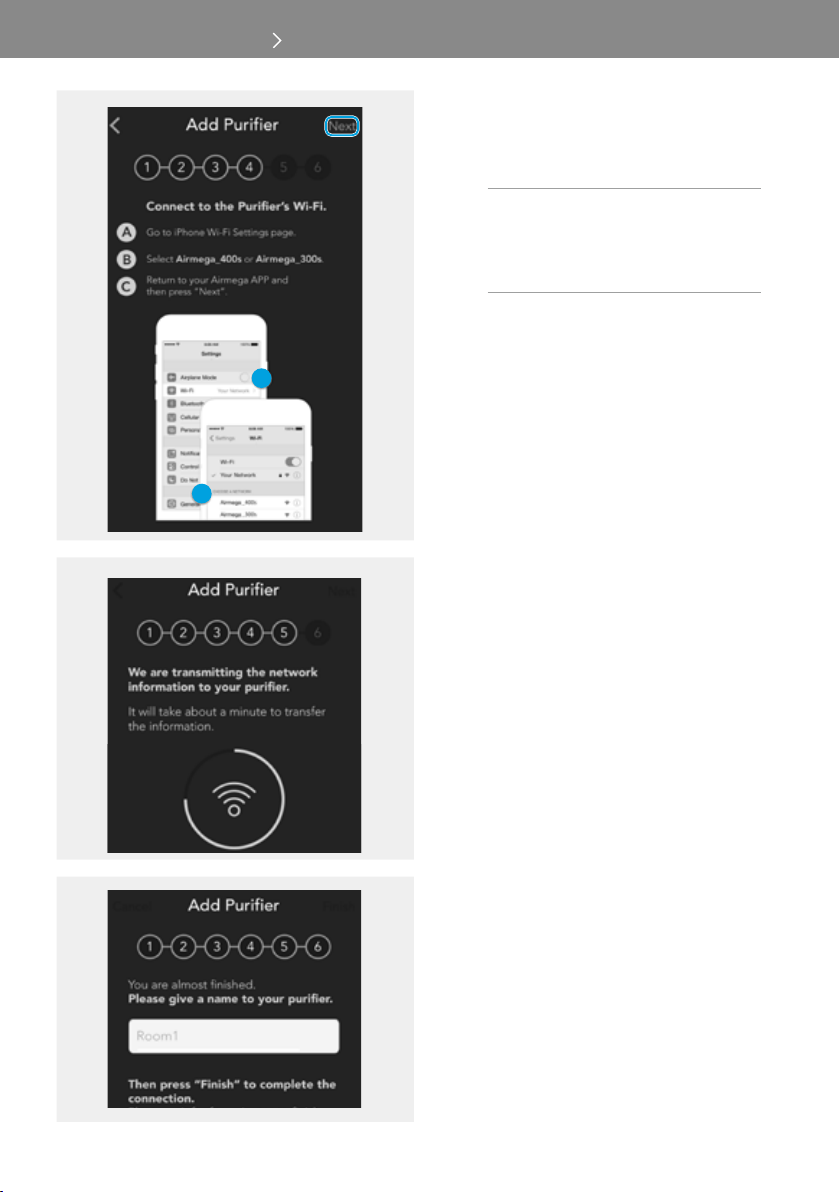
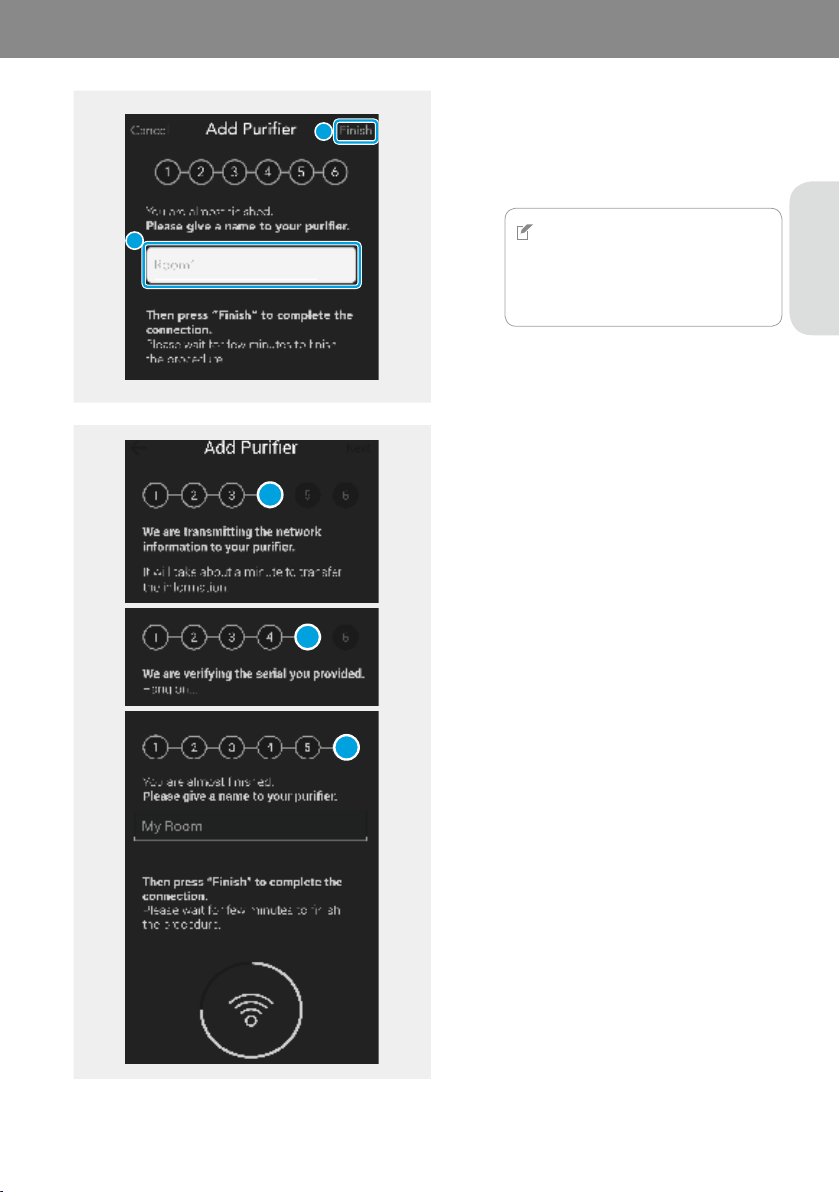
8
Finish
When the connection of the air purifier and
your smart phone is completed successfully,
[Wi-Fi] indicator is on.
NOTE
If you encounter trouble and cannot
proceed to the next, repeat the steps
from the first one or verify your network
environment.
9
2
1
For Android, step 4, 5, and 6 will be
proceeded automatically.
4
5
6
04 OPERATION
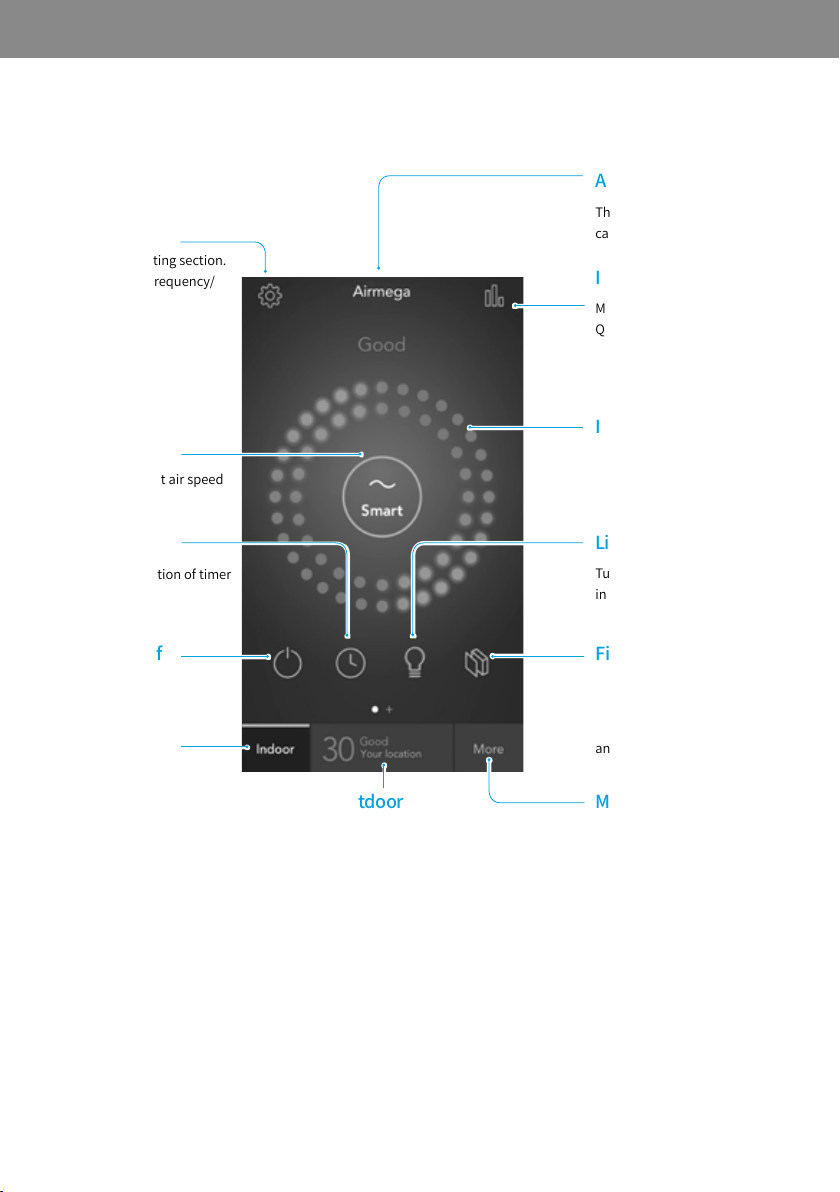
ScreenLayoutofAirmegaApp
Moves to the main page.
Shows the outdoor air quality
of the location you set.
Shows the filter lifetime.
It turns red when the
lifetime is left below 20 %
and blinking below 0 %.
Turns the air quality
indicator on or off.
Shows the real time indoor
air quality at 4 stages.
Moves to the indoor Air
Quality Indicator report
(24 hours, 7 days, 30 days,
12 months).
The name of product (This
can be changed in Setting.)
Moves to the more sections.
Purchase/About Airmega/
Help/Notification Settings/
Change Password options
are available.
Moves to the setting section.
Pre-filter Wash Frequency/
Smart Mode Sensitivity/
Name/Time Zone/Warranty
options are available.
Shows the current air speed
and selects the air speed.
Shows the activation of timer
and scheduler.
Turns the product on or off.
EN
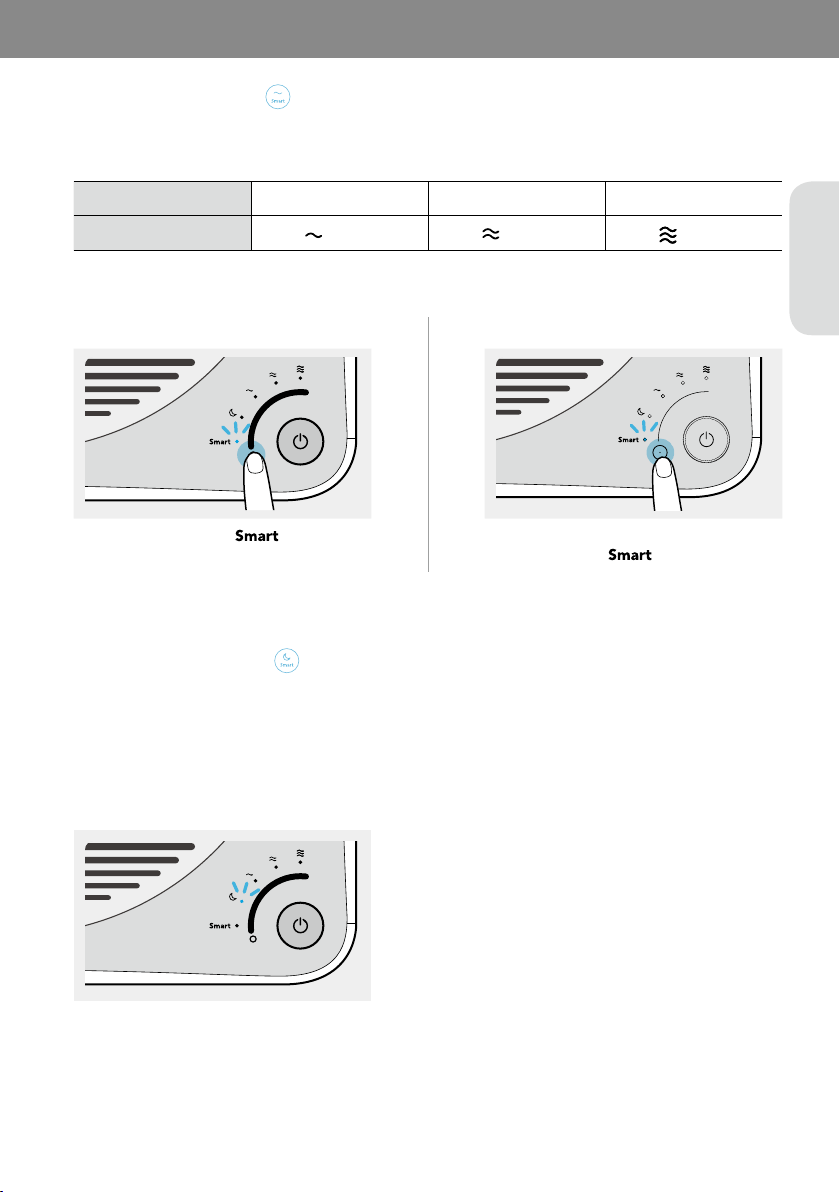
If the product is set to Smart mode, it automatically adjusts the air speed according to the current air quality around
the product. The air speed is adjusted as shown in the table below:
04 OPERATION
Good Moderate/unhealthy Very unhealthy
Level 1 (
) Level 2 (
)
Level 3 (
)
400S/400 300S/300
If the product is set to Smart mode, Sleep mode is activated automatically so that it can reduce noise and power. It
operates when the room is dark and the air quality is Good(Level 1) for 3 minutes.
If the light sensor detects the light for 5 minutes or longer and/or if the air quality level in the room is Moderate or
worse the Smart mode will not activate automatically.
400S/400
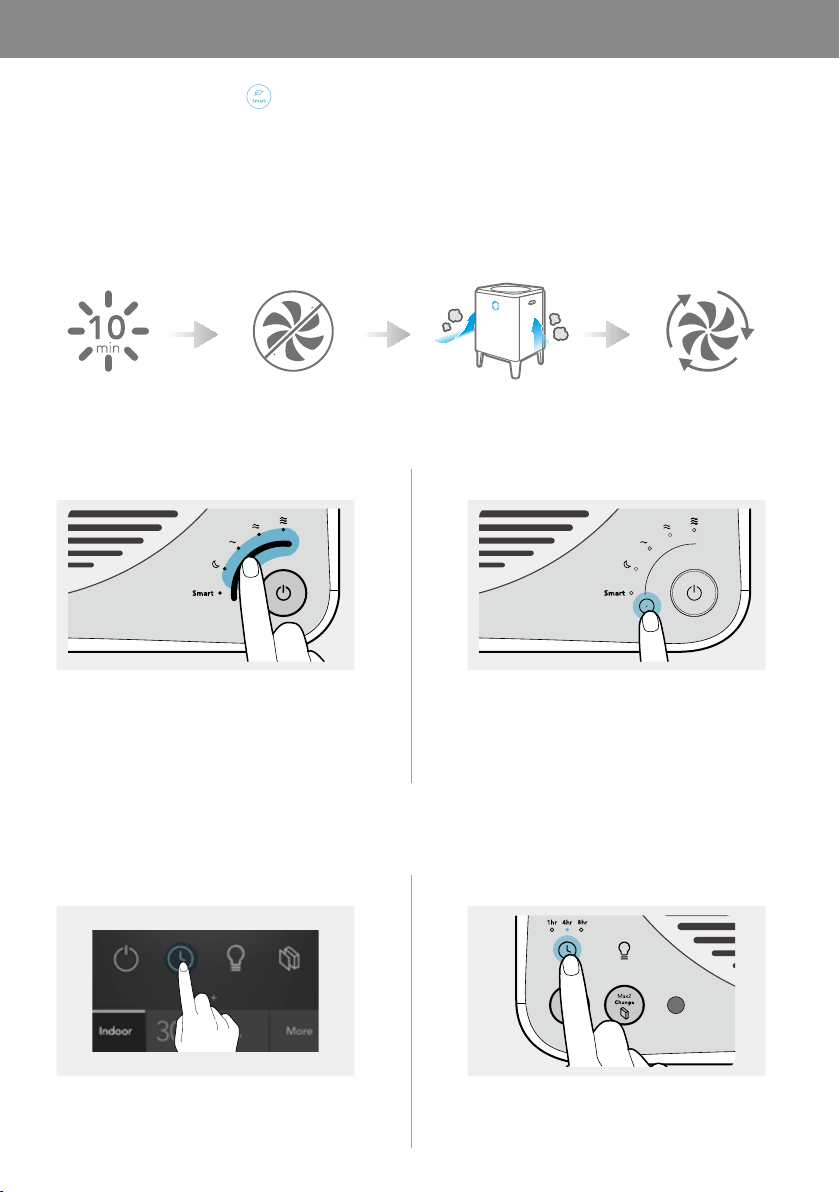
If the pollution level remains Good for more than 10 minutes when the product is set to Smart mode, the fan stops
automatically to conserve energy. If the product detects air pollution, the fan will automatically restart.
If the pollution level remains Good for more than 10 minutes in the smart mode, the fan stops automatically to save
energy. If the product detects air pollution, the fan will automatically restart. Also if the ECO mode maintains for 30
minutes, the fan will restart as well. If the pollution level remains Good for more than 10 minutes after restarting, the
ECO mode will be activated again.
Fresh Air Enter Eco Mode Detecting Air Pollution
You can adjust the air speed and select Sleep mode manually.
400S/400 300S/300
You can set the product to automatically turn off after an hour, 4 hours, or 8 hours. Use this feature to save energy
when you leave home or go to bed.
400S/300S 400/300
Exit Eco Mode
EN
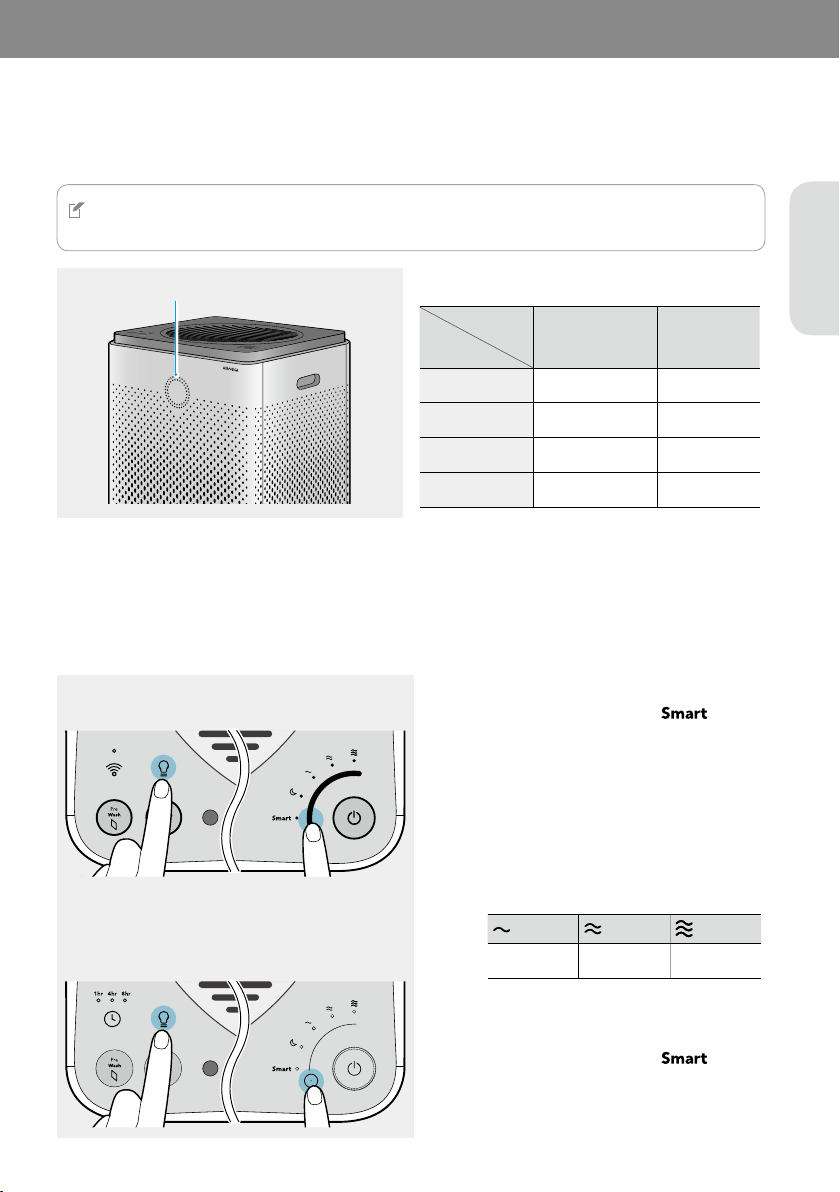
You can easily check the current air quality around the product using the air quality indicator on the front of the
product.
NOTE
For 400S/300S users, you can also check the current air quality in the smart phone application.
The color of the air quality indicator changes as follows:
Blue and green Blue
Green and yellow Purple
Yellow and pink Pink
Pink and red Red
You can adjust the pollution sensor's sensitivity.
400S/400
300S/300
1
2
400S/400: Touch one of the air speeds to
select the desired air sensitivity.
300S/300: Touch the [Air speed/mode] button
repeatedly until the desired air sensitivity is
selected.
Sensitive Normal
Less sensitive
3
You will hear a sound when the setting is
saved.
Clean the pre-filters and each part of the main unit and replace the Max2 filters regularly for optimum performance.
The following tables show the recommended maintenance cycle for filters and cleaning cycle for each part.
05 MAINTENANCE
Pre-filters* Cleaning the filters whenever the filter indicator is on**
Max2 filters* Replacing the filters whenever the filter indicator is on***
* After cleaning or replacing the filters, make sure to reset the filter indicator on the control panel. (P. 25 P. 24)
** 400S/300S: Approximately 2 weeks (based on daily 8 hours usage at max speed)
Filter cleaning cycle can be adjustable in the smart phone application .
400/300: Approximately 2 weeks (based on daily 8 hours usage at max speed)
*** Approximately 12 months (based on daily 8 hours usage at max speed)
The filter lifetime may differ depending on the real running time of product and the fan speed. The figures above are
evaluated on a general basis.
Front, left, and right cover
Every 2 months (recommended)Air outlet
Pollution sensor
CAUTION
• Be sure to turn off the power and disconnect the power plug before cleaning each part or replacing the Max2 filters.
• Do not use detergents that contain solvents, thinners, bleach, chlorine, or abrasives.
• Do not immerse the product in water or spray the product with water.
• If you use water to clean the pre-filter, dry the pre-filter in the shade before re-installing it.
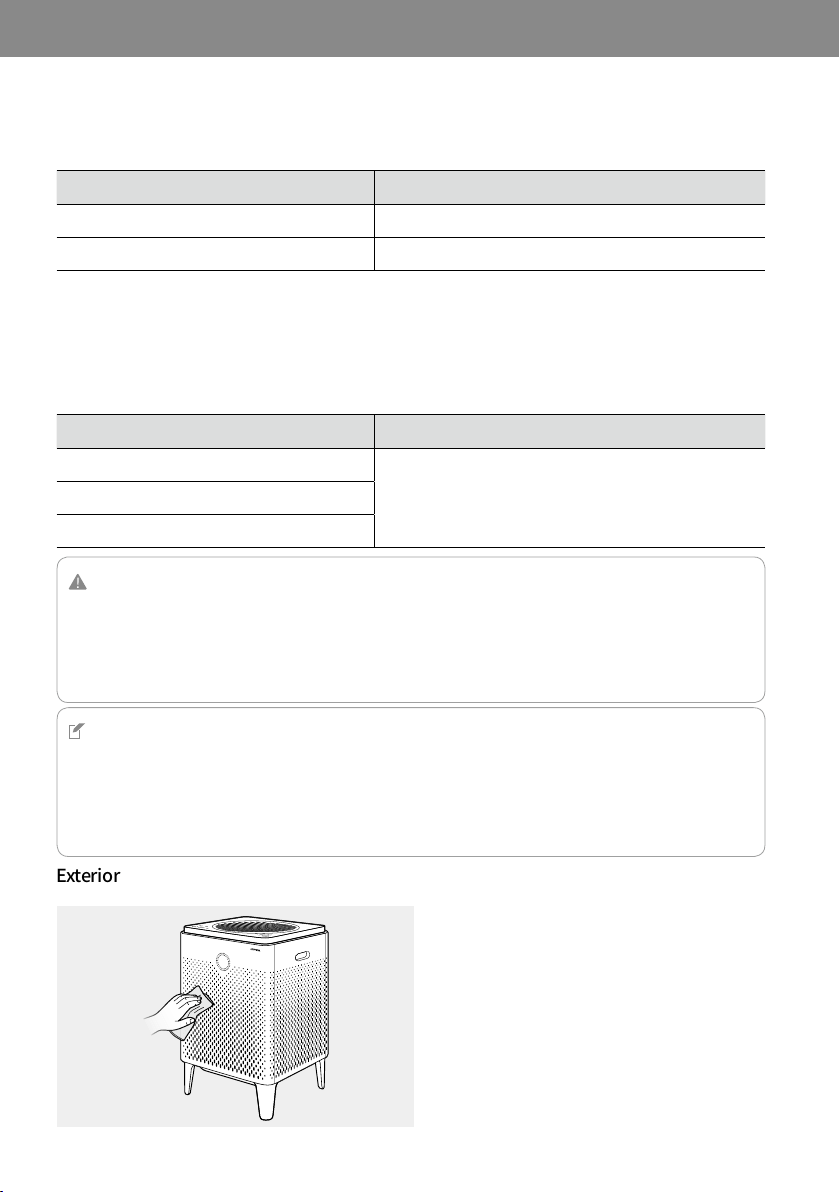
When the exterior is dirty, use a slightly damp
cloth.
NOTE
• If you are using the product in a polluted environment, clean each part or replace the Max2 filters more frequently
than the recommended cycle.
• Using a Airmega genuine filter is recommended for optimum performance.
• The Max2 filters are not reusable. Do not try to clean them with water. Always replace them with a new one.
• When disposing of the old Max2 filters, follow your local regulations.
EN
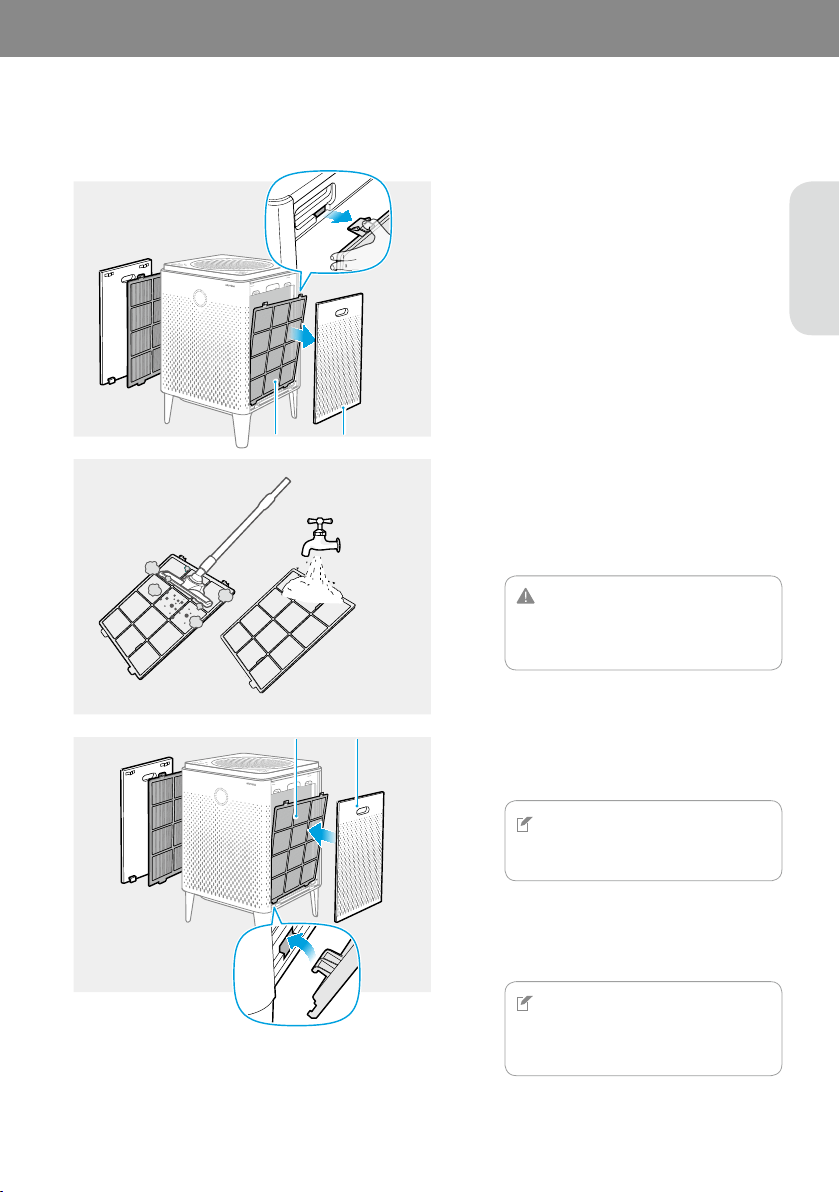
When the [Pre Wash] indicator is on, clean your pre-filters on both sides. Follow these instructions below to clean the
filters.
1
Press two tabs at the top of the pre-filters
and pull them outward to remove them from
the product.
2
If vacuuming does not seem to sufficiently
clean the pre-filters, gently wash them under
the water.
CAUTION
If you use water to clean the pre-filter, dry
the pre-filter in the shade before
re-installing it.
3
NOTE
The product will not turn on if the right
and left covers are installed incorrectly.
4
NOTE
After cleaning the pre-filters, you must
reset the filter’s cleaning cycle using the
[Pre Wash] button.
Pre-filter Cover
Pre-filter Cover
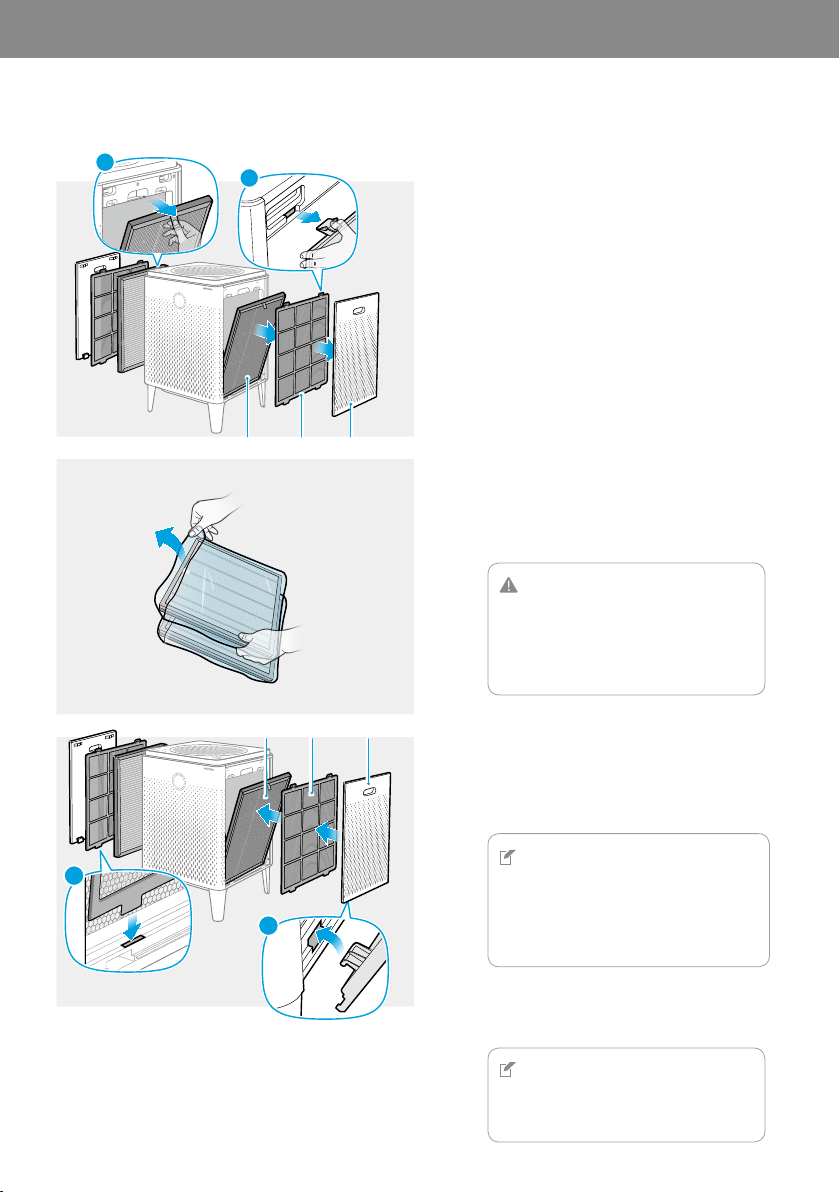
When the [Max2 Change] indicator is on, replace your Max2 filters on both sides. Follow these instructions below to
replace the filters.
1
Covers ▶ Pre-filters ▶ Max2 filters
2
Discard the old Max2 filters. These are not
reusable.
CAUTION
•
When removing the plastic wrapping from
the filters, be careful not to damage the
surface of filters.
•
Do not allow children to play with the
plastic wrapping.
3
Max2 filters ▶ Pre-filters ▶ Covers
NOTE
•
Place the Max2 filters into the filter case with
the green side facing the product. Reversed
placement may affect the filter lifetime.
•
The product will not turn on if the right and
left covers are installed incorrectly.
4
NOTE
After replacing the Max2 filters, you must
reset the filter’s replacement cycle using
the [Max2 Change] button.
1
2
Max2 filter Pre-filter Cover
FRONT/전면/前
FRONT/전면/前
1
2
Max2 filter Pre-filter Cover
EN
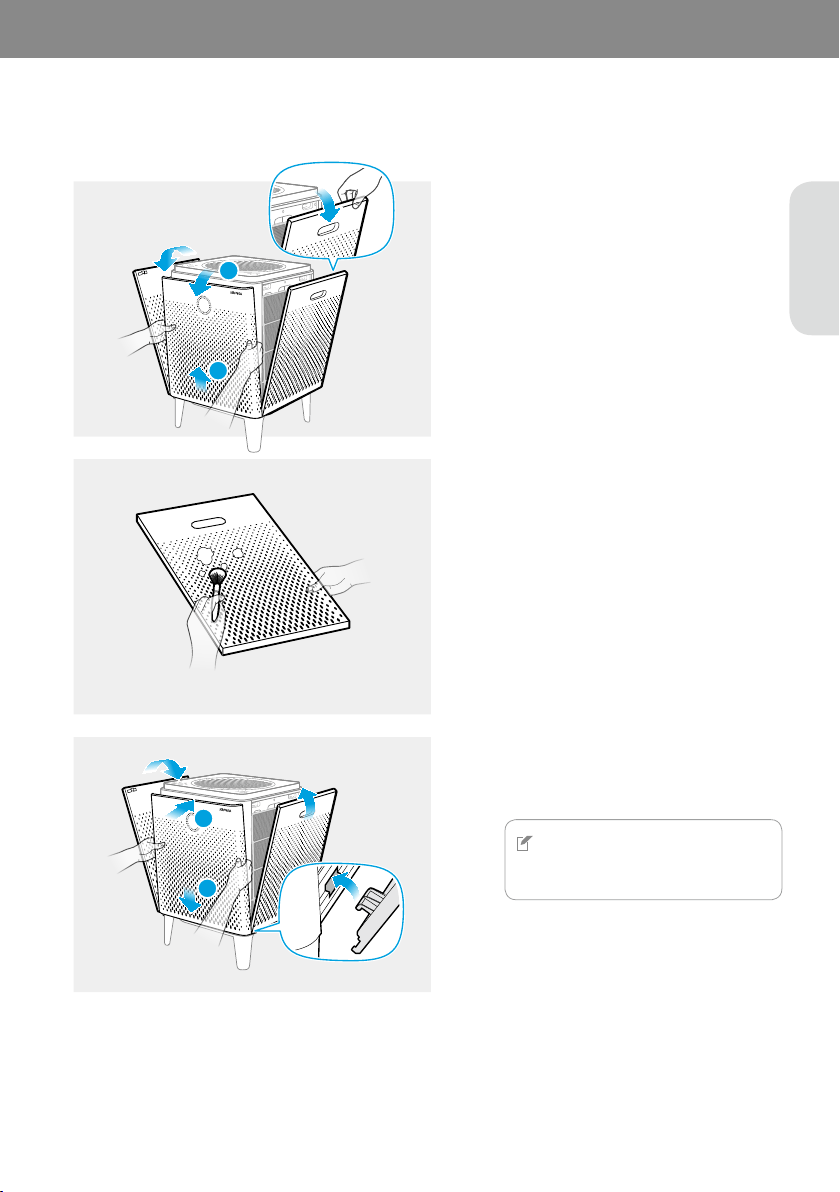
Clean the front, right, and left covers frequently for optimum performance. Follow these instructions below to clean
the covers.
1
Lift and pull the upper part of front cover to
remove it.
Pull the upper part of the right and left
covers to remove them.
2
2
1
3
NOTE
The product will not turn on if the right
and left covers are installed incorrectly.
1
2
Clean the air outlet frequently for optimum performance. Follow these instructions below to clean it.
1
2
1
ONE CENT
2
CAUTION
Be careful not to allow any foreign objects
and liquid to enter into the air purifier.
1
3
2
3
CAUTION
•
Do not place anything on top of the
product.
•
Be careful not to drop anything into the air
outlet cover.
EN
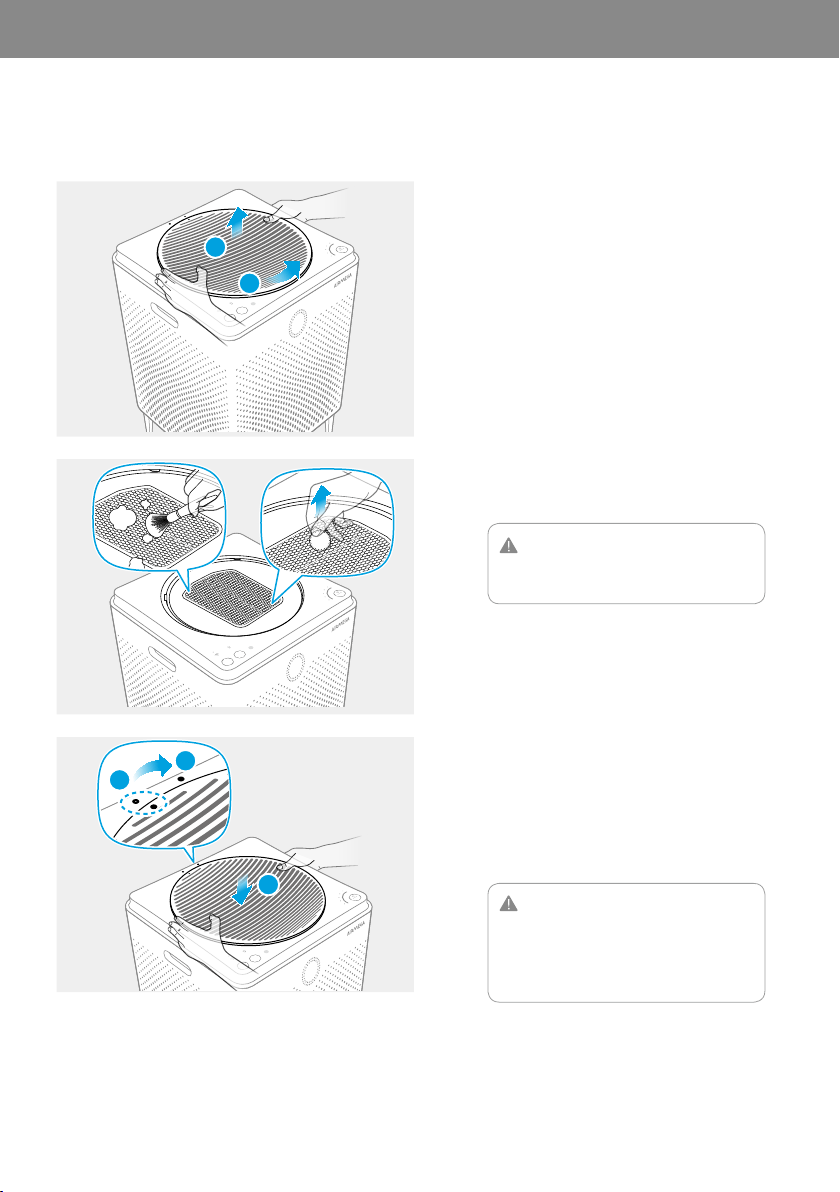
Clean the pollution sensor approximately every 2 months for optimum performance. Follow these instructions
below to clean it.
1
2
1
2
Lens
Dust inlet
Dust outlet
3
CAUTION
Do not use water. If you use it accidently,
make sure to remove any moisture
completely.
4
5
Before contacting the customer service center, please attempt the following solutions. All other servicing should be
done by a Airmega authorized service center.
Check Is the power plug connected?
Solution Connect the power plug to an AC power outlet (120 V~ 60 Hz).
Check Are all the indicators turned off?
Solution Touch the [Power] button to turn on the product.
Check Has power failure occurred?
Solution Wait until the power is restored, and then try to use the product.
Check Have the filter cleaning and replacement cycle passed?
Solution
Confirm the filter cleaning and replacement cycle, and then clean or replace the filter if
necessary. (P. 24)
Check Is the pollution sensor’s lens polluted?
Solution Clean the pollution sensor. (P. 29)
Check1
Does the pollution level remain ‘Very unhealthy’ after operating the air purifier for more than
two hours?
Check2
Does the pollution level remain ‘Good’ more than an hour when operating the air purifier in a
polluted environment?
Solution Adjust the pollution sensor’s sensitivity. (P. 23)
Check Have the filter cleaning and replacement cycle passed?
Solution
Confirm the filter cleaning and replacement cycle, and then clean or replace the filter if
necessary. (P. 24)
* Regarding Airmega app troubleshooting, please visit www.airmega.com for more information.
06 APPENDIX
EN
The specification is subject to minor changes to improve the product performance.
Item Specification
ModelName
400S (AP-2015E) 400 (AP-2015F) 300S (AP-1515G) 300 (AP-1515H)
Coverage
1,560 ft
2
(145 m
2
)*
780 ft
2
(72 m
2
)**
1,256 ft
2
(117 m
2
)*
628 ft
2
(58 m
2
)**
Filter
Washable Pre‐Filter + Max2 filter set (Activated Carbon + Green True HEPA)
RatedVoltage
120 V~ 60 Hz
Power
66 W 57 W
Weight
24.7 lb (11.2 kg) 21.4 lb (9.7 kg)
Size(HWD)
22.8 x 14.8 x 14.8 inch (58.0 x 37.6 x 37.6 cm) 20.1 x 13.6 x 13.6 inch (53.2 x 34.5 x 34.5 cm)
The coverage area of the air purifier is based on an area where the air cleaner can make two air changes per hour
(ACPH). An air change per hour translates to how many times an air purifier can clean an area, assuming the height
of a ceiling to be 8 ft, in one hour. Therefore * means two air changes per hour means that the cleaner can clean the
area once every 30 minutes. And ** means air changes per hour means that the air purifier can clean the area once
every 15 minutes.
This equipment complies with FCC radiation exposure limits set forth for an uncontrolled environment. This
equipment should be installed and operated with minimum distance 20 cm between the radiator & your body.
Any changes or modifications not expressly approved by the manufacturer could void the user’s authority to operate
this equipment.
This equipment complies with IC RSS-102 radiation exposure limits set forth for an uncontrolled environment. This
equipment should be installed and operated with minimum distance 20 cm between the radiator & your body.
Any changes or modifications not expressly approved by the manufacturer could void the user’s authority to operate
this equipment.
This device complies with Industry Canada licence-exempt RSS standard(s). Operation is subject to the following
two conditions: (1) this device may not cause harmful interference and (2) this device must accept any interference
received, including interference that may cause undesired operation.
This Class B digital apparatus complies with Canadian ICES-003.

5-YearManufacturer’sLimitedWarranty
Subject to the terms and conditions of this limited
warranty, (“Coway”) warrants that the motor and
electronic parts of the product will be free from
manufacturing defects for a period of 5 years from the date
of its original retail purchase.
HowLongIsTheCoverage?
This warranty is for a period of 5 years from the date of its
original retail purchase. This warranty is not transferable
and coverage terminates if you sell or otherwise transfer
the product.
WhatWillManufacturerDo?
If the motor or electronic parts of the product prove to
have a manufacturing defect within the warranty period,
when used as directed, Coway will, at its sole discretion,
either: repair the defective motor or electronic part; or
replace the defective motor or electronic part, at no
charge. The repaired or replaced motor or part will be
covered by the remaining period of the original warranty.
WhatDoesThisWarrantyNotCover?
This limited warranty excludes any and all replacement
filter parts and any problem/damage arising from (a)
abuse, misuse, neglect or accident; (b) alteration of the
product or any component thereof; (c) shipping; (d)
improper installation, operation or maintenance; (e) use
of any parts from another manufacturer; or (f) problems or
damages due to natural disasters, force majeure events or
an act of God event.
WarrantyVoid
The warranty is void if the serial number or date of
purchase is illegible or the warranty claim is not timely
made.
EXCEPTASEXPRESSLYPROVIDEDHEREIN,THEREARE
NOOTHERWARRANTIES,EXPRESSEDORIMPLIED,
INCLUDINGBUTNOTLIMITEDTOWARRANTIESOF
MERCHANTABILITYORFITNESSFORAPARTICULAR
PURPOSE.
Totheextentpermissiblebyapplicablelaw,Coway
shallnotbeliableunderanylegaltheoryforindirect,
incidental,special,consequentialorothersimilar
damagesthatmayariseincludinglostprofits,damage
topersonorproperty,lossofuseorinconvenience.
Yoursoleremedyshallbelimitedtotherepairor
replacementoftheproduct,atCoway’sdiscretion.
HowDoYouMakeaClaim?
In order to be eligible for service under this warranty,
within 45 days of discovering a manufacturing defect
that falls within the warranty period, please call 1-800-
285-0982, between [7:00 AM and 7:00 PM PST], Monday
through Friday, to speak with an authorized representative
of Coway. A claim file will be opened, and you will be
instructed where to send proof of purchase and the
defective product. Returns must be shipped by verifiable
tracking number (FedEx, UPS or USPS Priority) to the
location specified by the authorized representative of
Coway. Within 45 days of receipt of the proof of purchase
and the defective product, Coway will send you the
repaired product or a replacement product, or notify you
that the warranty claim is denied and send the original
product to you. RETURNS RECEIVED 30 DAYS OR MORE
AFTER THE CLAIM FILE HAS BEEN OPENED MAY BE
REFUSED AND RETURNED AT YOUR EXPENSE.
AdditionalTermsandConditions
You must return the defective product in its original
carton with the original packing materials, including all
accessories. You are responsible for all shipping, handling
and processing costs on the defective product.
YourRightsUnderStateLaw
This warranty gives you specific legal rights, and you may
also have other rights which vary from state to state.
Contactus
Coway welcomes feedback from our customers.
If you have a question, concern or comment,
please call our Customer Relations Department toll-
free at 1-800-285-0982
info@airmega.com.

EN


MEMO
EN
4221, Wilshire Blvd. #210,
Los Angeles, CA 90010
1- 800-285-0982
Made in Korea
www.airmega.com
1216776
001