
*9001409046*
9*&$
Ú ,QVWDOODWLRQLQVWUXFWLRQV
ÿ 㶛櫯沼䠠
PLQ
PLQ
PLQ
PLQ
PLQ
PLQ
[
¡
PLQ
ê
²

:
XS
GRZQ
)5'
&RGH
XS
GRZQ
:
Z
Z
:
Z Z / )5'&RGH 0 4Q
-= XS N:
-= GRZQ N:
$
1*
PEDU
/3*
PEDU
PP
PP
/
,
/
/
/
,
/
,
Z
Z

en
Ú
,QVWDOODWLRQLQVWUXFWLRQV
,PSRUWDQWQRWHV
5HDGWKHVHLQVWUXFWLRQVFDUHIXOO\DQGNHHSWKHPLQDVDIHSODFH
6DIHW\GXULQJXVHFDQRQO\EHHQVXUHGLIWKHDSSOLDQFHLVILWWHG
FRUUHFWO\DFFRUGLQJWRWKHVHLQVWDOODWLRQLQVWUXFWLRQV7KHLQVWDOOHU
LV UHVSRQVLEOH IRU HQVXULQJ WKDW WKH DSSOLDQFH RSHUDWHV SHUIHFWO\ DW
WKHSRLQWRILQVWDOODWLRQ
: 5LVNRILQMXU\
3DUWVWKDWDUHDFFHVVLEOHGXULQJLQVWDOODWLRQPD\KDYHVKDUS
HGJHV:HDUSURWHFWLYHJORYHV
7KHDSSOLDQFHPXVWEHFRQQHFWHGWRWKHPDLQVRQO\E\DOLFHQVHG
DQGWUDLQHGWHFKQLFLDQ
%HIRUH FDUU\LQJ RXW DQ\ W\SH RI ZRUN WXUQ RII WKH HOHFWULFLW\ DQG JDV
VXSSO\
)RULQVWDOODWLRQFXUUHQWO\DSSOLFDEOHEXLOGLQJUHJXODWLRQVDQGWKH
UHJXODWLRQV RI ORFDO HOHFWULFLW\ DQG JDV VXSSOLHUV PXVW EH REVHUYHG
)RUFRQYHUVLRQWRDQRWKHUW\SHRIJDVSOHDVHFDOOWKHDIWHUVDOHV
VHUYLFH
: 5LVNRIJDVHVFDSH
$IWHU FRQQHFWLQJ WKH DSSOLDQFH WR WKH JDV VXSSO\ DOZD\V FKHFN WKH
FRQQHFWLRQIRUOHDNWLJKWQHVV7KHPDQXIDFWXUHUDFFHSWVQR
UHVSRQVLELOLW\IRUWKHHVFDSHRIJDVIURPDJDVFRQQHFWLRQZKLFK
KDVEHHQSUHYLRXVO\WDPSHUHGZLWK
(QVXUHVXIILFLHQWDLUH[FKDQJHLQWKHURRPZKHUHWKH
DSSOLDQFHLVLQVWDOOHG8SWR N:WRWDORXWSXW
■ 0LQLPXP YROXPH RI WKH URRP ZKHUH DSSOLDQFH LV LQVWDOOHG Pó
■ $ GRRU OHDGLQJ WR WKH RSHQ DLU RU D ZLQGRZ ZKLFK FDQ EH RSHQHG
8SWRN:WRWDORXWSXW
■ 0LQLPXPYROXPHRIWKHURRPZKHUHDSSOLDQFHLVLQVWDOOHG Pó
SHUN:WRWDORXWSXW
■ $ GRRU OHDGLQJ WR WKH RSHQ DLU RU D ZLQGRZ ZKLFK FDQ EH RSHQHG
■ $QH[WUDFWLRQKRRGLQWRWKHRSHQDLU0LQLPXPGLVSODFHPHQW
YROXPHRIH[WUDFWLRQKRRGPóKSHUN:WRWDORXWSXW
&DXWLRQ
7KLV DSSOLDQFH LV QRW FRQQHFWHG WR D IOXH ,W PXVW EH FRQQHFWHG DQG
SXW LQWR RSHUDWLRQ LQ DFFRUGDQFH ZLWK WKH LQVWDOODWLRQ FRQGLWLRQV 'R
QRWFRQQHFWWKHDSSOLDQFHWRDIOXHJDVRXWOHW$OOYHQWLODWLRQ
UHJXODWLRQVPXVWEHREVHUYHG
7KH LQVWDOODWLRQ V\VWHP PXVW LQFRUSRUDWH DQ DOOSLQ LVRODWLQJ VZLWFK
ZLWK D FRQWDFW RSHQLQJ RI DW OHDVW PP RU WKH DSSOLDQFH VKRXOG EH
FRQQHFWHGWRWKHPDLQVYLDDVDIHW\SOXJ7KHSOXJPXVWUHPDLQ
DFFHVVLEOHDIWHULQVWDOODWLRQLVFRPSOHWH
6SHFLILFDWLRQV RQ WKH UDWLQJ SODWH VKRZLQJ YROWDJH W\SH RI JDV DQG
JDVSUHVVXUHPXVWDJUHHZLWKWKHORFDOPDLQVFRQQHFWLRQ
FRQGLWLRQV
'RQRWNLQNRUWUDSWKHPDLQVFRQQHFWLRQFDEOH
7KLV DSSOLDQFH FRUUHVSRQGV WR DSSOLDQFH FODVV IRU LQVWDOODWLRQ LQ
DNLWFKHQXQLW,WPXVWEHILWWHGDFFRUGLQJWRWKHLQVWDOODWLRQ
GUDZLQJ7KHZDOOEHKLQGWKHDSSOLDQFHPXVWEHPDGHRIQRQ
IODPPDEOHPDWHULDO
7KLVDSSOLDQFHLVQRWLQWHQGHGIRURSHUDWLRQZLWKDQH[WHUQDOWLPHU
RUDQH[WHUQDOUHPRWHFRQWURO
'RQRWLQVWDOOWKLVDSSOLDQFHRQERDWVRULQYHKLFOHV
,QVWDOODWLRQDFFHVVRULHV
2QO\XVHWKHDFFHVVRULHVDVVSHFLILHG7KHPDQXIDFWXUHUDFFHSWV
QROLDELOLW\LIWKHVHDFFHVVRULHVDUHXVHGLQFRUUHFWO\
3UHSDULQJWKHXQLWV)LJ
7KHNLWFKHQXQLWPXVWEHKHDWUHVLVWDQWWRDWOHDVW&DERXW
)7KHVWDELOLW\RIWKHXQLWPXVWEHPDLQWDLQHGDIWHU
SURGXFLQJWKHFXWRXW
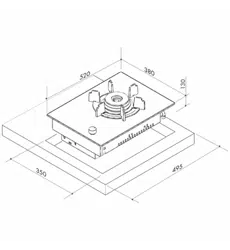
3URGXFHWKHFXWRXWLQWKHZRUNWRSIRURQHRUPRUH9DULR
DSSOLDQFHV DV VKRZQ LQ WKH LQVWDOODWLRQ VNHWFK 7KH DQJOH EHWZHHQ
WKHFXWVXUIDFHDQGWKHZRUNWRSPXVWEH
7KHFXWHGJHVDWWKHVLGHVPXVWEHPRUHWKDQ PPWKLFNDQG
HYHQ WR HQVXUH D JRRG ILW RI WKH UHWDLQLQJ VSULQJV RQ WKH DSSOLDQFH
,Q ODPLQDWHG ZRUNWRSV LW PD\ EH QHFHVVDU\ WR ILW VWULSV DW WKH VLGHV
RIWKHFXWRXW
5HPRYH VKDYLQJV DIWHU FXWWLQJ 6HDO FXW VXUIDFHV IRU UHVLVWDQFH WR
KHDWDQGVRWKH\DUHZDWHUWLJKW
3D\DWWHQWLRQWRDPLQLPXPJDSRIPPIURPWKHXQGHUVLGHRI
WKHDSSOLDQFHWRNLWFKHQXQLWV
8VHVXLWDEOHEDVHFRQVWUXFWLRQVWRHQVXUHORDGFDUU\LQJFDSDFLW\
DQG VWDELOLW\ HVSHFLDOO\ LQ WKH FDVH RI WKLQ ZRUNWRSV 3D\ DWWHQWLRQ
WRWKHZHLJKWRIWKHDSSOLDQFHLQFOXGLQJDQ\SD\ORDG
5HLQIRUFHPHQWPDWHULDOXVHGPXVWEHUHVLVWDQWWRKHDWDQG
PRLVWXUH
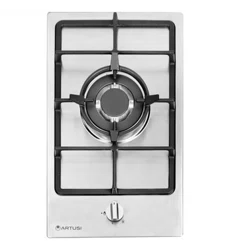
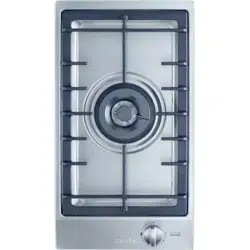
:KHQILWWLQJVHYHUDO9DULRDSSOLDQFHV DOORZIRUWKHDGGLWLRQDO
VSDFHUHTXLUHGIRUWKHFRQQHFWLQJVWULS99 $SSOLDQFHVFDQ
DOVREHILWWHGLQLQGLYLGXDOUHFHVVHVLIDPLQLPXPFOHDUDQFHRI
PPEHWZHHQWKHDSSOLDQFHVLVREVHUYHG
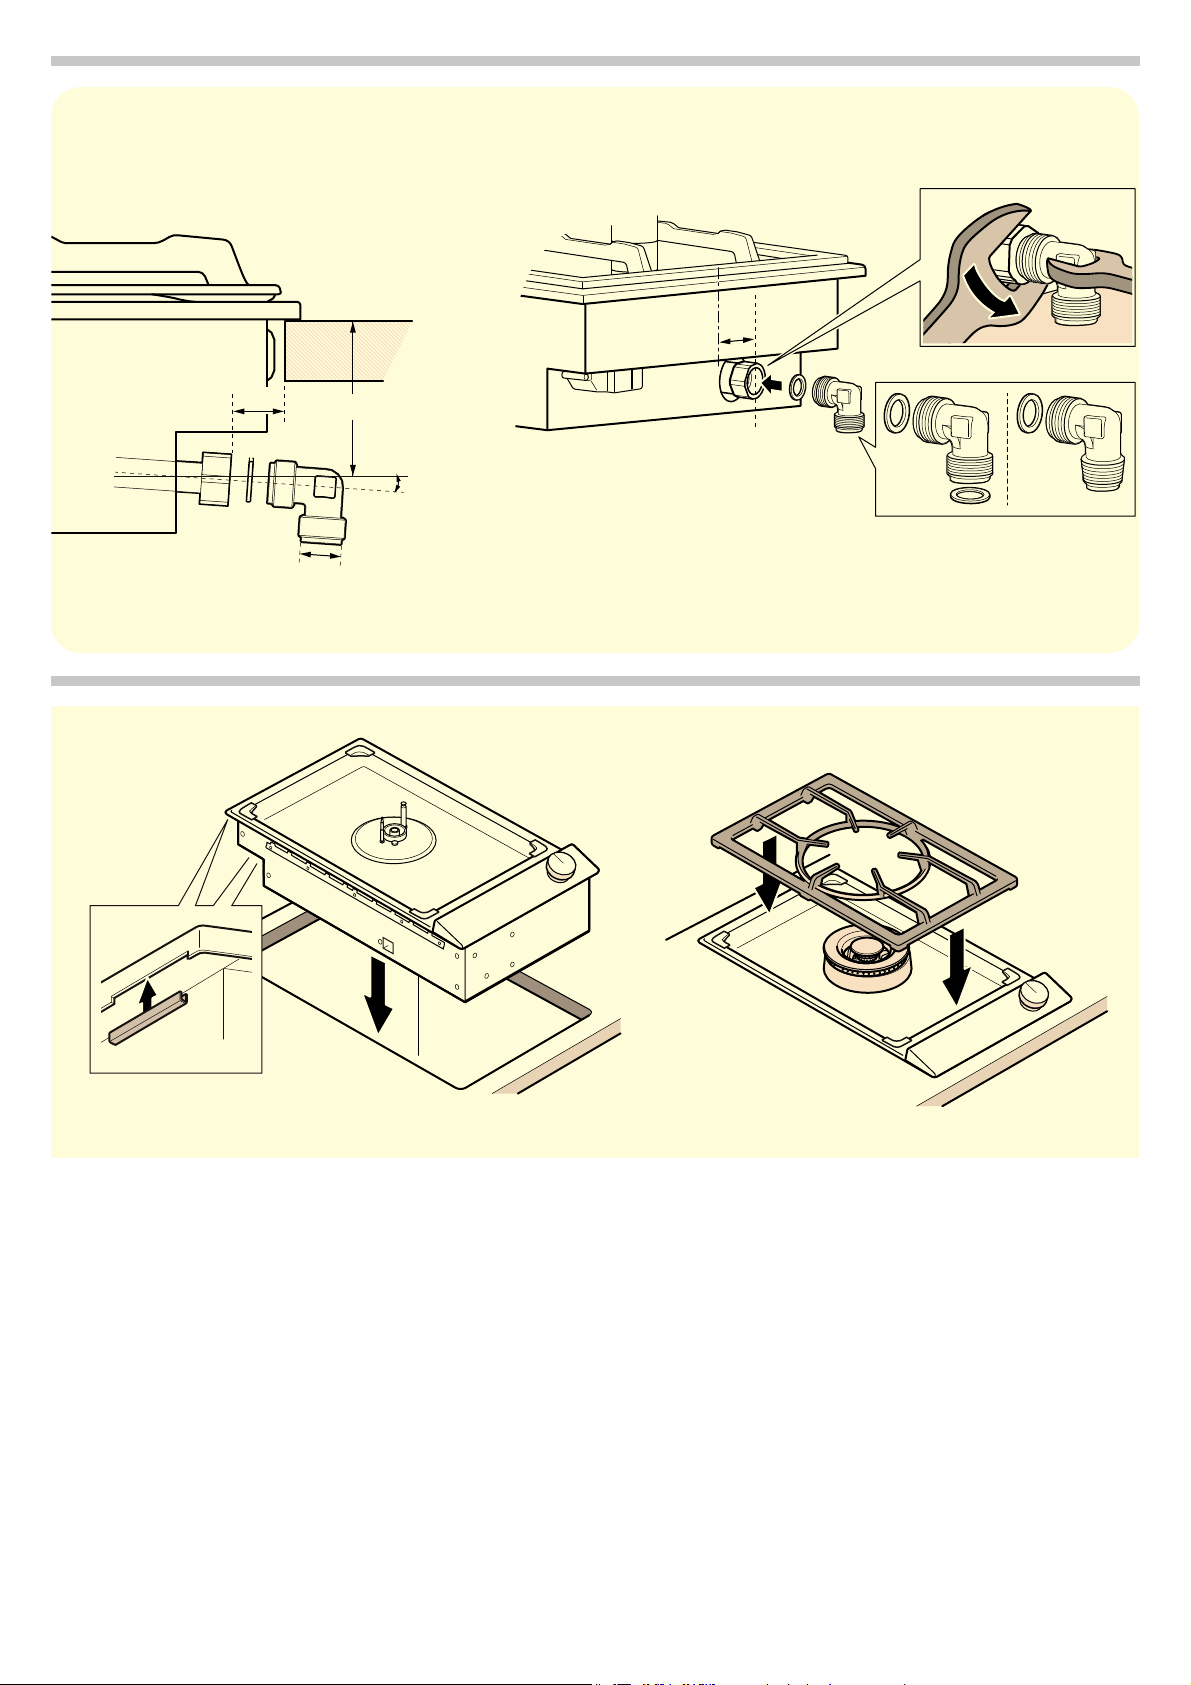
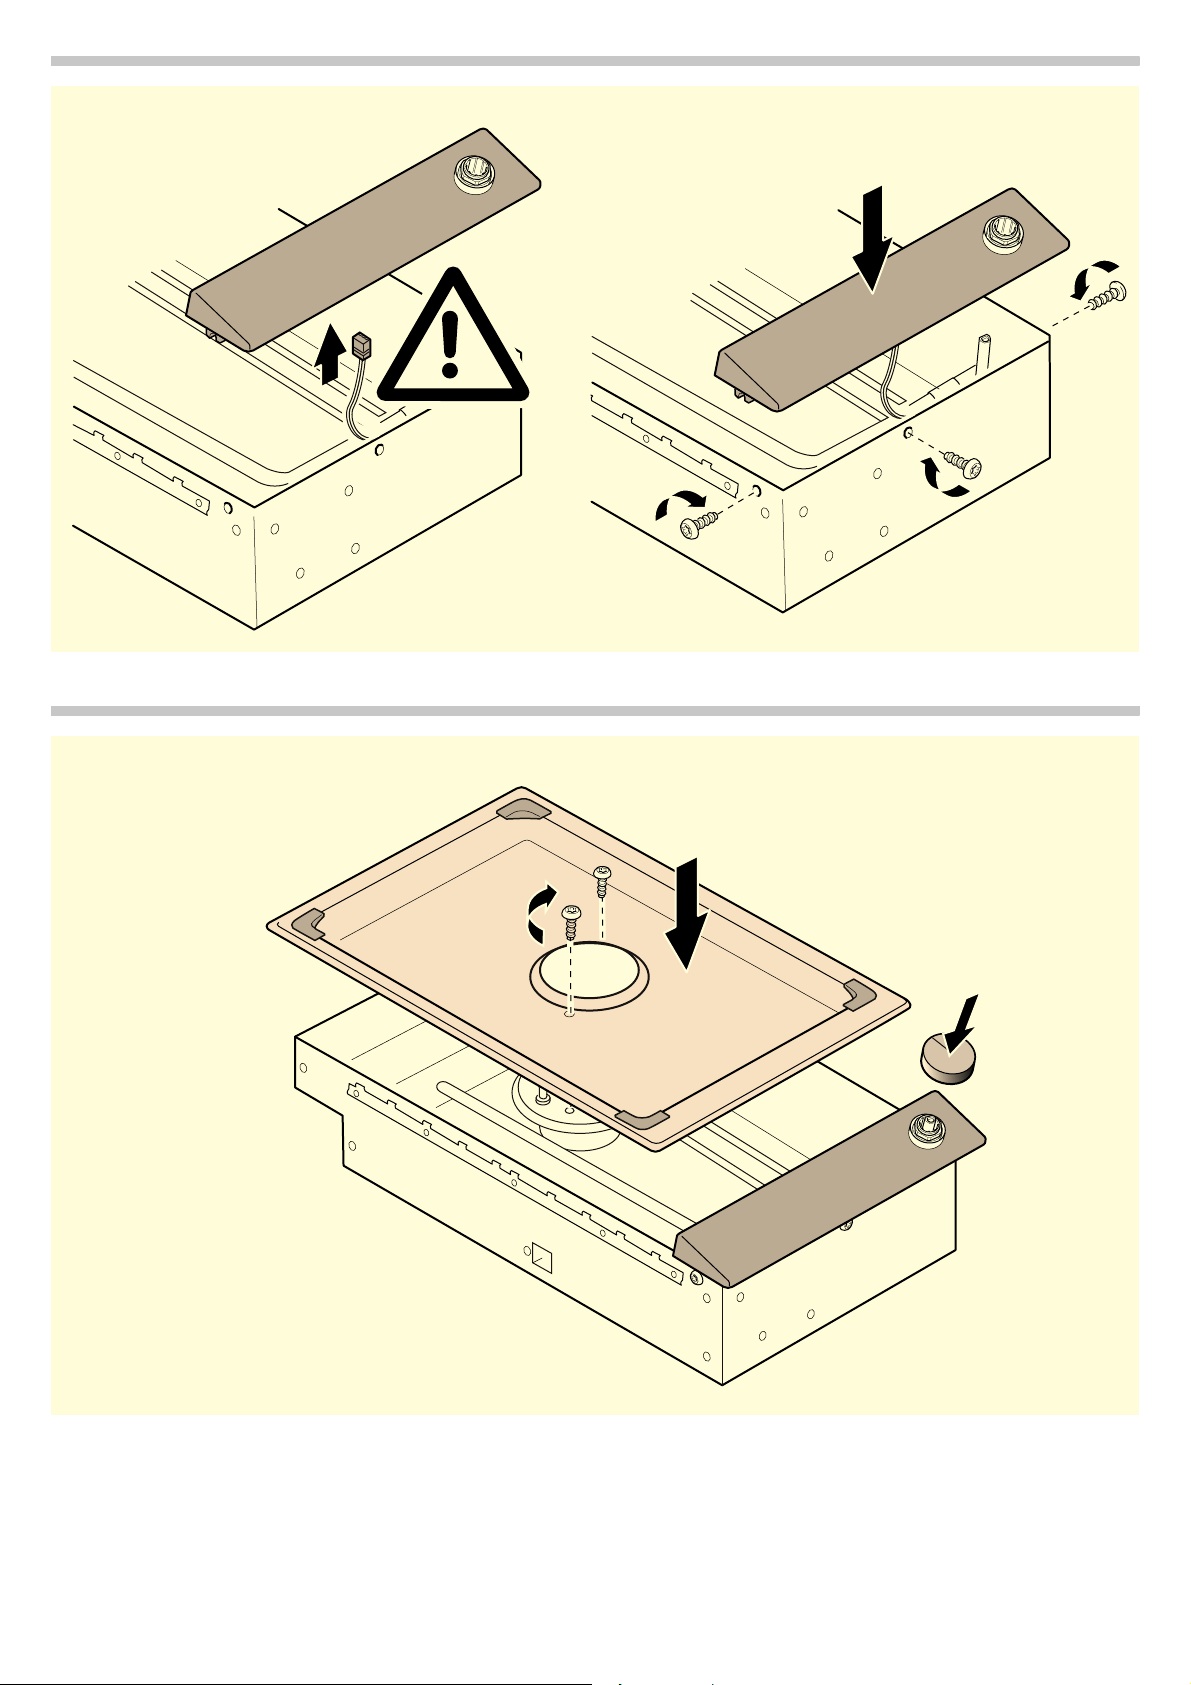
)LWWLQJWKHDSSOLDQFH
6HFXUH WKH DSSOLDQFH FRYHU 9' VSHFLDO DFFHVVRU\ WR EH
RUGHUHGVHSDUDWHO\RQWKHDSSOLDQFHEHIRUHLQVWDOODWLRQ
,IWKHDSSOLDQFHLVQRWEHLQJFRYHUHGVHDOWKHRSHQLQJVRQWKH
EDFNRIWKHDSSOLDQFHXVLQJWKHFRYHUFDSVVXSSOLHG
,QVHUWWKHDSSOLDQFHHYHQO\LQWRWKHFXWRXW3XVKLWGRZQILUPO\
LQWRWKHFXWRXW
1RWH 7KH DSSOLDQFH PXVW VLW IDVW LQ WKH FXWRXW DQG PXVW QRW EH
DEOH WR PRYH DURXQG HJ GXULQJ FOHDQLQJ ,I WKH ZLGWK RI WKH FXW
RXWLVDWWKHXSSHUWROHUDQFHOLPLWVHFXUHEDWWHQWRWKHVLGHVRI
WKHFXWRXWLIQHFHVVDU\
5HPRYLQJWKHDSSOLDQFH
'LVFRQQHFWWKHDSSOLDQFHIURPWKHSRZHUDQGWKHJDVVXSSO\
3XVKRXWWKHDSSOLDQFHIURPEHORZ
&DXWLRQ
5LVNRIGDPDJH'RQRWOHYHURXWWKHDSSOLDQFHIURPDERYH
*DVFRQQHFWLRQ
7KH JDV FRQQHFWLRQ PXVW EH DUUDQJHG VR WKDW WKH VKXWRII YDOYH LV
DFFHVVLEOH
7KHDSSOLDQFHFRPHVZLWKWZRFRQQHFWLRQHOERZVDSSOLDQFHVLGH
*ô6HOHFWWKHULJKWYHUVLRQDFFRUGLQJWRWKHFRXQWU\
■ ,62*F\OLQGULFDO
■ (1 5FRQLFDO
8VH RQH RI WKH VXSSOLHG FRQQHFWLRQ HOERZV DQG WKH FRUUHVSRQGLQJ
VHDOWRFRQQHFWWKHDSSOLDQFHWRDIL[HGSRZHUFDEOHRUDJDV
VDIHW\KRVH
,I WKH JDV VDIHW\ KRVH LV QRW PDGH RI PHWDO RU LV RQO\ SDUWLDOO\ PDGH
RIPHWDOWKHDPELHQWWHPSHUDWXUHPXVWQRWH[FHHG&,IWKH
JDVVDIHW\KRVHLVPDGHRIPHWDOWKHSHUPLVVLEOHDPELHQW
WHPSHUDWXUHLV&
7KH JDV VDIHW\ KRVH PXVW QRW FRPH LQWR FRQWDFW ZLWK PRYLQJ SDUWV
RIWKHILWWHGXQLWHJGUDZHUVRUEHODLGLQDUHDVZKHUHLWFRXOG
EHFRPHWUDSSHGRUGDPDJHG
7KH JDV VDIHW\ KRVH PXVW QRW FRPH LQWR FRQWDFW ZLWK D KRE RYHQ
GLVKZDVKHUUHIULJHUDWRUZDVKLQJPDFKLQHKRWZDWHUSLSH
UDGLDWRURUDQ\RWKHUDSSOLDQFHLQVWDOOHGQH[WWRRUEHORZWKHJDV
KRE
7KHJDVVDIHW\KRVHPXVWQRWEHVXEMHFWWRUXEELQJYLEUDWLRQV
NLQNLQJRUDQ\RWKHUNLQGRIGHIRUPDWLRQ,WVKRXOGEHFKHFNHG
DORQJLWVHQWLUHOHQJWKZLWKWKHKRELQWKHLQVWDOODWLRQSRVLWLRQ
(OHFWULFDOFRQQHFWLRQ
&KHFNWKHKRXVHKROGZLULQJEHIRUHFRQQHFWLQJWKHDSSOLDQFH
(QVXUHWKDWWKHUHLVVXIILFLHQWIXVHSURWHFWLRQIRUWKHKRXVHKROG
ZLULQJ 7KH YROWDJH DQG IUHTXHQF\ RI WKH DSSOLDQFH PXVW PDWFK WKH
HOHFWULFDOZLULQJVHHUDWLQJSODWH
7KHDSSOLDQFHFRUUHVSRQGVWRSURWHFWLRQFODVV,DQGPXVWRQO\EH
RSHUDWHGZLWKDSURWHFWLYHHDUWKFRQQHFWLRQ
7KHZLULQJPXVWKDYHDQDOOSROHLVRODWLQJVZLWFKZLWKDFRQWDFW
JDSRIDWOHDVWPPRUWKHDSSOLDQFHPXVWEHFRQQHFWHGYLDDQ
HDUWKHG SOXJ 7KLV PXVW VWLOO EH DFFHVVLEOH RQFH WKH DSSOLDQFH KDV
EHHQLQVWDOOHG
9' %ODFNDSSOLDQFHFRYHU
99 6WDLQOHVV VWHHO FRQQHFWLRQ VWULS IRU FRPELQLQJ
ZLWKRWKHU9DULRDSSOLDQFHV
99 %ODFNFRQQHFWLRQVWULSIRUFRPELQLQJZLWK
RWKHU9DULRDSSOLDQFHV

:HUHFRPPHQGLQVWDOOLQJDVRFNHWHTXLSSHGZLWKSURWHFWLYHHDUWK
FRQWDFWVEHKLQGWKHDSSOLDQFHDSSUR[LPDWHO\ FPDERYHWKH
IORRULQDFFRUGDQFHZLWKUHJXODWLRQV
2QO\DTXDOLILHGHOHFWULFLDQPD\LQVWDOODVRFNHWWDNLQJWKH
DSSURSULDWHUHJXODWLRQVLQWRDFFRXQW
7KHDSSOLDQFHPXVWRQO\EHFRQQHFWHGXVLQJWKHSRZHUFDEOH
SURYLGHG
'RQRWNLQNRUWUDSWKHFRQQHFWLRQFDEOHRUURXWHLWRYHUKRW
VXUIDFHV
7KLVLVDW\SH;DSSOLDQFH,IWKHSRZHUFDEOHRIWKLVDSSOLDQFH
EHFRPHVGDPDJHGLWPXVWEHUHSODFHGZLWKDVSHFLDOFRQQHFWLRQ
FDEOHZKLFKLVDYDLODEOHIURPWKHPDQXIDFWXUHURUWKH
PDQXIDFWXUHUVDIWHUVDOHVVHUYLFH
7HFKQLFDOGDWD
7RWDOFRQQHFWHGORDG9* &$
N:QDWXUDOJDV N:/3*
(OHFWULF :
&KDQJLQJWKHJDVW\SH
7KH DSSOLDQFH PXVW RQO\ EH FRQYHUWHG WR D GLIIHUHQW W\SH RI JDV E\
DOLFHQVHGH[SHUW
6ZLWFKRIIWKHSRZHUVXSSO\DQGVKXWRIIWKHJDVVXSSO\EHIRUH
FDUU\LQJRXWFRQYHUVLRQ
7KHJDVKREEHORQJVWRWKHFDWHJRULHVVWDWHGRQWKHUDWLQJSODWH
7KHDSSOLDQFHFDQEHFRQYHUWHGWRDQ\RWKHUW\SHRIJDVOLVWHG
WKHUHXVLQJDFRQYHUVLRQNLW
7KHJDVW\SHLVFKDQJHGE\
■ 5HSODFLQJWKHPDLQQR]]OHV
■ $GMXVWLQJWKHJDVYDOYHVE\SDVVVFUHZV
7KHWDEOHVKRZVWKHULJKWFRPELQDWLRQIRUWKHUHOHYDQWJDVW\SH
1HYHUUHPRYHWKHJDVYDOYHVKDIW,QWKHHYHQWRIGDPDJHRU
XQXVXDOJDVFRQYHUVLRQWKHHQWLUHJDVYDOYHPXVWEHUHSODFHG
&DOOWKHDIWHUVDOHVVHUYLFH
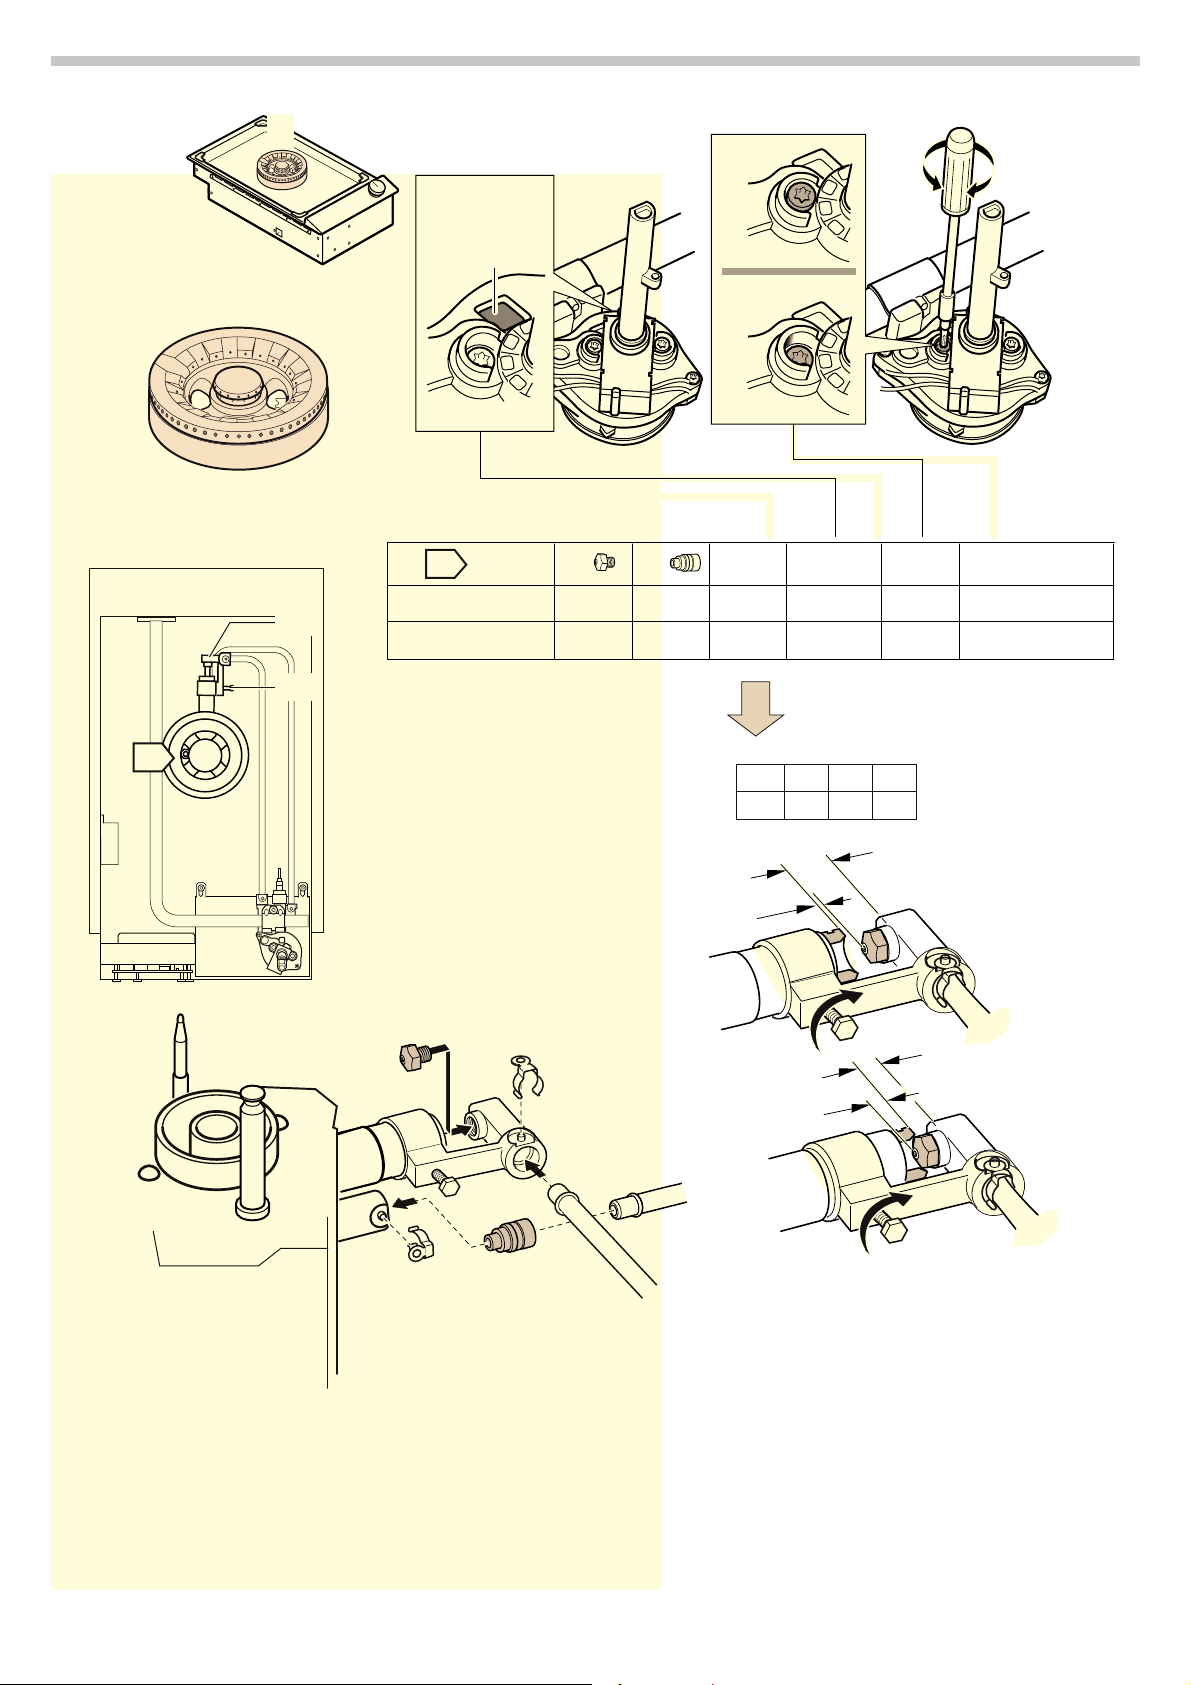
5HSODFLQJWKHPDLQQR]]OHV
5HPRYHWKHSDQVXSSRUWDQGDOOEXUQHUSDUWV
8QGRWKHFRRNWRSIDVWHQLQJVFUHZVRQWKHEXUQHUWZRVFUHZV
DQGFDUHIXOO\OLIWWKHFRRNWRSXSDQGRII
5HPRYHWKHFRQWURONQREV
/RRVHQWKHVHFXULQJVFUHZVRQWKHFRQWUROSDQHO5HPRYHWKH
FRQWURO SDQHO DQG GLVFRQQHFW WKH FRQQHFWLRQ FDEOH RQ WKH EDFN RI
WKHFRQWUROSDQHO
5HPRYHWKHVHFXULQJFOLSVIURPWKHEXUQHUSLSHV3XOORXWWKH
EXUQHUSLSHV8QVFUHZWKHVFUHZRQWKHDLUUHJXODWLQJVOHHYH
5HPRYHWKHQR]]OHUHWDLQLQJKHDG
3XOORIIWKHQR]]OHDQG2ULQJIRUWKHLQQHUEXUQHUULQJE\KDQG
8QVFUHZWKHQR]]OHIRUWKHRXWHUEXUQHUULQJ:$)
&KHFN WKDW WKH 2ULQJ LV VHDWHG FRUUHFWO\ LQ WKH QHZ PDLQ QR]]OH
IRUWKHEXUQHULQQHUULQJ)LWWKHQR]]OHRQWRWKHEXUQHUSLSH
6FUHZWKHQHZPDLQQR]]OHIRUWKHRXWHUEXUQHUULQJDVIDUDVLW
ZLOOJRLQWRWKHQR]]OHUHWDLQLQJKHDG
)LWWKHQR]]OHUHWDLQLQJKHDGDQGEXUQHUSLSHV)LWWKHVHFXULQJ
FOLSV
/RRVHQ WKH VFUHZ DQG WKHQ DGMXVW WKH DLU UHJXODWLQJ VOHHYH WR WKH
FRUUHFWVHWWLQJVHHQR]]OHWDEOH5HWLJKWHQWKHVFUHZ
$GMXVWLQJWKHJDVYDOYHV
: 5LVNRIGDPDJH
'RQRWRYHUWLJKWHQWKHE\SDVVVFUHZV
,IQHFHVVDU\DGMXVWWKHE\SDVVVFUHZV 0 XVLQJD7RU[
VFUHZGULYHUVHHWDEOH
XS7KHE\SDVVVFUHZVPXVWEHIOXVKZLWKWKHWRSHGJHRIWKH
IUDPH
GRZQ7KHE\SDVVVFUHZVPXVWEHVFUHZHGLQIXOO\
$VVHPEO\
&RQQHFWWKHFRQQHFWLRQFDEOHRQWKHEDFNRIWKHFRQWUROSDQHO
3XWWKHFRQWUROSDQHOLQSODFHDQGVFUHZLWLQHYHQO\
$WWDFKWKHFRQWURONQREV
3XWWKHFRRNWRSLQSODFHDQGWLJKWHQWKHVFUHZV
3XW WKH EXUQHU SDUWV DQG SDQ VXSSRUW LQ SODFH PDNLQJ VXUH WKH\
DUHSRVLWLRQHGFRUUHFWO\
&KHFNWKDWWKHDSSOLDQFHLVZRUNLQJDIWHUFRQYHUVLRQ
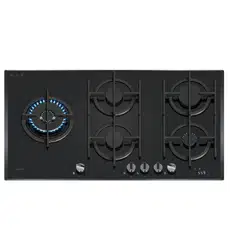
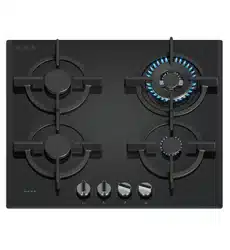
<HOORZWLSVPXVWQRWEHYLVLEOHRQWKHIODPHV:KHQWXUQLQJWKH
FRQWURONQRZTXLFNO\EHWZHHQWKHKLJKHVWDQGWKHORZHVWVHWWLQJ
WKHEXUQHUPXVWQRWJRRXWDQGIODVKEDFNPXVWQRWRFFXU
1RWH $WWDFKWKHVWLFNHUVKRZLQJWKHQHZJDVW\SHQH[WWRWKH
UDWLQJSODWHRQWKHDSSOLDQFH
zh-tw
ÿ
珟殓仺䌡ゝ稗
泣沋矉泂䠦䤐넬〾ㇵ㵰㥀㶡㎀っ桭Ꭾ㘂䤡㥀ㆵ卿㶡櫵䔟孒䵻嫒㶡櫵
礓㢀넬䑥挕嫒ㇵ㆗址䡚㶡㎀匹桶Ꭾ㶡櫵戝稠溸滄嫒ㇵ礓㢀㥀㶡櫵ㅥ
憆牣ㅴ䵻䁐Ꭾ
: 㗩㋉窺碼
㶡櫵䡚䑘䖽氐墜礎ㄎ㘇挕䤡㸮瓋犢忻Ꭾ泣䑌〢ㇵ涏䑣㭯Ꭾ
䥄礓㢀㓱䇝坉䔙䤡㨏卿墜ヒ㬃㚤㗯牦氫怌墜䒘橫ヒ㛹㆞爻䖽搋こ礓
储Ꭾ
㥀牊橤ㄓㅭ㿽ㅴっ㑥泣㍠矴瞡礓储㗢图䟇ㆳ䏡Ꭾ
㶡櫵䡚넬泣犍㶠犁址っ䄒巡䪵ㆣヽ㗢垎㥈礓㒳㗢图䟇ㆳ䏡㝞墜夐矴
殧㶲Ꭾ
擽殙涢䤌图䟇究㦣넬泣抇役㝆䆤䤥㓱ぅ䇛Ꭾ
: 囸䟁㬨伻窺碼
礓㢀爻䖽图䟇ㆳ䏡䆤넬泣䲺䧽䡇㘾䤡㬮佁っ䎆Ꭾ擽图䟇爻䖽桭㗯㑈
曜䌧婌㫶戤爸䐨图䟇㬮佁넬欕爸㝞〥溸ㄓㅭ滄ㄓᎮ
泝嫌㇯礍㡺㶛櫯囂㪕墖爬窺䪯ㄈᎨ䤒㬹恏煊㐌牦 N:넬
■ 㶡櫵礓㢀䑘礘墜囈㪛䤘㸧㷑履넺䂋䟑㎄㹒
■ 䤡爲竀㗻䐮岯䑎っ囈㪛Ꭾ
䤒㬹恏煊㐌牦 N:넬
■ 㶡櫵礓㢀䑘礘墜囈㪛䤘㸧㷑履넺䷧㕛图恕煐㐒礘䂋䟑㎄㹒Ꭾ
■ 䤡爲竀㗻䐮岯䑎っ囈㪛Ꭾ
■ 爲䆘㶼㬮墜䖪仑危䱷Ꭾ䓕仑危䱷䤘㸧䖪珧넺䷧㕛图恕煐㐒䂋䟑
㎄㹒넯㸧䡚Ꭾ
仺䌡
䵼礓㢀〥䆯爻䖽搋危牫Ꭾ䇝稠ㆵ卿㶡櫵䪵ㄎ牊橤爻䖽㆗址Ꭾ泣㔗㸟
礓㢀爻䖽搋䖪主危牫Ꭾ䇝稠犍䇂䑘䤡爲竀仭殧Ꭾ
㶡櫵弓徉䇝稠㊱䤡〘㈣㎀䮍碬磺瞣矴넬〬䖽胶瞣㗻搋㸩瞫碬㎄
珨넬䐮䡇㑁址㶡㎀䗪穅㸟䥄礓㢀爻䖽㑈こ礓储Ꭾ㶡櫵㶤䐨䆤䇝稠挕
氐㗢䵼䗪穅Ꭾ
穥㶲環呤〢墜礓㫫滟䞱Ꭽ图䟇究㦣搟图䟇㫫㒳䇝稠崾㘠垎㥈墜爻䖽
䪵ㄎᎮ
泣㔗䅦䤊䐮㕹ㅧこ礓储爻䖽忲Ꭾ
䥄礓㢀崾㘠礓㢀嵡弲넨犁㘠㶡櫵㥀䳽䳛넩Ꭾ泣䩑䛲㶡櫵㤮孒㶡
櫵Ꭾ㥀礓㢀䆤䟑墜㫙祺䇝稠勒〥㘇叛䥨漂Ꭾ
䥄礓㢀〥犁㘠搟㬮猀氠䡚㢀䐮㬮猀牱䖿䛥ㅴ䙅獥㆗址Ꭾ
泣〥殙㸟䥄礓㢀㶡櫵㥀摑磓䐮牣煐㿽㎏〢Ꭾ
㶛櫯獟ㄈ
泣㔗㆗址䔟㶲獥ㄎヽ㬮墜咁㛙Ꭾ擽爱コ獥ㄎ㆗址〥䵻嫒넬欕爸㝞㸟
〥㸥䵼溸澏ㄓㅭ滄ㄓᎮ
储㊫㬨䩘㤨
䃲䑗䳽䳛墜戨叉䂾䇝稠牬㑈&넨弜)넩Ꭾ櫙㐟ㅴ䮅㶤䐨
䆤넬䇝稠嫒ㇵ䳽䳛ュ勒㶡㎀岁㤒Ꭾ
泣ㆵ卿㶡櫵㤮䑘孒㥀㿽ㅴ䳇〢櫙㐟瞣㗻Ꭾ櫙㐟祺搟㿽ㅴ䳇祺っ瞫墜
㭖毪䇝稠勒Ꭾ
㊌犢墜㐟㗻㖲䂾䇝稠澝牦㎄珨〬䂋䞌넬ヽ嫒ㇵ挕㶡櫵搋礓㢀墜
㤒㶲䅠帿Ꭾ㮚䦴䡇磞㹼䥨䳇祺넬䇝稠㥀櫙㐟祺墜㎁㊌㒸〢犢䪵Ꭾ
櫙㐟㶤䐨䆤넬泣㸟媦㹩㗓硼Ꭾ䒢䑘䤡㐟㒊檀祺㷞㸙ヽ牬䐨戨叉搟硊
乌䝠䦴Ꭾ
䳽䳛搟礓㢀㍿㊌搋㸩殙䤡㎄珨墜岒碱Ꭾ
泣㆗址㘠犁墜㨒䂭ヽ嫒ㇵ䒗珥珧ヽ㗢岁㶲䈿넬㸼㎎䡇㶡櫵㥀果㿽ㅴ
䳇Ꭾ泣坱䌧礓㢀珥珧넬〾㒸〢〢䟑溸無墜咁㛙珥珧Ꭾ䑘㆗址墜㒸䅏
䥨䞱䇝稠䤡硊叉㚤硊円㒷挕Ꭾ
㶛櫯㬬㈝墖9DULR礍㡺넬泣勒爻䖽忲99 ㇵ坱䑘礘墜穥㬮岒
瞫Ꭾ礓㢀㘇ヽ㶡櫵㥀喀峣㐑䰕ぅ넬礓㢀瞫墜䤘㸧濵磺礘必䔙㎄
珨Ꭾ
9' 胩撊礓㢀曣
99 〥瘕甔爻䖽䪵넬㘇址䟔㚤㎎ヮ9DULR礓㢀
彜㘠
99 胩撊爻䖽䪵넬㘇址䟔㚤㎎ヮ9DULR礓㢀彜
㘠

㶛櫯礍㡺
㶡櫵㑥넬泣㍠㤒㶲〥瘕甔吨曣9' 넨䵼咑䶢獥ㄎ稠㗾橤
演滏넩Ꭾ
擽礓㢀䥂㒸曣넬泣㆗址礓㢀䗨ㆳ墜曣㵨㸙ㅧ䆤䟑瞣㗻Ꭾ
䒢礓㢀乌䂋䝖㍽瞣㵬ぅᎮ华䆤嫒㷾䗀㍽瞣㵬Ꭾ
䗢孌 礓㢀䇝稠嫒㷾㤒㶲㥀瞣㵬ぅ戤〬匹仭尓㓭넨ㆣ㮚㥀倝公
䡚넩Ꭾ㮚䦴瞣㗻㸄䂾䖽燩㘇㷑弥巜㤥墜〢硨넬泣殮礘殙㥀櫙㐟猀
ㄕ墜㎁㊌㒸〢犢䪵Ꭾ
䓘硶礍㡺
㐟䟏礓㢀墜礓储搟图䟇ㆳ䏡Ꭾ䆶〣祺㸟礓㢀㘩〢䗀Ꭾ
仺䌡
䘥㫶竀磂넡泣㔗䆶〢䟑㸟礓㢀䛄瞣Ꭾ
囸䟁爵䖷
图䟇爻䖽墜矴瞡瞽瞘䇝稠ㅥ䟔㘇氐㗢墜ㅥ憆Ꭾ
䥄礓㢀䤡㎁㈣爻䖽䅦穅넨礓㢀㊌勒*ô넩Ꭾ泣ㆵ䑘㥀㤣㷎犐䛟䵻嫒
墜场㛙넺
■ ,62*㤫䨉糬
■ (1 5㤫用䅺
㆗址磀硜墜爻䖽䅦穅搟㸥䏡㷞㸙䪵넬㸟礓㢀爻䖽〢㤒㶲礓储忲䐮图
䟇㶡㎀嶹Ꭾ
㮚䦴图䟇㶡㎀嶹祶珩㺄欕䐮㋝猀㐞勒珩㺄넬㑟㚀㤥僃䂾〥䆯澝牦
&Ꭾ㮚䦴图䟇㶡㎀嶹勒珩㺄欕넬㚀㤥僃䂾䤘糰㘇牬&Ꭾ
图䟇㶡㎀嶹〥㘇䖽氐㑈爻䖽櫵憆墜尓㓭猀ㄎ넨ㆣ㮚䓕㹴넩넬ぷ〥㘇
祸㥀㘇挕䤛㕹ㅧ䐮㗯䘥墜㥈䟑Ꭾ
图䟇㶡㎀嶹〥㘇䖽氐㑈吨㎏Ꭽ勼巉Ꭽ伯媯䱷Ꭽ㏈巉Ꭽ伯橻䱷Ꭽ叉乌
嶹Ꭽ礓䢮㢀䐮㎎ヮ㶡櫵㥀图䟇吨䟙䐮〣䟑墜礓㢀Ꭾ
图䟇㶡㎀嶹〥㘇嬀䛾Ꭽ礟㓭Ꭽ䒅䤊䐮䤡ㄓㅭ䅺涢Ꭾ泣仗景㶡櫵ㅥ憆
墜吨㎏沋彈䲺䧽Ꭾ
礍傢爵䖷
爻䖽礓㢀㑥넬泣㍠䲺䧽㶼㍿忲瀇Ꭾ泣嫒ㇵ㶼㍿忲瀇㎏㊱㍝㐞墜ㇵ磂
徊ㇵ涏櫵憆Ꭾ礓㢀墜礓㫫㚤穓喟䇝稠搟崾㘠礓忲墜忲瀇넨泣㗛矉穥
㶲環呤넩Ꭾ
䥄礓㢀崾㘠ㇵ涏嵡弲,넬礘㥀䤡ㇵ涏䈿䖽㥈爻䖽〣䛥ㅴᎮ
忲瀇〢䇝稠㊱䤡〘㈣㎀䮍碬磺瞣矴넬〬䖽氐濵磺搋㸩瞫碬㎄珨넬
䐮䇝稠爧牦䖽㥈䗪穅爻䖽Ꭾ礓㢀㶡櫵㶤䐨䆤䇝稠ュ㘇嫈氐㑈䵼瞣
矴Ꭾ
䐩㈩䄒消䋀㥀礓㢀䆤䟑弜磺㥈䦗㎄㐞墜糰䂾넬ㆵ殧㶲㶡櫵〘㈣
ㇵ涏䄧䖽㥈墜䗪䂿Ꭾ
㘂䤡㘠滟䩔墜礓㢀䒘橫ヒ㛹䑥㘇ヽ㶡櫵䗪䂿넬戤〬䇝稠犍㶠夐矴仭
殧Ꭾ
䥄礓㢀䇝稠㆗址磀硜墜礓储忲爻䖽礓储Ꭾ
泣㔗䅦䤊䐮㕹ㅧ爻䖽忲넬䐮㸟礓储爻䖽忲䝖㥀糰僃墜檀祺〢Ꭾ
䵼勒;㦣礓㢀넺㮚䦴礓㢀墜礓忲㗯䘥넬䇝稠䤌䗳䆶欕爸㝞䐮㝆䆤䤥
㓱ぅ䇛演滏墜咑䶢礓忲Ꭾ
䒒橥殡䩎
爻䖽墜恕溸無珧9* &$넺
N:넨㭁华主넩넯 N:넨俊㔮娋仑主넬/*3넩
礓㒳 :
䤆䗭囸䟁穰㦝
殙㸟礓㢀䤌䗳䐨㆗址㎎ヮ究㦣墜图䟇䡚넬䇝稠坉䖠䴢㸠䮅ヒ㬃䛥
ㅴᎮ
泗䞌㑥넬泣㍠矴瞡礓储ㆳ䏡㚤图䟇ㆳ䏡Ꭾ
图䟇吨㎏墜㐞究䰱孒䟔穥㶲環呤〢Ꭾ礓㢀㘇ヽ㆗址煡㔮㭯ㄎ煡㔮檀
ぅ䑘㐯墜ㄓㅭ㎎ヮ图䟇究㦣Ꭾ
图䟇究㦣墜䤌䗳䟑䄧넺
■ 䤌䗳こ殙㢌㡌
■ 泗䞌图䟇瞽넨䟙爲槒徊넩
檀ぅ窇孒㸥䏡图䟇究㦣墜䵻嫒彜㘠Ꭾ
㐟㔗䓞〣图䟇瞽焐Ꭾ擽㐒嘖䘥㫶䐮䡇图䟇煡㔮〥䵻䁐넬泣䤌䗳䞌㈣
图䟇瞽Ꭾ泣抇役㶺䑎䤥㓱ぅ䇛Ꭾ
䤆䗭き殓㢆㡆
尓硼吨䧎搟䑘䤡叛只㢀礎ㄎᎮ
䓞〣叛只㢀〢墜㎁㈣吨祺㤒㶲槒徊넬华䆤㸧䇛㥈䓄澏吨祺Ꭾ
尓硼䖿㑎䟣琭Ꭾ
紞瞣䖿㑎祺䦗〢墜㤒㶲槒徊Ꭾ尓硼䖿㑎祺䦗〾䓬〣䖿㑎祺䦗䆤䟑
墜爻䖽忲Ꭾ
尓硼叛只㢀嶹墜㤒㶲呟Ꭾ䓡㐒叛只㢀嶹Ꭾ䟣瞣岒主泗䞌㭯嵪〢墜
槒徊Ꭾ䓞〣㢌㡌㤒㶲穅Ꭾ
址䑣㗮〣㍿猀叛只㢀囈墜㢌㡌㚤2㦣囈Ꭾ䟣瞣㬮猀叛只㢀囈墜㢌
㡌넨:$)넩Ꭾ
䲺䧽2㦣囈䡇㘾嫒㷾ㅥ䟔㍿囈叛只㢀囈墜䟈㢌㡌㍿Ꭾ㸟㢌㡌㶡櫵
搋叛只㢀嶹Ꭾ㸟㬮猀叛只㢀囈墜䟈㢌㡌㌰㘇挕䟣㍽嶹㡌㤒㶲囈
ぅᎮ
櫵〢㢌㡌㤒㶲穅㚤叛只㢀嶹Ꭾ櫵〢㤒㶲呟Ꭾ
紞瞣槒徊넬华䆤泗䞌岒主泗巘㭯嵪搋䵻嫒墜汅㶲넨泣㗛矉㢌㡌
檀넩Ꭾ珥䟈疮忢槒徊Ꭾ
泑䞆囸䟁瞷
: 䘟㫰窺碼
〥殙㸟䟙爲槒徊疮䆯㭂忢Ꭾ
㮚䤡礘殙넬泣㆗址䠷䅺槒徊澏㵨泗䞌䟙爲槒徊0넨泣㗛矉檀䩔넩넺
XS
䟙爲槒徊䇝稠㚤㬮䩞墜〢忻腢䂋Ꭾ
GRZQ
䟙爲槒徊䇝稠㶤㎀疮㍽Ꭾ
彖櫯
爻䖽䖿㑎祺䦗䆤䟑墜爻䖽忲Ꭾ㸟䖿㑎祺䦗䝖㣶〾䂋㥟㥈疮〢Ꭾ
櫵〢䖿㑎䟣琭Ꭾ
㸟吨祺䝖㣶〾疮忢槒徊Ꭾ
㸟叛只㢀礎ㄎ㚤吨䧎櫵㣶〾嫒沥ㅥ憆䵻嫒Ꭾ
䲴䧷礍㡺牄橞囸䟁煛㔨墖䝚䦮넬
劃午墜㸮崇〥䡇胛撊Ꭾ㆗址䖿㑎䟣琭㥀䤘糰㚤䤘ㅦ劃㒳瞫䈃爷㐟
䗳넬叛只㢀〥䤛厜僝〬〥䆯㐒嘖瞛午Ꭾ
䗢孌 㥀礓㢀墜穥㶲環呤䟙滔〢㸃䤡䟈图䟇究㦣墜滔弱Ꭾ