Loading ...
Loading ...
Loading ...
Your iron
13. secure / SensorSecure indicator light*
7. Water tank6. Soleplate
2. Shot of steam
5. Spray nozzle
3. Steam regulator
1. Spray button
4. Water inlet
and lid
12. Power cable
9. Pointer
8."max" level mark
10. Temperature control
11. Pilot light
* Model dependent
Before using the iron for the first time
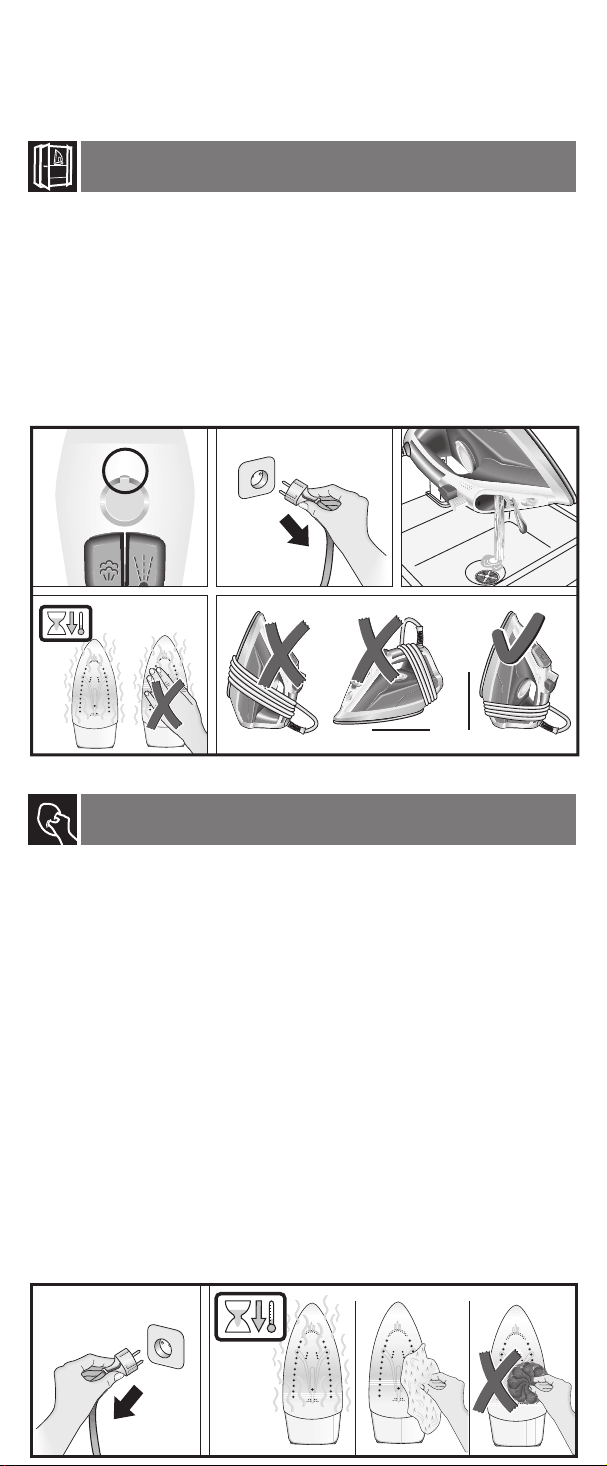
Remove any label or protective cover from the soleplate (6).
Your new iron may smell and give off some smoke when you use it for
the first time, this is normal and will cease after a short while.
Filling the water tank
This appliance has been designed to use normal tap water.
• The addition of other liquids, (unless recommended by Bosch) such
as perfume, will damage the appliance.
• Do not use condensation water from tumble dryers, air conditioning
systems or similar.
Any damage caused by the use of the aforementioned products
will make the guarantee void.
E
Set the steam regulator (3) to the “0” position and unplug the
iron from the mains!
1. Place the iron at an angle of 45° or more, with the point facing upwards.
2. Open the water inlet lid (4).
3. Fill the water tank. Never fill beyond the level mark for maximum
filling (8).
4. Close the water inlet lid.
Tip: To prolong the optimum steam function, you may mix tap water
with distilled water 1:1. If the tap water in your district is very hard, mix
tap water with distilled water 1:2.
You can inquire about the water hardness with your local water supplier.
45º 45º
1
0
2
calc
45º
Setting the temperature
Check the laundry care label for the required ironing temperature.
1. Set the temperature control (10) to the corresponding position by lining
it up with the pointer (9) on the iron.
Fabric Temperature Setting
Synthetics •
Silk - Wool ••
Cotton •••
Linen max
2. The pilot light (11) switches on while the appliance is heating up
and switches off as soon as the set temperature is reached. lf the
temperature of the hot iron drops, you can continue ironing while the
iron heats up again to the set temperature.
Tips:
• Sort your garments according to their care labels, always starting with
clothes that have to be ironed at the lowest temperature.
• If you are unsure what type of material the garment is made from, start
ironing on the lowest temperature setting and increase accordingly. If
the garment is made from mixed fabrics, set the temperature for the
most delicate material.
• For silk, woollen or synthetic materials iron the reverse side of the fabric to
prevent shiny patches. Avoid using the spray function to prevent stains.
Ironing with steam
The steam regulator (3) is used to adjust the amount of steam
produced when ironing.
Steam is only available if the temperature control (10) is set at the steam
symbols
- between “••” and “max”.
Tip: for better ironing results, iron the last strokes without steam to dry
the garment.
Extra steam
To facilitate the ironing of very creased laundry or thick materials, the
volume of steam can be increased briefly.
Get extra steam by pressing the steam regulator (3) for maximum 2 seconds.
To do this, set the temperature control (10) to “max”.
shot
Shot of steam
This can be used to remove stubborn wrinkles or to press in a
sharp crease or pleat.
1. Set the temperature control (10) to “max”.
2. Press the shot of steam button
(2) repeatedly with intervals of at
least 5 seconds.
Vertical steam
E
Never direct the steam jet at garments that are being worn.
Never direct the steam at persons or animals!
1. Set the temperature control (10) to at least the “•••” position.
2. Hang article of clothing on a clothes hanger.
3. Operate the iron in a vertical position at a distance of 10 cm / 4 in,
and press the shot of steam button
(2) repeatedly with pauses of
at least 5 seconds.
5´´
Ironing without steam
Set the steam regulator (3) to “0”.
1
0
2
calc
Spray
This can be used to remove stubborn wrinkles.
Do not use the spray function with silk.
secure
“secure” auto shut-off function *
The “secure” auto shut-off function switches off the iron when
it is left unattended, thus increasing security and saving energy.
If your iron is equipped with “secure” function, you can find the text “auto
off” on handle.
1. Plug in the iron.
2. Initial heating up process: this function will be inactive for the first two
minutes in order to give the appliance time to reach the set temperature.
3. The safety circuit will switch the appliance off automatically and the
indicator light (13*) will start flashing in the following cases:
a
If the iron is not moved for 30 seconds while resting on its soleplate
or on its side.
b
If the iron is not moved for 8 minutes while in the upright position.
4. To reconnect the iron, just move it about gently.
a
b
“SensorSecure” function *
The “SensorSecure” function makes the iron heat up only while
ironing.
Thus, safety and saving energy get increased.
1. Plug in the iron.
2. “SensorSecure” indicator light (13*) flashes while resting, and will show
a continuous light while ironing.
3. If the iron is resting for more than 12 seconds, the iron will stop heating
automatically.
4. Once ironing is restarted, the iron will heat up again.
Initial heating up process: it is not necessary to grip the handle until the
iron heats up to the set temperature. During heating, the “SensorSecure”
light flashes at a high frequency. Once set temperature is reached, the
light will flash at a lower frequency.
After ironing
1. Set the steam regulator (3) to the “0” position.
2. Unplug the iron from the mains socket.
3. Hold the iron with the front facing down and shake it gently until the
water tank is empty.
4. Set the iron aside in a vertical position to cool down.
5. Coil the power cable (12) loosely around the heel of the iron, before
storing. Depending on the model, the cable can be inserted into the
clip located at the bottom of the back cover.
Tip: Store the iron in an upright position.
1
0
2
calc
Cleaning & Maintenance
E
Attention ! Risk of burns !
Always unplug the appliance from the mains supply before
carrying out any cleaning or maintenance operation on it.
1. If the iron is only slightly soiled, pull out the plug and allow the soleplate
to cool down. Wipe the housing and the soleplate with a damp cotton
cloth only.
2. If the cloth is synthetic, it may melt due to the high temperature on the
soleplate. Switch off the steam and rub off any residue immediately
with a thickly folded, damp cotton cloth.
3. To keep the soleplate smooth, you should avoid hard contact with
metal objects. Never use a scouring pad, or chemicals to clean the
soleplate.
DO NOT de-scale or clean the water tank with cleaning products or
solvents, as these could cause the iron to drip when using the steam
function.
DO NOT use a “professional steam cleaner” for cleaning the appliance.
DO NOT use sharp objects or abrasive products to clean the soleplate or
any other part of the appliance. To keep the soleplate in good condition, do
not allow it to come into contact with metal objects.
AntiCalc
Multiple descaling system
A. self-clean
Each time you press the steam regulator (3), the “self-clean” system
cleans the mechanism of scale deposits.
B. Calc’nClean
The “Calc’nClean” function helps to remove scale particles out of the
steam chamber.
Use this function approximately every 2 weeks if the water in your area
is very hard.
1. Set the temperature control to the “max” position and plug in the iron.
2. After the necessary warm-up period, unplug the iron.
3. Hold the iron over a sink and remove the steam regulator (3) by turning
it to the “calc” position.
4. Slowly pour water (approximately 300 ml) into the steam regulator hole.
5. Gently shake the iron. Boiling water and steam will come out of the
soleplate (6) carrying scale or deposits that might be there. When the
iron stops dripping, reassemble the steam regulator by reinserting
it, lining up the “calc” position with the pointer (9), pressing it in and
turning it to the “0” position.
6. Plug in the iron. Heat up the iron again until the remaining water has
evaporated.
Tip: If the steam regulator needle is soiled, remove any deposits from
the tip with vinegar and rinse it off with clean water.
C. anti-calc *
The “anti-calc” cartridge has been designed to reduce the build-up of
scale produced during steam ironing, helping to extend the useful life of
your iron. Nevertheless the “self-clean” cartridge cannot remove all of
the scale that is produced naturally over time.
3. anti-calc
2. Calc'nClean
1. self-clean
Calc'nClean
1
0
2
calc
* Model dependent
Loading ...
Loading ...
Loading ...