~s&athide
;?,
,’,..,..... .,,,,’,,,, ,,
,,.,,.,.,,,
.:,
ElectricSfide=in
Safety Instructions ...................4-7
Anti-Tip Device........................................ 4,46
Operating Instructions, Tps
Aluminum Foil.......................... 6,28,32, 34
ClockandTimer ................................... 24, 25
Features....................................................... 8,9
Oven.................................................... 26-39
Bating .................................................27-29
Broiling,BroilingGuide................... 34,35
Conmlsattings.....27,29,30,32,34,37,38
Light BulbReplacement................ 26,43
Roasting,RoastingGuide...............32,33
Self%leaning Instructions.............36-39
Shelves.............
5,26-28,32,34-36,43
Timed Baking
....................................
29,30
Surface Module Cooking................... 10-23
CanningTips............................................. 23
CoilSurface Unit Module
...............
12,13
ControlSettings....................................... 11
CooktopComparison............................. 10
GriddleAccessory............................ 20-22
GrillModule ....................................... 17-19
Module Cover.............................................. 3
Modules andAccessories........................ 3
RadiantModule..,..,.......................... 14-16
Range
Problem solver ......................56-58
Thermostat Adjustment–
Do It Yourself............................................ 31
More questions?..,call
GEAnswerCenteP8(J0.626.2000
Care and Cleaning ...................4G45
CoilSurface Unit Module
..........................
40
Door Removal..............................................44
GriddleAccessory.......................................42
GrillModule ..................................................
42
Radiant Module ........................................... 41
Vent System..........................................43,45
Preparation ...........................................7
Anti-Tip Device........................................ 4,46
FlooringUnder the Range...........................7
Leveling............................................................7
Installation .................................47-55
Consumer Services ..................59
Appliance Registration.................................2
Important Phone Numbers....................... 59
Model and SerialNumbers .........................2
Warranty ....................................... BackCover
GEAppliances
Model: JSP69
164D2966P163
HELP USHELP YOU...
Beforeusingyourrange,readthis
If youreceiveda damagedrangeor
guidecarefully.
modularcomponents...
It is intended to help youoperateandmaintainyour
Immediatelycontactthedealer(orbuilder)thatsold
newrangeproperly.
youtherange.
Keepit handyforanswersto yourquestions.
Ifyoudon’tunderstandsomethingorneedmorehelp,call:
GEAnswerCenter@
Savetimeandmoney.
Beforeyou requestservice...
800.626.2000
ChecktheProblemSolverinthebackofthisguide.
24hoursa day,7 daysa week
It listscausesof minoroperatingproblemsthatyou
cancorrectyourself.
Writedownthemodelandserialnumbers.
You’llfindthemonalabelbehindthestoragedrawer.
Accessories
ThesenumbersarealsoontheConsumerProduct
Toaddversatilityto yourmodularrange,accessories
OwnershipRegistrationCardthatcamewithyour areavailableatextracostfromyourGEAppliance
range.Beforesendinginthiscard,pleasewritethese
dealer.SeetheModulesandAccessoriessection.
numbershere:
ModelNumber
SerialNumber
Usethesenumbersin anycorrespondenceor service
callsconcerningyourrange.
IF YOUNEEDSERVICE...
Toobtainservice,seetheConsumerServicespagein
thebackofthisguide.
We’reproudofourserviceandwantyouto be
pleased.If for somereasonyouarenothappywith
theserviceyoureceive,herearethreestepsto follow
for furtherhelp.
FIRST,contactthepeoplewhoservicedyour
appliance.Explainwhyyouarenotpleased.In most
cases,thiswillsolvetheproblem.
NEXT,ifyouarestillnotpleased,writeallthe
details-including yourphonenumber—to:
Manager,ConsumerRelations
GEAppliances
AppliancePark
Louisville,KY40225
FINALLY,ifyourproblemis stillnotresolved,write:
MajorApplianceConsumerActionProgram
20NorthWackerDrive
Chicago,IL60606
2
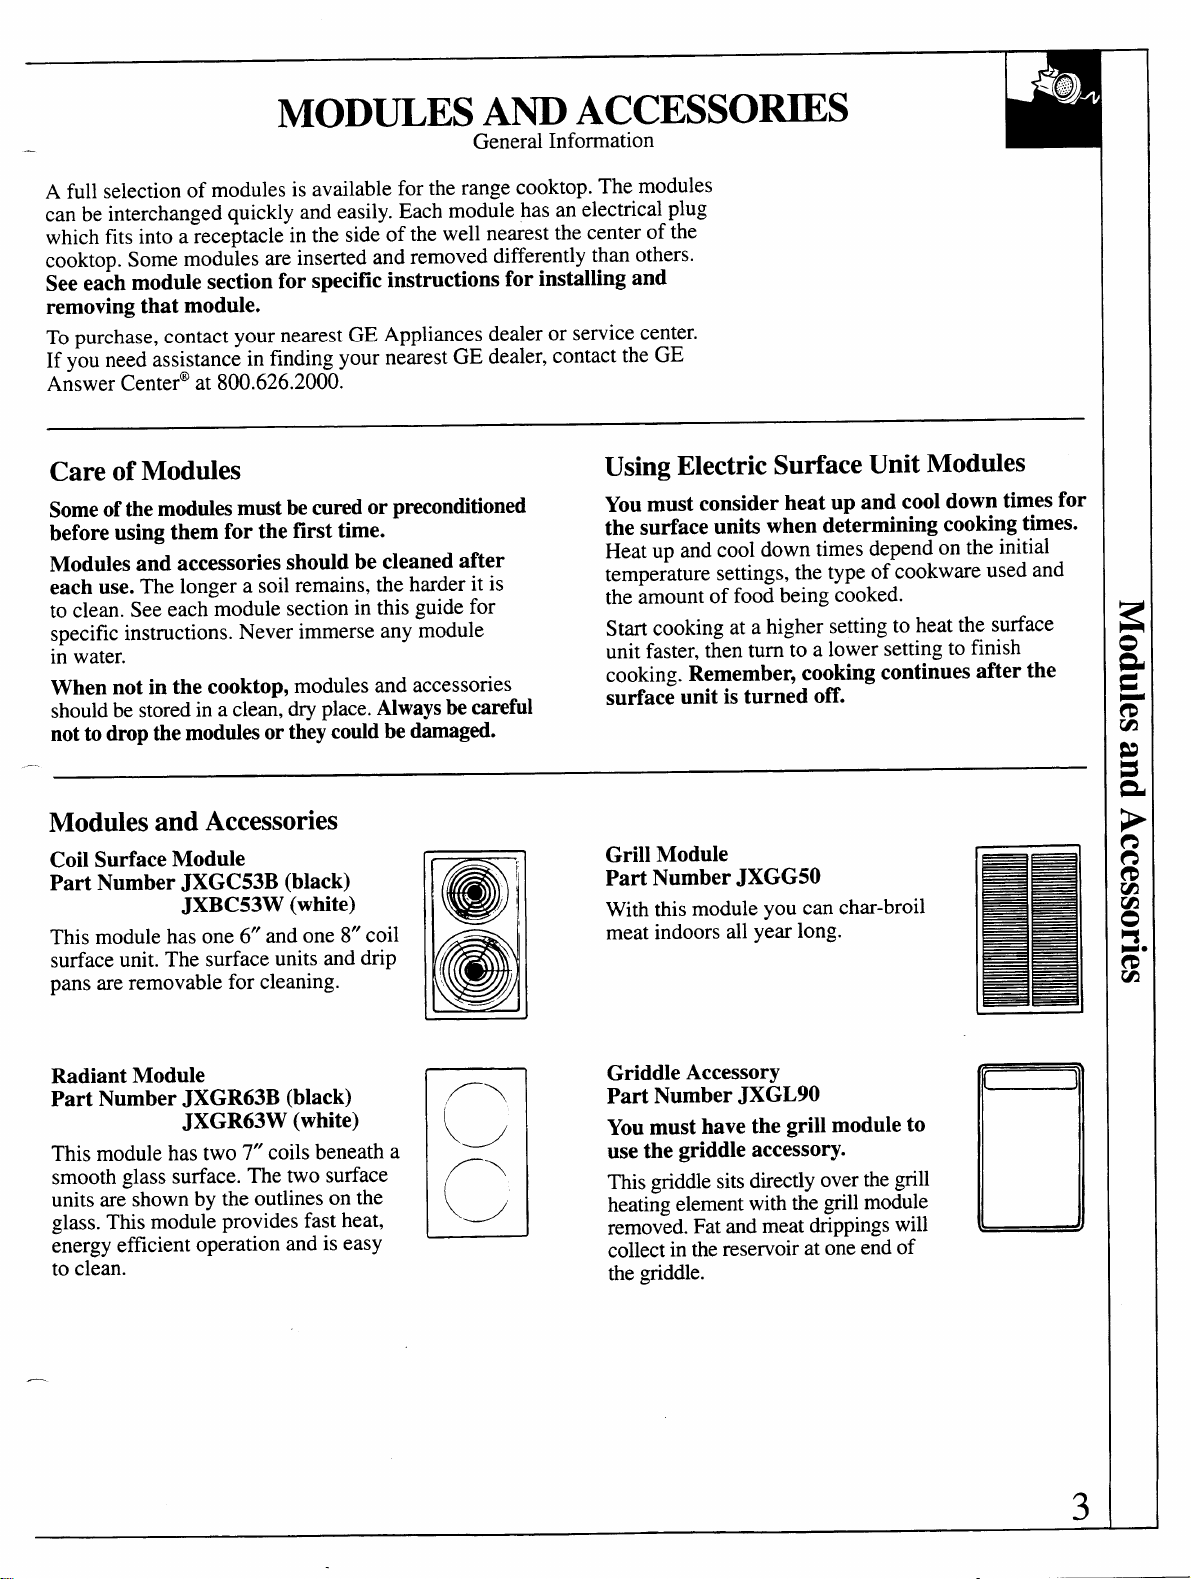
MOD~ES Am ACCESSO~S
—
General Information
A full selection of modules is available for the range cooktop. The modules
can be interchanged quickly and easily. Each module has an electrical plug
which fits into a receptacle in the side of the well nearest the center of the
cooktop. Some modules are inserted and removed differently than others.
See each module section for specific instructions for installing and
removing that module.
To purchase, contact your nearest GE Appliances dealer or service center.
If you need assistance in finding your nearest GE dealer, contact the GE
Answer Center@at 800.626.2000.
Careof Modules
Someof themodulesmustbe curedor preconditioned
before using them for the first time.
Modules and accessories should be cleaned after
each use. The longer a soil remains, the harder it is
to clean. See each module section in this guide for
specific instructions. Never immerse any module
in water.
When not in the cooktop, modules and accessories
shouldbe stored in a clean,dry place.Alwaysbe careful
notto dropthemoddes ortheycouldbe damaged.
UsingElectricSurfaceUnit Modules
Youmust consider heat up and cool down times for
the surface units when determining cooking times.
Heat up and cool down times depend on the initial
temperature settings, the type of cookware used and
the amount of food being cooked.
Start cooking at a higher setting to heat the surface
unit faster, then turn to a lower setting to finish
cooking. Remember, cooking continues after the
surface unit is turned off.
ModulesandAccessories
Coil Surface Module
Part Number JXGC53B (black)
JXBC53W (white)
This module has one 6“ and one 8“ coil
surface unit. The surface units and drip
pans are removable for cleaning.
Radiant Module
Part Number JXGR63B (black)
JXGR63W (white)
This module has two 7“ coils beneath a
smooth glass surface. The two surface
units are shown by the outlines on the
glass. This module provides fast heat,
energy efficient operation and is easy
to clean.
Grill Module
Part Number JXGG50
With this module you can char-broil
meat indoors all year long.
Griddle Accessory
Part Number JXGL90
You must have the grill module to
use the griddle accessory.
Thisgriddlesitsdirectly over the grill
heatingelement with the grillmodule
removed.Fat and meat drippingswill
collectin the reservoir at oneend of
the ~tiddle.
D
—
3
U
!
WORTAm SME~ mSTRUC~ONS
Rwd d imtmctiom beforewing t~ appfiance.
I~ORTANT SAFETYNOTICE
● TheCWornia SafeDrinkingWaterandToxic
EnforcementAct requirestheGovernorof
Californiato publisha listof substancesknownto
thestatetocausebirthdefectsorotherreproductive
harm,andrequiresbusinessesto warncustomersof
potentialexposureto suchsubstances.
● Theflber~ass insulationin self-cleanovens
givesoff a very smallamountof carbon
monotide during the cleaningcycle.Exposure
can be minimizedby ventingwith an open
windowor using a ventilationfan or hood.
men usingelectricalappliances,basicsafety
precautionsshouldbe followed,includingthe
following:
● Use this applianceonlyforitsintendeduse
as describedin this guide.
● Havethe instiller showyouthelocationofthe
circuitbreakeror fuse.Markitfor easyreference.
● Be sureyourappfianceisproperlyinsta~edand
groundedby a qualifiedtechnicianin accordance
withthe providedinstallationinstructions.
● Do not attempt to repairor replaceany
part of your rangeunless it is specifically
recommendedinthis guide.All otherservicing
shouldbe referred to a qualifiedtechnician.
● Beforeperformingany service,DISCONNECT
THERANGE POWERSUPPLYATTHE
HOUSEHOLDDISTRIBUTIONPANELBY
REMOVNG ~E FUSE OR SWTCHING OFF
THE CIRCU~ BREA~R.
● Do not leavechtidrendon~hildren should
notbe left aloneor unattendedin an area where an
applianceis in use. They shouldneverbe allowed
to sitor standon any part of the appliance.
● Do not a~ow anyoneto climb,stand or hang
on the door or cooktop.Theycould damage
the range and even tip it over,causingsevere
personalinjury.
● CAU~ON: ITEMSOF ~TEREST TO
CHKDREN SHOULDNOT BE STORED~
CAB~ETS ABOVEA RANGE OR ON THE
BAC=PLASH OF A RANG&C~LDREN
CL~B~G ON THERANGETO REACH
ITEMSCO~D BESENOUSLY IN~mD.
WAMING–A1lranges >
can tip and injurycould result.
Topreventaccidentaltippingof
E
b
d
;4
the rangefromabnormalusage,
attachit to thewall or floorby
installingthe Anti-Tipdevice
supplied.Tocheckif thedeviceis
A
,.4
installedand engagedproperly,open
the lowercompartmentandinspect
the device.Makesurethe stability
bracketand stabilitymountingdeviceare in place.
If you pulltherange outfrom the wallfor any
reason, makesurethe deviceis properlyengaged
before you push the rangeback againstthe wall.
If it is not, thereis a possiblerisk of therange
tippingover and causinginjuryif you or a child
stand,sit or lean on an open door.
Pleaserefer to theAnti-Tipdevice informationin
this guide.Failureto takethis precautioncould
resultin tippingof therange and injury.
● Teachchildrennot to play with the controls
or any otherpart of therange.
● Alwayskeepcombustiblewall coverings,
curtainsor drapesa safedistancefrom
your range.
cDo not storeflammablematerialsin anoven
or nearthecooktop.
● Neverwearloose-fittingor hanging garments
whileusing the appliance.Be carefulwhen
r~ching for items storedover the range.
Hammable materialcouldbe ignitedif brought
in contactwith hot surfaceunits or heating
elementsand may causesevereburns.
B
● Use only dry pot holders—moist
or damp pot holders on hotsurfaces
may resultin bums from steam.
Do not let pot holderstouch hot surfaceunits or
heatingelements.Do not use a towel or other
bulkycloth.Such clothscan catch fire on a hot
surfaceunitor heatingelement.
● Alwayskeepdish towels,dish cloths, pot
holdersand other finensa safe distanceaway
fromyour range.
● Alwayskeep woodenand plasticutensfls
andcannedfood a safe distanceaway from
yourrange.
● For your safety,neveruse your appliancefor
warmingor heatingthe room.
4
—
D
!
●
●
DONOT STOREOR USE COMBUSTWLE
MATERIALS,GASOL~E OR OTHER
FLAWBLE VAPORSAND LIQ~S ~
- VIC~I~ OF T~S OR ANT OTnR
APPLIANCE.
● Keepthehoodandgreasefalterscleanto maintain
good venting andto avoidgreasefires.
● Do not let cookinggreaseor otherflammable
materi* accumulatein or near the range.
● Do not obstructthe vent airflow gfls.
Do notputanythingin them or allowanythingto
spillover into them.
● Keepthe gri~ panclean to reducesmokingand
avoidgreasefwes.
● Keepthe cooktopvent @k and the oven
ventunobstructed.
e
4
- Do not use wateron greasefires.
‘J
Neverpick up a flamingpan.
Turnthe controlsoff. Smothera
flamingpan on a surfaceunitby coveringthe
pan completelywitha well-fittinglid, cookie
sheetor fiat tray.Use a multi-purposedry
chemicalor foam-typefire extinguisher.
flaming grease outsidea pan can beput out
by covering with baking s~a or, if av~lable,
a multi-purposedry chemicrdor foam-typefire
extinguisher.
Hame in the ovencan be smotheredcompletely
by closing the ovendoor andturningthe oven
off or by usinga multi-purposedry chemicalor
foam-typefire extinguisher.
● Do not touch the modde surfaceunits,
heatingelementsor the interiorsurfaceof the
oven.Thesesurfacesmay be hot enoughto burn
eventhough theyare dark in color,Duringand
after use?do nottouch,or let clothingor other
flammablematerialscontactthemodulesurface
units,areas nearbythe modulesurfaceunitsor
any interior area of the ovemallow sufficienttime
for coolingfirst.
Potentiallyhot surfacesincludethe grillgrates,
griddle,cwktop and ar@ facingthe cooktop.
oven vent opening,stiaces near the opening,
crevicesaroundthe ovendoor,the edgesof the
door window and metal trim parts above the door.
Remember: The inside surfaceof the oven may
be hot when the door is opened.
● When cookingpork,follow the directions
exactlyand alwayscook the meatto an intemd
temperatureof at least 170°F.This assuresthat,
in the remote possibilitythat trichinamaybe
presentin the meat, it willbe killed and the meat
willbe safeto eat.
Oven
● Standaway fromthe rangewhen openingthe
ovendoor.Hot air or steam which escapescan
causebums to hands,face andor eyes.
● Do notheatunopenedfood containers.
Pressurecouldbuild up and the containercould
burst,causingan injury.
● Keepthe ovenvent unobstructed.
● Keepthe ovenfreefrom greasebuildup.
● When using cooking or roastingbagsin the
oven,followthe manufacturer’sdirections.
● Place the oven shelf in the desiredposition
whilethe oven is cool. If the shelvesmust be
handledwhenhot, do not let pot holderscontact
the heatingelements.
● Pnl~ng outthe shelf to the shelf stopis a
conveniencein #iftingheavyfoods. It is dso
a precautionagainstburns from touchinghot
surfacesof thedoor or oven walls.
● Do notuse your oven to dry newspapers.
If overheated.they can catch fire.
● Do not use the oven for a storage area.
Items storedin an oven can ignite.
● Do not leavepaper products,cooking utensils
orfood in the oven when notin use.
● .4fterbrofing, alwaystake the broilerpan out
of therange and clean it. Leftovergreasein the
broilerpan can catchfire the next time you use
the pan.
*Never Ieavejars or cans of fat drippingson or
nearyour range.
● Neverleavethe ovendoor open when you are
notwatchingthe range.
● The ovendoor must bedosed during broiling.
Open door broilingwill causethe controlpanelto
get very hot.
(cotltinued tl<~.rtpage)
5

● Ody c- typesof* gbs/@ra*
Mrthenwareorother*ed mntiers m
~tible fmcooktoptiee; othersmay
break
-We of thesuddenchangein tempera~.
.To
~ the
poss~tityofbins, ignition
offlammablemateriak,andspfiage,$e Me
ofamntainershodd be-ed towardtherenter
ofthe
range withoutextendingover thenearby
Stia tits.
* Mways h thernoddemtrok offbefore
remotig the mkw-
● Du nottierse orsoaktheremovnble
rnoddesad da~ *. M
notpmthem
ina dishwasher.Dono%seE+Ieanthemoddes
intheovem
6
● If a combinationofoilsor fats willbe used
in frying, stirtogetherbeforeheating, or as fats
melt slowly.
● Always heat fat slowly,and watchas it heats.
● Use a deep fat thermometerwhenever
possibleto prevent overheatingfat beyondthe
smokingpoint.
*Never try
tomove a panof hot fat, especially
a deepfat fryer.Waituntilthe fat is cool.
● NEVER USE WATER ON A GREASE FIRE.
● Use carewhen touchingthe cooktop.
Theglass surface of the cooktopwill retainheat
afterthe controlshavebeenturned off.
“Neverleavethe surfaceunits unattendedat
highheat settings.Boiloverscause smokingand
greasy sPilIoversthat
may catch on fire.
.
● Do not operatethe radiantsurface units if
the ghtssis broken.Spilloversor cleaning
solutionmay penetratea brokencooktopand
createa risk of electricalshock.Contacta
qualifiedtechnicianimmediatelyshouldyour
glasscooktopbecomebroken.
● Avoidscratchingthe glasscooktop surface.
The cooktopcan be scratchedwith items such
as sharpinstruments,or ringsor otherjewelry
and rivets on clothing.
● Neveruse the glasscooktopsurface as a
cuttingboard.
● Do not placeor store items on top of the glass
cooktopsurfacewhen it is not in use.
● Be carefulwhen placing spoons or other
stirringutensils on glasscooktopsurface
whenit is in use. They may become hot and
could causeburns.
● Do not standon the radiantglass cooktop.
The weightmay causethe top to bend.
SAW T~SE
~S~UCTIONS
I
L
PWPAMTION
FlooringundertheRange
Levelingthe Range
I
Yourrange, like many other householditems,is
heavyand can settleinto soft floor coveringssuch
m cushionedvinylor carpeting. Whenmovingthe
rangeon thistypeof flooring,itshouldbe installedon
a 1/4-inchthicksheetofplywood(orsimilarmaterial)
asfollows:
Whenthefloor coveringendsatthefront
of therange,
theareatherangewillreston shouldbe
builtup withplywoodto thesamelevelor higherthan
thefloorcovering.Thiswillallowtherangeto be
movedforcleaningor servicing.
Usea 1X“openendor adjustablewrenchtoequally
backoutthefourlegs.Theflanges(rims)belowthe
sidesofthecooktopmustberaisedabovethetopof
thecounter.Carefullyslidetherangeintoits
installationspace.Observethatit isclearingthe
countertop.Thenplacea spiritlevelor a glass
measuringcuppartiallyfilledwithwaterononeofthe
ovenshelvestocheckforlevelness.If usinga spirit
level.taketworeadings,withthelevelplaced
diagonallyfirstinonedirectionandthentheother.
Adjustthefourlegscarefully.Therangelegsshould
restonthefloor.Therangemust not hang fromthe
counter.
7
~mS OFYOm MODW
G-uG~Dm WGE
Seetie ModulesandAwessoriessectionfora listingofmodulesavailable.
—
%111111@
7/=, ,
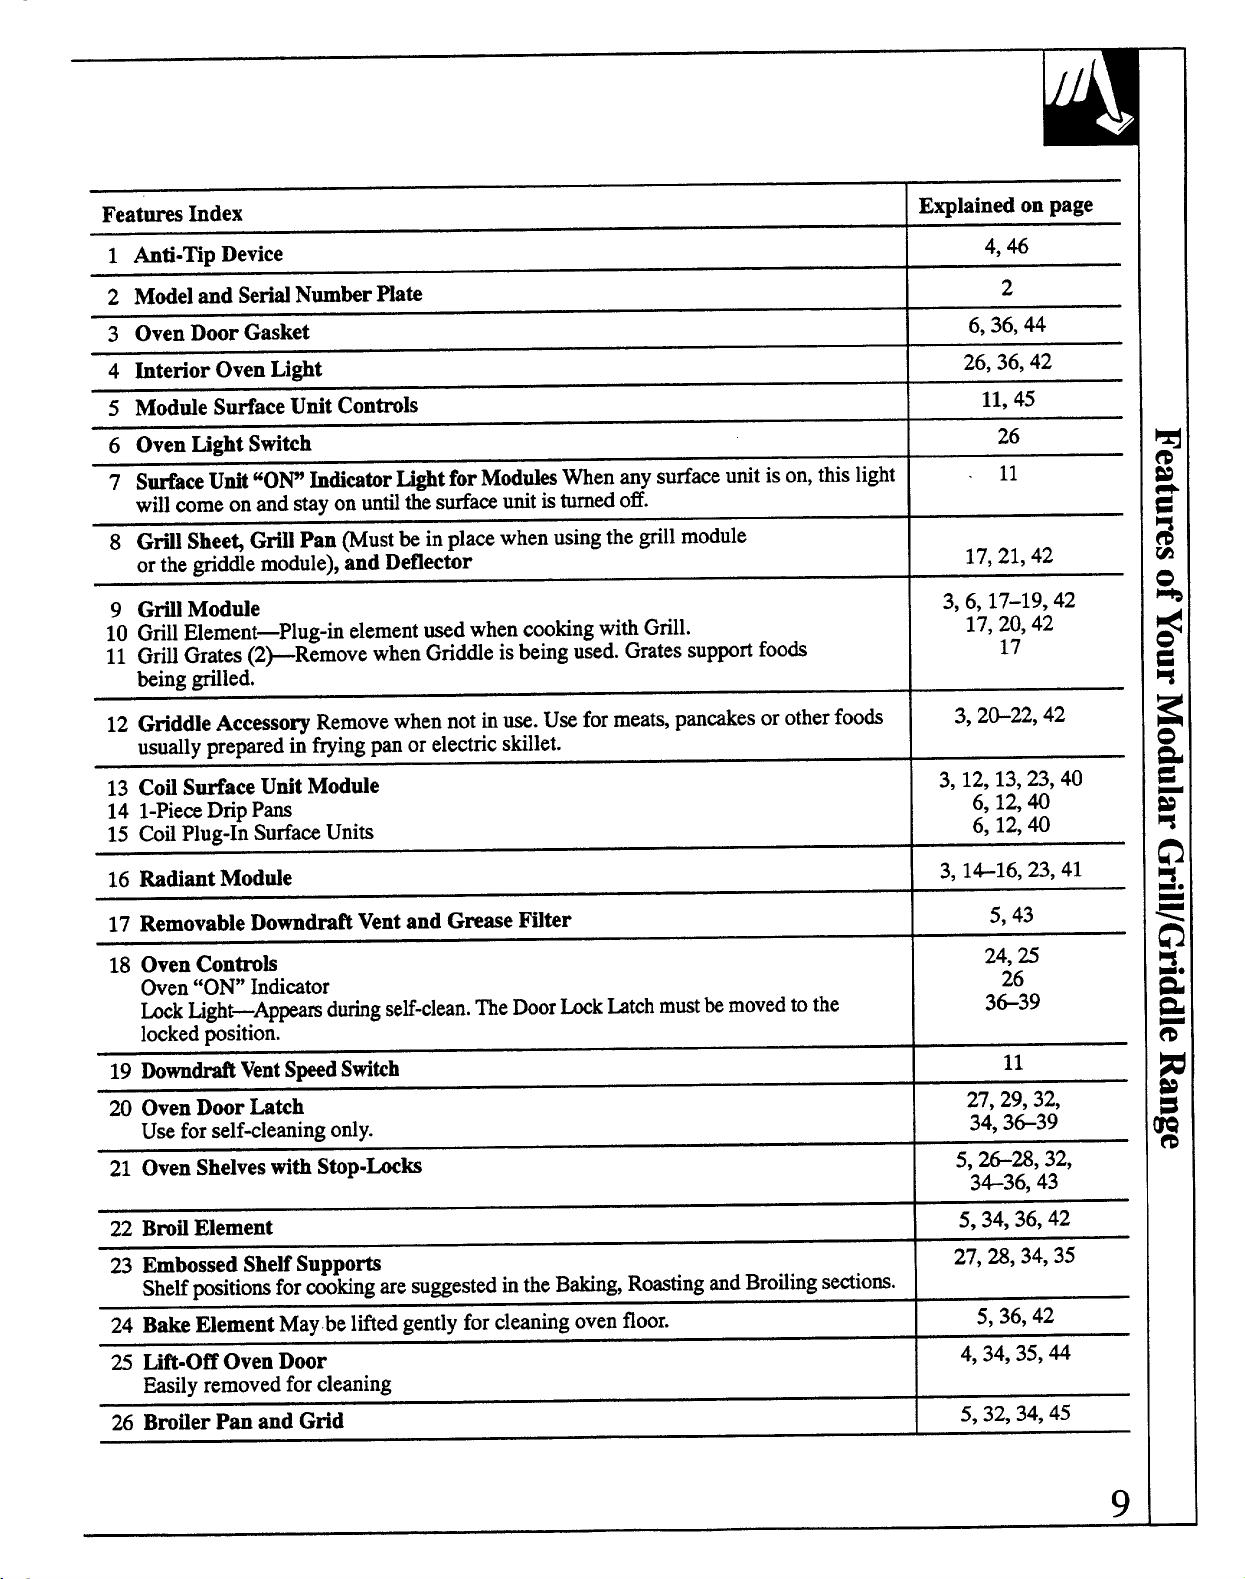
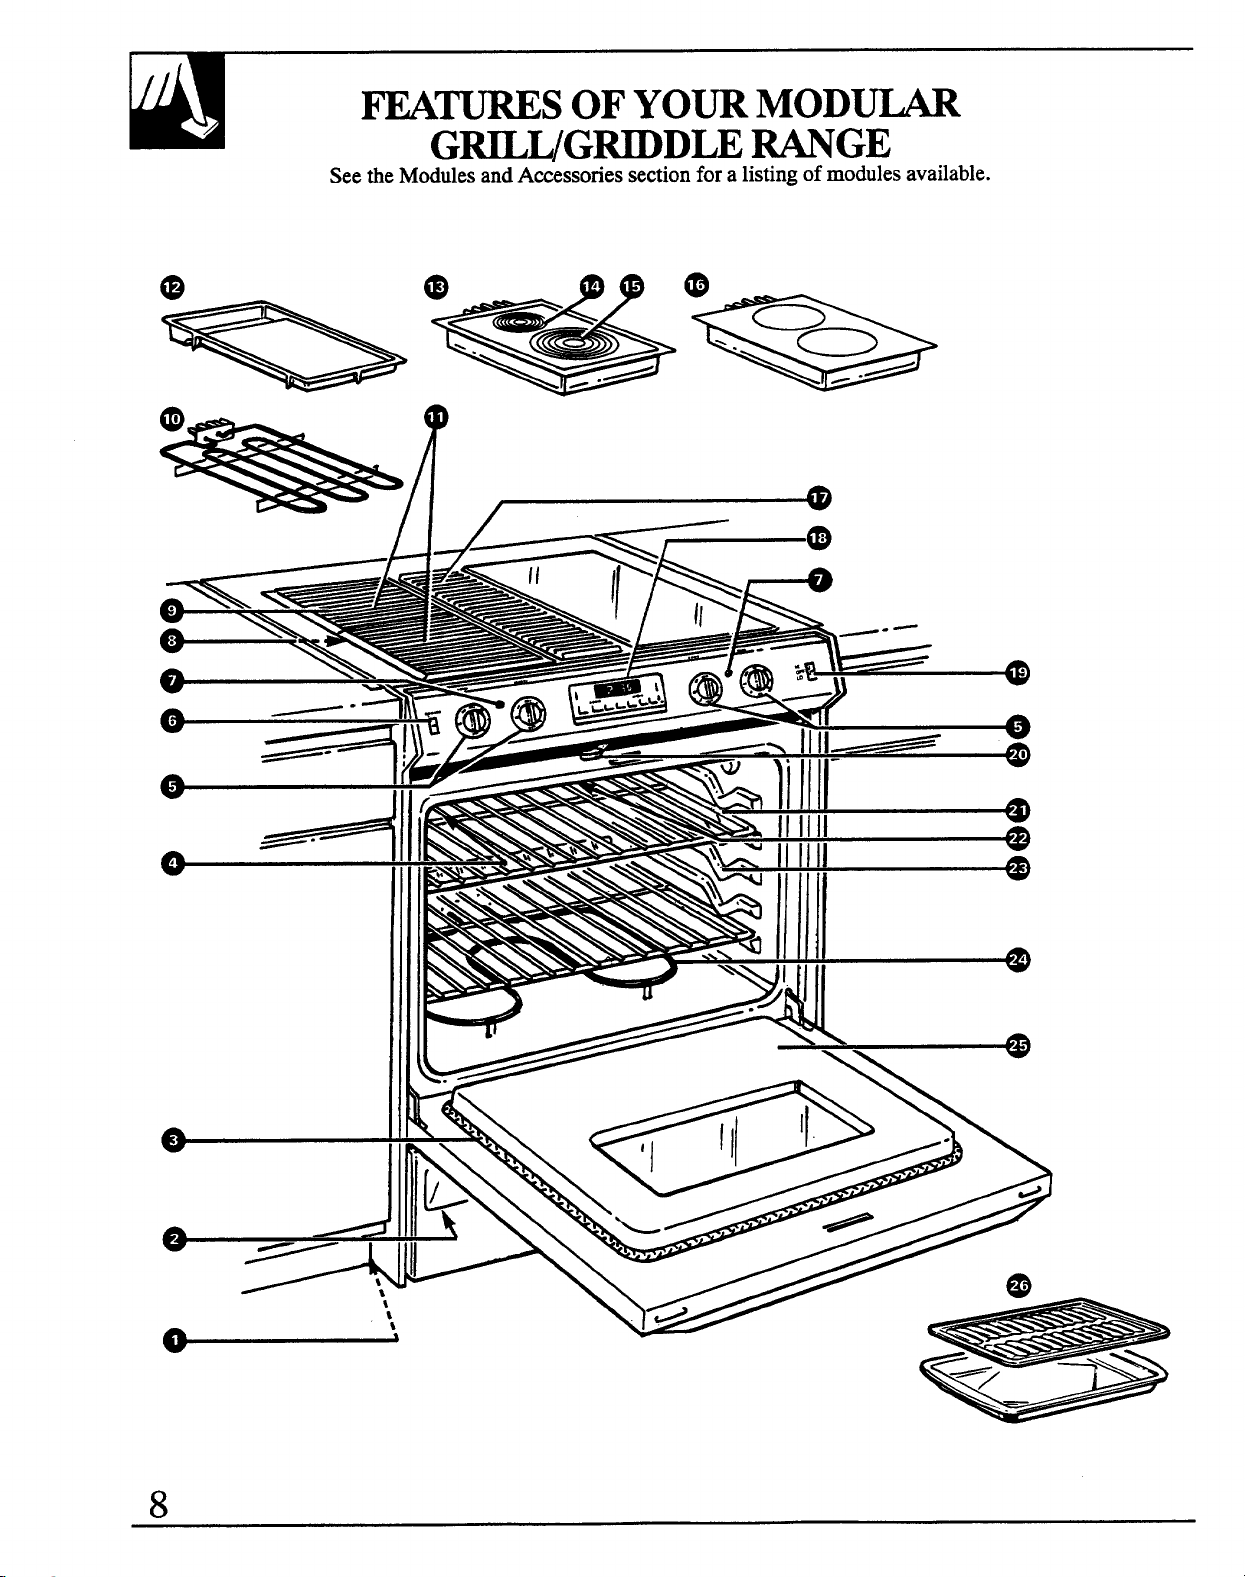
Featureshdex
1
Anti-MpDevice
2 ModelandSerkdNumberP1ati
3 OvenDoorGasket
4 htenor OvenLight
5 Modde SurfaceUnitControls
6 OvenLightSwitch
7 SurfaceUnit“ON hdicatorLightforModdesmen anysurfaceunitison,thislight
willcomeonandstayonunti thesurfamunitisturnedoff.
8 Gfll Sheet GriUPanmust beinplacewhenusingthegrillmodule
orthegridde module),andDeflector
9 Gfil Modtie
10 GrillElement—Plug-belementusedwhencookingwithGrill.
11 GriHGrates(2>Remove whenGndde isbeingused.Gratessupportfoods
being@led.
12 GriddleAccessog Removewhennotinuse.Useformeats,pancakesor otherfoods
usurdlypreparedinfryingpanorelectricskillet.
13 CoflSurfaceUnitModule
14 l-Piee DripPa
15 ~fl Plug-InSurfaw Units
16 Radiant Modde
17 RemovableDowndraftVentandGreaseFtiter
18 OvenControh
Oven“ON hdi~tor
bk Ught—Appearsduringseti-clean,me Doorkk htch mustbemovedtothe
lockedposition.
19 Downti VentSpeedSwitch
20 OvenDoortitch
Usefor self-cleaningordy.
21 OvenShelveswithStipkks
22 BrotiElement
23 EmbossedSheUSupports
ShelfpositionsforcookingaresuggestedintheBaking,RoastingandBrodingsections.
24 BakeElementMaybe liftedgentlyforcleaningovenfloor.
25 Lift-OffOvenDoor
Easilyremovedforcleaning
26 BrotierPanandGrid
Explainedonpage
4,46
2
6,36,44
26,36,42
11,45
26
11
17.21,42
3,6,17-19,42
17,20,42
17
3, 2&22,42
3,12,13,23,40
6,12,40
6,12,40
3,1616,23,41
5,43
24,25
26
3639
11
27,29,32,
34,3639
5,2628,32,
3*36, 43
5,34,36,42
27,28,34,35
5,36,42
4,34,35,44
5,32,34,45
9
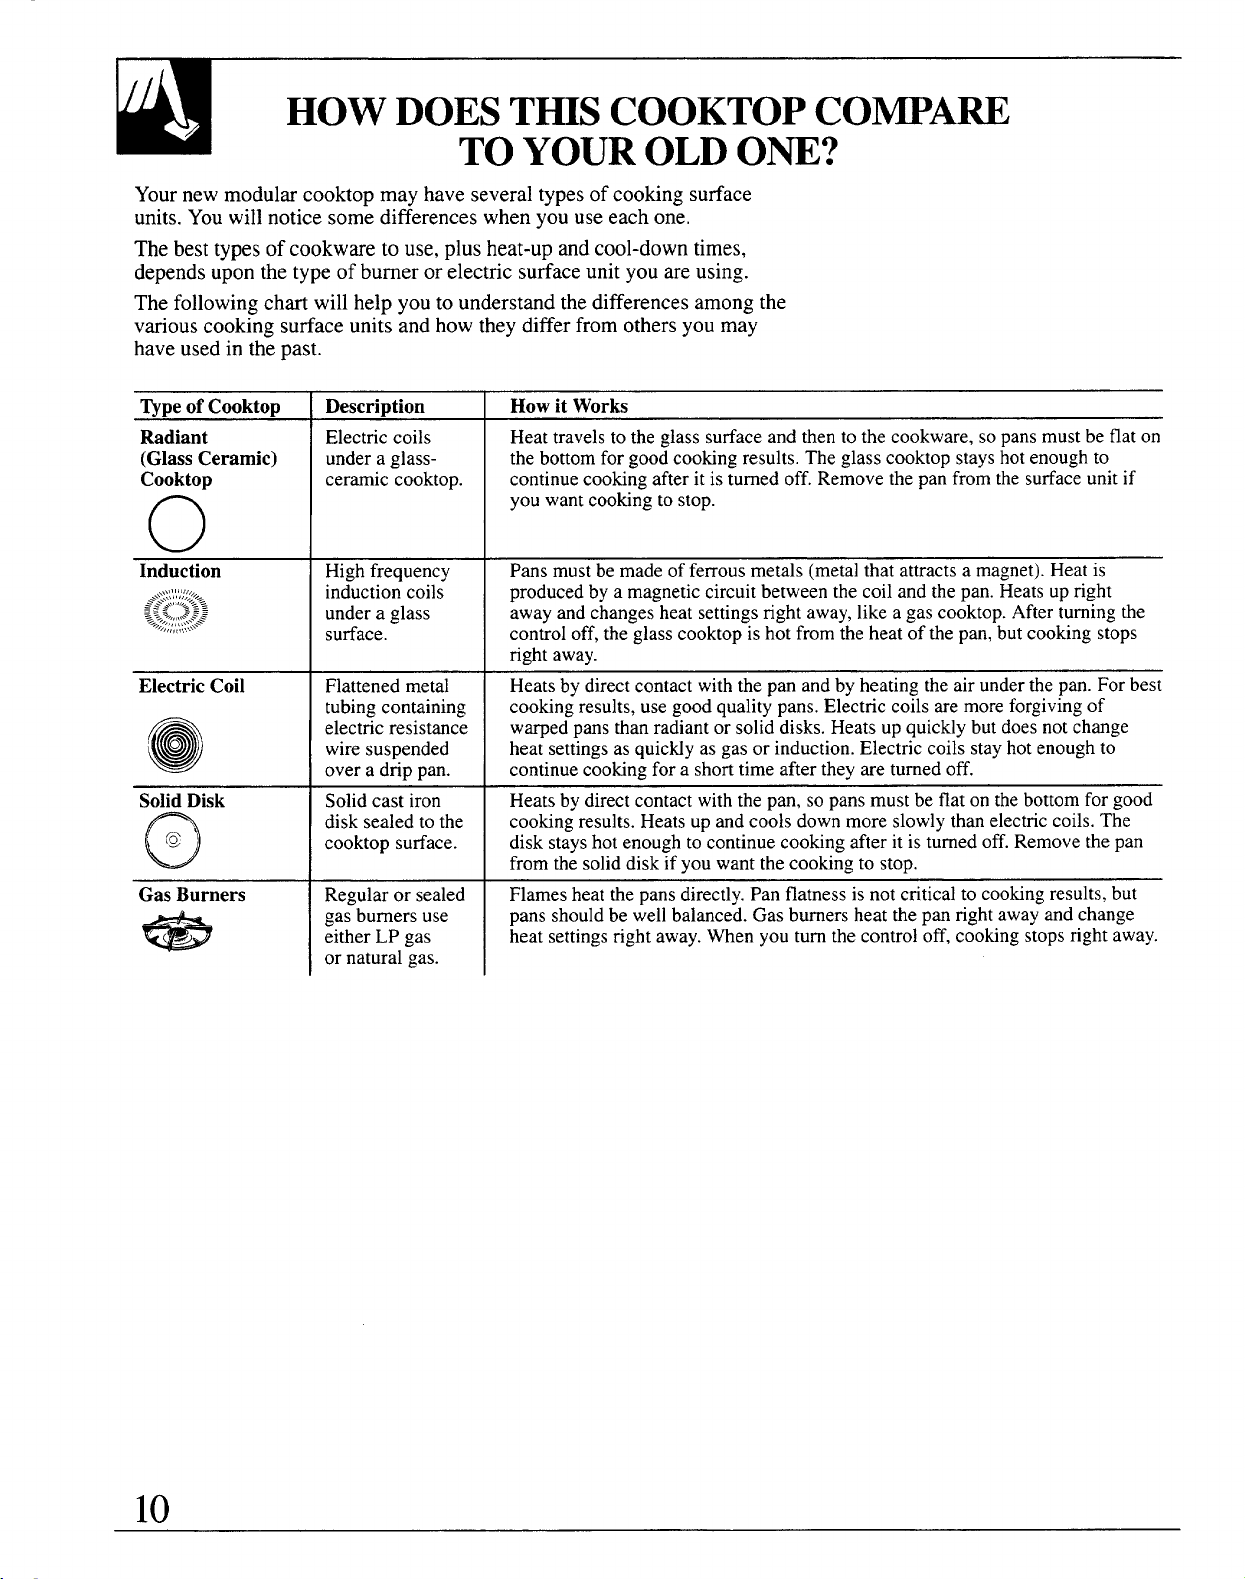
HOW DOEST~S COOKTOP COmAW
TO YO~ OLDOm?
Yournewmodularcooktopmayhaveseveraltypesof cookingsurface
units.Youwillnoticesomedifferenceswhenyouuseeachone.
Thebesttypesofcookwareto use,plusheat-upandcool-downtimes,
dependsuponthetypeofburnerorelectricsurfaceunityouareusing.
Thefollowingchartwillhelpyouto understandthedifferencesamongthe
variouscookingsurfaceunitsandhowtheydifferfromothersyoumay
haveusedin thepast.
~pe ofCooktop
Radiant
(GlassCeramic)
Cooktop
o
Induction
ElectricCoil
@
o
SolidDisk
o
@
‘,
GasBurners
Description
Electriccoils
underaglass-
ceramiccooktop.
Highfrequency
in~uctioncoil;
undera glass
surface.
Flattenedmetal
tubingcontaining
electricresistance
wiresuspended
overa drippan.
Solidcastiron
disksealedtothe
cooktopsurface.
Regularor sealed
gasburnersuse
eitherLPgas
ornaturalgas.
HowitWorks
Heattravelstotheglasssurfaceandthentothecookware,sopansmustbeflaton
thebottomforgoodcookingresults.Theglasscooktopstayshotenoughto
continuecookingafteritisturnedoff.Removethepanfromthesurfaceunitif
youwantcookingtostop.
Pansmustbemadeofferrousmetals(metalthatattractsa magnet).Heatis
producedbya magneticcircuitbetweenthecoilandthepan.Heatsupright
awayandchangesheatsettingsrightaway,likea gascooktop.Afterturningthe
controloff,theglasscooktopishotfromtheheatofthepan,butcookingstops
rightaway.
Heatsbydirectcontactwiththepanandbyheatingtheairunderthepan.Forbest
cookingresults,usegoodqualitypans.Electriccoilsaremoreforgivingof
warpedpansthanradiantorsoliddisks.Heatsupquicklybutdoesnotchange
heatsettingsasquictiy asgasor induction.Electriccoilsstayhotenoughto
continuecookingfora shorttimeaftertheyareturnedoff.
Heatsbydirectcontactwiththepan,sopansmustbeflatonthebottomforgood
cookingresults.Heatsupandcoolsdownmoreslowlythanelectriccoils.The
diskstayshotenoughtocontinuecookingafteritisturnedoff.Removethepan
fromthesoliddiskifyouwantthecookingto stop.
Flamesheatthepansdirectly.Panflatnessisnotcriticalto cookingresults,but
pansshouldbewellbalanced.Gasburnersheatthepanrightawayandchange
heatsettingsrightaway.men youturnthecontroloff,cookingstopsrightaway.
10
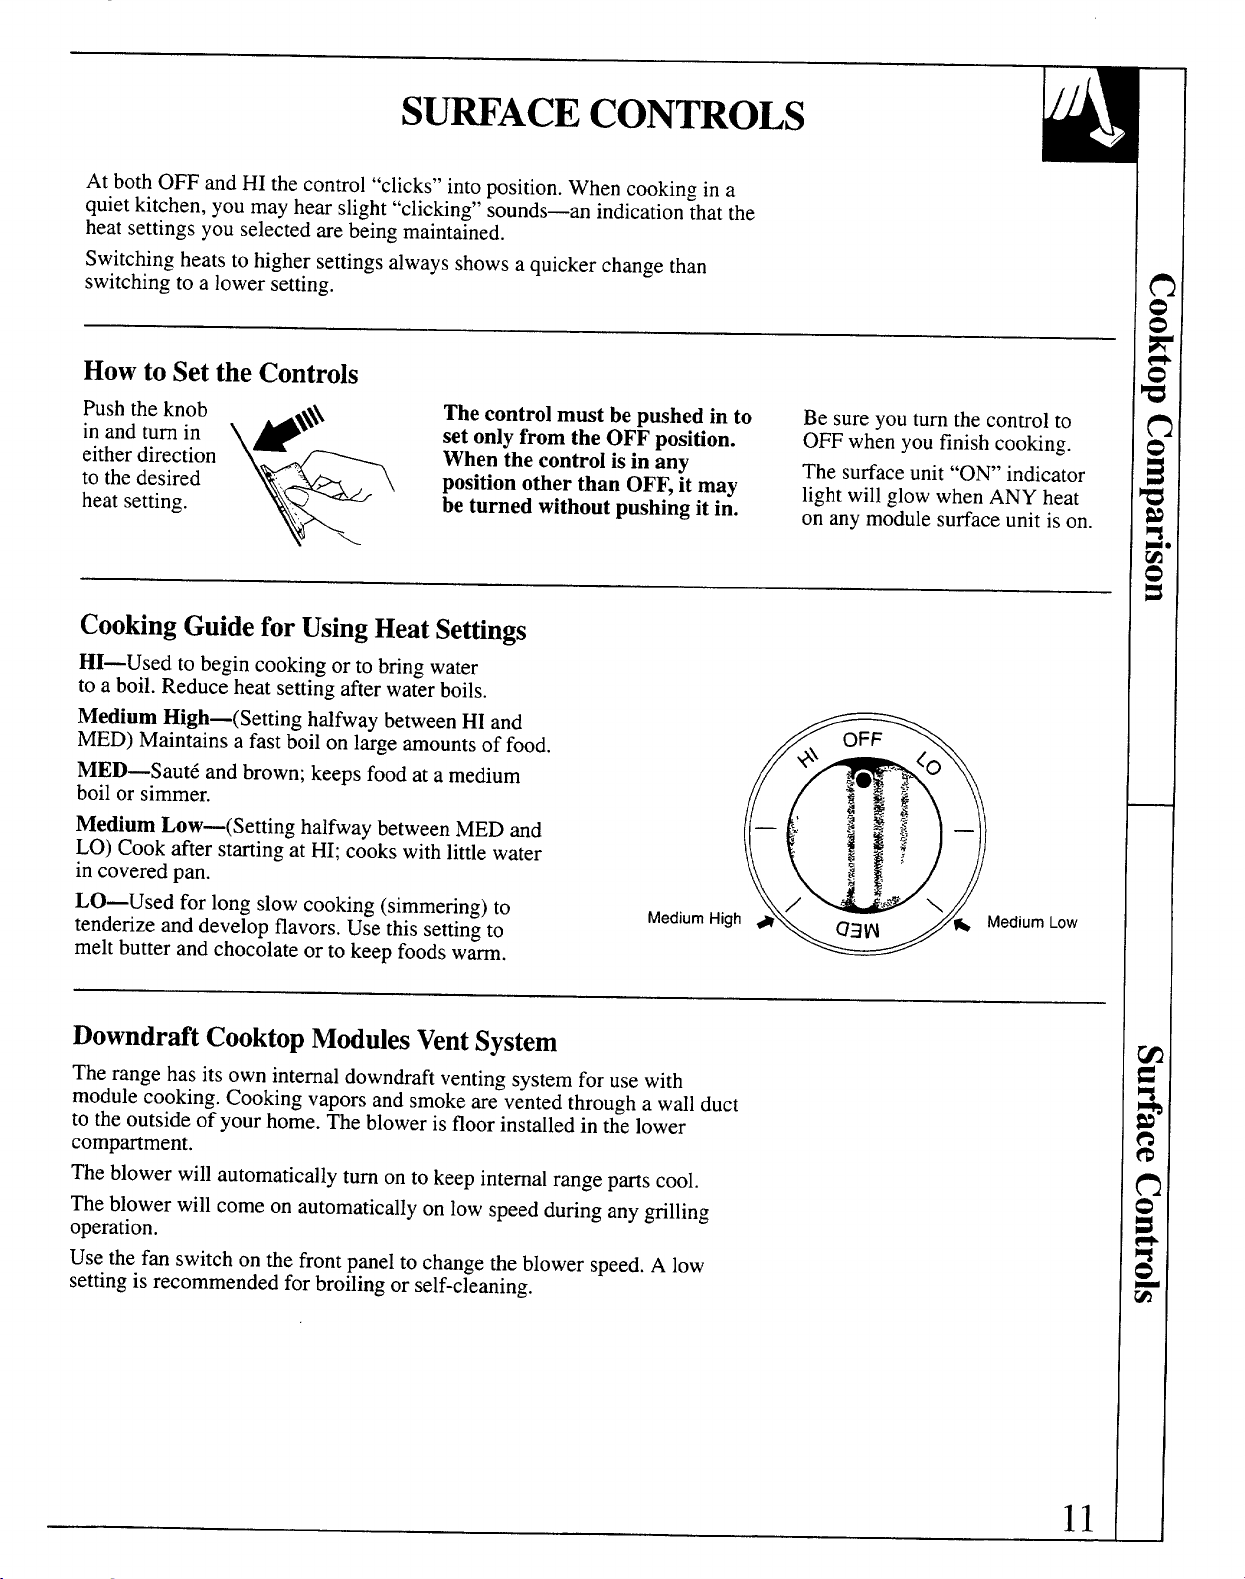
S~ACE CONTROLS
AtbothOFFandHI thecontrol“clicks”intoposition.Whencookingin a
quietkitchen,youmayhearslight“clicking”sounds—anindicationthatthe
heatsettingsyouselectedarebeingmaintained.
Switchingheatsto highersettingsalwaysshowsaquickerchangethan
switchingto a lowersetting.
Howto Set the Controls
Pushtheknob
+*
Thecontrolmustbepushedin to
*
Be
sure you turn the control to
in and turn in
k
set onlyfrom theOFFposition.
OFFwhenyoufinishcooking.
eitherdirection
When the control isin any
Thesurfaceunit“ON’ indicator
to thedesired ,, -
positionother than OFF,it may
heatsetting.
beturned without pushing it in.
lightwillglowwhenANYheat
on anymodulesurfaceunitison.
\
CookingGuidefor UsingHeatSettings
HI—Usedto begincookingorto bringwater
to a boil.Reduceheatsettingafterwaterboils.
Medium High—(SettinghalfwaybetweenHIand
MED)Maintainsafastboilon largeamountsoffood.
m
OFF
+\ .. (~
MED—Saut&andbrown;keepsfoodata medium
boilor simmer.
~o: ~
~gg
Medium Low—(SettinghalfwaybetweenMEDand
— <w
LO)CookafterstartingatHI;cookswithlittlewater
~g~ –
incovered
Dan.
f
~’
a’
.
LO—Usedfor longslowcooking(simmering)to
tenderizeanddevelopflavors.Usethissettingto
meltbutterandchocolateor tokeepfoodswarm.
DowndraftCooktopModulesVentSystem
Therangehasitsowninternaldowndraftventingsystemfor usewith
modulecooking.Cookingvaporsandsmokeareventedthrougha wallduct
to theoutsideof yourhome.Theblowerisfloorinstalledin the
lower
compartment.
Theblowerwillautomaticallyturnonto keepinternalrangepartscool.
Theblowerwillcomeon automaticallyon lowspeedduringanygrilling
operation.
Usethefan switchon thefrontpanelto changetheblowerspeed.A low
settingis recommendedfor broilingor self-cleaning.
11
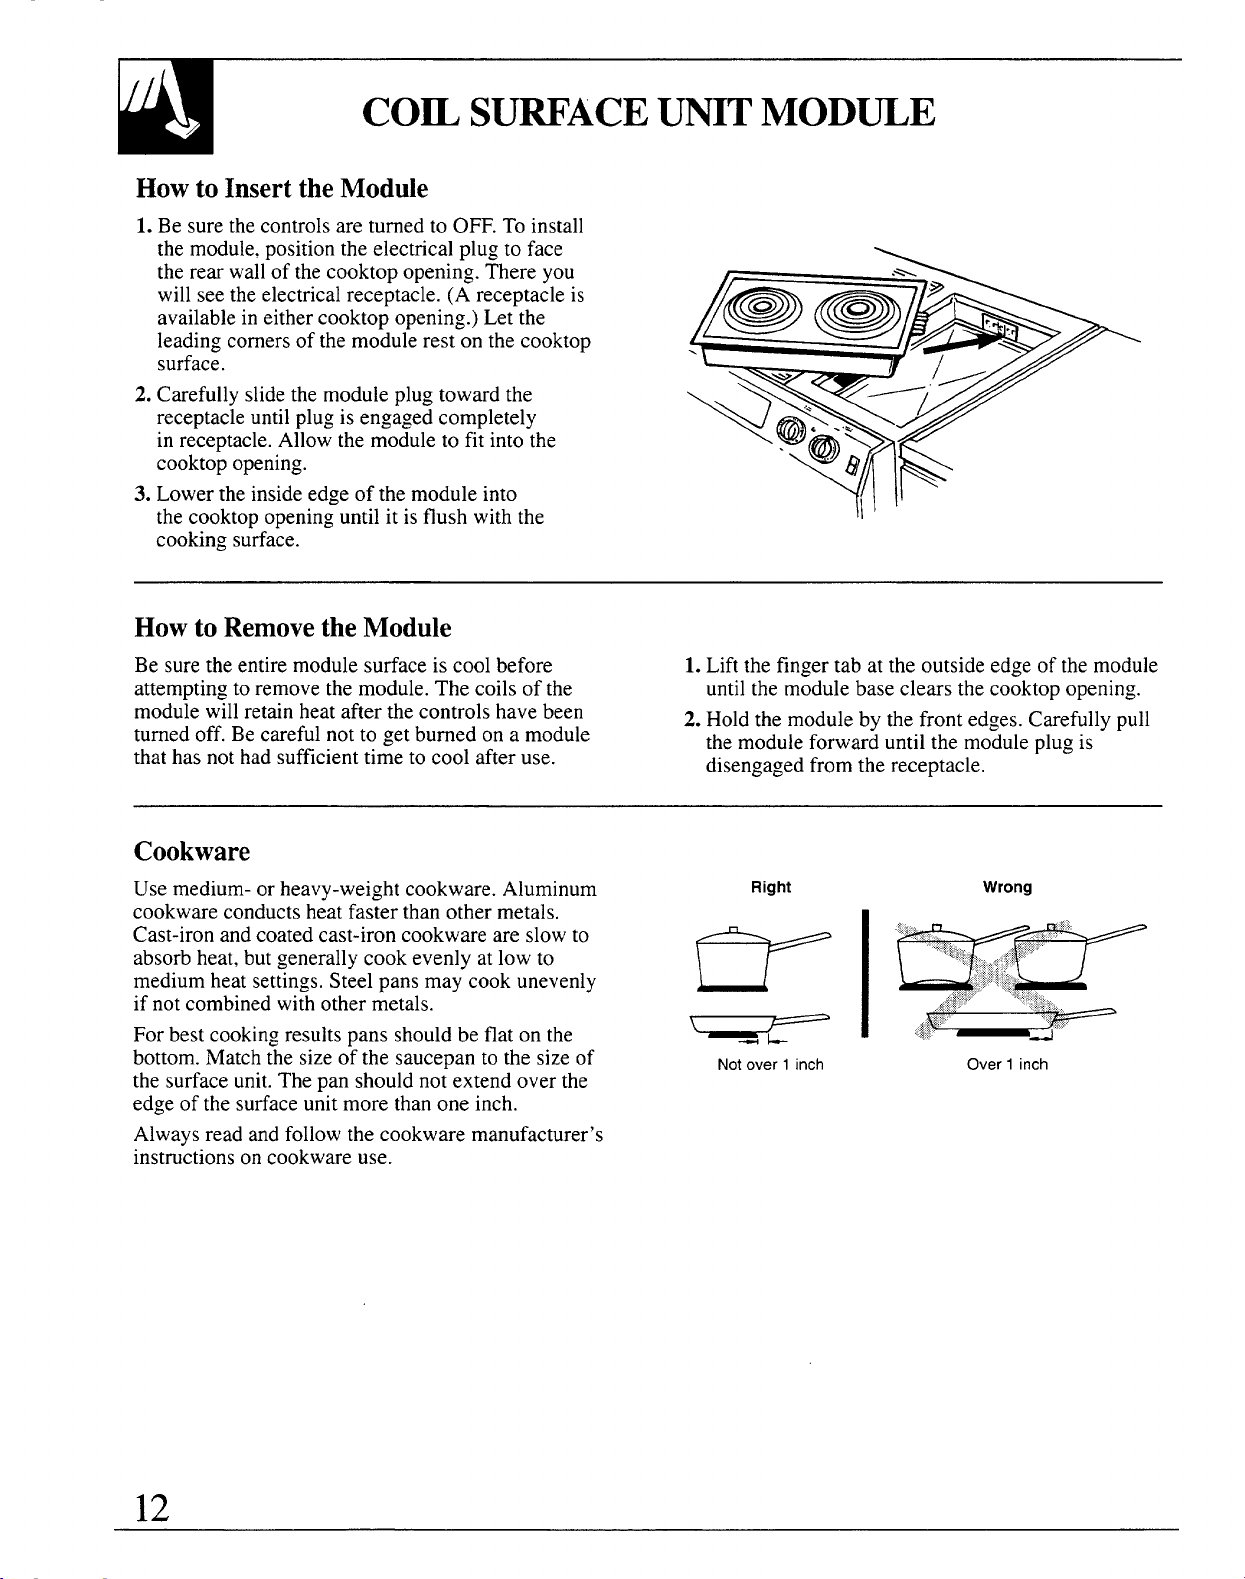
Howto InserttheModule
1.Be surethecontrolsareturnedto OFF.Toinstall
themodule,positiontheelectricalplugto face
therearwallof thecooktopopening.Thereyou
willseetheelectricalreceptacle.(Areceptacleis
availableineithercooktopopening.)Letthe
leadingcomersofthemodulerestonthecooktop
surface.
2.Carefullyslidethemoduleplugtowardthe
receptacleuntilplugis engagedcompletely
in receptacle.Allowthemoduleto fitintothe
cooktopopening.
3. Lowertheinsideedgeofthemoduleinto
thecooktopopeninguntilit isflushwiththe
cookingsurface.
.
Howto RemovetheModule
Besuretheentiremodulesurfaceis coolbefore
1.Liftthefingertab at the outsideedgeof themodule
attemptingto removethemodule.Thecoilsofthe
untilthemodulebaseclearsthecooktopopening.
modulewillretainheatafterthecontrolshavebeen
2. Holdthe moduleby thefrontedges.Carefullypull
turnedoff.Becarefulnotto getburnedon a module
thathasnothadsufficienttimetocoolafteruse.
themoduleforwarduntilthemoduleplugis
disengagedfromthereceptacle.
Cookware
Usemedium-orheavy-weightcookware.Aluminum
cookwareconductsheatfasterthanothermetals,
Cast-ironandcoatedcast-ironcookwareareslowto
absorbheat,butgenerallycookevenlyatlowto
mediumheatsettings.Steelpansmaycookunevenly
if notcombinedwithothermetals.
Forbestcookingresultspansshouldbeflatonthe
bottom.Matchthesizeofthesaucepanto thesizeof
thesurfaceunit.Thepanshouldnotextendoverthe
edgeof thesufiaceunitmorethanoneinch.
Alwaysreadandfollowthecookwaremanufacturer’s
instructionsoncookwareuse.
Right
Wrong
Notover1inch
Over1inch
12

Deep Fat Frying
Donotovetilllcookwarewithfatthatmayspilloverwhenaddingfood.
Frostyfoodsbubblevigorously.Watchfoodfryingathightemperatures.
Keeptherangeandhoodcleanfromgrease.
WokCooking
Werecommendthatyou
Donot usewoksthat
useonlya flat-bottomed
have support rings.
wok.Theyareavailable
*
Useof thesetypesof
..—
atyourlocalretailstore.
woks,withor without
theringinplacecanbe
,::*:*~.:QN’<
dangerous.piacingthe
ringoverthesu~aceunit
,..
willcausea build-upofheatthatwilldamagethe
brushedchromecooktop.Do nottry to usesuchwoks
withoutthering.Youcouldbeseriouslyburnedifthe
woktippedover.
CoilSutiace UnitModuleQuestionsandAnswers
Q. May I can foodsand preserves on my coil
Q. Why am I not getting the heat I need from my
surface uni~?
surface units even though I have the controls on
A. Yes,butonlyusecookwaredesignedforcanning
thecorrect heat setting?
purposes.Checkthemanufacturer’sinstructions
A. Afterturningthesurfaceunitsoffandmaking
andrecipesforpreservingfoods.Besurecanner
suretheyarecool,checkto makesuretheplug-in
is flat-bottomedandfitsoverthecenterofthecoil
unitsare securelypluggedin.
surfaceunitmodule.Sincecanninggenerateslarge
Q. Why doesmy cookwaretilt whenI placeit on
amountsof steam,be carefulto avoidbumsfrom
the surface unit?
steamor heat.Canningshouldonlybedoneonthe
surfaceunits.
A. Becausethesurfaceunitisnotflat.Makesurethe
Q. CanI cover my drip pans with foil?
feetof thesurfaceunitsaresittingontheinside
rimofthedrippanandthedrippanisflaton the
A.No.Cleanas recommendedin theCareand
cooktopsurface.
Cleaningsection.
Q. Why isthe porcelain finish on my cookware
Q. Can I use specialcookingequipment, likean
comingo~
oriental wok,on any surface unit?
A. If yousetthesurfaceunitcoilhigherthanrequired
A.Cookwarewithouta flatsurfaceis not
for thecookwarematerialandleaveit,thefinish
recommended.Thelifeof themodulesurface
maysmoke,crack,poporbumdependingon the
unitscanbe shortenedandthecooktopcanbe
potorpan.
damagedfromthehighheatneededforthistype
Also,if yousetthe surfaceunitcoilhigherthan
of cookware.A specialflat-bottomedwokcanbe
usedsafely.
requiredfora longperiodof time,withsmall
amountsofdryfood,youcandamagethefinish.
13
WDWNT MODULE
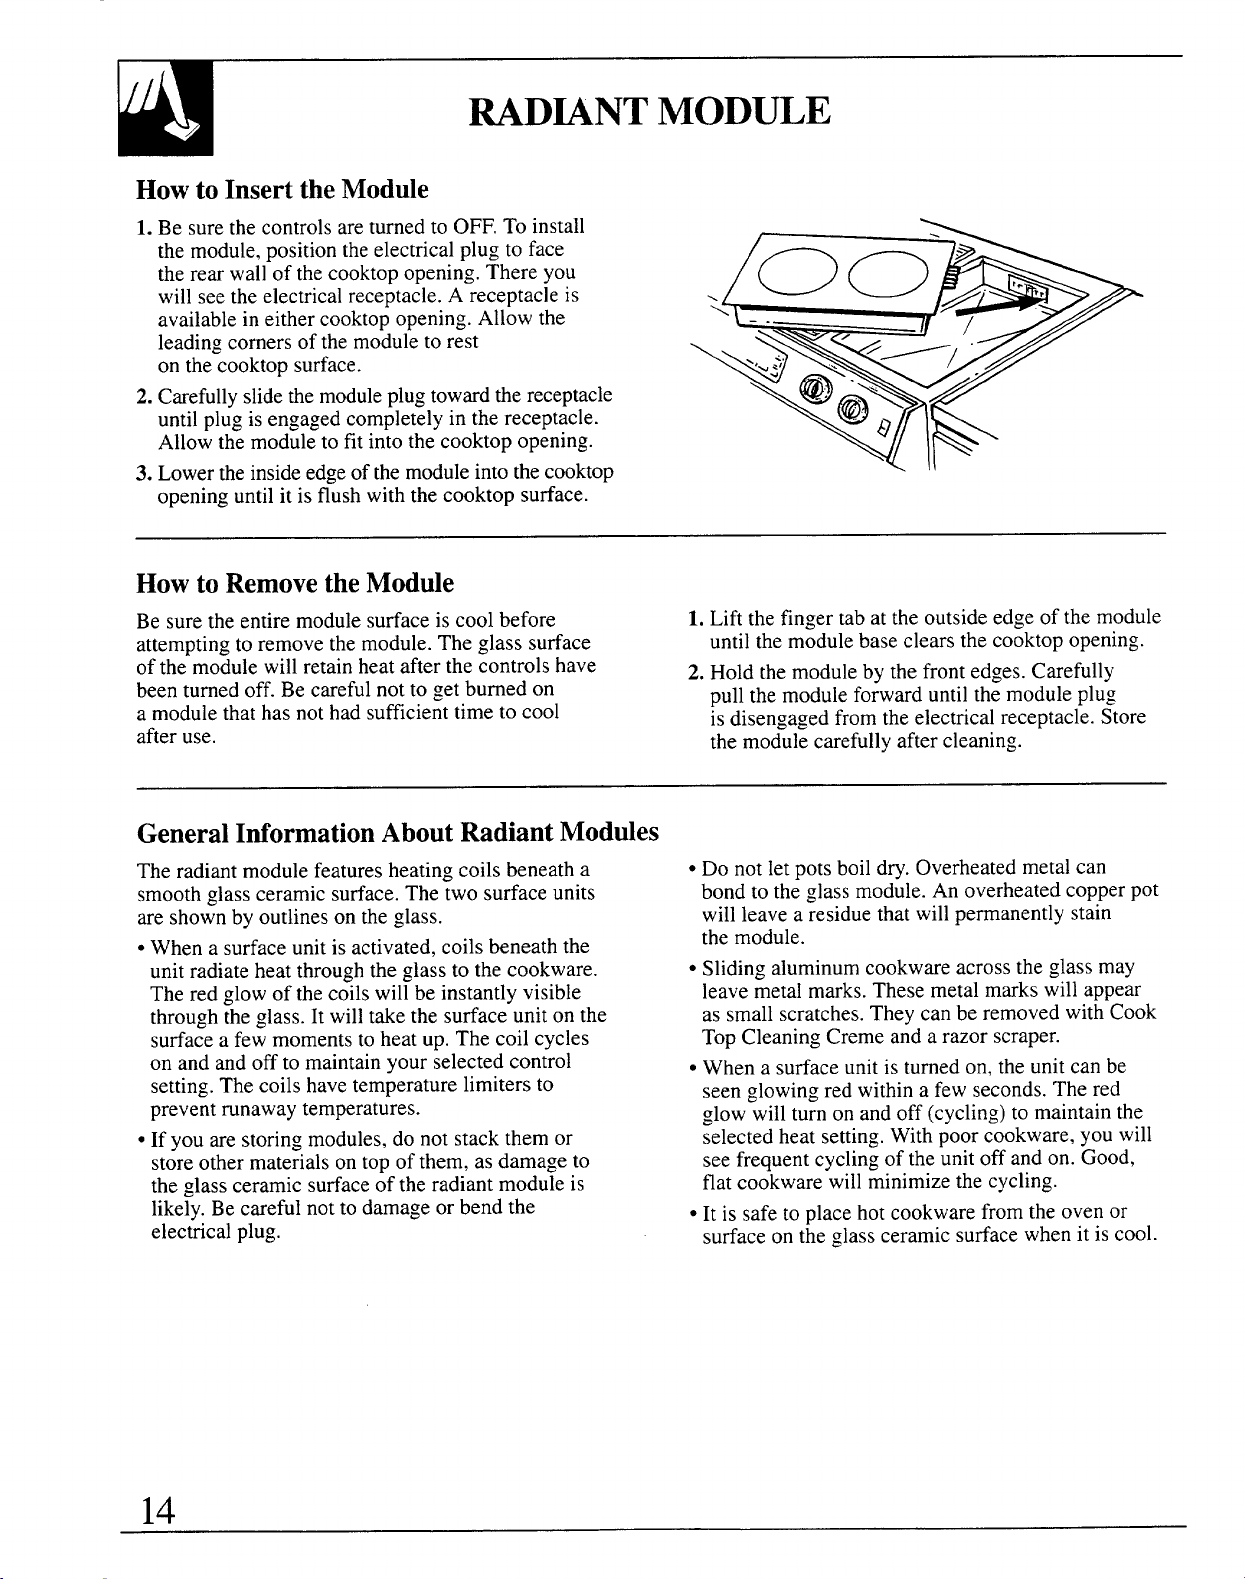
Howto InserttheModule
1.Besurethecontrolsareturnedto OFF.Toinstall
themodule,positiontheelectricalplugto face
therearwallof thecooktopopening.Thereyou
willseetheelectricalreceptacle.A receptacleis
availableineithercooktopopening.Allowthe
leadingcornersofthemoduleto rest
onthecooktopsurface.
2.Carefullyslidethemoduleplugtowardthereceptacle
untilplugis engagedcompletelyin thereceptacle.
Allowthemoduleto fitintothecooktopopening.
3. Lowertheinsideedgeofthemoduleintothecooktop
openinguntilitis flushwiththecooktopsurface.
Howto RemovetheModule
Besuretheentiremodulesurfaceiscoolbefore
1.Liftthefingertabattheoutsideedgeofthemodule
attemptingto removethemodule.Theglasssurface
untilthemodulebaseclearsthecooktopopening.
ofthemodulewillretainheatafterthecontrolshave
beenturnedoff.Becarefulnotto getburnedon
2.Holdthemodulebythefrontedges.Carefully
a modulethathasnothadsufficienttimeto cool
pullthemoduleforwarduntilthemoduleplug
isdisengagedfromtheelectricalreceptacle.Store
afteruse.
themodulecarefullyaftercleaning.
GeneralIMormationAboutRadiantModules
Theradiantmodulefeaturesheatingcoilsbeneatha
● Do notletpotsboildry.Overheatedmetalcan
smoothglassceramicsurface.Thetwosurfaceunits
bondto theglassmodule.Anoverheatedcopperpot
areshownbyoutlinesontheglass.
willleavea residuethatwillpermanentlystain
● Whena surfaceunitisactivated,coilsbeneaththe
themodule.
unitradiateheatthroughtheglasstothecookware.
● Slidingaluminumcookwareacrosstheglassmay
Theredglowof thecoilswillbeinstantlyvisible
leavemetalmarks.Thesemetalmarkswillappear
throughtheglass.Itwilltakethesurfaceunitonthe
as smallscratches.TheycanberemovedwithCook
surfacea fewmomentstoheatup.Thecoilcycles
TopCleaningCremeanda razorscraper.
on andandoffto maintainyourselectedcontrol
● Whena surfaceunitisturnedon,theunitcanbe
setting.Thecoilshavetemperaturelimitersto
preventrunawaytemperatures.
seenglowingredwithina fewseconds.Thered
glowwillturnonandoff(cycling)to maintainthe
● If youarestoringmodules,donotstackthemor
selectedheatsetting.Withpoorcookware,youwill
storeothermaterialsontopofthem,asdamageto
seefrequentcyclingoftheunitoffandon.Good,
theglassceramicsurfaceof theradiantmoduleis
flatcookwarewillminimizethecycling.
likely.Becarefulnotto damageorbendthe
● It is safeto placehotcookwarefromtheovenor
electricalplug.
surfaceontheglassceramicsurfacewhenitis cool.
~pes of Cookware
Thefollowinginformation willhelp you choose
cookwarewhich willgivegoodperformance.
StainlessSteel:
highly recommended
Especially goodwitha sandwichcladbottom.The
sandwichbottomcombinesthebenefitsof stainless
steel(appearance,durability,andstability)withthe
advantagesof aluminumor copper(heatconduction,
evenheatdistribution).
Aluminum:
heavy weight recommended
Goodconductivity.Aluminumresiduessometimes
appearasscratchesonthecooktop,butcanbe
removedif cleanedimmediately.Becauseof its
lowmeltingpoint,thinweightaluminumshouldnot
beused.
Glass-ceramic:
Usable, but not recommended.
Poorperformance.Mayscratchsurface.
Howto CheckPanPerformance
Useofcorrect cookwarecan affectthe cooking
performance and cleaningofyour cooktop.
Thecorrectcookwarereducesthetemperatureof
thecooktopsurfaceandminimizesthechanceof
spilloversburningontothecooktop.
Youmust use pans with perfectly flat bottoms.
Somepansmayhavecurvedorroundedbottomsor
maybewarped.If youareunsureof theflatnessof
yourpansyoumaydo thisquicktest.
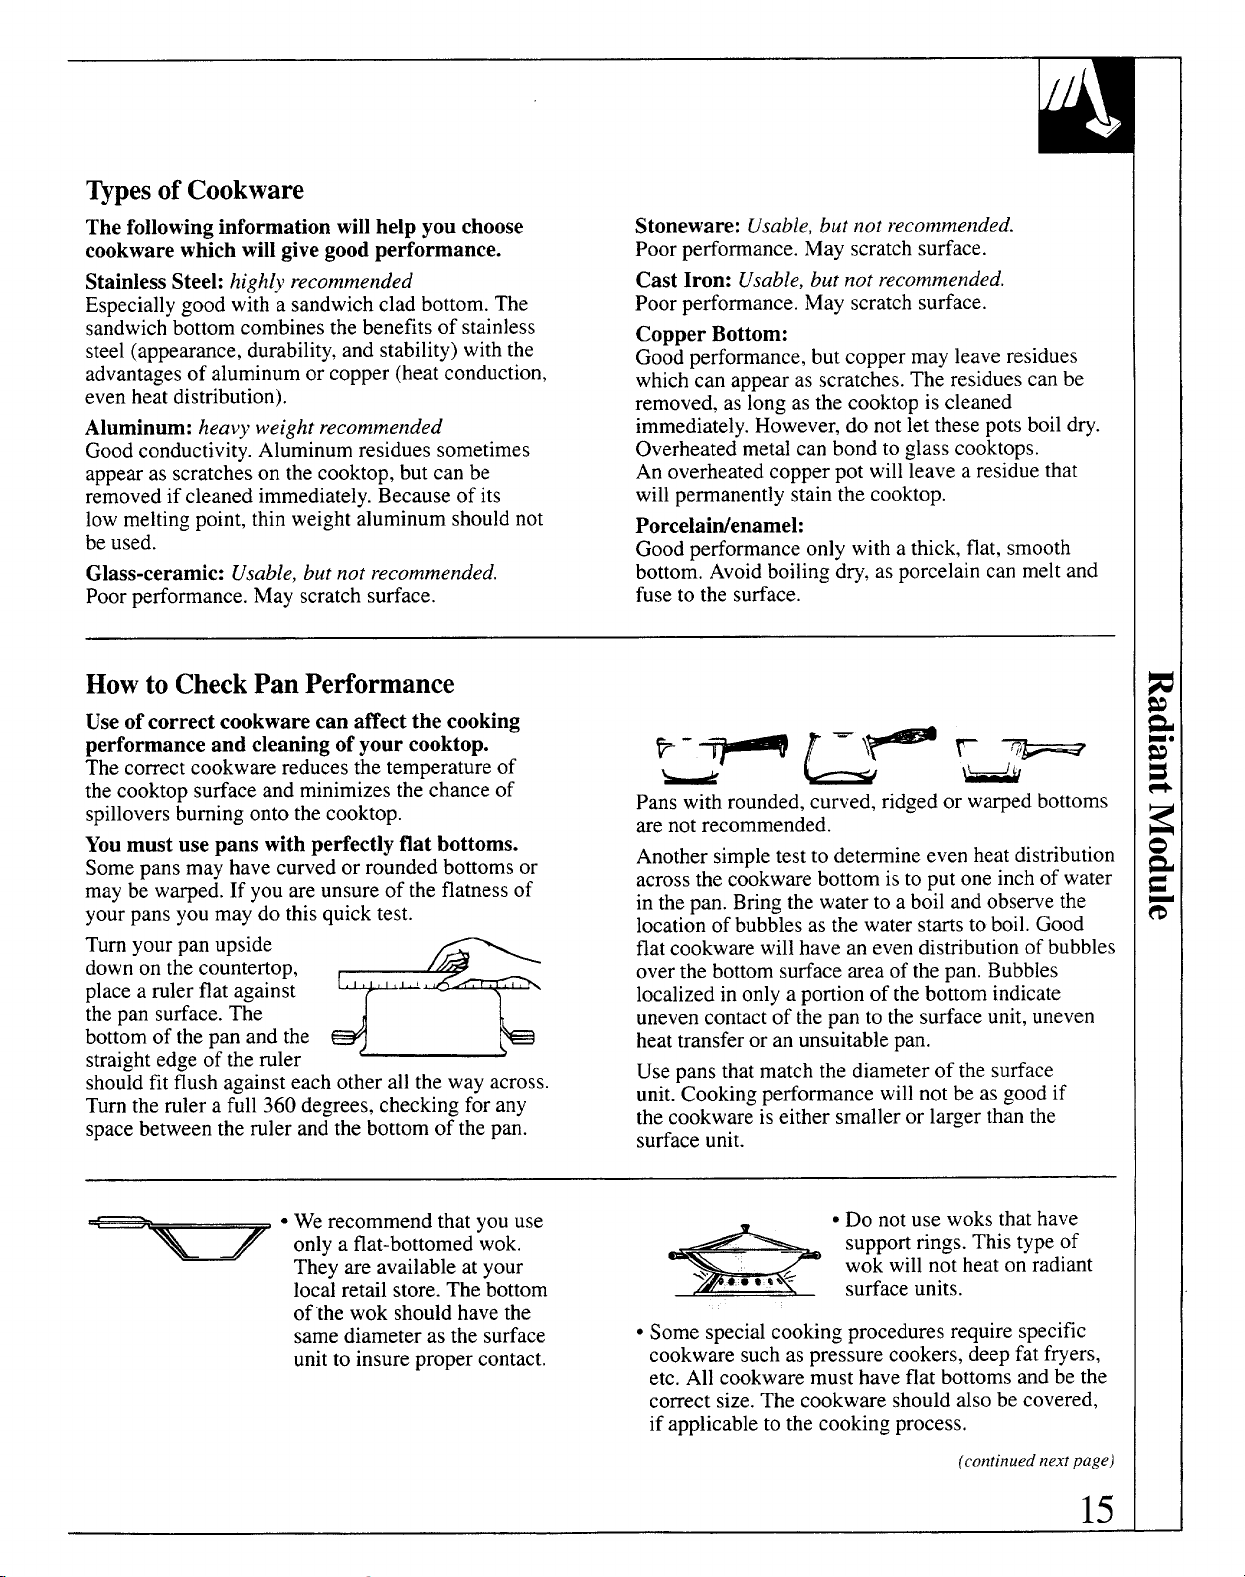
Turnyourpanupside
downon thecountertop,
placea rulerflatagainst
e
m
thepansurface.The
bottomofthepanandthe
straightedgeoftheruler
shouldfitflushagainsteachotherallthewayacross.
Turnthemler a full360degrees,checkingforany
spacebetween
the rulerandthebottomof thepan.
Stoneware:
Usable, but not recommended.
Poorperformance.Mayscratchsurface.
Cast Iron:
Usable, but not recommended.
Poorperformance.Mayscratchsurface.
Copper Bottom:
Goodperformance,butcoppermayleaveresidues
whichcanappearas scratches.Theresiduescanbe
removed,aslongasthecooktopiscleaned
immediately.However,do notletthesepotsboildry.
Overheatedmetalcanbondto glasscooktops.
Anoverheatedcopperpotwillleavearesiduethat
willpermanentlystainthecooktop.
Porcelaidenamel:
Goodperformanceonlywitha thick,flat,smooth
bottom.Avoidboilingdry,asporcelaincanmeltand
fuseto the surface.
-’ e-
Panswithrounded,curved,ridgedor warpedbottoms
arenotrecommended.
Anothersimpletesttodetermineevenheatdistribution
acrossthecookwarebottomistoputoneinchof water
inthepan.Bringthewatertoaboilandobservethe
locationofbubblesasthewaterstartstoboil.Good
flatcookwarewillhaveanevendistributionofbubbles
overthebottomsurfaceareaof thepan.Bubbles
localizedinonlyaportionof thebottomindicate
unevencontactofthepantothesurfaceunit,uneven
heattransferoranunsuitablepan.
Usepansthatmatchthe diameterofthesurface
unit.Cookingperformancewillnotbeasgoodif
thecookwareiseithersmalleror largerthanthe
surfaceunit.
+- ● Werecommendthatyouuse
onlya flat-bottomedwok.
Theyare availableatyour
localretailstore.Thebottom
of‘thewok shouldhavethe
samediameterasthesurface
unitto insurepropercontact.
● Do notusewoksthathave
= surfaceunits.
supportrings.Thistypeof
wokwdl notheatonradiant
● Somespecialcookingproceduresrequirespecific
cookwaresuchaspressurecookers,deepfatfryers,
etc.All cookwaremusthaveflatbottomsandbethe
correctsize.Thecookwareshouldalsobecovered,
if applicableto thecookingprocess.
(continued next page)
15
WDWNT MOD~E
(continued)
CAUTION
● Nevercookdirectlyontheglass.Alwaysusecookware.
● Alwaysplacethepanin thecenterofthesurfaceunityouarecookingon.
● Donotslidecookwareacrossthecooktopbecauseitcan scratchtheglass.
Theglassisscratchresistant,notscratch-proof.
● Donotusethesurfaceas a cuttingboard.
PlasticandSugarySpillovers
Sugaryspillovers(suchasjellies,fudge,candysyrups)
Specialcareshouldbetakenwhenremovinghot
ormelted plasticscancausepittingofthesurfaceof
substances.FollowtheinstructionsintheCareand
yourmodule(notcoveredbythewarranty)unlessthe Cleaningsectioncarefully.
spillisremovedwhilestillhot.
DeepFat Frying WokCooking
Donotovetilllcookwarewithfatthatmayspillover
whenaddingfood.Frostyfoodsbubblevigorously.
Watchfoodfryingathightemperatures.Keepthe
rangeandhoodcleanfromgrease.
We recommendthatyouuse
onlya flat-bottomedwok.
Theyare availableatyourlocal
retailstore.
16
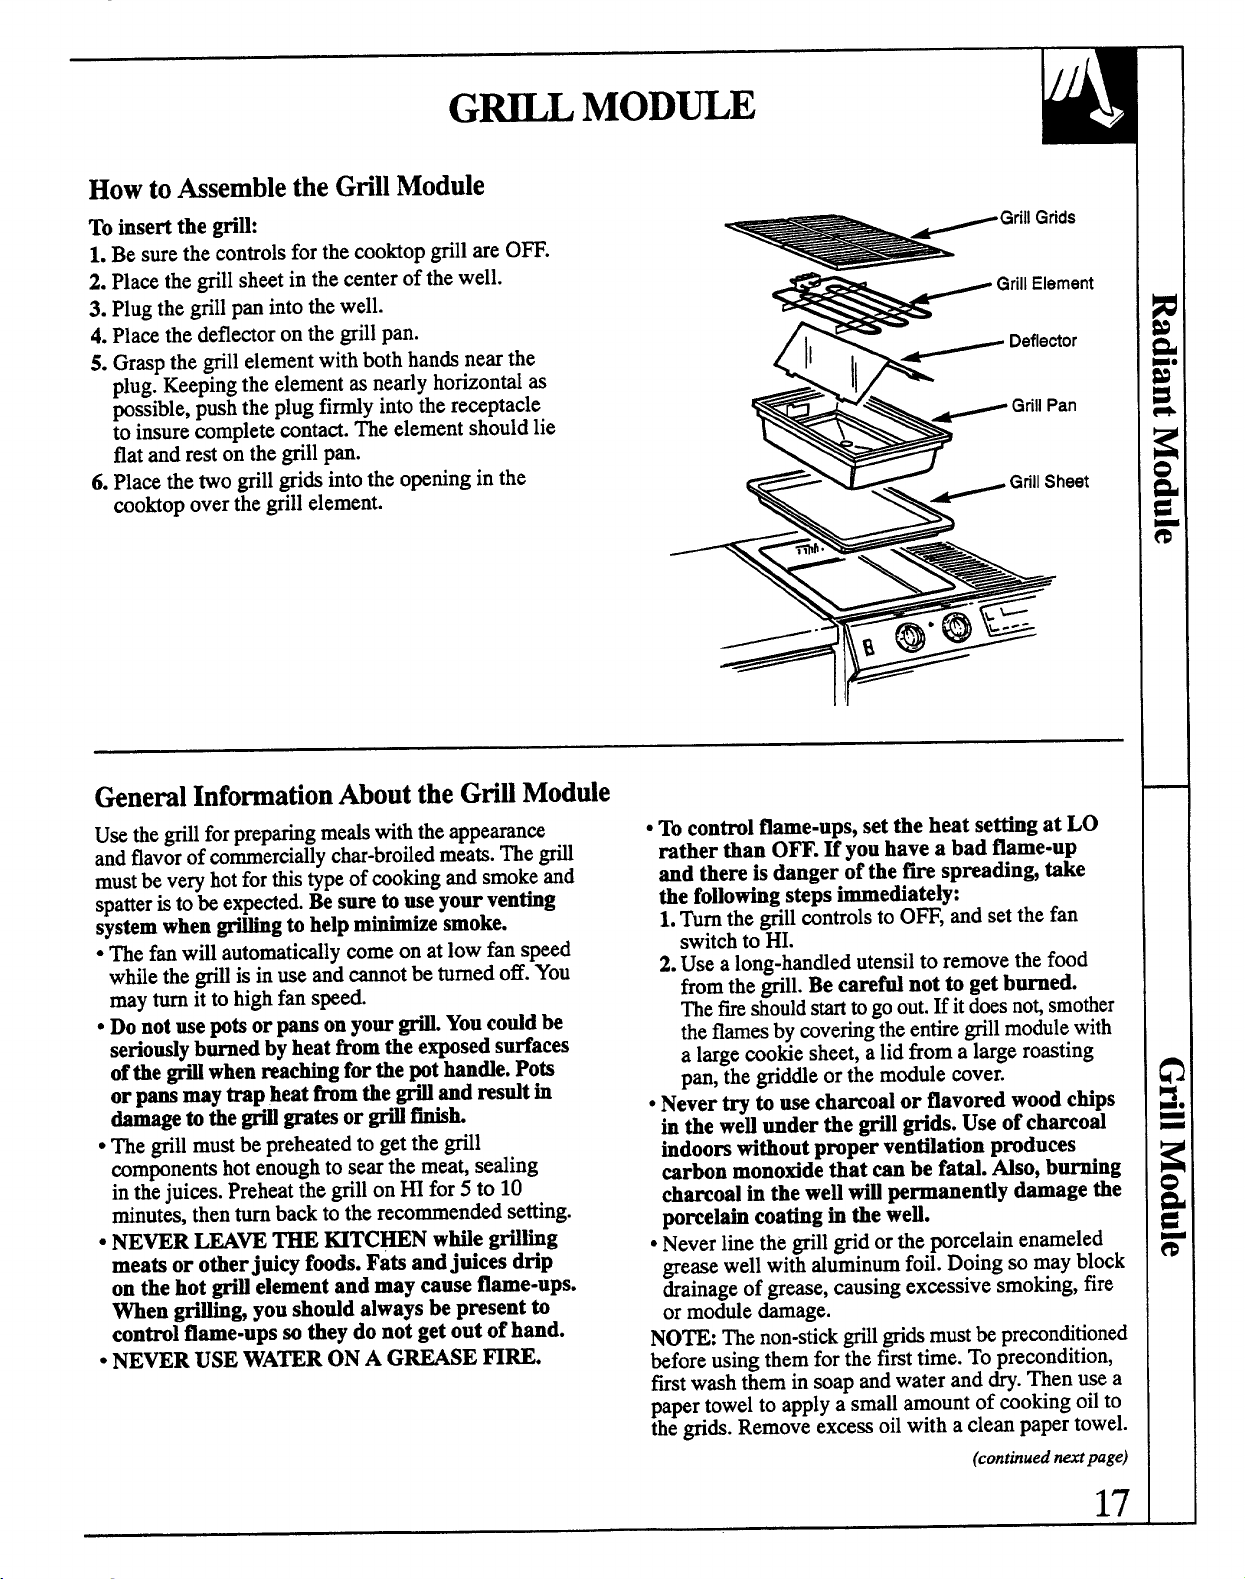
HowtoAssemblethe Gtill Module
I
Toinsertthegri~:
1.Besurethecontrolsforthecooktopgrillare0~.
2. Placethegrillsheetin thecenterofthewell.
3. Plugthegrillpanintothewell.
4.Placethedeflectoronthegrillpan.
5. Graspthegrillelementwithbothhandsnearthe
plug.Keepingtheelementasnearlyhotiontal as
possible,pushtheplugfidy intothereceptacle
to insurecompletecontact.Theelementshouldlie
flatandrestonthegrillpan.
6. Placethetwogrillgridsintotheopeninginthe
cooktopoverthegrillelement.
/ [$
Geneml InformationAbout the Gtill Module
Usethegrillforpreparingreeds withtheappearance
andflavorofcommerciallychar-brotiedmeats.The@l
mustbeveryhotforthistypeofcookingandsmokeand
spatteristobeexpected.Besuretouseyourventing
systemwhengri~g tohelpm-e smoke.
● Thefanwillautomatidly comeon at lowfan speed
whflethegri~is inuseandcannotbe turnedoff.You
mayturnittohighfanspeed.
● Donotusepotiorpansonyour@. Youcotid be
seriourdyburnedbyheatfromtheexposedsurfaces
ofthe@ whenreachingforthepothande. Pots
orpansmaytrapheatfromthe@ andresdt in
_etitie@~@sor@~k
● Thegrillmustbe preheatedto getthe@l
componentshotenoughto searthemeat,sealing
inthejuices.Preheatthegrillon~ for5 to 10
minutes,thenturnbacktotherecommendedsetting.
cNEVERLEAVE= ~TC~N w~e gtihg
meatsorotherjuicy foods.Fatsandjuices drip
onthehot@ elementandmaycauseflame-ups.
Whengrihg, youshodd alwaysbepresentto
controlflame=upssotiey donotgetoutofhand.
● NEVERUSEWATERONA GREASEHRE.
● Tocontrolflame-ups,settheheatsettingatLO
ratherthanOFF.fi youhavea badflame-up
andthereis dangerofthefm spreading,take
thefollowingstepsimmediately:
1.Turnthegrillcontrolsto 0~, andsetthefan
switchto HI.
2.Usealong-handedutensilto removethefood
fromthegrill.Becareti notto getburned.
Thefi shouldstarttogoout.Ifitdoesno~smother
theflamesbycoveringtheentiregrillmodulewith
a largecookiesheet,a lid froma largeroasting
pan,thegridde or themodulecover.
● Nevertry to usecharcoalor flavoredwoodchips
inthewe~underthe@l grids.Useof charcoal
indoomwithoutproperventilationproduces
carbonmonoxidethatcanbe fati. Mso, burning
charcoalin thewe~winWrrnanentiydamagethe
Wrcelti coatinginthewe~.
● Neverlinethegrillgridortheporcelainenameled
greasewellwithaluminumfoil.Doingso mayblock
drainageofgrease,causingexassive smoking,fire
or moduledamage.
NOTE:Thenon-stick@l gridsmustbepreconditioned
beforeusingthemforthefirsttime.Toprecondition,
firstwashtheminsoapandwateranddry.Thenusea
papertowelto applya smallamountof cookingoilto
thegrids.Removeexcessoilwith a cleanpapertowel.
(conthued ntipage)
17
G~L MOD~E
(continued)
NOTE:It is recommendedthatyouhavea dry chemical,foamorHalon
typefireextinguisherwhereyoucaneasilyreachit in caseof a cooking
fire.NEVERUSEWATERONA GREASEFIREas itis likelyto spread
theflames.Readtheinstructionson theextinguisheraheadoftimeandbe
preparedtofollowthemincaseofa cookingfire.
GrillTips
● Do notleavethegrillunattendedwhileit is inuse.
● Removeaccumulatedgreasefromthegrillpanafter
eachusetolessensmokingandodors.Greasebuildup
canbecomea firehmard.
● Thegratesshouldbeoiledor sprayedwitha
non-stick,salt-freevegetableoilbeforecooking
to preventsticking.
● Preheatthegrillfor5-10minutesatHI heatsetting,
thenturnto thedesiredsettingforcooking.
● Trimthefatfrommeatsbeforeplacingthemonthe
grill.Thiswillreducesmokingandlessengrease
buildupinthegreasewell.
● Allowspacebetweenfoodswhenplacingthemon
thegrill.Airneedstocirculatearoundthefoodfor
bestcookingresults.
● Occasionallyrearrangefoodson thegrillto prevent
stickingandprovidebetterbrowning.
● Seasonmeatsaftercookingratherthanbefore—
saltcandrawoutjuicesanddryoutmeat.Usetongs
to turnandrearrangemeatsonthegrill;forkswill
piercethemeatandreleasejuices.
GrillQuestionsand Answers
Q.Whencookingmanyindividualfoods,whatcan
I doto insurethatfoodswillcookevenly?
A.Whencookingfoodsof varioussizesand
thicknesses,startlargerorthickerpiecesfirst
andaddquickercooking,smallerpieceslater.
Pressthemeatlightlyto lieflatonthegrill.
Slashthefat on theedgesofsteaksandchops
to preventcurling.Breakthejointsof split
chickensso theywilllieflat.
Q.My grilledmeatssometimescomeout
drierthantheyshould.WhatcanI do
to helppreventthis?
A. Seasonmeatsaftercookingratherthanbefore—
saltcandrawoutjuicesanddryoutmeat.Use
tongsto turnandrearrangemeatsonthegrill;
forkswillpiercethemeatandreleasejuices.
Q.Ifollowthecookingtimessuggested,butmy
foodsdon’tgetdoneproperly.Is there
somethingwrongwithmygrill?
A. Probablynot.Suggestedcookingtimesshouldbe
usedonlyas a generalguide.Variablesinfoodcan
changecookingtimesrequired.
Q.HowcanI keepbarbecuedmeatsfrom
developinganunattractiveburnedlook
andtaste?
A. Saucescontainingsugarwilloftenburnif used
duringtheentirecookingtime.If yourfavorite
saucecontainssugar,try addingit onlyduring
thelast 15to 20minutesofcookingtimefor
bestresults.
Q.Canmygrillbeswitchedtothe otherside
oftherange?
A. Yes.Theseinterchangeablemodulescanbeused
oneithertherightorleftsideof the cooktop.
Wheninsertingorremovinga module,takecare
notto forcetheconnectionor exertunduepressure
whichcoulddamagetheelectricalcontacts.
Additionalmodulescanbepurchasedfromyour
dealerto doubleyourgril~griddlecapacityorto
addtwo morecoilsurfaceunits.
Q. Foodscookedon my grill are not browning as
much as I wouldlike.Whatcouldcausethis?
A. A longerpreheatingandgrilltimemaybe
necessaryto achievethedesiredresults.
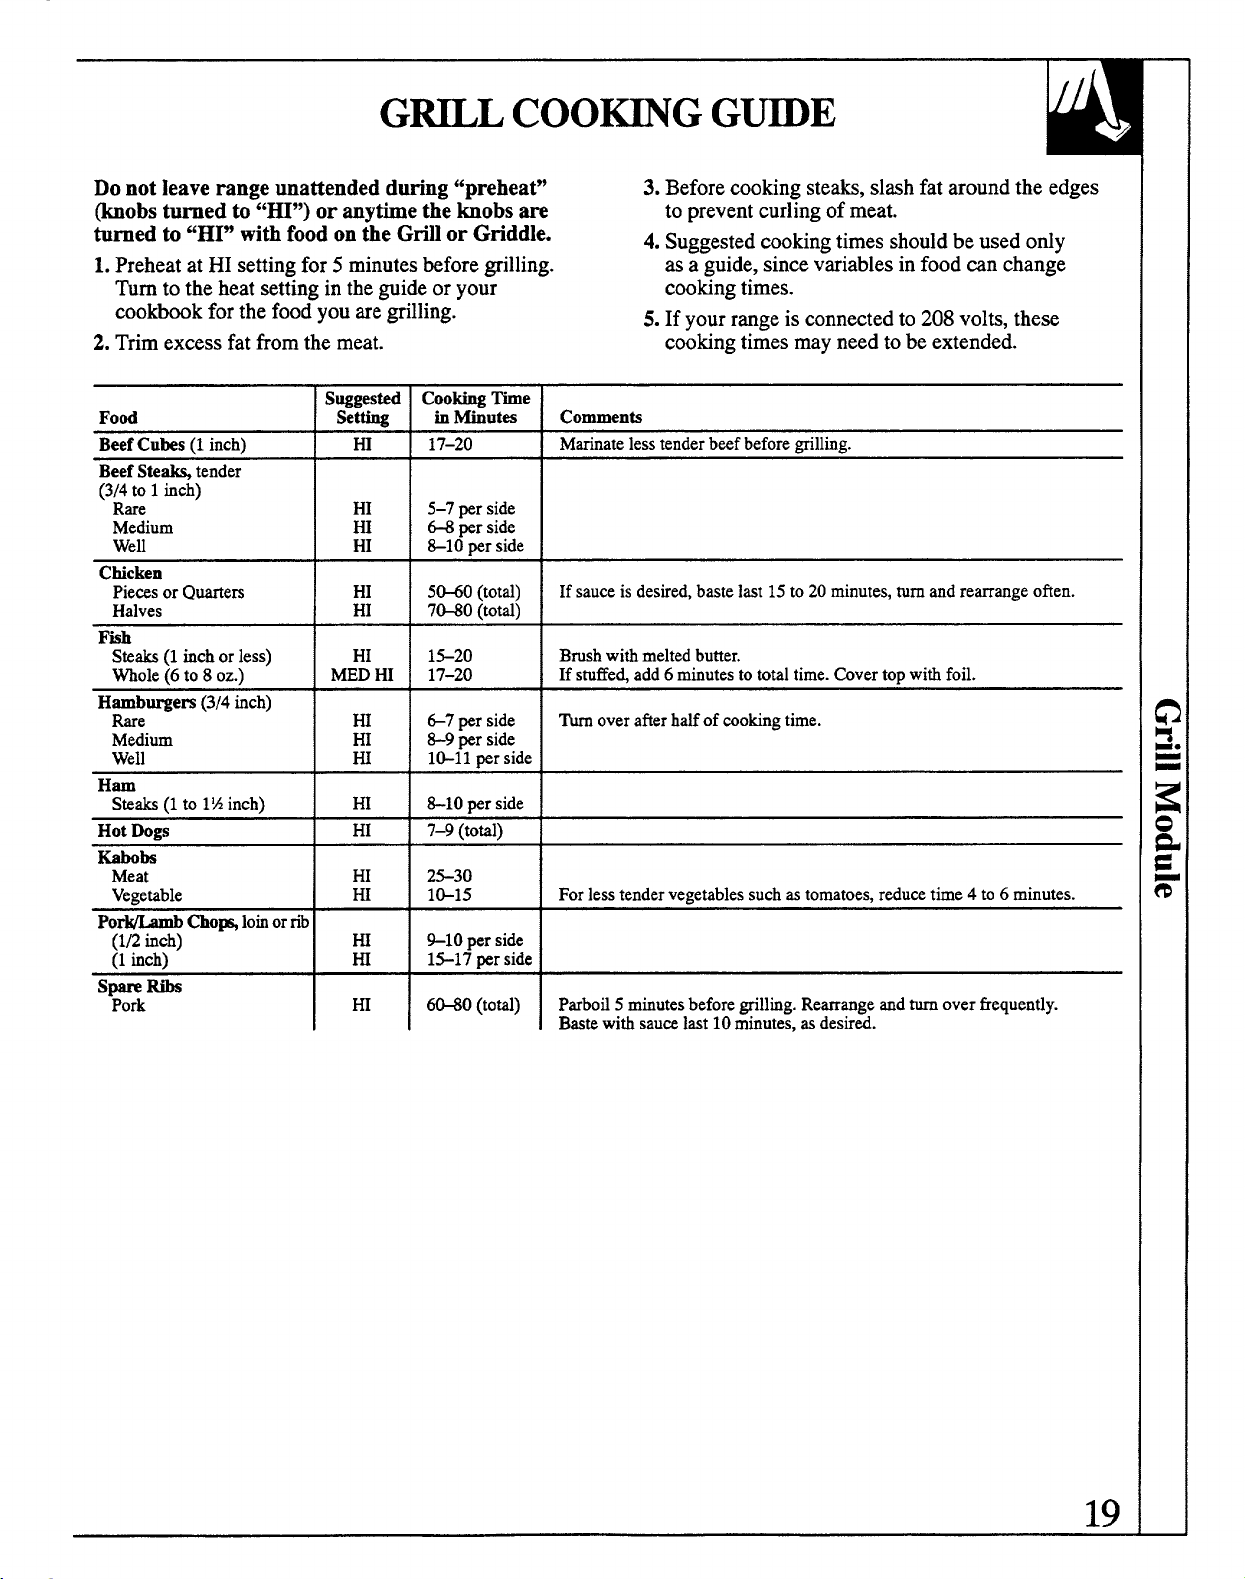
Donotleaverangeunattendedduring“preheat”
3.Beforecookingsteaks,slashfataroundthe edges
@ohs turnedto “~”) oranytimethebobs are
topreventcurlingofmeat.
turned to “HI” with food on the Grill or Griddle.
4.Suggestedcookingtimesshouldbeusedonly
1.Preheatat HI settingfor 5 minutesbeforegrilling.
asa guide,sincevariablesinfoodmn change
Turnto the heatsettingin theguideor your
cookbookforthefoodyouaregrilling.
2.Trimexcessfat fromthemeat.
Suggested
Foti
Set@
BeefCubs (1inch) ] HI
BeefSte@ tender
(31: 1inch)
HI
Medium HI
Well
HI
Cticken
PieeesorQuarters HI
Halves HI
H&:qers (3/4inch)
m
Medium
HI
Well
m
Hmn
Steaks(1to 1%inch) HI
HotDogs HI
mhohs
Meat
HI
17–20
5-7 perside
= perside
*1O ~r side
5M0 (total)
7M0 (toti)
1s20
17-20
&7 perside
%9 perside
lW1l perside
%10perside
7-9 (total)
2S30
1G15
%10per side
1S17 perside
6B0 (toti)
cookingtimes.
5.If yourrangeis connectedto 208volts,these
cookingtimesmayneedtobeextended.
Comments
Marinatelesstenderbeefbeforegrilling.
Ifsaua isdesired,bastelast15to20minutes,turnmd rearrangeoften.
Brushwithmeltedbutter.
Ifstuffe~add6minutestototaltime.Covertopwiti foil.
h overafterhalfofeootig time.
Forlesstendervegetablessuchastomatoes,redueetime4 to6 minutes.
Parbofl5minutesbeforegrilling.Rearrangeandturnoverfrequently.
Bastewithsauwlast10minutes,asdesired.
19
G~DLE ACCESSORY
Yournon-stickcoatedgriddleprovidesanextra-largecookingsurface
formeats,pancakesorotherfoodsusuallypreparedinafryingpanor
electricskiUet.Youcanalsousethegridde asa warmingtrayby using
a low-heatsetting.
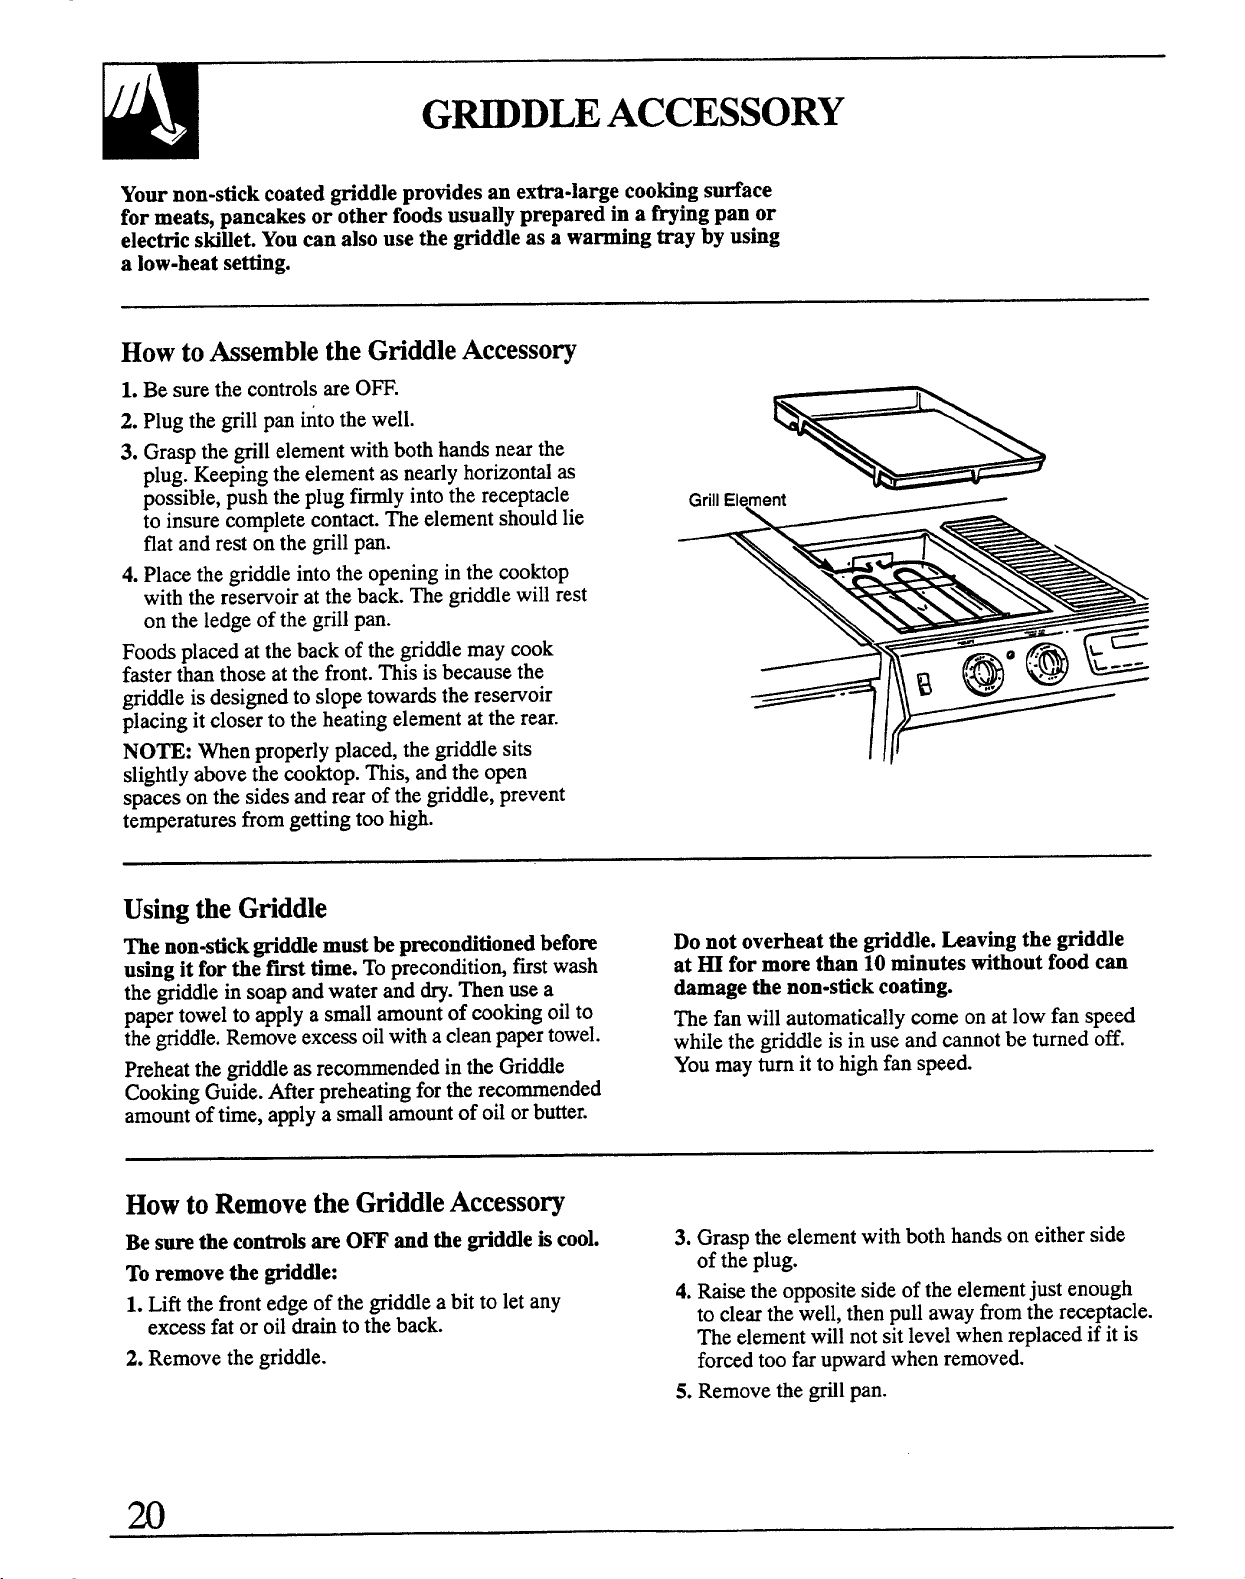
HowtoAssemblethe GtiddleAccesso~
1.BesurethecontrolsareOFF.
2. Plugthegrillpanintothewell.
3. Graspthegrillelementwithbothhandsnearthe
plug.Keepingtheelementasnearlyhortionti as
-
possible,pushtheplugf~y intothereceptacle
to insurecompletecontact.Theelementshouldlie
flatandrestonthegrillpan.
4.Placethegndde intotheopeninginthecooktop
withthereservoirattheback.Thegndde willrest
ontheledgeofthegrillpan.
Foodsplacedatthebackofthegridde maycook
fasterthanthoseatthefront.Thisisbecausethe
gridde isdesignedto slopetowardstheresemoir
placingitcloserto theheatingelementattherear.
NO~: men properlyplaced,thegndde sits
slightlyabovethecooktop.This,andtheopen
spacesonthesidesandrearofthegridde, prevent
temperaturesfromgettingtoohigh.
Usingthe Gtiddle
Thenon-stick@d@emti bepmonditionedbefore
Donotoverheatthegriddle.having thegriddle
usingitforthefmt time.Topreconditionfirstwash
at ~ for more than 10minutes withoutfoodcan
thegridde insoapandwateranddry.Thenusea
damage the non-stickcoating.
papertowelto applya smallamountofcookingoilto
Thefanwillautomaticallycomeonatlowfanspeed
thegridde. Removeexwssoilwithacleanpapertowel.
whilethegridde isinuseandcannotbe turnedoff.
Preheatthegridde asrecommendedintheGridde
Youmayturnitto highfan speed.
tioking Guide.Mer preheatingfortherecommended
amountoftime,applya smallamountofoilorbutter.
Howto Removethe GtiddleAccesso~
Besurethecontrohare0~ md thegridde iscool.
3. Gr=p theelementwithbothhandsoneitherside
Toremovethe gridde:
oftheplug.
1.Liftthefrontedgeofthegridde abitto letany
4.Raisetheoppositesideoftheelementjustenough
excessfator oildraintotheback.
to clearthewell,thenpullawayfromthereceptacle.
Theelementwillnotsitlevelwhenreplacedif itis
2. Removethegridde.
forcedtoofarupwardwhenremoved.
5. Removethegrillpan.
GtiddleTips
● Conditionor“season”thegndde before ● Foodswhicharehighinnaturalfat,suchasbacon
first-timeuse. orsausage,maybestartedona coldgridde.
● Mostgridded foodsrequirecookingon apreheated
surfaw,whichmaybe greasedlightlybeforeadding
food.Preheatthe@d&e 5 minutesatHI heatsetting,
urdessotherwiseindicatedintheGndde Cooking
Guide,thenswitchtotherecommendedcooksetting.
● Foodsto bewarmedmaybeplaceddirectlyonthe
gridde; a highdomedmeti @ver,suchasan
invertedkettle,placedoverthemwillhelpstorethe
heat.Foodsincovereddishesorpansmaydso be
warmedonthegridde. Useheat-resistantdishesordy.
● Makesurethegrillpaniscleanbeforeusinggriddle.
● Topreservethefinish,useordyTeflon”coate~
nylonorwoodenspatulasandspoons.Neveruse
thegriddlesurfaceasa cuttingboard.
. Overa periodof time,minorscratchesandsome
discolorationmayappearinthenon-stickcoating.
Thiswillnotaffectthecookingperformanceorthe
non-stickfinish.
Gtid~e Questionsand~swem
Q.HowshouldI storemygriddlewhenitis not
inuse?
A. Toavoidmarringthenon-stickfinish,storethe
gridde uprightontheedgewiththeterminalsup
to avoiddamage.Hit isnecessaryto storeit flat,
avoidplacingotherpansor cookwareontop.
Q. Howlongcanfoodsbekeptwarmwiththe
grid~e withoutlosingtheirappeal?
A. Nolongerthan2 hoursis recommended,to assure
goodf~odqualityandpreventspoilage.“Delicate
foods,suchas eggs,shouldnotbekeptmorethan
15to30 minutes;entreesandcasserolesmaybe
warmedfor30to 60minutes.Horsd’oeuvreswill
stayhotfor servingup to 1or 1%hours.Rearrange
orstirfoodsoccasionally,if possible.
Q.Canmygridde bestitched totheotherside
ofthefinge whereitwotid bemoreconvenient
forme?
A. N1 interchangeablemodties canbeusedon either
therightorleftsideofyourcooktop.Simplylift
outthemodules,takingcarenotto damagethe
electricrdcontactsbyjerkingorforcingthem.
Q.Mygriddleiscookingfasteriutherearthanin
thefront Istheresomethingwrong?
A No.Sin& thegridde is designedtoslopeslightly
sothatthegreasewillcollectinthereservoir,the
rearofthegridde setsclosertotheelement,which
maycausefoodsto cookmorequic~y.
Q.my aren’tmyfoodsdoneeventhoughthey
havecookedthefuntime?
A Preheatthegndde fora longertimeandleave
foodsonthegridde longerto attainthedesired
degreeof browning.
Q. DoI need specialcookwarefor use with my
gridde?
A Avoidusingmetalcookwarewithsharppoints
orroughor sharpedgeswhichmightdamagethe
non-stickcoatedgridde surface.Do notcutfoods
onthegridde. Useordyheat-resistantdisheswhen
foodsincontainersaretobewarmedonthe@dde.
Forfurtherinformationontig foryourgridde’s
surface,seetheCareandCleaningsection.
Q.Canprolongedperiodsofhighheatdamage
mygriddle’ssurface?
A. A briefpreheatingperiodis oftennecessaryfor
bestresultswithmanyfoods,butleavingthe
gridde on M heatsettingformorethan10minutes
withoutfoodcandamagethenon-stickmating.
Aways be sureto turnthecontrolknobsto OFF
whenwoking iscompleted.
(continued n-page)
G~DLE ACCESSORY
(continued)
Donotleavetherangeunattendedduring“preheat”
(knobsturnedto “H~) oranytimetheknobsare
turnedto “H~ withfoodontheGrillor Gridde.
1.Suggestedcookingtimesshouldbeusedonlyasa
guidesincevariablesinfd maychangecooking
tima.
2.Preheatthegridde 5 minutesunlessotherwise
indicatedinguidebelow.Addoilorbutteratthe
endofthepreheattime.Additiondod or butter
maybeneededduringcookingtime.
3. Rearrangeorturnfoodsoverasneededtoinsure
evencooking.
4. Gridde settingsmayneedtobe adjustedif the
gridde isusedforanemendedtime.
5.Avoidusingmetalutensilswithsharppointsor
roughorsharpedgeswhichmightdamagethe
non-stickcoatedgridde surface.Do notcutfoods
onthegridde. Useonlyheat-resistantdisheswhen
foodsincontainersaretobewarmedonthegndde.
6. If yourrangeisconnectedto 208volts,these
cookingtimesmayneedtobeextended.
Food
Bacon(1lb.)
Chow Por~mh
(1/4to12inch)
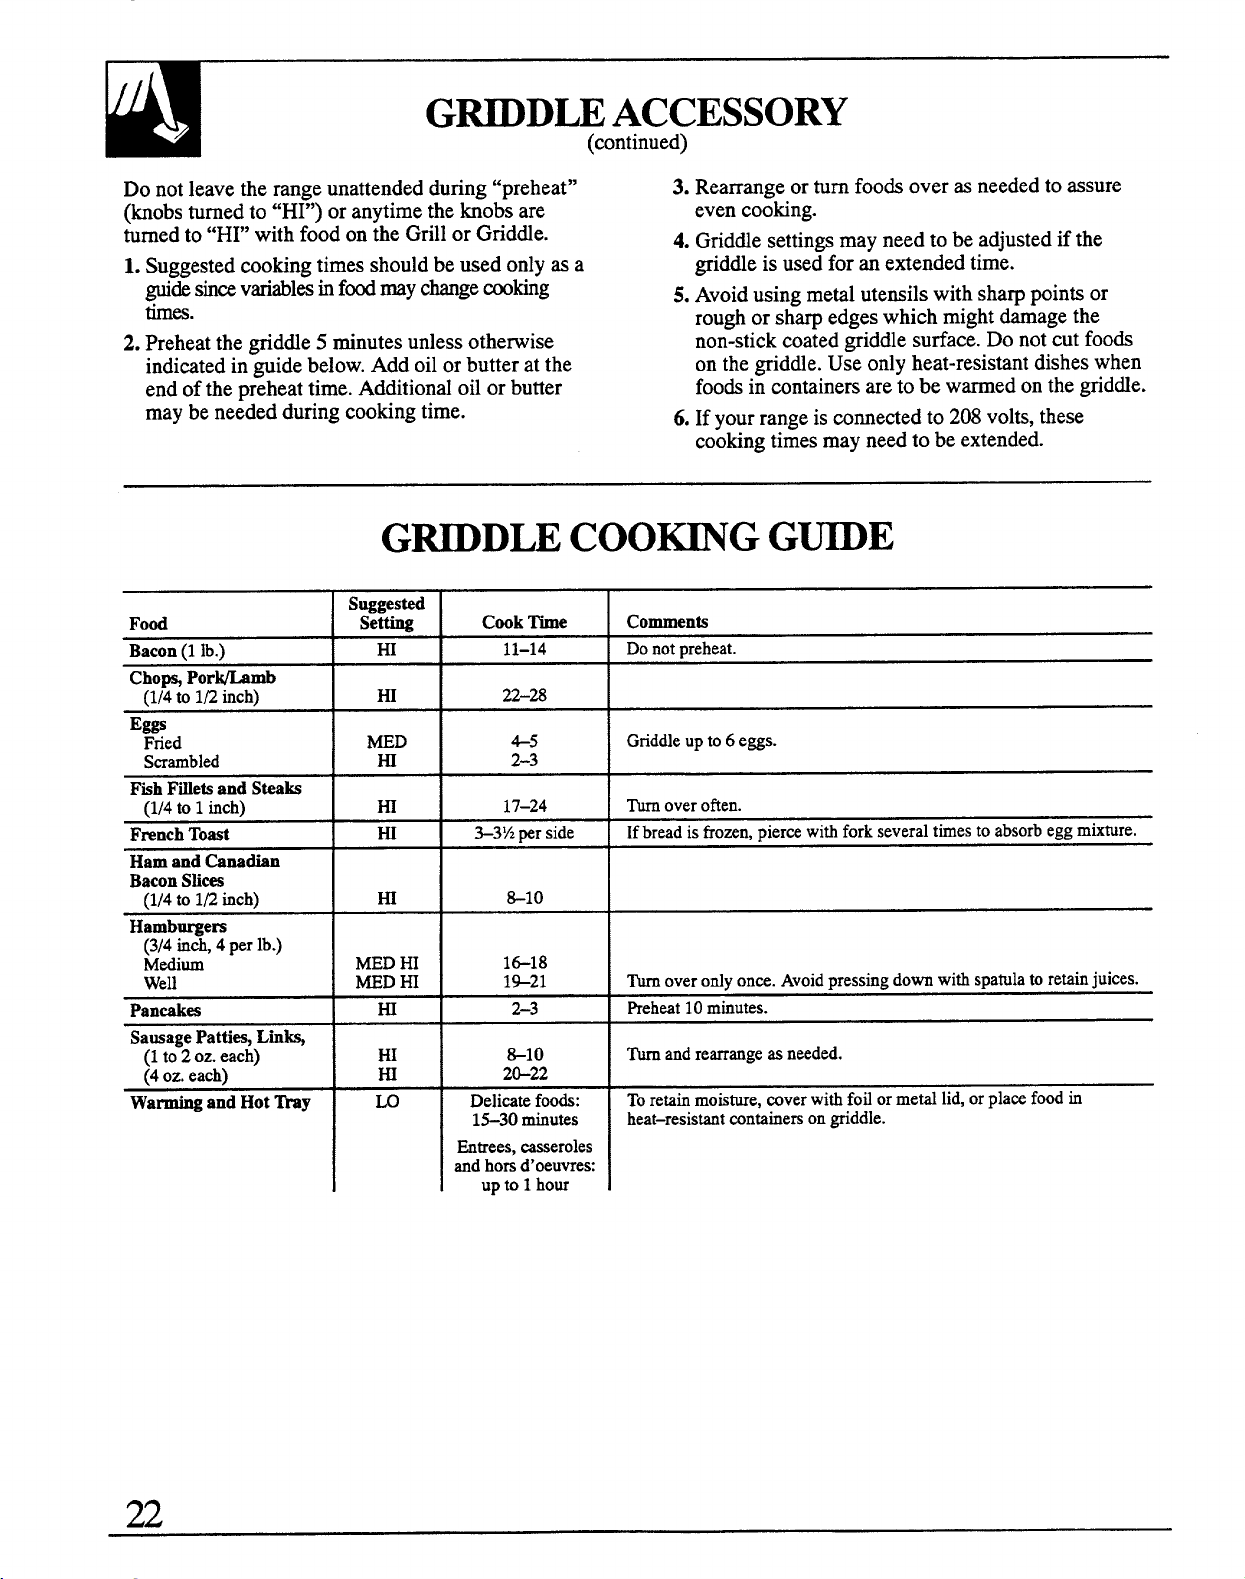
G~DLE COOmG GmE
Suggested
Setting CookTime
HI 11-14
Eggs
Fried MED
65
Scrambled
m 2-3
F~h FtietsandSteaks
(1/4to 1inch) m 17–24
FrenchToast
m
>3%perside
HamandCanadian
BaconStiees
(1/4tolE inch)
I
m
I
&lo
Hamburgers
(3/4inch4perlb.)
Medium
MED~ l&18
Well ~D M
1%21
Pan*=
H 2-3
SausagePatties,Uiks,
(1to
2oz.each) H
*1O
(4oz.each) H
2&22
WarmingandHottiy m
Deli=te foods:
1>30 minutes
I
~trees, mseroles
andhorsd’oeuvres
Up to 1hour
Comments
Donotpreheat.
Griddleupto6eggs.
Turnoveroften.
Ifbreadisfrozen,piermwiti forkseveraltimesto absorbeggmixture.
Turnoverordyonce.Avoidpressingdownwithspatulatoretainjuices.
Preheat10mkutes.
ti andrearrangeas needed.
Toretainmoisture,roverwithfoflormetallid,orplaw foodin
heat–resistantcontainersongriddle.
22
CanningshouldbedoneontheCoilSurfaceUnits
ortheRadiantUnitsonly.
Potsthatextendbeyond1inchofthesurfaceunitarenot
recommendedformostsurfacecooking.However,when
canningwitha water-bathorpressurecanner,larger-
diametercookwaremaybeused.Thisisbecauseboiting
watertemperatures(evenunderpressure)arenot
harmfultocooktopsurfacessurroundingthesurfaceunit.
HOWEVER,DONOTUSELARGEDIAMETER
CANNERSOROTHERLARGEDIAMETERPOTS
FORFRYINGORBOILINGFOODSOTHER
THANWATER.Mostsyrupor saucemixtures—and
alltypesof frying-cook at temperaturesmuchhigher
thanboilingwater.Suchtemperaturescould
eventuallyharmcooktopsurfacessurroundingthe
modulesurfaceunits.
ObserveFolloting Poinfi in Canning
1.Besurethecannerfitsoverthecenterofthesurface
unit.Hyourcooktoporitslocationdoesnotallowthe
cannertobecenteredonthesurfaceunit,usesmdler-
diametercannersforgoodcanningresults.Besurethe
cannerorotherlargedlarneterpansdonottouchthe
controlknobsortheventgrille.Theknobsandthevent
grillewillbedamagediftouchedbyhotcookware.
2. ~at-bottomedcannersmustbeused.Donotuse
cannerswithflangedorrippledbottoms(often
foundin enamelware)becausetheydon’tmake
enoughcontactwiththesurfaceunitandtakea
longtimeto boilwater.
Flat-bottomedcannersarerecommendedfor
electriccoilsurfaceunits.Theyare
required for
glasscooktops.
3. Whencanning,userecipesandproceduresfrom
reputablesources.Reliablerecipesandprocedures
areavailablefromthemanufacturerofyourcanner;
manufacturersof glassjarsfor canning,suchas
Bdl andKerr;andtheUnitedStatesDepartmentof
AgricultureExtensionService.
4. Rememberthatcanningisaprocessthatgenerates
largeamountsof steam,Toavoidburnsfromsteam
or heat,be carefulwhencanning.
NOTE:If yourhousehaslowvoltage,canningmay
takelongerthanexpected,eventhoughdirections
havebeencarefullyfollowed.
Theprocesstimewillbeshortenedby:
(1) usingapressurecanner,and
(2) startingwithHOTtapwaterforfastest
heatingoflargequantitiesof water.
CAUTIONS:
Sinceyoumustmakesureto processthecanningjars
Safemnningrequiresthatharmfdmicroorganisms
fortheprescribedtime,withnointerruptioninprocessing
aredestroyedandthatthejarsaresealed
time,youcannotcanonglasssurfaceunitsif the
com~ietelv.Whencanningfoodsin awater-bath
bottomof yourcannerisnotflatenough.
m
canner,a ~entlebutstead~boilmustbemaintained
continuouslyfortherequiredtime.Whencanning
foodsin a pressurecanner,thepressuremustbe
maintainedcontinuouslyfortherequiredtime.
Afteryouhaveadjustedthecontrols,itis very
importanttomakesuretheprescribedboilor
pressurelevelsaremaintainedfortherequiredtime.
RADMNTGLASSCAU~ONS:
Glasssurfaceunitshavetemperaturelimitersthathelp
preventthemfromgettingtoohot.Ifthebottomof
yourcanneris notflat,thesurfaceunitcanoverheat,
triggeringthetemperaturelimiterstoturntheunitoff
foratime.Thiswillstoptheboilorreducethe
pressureinthecanner.
mat is a TemperatureLimiter?
EveryradiantsurfaceunithasaTemperatureLimiter.
TheTemperatureLimiterprotectstheglass-ceramic
surfacefromgettingtoohot.
TheTemperatureLimitermayturnoffthe
surfaceunitsifi
● Thepanboilsdry.
● Thepanbottomisnotflat.
● Thepanis offcenter.
● Thereis nopanontheunit.
23
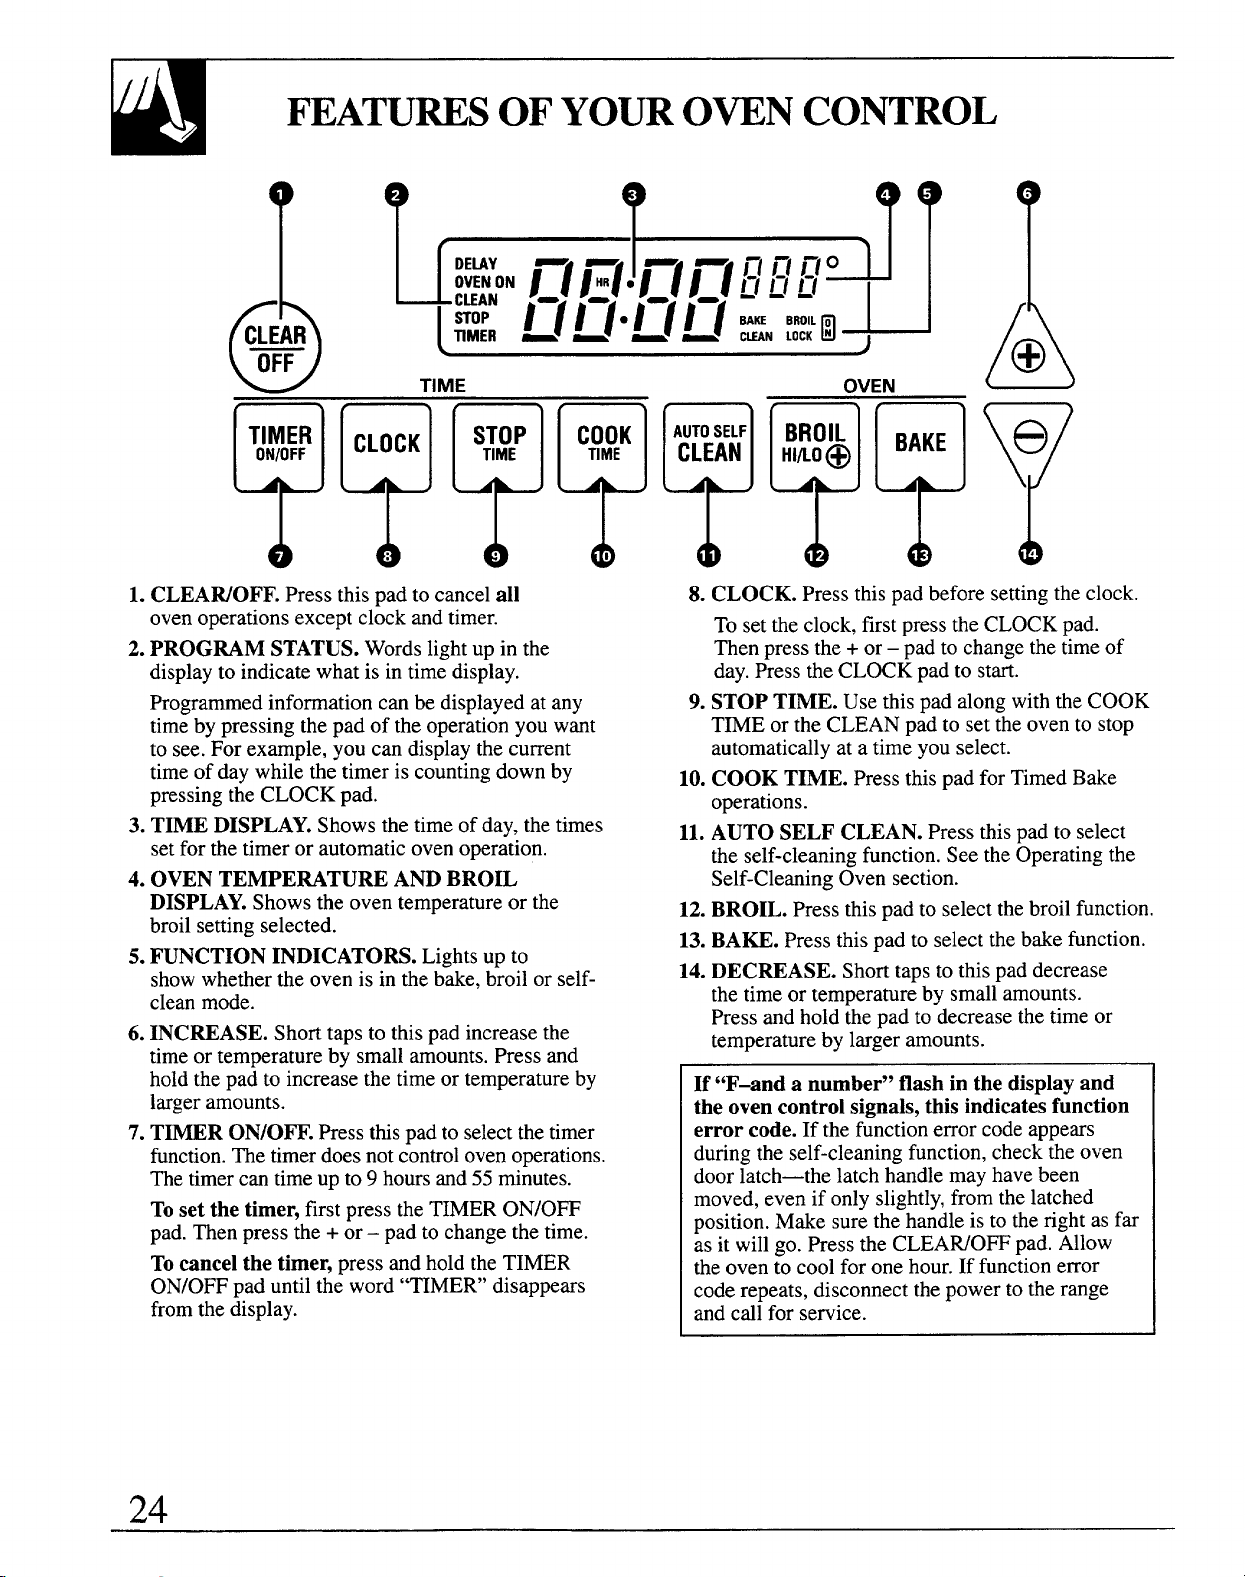
FEATURESOF YOUROWN CONTROL
1.CLEAWOFF.Pressthispadto cancelall
ovenoperationsexceptclockandtimer.
2.PROGRAM STATUS.Wordslightupin the
displayto indicatewhatis intimedisplay.
Programmedinformationcanbedisplayedatany
timebypressingthepadof theoperationyouwant
to see.Forexample,youcandisplaythecurrent
timeofdaywhilethetimeris countingdownby
pressingtheCLOCKpad.
3. T~E DISPLAY.Showsthetimeofday,thetimes
setforthetimerorautomaticovenoperation.
4. OVENTEMPEWTURE ANDBRO~
DISPLAY.Showstheoventemperatureor the
broilsettingselected.
5.FUNCTION INDICATORS.Lightsup to
showwhethertheovenis in thebake,broilor self-
cleanmode.
6.INCREASE.Shorttapsto thispadincreasethe
timeor temperatureby smallamounts.Pressand
holdthepadto increasethetimeortemperatureby
largeramounts.
7. T~R ON/OFF.Pressthispadto selectthetimer
function.Thetimerdoesnotcontrolovenoperations.
Thetimercantimeupto9 hoursand55minutes.
Tosetthetimer,firstpresstheTIMERON/0~
pad.Thenpressthe+ or– padto changethetime.
Tocancelthetimer,pressandholdtheTIMER
ON/0~ paduntiltheword“TIMER’disappears
fromthedisplay.
&
8. CLOCK. Pressthispadbeforesettingtheclock.
Tosettheclock,firstpresstheCLOCKpad.
Thenpressthe+or– padto changethetimeof
day.PresstheCLOCKpadto start.
9. STOP TIME. UsethispadalongwiththeCOOK
T~E ortheCLEANpadto settheovento stop
automaticallyata timeyouselect.
10.COOKTIME.PressthispadforTimedBake
operations.
11.AUTOSELFCLEAN.Pressthispadtoselect
theself-cleaningfunction.SeetheOperatingthe
Self-CleaningOvensection.
12.BROIL. Pressthispadto selectthebroilfunction.
13.BAKE.
Press this pad to select the bake function.
14.
DECREASE.Shorttapstothispaddecrease
thetimeor temperatureby smallamounts.
Pressandholdthepadtodecreasethetimeor
temperatureby largeramounts.
h
If“F-anda number”flashinthedisplayand
theovencontrolsignals,thisindicatesfunction
errorcode.If thefunctionerrorcodeappears
duringtheself-cleaningfunction,checktheoven
doorlatch—thelatchhandlemayhavebeen
moved,evenif onlyslightly,fromthelatched
position.Makesurethehandleisto therightasfar
asit willgo.PresstheCLEAWOFFpad.Allow
theovento coolfor onehour.If functionerror
coderepeats,disconnectthepowertotherange
andcdl for service.
24
OWN CONTROL,CLOCKAm T~R
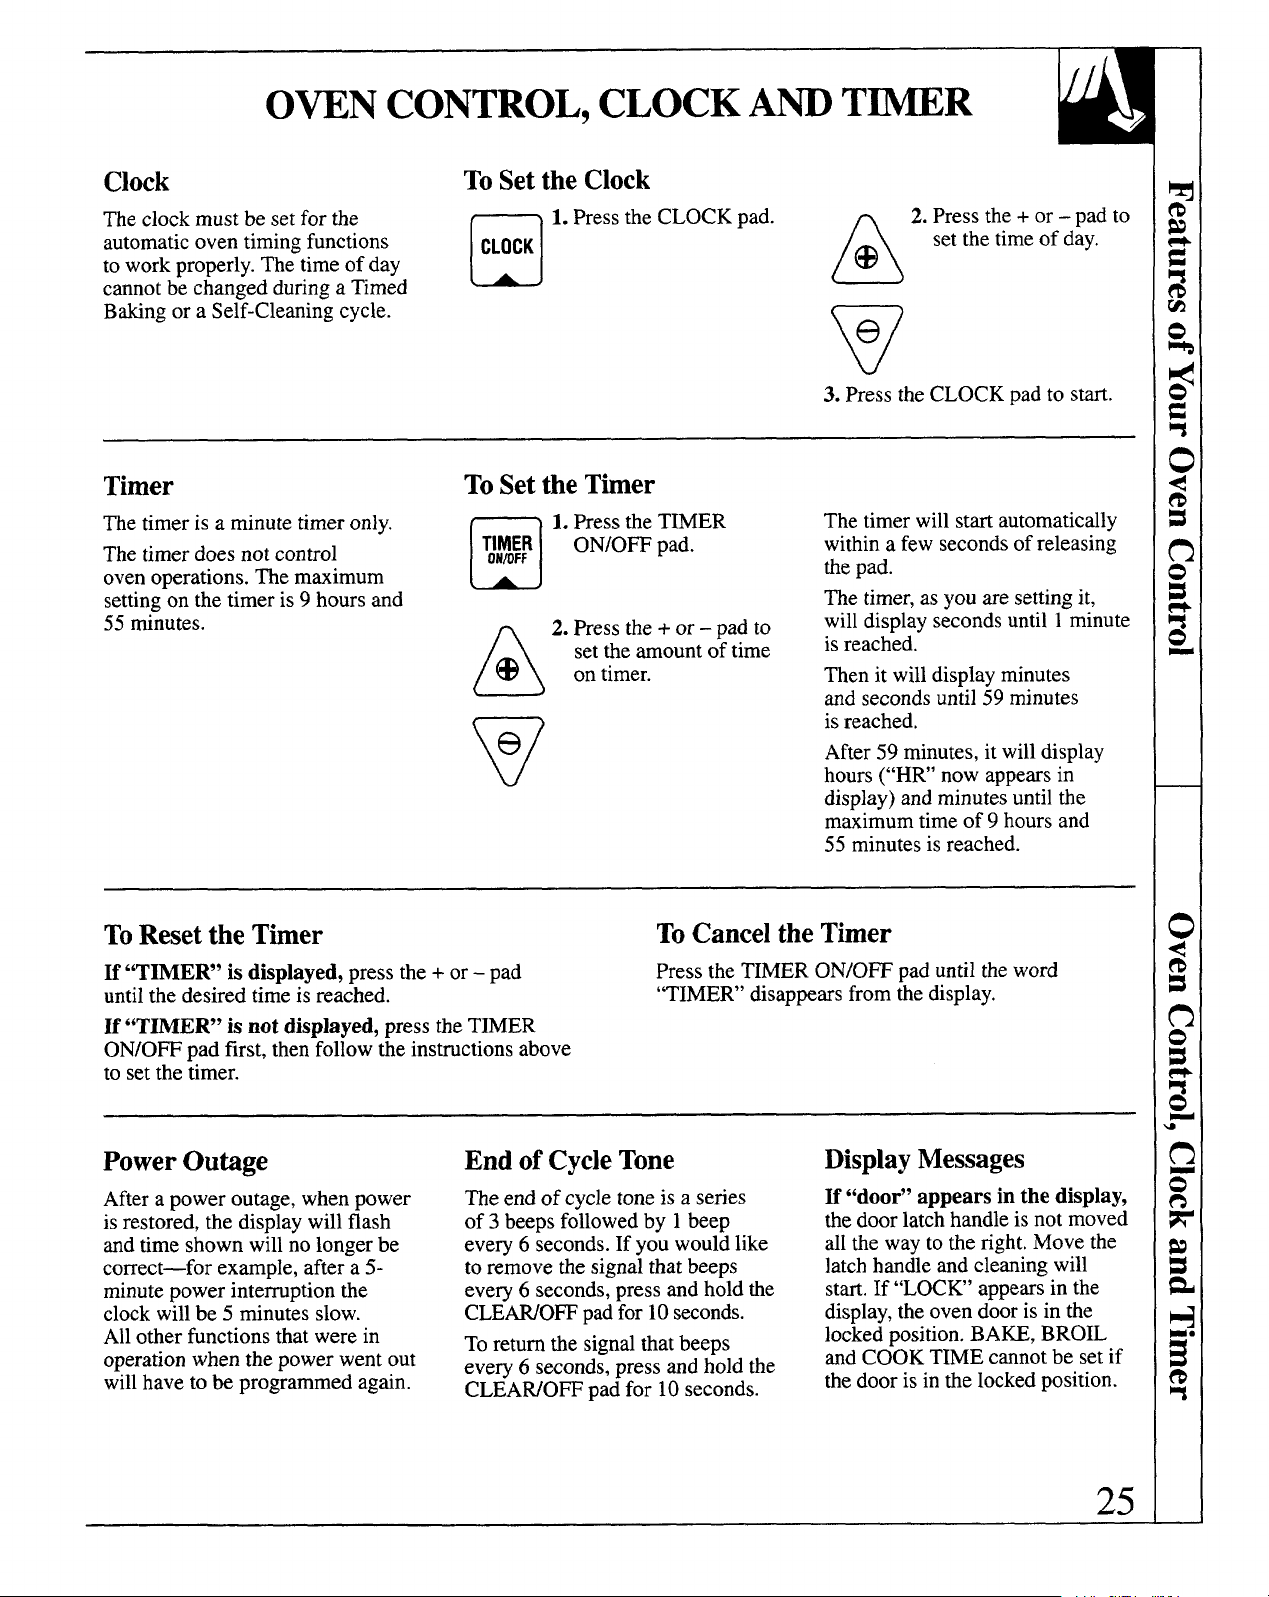
Clock
ToSetthe Clock
Theclockmustbe setforthe
D
1.PresstheCLOCKpad.
A
2. Pressthe+ or– padto
automaticoventimingfunctions
CLOCK
setthetimeof day.
toworkproperly.Thetimeofday
@
cannotbechangedduringa Timed
Bakingor a Self-Cleaningcycle.
v
e
3. PresstheCLOCKpadto start.
Timer
ToSetthe Timer
Thetimeris a minutetimeronly.
n
1.PresstheTIMER
Thetimerdoesnotcontrol
T~$~~
ON/OWpad.
ovenoperations.Themaximum
[Al
settingonthetimeris9 hoursand
55minutes.
A
2. Pressthe+ or – padto
@
settheamountoftime
ontimer.
v
e
Thetimerwillstartautomatically
withina fewsecondsofreleasing
thepad.
Thetimer,as youaresettingit,
willdisplaysecondsuntil1minute
isreached.
Thenit willdisplayminutes
andsecondsuntil59minutes
isreached.
After59minutes,itwilldisplay
hours(“HR’ nowappemsin
display)andminutesuntilthe
maximumtimeof 9hoursand
55minutesisreached.
ToResetthe Tmer
ToCancelthe Timer
If“TIMER”isdisplayed,pressthe+ or– pad
PresstheTIMERON/OW paduntiltheword
untilthedesiredtimeis reached.
‘TIMER’ disappearsfromthedisplay.
If“TIMER”is notdisplayed,presstheTIMER
ON/0~ pad first,thenfollowtheinstructionsabove
to setthetimer.
PowerOutige
Afterapoweroutage,whenpower
isrestored,thedisplaywillflash
andtimeshownwillnolongerbe
correct-for exarnpIe,aftera 5-
minutepowerinterruptionthe
clockwillbe 5 minutesslow.
Allotherfunctionsthatwerein
operationwhenthepowerwentout
willhaveto be programmedagain.
Endof CycleTone
Theendof cycletoneis a series
of 3 beepsfollowedby 1beep
every6 seconds.If youwouldlike
toremovethesignalthatbeeps
every6 seconds,pressandholdthe
CLENO~ padfor 10seconds.
Toreturnthe signalthatbeeps
every6 seconds,pressandholdthe
CLEAWO~ padfor 10seconds.
DisplayMessages
U “door”appearsinthedisplay,
thedoorlatchhandleisnotmoved
allthewayto theright.Movethe
latchhandleandcleaningwill
start.If “LOCK’appearsin the
display,theovendoorisin the
lockedposition.BAKE,BRO~
andCOOKTIMEcannotbe setif
thedoorisinthelockedposition.
25
BeforeUsingYourOven
1.Lookatthecontrols.Besureyouunderstand
3. Readovertheinformationandtipsthatfollow.
howto setthemproperly.Readoverthedirections
fortheOvenControlssoyouunderstandhowto
4. Keepthisguidehandysoyoucanreferto it,
especiallyduringthefirstweeksof usingyour
usethem.
newrange.
2.Checktheoveninterior.Lookattheshelves.
Takea practicerunatremovingandreplacing
themproperlytogivesure,sturdysupport.
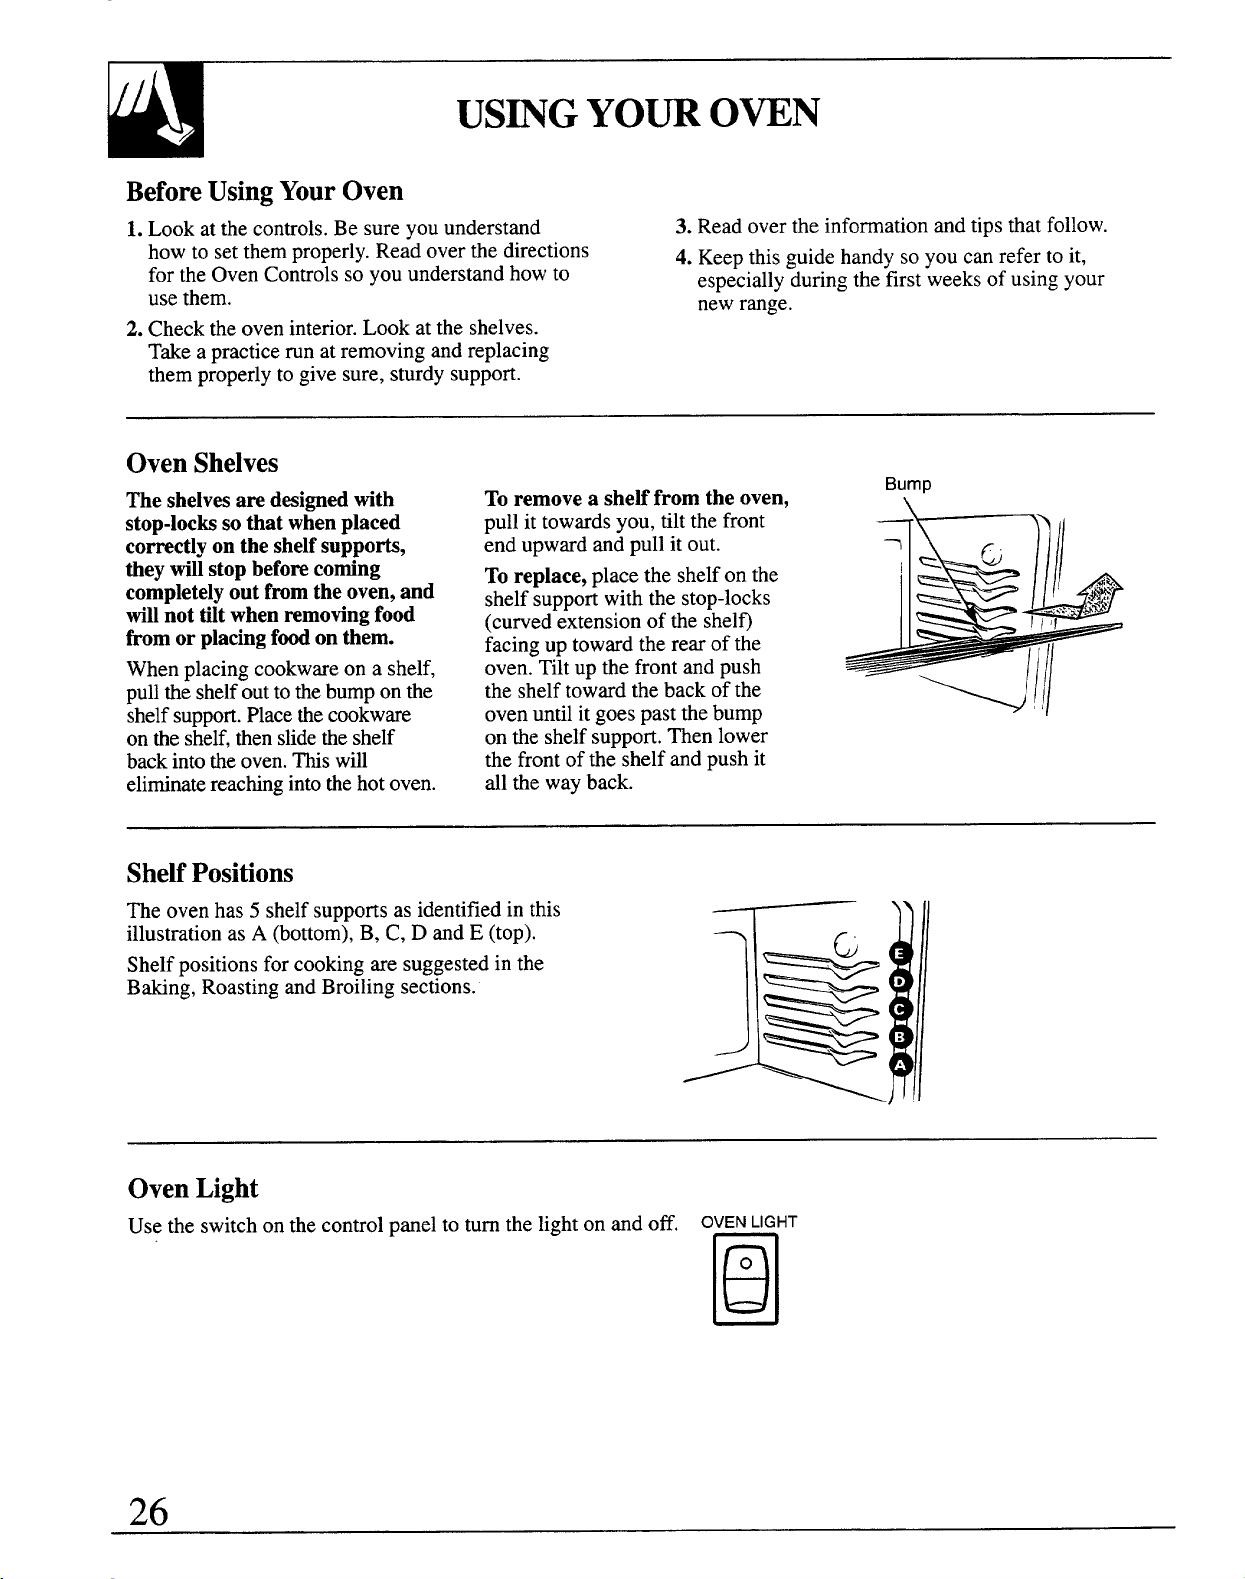
OvenShelves
Theshelvesared=ignedwith
stop-lockssothatwhenplaced
correctlyontheshelfsuppoti,
theywillstopbeforecoming
completelyoutfromtheoven,and
willnottiltwhenremovingfood
fromorplacingfoodonthem.
Whenplacingcookwareon a shelf,
pulltheshelfouttothebumponthe
shelfsupport.Placethecookware
ontheshelf,thenslidetheshelf
backintotheoven.Thiswill
eliminatereachingintothehotoven.
Toremovea shelffromtheoven,
Bump
pullit towardsyou,tiltthefront
endupwardandpullitout.
7
Toreplace,placetheshelfonthe
shelfsupportwiththestop-locks
* II
(curvedextensionoftheshelo
‘ ‘G,;
4
facingup towardtherearofthe
oven.Tiltupthefrontandpush
theshelftowardthebackofthe
/’/
ovenuntilitgoespastthebump
–\//
!,
ontheshelfsupport.Thenlower
thefrontoftheshelfandpushit
allthewayback.
ShelfPositions
The ovenhas5 shelfsupportsas identifiedinthis
illustrationas A (bottom),B, C,D andE (top).
r
6
))11
Shelfpositionsforcookingaresuggestedin the
Baking,RoastingandBroilingsections.
a
7
‘all>’
OvenLight
Usethe switchonthecontrolpanelto turnthelightonandoff. ovENLIGHT
PI
o
BA~G
Donotlocktheovendoortith thelatchduring
If youthinkan adjustmentis necessary,seetheAdjust
baking.The latch is usedforself-cleaningonly.
theOvenThermostatsection.It giveseasyDoIt
Youroventemperatureis controlledveryaccurately
Yourse~instructionsonhowto adjustthethermostat.
usingan ovencontrolsystem.Werecommendthat
NOTE: Whentheovenishot,thetopandoutside
youoperatetherangeforanumberofweeksusingthe
surfacesoftherangegethottoo.
timegivenonrecipesasa guidetobecomefamiliar
withyournewoven’sperformance.
Howto Set YourRangeforBating
Toavoidpossibleburns,placethe shelvesinthe
correctpositionbeforeyouturntheovenon.
n
1.~ess theBA~ pad.
BAKE
(AJ
2.Pressthe+ or – pad.
Thelastovensettemperatureappearsin the
display.Continuepressinguntilthedesired
temperatureisdisplayed.
Theovenwillstartautomatically.Theword“ON”
and“100°”willbe displayed.AstheovenheatsUP,
thedisplaywillshowthechangingtemperature.
Whentheovenreachesthetemperatureyouset,a
tonewill sound.
3. PresstheCLEAWO~ padwhenbtilng isfinished
andthenremovethefoodfromtheoven.
Tochange the oventemperature during the
BA~ cycle,presstheBA~ pad andthenthe
+ or– padto getthenewtemperature.
OvenShelves
kange theoven
shelfor shelvesin
thedesiredlocations
whiletheovenis
cool.Thecorrect
shelfposition
dependsonthekind
offoodandthe
browningdesired.
Asageneralrule,
TypeofFood
ShelfPosition
hgel foodcake
A
Biscuitsor muffins
Bor C
Cookiesorcupcakes
Bor C
Brownies
Bor C
Layercakes
Bor C
.
place-mostfoodsin themiddleof theoven,oneither
Bundtor poundcakes
Aor B
shelfpositionsBorC. Seethechartforsuggested
shelfpositions.B willbeusedmorethanC.
Piesorpieshells
Bor C
~
Preheating
Preheattheoveniftherecipecallsforit.Preheatmeans
Formostcasserolesandroasts,preheatingisnot
bringingtheovenupto thespecifiedtemperature
necessary.Forovenswithouta preheatindicatorlight
beforeputtingtie foodin theoven.Topreheat,setthe
or tone,preheat10minutes.Aftertheovenis
ovenatthecorrecttemperature-selectingahigher
preheated,placethefoodin theovenasquicklyas
temperaturedoesnotshortenpreheattime.
possibleto preventheatfromescaping.
Preheatingis necessaryforgoodresultswhenbaking
(continued next page)
cakes,cookies,pastryandbreads.
27

BA~G
(continued)
BakingPans PanPlacement
Usetheproperbakingpan.me typeoffinishonthe
Forevencookingandproperbrowning,theremustbe
pandeterminestheamountofbrowningthatwilloccur. enoughroomforaircirculationin theoven.Baking
“Dark,roughor dullpansabsorbheatresultingin a
resultswillbe betterif bakingpansarecenteredas
browner,crispercrust.Usethistypeforpies.
muchas possibleratherthanbeingplacedtothefront
or to thebackoftheoven.
● Shiny,brightandsmoothpansreflectheat,resulting
in a lighter,moredelicatebrowning.Cakesand
Pansshouldnottoucheachotherorthewallsof the
cookiesrequirethistypeofpan.
oven.Allow 1-to 1‘A-inchspacebetweenpansaswell
as fromthebackoftheoven,thedoorandthesides.
● Glassbakingdishesalsoabsorbheat.Whenbaking
If youneedto usetwo shelves,staggerthepansso
inglassbakingdishes,thetemperaturemayneedto
bereducedby25°F.
oneis notdirectlyabovetheother.
BakingGuides
Whenusingpreparedbakingmixes,followpackagerecipeorinstructions
forthebestbakingresults.
Cookies
Whenbakingcookies,flat
cookiesheets(without
sides)producebetter-
lookingcookies.Cookies
bakedin ajelly rollpan
(shortsidesallaround)
mayhavedarkeredges
andpaleor light
browningmayoccur.
Donotusea cookiesheetso largethatit touchesthe
wallsor thedoorof theoven.Neverentirelycovera
shelfwitha largecookiesheet.
Forbestresults,useonlyonecookiesheetin theoven
at a time.
AluminumFoil
Neverentirelycovera
shelfwithaluminum
foil.~is willdisturb
theheatcirculationand
resultin poorbaking.A
smallersheetof foil
maybe usedto catcha
spilloverby placingit
on a lowershelfseverrd
inchesbelowthefood.
Pies
Cakes
Forbestresults,bakepiesindark,roughor dullpans Whenbakingcakes,warpedor bentpanswillcause
to producea browner,crispercrust.Frozenpiesin foil
unevenbakingresultsandpoorlyshapedproducts.
pansshouldbeplacedonanaluminumcookiesheet
A cakebakedin apanlargerthantherecipe
forbakingsincethe shinyfoilpanreflectsheataway
recommendswillusuallybecrisper,thinneranddrier
fromthepiecrust;thecookiesheethelpsretainit.
thanit shouldbe.If bakedin a pansmallerthan
recommended,itmaybeundercookedandbattermay
oveflow. Checktherecipeto makesurethepansize
usedis theonerecommended.
28
u
Don’tPeek
Setthetimerfortheestimatedcookingtimeanddo
DONOTopenthedoorto checkuntiltheminimum
notopenthedoortolookatyourfood.Mostrecipes
time.Takeadvantageofthe“BigView”windowto
provideminimumandmwimum bakingtimessuch monitorcookingprogress.Openingtheovendoor
as“bake30-40minutes.”
frequentlyduringcookingallowsheatto escapeand
makesbakingtimeslonger.Yourbakingresultsmay
dso beaffected.
T~D BA~G
Howto TimeBake
Donotlocktheovendoorwiththelatch NOTE:Beforebeginning,makesuretheovenclock
during Timed Baking.Thelatchisusedforself- showsthecorrecttimeof day.
cleaningonly.
Tosettheclock,firstpresstheCLOCKpad.Pressthe
Yourovencanbesettoturnon andoffautomatically.
+or– paduntilcorrecttimeofdayisdisplayed.Press
theCLOCKpadto start.
I
Howto Set ImmediateStiti and AutomaticStop
Toavoidpossibleburns,placetheshelvesin
thecorrectpositionbeforeyouturntheovenon.
Theovenwillturnonimmediatelyandcookfora
selectedlengthoftime.AttheendoftheCookTime
theovenwillturnoffautomatically.
n
1.PresstheBAKEpad.
BAKE
\
LJ
A
2. Pressthe+ or– paduntilthedesired
@
temperatureisdisplayed.
n
3. PresstheCOOKTIMEpad.
Cf$K
LAJ
4. Pressthe+ or– paduntilthedesiredlengthof
bakingtimeisdisplayed.
Theovenwillstartautomatically.Theword“ON’
and”100°”willbe displayed.TheCookTimewill
beginto countdown.As theovenheatsup,the
displaywillshowthechangingtemperature.men
theovenreachesthetemperatureyouset,a tone
willsound.Theovenwillcontinuetocookforthe
programmedamountof time,thenshutoff
automatically.
5. At theend of TimedBaking,thedisplaywillshow
“OHR:OOCOOKTIME’ andtheovenwillturnoff.
Theendofcycletonewillsound.
6.Bess theCLEAWOFFpadto clearthedisplayif
necessary.Removethefoodfromtheoven.
Remember,foodsthatareleftin theovencontinue
cookingafterthecontrolsareoff.
NOTE: Foodsthatspoileasilysuchasmilk,eggs,
fish,stuffings,poultryandporkshouldnotbeallowed
to sitformorethanonehourbeforeor aftercooking.
Roomtemperaturepromotesthegrowthofharmful
bacteria.Besurethattheovenlightisoffbecauseheat
fromthebulbwillspeedharmfulbacteriagrowth.
(continued next page)
HD BA~G
(continued)
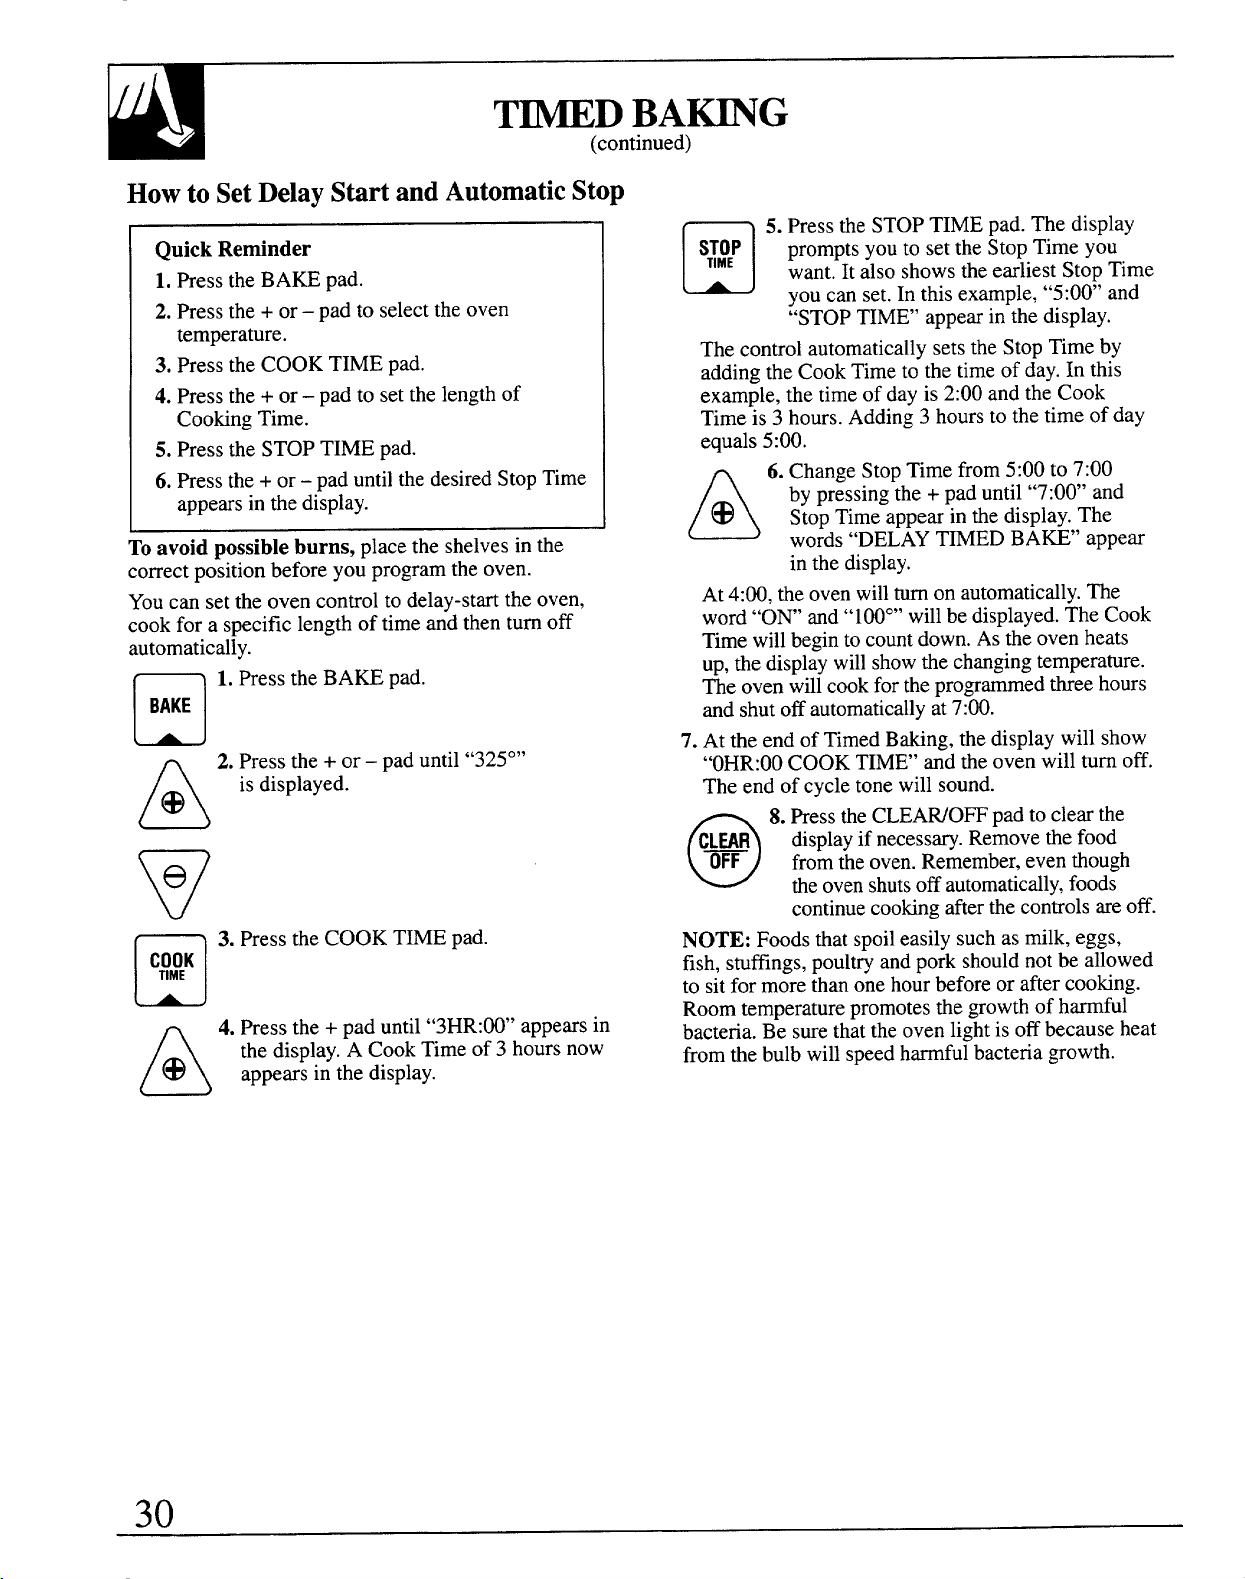
Howto SetDelayStirt andAutomaticStop
QuickReminder
1.PresstheBA~ pad.
2. Pressthe+ or– padto selecttheoven
temperature.
3. PresstheCOOKTIMEpad.
4. Pressthe+ or– padto setthelengthof
CookingTime.
5.PresstheSTOPTIMEpad.
6.Pressthe+ or– paduntilthedesiredStopTime
appearsin thedisplay.
Toavoidpossibleburns,placetheshelvesinthe
correctpositionbeforeyouprogramtheoven.
Youcan setthe ovencontrolto delay-stti theoven,
cookfor a specificlengthoftimeandthenturnoff
automatically.
n
1.PresstheBAKEpad.
BAKE
(AJ
A
2.Pressthe+ or – paduntil“325°”
@
is displayed.
v
e
n
3.PresstheCOOKTIMEpad.
C##K
A
4.Pressthe+ paduntil“3HR:W’appearsin
@
thedisplay.A CookTimeof 3 hoursnow
appearsinthedisplay.
n
5.Pressthe STOPTIMEpad.Thedisplay
s;:~
promptsyouto settheStopTimeyou
want.It alsoshowstheearliestStopTime
youcanset.In thisexample,“5:O@’and
“STOP TIME’ appearin thedisplay.
ThecontrolautomaticallysetstheStopTimeby
addingtheCookTimeto thetimeof day.In this
example,thetimeofdayis 2:00andtheCook
Timeis 3 hours.Adding3 hourstothetimeofday
equals5:00.
A
6.ChangeStopTimefrom5:00to 7:00
@
bypressingthe+ paduntil“7:00’and
StopTimeappearin thedisplay.The
words“DELAYTIMEDBAW’ appear
inthedisplay.
At4:00,theovenwillturnonautomatically.The
word“ON’ and“100°”willbedisplayed.TheCook
Timewillbegintocountdown.Astheovenheats
up,thedisplaywillshowthechangingtemperature.
Theovenwillcookfortheprogrammedthreehours
andshutoffautomaticallyat7:00.
7.AttheendofTimedBaking,thedisplaywillshow
“OHR:OO
COOK TIME’ and the oven will turn off.
Theendofcycletonewillsound.
o
8.PresstheCLEAWOFFpadtoclearthe
C*R
displayifnecessary.Removethefood
fromtheoven.Remember,eventhough
theovenshutsoffautomatically,foods
continuecookingafterthecontrolsareoff.
NOTE:Foodsthatspoileasilysuchasmilk,eggs,
fish,stuffings,poultryandporkshouldnotbeallowed
to sitformorethanonehourbeforeoraftercooking.
Roomtemperaturepromotesthegrowthofharmful
bacteria.Besurethattheovenlightis offbecauseheat
fromthebulbwillspeedharmfulbacteriagrowth.
30

ADJUST THE OVEN THERMOSTAT—
DO ZTYOURSELF!
Y
Youmayfindthatyournewovencooksdifferently
thantheoneit replaced.Werecommendthatyou
useyournewovenfora fewweekstobecomemore
familiwwithit,followingthetimesgiveninyour
recipesas a guide.
~ youthinkyournewovenistoohotortoocold,
youcanadjustthethermostatyourself.If youthink
it is toohot,adjustthethermostatto makeit cooler.If
youthinkit is toocool,adjustthethermostatto make
it hotter.
Wedo not recommendthe use of inexpensive
thermometers, suchasthosefoundingrocerystores,
tocheckthetemperaturesettingof yournewoven.
Thesethermometersmayvary2M0 degrees.
ToAdjusttheThermostat:
n
1.Pressthe BA~ pad.
BAKE
lAJ
2. Selectan oventemperaturebetween500°F.
and550°F.
3. Immediately,before“ON’ appears,pressand
holdtheBA= padfor about4 seconds.Thetime
displaywillchangeto theovenadjustmentdisplay.
4.Theoventemperaturecanbeadjustedupto (+)
35°F.hotteror (–)35°F.cooler.Usethe+ or– pad
to selectthedesiredchangeinthedisplay.
5.Whenyouhavemadetheadjustment,pressthe
CLEAWOFFpadto gobackto thetimeofday
display.Useyourovenasyouwouldnormally.
NOTE:Thisadjustmentwillnotaffectthebroilingor
theself-cleaningtemperatures.It willbe retainedin
memoryafterapowerfailure.
31
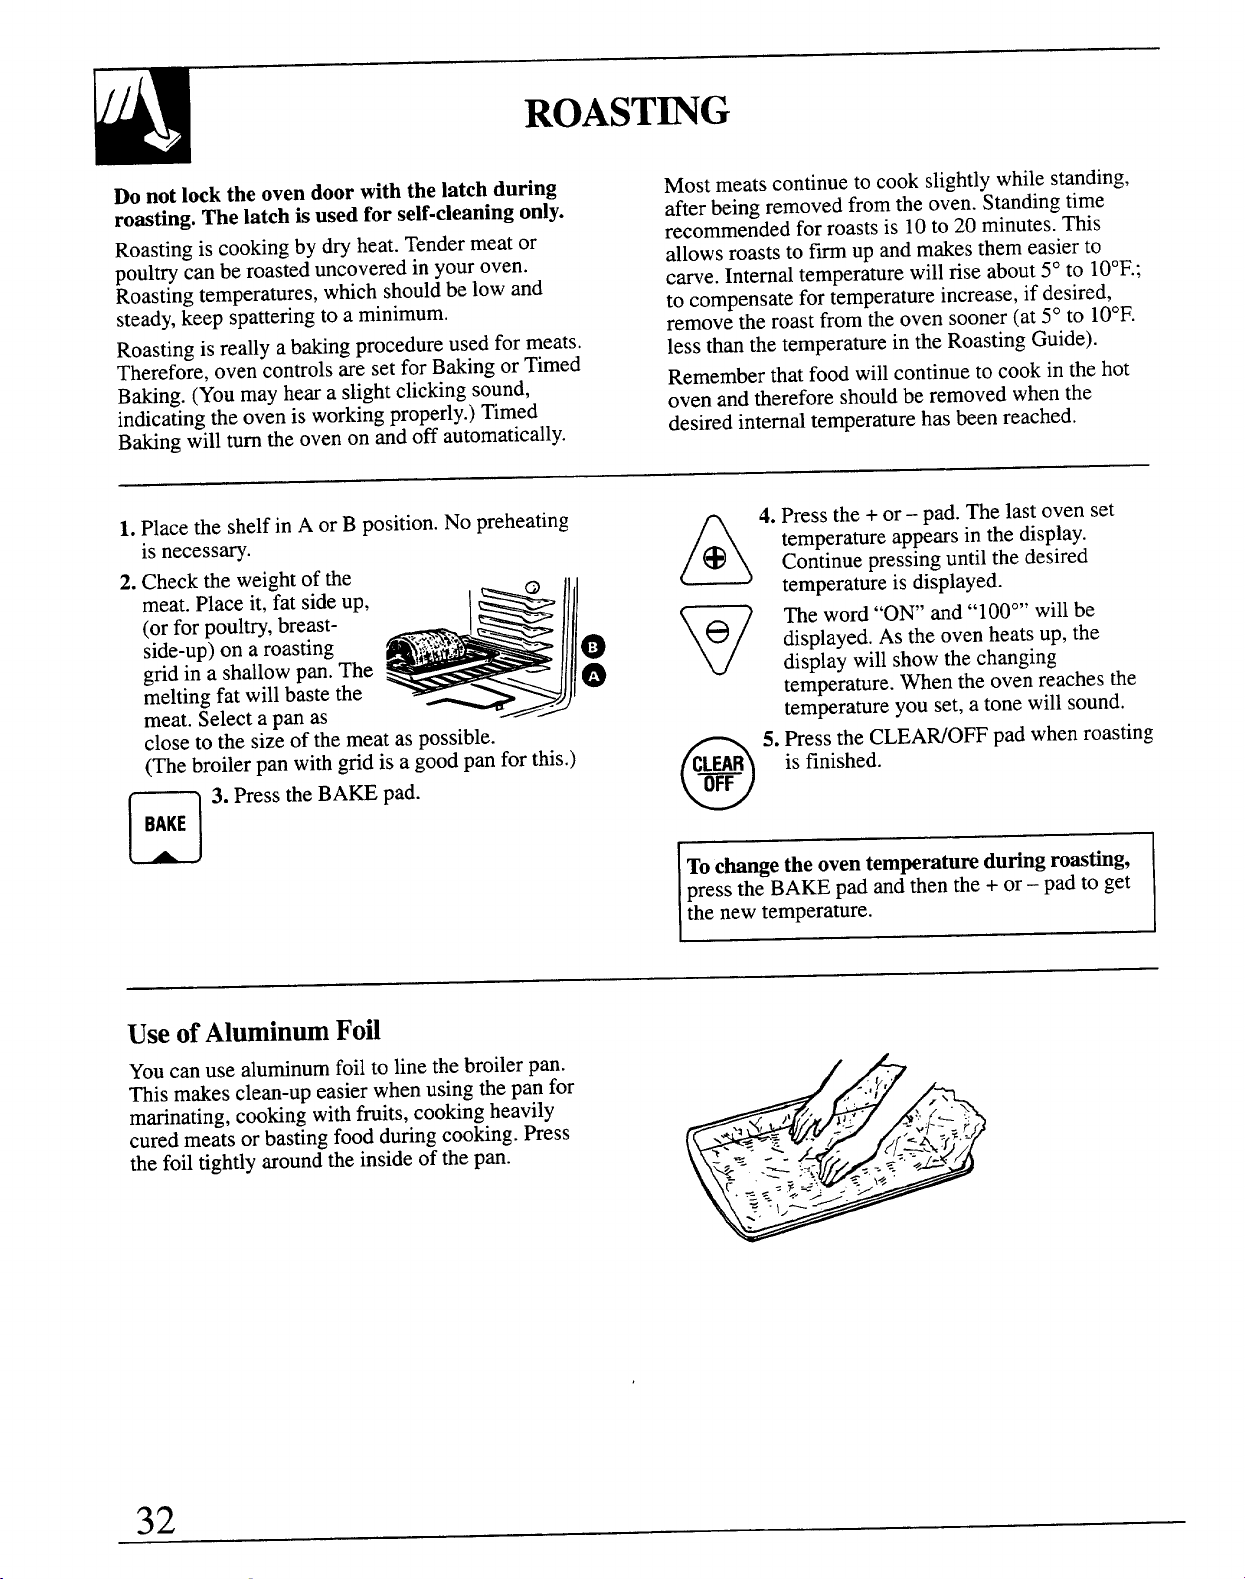
ROAST~G
Donotlocktheovendoorwiththelatchduring
roasting.Thelatchisusedforself-cleaningonly.
Roastingis cookingbydryheat.Tendermeator
poultrycanberoasteduncoveredinyouroven.
Roastingtemperatures,whichshouldbelowand
steady,keepspatteringtoa minimum.
Roastingis reallya bakingprocedureusedformeats.
Therefore,ovencontrolsaresetforBakingorTimed
Baking.(Youmayheara slightclicklngsound,
indicatingtheovenis workingproperly.)Timed
Bakingwillturntheovenonandoffautomatically.
Most meats continue to cook slightly while standing,
after being removed from the oven. Standing time
recommended for roasts
is 10to20minutes.This
allowsroaststo firmup andmakesthemeasierto
carve.Internaltemperaturewillrise about5°to 10°F.;
to compensatefortemperatureincrease,ifdesired,
removetheroastfromtheovensooner(at5°to 10°F.
lessthanthetemperaturein theRoastingGuide).
Rememberthatfoodwillcontinuetocookinthehot
ovenandthereforeshouldberemovedwhenthe
desiredinternaltemperaturehasbeenreached.
1.Placetheshelfin AorB position.No preheating
is necessary.
2.Checktheweightof the
meat.Placeit,fat sideup,
e Ill
(orforpoultry,breast-
-’
side-up)on a roasting
#-
y,,
-Jll
c-
0
gridii a shallowpan.The
meltingfatwillbastethe
@
meat.Selectapanas
~~>
closeto the sizeof themeataspossible.
(Thebroilerpanwithgridis a goodpanforthis.)
n
3.Press the BA~ pad.
BAKE
A
4. Pressthe+ or– pad.Thelastovenset
@
temperatureappearsin thedisplay.
Continuepressinguntilthedesired
temperatureis displayed.
v
e
Theword“ON’ and“100°”willbe
displayed.Astheovenheatsup,the
displaywillshowthechanging
temperature.men the ovenreachesthe
temperatureyou set,atonewillsound.
o
5.PresstheCLEAWOFFpadwhenroasting
C#R
is finished.
Tochangetheoventem~ra~ duringroastig,
pressthe BA~ pad andthenthe+ or– padto get
thenewtemperature.
Use of Aluminm Foil
Youcanuse aluminumfoilto linethebroilerpan.
Thismakesclean-upeasierwhenusingthepanfor
marinating,cookingwithfruits,cookingheavily
curedmeatsor bastingfoodduringcooking.~ess
thefoiltightlyaroundtheinsideofthepan.
32
QuestionsandAnswers
Q.Isit necessaryto check for donenesswith a
meat thermometer?
A. Checkingthefinishedinternaltemperatureat
thecompletionof cookingtimeisrecommended.
Temperaturesare shownin theRoastingGuide.
Forroastsover8 lbs,,checkwiththermometer
at half-hourintervalsafterhalfthecookingtime
haspassed.
Q. Why is my roast crumbling when I try to
carve it?
A. Roastsareeasierto sliceif allowedto cool10to
20minutesafterremovingthemfromtheoven.
Besureto cutacrossthegrainofthemeat.
Q. Do I need to preheat my oveneach time I cook
a roast or poultry?
A. It is notnecessaryto preheatyouroven.
Q. When buying a roast, are there any specialtips
that wouldhelp me cookit more evenly?
A. Yes.Buya roastas evenin thicknessas possible,
or buyrolledroasts.
Q. CanI serdthesidesofmy foil“tent” when
roasting a turkey?
A. Sealingthefoilwillsteamthemeat.Leavingit
unsealedallowstheairtocirculateandbrown
themeat.
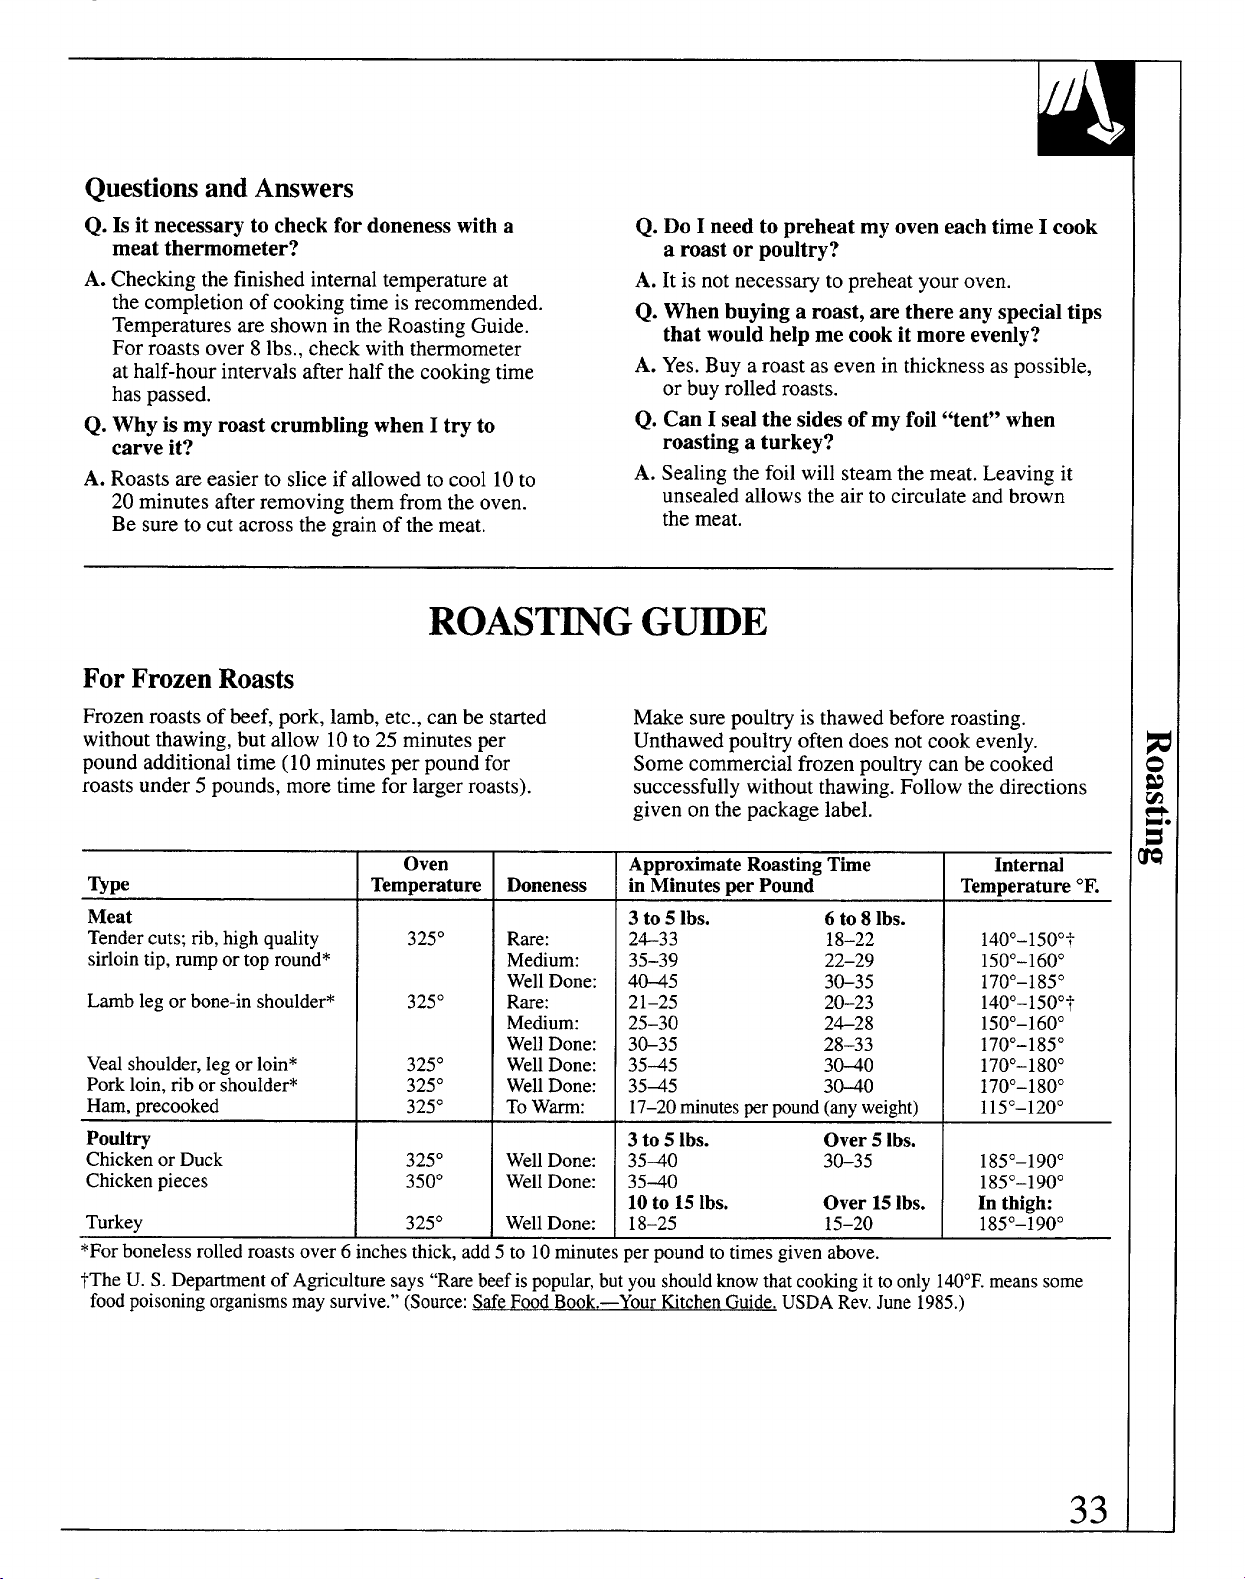
For FrozenRoask
Frozenroastsofbeef,pork,
ROAST~G G~E
lamb,etc.,canbe started
Makesureuoulm is thawedbeforeroasting.
withoutthawing,butailow10to 25minutesper
Unthawed~oult~ oftendoesnotcookeve~ly.
poundadditionaltime(10minutesperpoundfor
Somecommercialfrozenpoultrycanbecooked
roastsunder5 pounds,moretimeforlargerroasts).
successfullywithoutthawing.Followthedirections
givenonthepackagelabel.
Oven
Approximate Roasting Time
Internal
Type
Temperature
Doneness
inMinutesperPound
Temperature‘F.
Meat
3to5lbs.
6to8lbs.
Tendercuts;rib,highquality
325° Rare: 2633
18–22 140°–1500+
sirlointip,romportopround*
Medium: 35-39
22-29 150°–1600
WellDone: 4W5
3&35 170°–1850
Lamblegorbone-inshoulder*
325° Rare: 21-25
20-23 140°–1500?
Medium: 25-30
2628 150°–1600
WellDone:
3G35 28–33 170°–1850
Vealshoulder,legor loin*
325°
WellDone:
3545 3M0 170°–1800
Porkloin,riborshoulder*
325° WellDone:
3545
3W0 170°–1800
Ham,precooked
325° ToWarm: 17-20minutesperpound(anyweight)
115°–1200
Podtry
3 to 5 Ibs.
Over 5 Ibs.
ChickenorDuck
325°
WellDone:
3540 3&35
185°–1900
Chickenpieces
350°
WellDone:
3540
185°–1900
10to 15lbs.
Over 15lbs.
In thigh:
Turkey
325° Well Done:
18-25
15-20 185”–190°
*Forbonelessrolledroastsover6inchesthick,add5 to 10minutesperpoundtotimesgivenabove.
~TheU. S.Departmentof Agriculturesays“Rarebeefispopular,butyoushouldknowthatcookingittoonly140°F.meanssome
foodpoisoningorganismsmaysurvive.”(Source:SafeFoodBook.—YourKtchenGuide.USDARev.June1985.)
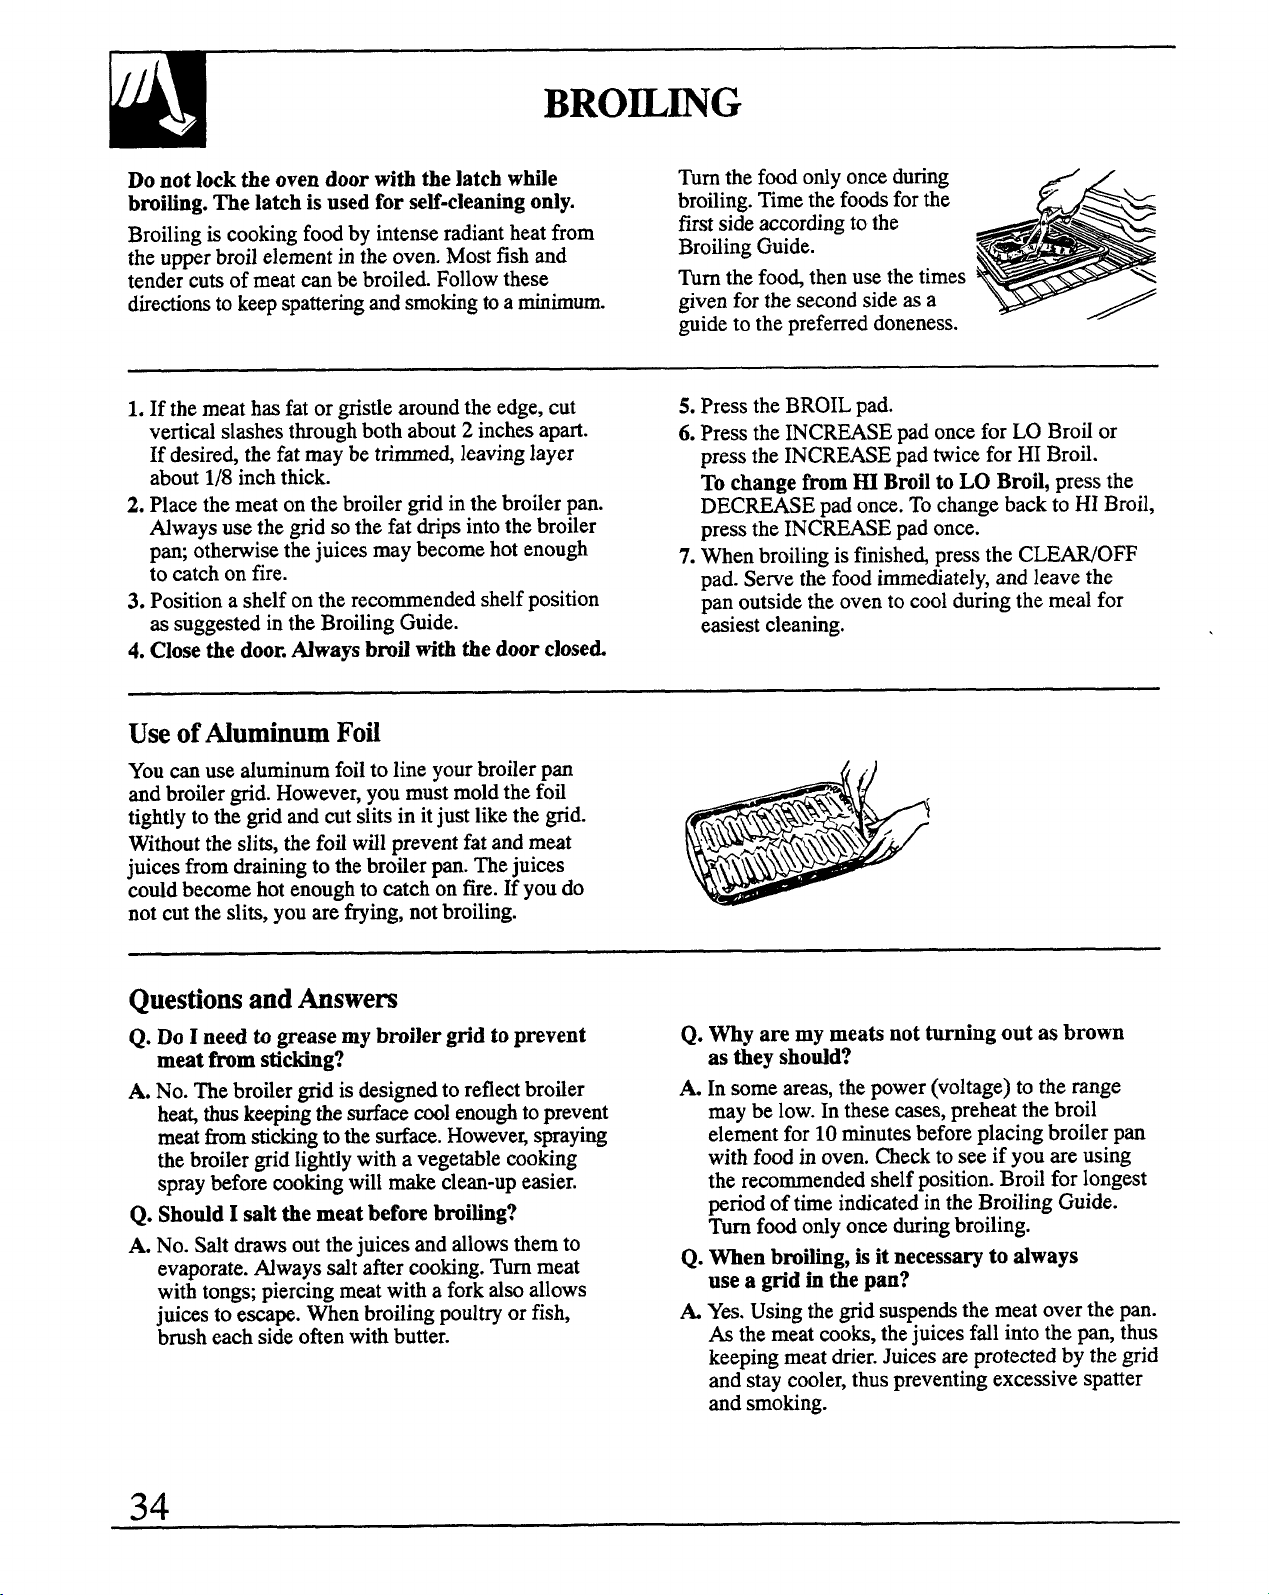
BROm~G
Donotlocktheovendoorwiththelatchwhile
Turnthefoodody onceduring
broiting.The latch is used forse~-cleaningonly.
broiling.Timethefoodsforthe
Broilingis cookingfoodby intenseradiantheatfrom
firstsideaccordingto the
theupperbroilelementintheoven.Mostfishand
BroflingGuide.
tendercutsofmeatcanbebroiled.Followthese Turnthefoo~ thenusethetimes
directionstokeepspatteringandsmokingtoaminimum. givenforthesecondsideasa
guideto thepreferreddoneness.
1.If themeathasfatorgnsde aroundtheedge,cut
verticalslashesthroughbothabout2 inchesapart.
If desire~ thefatmaybe trirnrne~leavinglayer
about1/8inchthick.
2. Placethemeatonthebroilergridinthebroilerpan.
Aways usethegridsothefat dripsintothebroiler
pan;otherwisethejuicesmaybecomehotenough
to catchonfire.
3. Positiona shelfontherecommendedshelfposition
as suggestedintheBroilingGuide.
4. Closethe doorAways brotiwiththedoorclosed
5.PresstheBROILpad.
6.PresstheINCREASEpadoncefor LOBroilor
presstheINCREASEpadWicefor HI Broil.
Tochangetim ~ Broilto LO Broil,pressthe
DECREASEpadonce.Tochangebackto HIBroil,
presstheINCREASEpadonce.
7.Whenbroilingisfinishe~pressthe CLENOFF
pad.Servethefoodimmediately,andleavethe
panoutsidetheovento coolduringthemealfor
easiestcleaning.
UseofMuminumFofl
Youcanusedurninumfoilto lineyourbroilerpan
andbrofiergrid.However,youmustmoldthefofl
tightlyto thegridandcutslitsin itjust likethegrid.
Withoutthesli~, thefotiwdlpreventfatandmwt
juicesfromdrainingto thebroilerpan.Thejuices
cotid becomehotenoughto wtch onfire.Ifyoudo
notcuttheslits,youarefrying,notbroiling.
Questionsandhswem
Q.
DoI needtogreasemybroilergridtoprevent
Q.Whyaremymeatinotturningoutasbrown
meatfromsticking?
astheyshotid?
A. No.Thebroilergridisdesignedto reflectbrotier
A Insomeareas,thepower(voltage)to therange
hea; thuskeepingthesurfacecoolenoughtoprevent
meatfromstickingtothesurface.Howeveqspraying
thebroilergridIighdywitha vegetablecooking
spraybeforerookingwillmakeclean-upeasier.
Q. Shodd I saltthemeatbeforebroiting?
A. No.Sdt drawsoutthejuicesandallowsthemto
maybe low.In the;e cases,preheatthebroil
elementfor 10minutesbeforeplacingbroilerpan
withfoodin oven.~eck to see ifyouareusing
therecommendedshelfposition.Broilfor longest
periodoftimeindicatedintheBroilingGuide.
Turnfoodordyonceduringbroiling.
evaporate.Aways dtafter cooking.Turnmeat
~. Whenbrofling,is it necessaryto always
withtongq piercingmeatwitha forkdso allows
usea gridinthepan?
juicesto-e~pe. Whenbroilingpoultryorfish,
A Yes.Usingthegridsuspendsthemeatoverthepan.
brusheachsideoftenwithbutter.
As themeatcooks,thejuicesfdl intothepan,thus
keepingmeatdrier.Juicesareprotectedby thegrid
andstaycooler,thuspreventingexcessivespatter
andsmoking.
34
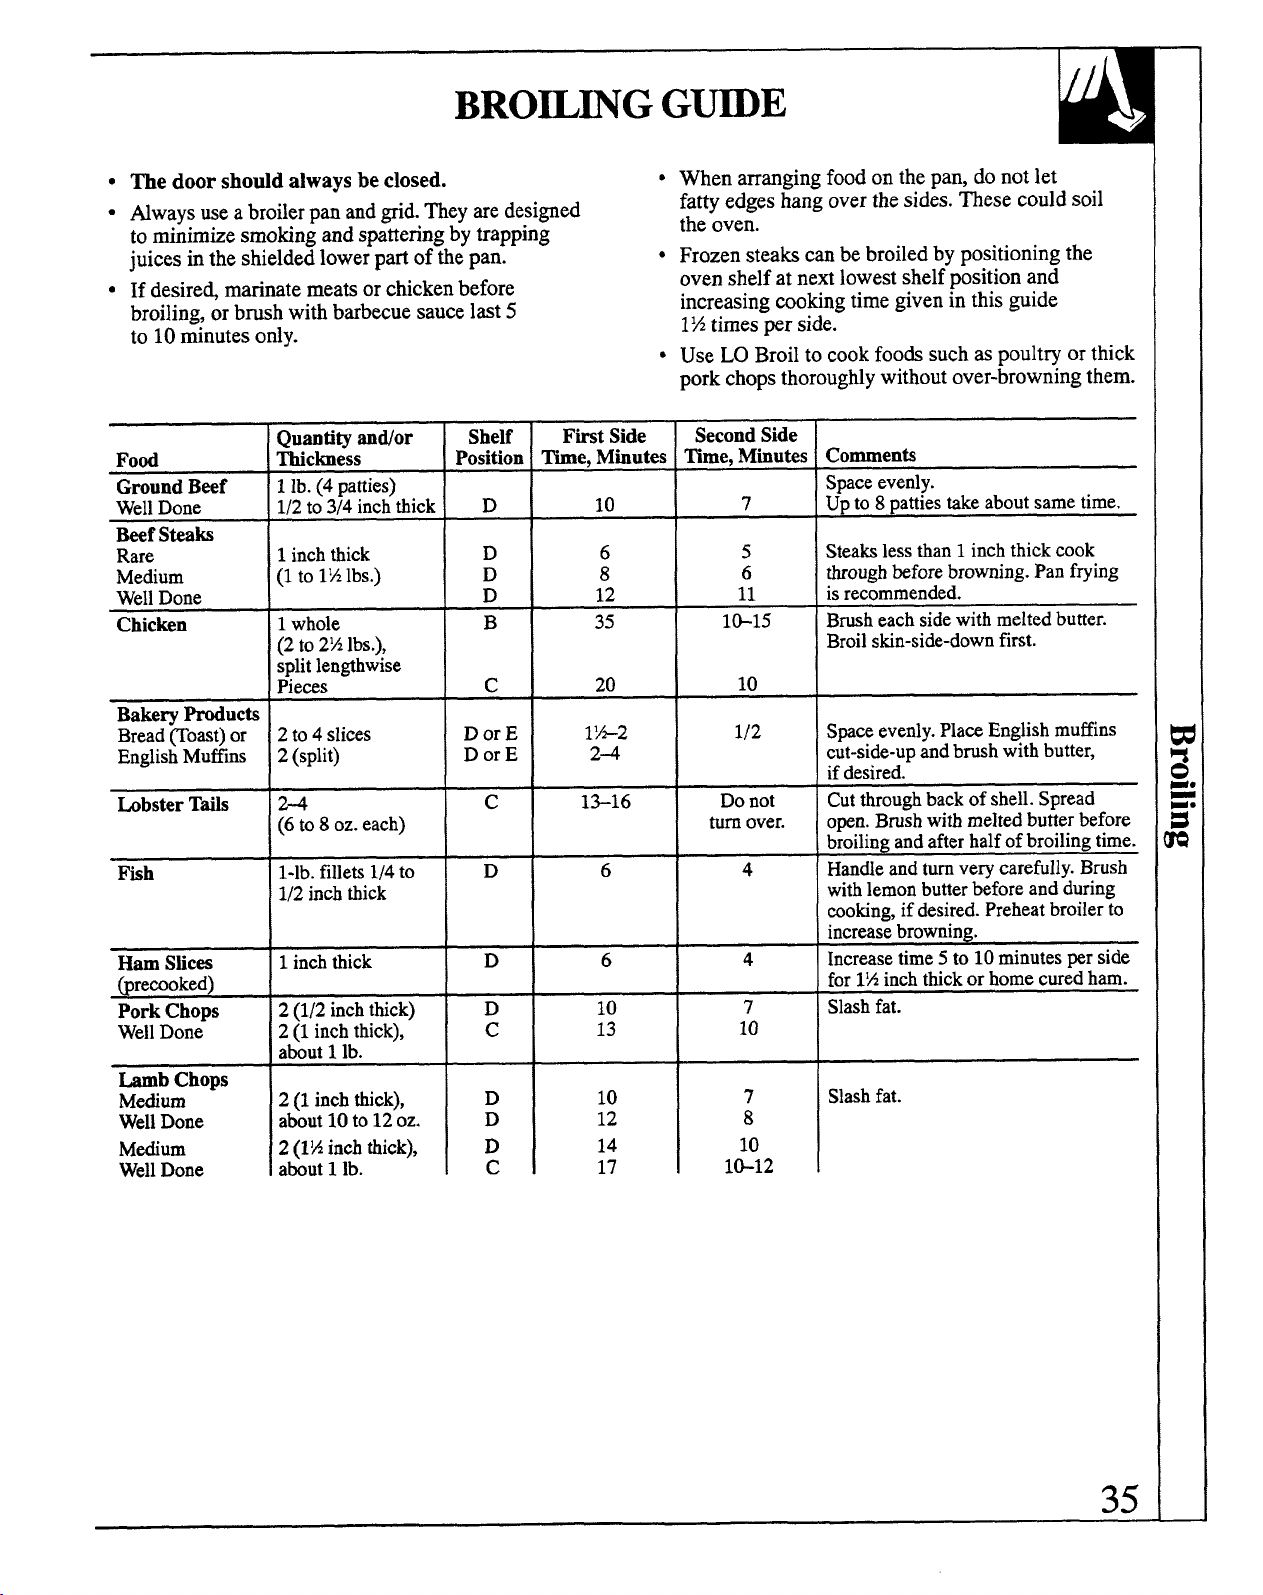
BROE~G G~E
me doorshotid alwaysbeclosed.
●
Nways useabroilerpanandgrid.~ey aredesigned
to minimizesmokingandspatteringbytrapping
Whenarrangingfoodonthepan,donotlet
fattyedgeshangoverthesides.~ese couldsoil
theoven.
Frozensteakscanbebroiledbypositioningthe
ovenshelfat nextlowestshelfpositionand
increasingcookingtimegiveninthisguide
1%timesperside.
UseLOBroilto cookfoodssuchaspoultryor thick
porkchopsthoroug~ywithoutover-browningthem.
juicesintheshieldedlowerpartofthepan.
If desire~ marimtemeatsorchickenbefore
broiling,orbrushwithbarbecuesaucelast5
to 10&nutes ordy.
~
Upto8pattiestakeaboutsametime.
Shelf
Positiol
First Side
Time,Minutes
10
6
8
12
35
20
1Y*2
24
1>16
Quantityandor
Thickness
1lb.(4 patties)
1/2
to 3/4inchthicl
Food
GroundBeef
WellDone D
D
D
D
BeefSteaks
Rare
Medium
WellDone
Chicken
5 Steakslessthan1inchthickcook
6
throughbeforebrowning.Panfrying
11
is
recommended.
1inchthick
(1to 1%lbs.)
,
l&15 I Brusheachsidewithmeltedbutter.
1whole
(2to2%lbs.),
splitlengthwise
Piems
B
c
Broilskin-side-downfirst.
BakeryProducts
Breadcoast) or
EnglishMuffIns
1/2
Donot
turnover.
Spaceevenly.PlaceEnglishmuffins
cut-side-upandbrushwithbutter,
ifdesired.
Cutthroughbackofshell.Spread
open.Brushwithmeltedbutterbefore
broilingandafterhalfofbroilingtime.
Hande andturnverycarefully.
Brush
withlemonbutterbeforeandduring
cooking,ifdesited.Preheatbroilerto
Dor E
Dor E
c
D
2to4slices
2(split)
LobsterTails
~6<o8 oz.each)
l-lb. fillets1/4to
1/2inchthick
4
Fish
6
increasebrowning.
4
Increasetime5to10minutes~r
side
for1’Ainchthickor homecuredham.
7
Slashfat.
HamShces
@recooked)
Pork
Chops
WellDone
1inchthick D
D
c
6
10
13
10
12
14
17
2(1/2inchthick)
2(1 inchthick),
about1lb.
10
I
LambChops
Medium
WellDone
Medium
WellDone
Slashfat.
:
10
l&12
D
D
D
c
2(1 inchthick),
about10to12oz.
2(1%inch
thick),
about1lb.
35
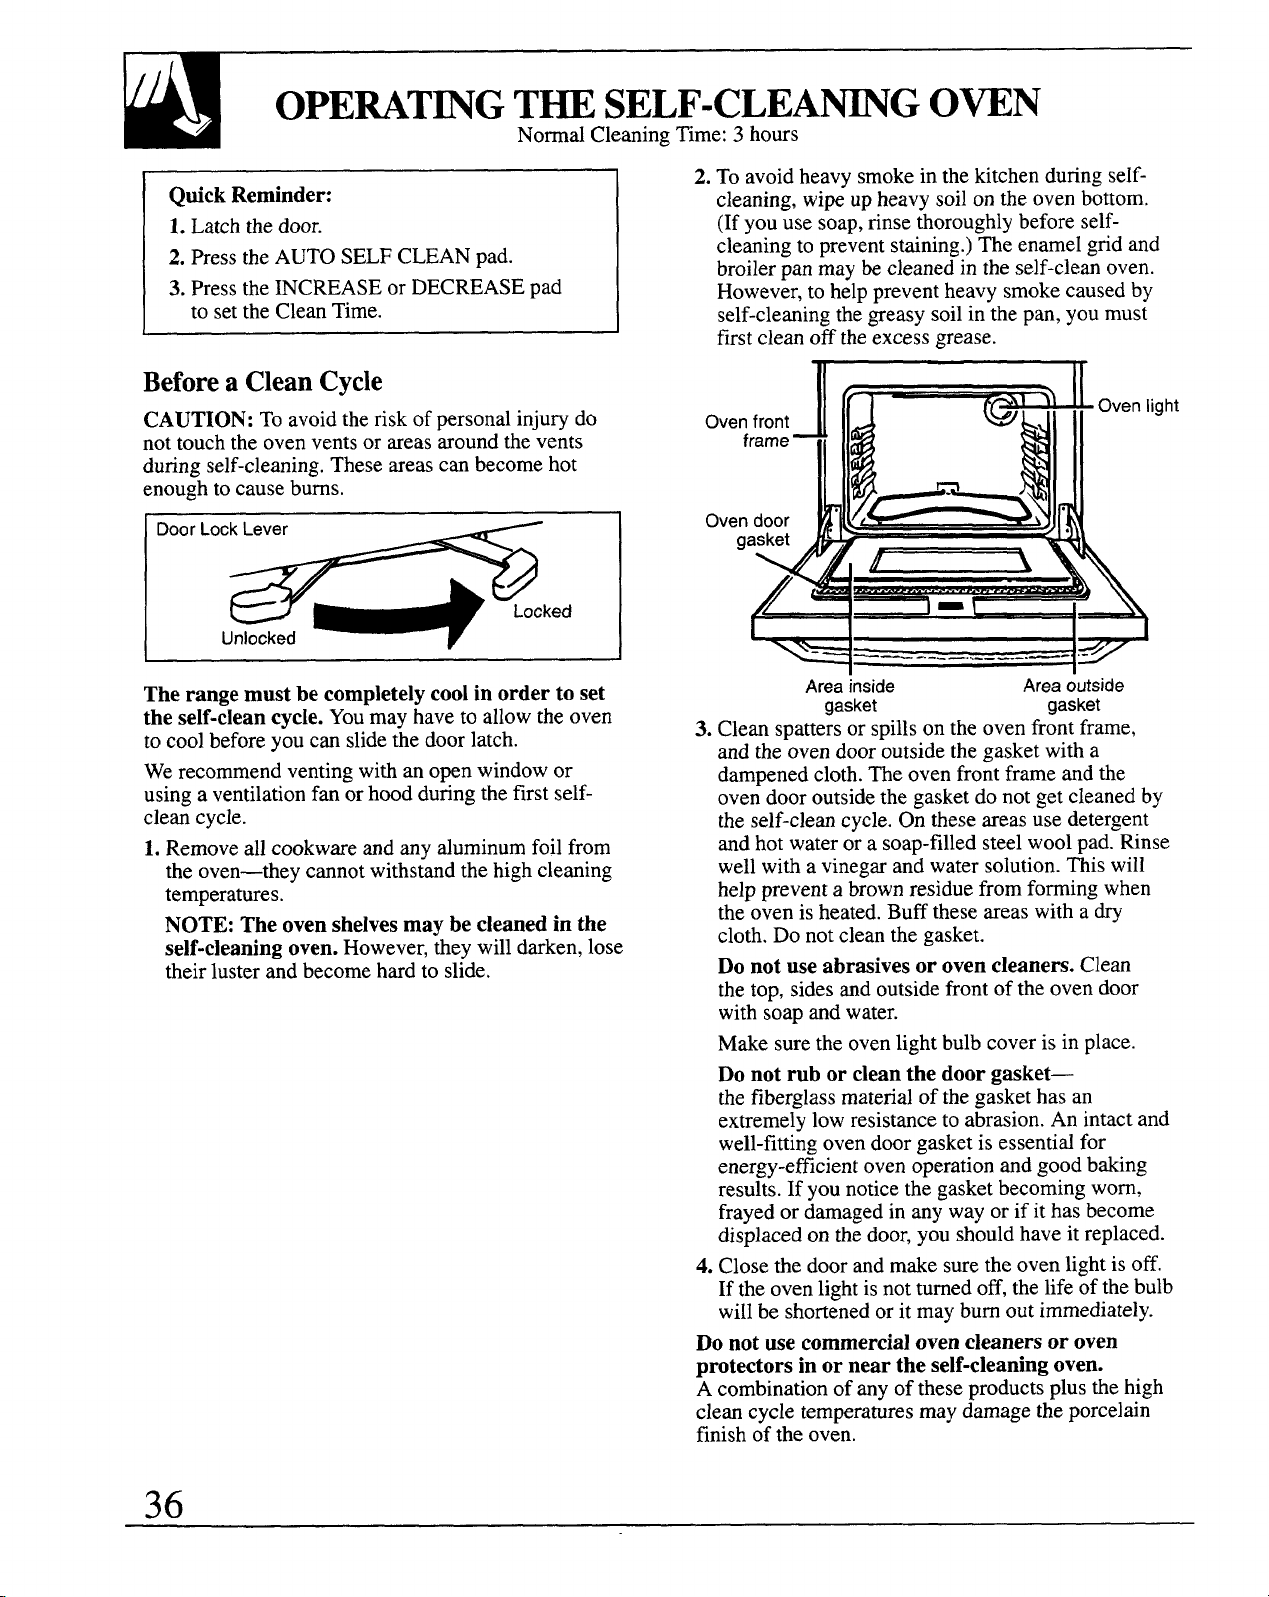
OPEWT~G T~ SELF-CLEA~G OWN
Norrnd CleaningTime:3 hours
QuickReminder:
1.Latchthedoor.
2. PresstheAUTOSELFCLEANpad.
3. PresstheINCREASEor DECREASEpad
to settheCleanTime.
Beforea CleanCycle
CAUTION:Toavoidtheriskofpersonalinjurydo
nottouchtheovenventsor areasaroundthevents
duringself-cleaning.Theseareascanbecomehot
enoughtocausebums.
‘oorLocWked
Unlocked
Therangemustbe completelycoolinorderto set
theself-cleancycle.Youmayhaveto allowtheoven
tocoolbeforeyoucanslidethedoorlatch.
Werecommendventingwithanopenwindowor
usinga ventilationfan orhoodduringthefirstself-
cleancycle.
1.Removeallcookwareandanyaluminumfoilfrom
theoven—theycannotwithstandthehighcleaning
temperatures.
NOTE:Theovenshelvesmaybecleanedinthe
self-cleaningoven.However,theywilldarken,lose
theirlusterandbecomehardto slide.
2.Toavoidheavysmokein thekitchenduringself-
cleaning,wipeupheavysoilontheovenbottom.
(Ifyouuse soap,rinsethoroughlybeforeself-
cleaningto preventstaining.)Theenamelgridand
broilerpanmaybecleanedin theself-cleanoven.
However,to helppreventheavysmokecausedby
self-cleaningthegreasysoilin thepan,youmust
firstcleanofftheexcessgrease.
Ov
ight
Ov
Area inside
Areaoutside
gasket
gasket
3.Cleanspattersor spillsontheovenfrontframe,
andtheovendooroutsidethegasketwitha
dampenedcloth.Theovenfrontframeandthe
ovendooroutsidethegasketdonotgetcleanedby
theself-cleancycle.Ontheseareasusedetergent
andhotwaterora soap-filledsteelwoolpad.Rinse
wellwitha vinegarandwatersolution.Thiswill
helppreventa brownresiduefromformingwhen
theovenisheated.Bufftheseareaswitha dry
cloth.Do notcleanthegasket.
Do notuseabrasivesorovencleaners.Clean
thetop,sidesandoutsidefrontoftheovendoor
withsoapandwater.
Makesuretheovenlightbulbcoveris in place.
Donotruborcleanthe doorgasket—
thefiberglassmaterialofthegaskethasan
extremelylowresistanceto abrasion.Anintactand
well-fittingovendoorgasketis essentialfor
energy-efficientovenoperationandgoodbaking
results.If younoticethegasketbecomingworn,
frayedor damagedinanywayorif it hasbecome
displacedonthedoor,youshouldhaveitreplaced.
4. Closethe doorandmakesuretheovenlightis off.
If theovenlightis notturnedoff,thelifeofthebulb
will be shortenedoritmaybumoutimmediately.
Donotusecommercialovencleanersoroven
protectorsinorneartheself-cleaningoven.
A combinationof anyoftheseproductsplusthehigh
cleancycletemperaturesmaydamagetheporcelain
finishoftheoven.
36
Howto Setthe Ovenfor Cleaning
QuickReminder:
1.Latchthedoor.
2. PresstheAUTOSELFCLEANpad.
3. Pressthe+ or– padto settheCleanTime.
L
If theovenis toohotandyou startto setaclean
cycle,theword“0~’ willappearinthedisplay.
Allowadditionaltimefor coolingbeforeyoutryto
setthecycle.
1.Followthedirectionsto preparethe oven
forcleaning.
2.Slidethelatchhandleto the~
rightasfar as it willgo.
Neverforce the latch
&
handle.Forcingthe
handlewilldamagethe
doorlockmechanism.
—~ 3.
Press the AUTO SELF CLEAN pad.
AUTOSELF
CLEAN
A
4. Pressthe+ or- paduntildesired
@
CleanTimeis displayed.
v
e
CleanTimeisnormally3hours.Youcanchangethe
CleanTimetoanywherebetween2 and4 hours,
dependingon howdirtyyourovenis.
Theself-cleancyclewillautomaticallybeginafter
“CLEAN”is displayedandthetimefortheclean
cycleis set.Thewords“ON’ and“LOCK’will
appearinthedisplay.It willnotbepossibleto open
theovendooruntilthetemperaturedropsbelowthe
locktemperatureandtheLOCKlightgoesoff.
5.WhentheLOCKlightis off,slidethelatchhandle
to theleftasfarasitwillgo andopenthedoor.
Theword“door”willbedisplayed,theword“LOCK’
willflashandtheovencontrolwillsignalif youset
thecleancycleorforgetto closetheovendoor.
Aftera CleanCycle
Aftercleaningiscomplete,thedoorlatchmustbe
If white spots remain, removethemwitha soap-
retumedto its originalpositionbeforeyoucanusethe
filledsteelwoolpad.Besureto rinsethoroughly
oven.Theovendoorwillstaylockeduntiltheoven
witha vinegarandwatermixture.Thesedeposits
cools.If youcannotslidethelatcheasilyto unlockthe
areusuallyasaltresiduethatcannotberemovedby
door,allowadditionaltimefor cooling.
thecleancycle.
Neverforce the latch handle. The latch slides
E the ovenisnot clean after one clean cycle,
easily.Forcing the latch handle may damage the
repeatthecycle.
door lock.
If theshelveshavebecomehardto slide,wipethe
Youmay noticesomewhite ash in the oven.Just
shelfsupportswithcookingoil.
wipeit up witha dampclothaftertheovencools.
NOTE: No functionscanbeprogrammedbeforethe
doorautomaticallyunlocks.
ToStopa CleanCycle
1.PresstheCLEAWOFFpad.
2.WhentheLOCKlightgoesoffandtheovenhascooledbelowthe
lockingtemperature,openthedoor.
(continued next page)
37
OPEWmG T~ SELF-CLEA~G OWN
(continued)
Howto SetDelayStati of Cleaning
QuickReminder:
1.Latchthedoor.
2. PresstheAUTOSELFCLEANpad.
3. Pressthe+ or– paduntildesiredClean
Timeappears.
4. PresstheSTOPTIMEpad.
5. Pressthe+ or– paduntilthedesiredStop
Timeappearsinthedisplay.
.-
DelayStartis settingtheoventimerto startmeclean
cycleautomaticallyata latertimethanthepresent
timeofday.
NOTE: Beforebeginning,makesuretheovenclock
showsthecorrecttimeofday.
1.Followstepstopreparetheovenfor cleaning.
2. Slidethelatchhandleto the
rightasfarasitwillgo.
Neverforcethe latch
*
‘i
handle. Forcingthe handle
willdamage the door lock
mechanism.
D
3. PresstheAUTOSELFCLEANpad.
AUOSELF
CLEAN
A
4. Pressthe+ or – padto enterthe
CleanTime.
@
u
n
5. PresstheSTOP~E pad.“STOP
s;:?
~E’ andtheearliestStopTimeyou
can setwillappearin thedisplay.
TheearliestStopTimewillbetheCleanTime
selectedplusthetimeof day.For example: If the
CleanTimeis 3 hoursandthetimeofdayis 6:00,the
StopTimethatappearsin thedisplaywillbe9:00.
A
6. Pressthe+ padtochangetheStopTime
@
to a latertimeof dayif desired.For
example:If yousetStopTimeat 11:00,
ovenwillstartcleancycleat 8:00andend
at 11:00.Thedoorlatchesautomatically.
Theself-cleancyclewillautomaticallybeginafter
“CLEAN’is displayedandthetimefor cleancycle
is set.Thewords“ON’ and“LOCK’willappear
onthe display.It willnotbepossibleto openthe
ovendooruntilthetemperaturedropsbelowthe
locktemperatureandtheLOCKlightgoesoff.
7. WhentheLOCKlightisoff,slidethelatchhandle
totheleftas far as it willgoandopenthedoor.
I
,
QuestionsandAnswers
Q.If myovenclockisnotsetto thecorrecttimeof
day,canI stillself-cleanmyoven?
A.If theclockisnotsetto thecorrecttimeofday
youwillnotbe ableto seta delaycleantoendat a
specifictime.
Q. Can I use commercialovencleaners on any part
of my self-cleaningoven?
A. No cleanersorcoatingsshouldbeusedaround
anypartof thisoven.Ifyoudousethemanddo
notthoroughlyrinsetheovenwithwater,wipingit
absolutelycleanafterwards,theresiduecanscar
theovensurfaceanddamagemetalpartsthenext
timetheovenis automaticallycleaned.
Q. What shodd I do if excessivesmokingoccurs
duringcleaning?
A.Thisiscausedby excessivesoil.Pressthe
CLEAWO~ pad.Openthewindowstoridthe
roomof smoke.Waituntilthe ovenhascooledand
theword“LOCK’isoffinthedisplay.Wipeup
theexcesssoilandresetthecleancycle.
Q. Is the “crackling” or “popping” sound I hear
during cleaningnormal?
A. Yes.Thisis the soundofthemetalheating
andcoolingduringboththecookingand
cleaningfunctions.
Q. Shouldthere be any odor during the cleaning?
A. Yes,therewillbe anodorduringthefirstfew
cleanings.Failureto wipeoutexcessivesoilmight
dso causea strongodorwhencleaning.
Q.Whatcausesthehair-likelinesontheenameled
surfaceofmyoven?
A.
This is anormalcondition,resultingfromheating
andcoolingduringcleaning.Theselinesdo not
affecthowyourovenperforms.
Q. WhydoI haveash leftinmyovenaftercleaning?
A. Sometypesofsoilwillleavea depositwhichis ash.
It canbe removedwitha dampspongeor cloth.
Q. My ovenshelvesdo not slideeasily.What is
the matter?
A. Theself-cleancyclecausestheovenshelvesto
losetheirlusterandbecomehard to slide.Tomake
shelvesslidemoreeasily,wipetheshelfsupports
withcookingoil.
Q. My ovenshelveshave becomegray after the
self-cleancycle.Is this normal?
A. Yes.Aftertheself-cleancycle,theshelveswill
losesomelusterandchangeto adeepgraycolor.
Q. Can 1cookfoodon the cooktopwhilethe oven
isself-cleaning?
A.Yes.Whiletheovenis self-cleaning,youcan
usethecooktopjust asyounorrndlydo.
Q. The word “door” appeared in the display when
I selectedthecleancycle.What’swrong?
A.
The door latch handle must be moved all the
way to the right. Move the latch handle and
cleaning will start.
39
Propercareandcleaningareimportantsoyourrange
BE SUREELEC~CAL POWER 1SOFF AND
willgiveyouefficientandsatisfactoryservice.Follow
ALL SU~ACES ARE COOL BEFORE
thesedirectionscarefullyin caringforitto helpassure
CLEANING- P~T OF T~ RANGE.
safeandpropermaintenance.
Careof Modules
PomelainEnameledGrillPan& Deflector
Someofthemodulesmustbecuredorpreconditioned
Cleanaftereveryuse.Porcelainenamelcancrack
beforeusingthemforthefirsttime.Modulesand
orchipwithmisuse.It canstainif spilloversof foods
accessoriesshouldbe cleanedaftereachuse.The
witha highacidcontent(suchastomatoesor lemon
longera soilremains,theharderitistoclean.Seeeach
juice)arenotcleanedupquictiy.
modulesectioninthisguideforspecificinstructions.
Neverimmerseanymoduleinwater.Men notinthe
maintop,modulesandaccessoriesshouldbestoredin
a clean,dryplace.Aways beweful notto dropthe
modulesortheycouldbedamaged.
CoflModuleSurfaceUnik
Tocleanthesurfaceunits,turnthecontroltothehighest
settingfora minute.Thecoilswillbumoffanysoil.
CAUTfON
● Besured] thecontrolsareturnedtoOFFand
thesurfaceunitsarecoolbeforeattemptingto
removethem.
● Do notimmersethesurfaceunitsorthemodule
inliquidsof anykind.
● Do notcIeanthesurfaceunitsorthemodule
in a dishwasher.
● Do notbendthesurfamunitplugterrninds.
● Do notattemptto clean,adjustor in anyway repair
theplug-inreceptaclesorthemodule.
Toremoveasurfaceunit:
Toremovethedrippansforcleaning,thesurfaceunits
mustbe removedfirst.
SutiaM UnR
Receptacle
DripPan
Liftthesurfaceunitabout1inchabovethedrippan
andpullit out.
Donotliftthesurfaceunitmorethan1inch.Ifyou
do,itmaynotlieflatonthedrippanwhenyou
plugit backin.
Repeatedlitig ofthe surfaceunitmorethan1
inchabovethedrippancanpermanentlydamage
thereceptacle.
Toreplacea surfaceunit:
● Replacethedrippanintotherecessinthe
cooktop.Makesuretheopeninginthepanlines
upwiththereceptacle.
● Inserttheterminalsofthesurfaceunitthroughthe
openinginthedrippanandintothereceptacle.
● Guidethesurfaceunitintoplaceso it restsevedy.
DripPans
Removethesurfaceunits.Thenliftoutthe drippans.
Forbestresdti, cleanthedrippansby hand.
Placethemin a coveredcontainer(ora plasticbag)
with 1/4cupammoniato loosenthesoil.Thenscrub
witha soapfilledscouringpadif necessary.Rinse
withcleanwaterandpolishwitha cleansoftcloth.
Thedrippansmayalsobe cleanedin the dishwasher.
Blackdrippans(onsomemodels)maybe cleanedin
a self-cleaningovenaftertheyhavebeenthoroughly
rinsed.However,self-cleaningthemmaycausethem
to losetheiroriginallusterandshine.
Cleantheareaunderthedrippansoften.
Built-upsoil,especiallygrease,maycatchon fire.
Donotcoverthedrippanswithfoil.Usingfoil
so closeto thereceptaclecouldcauseshock fireor
damageto therange.
RadiantModul*Glass CeramicCooktopCleaning
Cleaningofglassceramiccooktopmodulesis
differentfromcleaninga standardporcelainfinish.
Tomaintainandprotectthesurfaceofyournewglass
ceramicmodulefollowthesebasicsteps.
Beforeyouusethemoduleforthefirsttime,clean
itwithCookTopCleaningCreme.Thishelpsprotect
thetopandmakescleaningeasier.
DAILYCLEANING:UseonlyCookTopCleaning
Creme on GlassCeramic.
For normal, lightsoil:
1.Rubafewdrops(lessisbetter)ofCookTopCleaning
Cremeontothesoiledareausingadamppapertowel.
Wipeuntilallsoilandcremeareremoved.Frequent
cleaningleavesaprotectivecoatingwhichisessential
inpreventingscratchesandabrasions.
2.CleanthesurfacewithCookTopCleaningCreme
aftereachuse.
For heavy,burned on soil:
1.Applya fewdropsof CookTopCleaningCreme
to the (cool)soiledarea.
2.Usinga damppapertowel,rub cremeintothe
burnedon area.Aswithanyburnedon spill,this
mayrequiresomeeffort.
3.Carefullyscraperemainingsoilwiththerazor
scraper.Holdthescraperata30°angleagainstthe
ceramicsurface.
4.If anysoilremains,repeatthestepslistedabove.
Foradditionalprotection,afterallsoilhasbeen
removed,polishtheentiresurfacewiththeCook
TopCleaningCreme.
5. Buffwitha drypapertowel.
NOTE:
● Usinga razorscraperwillnotdamagethesurface
if the 30°angleis maintained.
● Be suretousea new,sharprazorscraper.
Do notusea dullor nickedblade.
● Store the razor scraper out ofreach ofch]ldren.
PRECAUTIONS
● Mostcleanerscontainarnmoni~chemicalsandabrasives
whichcandamagethesurfaceof yourmodule.Use
ody the CookTopCleaningCreme for proper
cleaningandprotectionofyour~ass ceramicsurface.
● If you slidealuminum or copper cookwareacross
thesurfaceofyourmodule,theymayleavemeti
markings whichappear as scratches. If thisshould
happen,usetherazorscraperandCleaningCremeto
removethesemarkings.Failureto removethese
residuesimmediatelymayleavepermanentmarks.
● Waterstains(rninerddeposits)areremovableusing
CookTopCleaningCremeorml strengthwhitevinegar.
SpecialCare:
Sugaryspillovers(suchasjellies,fudge,candy
syrups)ormelted plasticscancausepittingofthe
surfaceofyourmodule(notcoveredbythewarranty)
unlessthespillisremovedwhilestillhot.Special
care should betakenwhenremovinghot
substances.Followtheseinstructionscarefullyand
removethesoilwhilethe spillis stillhot.
1.Turnoffallthesurfaceunitsaffectedbythe
spillover.Removehotpans.
2.Wearinganovenmitt,holdtherazor \
e
\ ,,+~,~!{::”,;;
scraperat a 30°~gle to themodule –~ .~<:~’
andscrapethehotspillto a coolarea-
outsidethesurfaceunit.
3.Withthespillina coolarea,usea drypapertowelto
removeanyexcess.Anyspilloverremainingshould
beleftuntilthesurfaceofthemodulehascooled.
Donotcontinuetousethesoiledsurfaceunituntildl
ofthespilloverhasbeenremoved.Followthesteps
underHeavySoiltocontinuethecleaningprocess.
General Information:
AstheCookTopCleaningCremecleans,it
leavesa protectivecoatingonthemodulesurface.
Thiscoatinghelpsto preventbuild-upofmineral
deposits(waterspots)andwillmakefuturecleaning
easier.Dishwashingdetergentsremovethisprotective
coatingandthereforemakethemodulemore
susceptibleto staining.
Toconvenientlyorder more creme an~or
scrapers for cleaningyour radiant module,
pleasecall our tollfree number:
NationalPam Center
800-626-2002
Creme10oz.
# WB02X8273
Scraper
# WX5X1614
Cremeandscraperkit
# WB64X5027
● If potswith a thinoverlayof aluminum,copper,or
enamelare allowedto boildry,theoverlaymay bond
with the glassceramicand leavea black discoloration.
This shouldbe removedimmediatelybeforeheating
againor the discolorationmay be permanent.
● Use of window cleaner may leave an iridescent
film on the module. Cook Top Cleaning Creme will
remove this discoloration.
Read and follow all instructions and warnings
onCookTopCleaningCremelabels.
(continued next page)
41
CM N CL~
G
(continued)
Gtil Module
Cleantheml module
aftereveryuse.Do
not~uttheelement
.
intowater.It cleans
itselfwhenheated
duringnormaluse.To
-’E’ement
removeanycharred
-
Deflector
soil,cleanwitha dry,
stiffbrushwhenthe
elementiscool.Never
*
~Gfill Pan
use
steelwoolor
metalscouringpads
becausetheymay
damagetheouter
casingoftheelement.
-sheet
Donotuseabrasivecleaningprodu~s.
Fromtimeto time,youshodd reconditionthegrids
withcookingoilasexplainedin theGrillModule
sectionof Surfaw Cooking.
Washthenon-stickgridsinthesinkinsoapandwarm
water.Usea non-meti scouringpadifnecew.
Washthedeflector,grillpan & grillsheetin thesink
in soapandwarmwateroryou mayputtheminthe
dishwasher.Soakstubbornstainsthenrubgentlywith
a non-metalscouringpad.
GtiddleAccesso~
Aftercookinga
greasyfoo~ wipe
thenon-stickgridde
whileit is stillwarm
witha @ Pawr
Q
towel.B; ~~efulnot
tobum yourfingers.Whencool,washthegridde at
thesinkinsoapandwater.Usea non-metalscouring
padif necessary.
Donotuseabrasivecleaningproducts.Donotwash
inthedishwasher.Fromtimetotime,reconditionthe
gridde withcookingoilas describedin theGridde
AccessorysectionofSurfaceCooking.
It is a goodideatostorethegridde ononeedge.
If youlayitflat,pansor othercookwaremaybe
puton topandscratchthe non-stickcoating.
OvenHeatingElements
Donotcleanthebakeelementorthebroilelement
Anysoilwillburnoffwhentheelementsareheated.
Thebakeelementcanbe liftedgentlyto cleanthe
ovenfloor.If spillovers,residueor ashaccumulate
aroundthebakeelementgentlywipearoundthe
elementwithwarmwater.
BroilElement
BakeElement
/
OvenLightBulb
NO~: The@asscover
shouldberemovedordy
OQ
J
)
~,\;’.+,
,;j:-
whencold.Wearing
L ..!:?” J ,
latex#eves mayoffera
bettergrip.
- ‘{
Thelightbulbislocatedonthebackwrdloftheo;en.
Beforereplacingthebulb,disconnectelectricrdpower
to therangeat themainfuseor circuitbreakerpanel
orunplugtherangefromtheelectrial outlet.Ut the
bulbcoolcompletelybeforeremovingit.Foryour
safety,donottouchahotbulbwitha dampcloth.If
youdo,thebulbwillbreak.
Toremove Unscrewthecoverandremovethebtib.
DONOTREMO~ - SCREWSTO REMOW
THECO~R ORREPLACETHELIGHTBULB.
Toreplace: Put ina new40-wattappliancebdb.
NO~:
● A 40-wattappliancebulbis smallerthan
a standard4@watthouseholdbtib.
● Instrdlandtightenthecover.
● Reconnectelectricalpowerto therange.
42
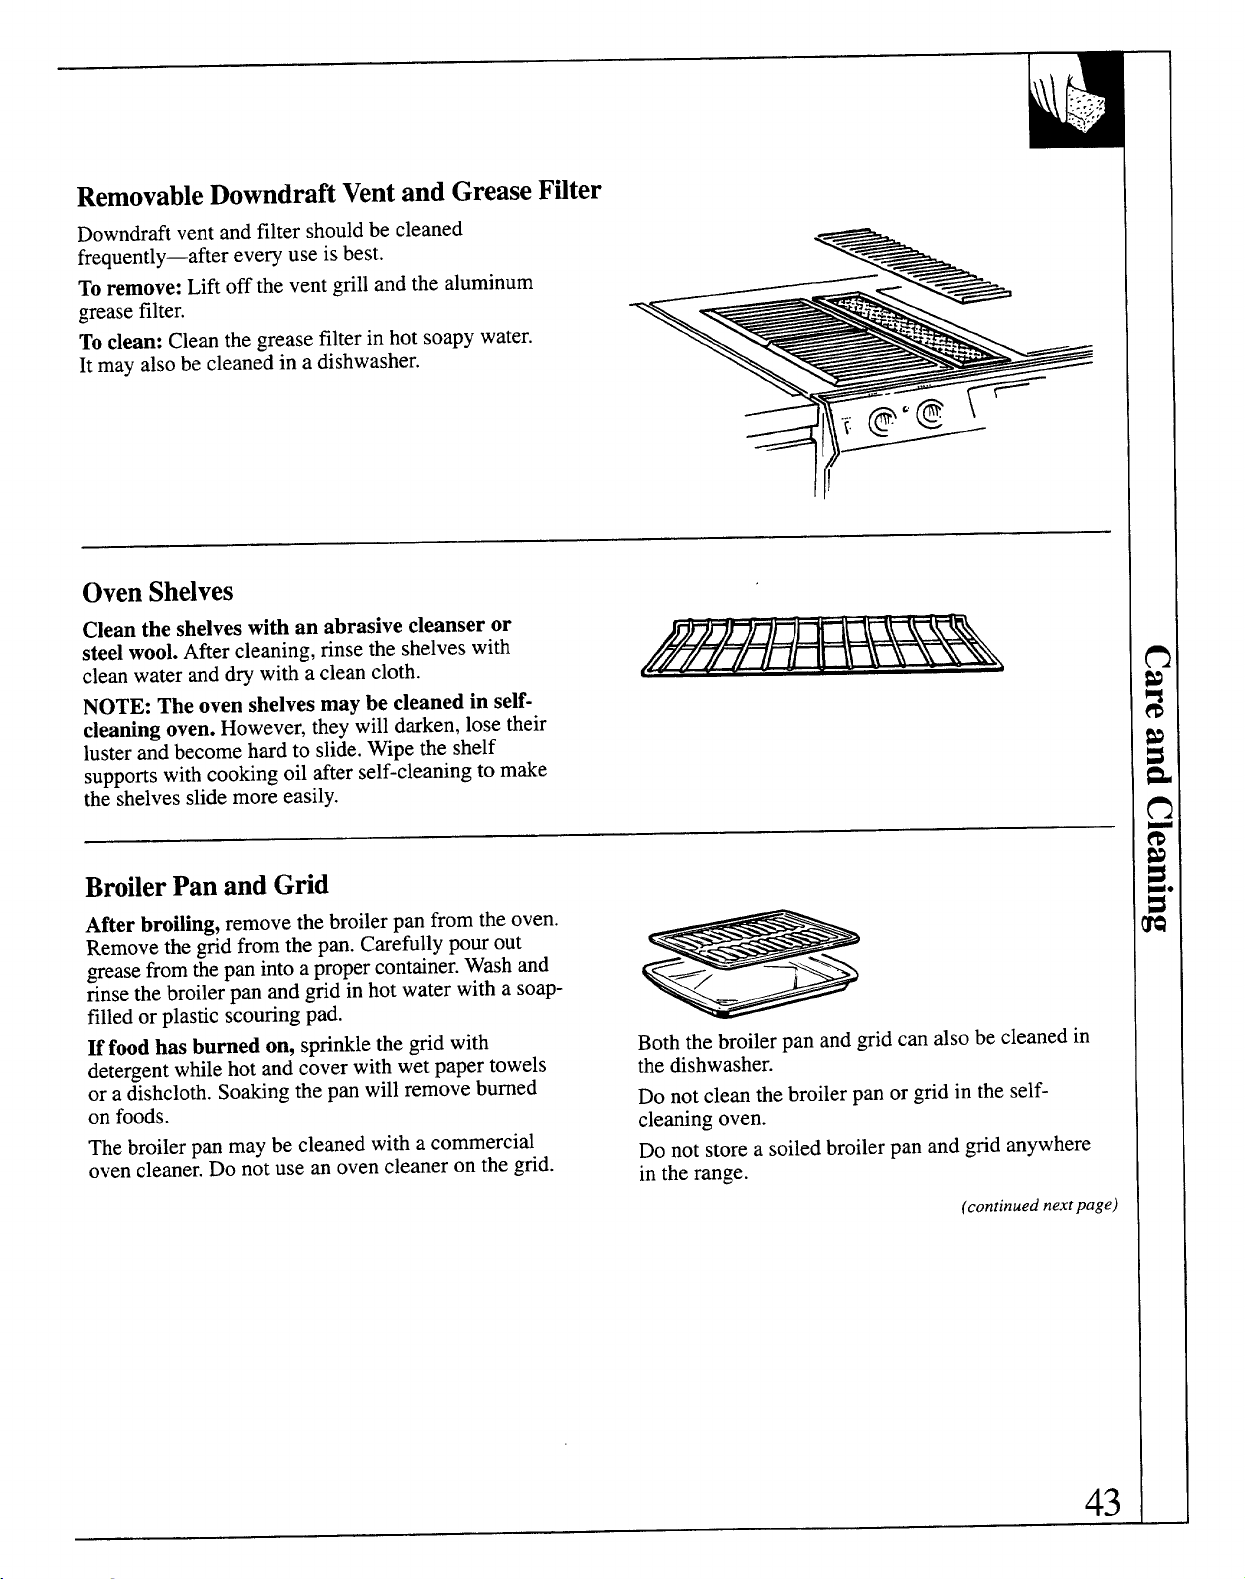
RemovableDowndraftVentand GreaseFtiter
I
Downdraft vent and filter should be cleaned
frequently—after every use is best.
Toremove:Liftofftheventgrillandthealuminum
greasefilter.
Toclean:Cleanthegreasefilterinhotsoapywater.
It mayalsobe cleanedin a dishwasher.
I
OvenShelves
Cleantheshelveswithanabrasivecleanseror
steelwool.Aftercleaning,rinsethe shelveswith
cleanwateranddrywithacleancloth.
NOTE:Theovenshelvesmaybecleanedinself-
cleaningoven.However,theywilldarken,losetheir
lusterandbecomehardto slide.Wipetheshelf
supportswithcookingoilafterself-cleaningto make
theshelvesslidemoreeasily.
BroilerPan andGrid
Afterbroiling,removethebroilerpanfromtheoven.
Removethegridfromthepan.Carefullypourout
greasefromthepanintoapropercontainer.Washand
rinsethebroilerpanandgridinhotwaterwitha soap-
filledor plasticscouringpad.
Iffoodhasburnedon,sprinklethegridwith
Boththebroilerpanandgridcandso becleanedin
detergentwhilehotandcoverwithwetpapertowels
thedishwasher.
or a dishcloth.Soakingthepanwillremoveburned
Do notcleanthebroilerpanorgridintheself-
onfoods.
cleaningoven.
Thebroilerpanmaybecleanedwithacommercial
ovencleaner.Do notusean ovencleaneron thegrid.
Do not storea soiledbroilerpan andgridanywhere
intherange.
43 I
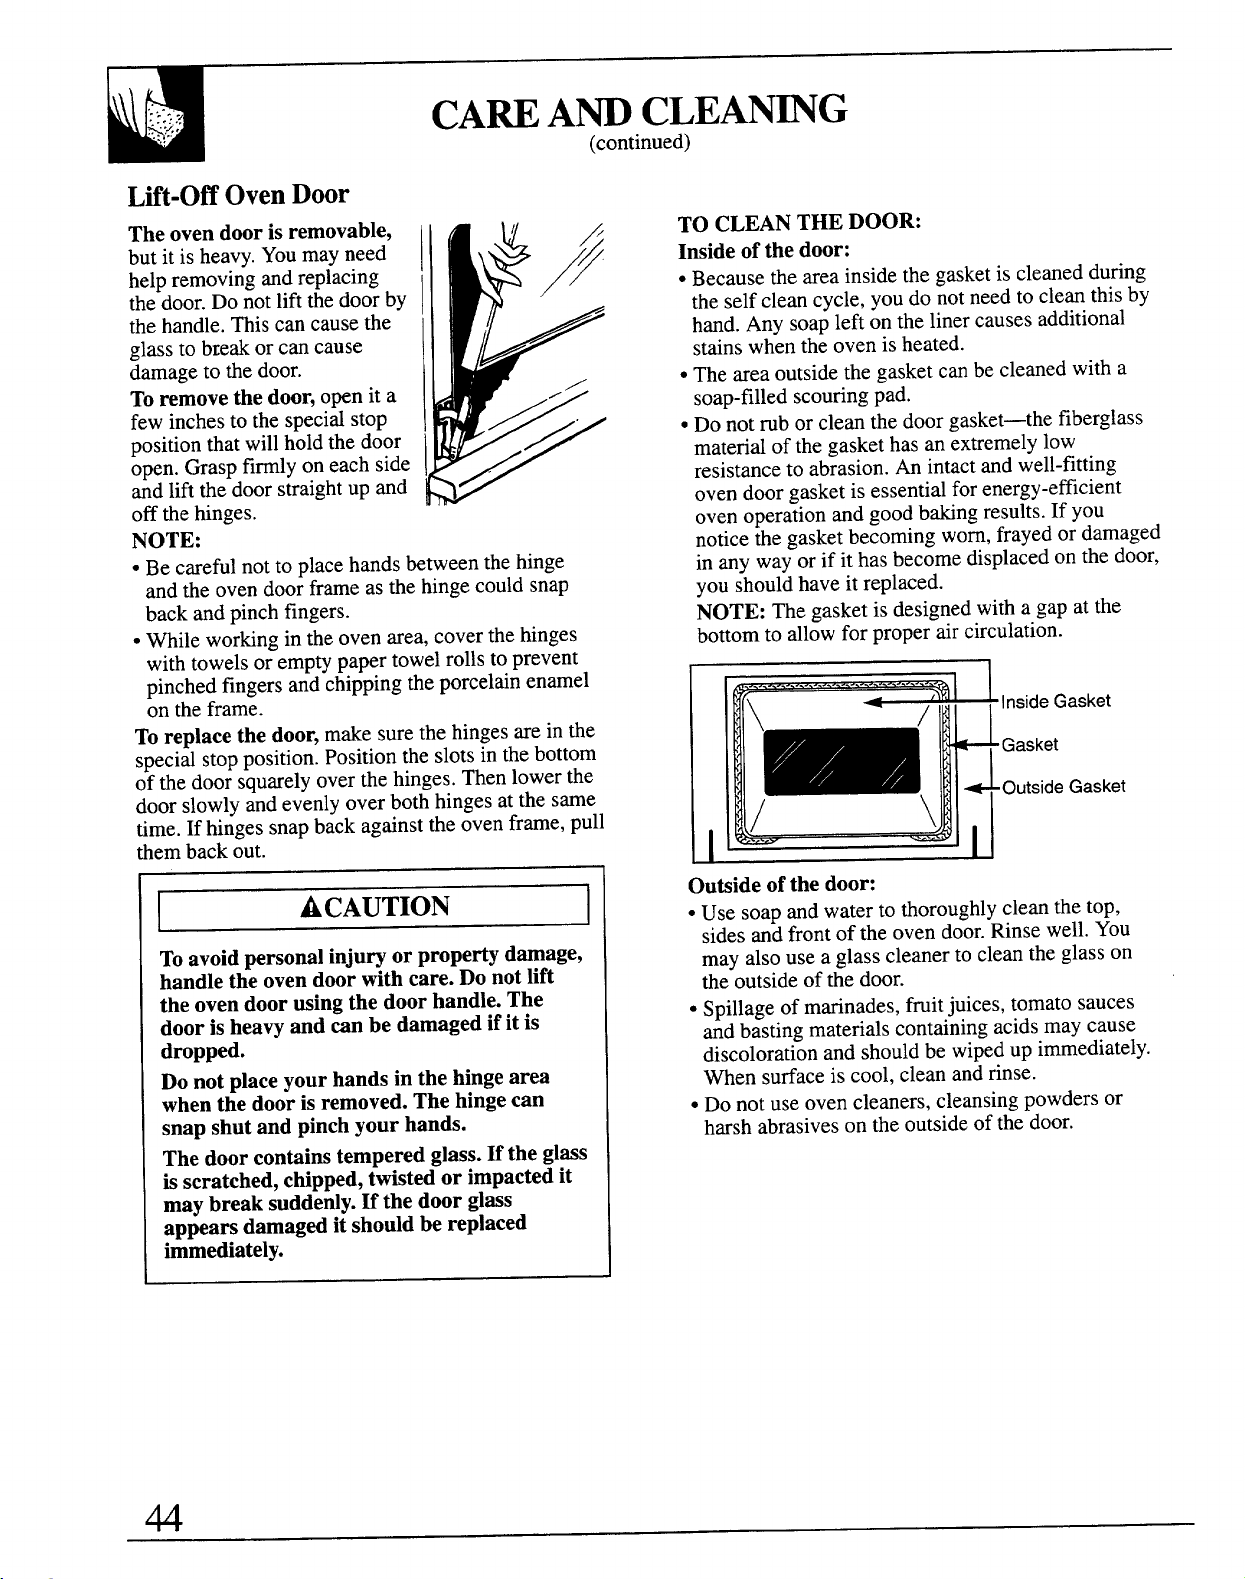
CAW Am CLEA~G
(continued)
Ltit-OffOvenDoor
Theovendooris removable,
but it is heavy. You may need
help removing and replacing
the door. Do not lift the door by
the handle. This can cause the
glass to break or can cause
damage to the door.
Toremovethedoor,openit a
fewinchestothespecialstop
positionthatwillholdthedoor
open.Graspfirmlyoneachside
andliftthedoorstraightup and
offthehinges.
NOTE:
● Be carefulnotto placehandsbetweenthehinge
andtheovendoorframeasthehingecouldsnap
backandpinchfingers.
● Whileworkingintheovenarea,coverthehinges
withtowelsor emptypapertowelrollstoprevent
pinchedfingersandchippingtheporcelainenamel
ontheframe.
Toreplace the door,makesurethehingesareinthe
specialstopposition.Positiontheslotsinthebottom
of thedoorsquarelyoverthehinges.Thenlowerthe
doorslowlyandevenlyoverbothhingesatthe same
time.If hingessnapbackagainsttheovenframe,pull
thembackout.
ACAUTION
Toavoidpersonalinjuryorpropertydamage,
handletheovendoorwithcare.Donotlift
theovendoorusingthedoorhandle.The
dooris heavyandan bedamagedifit is
dropped.
Donotplaceyourhandsinthehingearea
whenthedooris removed.Thehingecan
snapshutandpinchyourhands.
Thedoorcontainstemperedglass.If theglass
isscratched,chipped,twistedorimpactedit
maybreaksuddenly.If thedoorglass
appearsdamagedit shodd be replaced
immediately.
TOCLEANTHEDOOR:
Insideofthedoor:
● Becausetheareainsidethegasketis cleanedduring
theselfcleancycle,youdonotneedto cleanthisby
hand.Anysoapleftonthelinercausesadditional
stainswhentheovenisheated.
● Theareaoutsidethegasketcanbecleanedwitha
soap-filledscouringpad.
● Donotruborcleanthedoorgasket—thefiberglass
materialofthegaskethasanextremelylow
resistanceto abrasion.Anintactandwell-fitting
ovendoorgasketis essentialforenergy-efficient
ovenoperationandgoodbakingresults.If you
noticethegasketbecomingworn,frayedordamaged
in any way-or if it has bec~me displaced on the door,
you should have it replaced.
NOTE:Thegasketis designedwitha gapatthe
bottomto allowforproperaircirculation.
,w’:eG
Outsideofthe door:
● Use soap and water to thoroughly clean the top,
sides and front of the oven door. Rinse well. You
may also use a glass cleaner to clean the glass on
the outside of the door.
● Spillage of marinades, fruitjuices, tomato sauces
and basting materials containing acids may cause
discoloration and should be wiped up immediately.
When surface is cool, clean and rinse.
● Do not use oven cleaners, cleansing powders or
harsh abrasives on the outside of the door.
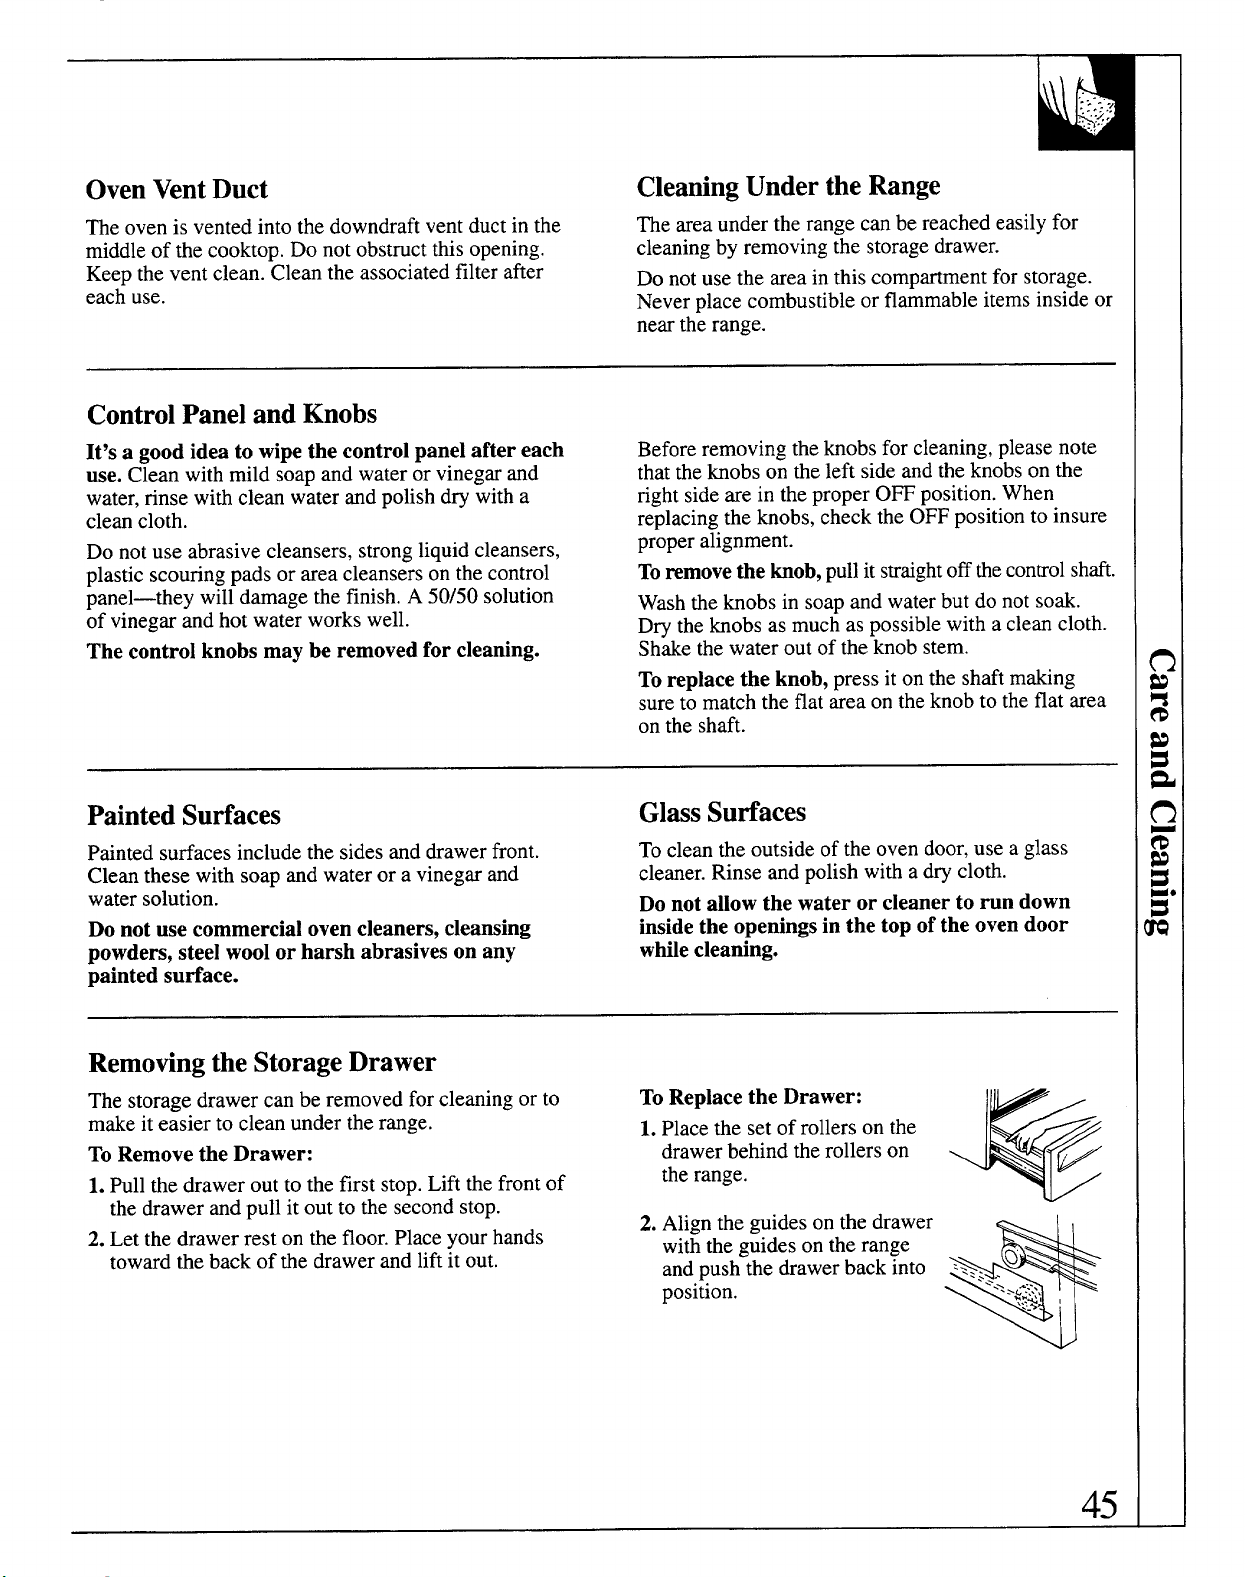
OvenVentDuct
CleaningUnderthe Range
Theovenis ventedintothedowndraftventductinthe
Theareaundertherangecanbereachedeasilyfor
middleof thecooktop.Donotobstructthisopening.
cleaningby removingthe storagedrawer.
Keeptheventclean.Cleantheassociatedfilterafter
Do notusetheareainthiscompartmentfor storage.
eachuse.
Neverplacecombustibleor flammableitemsinsideor
neartherange.
ControlPanelandKnobs
It’sa goodideatowipethecontrolpanelaftereach
use.Cleanwithmildsoapandwateror vinegarand
water,rinsewithcleanwaterandpolishdrywitha
cleancloth.
Do not use abrasive cleansers, strong liquid cleansers,
plastic scouring pads or area cleansers on the control
panel—they will damage the finish. A 50/50 solution
of vinegar and hot water works well.
Thecontrolknobsmaybe removedforcleaning.
Beforeremovingtheknobsforcleaning,pleasenote
thattheknobsontheleft sideandtheknobsonthe
rightsidearein theproper0~ position.When
replacingtheknobs,checktheOFFpositionto insure
properalignment.
Toremovethe knob,pullitstraightoffthecontrolshaft.
Washtheknobsin soapandwaterbutdonotsoak.
Drytheknobsas muchas possiblewitha cleancloth.
Shakethewateroutoftheknobstem.
Toreplacetheknob,pressitontheshaftmaking
sureto matchtheflatareaontheknobto theflatarea
ontheshaft.
PaintedSutiaces
GlassSuflaces
Paintedsurfacesincludethesidesanddrawerfront.
Tocleantheoutsideoftheovendoor,usea glass
Cleanthesewithsoapandwaterora vinegarand
cleaner.Rinseandpolishwithadrycloth.
watersolution.
Donot allowthe water or cleaner to run down
Do not use commercialovencleaners,cleansing
insidethe openingsin the top ofthe ovendoor
powders, steelWOOIor harsh abrasives on any
whilecleaning.
painted surface.
Removingthe StorageDrawer
Thestoragedrawercanberemovedforcleaningor to
makeiteasierto cleanundertherange.
ToRemovetheDrawer:
1.
Pull the drawer out to the first stop. Lift the front of
the drawer and pull it out to the second stop.
2. Let the drawer rest on the floor. Place
yourhands
towardthebackof thedrawerandliftit out.
ToReplacetheDrawer:
1.Placethe setofrollerson the
drawerbehindtherollerson
therange.
2. Aligntheguidesonthedrawer
withtheguidesontherange
andpushthedrawerbackinto
position.
45
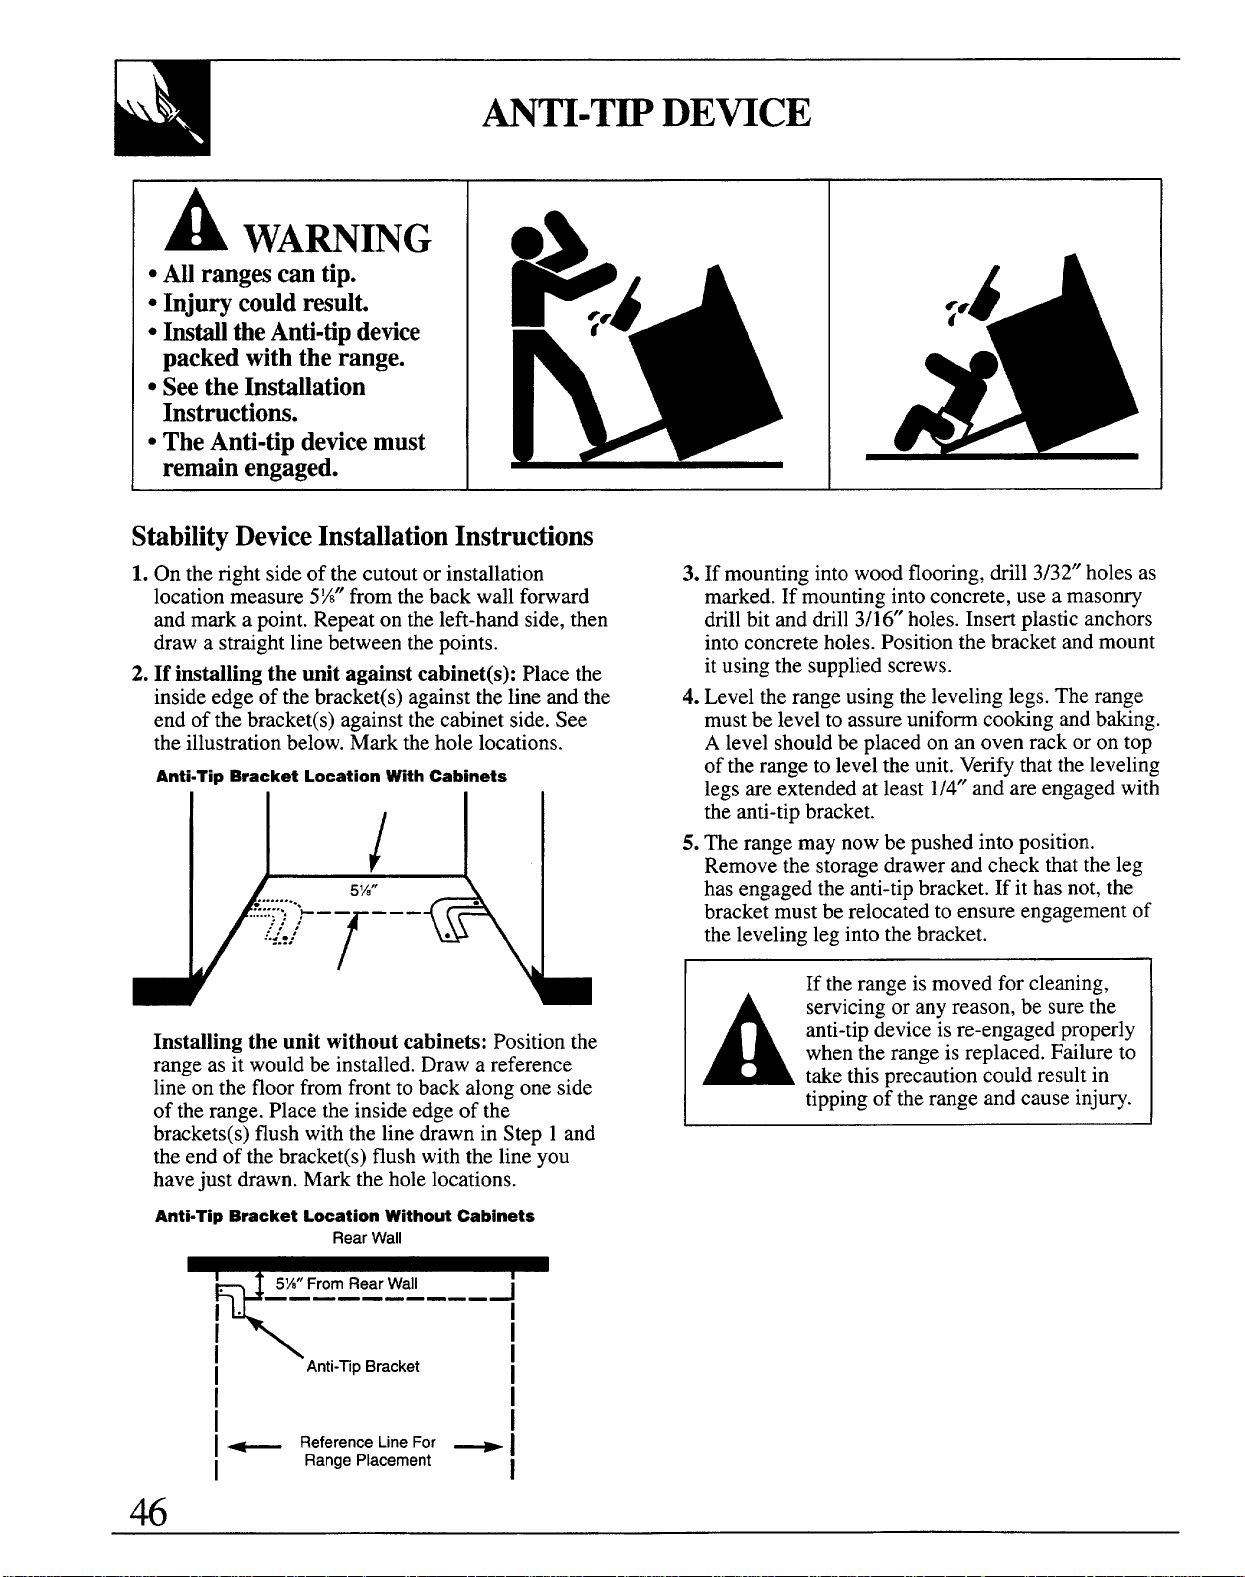
A
WAmING
● All ranges can tip.
● Injury could result.
. M the Anti-tip device
packed with the range.
. See the Instigation
Instructions.
● The Anti-tip device must
remain engaged.
StabilityDeviceInstillation Instructions
1.Ontherightsideofthecutoutorinstallation 3. If mountingintowoodflooring,drill3/32”holesas
locationmeasure5ti”fromthebackwallforward marked.If mountingintoconcrete,usea masonry
andmarka point.Repeatontheleft-handside,then drillbitanddrill3/16”holes.Insertplasticanchors
drawa straightlinebetweenthepoints.
intoconcreteholes.Positionthebracketandmount
2. If installing the unit against cabinet(s): Placethe
itusingthesuppliedscrews.
insideedge-ofthebrac~et(s)againstthe”lineandthe 4.Leveltherangeusingthelevelinglegs.Therange
endofthebracket(s)againstthecabinetside.See mustbeleveltoassureuniformcookingandbaking.
theillustrationbelow.Marktheholelocations. A levelshouldbeplacedonan ovenrackorontop
Anti-fip Bracket Location Wth Cabinets
oftherangetolev~ltheunit.Verifythattheleveling
11,11
legs are extended at least 1/4”and are engaged with
the anti-tip bracket.
Installingtheunitwithoutcabinets:Position the
range as it would be installed. Draw a reference
line on the floor from front to back along one side
of the range. Place the inside edge of the
brackets(s) flush with the line drawn in Step 1 and
the end of the bracket(s) flush with the line you
havejust drawn. Mark the hole locations.
Anti-~p Bracket Location Wthout Cabinets
RearWall
M
I
Anti-~pBracket
I
I
I
i
i
I ~ ReferenceUneFor ~ I
I
RangePlacement
I
5.me rangemaynowbepushedintoposition.
Removethestoragedrawerandcheckthattheleg
hasengagedtheanti-tipbracket.If it hasnot,the
bracketmustberelocatedtoensureengagementof
thelevelinglegintothebracket.
If therangeismovedforcleaning,
A
servicing or any reason, be sure the
anti-tip device is re-engaged properly
when the range is replaced. Failure to
take this precaution could result in
tipping of the range and cause injury.
BEFOREYOU BEGIN
Read these instructions completelyand carefu~y.
WORT~ Savethese instructions for the
lod electricrdinspectors use.
~PORT~ OBSERVE ~ GOVE-G
CODES ~ ORDIN~C~.
N~ ~ ~ST-R have these instructions
with the appfianceafter initiation is completed.
N~ TO CONSUMER Keep tils Use and
Care Guide and Ins~ation Instructions for
future use.
N~. This apptiancemust be properlygrounded.
TOOLSYOUWILL NEED
. kge
bladescrewdriver
● Channellockpfiersorsmallratchetwrench
(forlevehg range)
● l/4inch hexheadnutdriver
ELECTRIU REQUIREMENTS
W~ON—POR PERSON~ ~
DO NOTUSE ~ -NSION CORD
= ~S ~P~CE.
This apptice must be supptiedwith the proper
voltage and frequency, and connected to an
individud, properly grounded branch circuit
protected by a circuit breaker or time delayfuse,
as noted on the rating plate.
Wtig must conformto Natioti Electrid Codes.
Hthe electric service provided does not meet the
above spectications, it is recommended that a
ticensed electrician insti an approvedoutiet
Because the range terminals are not accessible
after the range is in position,a flexibleservice
conduit or cord must be used.
Step 1
CHOOSEM lNSTMMT!OHLOUTIOW
Choosea ltim based on the foU* *H:
1. The range is designed to be vented outdoors.
2. The electrid rating is 14.7~, 120/240V,
60W.
3. Drafts caused by home heating and ~
conditioningand or open doors or windows can
disrupt the ventilationair pattern. The range
should not be instied near windows or doors.
4. The unit cannotbe instied in a tunnel type
WWopening.M currents movingthrough the
tunnel m disrupt the ventilationair pattern.
5. The range can either be ducted through the
wd or through the floorto the outside.
6. Make sure there is adequate space for proper
initiation.
7. Removeprotectivepackingmaterials from the
range. Tape residue can be cleaned with a soft
cloth and alcohol.
8. Carefu~yread d instructions before
beginning initiation.
(continuednti)age)
47
Repare theCaMnetOpening
Therange
shouldetiend approtiately 1%”
born the
cabinetfronttotheovendoorhandle.
Removeventing kitfrom the storage drawer.
Using the dimensions belowand the special
countertop conditions in these hstiation
Instructions, prepare the cabinet opening,
r I
I
-e ~mensions:
Width-2gl%b”
Depth-28”
Height—36”
_um Clearances to timbustible
S-ces:
● Minimum clearance to the rear w~ is O“
c Minimum clearace to avertical right or left
side WWis 3“
● Minimum clearance to the countertop/cabinet
in each side is O
s Mtium of30”between the top ofthe
cooking surface and the bottom ofan
unprotected wood or meti cabinet
A
W~G. To avoidthe risk of
burns or tie by reaching overthe
surface units, cabinetstorage space
l~ted abovethe rangeshodd be avoided.
StandardCatinetandtiunte~p
Height
Wdl
\
1“~::.--2
[
4
35”
v
Specialtiunh~p Conditiom
Irr_ Ubinet and Countertop Hei@ts
Countertopssuch as ceramic tie tops wi~cause
the ~binet and countertop to be higher than 36”.
Fo~owthese instructions when the countertop is
higher than 36”.
1. Raisethelevekg legs to the mtium level.
2. Measure from the floorto the side trim. E the
measurement is less than the height ofthe
countertop the floormust be shimmed.
3. Shim the floorusing a piece ofplywoodthe
same ske as the range openhg. Secure the
plywoodto the floor.The plywoodmust be as
secure as the originalflooring.
4. Insti the anti-tipbracket and sfidethe range
intoplace.
Ishd or Peninstia hstition
Islandorpeninsulainitiations with24”deep
base~binets mustuse flush back cabinets with
no rear toe space to avoidrange interference.
Ha rear toe space is desired, use 27”or deeper
base cabinets.
SEde-~ bstiation
Fora manufacturedmuntetiop,
withorwithouta backsplash,
makethecutoutkeepingthe
reardmensionasillustrated.
ne backrailontie backofthe
rangewillslideoverthe
manufatired countenop
creatingatightfi.
i
48
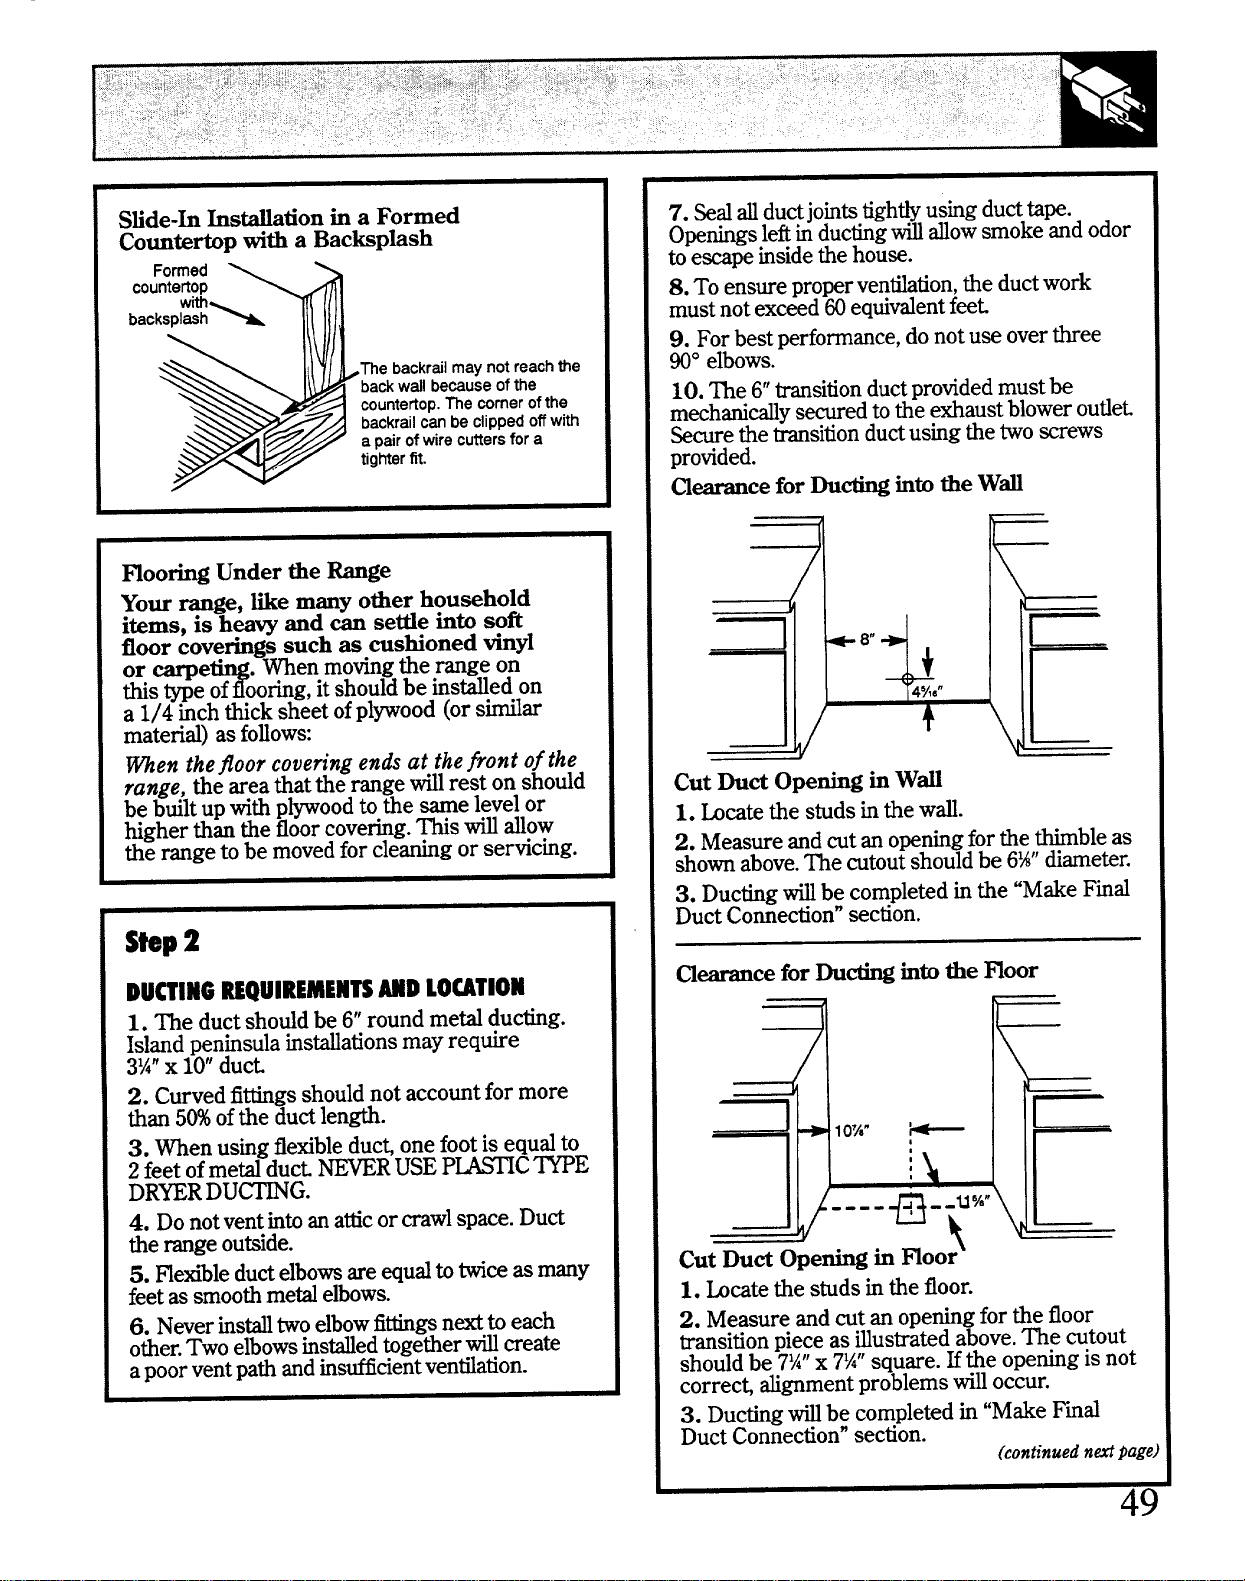
Sfide-k hstiation in a Formed
Countertop with a Backsphsh
mooring Under the Range
Your range, me many other household
items, is heavy and can setie into soft
floor cov~rings such as cushioned vinyl
Y
or -e
. men movingthe rangeon
thistype
of ooring,itshouldbe ins~ed on
a
1/4 inch thick sheet ofpl~ood (or stiar
matend) as foflows
men
thefloor covering ends at thefront of the
range, the
areathattherangetil rest on should
be built upwiti pl~ood to the same level or
higher than the floorcovering.This ~ dow
the range to be movedfor cleaning or servicing.
Shp
2
DU~IHG REQUIREMENTSMD LO~llOH
1. The
ductshodd be6“roundmeti ducting.
Islandpeninsulainitiations mayrequire
3%”X 10”duct
2. Curvedfittingsshouldnotaccountformore
than5Woftheductlength.
3. men usingflexibleduct onefootis equalto
2feetofmeti duct =R USEP~C ~E
DRYER
DU~G.
4. Do notventintoan atticor crawlspace. Duct
the range outside.
5. Hexible ductelbowsare equalto Mm as
manY
feetassmoothmeti elbows.
6. Neverins@twoelbowfittingsnW toeach
other.Twoelbowsinstied togetherti create
apoorventpathandinsticient ventilation.
7. %d d ductjointstigh@ using ducttape.
Openingsleftin ductig d dow smoke and odor
to e=pe insidethe house.
S.
Toensureproperventition, the ductwork
must not exceed 60equivalentfeet
9. For best performance,do not use overthree
W“ elbows.
10. me 6“transitionductprovidedmust be
mechanidy secured h the exhaustblowerouflet
Securetie transitionductusing the two screws
provided.
~~ce for Ducdng hto tie Wd
7
II I
+
AsLen
I II
,,
,.4 \,
~
~
Cut Duct Opening in Wd
1. bcate the studsinthewd.
2. Measure and cut an openingfor the thimble as
shownabove.The cutoutshould be 6Wdiameter.
3.
Ductig fl becompletedinthe “MakeFmd
DuctConnection”section.
I
2. Measureandcutanopeningforthefloor
transitionpieceasUustratedabove.The cutout
shouldbe7%”x 7%”square.Ethe openingisnot
correcgtignment problemswifloccur.
3. Ductingti be completedin“MakeFiid
DuctConnection”section.
(continuedn&page,
4Y
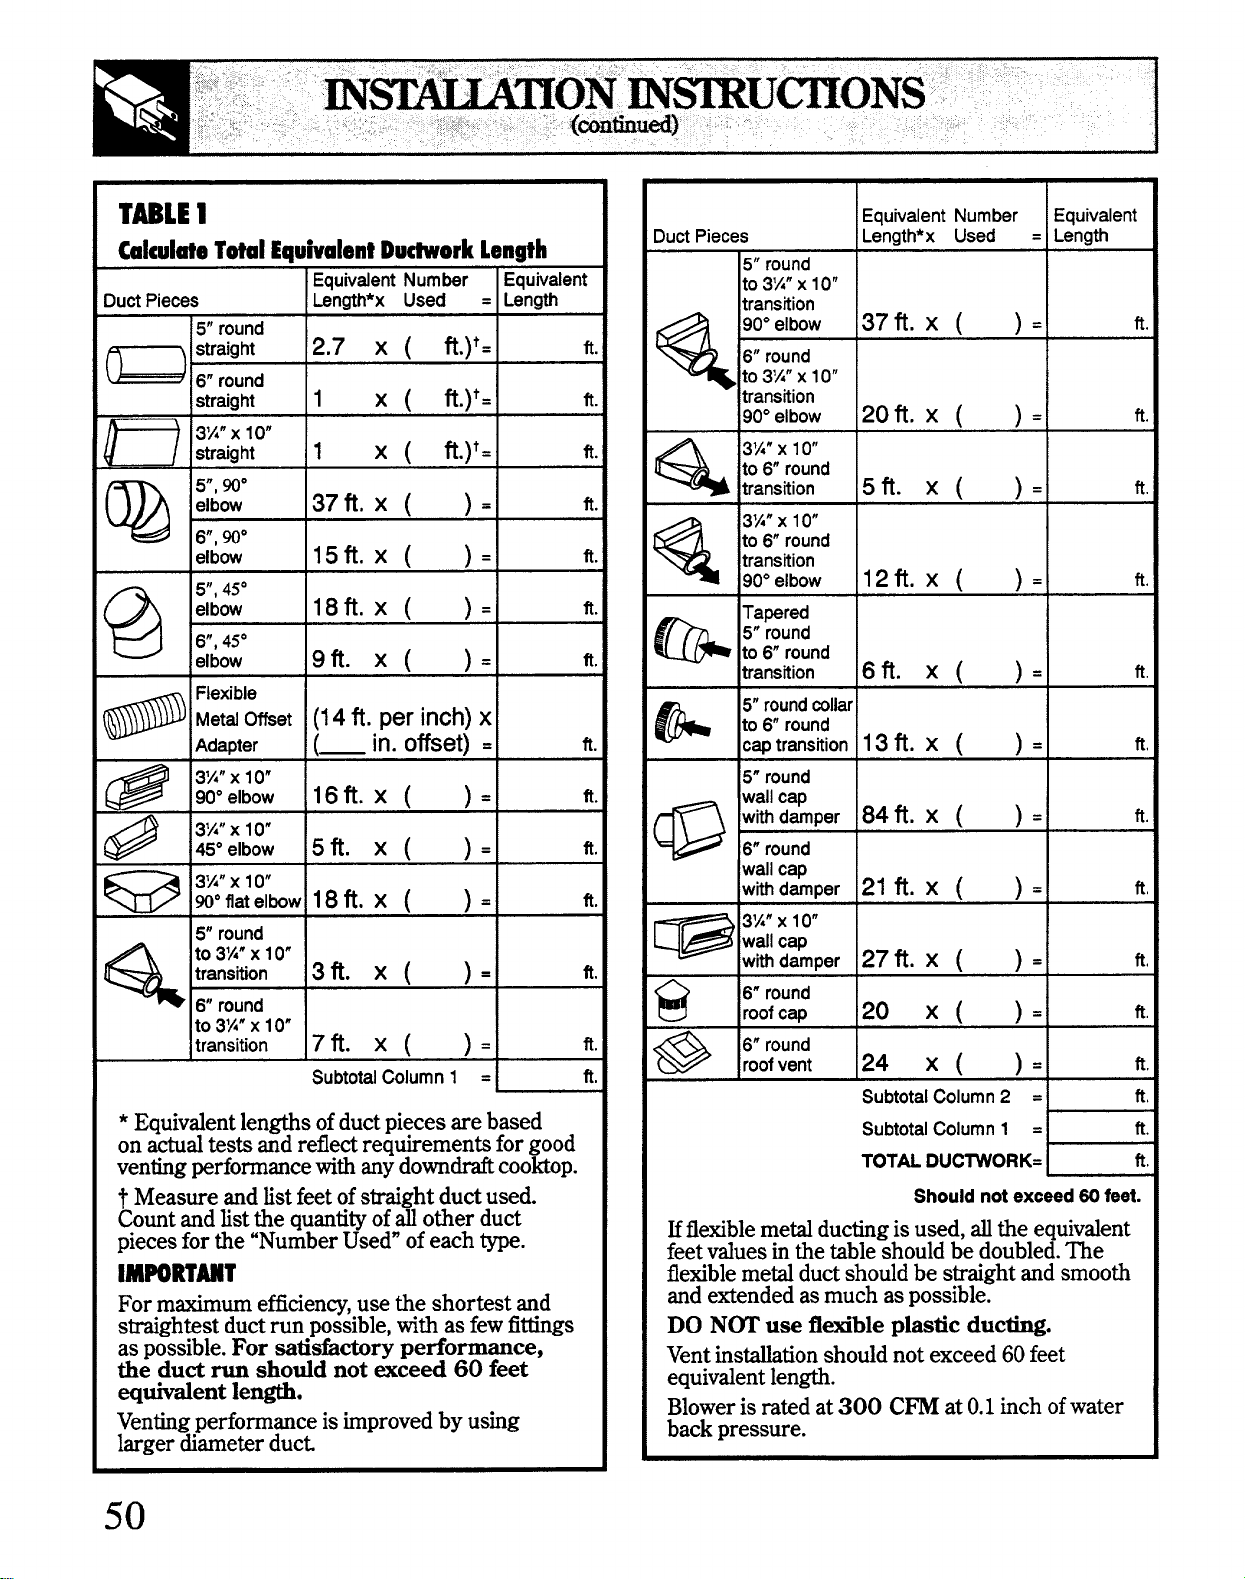
TMLE 1
CalculateTotalEquhalentDu-ork Len@h
EquivalentNumber
EquNalent
)uct Pieces Length*x Used
= Length
5“ round
D
;:::;d
2.7 X ( R.)i=
ft
straight
1
x ( fi.)t=
fi
\
3X” x 1
o“
str~ght
1
x ( fi.)t=
ft
Q
5“,No
elbow
37 fi. x( )= ft
6“,%0
elbow
15fi. x (
)=
fi
a
5“,45”
elbow
18fi. x( )=
ft
6“,45”
elbow
9fi. x( )= ft
Flexible
MetalOffset (14
ti. perinch)x
Adapter
(—
in.offset) =
ft.
@
3WX1O”
90°elbow
16fi. x( )= ft
@
3WX1O”
45°elbow
5fi. x( )= fi
Q
3TX1O”
W“ flatelbow
18fi. x( )=
ft
5“ round
%
to 3B” x 1o“
transition
3fi. x( )=
ft
6“ round
to 3%”x 1
o“
transition
7ti. x (
)=
R
SubtotalColumn1 = ft
*
Equivalentlengthsofductpiecesarebased
onactualtes~ andreflectrequirementsforgood
ventingperformancewithanydowndraftcooktop.
~Measureandfistfeetofstraightductused.
Countandtistthe quantityofd otherduct
piecesforthe“NumberUsed”ofeachtype.
IMWRTMT
Formaximumefficiency,usethe shortestand
straightestductrunpossible,withasfewfittings
aspossible.
Forsatisfactoryperformance,
theductrunshodd notexceed60feet
qtient len~.
Ventingperformanceisimprovedbyusing
largerdiameterducL
EquivalentNumber Equivalent
)uct Pieces Length*x Used = Length
5“ round
to 35” x
10”
transition
Q
90°elbow
37 fi. x( )= R.
6“ round
to 3%”x lo”
transition
90°elbow
2ofi. x( )=
ft.
a
3%”x 1o“
to 6“ round
transition
5fi. x (
)=
ft.
%
3%”x 1o“
to 6“ round
transition
90°elbow
12 fi. x( )=
ft.
m
Tapered
5“ round
.
to 6“ round
transtion
6fi. X( )= ft.
&
5“roundcollar
to 6“ round
captransition
13fi. x( )=
R.
5“ round
D
wallcap
withdamper
84 fi. x( )= ft.
6“ round
?; 7&per
21ti. x( )= ft!
=
3%”x 1o“
wdl cap
withdamper
27 fi. x( )= ft.
9
6“ round
roofcap
20X()= ft.
e
6“ round
roofvent
24x()= ft.
SubtotalColumn2 = ft.
SubtotalColumn1 = ft.
TOTALDUCWORK=
ft.
Should not exceed60feet.
H
flexiblemeti ductingisused,d the equivalent
feetvaluesinthetableshouldbe doubled.me
flexiblemeti ductshouldbe straightandsmooth
andextendedasmuchaspossible.
DO N~ usefitible plasticduc~.
Ventins~ation shouldnotexceed60feet
equivalentlength.
Bloweris ratedat300 Cm at 0.1inchofwater
backpressure.
I
50
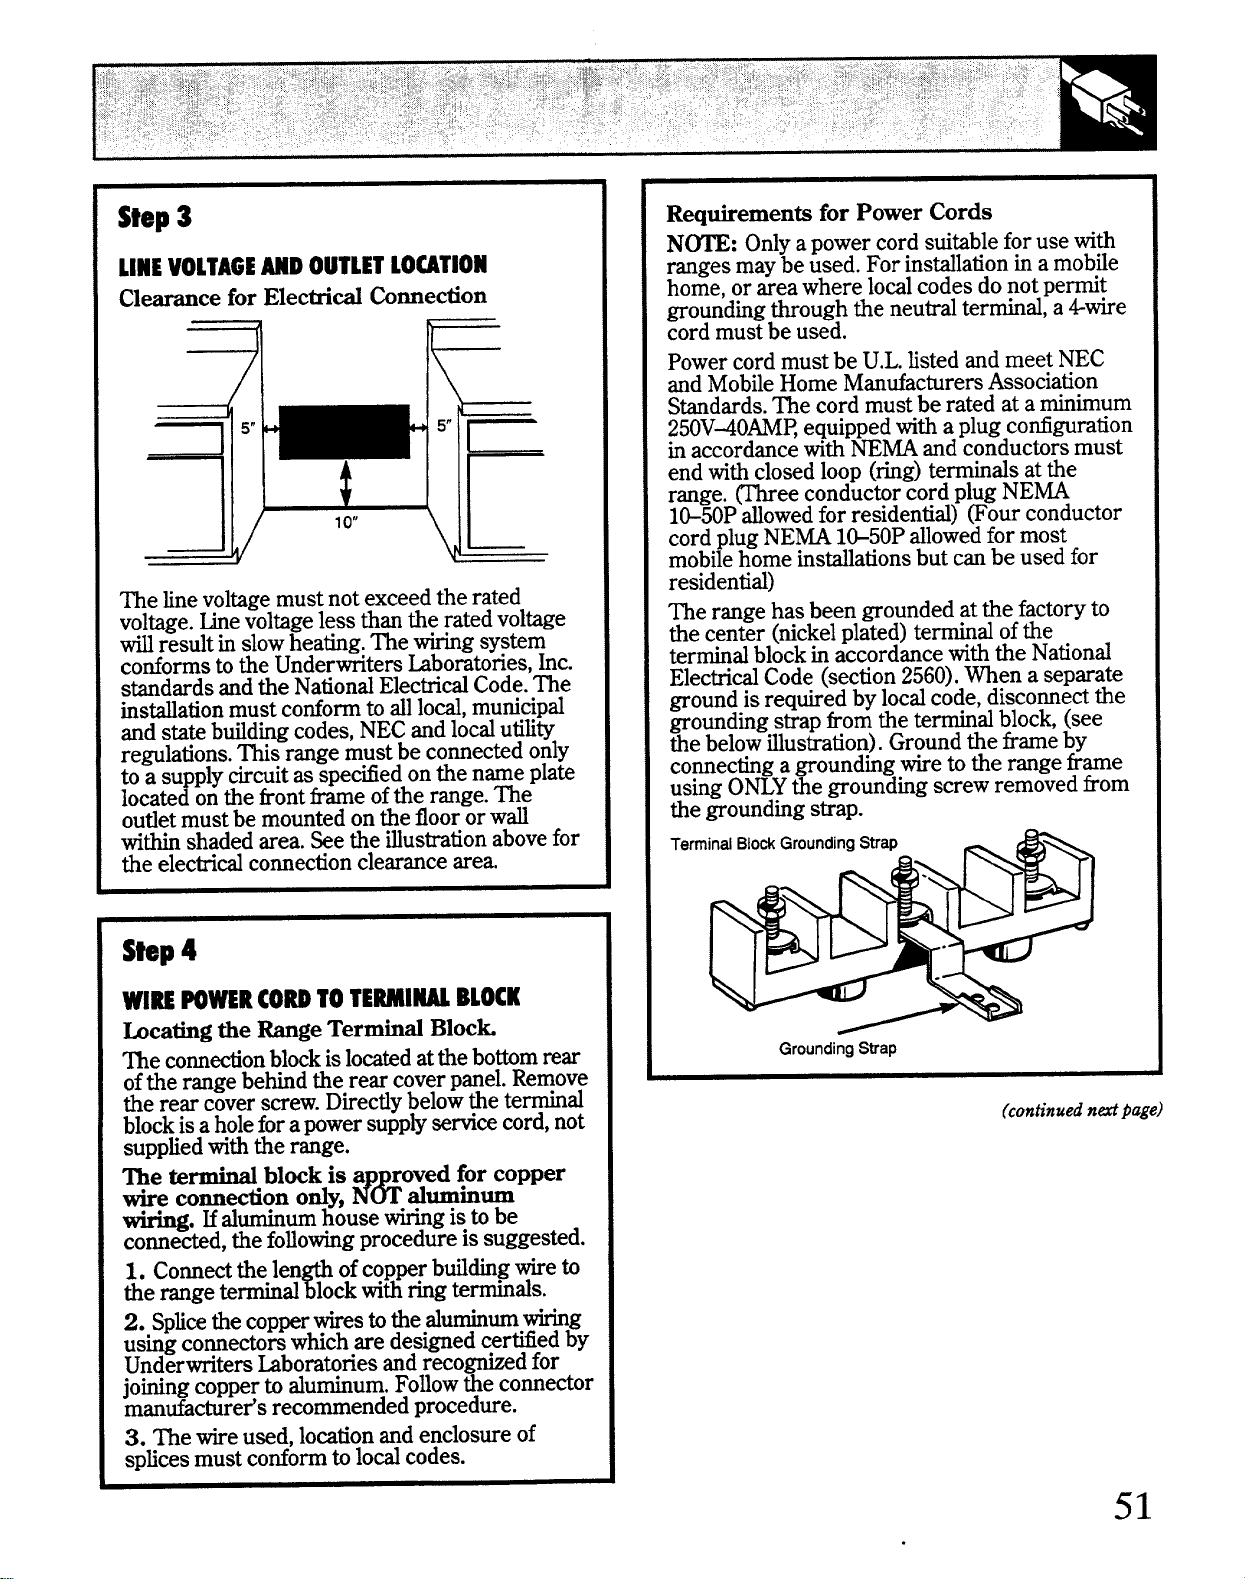
Step3
LINEVOLTAGEAKDOUTLETLOUTION
Clearance for Electrid tinnection
=
5“
me tie voltagemustnotexceed the rated
voltage.tie voltageless thanthe ratedvoltage
W resultinslowheating.Thewiringsystem
conformstotheUnderwritersLaboratories,hc.
standardsad the NationalElectrid Code.The
initiation mustconformto dl led, municipal
andstatebtiding codes, NECandlocrdutifity
regulations.Thisrangemustbe connectedonly
to asupplycircuitas specifiedonthe nameplate
locatedonthe frontframeofthe range.The
outietmustbe mountedonthefloororWW
withinshadedarea.See the Uustrationabovefor
the electrid connectionclearancearea.
step 4
WIRE~WER CORDTOTEWIU BLOCK
beating the Range Termti Block
me connectionblockislo=ted attie bottomrear
ofthe rangebehindthe rearcoverpanel.Remove
the rearcoverscrew.Directiybelowthe terminal
blockisaholeforapowersupplyservicecord,not
suppfiedwiththe range.
we @_. block is a ro~&fr~pper
we connetion ody,
#&
wiring. Haluminumhouse wiringis tobe
connected,thefo~owingprocedureis suggested.
1. Connectthelen
P
ofcopperbtiding wireto
the rangeterminal lockwithringterminals.
2. Spticethecopperwirestothealuminum~g
usingconnectorswhicharedesignedcertifiedby
UnderwritersLaboratoriesandrecomd for
joiningcopperto aluminum.FOUOWthe connector
manufactured recommendedprocedure.
3. Thewireused, locationandenclosureof
spficesmustconformto lod codes.
Reqtiements for Power Cords
N~: Onlyapowercordsuitableforuse with
rangesmaybe used. For instigation in a mobfle
home, or area where localcodes do not permit
grounding tiough the neutral terrnind, a Awire
cord must be used.
Power cord must be U.L.fisted and meet NEC
and MobileHome Manufacturers Association
Standards. The cord must be rated at a minimum
250V40AM~ equipped with a plug configuration
in accordance with NEMAand conductors must
end with closed loop (ring) terminals at the
range. ~ee conductor cord plug NE~
l&50P dewed for residentid) @our conductor
cord plug NEMAl&50P allowedfor most
mobilehome instigations but can be used for
residentid)
The range has been grounded at the factory to
the center (nickelplated) terminal ofthe
terminal block in accordance with the National
Electrid Code (section 2560).men a separate
ground is required by localcode, disconnect the
grounding strap from the terminal block, (see
the below~ustration). Ground the frame
by
connectingagroundingwiretothe rangeframe
usingONLYthegroundingscrewremovedfrom
thegroundingstrap.
Term
GrountingStiap
(continuedndpage)
51
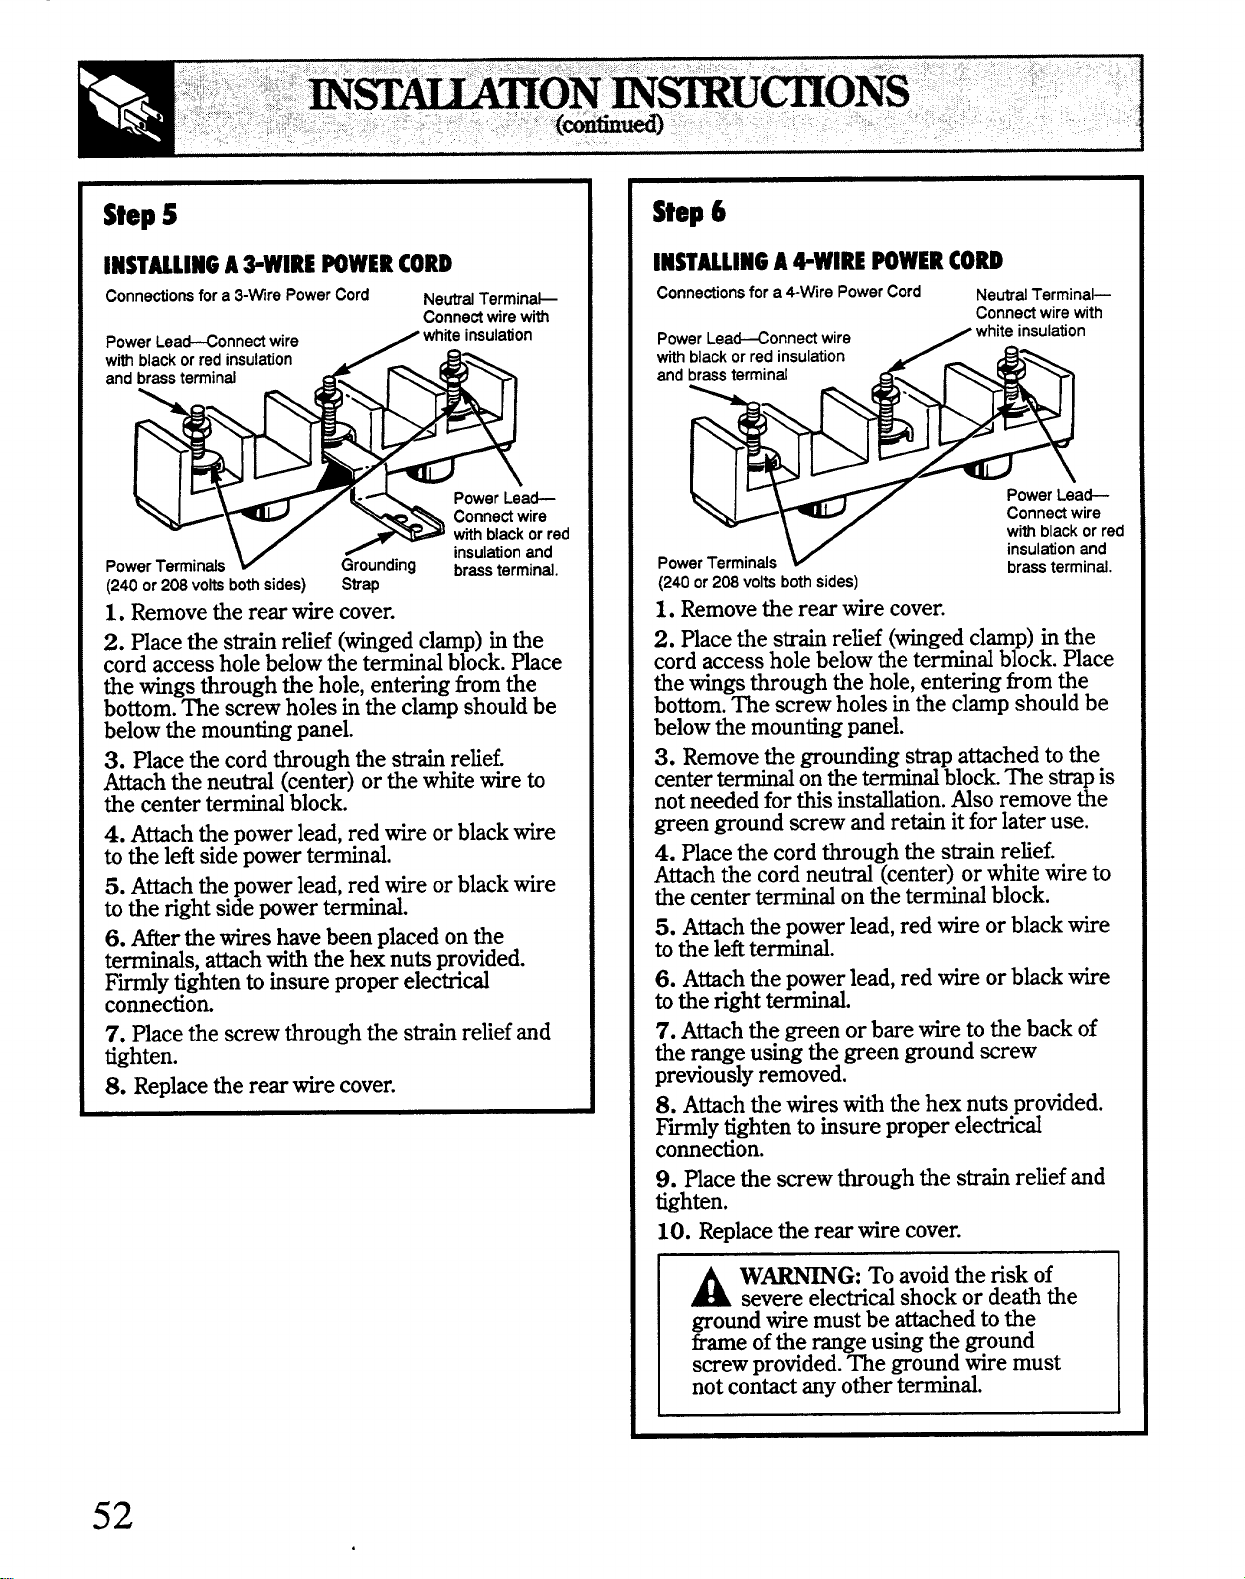
Step5
INSTWLIN6A*WIRE ~WER CORD
Connedonsfora3-WrePowerCord
NeutralTermin+
Conneotwirewith
d
(240or208voh bothsides) Strap
1. Removetherearwirecover.
2. Placethe strainretief(wingedclamp)inthe
cordaccessholebelowtheterminalblock.Pkce
thewingsthroughthehole,enteringfromthe
bottom.Thescrewholesinthe clampshouldbe
belowthemountingpanel.
3. Placethe cordthroughthe strainretief
Attachthe neuti (center)orthe whitewireto
the centerterrnindblock.
4. Attachthepowerlead,redtie orblackwire
to the leftsidepowerterminal.
5. Atich thepowerlead,redwireorblackwire
tothe rightsidepowerterminal.
6. Afterthewireshavebeenplacedonthe
terminrds,attachwiththehexnutsprovided.
Ftiy tightentoinsureproperelectrid
connection.
7. Placethe screwtirough the strainrefiefand
tighten.
8. Replacethe rearwirecover.
Step
6
IHSTWLIH6A*WIRE HWER CORD
Connationsfor a4Wlre PowerCord
NeutralTerminaL
Connedwirewith
Pow
tih
and
d
PowerTerminals
v
insulationand
(240or208voltsbothsides)
brassterminal
1. Removethe rearwirecover.
2. Placethestrainrefief(wingedclamp)h the
cordaccessholebelowtheterminalblock.Place
tie wingsthroughthehole,enteringfromthe
bottom.The screwholesinthe clampshouldbe
belowthemountingpanel.
3. Removethe groundingstrapa~ched tothe
centerterminalontheterminalblockThestrapis
notneededforthisinitiation. Nso removethe
greengroundscrewandretainitforlateruse.
4. Place the cord through the strain refief.
Attach the cord neuti (center) or white wire to
the center terminal on the terrnind block.
5. Atich the power lead, red wire or black wire
to the leftterminal.
6. Attachtie powerlead,redwireorblackwire
tothe rightterminal.
7. A~ch the greenorbarewireto the backof
therangeusing the greengroundscrew
previouslyremoved.
8. Attachthe wireswiththehex nuts provided.
Piiy tightento insureproperelectrid
connection.
9. Hate the screwtiough the strainretiefand
tighten.
10. Replacethe rearwirecover.
A
W~G: Toavoidtheriskof
severeelectrid shockor deaththe
groundwiremustbe atiched tothe
frameofthe rangeusingtheground
screwprovided.Thegroundwiremust
notconhct anyotherterminal.
52
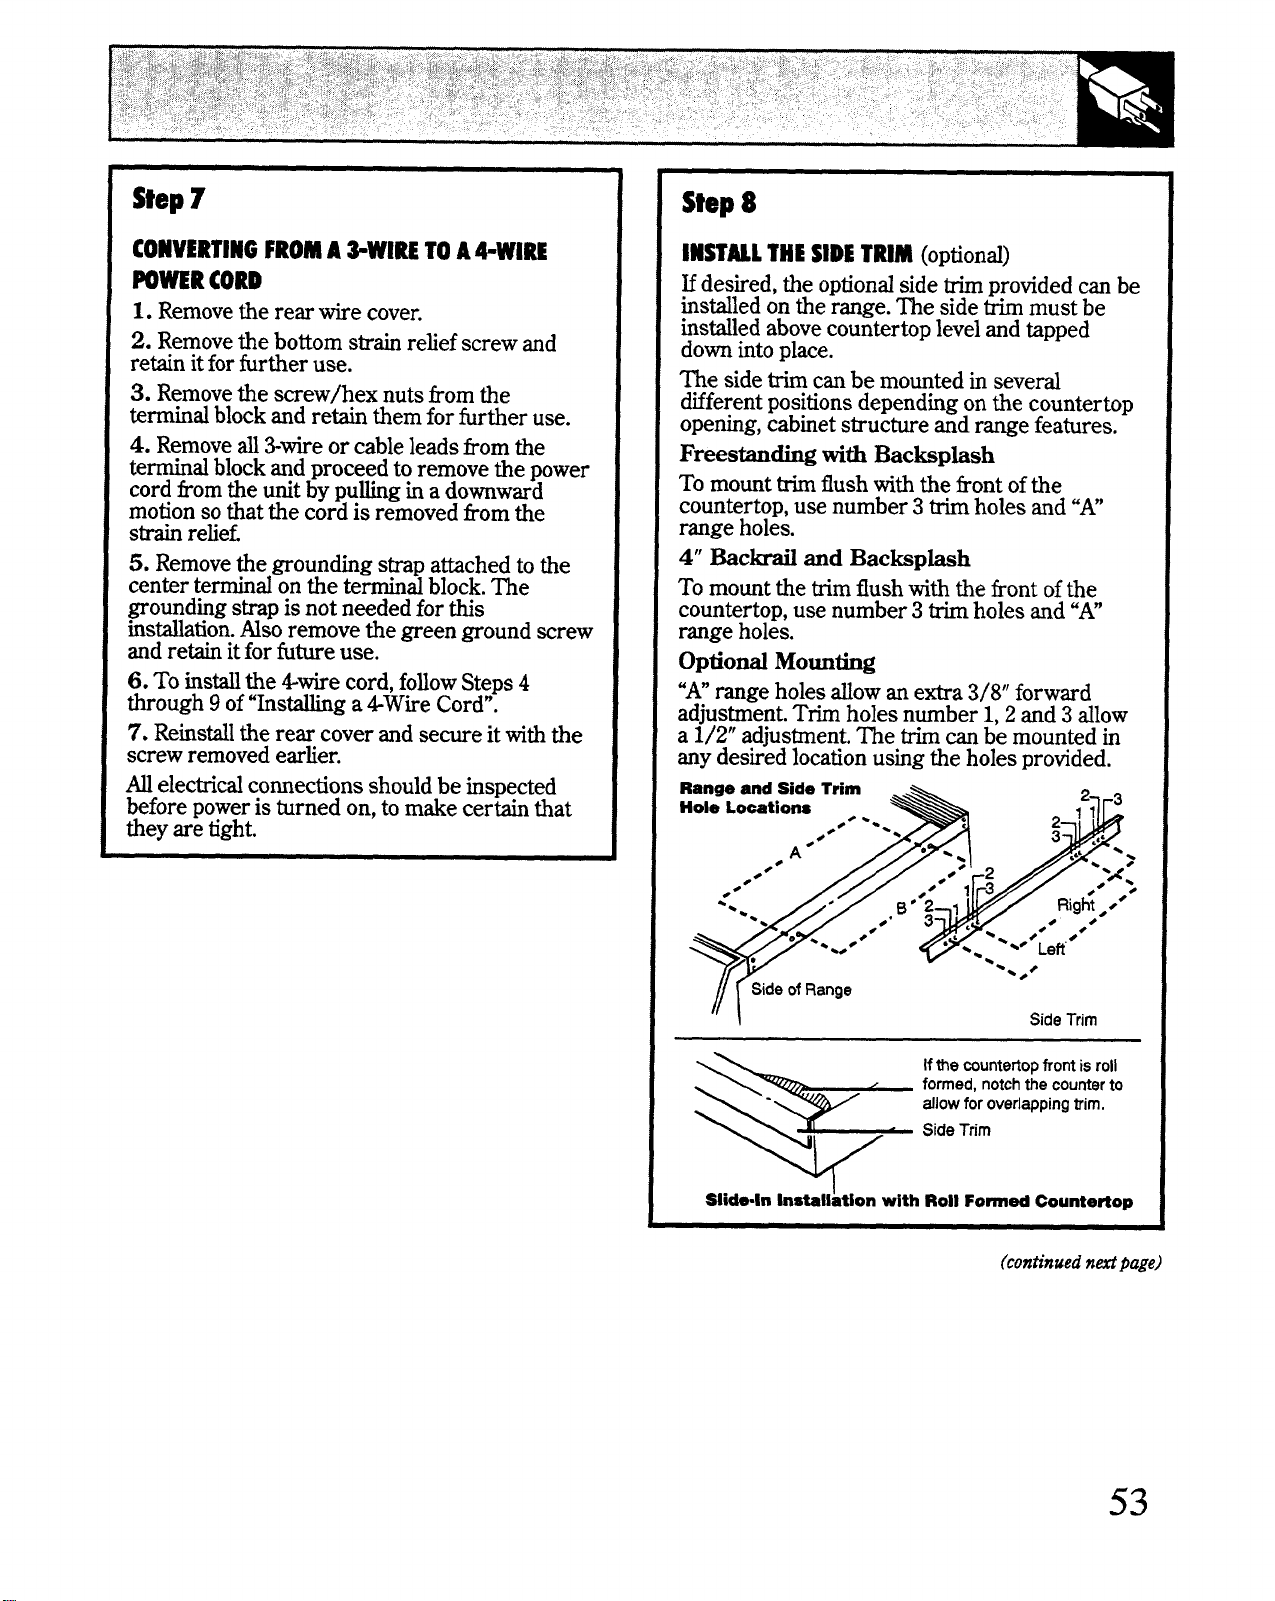
Step 7
CONVERTINGFROMA+WIRETOA&WIRE
HWER CORD
1. Removethe rear wire cover.
2. Removethe bottom strain refiefscrew and
retain it for further use.
3. Removethe screw/hex nuts from the
terminal block and retain them for further use.
4. Remove~ Swire or cable leads from the
terrnind block and proceed to remove the power
cord fromthe unit by pu~g in a downward
motion so that the cord is removed born the
strain retiet
5. Removethe grounding strap attached to the
center terminal on the terminal block.The
groundhg strap is not needed for this
initiation. Mso remove the green ground screw
and retain itfor future use.
6. To ins~ the 4wire cord, fo~owSteps 4
through 9 of“hs-g a 4Wire Cord”.
7. Rekstil the rear cover and secure it with tie
screw removed eartier.
~ electrid connections should be inspected
before poweris turned on, to make certain that
they are tight.
Step 8
INSTWLTHESIDETRIM(optional)
Udesired, the optionalside trim provided can be
kstiled on the range. The side trim must be
instiled abovecountertop leveland tapped
down into place.
The side trim can be mounted in several
different positionsdepending on the countertop
opening,cabinet structure and range features,
Frees~@ tith
Backpbsh
Tomounttrimflushwiththefrontofthe
countertop,usenumber3trimholesand‘N
rangeholes.
4“ BacW
andBacksplash
Tomountthe trimflushwiththefront ofthe
countertop,use number3 trimholes and‘An
rangeholes.
Optiod Montig
‘Amrangeholes Wowanextra3/8 forward
adjustment.Trimholes number1,2 and3 allow
a 1/2” adjustment.me trimm be mountedin
anydesiredlocationusingthe holesprovided.
Ii I
SideTrim
\
Ifthewuntefiopfrontisroll
*
formed,notchthecounterto
allowforoverlappingtrim,
SideTrim
Sfide.in Installation with Roll Fomad Countertop
(continuedn&page)
53

Step9
~imble (aRati totie wdl orfloor)
FlexDud
Blowe
Scr
L~Ho” C’amp
>*
Blower
1. Removethe screw in the front ofthe blower
transition separating the blower transition from
the blowerhousing.
2. Place the hose clamp around the round end of
the blowertransition. Attach the flexduct to the
blowertransition using the hose clamp.
3. With the anti-tipbracket properly instied in
the floor,placethe long end ofthe thimble hto
the wd and screw it into place using the four
screws provided, one in each corner.
4. Place the hose clamp provided around the
short end ofthe thimble. Attach the opposite end
ofthe flex duct to the short end ofthe thimble
using the hose clamp.
5. Plug the range into the wd.
6. CarefuUypush the range back into position.
Avoidpinchingthe transition piece or flexduct
7. Using the guide screw to locate the hole in
the rear ofthe blower housing, position the
transitionhside the blowerhousing.Rotatethe
transitionunti the holeinthefrontoftheblower
housingistigned. Securethetransitionwiththe
screwprovided.
8. Sed auductjointswithducttape.
9. Checkundertherangetobe surethe levehg
legisfullyengagedinthe anti-tipbracket
10. hsti the storagedrawer.
Fii Duct Connection tiou@ the moor
e
1. Attachthe rubbergasket
\
aroundthe edge ofthe
transitionpiece.me flatside
/“\.
ofthe rubbergasket should
--
be onthe underside ofthe
transitionpiece.
2. Placethe roundendtransitionpieceintothe
floor.Securethetransitionpieceusingthe 8
screwsprovidedintie kit YoumustM the edge
ofthe rubbergaskettoinstallthe screws.Make
surethe roundedgeofthegasketisfacingup.
3. Insertthefloorelbowductintothe transition
piece.me tide flze must face
towardthe
front of the -e. Attach the floor elbowduct
to ductplate using the two screws provided.
Tighten onlythe front screw.
4. Attach the floor elbow duct to the blower
using the 8 screws provided.me floor elbow
duct should be inside the blower.
5. Plug the range into the wd.
FloorElbow
Blower
Duet\
/
tape,
TranstionPie@
\ FloorPlate
6. Pushthe rmge intoposition.Makesure
thatthefloorelbowductis directiyoverthe
transitionpieceandrubbergasket me rubber
gasketfi provideased be~een the floor
elbowandthe transitionpiece.Seethe above
Uustration.
7. hosen thefrontscrewattachingthefloor
elbowductplateandthefloorelbowduct Sfide
thefloorelbowductplatedowntightagainstthe
rubbergasketandtightenthe screw.
8. Sed thejointbetweentheblowerandelbow
trmsitionpiecewithducttape.Checkunderthe
rangetoensurethe anti-tipbracketisengaged.
9. Insti the storagedrawer.
54
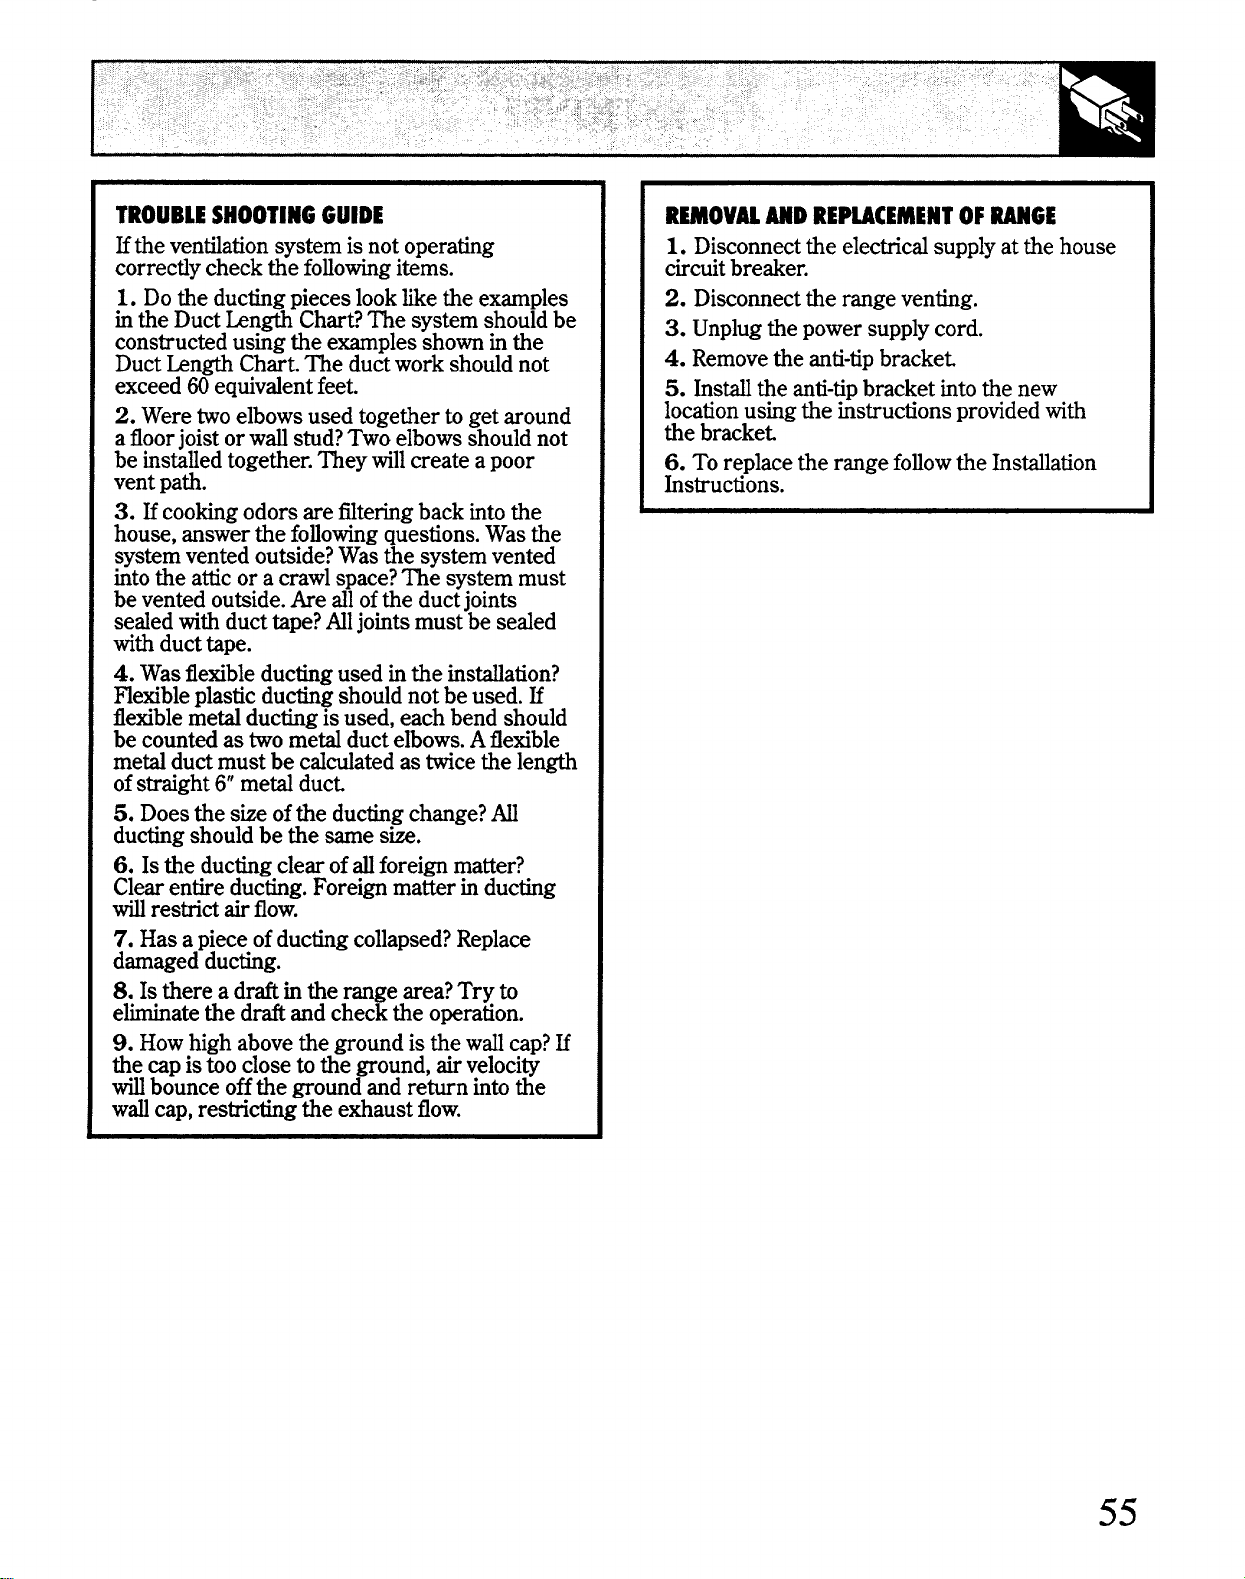
TROUBLESHOOTINGGUIDE
Ethe ventilationsystem is not operating
correcfly check the fo~owingitems.
1. Do the ductig pieces lookWe the examples
in the Duct kn@ Chart? The system should be
constructed using the examples shown in the
Duct hngth Chart The ductwork should not
exceed W equivalentfeet.
2. Were two elbows used together to get around
a floorjoist or w~ stud?Two elbows should not
be insta~ed together. They willcreate a poor
vent path.
3. Hcookingodors are fikefig back intothe
house, answer the fo~owingquestions. Wasthe
system vented outside?Wasthe system vented
into the attic or a crawl space?me system must
be vented outside.Are dl ofthe ductjoints
sealed with duct tape?Mljoints must be sealed
with duct tape.
4. Was flexibleducting used in the initiation?
flexible plastic ducting should not be used. E
flexiblemeti ducting is used, each bend should
be counted as two meti duct elbows.Aflexible
meti duct must be cddated as twicethe length
ofstraight 6“meti
duct
5. Doestheske ofthe ductig change?M
ductingshouldbethe samesk.
6. Isthe ductingclearofd foreignmatter?
Clearentireducting.Foreignmatterinducting
W restrictairflow.
7. Hasapieceofductingcollapsed?Replace
damagedducting.
8. Isthereadraftintherangearea?Try to
e~ate thedraftandchecktheoperation.
9. Howhighabovethegroundisthewdl cap?H
thecapistooclosetothe ground,airvelocity
d bounceoffthe groundandreturnintothe
WMcap,restrictingtheexhaustflow.
-OVN MD REPUCEMENTOF~GE
1.
Disconnectthe electricalsupplyatthehouse
circuitbreaker.
2. Disconnectthe rangeventing.
3. Unplugthepowersupplycord.
4. Removethe anti-tipbracket
5. Insti the anti-tipbracketintothe
new
locationusing the instructions provided with
the bracket
6. To replace the range foflowthe hstilation
hstructions.
55
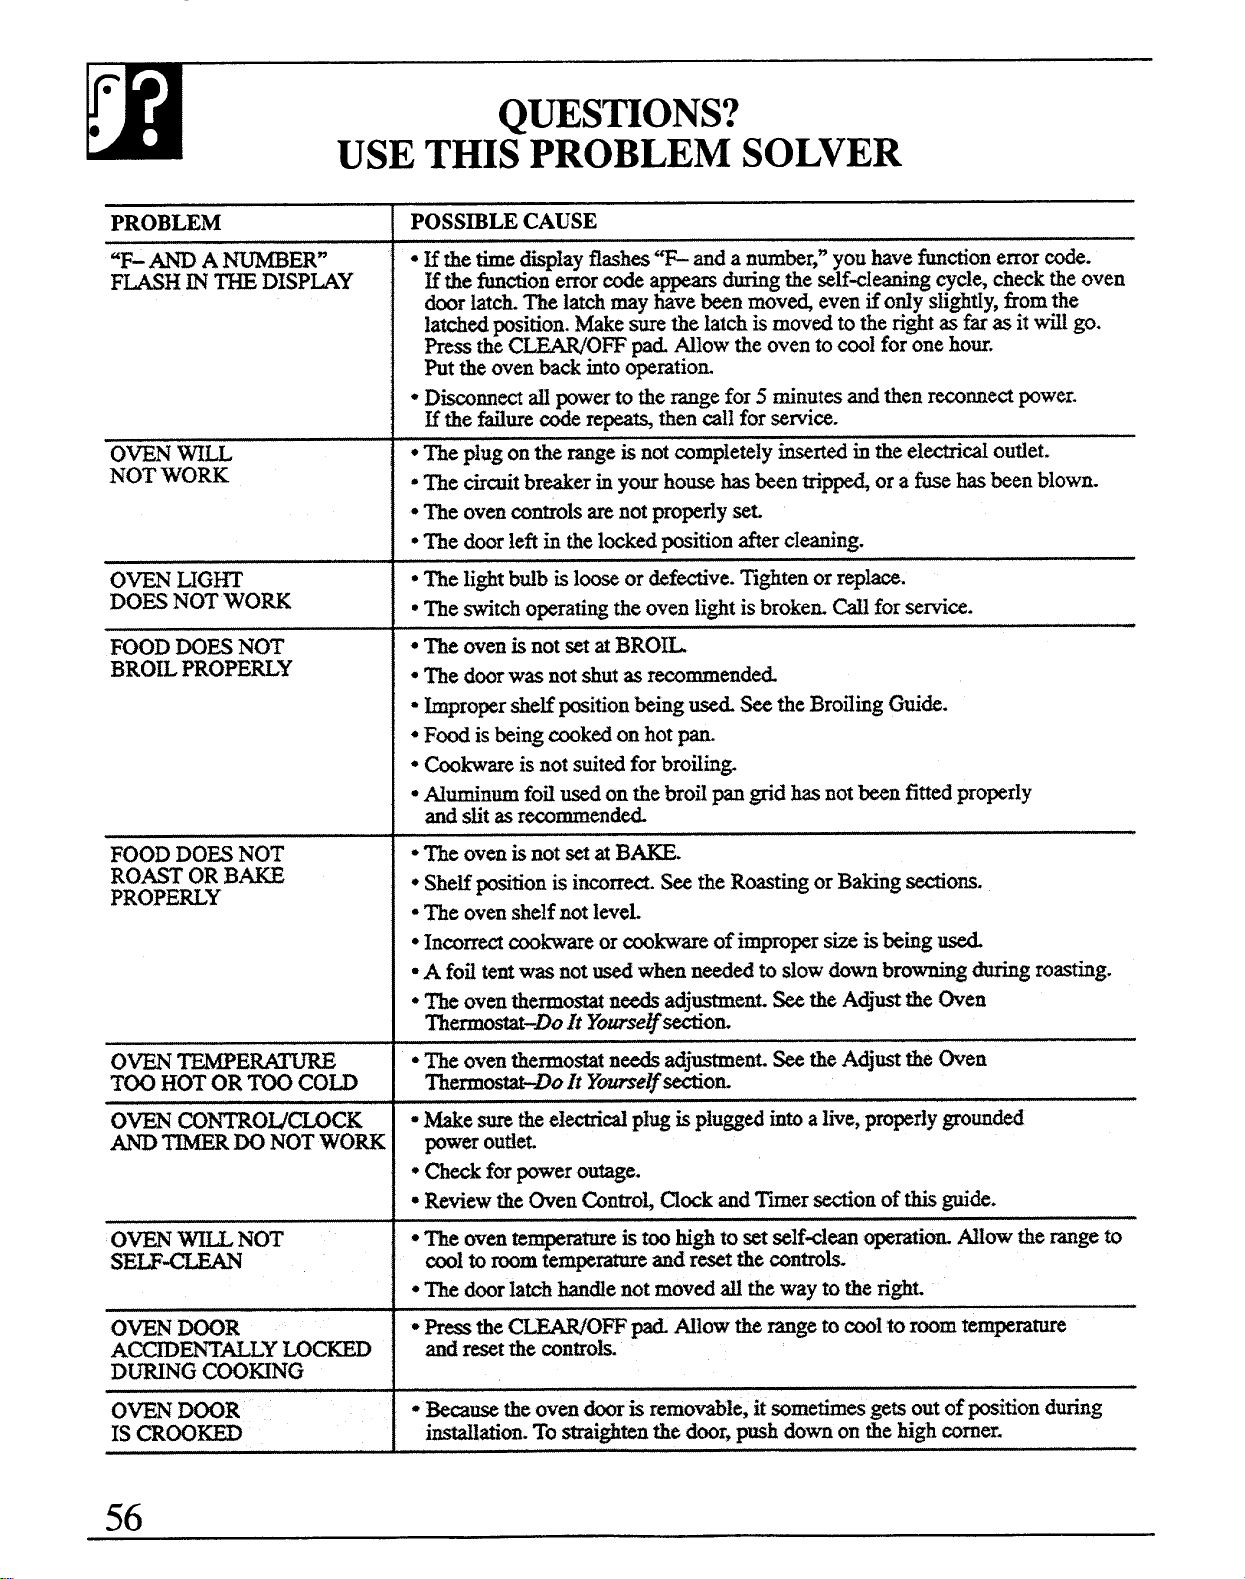
QUESmONS?
USETHISPROBLEMSOLVER
PROBLEM
“F-AND A _ER=
MH ~ THEDISPLAY
FOODDOES
NOT
BROLPROPEWY
FOODDOWNOT
ROASTORB&
PROPERLY
o= TEMP~
TOO HOTORTOOCOLD
OWN DOOR
IS ~00~
POSS~LE CAUSE
● Hthetimedisplayflashes% anda nmber,wyouhavefunctione~or *.
E thefunctionerrorcodeappearsdtig these~deting cycle,checkmeoven
doorlatch Thelatchmayhavebeenmov~ evenifody sli@tly,fromthe
latchedposition.me surethelatchis
movedto therightas far wit til go.
Pressthe
CWOFF p~ Alow theovento-1 foronehour.
Puttheovenbacktito operatiom
● Disconnectti powerto therangefor5 minutes=d thenrecomectpowsr.
Uthe~we - re= thencallforservim.
*Theplugontherangeisnotcompletelyinsertedintheelectrid outiet.
● Thecircuitbreakerinyourhousehasbeentrip- ora ti hasbeenblown.
● Theovencontrolsarenotproperlyse~
*Thedoorleftin thelockedpositionaftercleaning.
● Thelightbtib islooseordefhve. ~ghten or replace.
● Theswitchoperatingtheoveniightis broke~ ~ forservice.
● me ovenisnotsetatBRO&
● Thedoorwas notshutas reeo-ended
● bproper she~positionbeingd SeetheBroflingGuide.
● Foodisbeinginked onhot~
● @kware is notsuitedforbrofiin&
broflpangrid b notbeenfittedproperly
● me ovenisnotsetatB-.
● SheMpositionisincorrect.SeetheRoastingorBakingsections.
● TheovenshelfnotleveL
● Inmrrectcookwareorcookwareof impropersti isbeing-
● A fofitentwas notusedwhenneededto slowdownbrowningduringroasting.
● Theoventhermostatn- adj-en~ Seethe AdjusttheOven
Thermostat-DoJt Yome~sectio&
*Theoventhermostatneedsad-ent Seethe Adjust&e Oven
ThermosMo It YWe~sectio&
*we suretheelectri~ pm ispluggedintoalive,properlygrounded
poweroutiet
*-k forpowerowge.
● Reviewtie Oven~atrol ~ock andTrier sectionofthisguide.
*Theoventemperatureistoohightosetself+lean operatiomN1owtherangeto
coolto roomtemperature=d resetthemtroh
● me doorktch Wde notmovedti thewayto Weright.
. Pressthe~0~ @ Mow therange
tocool10roomtemperature
andresetthe controls.
● Becausetheovendooris mmovab}e,it sometimesgetsoutofpositionduring
=ation. Tostraightenthedoor,ptrshdownonthetigh mmez
56
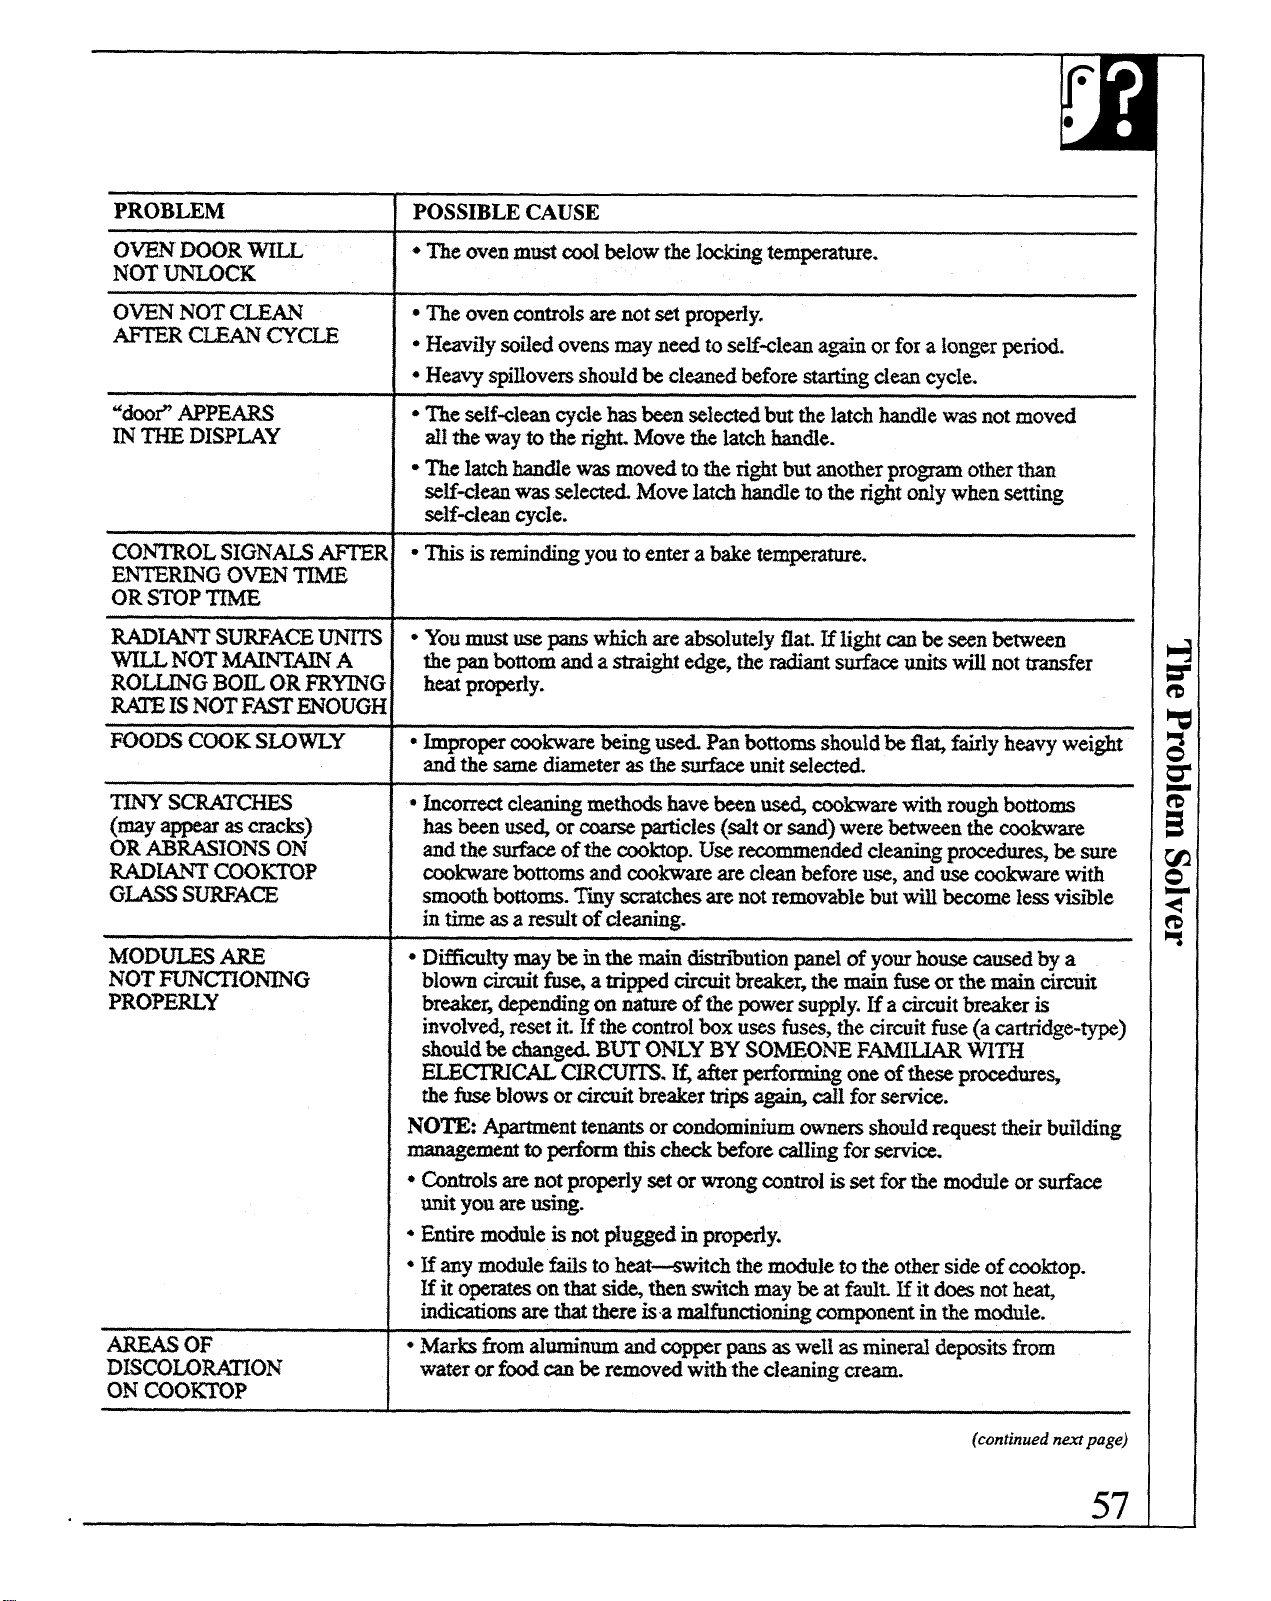
PROBLEM
OWDOOR WLL
NOTUNLOCK
OH NOTCLEAN
-R CLEAN~~
~ OF
DISCOLO~ON
ON
coomoP
POSSIBLECAUSE
*TheovenmustcoolbelowtheI&g ternpera~e.
*Theovencontrolsarenotsetproperly.
*HeavEysofiedovemmayneedtoseu+la againorfora Iongerperi~
*Heavyspitioversshotid beclaed beforestartingdean cycle.
● Theself<ieancyclehasbeenseleti butthelatchhan~e wasnotmoved
~1the wayto theri@t Movethebtch han~e.
. Thelatchhande wasmovedto therightbutanotherprogramotherthan
se~wleanwasseIectd MoveMch haude to therightody whensetting
self~ean cycle.
● Thisis remindingyouto entera We temperature.
● Youmustusepanswhichareabsolutelyfla~E lightcanbeseenbetween
thepanbottomandastraightedge,theradiantsurfaceunitsti nottransfer
beatproperly.
● -roper coo&are betig - Panbottomsshouldbefl~ fairlyheavyweigh?
andthesamediameterasthesurfaceunitsel@ed.
*ticoti dtig methodshavebeen~ cootiare withroughbottoms
hasbeenuses orcoarseparticles
(At or sand)werebetweenthecoo-e
andthes- ofthecooMop.Userecommendedcleaningprocedur~ besw
coobare bottomsandcoohare are cleanbeforeuse,and& cookare with
smoothbottoms.Tinysratches arenotremovablebutti becomelessvisl%le
intimeasa redt of cleantig.
● DWdty maybe inthemaindistributionprmelof yourhousecawd by a
blowncircuit~ a trippedcirtit br~r, themain& or the~ circuit
br- ending on natureof thepowersupply.If acirmit Mer is
involv@resetit.If thecontrolbox usesfuses,thecircuitfise (amrtridge-type)
shodd bechangd BUTONLYBYSOMEONEFMW WTH
E~CAL ~-.x afterperfo~g oneoftheseprocedure%
theb blowsorcircuitbre~r tripsa- dl forservice.
NO~: Apartmenttenantsorcondominiumownersshodd requesttheirbuilding
managementto performthischd beforeMing for service.
● @n&ok arenotproperlysetor wrongcontrolissetforthemodde or surface
tit youareusing.
. Entiremodde is not@uggedinpropedy.
● E =y modse - toh~t-itch thern~e totheothersideofcoo&op.
Hit operatesonthatsik thenswitchmaybe atfatik Hitdoesnoth~
indi~ons arethatthereisa dfunctiotig componentinthem~e.
● Mark from&m’num md qper pausaswellasmineti deposits fr~m
wateror W canberemovedwiththecleaningaearn.
(continued nmpage)
57
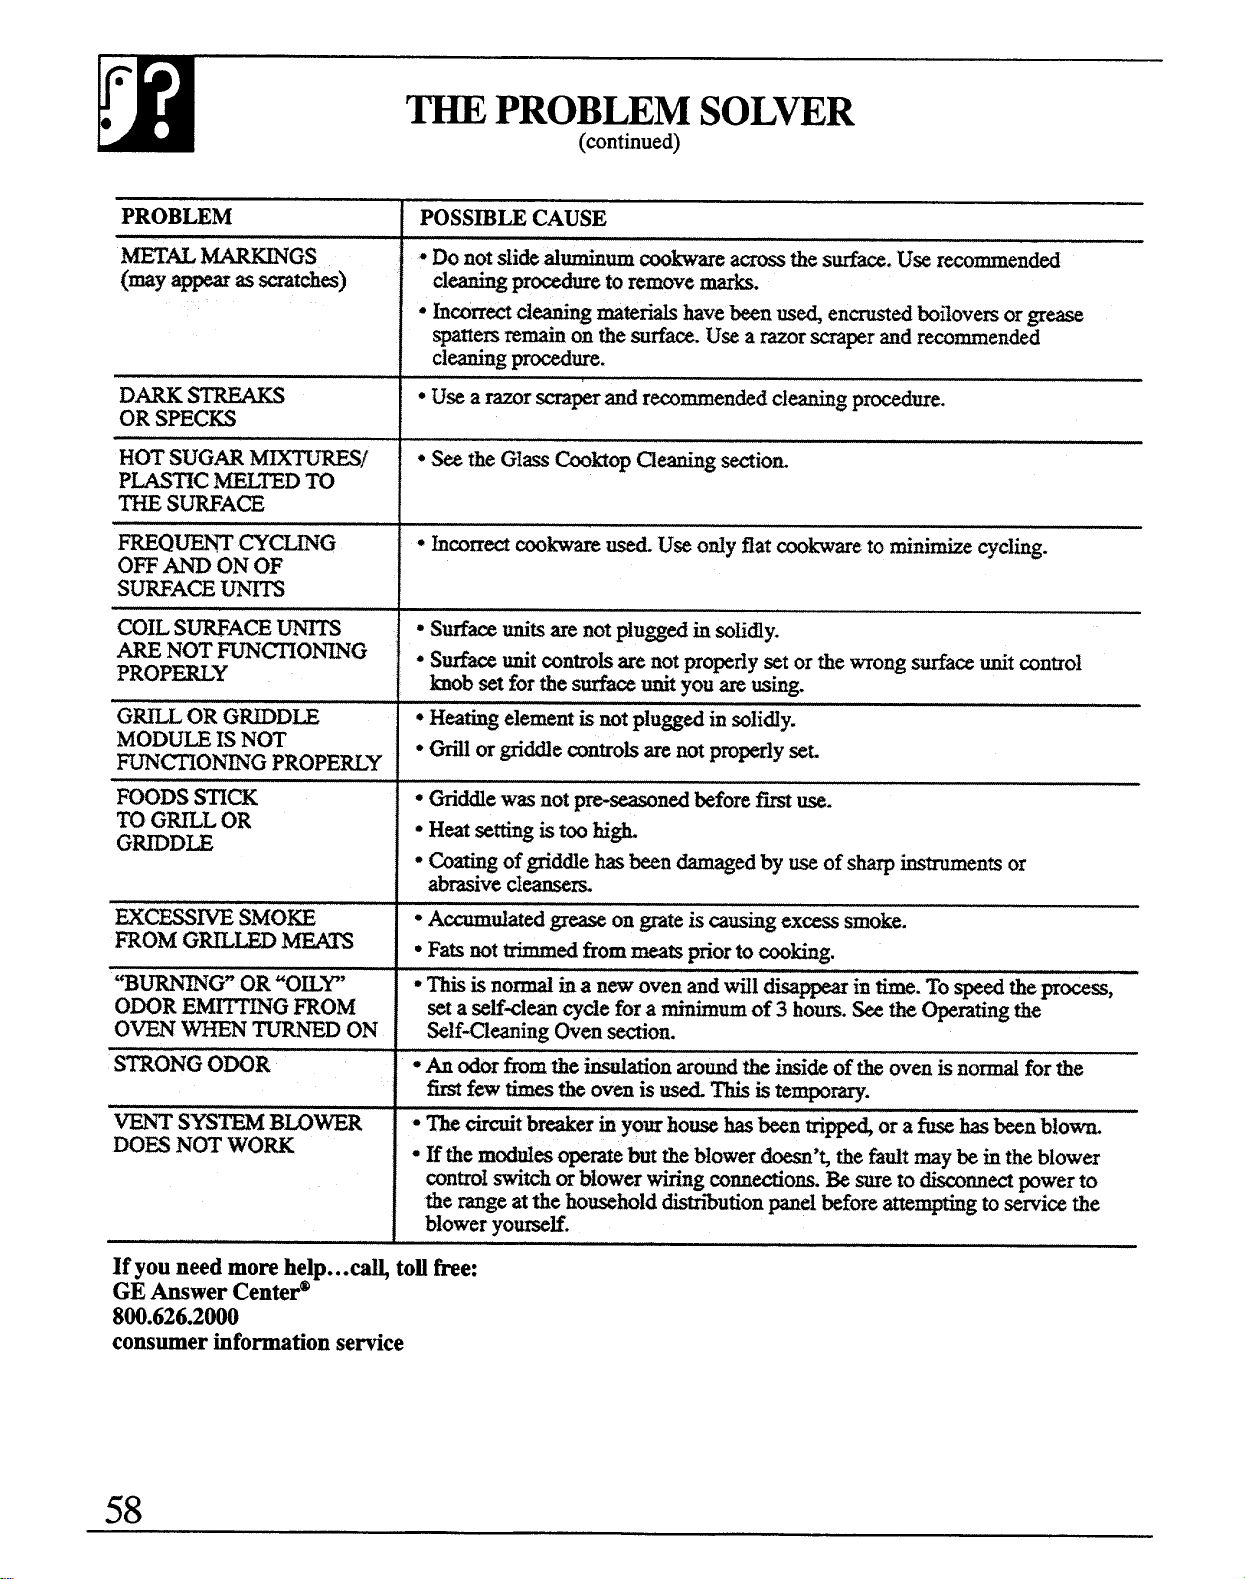
(continued)
PROBLEM
~& ~GS
(mayappearas~tdes)
G~L ORG~DN
MODULEIS NOT
FUN~ONNG PROPEWY
“B~G” OR“Omr
ODOREMmG
FROM
OW -
TURNEDON
STRONGODOR
W SYSW BLOWER
DOESNOTWOW
~ PROBLEM SOLVER
POSS~LE CAUSE
● karrm dtig rnateri*havebeenm enmed bofioversorgrease
spattemremainm thesurfam. Usea mor -per andmmmended
cleaningprtim.
● Surf-units arenotpluggedin soti~y.
● S-unit Qntrok are notpropedysetorthewrongS*W unitantrol
knobset forthesurfamunityouareusing.
*Heatingelementisnotpluggedin solidy.
, - or gri~e mntrok arenotproperlyset.
*GriWe wasnotpre-seasonedbefore~ use.
● Heatsetig istoohi~
● O-g ofgridde has~ damagedby useofsharptients or
abrasivedeanse~
● A_@tied greaseonpte is ~using exeesssmoke.
● F* nottrimmedfiornmess priorto eootig.
*Thisis no- b a newovenandWI diwppearin time.Tospeedthepr~ss,
seta seif+l- ~de fora minimumof 3 hem. SeetheOpera&g the
SeIf-~eaning Ovense~ion.
*AnodorfromtheHation around& insideof h ovenisnoti furthe
firstfewtirnesthe ovenisti~is temporary.
● The-t breakerin yourhousehasbeentrix ora * hasbeenblom
● E them~es operatebuttheblowerdoesn’~thefadt maybein theblower
mntrolswitchorblowerwiringmnndons. Besureto-nnti powerto
tbemge attheho~hold ti%ution panelbefore~mpting toservimtie
bioweryouBE.
If you
needmorehelp...~ to~free:
GEAnswer Center@
800.626.2000
consumerkforrnation sefice
58
WdllBeThere
WiththepurchaseofyournewGEappliance,receivetie assurancethatifyoueverneed
informationorassistancehornGE,wdUbethere.AllyouhavetodoiscaII–toil-free!
GEAnswerCentep
Whateveryour question about anyGEmajorappliance, GEAnswerCenter@
information serviceisavaiIableto help. Yourcall-and your question-till be
answered prompdy and courteously.And youcan callanytime. GEAnswer
Center@setice isopen 24hours aday, 7daysaweek.
AGEconsumer service professional will provide expert repair service,
scheduled at a time that’s convenient for you. ManyGEConsumer Service
company~perated locations offer you sefice todayor tomorrow, or atyour
convenience
(7:00a.m. to 7:00 p.m. weekdays,9:00a.m. to 2:00p.m. Saturdays).
Our facto~-trained techniciansknowyour appfiance inside and out+o most
repairs can be handed injust one visit.
~
—-----
-—-. —. . ...
ForCustomerWti SpecialNeeds...
80~6262000
Uponrequest,GEwillprovide
Consumerswithimpairedhearingorspeechwhohave
BraillecontrolsforavarietyofGE
accessto aTDDoraconventionalteletypewritermay
appliances,and abrochureto
cdl 80&TDBGEAC(800#3W322)torequest
assistinplanningabarrier-free informationor setice.
kitchenforpersonswithlimited
mobfiity.Toobtaintheseitems,
freeofcharge,cdl 800.626.2000.
SemisCon&a&
8aM2&2224
Youcan havethe secure feeling that GEConsumer Servicewillstillbe there
&er your warranty expires. Purchase a GEcontract whileyourwarranty isstill
in effectand you’llreceiveasubstantialdiscount.With a multipleyear contract,
you’reassured offiture sefice at today’sprices.
bdividti q-led to service tieir own app~ances
Usermbtenmce ktictions contained in this @de
can have partsor accessories sent direcdy to their home. cover procedmes intended to be performed byanyuser.
The GE parts system provides access to over
47,000
Otier servi~ gene~y shodd he referred to qu~led
par~...and all GE Genuine Renewal
Partsare fully
servicepersonnel. Caution must be exercise~ since
warranted. VISA,MasterCard and Discovercards
improper serncing maycauseunsafe operation.
are accepted.
t
YOUR GE ELECTRIC RANGE
Staplesalesslip or cancelledcheck
WARRANW
here. Proofof originalpurchase date
is neededto obtain se~ice
underwarranty.
I
I
WHATISCOVERED
FULLONE-YEARWARRAN~
Foroneyearfromdateoforiginal
Thiswarrantyisehendedtothe
purchase,wewill provide,freeof
originalpurchaser
and any su-eding
charge, patis and service labor in
ownerfor productspurchasedfor
your
hometo repairor replace
ordina~homeuseinthe48mainland
anypati of the rangethatfails
states,HawaiiandWashington,D.C.
becauseofa manufacturingdefect.
InAlaskathewarrantyisthesame
exce~tthatit isLIMITEDbecause
youmustpaytoshipthe productto
theserviceshoporfortheservice
technician’stravelcoststoyourhome.
Allwarrantyservicewill beprovided
byourFactoryServiceCentersor by
ourauthorizedCustomerCar@
servicemduringnormalworkinghours.
Shouldyourapplianceneedservice,
duringwarrantyperiodorbeyond,
call800-GE-CARES(800-2-2737)
WMT ISNOTCOVERED
● Servicetripsto yourhometo
Ifyouhavean installationproblem,
teachyouhowtousetheproduct. contactyourdealerorinstaller.
ReadyourUseandCarematerial.
Youareresponsiblefor providing
Ifyouthenhaveanyquestions
adequateelectri~, gas,exhausting
aboutoperatingtheproductplease
andotherconnectingfacilitiesas
contactyourdealerorour
describedintheInstallationInstructions
ConsumerAffairsofficeatthe
providedwiththeproduct.
addressbelow,orcall,tollfree:
● Replacementof housefusesor
GEAnswerCenteP
resettingofcircuitbreakers.
800.626.2000
● Failureoftheproductif it is used
consumerinformationservice
forotherthanits intendedpurpose
● Improperinstallation.
orusedcommercially.
● Damageto productcausedby
accident,fire,floodsor actsofGod.
WARRANTORISNOTRESPONSIBLE
FORCONSEQUENTIALDAMAGES.
Somestatesdonotallowtheexclusionor limitationofincidentdorconsequentialdamages,sothe~ove limitationorexclusion
maynotapplytoyou.~s warrantygivesyouspecificIegd rights,andyoumaydso haveotherrightswhichvaryfromstatetostate.
Toknowwhatyourlegalrightsareinyourstate,consultyourIod orstateconsumeraffairsofficeoryourstate’sARorneyGeneral.
Warranto~GeneralElectricCompany
Iffurtherhelpisneededconcerningthiswarranty,write:
Manager<onsumer Affairs,GEAppliances,Louisville,N 40225
JSP69
PrintedintheUnitedStates