Documents: Go to download!
User Manual
- User Manual - (English)
- Specification - (English)
- Product Features
- Specifications
- How to use washer
- Adding detergent
- Maintenance
- Troubleshooting guide
Table of contents
User Manual
Product Features
 Inverter Direct Drive system
The advanced Brushless DC motor directly drives the drum without belt and pulley.
 Low noise speed control system
By sensing the amount of load and balance, it evenly distributes load to minimize the spinning noise level.
 Child Lock
The Child Lock prevents children from pressing any button to change the settings during operation.
 More economical with Intelligent Wash system
Intelligent Wash System detects the size of load and water temperature, and then determines the optimum water level and washing time to minimize energy and water consumption.
 Built-in heater
Internal heater automatically heats the water to the best temperature on selected cycles.
 Protection against creases
With the alternating rotation of the drum, creasing is minimized.
 6 Motion
Washer is able to perform various drum actions or a combination of different actions depending on the wash program selected. Combined with a controlled spin speed and the ability of the drum to rotate both left and right, the wash performance of the machine is greatly improved, giving you perfect results every time.
Specifications
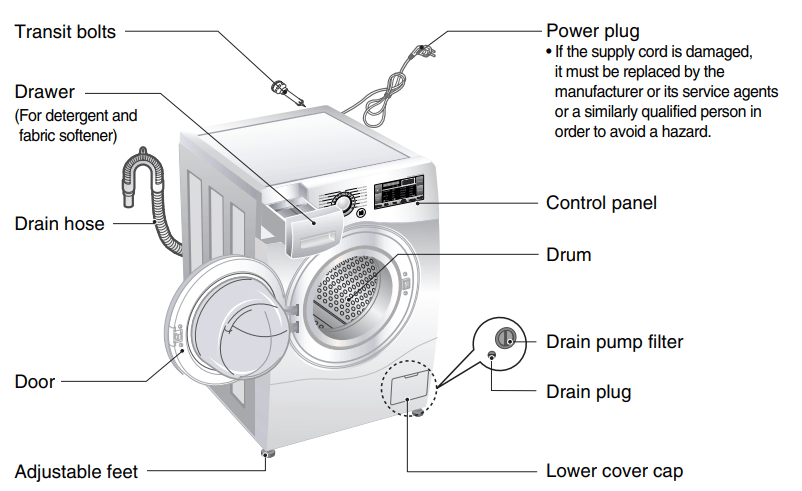
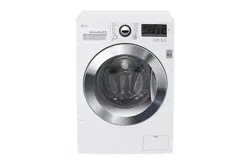
- Name : Front loading washing machine
- Power supply : 220 - 240 ~, 50 Hz
- Size : 600 mm(W) ✕ 640 mm(D) ✕ 850 mm(H)
- Weight : 68 kg
- Max.Watt : 2100 W
- Wash capacity : 8 kg
- Permissible water pressure : 100 - 800 kPa (1.0 - 8.0 kgf / cm2)
- The external hot water supply MUST NOT exceed 65°C
- Permissible cold water temperature : 4 - 25°C
- No further backflow protection required for connection to the water supply.
- The appearance and specifications may be varied without notice to lmprove the units quality.
- Specifications subject to change by manufacturer.
How to use washer
Operating washing machine
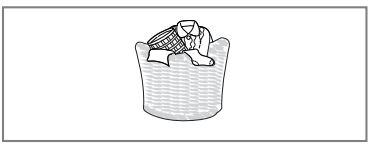
1. Sort Laundry.
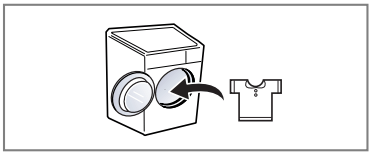
2. Open the door and load laundry.
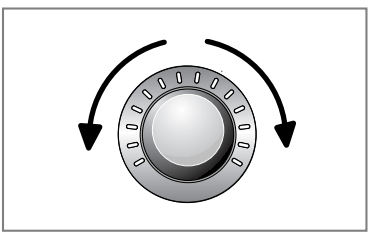
3. Press the Power button.

4. Select a Program.
Select options at this time
- Additional Program
- Temperature
- Spin Speed
- Other functions
5. Add detergent
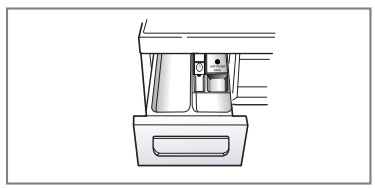
6. Press the Start/Pause button.

Care before washing
1. Care Labels
Look for a care label on your clothes. This will tell you about the fabric content of your garment and how it should be washed
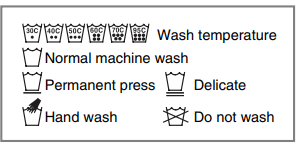
2. Sorting
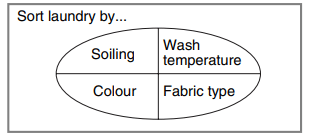
To get the best results, sort clothes into loads that can be washed with the same wash cycle. Water temperature and spin speed and different fabrics need to be washed in different ways.
Always sort dark colors from pale colors and whites. Wash separately as dye and lint transfer can occur causing discolouration of white etc. If possible, do not wash heavily soiled items with lightly soiled one.
- Soil (Heavy, Normal, Light) Separate clothes according to amount of soil.
- Color (White, Lights, Darks) Separate white fabrics from colored fabrics.
- Lint (Lint producers, Collectors) Wash lint producers and lint collectors separately.
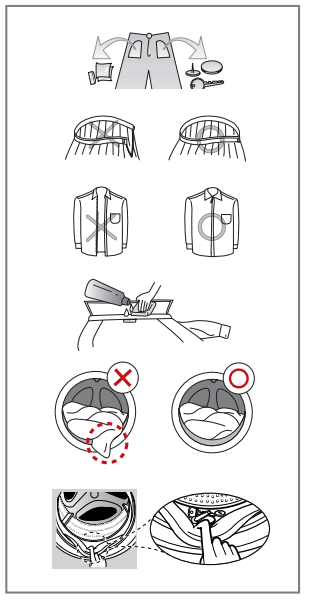
3. Caring before loading
Combine large and small items in a load. Load large items first. Large items should not be more than half the total wash load. Do not wash single items.
This may cause an out-of-balance load. Add one or two similar items.
- Check all pockets to make sure that they are empty.Items such as nails, hair clip, matches, pens, coins and keys can damage both your washer and your clothes.
- Close zippers, hooks and strings to make sure that these items don’t snag on other clothes.
- Pre treat dirt and stains by brushing a little detergent dissolved in water onto stains like collars and cuffs to help lift dirt.
- Check the folds of the flexible gasket (gray) and remove any small articles.
- Check inside of the drum and remove any item from a previous wash.
- Remove any clothing or items from the flexible gasket to prevent clothing and gasket damage.
Washing program table
Recommended courses according to the laundry type.
Program | Description | Fabric type | Proper Temp. | Maximum* Load |
| Cotton | Provides better performance by combining various drum motions. | Color fast garments (shirts, nightdresses, pajamas, etc) and normally soiled cotton load (underwear). | 40°C (Cold to 95°C) | Rating |
| Cotton Eco | Provide optimized washing performance with less energy consumption. | 60°C (Cold to 60°C) | ||
| Easy Care | This cycle is suitable for casual shirts that do not need ironing after washing. | Polyamide, Acrylic, Polyester. | 40°C (Cold to 60°C) | Less then 4.5 kg |
| Mix | Enables various fabrics to be washed simultaneously. | Various kind of fabrics except special garments. (Silk/delicate, sports wear, dark clothes, wool, Duvet/Curtains). | 40°C (Cold to 40°C) | |
Baby care | Remove solid and protein stain and provide better rinse performance | Lightly soiled baby wear | 60°C (95°C) | |
Silent Wash | Provides less noise and vibration and saves money by using overnight electricity. | Color fast garments (shirts, nightdresses, pajamas, etc)and lightly soiled white cotton (underwear). | 40°C (Cold to 60°C) | Less then 5.0 kg |
| Skin Care | Remove efficiently detergent residue in clothes | Fabrics which will be in direct contact with the skin, e.g. underwear, nappies, towelling, bed linen, pillow and mattress covers | Rating | |
| Duvet | This cycle is for large items such as bed cover, pillows, sofa covers, etc. | Cotton bedding except special garments (delicates, wool, silk, etc.) with filling: duvets, pillows, blankets, sofa covers with light filling. | 40°C (Cold to 40°C) | 1 single size |
Sports Wear | This cycle is suitable for sports wear such as jogging clothes and running wear. | Coolmax, Gore-tex, fleece and Sympatex. | Less then 3.0 kg | |
Dark Wash | If it's possible for clothes to decolorate, please use this cycle. The cycle prevent decolorization. (Please use detergent for colored fabrics.) | Dark garments made from cotton or mixed fabrics. | 30°C (Cold to 40°C) | |
| Delicate | This cycle is for delicate clothes such as underwear, blouse, etc. | Delicate, easily damaged laundry. | ||
Wool | Enable to wash wool fabrics. (Please use detergent for machinewashable woolens). | Machine washable woolens with pure new wool only. | 40°C (Cold to 40°C) | |
| Quick 30 | This cycle provides fast washing time for small loads and lightly soiled clothes. | Colored laundry which is lightly soiled fast. | 30°C (Cold to 40°C) | |
Intensive 60
| Within 60mins provide better washing performance and energy efficiency. | Cotton and mix fabrics. (Special PROGRAM within 60 mins for normally soiled laundry). | 60°C (Cold to 60°C) | Less then 4.5 kg |
- Water Temperature: Select water temperature to suit wash cycles. Always follow garment manufacture’s care label or instructions when washing.
- Set program at “Cotton Eco, 40°C, Intensive, Normal Rinse, 1400RPM” is for normally soiled load and test in accordance or in conformity with AS/NZS 2040.1.
- The test results depend on water pressure, water hardness, water inlet temperature, room temperature, type and amount of load, degree of soiling utilized detergent, fluctuations in the main electricity supply and chosen additional options.
- For best washing results, we recommend to mix dry detergent with warm water
Control panel
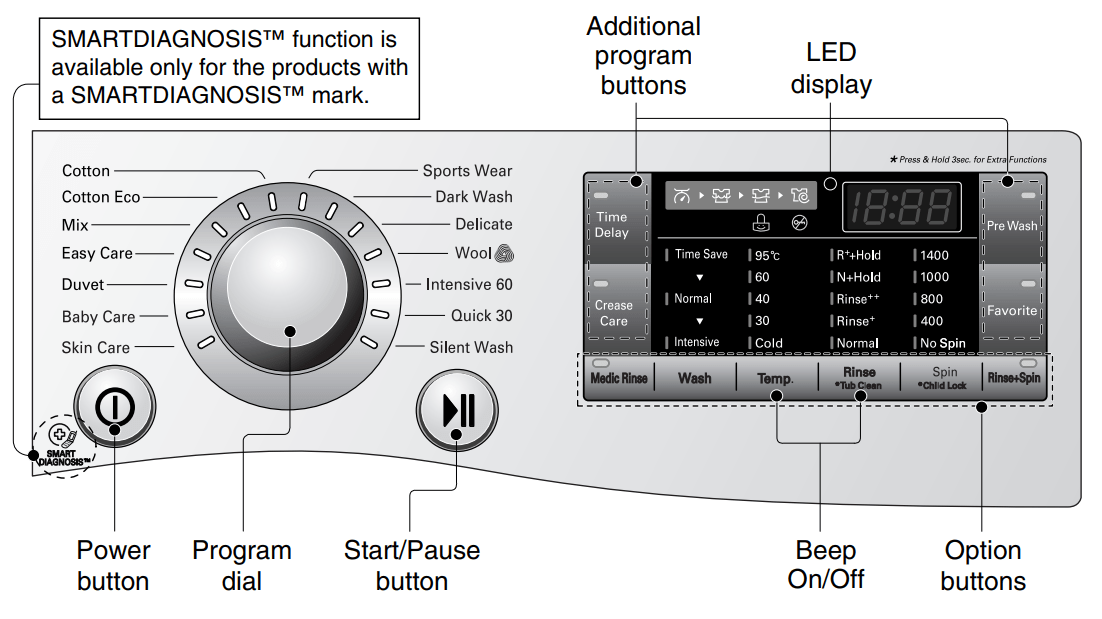
Power
- Press the Power button to turn power on and off.
- To cancel the Time Delay function, the power button should be pressed.
LED display
- The display shows the settings, estimated time remaining, options, and status messages for your washer. The display will remain on through the cycle.
Program dial
- Turn the Dial to select the cycle appropriate to the laundry type.
- Lamp will light up to indicate selected program.
Additional program
- Use these buttons to select the desired cycle options for the selected cycle.
- Some options may be limited to certain cycles.
Options
- This allows you to select an additional option and will light when selected.
Start/Pause
- This Start/Pause button is used to start wash cycle or pause the wash cycle.
- If temporary stop of wash cycle is needed, press the Start/Pause button.
- When in Pause, the power is turned off automatically after 4 minutes.
Additional program
Time Delay
You can set a time delay so that the washing machine will start automatically and finish after a specified time interval.
- Press the Power button.
- Select a cycle.
- Touch the Time Delay button and set time required.
- Press the Start/Pause button.
Crease Care
If you want to prevent creasing, select Crease Care option.
- Press the Power button.
- Select a cycle.
- Touch the Crease Care button.
- Press the Start/Pause button.
Favorite
Favorite program allows you to store a customized wash cycle for future use.
- Press the Power button.
- Select a cycle.
- Select the course. (Washing method, number of rinses, spin speed, water temperature etc.)
- Touch and hold Favorite program button for 3 seconds.
The Favorite program is now stored for future use.
To reuse the program, select Favorite program and press the Start/Pause.
Pre Wash
If the laundry is heavily soiled, “Pre Wash” course is effective.
- Press the Power button.
- Select a cycle.
- Touch the Pre Wash button and add the detergents.
- Press the Start/Pause button.
Options
Medic Rinse
For best results or for cleaner rinsing.
This allows the final rinse to be heated to 40 degrees.
- Press the Power button.
- Select a cycle.
- Touch the Medic Rinse button and set time required.
- Press the Start/Pause button.
Wash
• Time Save : This option can be used to reduce the time of a wash program.
It is best used on lightly soiled loads.
• Intensive : If a normal load is heavily soiled, “Intensive" option is effective.
Temp.
• By touching the Temp. button the water temperature can be selected.
- Cold
- 30°C, 40°C, 60°C, 95°C
• Water temperature selection is limited in certain programs.
Rinse
• R++Hold : Add rinse once then after rinsing process, the course is paused until start button is pressed again.
• N+Hold : The course is paused until start button is pressed again when rinse is finished.
• Rinse++ : Add rinse twice.
• Rinse+ : Add rinse once.
Rinse+Spin
This can be helpful in preventing fresh stains from setting in fabrics.
This is a separate cycle.
- Press the Power button.
- Select a cycle.
- Touch the Option button (Rinse+Spin light up).
- Press the Start/Pause.
- The cycle chosen determines the amount of Rinses and their duration as well as the spin during for this function.
Other functions
Spin Only
- Press the Power button.
- Touch the Spin button to select RPM.
- Press the Start/Pause.
NOTE
When you select "No Spin", it will still rotate for a short time with low speed to drain quickly.
Child Lock
Select this function to lock the buttons on the control assembly to prevent tampering. "Child Lock" can be set only during the washing cycle.
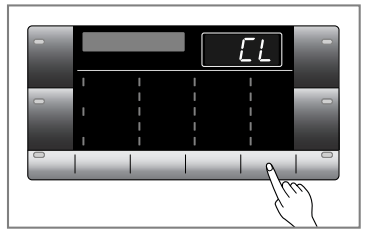
Locking the control panel
- Touch and hold the Child Lock button for 3 seconds.
- A beeper will sound, and '
 ' will appear on the LED display.
When the child lock is set, all buttons are locked except the Power button.
Unlocking the control panel
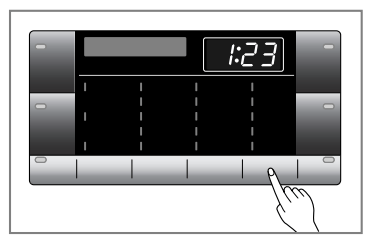
- Touch and hold the Child Lock button for 3 seconds.
- A beeper will sound and the remaining time for the current programme will reappear on the LED display.
Beep On / Off
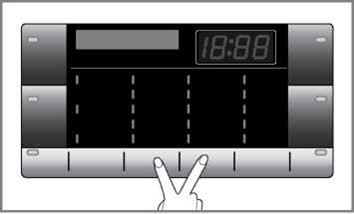
The Beep on/off function can be set only during the washing cycle.
1. Press the Power button.
2. Press the Start/Pause button.
3. Touch and hold the Temp. and Rinse button simultaneously for three seconds to set Beep on/off function.
Once the Beep on/off function is set, the setting is memorized even after the power is turned off.
NOTE
• If you want to turn the Beeper on, simply repeat this process.
Tub Clean
Tub Clean is a special cycle to help clean the inside of the washing machine. A higher water level and higher spin speed is used in this cycle. Perform this cycle regularly.
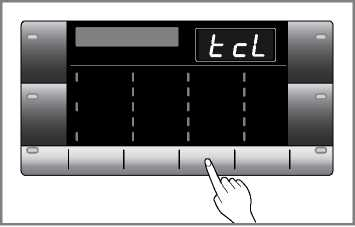
- Remove any clothing or items from the washer and close the door.
- Open the dispenser drawer and add Anti limescale(e.g. Calgon) to the main wash compartment.
- Close the dispenser drawer slowly.
- Power On and then touch and hold Tub Clean button for 3 seconds. then “
 ” will be displayed on the LED display.
 - Press the Start/Pause button to start.
- After the cycle is complete, leave the door open to allow the washer door opening, flexible gasket and door glass to dry.
Door Lock & Detecting
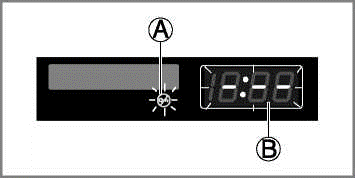
- A “Door Lock” - For safety reasons, the door will lock while machine is in use and the “Door Lock” icon will light up. You can safely open the door after the “Door Lock” icon turns off. This can take up to 3 minutes.
- B While "Detecting" is shown on the display the washing machine rotates slowly and detects how much laundry is loaded in the drum. It will take a short time.
Adding detergent
Adding detergent and fabric softener
The dispenser drawer
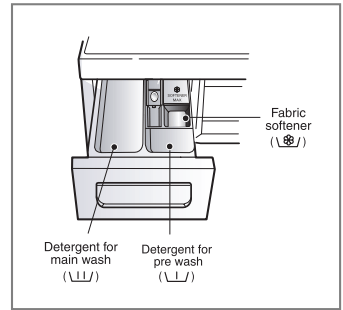
- Main wash only ➔

- Pre Wash + Main Wash➔

Adding fabric softener
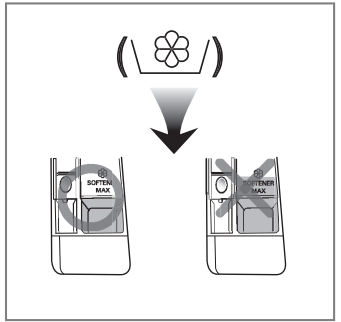
- Do not exceed the maximum fill line. Overfilling can cause early dispensing of the fabric softener which could stain clothes. Close the dispenser drawer slowly
- Do not leave the fabric softener in the detergent drawer for more than 2 days. (Fabric softener could be harden)
- Softener will automatically be added during the last rinse cycle.
- Do not open the drawer when water is supplied.
- Solvents(benzene, etc) should not be used
Detergent dosage
- Detergent should be used according to the instruction of the detergent manufacture.
- If too much detergent is used, too many suds can occur and this will decrease the washing result or cause heavy load to the motor.
- It is recommended that you use powdered detergent for best results.
- If you wish to use liquid detergent follow guidelines provided by the detergent manufacturer.
- You can pour liquid detergent directly into the main detergent drawer if you are starting the cycle immediately.
- Please do not use liquid detergent if you are using 'Time Delay ' as the liquid may harden, or if you have selected 'Pre Wash‘.
- If too many suds occur, please reduce the detergent amount.
- Detergent usage may need to be adjusted for water temperature, water hardness, size and soil level of the load. For best results, avoid oversudsing.
Adding water softener
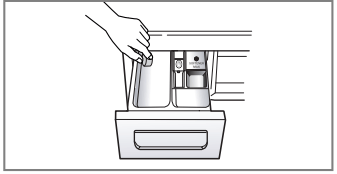
- A water softener, such as Anti-limescale (e.g. Calgon) can be used to cut down on the use of detergent in extremely hard water areas. Dispense according to the amount specified on the packaging. First add detergent and then the water softener.
- Use the quantity of detergent as for soft water.
Using tablet

1. Open the door and put tablets into the drum.
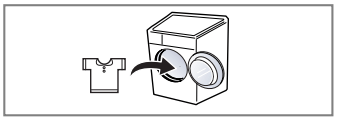
2. Load the laundry into the drum and close the door.
Maintenance
- Before cleaning the washer interior, unplug the electrical power cord to avoid electrical shock hazards.
- Turn off the stopcock if the machine is to be left for any length of time (e.g. holiday), especially if there is no floor drain(gully) in the immediate vicinity
The water inlet filter
- "
 " icon will be displayed on the control panel when water does not enter the detergent drawer.
 - If water is very hard or contains traces of lime deposit, the water inlet filter may become clogged. It is therefore a good idea to clean it from time to time
1. Turn off the water tap
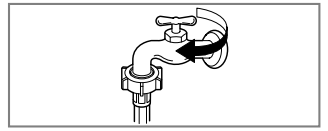
2. Unscrew the water inlet hose.
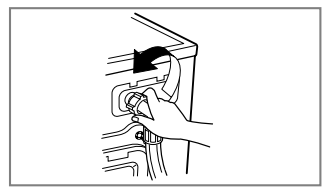
3. Clean the filter using a hard bristle brush
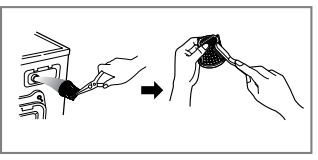
4. Refit and tighten up the inlet hose
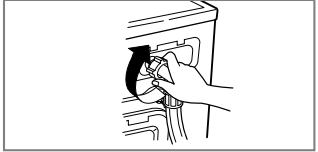
The drain pump filter
- The drain filter collects threads and small objects left in the laundry. Check regularly that the filter is clean to ensure smooth running of your machine.
- Allow the water to cool down before cleaning the drain pump, carrying out emergency emptying or opening the door in an emergency.
1. Open the lower cover cap. Pull out the hose.
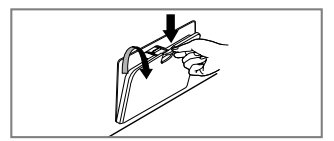
2. Unplug the drain plug first to remove any remaining water. Open the filter cap by turning to the left.
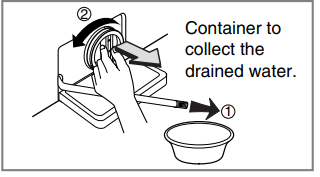
3. Remove any extraneous matter from the pump filter.
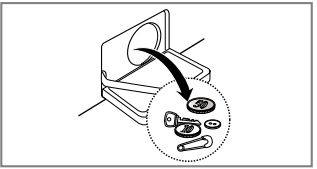
4. After cleaning, carefully refit the cap by slowly turning it clockwise and insert the drain plug.
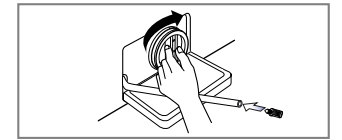
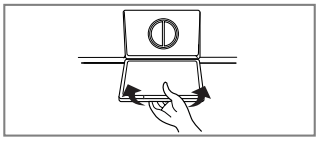
5. Close the lower cover cap. If water leaks from the cover after refitting the filter cap. Repeat steps 1 and 2 and Refit the filter cap as it may be cross threaded.
Dispenser drawer
- After a while, detergents and fabric softeners leave a deposit in the drawer.
- It should be cleaned from time to time with a jet of running water.
- If necessary it can be removed completely from the machine by pressing the catch downwards and by pulling it out.
- To facilitate cleaning, the upper part of the fabric softener compartment can be removed
1. Pull out the dispenser drawer.
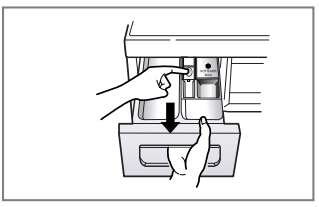
2. Clean the dispenser drawer under water.
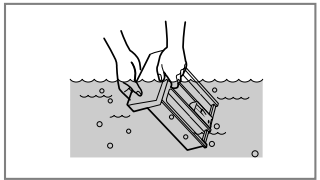
3. Clean inside the recess with an old toothbrush
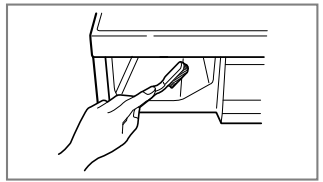
4. Insert the dispenser drawer
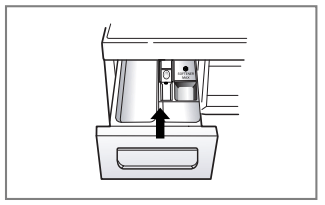
The washing drum
- If you live in a hard water area, limescale may build up continuously in places where it cannot be seen and thus not easily removed. Over time the build up of scale clogs appliances, and if it is not kept in check these may have to be replaced.
- Although the washing drum is made of Stainless steel, specks of rust can be caused by small metal articles (paper clips, safety pins) which have been left in the drum.
- The washing drum should be cleaned from time to time.
- If you use descaling agents, dyes or bleaches, make sure they are suitable for washing machine use.
- Descaler may contain chemicals that may damage part of your washing machine.
- Remove any spots with a stainless steel cleaning agent.
- Never use steel wool.
Cleaning your washer
Exterior
- Proper care of your washer can extend its life.
- The outside of the machine can be cleaned with warm water and a neutral non abrasive household detergent.
- Immediately wipe off any spills. Wipe with damp cloth.
- Try not to hit surface with sharp objects.
- Do not use methylated spirits, diluents or similar products.
Interior
- Dry around the washer door opening, flexible gasket and door glass.
- Run washer through a complete cycle using hot water.
- Repeat process if necessary.
NOTE To remove hard water deposits, use only cleaners labelled washer safe.
Cold conditions
If the washer is stored in an area where freezing may occur or moved in freezing temperatures, follow these instructions to prevent damage to the washer:
- Turn off water supply tap.
- Disconnect hoses from water supply and drain water from hoses.
- Plug electrical cord into a properly grounded electrical outlet.
- Add 1gallon (3.8L) of nontoxic recreational vehicle(RV) antifreeze into an empty wash drum. Close the door.
- Set spin cycle and let washer spin for 1minute to drain out all water. Not all of the RV antifreeze will be expelled.
- Unplug electrical power cord, dry the drum interior, and close the door.
- Remove dispenser drawer, drain and dry excess water from the compartments.
- Store washer in an upright position.
- To remove antifreeze from washer after storage, run empty washer through a complete cycle using detergent. Do not add wash load.
Troubleshooting guide
This washing machine is equipped with automatic safety functions which detect and diagnose faults at an early stage and react appropriately. When the machine does not function properly or does not function at all, check the following points before you contact your service provider.
Diagnosing Problem
Symptom | Possible Cause | Solution |
Rattling and clanking noise | • Foreign objects such as coins or safety pins maybe in drum or pump. | Stop washer, check drum and drain filter. If noise continues after washer is restarted, call your authorised service centre. |
Thumping sound | • Heavy wash loads may produce a thumping sound. This is usually normal. | If sound continues, washer is probably out of balance. Stop and redistribute wash load. |
Vibrating noise | • Have all the transit bolts and packing been removed? • Are all the feet resting firmly on the ground? | If not removed during installation, refer to Installation guide for removing transit bolts. Wash load may be unevenly distributed in drum. Stop washer and rearrange wash load. |
Water leaks. | • Fill hoses or drain hose are loose at tap or washer. | Check and tighten hose connections. |
| • House drain pipes are clogged. | Unclog drain pipe. Contact plumber if necessary. |
Oversudsing |
| Too much detergent or unsuitable detergent may cause excessive foaming which may result in water leaks. |
Water does not enter washer or it enters slowly | • Water supply is not adequate in area. | Check another tap in the house. |
• Water supply tap is not completely open. | Fully open tap. | |
| • Water inlet hose(s) are kinked. | Straighten hose. |
| • The filter of the inlet hose(s) clogged. | Check the filter of the inlet hose. |
Water in the washer does not drain or drains slowly. | • Drain hose is kinked or clogged. • The drain filter is clogged. | Clean and straighten the drain hose. Clean the drain filter. |
Washer does not start | • Electrical power cord may not be plugged in or connection may be loose. | Make sure plug fits tightly in wall outlet. |
| • House fuse blown, circuit breaker tripped,or a power outage has occurred. • Water supply tap is not turned on. | Reset circuit breaker or replace fuse. Do not increase fuse capacity. If problem is a circuit overload, have it corrected by a qualified electrician. Turn on water supply tap. |
Washer will not spin | • Check that the door is firmly shut. | Close the door and press the Start/Pause button. After pressing the Start/Pause button, it may take a few moments before the washer begins to spin. The door must be locked before spin can be achieved. Add 1 or 2 similar items to help balance the load. Rearrange load to allow proper spinning. |
Door does not open |
| Once machine has started, the door cannot be opened for safety reasons. Check if the "Door Lock" icon is illuminated. You can safely open the door after the "Door Lock" icon turns off. |
Wash cycle time delayed |
| The washing time may vary by the amount of laundry, water pressure, water temperature and other usage conditions. If an imbalance is detected or if the suds removing programme is on, the wash time shall be increased. |
Fabric softener overflow | Too much softener may cause an overflow. | Follow softener guidelines to ensure appropriate amount is used. Do not exceed the maximum fill line |
Softeners dispensed too early |
| Close the dispenser drawer slowly. Do not open the drawer during the wash cycle. |
Error Messages
Symptom | Possible Cause | Solution |
 | • Water supply is not adequate in area. • Water supply taps are not completely open. • Water inlet hose(s) are kinked. • The filter of the inlet hose(s) are clogged. | Check another tap in the house. Fully open tap. Straighten hose(s). Check the filter of the inlet hose. |
| • Drain hose is kinked or clogged. • The drain filter is clogged. | Clean and straighten the drain hose. Clean the drain filter. |
HE | • Load is too small. • Load is out of balance. • The appliance has an imbalance detection and correction system. If individual heavy articles are loaded (ex. bath mat, bath robe, etc.) this system may stop spinning or even interrupt the spin cycle altogether. • If the laundry is still too wet at the end of the cycle, add smaller articles of laundry to balance the load and repeat the spin cycle. | Add 1 or 2 similar items to help balance the load. Rearrange load to allow proper spinning. |
|  • Ensure door is not open. • Ensure door is not open. | Close the door completely.
|
| Unplug the power plug and call for service. | |
 | ||
 FE | • Water overfills due to the faulty water valve. | Close the water tap. Unplug the power plug. Call for service. |
| • Water level sensor has malfunctioned. | |
| • Over load in motor. | Allow the washer to stand for 30 minutes to allow the motor to cool; then restart the cycle. |
| • The washer experienced a power failure. | Restart the cycle. |
Using SMARTDIAGNOSIS™
- Only use this feature when instructed to do so by the call center. The transmission sounds similar to a fax machine, and so has no meaning except to the call center.
- SMARTDIAGNOSIS™ cannot be activated if the washer does not power up. If this happens, then troubleshooting must be done without SMARTDIAGNOSIS™.
If you experience problems with your washer, call to Customer information center. Follow the call center agent's instructions, and do the following steps when requested:
1. Press the Power button to turn on the washer. Do not press any other buttons or turn the cycle selector knob.
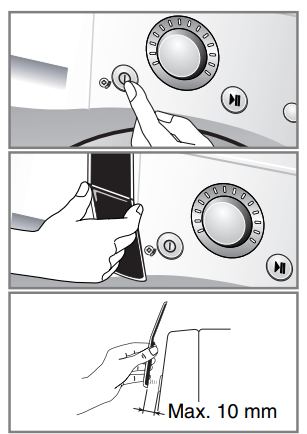
2. When instructed to do so by the call center, place the mouthpiece of your phone very close to the Power button
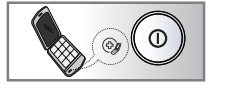
3. Touch and hold the “Temp.” button for three seconds, while holding the phone mouthpiece to the icon or Power button.
4. Keep the phone in place until the tone transmission has finished. This takes about 6 seconds, and the display will count down the time.
- For best results, do not move the phone while the tones are being transmitted.
- If the call center agent is not able to get an accurate recording of the data, you may be asked to try again.
- Pressing the Power button during the transmission will shut off the SMARTDIAGNOSIS™.
5. Once the countdown is over and the tones have stopped, resume your conversation with the call center agent, who will then be able to assist you using the information transmitted for analysis at the call to Customer information center.
- Smart Diagnosis is a troubleshooting feature designed to assist, not replace, the traditional method of troubleshooting through service calls. The effectiveness of this feature depends upon various factors, including, but not limited to, the reception of the cellular phone being used for transmission, any external noise that may be present during the transmission, and the acoustics of the room where the machine is located.
Accordingly, LG does not guarantee that Smart Diagnosis would accurately troubleshoot any given issue
See other models: GR-B226ACF GR-B227STS 22LD320H WF-T556 34UM68


 " is not released, call for service.


