Use & Care Guide for Wolf VU30S
Table of Contents
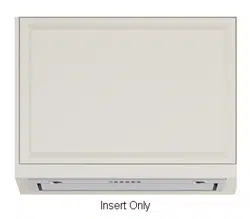
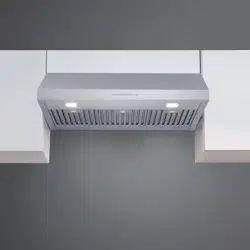
Under-Cabinet Hood Insert Features
FEATURES
1 Product Rating Plate (above filters)
2 Control Panel
3 Bottom Panel
4 Filters (above bottom panel)
5 LED Lighting
6 Remote Control (not shown)

CONTROL PANEL OPERATION
Control Panel
To operate the ventilation hood, use the control panel on the bottom of the hood.
ICON FUNCTION
 Turns the blower on or off.
 Turns the blower on to low.
 Turns the blower on to medium.
 Turns the blower on to high or boost.
 Turns the lights on or off.
BLOWER
To adjust the blower speed, press , , or . To turn on boost, press for two seconds. Boost increases airflow by approximately 20% more than high but is limited to 10 minutes. After 10 minutes, the blower automatically transitions to the previous selected speed. If boost is turned on with the blower off, it turns off after 10 minutes.
DELAY
The delay automatically turns the lights and blower off after 15 minutes of use. To turn on the delay, press and hold for two seconds.
NOTE: Delay and boost cannot be turned on at the same time.
LIGHTS
Press for high or press again for low. Press again to turn the lights off.
REMOTE CONTROL OPERATION
Remote Control
The remote requires two AAA batteries (not included).
ICON FUNCTION
 Turns the blower on to low. Turns the blower off.
 Increases the blower speed.
 Decreases the blower speed.
 Turns the blower on to boost.
 Turns the delay on.
 Turns the lights on or off.
BLOWER
To adjust the blower speed, press icons , , or . To turn on boost, press . Boost increases airflow by approximately 20% more than high but is limited to 10 minutes. After 10 minutes, the blower automatically transitions to the previous selected speed. If boost is turned on with the blower off, it turns off after 10 minutes.
DELAY
The delay automatically turns the lights and blower off after 15 minutes of use. To turn on the delay, press .
NOTE: Delay and boost cannot be turned on at the same time.
LIGHTS
Press for high or press and hold for two seconds for low. Press again to turn off the lights.
CARE RECOMMENDATIONS
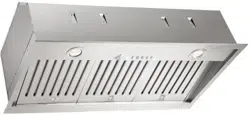
Filter Removal
The grease filters are dishwasher safe. Refer to care recommendations.
To access the filters, pull down the front edge of the bottom panel of the hood and allow it to rotate downward.
To remove the filters, refer to the illustration below.
IMPORTANT NOTE: Do not operate the ventilation hood without the grease filters.

Filter removal (30" model shown)
Care Recommendations
CLEANING
Stainless steel - Use a nonabrasive stainless steel cleaner and apply with a soft lint-free cloth. To bring out the natural luster, lightly wipe the surface with a water-dampened microfiber cloth followed by a dry polishing chamois. Always follow the grain of the stainless steel.
Control panel - Use a spray degreaser to remove fingerprints and food soil. Spray on a cloth before wiping the panel.
IMPORTANT NOTE: Do not spray cleaners directly on the control panel.
Filters - Filters are dishwasher safe and are designed to fit most dishwashers. Wipe the filters to remove excess grease before placing in the dishwasher.
Troubleshooting
OPERATION
Hood does not operate.
• Verify power is on.
• Verify electrical power to the hood and the home circuit breaker is on.
Light does not turn on.
• LED lighting must be replaced by Wolf Factory Certified Service.
SERVICE
• Maintain the quality built into your product by contacting Wolf Factory Certified Service. For the name of the nearest Wolf Factory Certified Service, check the contact & support section of our website, or call Wolf customer care at 800-222-7820.
• When contacting service, you will need the model and serial number of your product. Both numbers are listed on the product rating plate. Refer to page 6 for rating plate location.
• For warranty purposes, you will also need the date of installation and name of your authorized Wolf dealer. This information should be recorded on page 3 of this guide.
Wolf Appliance Residential Limited Warranty
FOR RESIDENTIAL USE
FULL TWO YEAR WARRANTY*
For two years from the date of original installation, this Wolf Appliance product warranty covers all parts and labor to repair or replace, under normal residential use, any part of the product that proves to be defective in materials or workmanship. All service provided by Wolf Appliance under the above warranty must be performed by Wolf factory certified service, unless otherwise specified by Wolf Appliance, Inc. Service will be provided during normal business hours.
LIMITED FIVE YEAR WARRANTY
For five years from the date of original installation, Wolf Appliance will repair or replace the following parts that prove to be defective in materials or workmanship: gas burners (excludes appearance), electric heating elements, blower motors (ventilation hoods), electronic control boards, magnetron tubes and induction generators. If the owner uses Wolf factory certified service, the service provider will repair or replace these parts with the owner paying for all other costs, including labor. If the owner uses non-certified service, the owner must contact Wolf Appliance, Inc. (using the information below) to receive repaired or replacement parts. Wolf Appliance will not reimburse the owner for parts purchased from non-certified service or other sources.
TERMS APPLICABLE TO EACH WARRANTY
The warranty applies only to products installed for normal residential use. The warranty applies only to products installed in any one of the fifty states of the United States, the District of Columbia or the ten provinces of Canada. This warranty does not cover any parts or labor to correct any defect caused by negligence, accident or improper use, maintenance, installation, service or repair.
THE REMEDIES DESCRIBED ABOVE FOR EACH WARRANTY ARE THE ONLY ONES THAT WOLF APPLIANCE, INC. WILL PROVIDE, EITHER UNDER THIS WARRANTY OR UNDER ANY WARRANTY ARISING BY OPERATION OF LAW. WOLF APPLIANCE, INC. WILL NOT BE RESPONSIBLE FOR ANY CONSEQUENTIAL OR INCIDENTAL DAMAGES ARISING FROM THE BREACH OF THIS WARRANTY OR ANY OTHER WARRANTY, WHETHER EXPRESS, IMPLIED OR STATUTORY.
Some states do not allow the exclusion or limitation of incidental or consequential damages, so the above limitation or exclusion may not apply to you. This warranty gives you specific legal rights and you may also have other legal rights that vary from state to state.
To receive parts and/or service and the name of Wolf factory certified service nearest you, contact Wolf Appliance, Inc., P.O. Box 44848, Madison, WI 53744; check the contact & support section of our website, or call 800-222-7820.
*Stainless steel (doors, panels, handles, product frames and interior surfaces) are covered by a limited 60-day parts and labor warranty for cosmetic defects.
*Replacement filters for ventilation hood recirculating kits are not covered by the product warranty
INSTALLATION
Hood Preparation
BOTTOM PANEL REMOVAL
To remove the bottom panel, refer to the illustration below.
FILTER REMOVAL
To remove the grease filters, refer to the illustration below.
IMPORTANT NOTE: Do not operate the ventilation hood without the grease filters.


DETACH BOTTOM ASSEMBLY
Remove six screws from the hood and detach the bottom assembly from the hood. Refer to the illustration below.

Detach bottom assembly
Hood Preparation
BLOWER INSTALLATION
IMPORTANT NOTE: The blower must be installed and plugged in prior to making the electrical connection to the hood.
1 Insert the blower by aligning the round discharge on the blower with the discharge on the hood.
2 Secure the blower to the hood using the two mounting screws provided with the blower. Refer to the illustration below.

Blower installation
DAMPER INSTALLATION
Place the round damper on the round discharge and secure with duct sealing tape. Refer to the illustration below.

Damper installation
Installation
HOOD INSTALLATION
1 Insert the power cord above or into an adjacent cabinet. Place the hood and the bottom assembly on a protected work surface under the cabinet opening. NOTE: The electrical connection to the bottom assembly will remain attached during the installation.
2 Insert the hood into the opening. The support brackets will temporarily support the weight of the hood. If the bottom of the enclosure is too thick to engage the brackets, the hood must be supported until the mounting screws are installed.
3 Turn the support bracket screws clockwise to draw the hood flange to the bottom of the enclosure. Refer to the illustration below.
4 Secure the hood flange to the enclosure using the mounting screws provided.

Hood installation
5 Press the bottom hood assembly against the bottom hood flange and secure with the six screws. Refer to the illustration below.
6 Insert the blower plug into the blower receptacle. Refer to the illustration below.
7 Insert the two tabs on the top of the transformer behind the two tabs on the hood and secure the bottom of the transformer with one screw.

Install bottom hood assembly

Hood connections
COMPLETION
1 Connect the ductwork to the damper and secure with duct sealing tape.
2 Plug the power cord into the receptacle.
3 Turn on the electrical supply at the circuit panel and verify operation.
4 Install the grease filters and bottom panel. Refer to the illustrations below.


Troubleshooting
IMPORTANT NOTE: If the hood does not operate properly, follow these troubleshooting steps:
1 Verify electrical power is supplied to the hood.
2 Verify proper wiring connections.
3 If the hood does not operate properly, contact Wolf Factory Certified Service. Do not attempt to repair the hood. Wolf is not responsible for service required to correct a faulty installation.