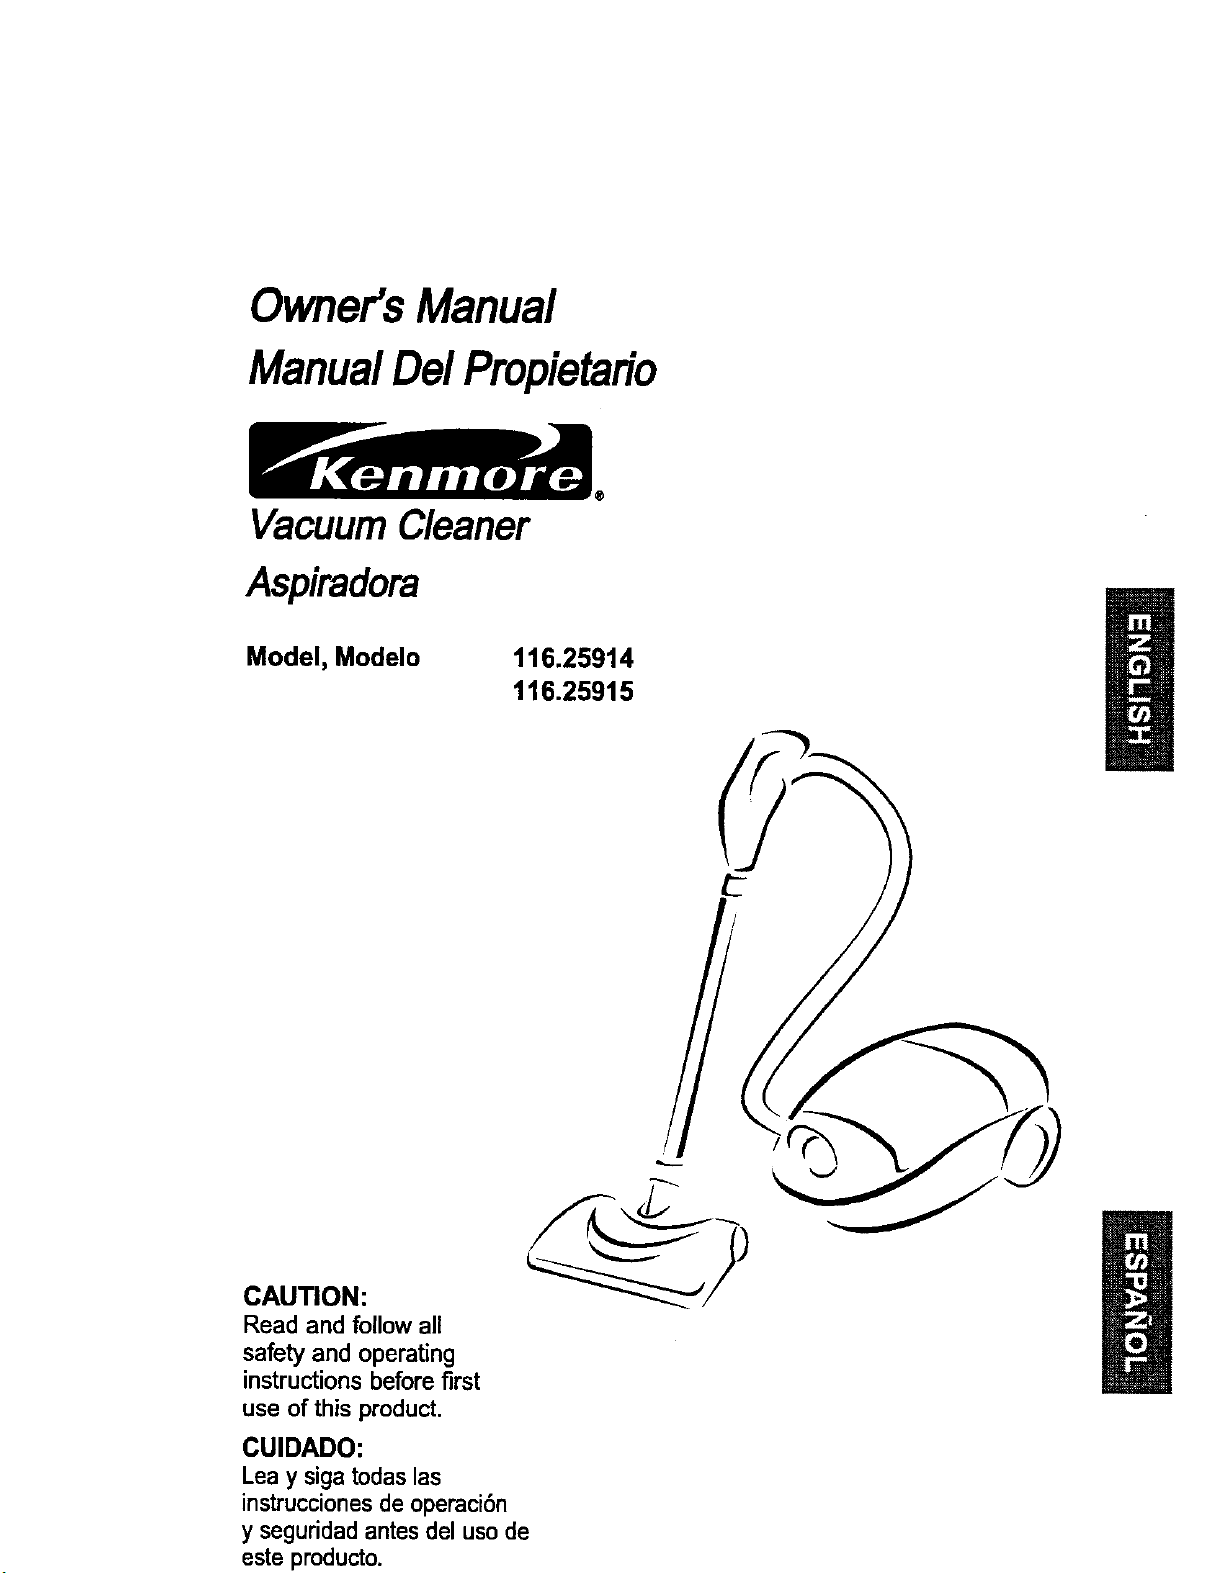
Owner's Manual
ManualDe/Propietafio
Vacuum Cleaner
Aspiradora
Model, Modelo
116.25914
116.25915
CAUTION:
Read and follow all
safety and operating
instructionsbefore first
use of this product.
CUIDADO:
Leay sigatodaslas
instruccionesde operaci6n
y seguridadantesdel usode
este producto.
Before Using Your New
Vacuum Cleaner .................... 2
Kenmore Vacuum Cleaner Warranty . .. 2
Important Safety Instructions ......... 3
Parts and Features ................. 4-5
Assembly Instructions ............. 6-7
Power-Mate Jr." Storage .............. 7
Operating Instructions ............... 8
How to Start ........................ 8
Vacuuming Tips .................... 10
Suggested Pile Height Settings ........ 11
Attachments ....................... 11
Attachment Use Table ............... 12
Performance Features ............. 12-14
How Your Vacuum Cleaner Works ....... 14
Canister Care ...................... 15
Bag Changing ..................... 15
Cleaning Exteriorand Attachments ..... 15
MotorSafety Filter Changing .......... 16
ExhaustFilter Changing .............. 17
Power-Mate* Care .................. 17
Dirt Sensor ........................ 18
Belt ChangingandAgitatorCleaning .. 18-19
LightBulbChanging ................. 20
AgitatorServicing ................... 20
Troubleshooting .................... 21
Requesting Assistance
Or Service .................. Back Cover
Please read this guide. It will help you assemble and operate your new Kenmore vacuum
cleaner in the safest and most effective way.
For more information about vacuum cleaner care and operation, call your nearest Sears store.
You will need the complete model and serial numbers when requesting information. Your vacu-
um cleaner's model and sedal numbers are located on the Model and Serial Number Plate.
Use the space belowto record the model numberand serial number of your new Kenmore
vacuum cleaner.
Model No.
Serial No.
Date of Purchase
Keep this book and your sales check (receipt) in a safe place for future reference.
LIMITED ONEYEARWARRANTY ON KENMORE VACUUM CLEANER
This warranty is for one year from the date of purchase, and includes only private household
vacuum cleaner use. During the warranty year, when this vacuum cleaner is operated and
maintained according to the owner's manual instructions, Sears will repair any defects in
material or workmanship free of charge.
This warranty excludes vacuum bags, belts, light bulbs, and filters, which are expendable parts
and become worn during normal use.
For warranty service, return this vacuum cleaner to the nearest Sears Service Center in
the United States.
This warranty applies only while this product is in use in the United States. This warranty gives
you specific legal rights, and you may also have other rights which vary from state to state.
Sears, Roebuck and Co., D/817 WA, Hoffman Estates, IL 60179
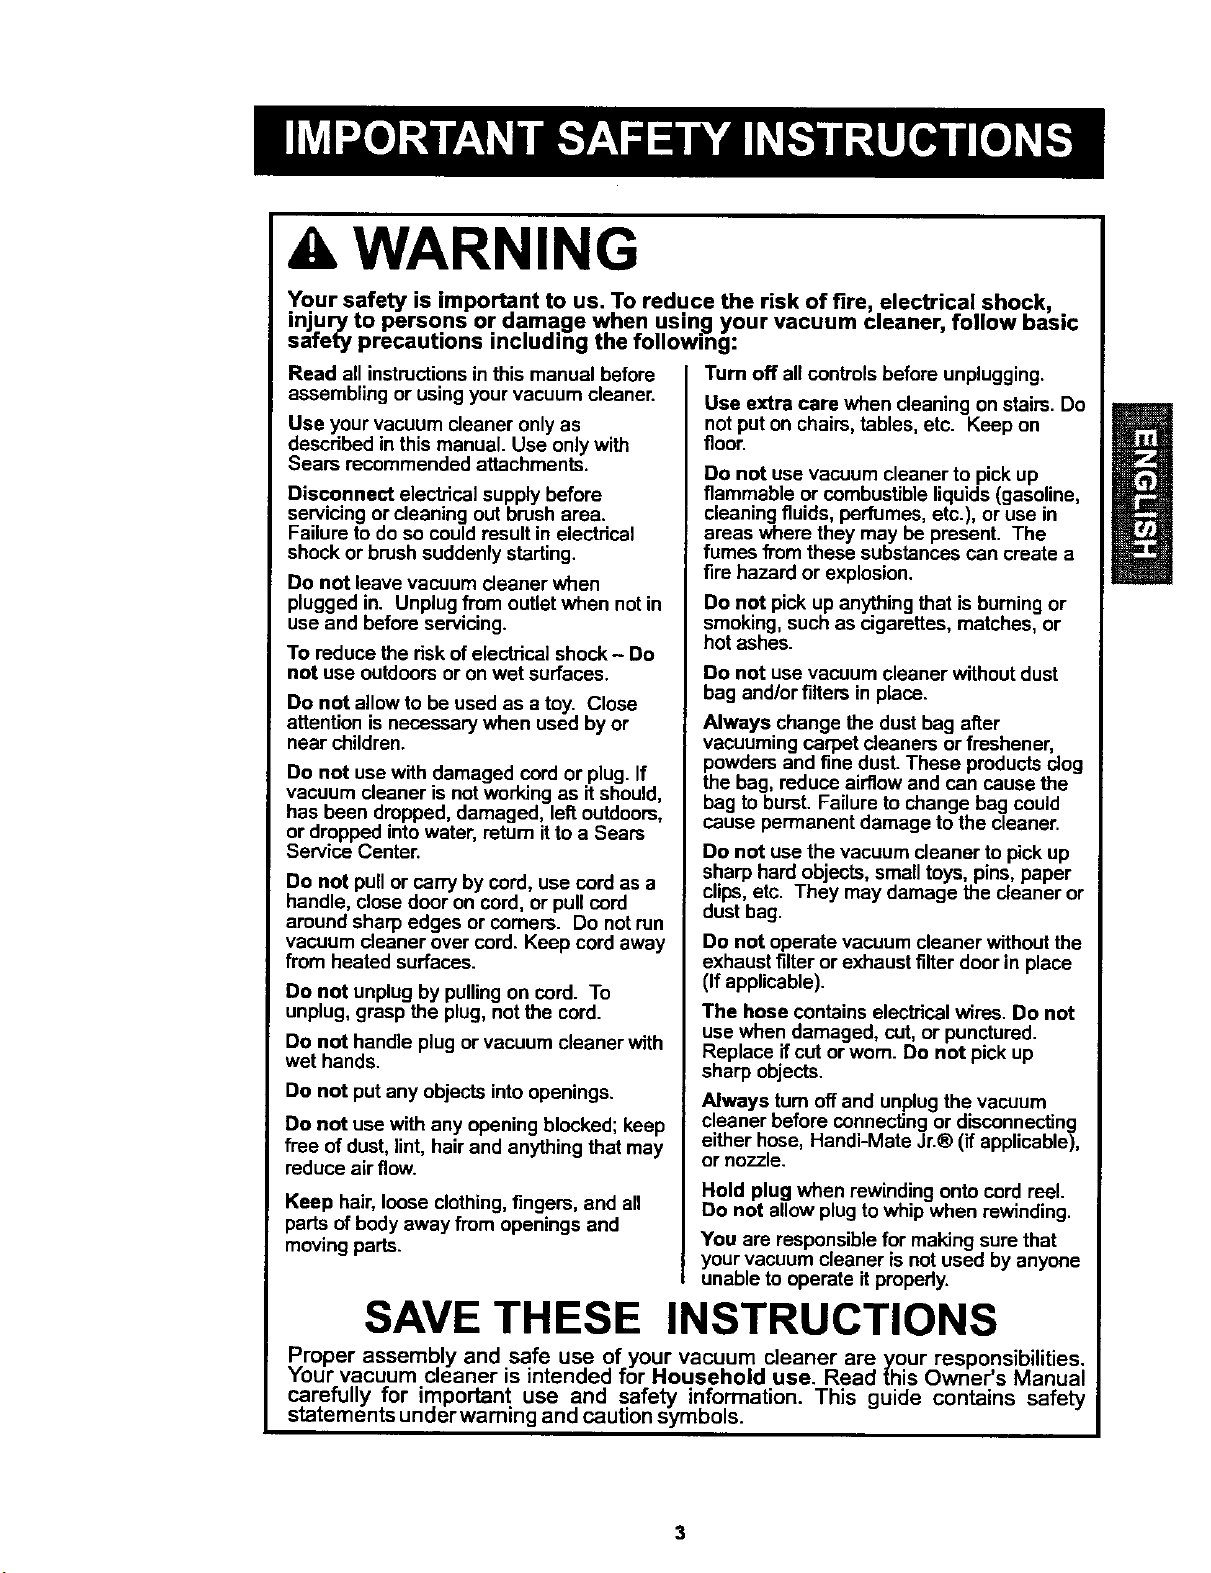
A WARNING
Your safety is important to us. To reduce the risk of fire electrical shock,
injury to persons or damage when usin.g your vacuum cleaner, follow basic
safety precautions including the following:
Read all instructionsin this manual before
assembling or using your vacuum cleaner.
Use your vacuum cleaner onlyas
described in this manual. Use onlywith
Sears recommended attachments.
Disconnect electrical supply before
servicing or cleaning out brush area.
Failure to do so could result in electrical
shock or brush suddenly starting.
Do not leave vacuum cleaner when
plugged in. Unplug from outlet when not in
use and before servicing.
To reduce the risk ofelectrical shock - Do
not use outdoors or on wet surfaces.
Do not allowto be used as a toy. Close
attention is necessary when used by or
near children.
Do not use with damaged cord or plug. If
vacuum cleaner is not working as itshould,
has been dropped, damaged, leftoutdoors,
or dropped into water, return itto a Sears
Service Center.
Do not pull or carry by cord, use cord as a
handle, close door on cord, or pull cord
around sharp edges or comers. Do notrun
vacuum cleaner over cord. Keep cord away
from heated surfaces.
Do not unplug by pullingon cord. To
unplug, grasp the plug,not the cord.
Do not handle plug or vacuum cleaner with
wet hands.
Do not put any objects into openings.
Do not use with any opening blocked; keep
free of dust, lint, hair and anything that may
reduce air flow.
Keep hair, loose clothing,fingers, and all
_arts of body away from openings and
moving parts.
SAVE THESE
Turn off all controls before unplugging.
Use extra care when cleaning on stairs. Do
not put on chairs, tables, etc. Keep on
foor.
Do not use vacuum cleaner to pick up
flammable or combustible liquids (gasoline,
cleaningfluids, perfumes, etc.), or use in
areas where they may be present. The
fumes from these substances can create a
fire hazard or explosion.
Do not pick up anything that is burningor
smoking, such as cigarettes, matches, or
hot ashes.
Do not use vacuum cleaner without dust
bag and/or filters in place.
Always change the dust bag after
vacuuming carpet cleaners or freshener,
powders and fine dust. These productsclog
the bag, reduce airflow and can cause the
bag to burst. Failure to change bag could
cause permanent damage to the cleaner.
Do not use the vacuum cleaner to pick up
sharp hard objects, small toys, pins, paper
clips, etc. They may damage the cleaner or
dust bag.
Do not operate vacuum cleaner without the
exhaust filter or exhaust filter door in place
(If applicable).
The hose contains electrical wires. Do not
use when damaged, cot, or punctured.
Replace if cut or worn. Do not pick up
sharp objects.
Always tum oftand unplug the vacuum
cleaner before connecting or disconnecting
either hose, Handi-Mata Jr,® (if applicable),
or nozzle.
Hold plug when rewinding onto cord reel.
Do not allow plug to whip when rewinding.
You are responsiblefor making sure that
yourvacuum cleaner is not used byanyone
unable to operate it properly.
INSTRUCTIONS
Proper assembly and safe use of your vacuum cleaner are your responsibilities.
Your vacuum cleaner is intended for Household use. Read this Owner's Manual
carefully for important use and safety information. This guide contains safety
statements under warning and caution symbols.
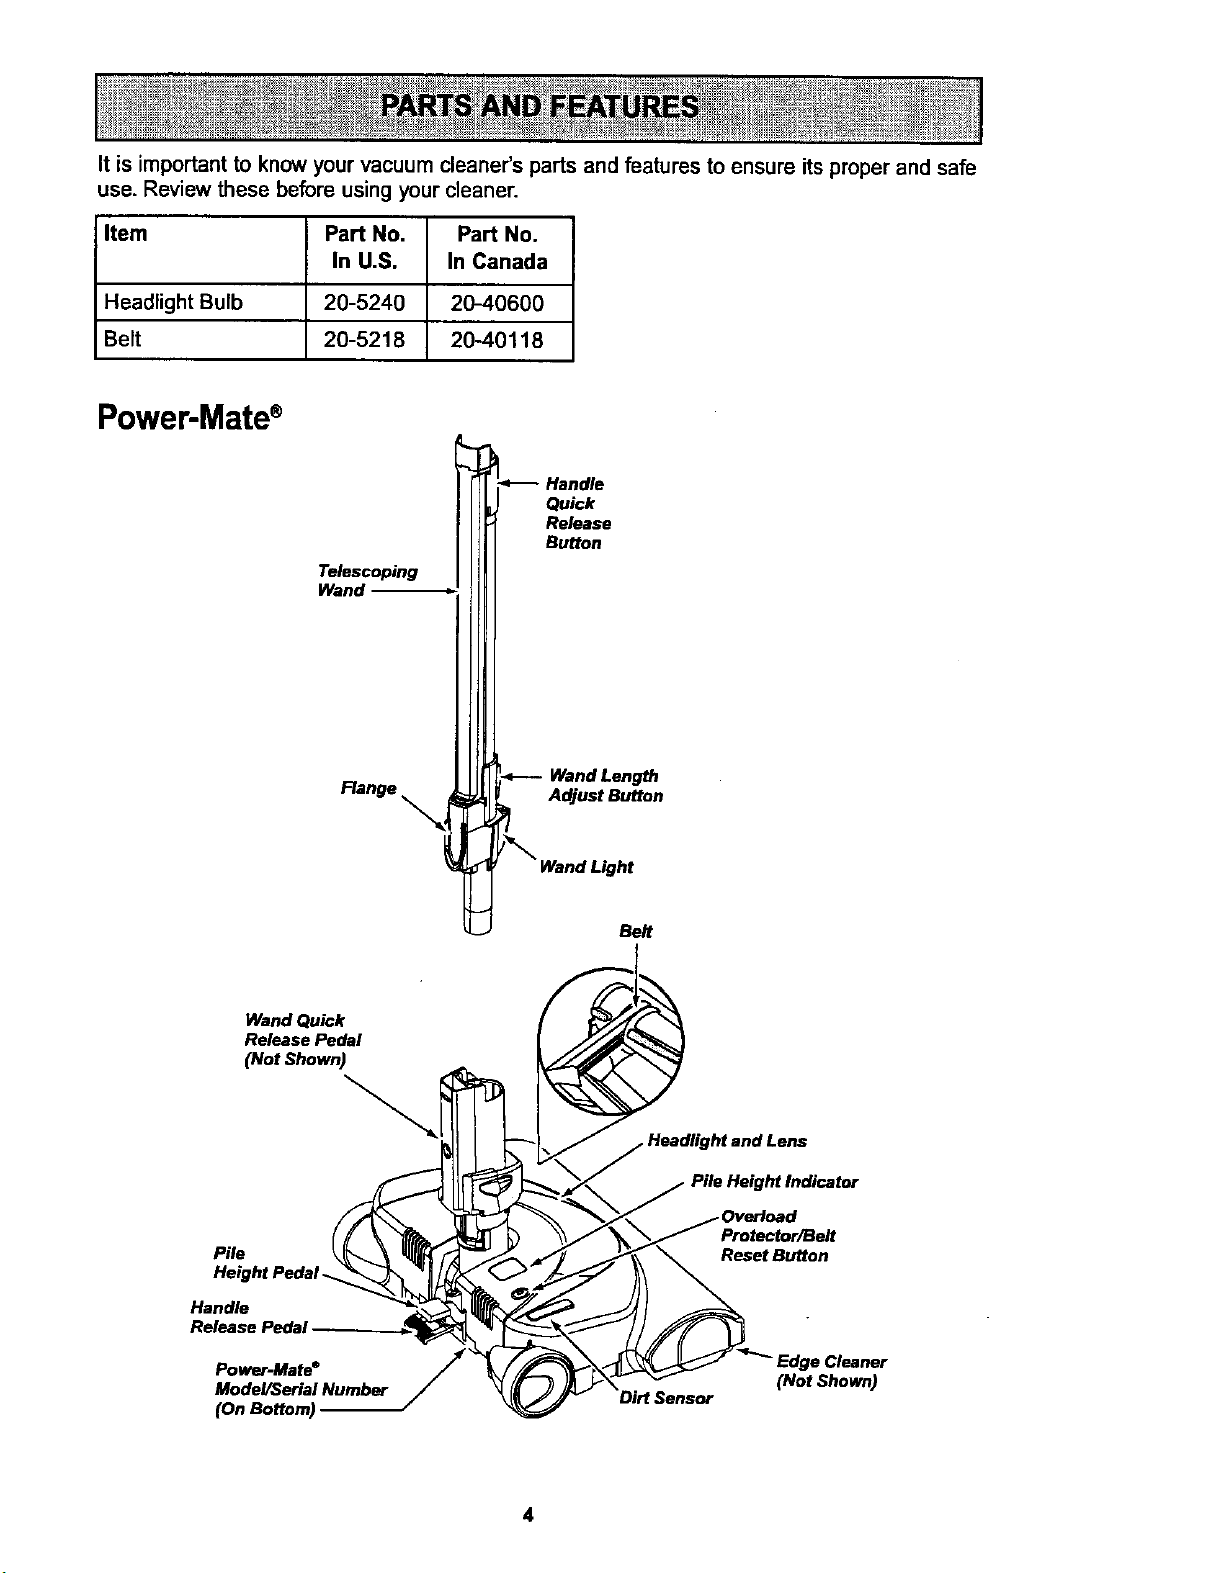
Itis important to know your vacuum cleaner's parts and features to ensure its proper and safe
use. Review these before using your cleaner.
Item Part No. Part No.
In U.S. In Canada
Headlight Bulb 20-5240 2040600
Belt 20-5218 20-40118
Power-Mate®
Telescoping
Wand
Flange
Quick
Release
Button
Wand Length
Adjust Button
Belt
Wand Quick
Release Pedal
(Not Shown)
Pile
Height Pedal.
Handle
Release PedaJ
Power-Mate ®
Model/Serial Number
(OnBottom)
Protector/Belt
Reset Button
Cleaner
(Not Shown)
4
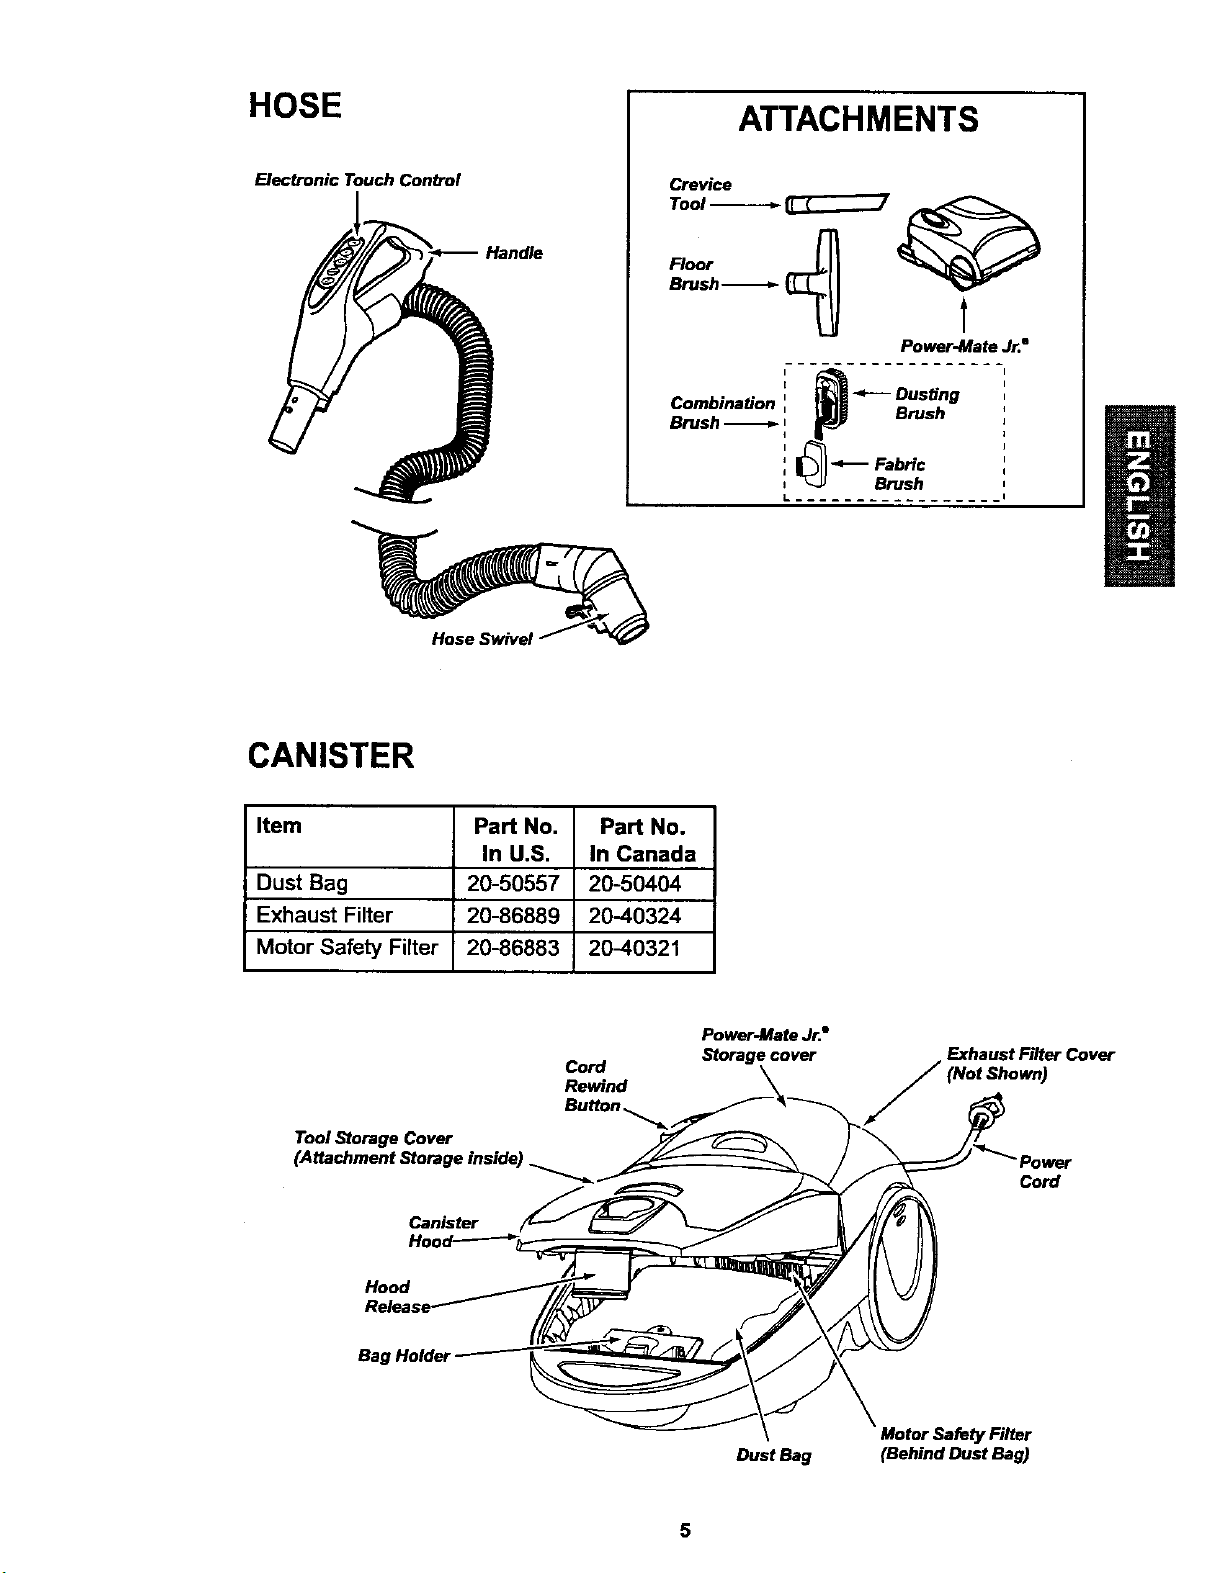
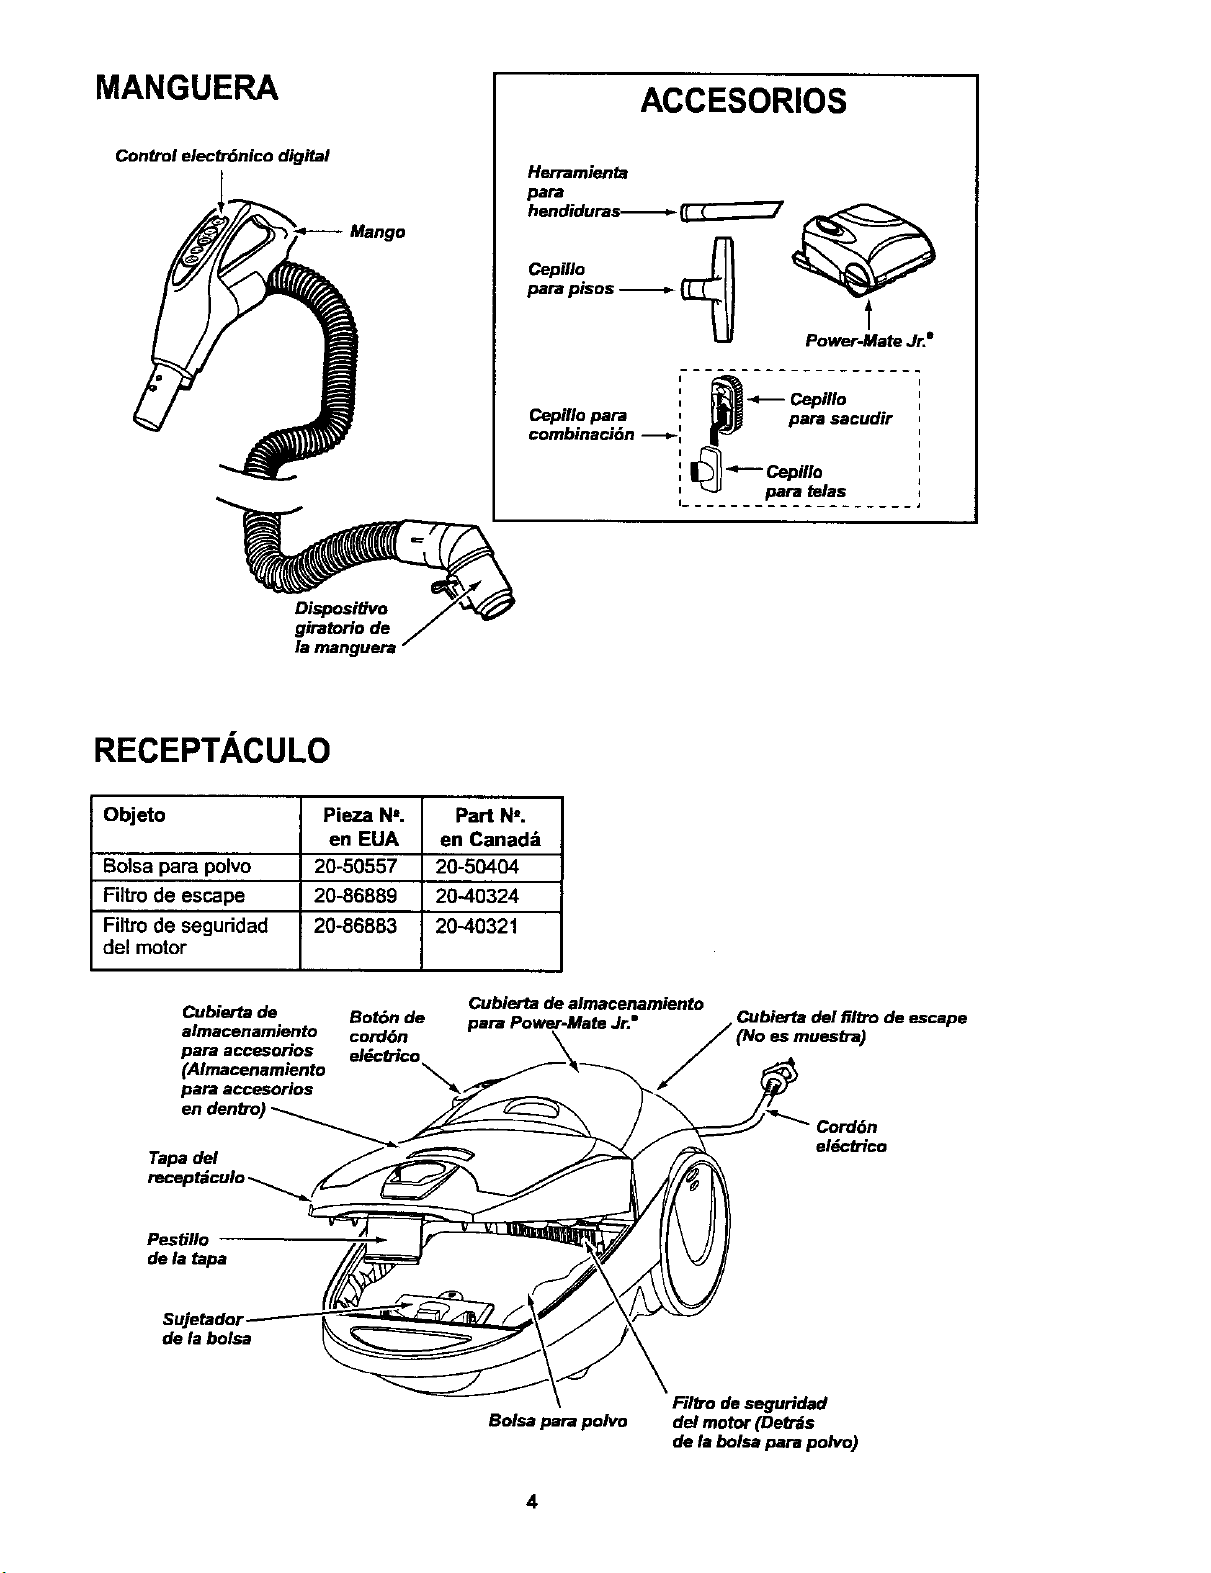
HOSE
Electronic Touch Con_ol
Handle
ATTACHMENTS
Crevice
Tool -_---_ _7
_'ush-----_ _ _
Po_r-Ma_ Jr.8
't _ _ Dusting
Combination ', p.__ Brush
Brush-_ I
i_FabHc
, _-_ Brush
L ---I
Hose Swivel
CANISTER
Item Part No. Part No.
In U.S. In Canada
Dust Bag 20-50557 20-50404
Exhaust Filter 20-86889 2040324
Motor Safety Filter 20-86883 2040321
Cord
Rewind
Power-Mate Jr.•
Storage cover
Exhaust Filter Cover
Tool Storage Cover
Canister
Cord
Hood
Bag
DustBag
Motor Safety Filter
(Behind Dust Bag)
A
Please pay special attention to these hazard alert boxes, and follow any instructions
given. WARNING statements alert you to such dangers as fire, electric shock, burns
I
and personal injury. CAUTION statements alert you to such dangers as personal
injury and/o_ property damage.
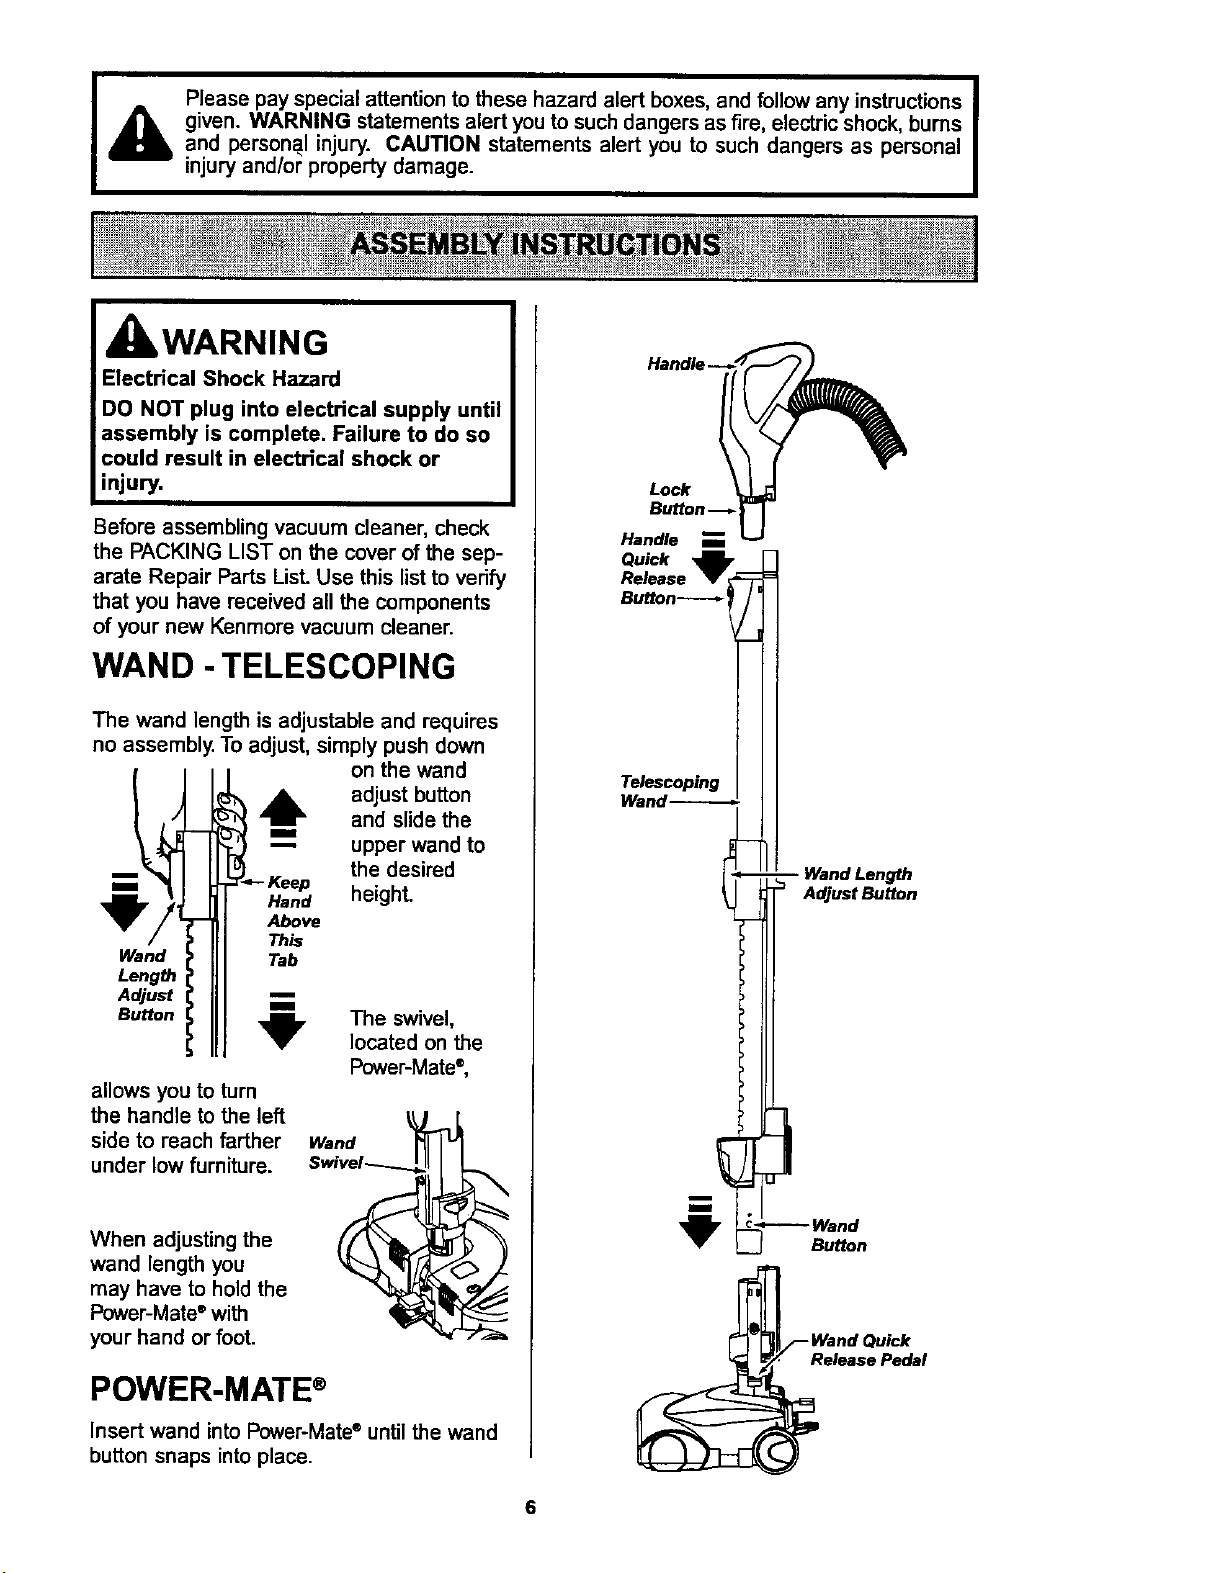
WARNING
Electrical Shock Hazard
DO NOT plug into electrical supply until
assembly is complete. Failure to do so
could result in electrical shock or
injury.
Before assembling vacuum cleaner, check
the PACKING LIST on the cover of the sep-
arate Repair Parts List. Use this list to vedfy
that you have received all the components
of your new Kenmore vacuum cleaner.
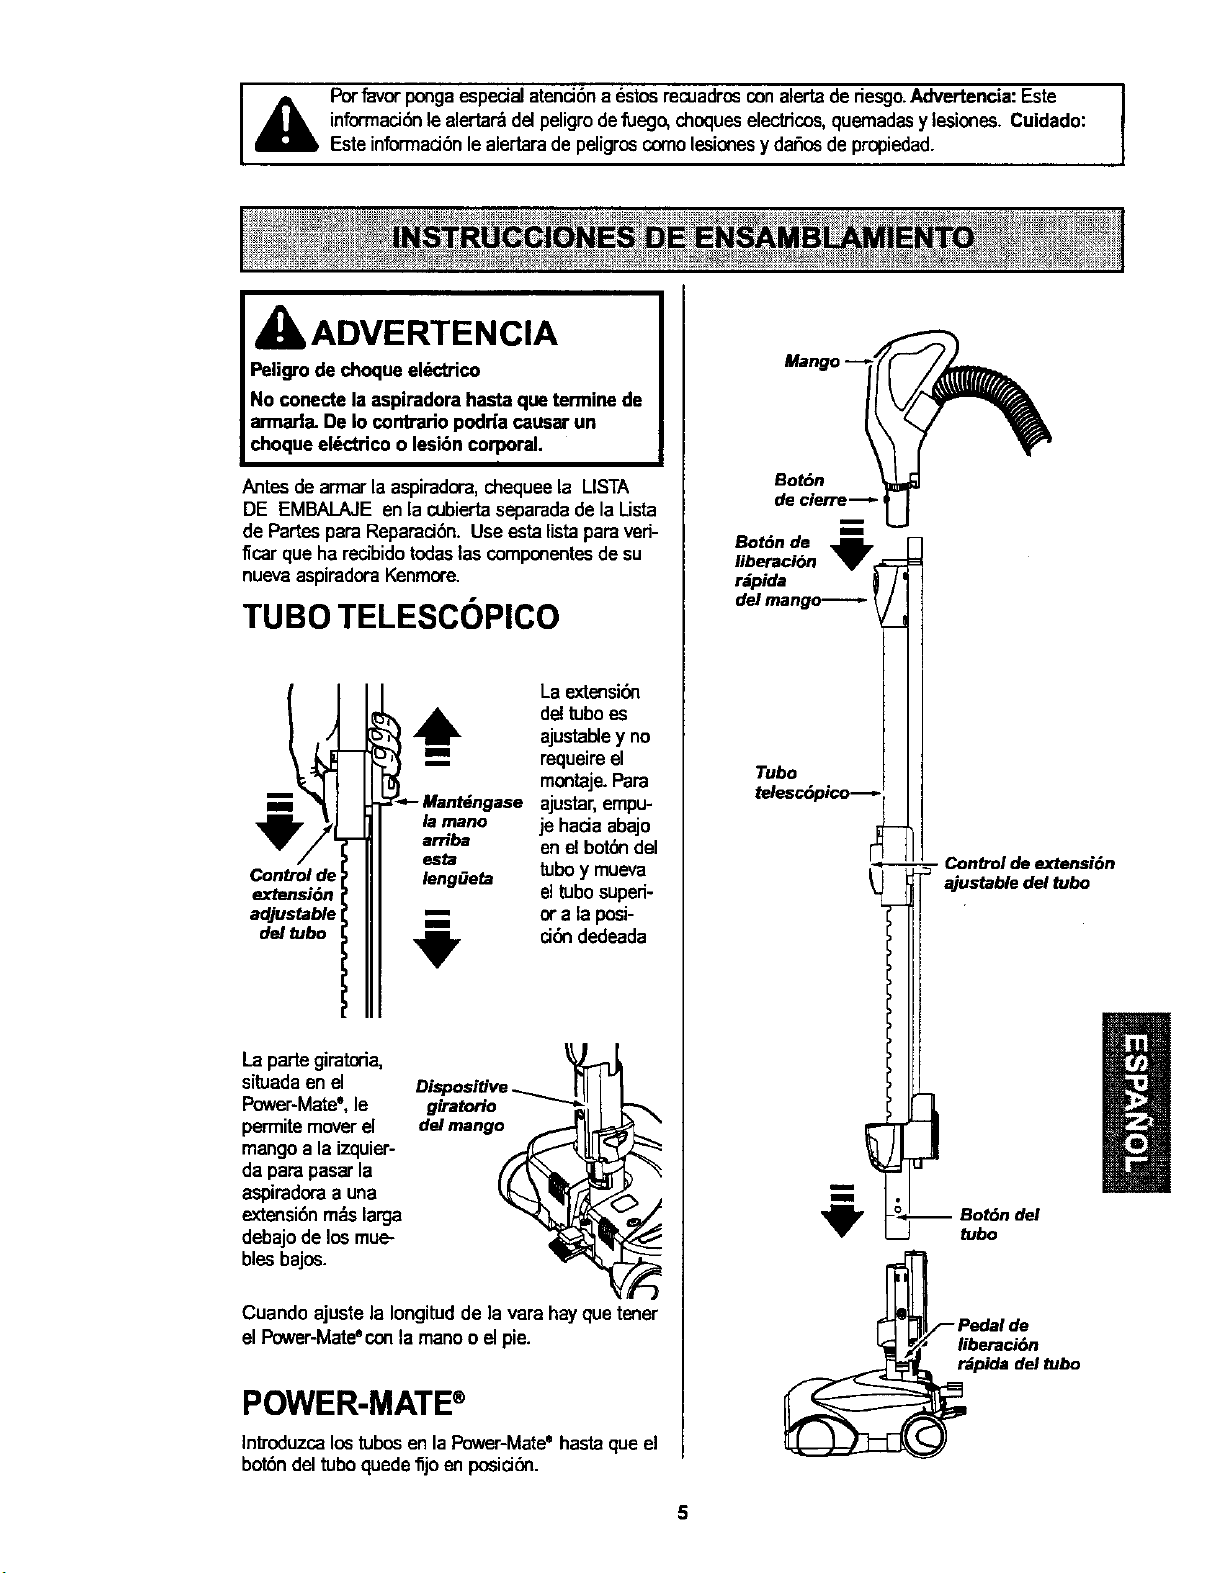
WAND -TELESCOPING
The wand length is adjustable and requires
no assembly. To adjust, simply push down
,__ the desired
height.
Wand
Length
Adjust
Button
on the wand
!_ adjust button
and slide the
" upper wand to
Keep
Hand
Above
This
Tab
,_ The swivel,
located on the
Power-Mate ®,
allows you to turn
the handle to the left
side to reach farther
under low furniture.
Wand
When adjusting the
wand length you
may have to hold the
Power-Mate ®with
your hand or foot.
POWER-MATE ®
Insert wand into Power-Mate* until the wand
button snaps into place.
Lock
Handle
Quick
Release
Telescoping
Wand-----,.-._
AdjustButton
Button
WandQu_k
e_asePedel
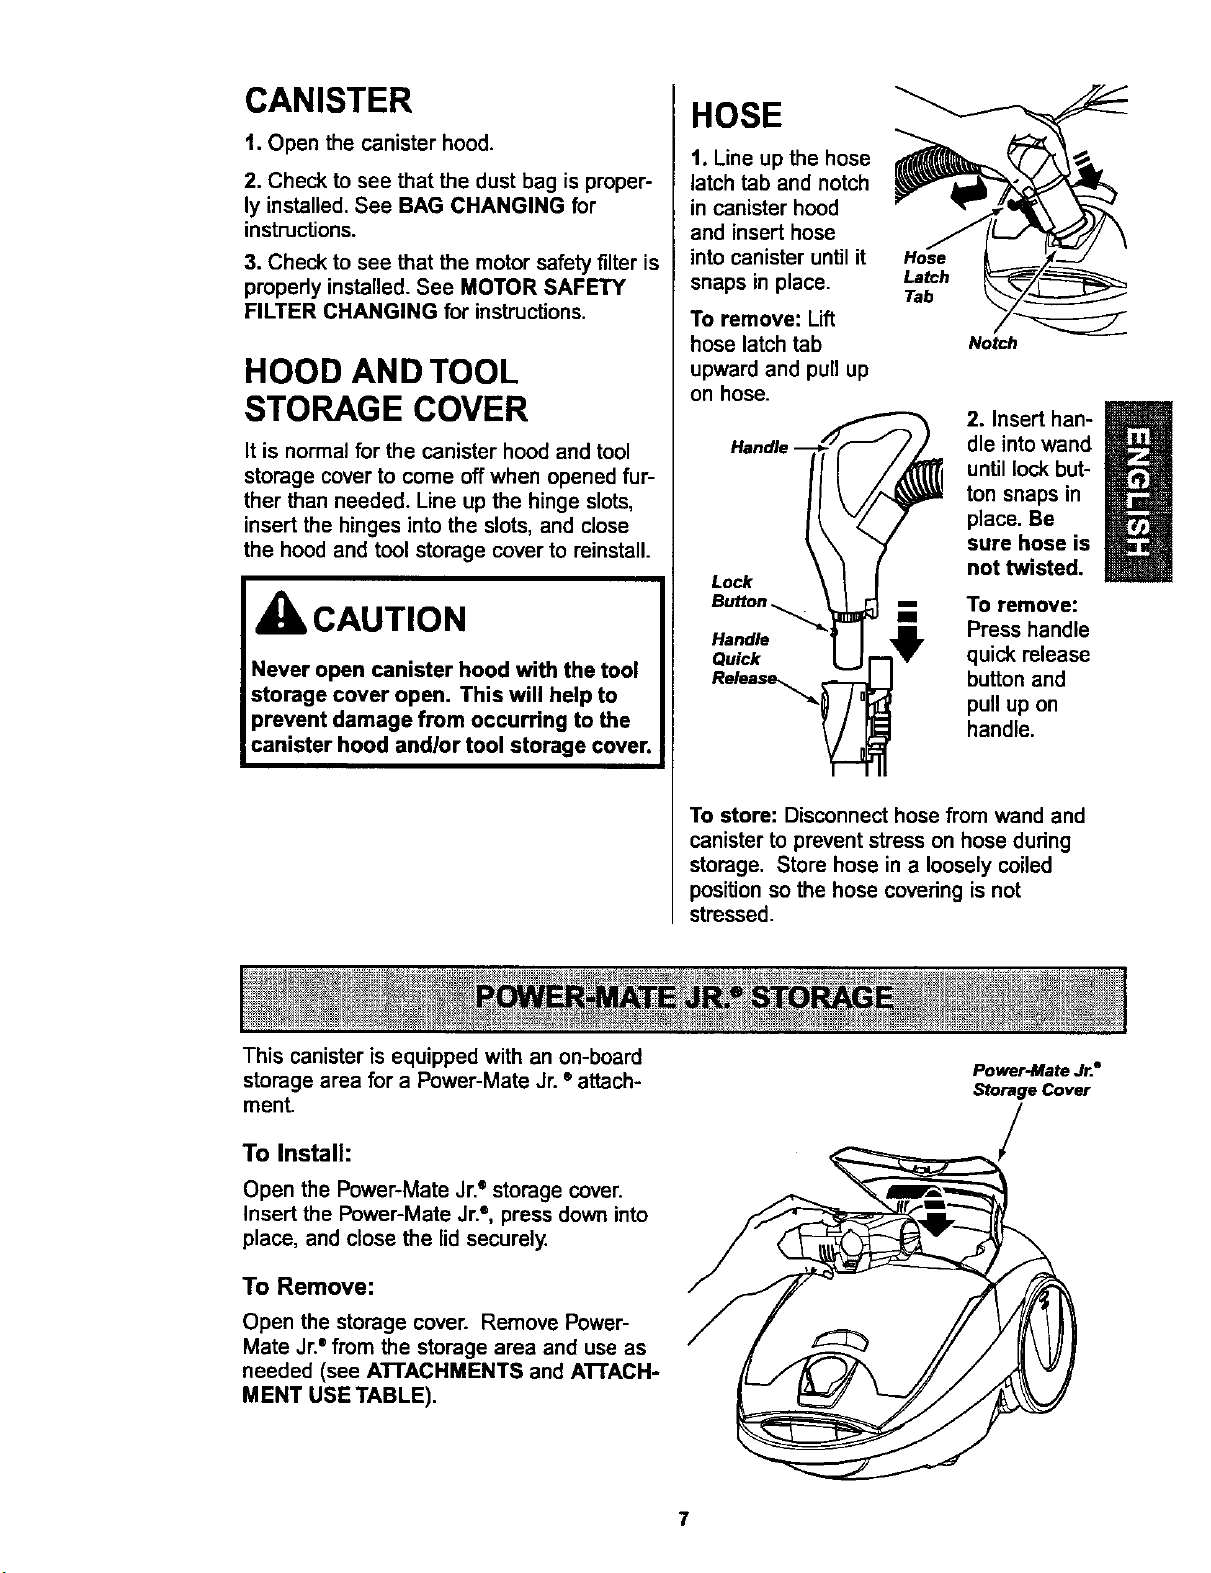
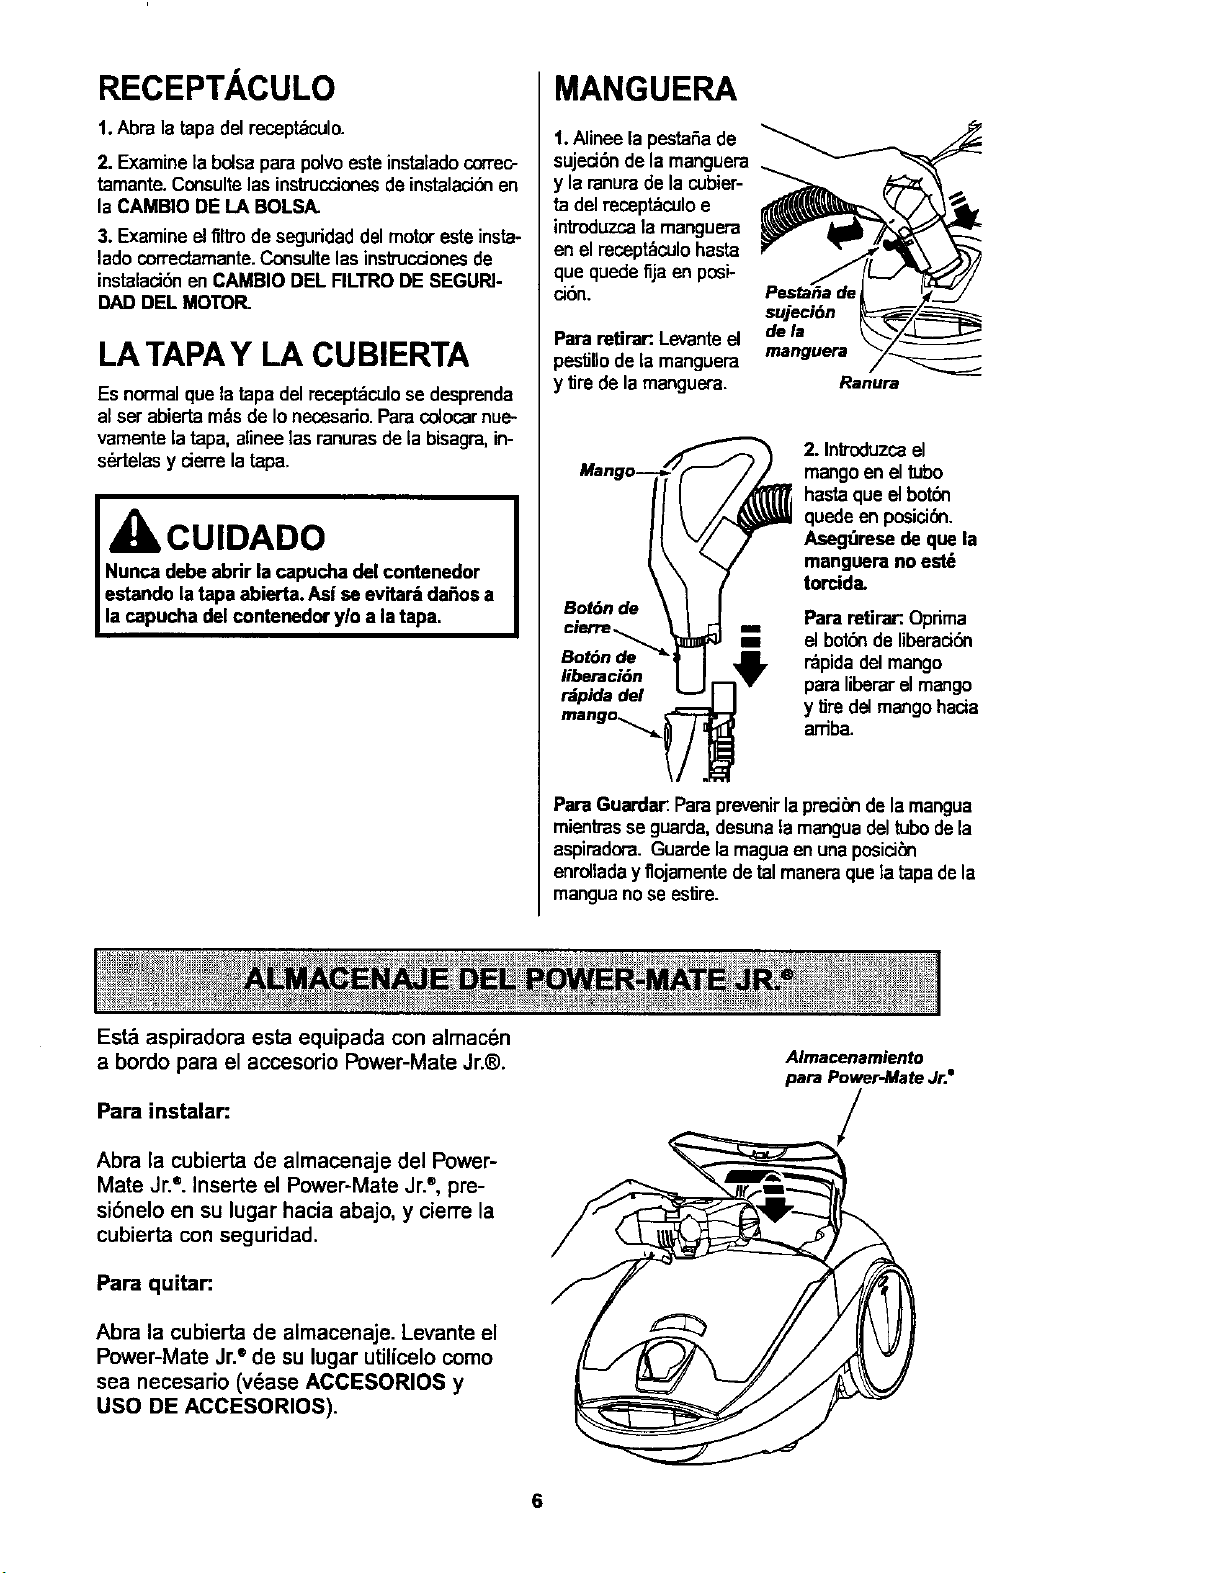
CANISTER
1. Open the canister hood.
2. Check to see that the dust bag is proper-
ly installed. See BAG CHANGING for
instructions.
3. Check to see that the motor safety filter is
properly installed. See MOTOR SAFETY
FILTER CHANGING for instructions.
HOOD AND TOOL
STORAGE COVER
It is normal for the canister hood and tool
storage cover to come off when opened fur-
ther than needed. Line up the hinge slots,
insert the hinges into the slots, and close
the hood and tool storage cover to reinstall.
CAUTION
Never open canister hood with the tool
storage cover open. This will help to
prevent damage from occurring to the
canister hood and/or tool storage cover.
HOSE
t. Line up the hose
latch tab and notch
in canister hood
and insert hose
into canister until it
snaps in place.
To remove: Lift
hose latch tab
upward and pull up
on hose.
Lock
Hose
Latch
Tab
Noah
m
2. Insert han-
dle into wand
until lock but-
ton snaps in
place. Be
sure hose is
not twisted.
To remove:
Handle Press handle
Quick quick release
Release_ button and
pull up on
handle.
To store: Disconnect hose from wand and
canister to prevent stress on hose during
storage. Store hose in a loosely coiled
position so the hose covedng is not
stressed.
This canister is equipped with an on-board
storage area for a Power-Mate Jr. ®attach-
ment.
To Install:
Open the Power-Mate Jr.e storage cover.
Insert the Power-Mate Jr.e, press down into
place, and close the lid securely.
To Remove:
Open the storage cover. Remove Power-
Mate Jr. ° from the storage area and use as
needed (see A'I-rACHMENTS and A'I-rACH-
MENT USE TABLE).
Power-Mate Jr.a
Storage Cover
7
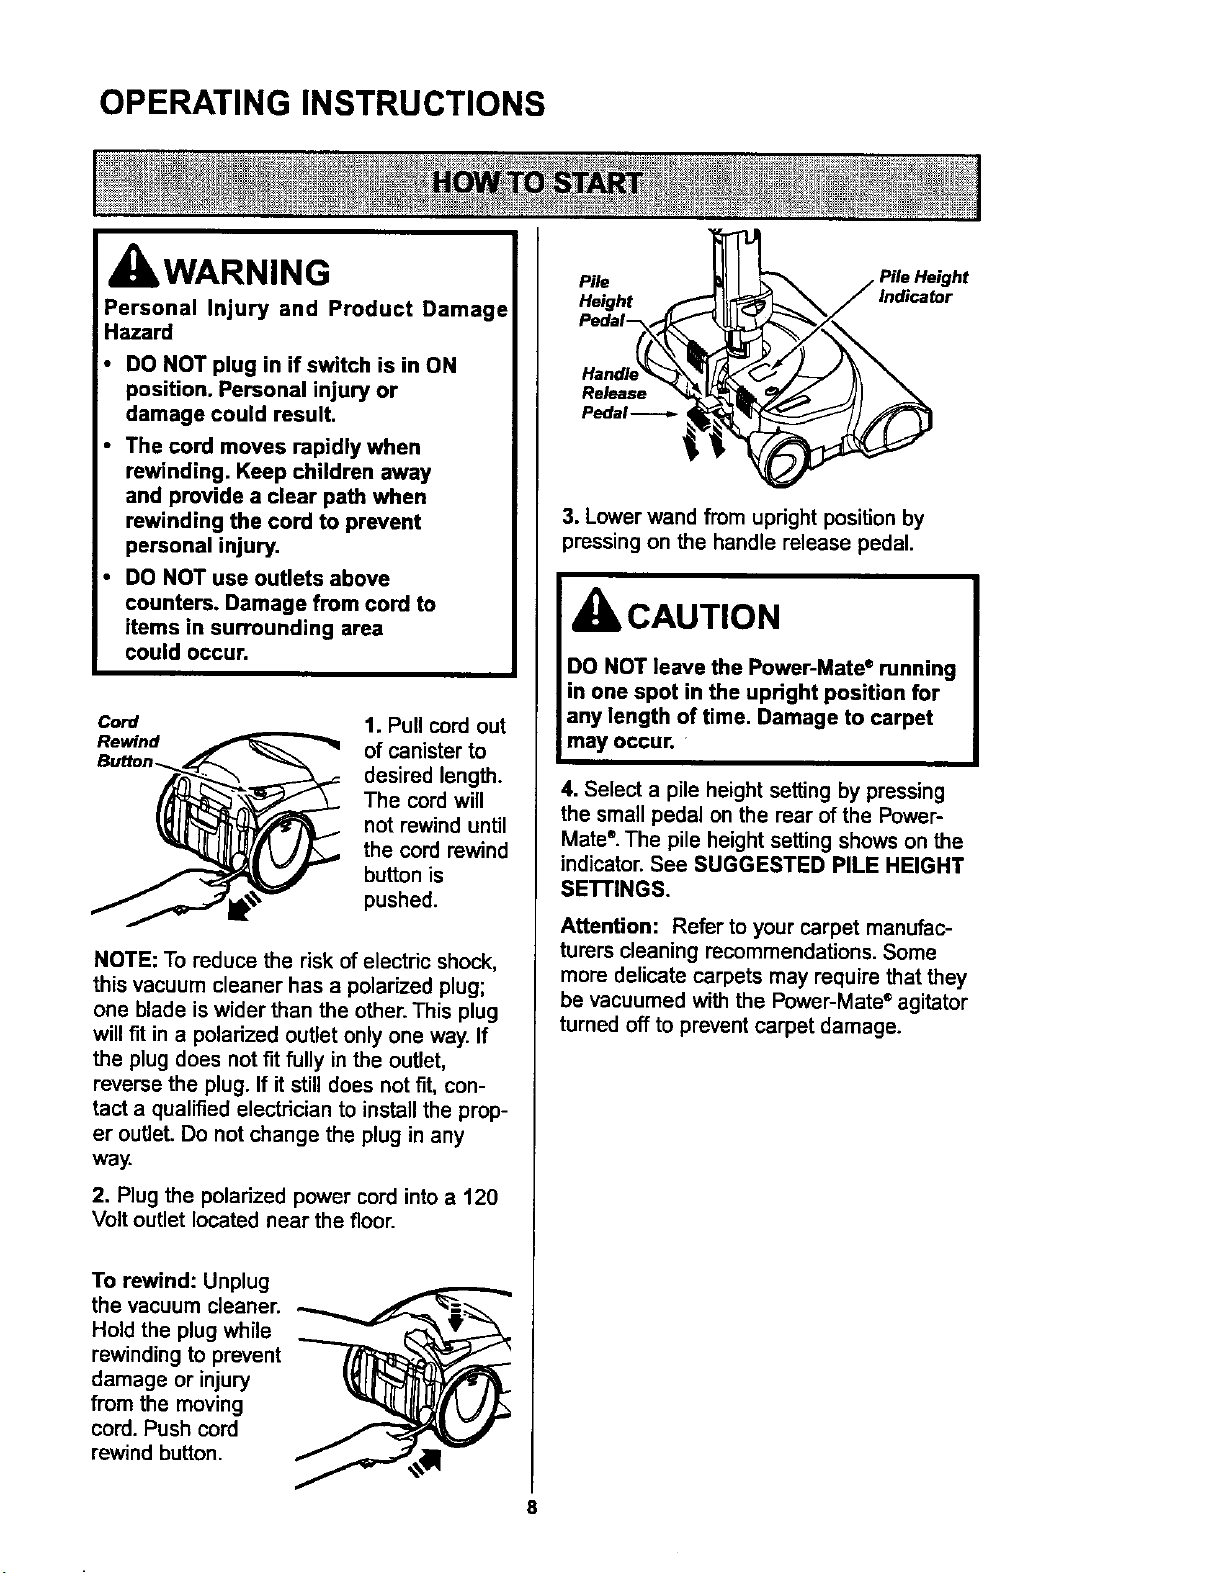
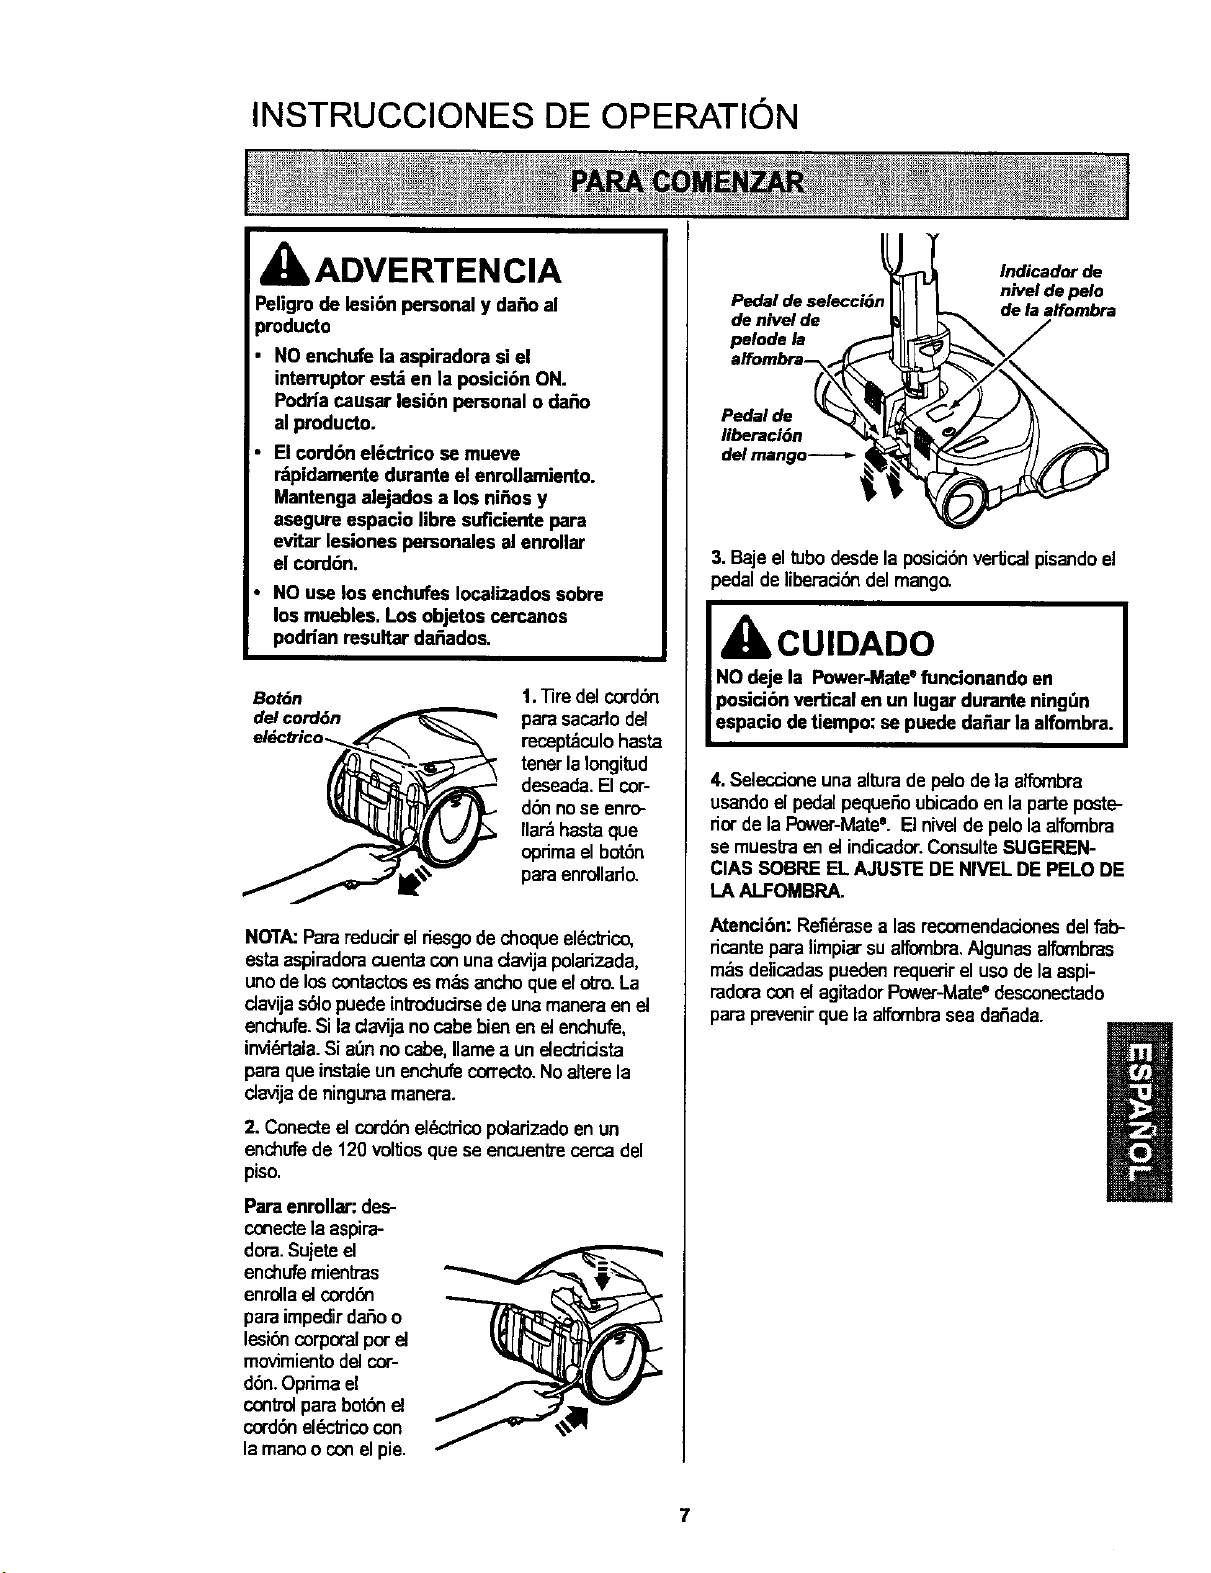
OPERATING INSTRUCTIONS
WARNING
Personal Injury and Product Damage
Hazard
• DO NOT plug in if switch is in ON
position. Personal injury or
damage could result.
• The cord moves rapidly when
rewinding. Keep children away
and provide a clear path when
rewinding the cord to prevent
personal injury.
DO NOT use outlets above
counters. Damage from cord to
items in surrounding area
could occur.
Cord
1. Pull cord out
of canister to
desired length.
The cord will
not rewind until
the cord rewind
button is
pushed.
NOTE: To reduce the risk of electric shock,
this vacuum cleaner has a polarized plug;
one blade is wider than the other. This plug
will fit in a polarized outlet only one way. If
the plug does not fit fully in the outlet,
reverse the plug. If it still does not fit, con-
tact a qualified electrician to install the prop-
er outlet. Do not change the plug in any
way.
2. Plug the polarized power cord into a 120
Volt outlet located near the floor.
To rewind: Unplug
the vacuum cleaner.
Hold the plug while
rewinding to prevent
damage or injury
from the moving
cord. Push cord
rewind button.
Pile
Height ,f
Pedei _
Pedal _
3. Lower wand from upright position by
pressing on the handle release pedal.
CAUTION
DO NOT leave the Power-Mate ®running
in one spot in the upright position for
any length of time. Damage to carpet
may occur.
4. Select a pile height setting by pressing
the small pedal on the rear of the Power-
Mate ®.The pile height setting shows on the
indicator. See SUGGESTED PILE HEIGHT
SE'R'INGS.
Attention: Refer to your carpet manufac-
turers cleaning recommendations. Some
more delicate carpets may require that they
be vacuumed with the Power-Mate ®agitator
turned off to prevent carpet damage.
8
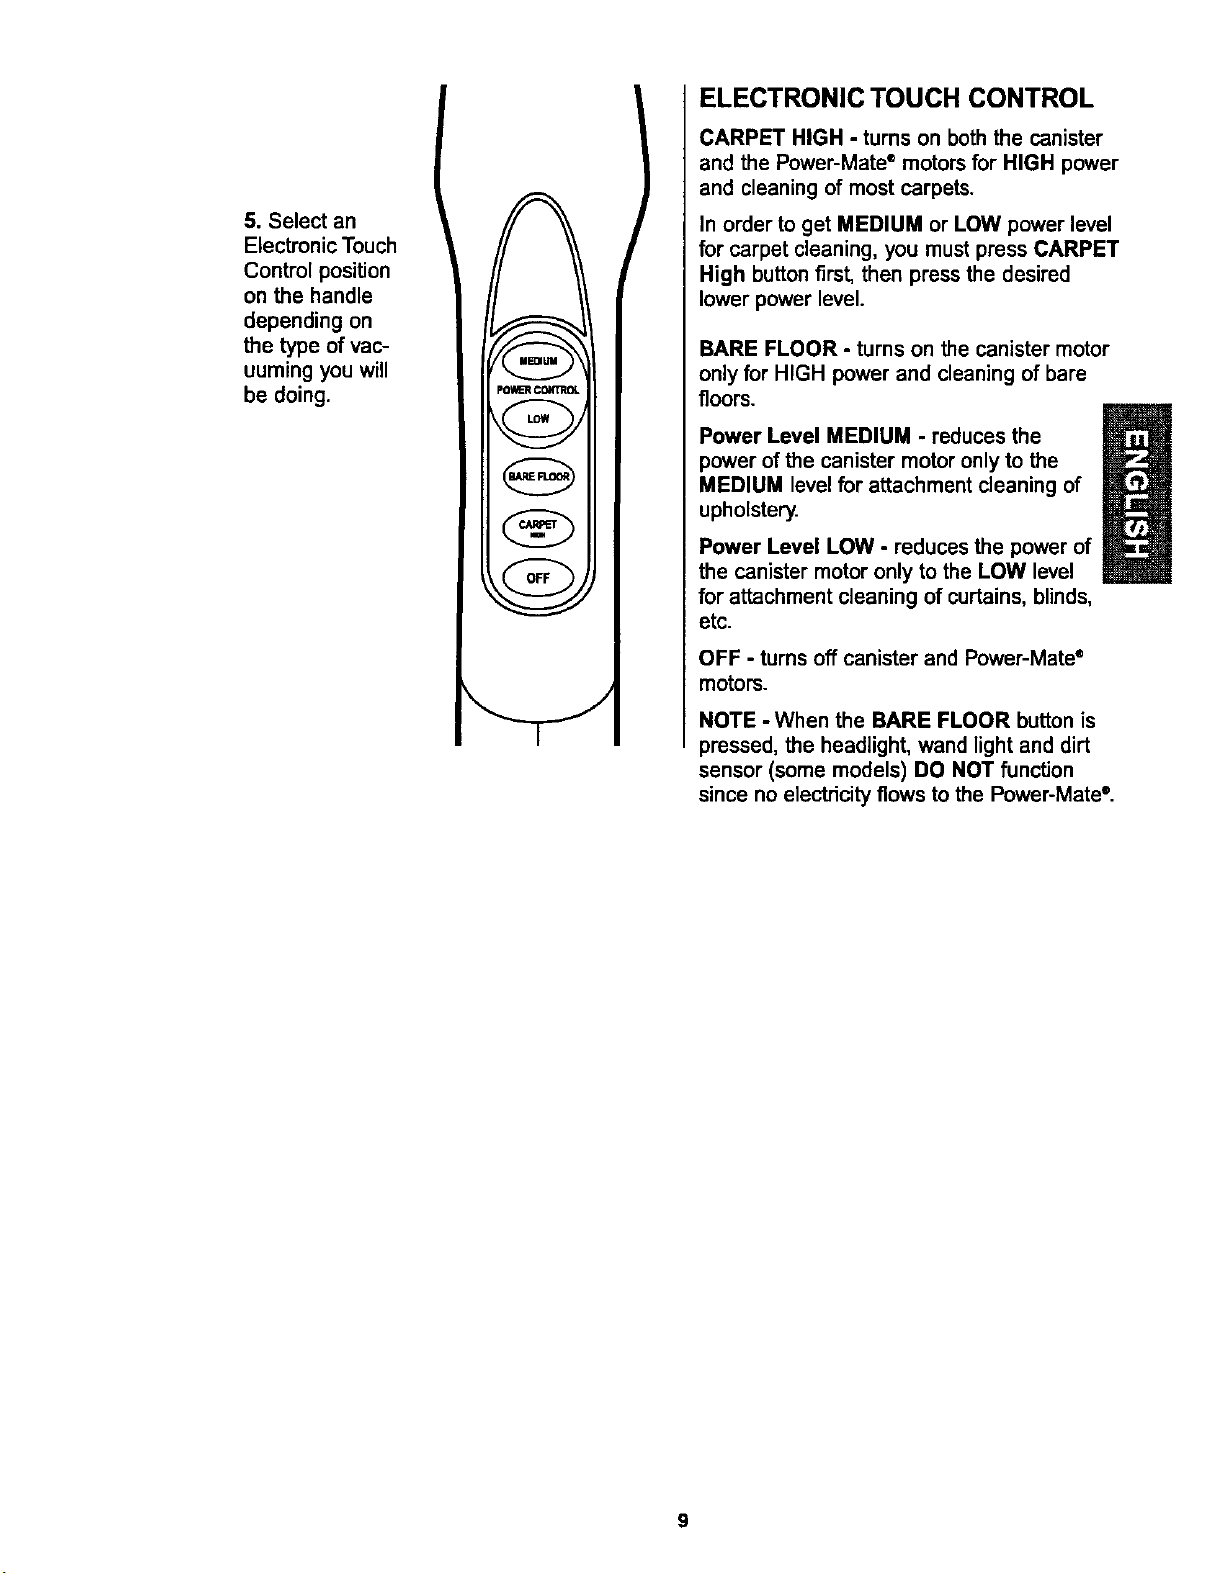
5. Select an
Electronic Touch
Control position
on the handle
depending on
the type of vac-
uuming you will
be doing.
C =aJu="_'_
PO_R CONTROL
I LOW I
v
{_FLOO_)
I RFF )
ELECTRONIC TOUCH CONTROL
CARPET HIGH - turns on both the canister
and the Power-Mate ®motors for HIGH power
and cleaning of most carpets.
In order to get MEDIUM or LOW power level
for carpet cleaning, you must press CARPET
High button first, then press the desired
lower power level.
BARE FLOOR - turns on the canister motor
onlyfor HIGH powerand cleaningof bare
floors.
Power Level MEDIUM - reduces the
power of the canister motor only to the
MEDIUM level for attachment cleaning of
upholstery.
Power Level LOW - reducesthe powerof
the canister motoronly to the LOW level
for attachmentcleaningof curtains,blinds,
etc.
OFF - turns off canister and Power-Mate ®
motors.
NOTE - When the BARE FLOOR button is
pressed, the headlight, wand light and dirt
sensor (some models) DO NOT function
since no electricity flows to the Power-Mate °.
9
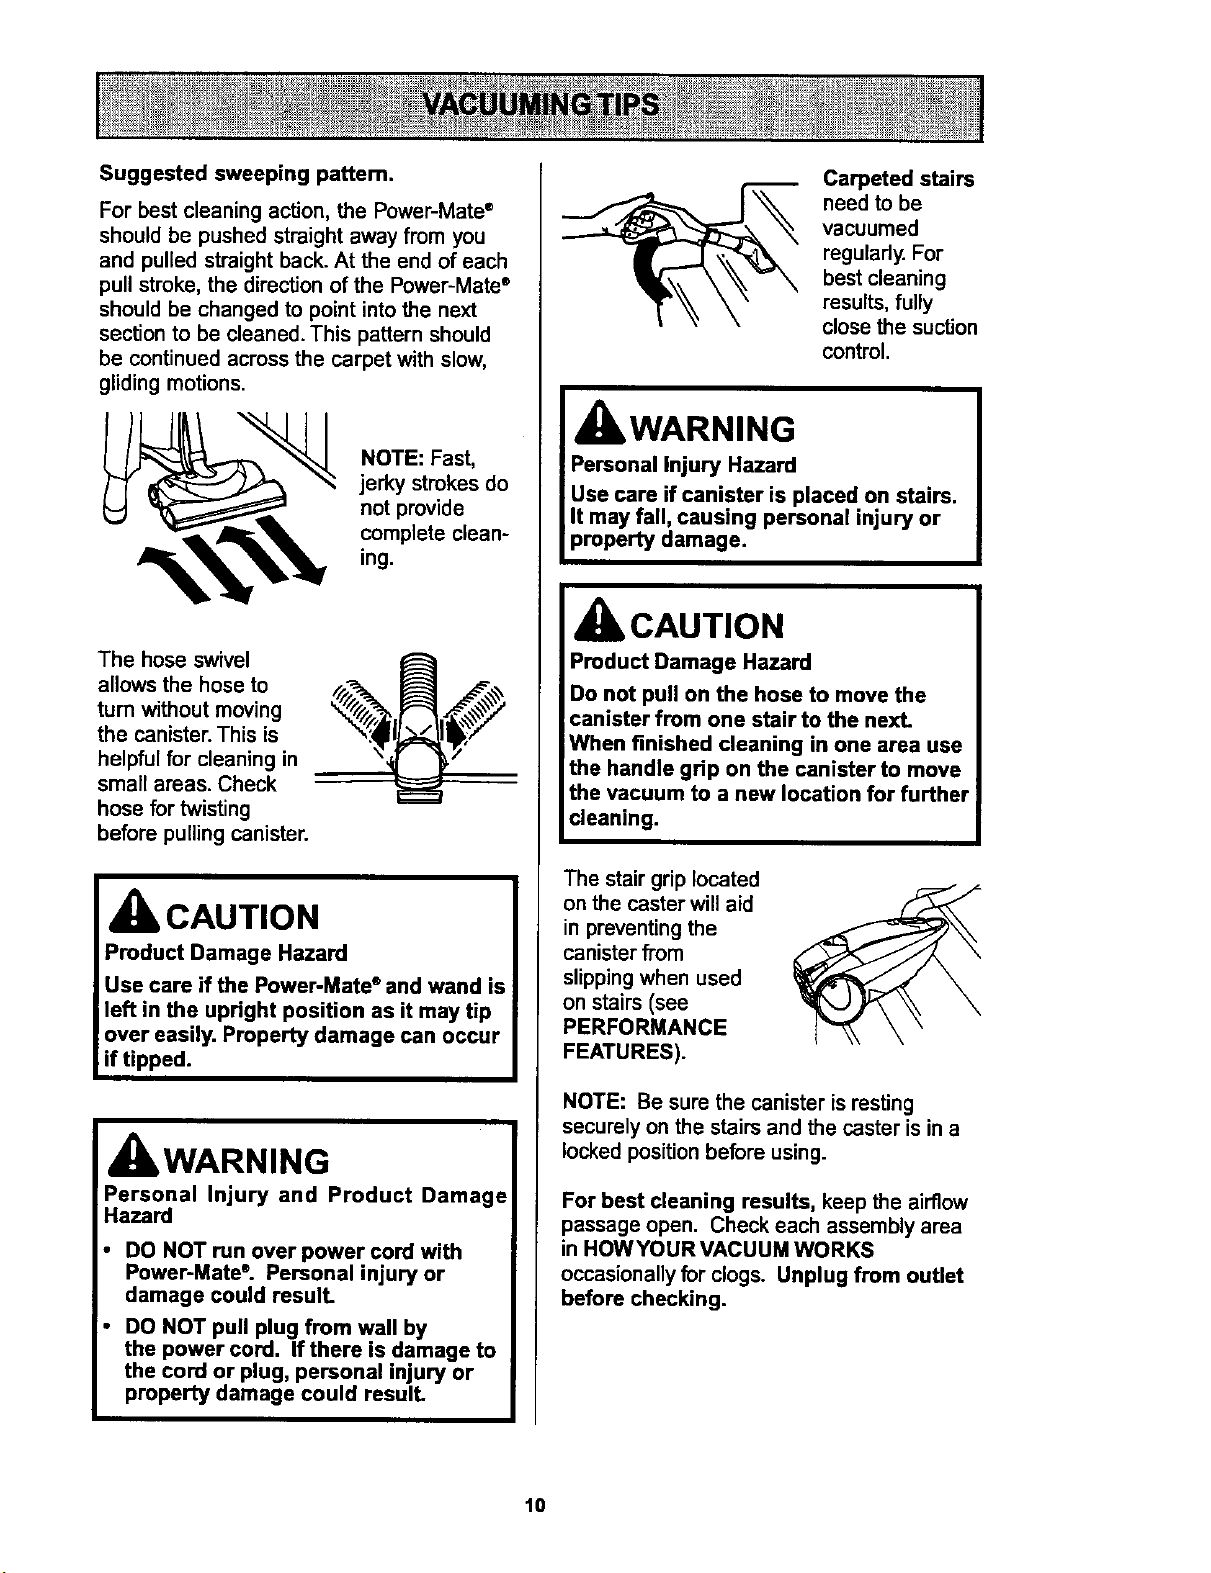
Suggested sweeping pattem.
For best cleaning action, the Power-Mata ®
should be pushed straight away from you
and pulled straight back. At the end of each
pull stroke, the direction of the Power-Mate ®
should be changed to point into the next
section to be cleaned. This pattern should
be continued across the carpet with slow,
gliding motions.
"_ NOTE: Fast,
jerky strokes do
not provide
complete clean-
ing.
The hose swivel
allows the hose to
turn without moving
the canister. This is
helpful for cleaning in
small areas. Check
hose for twisting
before pulling canister.
CAUTION
IWARNING
Personal Injury and Product Damage
Hazard
DO NOT run over power cord with
Power-Mate ®. Personal injury or
damage could result.
DO NOT pull plug from wall by
the power cord. If there is damage to
the cord or plug, personal injury or
property damage could result.
Carpeted stairs
need to be
vacuumed
regulady. For
best cleaning
results, fully
close the suction
control.
WARNING
Personal Injury Hazard
Use care if canister is placed on stairs.
It may fall, causing personal injury or
property damage.
CAUTION
Product Damage Hazard
Do not pull on the hose to move the
canister from one stair to the next.
When finished cleaning in one area use
the handle grip on the canister to move
the vacuum to a new location for further
cleaning.
The stair grip located
on the caster will aid
in preventing the
canister from
slipping when used
on stairs (see
PERFORMANCE
FEATURES).
NOTE: Be sure the canister is resting
securely on the stairs and the caster is in a
locked position before using.
For best cleaning results, keep the airflow
passage open. Check each assembly area
in HOWYOUR VACUUM WORKS
occasionally for clogs. Unplug from outlet
before checking.
10

For best deep down cleaning, use the XLO
setting. However, you may need to raise the
height to make some jobs easier, such as
scatter rugs and some deep pile carpets,
and to prevent the vacuum cleaner from
shutting off. Suggested settings are:
HI - Shag, deep pile, or scatter rugs.
MED - Medium to deep pile.
LO - Low to medium pile.
XLO - Most carpets and bare floors.
CAUTION
ATTACHMENTS ON HANDLE
NOTE: If the
Power-Mate ®is
attached, turn
vacuum clean- Lock A
er off before Handle
II
removing han- Quick i
die from wand. R_Jease--,-
1. Press han-
dle quick
release button
and pull up on
handle.
Upper
i
2. Slide attachments
firmly on handle as
needed. See AI-rACH-
MENT USE.
NOTE:
Dusting
To assemble Brush
dusting brush, __
insert the fabric
brush into the
dusting brush and
press into place. Fabric
Brush
To remove,
_ press latch
, and lift out.
Latch
ATTACHMENTS ON WANDS
1.To
remove
wands from
Power-
Mate e, lock
wands in
straight-up
position.
i Wand
m Quick
Release
ma Pedal
2. Press wand quick
release pedal with foot
and pull the wands
straight up and out of
Power-Mate e.
The Power-Mate e plug
and cord do not have
to be removed to use
attachments on the
wands.
3. Put attach-
ments on _"
wands as need-
ed. See
ATTACHMENT
USE TABLE.
11
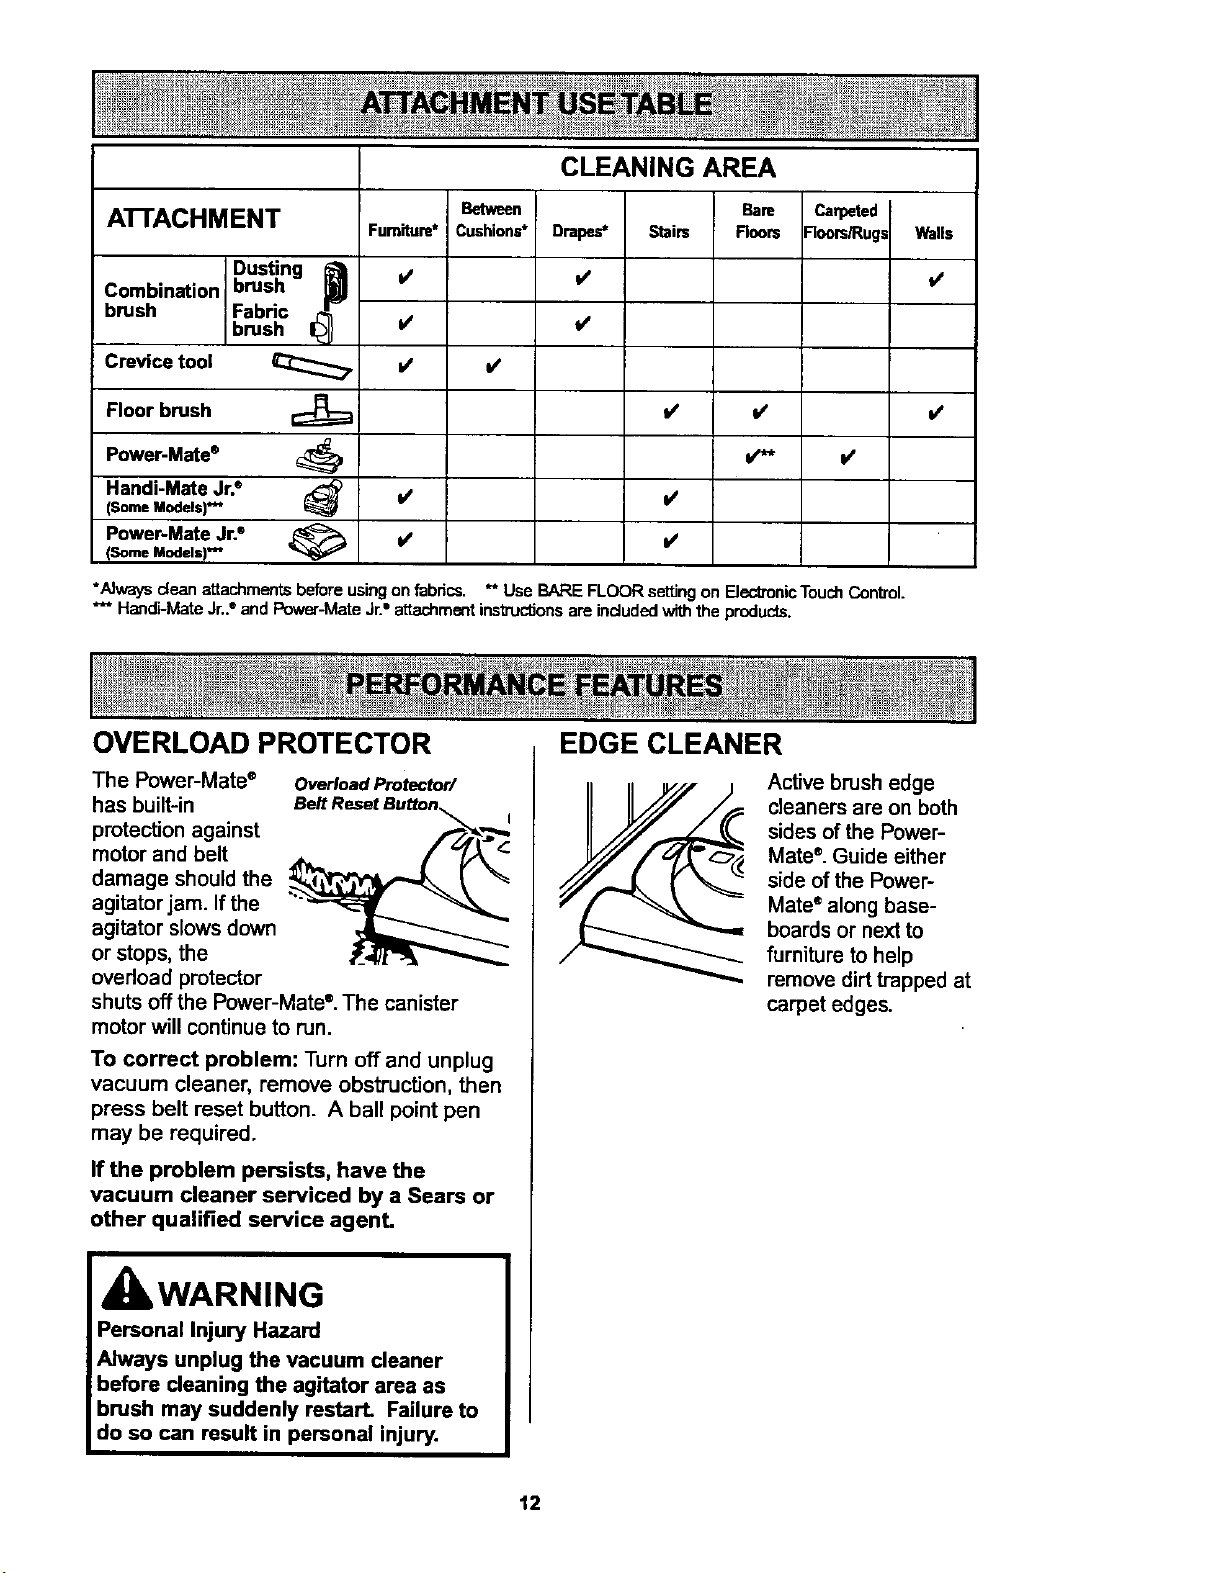
CLEANING AREA
A'I-rACHMENT Between Carpeted
Cushions* -"ioors/Rugs Walls
i/
Dusting I__
Combination brush
brush Fabric
brush
Crevice tool
Floor brush
P°wer-Mate®
Handi-Mate Jr.®
(Some Models)v'*
Power-Mate Jr2
(Some Models) *_
Furniture*
I/
V'
I/
i/
v'
v'
Drapes*
I/
l/
BaRB
Stairs Rears
*Nways clean attachments beforeusingon fabrics. ** Use BARE FLOOR settingon ElectronicTouchControl.
*** Handi-MateJr.2 end Power-MateJr.=attachmentinsb'uctJonsare includedwiththe produc_s.
v'
OVERLOAD PROTECTOR
The Power-Mate ® Overload Protector/
has built-in
protection against
motor and belt
damage should the
agitator jam. If the
agitator slows down
or stops, the
overload protector
shuts off the Power-Mate °. The canister
motor will continue to run,
To correct problem: Turn off and unplug
vacuum cleaner, remove obstruction, then
press belt reset button. A ball point pen
may be required.
If the problem persists, have the
vacuum cleaner serviced by a Sears or
other qualified service agenL
kWARNING
Personal Injury Hazard
Always unplug the vacuum cleaner
before cleaning the agitator area as
brush may suddenly restart. Failure to
do so can result in personal injury.
EDGE CLEANER
Active brush edge
cleaners are on both
sides of the Power-
Mate®. Guide either
side of the Power-
Mate" along base-
boards or next to
furniture to help
remove dirt trapped at
carpet edges.
12
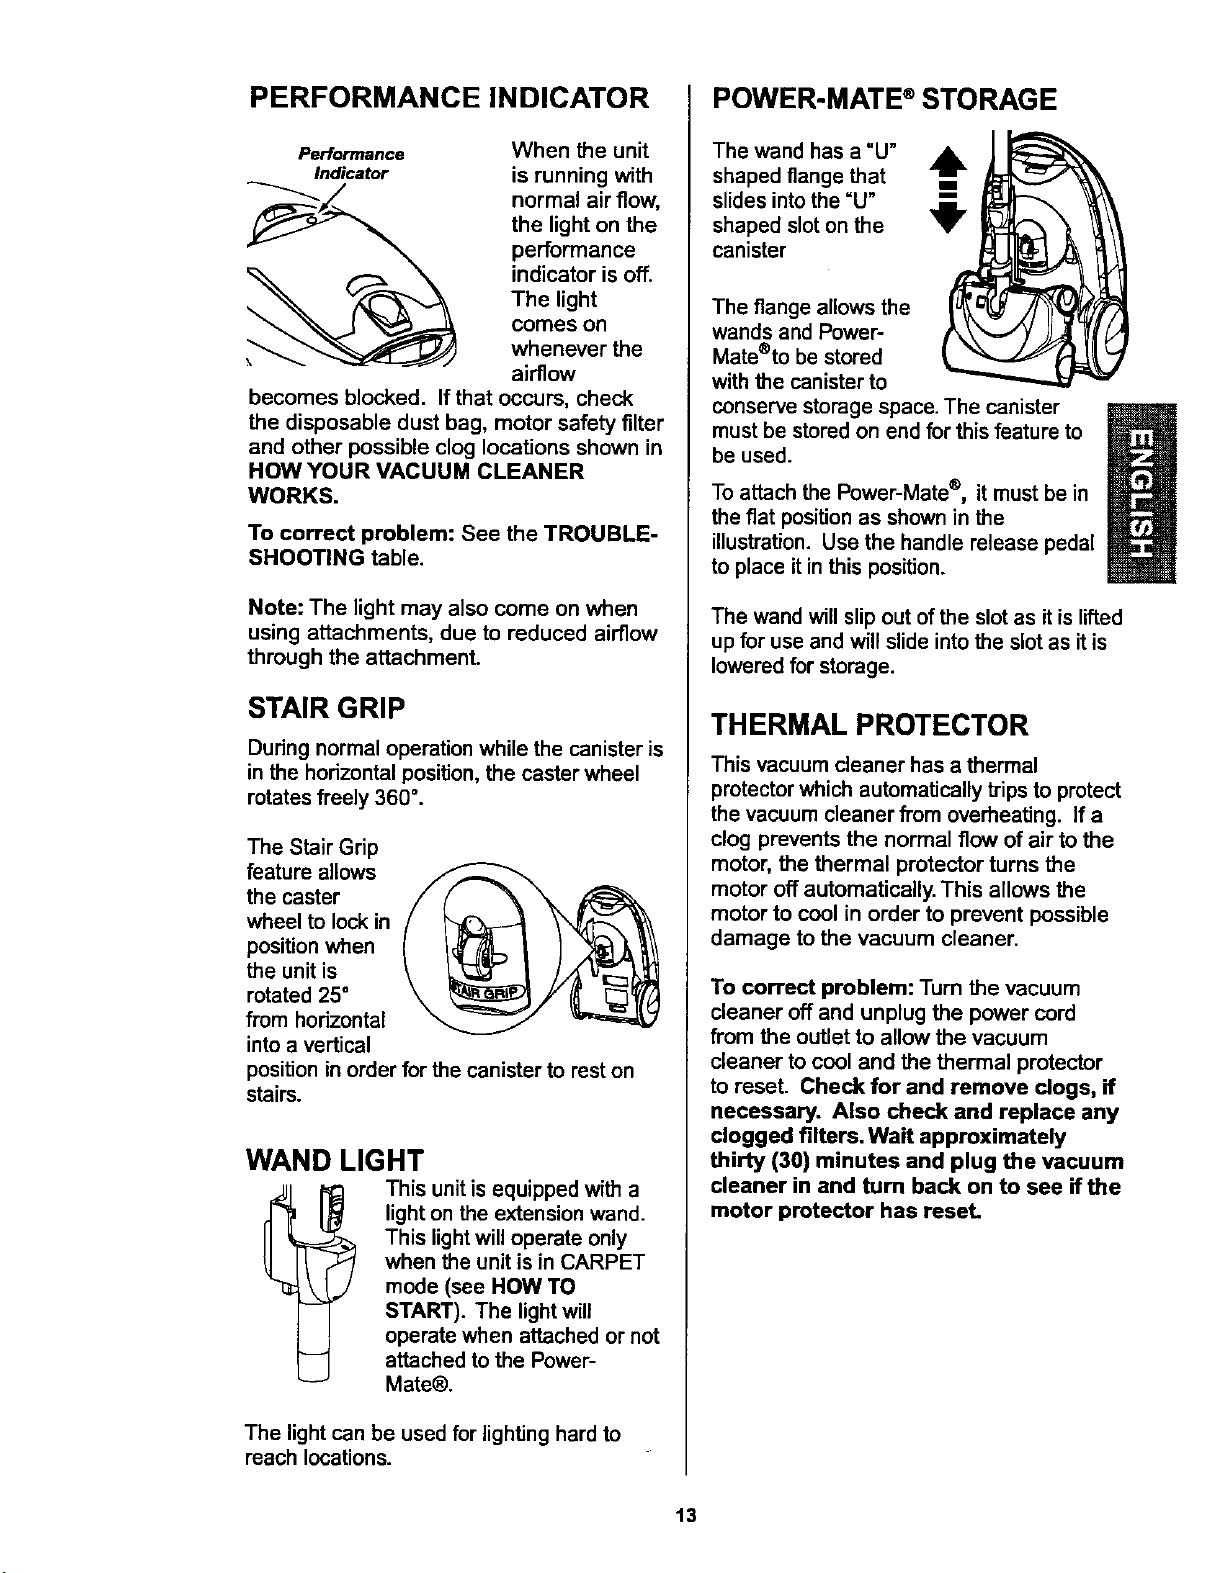
PERFORMANCE INDICATOR
Performance
Indicator
When the unit
is running with
normal air flow,
the light on the
performance
indicator is off.
The light
comes on
whenever the
airflow
becomes blocked. If that occurs, check
the disposable dust bag, motor safety filter
and other possible clog locations shown in
HOW YOUR VACUUM CLEANER
WORKS.
To correct problem: See the TROUBLE-
SHOOTING table.
Note: The light may also come on when
using attachments, due to reduced airflow
through the attachment.
STAIR GRIP
During normal operation while the canister is
in the horizontal position, the caster wheel
rotates freely 360 °.
The Stair Grip
feature allows
the caster
wheel to lock in
position when
the unit is
rotated 25"
from horizontal
into a vertical
position in order for the canister to rest on
stairs.
WAND LIGHT
This unit is equipped with a
light on the extension wand.
This light will operate only
when the unit is in CARPET
mode (see HOW TO
START). The light will
operate when attached or not
attached to the Power-
Mate@.
The light can be used for lighting hard to
reach locations.
POWER-MATE ®STORAGE
The wand has a "U" A
shaped flange that m
All,,
slides into the =U"
...lB._
shaped slot on the V
canister
The flange allows the
wands and Power-
Mate®to be stored
with the canister to
conserve storage space. The canister
must be stored on end for this feature to
be used.
To attach the Power-Mate ®, it must be in
the fiat position as shown in the
illustration. Use the handle release pedal
to place it in this position.
The wand will slip out of the slot as it is lifted
up for use and will slide into the slot as it is
lowered for storage.
THERMAL PROTECTOR
This vacuum cleaner has a thermal
protector which automatically trips to protect
the vacuum cleaner from overheating. If a
clog prevents the normal flow of air to the
motor, the thermal protector turns the
motor off automatically. This allows the
motor to cool in order to prevent possible
damage to the vacuum cleaner.
To correct problem: Turn the vacuum
cleaner off and unplug the power cord
from the outlet to allow the vacuum
cleaner to cool and the thermal protector
to reset. Check for and remove dogs, if
necessary. Also check and replace any
clogged filters. Wait approximately
thirty (30) minutes and plug the vacuum
cleaner in and turn back on to see if the
motor protector has reset.
13
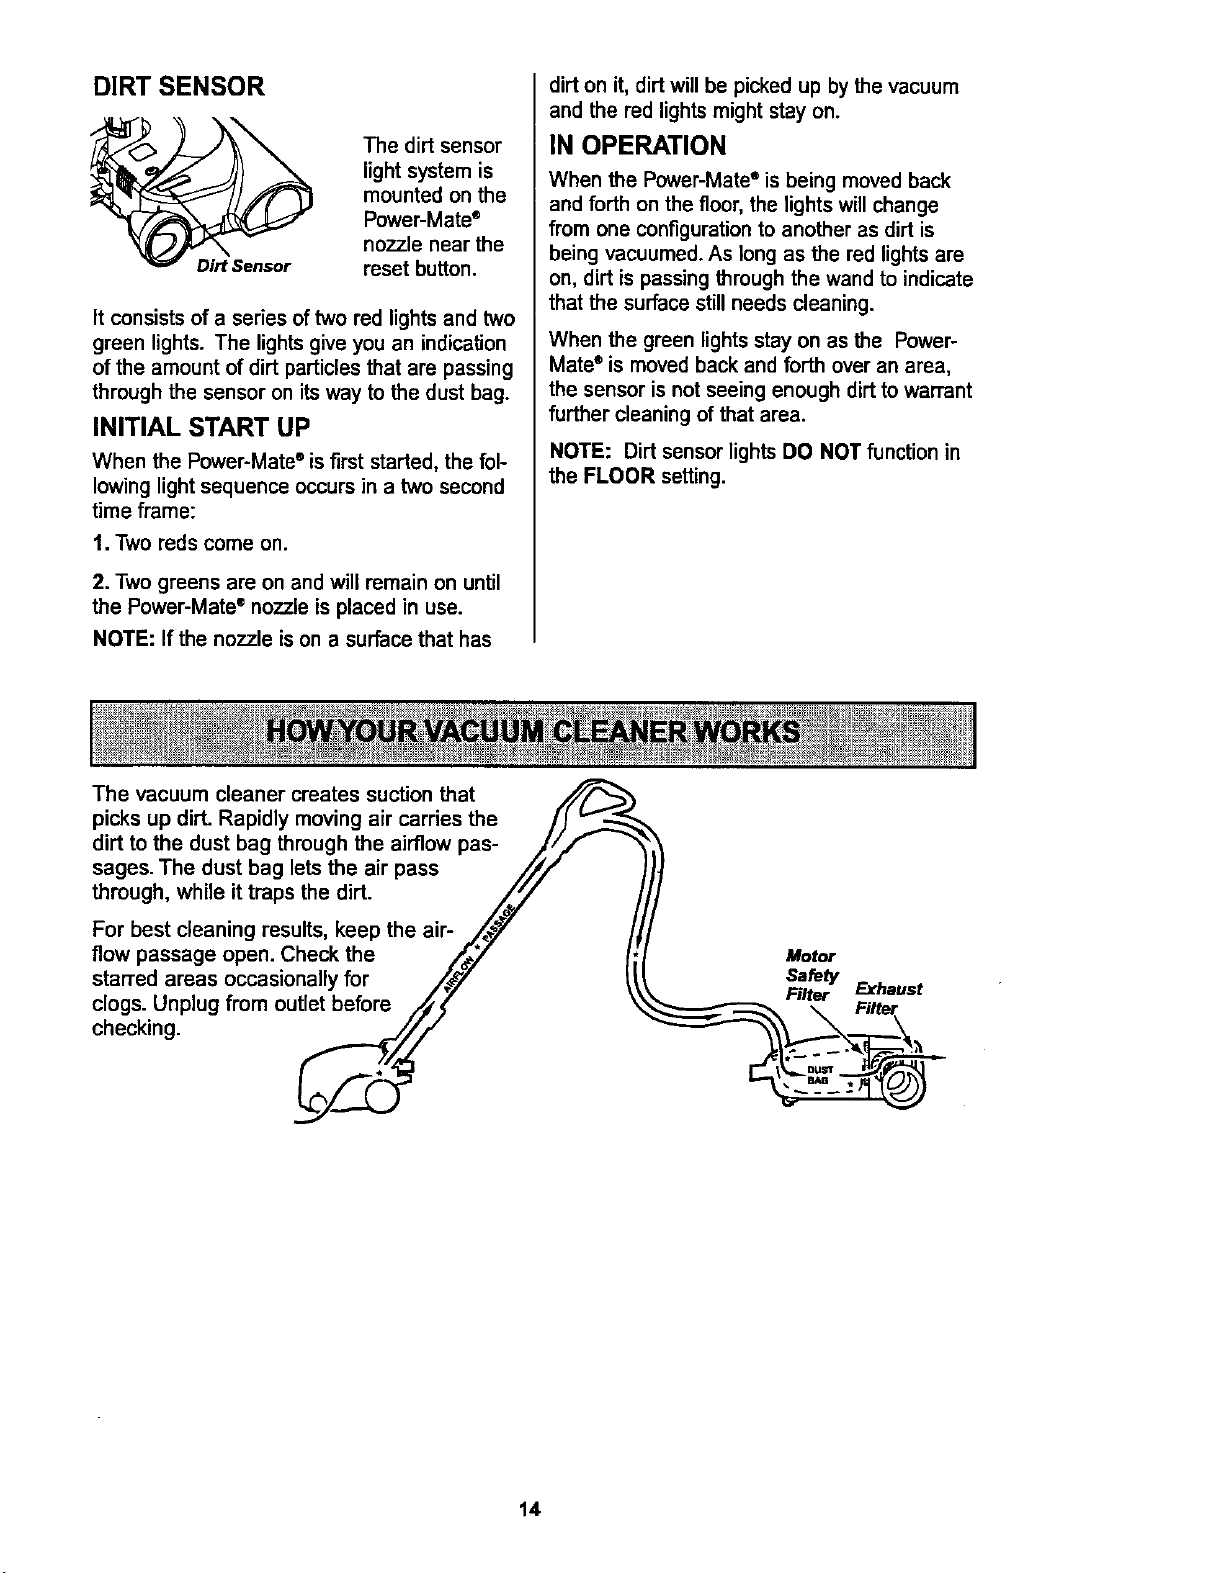
DIRT SENSOR
The dirt sensor
light system is
mounted on the
Power-Mate ®
nozzle near the
reset button.
It consists of a series of two rod lights and two
green lights. The lights give you an indication
of the amount of dirt particles that are passing
through the sensor on its way to the dust bag.
INITIAL START UP
When the Power-Mate ° is first started, the fol-
lowing light sequence occurs in a two second
time frame:
t. Two reds come on.
2. Two greens are on and will remain on until
the Power-Mate ®nozzle is placed in use.
NOTE: If the nozzle is on a surface that has
dirt on it, dirt will be picked up by the vacuum
and the red lights might stay on.
IN OPERATION
When the Power-Mate" is being moved back
and forth on the floor, the lights will change
from one configuration to another as dirt is
being vacuumed. As long as the rod lights are
on, dirt is passing through the wand to indicate
that the surface still needs cleaning.
When the green lights stay on as the Power-
Mate®is moved back and forth over an area,
the sensor is not seeing enough dirt to warrant
further cleaning of that area.
NOTE: Dirt sensor lights DO NOT function in
the FLOOR setting.
The vacuum cleaner creates suction that
picks up dirL Rapidly moving air carries the
dirt to the dust bag through the airflow pas-
sages. The dust bag lets the air pass
through, while it traps the dirt.
For best cleaning results, keep the air-
flow passage open. Check the
starTed areas occasionally for
clogs. Unplug from outlet before
checking.
Motor
Safety
Filter
Exhaust
14
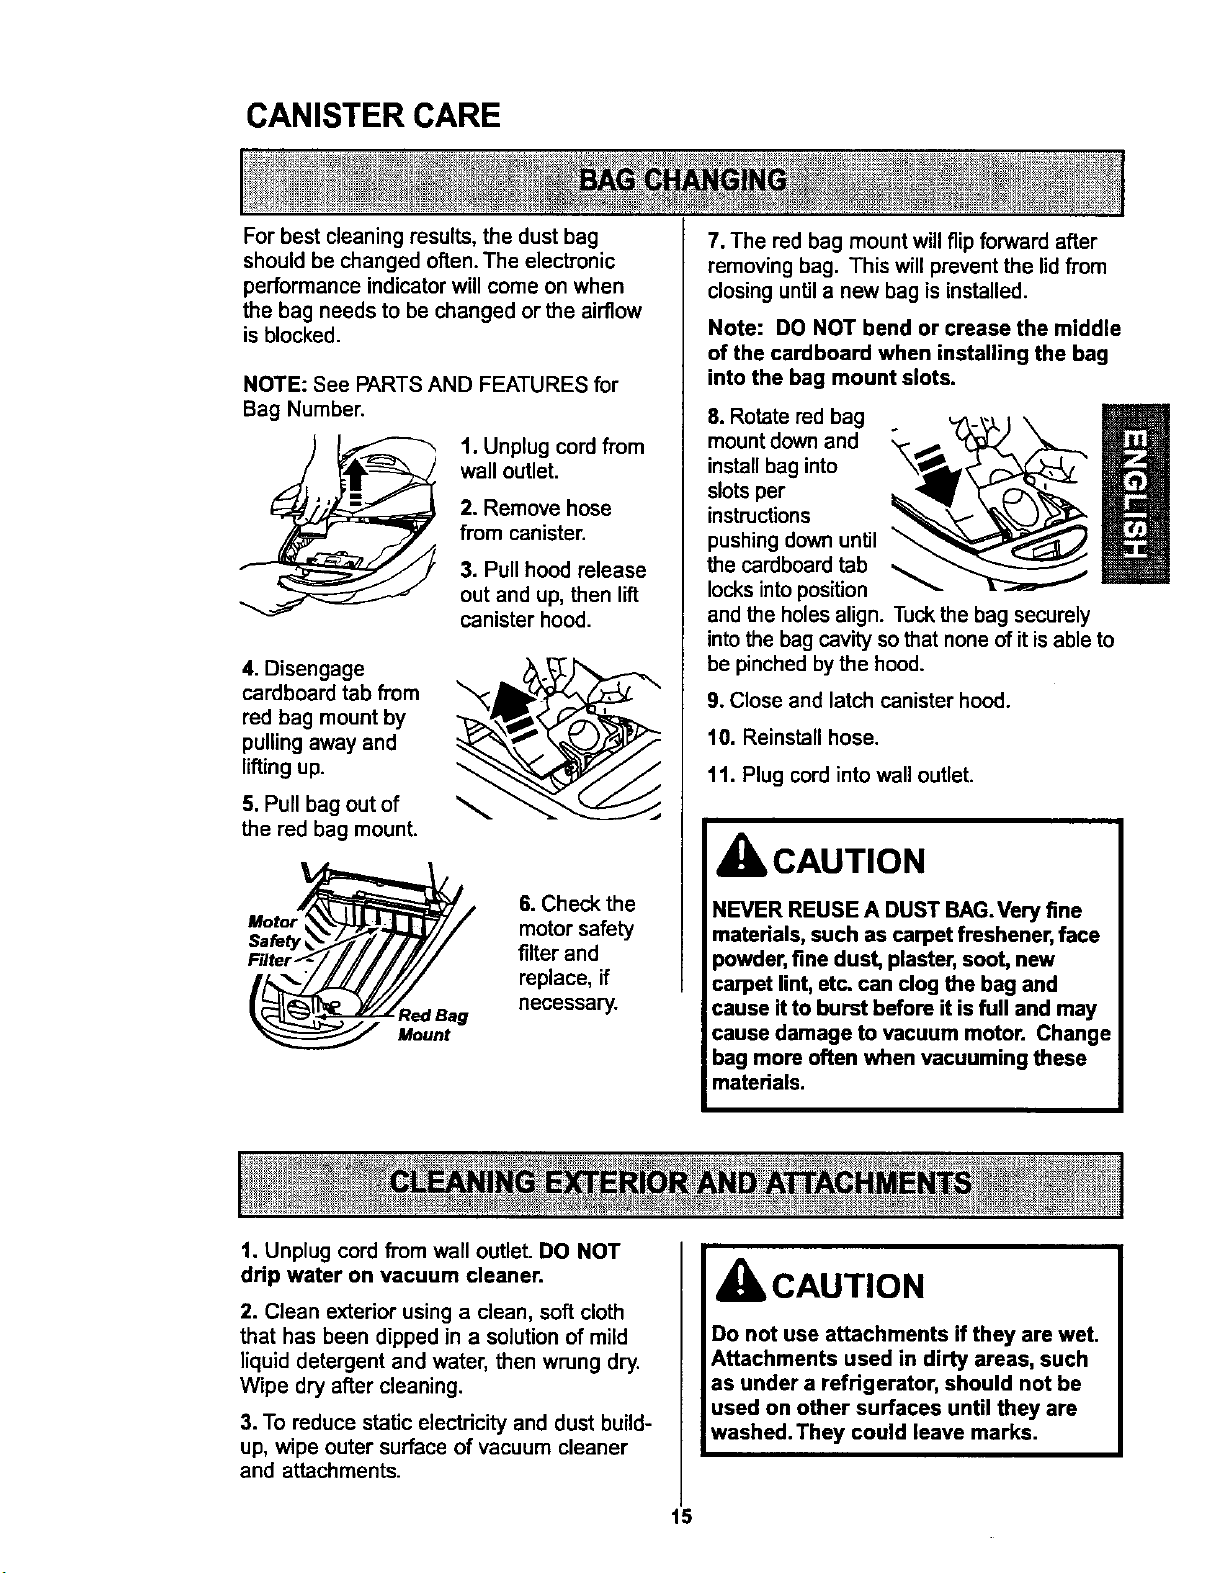
CANISTER CARE
For best cleaning results, the dust bag
should be changed often. The electronic
performance indicator will come on when
the bag needs to be changed or the airflow
is blocked.
NOTE: See PARTS AND FEATURES for
Bag Number.
1. Unplug cord from
wall outlet.
2. Remove hose
from canister.
3. Pull hood release
out and up, then lift
canister hood.
4. Disengage
cardboard tab from
red bag mount by
pulling away and
lifting up.
5. Pull bag out of
the red bag mount.
Mount
6. Check the
motor safety
filter and
replace, if
necessary.
7. The red bag mount will flip forward after
removing bag. This will prevent the lid from
closing until a new bag is installed.
Note: DO NOT bend or crease the middle
of the cardboard when installing the bag
into the bag mount slots.
8. Rotate red bag
mount down and
m
install bag into
slots per
instructions
pushing down until _
the cardboard tab
locks into position
and the holes align. Tuck the bag securely
into the bag cavity so that none of it is able to
be pinched by the hood.
9. Close and latch canister hood.
10. Reinstsllhose.
11. Plug cord into wall outlet.
CAUTION
NEVER REUSE A DUST BAG.Very fine
materials, such as carpet freshener, face
powder, fine dust, plaster, soot, new
carpet lint, etc. can clog the bag and
cause it to burst before it is full and may
cause damage to vacuum motor. Change
bag more often when vacuuming these
materials.
1. Unplug cord from wall outlet. DO NOT
drip water on vacuum cleaner.
2. Clean exterior using a clean, soft cloth
that has been dipped in a solution of mild
liquid detergent and water, then wrung dry.
Wipe dry after cleaning.
3. To reduce static electdcity and dust build-
up, wipe outer surface of vacuum cleaner
and attachments.
CAUTION
Do not use attachments if they are wet.
Attachments used in dirty areas, such
as under a refrigerator, should not be
used on other surfaces until they are
washed. They could leave marks.
15
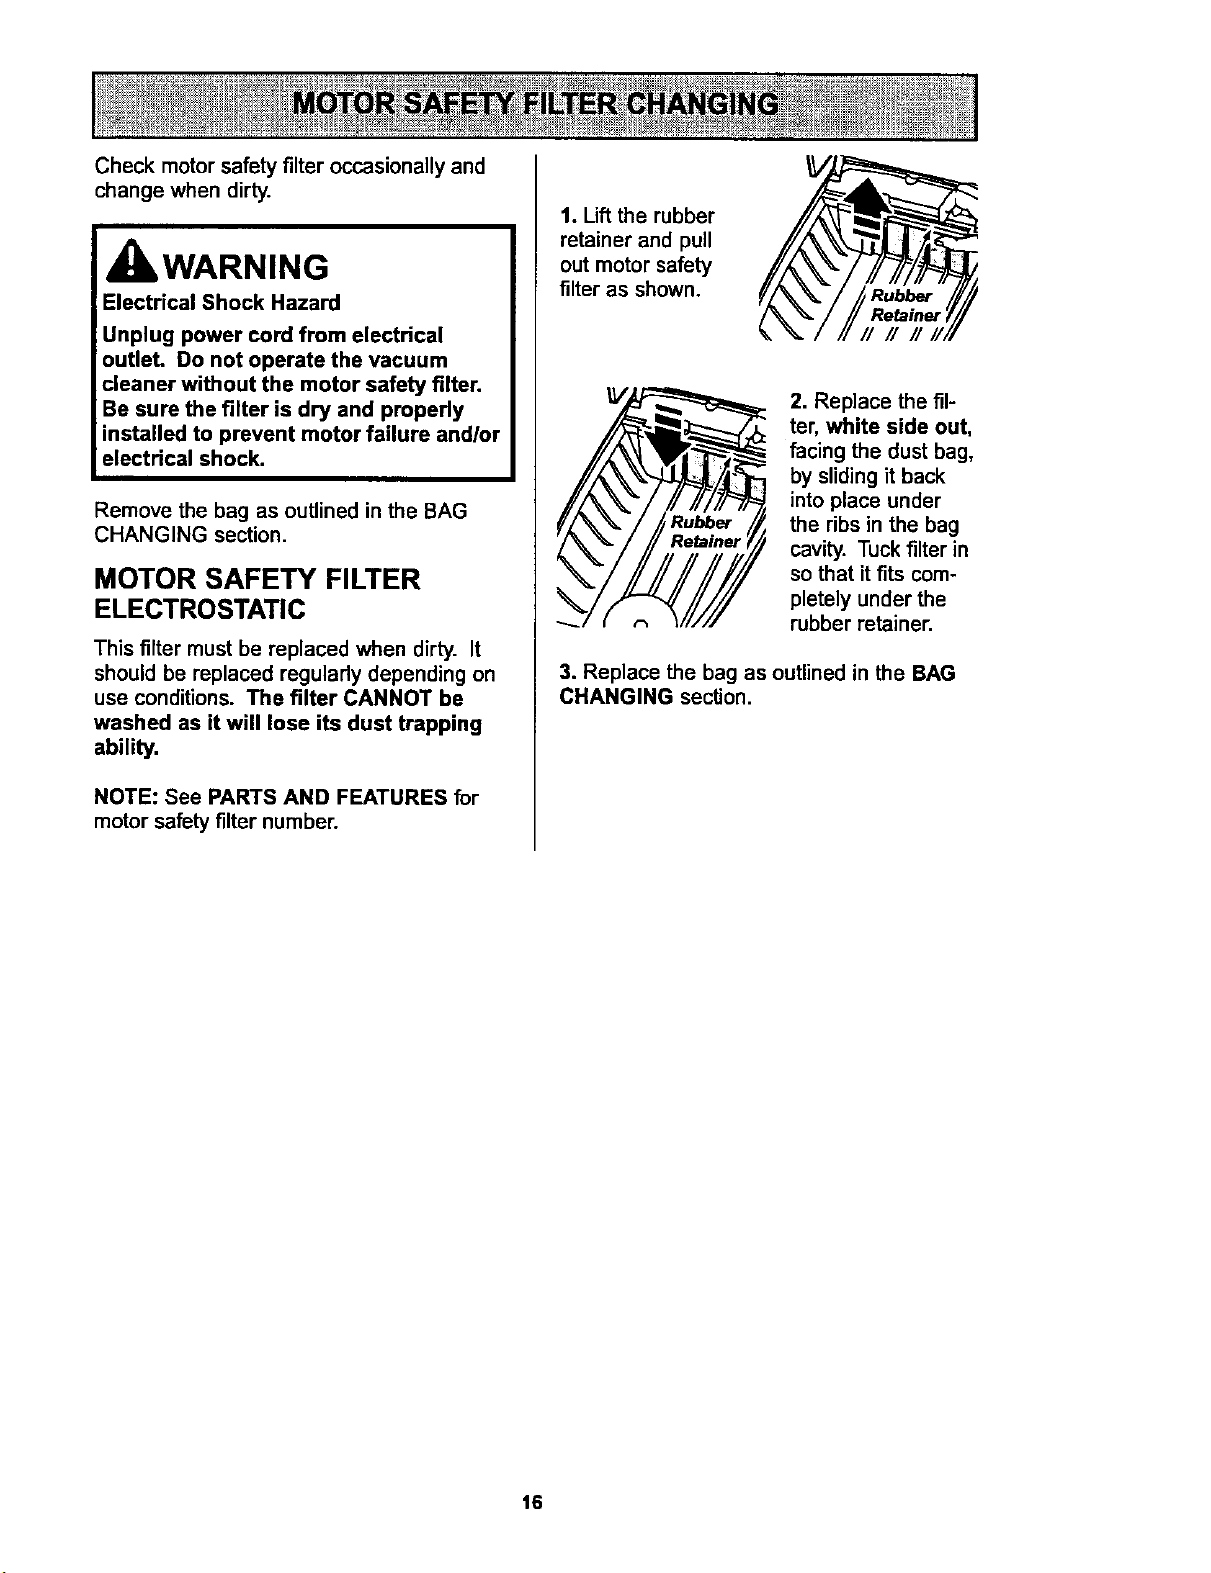
Check motor safety filter occasionally and
change when dirty.
IbWARNING
Electrical Shock Hazard
Unplug power cord from electrical
outleL Do not operate the vacuum
cleaner without the motor safety filter.
Be sure the filter is dry and properly
installed to prevent motor failure andlor
electrical shock.
Remove the bag as outlined in the BAG
CHANGING section.
MOTOR SAFETY FILTER
ELECTROSTATIC
This filter must be replaced when dirty. It
should be replaced regularly depending on
use conditions. The filter CANNOT be
washed as it will lose its dust trapping
ability.
NOTE: See PARTS AND FEATURES for
motor safety filter number.
1. Lift the rubber
retainer and pull
out motor safety
filter as shown.
Rubber
Retainer
r/ // //
2. Replace the fil-
ter, white side out,
facing the dust bag,
by sliding it back
into place under
the ribs in the bag
cavity. Tuck filter in
so that it fits com-
pletely under the
rubber retainer.
3. Replace the bag as outlined in the BAG
CHANGING section.
16
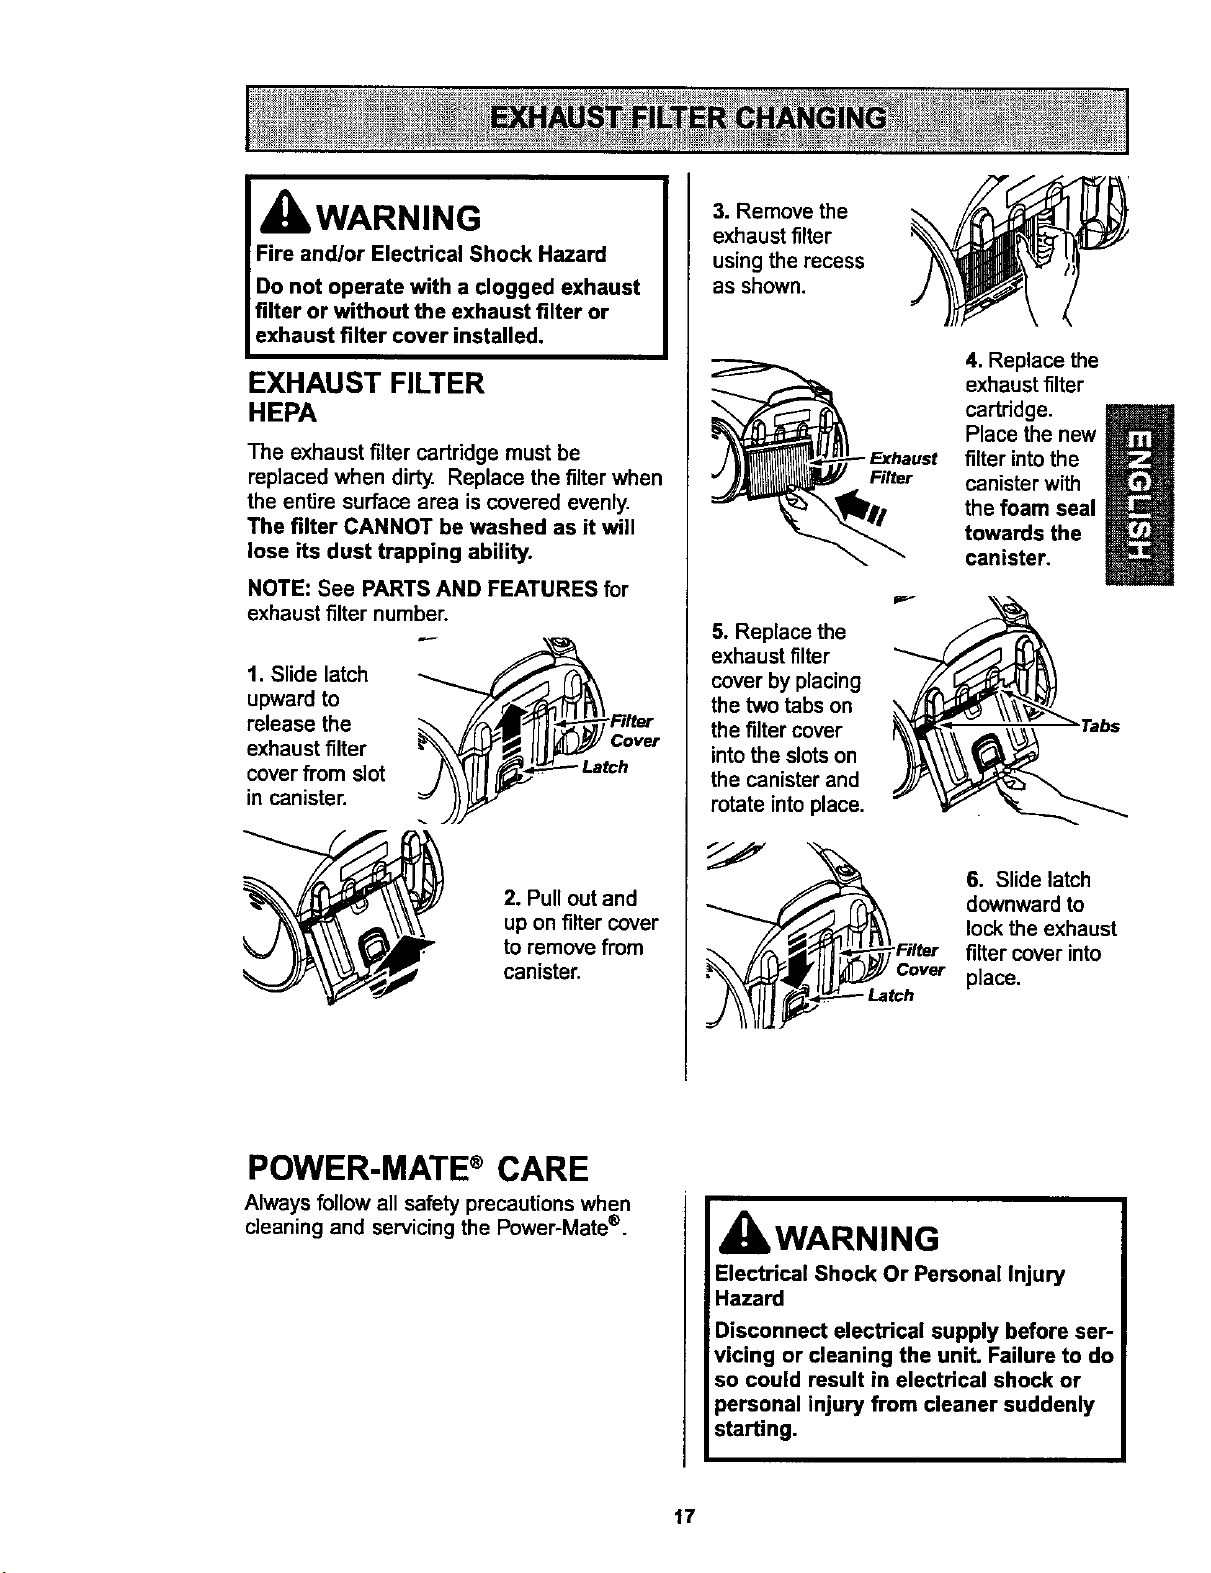
IbWARNING
Fire and/or Electrical Shock Hazard
Do not operate with a clogged exhaust
filter or without the exhaust filter or
exhaust filter cover installed.
EXHAUST FILTER
HEPA
The exhaust filter cartridge must be
replaced when dirty. Replace the filter when
the entire surface area is covered evenly.
The filter CANNOT be washed as it will
lose its dust trapping ability.
NOTE: See PARTS AND FEATURES for
exhaust filter number.
1. Slide latch
upward to
release the
exhaust filter
cover from slot
in canister.
__Fslter
2. Pull out and
up on filter cover
to remove from
canister.
3. Remove the
exhaust filter
using the recess
as shown.
Filter
5. Replace the
exhaust filter
cover by placing
the two tabs on
the fi]ter cover
into the slots on
the canister and
rotate into place.
4. Replace the
exhaust filter
cartridge.
Place the new
filter into the
canister with
the foam seal
towards the
canister.
6. Slide latch
downward to
lock the exhaust
filter cover into
place.
POWER-MATE®CARE
Always follow all safety precautions when
cleaning and servicing the Power-Mate ®.
WARNING
Electrical Shock Or Personal Injury
Hazard
Disconnect electrical supply before ser-
;vicing or cleaning the unit. Failure to do
so could result in electrical shock or
personal injury from cleaner suddenly
starting.
17
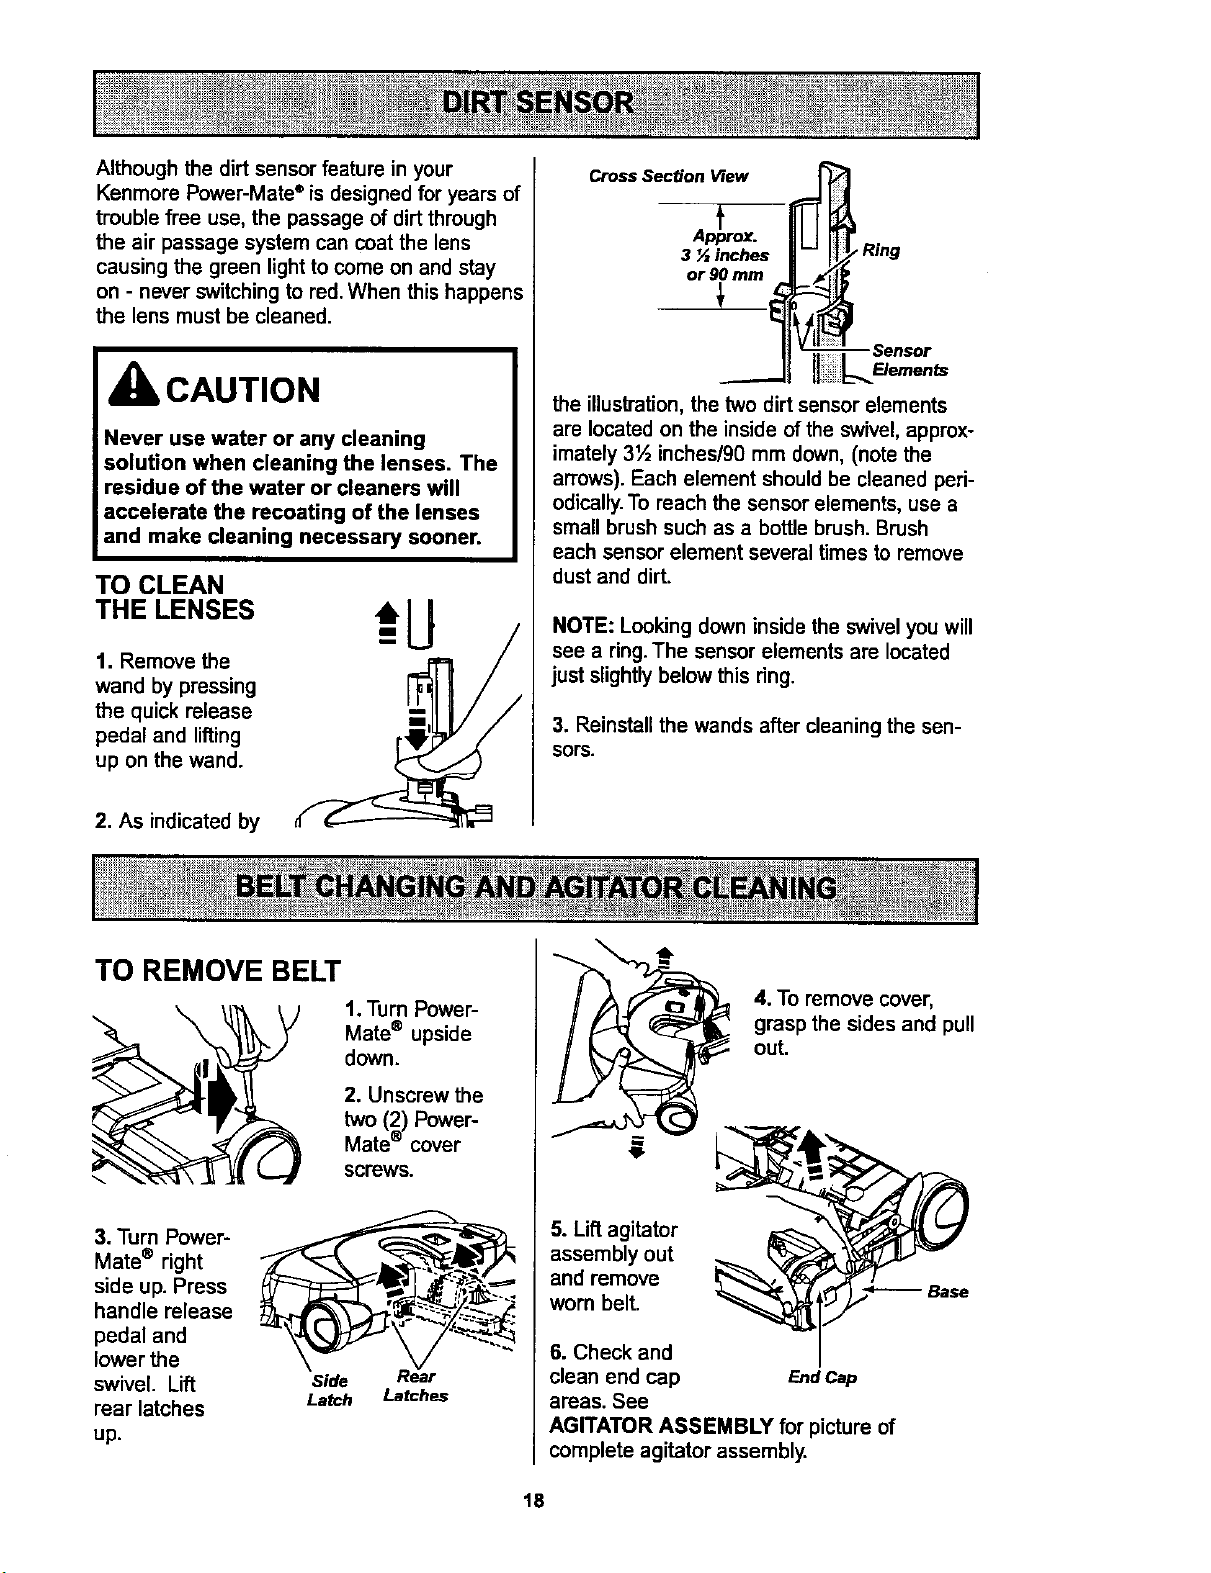
Although the dirt sensor feature in your
Kenmore Power-Mate ®is designed for years of
trouble free use, the passage of dirt through
the air passage system can coat the lens
causing the green light to come on and stay
on - never switching to red. When this happens
the lens must be cleaned.
CAUTION
Never use water or any cleaning
solution when cleaning the lenses. The
residue of the water or cleaners will
accelerate the recoating of the lenses
and make cleaning necessary sooner.
TO CLEAN
THE LENSES
1. Remove the
wand by pressing
the quick release
pedal and lifting
up on the wand.
2. As indicated by
Cross Section View
.f
p_ox.
3 N inches
or 90 mm
_ Ring
the illustration, the two dirt sensor elements
are located on the inside of the swivel, approx-
imately 3½ inches/90 mm down, (note the
arrows). Each element should be cleaned peri-
odically.To reach the sensor elements, use a
small brush such as a bottle brush. Brush
each sensor element several times to remove
dust and dirt.
NOTE: Looking down inside the swivel you will
see a ring.The sensor elements are located
just slightly below this ring.
3. Reinstall the wands after cleaning the sen-
sors.
TO REMOVE BELT
\
1. Turn Power-
Mate ® upside
down.
2. Unscrew the
two (2) Power-
Mate ® cover
screws.
3. Turn Power-
Mate ® right
side up. Press
handle release
pedal and
lower the
swivel. Lift
rear latches
up.
Side ear
Latch Latches
4. To remove cover,
grasp the sides and pull
out.
5. Lift agitator
assembly out
and remove
worn belt.
6. Check and
clean end cap EndCap
areas. See
AGITATOR ASSEMBLY for picture of
complete agitator assembly.
Base
t8
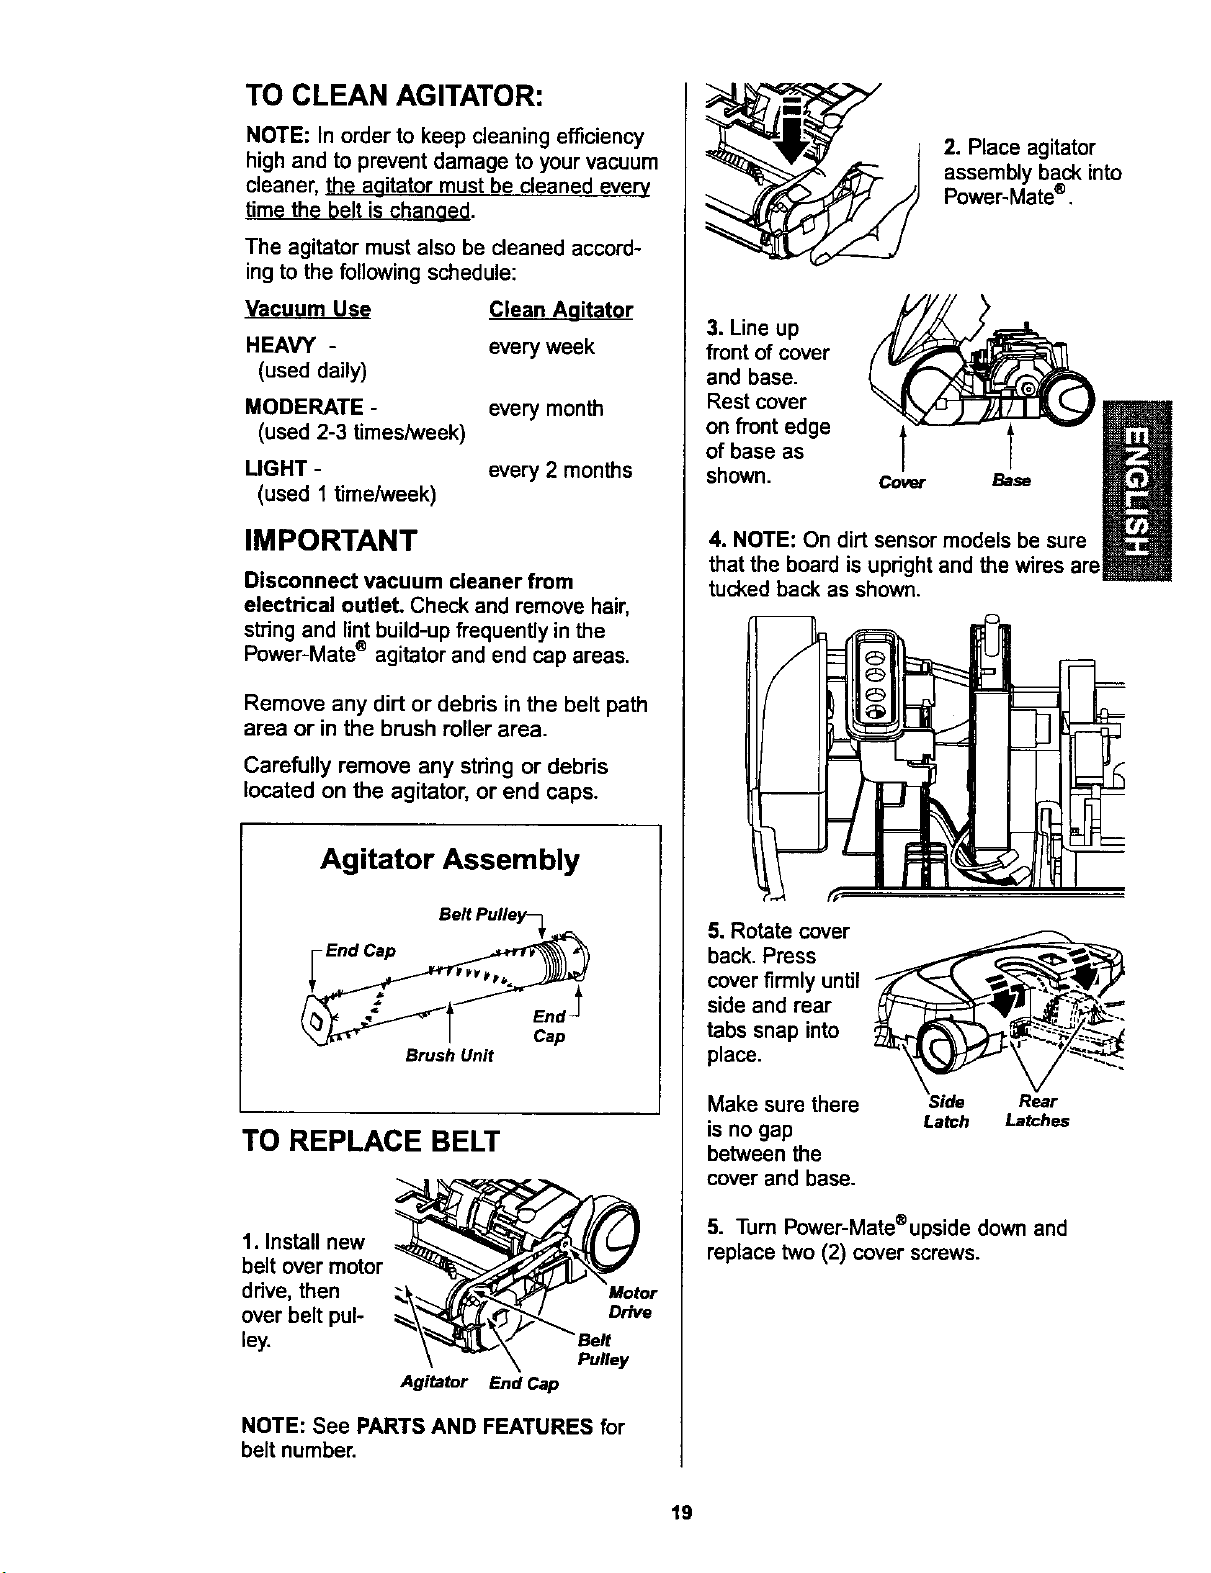
TO CLEAN AGITATOR:
NOTE: In order to keep cleaning efficiency
high and to prevent damage to your vacuum
cleaner, the agitator must be cleaned every
time the belt is changed.
The agitator must also be cleaned accord-
ing to the following schedule:
Vacuum Use
HEAVY -
(used daily)
MODERATE -
(used 2-3 times/week)
LIGHT -
(used 1 time/week)
Clean Aqitator
every week
every month
every 2 months
IMPORTANT
Disconnect vacuum cleaner from
electrical outlet. Check and remove hair,
string and lint build-up frequenUy in the
Power-Mate ® agitator and end cap areas.
Remove any dirt or debris in the belt path
area or in the brush roller area.
Carefully remove any string or debris
located on the agitator, or end caps.
Agitator Assembly
Brush Unit
TO REPLACE BELT
1. Install new
belt over motor
drive, then
over belt pul-
ley.
Motor
Drive
Pulley
Agitator End Cap
NOTE: See PARTS AND FEATURES for
belt number.
2. Place agitator
assembly back into
Power-Mate ®.
3. Line up
front of cover
and base.
Rest cover
on front edge
of base as
shown.
Cover Base
4. NOTE: On dirt sensor models be sure
that the board is upright and the wires are
tucked back as shown.
5. Rotate cover
back. Press
cover firmly until
side and rear
tabs snap into
place.
Make sure there
is no gap
between the
cover and base.
Side Rear
Latch Latches
5. Turn Power-Mate®upsidedown and
replace two (2) cover screws.
19

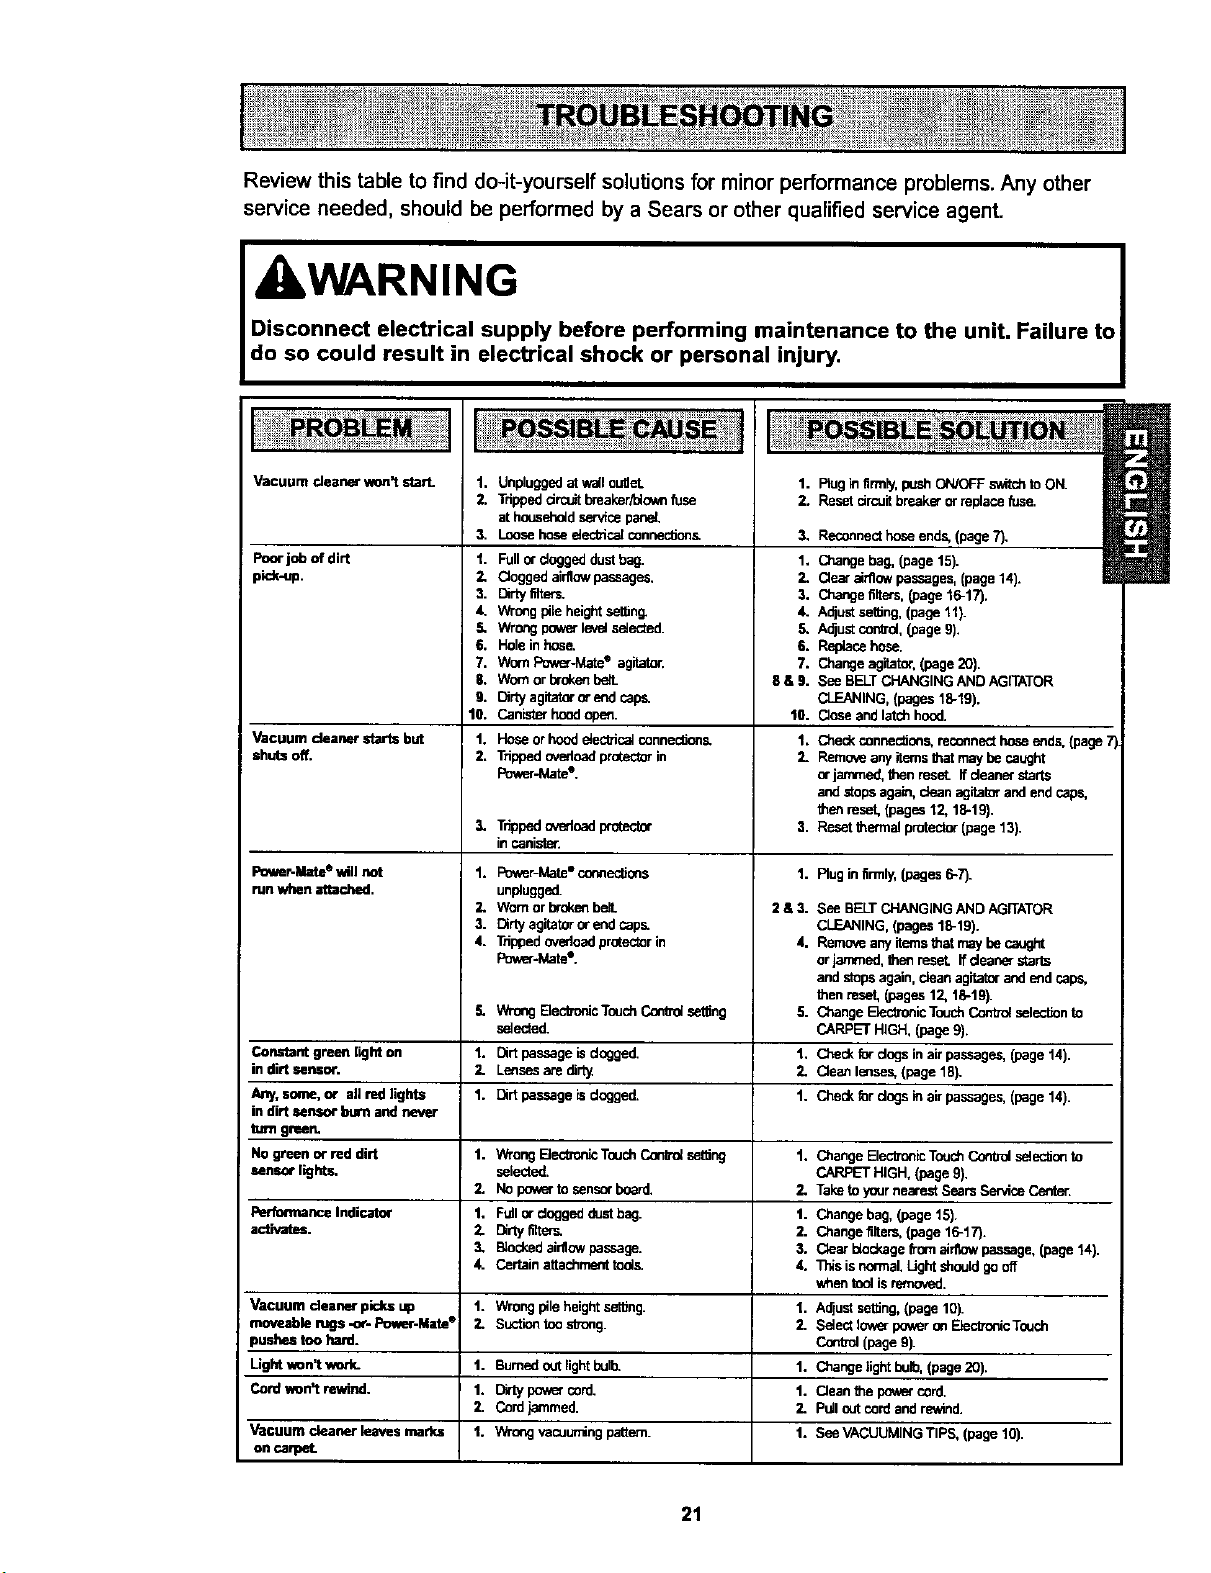
Review this table to find do-it-yourself solutions for minor performance problems. Any other
service needed, should be performed by a Sears or other qualified service agent.
WARNING
Disconnect electrical supply before performing maintenance to the unit. Failure to
do so could result in electrical shock or personal injury.
Vacuum deaner won't start. 1.
2.
3.
Poorjo_ ofdirt 1.
piok-up. 2,
Vacuum cleanerstartsbut
shutsoff.
Power.Mate ®will not
run when attached.
Unplugged at wall ouget.
Tripped drcuit breaker_o_m fuse
at household service par_.
Loose hose eieoffica[ connec_on&
Fullor doggeddustbag.
Cloggedairflowpassages.
3. Dirty_ers.
4. Wrongplteheightset_n_
.5. Wrongpov_rle,_elselected.
6. Holeinhos_
7. WornPower-MateQ agitator.
$. Wornorbroken
9. Clrty agitatororendcapp.
10. Canisterhoodopen.
1. Hoseorhoodeiec_ica_connec_ons.
2. _pped overloadprotectorin
Powar-Matet,
3.
Tr_ped_oad pmtoctor
incanist_.
1. Power-Mate"c_ec_ons
unplugged.
2. Wornorbrokenbe3.
3. Dirtyagitatoror endcaps
4. Trippedovedoagprotectorin
Poy_Jv_te'.
5.
1.
2.
1.
WrongE_ecb_icTouchConradset_ng
selected.
1. Rug in firmly,push ON/OFF switc_ to ON.
2. Reset circuit breaker orreplace fus_
3, Reconnecthoseends,(page7).
1. Changebag, (page15).
2. Clearairflowpassages,(page14).
3. Changefilters,(page 16-17).
4. AolustsetUog,(page11).
5. Adjustcon_ol,(page9).
6. Replacehose.
7. Changeagitator.(page20).
8 & 9. See BELTCHANGINGANDAGITATOR
CLEANING,(pages18-19).
13. Closeandlatchhood.
1. Checkconnec_ens,reconnecthoseends,(page7
2. Removeanyitemsthatmaybecaught
orjammed,thenreset_ffdeanerstarts
andstopsagain,dean agitatorandendcaps,
thenreset,(pages12,18-19},
3. Resetthermal protector(page13).
1. Rug infirmly,(pages6-7).
2 & 3. See BELTCHANGINGANDAGITATOR
CLEANING,(pages18-19).
4. Removeanyitemsthatmaybe caught
orjammed,Ihenreset. Ifdeanerstar'=
andstopsagain,dean agitatorandendcaps,
Menreset,(pages12,18-19).
5. CP,angeBec_onicTouchContT_seleclJonto
CARPETHIGH,(page9).
1, CP,eckforclogsinairpassages,(page14).
3. Cleanlenses,(page18).
1. Checkfordogsinair passages,(page14).
Constantgreen lighton Dirtpassageisdogged.
in dirt sensor. Lensesare dirt,_
Any,some,or allredltghts Dirtpassage isdogged.
in dirt sensorburn andnever
turn green.
No greenor reddirt 1. V_-ongElec_onicTouchConfrolset_og 1. ChangeElect'onicToushCo,"Wulselec_ento
sensorlights, selected. CARPETHIGH, (page9).
2. Nopowertosensorboard. 2, TaketoyournearestSearsServicecanter.
PertonnanceIndicator 1. Fullordoggeddust bag. 1. Change bag,(page15).
activates. 2. Dirly_e_. 2. Changefilte,-s,(page16-17).
3. B_ockedeinlowpassage. 3. Oear dockagefromeirnowpassage,(page14).
4. Certainattachmenttod._ 4. l_s isnormal.Lightshouldgooff
whentool isremoved.
Vacuum cleaner picksup 1. Wrongpileheightset_ng. 1. Adjustseffing,(page 10).
moveabfonJgs-or-Power-Mate® 3. Suc_ontoos_ong. 2. Selectfow_rpoweron_cTouch
pushes toohard. Con_ol(page9).
Lightvmn'twork. 1. Bumedoutlightbelb. 1. Changelight belb,(page20).
Cord_n't rewind. 1. Dirtypowercord. 1. Cleanthe gewe_cord.
2. Cord_mrned. 2. Pulloutcordand_d.
Vacuum cleaner leavesmarks 1. Wr_ngvacuumingpattern. 1. SeeVACUUMINGTIPS, (page10).
on
21

Antes de usar su aspiradora nueva ..... 1
Garantia de la aspiradora de Kenmore .. 1
Instrucciones importantes de
seguridad ............................ 2
Piezas y caracteHsticas ............... 3-4
Instrucciones de
ensamblamiento ............... 5-6
Almacenaje del Power-Mate Jr.® ....... 6
Instrucciones de operati6n ........... 7
Paracomenzar ....................... 7
Sugersnciaspara aspirar ............... 9
Sugerenciassobre el ajustede nivelde
pelo de la alfombra ................... 10
Accasorios.......................... 10
Uso de losaccasodos ................. 11
Caracter_stJcasderendimiento ........ 11-13
Funcionamientode su aspiradora ........ 13
Cuidado del recept_culo .............. 14
Cambiode la bolsa ................... 14
Limpieza delexteriory de losaccasodos... 14
Cambiodel filtro de seguddad del motor ... 15
Cambiodel filtro de escape ............. 16
Cuidado de la Power-Mate ° ............ 16
Detectorde _erra ..................... 17
Cambiode lacorreay limpieza
del agitador ...................... 17-18
Cambiode labombilla................. 19
Cuidadodelagitador.................. 19
Reconocimiento de problemas ......... 20
Informaci6n de
assistancia o servicio ..... PosteriorCubierta
Potfavorlea _ta guia que le ayudaraaassemblary operar suaspiradoranuevade Kenmoreen unamanera
mrs segumy effectiva.
Paramas informacidnacercadel cuidadoy operael6nde estaaspirador,Ilame a su_enda Searsmas carcana.
Cuandoprequnteporinformael6nustednecisitardel n_merocompletodesedey modelode laaspiradomque
est_Iocadoen laplacade losnemerosde modeloy sede.
Useel espaelode abajopara registrareln_merode modeloy sedeparasunuevaaspiradora de Kenmore.
N_merode Modelo
N_mero de Sede
Fechade Compra
Matenga estelibroy sureciboenu lugar seguroparareferendas futuras.
GARANTfAUMITADADE UN AI;IODELA ASPIRADORAKENMORE
Estagarant{aes por unaSo desdela fecha decompra,e incluyesolamenteelusode laaspiradoraen hogares
privados.Duranteela_ode garant[a,cuandolaaspiradoraes operaday mantenidade acuerdoalmanualde
instrucelonesdel dueSo,Searsreparardcualquierdefectoenmaterialesofabdcaci6n libredecargo.
EstagarantJaexcluyelasbolsasde colecci6n,con'eas,lamparillas,y filtrca, lascuelessonpartesgastablesque
se deterioranconelusonormal.
Parael servicio de garantJa,retorne esta aspirsdorael Centro deServicio Sears m:;scercanoen los
Estados Unidos.
Esta garantfa se aplicasolamente mienS'aseste productoestden usaenlos EstadosUnidos.Estagarantiale
daa ustedderechoslegalesespecificos,y ustedpuedetenertambi_notrosderechosloscualesvadan de
estadoa estado.
Sears, Roebuckand Co., D/817WA, HoffinanEstates,IL 60179
A ADVERTENCIA
Su seguridad es muy importante para nosotros. Para reducir el riesgo de incendio,
choque el_ctrico lesi6n corporal o da_os al utilizar su aspiradora, active de acuerdo
con precauc ones b_s cos de seguridad, entre elias:
Lea las ins_ucciones en este manual antes do
armar o usar su aspiradora.
Use su aspiradora 0nicamente en la forma
descrita en este manual. Use _nicamente con
accesodos recomendados por Sears.
Desconecte el cordbn eldctrico antes de
componer o limpiar el drea del cepillo. De Io
contrado, el cepillo podHa arrancar de form
imprevista o podria producirse un choque
electrico.
No abandone la espiradora cuando est_
conectada. Descon6cteta cuando no la estd
usando y antes de dade servicio.
Para reducir el riesgo de choque eI_ctrico, no
use su aspiradora al airs libre ni sobre
superficies mojadas.
No permita que sea utilizada como juguete.
Se requiem tener mayor cuidado cuando sea
utilizada en la proximidad de ni_os o por
ni_os.
No use la aspiradorasi el cord6no el enchufe
estddafiado.Sila aspiradorano estd
funcionandoadecuadamenteosi se ha
dejadocaer, estdda_ada, se ha dejado
expuestaa laintemperieo soha dejadocaer
en agua, devudlvalaa un Centrode servicio
de Sears.
No hale ni transportela aspiradoraporel
cord6n; no useel cord6n como mango;no
cierre puertassobreel cord6n; nohaloel
cord6nsobrerebordes agudosni esquinas.
No pase laaspiradora sobreel cord6n.
Mantengael cord6n alejadode superficies
calientes.
No desconecte la aspiradora tirando del
cord6n el_ctrico.Para desconectada, hale el
enchufe,noel cord6n.
No toque la aspiradora ni el enchufe con las
manos mojadas.
No coloque objetos en las aberturas.
No utilice la aspiradora si alguna abertura
estd bloqueada; mant6ngala libre de polvo,
Apague todoslos cont]'olesantesdo
desenchufar.
Tenga cuidado especial al utilizar la
aspiradora en escalones. No la coloque sobre
sUlas, mesas, etc. Mantdngala on el piso.
No use la aspiradora para aspirar Uquidos
inflamables o combustibles (gasolina, liquidos
para limpieza, perfumes, etc.) ni la use en
lugares donde 6stos podr_an estar presentes.
Los vapores de estas sustancias pueden crear
un peligro de incendio o explosi6n.
No levante ninguna cosa que so est6
quemando o emitiendo humo, como
cigarrillos, ceriltos o cenizas calientes.
No usela aspiradorasintenet instaladala
bolsapara polvoy!olosfiltros.
Cambie siempre labolsapara polvodespu6s
de aspirarlimpiadoresde alfombraso
desodorantes,talcosy polvosfinos.Estos
productosatascan labolsa, reducenelflujo de
aire y puedencausar que _.stase rompa.Si
no cambiala bolsapodrfaocasionardar_o
permanentea la aspiradora.
No usela aspiradorapara levantarobjetos
agudos,juguetes pequeSos,alfileres,
sujetapapeles,etc.PodrfandaSarla
aspiradorao labolsapara polvo.
No operesinel filtro de escapeni lacubierta
delfiltrodeescape instalados.
La manguera contiene cables elL=ctricos.No
la usecuandoestd dar_ada,cortada,o
perforada.Reemplacesi est_ cortada o
desgastada.No levanteobjetosafilados.
Siempre apagudy desconectela aspiradora
antesde conectar o desconectarla manguera,
Handi-MateJr.® (siaplicabie),o laboquilla.
Sujete el enchufecon la manoal enmllarel
cord6nel6ctrico.Para desconectada,hale on
enchufe,no el cord6n.
Usted es responsablede asegurarque su
aspiradorano sea utJlizadapotninguna
personaque nopueda manejarla
carrectamente.
GUARDE ESTAS INSTRUCClONES
El armada y usa seguro de su aspiradora son su responsab idad Esta aspiradora ha sido
diseSada exclusivamente para usodom6stJco.Laaspiradora deberd a macenarse enun lugar
seco yen el interior. Lea este Manual del probietario detendamente pues contiene
informaci,6n importante sobre seguddad _y uso. l£sta quia contiene in_ormaci6n sobre
segudoaa debajo desimbolosde aoverUenclacuidado.
2
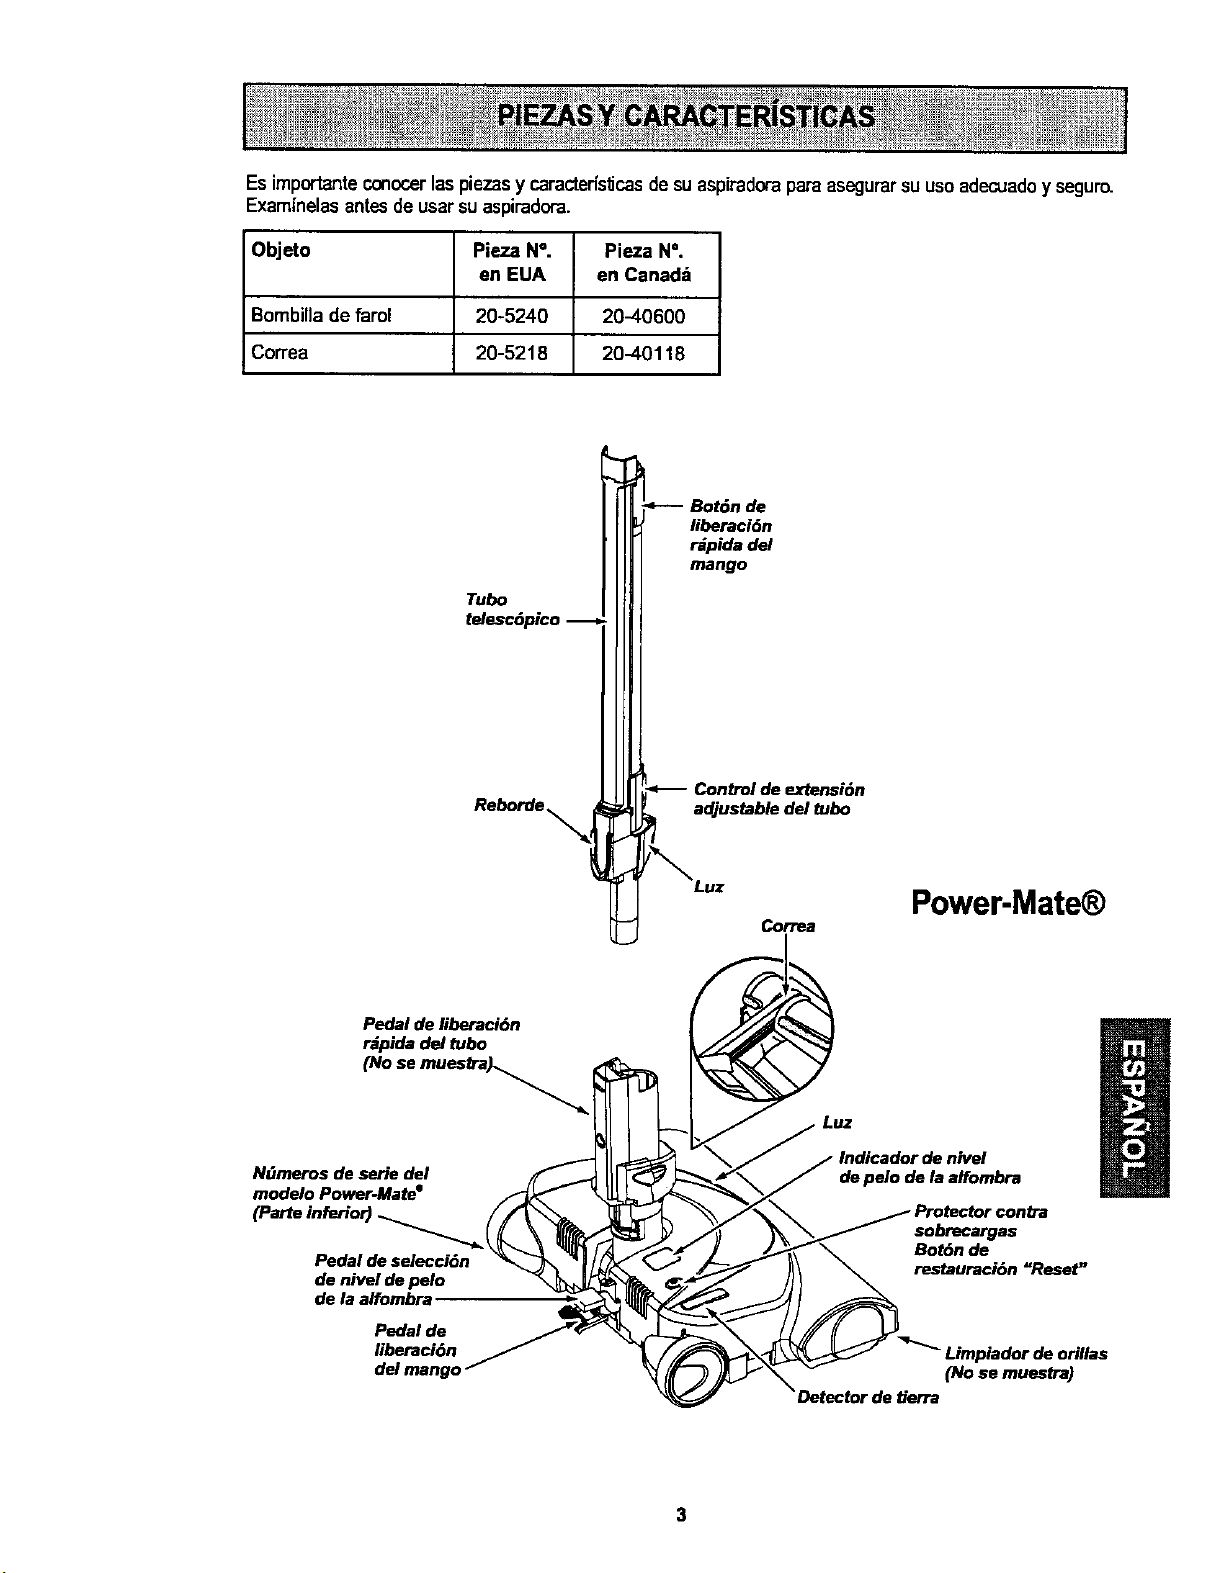
Esimportanteconocer laspiezas y caracterisf_casde su aspiradora para asegurarsuusoadecuadoy seguro.
Examinelas antes de usarsu aspiradora.
O_eto PiezaN °. Pieza N°.
en EUA en Canad_
Bombillade _ml 20-5240 20-40600
Co_ea 20-5218 20-40118
Tube
telesc6pico
Reb°rde'_l
Bot6n de
liberaci6n
r_pida del
mango
.<__ .o
Control de extension
adjustable del tube
/_Luz
Correa
Power-Mate
Pedal de liberaci6n
r_pida del tube
(No se muestra_._
NiJmoros de serie del
modelo Power-Mate e
Pedal de selecci6n
de nivel de pelo
de la alfombra
Pedal de
Iiboraci6n
de pelo de la alfombra
sebrecargas
Bot6n de
restauraci6n "Reset"
Limpiador de orillas
(No se muestra)
Detector de tierra
MANGUERA
Control electr6nico digital
ACCESORIOS
Herramienta
para
hendiduras-_ _
_m p_os _ _
t
Power-Mate Jr."
!a.-c mo
Cepillo para : _ para sacudir
combinaci6n -_ : |_
para _elas
I......
Dispositivo
giratoHo de
RECEPTACULO
Objeto Pieza N=. Part N'.
en EUA en Canad=;
Bolsa para polvo 20-50557 20-50404
Filtro de escape 20-86889 20-40324
Filtro de seguridad 20-86883 20-40321
del motor
Cubierta de Bot6n de
almacenamiento cordon
para accesorios el_cb'ico
(Almacenamiento
para accesorios
en denb_)
Tapa del
Cubierta de almacenamiento
para Power-Mate Jr." _ Cubierta del filtro de escape
J (No es muesCra)
el_ctrico
PesUIIo
de la tapa
de la bolsa
Bolsa para polvo
Filb'o de seguridad
del motor (Det_s
de la bolsa para polvo)
4
I A Potfavorpongaespecialatenci6na_stos recuadresconalertaderiesgo.Advertencia:Este I
informaci6nlealertar_ delpeligrodefuego,choqueselectricos,quemadas ylesiones. Cuidado:
I
Esteinformationle alertarade peligroscomolesionesy da_osdepropiedad.
ADVERTENCIA
Peligrode choqueelL_ctrico
No conecte la aspiradorahasta que terminede
armada. De Io contTariopodda causarun
choqueel_ctrico o lesi6n corporal.
I
Antes dearmarla aspiradora, chequeela LISTA
DE EMBALAJE enla cubiertaseparadade la Lista
de Partespara Reparation. Useesta Ustaparaved-
ficar que ha recibidotodasles compenentesde su
nuevaaspiradoraKenmore.
TUBO TELESCOPICO
Control de
extensi6n
adjustable _
del tubo
I
I
I
b
La extensiOn
i_ de!tuboes
ajustal_ey no
requeireel
montaje.Para
- ajustar,empu-
je haciaabajo
enelbotOndel
tuboy mueva
eltubosuperi-
or a laposi-
ciOndedeada
La partegiratoria,
situadaen el
Power-Mate',le
permitemoverel
mangoa la izquier-
da para pasarla
aspiradoraa una
extensionmdslarga
debajode losmue-
bles bajes.
Cuando ajuste la Iongitudde ]a vara hayque tener
el Power-Mateecon la manoo elpie.
POWER-MATE®
Introduzcalostubosen laPower-Mateehastaque el
bot6ndel tuboquede_jo en positiOn.
Bot6n
de cierre-_-
telesc6pico
tubo
_- Conb'ol de extension
ajustable del tubo
-- Botdn del
liberaci6n
r_pida del tubo
5
RECEPTACULO
1.Abrala tapadel recept_culo.
2. Examinelabolsapara polvoesteinstaladocorrec-
tamante.Consultelasins_uccionesdeinstalacibnen
la CAMBIO DE LA BOLSA.
3. Examineel filtrodeseguridaddelmotor este insta-
ladocorrectamante.Consultelasinstrucdonesde
instalacibn en CAMBIO DEL FILTRODE SEGURI-
DADDEL MOTOR.
LA TAPAY LA CUBIERTA
Es normalquela tapadel recept_culose desprenda
al set abiertam_,sde Ionecesario.Paracolocarnue-
vamentela tapa, alineelas ranurasdela bisagra,in-
sdrtelasy cierrelatapa.
CUIDADO
Nunca debe abrir la capucha del contenedor
estando la tapaabierta. As| se evitar_ dafiosa
la capucha del contenedor ylo a latapa.
Est_ aspiradora esta equipada con almac_n
MANGUERA
1.Alineela pestaSa de
sujed6n de la manguera
y la ranure de la cubier-
ta del recept_culo e
introduzcala manguera
en el recept_culohasta
que quede fija an posi-
ci6n.
Pararetirar:.Levanteel
pestillo de la manguera
y tire dela manguera.
sujeci6n
dela
msnguera
Bot6n de
cierre
Bot6n de_
liberacJ6n
r_pida del
2. Inf_x:iuzcael
mangoen el tubo
hastaque el botbn
quede en posicidn.
Asegt_resedeque la
manguera no est_
torcide.
Para retira_.Oprima
m el botdn de liberad6n
rdpidadelmango
paraliberarel mango
y tire delmango hacia
arTiba.
Para Guarder:Paraprevenir la pred_ndela mangua
miantrasse guarda,desunala mangua deltubode la
aspiradora. Guarde la magua en una posici_n
enrollada y flojamente detel manereque la tapa de la
mangua no se estire.
a bordo para el accesorio Power-Mate Jr.®.
Para instalar:
Abra la cubierta de almacenaje del Power-
Mate Jr. ®.InserLe el Power-Mate Jr.®,pre-
si6nelo en su lugar hacia abajo, y cierre la
cubierta con seguridad.
Para quitar:.
Abra la cubierta de almacenaje. Levante el
Power-Mate Jr.®de su lugar utilicelo como
sea necesario (vdase ACCESORIOS y
USO DE ACCESORIOS).
Almacenamiento
para Power-Mate Jr.e
6
INSTRUCCIONES DE OPERATION
kADVERTENCIA
Peligrode lesi6n personal y da_o al
_roducto
NOenchufe la aspiradora si el
interruptorestz_en la posici6n ON.
Podria causar lesi6n personal oda6o
alproducto.
Elcord6n el_ctrico se mueve
r_pidamentedurante el enrollamiento.
Mantengaalejados a los ni_os y
asegure espacio libre suficiente para
evitar lesiones personalesal enmllar
el cord6n.
NO use los enchufes Iocalizadossobre
los muebles. Los objetos cercanos
poddan resultar dafiados,
Bot6n
1."13redel cord6n
para sacadodel
recept_culo hasta
tenerla Iongitud
deseada.Elcor-
d6nnose enro-
Ilar_hastaque
oprima el botbn
para enrollado.
NOTA:Parareducirel riesgode choqueel6ctrico,
estaaspiradomcuentaconunadavijapolarizada,
unodeloscontactosesm_sanchoqueelotto.La
clavijas61opuedeintmducirsedeunamaneraenet
enchufe.Si ladavijanocabebienen elenchufe,
invidrtala.Siat_nno cabe,Ilamea unelectr;cista
paraque instaleun enchufecorrecto.Noalterela
clavijadeningunamanera.
2. Conecteel cord6neldctricopoladzadoen un
enchufede 120vol'dosque se encuentrecercadel
piso,
Paraenrollar:des-
conectelaaspira-
dora.Sujeteel
enchufemientras
enrollael cordon
paraimpedirdafioo
lesi6ncorporalpot el
movimientodelcor-
d6n.Opnmael
controlparabot6n el
cord6nel_-'lricocon
la manoo conel pie.
Pedal de selecci6_
de nivel de
pelode la
Indicador de
nivel de pelo
de la alfombra
Pedal de
liberaci6n
del mango-----=-
3. Bajeeltubodesdela posici6n verticalpisandoel
_edalde liberacidndel mango.
IbCUIDADO
NOdeje la Power-Mate"funcionandoen
posicibn vertical en un lugar durante ningt_n
espacio detiempo:se puededa_ar laalfombra.
4. Selecdoneuna alturade pelo de laaffombra
usandoel pedal pequefioubicadoen la parteposte-
riorde laPower-Matee. Elniveldepelolaalfombra
se muesltaen etindicador.ConsulteSUGEREN-
CIAS SOBREEL AJUSTE DE NIVEL DE PELODE
LA ALFOMBRA.
Atenci6n: Refi_rasealas recomendadonesdelfab-
ricantepara limpiar sualfombra,AJgunasalfornbras
m_s delicadaspuedenrequerirel usodela aspi-
radoraconel agitadorP_ver-Mate° desconectado
para prevenirque la alfombrasea dafiada.
7
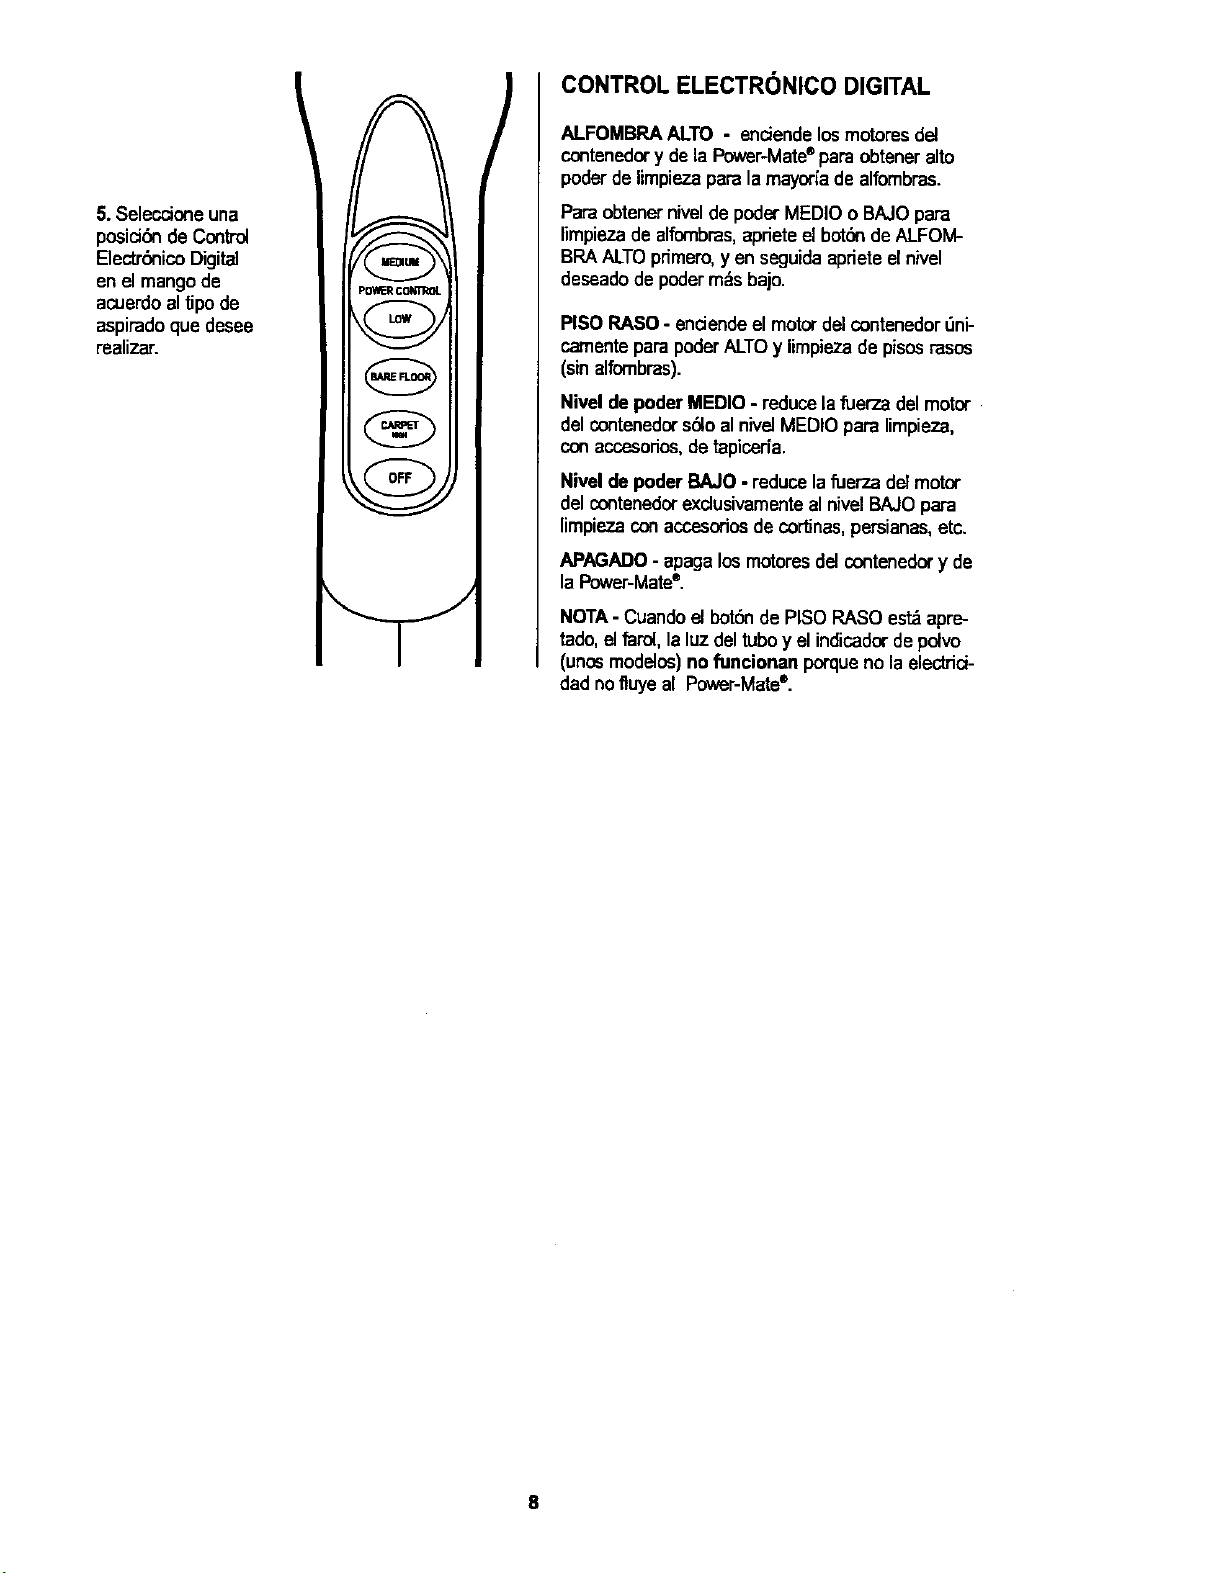
5.Seleccione una
posicidn de Control
Electrbnico Digital
enel mango de
acuerdoaltipode
aspiradoque desee
realizar.
P_ CONTROL
v
[ nJ-_ i
/
CONTROL ELECTRONICO DIGITAL
ALFOMBRAALTO - enciendelos motores del
contenedory dela Power-Mate®paraobteneralto
poderde limpiezaparalamayor[ade alfombras.
ParaobtenerniveldepoderMEDIO0 BAJOpara
nmpiezadealfombras,aprieteel botdndeALFOM-
BRAALTOprimero,yen seguidaapriete elnivel
deseadode podermdsbajo.
PISO RASO- endendeel motorde]contenedor_ni-
camenteparapoderALTOy limpieza de pisosrasos
(sinalfombras).
Nivel depoder MEDIO - reducela fuer7_adel motor
delcontenedors610alnivelMEDIOpara limpieza,
conaccesorios,detapiceda.
Nivelde poder BAJO - reducelafuerT_adel motor
delcontenedorexclusivamenteal nivelBAJOpara
limpiezaconaccesoriosde cor'dnas,persianas,etc.
APAGADO- apagalos motoresdelcontenedor y de
la Power-Mate®.
NOTA- Cuando e_botSnde PISOPASO est_apre-
tado,el farol,la luz del tuboy el indicadorde pelvo
(unosmodelos)no funcionan porqueno laelectrici-
dad nofluyeal Power-Mate®.
8
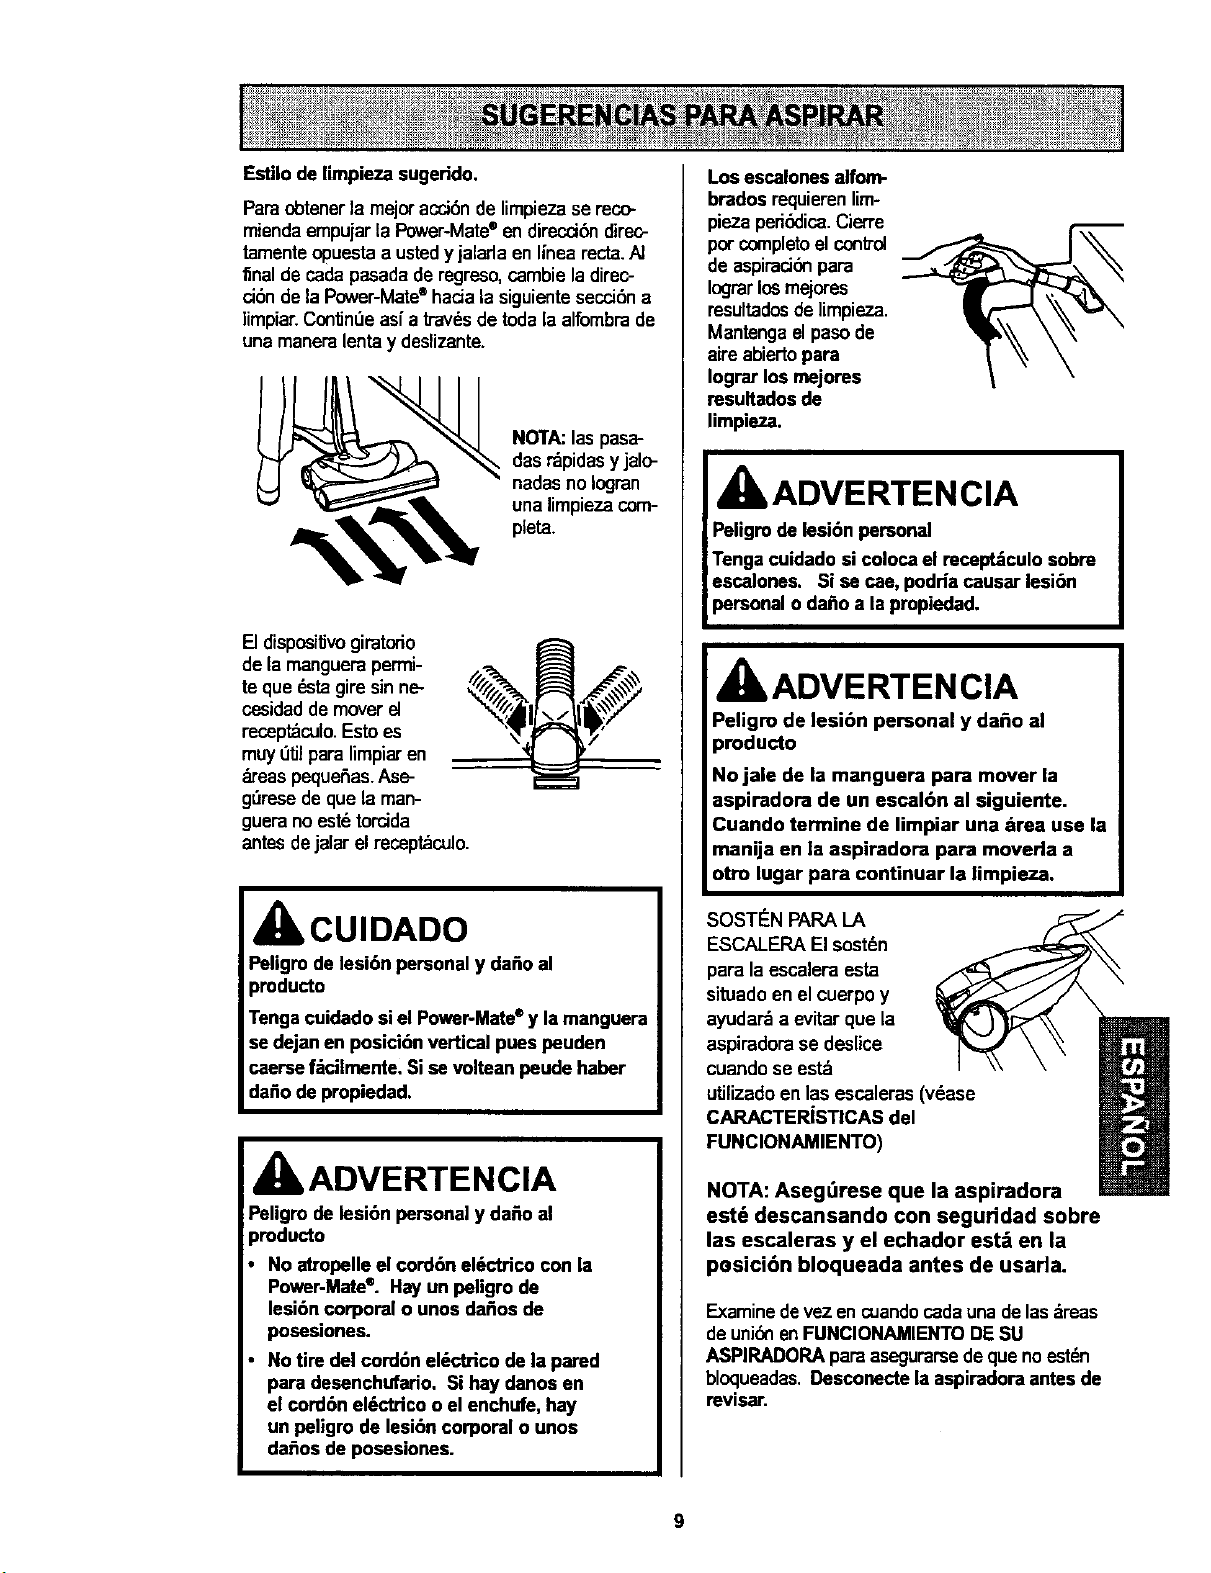
Estilodelimpiezasugerido.
Paraobtenerla mejoracci6nde limpieza se reco-
miendaempujarla Power-Mate®endireccibn direc-
tamenteopuestaa ustedy jaladaen linearecta.A]
final de cadapasadade regreso,cambieladirec-
ci6ndela Power-Mate®hada la siguientesecci6na
limpiar.ContinUeasf a travdsdetoda la alfombrade
unamaneralentay deslizante.
NOTA:laspasa-
dasrdpidasy jalo-
nadasno Iogran
una limpiezacom-
pleta.
[] dispositJvogiratodo
de la manguerapermi-
te que dstagire sinne-
cesidaddemoverel
receptdculo.Estoes
muy_tJlparalimpiaren
b'eas pequefas. Ase-
g_resede que la man-
gueranoest6torcida
antesdejalar elrecept_culo.
CUIDADO
Peligm de lesi6n personaly dafioal
pmducto
Tengacuidado siel Power-Mate*y la manguera
se dejan enposici6n vertical pues peuden
caersef_cilmente. Sise volteanpeude haber
dafiode propiedad.
IbADVERTENCIA
Paligrode lesi6n personaly da_o al
)roducto
No atropelleel cord6n el6ctrico con la
Power-Mate®. Hayun peligro de
lesi6n corporal o unos dafios de
posesiones.
No tire del cord6n el_ctrico de la pared
para desenchufario. Si hay danos en
el cord6n el6ctrico o el enchufe, hay
un peligro de lesi6n corporal o unos
dafios de posesiones.
Los escalones alfom-
brados requierentim-
piaza ped&:lica.Cierre
per completoelcontrol
de aspirad6npara
Iograrlosmejores
resultadosdelimpieza.
Mantengaelpasode
aire abiertopara
Iograr los mejorea
resultadosde
limpieza.
kADVERTENCIA
Peligm de lesi6n personal
Tenga cuidadosi colocael recept_culosobre
escalones. Si se cae,podHa causar lesi6n
personal o dafioa la propiedad.
A
dlt ADVERTEN ClA
Peligro de lesibn personal y dafio al
producto
No jale de la manguera para mover la
aspiradora de un escal6n al siguiente.
Cuando termine de limpiar una =trea use la
manija en la aspiradora para moverla a
otto lugar para continuar la limpieza.
SOST_N PAPALA
ESCALEPA El sostdn
para la escaleraesta
situadoen el cuerpoy
ayudarda evitarque la
aspiradorase deslice
cuandose estd
utilizadoen las escaleras(v_ase
CARACTERISTICAS del
FUNClONAMIENTO)
NOTA: Aseg_rese que la aspiradora
est_ descansando con seguddad sobre
las escaleras y el echador est_ en la
pesicibn bloqueada antes de usarla.
Examinedevezen cuandocadaunadelas_,reas
deuni6nenFUNClONAMIENTODE SU
ASPIRADOPA paraasegurarsedeque no estdn
bloqueadas.Desconectelaaspiradora antes de
revisar.
9
UseelajusteXLO(bajo) paraobtenerla mejorlim-
pieza a fondo. Pototraparte,quiz_s se requiemele-
varel nivelparafacilitaralgunastareas,comopot
ejemplocuandose tratadetapetesy algunasalfom-
binsde pelolargo,y paraimpedirque la aspiradora
se apague.Se sugierenlossiguiantesajustes:
HI- Pelomuylargoy suelto,tapetes,alfombras
muyacojinadas.
MED- Pelomediano a largo.
LO- Pelocortoa median_
XLO- Lamayoda de lasalfombrasy pisos
descubiertos.
IbCUIDADO
NO instale ni retire el mango ni los tubos
cuando la aspimdora est=_encendida. Esto
podria causar chispas y da_ar los contactos
el&ctdcos.
ACCESORIOS DEL MANGO
NOTA:Si IJene
instaladala
Power-Mate®,apa-
gue laaspiradora
antesdequitarel
mangode los
tubos.
1. Optimael bot6n
de bloqueoy
luegotire del
mangoparaqui-
tadodeltuba
Bot6nde
liberaci6n
rapide 7 _._
dpAmangO--,.
telescopio--
Sisu modelo_ene la caractedsf_caopcionaldela
liberacibndelmangor_pida,insb'taladeun modo
semejante.
2. Desliceelaccesododese-
adoconflrmeza sobre el
mang_Consulte la USO DE
LOSACCESORIOS
NOTA: CepiHo
Para montar el cepillo _ parasacudir
para sacudir inserte /" Lj)'_ \
el cepillo para telas =_--_=__'_._
dentro de la boquilla del "_ _,_
cepillo para sacudir \
presione en su lugar. CepMo
para telas
Para quitar,
_ resionar el
pestillo y
levantarse.
Pesti//o
ACCESORIOS DEL TUBO
1. Pararetirarlos
tubosde la
POWER-MATE°,
colSquelosen la
posici6nvertical
debloqueo.
Pedal de
liberaci6n
' r_pidadel
tubo
2. Pise d pedalde
liberaciSnr_pidadd
tuboy tire del tubo
haciaardbapara
desprandedodela
POWER-MATE®.
Noes necesarior_=tirar
el enchufey cordbn
el_ctrico dela
POWER-MATEe para
usar los accosoriosdel
tubo.
3.Coloqueel
accosoriodese-
adosobreel
tubo.Consulte
laUSO DE
LOS
ACCESOPJOS.
t0
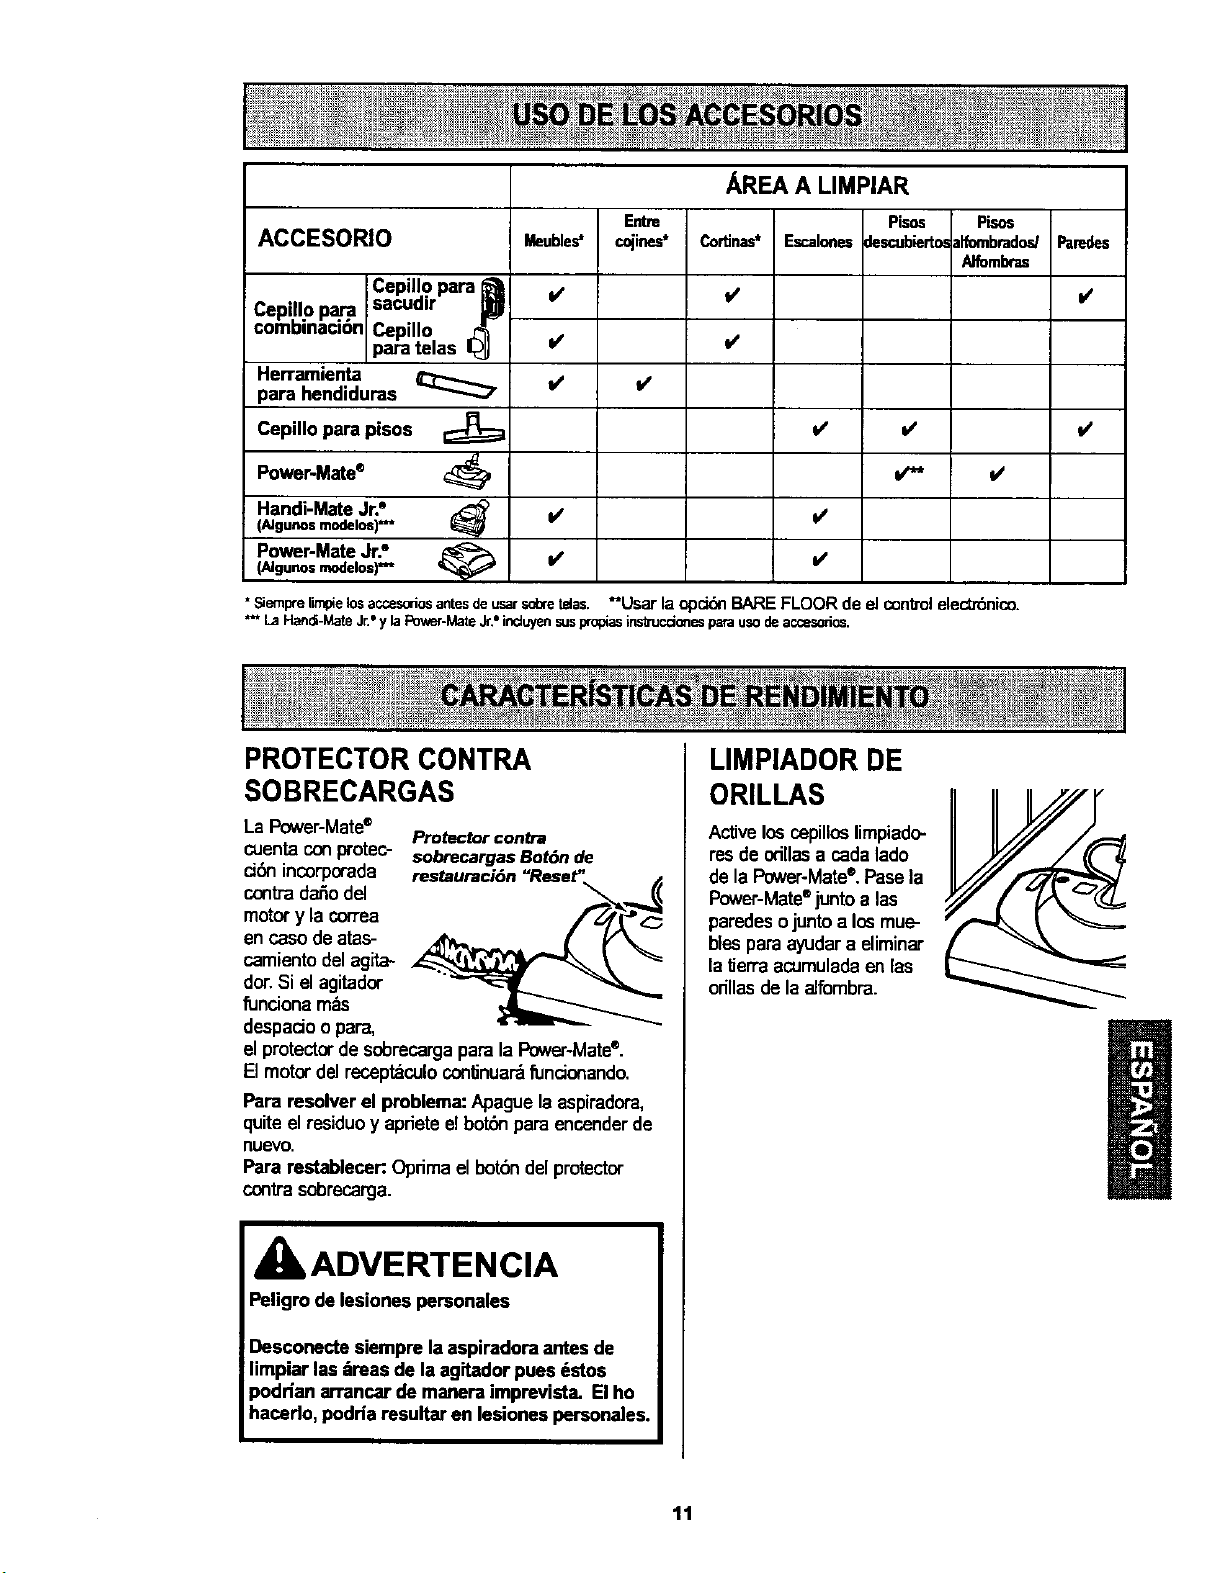
AREA A LIMPIAR
Entre Pisos Pisos
ACCESORIO cojines* Escalonesdescubierto_dfornbradodParedes
Alfombras
=/
C:piJ o?.r,=a
Cepillo para B
combinaci6n
Cepillo
para telas I_J
Herramienta
para hendiduras _
Cepillo para pisos
Power'Mate®
Handi-MateJr._
(AJgunos modelos) *_
Power-MateJr."(AJgunos modelos) *="
Meu_e_
it
V'
v'
Cortinas"
v'
v'
_' is
• Siemprefimpielosaccesoriosantesdeusarsdaretelas. _*Usar la opc_n BARE FLOOR de el control elect_nico.
*** LaHand-Male Jr."y laPower-Ma_Jr.*induyensusprop_asinstrucdonesparausodeaccesodos,
l/
PROTECTOR CONTRA
SOBRECARGAS
La Power-Mate®
Protector contra
cuentaConprotec- sobrecargasBot6nde
ci6n incorporada
conb-'adar_odel
motor y la correa
en caso de .tas-
camiento del agita-
dor.Si el agitador
funciona m_s
despado o para,
el protector de sobrecargapara la Power-Mate®.
El motor del recept_culo continuar_fundonando.
Para resolver el problem." Apague la aspiradora,
quite el residuoy apriete elbot_ para encenderde
nuevo.
Para restablecer:Oprimael bot6ndelprotector
contrasobrecarga.
ADVERTENCIA
Peligro delesiones personales
Desconecte siempre laaspiradora antesde
limpiar las m'easde laagitador pues dstos
podHan arrancar demanera imprevista. El ho
hacerlo,podria resultar en lesiones personales.
LIMPIADOR DE
ORILLAS
Activelosospillos limpiado-
res deodllasa cadalado
dela Power-Mate®.Pasela
Power-Mate®juntoalas
paredesojuntoa losmue-
blespara ayudara eliminar
laf_erraacumuladaenlas
orillas dela aJfombra.
tt
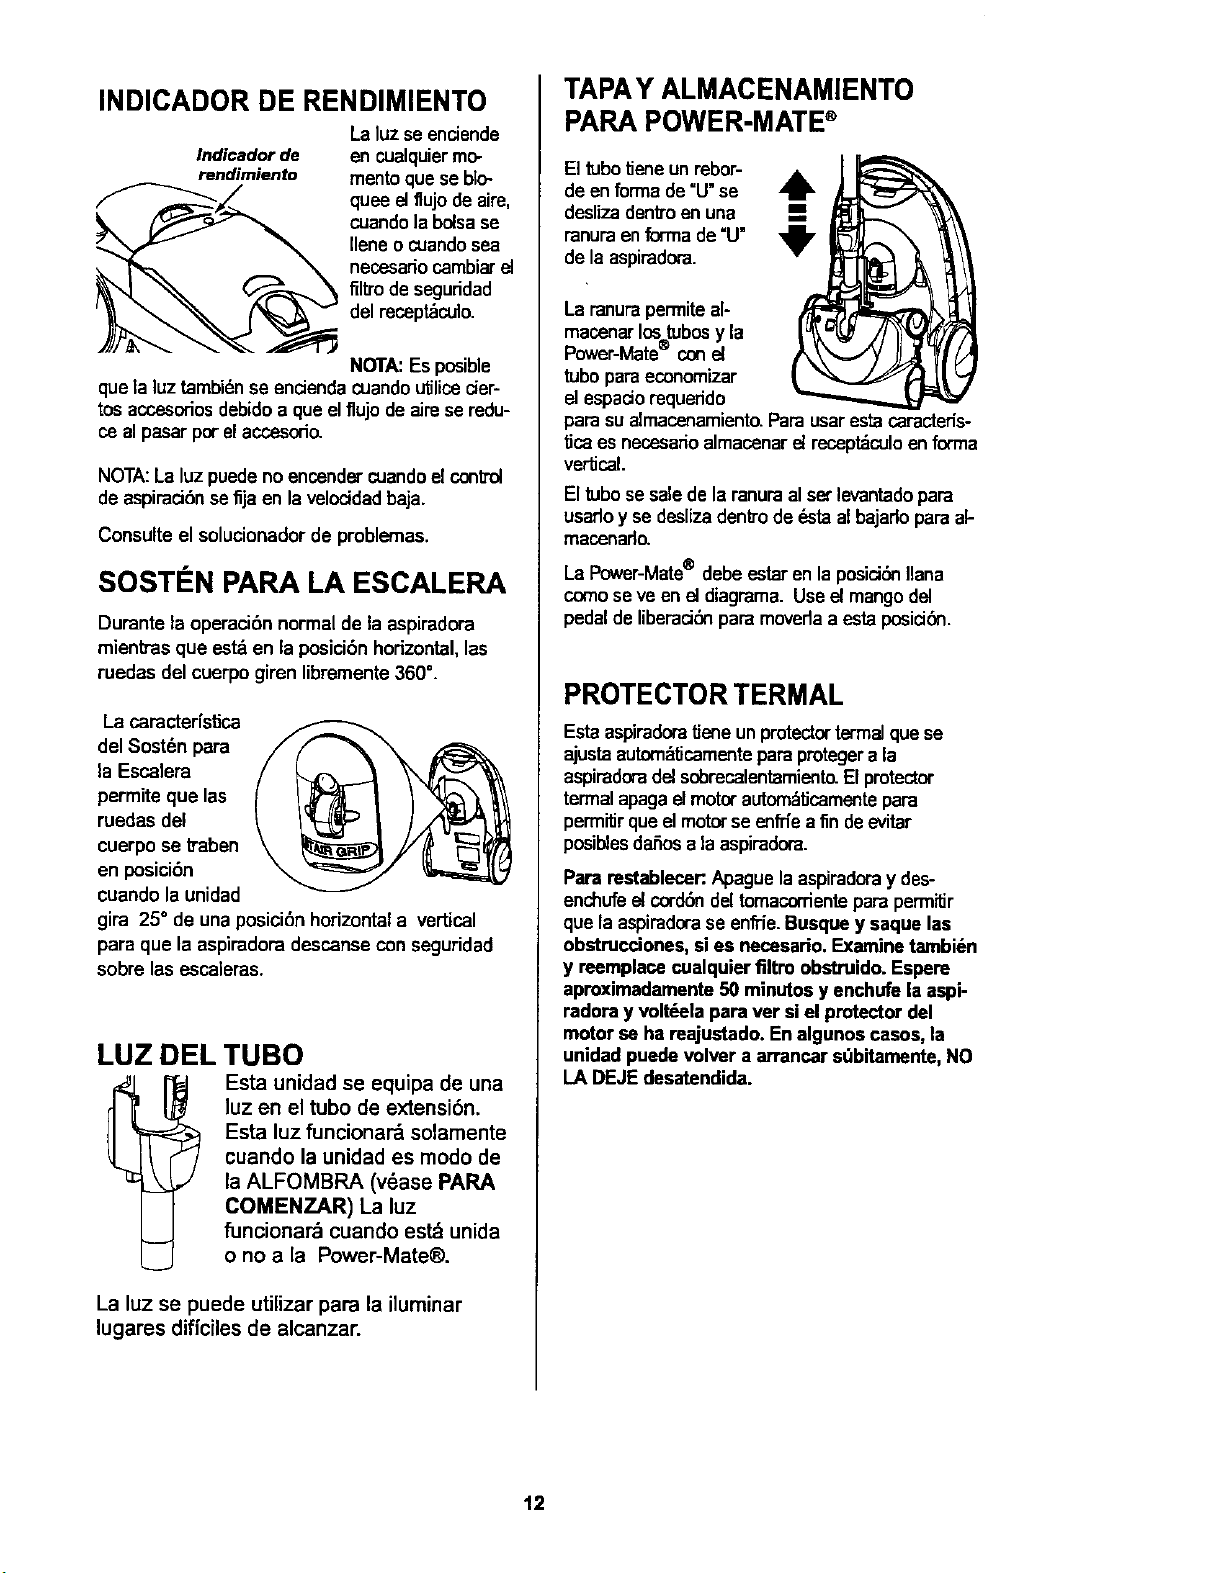
INDICADOR DE RENDIMIENTO
Laluzse enciende
Indicadorde en cualquiermo-
rendimiento mento quese blo-
quee eltlujodeaire,
cuandola bolsase
Ilene o cuandosea
necesariocambiarel
filtro de seguddad
del recept_culo.
NOTA:Es posible
quela luz tambidnse encienda cuandou_licecier-
tos accesodosdebidoa que elflujo de aimse redu-
ce alpasar porelaccesoda
NOTA:La luz puede no encendercuando el control
deaspiraci6n se fija en la veloddadbaja.
Consulte el solucionador de problemas.
SOSTI N PARA LA ESCALERA
Duranta la operaci6nnormal de la aspiradora
mientrasque est_ en la posicibnhorizontal,lea
ruedas del cuerpo giren libremente360°.
La caracterfstica
del Sost_n para
la Escalera
permite que las
ruedas del
cuerpo se ftaben
en posicibn
cuando la unidad
gira 25° de unaposiciSnhorizontala vertical
para que la aspiradoradescansecon seguridad
sobre lasescaleras.
LUZ DELTUBO
Esta unidad se equipa de una
luz en el tubo de extensibn.
Esta luz funcionard solamente
cuando la unidad es modo de
la ALFOMBRA (v6ase PARA
COMENZAR) La luz
funcionard cuando est_ unida
o no a la Power-Mate®.
La luz se puede utilizar para la iluminar
lugares dificiles de alcanzar.
TAPAY ALMACENAMIENTO
PARA POWER-MATE®
El tubotieneun rebor-
deen formade=U"se
deslizadenb'oen una
ranuraenforma de=U"
dela aspiradora.
Laranurapermite al-
macenarlostubosyla
Power-Mate conel
tubopara economizar
elespadorequeddo
para sualmacenamiento_Parausarestacaracteds-
ticaes necesadoalmacenarel recept_culoen forrna
vertical.
El tubose salede la ranuraal set levantadopara
usarloy se deslizadenlrodedstaalbajado paraak
macenado.
LaPower-Mate® debeestarenla posiciSnliana
comoseve enet diagrama.Useel mangodel
pedaldeliberaciSnparamovedaa estaposiciSn.
PROTECTORTERMAL
Esta aspiradoratJeneun protectortermelquese
ajustaautom_ficamenteparaprotegera la
aspiradoradel sobrecalentamiento_El protactor
termal apagaelmotorautom_,licamentepara
permitJrque el motorse enffiea fin deevitar
posiblesdaSosa la aspiradora.
Para restablecer:Apague laaspiradoray des-
enchufeel corddndel tomacorriente para permitJr
que la aspiradorase enffie.Busquey saque las
obstrucciones, sies necesario.Examine tarnbi_n
y reemplacecualquier filtro obstruido. Espere
aproximadamente50 minutosy enchufe laaspi-
radora y volt_ela para ver siel protectordel
motor se ha reajustado. En algunoscasos, la
unidad puedevolver a arrancar sQbitamente,NO
LA DEJEdesatendida.
12
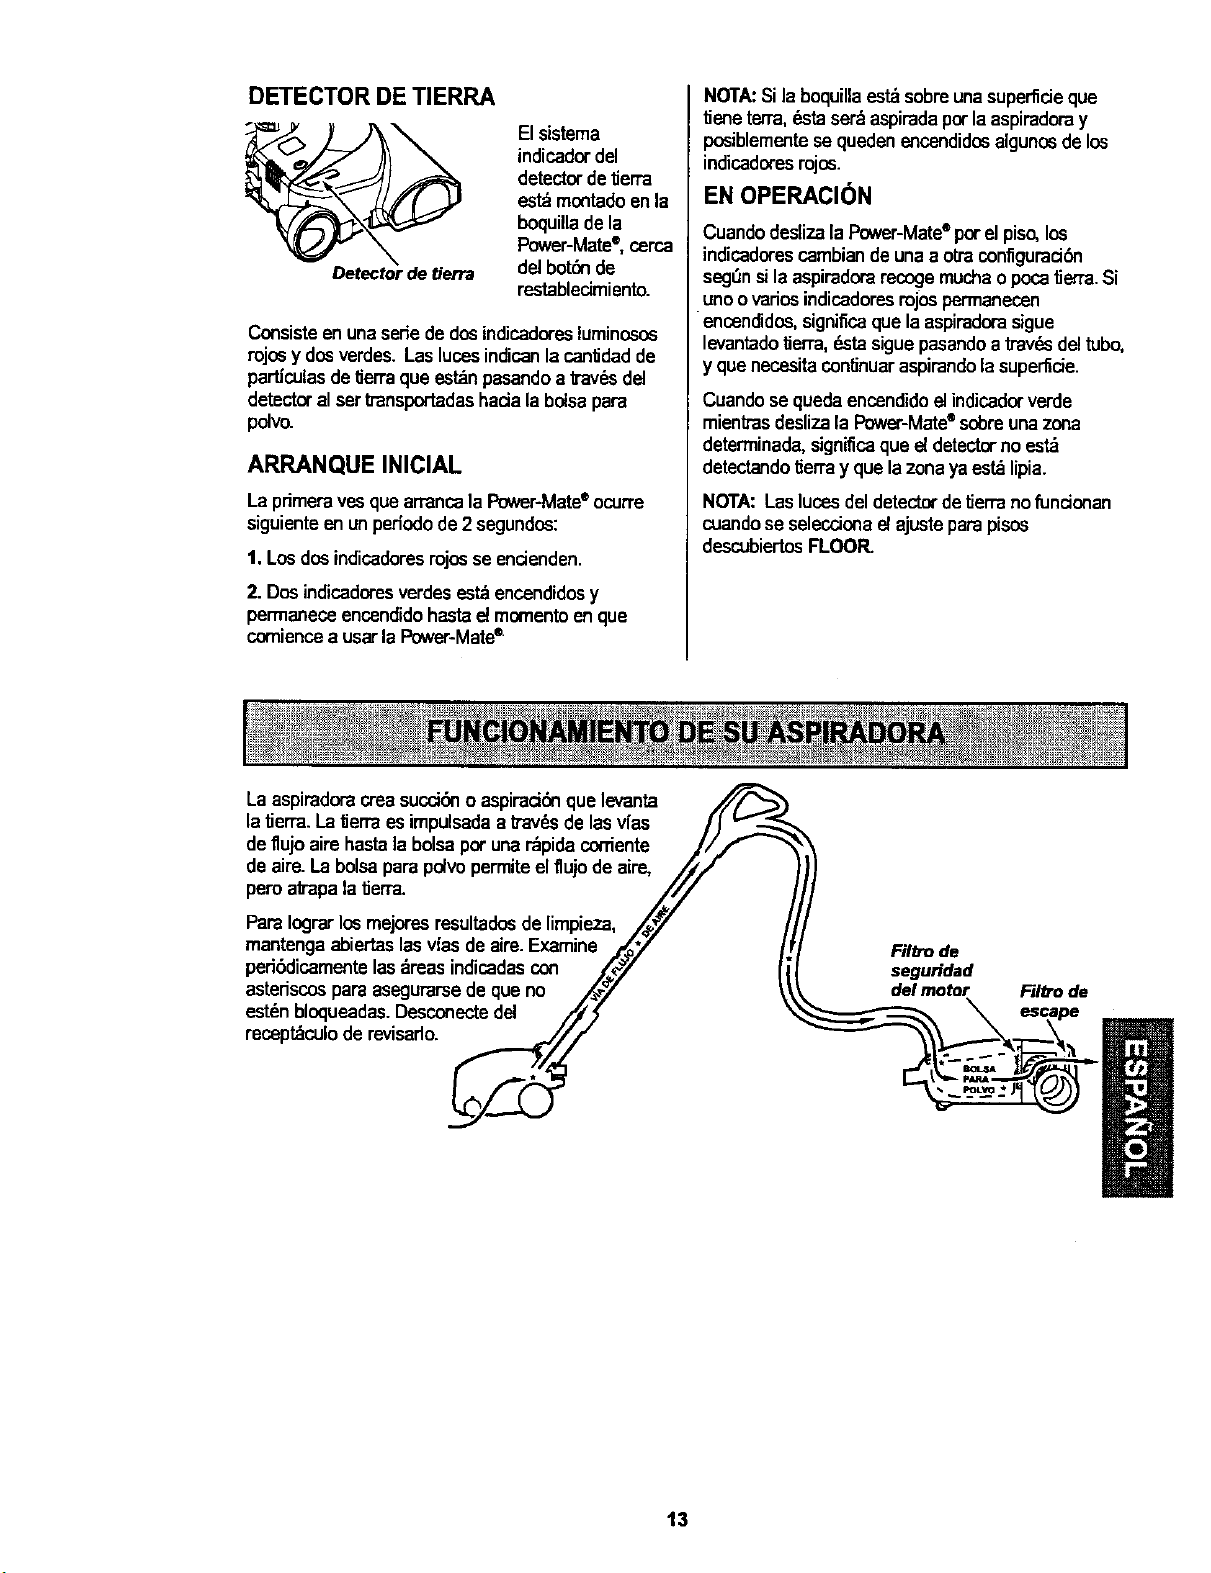
DETECTOR DE TIERRA
Detectorde tierra
El sistema
indicador del
detector de tierra
estdmontadoenla
boquillade la
Power-Mate®,cerca
del botdnde
restablecimiento.
Consisteenunasere dedosindic.adoresluminosos
rojosy dosverdes.LaslucesindicanlacanlJdadde
particulasdeIJerraque es_n pasandoa b'avdsdel
detectoralset transpottadashaciala bolsapara
polvo.
ARRANQUE INICIAL
La primerayesquearrancalaPower-Mate®ocurre
siguienteen un pefiodo de2 segundos:
t. Los dosindicadoresrojos se encienden.
2. Dosindicadores verdesestdencendidosy
permaneceencendidohastae! momentoenque
corniencea usarla Power-Mate®.
NOTA:Si laboquillaest_sobreunasupertideque
tieneterra,_ta ser_aspiradapot laaspiradoray
posiblementese queden encendidosalgunosdelos
indicadoresrojos.
EN OPERACl6N
Cuandodeslizala Power-Mate®por elpiso,los
indicadorescambiande unaaotra conflguradSn
seg_nsila aspiradorarecogemuchao pocatJerra.Si
unoovadosindicadoresrojospermanecen
encendidos, signiflcaque la aspiradorasigue
levantadotierra,dstasiguepasandoa trav_sdeltubo,
y quenecesitaconlinuaraspirandola supe_cie.
Cuandose queda encendidoel indicadorverde
mientrasdesliza la Power-Mate®so/oreunazona
deterrninada,significaque e{ detectorno est_
detectandoIJerray que la zona yaes_ lipia.
NORA:Lasluces del detectordetierra nofundonan
cuandose seleccionael ajustepara pisos
descubiertosFLOOR.
Laaspiradoracreasucdbno aspiraddnque levanta
latierra.La_erra es impulsadaa ITav_sde las v{as /J
deflujo aire hastalabolsapot unardpidacocriente J//'- _'_
deaire.Labolsa parapolvopermiteelflujode aire, /iJ
pero af_'apalatJerra. ////
PardIograrlosmejoresresultadosde limpieza, ,/_7
mantengaabiertaslasvfasde aire.Examine ./,_/
peribdicamentelas_reas indicadascon ,,_7
astedscospara asegurarsede queno ,/_'
est_nbloqueadas.Desconectedel /_
receptdculoderevisado._//f
Fil_mde
segu_dad
delmotor
Filttode
13
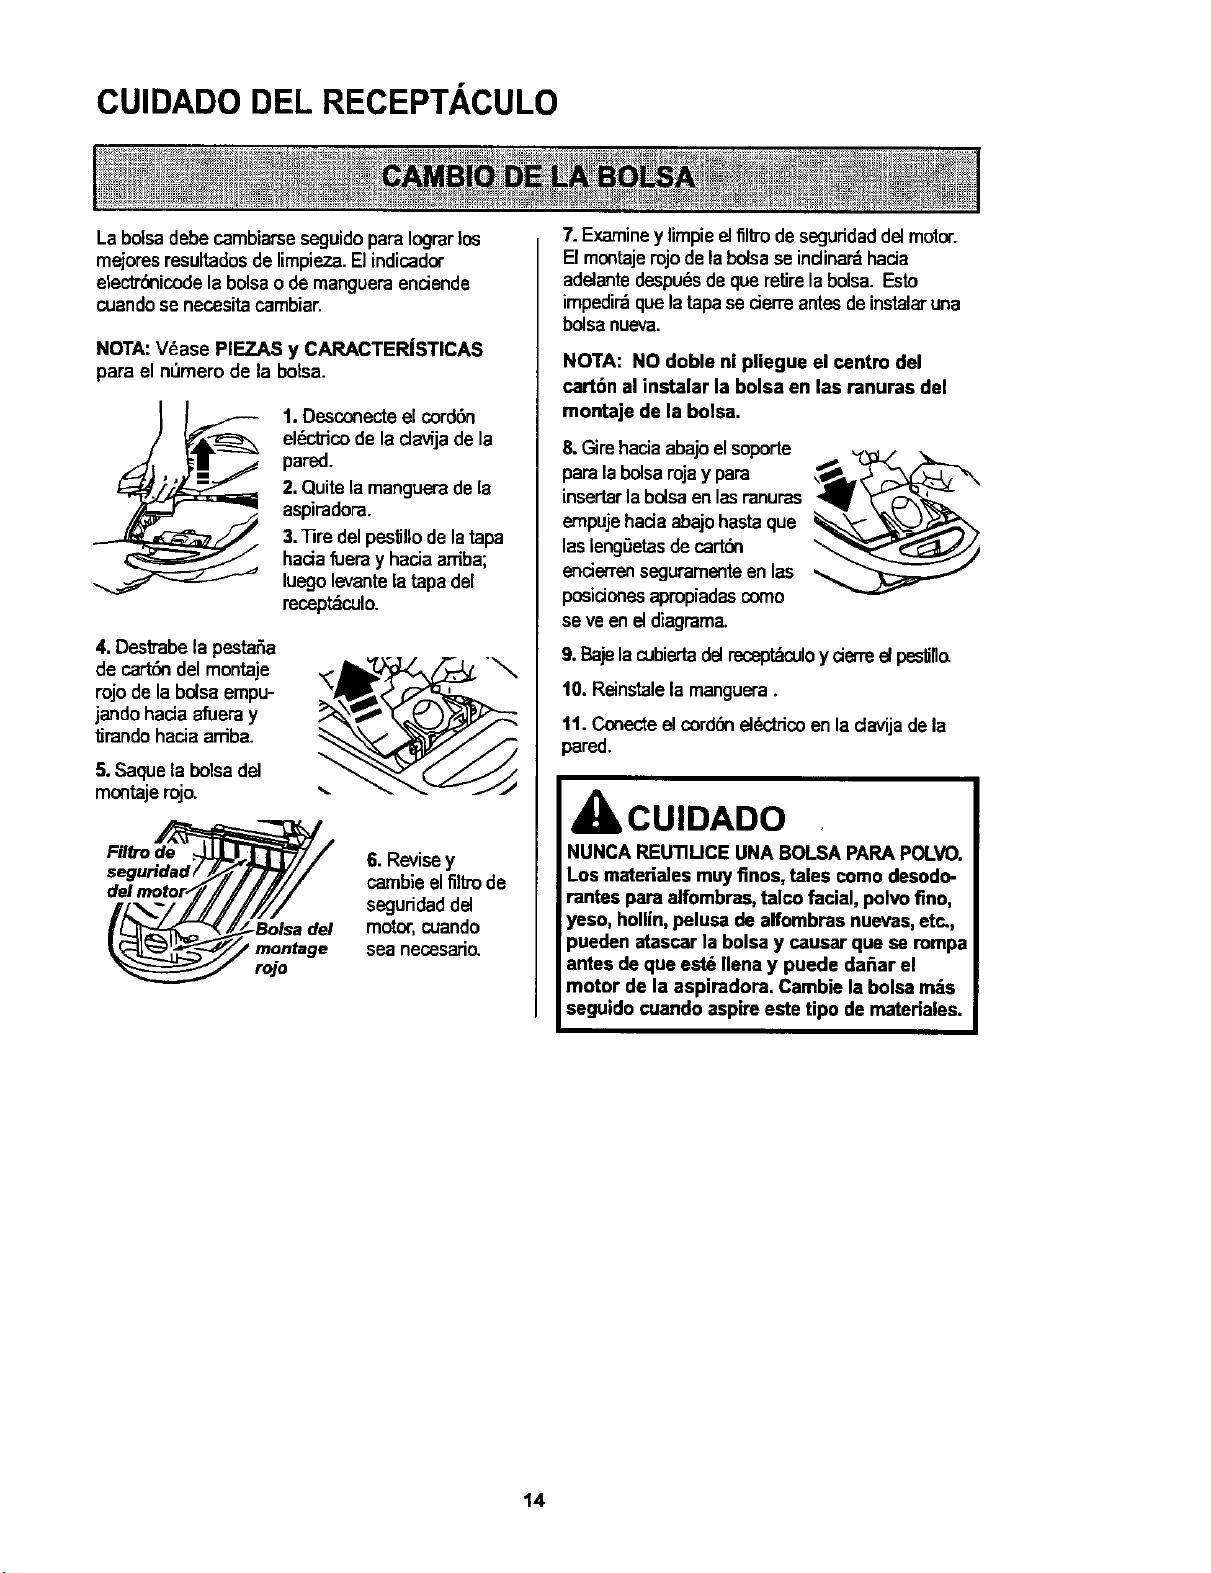
CUIDADO DEL RECEPTACULO
La bolsa debecambiarseseguidopara Iograrlos
mejoresresultadosdelimpieza.Elindicador
electrdnicodela bolsao demangueraenciende
cuandose necesitacambiar.
NOTA:Vdase PIEZAS y CARACTERJSTICAS
para el n_mero de la botsa.
1. Desconecteel cord6n
el_ctTicode ladavijade la
pared.
2.Quitelamangueradela
aspimdora.
3."13redelpes_llodelatapa
haelafueray haciaardba;
luegolevantelatapadel
mcept_culo.
4. Destrabela pestar_a
de cartSndelmontaje
rojode labolsaempu-
jandohaciaafuera y
tirando haciaardba.
5. Saquela bolsadel
montajemjo.
Filtrode
seguHdad/
rojo
6. Revisey
carnbieelflltrode
seguddaddel
motor,cuando
sea necssatio.
7.Examiney limpieelfil_'odeseguridaddelmotor.
Elmontajerojodelabolsase indinardhacia
adelantedespudsde queretirelabolsa. Esto
impedirdque latapase cierreantesdeinstalaruna
bolsanueva.
NOTA: NO doble ni pliegue el centre del
cart6n al instalar la bolsa en las ranuras del
montaje de la bolsa.
8.Gimhaciaabajoelsoporte
para labolsarojay para
insertarla boiseenlesranuras
empujehaciaabajohestaque
lasleng6etasde cartdn
encierrenseguramenteen las
posideaes apml:_adascome
se ve eneldiagrama.
9. BajelacubiertadelreceptdoJIoy derre el pes_ll_
10. Reinstalela manguera.
tl. Conecteel cord6nel_ctrico enladavija dela
pared.
CUIDADO
NUNCA REUTIUCE UNA BOLSA PARAPOLVO.
Los materiales muyfinos, tales como desodo-
rantee para alfombras,talco facial, polvofino,
_'eso,hollfn,peluea de alfombras nuevas,etc.,
)ueden atascar la bolsay causar que se rompa
lntes dequa est_ Ilena y puede da_ar el
motor de la aspiradora. Cambie labolsa rods
seguido cuando aspireeste tipo de mateHales.
t4

1.Desconecteelcord6nel6cbicode la davija dela
pared.NO choreeagua sobre laaspiradora.
2. Limpieel exteriorconuntTaposuavey limpio,que
ha sidoexpdmidodespuds de remojarenunasolu-
dbn deaguay detergenteliquidoligero.Sequeel
exteriorconuntTaposecodespu_sde limpiar.
3. Limpielasuper'fiaeexteriordelrecept_culoy de
losaccesoriosparareducirla electricidadest_tJcay
la acumulaelbndepolvo.
CUIDADO
Examineelfllb'odeseguridaddelmotordevezen
cuandoy cambiocuandoestdsuelo.
Paraquitarla bolsa,sigalasinstruccionesen
CAMBIODE LA BOLSA.
kADVERTENCIA
Peligrode choqueel_ctrico
Desenchufeel cordbn de la corrienteelSctrica.
No opere la aspiradora sin el flltro de seguri-
dad del motor. Aseg_urese de que elfiltro est_
seco• instaladoadecuadamente para impedir
que el motorfalle ylo que se produzca un
choqueel_ctrico.
FILTRO DE SEGURIDAD DEL
MOTOR
ELECTROSTATICO
EstefillTosetJeneque cambiarcuandoestdsucio.
Debecambiarseperi6dicamenteseg0nlas
condicionesde us_ Elfiltro no se puede lavar
pues perdeda su capacidadpara atraparaltrapar
polvo.
NOTA:Vdase PIEZAS y CARACTERISTICAS
para el n0mem delfil_o de seguridaddel motor.
Dispositivo de
retenci6n de goma
1.Levante el disposi_-
vode retenddn de
go_a y saqueel filtro
deseguridadcomose
ve en el diagrama.
2.Reemplaceel
filtmconla
superfieleblancaen
sucampodevista
porcorredodebajo
delascostJllasenla
cavidedde la bolsa.
Metaelfil_'opara
que quepa por
cunpletodebajodel
dispositJvode
retenci6ndegoma.
Dispositivo de
retenciOn de goma
%
3.VdaseCAMBIO DELA BOLSA paracarnbiar
labolsa.
15
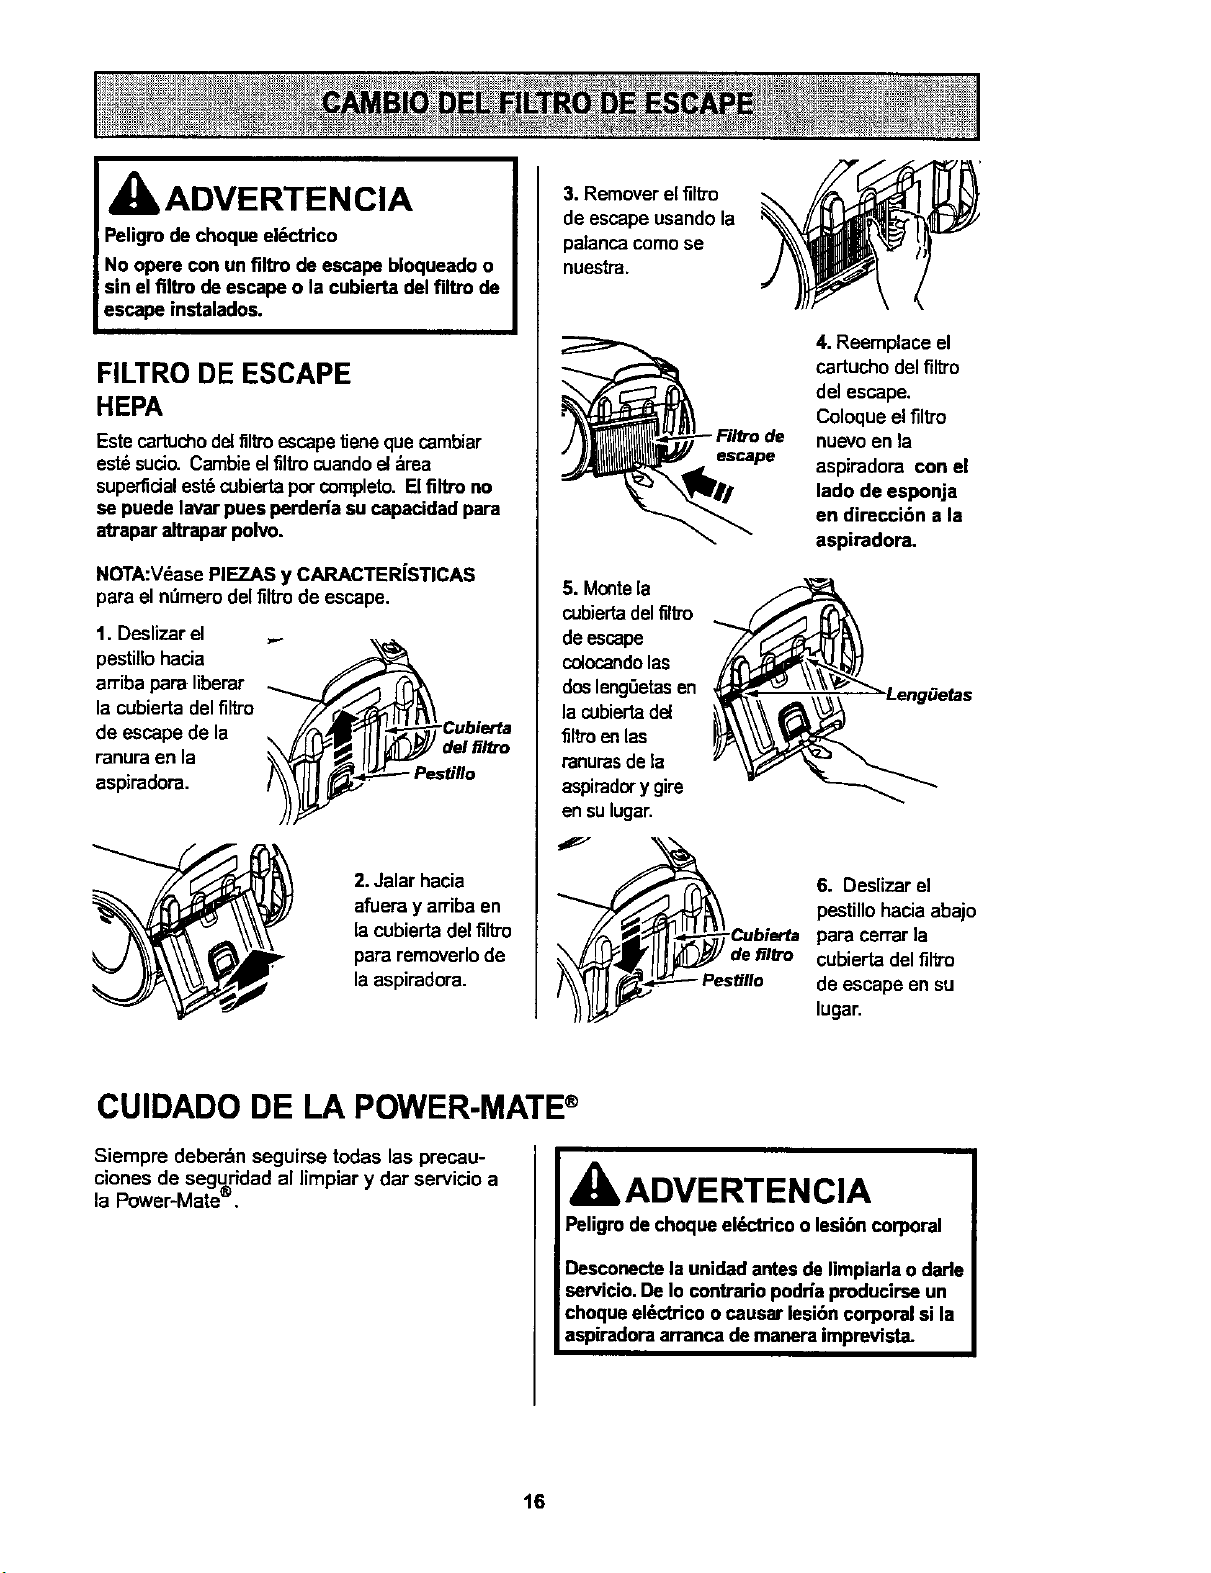
IbADVERTENCIA
Peligrode cheque el6ctHco
No opera con un filtro de escape bloqueadoo
sin el flltro de escapeo la cubierta del filtro de
escape instalados.
FILTRO DE ESCAPE
HEPA
Estecertuchodel flltro escapetieneque cambiar
estdsucio. Cambieelfiltro cuandoel_,rea
superficialest6cubiertapercompleto.Elflltro no
se puede laverpues perderiasu capacidad para
atrapar altraparpolvo.
NOTA:VdasePIEZAS y CARACTER[STICAS
para el nt_merodel filtro de escape.
1. Deslizar el ...
pestillohacia
arriba para liberar
la cubiertadel filtro _-_'_
Cubierta
de escape de la I I:_ _/!
del_/_o
ranura en la I
aspiradora. _ Pestillo
2.Jalar hacia
afueray arriba en
lacubierta delfilb'o
para rernoverlode
laaspiradora.
3. Removerel fllb'o
de escape usando la
palanca comose
nuestra.
4. Reemplace el
cartucho del filtro
del escape.
Coloque elflltro
nuevoen la
escape
aspiradora con el
lade de esponja
en direcci6n a la
aspiradora.
5. Montela
cubiertadelfiltm
deescape
colocandolas
doslengSetasen
la cubiertadel
filtro enlas
ranurasde la
aspiradery gire
en sulugar.
6. Deslizar el
pestillo hacia abajo
Cubierta para cerrarla
,_X_/__I/f IIi_J "/defilb'o cubiertadelflltro
_ I_'_'-_Pestill°deescapeensulugar.
CUIDADO DE LA POWER-MATE®
Siempre deberdn seguirse todas las precau-
clones de seguridad al limpiar y dar servicio a
la Power-Mates,
ADVERTENCIA
Peligrode chequeel_'trico o lesibn corporal
Descouectela unidadantes de Iimpiarlao darle
uervicio. De Io contrario podda producirseun
chequeelSctricoo causer lesibn corporal si la
aspiradoraarranca demanera imprevista.
16
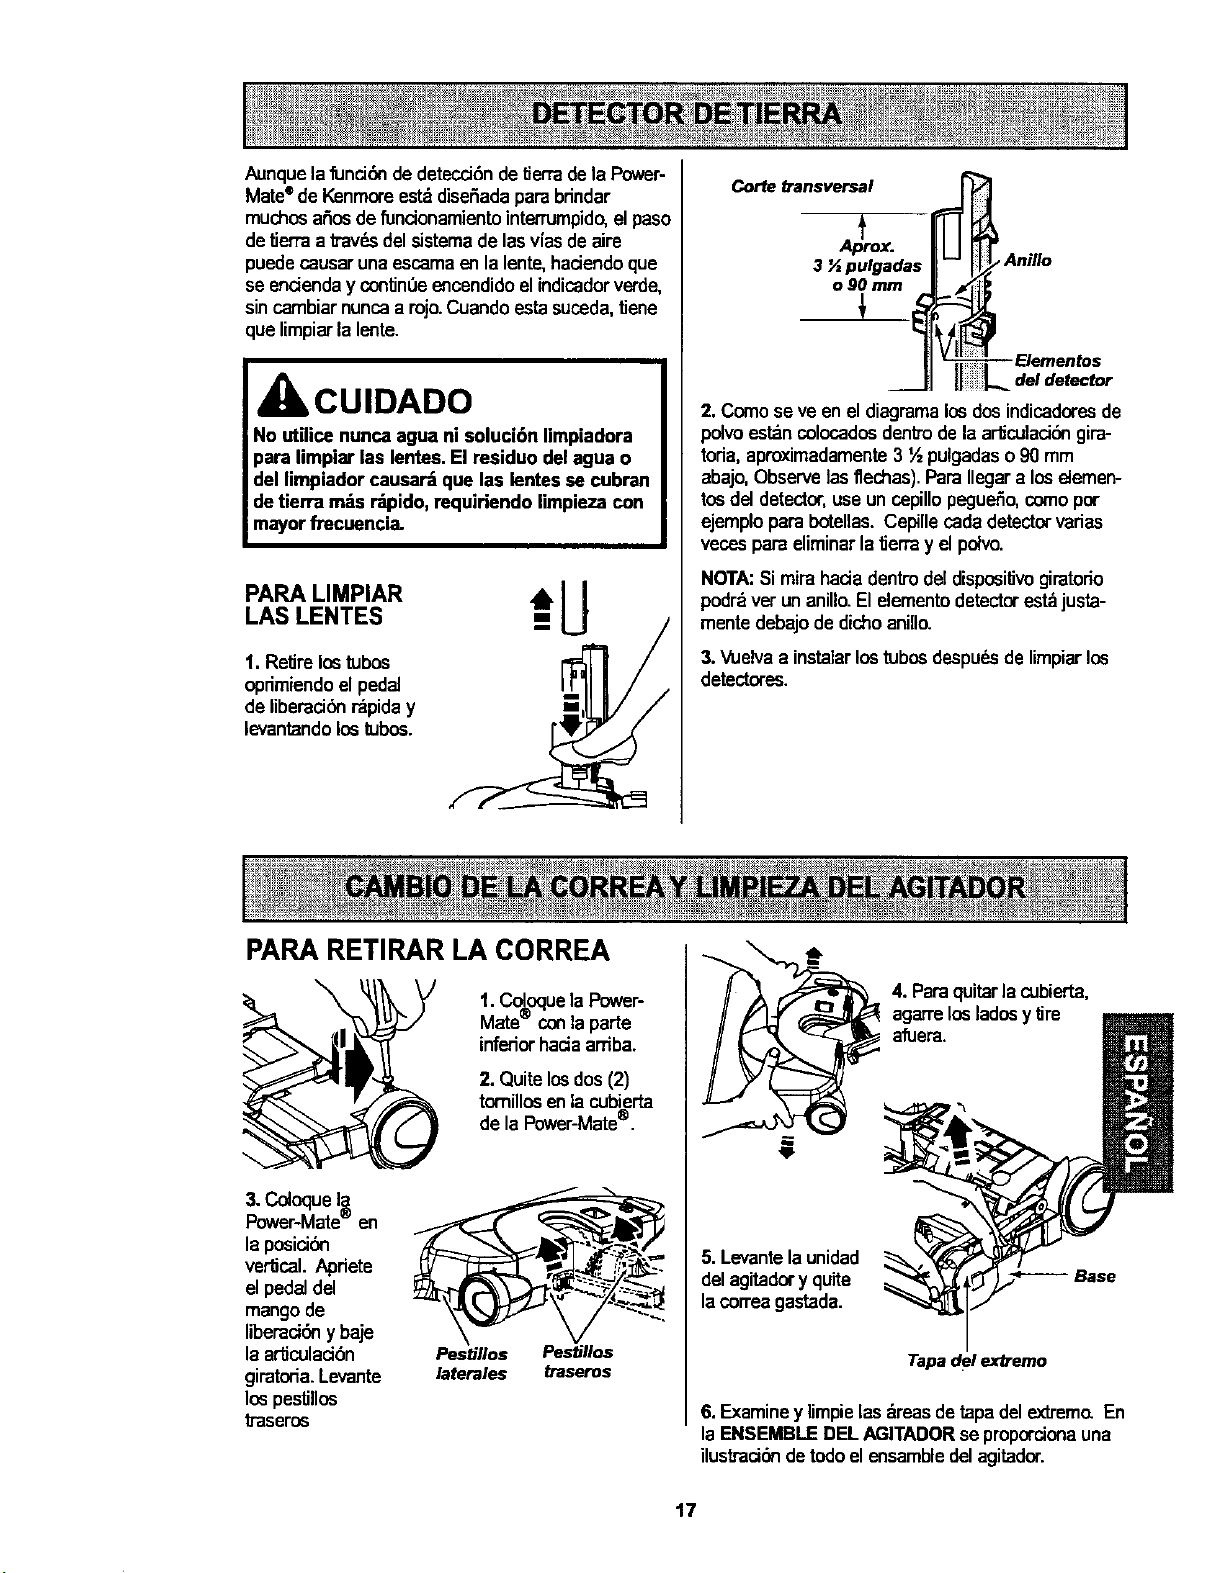
Aunquela funci6ndedetecd0ndetJerrade la Power-
Mate®de Kenmoreest_diseSadaparabrindar
muchosa_osde fundonamientointerrumpido,el paso
detierraa travdsdelsistemade lasv[asde=ire
puedecausaruna escamaen lalente,haciendoque
se endenday contJn0eencendidoelindicadorverde,
sincambiarnuncaa rojo.Cuandoestasuceda,tJene
que limpiarla lente.
CUIDADO
No utilice nunca agua ni soluci6n limpiadora
para limpiar las lentes.El residuo del agua o
del limpiadorcausar_ que las lentes se cubran
detierra m_s r-_lpido,requiriendo limpieza con
mayorfi'ecuencia.
*--U
LAS LENTES j
1. Retirelostubos I"_ /
oprimiendoelped=i
de liberaci6nrapiday
levantandolostubos.
PARA RETIRAR LA CORREA
Corte transversal
3 '/=pulgadas
o90 mm
3_
_ Anillo
2. Comese ve en eldiagramalos dosindicadoresde
polvoestancolocadosdentrodela ar_culad6ngira-
toria,aproximadamente3 ½ pulgadaso90 mm
abajo,Observelasflechas). ParaIlegara loseiemen-
tosdel detector,usauncepillopegu_o, comopor
ejemploparabotellas.Cepillecadadetectorvarias
vecespara eliminarla tJerray elpdvo.
NOTA:Si mirahada dentrodeldisposilJvogiratono
podrdvet unanillo.Elelementodetectorestdjusta-
mentedebajode dichoanillo.
3._vlJelvaa instalarlostubosdespudsde limpiarlos
detectores.
\
t. Coloquela Power-
Mate'_conlaparte
inferiorhada arriba.
2. Quitelosdos(2)
tornillosenlacubierta
de la Power-Mate®.
3. Co4oqueI_,
Power-Mate- en
la posici6n
vertical.Apriete
el pedaldel
mangode
liberaci6nybaje
la ar_culad6n Pestillos Pestillos
giratoria. Levante laterales traseros
lospestillos
traseros
4. Paraquitarla cubierta,
agarrelosladosy tire
afuera.
5. Levantela unidad
delagitadory quite
lacorreagastada.
Tapa del extremo
6. Examiney limpielasdreasdetapadelextrem_ En
la ENSEMBLEDEL AGITADORse proporcionauna
ilustraci6ndetodoel ensambledelagitador.
t7
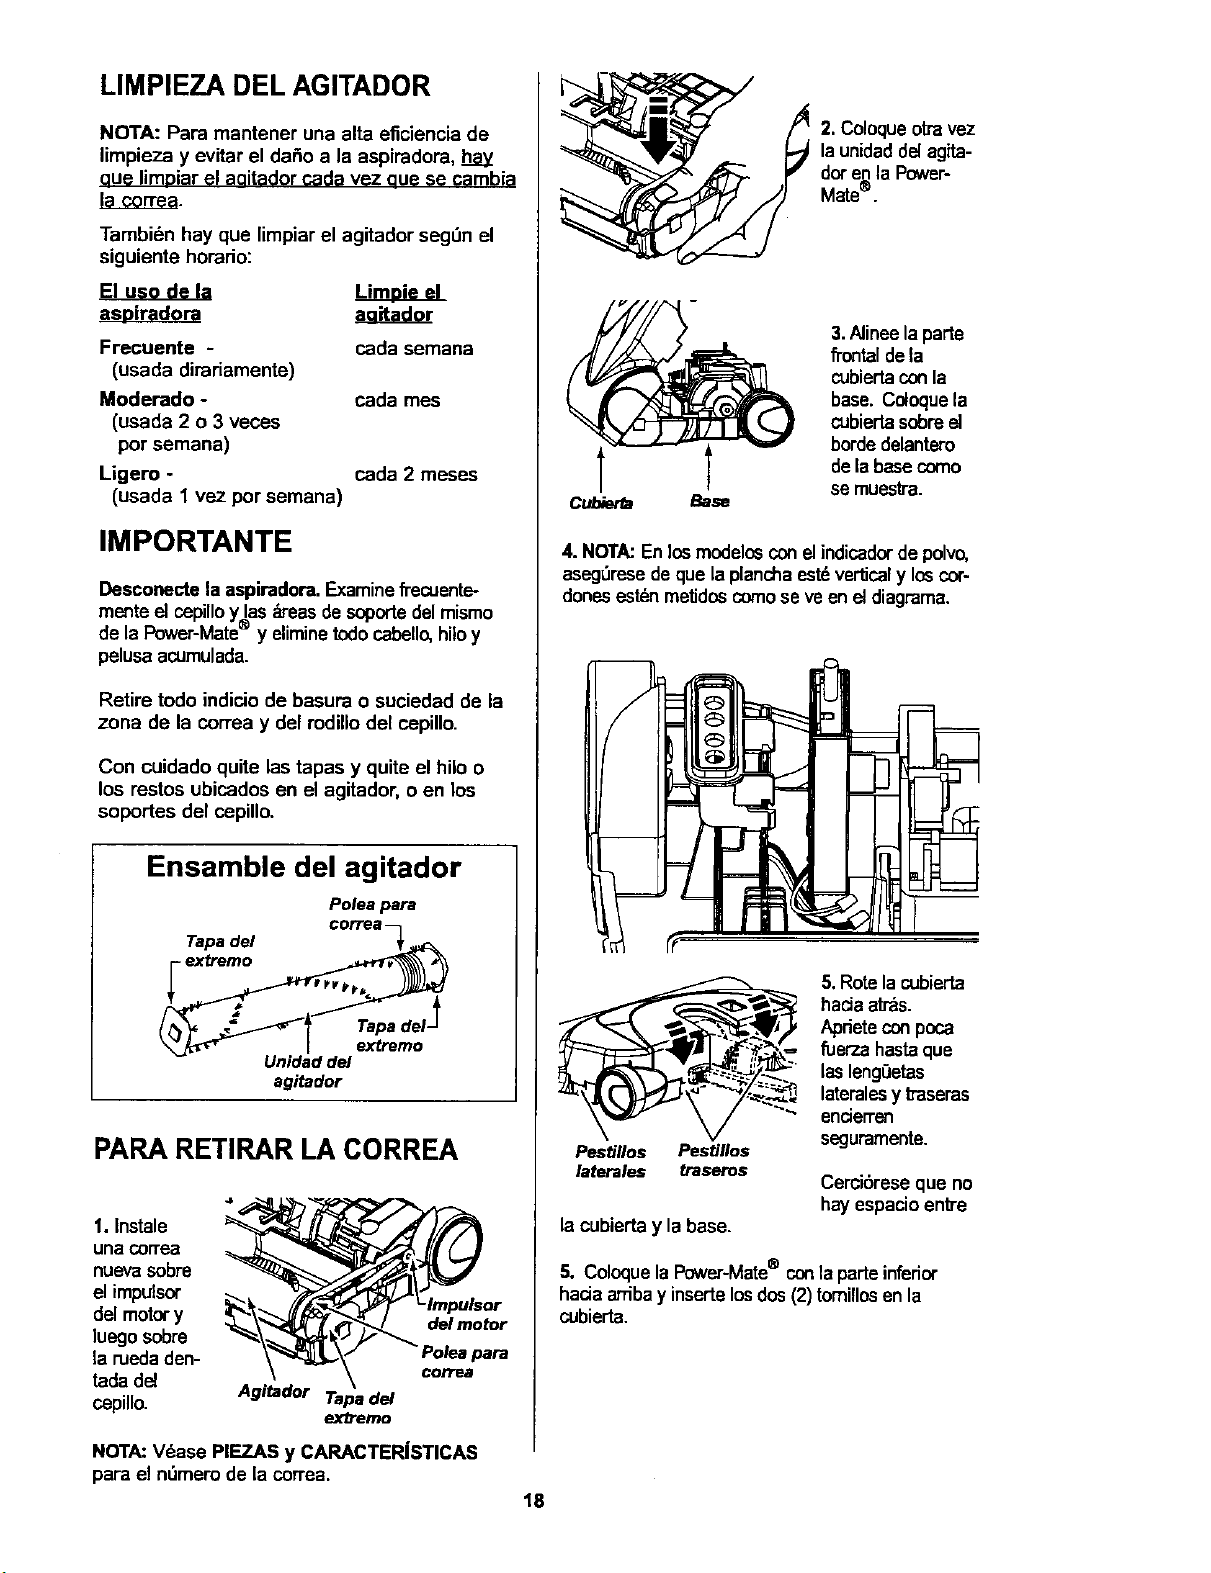
LIMPIEZA DEL AGITADOR
NOTA: Para mantener una alta eficiencia de
limpieza y evitar el da_o a la aspiradora, hay
aue limDiarel aaitador cada vez aue se cambia
la co_ea.
Tambi6n hay que limpiar el agitador segt)n el
siguiente horario:
aa_ador
Frecgente - cada semana
(usada dirariamente)
Moderado - cada mes
(usada 2 o 3 veces
pot semana)
Ligero - cada 2 meses
(usada 1 vez por semana)
IMPORTANTE
Desconecte la aspiradora.Examine_'ecuente-
menteel cepilloy las_'eas de soportedel mismo
de la Power-Mate® y eliminetodocabello,hitoy
pelusaacumulada.
Retire todo indicio de basura o suciedad de la
zona de la correa y del rodillodel cepillo.
Con cuidado quite las tapas y quite el hilo o
los restos ubicados en el agitador, o en los
soportes del cepillo.
Ensamble del agitador
Poleapara
CC rrE
Tapadel =_._:_
Unidad deJ
agitador
PARA RETIRAR LA CORREA
1. Instale
una correa
nuevasobre
el impulsor
del motory
luegosobre
la ruedaden-
tadadel
cepillo.
Agitador Tapa del
ex/Temo
del motor
para
correa
2. Coloqueotravez
launidaddel agita-
dot enla P_wer-
Mate®.
Cubierfa Base
3.Alineela parte
fTontaldela
cubiertaconla
base. Coloquela
cubiertasobreel
bordedelantero
delabasecomo
semuesb'a.
4. NOTA:En losmodelosconelindicadorde polvo,
aseg,_resedeque laplanchaastd ver_caly loscot-
dorieseslbnmetJdoscomese veen eldiagrama.
Pestillos Pestillos
laterales traseros
la cubiertay la base.
5. Rotelacubierta
haciaarras.
Aprieteconpoca
fuer-zahastaque
lasleng0etas
lateralesy baseras
enderren
seguramente.
Cercibreseque no
hayespacioenb'e
5. ColoquelaPower-Mate® conlaparteinferior
haciaarribay insertelosdos(2) tomillosenla
cubierta.
NOTA:V_ase PIEZAS y CARACTER|STICAS
para el nt)mem de la correa.
18
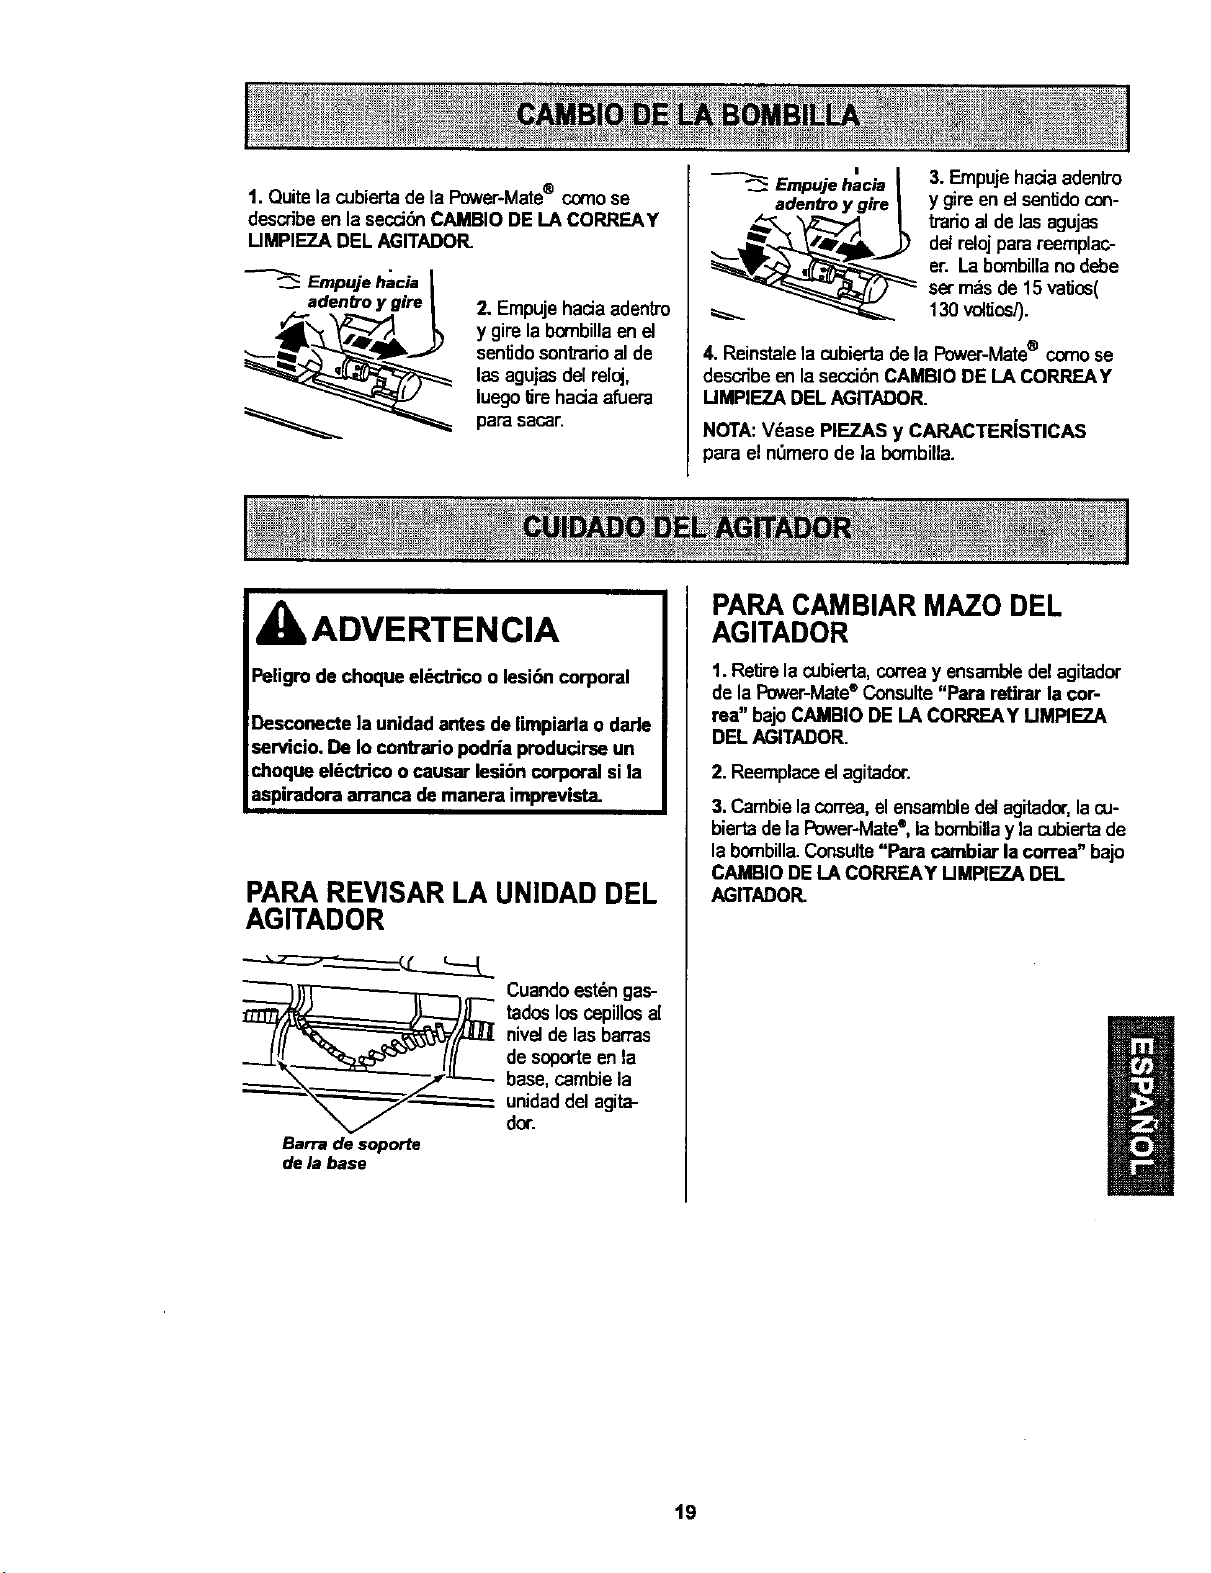
1.Quitelacubiertade la Power*Mate® comose
describe en lasecci6nCAMBIO DELA CORREAY
UMPIEZA DEL AGITADOR.
Empuje hacia
adenCroy gire
2. EmpujehaciaadentTo
y gire la bornbillaenet
senUdosontmdoal de
lasagujasdelreloj,
luegoUrehaciaafuera
para saca£
Empuje hacia
adentro y gire
3. Empujehacia adentro
y gire en el senUdocon-
tradoalde las agujas
delrelojpara reemplac-
er. La bcxnbillanodebe
set m_sde 15 vaUos(
130 voltJos/).
4. Reinsta]ela cubiertadela Power-Mate® comose
describeenla secci6nCAMBIODE LA CORREAY
UMPIEZA DEL AGITADOR.
NOTA:V_ase PIEZAS y CARACTER|STICAS
para el n_merode la bombilla.
ADVERTENCIA
PARA REVISAR LA UNIDAD DEL
AGITADOR
__ Cuando estdn gas-
tados los cepillos a[
nivel de las barras
de soporte en la
base, cambie la
unidad del agita-
dot.
Barra de soporte
de la base
PARA CAMBIAR MAZO DEL
AGITADOR
1.ReUrela cubierta,correay ensambtedel agitador
de la Power-Mate®Consulte"Para retirar la cor-
rea" bajoCAMBIO DELA CORREAY UMPIEZ.A
DELAGITADOR.
2. Reemplaceelagitador.
3. Cambielacorrea,elensambledelagitador,lacu-
biertadela Power-Mate®,labombillay lacubiertade
la bombilla.Consulte"Para cambiarla correa" bajo
CAMBIODE LA CORREAY UMPIEZA DEL
AGITADOR.
19
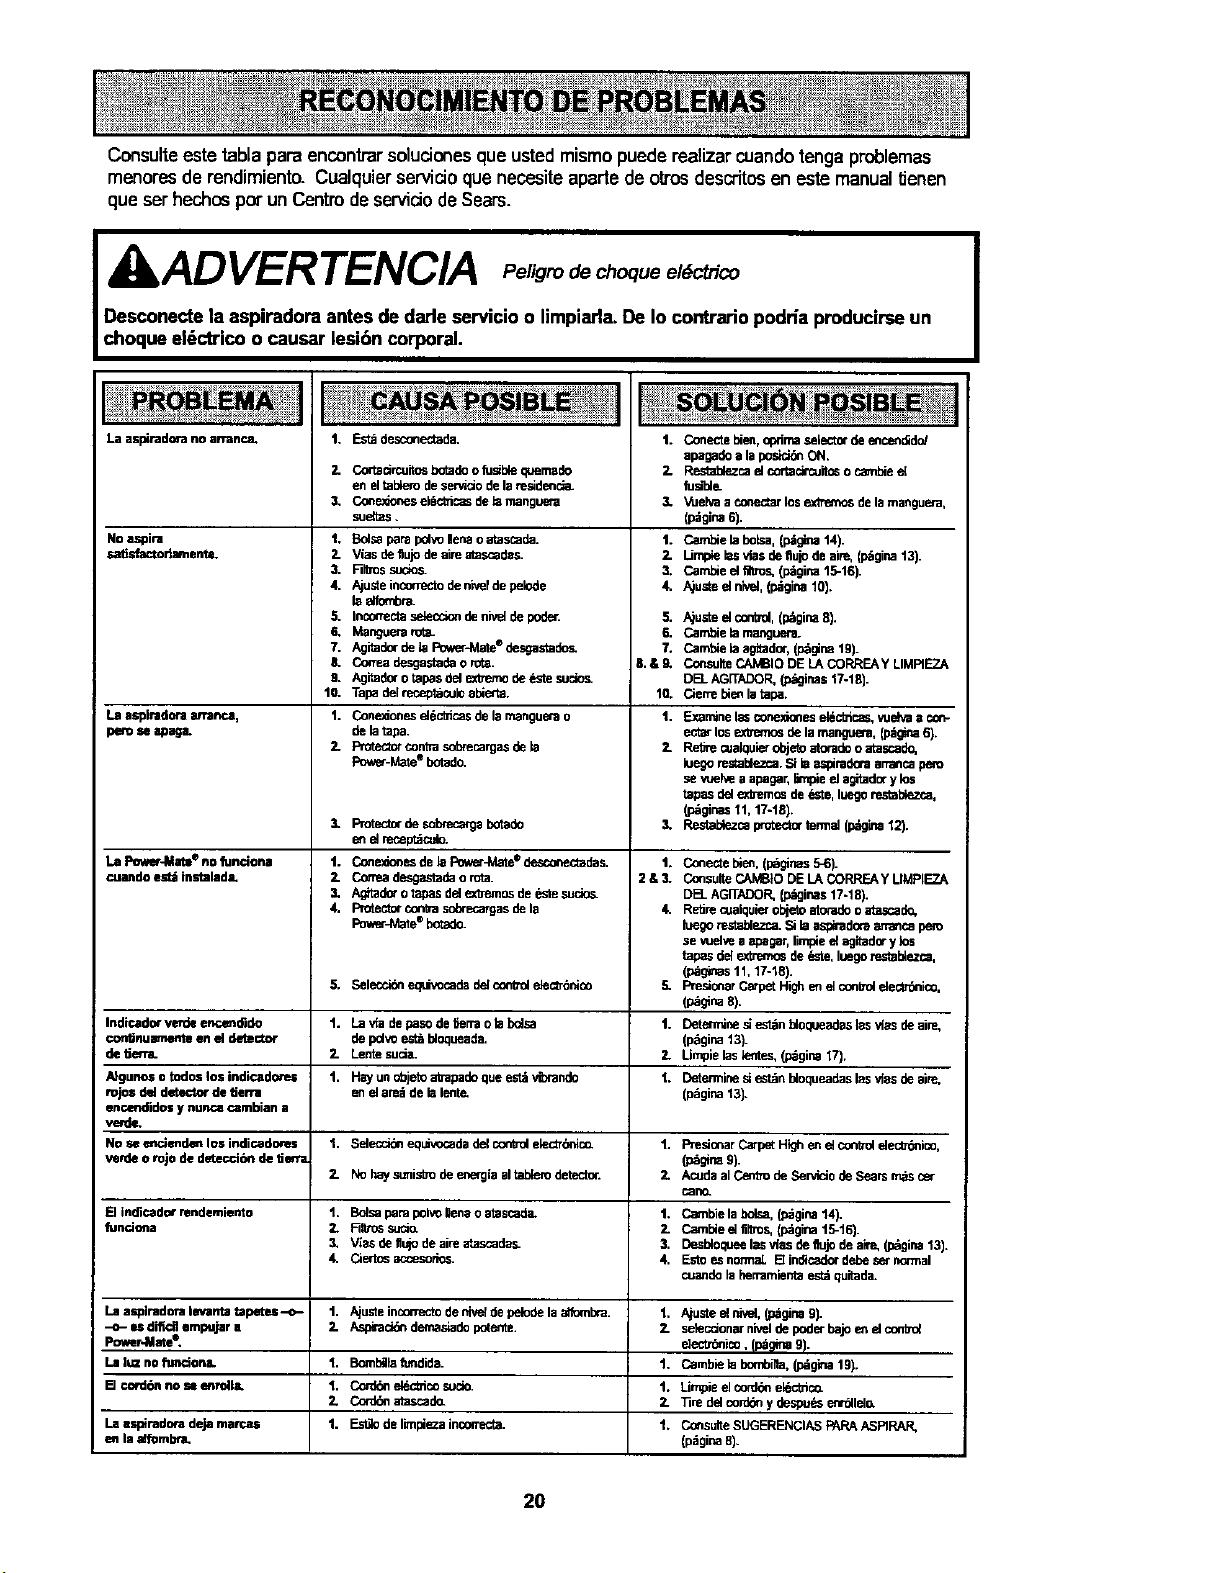
Consulteeste tabla paraencontrarsoluciones que ustedmismopuede realizar cuando tengaproblemas
menores de rendimiento. Cualquier servicio que necesite aparte deotros descritos en este manualf_enen
que ser hechos pot un Centredeserviciode Sears.
XkAD VER TENCIA ,,e,,g,o oquo
Desconecte la aspiradora antes dedarle servicio o limpiarla.De Io contrario podda producirseun
choque el_ctrico o causar lesi6n corporal.
La aspirado_a no arranca.
No aspira
s_dJsfactodarnente.
1,
2.
3.
Estddescone_ada.
Co_sc_rcuitosbotadoo fuell_ quemade
eft eltablorodese_do deham.s_denc_
ConrJnorP_.sel6ctficasde lo mangueta
sue_as.
t, 5dsa para pdvo lena o atascada.
2- Vias deflujode abe atasc_des.
3. F]lbossuoo_
4. A)usteloc_rreclo de n_f de pelode
laelfombm.
5. incorrectas_ec_on de ni_d de poder.
6. Mangue_ rot_
7. Ag_dor de haPow_hate ®P._gastade_
& Cortesdesgastadeo rot_.
9. Agitado(o tapas del e_l_emode _le sudo_
10. Tap_ delreceptaculoabha_a.
1. Cone_onesd6c_cas de hamanguerao
de b tapa.
Fmt_x conba s_xecargas de ha
Pov_r-Mate®botad(_
1. Conecte bien,optimaselectorde encen_do/
apagade a haposen ON.
2. RestaUezcael coTtaclrcuitoso cambie el
fu_l_
3. 'v_ehraa €onectarlosex_ de hamanguera,
(p_girm6).
1. Cambie habolsa,(p_gina14).
2. Umpie hasvlas deflujode abe, (_gina t3).
3. Cambie el fllUos,(l_gina 15-16).
4. Ajusted Kr_el,(p_gina10).
5.
6.
7.
IS.& 9,
Ajusteel coifs01,(pdgina 8).
Cambie hamanguerlL
Cambhahaag_tad_,(pdgloa19).
Co.suite CAMBIO DE LA CORRF.._y LIMRF.ZA
DE__AG[TADOR,{p_ginast7-18).
Cien_ebienla tapa.
Examine Isd;cotP_monesel_c_c_s, vueh4a1;
ecta_los e_'emos de hamanguera,(p,_r4s 6).
Redo oJa_quierobjetoatoradoo atascade,
lue_ restablezca.Si ha_mdera amancaperu
se vuelve a apagar,5r_pieel agbedo_y los
tapas del exbem_ de _te, haegores_t_.zc_,
(l_ginas 11, 17-18).
Resta_zca protect= termel(p_tgina12).
10.
La a_plrodonaarrarmo, 1.
peru se apaga.
2. 2.
1 Protectorde sc_mca_s botodo 3.
e_ el recepldculo.
La Power-Mate®no fun¢iona 1. Co_e_o_es de la Fov_r_Q,_e€ desconectades. 1. Co_ecte ble_, (pdglrBs5-6).
cuandoes_instalada, 2. Cotmadesgastadaoro_. 2&3. Co_sulteCAMBiODELACORREAYLIMPIEZA
3, Aghade_otapasdelexbemosde_'kesuclo_ DB_ AGITADOP_(pdginas17-18).
4, Proteclorconkasotxeca_asdela 4. ReSrecualquierobjetoatomdooatascade,
PowerJ_a_e®botado, luegorestablezca.Si haas;_radoraarran_ dem
se vudve a apagar,limpieel aghadory los
tapas del extremosde _ste, luegoresta_ezc=a,
(p_as tl, 17-18).
5. Selecc_ equivocadadel controlele_-delco 5. FTeelonarCarpetHighe_ el con_ elec_ico.
Lo_g_na8).
Indicado_ verde encem_do 1. La ela de pasode _errao habalsa 1. Detennlnes_est_n _loqueadas las vJasdeaim,
con_nu mnenteen el detector de pd_o establoqueade. (p6ginat3).
de fiend. 2. Lentesuda. 2. Umpie has_ltes. (p_girm_7).
A}gunosotodoslosindicade_.s 1. Hayun@ajetoab'apadequees_vibrap_lo t. [:>eterminesiest_nhaoqueadaslasvlasdeaire,
rojos del detector de derra eft d area de halentp. (p6ginat3).
enc4mdidosy nunca c=mbian a
verde.
Noseenclende_losindicadores 1. Selec_Z_equP_o=adedelcontrolehactT_nico. 1. Pres_onarCarpetHighe_elco_rolelecf_ico,
verde o rojo de dete_ de f_ena (p_gloa 9).
2. Nohayst_isbodee_e_giaaltab._Odetect(x. 2. AcudeelCentfodeServiciodeSearsmdscsr
_ano.
Elindicadorrendemiento 1. Bolsapampolvo_naoatascad_ 1. Ca_nbielabolsa,(p_gina14).
funci_a 2. RlVo_suc_. 7- CambieelfirPo_(p_gloa15-16).
3, V_asdefli_ode abe atascadas_ 3. Desbloqueehasvlas de fiujode _ (pdgina13).
& Cier_s ao:esodes. 4. Estoe_snormal B indicadordebeset n_nel
cuandoia herramientaest_quitada.
Laasplnadoralevantatapetes--o- 1. Ajusteinconectodeni_depelodelaelfombm. 1, Ajusteelelyel,(p_gina9).
--o- es difiol empujar a 2. Asp#aci_ demashadopo(ente. 2. setecelonarnivelde poderbajoe_ el co_o_
Pm_r4Aate e, electr_ico, (p_a 9).
Laluznoflm_ona. t. Bomb_hafundide. 1. Cambiehabo_bl]a,(p_gloa19).
[] cord_ no sa=enrdl& t. Cor_ ei_c_ico sucio. 1. Limpieel corddeek_c_co.
2. Cord_ atascade. 2. "i_redelcord_ y despu_ e_r_lel_
Lasspimdoradejamarcas 1. Est_delimpiezainco_ecta. 1. COnsulteSUGERENCIASPARAASRRAR,
e_ la alT_mb_a. (p_gina8).
20

21
Your Home
For repair - in your home - of all major brand appliances,
lawn and garden equipment, or heating and cooling systems,
no matter who made it, no matter who sold it!
For the replacement parts, accessories and
owner's manuals that you need to do-it-yourself.
For Sears professional installation of home appliances
and items like garage door openers and water heaters.
1-800-4-MY-HOME ® Anytime, day or night
(1-800-469-4663) (U.S.A. and Canada)
www.sears.com www.sears.ca
Our Home
For repair of carry-in products like vacuums, lawn equipment,
and electronics, call or go on-line for the nearest
Sears Parts and Repair Center.
1-800-488-1222 Anytime, day or night(U.S.A. only)
il i!ii iii
=
...... To purchase a protection agreement (U.S.A.)
or maintenance agreement (Canada) on a product serviced by Sears:
1-800-827-6655 (U.S.A.) 1-800-361-6665 (Canada)
Para pedir serviciode reparaci_n Au Canada pour service en fran_ais:
a domicilio,y para ordenar piezas: 1-800-LE-FOYER Mc
1-888-SU-HOG/_'_ s" (1-800-533-6937)
(1-888-784-6427) www.sears.ce
© Sears, Roebuckand Co.
® Registered Trademark I TMTrademarkI sMService Mark of Sears, Roebuckand Co.
® Mama Registrada / "_uMama de Fdbrica/ SMMarca de Servicio de Sears, Roebuc_ and Co.
MCMarque de commerce / MDMarque d_posde de Sears, Roebuckand Co.