
PLEASE
READ
THIS
OWNER'S
MANUAL
THOROUGHLY
BEFORE
OPERATING
AND
KEEP
IT
HANDY
FOR
REFERENCE
AT
ALL
TIMES.
OWNER'S
MANUAL
REFRIGERATOR-
FREEZER

2
INSTALLATION
..................................................
3
INNER
PARTS
....................................................
4
OPERATIONS
.....................................................
5
Lamp
Auto-Off
Feature
Before
Setting
The
Temperature
Controls
For
Refrigerator
Compartment
Super
Cool
Child
Lock
Door
Alarm
Self
Test
Controls
For
Freezer
Compartment
Ice
Making
(Optional)
Extra
Shelf
(Optional)
Vitamin
Vegetable
Drawer
(Optional)
Fresh
Zone
(Optional)
Defrosting
Deodorizer(Optional)
Warter
dispenser
SUGGESTIONS
ON
FOOD
STORAGE
............
13
CLEANING
........................................................
14
GENERAL
INFORMATION
...............................
14
LAMP
REPLACEMENT
....................................
15
IMPORTANT
WARNINGS
................................
15
BEFORE
CALLING
FOR
SERVICE
.................
16
CONTENTS

3
INSTALLATION
THIS
REFRIGERATOR
IS
MANUFACTURED
WITH
GREAT
CARE,
AND
UTILIZES
THE
LATEST
IN
TECHNOLOGY.
WE
ARE
CONFIDENT
THAT
YOU
WILL
BE
FULLY
SATISFIED
WITH
IT'S
PERFORMANCE
AND
RELIABILITY.
BEFORE
YOU
START
YOUR
REFRIGERATOR,
PLEASE
READ
THIS
BOOKLET
CAREFULLY.
IT
PROVIDES
EXACT
INSTRUCTIONS
FOR
INSTALLATION,
OPERATION
AND
MAINTENANCE,
AND
ALSO
SUPPLIES
SOME
USEFUL
HINTS.
1.
Select
a
good
location.
Place
your
refrigerator
where
it
is
easy
to
use.
2.
Avoid
placing
the
unit
near
heat
sources,
direct
sunlight
or
moisture.
3.
There
must
be
proper
air
circulation
around
your
refrigerator
to
keep
it
operating
efficiently.
If
your
refrigerator
is
placed
in
a
recessed
area
in
the
wall,
allow
at
least
10
inches
or
greater
clearance
above
the
refrigerator
and
2
inches
or
more
from
the
wall.
The
refrigerator
should
be
elevated
1
inch
from
the
floor,
especially
if
it
is
carpeted.
4.
To
avoid
vibrations,
the
unit
must
be
level.
If
required,
adjust
the
leveling
screws
to
compensate
for
unevenness
of
the
floor.
The
front
should
be
slightly
higher
than
the
rear
to
aid
in
door
closing.
Leveling
screws
can
be
turned
easily
by
tipping
the cabinet
slightly.
Turn
the
leveling
screws
clockwise(
)
to
raise
the
unit,
counterclockwise(
)
to
lower
it.
5.
Don't
install
this
appliance
below
5
°C.
It
may
cause
the
debasement
of
the
refrigerator.
NEXT
1.
Clean
your
refrigerator
thoroughly
and
wipe
off
all
dust
accumulated
during
shipping.
2.
Install
accessories
such
as
ice
cube
box,
etc.,
in
their
proper
places.They
are
packed
together
to
prevent
possible
damage
during
shipment.
3.
You
have
a
model
with
bar-type
handle,
assemble
the
handle
according
to
instruction
card.
4.
Connect
the
power
supply
cord
(or
plug)
to
the
outlet.
Don't
double
up
with
other
appliances
on
the
same
outlet.
5.
Prior
to
storing
food,
leave
your
refrigerator
onfor2or3hours.
Check
the
flow
of
cold
air
in
the
freezer
compartment
to
ensure
proper
cooling.
Your
refrigerator
is
now
ready
for
use.

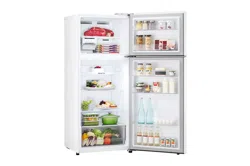
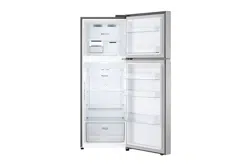
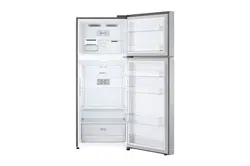
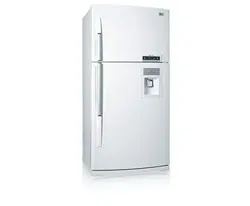
This
guide
covers
several
different
models.
The
refrigerator
you
have
purchased
may
have
some
or
all
of
the
features
shown
above.
NOTE
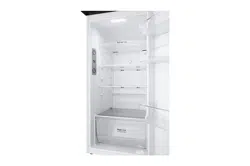
INNER
PARTS
4
Egg
Storage
Rack
Water
Dispenser
Utility
Corner
Refrigerator
Door
Rack
Freezer
Door
Rack
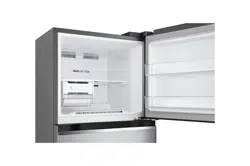
Leveling
Screw
Base
Cover
FREEZER
COMPARTMENT
Lamp
Shelf
Deodorizer
(Optional)
Vitamin
Vegetable
Drawer
(Optional)
Vegetable
Drawer
Shelves
Lamp
Fresh
Zone
(Optional)
REFRIGERATOR
COMPARTMENT
Freezer
Temperature
Control
Dial
Twisting
Ice
Serve
(Optional)
or
General
Type
Ice
Making
(Optional)
Extra
Shelf
(Optional)

OPERATIONS
5
LAMP
AUTO
OFF
FEATURE
When
the
door
is
open
for
7
minutes
or
longer,
the
lamp
inside
goes
off
automatically
to
save
energy
and
prevent
overheating.
However,
the
alarm
sound
continues
until
the
door
is
closed.
BEFORE
SETTING
THE
TEMPERATURE
The
temperature
of
the
refrigerator
is
kept
constant
regardless
of
changes
in
room
temperature.
it
is
recommended
not
to
change
the
settings
(the
controls
for
the
refrigerator
and
freezer
compartments)
unless
it
is
necessary.
This
refrigerator
has
one
temperature
control
button
for
the
refrigerator
compartment
and
one
temperature
control
dial
for
the
freezer
compartment.
The
default
setting
of
the
temperature
control
button
for
the
refrigerator
compartment
is
'Normal'.
The
default
setting
of
the
temperature
control
dial
for
the
freezer
compartment
is
'3'.
This
refrigerator
has
a
temperature
sensor
in
the
refrigerator
compartment.
It
will
start
and
stop
the
compressor
automatically
as
needed.
CONTROLS
FOR
REFRIGERATOR
COMPARTMENT
To
control
the
Refrigerator
temperature,
press
the
REF
TEMP
button.
The
temperature
is
set
in
5
steps,
from
MIN
to
MAX
cooling.
(MIN
=
warmest,
MAX
=
coldest
temperature.)
SUPER
COOL
The
Super
Cool
feature
operates
when
the
refrigerator
is
first
turned
on.
The
compressor
and
circulating
fan
operate
at
maximum
cooling
capacity
to
quickly
lower
the
refrigerator
temperature.
It
shuts
off
automatically.
If
warm
food
is
placed
into
the
refrigerator,
Super
Cool
can
be
started
with
the
button
on
the
control
panel.
Super
Cool
will
shut
off
when
the
temperature
reaches
the
proper
level
or
it
can
be
shut
off
manually
by
pressing
the
Super
Cool
button.
CHILD
LOCK
RE
EMP
SUPER
COOL
CHILD
LOCK
REF.TEMP
SUPE OOL

OPERATIONS
6
CHILD
LOCK
DOOR
ALARM
When
the
door
of
the
refrigerator
or
the
freezer
is
left
opened
for
a
while,
the
alarm
sounds
three
times
1
minute
after
and
then
three
times
every
30
seconds.
SELF
TEST
When
a
trouble
is
occurred,
this
function
indicates
it.
In
this
case,
if
you
press
any
operating
button,
the
refrigerator
does
not
operate
and
displays
abnormal.
At
this
time,
don't
disconnect
the
power
cord
from
the
outlet
and
inquire
to
the
service
center.
CONTROLS
FOR
FREEZER
COMPARTMENT
The
higher
number
the
control
setting
is,
the
lower
the
temperature
of
the
Freezer
compartment
becomes.
Since
the
temperature
of
the
refrigerator
and
freezer
compartments
is
controlled
with
a
fixed
amount
of
cooled
air,
the
refrigerator
compartment
will
be
warmer
if
the
freezer
compartment
becomes
colder.
When
the
freezer
compartment
is
not
cold
enough
in
winter,
adjust
the
control
for
the
freezer
to
High
(4~7).
Setting
the
Freezer
Knob
at
will
satisfy
4
STAR.
Setting
the
Freezer
Knob
at
NORMAL
will
have
sufficient
freezing
effect,
so
it
is
recommended
to
set
the
Knob
at
NORMAL.
CHIL
OCK
REF.TEMP
SUPER
COOL
1
7
3
2
43
FREEZER
CONTROL
FREEZER
MIN
NORMAL
FREEZER
MAX
CHILD
LOCK
Press
and
hold
the
CHILD
LOCK
button
for
3
seconds
to
lock
the
child
lock.
When
it
is
locked,
the
Lock
LED
will
be
on
and
the
other
button
will
not
operate.
To
unlock,
press
and
hold
the
CHILD
LOCK
button
for
3
seconds.

OPERATIONS
7
Ice
Trays
Ice
Cube
Box
ICE
MAKING
(OPTIONAL)
Choose
the
type
of
ice-making
system
you
have.
General
Type
To
make
ice
cubes,
fill
the
ice
tray
with
water
and
place
it
in
the
freezer.
To
remove
ice
cubes,
hold
the
tray
at
its
ends
and
twist
gently.
To
remove
ice
cubes
easily,
run
water
on
the
tray
before
twisting.
Twisting
Ice
Serve
Type
To
make
ice
cubes,
fill
the
ice
tray
with
water
and
insert
in
its
position.
To
remove
ice
cubes,
hold
the
knob
of
the
tray
and
turn
gently.
Then,
ice
cubes
drop
in
the
ice
cube
TIP

OPERATIONS
8
EXTRA
SHELF
(OPTIONAL)
Pull
forward
slightly,
then
push
down
gently.
As
shown
picture
<A>,
please
pull
on a
shelf
holding
the
lower
part
of
it.
As
shown
picture
<B>,
if
you
push
or
pull
the
shelf
holding
the
urrerside
of
it.
Your
hand
can
be
hurt.
It's
very
convenient
to
store
the
food
that
need
to
be
saperated.
Not
intended
for
heavy
items.
VITAMIN
VEGETABLE
DRAWER
(OPTIONAL)
Vitamin
KIT
used
to
keep
fruits
more
fresher.
Please
try
to
keep
the
kit
from
getting
wet
as
this
would
decrease
its
effectiveness.
<A>
<B>
Vitamin
KIT

OPERATIONS
9
TiO2
Catalyst
TiO2
Catalyst
FRESH
ZONE
(OPTIONAL)
When
the
door
is
opened,
the
warmer
air
don't
influence
in
the
fresh
zone.
So
you
can
store
food
more
fresh
in
it.
The
shelf
and
inserted
fresh
zone
must
be
placed
at
its
position.
If
it
is
moved,
the
fresh
zone
can't
fill
the
role
of
it.
DEFROSTING
Defrosting
takes
place
automatically.
The
defrosted
water
flows
down
to
the
evaporating
tray
which
located
in
the
lower
back
side
of
the
refrigerator
and
is
evaporated
automatically.
DEODORIZER(OPTIONAL)
By
using
an
"TiO2
catalyst,"
deodorizing
performance
is
guaranteed.
Unpleasant
odor
of
food
in
fresh
food
compartment
is
deodorized
with
no
harm
to
you
and
the
food.
How
to
use
As
the
catalyst
is
located
in
cooling
air
outlet
for
circulating
air
in
fresh
food
compartment,
there
is
no
need
for
any
handling.
Do
not
prick
the
cooling
air
outlet
with
a
sharp
tip
because
the
deodorizing
catalyst
may
be
damaged.
When
storing
food
with
a
strong
odor,
wrap
it
or
store
it
in
a
container
with
a
lid
because
odor
may
be
passed
on
to
other
foods.
Re-Using
of
the
catalyst
Used
some
length
and
the
odor
is
strong,
the
catalyst
can
be
revived
and
re-used.
Separate
deodorizer
in
ceiling
of
refrigerator
compartment,
dry
using
hair
drier
to
remove
moisture
or
malodor
and
oxidize
under
sunlight
to
decomposing
malodor
by
ultraviolet.

OPERATIONS(water
dispenser)
10
DISPENSER
PAD
GRILLE
DRIP
TRAY
HOLE
MOTOR(INSIDE)
LOCK
DIAL
EXTERIOR
TAB
HOLDER
TANK
HOLDER
WATER
TANK
HOLDER
TAB
CAP
HANDLE
WATER
TANK
INTERIOR
WATER
TANK
Features

OPERATIONS(water
dispenser)
11
Putting
The
Water
In
The
Water
Tank
Drinking
1
Turn
the
lock
dial
in
the
direction
of
the
arrow
as
shown
to
remove
it
and
pour
water
into
the
dispenser
water
tank.
2
Close
the
cap
by
tilting
it
and
putting
one
side
in
first
and
then
the
other
side
as
shown.
3
Place
the
water
tank
in
the
tank
holder
inside
the
refrigerator.
Make
sure
that
the
groove
on
the
connecting
part
is
in
position
with
the
tab.
Push
the
connecting
part
into
the
hole
unit
it
"Clicks".
4
Fix
the
connecting
part
in
place
by
means
of
the
holder
ring
as
shown.
?
Do
not
use
anything
other
than
water
including
soft
drinks,
milk
and
juice.
?
Hot
water
needs
to
be
cooled
before
being
put
in
the
water
tank.
?
Always
use
the holder
ring
to
fix
the
water
tank
in
place
to
prevent
the
tank
from
moving
or
getting
loose.
1
Press
the
dispenser
pad
with
the
glass.
2
The
water
is
released
when
the
dispenser
pad
is
pressed.
The
pad
returns
to
its
original
position
when
the
glass
is
removed,
and
the
water
stops
its
flow.
CAUTION
?
The
motor
rotates
in
reverse
for
a
few
seconds
after
the
dispenser
is
released
to
dispose
of
any
water
remaining
in
the
tubes.(This
may
cause
the
sound
of
water
being
sucked
back
inside)
NOTE
Tab
Groove

OPERATIONS(water
dispenser)
12
Grille
and
Drip
Tray
CLEANING
Other
Parts
1
Pull
the
drip
tray
our
and
remove
with
the
grille.
2
Dispose
of
the
water
in
the
kitchen
sink,
wash
the
drip
tray
and
the
grille
with
a
mild
detergent
and
rinse
thoroughly.
Water
Tank
1
Remove
the
cap.
2
Clean
the
inside
and
outside
of
the
water
tank
with
dishwashing
detergent
and
rinse
thoroughly
under
running
water.
?
Use
lukewarm
water
when
cleaning.
?
Do
not
use
anything
other
than
water.
If
it
is
used
with
soft
drinks,
put
water
in
the
water
tank
and
discharge
three
or
four
cups
of
water
shortly.
Remove
the
cap
and
clean
the
cap
and
connecting
part
with
a
mild
detergent
and
rinse
thoroughly.
CAUTION

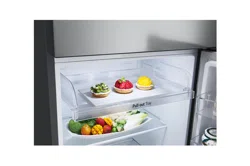
SUGGESTIONS
ON
FOOD
STORAGE
13
STORING
FOOD
Store
fresh
food
in
the
refrigerator
compartment.
How
food
is
frozen
and
thawed
is
an
important
factor
in
maintaining
its
freshness
and
flavor.
Do
not
store
food
which
goes
bad
easily
at
low
temperatures,
such
as
bananas,
pineapples,
and
melons.
Allow
hot
food
to
cool
prior
to
storing.
Placing
hot
food
in
the
refrigerator
could
spoil
other
food,
and
lead
to
higher
electric
bills!
When
storing
the
food,
cover
it
with
vinyl
wrap
or
store
in
a
container
with
a
lid.
This
prevents
moisture
from
evaporating,
and
helps
food
to
keep
its
taste
and
nutrients.
Do
not
block
air
vents
with
food.
Smooth
circulation
of
chilled
air
keeps
refrigerator
temperatures
even.
Do
not
open
the
door
frequently.
Opening
the
door
lets
warm
air
enter
the
refrigerator,
and
cause
temperatures
to
rise.
FREEZER
COMPARTMENT
Do
not
store
bottles
in
the
freezer
compartment
-
they
may
break
when
frozen.
Do
not
refreeze
food
that
has
been
thawed.
This
causes
loss
of
taste
and
nutrition.
When
storing
frozen
food
like
ice
cream
for
a
long
period,
place
it
on
the
freezer
shelf,
not
in
the
door
rack.
Loading
for
Freezing
-
It
is
recommended
to
load
newly
introduced
foods
on
the
following
position
for
freezing:
REFRIGERATOR
COMPARTMENT
Avoid
placing
moist
food
deep
inside
refrigerator
shelves,
it
could
freeze
upon
direct
contact
with
chilled
air.
To
avoid
this
it
is
better
to
store
food
in
the
covered
container.
It
is
desirable
to
store
moist
food
(especially
vegetable
and
fruit)
in
the
vegetable
storage
compartment.
If
it
is
necessary
to
store
on
a
shelf
of
the
refrigerator,
put
it
close
to
the
door
away
from
the
back
wall
of
the
refrigerator
to
avoid
being
frozen
by
the
cool
circulating
in
the
refrigerator.
Always
clean
food
prior
to
refrigeration.
Vegetables
and
fruits
should
be
washed
and
wiped,
and
packed
food
should
be
wiped
clean,
to
prevent
adjacent
food
from
spoiling.
When
storing
eggs
in
their
storage
rack,
ensure
that
they
are
fresh,
and
always
store
them
in
a
up-right
position,
which
keeps
them
fresh
longer.

14
CLEANING
It
is
important
that
you
refrigerator
be
kept
clean
to
prevent
undesirable
odors.
Spilled
food
should
be
wipe
up
immediately,
since
it
may
acidify
and
stain
plastic
surfaces
if
allowed
to
settle.
Never
use
metallic
scouring
pads,
brushes,
coarse
abrasive
cleaners
or
strong
alkaline
solutions
on
any
surface.
Before
you
clean,
however,
remember
that
damp
objects
will
stick
or
adhere
to
extremely
cold
surfaces.
Do
not
touch
frozen
surfaces
with
wet
or
damp
hands.
EXTERIOR
-
Use
a
lukewarm
solution
of
mild
soap
or
dish
washable
solution
to
clean
the
durable
finish
of
your
refrigerator.
Wipe
with
a
clean,
damp
cloth
and
then
dry.
INTERIOR
-
Regular
cleaning
of
the
interior
and
interior
parts
is
recommended.
Use
a
lukewarm
solution
of
mild
soap
or
dish
washable
solution
to
clean
the
durable
finish
of
your
refrigerator.
Wipe
with
a
clean,
damp
cloth
and
then
dry.
INTERIOR
PARTS
-
Wash
compartment
shelves,
door
racks,
storage
trays
and
magnetic
door
seals
etc.
Use
a
lukewarm
solution
of
mild
soap
or
dish
washable
solution
to
clean
the
durable
finish
of
your
refrigerator.
Wipe
with
a
clean,
damp
cloth
and
then
dry.
GENERAL
INFORMATION
VACATION
TIME
During
average
length
vacations,
you
will
probably
find
it
best
to
leave
the
refrigerator
in
operation.
Place
freezable
items
in
freezer
for
longer
life.
When
you
plan
to
be
away
for
an
extended
period,
remove
all
food,
disconnect
the
power
cord,
clean
the
interior
thoroughly,
and
leave
each
door
OPEN
to
prevent
odor
formation.
POWER
FAILURE
Most
power
failures
are
corrected
in
an
hour
or
two
and
will
not
affect
your
refrigerator
temperatures.
However,
you
should
minimize
the
number
of
door
openings
while
the
power
is
off.
During
power
failures of
longer
duration,
place
a
block
of
dry
ice
on
top
of
your
frozen
packages.
IF
YOU
MOVE
Remove
or
securely
fasten
down
all
loose
items
inside
the
refrigerator.
To
avoid
damaging
the
leveling
screw(s),
turn
them
all
the
way
into
the
base.
ANTI-CONDENSATION
PIPE
The
outside
wall
of
the
refrigerator
cabinet
may
sometimes
get
warm,
especially
just
after
installation.
Don't
be
alarmed.
This
is
due
to
the
anti-
condensation
pipe,
which
pumps
hot
refrigerant
to
prevent
"sweating"
on
the
outer
cabinet
wall.
WARNING
Always
remove
power
cord
from
the
wall
outlet
prior
to
cleaning
in
the
vicinity
of
electrical
parts(lamps,
switches,
controls,
etc.).
Wipe
up
excess
moisture
with
a
sponge
or
cloth
to
prevent
water
or
liquid
from
getting
into
any
electrical
part
and
causing
electric
shock.
Do
not
use
flammable
or
toxic
cleaning
liquids.
?
Caution
for
Cleaning
Not
in
use
:
Surface
active
agent,
Car
wax,
Anticorrosive,
All
sorts
of
oil,
Gasoline,
Acids,
Wax.
?
Usable
Detergent
Vegetable
dish
washable
solution,
Soapy
water
?
When
careless
using,
it
can
occur
a
color
change.
Anti-Condensation
Pipe

LAMP
REPLACEMENT
15
FREEZER
LAMP
To
remove
the
lamp
shield inside
the
freezer
compartment,
reach
behind
the
shield
and
pull
it
forward
as
shown
in
the
figure
on
the
right.
REFRIGERATOR
LAMP
To
remove
the
lamp
shield inside
the
refrigerator
compartment,
pull
it
down
while
pressing
the
triangular
area
with
your
thumb
and
pull
it
forward
as
shown
in
the
figure
on
the
right.
IMPORTANT
WARNINGS
DO
NOT
USE
AN
EXTENSION
CORD
If
possible,
connect
the
refrigerator
to
its
own
individual
electrical
outlet
to
prevent
it
and
other
appliances
or
household
lights
from
causing
an
overload
that
could
cause
a
power
outage.
ACCESSIBILITY
OF
SUPPLY
PLUG
The
refrigerator-freezer
should
be
so
positioned
that
the
supply
plug
is
accessible
for
quick
disconnection
when
accident
happens.
SUPPLY
CORD
REPLACEMENT
If
the
supply
cord
is
damaged,
it
must
be
replaced
by
the
manufacturer
or
its
service
agent
or
a
similarly
qualified
person
in
order
to
avoid
a
hazard.
ABOUT
GROUNDING
(EARTHING)
In
the
event
of
an
electric
short
circuit,
grounding
(earthing)
reduces
the
risk
of
electric
shock
by
providing
an
escape
wire
for
the
electric
current.
In
order
to
prevent
possible
electric
shock,
this
appliance
must
be
grounded.
Improper
use
of
the
grounding
plug
can
result
in
an
electric
shock.
Consult
a
qualified
electrician
or
service
person
if
the
grounding
instructions
are
not
completely
understood,
or
if
you
have
doubts
on
whether
the
appliance
is
properly
grounded.
DO
NOT
MODIFY
OR
EXTEND
THE
POWER
CORD
LENGTH
It
will
cause
electric
shock
or
fire.
VERY
DANGEROUS
ATTRACTION
An
empty
refrigerator
can
be
a
dangerous
attraction
to
children.
Remove
either
gaskets,
latches,
lids
or
the
entire
door
from
your
unused
appliance,
or
take
some
other
action
to
make
it
harmless.
This
appliance
must
be
grounded
(earthed).
DON'T
WAIT!
DO
IT
NOW!
Do
not
store
inflammable
materials,
explosives
or
chemicals
in
the
refrigerator.
The
appliance
is
not
intended
for
use
by
young
children
or
infirm
persons
without
supervision.
Young
children
should
be
supervised
to
ensure
that
they
do
not
play
with
the
appliance.

BEFORE
CALLING
FOR
SERVICE
16
SERVICE
CALLS
CAN
OFTEN
BE
AVOIDED!
IF
YOU
FEEL
YOUR
REFRIGERATOR
IS
NOT
OPERATING
PROPERLY,
CHECK
THESE
POSSIBLE
CAUSES
FIRST
:
PROBLEM
POSSIBLE
CAUSES
REFRIGERATOR
DOES
NOT
OPERATE
REFRIGERATOR
OR
FREEZER
COMPARTMENT
TEMPERATURE
TOO
WARM
ABNORMAL
NOISE(S)
REFRIGERATOR
HAS
ODOR
DEW
FORMS ON
THE
CABINET
SURFACE
Has
a
house
fuse
blown
or
circuit
breaker
tripped?
Has
the
power
cord
plug
been
removed
or
loosened from
the
electrical
wall
outlet?
Temperature
control
not
set
on
proper
position.
Appliance
is
placed
close
to
wall
or
heat
source.
Warm
weather-frequent
door
openings.
Door
left
open
for
a
long
time.
Large
amount
of
foods
are
kept
in
the
refrigerator.
Refrigerator
is
installed
in
a
weak
or
uneven
place,
or
leveling
screw
needs
adjusting.
Unnecessary
objects
placed
in
the
back
side
of
the
refrigerator.
Foods
with
strong
odors
should
be
tightly
covered
or
wrapped.
Interior
needs
cleaning.
Not
unusual
during
periods
of
high
humidity.
Door
may
have been
left
ajar.

P/No.
3828JD8759U