GEAppliances.com
49-80579 04-09 JR
Safety Instructions . . . . . . . . . . . 2–9
Operating Instructions
Microwave Control Panel . . . . .10, 11
Microwave Oven Controls . . . .10–21
Lower Oven Control Panel . . .22, 23
Lower Oven Controls . . . . . . . .22–34
Lower Oven Thermostat . . . . . . . .28
Sabbath Feature . . . . . . . . . . . .33, 34
Self-Cleaning Lower Oven . . . 29, 30
Sensor Controls . . . . . . . . . . . . .16, 17
Care and Cleaning
Door . . . . . . . . . . . . . . . . . . . . . . . . .36
Light Bulb . . . . . . . . . . . . . . . . . . . .37
Microwave Oven . . . . . . . . . . . . . . . 35
Racks . . . . . . . . . . . . . . . . . . . . . . . .38
Troubleshooting Tips . . . . . . 39–41
Accessories . . . . . . . . . . . . . . . . . . . 42
Consumer Support
Consumer Support . . . . . . . . . . . . 44
Warranty . . . . . . . . . . . . . . . . . . . . .43
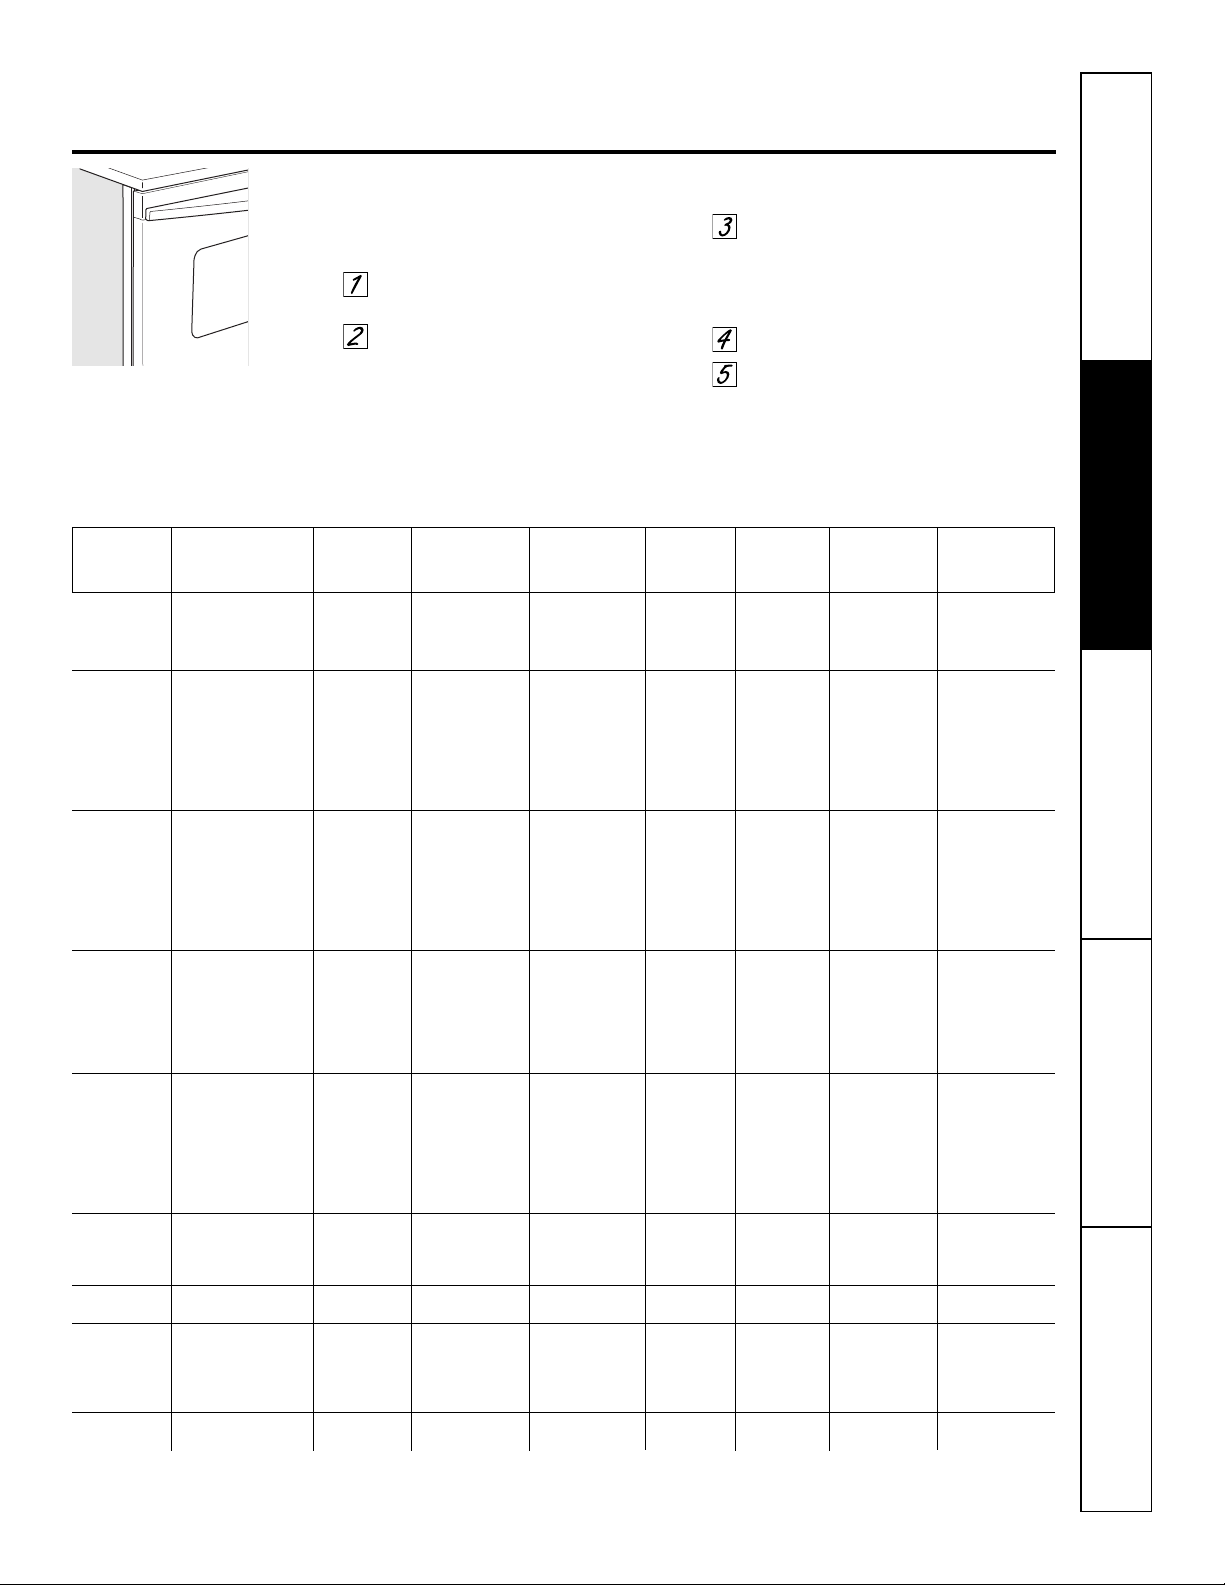
Write the model and serial
numbers here:
Model # ____________________
Serial #______________________
You can find them on a label inside
the upper oven on the left side.
Cooking Center
Microwave
The microwave oven in this
cooking center is 1000 watts.
JKP90–27 ″ Double Wall Oven
JTP90–30 ″ Double Wall Oven
Owner’s Manual
Printed in the United States
IMPORTANT SAFETY NOTICE
The California Safe Drinking Water and Toxic Enforcement Act requires the Governor of California to
publish a list of substances known to the state to cause cancer, birth defects or other reproductive
harm, and requires businesses to warn customers of potential exposure to such substances.
The fiberglass insulation in self-clean ovens gives off a very small amount of carbon monoxide during
the cleaning cycle. Exposure can be minimized by venting with an open window or using a ventilation
fan or hood.
2
Safety InstructionsOperating InstructionsCare and CleaningTroubleshooting TipsConsumer Support
IMPORTANT SAFETY INSTRUCTIONS.
READ ALL INSTRUCTIONS BEFORE USING.
WARNING!
For your safety, the information in this manual must be followed to minimize the risk of fire or
explosion, electric shock, or to prevent property damage, personal injury, or loss of life.
PRECAUTIONS TO AVOID POSSIBLE EXPOSURE TO EXCESSIVE
MICROWAVE ENERGY
■ Do not attempt to operate this oven with
the door open, since open-door operation
can result in harmful exposure to
microwave energy. It is important not to
defeat or tamper with the safety interlocks.
■ Do not place any object between the oven
front face and the door, or allow soil or
cleaner residue to accumulate on sealing
surfaces.
■ The oven should not be adjusted or
repaired by anyone except properly
qualified service personnel.
■ Do not operate the oven if it is damaged.
It is particularly important that the oven
door close properly and that there is no
damage to the:
■ door (bent),
■ hinges and latches (broken or
loosened),
■ door seals and sealing surfaces.
SAVE THESE INSTRUCTIONS
Safety Instructions
Operating Instructions
Care and Cleaning
Troubleshooting Tips Consumer Support
IMPORTANT SAFETY INSTRUCTIONS.
READ ALL INSTRUCTIONS BEFORE USING.
GEAppliances.com
When using electrical appliances, basic safety precautions should be followed, including the following:
WARNING—Grounding
Instructions: This appliance must be
connected to a grounded, metallic,
permanent wiring system, or an equipment
grounding conductor should be run with the
circuit conductors and connected
to the equipment grounding
terminal or lead on the appliance.
WARNING—To reduce the risk of
burns, electric shock, fire, injury to persons or
exposure to excessive microwave energy:
■ Use this appliance only for its intended
use as described in this manual. Do not
use corrosive chemicals or vapors in
this appliance. This cooking center is
specifically designed to heat or cook
food, and is not intended for laboratory
or industrial use.
■ Be sure your appliance is properly
installed and grounded by a qualified
technician in accordance with the
provided Installation Instructions.
■ Have the installer show you the location of
the circuit breaker or fuse. Mark it for easy
reference.
■ Be sure the cooking center is securely
installed in a cabinet that is firmly attached
to the house structure. Weight on the oven
door could cause the oven to tip and
result in injury. Never allow anyone to
climb, sit or hang on the oven door.
■ This appliance should be serviced only
by qualified service personnel. Contact
nearest authorized service facility for
examination, repair or adjustment. Do not
repair or replace any part of this appliance
unless specifically recommended in this
manual. All other servicing should be
referred to a qualified technician.
■ Do not store this appliance outdoors.
Do not use this product near water—for
example, in a wet basement, or near a
swimming pool.
■ Before performing any service, disconnect
the cooking center power supply at the
household distribution panel by removing
the fuse or switching off the circuit
breaker.
■ Do not operate this appliance if it has a
damaged cord or plug, if it is not working
properly, or if it has been damaged or
dropped.
■ Do not leave children alone—children
should not be left alone or unattended in
an area where appliance is in use. They
should never be allowed to sit or stand on
any part of the appliance.
■ Don’t allow anyone to climb, stand or
hang on the door. They could damage
the cooking center and cause severe
personal injury.
SAFETY PRECAUTIONS
SAVE THESE INSTRUCTIONS
3
4
Safety InstructionsOperating InstructionsCare and CleaningTroubleshooting TipsConsumer Support
IMPORTANT SAFETY INSTRUCTIONS.
READ ALL INSTRUCTIONS BEFORE USING.
Do not use water on grease fires. Never pick up a flaming pan. Smother flaming pan by covering
pan completely with well-fitting lid, cookie sheet or flat tray. Flaming grease outside a pan can be
put out by covering with baking soda or, if available, a multi-purpose dry chemical or foam-type
fire extinguisher.
WARNING!
SAFETY PRECAUTIONS
■ CAUTION: Items of interest to
children should not be stored in cabinets
above an oven; children climbing on the
oven to reach items could be seriously
injured.
■ Teach children not to play with the
controls or any other part of the
cooking center.
■ Large scratches or impacts to glass door
can lead to broken or shattered glass.
■ Wear proper clothing. Loose-fitting or
hanging garments should never be worn
while using the appliance. Flammable
material could be ignited if brought in
contact with hot heating elements and
may cause severe burns.
■ Use only dry pot holders—moist or damp
pot holders on hot surfaces may result in
burns from steam. Do not let pot holders
touch hot heating elements. Do not use a
towel or other bulky cloth. Such cloths can
catch fire on a hot element.
■ Always keep dish towels, dishcloths, pot
holders and other linens a safe distance
from your oven.
■ Always keep wooden spoons and plastic
utensils and canned food a safe distance
away from your oven.
■ Always keep combustible wall coverings,
curtains or drapes a safe distance from
your oven.
■ Do not store flammable material in an
oven or near the cooking center.
■ Do not cover or block any openings
on the appliance.
■ For your safety, never use your appliance
for warming or heating the room.
■ Do not leave paper products, cooking
utensils or food in the oven when not
in use.
■ Do not store or use combustible materials,
gasoline or other flammable vapors and
liquids in the vicinity of this or any other
appliance.
■ Do not let cooking grease or other
flammable materials accumulate in or
near the cooking center.
■ Do not touch heating elements or interior
surface of the oven. These surfaces may be
hot enough to burn even though they are
dark in color. During and after use, do not
touch, or let clothing or other flammable
materials contact any interior area of the
oven; allow sufficient time for cooling first.
■ Potentially hot surfaces include oven vent
openings, surfaces near the openings, and
crevices around the oven door.
■ REMEMBER: The inside surface of the
oven may be hot when the door is opened.
■ Never place cooking utensils or any other
items on the oven floor. There is a heating
element beneath the oven floor. Placing
items on the oven floor may cause the
oven to overheat, resulting in damage
to the oven and risk of damage or fire
to cabinets.
Cook meat and poultry thoroughly—meat to at least an INTERNAL temperature of 160°F and poultry
to at least an INTERNAL temperature of 180°F. Cooking to these temperatures usually protects against
foodborne illness.
COOK MEAT AND POULTRY THOROUGHLY…
SAVE THESE INSTRUCTIONS
Safety Instructions
Operating Instructions
Care and Cleaning
Troubleshooting Tips Consumer Support
IMPORTANT SAFETY INSTRUCTIONS.
READ ALL INSTRUCTIONS BEFORE USING.
GEAppliances.com
Read and follow the specific “Precautions to Avoid Possible Exposure to Excessive Microwave
Energy” section in this manual.
To reduce the risk of fire in the oven cavity:
■ Do not overcook food. Carefully attend
appliance if paper, plastic or other
combustible materials are placed inside
the oven to facilitate cooking.
■ Remove wire twist-ties from paper or
plastic containers before placing bags
in oven.
■ Do not use your microwave oven to dry
newspapers.
■ Do not pop popcorn in your microwave
oven unless in a special microwave
popcorn accessory or unless you use
popcorn labeled for use in microwave
ovens.
■ Do not overcook potatoes. They could
dehydrate and catch fire, causing damage
to your oven.
■ Do not operate the oven while empty to
avoid damage to the oven and the danger
of fire. If by accident the oven should run
empty a minute or two, no harm is done.
However, try to avoid operating the oven
empty at any time—it saves energy and
prolongs the life of the oven.
■ Do not use the oven for storage purposes.
Do not leave paper products, cooking
utensils or food in the oven when not
in use.
■ If materials inside the oven should ignite,
keep oven door closed, turn oven off,
and shut off power at the fuse or circuit
breaker panel. If the door is opened, the
fire may spread.
■ This microwave oven is not approved or
tested for marine use.
■ Some products such as whole eggs and
sealed containers—for example, closed
jars—will explode and should not be
heated in this microwave oven. Such use
of the microwave oven could result in
injury.
■ Do not operate the microwave oven
without the turntable and support in
place.
■ Avoid heating baby food in glass jars, even
with the lid off. Make sure all infant food
is thoroughly cooked. Stir food to
distribute the heat evenly. Be careful to
prevent scalding when warming formula
or breast milk. The container may feel
cooler than the milk really is. Always test
the milk before feeding the baby.
■ Do not boil eggs in a microwave oven.
Pressure will build up inside the egg
yolk and will cause it to burst, possibly
resulting in injury.
■ Foods with unbroken outer “skin” such
as potatoes, sausages, tomatoes, apples,
egg yolks, chicken livers and other giblets
should be pierced to allow steam to escape
during cooking.
■ Don’t defrost frozen beverages in narrow-
necked bottles (especially carbonated
beverages). Even if the container is
opened, pressure can build up. This can
cause the container to burst, possibly
resulting in injury.
■ Hot foods and steam can cause burns.
Be careful when opening any containers
of hot food, including popcorn bags,
cooking pouches and boxes. To prevent
possible injury, direct steam away from
hands and face.
■ As with any appliance, close supervision is
necessary when used by children.
MICROWAVE OVEN
SAVE THESE INSTRUCTIONS
5
6
Safety InstructionsOperating InstructionsCare and CleaningTroubleshooting TipsConsumer Support
IMPORTANT SAFETY INSTRUCTIONS.
READ ALL INSTRUCTIONS BEFORE USING.
Make sure all cookware used in your microwave oven is suitable for microwaving. Most glass
casseroles, cooking dishes, measuring cups, custard cups, pottery or china dinnerware which does
not have metallic trim or glaze with a metallic sheen can be used. Some cookware is labeled
“suitable for microwaving.”
WARNING!
MICROWAVE-SAFE COOKWARE
■ If you are not sure if a dish is microwave-
safe, use this test: Place in the oven both
the dish you are testing and a glass
measuring cup filled with 1 cup of water—
set the measuring cup either in or next to
the dish. Microwave 35–45 seconds at high.
If the dish heats, it should not be used
for microwaving.
■ If the dish remains cool and only the
water in the cup heats, then the dish is
microwave-safe.
■ If you use a meat thermometer while
cooking, make sure it is safe for use in
microwave ovens.
■ Do not use recycled paper products.
Recycled paper towels, napkins and
waxed paper may contain metal flecks
which could cause arcing or ignite.
Paper products containing nylon or
nylon filaments should be avoided,
since they may also ignite.
■ Some Styrofoam trays (like those that
meat is packaged on) have a thin strip
of metal embedded in the bottom. When
microwaved, the metal can burn the floor
of the oven or ignite a paper towel.
■ Not all plastic wrap is suitable for use in
microwave ovens. Check the package for
proper use.
■ Paper towels, waxed paper and plastic
wrap can be used to cover dishes in order
to retain moisture and prevent spattering.
Be sure to vent plastic wrap so steam
can escape.
■ Oversized food or oversized metal
cookware should not be used in a
microwave oven. Electrical shock or
fire could occur.
■ While paper plates may be used for timed
cooking and defrosting, do not use them
with Auto Sensor cooking. Use microwave-
safe plates or bowls for reheating. Cover
with plastic wrap.
■ Cookware may become hot because
of heat transferred from the heated
food. Pot holders may be needed to
handle the cookware.
■ “Boilable” cooking pouches and tightly
closed plastic bags should be slit, pierced
or vented as directed by package. If they
are not, plastic could burst during or
immediately after cooking, possibly
resulting in injury. Also, plastic storage
containers should be at least partially
uncovered because they form a tight seal.
When cooking with containers tightly
covered with plastic wrap, remove
covering carefully and direct steam
away from hands and face.
■ Use foil only as directed in this manual.
TV dinners may be microwaved in foil
trays less than 3/4″ high; remove the top
foil cover and return the tray to the box.
When using foil in the microwave oven,
keep the foil at least 1 inch away from the
sides of the oven.
SAVE THESE INSTRUCTIONS
Superheated liquid will bubble up out of the
cup when it is moved or when something
like a spoon or tea bag is put into it.
To prevent this from happening and causing
injury, do not heat any liquid for more than
2 minutes per cup.
After heating, let the cup stand in the
microwave for 30 seconds before moving it
or putting anything into it.
Spontaneous boiling
Under certain special circumstances, liquids
may start to boil during or shortly after removal
from the microwave oven.
To prevent burns from splashing liquid, we
recommend the following before removing
the container from the oven:
■ Allow the container to stand in the oven
for 30 to 40 seconds after the oven has
shut off.
■ Do not boil liquids in narrow-necked
containers such as soft drink bottles, wine
flasks and especially narrow-necked coffee
cups. Even if the container is opened,
excessive steam can build up and cause it
to burst or overflow.
Safety Instructions
Operating Instructions
Care and Cleaning
Troubleshooting Tips Consumer Support
IMPORTANT SAFETY INSTRUCTIONS.
READ ALL INSTRUCTIONS BEFORE USING.
GEAppliances.com
If you see arcing, press the CLEAR/OFF pad and correct the problem.
ARCING
Arcing is the microwave term for sparks in the
oven. Arcing is caused by:
■ Metal or foil touching the side of the oven.
■ Foil not molded to food (upturned edges
act like antennas).
■ Metal, such as twist-ties, poultry pins or
gold-rimmed dishes, in the microwave.
■ Recycled paper towels containing small
metal pieces being used in the microwave.
■ Plastic cookware – Plastic cookware
designed for microwave cooking is very
useful, but should be used carefully.
Even microwave-safe plastic may not
be as tolerant of overcooking conditions
as are glass or ceramic materials and
may soften or char if subjected to short
periods of overcooking. In longer
exposures to overcooking, the food
and cookware could ignite.
■ Follow these guidelines:
■ Use microwave-safe plastics only and
use them in strict compliance with
the cookware manufacturer’s
recommendations.
■ Do not microwave empty containers.
■ Do not permit children to use
plastic cookware without complete
supervision.
Microwaved water and other liquids do not always bubble when they reach the boiling point.
They can actually get superheated and not bubble at all.
SUPERHEATED WATER
SAVE THESE INSTRUCTIONS
7
8
Safety InstructionsOperating InstructionsCare and CleaningTroubleshooting TipsConsumer Support
IMPORTANT SAFETY INSTRUCTIONS.
READ ALL INSTRUCTIONS BEFORE USING.
■ Steam or vapor escaping from around
the door.
■ Light reflection around the door or the
outer case.
■ Dimming of the oven light and change
in the blower sound may occur while
operating at power levels other than high.
■ The microwave fan may operate with both
ovens off. It is cooling the control and will
turn itself off.
■ Some TV-radio interference might be
noticed while using your microwave oven.
It’s similar to the interference caused by
other small appliances and does not
indicate a problem with your oven.
■ A dull thumping sound while the oven
is operating.
ALL THESE THINGS ARE NORMAL WITH YOUR MICROWAVE
MICROWAVE TERMS AND DEFINITIONS
Arcing
Arcing is the microwave term for sparks in the oven.
Arcing is caused by:
■ metal or foil touching the side of the oven.
■ foil that is not molded to food (upturned edges act
like antennas).
■ metal such as twist-ties, poultry pins, gold-rimmed
dishes.
■ recycled paper towels containing small metal pieces.
Covering
Covers hold in moisture, allow for more even heating and
reduce cooking time. Venting plastic wrap or covering with
wax paper allows excess steam to escape.
Shielding
In a regular oven, you shield chicken breasts or baked
foods to prevent overbrowning. When microwaving, you
use small strips of foil to shield thin parts, such as the tips
of wings and legs on poultry, which would cook before
larger parts.
Standing Time
When you cook with regular ovens, foods such as roasts
or cakes are allowed to stand to finish cooking or to
set. Standing time is especially important in microwave
cooking. Note that a microwaved cake is not placed on
a cooling rack.
Venting
After covering a dish with plastic wrap, you vent the
plastic wrap by turning back one corner so excess steam
can escape.
SAVE THESE INSTRUCTIONS
PACEMAKERS
Most pacemakers are shielded from
interference from electronic products,
including microwaves. However, patients with
pacemakers may wish to consult their
physicians if they have concerns.
READ AND FOLLOW THIS SAFETY INFORMATION CAREFULLY.
SAVE THESE INSTRUCTIONS
IMPORTANT SAFETY INSTRUCTIONS.
READ ALL INSTRUCTIONS BEFORE USING. GEAppliances.com
9
Do not use aluminum foil to line oven bottoms, except as suggested in this manual. Improper
installation of aluminum foil may result in a risk of electric shock or fire.
WARNING!
SELF-CLEANING LOWER OVEN
■ Stand away from the oven when opening
the oven door. Hot air or steam which
escapes can cause burns to hands, face
and/or eyes.
■ Do not heat unopened food containers.
Pressure could build up and the container
could burst, causing an injury.
■ Keep the oven vent unobstructed.
■ Keep the oven free from grease buildup.
■ Keep the cooking center clean and free
of accumulations of grease or spillovers,
which may ignite.
■ Never leave the oven door open when you
are not watching the cooking center.
■ Place the oven rack in the desired position
while the oven is cool. If racks must be
handled when hot, do not let pot holder
contact the heating element.
■ When using cooking or roasting bags
in the oven, follow the manufacturer’s
directions.
■ Pulling out the rack to the stop-lock is a
convenience in lifting heavy foods. It is
also a precaution against burns from
touching hot surfaces of the door or
oven walls.
■ Do not use the oven for a storage area.
Items stored in an oven can ignite.
■ Do not leave paper products, cooking
utensils or food in the oven when not
in use.
■ After broiling, always take any broiler
pan out of the oven and clean it. Leftover
grease in a broiler pan can catch fire next
time you use the oven.
■ Do not use the oven to dry newspapers.
If overheated, they can catch on fire.
■ Never leave jars or cans of fat drippings
in or near your oven.
■ Clean only parts listed in this Owner’s
Manual.
■ Do not clean the door gasket. The door
gasket is essential for a good seal. Care
should be taken not to rub, damage or
move the gasket.
■ Do not use oven cleaners. No commercial
oven cleaner or oven liner protective
coating of any kind should be used in or
around any part of the oven. Residue from
oven cleaners will damage the inside of
the oven when the self-clean cycle is used.
■ Before self-cleaning the oven, remove
the probe, broiler pan, grid and other
cookware.
■ Be sure to wipe up excess spillage before
starting a self-cleaning cycle.
■ If the self-cleaning mode malfunctions,
turn the oven off and disconnect the
power supply. Have it serviced by a
qualified technician.
■ Listen for a fan—a fan noise should be
heard sometime during the cleaning
cycle. If not, call for service before
self-cleaning again.
Safety Instructions Operating Instructions
Care and Cleaning Troubleshooting Tips
Consumer Support

10
Safety InstructionsOperating InstructionsCare and CleaningTroubleshooting TipsConsumer Support
Using the microwave oven controls.
Throughout this manual, features and appearance may vary from your model. Your model may have one of the
following controls.
Safety Instructions
Operating Instructions
Care and Cleaning
Troubleshooting Tips Consumer Support
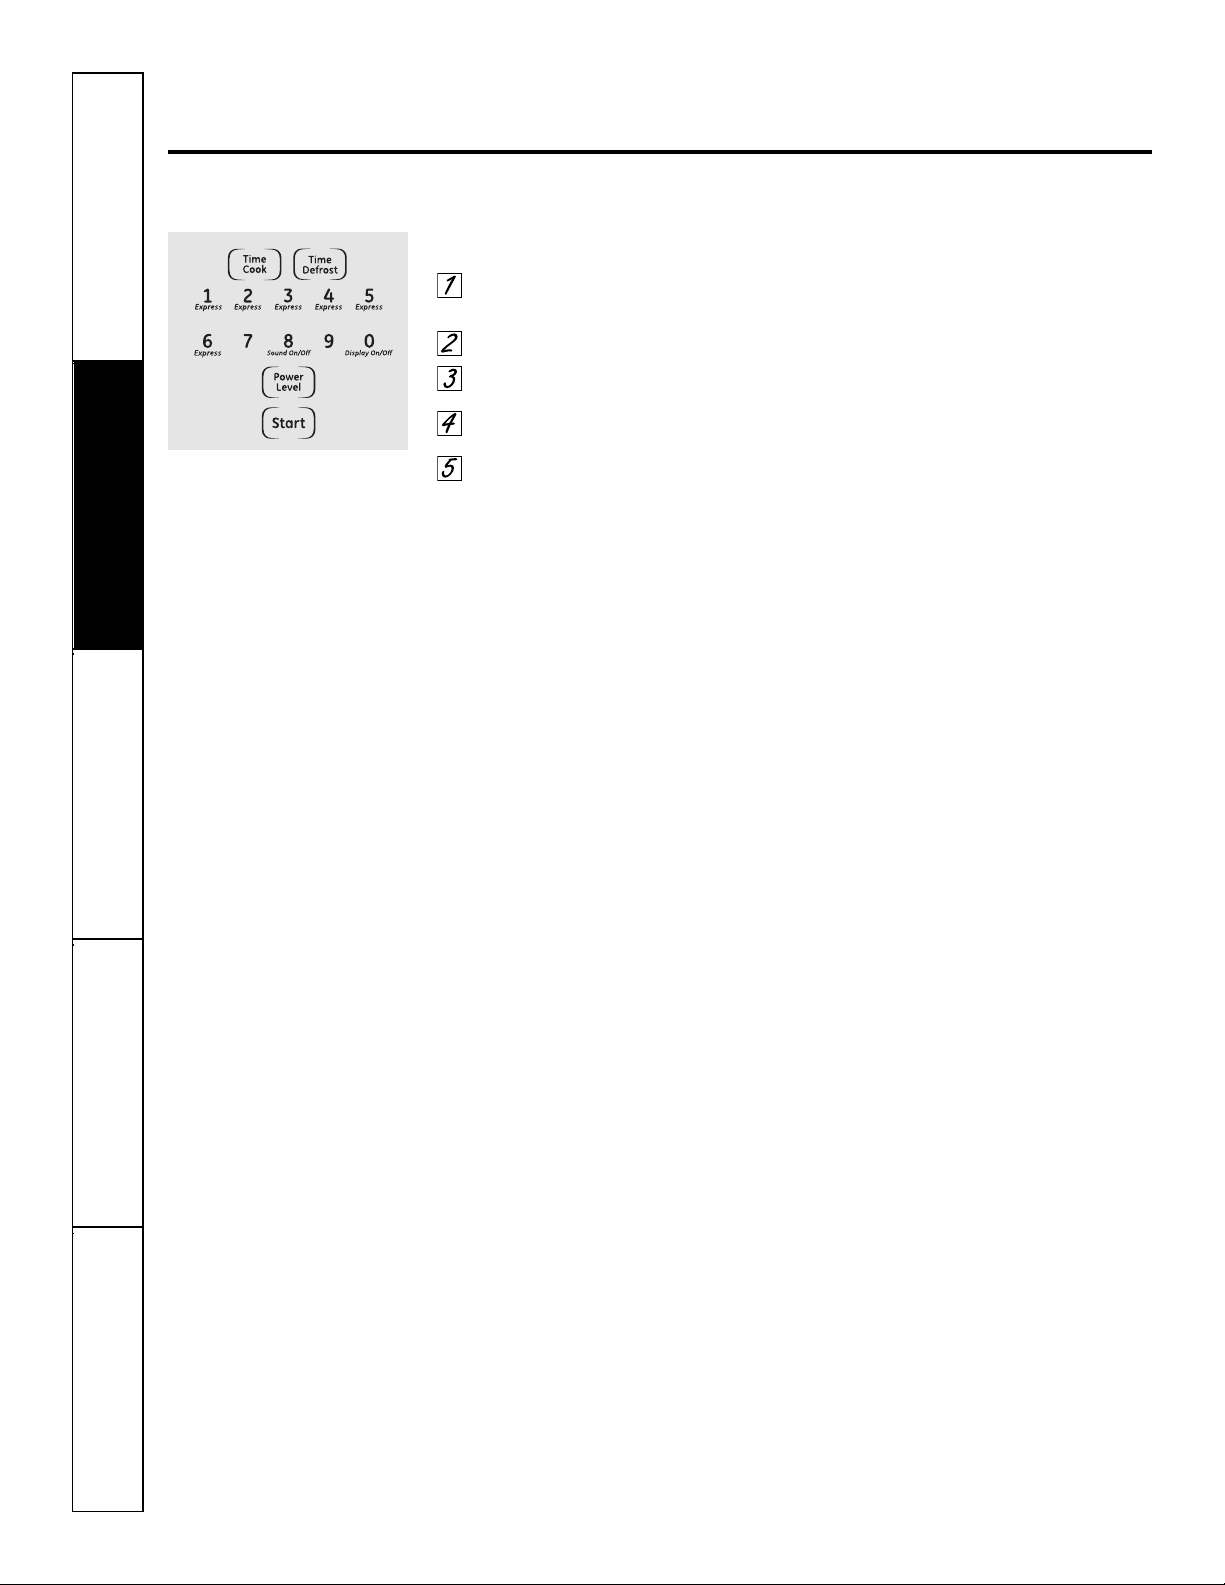
Microwave Oven Control Features and Settings
Display
Displays the time during cooking
functions, the power level being used,
the Auto Codes, the Auto Defrost food
weights, the cooking mode and
instructions.
NOTE: The time on the microwave display
is shown in minutes and seconds (1:30 is one
minute, 30 seconds). On the lower oven, time
is shown in hours and minutes (1:30 is one hour,
30 minutes).
Auto Sensor and Convenience Controls
The top row of pads lists specific items
you may choose to heat or cook.
Popcorn
Use to pop popcorn.
Reheat
Use when foods need a quick warm up.
Potato
Use when cooking whole potatoes.
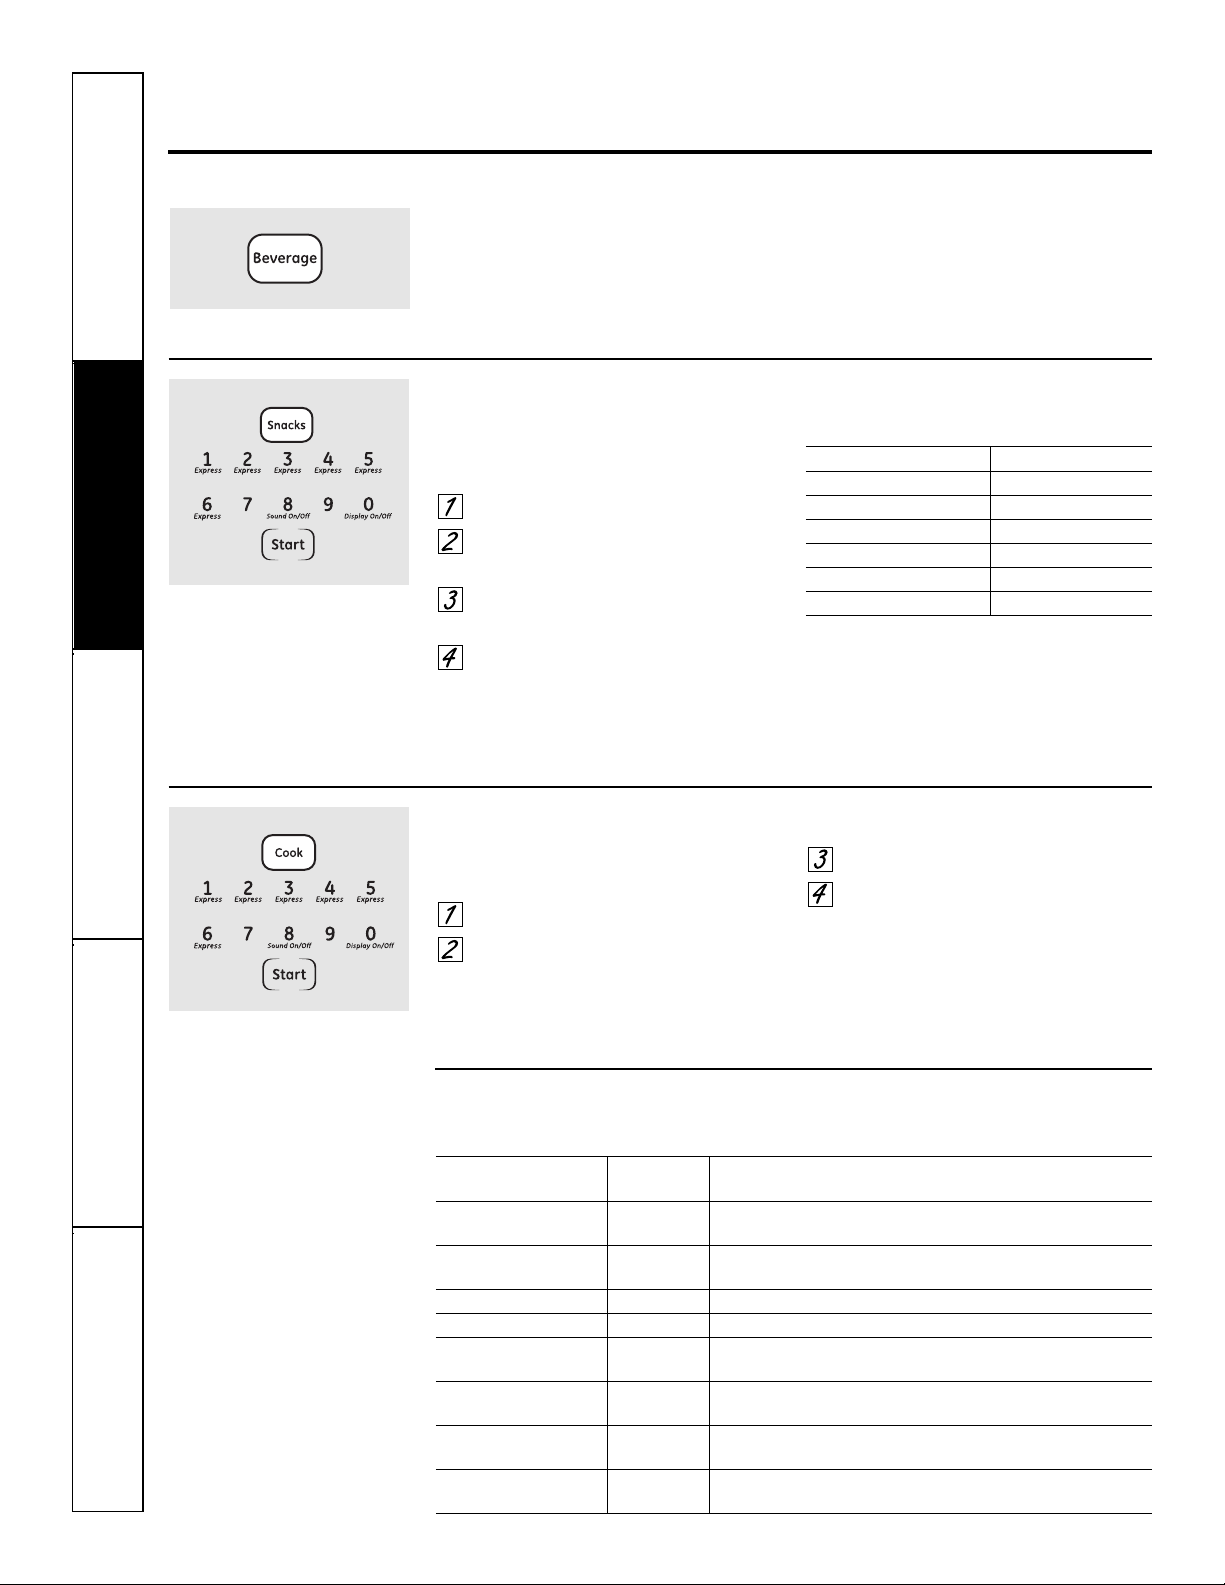
Beverage
Use to heat a cup of coffee or other
beverage.
Snacks
Use to warm a variety of snack foods.
Cook
Use to automatically set the cooking
times and power levels for a variety
of foods.
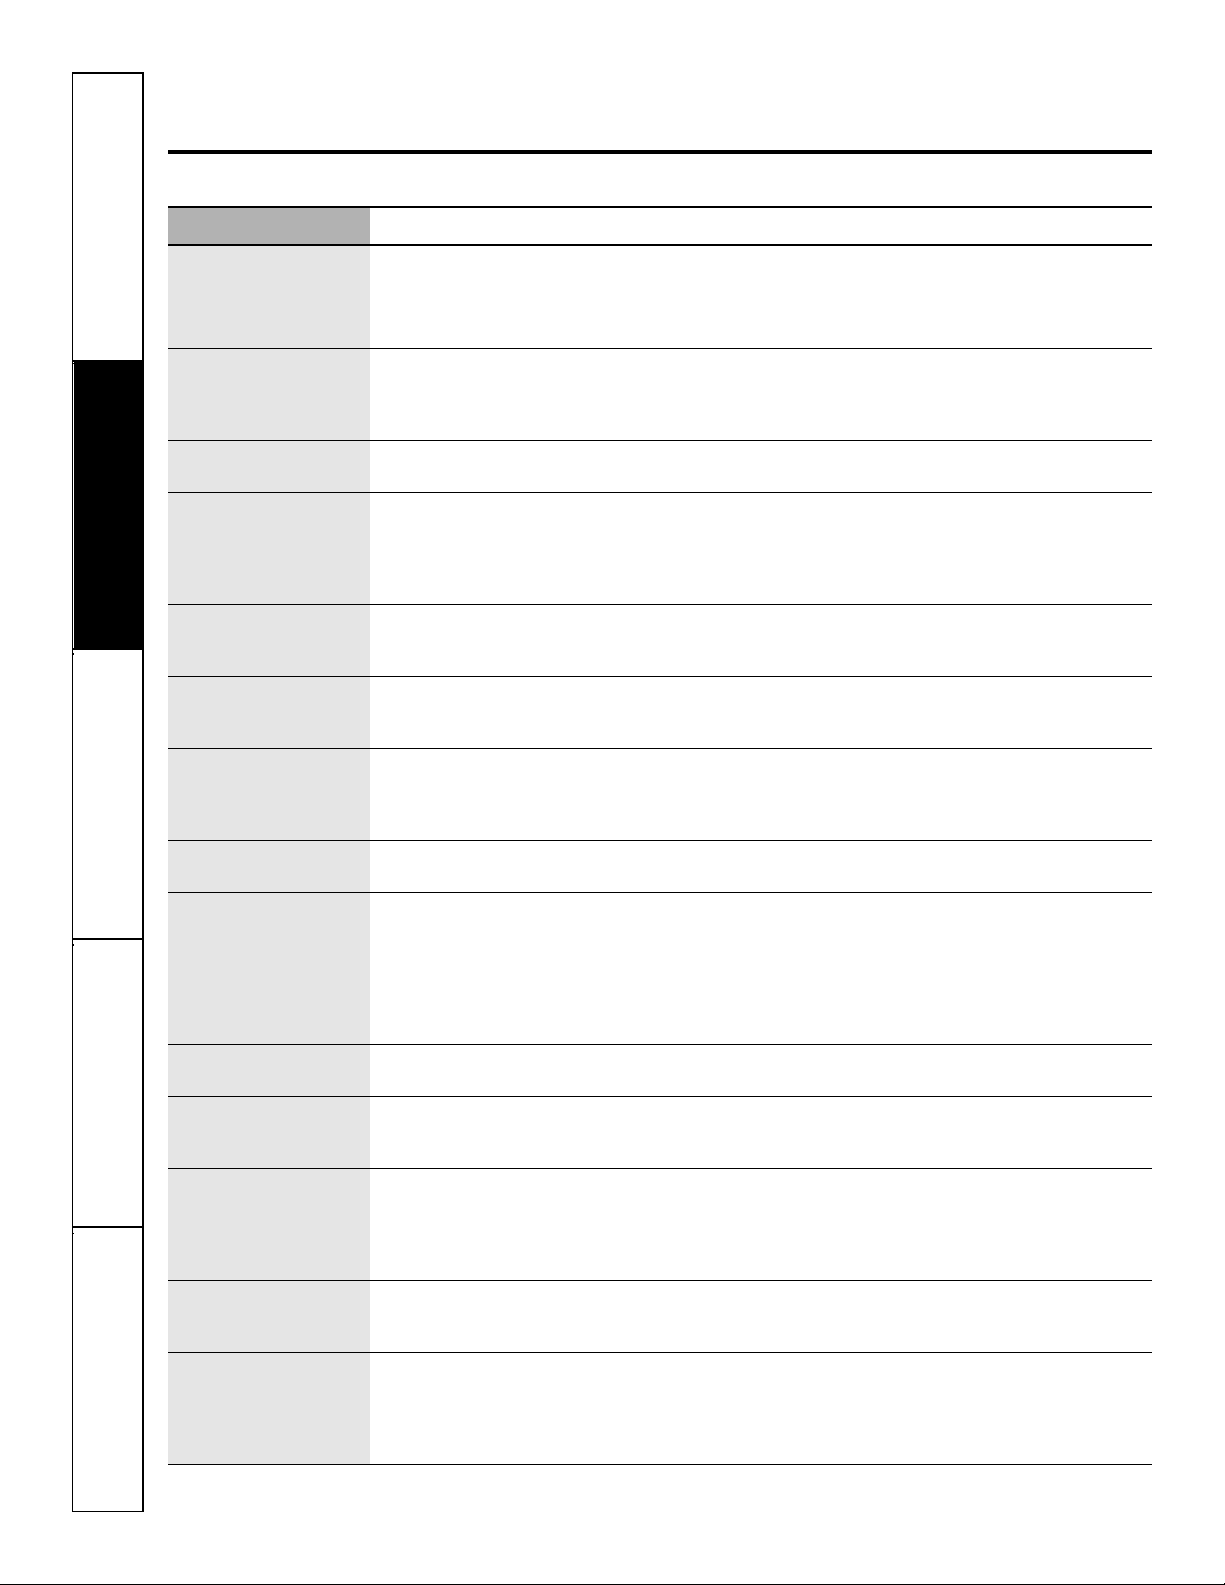
Time Defrost
Use Time Defrost for most other foods.
Auto Defrost
Use Auto Defrost for meat, poultry
and fish.
Time Cook
Allows you to microwave for any time up
to 99 minutes and 59 seconds.
Power Level
Press to choose the power level you want
to set. Watch the display while pressing
this pad to select the power level you want
to set. You will also see a defrost level. This
setting will allow you to choose your own
defrost power level by using the number
pads.
Number Pads
After pressing a function pad, press the
number pads to set the exact amount of
time you want to cook. For example, if
you press the 1, 2 and 5 pads, you have
set 1 minute and 25 seconds.
Clear/Off
Pressing the Clear/Off pad cancels all
microwave cooking functions. It does not
cancel the Kitchen Timer.
Start
After all selections are made, press this
pad to start the oven. The Start pad must
be pressed to turn on any function.
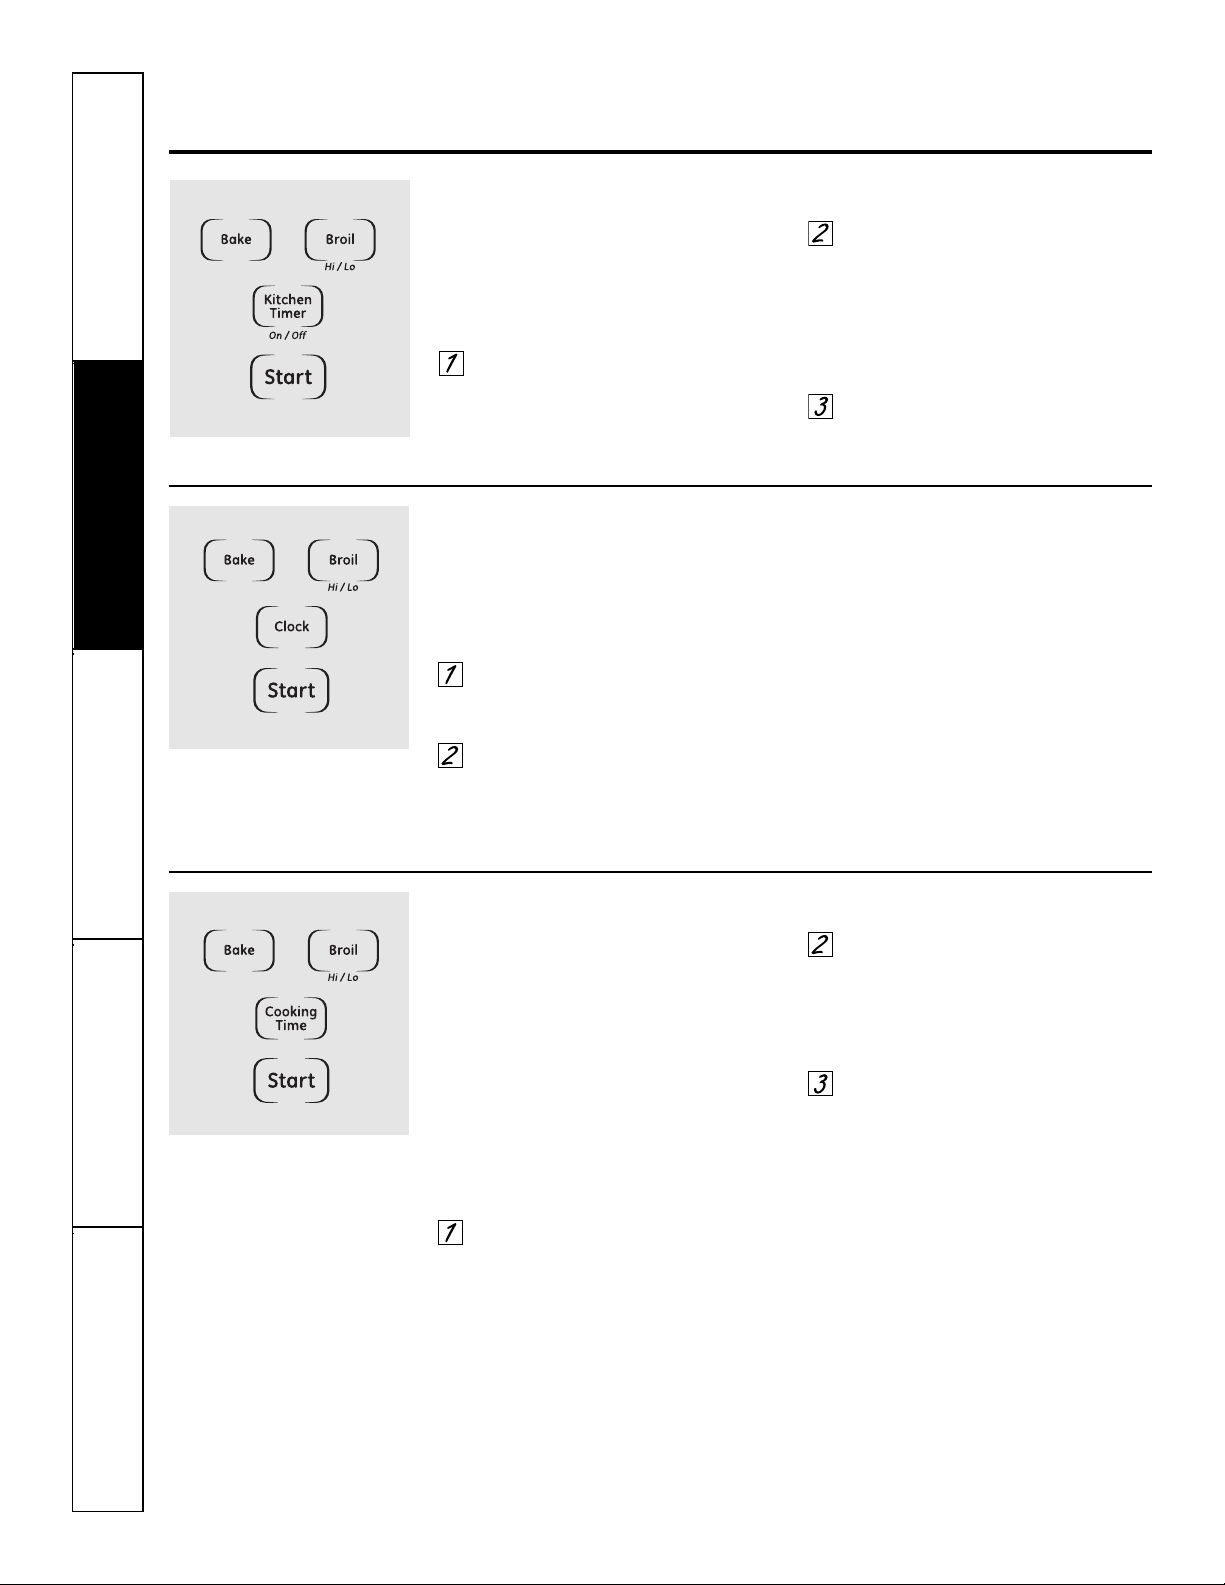
Kitchen Timer Min/Sec
Press to set the timer up to 99 minutes
and 59 seconds. Press the number pads
to set the time. Press the Kitchen Timer
Min/Sec pad again to start. Press the
Kitchen Timer Min/Sec pad twice to
clear the display.
Does not turn on microwave energy.
Delay Start
Allows you to set the microwave to
delay cooking up to 12 hours.
Add 30 Sec
Each time you press this pad the set
time is increased 30 seconds.
Clock
Press this pad before setting the clock.
11
GEAppliances.com
12
Safety InstructionsOperating InstructionsCare and CleaningTroubleshooting TipsConsumer Support
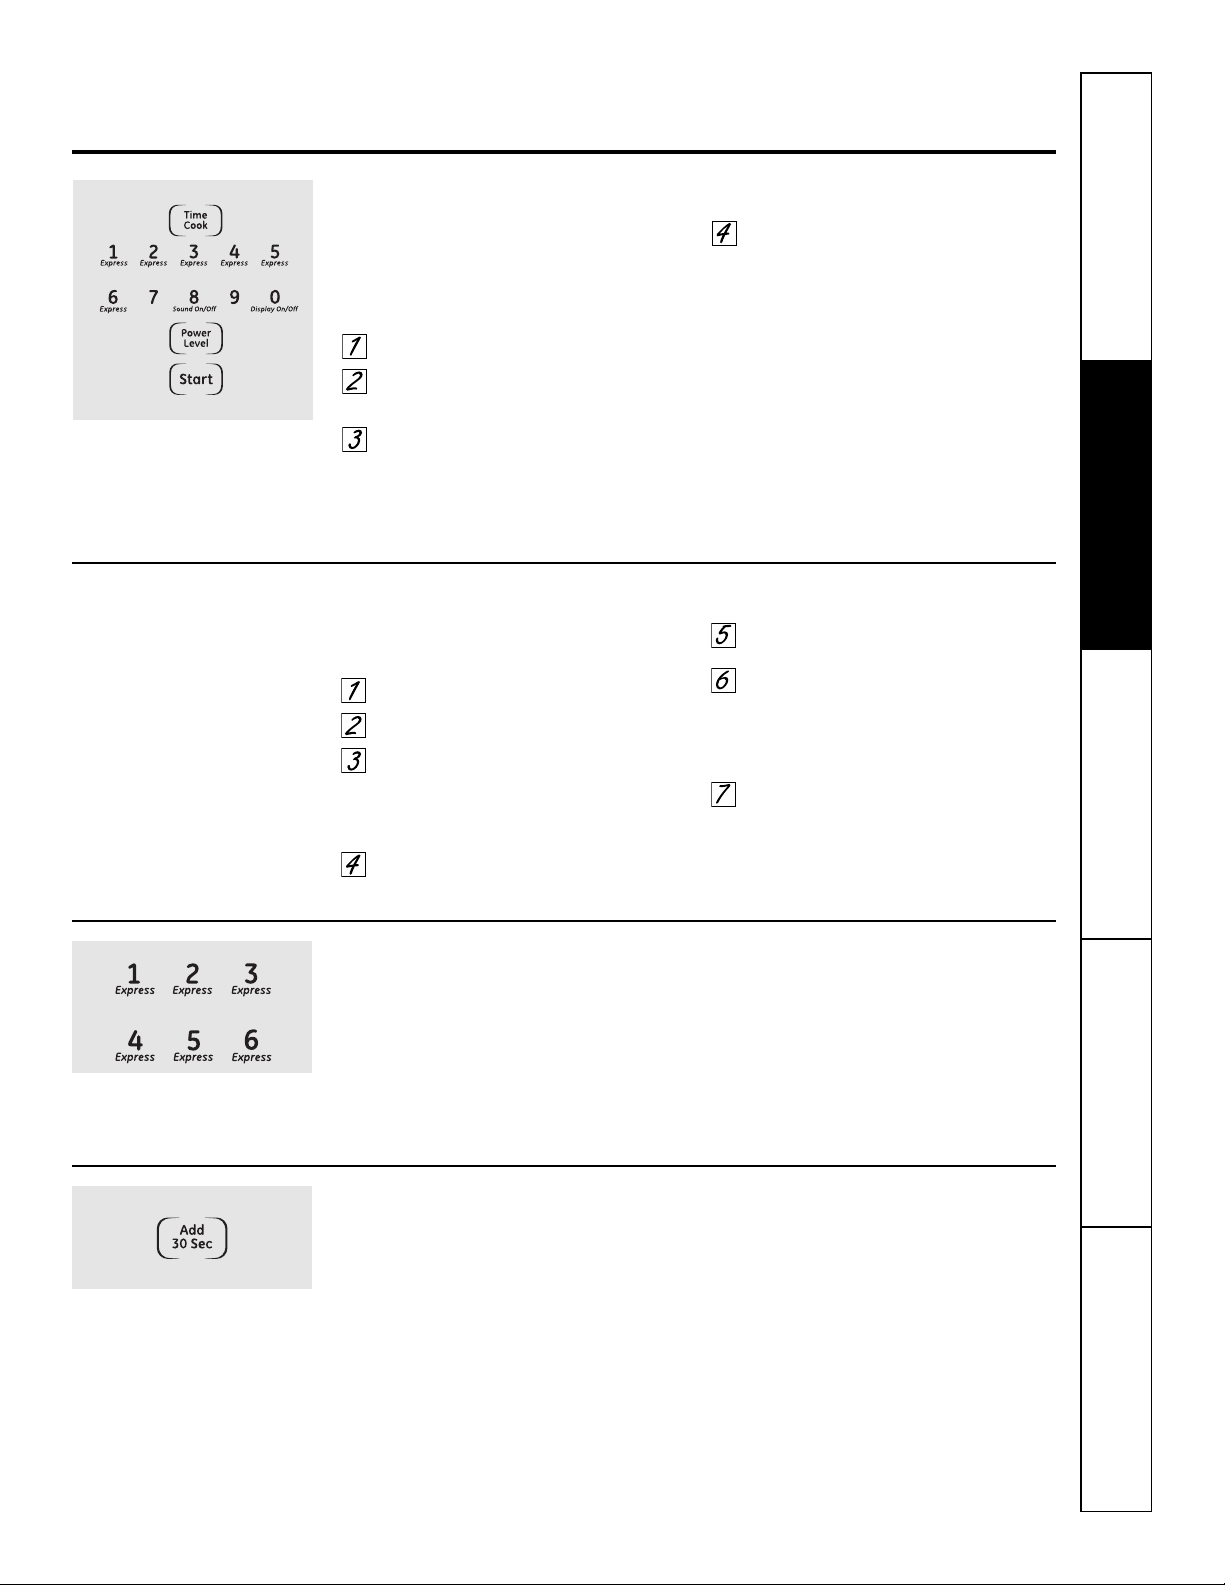
Changing the microwave power level.
The power level may be entered or changed immediately after entering the feature time for Time Cook,
Time Defrost or Express Cook. The power level may also be changed during time countdown.
To change the power level…
Press the Time Cook pad or the Time
Defrost pad.
Enter cooking or defrosting time.
Press the Power Level pad.
Select desired power level 1–10.
Press the Start pad.
Variable power levels add flexibility to microwave
cooking. The power levels on the microwave oven
can be compared to the surface units on a range.
Each power level gives you microwave energy a
certain percent of the time.
■ Power level 7 is microwave energy 70%
of the time.
■ Power level 3 is energy 30% of the
time.
■ Most cooking will be done on High
(power level 10) which gives you 100%
power. Power level 10 will cook faster
but food may need more frequent
stirring, rotating or turning over.
A lower setting will cook more evenly
and need less stirring or rotating of the
food. Some foods may have better flavor,
texture or appearance if one of the lower
settings is used. Use a lower power level
when cooking foods that have a tendency
to boil over, such as scalloped potatoes.
Rest periods (when the microwave
energy cycles off) give time for the food
to “equalize” or transfer heat to the inside
of the food. An example of this is shown
with power level 3—the defrost cycle.
If microwave energy did not cycle off,
the outside of the food would cook
before the inside was defrosted.
Here are some examples of uses for
various power levels:
■ High 10: Fish, bacon, vegetables,
boiling liquids.
■ Med-High 7: Gentle cooking of meat
and poultry; baking casseroles and
reheating.
■ Medium 5: Slow cooking and
tenderizing for stews and less tender
cuts of meat.
■ Low 2 or 3: Defrosting; simmering;
delicate sauces.
■ Warm 1: Keeping food warm; softening
butter.
Safety Instructions
Operating Instructions
Care and Cleaning
Troubleshooting Tips Consumer Support
Using the timed microwave features. GEAppliances.com
Time Cook I
Allows you to microwave for any time up to 99
minutes and 59 seconds.
Power level 10 (High) is automatically set,
but you may change it for more flexibility.
Press the Time Cook pad.
Enter cooking time. For example,
press 1, 5, 0 and 0 for 15 minutes.
Change power level if you don’t
want full power. (Press the Power
Level pad. Select a desired power
level 1–10.)
Press the Start pad.
You may open the door during Time
Cook to check the food. Close the
door and press the Start pad to
resume cooking.
Time Cook II
Lets you change power levels automatically
during cooking. Here’s how to do it:
Press the Time Cook pad.
Enter cooking time.
Change power level if you don’t
want full power. (Press the Power
Level pad. Select a desired power
level 1–10.)
Press the Time Cook pad again.
Enter the second cook time.
Change the power level if you don’t
want full power. (Press the Power
Level pad. Select a desired power
level 1–10.)
Press the Start pad.
At the end of Time Cook I, Time Cook II
counts down.
Express Cook
This is a quick way to set cooking time for
1 –6 minutes.
Press one of the Express pads (from 1 to
6 ) for 1 to 6 minutes of cooking at power
level 10. For example, press the 2 pad for
2 minutes of cooking time.
The power level can be changed as time
is counting down. Press the Power Level
pad and enter 1–10.
Add 30 Seconds
You can use this feature two ways:
■ It will add 30 seconds to the time
counting down each time the pad is
pressed.
■ It can be used as a quick way to set
30 seconds of cooking time. No need
to press the Start pad; the oven will
start immediately.
13
14
Using the timed microwave features.
Cooking Guide For Time Cook. Use power level High (10) unless otherwise noted.
Safety InstructionsOperating InstructionsCare and CleaningTroubleshooting TipsConsumer Support
Vegetable Amount Time Comments
Asparagus
(fresh spears) 1 lb. 7 to 10 min. In 1
1
⁄2-qt. casserole, place 1/4 cup water.
Med-High (7)
(frozen spears) 10-oz. package 5 to 8 min. In 1-qt. casserole.
Beans
(fresh green) 1 lb. cut in half 12 to 17 min. In 1
1
⁄2-qt. casserole, place 1/2 cup water.
(frozen green) 10-oz. package 6 to 9 min. In 1-qt. casserole, place 2 tablespoons water.
(frozen lima) 10-oz. package 6 to 9 min. In 1-qt. casserole, place 1/4 cup water.
Beets
(fresh, whole) 1 bunch 18 to 25 min. In 2-qt. casserole, place 1/2 cup water.
Broccoli
(fresh cut) 1 bunch (1
1
⁄4 to 1
1
⁄2 lbs.) 7 to 10 min. In 2-qt. casserole, place 1/2 cup water.
(fresh spears) 1 bunch (1
1
⁄4 to 1
1
⁄2 lbs.) 9 to 13 min. In 2-qt. casserole, place 1/4 cup water.
(frozen, chopped) 10-oz. package 5 to 8 min. In 1-qt. casserole.
(frozen spears) 10-oz. package 5 to 8 min. In 1-qt. casserole, place 3 tablespoons water.
Cabbage
(fresh) 1 medium head (about 2 lbs.) 8 to 11 min. In 1
1
⁄2- or 2-qt. casserole, place 1/4 cup water.
(wedges) 7 to 10 min. In 2- or 3-qt. casserole, place 1/4 cup water.
Carrots
(fresh, sliced) 1 lb. 6 to 9 min. In 1
1
⁄2-qt. casserole, place 1/4 cup water.
(frozen) 10-oz. package 5 to 8 min. In 1-qt. casserole, place 2 tablespoons water.
Cauliflower
(flowerets) 1 medium head 9 to 14 min. In 2-qt. casserole, place 1/2 cup water.
(fresh, whole) 1 medium head 9 to 17 min. In 2-qt. casserole, place 1/2 cup water.
(frozen) 10-oz. package 5
1
⁄2 to 8 min. In 1-qt. casserole, place 2 tablespoons water.
Corn
(frozen kernel) 10-oz. package 4 to 8 min. In 1-qt. casserole, place 2 tablespoons water.
Corn on the cob
(fresh) 1 to 3 ears 3 to 5 min. In 2-qt. glass baking dish, place corn. If corn is in husk,
per ear use no water; if corn has been husked, add 1/4 cup
water. Rearrange after half of time.
(frozen) 1 ear 5 to 7 min. Place in a round glass baking dish. Cover with vented
2 to 3 ears 2 to 4 min. plastic wrap. Rearrange after half of time.
per ear
Mixed vegetables
(frozen) 10-oz. package 4 to 8 min. In 1-qt. casserole, place 3 tablespoons water.
Peas
(fresh, shelled) 2 lbs. unshelled 9 to 12 min. In 1-qt. casserole, place 1/4 cup water.
(frozen) 10-oz. package 4 to 8 min. In 1-qt. casserole, place 2 tablespoons water.
Potatoes
(fresh, cubed, white) 4 potatoes (6 to 8 oz. each) 11 to 14 min. Peel and cut into 1-inch cubes. Place in 2-qt. casserole
with 1/2 cup water. Stir after half of time.
(fresh, whole, sweet 1 (6 to 8 oz.) 2 to 5 min. Pierce with cooking fork. Place in the oven, 1 inch apart,
or white) in circular arrangement. Let stand 5 minutes.
Spinach
(fresh) 10 to 16 oz. 5 to 8 min. In 2-qt. casserole, place washed spinach.
(frozen, chopped and leaf) 10-oz. package 5 to 8 min. In 1-qt. casserole, place 3 tablespoons water.
Squash
(fresh, summer and yellow) 1 lb. sliced 4 to 7 min. In 1
1
⁄2-qt. casserole, place 1/4 cup water.
(winter, acorn or butternut) 1 squash 7 to 11 min. Cut in half and remove fibrous membranes. In 2-qt.
(about 1 lb. each) glass baking dish, place squash cut-side-down.
Turn cut-side-up after 4 minutes.
Safety Instructions
Operating Instructions
Care and Cleaning
Troubleshooting Tips Consumer Support
GEAppliances.com
A dull thumping noise may be heard during defrosting. This is normal when oven is not operating at High power.
Time Defrost
Allows you to defrost for a selected length of
time. See the Defrosting Guide for suggested
times. (Auto Defrost explained in the About the
auto feature section.)
Press the Time Defrost pad twice.
Enter defrosting time.
Press the Start pad.
Turn food over when the oven
signals.
Press the Start pad.
Power level is automatically set at 3, but
can be changed. You can defrost small
items quickly by raising the power level
after entering the time. Power level 7
cuts the total defrosting time in about
half; power level 10 cuts the total time to
approximately 1/3. However, food will
need more frequent attention than usual.
Defrosting Tips
■ Foods frozen in paper or plastic can be
defrosted in the package. Closed packages
should be slit, pierced or vented AFTER food
has partially defrosted. Plastic storage
containers should be partially uncovered.
■ Family-size, prepackaged frozen dinners
can be defrosted and microwaved. If the
food is in a foil container, transfer it to a
microwave-safe dish.
■ Foods that spoil easily should not be
allowed to sit out for more than one hour
after defrosting. Room temperature promotes
the growth of harmful bacteria.
■ For more even defrosting of larger foods,
such as roasts, use Auto Defrost. Be sure
large meats are completely defrosted
before cooking.
■ When defrosted, food should be cool but
softened in all areas. If still slightly icy, return
to the microwave very briefly, or let it stand a
few minutes.
Food Time Comments
Breads, Cakes
Bread, buns or rolls (1 piece) 1/2 min.
Sweet rolls (approx. 12 oz.) 3 to 6 min. Rearrange after half the time.
Fish and Seafood
Fillets, frozen (1 lb.) 9 to 12 min.
Shellfish, small pieces (1 lb.) 3 to 7 min. Place block in casserole. Turn over and break up after half the time.
Fruit
Plastic pouch – 1 or 2 (10-oz. package) 3 to 7 min.
Meat
Bacon (1 lb.) 3 to 6 min. Place unopened package in oven. Let stand 5 minutes after defrosting.
Franks (1 lb.) 3 to 6 min. Place unopened package in oven. Microwave just until franks can be
separated. Let stand 5 minutes, if necessary, to complete defrosting.
Ground meat (1 lb.) 5 to 8 min. per lb. Turn meat over after first half of time.
Roast: beef, lamb, veal, pork 11 to 16 min. per lb. Use power level 1.
Steaks, chops and cutlets 5 to 10 min. per lb. Place unwrapped meat in cooking dish. Turn over after first half of time and
shield warm areas with foil. After second half of time, separate pieces with
table knife. Let stand to complete defrosting.
Poultry
Chicken, broiler-fryer, cut up 15 to 22 min. Place wrapped chicken in dish. Unwrap and turn over after first half of time.
(2
1
⁄2 to 3 lbs.) After second half of time, separate pieces and place in cooking dish. Microwave
2 to 4 minutes more, if necessary. Let stand a few minutes to finish defrosting.
Chicken, whole (2
1
⁄2 to 3 lbs.) 20 to 28 min. Place wrapped chicken in dish. After half the time, unwrap and turn chicken
over. Shield warm areas with foil. To complete defrosting, run cold water in
the cavity until giblets can be removed.
Cornish hen 9 to 16 min. per lb. Place unwrapped hen in the oven breast-side-up. Turn over after first half of
time. Run cool water in the cavity until giblets can be removed.
Turkey breast (4 to 6 lbs.) 5 to 10 min. per lb. Place unwrapped breast in microwave-safe dish breast-side-down. After first
half of time, turn breast-side-up and shield warm areas with foil. Defrost for
second half of time. Let stand 1 to 2 hours in refrigerator to complete defrosting.
Defrosting Guide
At one half of selected defrosting
time, the oven signals TURN.
At this time, turn food over and
break apart or rearrange pieces
for more even defrosting. Shield
any warm areas with small pieces
of foil.
15
16
Safety InstructionsOperating InstructionsCare and CleaningTroubleshooting TipsConsumer Support
Using the microwave sensor cooking features.
The Sensor Features detect the increasing humidity released during cooking. The oven automatically adjusts the
cooking time to various types and amounts of food.
Sensor Cooking
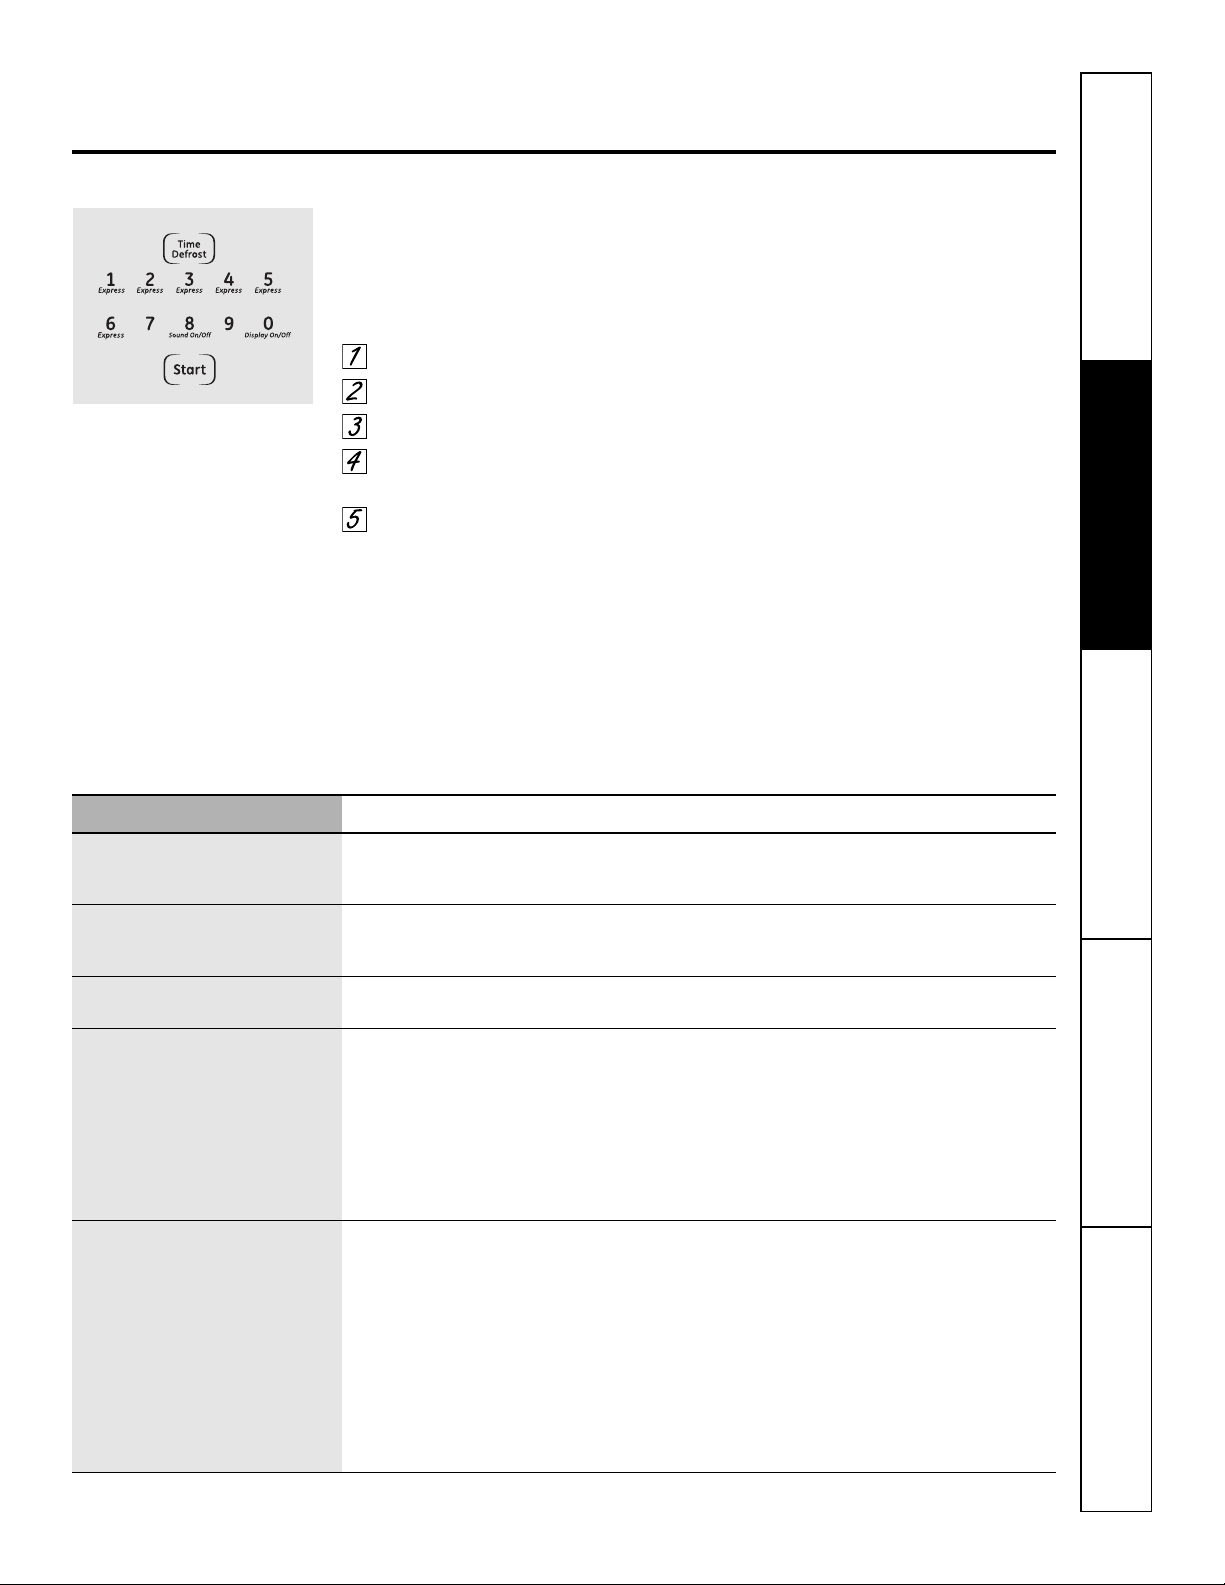
■ The proper containers and covers are
essential for best sensor cooking.
■ Always use microwave-safe containers
and cover them with lids or vented
plastic wrap. Never use tight sealing
plastic containers—they can prevent
steam from escaping and cause food
to overcook.
■ Be sure the outside of the cooking
containers and the inside of the
microwave oven are dry before
placing food in the oven. Beads
of moisture turning into steam
can mislead the sensor.
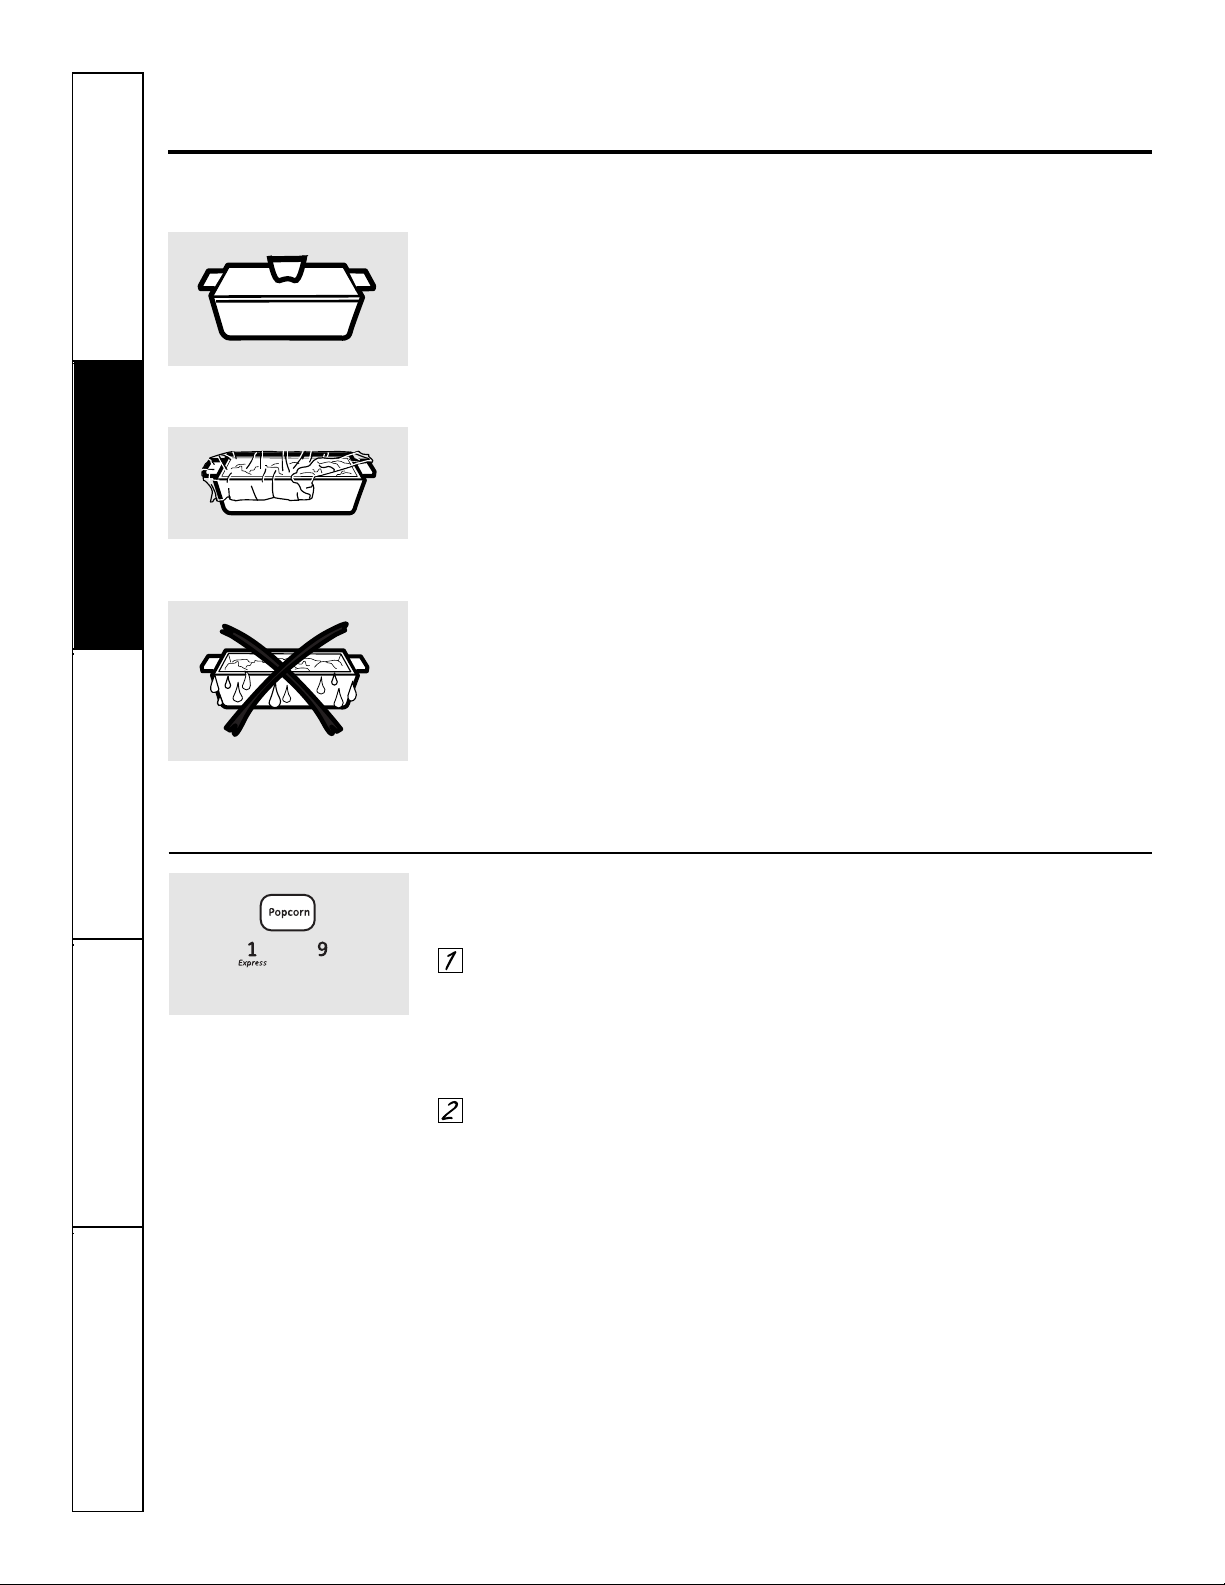
Popcorn
To use the Popcorn feature:
Follow package instructions, using
Time Cook if the package is less
than 1.75 ounces or larger than
3.5 ounces. Place the package
of popcorn in the center of
the microwave.
Press the Popcorn pad. The oven
starts immediately.
If you open the door while POP is displayed,
ERROR will appear. Close the door, press the
Clear/Off pad and begin again.
How to Adjust the Popcorn Program to
Provide a Shorter or Longer Cook Time:
If you find that the brand of popcorn you
use underpops or overcooks consistently,
you can add or subtract 20–30 seconds to
the automatic popping time.
To add time:
After pressing the Popcorn pad, press
the 9 pad immediately after the oven
starts for an extra 20 seconds. Press the
9 pad again to add another 10 seconds
(total 30 seconds additional time).
To subtract time:
After pressing the Popcorn pad, press
the 1 pad immediately after the oven
starts for 20 seconds less cooking time.
Press the 1 pad again to reduce cooking
time another 10 seconds (total 30
seconds less time).
Covered
Vented
Dry off dishes so they don’t mislead
the sensor.
Use only with prepackaged
microwave popcorn weighing
1.75 to 3.5 ounces.
(less time) (more time)
17
Safety Instructions
Operating Instructions
Care and Cleaning
Troubleshooting Tips Consumer Support
GEAppliances.com
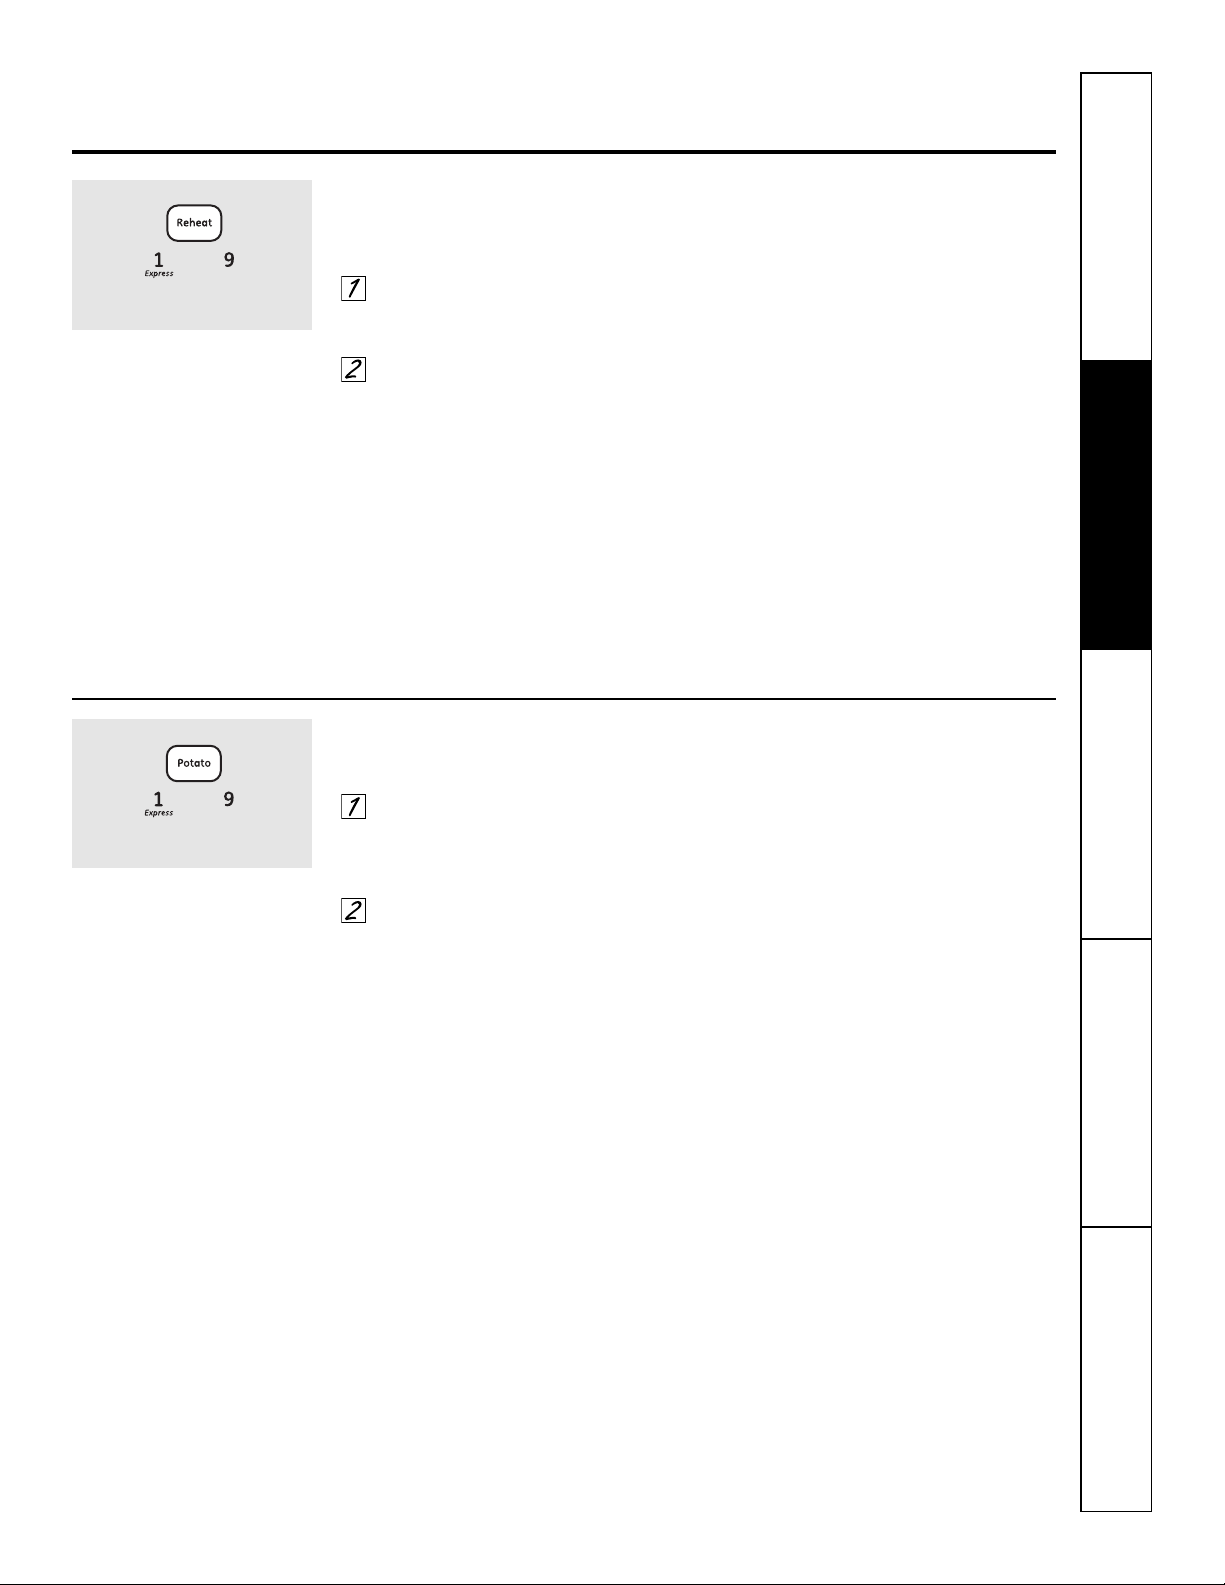
Reheat
The Reheat feature reheats single servings of
previously cooked foods or a plate of leftovers.
Place covered food in the oven.
Press the Reheat pad. The oven
starts immediately.
The oven signals when steam is
sensed and the time remaining
begins counting down.
Do not open the oven door until time is
counting down. If the door is opened,
close it and press the Start pad
immediately.
After removing food from the oven, stir, if
possible, to even out the temperature. If the food
is not hot enough, use Time Cook to reheat for
more time. Reheated foods may have wide
variations in temperature. Some areas may be
extremely hot.
Some foods not recommended for use with
Reheat—it is best to use Time Cook for
these foods:
■ Bread products.
■ Foods that must be reheated
uncovered.
■ Foods that need to be stirred or
rotated.
■ Foods calling for a dry look or crisp
surface after reheating.
How to Change the Automatic Settings:
To reduce time by 10%:
Press the 1 pad after the feature pad.
To add 10% to cooking time:
Press the 9 pad after the feature pad.
(less time) (more time)
Potato
The Potato feature cooks 1/2–2 lbs. of potatoes.
Pierce skin with fork and place
potatoes on the turntable. If cooking
three or more potatoes, arrange in a
star pattern.
Press the Potato pad. The oven
starts immediately. The oven signals
when steam is sensed and the time
remaining begins counting down.
Do not open the oven door until time is
counting down. If the door is opened,
close it and press the Start pad
immediately.
If food is not done enough, use Time Cook to cook
for more time.
(less time) (more time)
18
Safety InstructionsOperating InstructionsCare and CleaningTroubleshooting TipsConsumer Support
Using the microwave convenience cooking features.
Drinks heated with the Beverage feature may be very hot. Remove the container with care.
Beverage
Press the Beverage pad to heat a cup of
coffee or other beverage.
Snacks
The Snacks feature automatically sets the
microwaving times and power levels to warm a
variety of snack foods.
Press the Snacks pad.
Select snack type 1–6 (see the
Snacks Guide).
Enter the number of items or the
food weight in ounces.
Press the Start pad.
Hint: You can press and hold the Snacks pad
during cooking to display the remaining
microwaving time.
Snacks Guide
Food Type Quantity or Weight
1 Bread, rolls, muffins 1 to 4
2 Sandwiches 1 to 2
3 Pizza (leftover slices) 1 to 4
4 Dessert toppings 1 to 4
5 Soup 8 to 40 oz.
6 Cheese dip 4 to 16 oz.
Cook
The Cook feature automatically sets the cooking
times and power levels for a variety of foods.
Press the Cook pad.
Select food type 1–9 (see the Cook
Guide below).
Enter weight in ounces.
Press the Start pad.
Hint: Press and hold the Cook pad during cooking
to display the remaining cook time.
Cook Guide
Food Type Weight Comments
1 Canned Vegetables 4 to 20 oz. Use microwave-safe casserole or bowl. Cover with lid or vented
plastic wrap.
2 Frozen Vegetables 4 to 16 oz. Use microwave-safe casserole or bowl. Follow package instructions
for adding water. Cover with lid or vented plastic wrap.
3 Fresh Vegetables 4 to 16 oz. Use microwave-safe casserole or bowl. Add 2 tablespoons water
for each serving. Cover with lid or vented plastic wrap.
4 Potatoes 8 to 40 oz. Pierce skin with fork. Place potatoes on the turntable.
5 Fish 4 to 16 oz. Use oblong, square or round dish. Cover with vented plastic wrap.
6 Chicken Pieces 4 to 40 oz. Use oblong, square or round dish. Cover with vented plastic wrap
or wax paper.
7 Ground Meat 8 to 48 oz. Use round casserole dish. Crumble meat into dish. Cover with lid
(beef, pork, turkey) or vented plastic wrap.
8 Bacon 2 to 10 oz. Layer strips on a plate, 4 to a layer. Cover each layer with a paper
towel.
9 Pizza (frozen, 4 to 16 oz. Follow package instructions to prepare pizza for microwaving.
microwaveable)
19
Safety Instructions
Operating Instructions
Care and Cleaning
Troubleshooting Tips Consumer Support
Using the microwave auto feature. GEAppliances.com
The Defrost Auto/Time feature gives you two ways to defrost frozen foods. Press Auto Defrost once for Auto Defrost
or twice for Time Defrost.
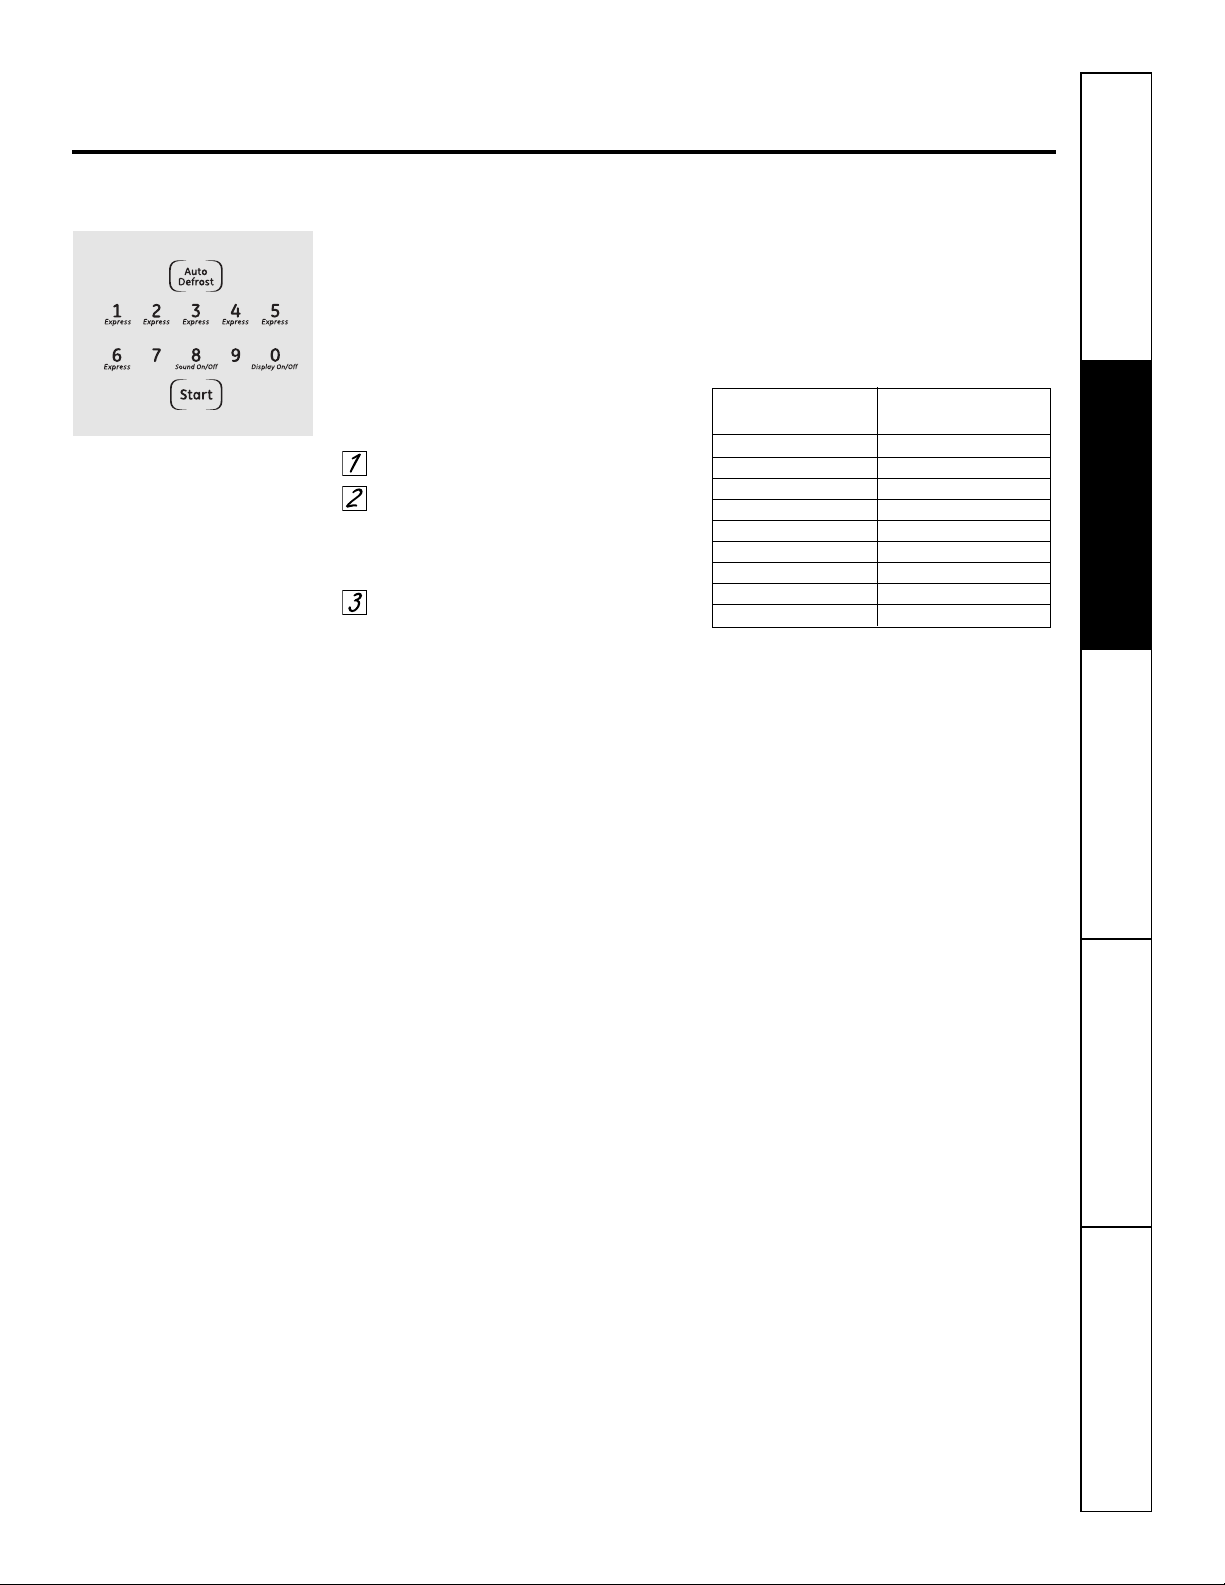
Auto Defrost
Use Auto Defrost for meat, poultry and fish up
to 6 pounds. Use Time Defrost for most other
frozen foods.
Auto Defrost automatically sets the
defrosting times and power levels to give
even defrosting results for meats, poultry
and fish.
Press the Auto Defrost pad once.
Using the Conversion Guide at
right, enter food weight. For
example, press pads 1 and 2 for
1.2 pounds (1 pound, 3 ounces).
Press Start.
Time Defrost is explained in the Using the
timed microwave features section.
■ Remove meat from package and place
on microwave-safe dish.
■ Twice during defrost, the oven signals
TURN. At each TURN signal, turn the
food over. Remove defrosted meat or
shield warm areas with small pieces
of foil.
■ After defrosting, most meats need
to stand 5 minutes to complete
defrosting. Large roasts should
stand for about 30 minutes.
Conversion Guide
If the weight of food is stated in pounds
and ounces, the ounces must be
converted to tenths (.1) of a pound.
Weight of Food Enter Food Weight
in Ounces (tenths of a pound)
1–2 .1
3.2
4–5 .3
6–7 .4
8.5
9–10 .6
11 .7
12–13 .8
14–15 .9

20
Safety InstructionsOperating InstructionsCare and CleaningTroubleshooting TipsConsumer Support
Using the other microwave features.
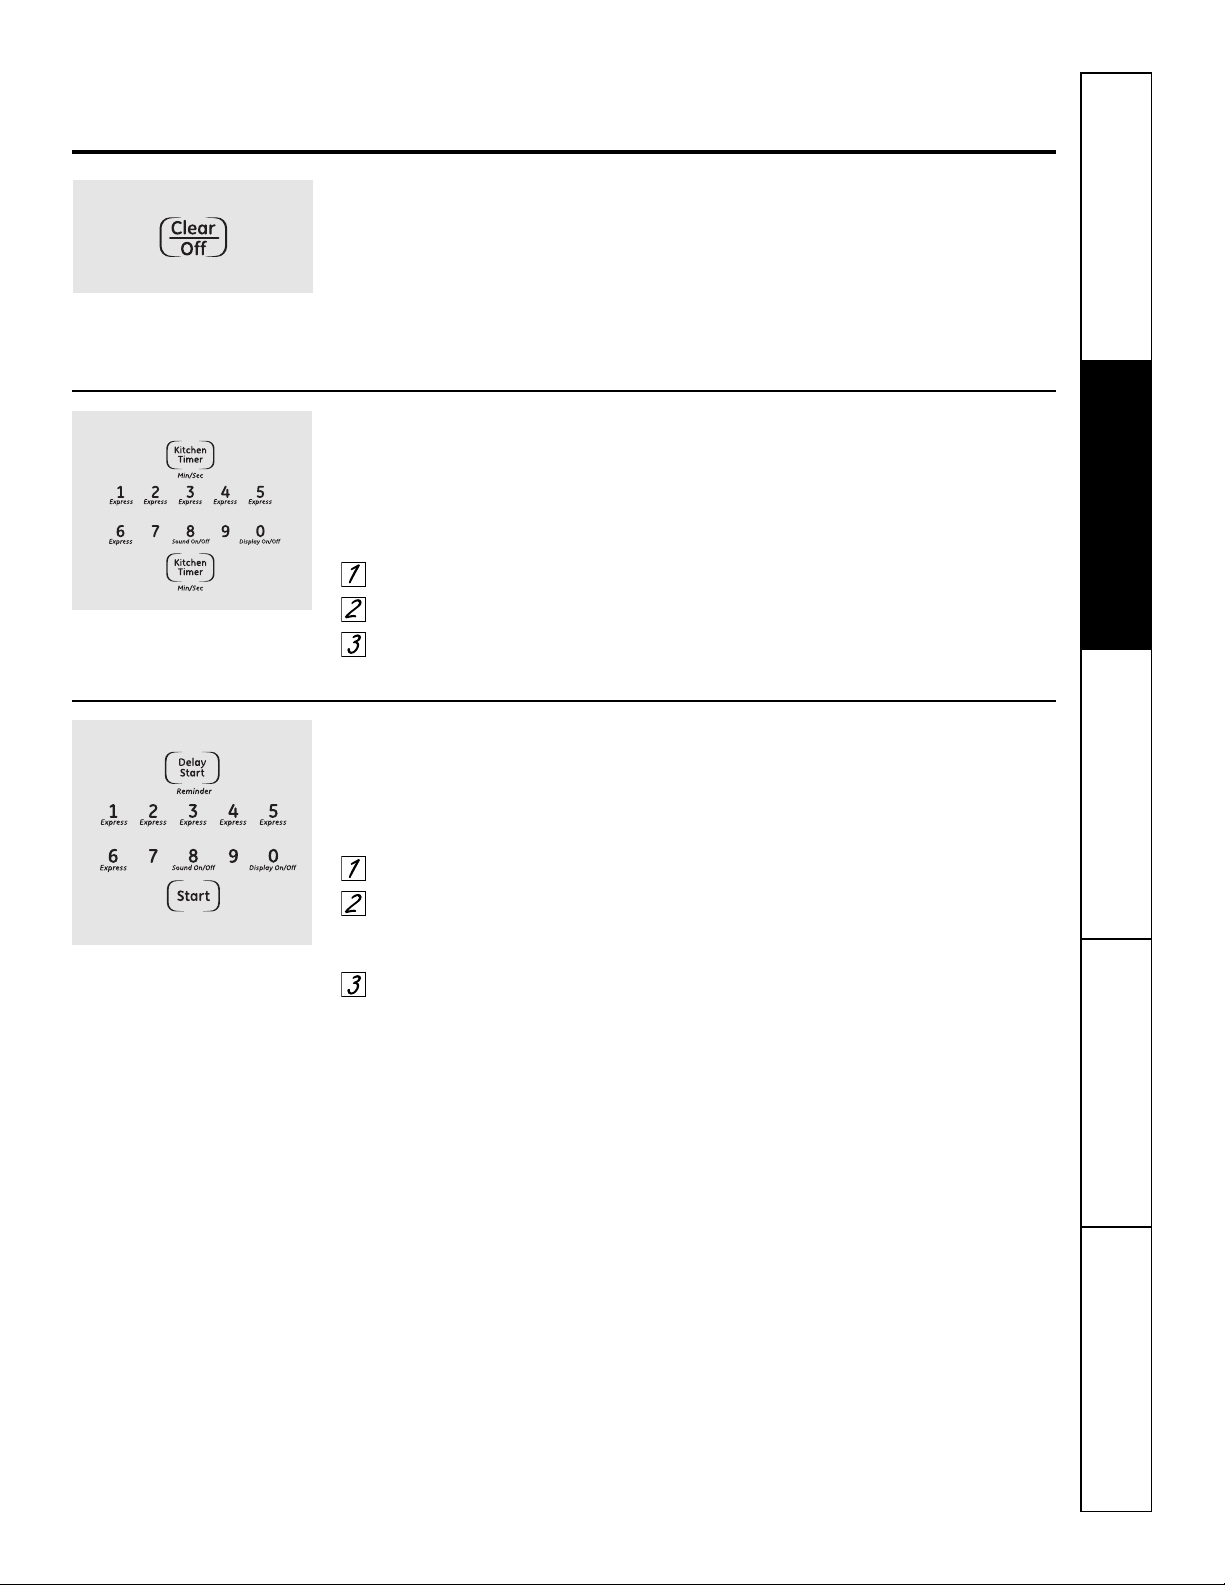
Cooking Complete Reminder: To remind you that you have food in the oven, the oven will beep once a minute
until you either open the oven door or press the Clear/Off pad.
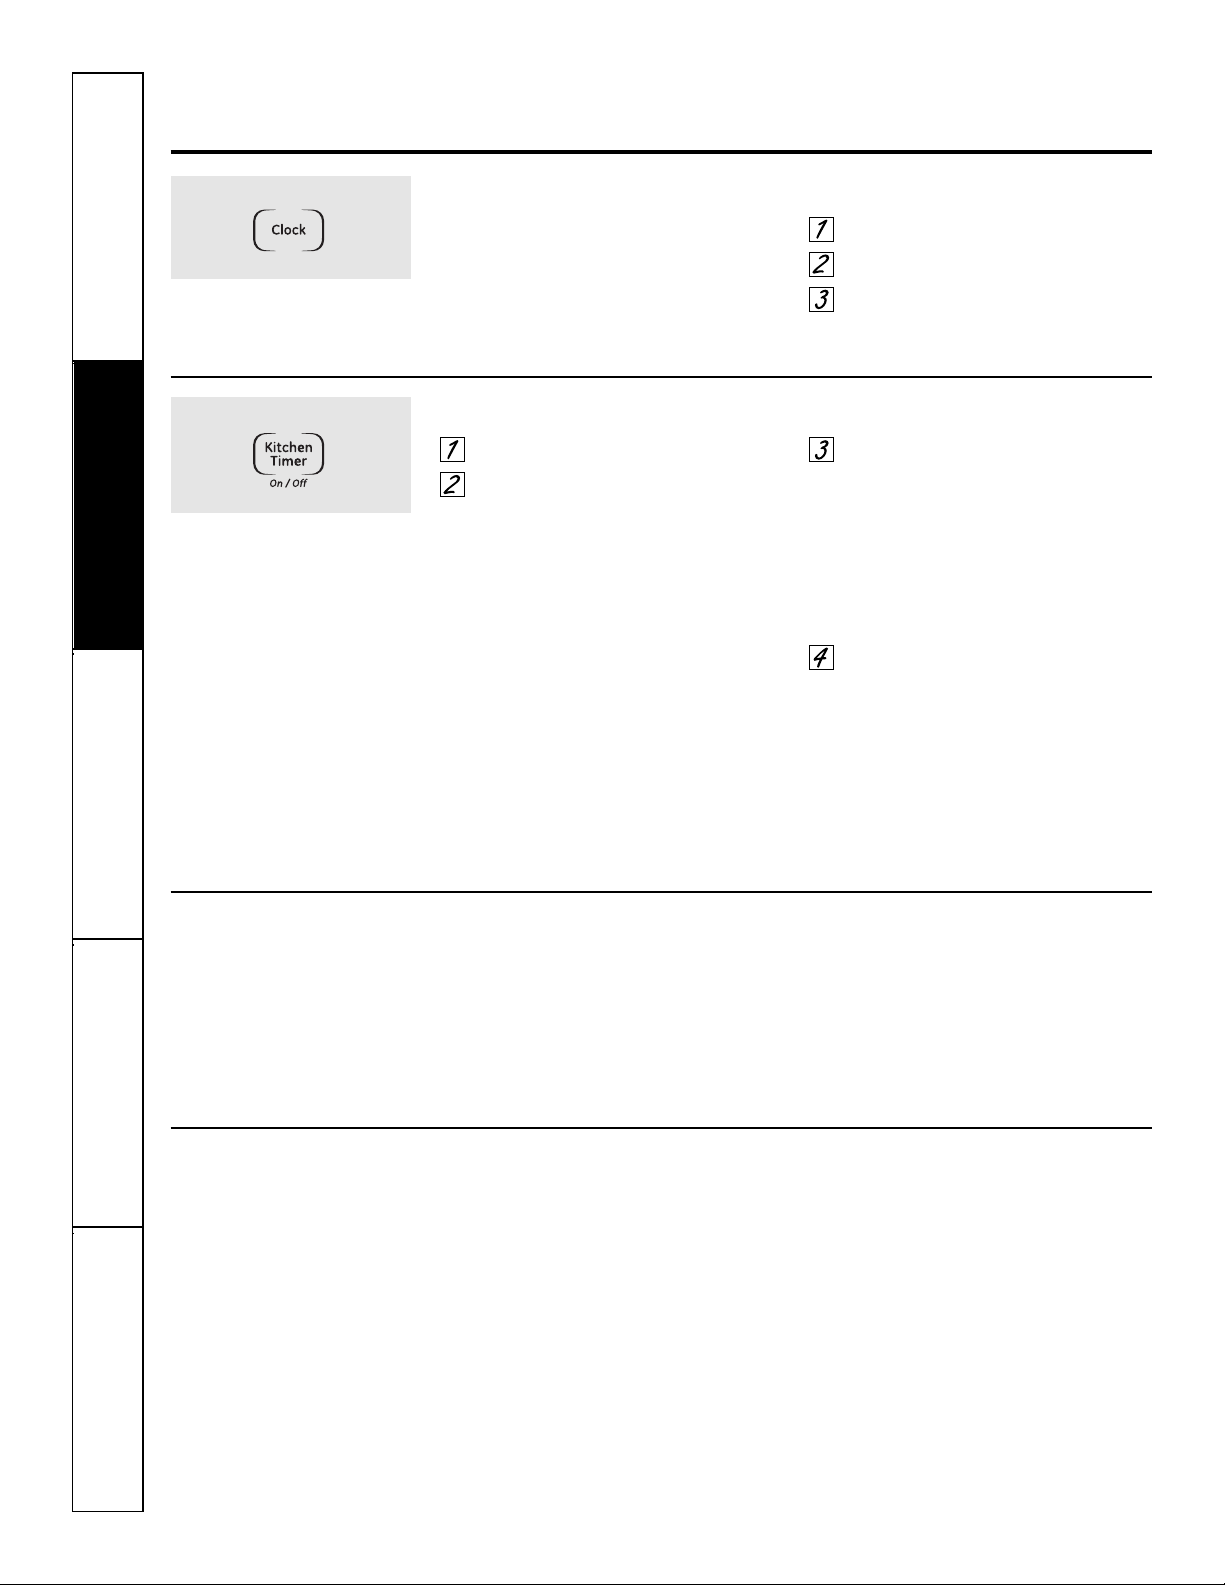
Clock
Press to enter the time of day or to check the time
of day while microwaving.
Press the Clock pad.
Enter time of day.
Press the Start pad or the
Clock pad.
Display On/Off
To turn the clock display on or off, press
and hold the 0 pad for about 3 seconds.
The Display On/Off feature cannot be
used while a cooking feature is in use.
Sound On/Off
To turn the beeper sound on or off, press
and hold the 8 pad for about 3 seconds.
Delay Start
Delay Start allows you to set the
microwave to delay cooking up to
12 hours.
Press the Delay Start pad.
Enter the time you want the oven to
start. (Be sure the microwave clock
shows the correct time of day.)
Select your desired cooking
program.
Press the Start pad.
The Delay Start time will be displayed.
The oven will automatically start at the
delayed time.
The time of day may be displayed by
pressing the Clock pad.
NOTE: You cannot use Delay Start with
Popcorn or Reheat.
Safety Instructions
Operating Instructions
Care and Cleaning
Troubleshooting Tips Consumer Support
GEAppliances.com
Child Lockout
You may lock the control panel to prevent the
microwave from being accidentally started or
used by children.
To lock or unlock the controls, press
and hold the Clear/Off pad for about
3 seconds.
When the control panel is locked, an L
will be displayed to the extreme right.
Kitchen Timer
Kitchen Timer operates as a minute timer and
can be used at any time, even when the oven is
operating.
How to use as a minute timer:
Press the Kitchen Timer Min/Sec pad.
Enter time you want to count down.
Press the Kitchen Timer Min/Sec pad.
When time is up, the oven will signal.
To turn off the timer signal, press the
Kitchen Timer Min/Sec pad.
NOTE: The timer indicator will be lit while the
timer is operating.
To cancel the timer during the
countdown, press the Kitchen Timer
Min/Sec pad.
Reminder
The Reminder feature can be used like an alarm
clock, and can be used at any time, even when
the oven is operating. The Reminder time can be
set up to 12 hours later.
Press the Delay Start pad.
Enter the time you want the oven to
remind you. (Be sure the microwave
clock shows the correct time of day.)
Press the Start pad. When Reminder
signal occurs, press the Delay Start
pad to turn it off. The Reminder
time may be displayed by pressing
the Delay Start pad.
NOTE: REM will remain on the display to show
that the Reminder is set until the Reminder time is
reached and the door is opened or Clear/Off
is pressed.
21
22
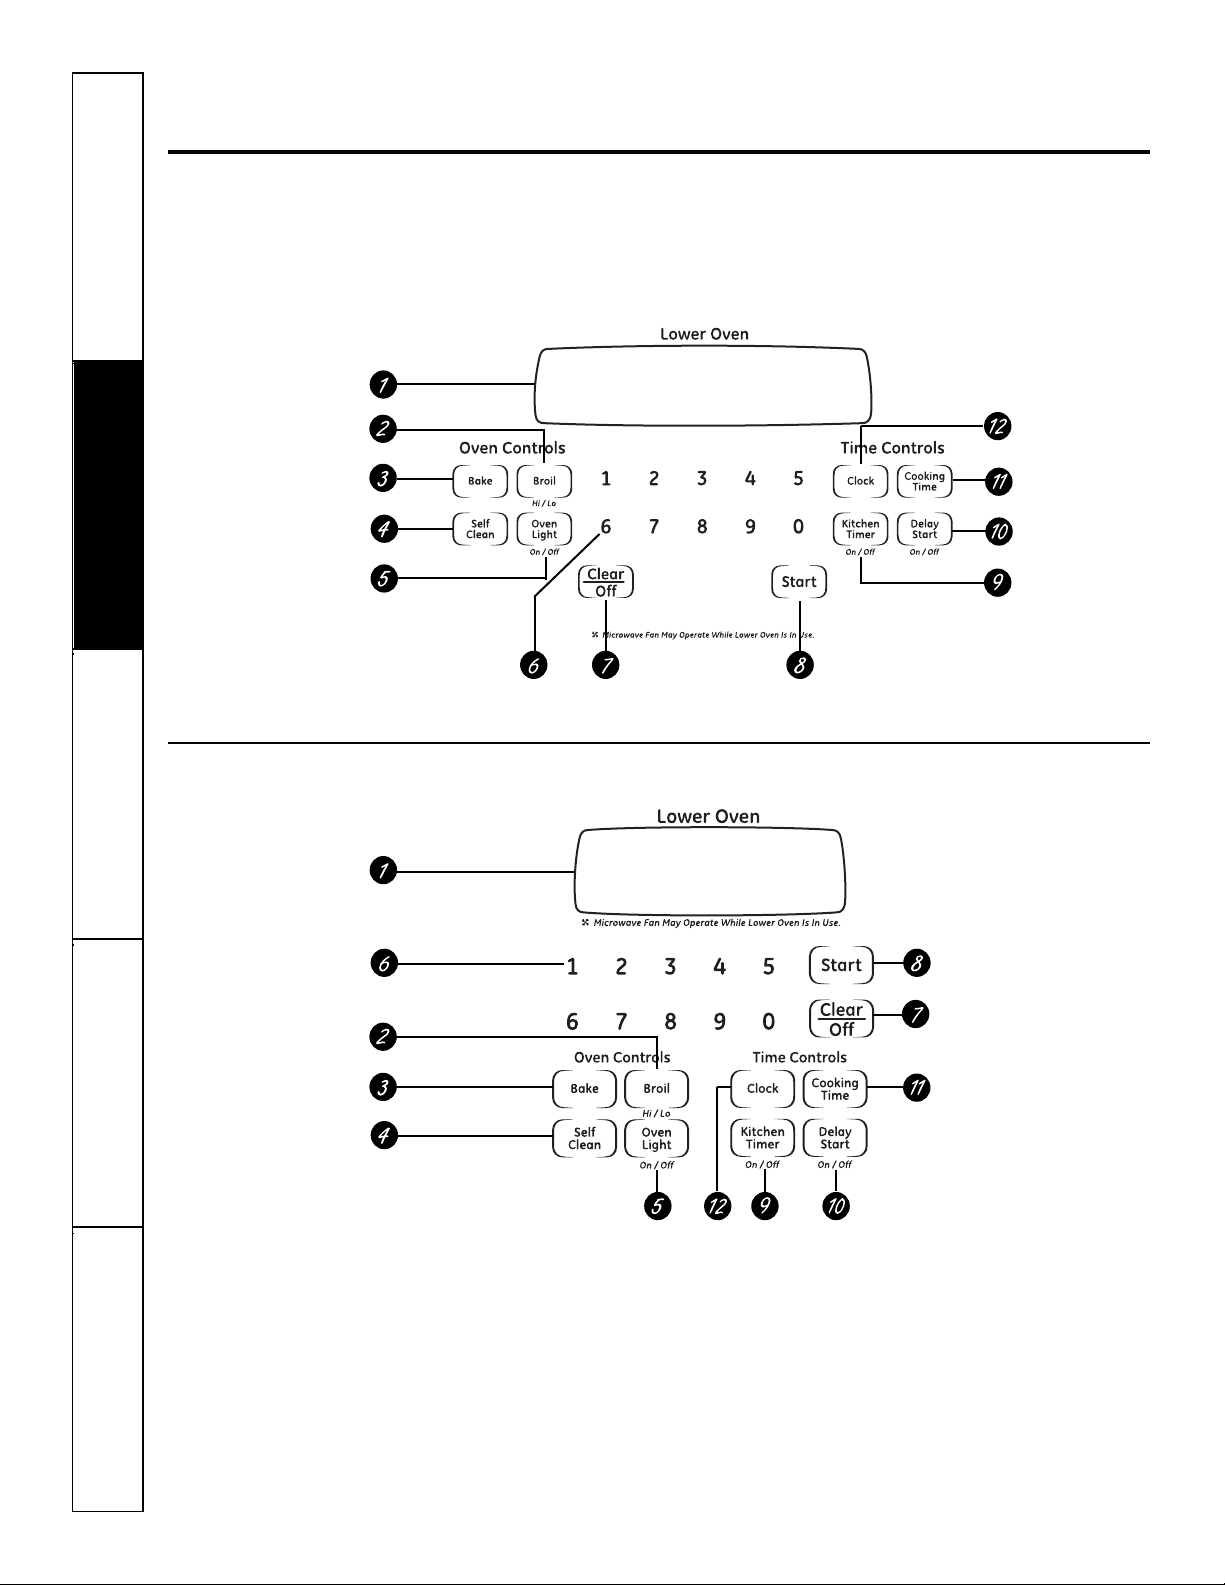
Safety InstructionsOperating InstructionsCare and CleaningTroubleshooting TipsConsumer Support
Using the lower oven controls.
Throughout this manual, features and appearance may vary from your model. Your model may have one of the
following controls.
23
Safety Instructions
Operating Instructions
Care and Cleaning
Troubleshooting Tips Consumer Support
GEAppliances.com
Lower Oven Control, Clock and Timer Features and Settings
Display
Shows the time of day, oven temperature,
whether the oven is in the bake, broil or
self-cleaning mode and the times set for
the timer or automatic oven operations.
NOTE: The time on the lower oven display is
shown in hours and minutes (1:30 is one hour,
30 minutes). On the microwave oven, time is
shown in minutes and seconds (1:30 is one
minute, 30 seconds).
If “F– and a number or letter” flash in the
display and the oven control signals, this
indicates a function error code. Press the
Clear/Off pad. Allow the oven to cool for one
hour. Put the oven back into operation. If the
function error code repeats, disconnect the power
to the oven and call for service.
If your oven was set for a timed oven
operation and a power outage occurred, the
clock and all programmed functions must be reset.
The time of day (may be incorrect) will flash
in the display when the there has been a
power outage.
Broil Hi/Lo Pad
Press to select the broil function.
Bake Pad
Press to select the bake function.
Self Clean Pad
Press to select the self-cleaning function.
See the Using the self-cleaning lower oven
section.
Oven Light Pad
Press to turn the oven light on or off.
Number Pads
Use to set any function requiring
numbers such as the time of day on the
clock, the timer, the oven temperature,
the start time and length of operation for
timed baking and self-cleaning.
Clear/Off Pad
Press to cancel ALL oven operations
except the clock and timer.
Start Pad
Must be pressed to start any cooking or
cleaning function.
Kitchen Timer On/Off Pad
Press to select the timer feature.
Delay Start Pad
Use along with Cooking Time or Self Clean
pads to set the oven to start and stop
automatically at a time you set.
Cooking Time Pad
Press and then press the number pads
to set the amount of time you want your
food to cook. The oven will shut off
automatically when the cooking time
has run out, unless the Cook and Hold
feature was set.
Clock Pad
Press before setting the clock.

24
Safety InstructionsOperating InstructionsCare and CleaningTroubleshooting TipsConsumer Support
Using the lower oven.
Do not use aluminum foil on the bottom of
the oven.
Never entirely cover a rack with
aluminum foil. This will disturb the heat
circulation and result in poor baking.
A smaller sheet of foil may be used to
catch a spillover by placing it on a lower
rack several inches below the food.
To avoid possible burns, place the racks in the desired position before you turn the oven on.
Before you begin…
The racks have stop-locks, so that when
placed correctly on the supports, they will
stop before coming completely out, and
will not tilt.
When placing and removing cookware,
pull the rack out to the bump on the
rack support.
To remove a rack, pull it toward you,
tilt the front end up and pull it out.
To replace, place the end of the rack
(stop-locks) on the support, tilt up
the front and push the rack in.
NOTE: The oven has 7 rack positions.
CAUTION:Never place cooking
utensils or any other items on the oven floor. There is
a heating element beneath the oven floor. Placing items
on the oven floor may cause the oven to overheat,
resulting in damage to the oven and risk of damage
or fire to cabinets.
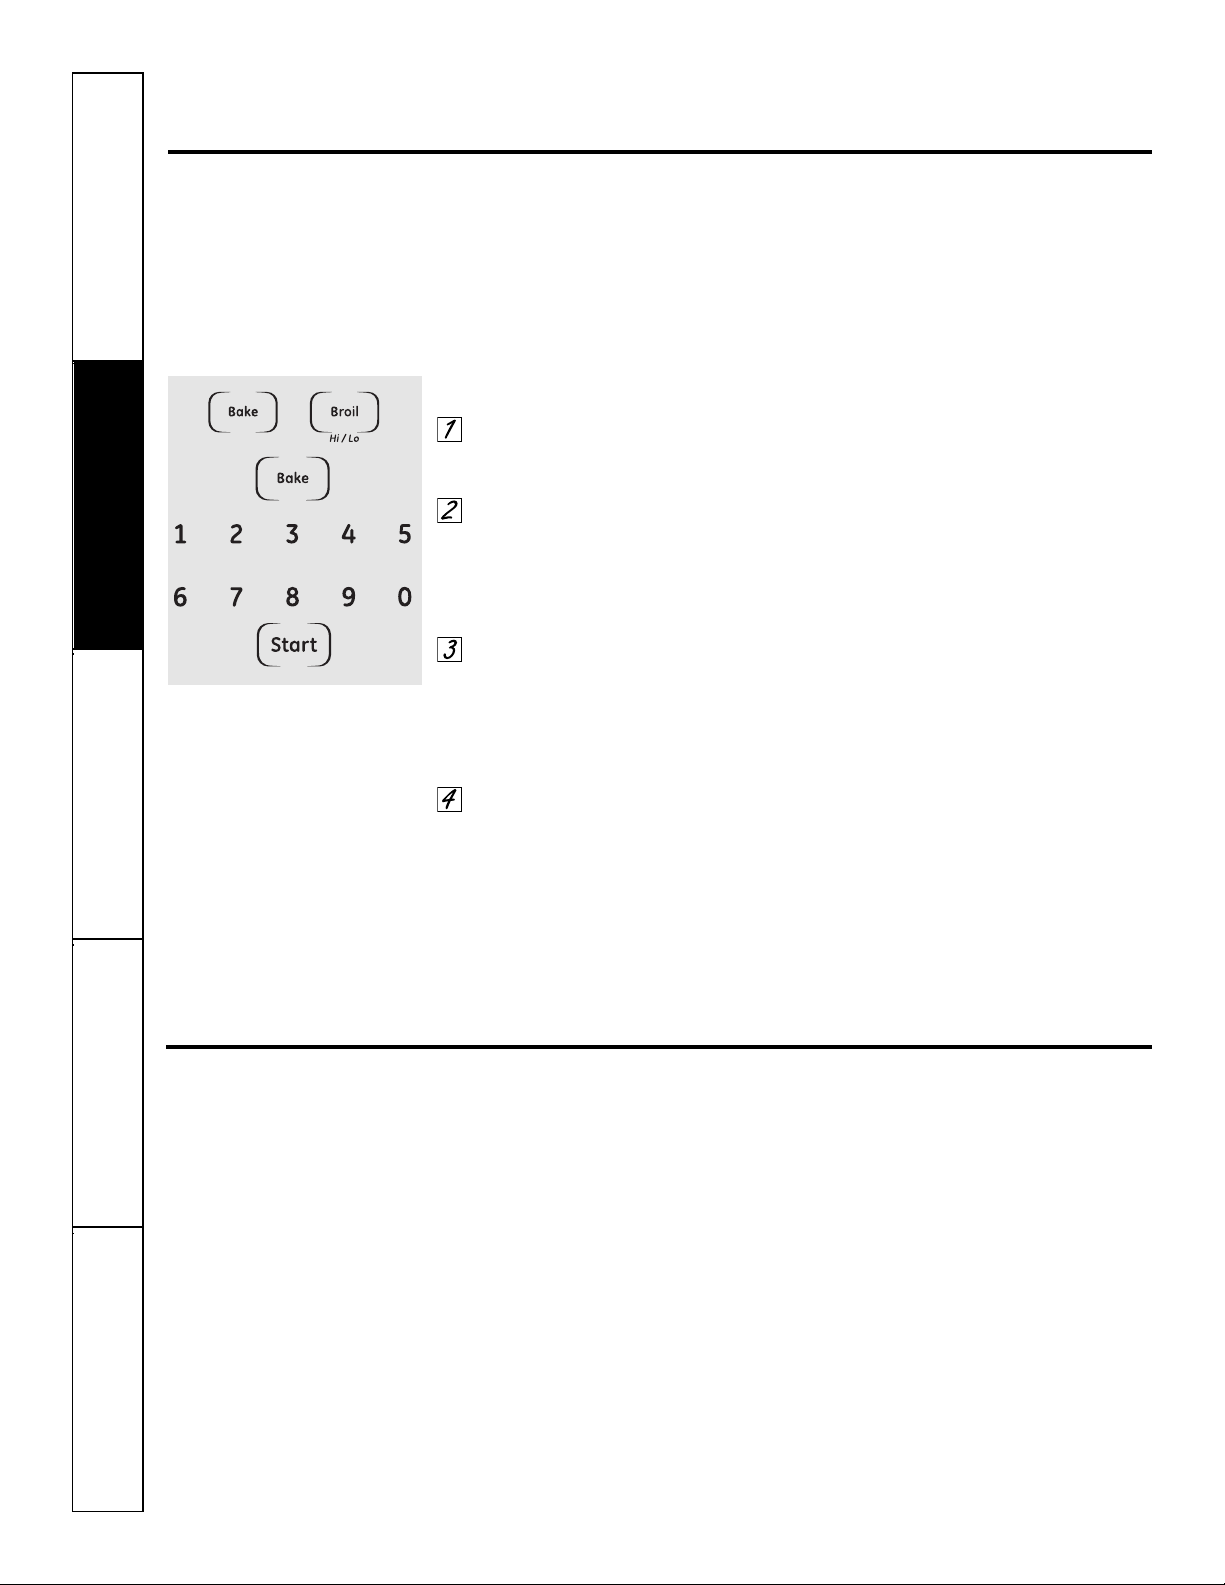
How to Set the Oven for Baking or Roasting
Press the Bake pad.
Press the number pads to set the
desired temperature.
Press the Start pad.
Check food for doneness at
minimum time on recipe. Cook
longer if necessary.
Press the Clear/Off pad when
cooking is complete.
For 27 ″ Ovens: If baking four cake layers
at the same time, place two layers on rack
A and two layers on rack C.
For 30 ″ Ovens: If baking four cake layers
at the same time, place two layers on rack
B and two layers on rack D.
Stagger pans on the rack so one is not
directly above the other
.
Rack Position
Type of Food 27” Oven 30” Oven
Frozen pies B or C C or D
(on cookie sheet)
Angel food cake A A or B
Bundt or pound cakes A A or B
Biscuits, muffins, B or C C or D
brownies, cookies,
cupcakes, layer
cakes, pies
Casseroles B or C C or D
Preheating and Pan Placement
Preheat the oven if the recipe calls for it.
Preheating is necessary for good results
when baking cakes, cookies, pastry and
breads.
Baking results will be better if baking
pans are centered in the oven as much
as possible. Pans should not touch each
other or the walls of the oven. If you
need to use two racks, stagger the pans
so one is not directly above the other,
and leave approximately 1
1
⁄2″ between
pans, from the front, back and sides
of the wall.
Aluminum Foil
NOTE: A cooling fan may
automatically turn on and off to
cool internal parts. This is normal,
and the fan may continue to run
even after the oven is turned off.
To preheat, set the oven at the
correct temperature. The control
will beep when the oven is
preheated and the display will show
your set temperature. This may take
approximately 10 minutes.
Broiling Guide
27” Ovens 27” Ovens 27” Ovens 30” Ovens 30” Ovens 30” Ovens
Quantity and/ Rack First Side Second Side Rack First Side Second Side
Food or Thickness Position Time (min.) Time (min.) Position Time (min.) Time (min.) Comments
Ground Beef 1 lb. (4 patties) C 10 7 E or F 10 7 Space evenly. Up
Well Done 1/2 to 3/4″ thick C 10 9 E or F 10 9 to 8 patties take
about the same
time.
Beef Steaks
Rare † 1″ thick C 6 5 E 8 6 Steaks less than
Medium 1 to 1
1
⁄2 lbs. C 8 6 E 10 8 1″ thick cook
Well Done C 12 11 E 12 10 through before
browning.
Rare † 1
1
⁄2″ thick C 10 7–8 E 10 8 Pan frying is
Medium 2 to 2
1
⁄2 lbs. C 15 14–16 E 15 14–16 recommended.
Well Done C 25 20–25 E 25 20–25 Slash fat.
Chicken 1 whole A 35 10–15 C 25 10 Reduce time about
2 to 2
1
⁄2 lbs., 5 to 10 minutes
split lengthwise per side for cut-up
Lo Broil Pieces A or B 25–35 15–20 B or C 25–35 15–20 chicken. Brush
Lo Broil Boneless A or B 15–20 10–15 B or C 15–20 10–15 each side with
melted butter.
Broil skin-side-
down first.
Lobster Tails 2–4 B 18–20 Do not C 18–20 Do not Cut through back of
6 to 8 oz. each turn over. turn over. shell. Spread open.
Lo Broil C 18–25 N/A D 18–25 N/A Brush with melted
butter before
broiling and after
half of broiling
time.
Fish Fillets 1/4 to 1/2″ thick Handle and turn
Hi Broil C 5 5 E 5 5 very carefully.
Lo Broil D 5 5 F 5 5 Brush with lemon
butter before and
during cooking, if
desired. Preheat
broiler to increase
browning.
Ham Slices 1″ thick B 8 8 D 8 8 Increase time 5 to
(precooked) 10 minutes per
side for 1
1
⁄2″ thick
or home-cured ham.
Pork Chops 2 (1/2″ thick) C 10 10 E 10 10 Slash fat.
Well Done 2 (1″ thick) about 1 lb. B 13 13 D 15 15
Lamb Chops
Medium 2 (1″ thick) about 10 C 10 9 E 10 9 Slash fat.
Well Done to 12 oz. C 12 10 E 12 10
Medium 2 (1
1
⁄2″ thick) about 1 lb. C 14 12 E 14 12
Well Done B 17 12–14 E 17 12–14
Garlic Bread C3 N/AE3N/A
Lo Broil
† The U.S. Department of Agriculture says “Rare beef is popular, but you should know that cooking it to only 140°F means some food poisoning
organisms may survive.” (Source: Safe Food Book. Your Kitchen Guide. USDA Rev. June 1985.)
25
Safety Instructions
Operating Instructions
Care and Cleaning
Troubleshooting Tips Consumer Support
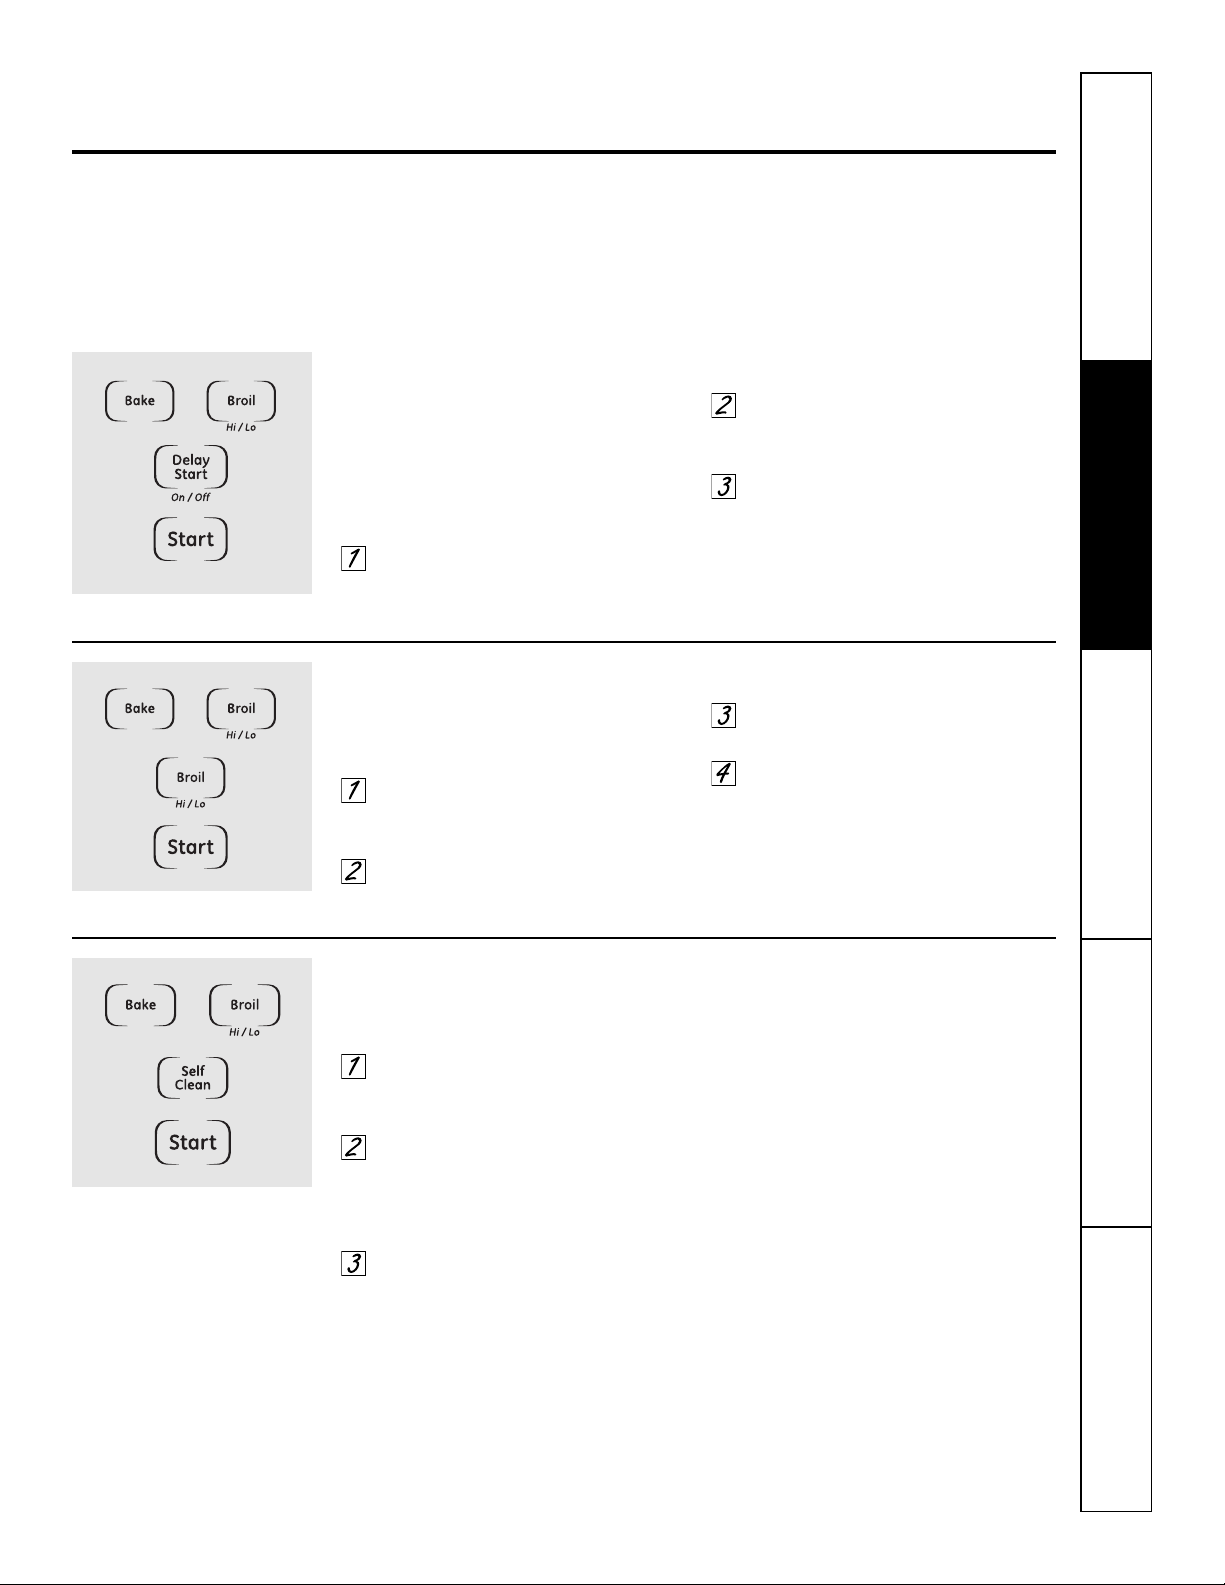
How to Set the Oven for Broiling
Close the door. Always broil with the door
closed.
Place the meat or fish on a broiler
grid in a broiler pan.
Follow suggested rack positions in
the Broiling Guide.
The size, weight, thickness, starting temperature
and your preference for doneness will affect
broiling times. This guide is based on meats
at refrigerator temperature.
Press the Broil Hi/Lo pad once for
HI Broil.
To change to LO Broil, press the
Broil Hi/Lo pad again.
Press the Start pad.
When broiling is finished, press
the Clear/Off pad.
GEAppliances.com
Close the door. Always broil with
the door closed.
If your oven is connected to 208
volts, rare steaks may be broiled by
preheating the broiler and positioning
the oven rack one position higher.
26
Safety InstructionsOperating InstructionsCare and CleaningTroubleshooting TipsConsumer Support
Using the lower oven clock and timer.
To Set the Clock
The clock must be set to the correct
time of day for the automatic oven
timing functions to work properly. The
time of day cannot be changed during a
timed baking or self-cleaning cycle.
Press the Clock pad.
Press the number pads.
Press the Start pad until the time of
day shows in the display.
Make sure the clock is set to the
correct time of day.
To Set the Timer
Press the Kitchen Timer On/Off pad.
Press the number pads until the
amount of time you want shows in
the display. For example, to set 2
hours and 45 minutes, press 2, 4
and 5 in that order. Maximum time
that can be entered in minutes is 59.
Cooking times more than 59
minutes should be changed to
hours and minutes. For example,
enter 90 minutes as 1 hr. 30
minutes. If you make a mistake,
press the Kitchen Timer On/Off pad
and begin again.
Press the Start pad.
After pressing the Start pad, SET
disappears; this tells you the time
is counting down, although the
display does not change until one
minute has passed. Seconds will
not be shown in the display until
the last minute is counting down.
When the timer reaches :00,the
control will beep 3 times followed
by one beep every 6 seconds until
the Kitchen Timer On/Off pad is
pressed.
The 6-second tone can be canceled by following
the steps in the Special features of your lower
oven control section under Tones at the End of
a Timed Cycle.
The timer is a minute timer only.
The timer does not control oven
operations. The maximum setting on
the timer is 9 hours and 59 minutes.
To Reset the Timer
If the display is still showing the time
remaining, you may change it by pressing
the Kitchen Timer On/Off pad, then press
the number pads until the time you want
appears in the display.
If the remaining time is not in the display
(clock, delay start or cooking time are in
the display), recall the remaining time by
pressing the Kitchen Timer On/Off pad and
then pressing the number pads to enter
the new time you want.
To Cancel the Timer
Press the Kitchen Timer On/Off pad twice.
Safety Instructions
Operating Instructions
Care and Cleaning
Troubleshooting Tips Consumer Support
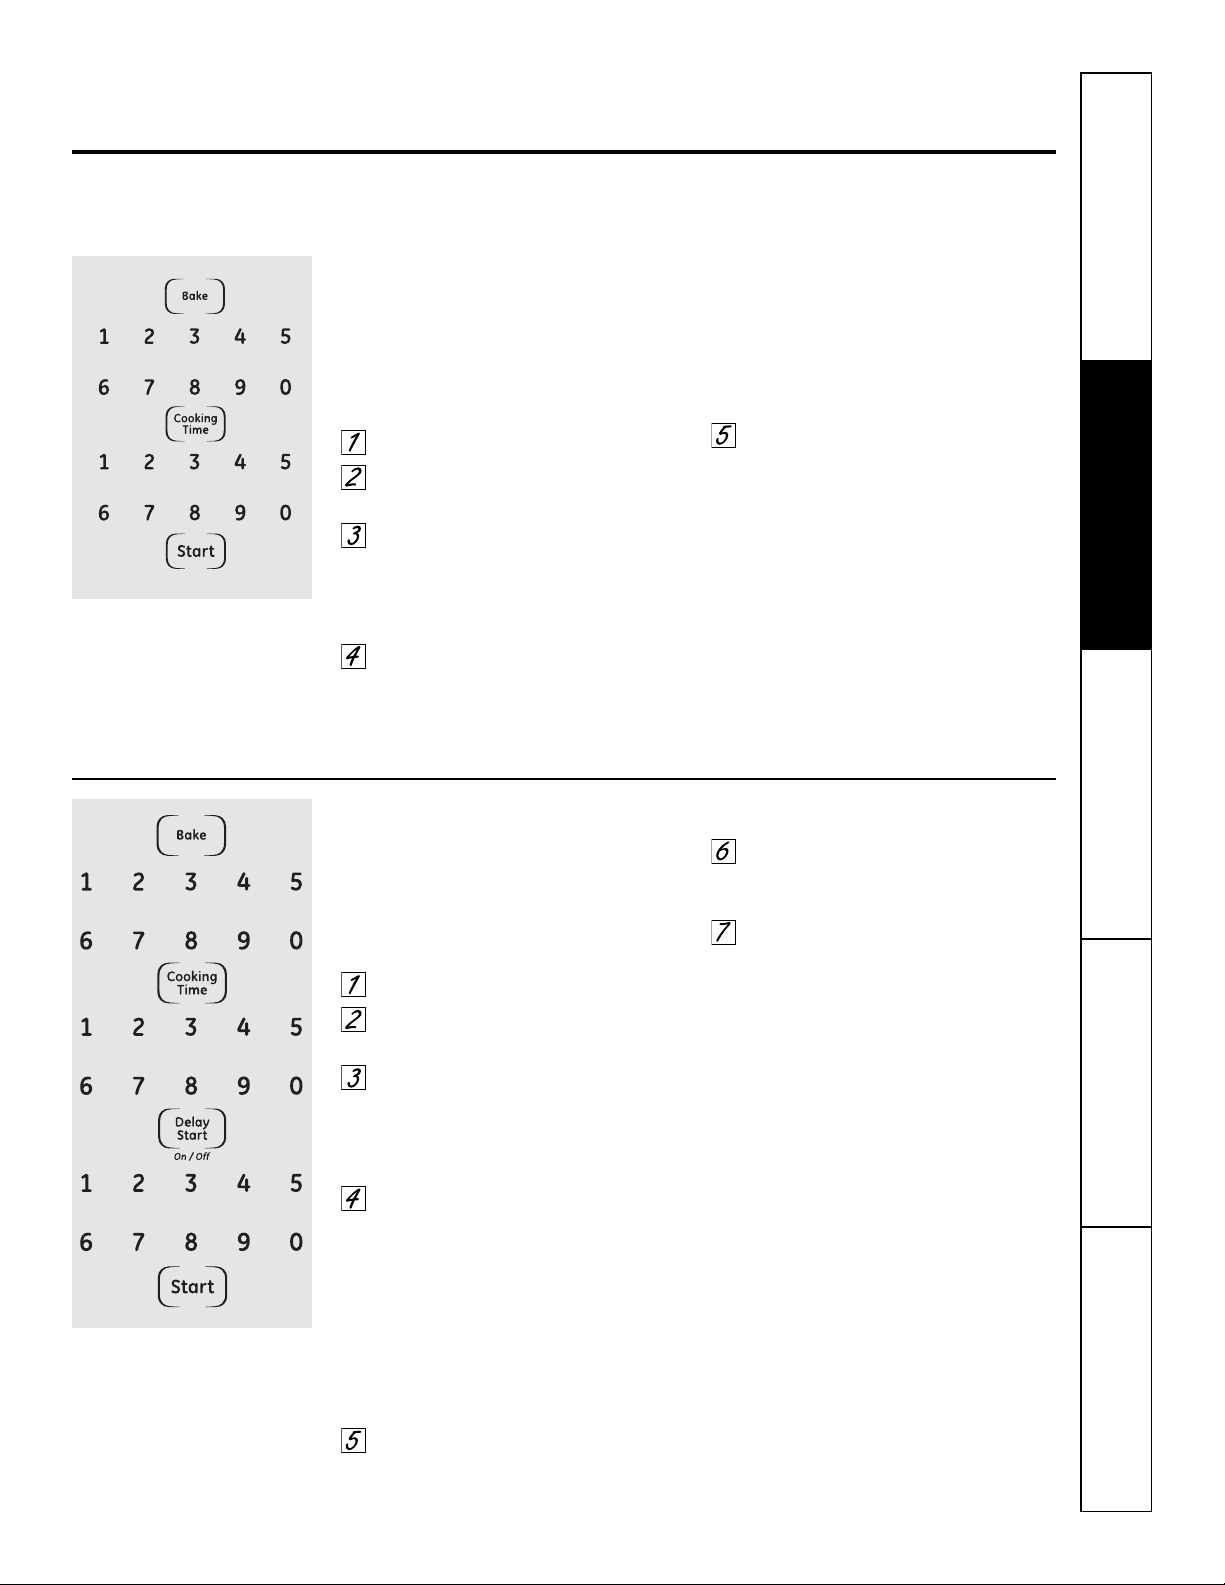
You can set the oven control to delay-start the
oven, cook for a specific length of time and then
turn off automatically.
Make sure the clock shows the correct
time of day.
Press the Bake pad.
Using the number pads, enter the
desired temperature.
Press the Cooking Time pad.
NOTE: If your recipe requires preheating, you may
need to add additional time to the length of the
cooking time.
Using the number pads, enter the
desired baking time. Maximum time
that can be entered in minutes is 59.
Cooking times more than 59
minutes should be changed to hours
and minutes. For example, enter 90
minutes as 1 hr. 30 minutes. The
oven temperature and the cooking
time that you entered will be
displayed.
Press the Delay Start pad.
Using the number pads, enter the
time of day you want the oven to
turn on and start cooking.
Press the Start pad.
NOTE: An attention tone will sound if you are
using timed baking and do not press the Start pad
after entering the baking temperature.
If you would like to check the times you
have set, press the Delay Start pad to
check the start time you have set or press
the Cooking Time pad to check the length
of cooking time you have set.
When the oven turns on at the time of
day you have set, the display will show the
changing temperature (starting at 100°F)
and the cooking time countdown. The
display starts changing once the
temperature reaches 100°F.
The oven will continue to cook for the
programmed amount of time, then shut
off automatically, unless the Cook and
Hold feature was set. See the Special
features of your lower oven control section.
Press the Clear/Off pad to clear the
display.
Using the lower oven
timed baking and roasting features.
(on some models) GEAppliances.com
NOTE: Foods that spoil easily–such as milk, eggs, fish, stuffings, poultry and pork–should not be allowed to sit for
more than 1 hour before or after cooking. Room temperature promotes the growth of harmful bacteria. Be sure that
the oven light is off because heat from the bulb will speed harmful bacteria growth.
How to Set an Immediate Start and Automatic Stop
The oven will turn on immediately and cook for a
selected length of time. At the end of the cooking
time, the oven will turn off automatically.
Make sure the clock shows the correct
time of day.
Press the Bake pad.
Using the number pads, enter the
desired temperature.
Press the Cooking Time pad.
NOTE: If your recipe requires preheating, you may
need to add additional time to the length of the
cooking time.
Using the number pads, enter the
desired baking time. Maximum time
that can be entered in minutes is 59.
Cooking times more than 59
minutes should be changed
to hours and minutes. For
example, enter 90 minutes as 1 hr.
30 minutes. The oven temperature
and the cooking time that you
entered will be displayed.
Press the Start pad.
The display shows the oven temperature
that you set and the cooking time
countdown. The display starts changing
once the temperature reaches 100°F.
The oven will continue to cook for the
programmed amount of time, then shut
off automatically, unless the Cook and
Hold feature was set. See the Special
features of your lower oven control section.
Press the Clear/Off pad to clear the
display.
How to Set a Delayed Start and Automatic Stop
27
28
Safety InstructionsOperating InstructionsCare and CleaningTroubleshooting TipsConsumer Support
Adjust the lower oven thermostat—Do it yourself!
You may find that your new oven cooks differently than the one it replaced. Use your new oven for a few
weeks to become more familiar with it. If you still think your new oven is too hot or too cold, you can adjust
the thermostat yourself.
Do not use thermometers, such as those found in grocery stores, to check the temperature setting of your oven.
These thermometers may vary 20–40 degrees.
NOTE: This adjustment will only affect baking and roasting temperatures; it does not affect broiling or self-cleaning
temperatures. The adjustment will be retained in memory after a power failure.
To Adjust the Thermostat
Press the Bake and Broil Hi/Lo
pads at the same time for 3 seconds
until the display shows SF.
Press the Bake pad. A two digit
number shows in the display.
Press Bake once to decrease
(-) the oven temperature, or
twice to increase (+).
The oven temperature can be
adjusted up to (+) 35°F hotter
or (-) 35°F cooler. Press the number
pads the same way you read them.
For example, to change the oven
temperature 15°F, press 1 and 5.
When you have made the
adjustment, press the Start
pad to go back to the time of
day display. Use your oven as
you would normally.
The type of margarine will affect baking performance!
Most recipes for baking have been developed using high-fat products such as butter or margarine (80% fat). If you
decrease the fat, the recipe may not give the same results as with a higher-fat product.
Recipe failure can result if cakes, pies, pastries, cookies or candies are made with low-fat spreads. The lower the fat
content of a spread product, the more noticeable these differences become.
Federal standards require products labeled “margarine” to contain at least 80% fat by weight. Low-fat spreads, on the
other hand, contain less fat and more water. The high moisture content of these spreads affect the texture and flavor
of baked goods. For best results with your old favorite recipes, use margarine, butter or stick spreads containing at least
70% vegetable oil.
+
29
Safety Instructions
Operating Instructions
Care and Cleaning
Troubleshooting Tips Consumer Support
Using the self-cleaning lower oven. GEAppliances.com
The oven door must be closed and all controls must be set correctly for the cycle to work properly.
Before a Clean Cycle
We recommend venting your
kitchen with an open window or
using a ventilation fan or hood
during the first self-clean cycle.
Remove any broiler pan, broiler grid, all
cookware and any aluminum foil from
the oven.
The oven racks can be self-cleaned,
but they will darken, lose their luster and
become hard to slide.
Do not use abrasives or oven cleaners.
Clean the top, sides and outside of the
oven door with soap and water.
Make sure the oven light bulb cover
(on some models) is in place and the
oven light is off.
IMPORTANT: The health of some birds
is extremely sensitive to the fumes given
off during the self-cleaning cycle of any
oven. Move birds to another well
ventilated room.
CAUTION:Never place cooking
utensils or any other items on the oven floor.
There is a heating element beneath the oven
floor. Placing items on the oven floor may cause
the oven to overheat, resulting in damage to
the oven and risk of damage or fire to cabinets.
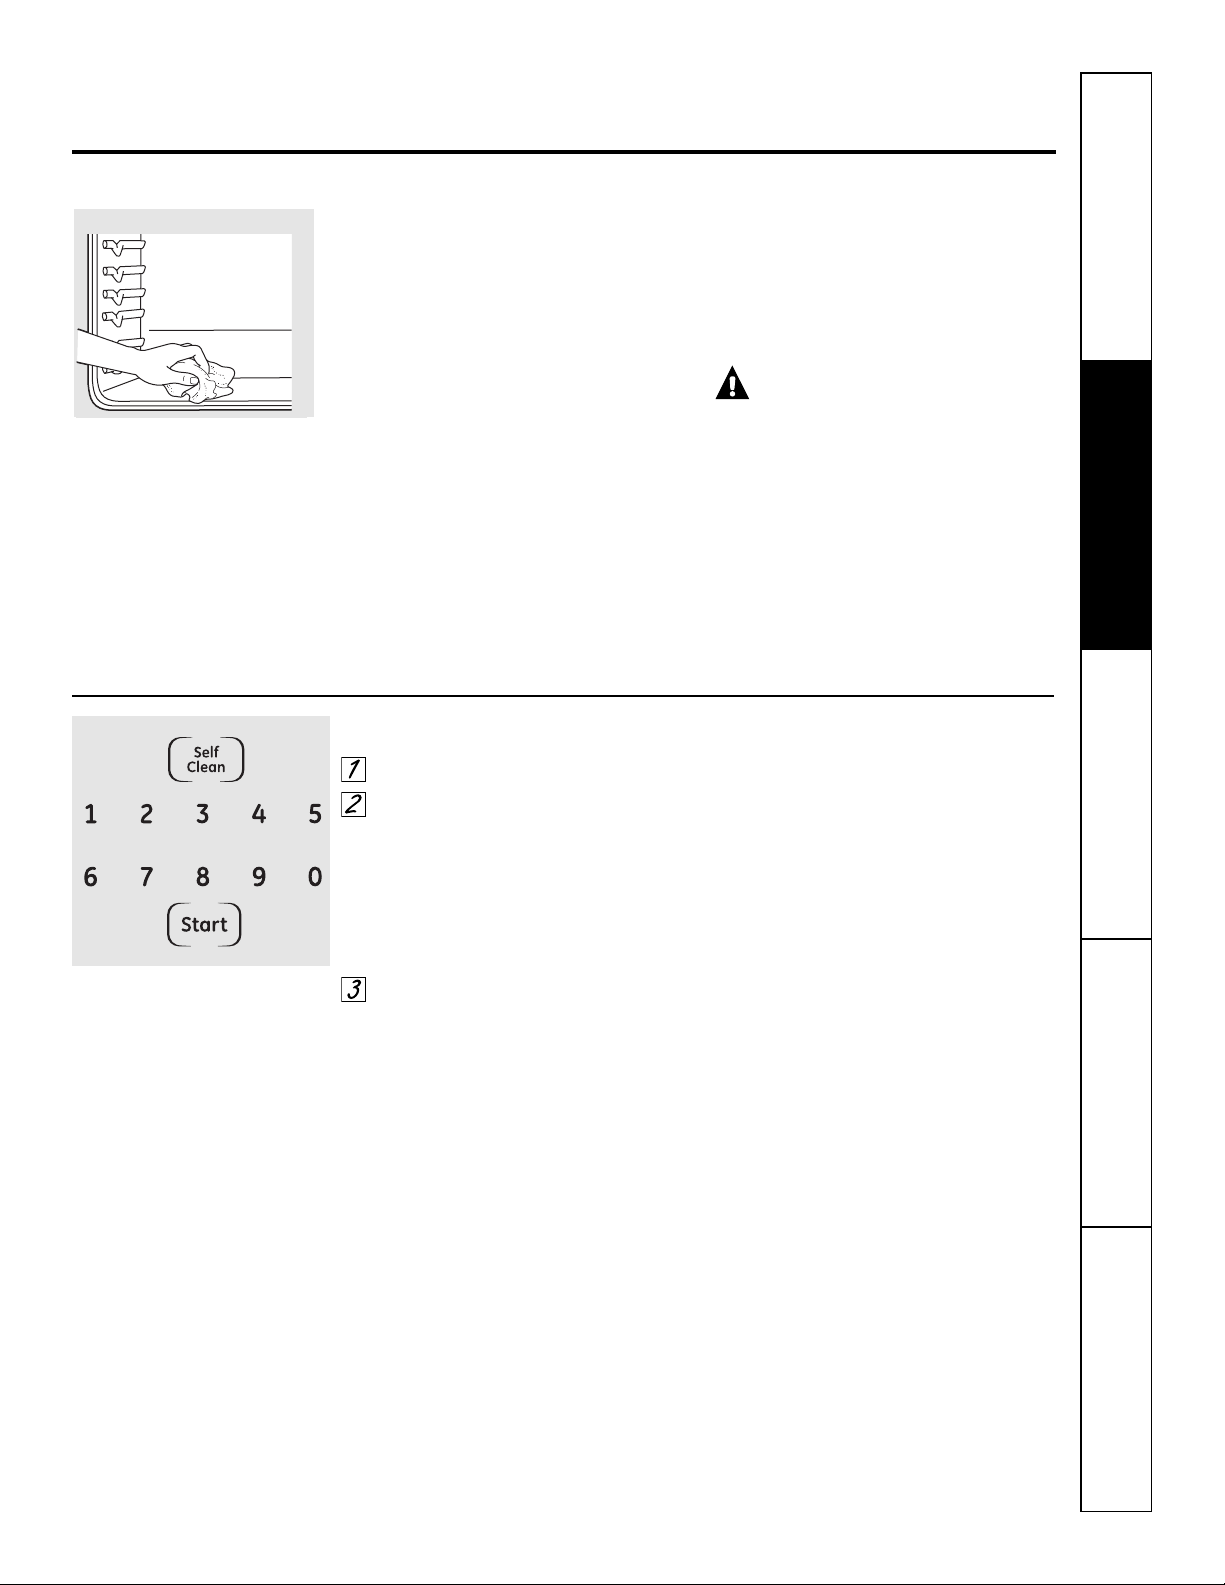
Wipe up heavy soil on the oven
bottom.
How to Set the Oven for Cleaning
Press the Self Clean pad.
Using the number pads, enter the
desired clean time, if a time other
than 4 hours is needed.
Clean cycle time is normally 4 hours. You
can change the clean time to any time
between 3 hours and 5 hours, depending
on how dirty your oven is.
Press the Start pad.
The door locks automatically. The display
will show the clean time remaining. It will
not be possible to open the oven door
until the temperature drops below the
lock temperature and the LOCKED or
LOCKED DOOR light goes off.
When the LOCKED or LOCKED DOOR light
goes off, you will be able to open the
door.
■ The word LOCKED or LOCKED DOOR will
flash and the oven control will signal if
you set the clean cycle and forget to
close the oven door.
■ To stop a clean cycle, press the
Clear/Off pad. When the LOCKED or
LOCKED DOOR light goes off, indicating
the oven has cooled below the locking
temperature, you will be able to open
the door.
30
Safety InstructionsOperating InstructionsCare and CleaningTroubleshooting TipsConsumer Support
Using the self-cleaning lower oven.
The oven door must be closed and all controls must be set correctly for the cycle to work properly.
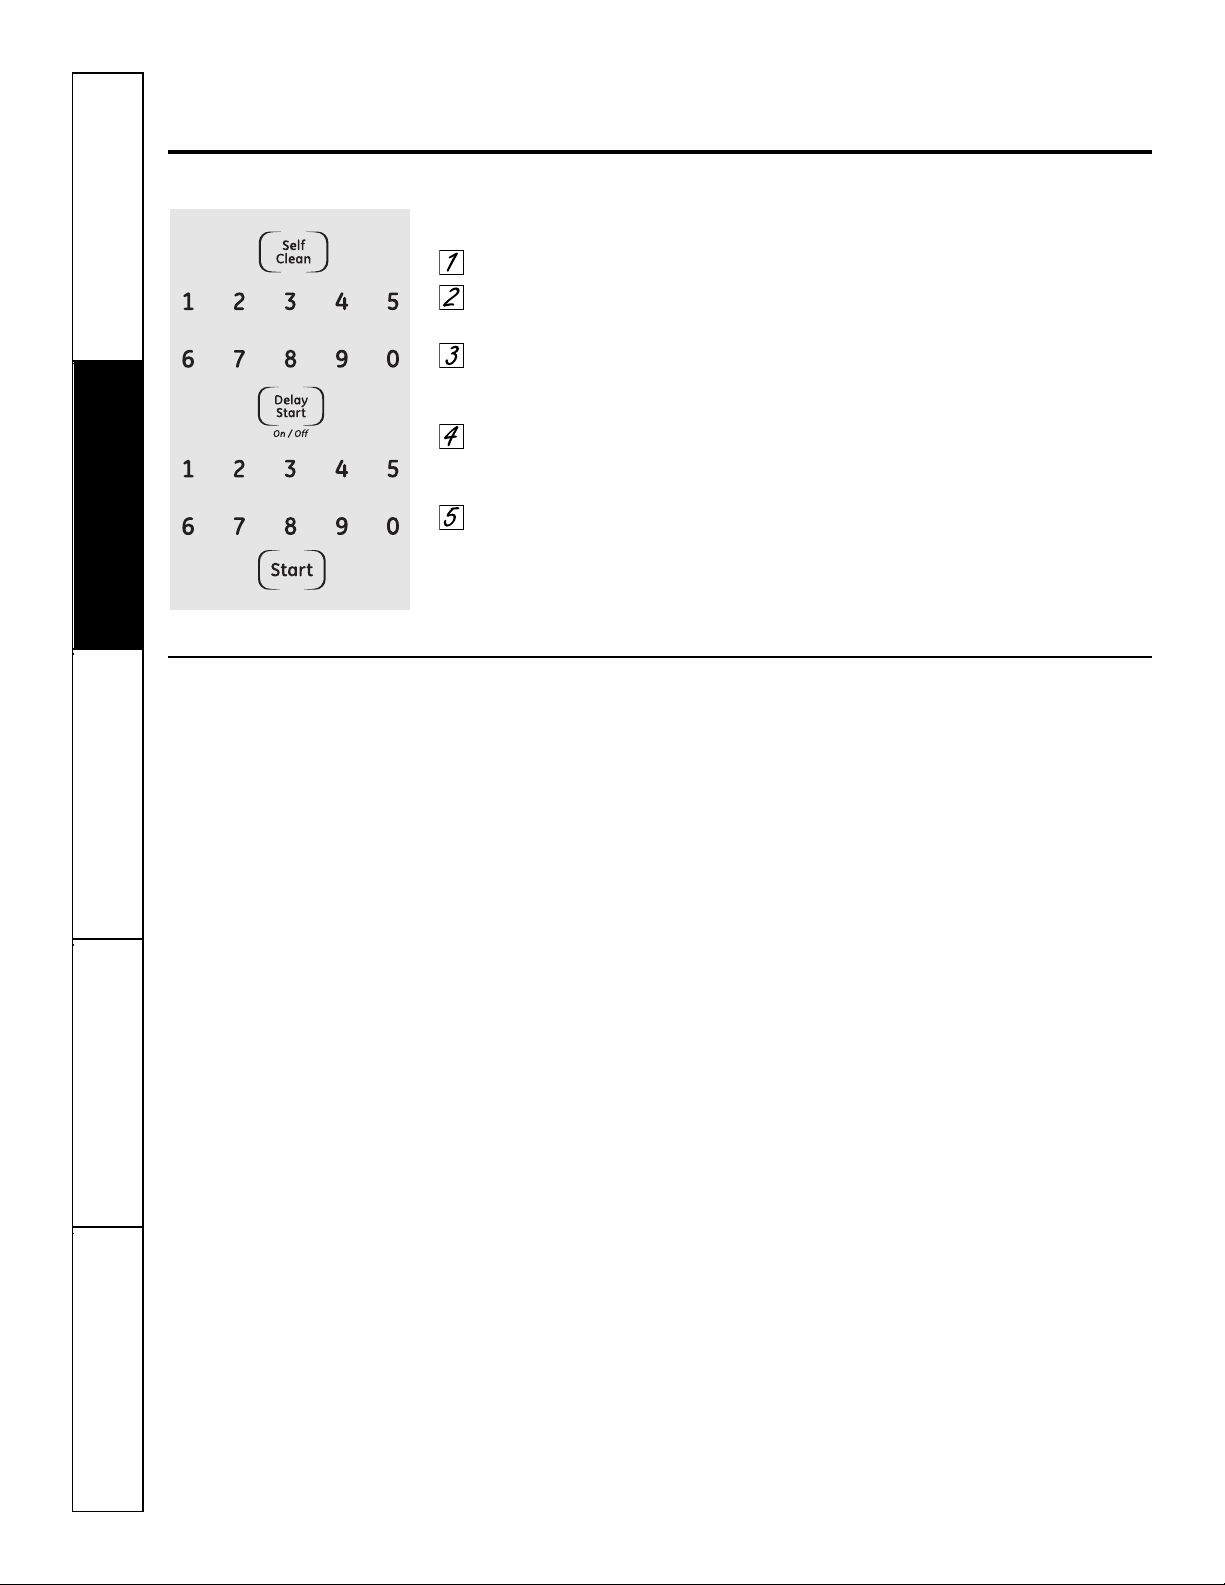
How to Delay the Start of Cleaning (available on JKP86 models only)
Press the Self Clean pad.
Using the number pads, enter the
desired clean time.
Press the Delay Start pad. The
earliest start time you can set will
appear in the display.
Using the number pads, enter the
time of day you want the clean cycle
to start.
Press the Start pad.
The door locks automatically. The display
will show the start time. It will not be
possible to open the oven door until
the temperature drops below the lock
temperature and the LOCKED or LOCKED
DOOR light goes off.
When the LOCKED or LOCKED DOOR light
goes off, you will be able to open the
door.
After a Clean Cycle
You may notice some white ash in the
oven. Wipe it up with a damp cloth after
the oven cools.
If white spots remain, remove them with a
soap-filled steel wool pad and rinse thoroughly
with a vinegar and water mixture.
These deposits are usually a salt
residue that cannot be removed by
the clean cycle.
If the oven is not clean after one clean
cycle, repeat the cycle.
■ You cannot set the oven for cooking
until the oven is cool enough for the
door to unlock.
■ While the oven is self-cleaning, you
can press the Clock pad to display
the time of day. To return to the
clean countdown, press the Cooking
Time pad.
■ If the racks become hard to slide,
apply a small amount of vegetable oil
or cooking oil to a paper towel and
wipe the edges of the racks with the
paper towel.
31
Safety Instructions
Operating Instructions
Care and Cleaning
Troubleshooting Tips Consumer Support
Special features of your lower oven control. GEAppliances.com
Your new touch pad control has additional features that you may choose to use. The following are the features and
how you may activate them.
The special feature modes can only be activated while the display is showing the time of day. They remain in the
control’s memory until the steps are repeated.
When the display shows your choice, press the
Start pad. The special features will remain in memory after a
power failure.
12-Hour Shutoff
With this feature, should you forget and leave the
oven on, the control will automatically turn off the
oven after 12 hours during baking functions or
after 3 hours during a broil function.
If you wish to turn OFF this feature, follow
the steps below.
Press the Bake and Broil Hi/Lo pads
at the same time for 3 seconds until
the display shows SF.
Press the Delay Start pad until
no shdn (no shutoff) appears in the
display.
Press the Start pad to activate the no
shutoff and leave the control set in
this special features mode.
Fahrenheit or Centigrade Temperature Selection
Your oven control is set to use the Fahrenheit
temperature selections, but you may change this
to use the Centigrade selections.
Press the Bake and Broil Hi/Lo pads
at the same time for 3 seconds until
the display shows SF.
Press the Broil Hi/Lo pad. The display
will show F (Fahrenheit).
Press the Broil Hi/Lo pad again. The
display will show C (Centigrade).
Press the Start pad.
Control Lockout
Your control will allow you to lock down the touch
pads so they cannot be activated when pressed.
Press the Bake and Broil Hi/Lo pads
at the same time for 3 seconds until
the display shows SF.
Press the Self Clean pad. The display
will show LOC OFF.
Press the Self Clean pad again.
The display will show LOC ON.
Press the Start pad to activate
the control lockout feature and
leave the control set in this special
features mode.
When this feature is on and the touch
pads are pressed, the display will show
LOC.
To unlock the control, repeat steps 1 and
2. Press the Start pad when the display
shows LOC OFF.
NOTE: The control lockout mode will not affect
the Clock, Kitchen Timer On/Off and Oven
Light touch pads.
+
+
+
32
Safety InstructionsOperating InstructionsCare and CleaningTroubleshooting TipsConsumer Support
Special features of your lower oven control.
Tones at the End of a Timed Cycle
At the end of a timed cycle, 3 short beeps will
sound followed by one beep every 6 seconds
until the Clear/Off pad is pressed. This
continuous 6-second beep may be canceled.
To cancel the 6-second beep:
Press the Bake and Broil Hi/Lo pads
at the same time for 3 seconds until
the display shows SF.
Press the Kitchen Timer On/Off
pad. The display shows CON BEEP
(continuous beep). Press the Kitchen
Timer On/Off pad again.
The display shows BEEP. (This
cancels the one beep every
6 seconds.)
Press the Start pad.
12-Hour, 24-Hour or Clock Blackout
Your control is set to use a 12-hour clock.
If you would prefer to have a 24-hour
military time clock or black out the clock
display, follow the steps below.
Press the Bake and Broil Hi/Lo pads
at the same time for 3 seconds until
the display shows SF.
Press the Clock pad once. The
display will show 12 hr. If this is
the choice you want, press the
Start pad.
Press the Clock pad again to change
to the 24-hour military time clock. The
display will show 24 hr. If this is the
choice you want, press the Start pad.
Press the Clock pad again to black out
the clock display. The display will show
OFF. If this is the choice you want, press
the Start pad.
NOTE: If the clock is in the black-out mode, you
will not be able to use the Delay Start function.
Cook and Hold
Your new control has a cook and hold feature that
keeps cooked foods warm for up to 3 hours after
Timed Baking or Roasting is finished.
NOTE: This feature can only be programmed to
work with Timed Baking or Roasting. (See the
Using the lower oven timed baking and roasting
features section.) After Timed Baking or Roasting
has automatically stopped, the programmed Cook
and Hold will automatically start.
To activate this feature for use after
Timed Baking or Roasting, follow the
steps below.
Press the Bake and Broil Hi/Lo pads
at the same time for 3 seconds until
the display shows SF.
Press the Cooking Time pad.
The display will show Hld OFF.
Press the Cooking Time pad again
to activate the feature. The display
will show Hld ON.
Press the Start pad to activate
the cook and hold feature and
leave the control set in this special
features mode.
+
+
+
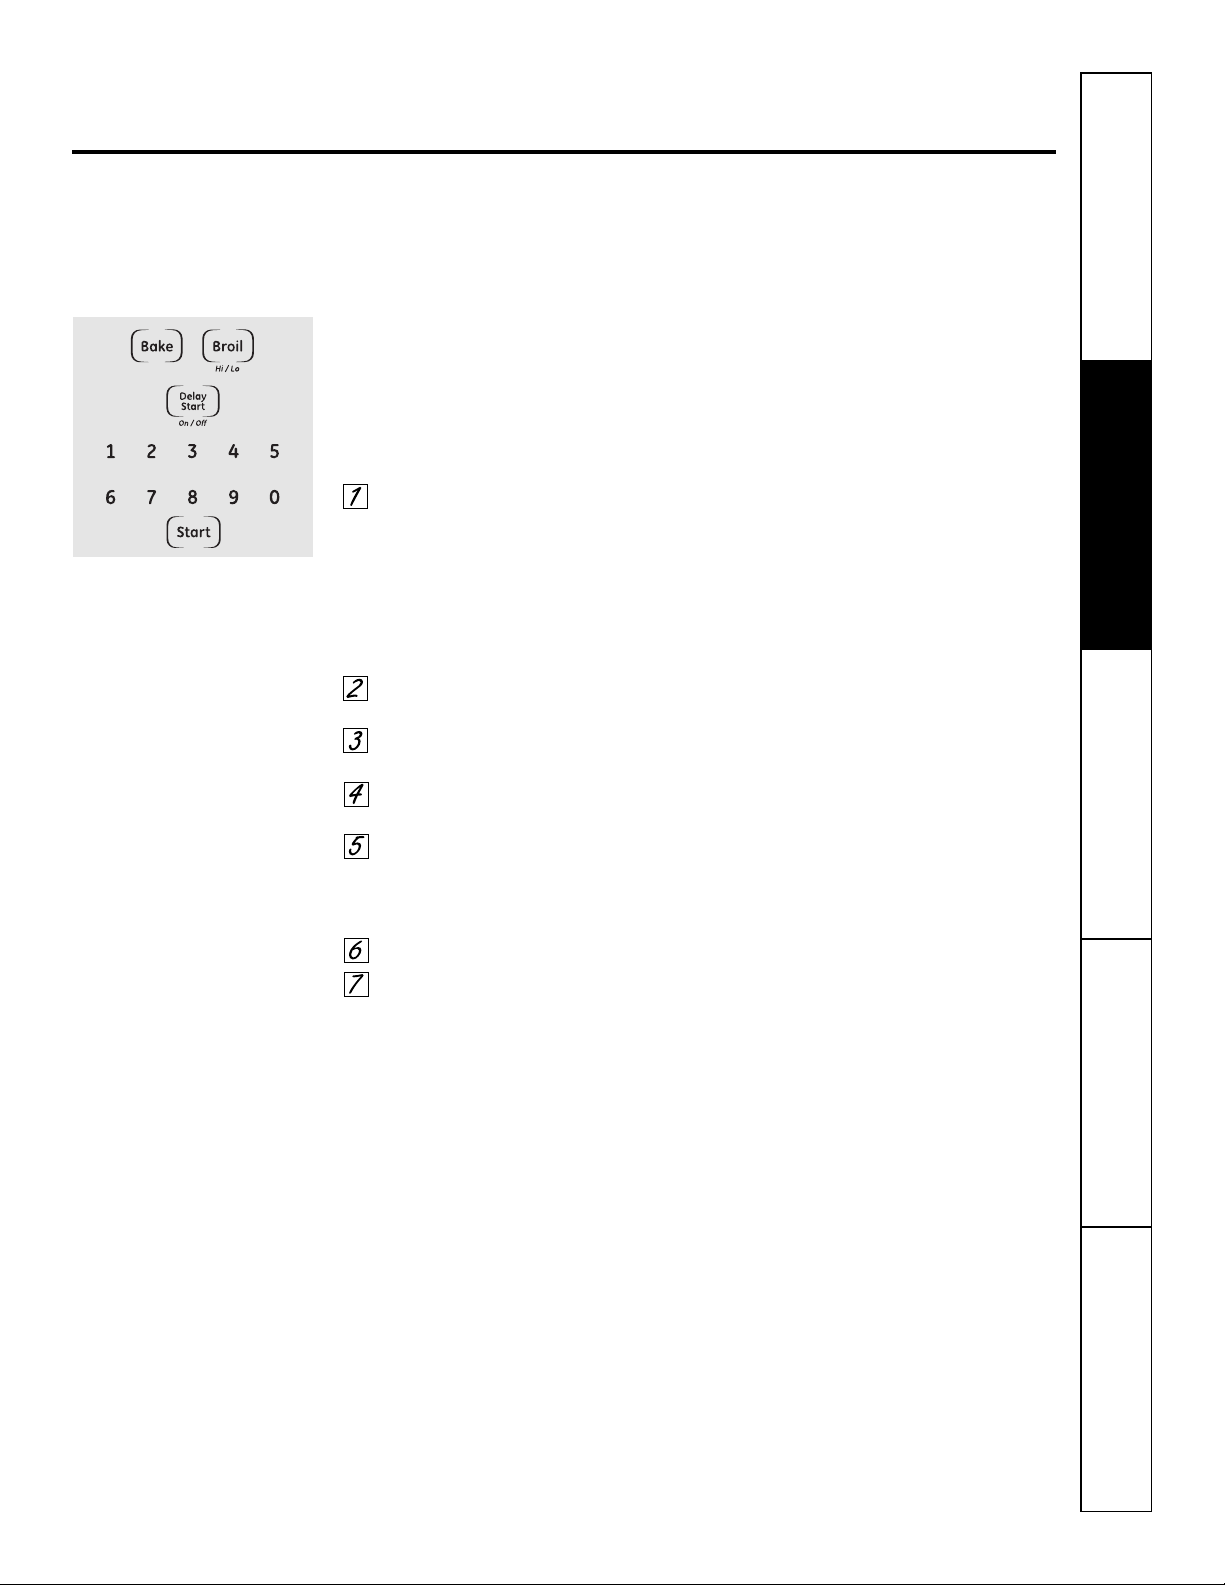
33
Safety Instructions
Operating Instructions
Care and Cleaning
Troubleshooting Tips Consumer Support
Using the Sabbath Feature.
(Designed for use on the Jewish Sabbath and Holidays.) (on some models) GEAppliances.com
The Sabbath feature can be used for baking/roasting only. It cannot be used for broiling, self-cleaning
or Delay Start cooking.
NOTE: The oven light comes on automatically (on some models) when the door is opened and goes off when the door
is closed. The bulb may be removed. See the Oven Light Replacement section. On models with a light switch on the
control panel, the oven light may be turned on and left on.
How to Set Sabbath Feature for Regular Baking/Roasting
NOTE: To understand how the oven
control works, practice using regular baking
(non-Sabbath) before entering Sabbath mode.
Make sure the clock shows the correct time
of day.
Press and hold both the Bake and
Broil Hi/Lo pads, at the same time,
until the display shows SF.
NOTE: If bake or broil appears in
the display, the Bake and Broil Hi/Lo
pads were not pressed at the same
time. Press the Clear/Off pad and
begin again.
Tap the Delay Start pad until
SAb bAtH appears in the display.
Press the Start pad and ⊃ will appear
in the display.
Press the Bake pad. No signal will
be given.
Press the number pads in order to
set the desired temperature.
No signal or temperature will be
given.
Press the Start pad.
After a random delay period of
approximately 30 seconds to 1
minute, ⊃ will appear in the
display indicating that the oven is
baking/roasting. If ⊃ does not
appear in the display, start again at
step 4.
To adjust the oven temperature, press the
Bake pad and enter the new temperature
using the number pads
Press the Start pad.
NOTE: The Clear/Off and Cooking Time
pads are active during the Sabbath
feature.
⊃
⊃
When the display shows ⊃ the oven
is set in Sabbath. When the display
shows ⊃ the oven is
baking/roasting.
⊃
+
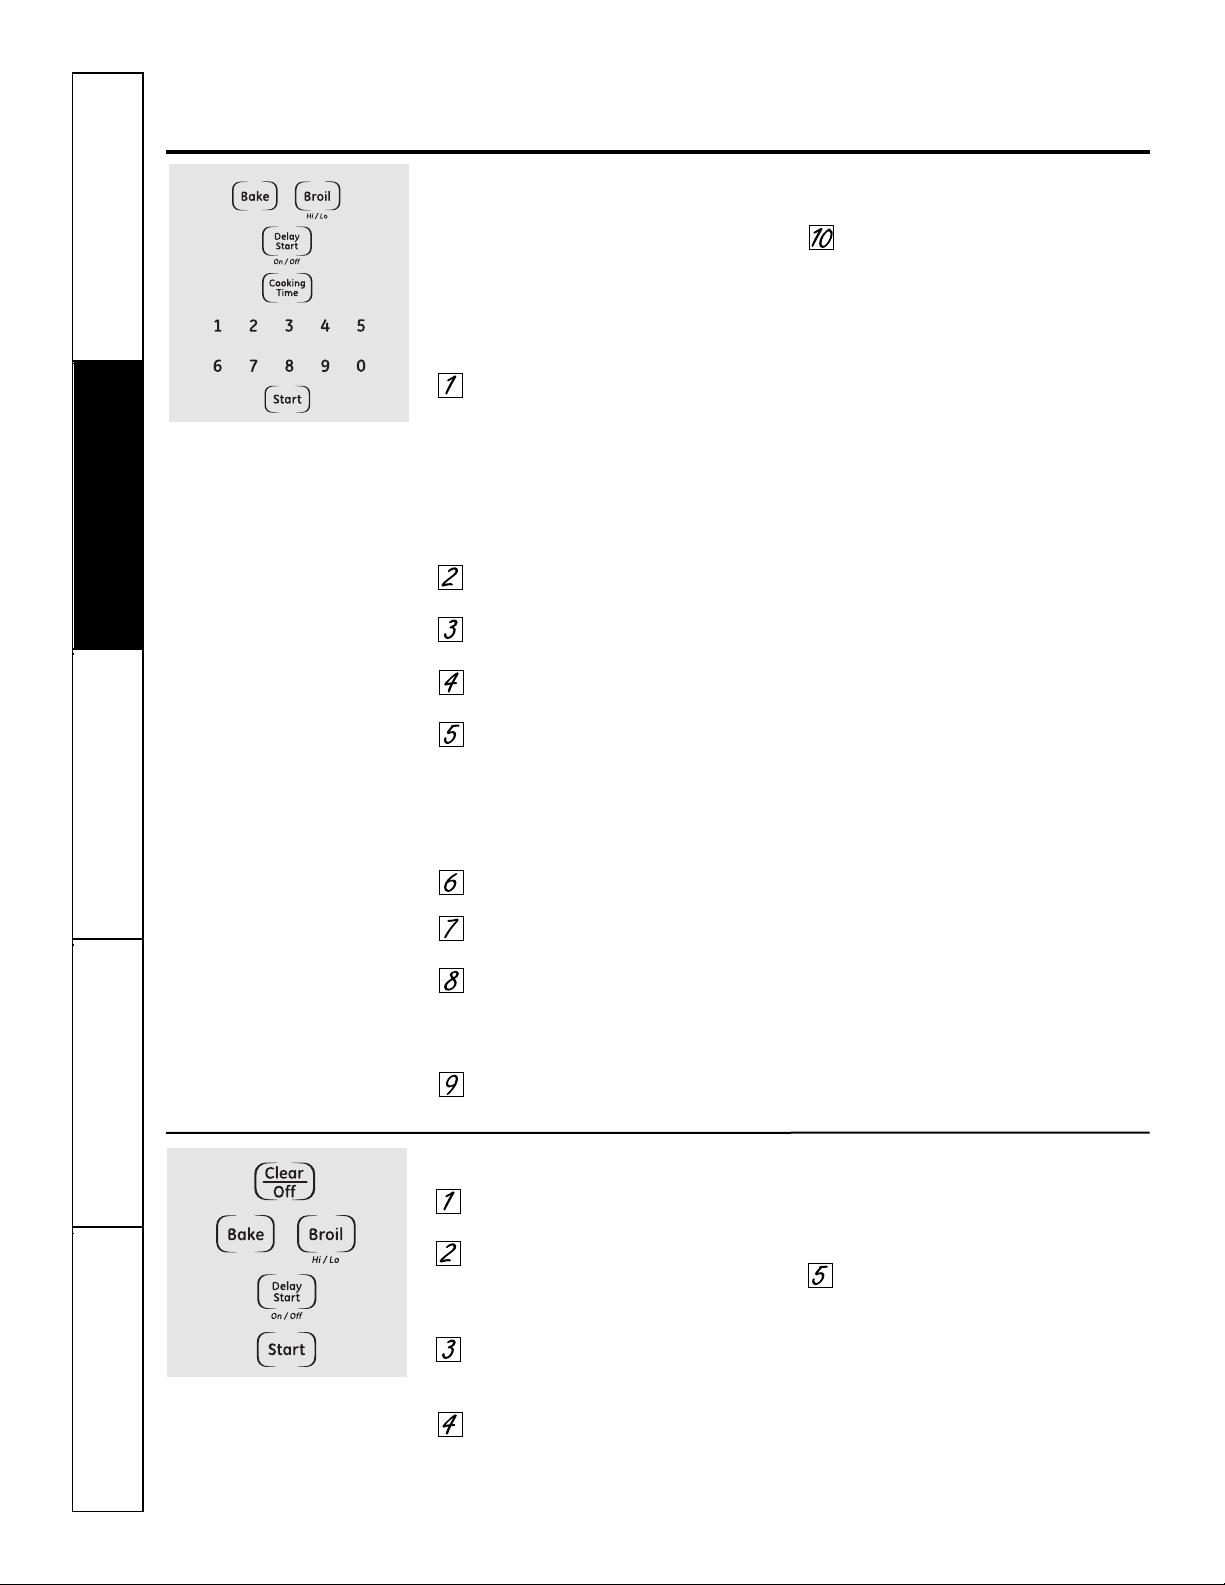
34
Safety InstructionsOperating InstructionsCare and CleaningTroubleshooting TipsConsumer Support
NOTE: To understand how the oven control
works, practice using regular (non-Sabbath)
Immediate Start and Automatic Stop before
entering the Sabbath mode.
Make sure the clock shows the correct time
of day.
Press and hold both the Bake and
Broil Hi/Lo pads, at the same time,
until the display shows SF.
NOTE: If bake or broil appears in
the display, the Bake and Broil Hi/Lo
pads were not pressed at the same
time. Press the Clear/Off pad and
begin again.
Tap the Delay Start pad until SAb
bAtH appears in the display.
Press the Start pad and ⊃ will appear
in the display.
Press the Cooking Time pad.
Press the number pads to set
the desired length of cooking time
between 1 minute and 9 hours and
99 minutes.
The cooking time that you entered
will be displayed.
Press the Start pad.
Press the Bake pad. No signal will
be given.
Press the number pads in order to
set the desired temperature.
No signal or temperature will be
given.
Press the Start pad.
After a random delay period of
approximately 30 seconds to 1
minute, ⊃ will appear in the
display indicating that the oven is
baking/roasting. If ⊃ does not
appear in the display, start again
at step 7.
To adjust the oven temperature, press the
Bake pad and enter the new temperature
using the number pads.
Press the Start pad.
When cooking is finished, the display
will change from ⊃ to ⊃ and 0:00 will
appear, indicating that the oven has
turned OFF but is still set in Sabbath.
Remove the cooked food.
⊃
⊃
⊃
How to Set Sabbath Feature for Timed Baking/Roasting – Immediate Start
and Automatic Stop
When the display shows ⊃ the oven
is set in Sabbath. When the display
shows ⊃ the oven is
baking/roasting.
⊃
Using the Sabbath Feature.
(Designed for use on the Jewish Sabbath and Holidays.) (on some models)
How to Exit the Sabbath Feature
Press the Clear/Off pad.
If the oven is cooking, wait
for a random delay period of
approximately 30 seconds to 1
minute, until only ⊃ is in the display.
Press and hold both the Bake and
Broil Hi/Lo pads, at the same time,
until the display shows SF.
Tap the Delay Start pad until 12 shdn
or no shdn appears in the display. 12
shdn indicates that the oven will
automatically turn off after 12 hours.
no shdn indicates that the oven will
not automatically turn off.
Press the Start pad.
NOTE: If a power outage occurred while
the oven was in Sabbath mode, the oven
will automatically turn off and the oven
control must be reset.
+
+
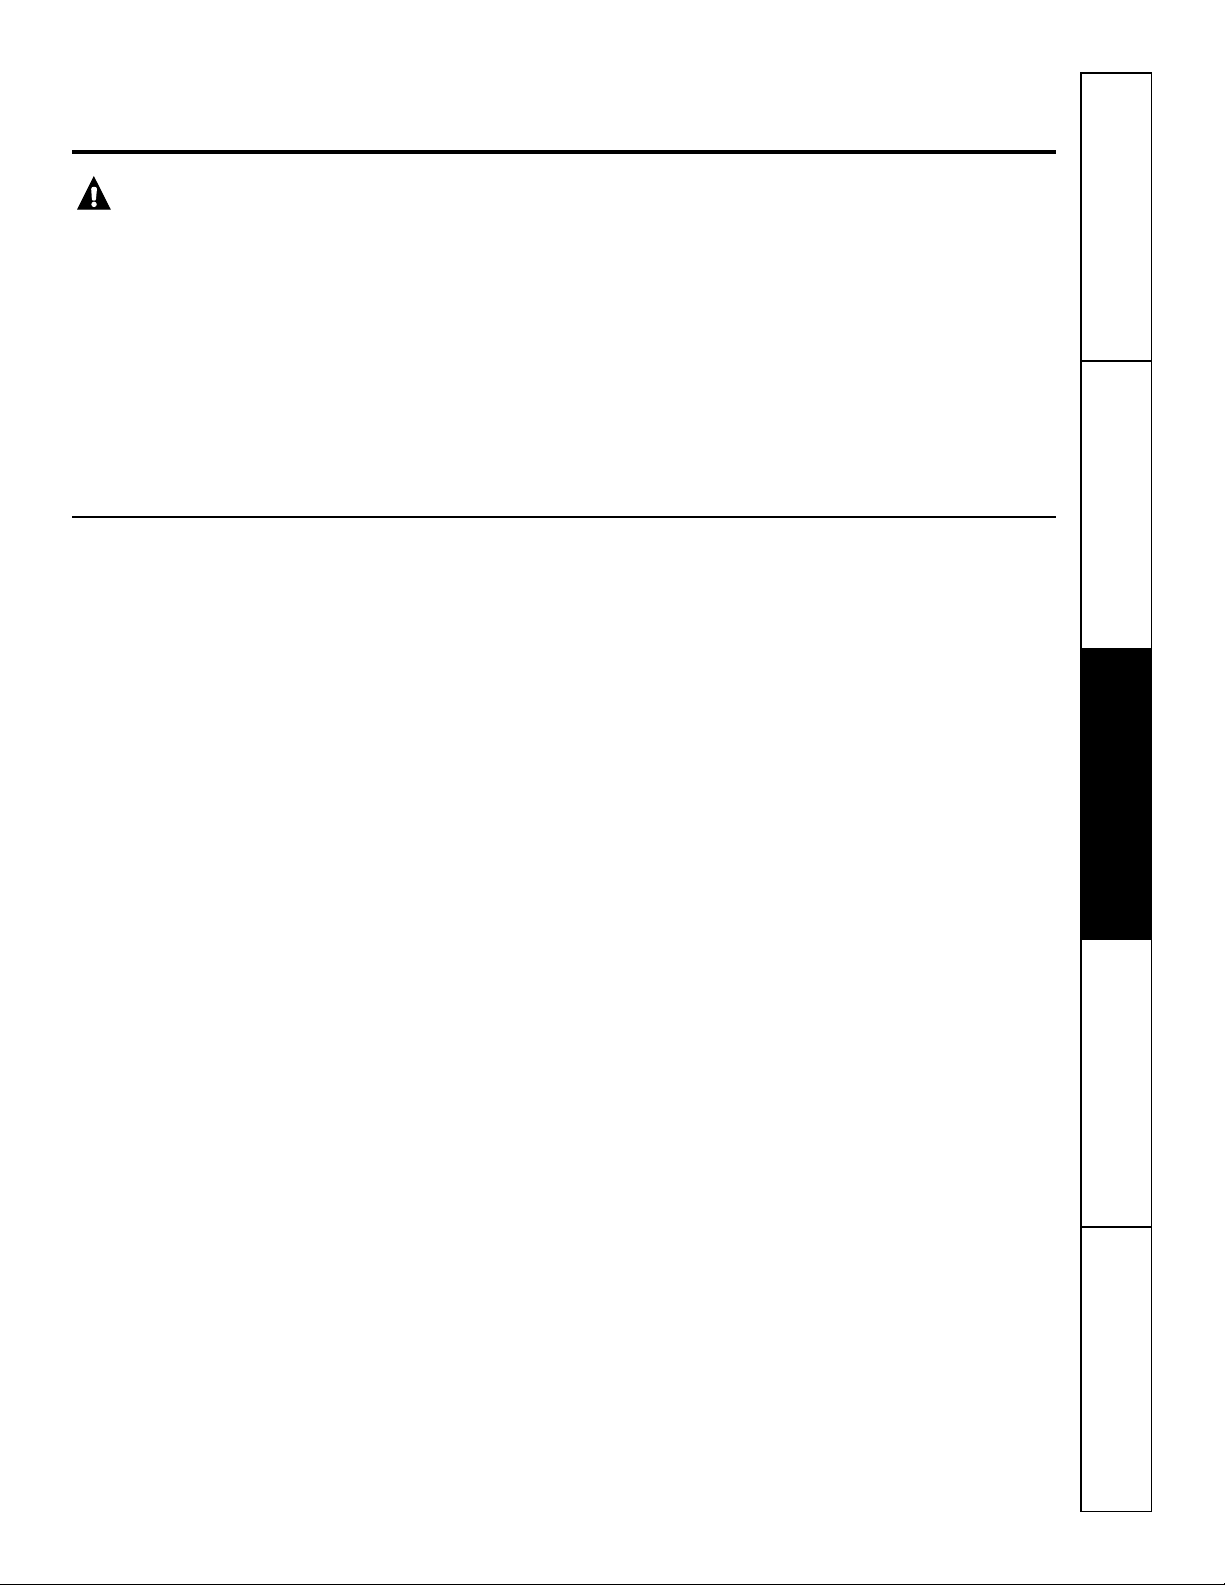
Safety Instructions
Operating Instructions
Care and Cleaning
Troubleshooting Tips Consumer Support
Do not use a commercial oven cleaner on any part
of your microwave oven.
Removable Turntable and Turntable Support
To prevent breakage, do not place the
turntable into water just after cooking.
Wash it carefully in warm, sudsy water or
in the dishwasher.
The turntable and support can be
broken if dropped. Remember, do not
operate the microwave oven without the
turntable and support in place.
To replace the support, place its center
post in the hole. Turn the support
around until it seats into place.
Inside
Keep the microwave oven clean and
sweet-smelling. Opening the oven door a
few minutes after cooking helps air out
the interior. An occasional thorough
wiping with a solution of baking soda
and water keeps the interior fresh.
Spills and spatters are easy to remove
from walls and floor if they are wiped
up soon after the food is removed.
Some spatters wipe up with a paper towel,
some may require a damp cloth. Remove
greasy spatters with a sudsy cloth, then
rinse and dry.
Do not clean with metal scouring pads. Pieces can
break off the pad, causing electrical shock.
Wipe up spatters on the window on
the inside of the door daily. When the
window is soiled, wash it with a damp
cloth. Rinse thoroughly and dry.
Wipe metal and plastic parts on the
inside of the door frequently. Use a damp
cloth to remove all soil.
Do not use abrasives, such as cleaning powders
or steel and plastic pads. They may mar the
surface.
Outside
Clean the outside of the microwave oven
with soap and a damp cloth, then rinse
with a damp cloth and dry. Wipe the
window clean with a damp cloth. Chrome
is best wiped with a damp cloth and then
with a dry towel.
Door Surface
When cleaning surfaces of door and oven
that come together on closing the door,
use only mild, non-abrasive soaps or
detergents applied with a sponge or
soft cloth.
Care and cleaning of the cooking center. GEAppliances.com
WARNING: Be sure electrical power is off and all surfaces are cool before cleaning any part
of the cooking center.
How to Remove Protective Shipping Film and Packaging Tape
Carefully grasp a corner of the protective
shipping film with your fingers and slowly
peel it from the appliance surface. Do
not use any sharp items to remove the
film. Remove all of the film before using
the appliance for the first time.
To assure no damage is done to the
finish of the product, the safest way to
remove the adhesive from packaging tape
on new appliances is an application of a
household liquid dishwashing detergent.
Apply with a soft cloth and allow to soak.
NOTE: The adhesive must be removed from all
parts. It cannot be removed if it is baked on.
Microwave Oven
35
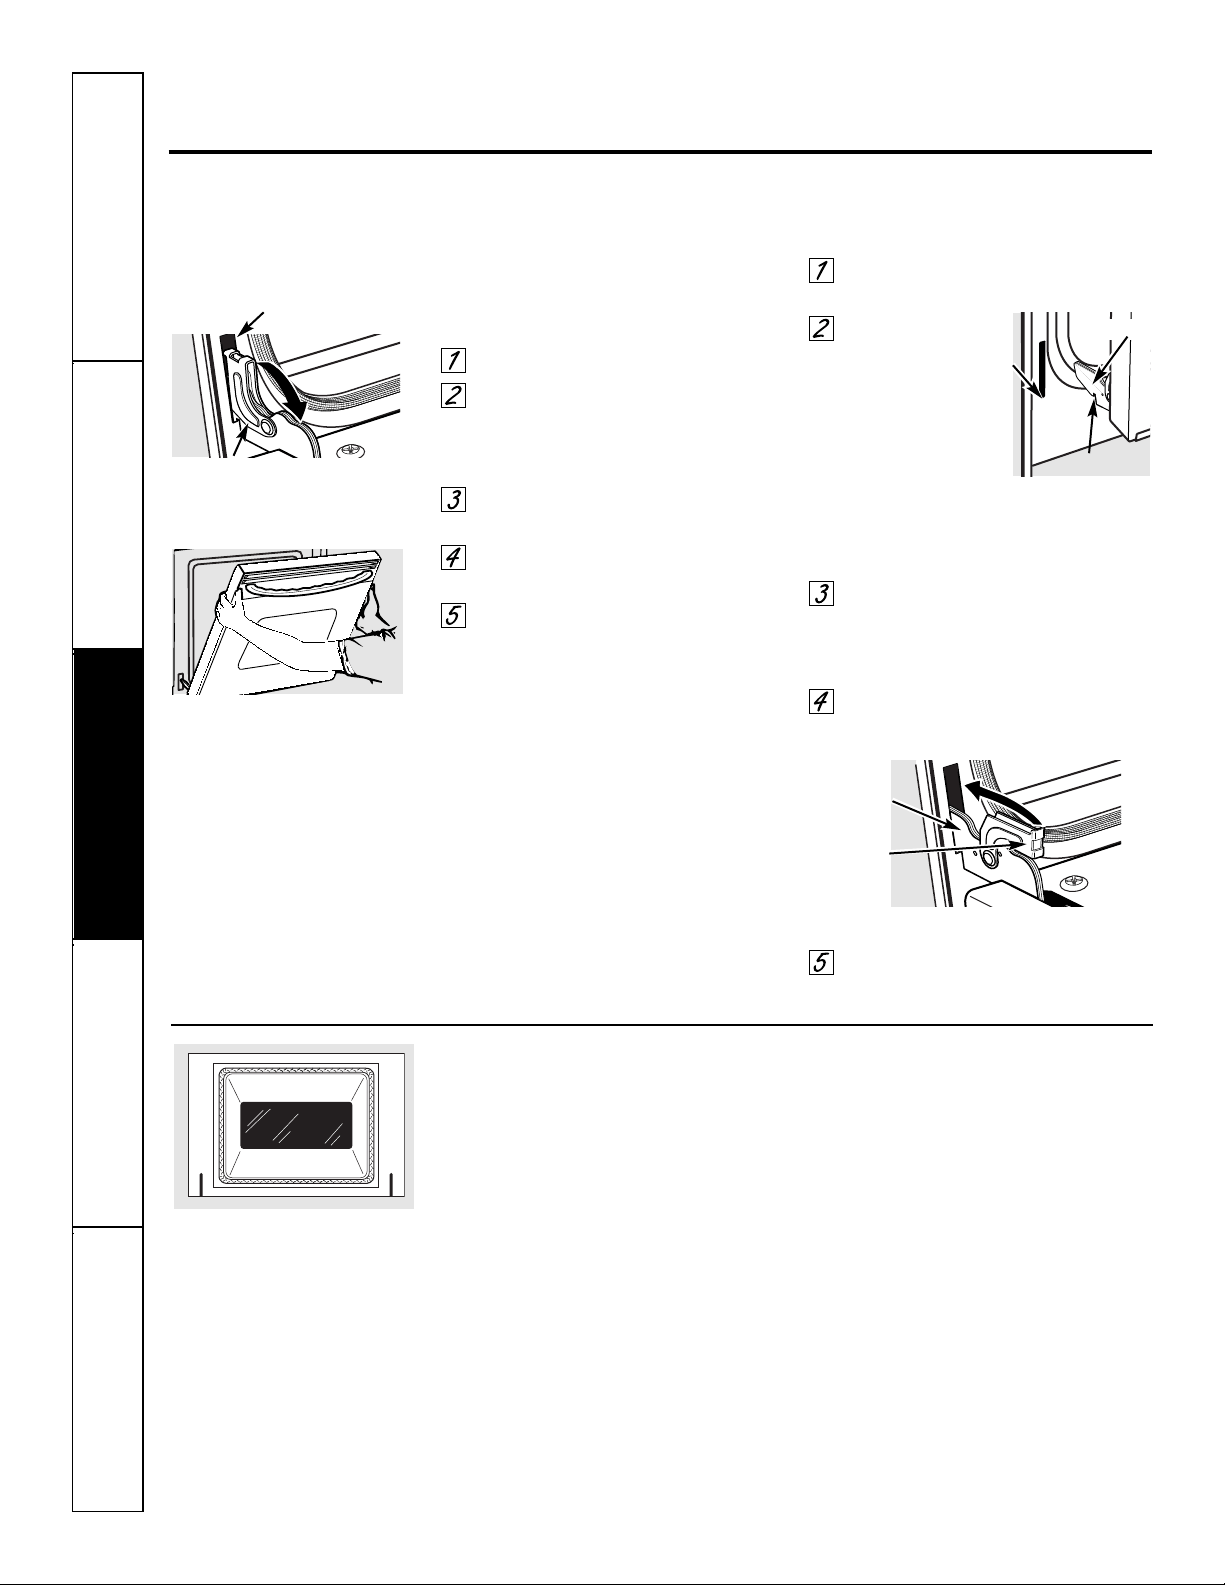
Safety InstructionsOperating InstructionsCare and CleaningTroubleshooting TipsConsumer Support
Do not rub or clean the door gasket—
it has an extremely low resistance to
abrasion.
If you notice the gasket becoming worn,
frayed or damaged in any way or if it has
become displaced on the door, you should
have it replaced.
To clean the inside of the door:
■ Because the area inside the gasket is
cleaned during the self-clean cycle, you
do not need to clean this by hand.
■ The area outside the gasket and
the door liner can be cleaned with a
soap-filled or plastic scouring pad,
hot water and detergent. Rinse well
with a vinegar and water solution.
To clean the outside of the door:
■ Use soap and water to thoroughly
clean the top, sides and front of the
oven door. Rinse well. You may also
use a glass cleaner to clean the glass
on the outside of the door. Do not let
water drip into the vent openings.
■ If any stain on the door vent trim is
persistent, use a soft abrasive cleaner
and a sponge-scrubber for best results.
■ Spillage of marinades, fruit juices,
tomato sauces and basting materials
containing acids may cause
discoloration and should be wiped
up immediately. When surface is cool,
clean and rinse.
■ Do not use oven cleaners, cleaning
powders or harsh abrasives on the
outside of the door.
Care and cleaning of the cooking center.
36
The door is very heavy. Be careful when
removing and lifting the door.
Do not lift the door by the handle.
To remove the door:
Fully open the door.
Pull the hinge locks down toward
the door frame, to the unlocked
position. A tool, such as a small flat-
blade screwdriver, may be required.
Firmly grasp both sides of the door
at the top.
Close door to the door removal
position (see illustration).
Lift door up and out until the hinge
arm is clear of the slot.
To replace the door:
Firmly grasp both sides of the door
at the top.
With the
door at the
same angle as
the removal
position, seat the
indentation of
the hinge arm
into the bottom
edge of the hinge slot. The notch in
the hinge arm must be fully seated
into the bottom of the slot.
Fully open the door. If the door will
not fully open, the indentation is
not seated correctly in the bottom
edge of the slot.
Push the hinge locks up against the
front frame of the oven cavity, to the
locked position.
Close the oven door.
Lift-Off Oven Door
Removal position
Hinge arm
Indentation
Bottom
edge
of slot
Hinge lock
Slot
Pull hinge locks down to unlock
Hinge
lock
Hinge
arm
Push hinge locks up to lock
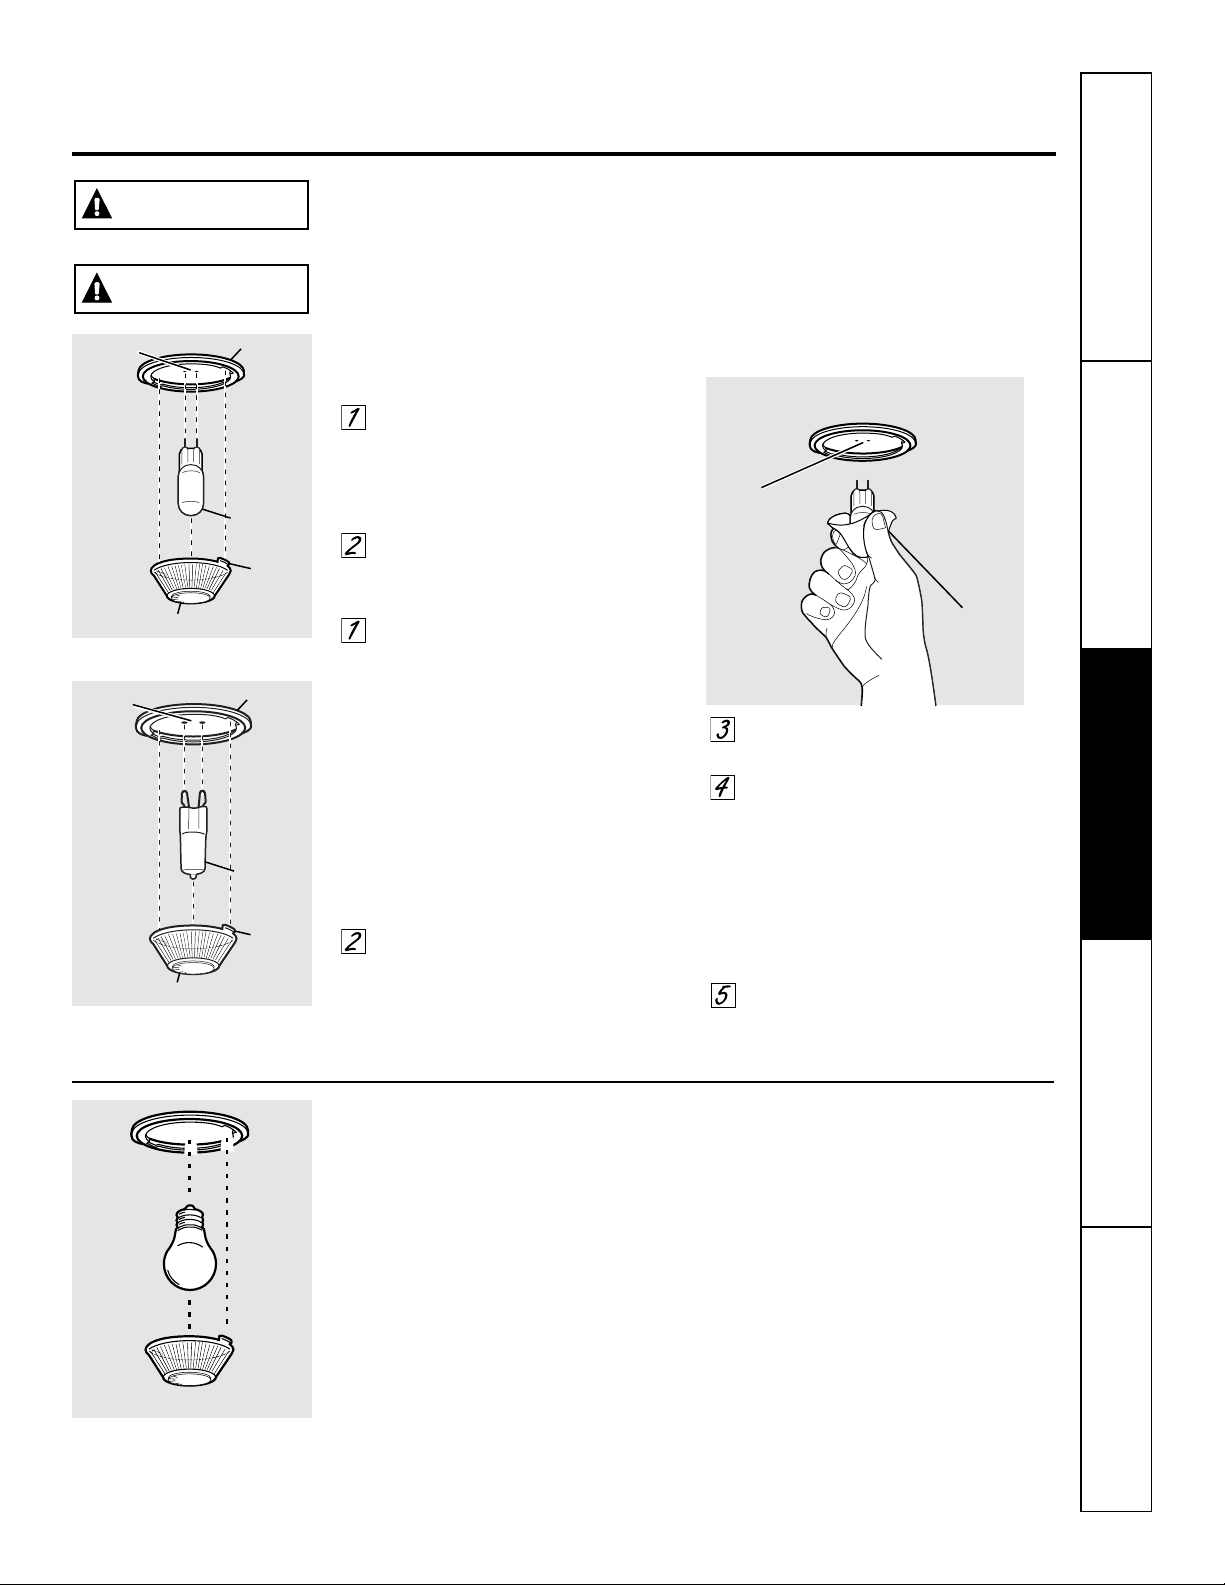
Safety Instructions
Operating Instructions
Care and Cleaning
Troubleshooting Tips Consumer Support
GEAppliances.com
Lower Oven Light Bulb (on some models)
To remove:
Turn the glass cover counterclockwise
1/4 turn until the tabs of the glass cover
clear the grooves of the socket. Remove
the bulb.
To replace:
Put in a new 40-watt appliance bulb.
Place the tabs of the glass cover into the
grooves of the socket. Turn the glass
cover clockwise 1/4 turn.
NOTES:
■ A 40-watt appliance bulb is smaller than
a standard 40-watt household bulb.
■ Install and tighten the cover clockwise.
■ Reconnect electrical power to the oven.
■ For improved lighting inside the oven, clean
the glass cover frequently using a wet cloth.
This should be done when the oven is
completely cool.
Bulb
Socket
Tab
Maximum
length
3
1
⁄2”
Glass cover
Oven Light Replacement
To remove:
Turn the glass cover
counterclockwise 1/4 turn until
the tabs of the glass cover clear the
grooves of the socket. Wearing latex
gloves may offer a better grip.
Using gloves or a dry cloth, remove
the bulb by pulling it straight out.
To replace:
Use a new 120/130-volt halogen
bulb, not to exceed 50 watts.
Replace the bulb with the same
type of bulb that was removed. Your
model will have one of the two types
shown on the left. To determine the
correct replacement bulb, check the
bulb terminals. Bulbs with 2 straight
pin terminals are G6.35 bulbs. Bulbs
with 2 looped terminals are G9
bulbs. (Do not interchange.) Be sure
the replacement bulb is rated 120
volts or 130 volts (NOT 12 volts).
Using gloves or a dry cloth, remove
the bulb from its packaging. Do not
touch the bulb with bare fingers. Oil
from skin will damage the bulb and
shorten its life.
Push the bulb straight into the
receptacle all the way.
Place the tabs of the glass cover into
the grooves of the socket. Turn the
glass cover clockwise 1/4 turn.
For improved lighting inside
the oven, clean the glass cover
frequently using a wet cloth. This
should be done when the oven is
completely cool.
Reconnect electrical power to
the oven.
G6.35 Bulb
Socket
Tab
Glass cover
Receptacle
Use gloves
or cloth
Receptacle
G9 Bulb
Socket
Tab
Glass cover
Receptacle
(on some models)
(on some models)
SHOCK OR BURN HAZARD: Before replacing oven light bulb, disconnect the electrical
power to the oven at the main fuse or circuit breaker panel. Failure to do so may result
in electric shock or burn.
WARNING
BURN HAZARD: The glass cover and bulb should be removed when cool. Touching hot glass
with bare hands or a damp cloth can cause burns.
CAUTION
37

38
It’s a good idea to wipe the control panel
after each use. Clean with mild soap and
water or vinegar and water, rinse with
clean water and polish dry with a soft
cloth. When cleaning, the control panel
should be at room temperature and not
in direct sunlight.
Do not use abrasive cleansers, strong
liquid cleansers, plastic scouring pads or
oven cleaners on the control panel—they
will damage the finish. A 50/50 solution
of vinegar and hot water works well.
Control Panel
Care and cleaning of the cooking center.
Safety InstructionsOperating InstructionsCare and CleaningTroubleshooting TipsConsumer Support
Oven Racks (lower oven)
Clean the oven racks with an abrasive
cleanser or steel wool. After cleaning,
rinse the racks with clean water and
dry with a clean cloth.
To make the racks slide more easily,
apply a small amount of vegetable oil or
cooking oil to a paper towel and wipe the
edges of the oven racks with the paper
towel.
NOTE: The oven racks may be
cleaned in the self-cleaning oven.
However, the racks will darken in
color, lose their luster and become
hard to slide if cleaned during the
self-cleaning cycle.
Safety Instructions
Operating Instructions
Care and Cleaning
Troubleshooting Tips Consumer Support
Before You Call For Service… GEAppliances.com
Troubleshooting Tips
Save time and money! Review the charts on the following
pages first and you may not need to call for service.
Problem Possible Causes What To Do
Control panel on You forgot to press the • Press the Start pad.
microwave oven Start pad.
will not operate
Door not securely closed. • Make sure the microwave oven door is closed.
Another function was pressed. • Press the Clear/Off pad twice to cancel it and begin
again.
The Clear/Off pad was • Begin again.
pressed accidentally.
Oven controls • While using Time Defrost, numbers not entered after
improperly set. pressing the Auto Defrost pad.
“SENSOR ERROR” During a sensor • The microwave oven door should not be opened
appears in the function the microwave before the time begins to count down in the display.
microwave oven oven door was opened
display too soon.
Microwave oven light Light bulb is loose • Call for service.
does not work or defective.
Foods overcooked or Varying density and amount • Varying density and amount sometimes require more
undercooked in the of foods being cooked. cooking time.
microwave oven
Food not turned or stirred • Turn or stir food and begin again.
as called for in the recipe.
Too many dishes in the • Do not overload your microwave oven.
oven at the same time.
Food not thoroughly defrosted. • See the Using the microwave sensor controls section.
Improper cookware or • See the Microwave safe cookware section of the
coverings being used. Important Safety Instructions section.
Humidity or moisture in • Make sure the inside of the oven and the outside of
the oven will lessen the the containers are dry.
Sensor cooking time.
Food not allowed to stand. • Some standing time is recommended for certain
vegetables cooked with the Sensor Controls.
Clock and timer A fuse in your home may be • Replace the fuse or reset the circuit breaker.
do not work or blown or the circuit breaker
display goes blank tripped.
Controls improperly set. • See the Using the clock and lower oven timer section
for the lower oven clock.
• See the Display On/Off section for the microwave oven
clock.
The clock is in the • See the Special features of your lower oven control
black-out mode. section for the lower oven clock.
• See the Display On/Off section for the microwave oven
clock.
39
Safety InstructionsOperating InstructionsCare and CleaningTroubleshooting TipsConsumer Support
40
Troubleshooting Tips
Problem Possible Causes What To Do
“F— and a number or You have a function • Press the Clear/Off pad. Allow the oven to cool for one
letter” flash in the error code. hour. Put the oven back into operation.
lower oven display
If the function code • Disconnect all power to the cooking center for at
repeats. least 30 seconds and then reconnect power. If the
function error code repeats, call for service.
Display flashes Power failure. • Reset the lower oven clock.
Unable to get the Oven control pads were • The Bake and Broil Hi/Lo pads must be pressed
lower oven display not pressed properly. at the same time and held for 3 seconds.
to show “SF”
Lower oven temperature Oven thermostat needs • See the Adjust the lower oven thermostat—Do it
too hot or too cold adjustment. yourself! section.
Lower oven will A fuse in your home may • Replace the fuse or reset the circuit breaker.
not work be blown or the circuit
breaker tripped.
Oven controls improperly set. • See the Using the lower oven section.
Lower oven control You forgot to enter • Press the Bake pad and desired temperature or the
signals after entering a bake temperature Self-Clean pad and desired clean time.
cooking time or or cleaning time.
delay start
Food does not bake or Oven controls improperly set. • See the Using the lower oven section.
roast properly in the
Rack position is incorrect • See the Using the lower oven section.
lower oven
or the rack is not level.
Oven thermostat needs • See the Adjust the lower oven thermostat—Do it
adjustment. yourself! section.
Food does not broil Oven door is open. • Close the door. This model is designed for closed door
properly in the broiling only. Always broil with the door closed.
lower oven
Oven controls improperly set. • Make sure you press the Broil Hi/Lo pad.
Improper rack position • See the Broiling Guide.
being used.
Cookware not suited • For best results, use a pan designed for broiling.
for broiling.
In some areas the power • Preheat the broil element for 10 minutes.
(voltage) may be low.
• Broil for the longest period of time recommended
in the Broiling Guide.
Before You Call For Service…
Problem Possible Causes What To Do
Lower oven light does Light bulb is loose or defective. • Tighten or replace the bulb.
not work
Pad operating light is broken. • Call for service.
Lower oven will Oven controls • See the Using the self-cleaning lower oven section.
not self-clean improperly set.
The oven temperature is • Allow the oven to cool and reset the controls.
too high to set a self-clean
operation.
“Crackling” or This is the sound of the metal • This is normal.
“popping” sound heating and cooling during
in the lower oven both the cooking and
cleaning functions.
Excessive smoking in Excessive soil. • Press the Clear/Off pad. Open the windows to rid
the lower oven during the room of smoke. Wait until the LOCKED or LOCKED
a clean cycle DOOR light goes off. Wipe up the excess soil and reset
the clean cycle.
Lower oven door will Oven too hot. • Allow the oven to cool below locking temperature.
not open after a
clean cycle
Lower oven not clean Oven controls improperly set. • See the Using the self-cleaning lower oven section.
after a clean cycle
Oven was heavily soiled. • Clean up heavy spillovers before starting the clean
cycle. Heavily soiled ovens may need to self-clean
again or for a longer period of time.
“LOCKED” or “LOCKED The self-clean cycle has been • Close the oven door.
DOOR” flashes in the selected but the door is not
lower oven display closed.
“LOCKED” or “LOCKED The oven door is locked • Press the Clear/Off pad. Allow the oven to cool.
DOOR” light is on when because the temperature
you want to cook in the inside the oven has not
lower oven dropped below the locking
temperature.
Power outage, Power outage or surge. • Reset the clock. If the oven was in use, you must reset
clock flashes it by pressing the Clear/Off pad, setting the clock
and resetting any cooking function.
“Burning” or “oily” This is normal in a new oven • To speed the process, set a self-clean cycle for a
odor emitting from and will disappear in time. minimum of 3 hours. See the Using the self-
oven vent when using cleaning lower oven section.
the lower oven
Strong odor in the An odor from the insulation • This is temporary.
lower oven around the inside of the
oven is normal for the first
few times the oven is used.
Fan noise when using A cooling fan may • This is normal. The cooling fan will turn on
the lower oven automatically turn on. to cool internal parts. It may run for up to
1-1/2 hours in 30″ models and up to 2 hours
in 27″ models after the oven is turned off.
41
GEAppliances.com
Safety Instructions
Operating Instructions
Care and Cleaning
Troubleshooting Tips Consumer Support
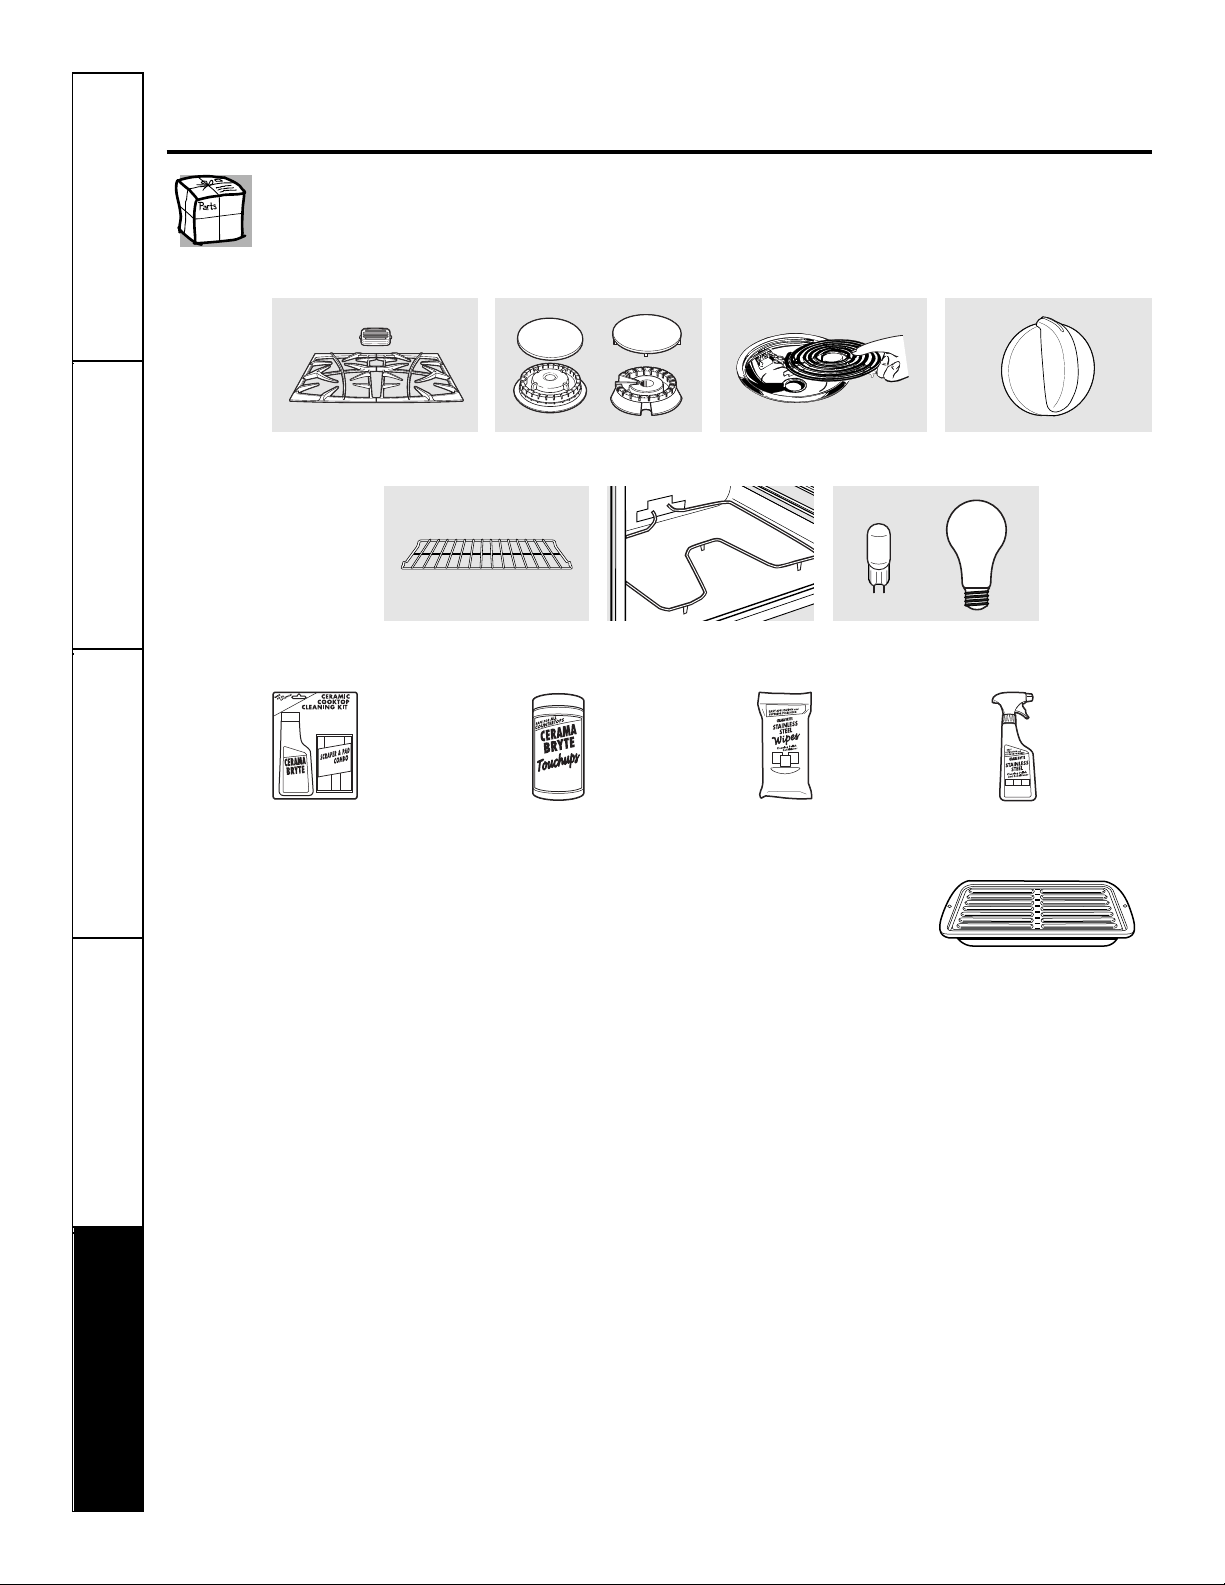
Safety InstructionsOperating InstructionsCare and CleaningTroubleshooting TipsConsumer Support
42
Accessories.
Looking For Something More?
You can find these accessories and many more at GEAppliances.com (U.S.) or
www.GEAppliances.ca (Canada), or call 800.626.2002 (U.S.) or 800.661.1616
(Canada) (during normal business hours). Have your model number ready.
Experience these other great products to keep your kitchen looking great!
Get the most out of your Broiler Pan! (Not for use with Broiler Drawer models.)
Use your pan and grid cover to broil hamburgers, seafood, steaks, vegetables,
bacon, chops and so much more! The pan below catches the excess fats and oils.
• Genuine GE Part
• Easy To Clean
• One-Year Warranty
Limited Time Offer! Free Shipping!
When you order your broiler pan within 30 days of purchasing your GE cooking product.
Small Large* XL**
U.S. Part # WB48X10055 WB48X10056 WB48X10057
Canada Part # 222D2097G001 222D2097G002 N/A
Dimensions 8-3/4" W x 1-1/4" H x 13-1/2" D 12-3/4" W x 1-1/4" H x 16-1/2" D 17" W x 1-1/4" H x 19-1/4" D
Price US$10.50
†
US$14.50
†
US$16.75
†
† Plus applicable state sales tax (PST/HST and GST)
* The large (standard) broil pan does not fit in 20"/24" ranges.
** The XL pan does not fit in 24" wall ovens, 27" drop-ins or 20"/24" ranges.
To place your order, call 800.626.2002 (U.S.), 800.661.1616 (Canada) or mail this form to:
In the U.S.: GE Parts, P.O. Box 221027, Memphis, TN 38122-1027. In Canada: GE Parts, 1 Factory Lane, Moncton, N.B. E1C 9M3
Broiler Pan Order Form
Quantity ____________________ Part Number ______________________________________________________________
____________________ ______________________________________________________________
____________________ ______________________________________________________________
Model Number ______________ Serial Number____________________ Brand ________________ Date of Purchase____________
First Name ____________________________________________ Last Name ______________________________________________
Address __________________________________________________________________________________________________________
City __________________________________________________ State ____________ Zip Code ______________________________
Phone ________________________________________________ E-Mail __________________________________________________
Credit Card ____ Check ____ Money Order ____
Visa ____ MasterCard ____ Discover ____ AmEx ____ Credit Card # ________________________________________________
Exp. Date: Month ________________ Year __________________ Signature: ____________________________________________
Surface Elements and Drip Pans
Grates Surface Burner Heads and Caps
Oven Elements Light Bulbs
Knobs
Oven Racks
WX10X117GCS
WX10X305
WX10X10001
PM10X311
Ceramic Cooktop
Cleaning Kit:
Includes cleaner,
scraper and pad
Ceramic Cooktop
Cleaning Wipes
Stainless Steel
Appliance Polish
Wipes
Stainless Steel
Appliance
Cleaner
_ _ _ _ _ _ _ _ _ _ _ _ _ _ _ _ _ _ _ _ _ _ _ _ _ _ _ _ _ _ _ _ _ _ _ _ _ _ _ _ _ _ _
✁
or
43
Safety Instructions
Operating Instructions
Care and Cleaning
Troubleshooting Tips Consumer Support
GE Built-In Microwave Cooking Center Warranty.
■ Service trips to your home to teach you how to use
the product.
■ Improper installation, delivery or maintenance.
■ Failure of the product if it is abused, misused, or
used for other than the intended purpose or used
commercially.
■ Replacement of house fuses or resetting of
circuit breakers.
■ Damage to the product caused by accident, fire,
floods or acts of God.
■ Incidental or consequential damage caused
by possible defects with this appliance.
■ Damage caused after delivery.
■ Product not accessible to provide required service.
What GE Will Not Cover:
This warranty is extended to the original purchaser and any succeeding owner for products purchased for
home use within the USA. If the product is located in an area where service by a GE Authorized Servicer is not
available, you may be responsible for a trip charge or you may be required to bring the product to an Authorized GE
Service location for service. In Alaska, the warranty excludes the cost of shipping or service calls to your home.
Some states do not allow the exclusion or limitation of incidental or consequential damages. This warranty
gives you specific legal rights, and you may also have other rights which vary from state to state. To know
what your legal rights are, consult your local or state consumer affairs office or your state’s Attorney General.
Warrantor: General Electric Company. Louisville, KY 40225
All warranty service provided by our Factory Service Centers,
or an authorized Customer Care
®
technician. To schedule
service, visit us on-line at GEAppliances.com, or call
800.GE.CARES (800.432.2737). Please have serial number
and model number availa ble when calling for service.
Staple your receipt here.
Proof of the original purchase
date is needed to obtain service
under the warranty.
For The Period Of: GE Will Replace:
One Year Any part of the microwave cooking center which fails due to a defect in materials
From the date of the or workmanship. During this limited one-year warranty, GE will also provide,
original purchase free of charge, all labor and in-home service to replace the defective part.
EXCLUSION OF IMPLIED WARRANTIES—Your sole and exclusive remedy is product repair as provided in this Limited
Warranty. Any implied warranties, including the implied warranties of merchantability or fitness for a particular purpose,
are limited to one year or the shortest period allowed by law.
Register Your Appliance GEAppliances.com
Register your new appliance on-line—at your convenience! Timely product registration will allow for
enhanced communication and prompt service under the terms of your warranty, should the need arise.
You may also mail in the preprinted registration card included in the packing material.
Consumer Support.
GE Appliances Website
GEAppliances.com
Have a question or need assistance with your appliance? Try the GE Appliances Website 24 hours a day,
any day of the year! For greater convenience and faster service, you can now download Owner’s Manuals,
order parts or even schedule service on-line.
Schedule Service GEAppliances.com
Expert GE repair service is only one step away from your door. Get on-line and schedule your service at
your convenience any day of the year! Or call 800.GE.CARES (800.432.2737) during normal business hours.
Real Life Design Studio GEAppliances.com
GE supports the Universal Design concept—products, services and environments that can be used by
people of all ages, sizes and capabilities. We recognize the need to design for a wide range of physical
and mental abilities and impairments. For details of GE’s Universal Design applications, including kitchen
design ideas for people with disabilities, check out our Website today. For the hearing impaired, please call
800.TDD.GEAC (800.833.4322).
Extended Warranties GEAppliances.com
Purchase a GE extended warranty and learn about special discounts that are available while your warranty
is still in effect. You can purchase it on-line anytime, or call 800.626.2224 during normal business hours.
GE Consumer Home Services will still be there after your warranty expires.
Parts and Accessories GEAppliances.com
Individuals qualified to service their own appliances can have parts or accessories sent directly to their
homes (VISA, MasterCard and Discover cards are accepted). Order on-line today, 24 hours every day or
by phone at 800.626.2002 during normal business hours.
Instructions contained in this manual cover procedures to be performed by any user. Other servicing generally
should be referred to qualified service personnel. Caution must be exercised, since improper servicing may cause
unsafe operation.
Contact Us GEAppliances.com
If you are not satisfied with the service you receive from GE, contact us on our Website with all the details
including your phone number, or write to: General Manager, Customer Relations
GE Appliances, Appliance Park
Louisville, KY 40225

GEAppliances.com
49-80579 04-09 JR
Instrucciones de seguridad . . . . . . . . . 2–9
Instrucciones de operación
Autolimpieza del horno inferior
. . . . . 29, 30
Controles del horno inferior . . . . . . .22–34
Controles del horno microondas
. . . . .10–21
Controles del sensor . . . . . . . . . . . . . .16, 17
Función Sabbath
. . . . . . . . . . . . . . . . . 33, 34
Panel de control del horno inferior
. . .22, 23
Panel de control del microondas . . . .10, 11
Termostato del horno inferior . . . . . . . . .28
Cuidado y limpieza
Bombilla de alumbrado . . . . . . . . . . . . . . . . .37
Horno microondas . . . . . . . . . . . . . . . . . . 35
Parrillas . . . . . . . . . . . . . . . . . . . . . . . . . . . .38
Puerta . . . . . . . . . . . . . . . . . . . . . . . . . . . . .36
Consejos para la resolución
de problemas . . . . . . . . . . . . . . . . . . . 39–41
Accesorios . . . . . . . . . . . . . . . . . . . . . . . . . 42
Soporte al consumidor
Garantía . . . . . . . . . . . . . . . . . . . . . . . . . . .43
Soporte al consumidor . . . . . . . . . . . . . . . 44
Escriba los números de modelo y
serie aquí:
Nº de modelo ________________
Nº de serie __________________
Puede encontrarlos en
una etiqueta dentro del horno
superior en el lado izquierdo.
El horno microondas en este centro
de cocina es de 1000 vatios.
JKP90–Horno de doble pared de 27″
JTP90–Horno de doble pared de 30 ″
Manual del propietario
Centro de cocina
de Microondas
Impreso en los Estados Unidos

2
SeguridadOperaciónCuidado y limpiezaSolucionar problemasSoporte al consumidor
AVISO IMPORTANTE DE SEGURIDAD
La Ley de tóxicos y agua potable segura de California (California Safe Drinking Water and Toxic
Enforcement Act) exige al gobernador de California publicar una lista de las sustancias conocidas
en el estado que causan cáncer, defectos de nacimiento u otros daños, y exige a las empresas que
alerten a los clientes sobre la exposición potencial a dichas sustancias.
El aislamiento de fibra de vidrio en los hornos de autolimpieza emite una pequeña cantidad de
monóxido de carbono durante el ciclo de limpieza. Puede minimizarse la exposición permitiendo
la ventilación con una ventana abierta o utilizando un ventilador.
INSTRUCCIONES IMPORTANTES DE SEGURIDAD.
LEA TODAS LAS INSTRUCCIONES ANTES DE USAR.
¡ADVERTENCIA!
Si no se sigue exactamente la información de este manual, puede ocurrir un incendio, una explosión
o un cortocircuito que podría causar daños a la propiedad, lesiones personales o la muerte.
PRECAUCIONES PARA EVITAR LA POSIBLE EXPOSICIÓN A UNA
ENERGÍA DE MICROONDAS EXCESIVA
■ No intente operar este horno con
la puerta abierta ya que la operación
con la puerta abierta puede resultar en
una exposición nociva a la energía de
microondas. Es importante no anular o
alterar los interbloqueos de seguridad.
■ No coloque ningún objeto entre la parte
frontal del horno y la puerta ni permita
que se acumulen residuos sobre las
superficies de sellado.
■ Nadie debe ajustar o reparar el horno
a excepción del personal de servicio
adecuadamente calificado.
■ No opere el horno si está dañado.
Es particularmente importante que la
puerta del horno cierre apropiadamente
y que no existan daños a:
■ la puerta (dobladura),
■ las bisagras y aldabas (rotas o flojas),
■ los sellos de la puerta y superficies de
sellado.
GUARDE ESTAS INSTRUCCIONES
ADVERTENCIA—Instrucciones
de conexión a tierra: este aparato debe estar
conectado a un sistema de cableado
permanente, metálico, conectado a tierra
o se debe tender un conductor de conexión
a tierra del equipo con los conductores del
circuito y estar conectado a la terminal de
conexión a tierra del equipo o puesto sobre
el aparato.
ADVERTENCIA—para reducir
el riesgo de quemaduras, cortocircuitos,
incendio, lesiones a personas o exposición
a un exceso de energía de microondas:
■ Use este aparato únicamente para los
fines descritos en este manual. No utilice
químicos o vapores corrosivos en este
aparato. Este centro de cocina está
diseñado específicamente para calentar
o cocinar alimentos, y no debe utilizarse
para uso industrial o en laboratorios.
■ Asegúrese de que su aparato esté instalado
apropiadamente y sea conectado a tierra
por un técnico calificado según las
instrucciones de instalación suministradas.
■ Pida al instalador que le muestre la
ubicación del cortacircuitos o fusible.
Márquelo para obtener referencia fácil.
■ Asegúrese de que el centro de cocina
esté instalado de una manera segura en
un gabinete y que esté fijado firmemente
a la estructura de la casa. El peso sobre
la puerta del horno podría causar que
el horno se incline y produzca una lesión.
Nunca permita que nadie se suba,
se siente o se cuelgue sobre la puerta
del horno.
■ Este aparato debe ser reparado
únicamente por el personal de servicio
calificado. Contacte a la planta de servicio
autorizada más cercana para la inspección,
reparación o ajuste. No repare o
reemplace ninguna parte de este aparato
a menos que esté específicamente
recomendado en este manual. Todas las
demás reparaciones deben ser referidas
a un técnico calificado.
■ No almacene este aparato a la intemperie.
No utilice este producto cerca del agua,
como por ejemplo en un sótano húmedo,
o cerca de una piscina.
■ Antes de realizar cualquier reparación,
desconecte el suministro de corriente
del centro de cocina en el panel de
distribución de la casa quitando el fusible
o apagando el cortacircuitos.
■ No opere este aparato si tiene un cable o
enchufe dañado, si no está funcionando
apropiadamente, si ha sido dañado o
se ha caído.
■ No deje a los niños sin supervisión;
los niños no deben estar solos o sin
supervisión en un área en la que un
aparato está en uso. No se les debe
permitir sentarse o pararse sobre ninguna
de las partes del aparato.
■ No permita que nadie se suba, se siente
o se cuelgue sobre la puerta. Esto podría
dañar el centro de cocina y causar una
lesión personal grave.
■ PRECAUCIÓN: no se deben
guardar artículos de interés para los niños
en los gabinetes ubicados encima de
un horno; los niños que suban al horno
para alcanzar cosas podrían resultar
gravemente heridos.
■ Enseñe a los niños a no jugar con
los controles o con cualquier otra parte
del centro de cocina.
■ Los rayones o impactos severos sobre
la cubierta de cristal podrían romper
o destrozar el vidrio.
■ Utilice ropa apropiada. Nunca debe
vestir ropa suelta u holgada mientras
esté utilizando el aparato. Los materiales
inflamables pueden encenderse si entran
en contacto con elementos calientes y
pueden causar quemaduras graves.
Seguridad
Operación
Cuidado y limpieza
Solucionar problemas Soporte al consumidor
INSTRUCCIONES IMPORTANTES DE SEGURIDAD.
LEA TODAS LAS INSTRUCCIONES ANTES DE USAR.
GEAppliances.com
Cuando se utilizan aparatos eléctricos, se deben seguir las precauciones de seguridad básicas,
incluyendo las siguientes:
PRECAUCIONES DE SEGURIDAD
GUARDE ESTAS INSTRUCCIONES
3
4
SeguridadOperaciónCuidado y limpiezaSolucionar problemasSoporte al consumidor
INSTRUCCIONES IMPORTANTES DE SEGURIDAD.
LEA TODAS LAS INSTRUCCIONES ANTES DE USAR.
No use agua para apagar incendios causados por grasa. Nunca agarre una cacerola que se esté
quemando. Sofoque las cacerolas que se estén quemando cubriéndolas completamente con una
tapa bien ajustada, una bandeja para hornear o una bandeja plana. La grasa que se esté quemando
fuera de una cacerola puede sofocarse con bicarbonato de sodio o, si está disponible, un extintor
de incendios multipropósito de polvo seco o de espuma.
¡ADVERTENCIA!
PRECAUCIONES DE SEGURIDAD
■ Use únicamente guantes para cacerolas
que estén secos. Los guantes húmedos
o mojados sobre superficies calientes
podrían causar quemaduras debido al
vapor. No permita que los guantes entren
en contacto con los elementos de la
superficie caliente. No use una toalla u
otro tipo de tela voluminosa. Este tipo de
tela puede encenderse sobre un elemento
de superficie caliente.
■ Siempre mantenga las toallas para platos,
guantes para cacerolas y otros objetos de
tela a una distancia segura de su horno.
■ Siempre mantenga los utensilios de madera
y plástico, así como alimentos enlatados, a
una distancia segura de su horno.
■ Siempre mantenga tapices, cortinas
o paños combustibles a una distancia
segura de su horno.
■ No almacene materiales inflamables
dentro del horno o cerca del centro
de cocina.
■ No cubra ni bloquee ninguna de las
aperturas del aparato.
■ Por su seguridad, nunca use su aparato
para calentar la habitación.
■ No deje objetos hechos de papel,
utensilios de cocina o alimentos sobre
el horno mientras no esté en uso.
■ No almacene ni utilice materiales
combustibles, gasolina u otros vapores
inflamables cerca de éste o de cualquier
otro aparato.
■ No permita que la grasa de cocina u otros
materiales inflamables se acumulen dentro
o cerca del centro de cocina.
■ No toque los elementos de
calentamiento o la superficie interior
del horno. Estas superficies podrían estar
lo suficientemente calientes como para
quemar aun si están oscuras. Durante y
después del uso, no toque ni permita que
la ropa u otros materiales inflamables
entren en contacto con cualquier área
interior del horno; permita el tiempo
suficiente para que primero se enfríe.
Las superficies potencialmente calientes
incluyen las aperturas de ventilación del
horno, la superficie cerca a las aperturas
y las hendiduras alrededor de la puerta
del horno.
■ RECUERDE: la superficie interna
del horno puede estar caliente cuando
se abre la puerta.
■ Nunca coloque los utensilios de cocina
ni otros artículos sobre el piso del horno.
Existe un elemento de calentamiento
debajo del piso del horno. Colocar
artículos sobre el piso del horno puede
causar que el horno se sobrecaliente,
resultando en daños para el horno
y en riesgo de daños o incendio en
los gabinetes.
Cueza la carne roja y de ave por completo: la carne roja a una temperatura INTERNA de al menos 160 °F y la de
ave a una temperatura INTERNA de al menos 180 °F. La cocción a estas temperaturas ofrece protección contra
enfermedades de transmisión por alimentos.
CUEZA LAS CARNES Y EL POLLO COMPLETAMENTE…
GUARDE ESTAS INSTRUCCIONES
Para reducir el riesgo de incendio
en la cavidad del horno:
■ No permita que los alimentos se sobrecocinen.
Esté atento si se encuentra papel, plástico u
otros materiales combustibles en el interior
del aparato para facilitar la cocción.
■ Remueva las tirillas de papel-alambre de los
recipientes de papel o plástico antes de colocar
las bolsas en el horno.
■ No utilice su horno microondas para secar
periódicos.
■ No cocine palomitas de maíz en su horno
microondas a menos que se encuentren en
un accesorio de palomitas de maíz especial
para microondas o a menos que utilice unas
palomitas de maíz hechas para ser cocinadas
en hornos microondas.
■ No sobrecocine las papas. Éstas podrían
deshidratarse y encenderse, causando daños
al horno.
■ Para evitar daños al horno y el peligro de un
incendio, no opere el horno mientras esté vacío.
Si el horno funciona vacío durante un minuto o
dos por accidente, no hay ningún peligro. Sin
embargo, es importante que evite la operación
del horno vacío en todo momento: esto ahorra
energía y prolonga la vida útil del horno.
■ No utilice el horno para propósitos de
almacenamiento. No deje objetos hechos de
papel, utensilios de cocina o alimentos sobre
el horno mientras no esté en uso.
■ Si se encienden los materiales que
se encuentran dentro del horno, mantenga
la puerta del horno cerrada, apague el horno
y desconecte la corriente en el fusible o en
el panel de cortacircuitos. Si la puerta abierta,
se puede extender el fuego.
■ Este horno de microondas no está aprobado
ni comprobado para el uso marítimo.
■ Algunos productos como los huevos en el
cascarón y los contenedores sellados—por
ejemplo, jarras cerradas—explotarán y no
deben calentarse en este horno microondas.
Tal uso del horno microondas podría resultar
en lesiones.
■ No opere el horno microondas si no
se encuentran colocados la plataforma giratoria
y el apoyo.
■ Evite calentar alimentos para bebés en jarras
de vidrio, incluso sin la tapa. Asegúrese de que
todos los alimentos para niños se cocinen por
completo. Agite los alimentos para distribuir el
calor uniformemente. Cuando caliente la leche
de fórmula o la leche materna sea cuidadoso
para evitar que hierva. El recipiente puede
sentirse más frío de lo que está la leche.
Siempre pruebe la temperatura de la leche
antes de alimentar al bebé.
■ No hierva huevos en un horno microondas. La
presión se acumulará dentro de huevo y causará
que éste explote, resultando en posibles lesiones.
■ Los alimentos con una “cáscara o piel” intacta
como las papas, embutidos, tomates, manzanas,
huevos, hígados de pollo y otras menudencias
deben ser agujereados para permitir que el
vapor escape durante la cocción.
■ No descongele bebidas congeladas en botellas
con un cuello estrecho (especialmente las
bebidas carbonatadas). Aunque el recipiente
esté abierto, puede acumularse la presión. Esto
puede causar que el recipiente explote,
resultando en posibles lesiones.
■ Los alimentos calientes y el vapor pueden
causar quemaduras. Tenga cuidado cuando
abra cualquier recipiente con comida caliente,
incluyendo las bolsas de palomitas de maíz,
bolsas y cajas de cocción. Para prevenir posibles
lesiones, dirija el vapor lejos de las manos y
el rostro.
■ Como con cualquier aparato, se necesita una
supervisión cercana cuando sea utilizado por
niños.
Lea y siga la sección específica "precauciones para evitar una posible exposición a una energía de
microondas excesiva" en este manual.
HORNO MICROONDAS
Seguridad
Operación
Cuidado y limpieza
Solucionar problemas Soporte al consumidor
INSTRUCCIONES IMPORTANTES DE SEGURIDAD.
LEA TODAS LAS INSTRUCCIONES ANTES DE USAR.
GEAppliances.com
GUARDE ESTAS INSTRUCCIONES
5

6
SeguridadOperaciónCuidado y limpiezaSolucionar problemasSoporte al consumidor
INSTRUCCIONES IMPORTANTES DE SEGURIDAD.
LEA TODAS LAS INSTRUCCIONES ANTES DE USAR.
Asegúrese de que todos los utensilios de cocina utilizados en su horno de microondas sean adecuados para cocinar
con microondas. Pueden utilizarse la mayoría de cacerolas de vidrio, platos para cocinar, tazones de medición, tazones
para cremas, cerámica o vajilla de porcelana que no tenga adornos metálicos o esté barnizada con un lustre metálico.
Algunos utensilios de cocina están etiquetados como “aptos para cocinar con microondas”.
¡ADVERTENCIA!
UTENSILIOS DE COCINA SEGUROS PARA MICROONDAS
■ Si no está seguro si un plato es seguro para cocinar
con microondas, haga esta prueba: coloque en el
horno el plato que está probando y un tazón de
medición de vidrio llenado con una taza de agua;
coloque el tazón de medición sobre o al lado del
plato. Encienda el horno microondas durante 35 a 45
segundos en alto. Si el plato se calienta, no debe ser
utilizado para cocinar con microondas.
■ Si el plato permanece frío y sólo se calienta
el agua en la taza, entonces el plato es seguro
para cocinar con microondas.
■ Si utiliza un termómetro para carne durante
la cocción, asegúrese de que éste sea seguro
para utilizarse en hornos microondas.
■ No utilice productos de papel reciclado. Las toallas,
servilletas y papel parafinado de papel reciclado
pueden contener trozos metálicos que pueden causar
un arco eléctrico o la ignición. Deben evitarse
los productos de papel que contengan nailon o
filamentos del nailon ya que también pueden
encenderse.
■ Algunas bandejas de poliestireno (como en las que
se encuentra empacada la carne) tienen una cinta
delgada de metal incrustada en la parte inferior.
Cuando estas bandejas son calentadas, el metal puede
quemar el piso del horno o encender una toalla
de papel.
■ No todas las envolturas plásticas son adecuadas para
el uso en hornos microondas. Revise el paquete para
obtener instrucciones de uso apropiado.
■ Las toallas de papel, el papel parafinado y
las envolturas plásticas pueden utilizarse para cubrir
los platos con el fin de retener la humedad y prevenir
las salpicaduras. Asegúrese de ventilar la envoltura
plástica para que el vapor pueda escapar.
■ La comida o los utensilios metálicos de cocina
demasiado grandes no deben ser utilizados en
un horno microondas. Podría presentarse
un cortocircuito o incendio.
■ Aunque los platos de papel pueden utilizarse para
la cocción cronometrada y el descongelamiento,
no los utilice para la cocción con Auto Sensor.
Para recalentar, utilice platos o tazones seguros para
cocinar con microondas. Cubra con una envoltura
plástica.
■ Los utensilios de cocina pueden calentarse debido
a la transferencia de calor a partir de los alimentos
calientes. Es posible que se necesiten agarraderas
para manipular los utensilios de cocina.
■ Las bolsas de cocción “hervibles” y las bolsas
plásticas estrechamente cerradas deben ser
cortadas, perforadas o ventiladas de acuerdo
con las instrucciones del paquete. De no hacerlo,
el plástico podría explotar durante o inmediatamente
después de la cocción, resultando en posibles lesiones.
También, los recipientes plásticos de almacenamiento
deben estar por lo menos parcialmente destapados
ya que forman un sello hermético. Cuando cocine
con recipientes cerrados herméticamente con
una envoltura plástica, remueva cuidadosamente
la cubierta y dirija el vapor lejos de las manos y
el rostro.
■ Utilice el papel aluminio únicamente de acuerdo
con las instrucciones en este manual. Los alimentos
preparados en porciones listas para calentar y servir
(TV Dinners) pueden cocinarse con microondas en
bandejas de papel aluminio de una altura menor a
3/4″; remueva la cubierta superior de aluminio y
vuelva a colocar la bandeja en la caja. Cuando utilice
papel aluminio en el horno microondas, mantenga
el papel aluminio a una distancia de al menos
1 pulgada de los lados del horno.
■ Utensilios de cocina plásticos: los utensilios de cocina
plásticos diseñados para la cocción con microondas
son muy útiles, pero deben utilizarse cuidadosamente.
Incluso el plástico seguro para microondas puede no
ser tan tolerante a las condiciones de sobrecocción
como lo son vidrio o los materiales cerámicos, y puede
ablandarse o quemarse si es sometido a periodos
cortos de sobrecocción. En exposiciones prolongadas
a la sobrecocción, los alimentos y los utensilios de
cocina pueden encenderse.
■ Siga las siguientes directrices:
■ Utilice sólo plásticos seguros para microondas
y utilícelos en estricto cumplimiento con las
recomendaciones del fabricante de los utensilios
de cocina.
■ No caliente con microondas los recipientes
vacíos.
■ No permita que los niños utilicen utensilios de
cocina plásticos sin total supervisión.
GUARDE ESTAS INSTRUCCIONES
Seguridad
Operación
Cuidado y limpieza
Solucionar problemas Soporte al consumidor
INSTRUCCIONES IMPORTANTES DE SEGURIDAD.
LEA TODAS LAS INSTRUCCIONES ANTES DE USAR.
GEAppliances.com
Si observa un arco eléctrico, presione el botón CLEAR/OFF y corrija el problema.
ARCO ELÉCTRICO
El arco eléctrico es el término de microondas
para definir las chispas dentro del horno.
El arco eléctrico es causado por:
■ Metal o papel aluminio que está en
contacto con el lado del horno.
■ El papel aluminio no está amoldado a
los alimentos (los bordes colocados hacia
arriba actúan como antenas).
■ Metal, como tirillas para torcer, alfileres
para aves o platos con adornos dorados
en el microondas.
■ Se están utilizando toallas de papel
reciclado en el horno microondas que
contienen pequeñas piezas metálicas.
El agua y otros líquidos que son sometidos a las microondas no siempre forman burbujas cuando
alcanzan el punto de ebullición. Ciertamente pueden estar sobrecalentados y no mostrar ninguna
burbuja.
Los líquidos sobrecalentados burbujearán
fuera de la taza cuando ésta se mueva o
cuando algo como una cuchara o una bolsa
de té se coloquen en ella.
Para prevenir que esto suceda y cause
lesiones, no caliente ningún líquido por más
de 2 minutos por taza.
Después de calentar, permita que la taza
permanezca en el horno microondas
durante 30 segundos antes de moverla o
colocar algo dentro de ella.
Ebullición espontánea
Bajo ciertas circunstancias especiales, los
líquidos pueden comenzar a hervir durante
o poco después de ser quitados del horno
microondas.
Para prevenir quemaduras por las
salpicaduras del líquido, antes de quitar
el recipiente del horno recomendamos
lo siguiente:
■ Permita que el recipiente permanezca
en el horno durante 30 a 40 segundos
después que el horno se haya apagado.
■ No permita la ebullición de líquidos en
recipientes con un cuello estrecho como
las botellas de gaseosas, botellas de vino y
especialmente las tazas de café con cuello
estrecho. Incluso si el recipiente está
abierto, puede acumularse un exceso
de vapor y causar que éste explote
o se rebose.
AGUA SOBRECALENTADA
GUARDE ESTAS INSTRUCCIONES
7

GUARDE ESTAS INSTRUCCIONES
8
SeguridadOperaciónCuidado y limpiezaSolucionar problemasSoporte al consumidor
INSTRUCCIONES IMPORTANTES DE SEGURIDAD.
LEA TODAS LAS INSTRUCCIONES ANTES DE USAR.
■ Vapor escapando alrededor de la puerta.
■ Reflejo de luz alrededor de la puerta o de
la carcasa externa.
■ Puede presentarse una pérdida de
intensidad de la luz del horno y un
cambio en el sonido del soplador cuando
se opera a niveles de corriente inferiores.
■ El ventilador del microondas puede
operar con ambos hornos apagados. Una
vez se enfríe el control se apagará solo.
■ Mientras esté utilizando su horno
microondas es posible que note algo de
interferencia en la TV o radio. Es similar a
la interferencia causada por otros aparatos
pequeños y no indica un problema con
su horno.
■ Un golpeteo amortiguado mientras está
funcionando el horno.
TODOS LOS SIGUIENTES ASPECTOS SON NORMALES CON
SU HORNO MICROONDAS
TERMINOS Y DEFINICIONES DE MICROONDAS
Arco eléctrico
El arco eléctrico es el término de microondas para
definir las chispas dentro del horno. El arco eléctrico
es causado por:
■ Metal o papel aluminio en contacto con el lado
del horno.
■ Papel aluminio no amoldado a la comida (los bordes
hacia arriba actúan como antenas).
■ Metal, como tirillas para torcer, alfileres para pollo o
platos con adornos dorados.
■ Las toallas de papel reciclado contienen pequeñas piezas
metálicas.
Cubiertas
Las cubiertas mantienen la humedad, permitiendo un
calentamiento más uniforme y reducen el tiempo de
cocción. Las envolturas de plástico con respiraderos o
las cubiertas de papel parafinado permiten que el exceso
de vapor escape.
Resguardar
En un horno regular, usted cubre las pechugas de pollo
o los alimentos horneados para evitar que se doren
demasiado. Cuando utiliza el horno microondas, utiliza
pequeñas tiras de papel aluminio para cubrir partes
delgadas, como las puntas de las alas y patas de las aves,
las cuales se cocinarían antes de las partes más grandes.
Tiempo de reposo
Cuando cocina con hornos regulares, a los alimentos como
la carne asada o los pasteles se les permite reposar para
terminar la cocción o para que se endurezcan. El tiempo
de reposo es especialmente importante en la cocción con
microondas. Tenga en cuenta que un pastel cocinado con
microondas no es colocado en una parrilla de enfriamiento.
Ventilación
Después de cubrir un plato con una envoltura plástica,
usted ventila la envoltura plástica volteando una esquina
de tal forma que el exceso de vapor pueda escapar.
La mayoría de los marcapasos se encuentran
protegidos contra la interferencia de
productos electrónicos, incluyendo
microondas. Sin embargo, los pacientes que
tengan marcapasos deberían consultar a sus
médicos si tienen alguna duda.
AVISO: MARCAPASOS

LEA Y SIGA ESTA INFORMACIÓN DE SEGURIDAD
CUIDADOSAMENTE.
GUARDE ESTAS INSTRUCCIONES
9
Seguridad
Operación
Cuidado y limpieza
Solucionar problemas Soporte al consumidor
INSTRUCCIONES IMPORTANTES DE SEGURIDAD.
LEA TODAS LAS INSTRUCCIONES ANTES DE USAR.
GEAppliances.com
No utilice papel aluminio para recubrir la parte inferior del horno, excepto como se sugiere en este
manual. La instalación inapropiada del papel aluminio podría resultar en un riesgo de cortocircuito
o fuego.
¡ADVERTENCIA!
AUTOLIMPIEZA DEL HORNO INFERIOR
■ Permanezca alejado del horno cuando abra
la puerta del horno. El aire caliente o el vapor
que escapa puede causar quemaduras en
las manos, rostro y/u ojos.
■ No caliente los recipientes de comida
que no estén abiertos. La presión puede
acumularse y el recipiente podría explotar,
causando lesiones.
■ Mantenga la ventilación del horno sin
obstrucciones.
■ Mantenga el horno libre de acumulaciones
de grasa.
■ Mantenga el centro de cocina limpio y libre de
acumulaciones de grasa o derrames, los cuales
pueden encenderse.
■ Nunca deje la puerta del horno abierta cuando
no esté observando el centro de cocina.
■ Coloque la parrilla del horno en la posición
deseada mientras el horno esté frío. Si se deben
manipular las parrillas cuando el horno está
caliente, no permita que la agarradera de
la olla entre en contacto con el elemento de
calentamiento.
■ Cuando utilice bolsas de cocción o asado en
el horno, siga las instrucciones del fabricante.
■ Extraer la parrilla al seguro de parada es
conveniente para levantar alimentos pesados.
También es una precaución contra quemaduras
producidas al tocar superficies calientes de
la puerta o de las paredes del horno.
■ No utilice el horno como un área de
almacenamiento. Los artículos almacenados
en un horno pueden encenderse.
■ No deje productos de papel, utensilios de
cocina o alimentos en el horno cuando no esté
en uso.
■ Después de asar a la parrilla, siempre saque
del horno una cacerola para asar y límpiela.
La grasa remanente en una cacerola para asar
puede encenderse la siguiente vez que utilice
el horno.
■ No utilice el horno para secar periódicos.
Si son sobrecalentados, pueden encenderse.
■ Nunca deje frascos o latas con grasa derramada
sobre o cerca de su horno.
■ Únicamente limpie las partes enumeradas en
este Manual del propietario.
■ No limpie el empaque de la puerta.
El empaque de la puerta es esencial para
un buen cierre. Debe tenerse cuidado de
no desgastar, dañar o mover el empaque.
■ No utilice limpiadores. Ningún limpiador
comercial para hornos ni ninguna cubierta
protectora para hornos debe utilizarse dentro o
alrededor de las partes del horno. Los residuos
de los limpiadores de hornos dañarán
el interior del horno cuando se utilice
el ciclo de autolimpieza.
■ Antes de la autolimpieza del horno, remueva
la sonda, cualquier cacerola para asar, parrilla
y otros utensilios de cocina.
■ Antes de comenzar un ciclo de autolimpieza,
asegúrese de limpiar con un trapo los
derrames.
■ Si el modo de autolimpieza no funciona bien,
apague el horno y desconecte el suministro
de corriente. Haga que un técnico calificado
realice la reparación.
■ Esté atento al ventilador: en algún momento
durante el ciclo de limpieza debe escucharse
el ruido de un ventilador. Si no sucede esto,
llame para que el horno reciba mantenimiento
antes de una nueva autolimpieza.
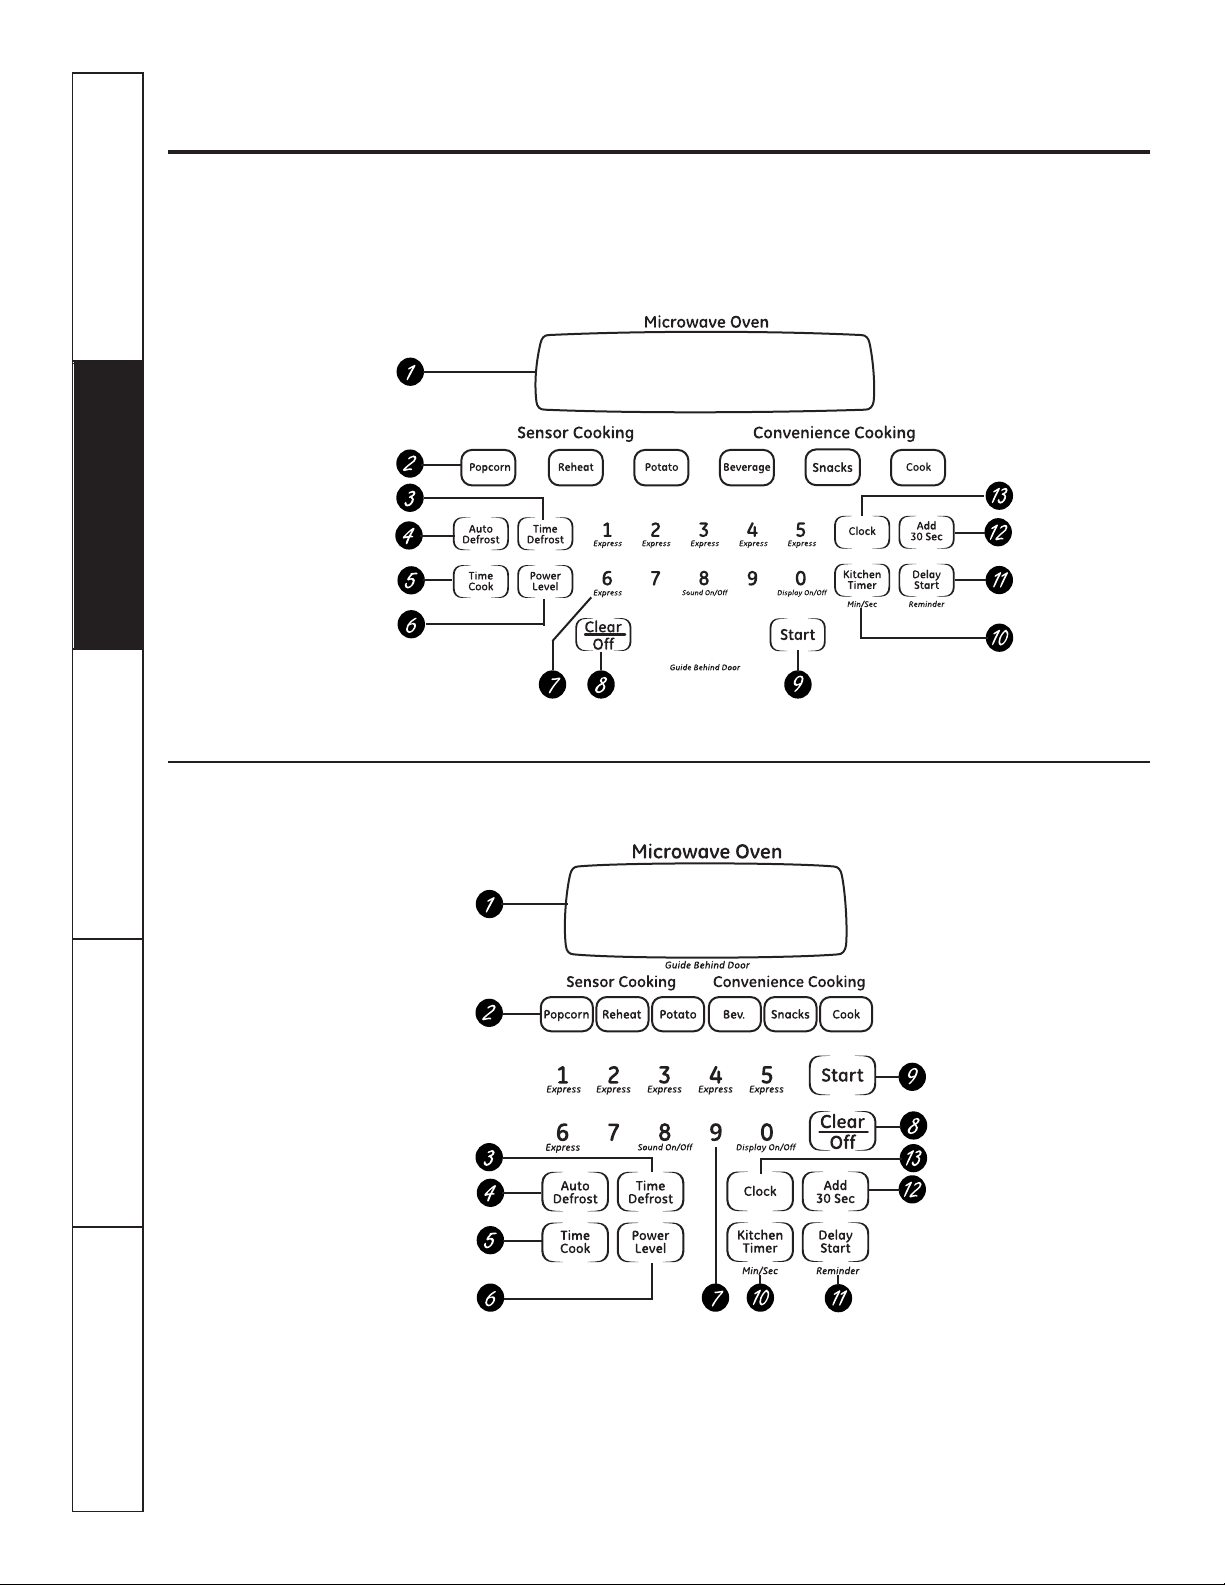
10
Uso de los controles del horno microondas.
A lo largo de este manual, las características y apariencia pueden variar con los de su modelo. Es posible que
su modelo tenga uno de los siguientes controles.
SeguridadOperaciónCuidado y limpiezaSolucionar problemasSoporte al consumidor
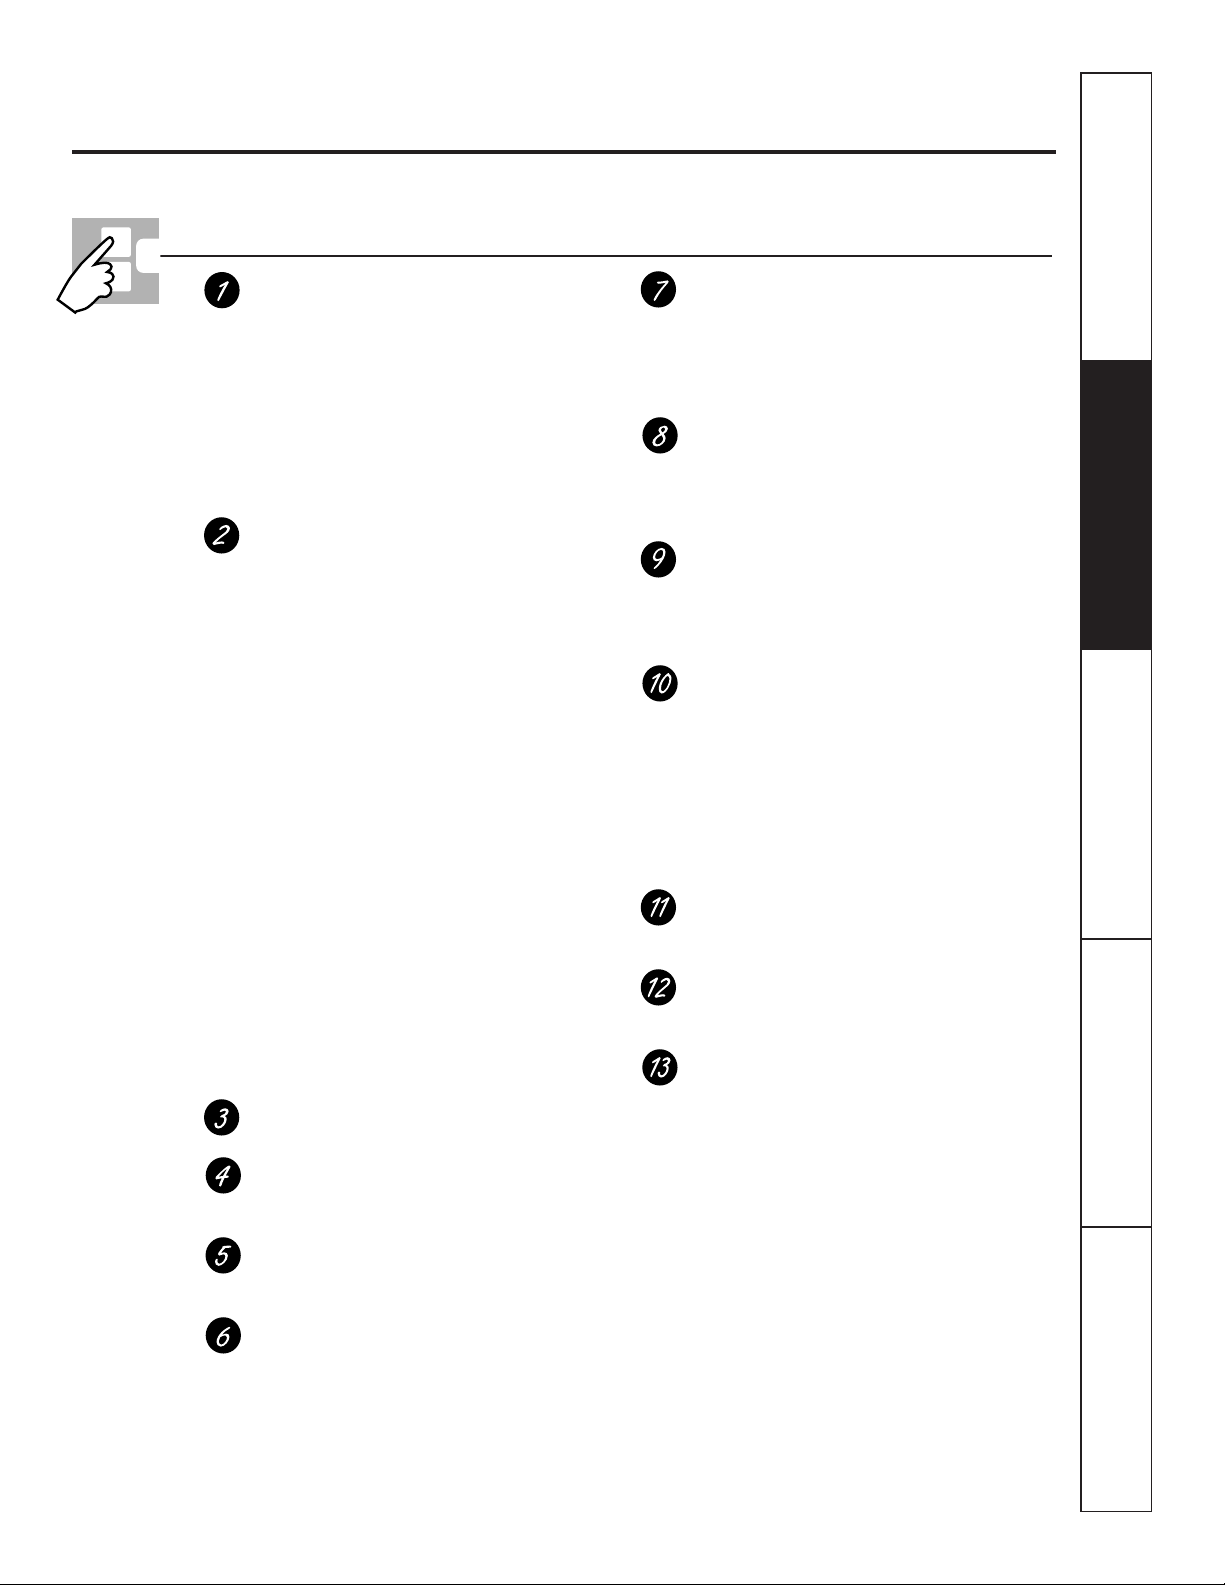
GEAppliances.com
Características y configuraciones de control del horno microondas
Pantalla
Muestra el tiempo durante las funciones de
cocción, el nivel de potencia que está siendo
utilizado, los códigos automáticos, los pesos
de los alimentos para autodescongelamiento,
el modo de cocción y las instrucciones.
NOTA: el tiempo en la pantalla del microondas
se muestra en minutos y segundos (1:30 es un minuto,
30 segundos). En el horno inferior, el tiempo se muestra
en horas y minutos (1:30 es una hora, 30 minutos).
Controles de sensor automático y
de regulación manual
La fila superior de botones enumera artículos
específicos que puede elegir para calentar o
cocinar.
Popcorn (Palomitas de maíz)
Utilícelo para preparar las palomitas de maíz.
Reheat (Recalentar)
Utilícelo cuando los alimentos necesiten un
calentamiento rápido.
Potato (Papas)
Utilícelo cuando cocine papas enteras.
Beverage (Bebidas)
Utilícelo para calentar una taza de café u otras
bebidas.
Snacks (Refrigerios)
Se utiliza para calentar varios tipos de
refrigerios.
Cook (Cocción)
Se utiliza para determinar en forma automática
los tiempos de cocción y los niveles de potencia
para varios tipos de alimentos.
Time Defrost (Tiempo de descongelamiento)
Se utiliza para la mayoría de los alimentos.
Auto Defrost (Descongelamiento automático)
Utilice Auto Defrost para descongelar carne
roja, de ave y pescado.
Time Cook (Tiempo de cocción)
Le permite utilizar el microondas hasta por
99 minutos y 59 segundos.
Power Level (Nivel de potencia)
Presiónelo para elegir el nivel de potencia que
desea establecer. Observe la pantalla mientras
presiona este botón para seleccionar el nivel de
potencia que desea establecer. También verá un
nivel de descongelamiento. Esta configuración
le permitirá escoger su propio nivel de potencia
de descongelamiento utilizando los botones
numéricos.
Botones numéricos
Después de presionar un botón de función,
presione los botones numéricos para establecer
la cantidad exacta de tiempo que desea cocinar.
Por ejemplo, si presiona los botones 1, 2 y 5,
establece 1 minuto y 25 segundos.
Clear/Off (Borrar/Apagar)
Presionar Clear/Off cancela todas las funciones
de cocción del horno microondas. Esto no
borra el Kitchen Timer (Temporizador de
Cocina).
Start (Inicio)
Después de efectuar todas las selecciones,
presione esta almohadilla para encender
el horno. Debe presionarse el botón Start
para encender cualquier función.
Kitchen Timer Min/Sec
(Temporizador de cocina)
Presione para establecer el temporizador hasta
99 minutos y 59 segundos. Presione los botones
numéricos para establecer el tiempo. Presione
el botón Kitchen Timer Min/Sec nuevamente
para iniciar. Presione el botón Kitchen Timer
Min/Sec dos veces para borrar la pantalla.
No enciende la energía de microondas.
Delay Start (Inicio retardado)
Le permite configurar el horno microondas
para que demore la cocción hasta por 12 horas.
Add 30 Sec (Adicionar 30 segundos)
Cada vez que presione este botón, el tiempo
establecido aumenta en 30 segundos.
Clock (Reloj)
Presione este botón antes de configurar
el reloj.
11
Seguridad
Operación
Cuidado y limpieza
Solucionar problemas Soporte al consumidor

12
SeguridadOperaciónCuidado y limpiezaSolucionar problemasSoporte al consumidor
Cambio del nivel de potencia del microondas.
El nivel de potencia puede ingresarse o cambiarse inmediatamente después de ingresar el tiempo para Time Cook,
Time Defrost o Express Cook. El nivel de potencia también puede cambiarse durante la cuenta regresiva del tiempo.
Para cambiar el nivel de potencia…
Presione el botón Time Cook o Time
Defrost.
Ingrese el tiempo de cocción o de
descongelamiento.
Presione el botón Power Level.
Seleccione el nivel de potencia
deseado 1 a 10.
Presione el botón Start.
Los distintos niveles de potencia añaden
flexibilidad a la cocción con microondas. Los
niveles de potencia en el horno microondas
pueden compararse con las unidades de
superficie sobre una cocina. Cada nivel de
potencia le brinda a su horno microondas
energía un cierto porcentaje del tiempo.
■ El nivel de potencia 7 es energía de
microondas el 70% del tiempo.
■ El nivel de potencia 3 es energía el 30%
del tiempo.
■ La mayoría de la cocción se hará
en Alto (nivel de potencia 10) lo que
le da 100% de la potencia. El nivel de
potencia 10 cocinará más rápido pero
es posible que los alimentos necesiten
un movimiento, rotación o giro más
frecuente.
Una configuración más baja cocinará más
uniformemente y se necesitará menos
movimiento o rotación de los alimentos.
Algunos alimentos pueden tener un
mejor sabor, textura o apariencia si
se utiliza una de las configuraciones
inferiores. Utilice un nivel de potencia
inferior cuando cocine alimentos que
tengan tendencia a hervir, como
las papas gratinadas.
Permita plazos de descanso (cuando
los ciclos de energía de microondas
se apaguen) para que los alimentos
“balanceen” o transfieran el calor a su
interior. Un ejemplo de esto se muestra
con el nivel de potencia 3: el ciclo de
descongelamiento. Si el ciclo de energía
de microondas no se apaga, el exterior
de los alimentos se cocinará antes de
que el interior se descongele.
Aquí se presentan algunos ejemplos de los
usos para los distintos niveles de potencia:
■ Alto 10: pescado, tocino, verduras,
hervir líquidos.
■ Medio a Alto 7: cocción suave de carne
roja y de ave; cacerolas para hornear y
recalentar.
■ Medio 5: cocción lenta y
ablandamiento para estofados y cortes
menos blandos de carne.
■ Bajo 2 ó 3: escongelamiento; hervir
a fuego lento; salsas delicadas.
■ Calentar 1: mantener la comida
caliente; ablandar la mantequilla.
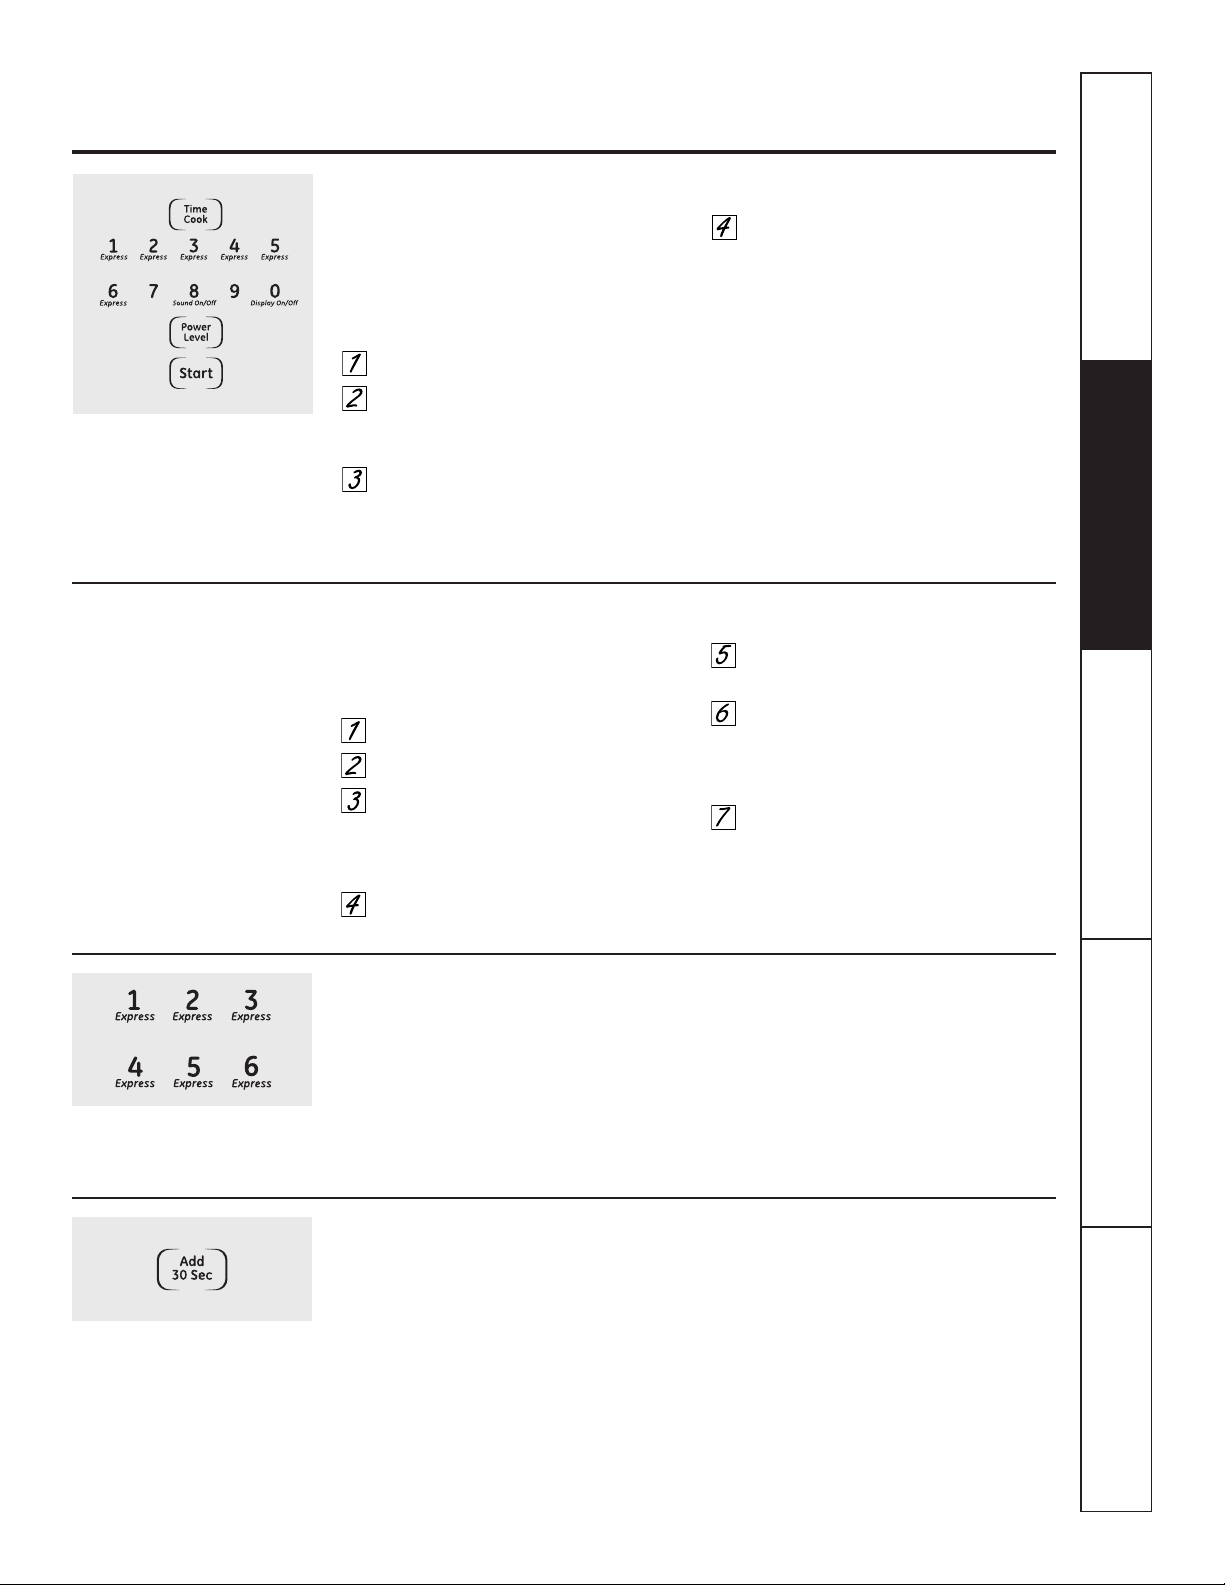
Usted puede utilizar esta característica de dos
maneras:
■ Añadirá 30 segundos a la cuenta
regresiva del tiempo cada vez que
presione el botón.
■ Puede utilizarse como una manera rápida
de establecer 30 segundos de tiempo de
cocción. No necesita presionar el botón
Start; el horno se encenderá
inmediatamente.
13
Seguridad
Operación
Cuidado y limpieza
Solucionar problemas Soporte al consumidor
Uso de las características
cronometradas del microondas.
GEAppliances.com
Time Cook I (Tiempo de cocción I)
Le permite utilizar el microondas hasta por
99 minutos y 59 segundos.
El nivel de potencia 10 (Alto) se establece
automáticamente, pero usted puede
cambiarlo para más flexibilidad.
Presione el botón Time Cook.
Ingrese el tiempo de cocción. Por
ejemplo, presione 1, 5, 0 y 0 para
15 minutos.
Cambie el nivel de potencia si no
desea toda la potencia. (Presione
el botón Power Level. Seleccione el
nivel de potencia deseado 1 a 10).
Presione el botón Start.
Usted puede abrir la puerta durante
Time Cook para revisar la comida. Cierre
la puerta y presione el botón Start para
continuar la cocción.
Time Cook II (Tiempo de cocción II)
Le permite cambiar los niveles de potencia
automáticamente durante la cocción. Aquí
se indica como hacerlo:
Presione el botón Time Cook.
Ingrese el tiempo de cocción.
Cambie el nivel de potencia si no
desea toda la potencia. (Presione
el botón Power Level. Seleccione
el nivel de potencia deseado 1 a 10.)
Presione nuevamente el botón
Time Cook.
Ingrese el segundo tiempo
de cocción.
Cambie el nivel de potencia si no
desea toda la potencia. (Presione
el botón Power Level. Seleccione
el nivel de potencia deseado 1 a 10).
Presione el botón Start.
Al final de Time Cook I, Time Cook II
enciende la cuenta regresiva.
Express Cook (Cocción exprés)
Esta es una forma rápida de establecer el tiempo
de cocción entre 1 y 6 minutos.
Presione uno de los botones Express
(de 1 a 6) para 1 a 6 minutos de cocción
a un nivel de potencia 10. Por ejemplo,
presione el botón 2 para 2 minutos de
tiempo de cocción.
El nivel de potencia puede cambiarse
cuando el tiempo esté en cuenta
regresiva. Presione el botón Power Level
e ingrese 1 a 10.
Add 30 Seconds (añadir 30 segundos)
Uso de las características cronometradas del microondas.
Guía de cocina para el tiempo de cocción. Utilice el nivel de potencia Alto (10) a menos que se indique lo contrario.
Verduras Cantidad Tiempo Comentarios
Arvejas
(frescas, descascaradas) 2 lb con la cáscara 9 a 12 min En una cacerola de 1 cuarto, coloque 1/4 de taza de agua.
(congelada) paquete de 10 oz 4 a 8 min En una cacerola de 1 cuarto, coloque 2 cucharadas de agua.
Brócoli
(corte fresco) 1 racimo (1
1
⁄4 a 1
1
⁄2 lb) 7 a 10 min En una cacerola de 2 cuartos, coloque 1/2 taza de agua.
(tallos frescos) 1 racimo (1
1
⁄4 a 1
1
⁄2 lb) 9 a 13 min En una cacerola de 2 cuartos, coloque 1/4 de taza de agua.
(congelado, picado) paquete de 10 oz 5 a 8 min En una cacerola de 1 cuarto.
(tallos congelados) paquete de 10 oz 5 a 8 min En una cacerola de 1 cuarto, coloque 3 cucharadas de agua.
Calabaza
(fresca, de verano y amarilla) 1 lb en rodajas 4 a 7 min En una cacerola de 1
1
⁄2 cuartos, coloque 1/4 de taza de agua.
(de invierno, bellota o marrón) 1 calabaza 7 a 11 min Corte en mitades y quite las membranas fibrosas. En un
(aproximadamente 1 lb cada una) recipiente de vidrio de 2 cuartos, coloque el corte de la calabaza
hacia abajo. Voltee el corte hacia arriba después de 4 minutos.
Coliflor
(florescencia) 1 cabeza mediana 9 a 14 min En una cacerola de 2 cuartos, coloque 1/2 taza de agua.
(fresca, entera) 1 cabeza mediana 9 a 17 min En una cacerola de 2 cuartos, coloque 1/2 taza de agua.
(congelada) paquete de 10 oz 5
1
⁄2 a 8 min En una cacerola de 1 cuarto, coloque 2 cucharadas de agua.
Espárragos
(tallos frescos) 1 lb 7 a 10 min En una cacerola de 1
1
⁄2 cuartos, coloque 1/4 de taza de agua.
Medio a Alto (7)
(tallos congelados) paquete de 10 oz 5 a 8 min En una cacerola de 1 cuarto.
Espinacas
(frescas) 10 a 16 oz 5 a 8 min En una cacerola de 2 cuartos, coloque la espinaca lavada.
(congelada, picada y en hojas) paquete de 10 oz 5 a 8 min En una cacerola de 1 cuarto, coloque 3 cucharadas de agua.
Frijoles
(verdes frescos) 1 lb corte en mitades 12 a 17 min En una cacerola de 1
1
⁄2 cuartos, coloque 1/2 taza de agua.
(verdes congelados) paquete de 10 oz 6 a 9 min En una cacerola de 1 cuarto, coloque 2 cucharadas de agua.
(lima congelada) paquete de 10 oz 6 a 9 min En una cacerola de 1 cuarto, coloque 1/4 de taza de agua.
Maíz
(grano congelado) paquete de 10 oz 4 a 8 min En una cacerola de 1 cuarto, coloque 2 cucharadas de agua.
Mazorca de maíz
(fresca) 1 a 3 espigas 3 a 5 min Coloque el maíz en un recipiente de vidrio para hornear de
por espiga 2 cuartos. Si el por espiga maíz está en la cascarilla, no utilice
agua; si el maíz ha sido descascarillado, añada 1/4 de taza de
agua. Reacomode después de la mitad del tiempo.
(congelada) 1 espiga 5 a 7 min Coloque en un plato de vidrio para hornear. Cubra con una
2 a 3 espigas 2 a 4 min envoltura plástica ventilada. Reacomode después de la mitad
por espiga del tiempo.
Papas
(frescas, blancas, en cubos) 4 papas (6 a 8 oz cada una) 11 a 14 min Pele y corte en cubos de 1 pulgada. Coloque en una cacerola de
2 cuartos con 1/2 taza de agua. Agite después de la mitad del
tiempo.
(frescas, enteras, dulces 1 (6 a 8 oz.) 2 a 5 min Perfore con un tenedor de cocina. Coloque en el horno, 1 pulgada
o blancas) aparte, en una disposición circular. Permita que repose 5 minutos.
Remolachas
(frescas, enteras) 1 racimo 18 a 25 min En una cacerola de 2 cuartos, coloque 1/2 taza de agua.
Repollo
(fresco)
1
cabeza mediana
(aproximadamente 2 lb)
8 a 11 min En una cacerola de 1
1
⁄2 ó 2 cuartos, coloque 1/4 de taza de agua.
(trozos grandes) 7 a 10 min En una cacerola de 2 ó 3 cuartos, coloque 1/4 de taza de agua.
Verduras mezcladas
(congelada) paquete de 10 oz 4 a 8 min En una cacerola de 1 cuarto, coloque 3 cucharadas de agua.
Zanahorias
(frescas, en rodajas) 1 lb 6 a 9 min En una cacerola de 1
1
⁄2 cuartos, coloque 1/4 de taza de agua.
(congeladas) paquete de 10 oz 5 a 8 min En una cacerola de 1 cuarto, coloque 2 cucharadas de agua.
14
SeguridadOperaciónCuidado y limpiezaSolucionar problemasSoporte al consumidor
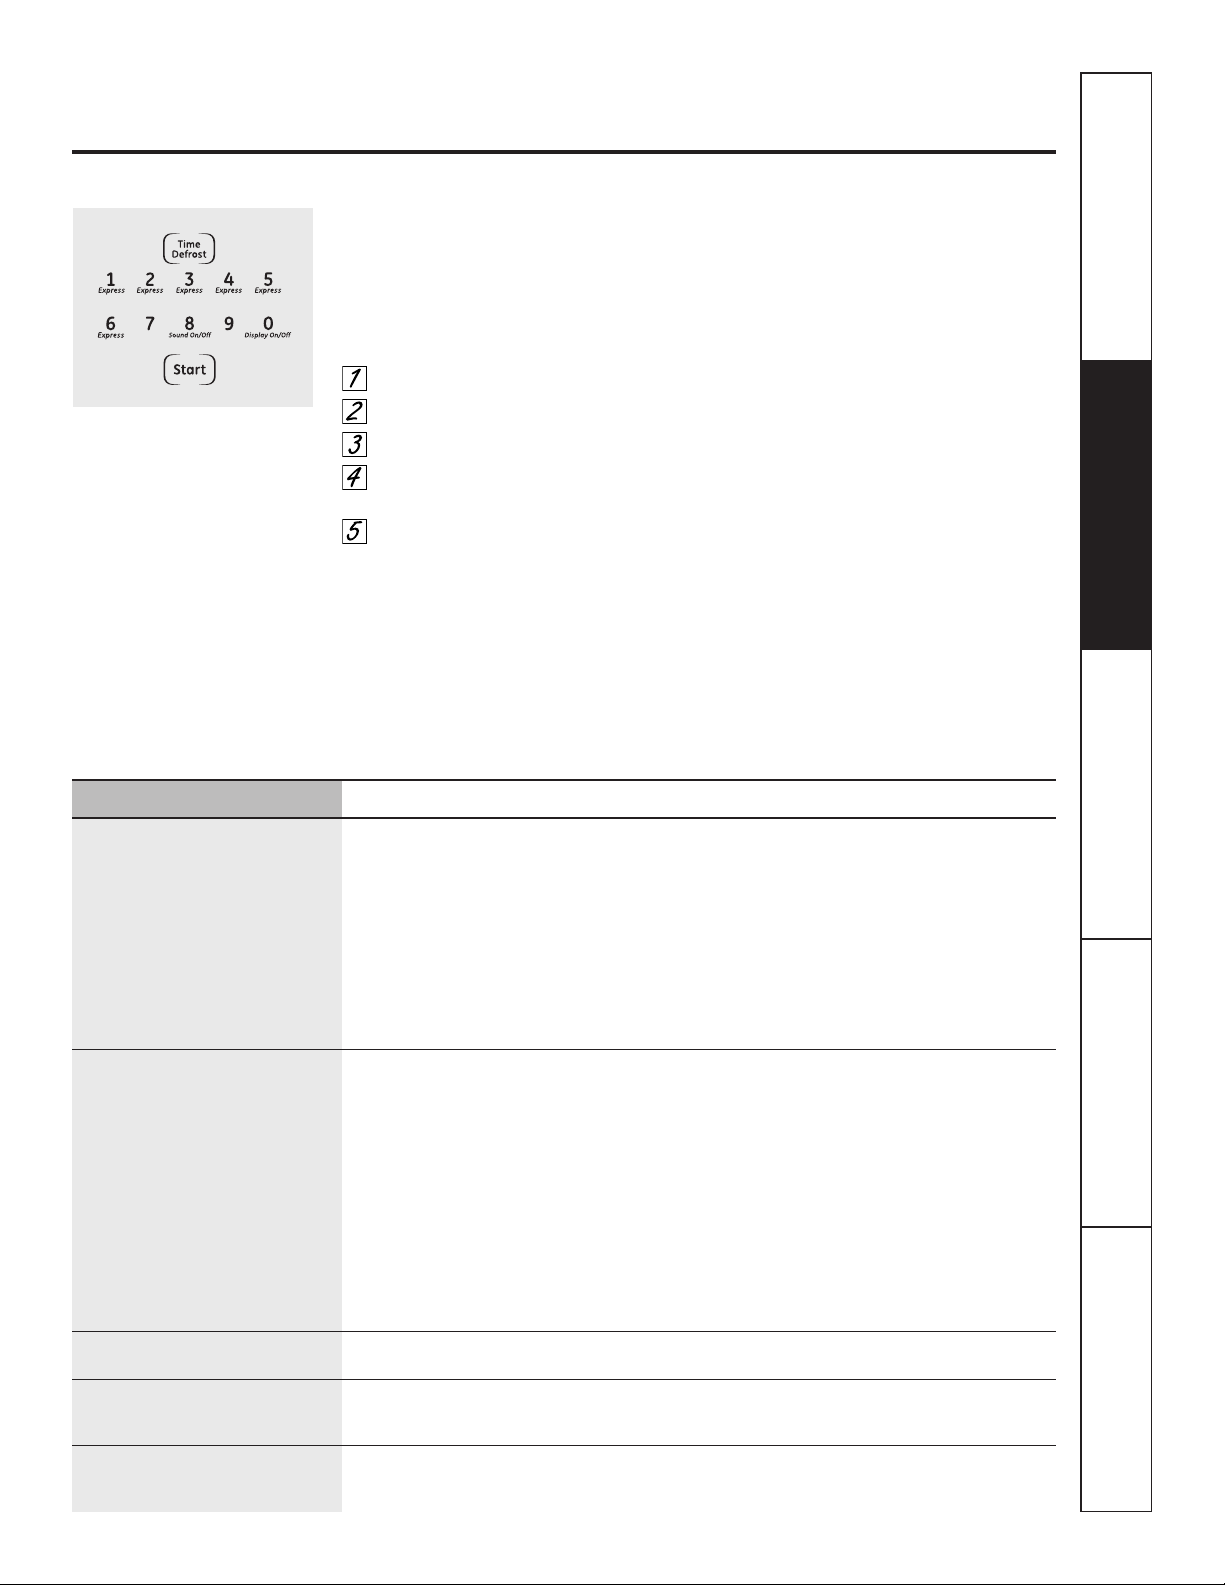
Alimento Tiempo Comentarios
Carne
Bistec, chuleta y costillas 5 a 10 min por lb. Coloque la carne desempacada en un plato de cocción. Voltee después de la primera mitad
del tiempo y proteja las áreas calientes con papel aluminio. Después de la segunda mitad
del tiempo, separe los pedazos con un cuchillo de mesa. Deje reposar para completar
el descongelamiento.
Carne asada: res, cordero, ternera, cerdo 11 a 16 min por lb. Utilice el nivel de potencia 1.
Carne molida (1 lb) 5 a 8 min por lb. Voltee la carne después de la primera mitad del tiempo.
Salchichas de Frankfurt (1 lb) 3 a 6 min Coloque el paquete sin abrir dentro del horno. Caliente en el microondas hasta
que las salchichas puedan separarse. Deje reposar 5 minutos, si es necesario, para
completar del descongelamiento.
Tocino (1 lb) 3 a 6 min Coloque el paquete sin abrir dentro del horno. Deje reposar 5 minutos después del
descongelamiento.
Carne de ave
Gallina Cornish 9 a 16 min por lb. Coloque la gallina desempacada en el horno con la pechuga hacia arriba. Voltee después de
la primera mitad del tiempo. Deje correr agua fría en la cavidad hasta que se puedan quitar
las menudencias.
Pechuga de pavo (4 a 6 lb) 5 a 10 min por lb. Coloque la pechuga desempacada en un plato seguro para microondas con la pechuga hacia
abajo. Después de la primera mitad del tiempo, voltee la pechuga hacia arriba y proteja las
áreas calientes con papel aluminio. Descongele durante la segunda mitad del tiempo. Deje
reposar 1 a 2 horas en el refrigerador para completar el descongelamiento.
Pollo, entero (2
1
⁄2 a 3 lb) 20 a 28 min Coloque el pollo empacado en un plato. Después de la primera mitad del tiempo,
desenvuelva y voltee el pollo. Proteja las áreas calientes con papel aluminio. Para completar
el descongelamiento, deje correr agua fría en la cavidad hasta que se remueva el menudo.
Pollo, pollo para asar/freír, cortado 15 a 22 min Coloque el pollo empacado en un plato. Desenvuelva y voltee después de la primera mitad
(2
1
⁄2 a 3 lb) del tiempo. Después de la segunda mitad del tiempo, separe los pedazos y colóquelos en un
plato de cocción. Hornee en el microondas 2 a 4 minutes más, si es necesario. Deje reposar
unos pocos minutos para terminar el descongelamiento.
Frutas
Bolsa plástica – 1 ó 2 (paquetes de 10 oz) 3 a 7 min
Pan, pasteles
Pan, panecillos o rollos (1 pedazo) 1/2 min
Rollos de dulce (aprox.12 oz) 3 a 6 min Reorganice después de la mitad del tiempo.
Pescado y mariscos
Crustáceos, pedazos pequeños (1 lb) 3 a 7 min Coloque el bloque en la fuente. Voltee y separe después de la mitad del tiempo.
Filetes, congelados (1 lb) 9 a 12 min
Guía de descongelamiento
15
Seguridad
Operación
Cuidado y limpieza
Solucionar problemas Soporte al consumidor
GEAppliances.com
Durante el descongelamiento puede escucharse un golpeteo amortiguado. Esto es normal cuando el horno no está funcionando en Alto.
Time Defrost (Tiempo de descongelamiento)
Le permite descongelar durante un periodo de tiempo
seleccionado. Vea la Guía de descongelamiento para los
tiempos sugeridos. (La función de descongelamiento
automático se explica en la sección Uso de las características
automáticas del microondas).
Presione el botón Time Defrost.
Ingrese el tiempo de descongelamiento.
Presione el botón Start.
Voltee los alimentos cuando el horno dé
la señal.
Presione el botón Start.
El nivel de potencia está establecido
automáticamente en 3, pero puede cambiarse.
Usted puede descongelar artículos pequeños
rápidamente aumentando el nivel de potencia
después de ingresar el tiempo. Nivel de potencia 7
acorta el tiempo total de descongelamiento en
aproximadamente la mitad; nivel de potencia 10
acorta el tiempo total a aproximadamente 1/3.
Sin embargo, los alimentos necesitarán una
atención más frecuente que lo usual.
Consejos de descongelamiento
■ Los alimentos congelados en papel o plástico pueden ser
descongelados dentro del paquete. Los paquetes cerrados
deben ser cortados, perforados o ventilados DESPUÉS de
que los alimentos hayan sido descongelados parcialmente.
Los recipientes plásticos de almacenamiento deben estar
parcialmente destapados.
■ Las cenas congeladas preempacadas de tamaño familiar,
pueden descongelarse y cocinarse en el microondas.
Si la comida se encuentra en un recipiente de papel
aluminio, transfiérala a un plato seguro para microondas.
■ Los alimentos que se echan a perder fácilmente
no deben dejarse fuera por más de una hora después del
descongelamiento. La temperatura ambiente promueve
el crecimiento de bacterias peligrosas.
■ Para un descongelamiento más uniforme de comidas
grandes, como asados, utilice Auto Defrost. Antes de
la cocción, asegúrese de que las carnes grandes estén
completamente descongeladas.
■ Cuando está descongelada, la comida debe estar fría
pero blanda en todas las tareas. Si todavía está un poco
congelada, regrésela un momento al horno microondas,
o déjela reposar durante unos pocos minutos.
En la mitad del tiempo de
descongelamiento seleccionado,
el horno señala TURN. Entonces,
voltee la comida y separe o
reorganice los trozos para dar un
descongelamiento más uniforme.
Proteja las áreas calientes con
pequeños trozos de papel
aluminio.
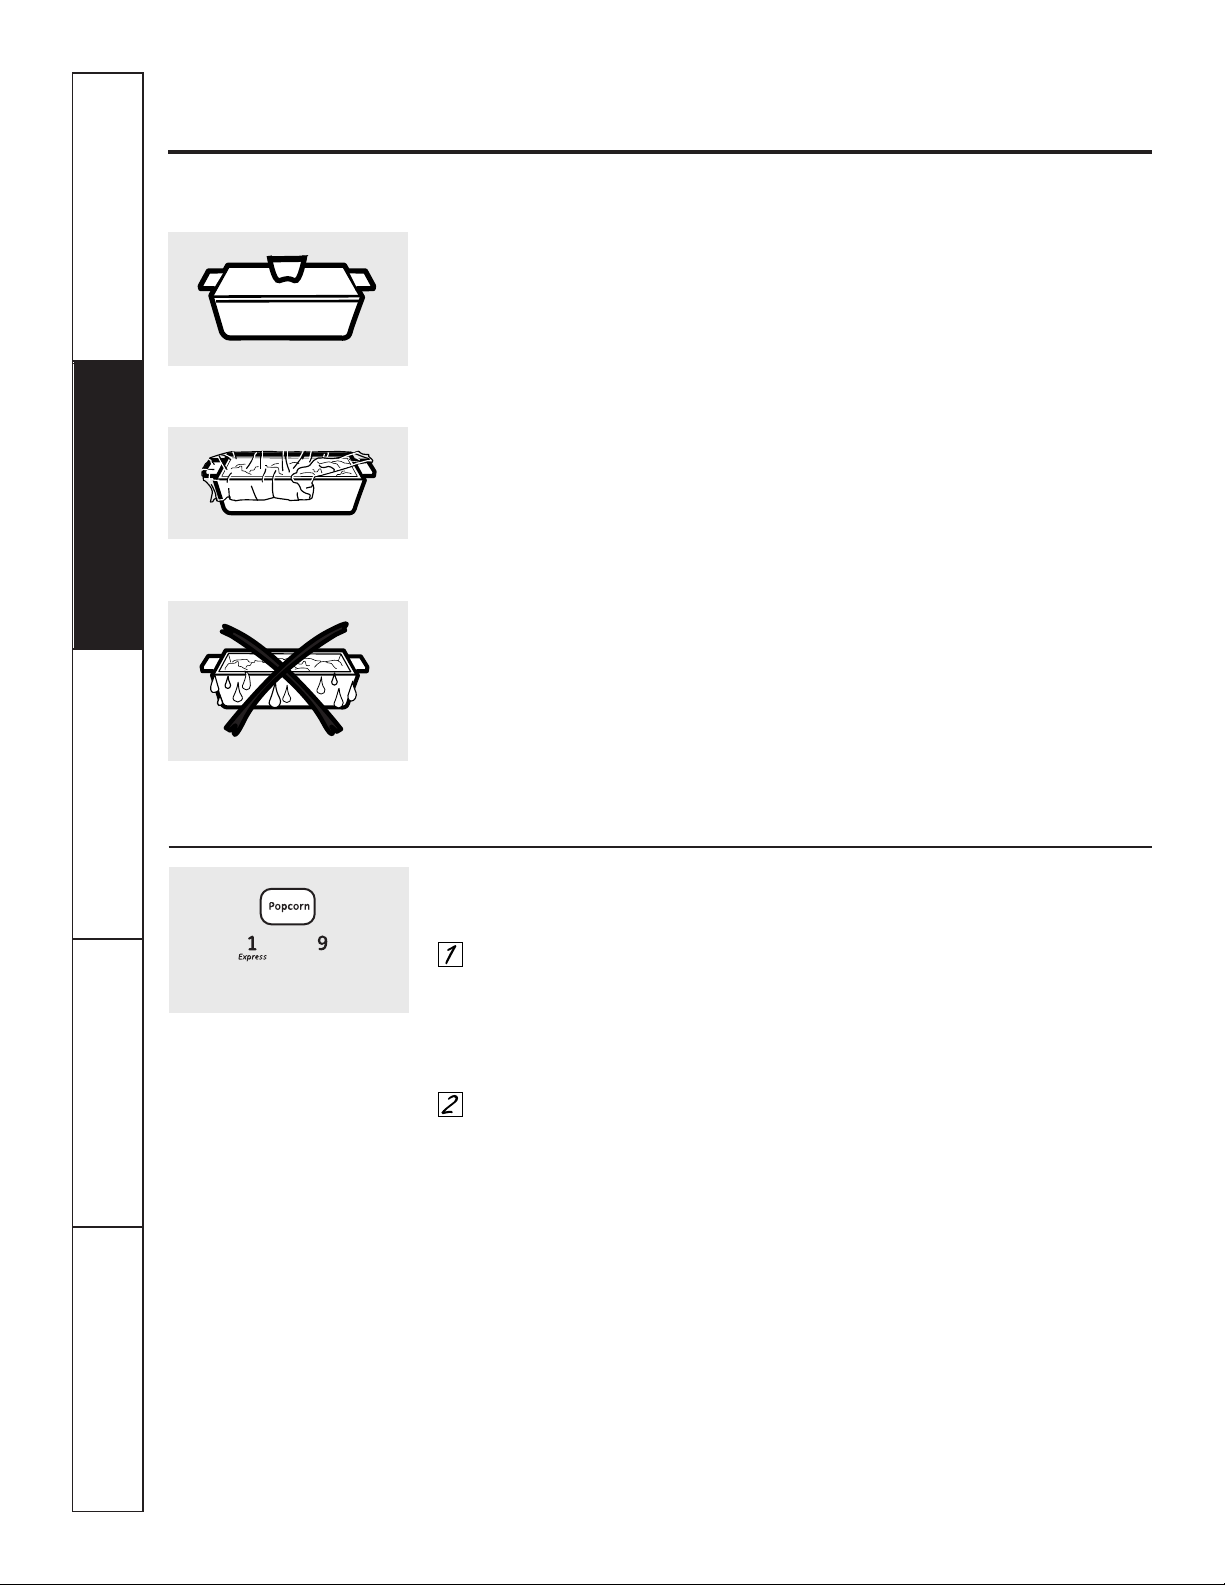
16
SeguridadOperaciónCuidado y limpiezaSolucionar problemasSoporte al consumidor
Uso de las características del sensor de cocción del horno
microondas.
La característica Sensor detecta el aumento de la humedad liberada durante la cocción. El horno ajusta
automáticamente el tiempo de cocción a varios tipos y cantidades de alimentos.
Sensor de cocción
■ Los recipientes y cubiertas
apropiados son esenciales para el buen
funcionamiento del sensor de cocción.
■ Siempre utilice recipientes seguros
para microondas y cúbralos con tapas
o envolturas plásticas ventiladas. Nunca
utilice recipientes plásticos de cierre
hermético: estos recipientes pueden
evitar que el vapor escape y causan
que los alimentos es sobrecocinen.
■ Antes de colocar los alimentos en
el horno, asegúrese de que la parte
externa de los recipientes de cocción y
el interior del horno microondas estén
secos. Las gotas de humedad que se
convierten en vapor pueden confundir
al sensor.
Popcorn (Palomitas de maíz)
Para usar la característica Popcorn:
Siga las instrucciones del paquete,
utilizando Time Cook si el paquete
es menor de 1,75 onzas o mayor
que 3,5 onzas. Coloque el paquete
de palomitas de maíz en el centro
del microondas.
Presione el botón Popcorn.
El horno arranca inmediatamente.
Si abre la puerta mientras está POPCORN en
la pantalla, aparecerá ERROR. Cierre la puerta,
presione el botón Clear/Off y comience de nuevo.
Cómo ajustar el programa Popcorn para
proporcionar un tiempo de cocción más
corto o más largo:
Si sucede que la marca de palomitas
de maíz que utiliza no revienta
completamente o se sobrecocina
consistentemente, usted puede añadir
o sustraer 20 a 30 segundos al tiempo
de cocción automático.
Para añadir tiempo:
Después de presionar el botón Popcorn,
presione el botón 9 inmediatamente
después de que arranque el horno para
un extra de 20 segundos. Presione el
botón 9 nuevamente para añadir 10
segundos adicionales (total de 30
segundos de tiempo adicional).
Para disminuir tiempo:
Después de presionar el botón Popcorn,
presione el botón 1 inmediatamente
después que arranca el horno para
permitir 20 segundos menos de tiempo
de cocción. Presione el botón 1
nuevamente para restar otros
10 segundos al tiempo de cocción
(total de 30 segundos menos de tiempo).
Cubierto
Ventilado
Seque los platos de tal forma que no
confundan al sensor.
Utilice sólo con palomitas de maíz
preempacadas para microondas
que pesen entre 1,75 y 3,5 onzas.
(menos tiempo) (más tiempo)
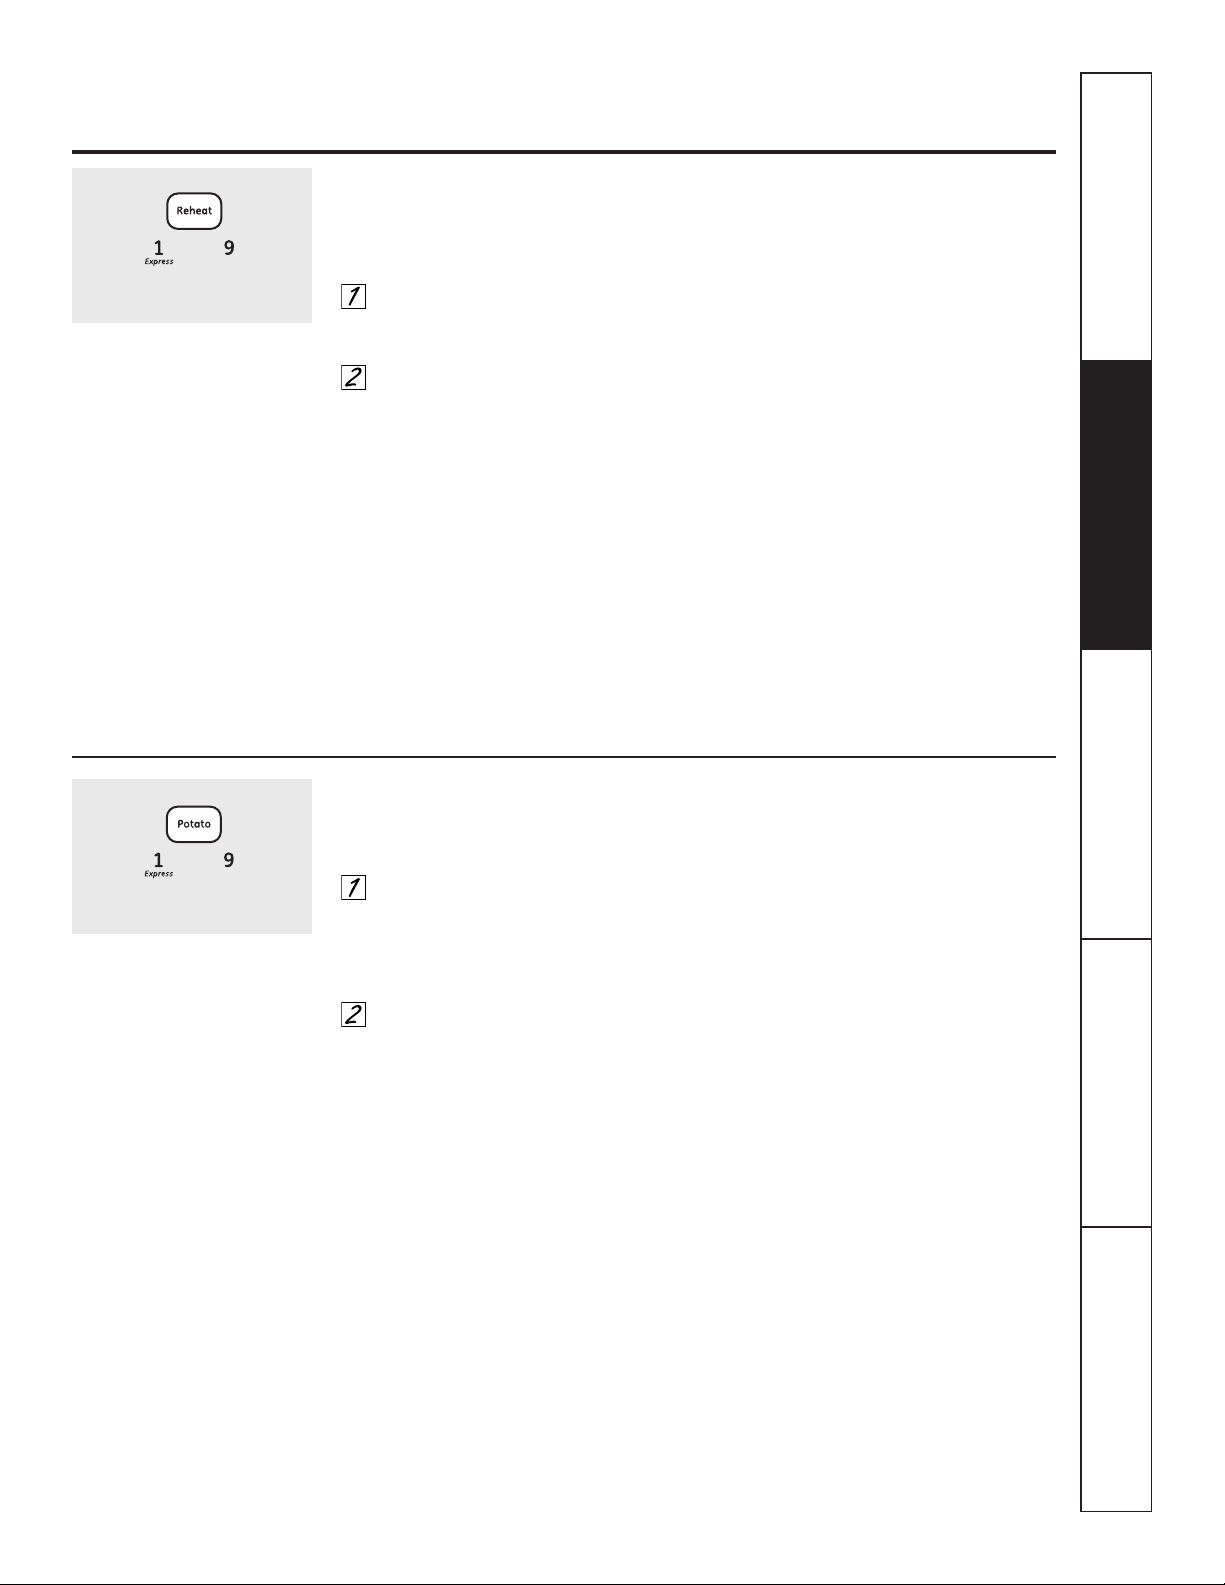
17
GEAppliances.com
Seguridad
Operación
Cuidado y limpieza
Solucionar problemas Soporte al consumidor
Reheat (Recalentar)
La característica Reheat recalienta porciones
individuales de alimentos previamente cocinados
o un plato de sobrantes.
Coloque la comida cubierta en
el horno. Presione el botón Reheat.
El horno arranca inmediatamente.
El horno indica cuando se detecta
vapor y el tiempo restante comienza
la cuenta regresiva.
No abra la puerta del horno hasta que
el tiempo esté en cuenta regresiva. Si la
puerta está abierta, ciérrela y presione
inmediatamente el botón Start.
Después de quitar los alimentos del horno,
agítelos, si es posible, para homogenizar
la temperatura. Si la comida no está
suficientemente caliente, utilice Time
Cook para recalentar por más tiempo. Las
comidas recalentadas pueden tener grandes
variaciones de temperatura. Algunas áreas
pueden estar sumamente calientes.
Algunos alimentos no son recomendados
para utilizarse con Reheat; para estos
alimentos es mejor utilizar Time Cook:
■ Productos de pan.
■ Alimentos que deben ser recalentados
sin estar cubiertos.
■ Alimentos que necesitan ser agitados
o rotados.
■ Alimentos que necesitan un aspecto
seco o una superficie crujiente después
del recalentamiento.
Cómo cambiar las configuraciones
automáticas:
Para reducir el tiempo en 10%:
presione el botón 1 después el botón de
la característica.
Para añadir un 10% al tiempo de cocción:
presione el botón 9 después el botón de
la característica.
(menos tiempo) (más tiempo)
Potato (Papas)
La característica Potato cocina 1/2 a 2 lb
de papas.
Perfore la cáscara con un tenedor y
coloque las papas en la plataforma
giratoria. Si está cocinando tres o
más papas, acomódelas formando
un patrón de estrella.
Presione el botón Potato. El horno
arranca inmediatamente. El horno
indica cuando se detecta vapor y el
tiempo restante comienza la cuenta
regresiva.
No abra la puerta del horno hasta que
el tiempo esté en cuenta regresiva. Si la
puerta está abierta, ciérrela y presione
el botón Start inmediatamente.
Si los alimentos no están listos todavía, utilice
Time Cook para cocinar por más tiempo.
(menos tiempo) (más tiempo)
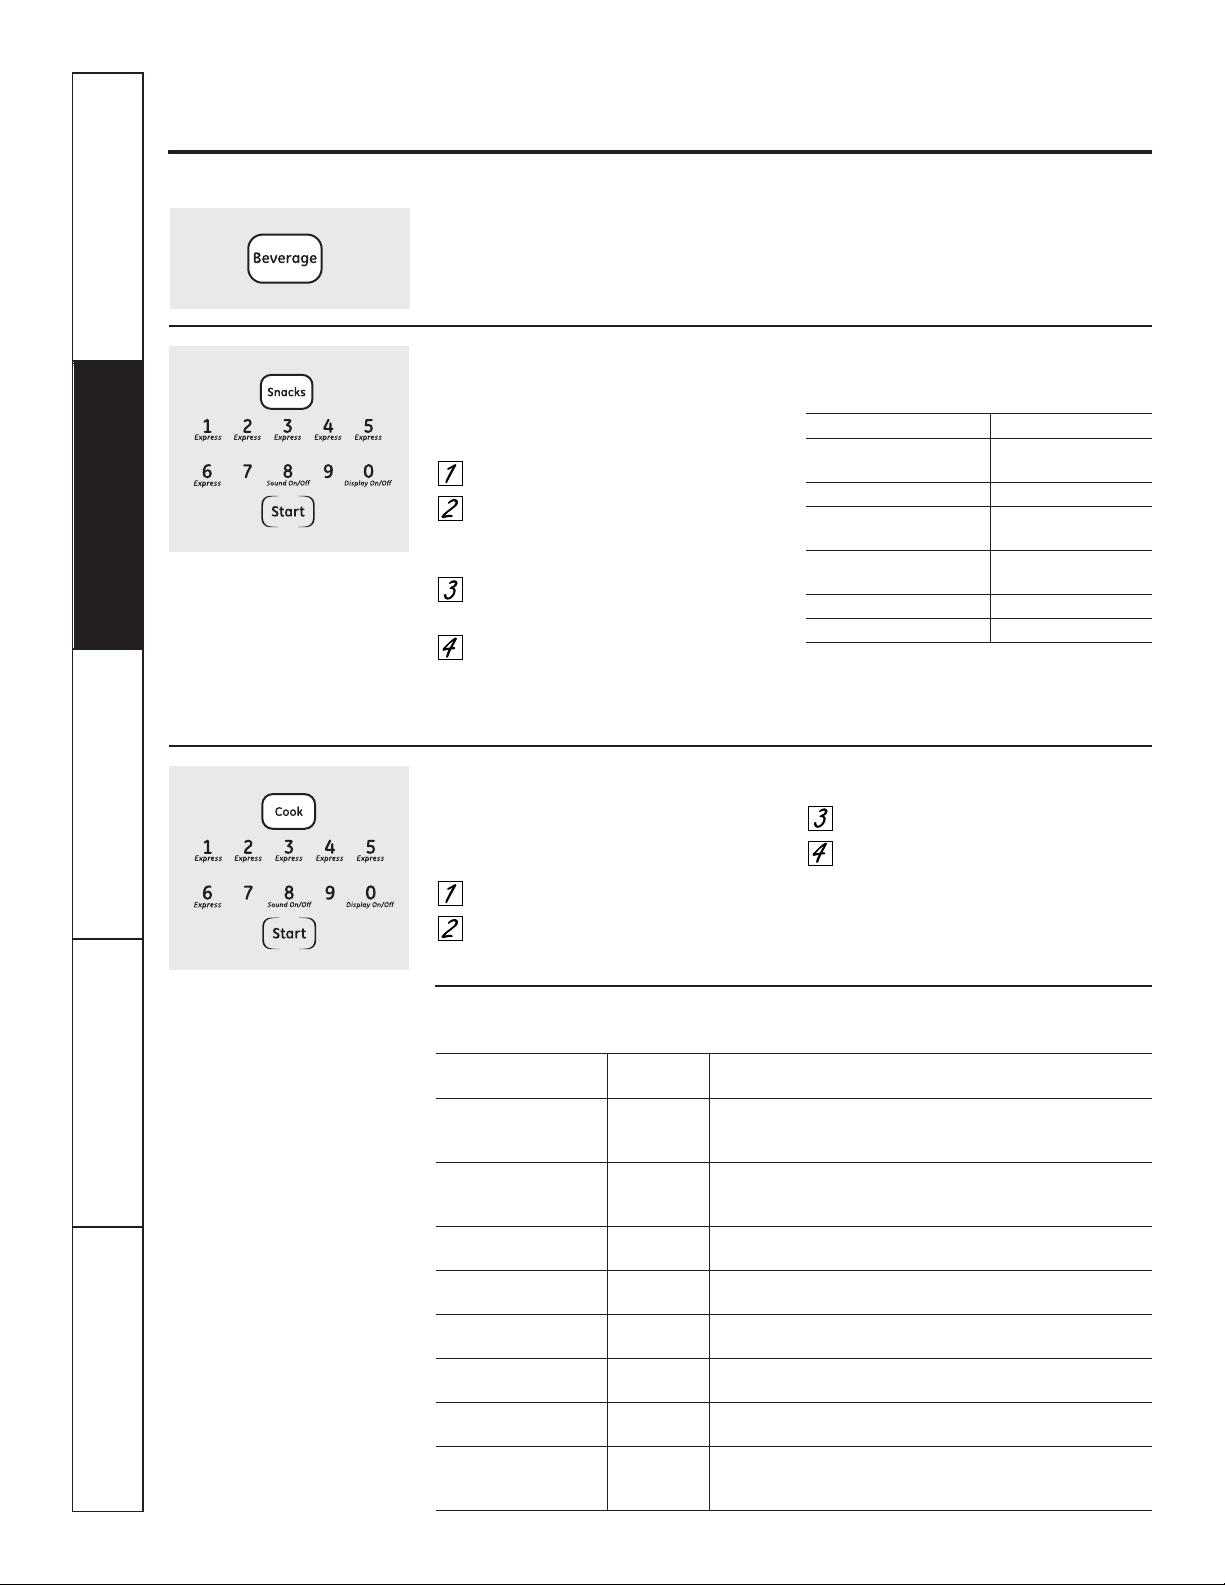
18
Uso de las funciones del microondas para cocción fácil.
Las bebidas calentadas con la característica Beverage pueden estar muy calientes. Retire el recipiente con cuidado.
Beverage (Bebidas)
Presione el botón Beverage para calentar
una taza de café u otra bebida.
Snacks (refrigerios)
La función Snacks determina en forma automática
el tiempo y la potencia para calentar varios tipos
de refrigerios.
Presione el botón Snacks.
Seleccione el tipo de refrigerio
de 1 a 6 (consulte la Guía de
refrigerios).
Ingrese la cantidad de alimentos
o el peso en onzas.
Presione el botón Start (Inicio).
Consejo: Puede presionar el botón Snacks y
mantenerlo presionado durante la cocción para
ver el tiempo restante.
Guía de refrigerios
Tipo de alimento Cantidad o peso
1 Pan, rosquillas, de 1 a 4
pastelillos
2 Sándwiches de 1 a 2
3 Pizza (porciones que de 1 a 4
sobraron)
4 Coberturas para de 1 a 4
postres
5 Sopas de 8 a 40 oz.
6 Salsas de queso de 4 a 16 oz.
Cook (cocción)
La función Cook determina en forma automática
los tiempos de cocción y los niveles de potencia
para los distintos tipos de alimentos.
Presione el botón Cook.
Seleccione el tipo de alimento de
1 a 9 (consulte la Guía de cocción
a continuación).
Ingrese el peso en onzas.
Presione el botón Start.
Consejo: Presione el botón Cook y manténgalo
presionado durante la cocción para ver el tiempo
que resta.
Guía de cocción
Tipo de alimento Peso Comentarios
1 Vegetales enlatados de 4 a 20 oz. Utilice una olla o un bol para microondas. Cubra con una tapa
o un envoltorio de plástico con ventilación.
2 Vegetales de 4 a 16 oz. Utilice una olla o un bol para microondas. Siga las instrucciones
congelados del envase para agregar agua. Cubra con una tapa o un envoltorio
de plástico con orificios de ventilación.
3 Vegetales frescos de 4 a 16 oz. Utilice una olla o un bol para microondas. Agregue dos
cucharadas de agua por cada porción. Cubra con una tapa o
un envoltorio de plástico con ventilación.
4 Papas de 8 a 40 oz. Perfore la piel con un tenedor. Coloque las papas en la bandeja
giratoria.
5 Pescado de 4 a 16 oz. Utilice un plato rectangular, cuadrado o redondo. Cubra con
un envoltorio de plástico con ventilación.
6 Porciones de pollo de 4 a 40 oz. Utilice un plato rectangular, cuadrado o redondo. Cubra con
un envoltorio de plástico con ventilación o papel encerado.
7 Carne picada de 8 a 48 oz. Utilice una olla redonda. Desmenuce la carne dentro de la olla.
(res, cerdo, pavo) Cubra con una tapa o un envoltorio de plástico con ventilación.
8 Tocino de 2 a 10 oz. Coloque tiras en capas sobre un plato, 4 por capa. Cubra cada
capa con papel de cocina.
9 Pizza (congelada, de 4 a 16 oz. Siga las instrucciones del envase para cocinar la pizza en
lista para cocinar el microondas.
en el microondas)
SeguridadOperaciónCuidado y limpiezaSolucionar problemasSoporte al consumidor
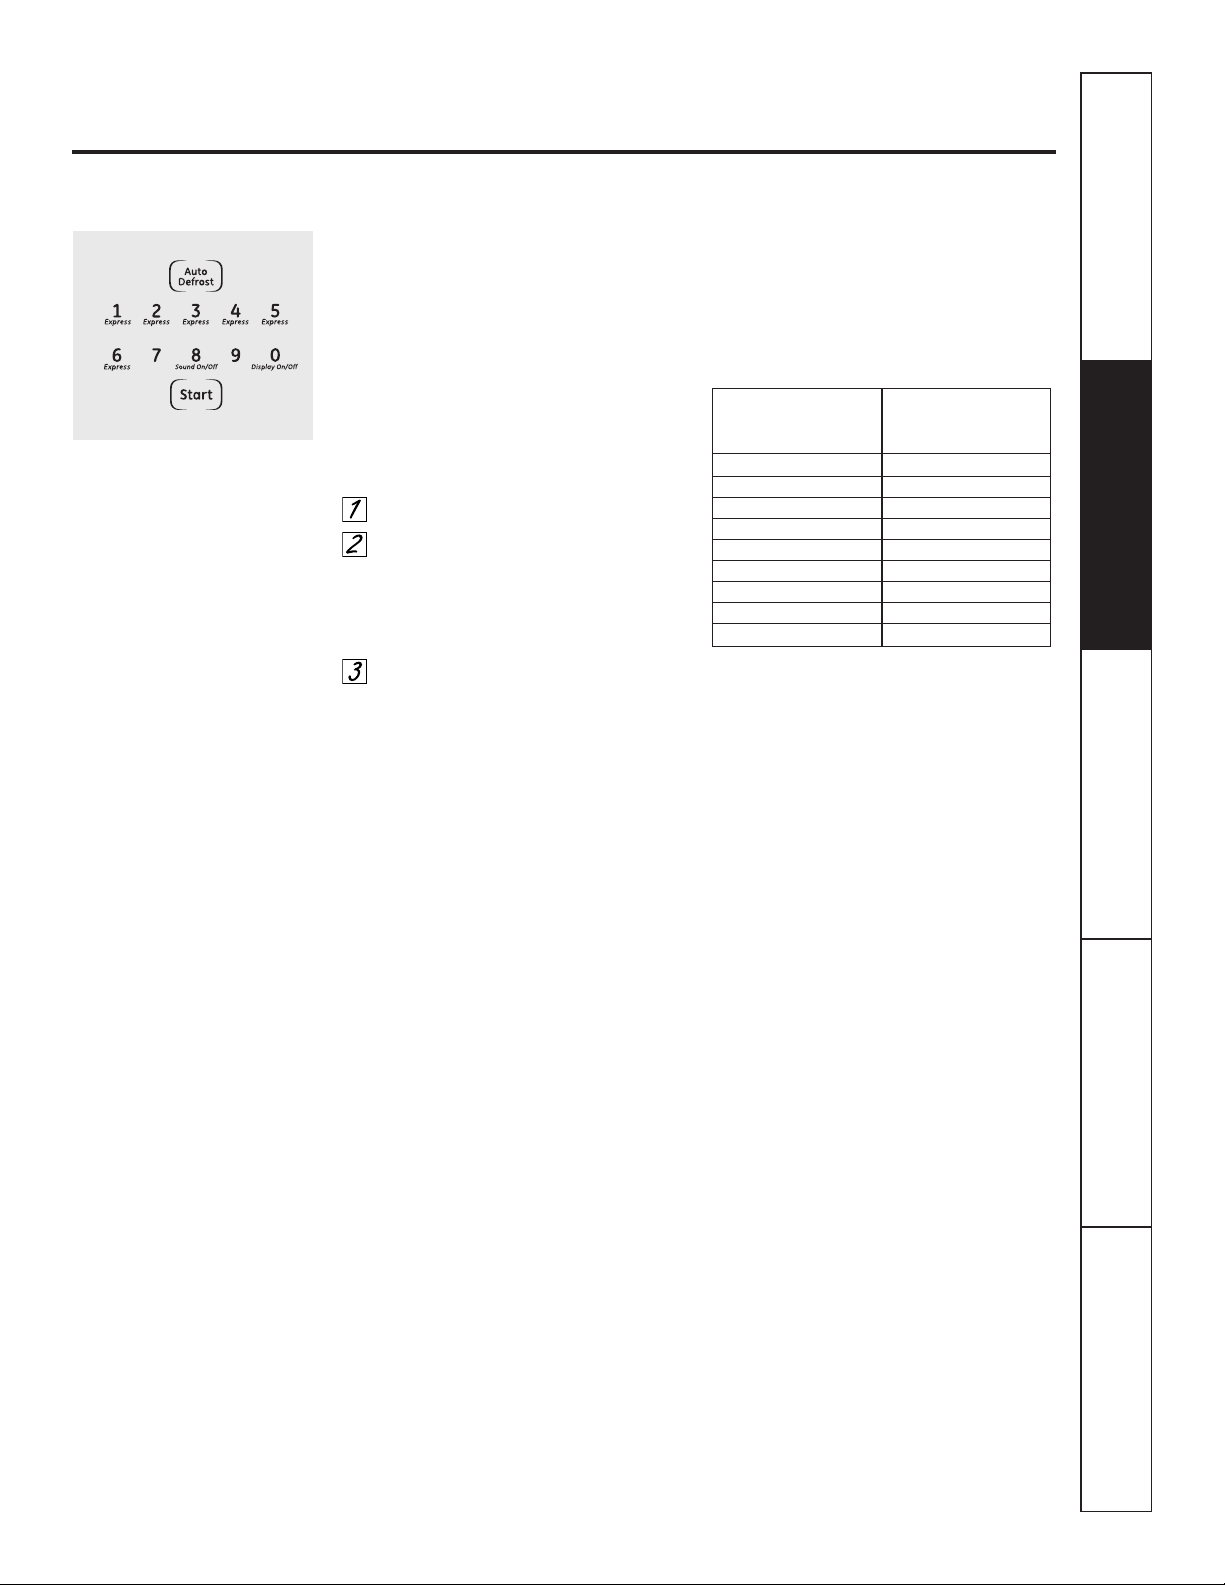
19
La función Defrost Auto/Time (Descongelamiento automático/Tiempo de descongelamiento) ofrece dos formas para
descongelar alimentos. Presione Auto Defrost una sola vez para Auto Defrost o dos veces para Time Defrost.
Seguridad
Operación
Cuidado y limpieza
Solucionar problemas Soporte al consumidor
Uso de las características automáticas del microondas. GEAppliances.com
Auto Defrost (Descongelamiento automático)
Utilice Auto Defrost para carne roja, aves y
pescado hasta 6 libras. Utilice Time Defrost
para los otros alimentos congelados.
Auto Defrost establece
automáticamente los tiempos de
descongelamiento y los niveles de
potencia para obtener resultados de
descongelamiento más uniformes
para carnes rojas, aves y pescado.
Presione el botón Auto Defrost.
Utilizando la Guía de conversión
a la derecha, ingrese el peso de
la comida. Por ejemplo, presione
los botones 1 y 2 para 1,2 libras
(1 libra, 3 onzas).
Presione Start/Pause (Inicio/Pausa).
Time Defrost está explicado en
la sección del Uso de las características
cronometradas del microondas.
■ Remueva la carne del paquete y
colóquela en un plato seguro para
microondas.
■ Dos veces durante
el descongelamiento, el horno
indica TURN. En cada señal TURN,
voltee la comida. Remueva la carne
descongelada o proteja las áreas
calientes con pequeños trozos
de papel aluminio.
■ Después de descongelarse,
la mayoría de las carnes necesitan
reposar 5 minutos para completar
el descongelamiento. Las carnes asadas
grandes deben reposar durante
aproximadamente 30 minutos.
Guía de conversión
Si el peso de la comida está establecido
en libras y onzas, las onzas deben
convertirse a décimas (0,1) de una libra.
Ingrese el peso
Peso de la comida de la comida
en onzas (décimas de una libra)
1 a 2 0,1
3 0,2
4 a 5 0,3
6 a 7 0,4
8 0,5
9 a 10 0,6
11 0,7
12 a 13 0,8
14 a 15 0,9
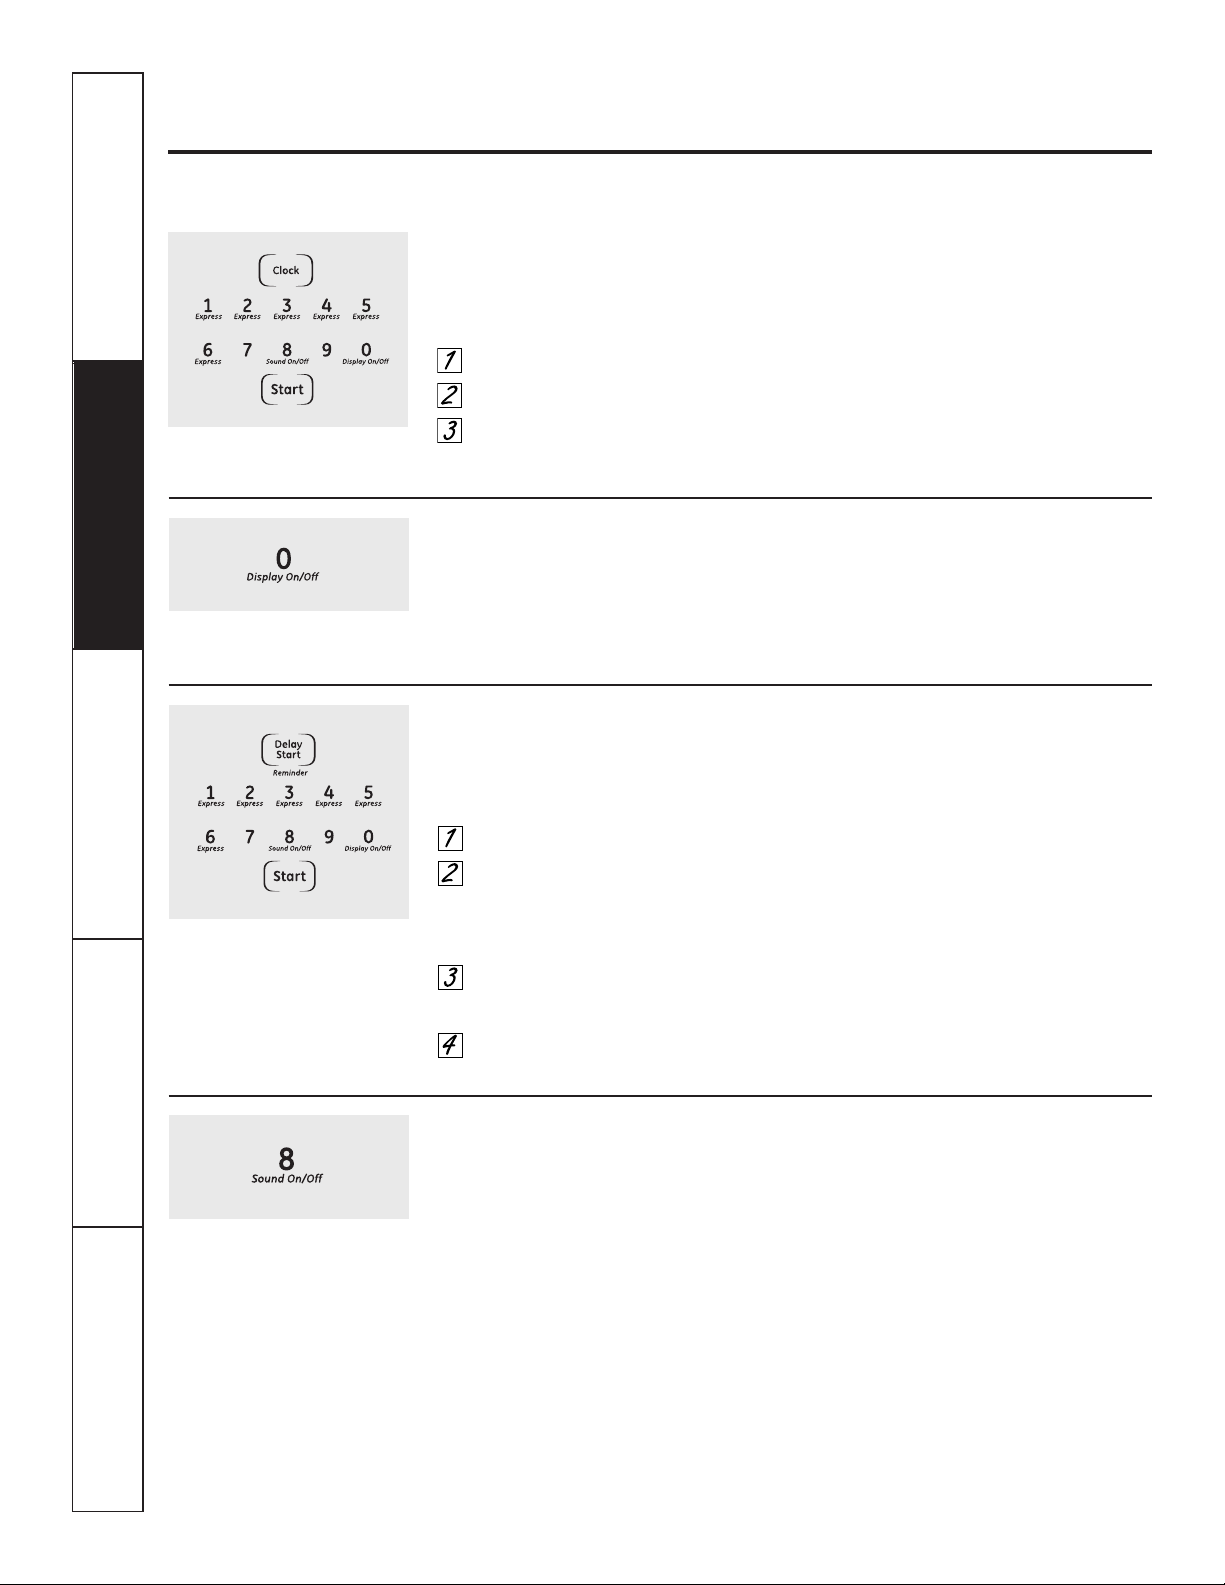
20
SeguridadOperaciónCuidado y limpiezaSolucionar problemasSoporte al consumidor
Uso de las otras características del microondas.
Recordador de cocción terminada: para recordarle que tiene comida en el horno, el horno sonará una alarma una
vez por minuto hasta que abra la puerta del horno o presione el botón Clear/Off.
Clock (Reloj)
Presione para ingresar la hora del día o revisar
la hora del día mientras cocina con el horno
microondas.
Presione el botón Clock.
Ingrese la hora del día.
Presione el botón Start
o el botón Clock.
Display On/Off (Pantalla On/Off)
Para encender o apagar la pantalla
del reloj, presione y mantenga sostenido
el botón 0 durante aproximadamente
3 segundos. La característica Display
On/Off no puede utilizarse mientras esté
en uso una característica de cocción.
Delay Start (Inicio retardado)
Delay Start le permite establecer
que el horno microondas demore
la cocción hasta por 12 horas.
Presione el botón Delay Start.
Ingrese la hora en la cual desea
que el horno inicie. (Asegúrese de
que el reloj del horno microondas
muestre la hora correcta del día).
Seleccione el programa de cocción
que desee.
Presione el botón Start.
El tiempo de Delay Start se mostrará
en la pantalla. El horno arrancará
automáticamente en la hora postergada.
Es posible ver la hora del día al presionar
el control Clock (Reloj).
Nota: No se puede utilizar la función Delay Start
(Inicio retardado) con palomitas de maíz
o la función Reheat (Recalentar).
Sound On/Off (Sonido On/Off)
Para encender o apagar el sonido de
la alerta sonora, presione y mantenga
sostenido el botón 8 durante
aproximadamente 3 segundos.
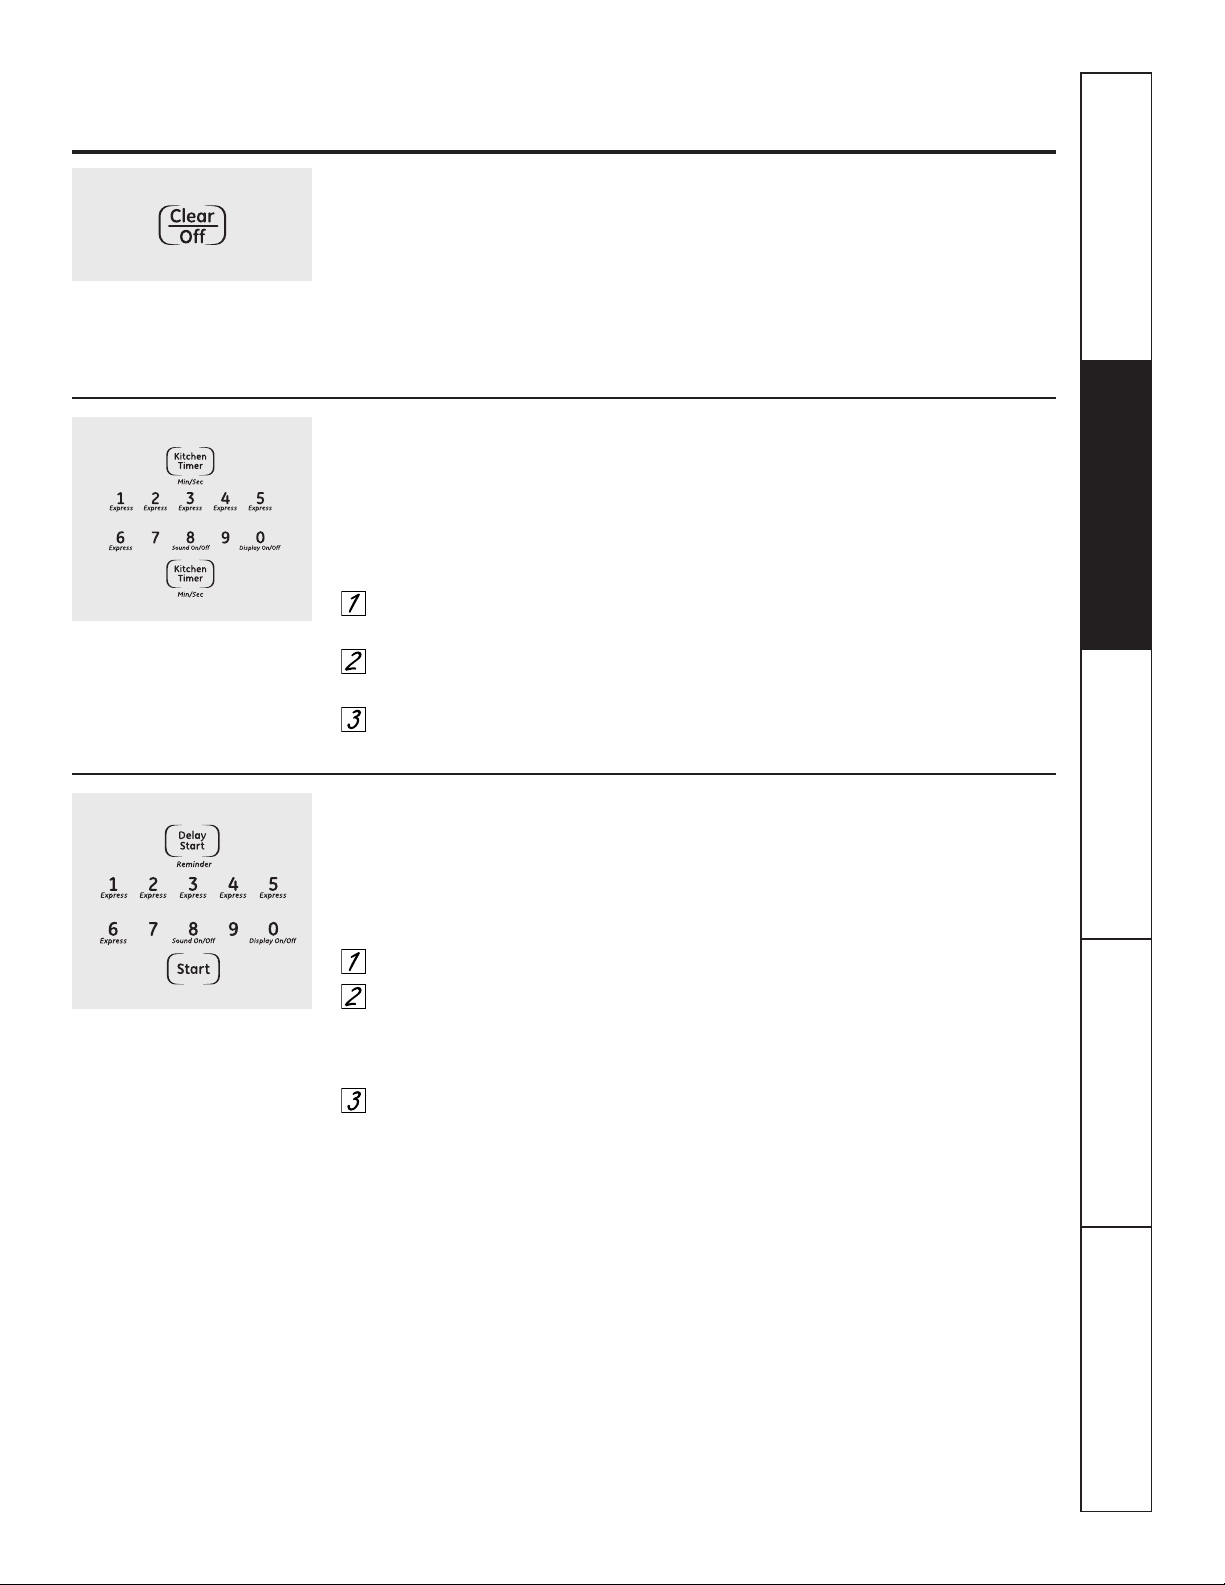
GEAppliances.com
21
Seguridad
Operación
Cuidado y limpieza
Solucionar problemas Soporte al consumidor
Child Lockout (Bloqueo de niños)
Usted puede bloquear el panel de control para
evitar que el horno microondas sea iniciado
accidentalmente o utilizado por niños.
Para bloquear o desbloquear los
controles, presione y mantenga
sostenido el botón Clear/Off durante
aproximadamente 3 segundos.
Cuando el panel de control esté
bloqueado, aparecerá una L en
el extremo derecho de la pantalla.
Kitchen Timer (Temporizador de cocina)
Kitchen Timer funciona como un temporizador de
minutos y puede utilizarse en cualquier momento,
incluso cuando el horno está funcionando.
Cómo utilizarlo como un temporizador de
minutos:
Presione el botón Kitchen Timer
Min/Sec.
Ingrese el tiempo que desea contar
regresivamente.
Presione el botón Kitchen Timer
Min/Sec.
Cuando se acabe el tiempo, el horno
emitirá la señal. Para apagar la señal
del temporizador, presione el botón
Kitchen Timer Min/Sec.
NOTA: el indicador del temporizador
estará encendido mientras esté funcionando
el temporizador.
Para cancelar el temporizador durante
la cuenta regresiva, presione el botón
Kitchen Timer Min/Sec.
Reminder (Recordatorio)
La característica Reminder puede ser utilizada
como reloj despertador, y puede ser utilizada
en cualquier momento, incluso cuando el horno
esté funcionando. El recordatorio puede ser
configurado hasta 12 horas después.
Presione el botón Delay Start.
Ingrese la hora que usted desea que
el horno le recuerde. (Asegúrese de
que el reloj del horno microondas
muestre la hora correcta del día).
Presione el botón Start. Cuando
se presente la señal del Reminder,
presione el botón Delay Start para
apagarla. La hora del Reminder
puede observarse en la pantalla
presionando el botón Delay Start.
NOTA: Las letras REM permanecerán en
la pantalla para indicar que la función Reminder
(Aviso) estará activada hasta que se cumpla
el tiempo y se abra la puerta del microondas
o se presione el control Clear/Off
(Borrar/Apagar).
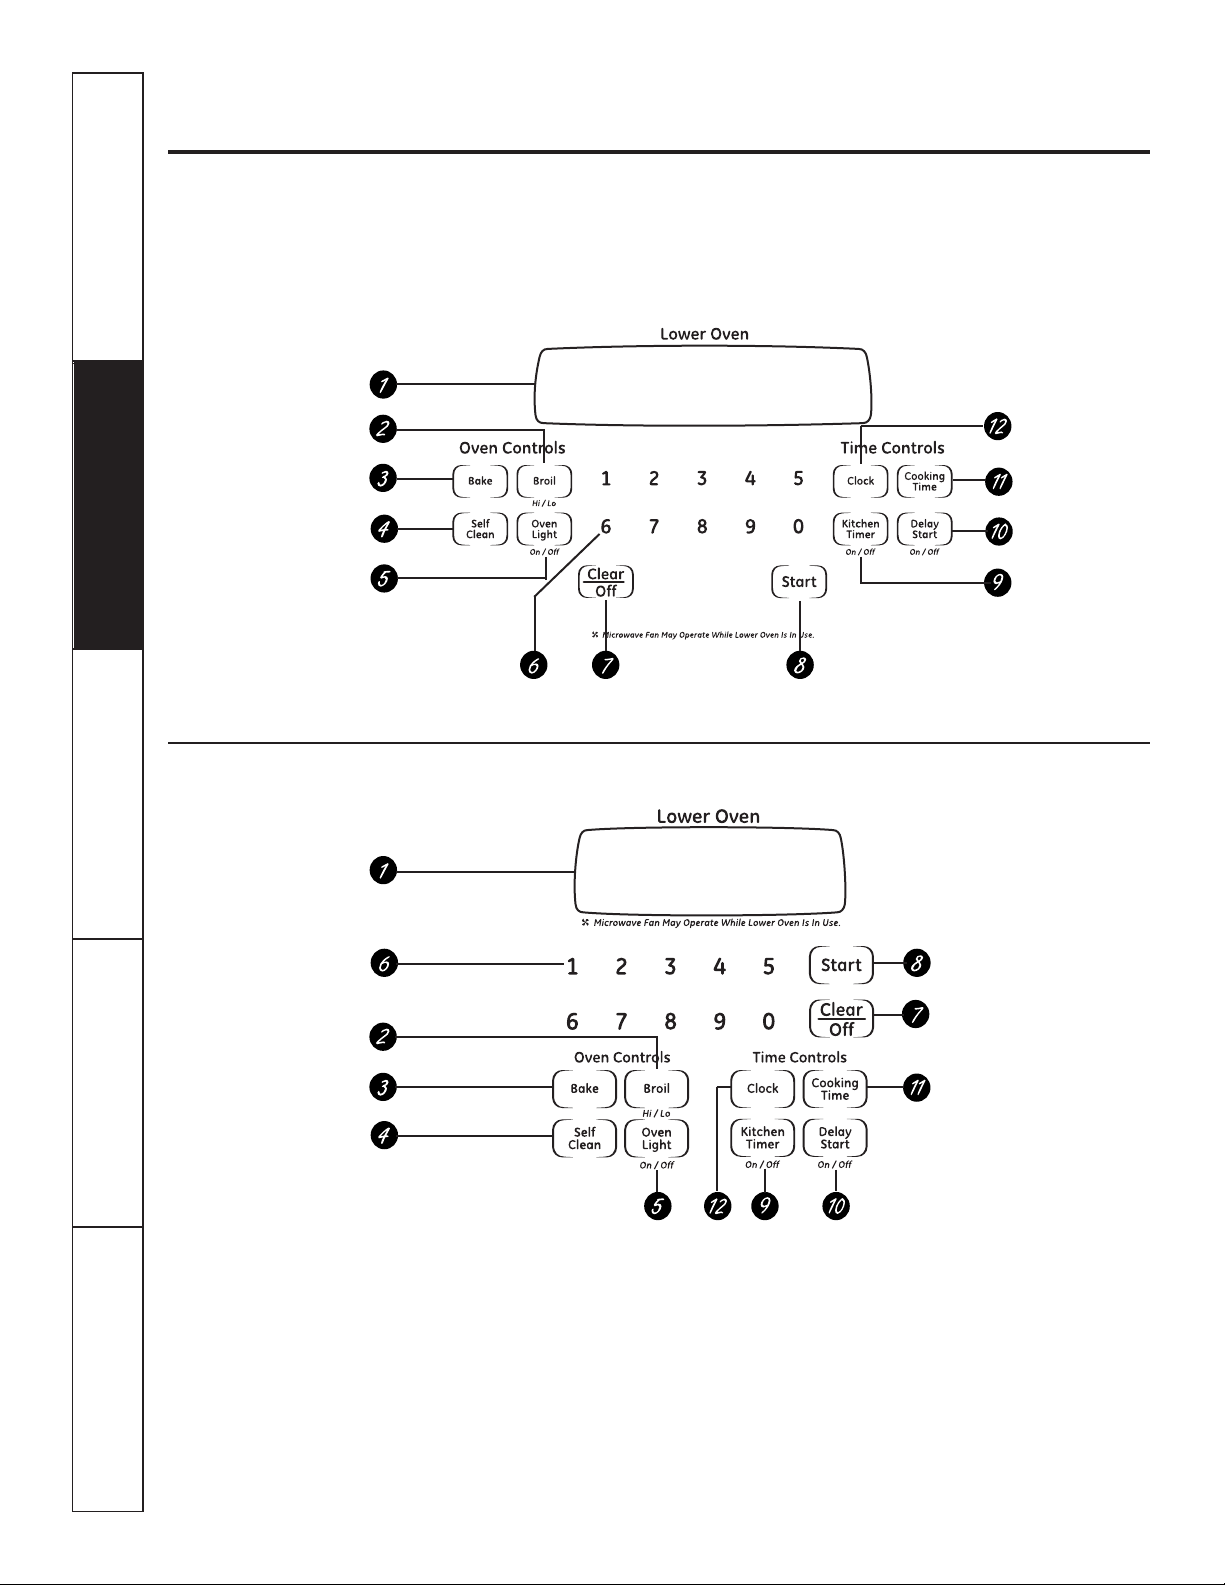
22
Uso de los controles del horno inferior.
A lo largo de este manual, las características y apariencia pueden variar con los de su modelo. Es posible que
su modelo posea uno de los siguientes controles.
SeguridadOperaciónCuidado y limpiezaSolucionar problemasSoporte al consumidor

23
GEAppliances.com
Seguridad
Operación
Cuidado y limpieza
Solucionar problemas Soporte al consumidor
Pantalla
Muestra la hora del día, la temperatura del horno,
si el horno está en el modo de horneado, de asar a
la parrilla o de autolimpieza y las horas establecidas
para el temporizador o las operaciones automáticas
del horno.
NOTA: La hora en la pantalla del horno inferior muestra horas y
minutos (1:30 es una hora, 30 minutos). En el horno microondas,
el tiempo se muestra en minutos y segundos (1:30 es un minuto,
30 segundos).
Si una "F– y un número o letra" parpadean en la pantalla
y las señales de control del horno, esto indica un código
de error de la función. Presione el botón Clear/Off. Permita
que el horno se enfríe durante una hora. Ponga el horno
nuevamente en operación. Si el código de error de la función
se repite, desconecte el cable de corriente del horno y
comuníquese con el servicio de mantenimiento.
Si su horno fue configurado para una operación
cronometrada del horno y se presentó una interrupción
en el fluido eléctrico, el reloj y todas las funciones
programadas deben restablecerse.
La hora del día (puede ser incorrecta) parpadeará
en la pantalla cuando se haya presentado
una interrupción en el fluido eléctrico.
Botón Broil Hi/Lo (Asar a la Parrilla Alto/Bajo)
Presione para seleccionar la función asar a la parrilla.
Botón Bake (Horneado)
Presione para seleccionar la función horneado.
Botón Self Clean (autolimpieza)
Presione para seleccionar la función de autolimpieza.
Consulte la sección Uso de la autolimpieza del horno
inferior.
Botón Oven Light (Luz del horno)
Presione para encender o apagar la luz del horno.
Botones numéricos
Utilice para configurar cualquier función que
necesite números como la hora del día en el reloj,
el temporizador, la temperatura del horno,
la hora de inicio y la duración de la operación para
el horneado cronometrado y la autolimpieza.
Botón Clear/Off
Presione para cancelar TODAS las operaciones
del horno excepto el reloj y el temporizador.
Botón Start (Inicio)
Debe presionarse para iniciar cualquier función
de cocción o limpieza.
Botón Kitchen Timer On/Off
(Temporizador de cocina encender/apagar)
Presione para seleccionar la característica del
temporizador.
Botón Delay Start (Inicio postergado)
Utilice junto con los botones Cooking Time o Self Clean
para configurar el horno para que inicie y se detenga
automáticamente en el momento que usted programe.
Botón Cooking Time (Tiempo de cocción)
Presione y luego presione los botones numéricos
para establecer la cantidad de tiempo que desea
cocinar sus alimentos. El horno se apagará
automáticamente cuando se haya agotado el tiempo
de cocción, a menos que la función Cook and Hold
(Cocinar y mantener la temperatura) esté activada.
Botón Clock (Reloj)
Presione antes de configurar el reloj.
Control del horno inferior, características y configuraciones del reloj
(Clock) y del temporizador (Timer)
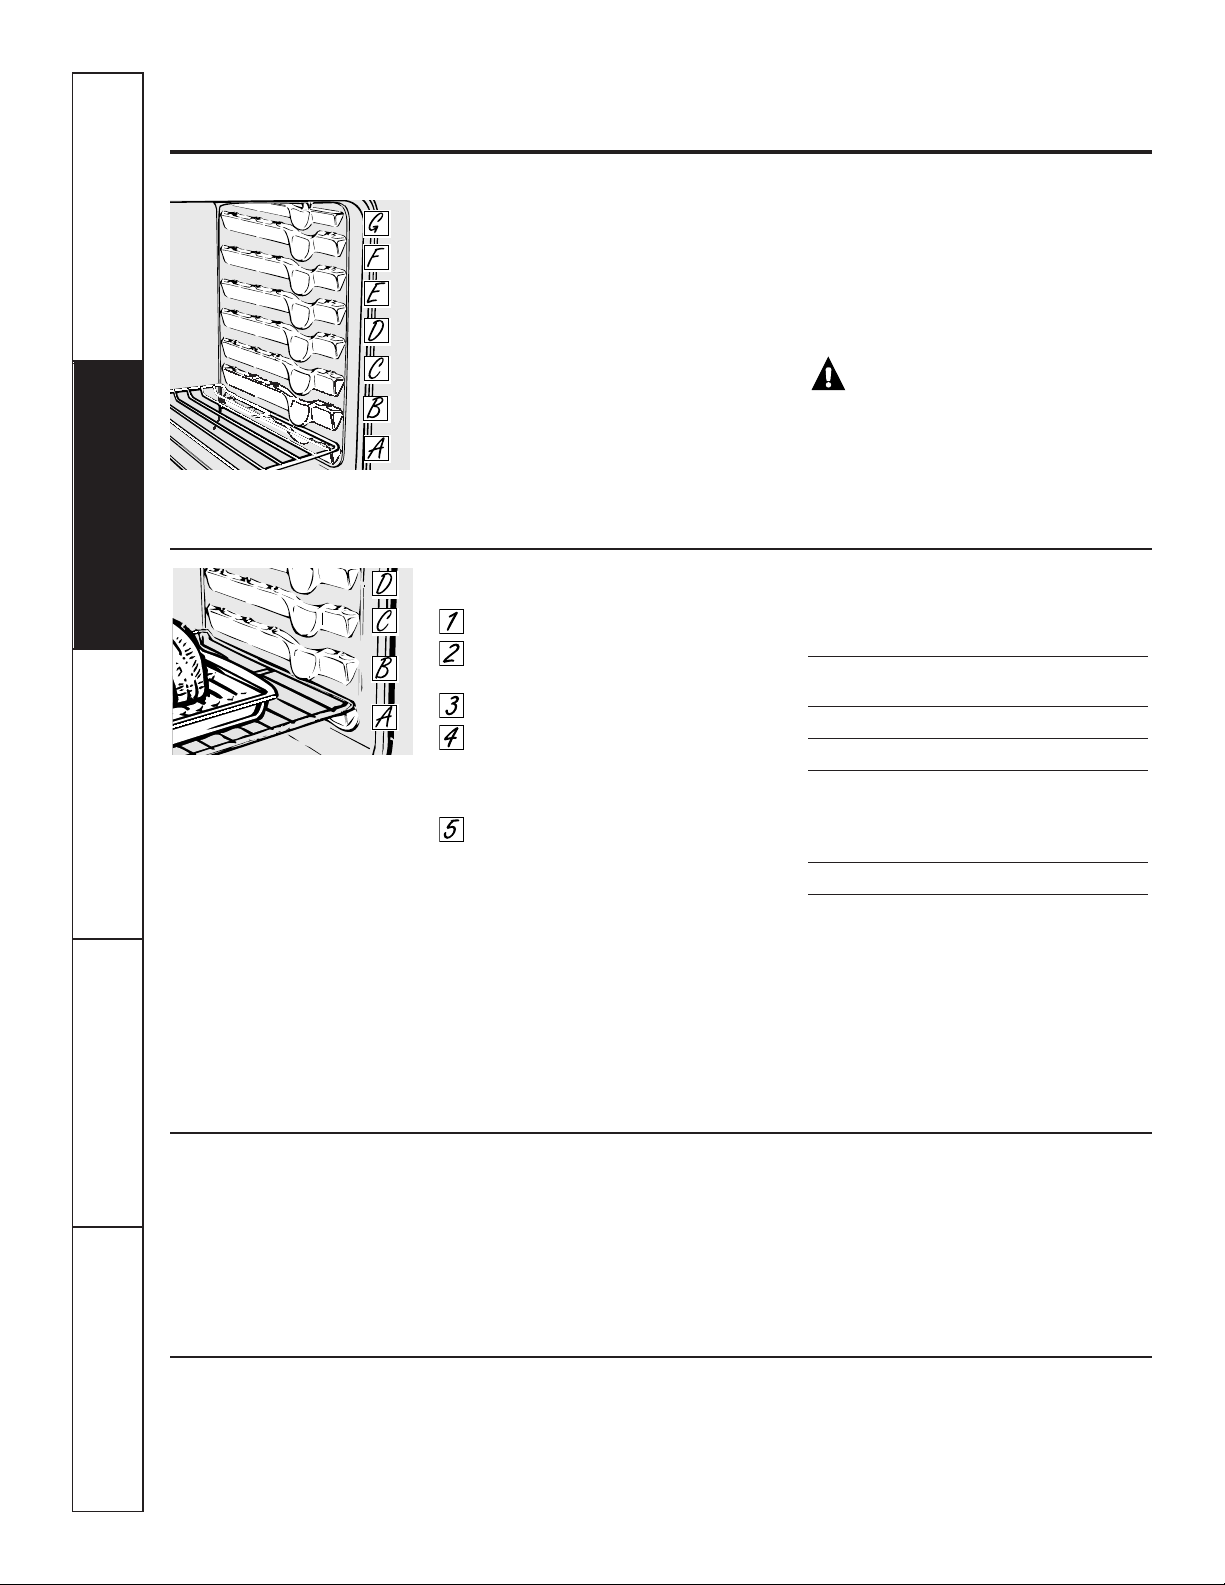
24
NOTA: es posible que se encienda
automáticamente un ventilador de
enfriamiento para refrigerar las
partes internas. Esto es normal, y el
ventilador puede continuar andando
incluso después de apagar el horno.
SeguridadOperaciónCuidado y limpiezaSolucionar problemasSoporte al consumidor
Uso del horno inferior.
Para prevenir posibles quemaduras, coloque las parrillas en la posición deseada antes de encender el horno.
Antes de comenzar…
Las parrillas tienen cierres de tope,
de forma tal que cuando se encuentren
colocados correctamente en los soportes,
se detendrán antes de salir completamente y
no se inclinarán.
Cuando se encuentre colocando o quitando
utensilios de cocina, tire de la parrilla hacia
afuera hasta la protuberancia en el apoyo de
la parrilla.
Para quitar una parrilla, tírela hacia usted,
incline el frente hacia arriba y tire la parrilla
hacia afuera.
Para reemplazar, coloque el extremo
de la parrilla (topes de cierre) en el apoyo,
incline el frente y empuje de la parrilla hacia
adentro.
NOTA: El horno tiene 7 parrillas en posición.
PRECAUCIÓN:nunca coloque
los utensilios de cocina ni otros artículos sobre el piso
del horno. Existe un elemento de calentamiento debajo
del piso del horno. Colocar artículos sobre el piso del
horno puede causar que el horno se sobrecaliente,
resultando en daños para el horno y el riesgo de daños
o incendio en los gabinetes.
Cómo configurar el horno para hornear o asar
Presione el botón Bake.
Presione los botones numéricos para
establecer la temperatura deseada.
Presione el botón Start.
Revise los alimentos para el punto de
cocción al mínimo tiempo en la receta.
Cocine durante más tiempo si es
necesario.
Presione el botón Clear/Off cuando esté
completa la cocción.
Hornos de 27 ″: Si hornea cuatro capas de
pastel al mismo tiempo, coloque dos capas
en la parrilla A y dos capas en la parrilla C.
Hornos de 30 ″: Si hornea cuatro capas
de pastel al mismo tiempo, coloque dos capas
en la parrilla B y dos capas en la parrilla D.
Ubique las cacerolas en la parrilla de tal
forma que una no esté colocada directamente
sobre la otra.
Posición de la parrilla
Tipo de comida Horno de 27” Horno de 30”
Pasteles congelado B o C C o D
(sobre una bandeja para hornear)
Torta ligera (angel cake) A A o B
Tarta de libra o Bundt A A o B
Bizcochos, muffins, B o C C o D
brownies, galletas,
pasteles individuales
en capa, bizcochos, pasteles
Guiso B o C C o D
Precalentamiento y ubicación de la cacerola
Precaliente el horno si la receta así lo indica.
El precalentamiento es necesario para
obtener buenos resultados cuando hornee
tortas, dulces, pastelitos y panes.
Los resultados del horneado son mejores
si las sartenes de hornear están centradas en
el horno tanto como sea posible. Las sartenes
no se deben tocar entre sí ni deben tocar
las paredes del horno. Si necesita usar dos
parrillas, coloque las sartenes de forma que
una no quede inmediatamente encima de
la otra, y deje aproximadamente 11⁄2″ entre
cada sartén, desde el frente, desde atrás y
desde los costados.
Papel aluminio
Nunca cubra el fondo del horno con papel de aluminio.
Nunca cubra por completo una parrilla con
papel aluminio. Esto obstruirá la circulación
del calor y obtendrá un asado deficiente.
Puede utilizarse una pequeña hoja de papel
aluminio para atrapar derrames colocándola
en uno de las parrillas inferiores varias
pulgadas por debajo del alimento.
Para precalentar, configure
el horno a la temperatura correcta.
El control pitará cuando el horno esté
precalentado y la pantalla mostrará
su temperatura configurada. Esto
puede tomar aproximadamente
10 minutos.

25
Seguridad
Operación
Cuidado y limpieza
Solucionar problemas Soporte al consumidor
Hornos de 27” Hornos de 27” Hornos de 27” Hornos de 30” Hornos de 30” Hornos de 30”
Cantidad y/ Posición Primer lado Segundo lado Posición Primer lado Segundo lado
Alimento o grosor de la Parrilla Tiempo (min) Tiempo (min) de la Parrilla Tiempo (min) Tiempo (min) Comentarios
Carne molida 1 lb (4 croquetas) C 10 7 E o F 10 7 Distribuya uniformemente.
Bien cocido 1/2 a 3/4″ de espesor C 10 9 E o F 10 9 Hasta 8 croquetas
toman aproximadamente
el mismo tiempo.
Filetes de carne
Poco cocido† 1″ de espesor C 6 5 E 8 6 Los filetes de menos
Medio 1 a 1
1
⁄2 lb C 8 6 E 10 8 de 1 pulgada de espesor
Bien cocido C 12 11 E 12 10 se cocinan por
completo antes
Poco cocido† 1
1
⁄2″ de espesor C 10 7 a 8 E 10 8 de dorarse.
Medio 2 a 2
1
⁄2 lb C 15 14 a 16 E 15 14 a 16 Recomendamos
Bien cocido C 25 20 a 25 E 25 20 a 25 freír en el sartén.
Corte la grasa.
Pollo 1 completo A 35 10 a 15 C 25 10 Reduzca el tiempo en
2 a 2
1
⁄2 lb, aproximadamente 5
dividido longitudinalmente a 10 minutos por lado
Lo Broil Presas A o B 25 a 35 15 a 20 B o C 25 a 35 15 a 20 para pollo despresado.
Lo Broil Deshuesado A o B 15 a 20 10 a 15 B o C 15 a 20 10 a 15 Unte cada lado con
mantequilla derretida.
Ase primero con
la piel hacia abajo.
Colas de 2 a 4 B 18 a 20 No voltee C 18 a 20 No voltee Corte a través de
langosta 6 a 8 oz cada una el caparazón el caparazón la parte posterior
Lo Broil C 18 a 25 N/A D 18 a 25 N/A del caparazón. Deje
las colas bien separadas.
Unte con mantequilla
derretida antes de
asar y después de
la mitad del tiempo
de cocción.
Filetes de 1/4 a 1/2″ de espesor Manipule y voltee
pescado con cuidado. Unte con
Hi Broil C 5 5 E 5 5 mantequilla de limón
Lo Broil D 5 5 F 5 5 antes y durante la
cocción, si lo desea.
Precaliente el asador
para aumentar el
dorado.
Rodajas de 1″ de espesor B 8 8 D 8 8 Aumente el tiempo
jamón de 5 a 10 minutos por
(precocido) lado para 1
1
⁄2″ de
espesor o jamón
curado en casa.
Chuletas de cerdo 2 (1/2″ de espesor) C 10 10 E 10 10 Corte la grasa.
Bien cocido 2 (1″ de espesor) aprox. 1 lb B 13 13 D 15 15
Chuletas
de cordero
Medio 2 (1″ de espesor) C 10 9 E 10 9 Corte la grasa.
Bien cocido aproximadamente 10 a 12 oz C 12 10 E 12 10
Medio 2 (1
1
⁄2″ de espesor) C 14 12 E 14 12
Bien cocido aproximadamente 1 lb B 17 12 a 14 E 17 12 a 14
Pan de ajo C3 N/AE3N/A
Lo Broil
†
El Departamento de Agricultura de EE.UU. indica que: “la carne a poco cocida es popular, pero usted debe saber que cocinarla a solamente 140 °F
significa que algunos organismos venenosos podrían sobrevivir”. (Fuente: Safe Food Book. Your Kitchen Guide. USDA Rev. Junio 1985.)
Cómo configurar el horno para asar a la parrilla
Cierre la puerta. Siempre ase a la parrilla con
la puerta cerrada.
Coloque la carne o el pescado sobre
una rejilla para asar en una bandeja para
asar.
Siga las posiciones en la parrilla
sugeridas en la Guía para asar a la parrilla.
El tamaño, peso, grosor, temperatura inicial y su
preferencia sobre el punto de cocción de los alimentos
afectarán los tiempos de cocción. Esta guía está
basada en carnes a temperatura de refrigerador.
Presione el botón Broil Hi/Lo una vez
para asar a la parrilla HI (Alto).
Para cambiar a Asar a la parrilla LO
(Bajo), presione el botón Broil Hi/Lo
nuevamente.
Presione el botón Start.
Cuando el asado a la parrilla
esté terminado, presione el botón
Clear/Off.
GEAppliances.com
Cierre la puerta. Siempre ase a
la parrilla con la puerta cerrada.
Si su horno está conectado a 208 voltios,
los filetes poco cocidos pueden asarse
a la parrilla precalentando la parrilla y
posicionando la parrilla del horno
en una posición más alta.
Guía para asar a la parrilla

26
SeguridadOperaciónCuidado y limpiezaSolucionar problemasSoporte al consumidor
Uso del reloj y el temporizador del horno inferior.
Para ajustar el reloj
El reloj debe ser ajustado en la hora
correcta del día para que las funciones
automáticas cronometradas del horno
funcionen apropiadamente. La hora del
día no puede cambiarse durante un ciclo
de horneado cronometrado o
autolimpieza.
Presione el botón Clock.
Presione los botones numéricos.
Presione el botón Start hasta que en
la pantalla aparezca la hora del día.
Asegúrese de que el reloj sea
ajustado en la hora correcta del día.
Para ajustar el temporizador
Presione el botón Kitchen Timer
On/Off.
Presione los botones numéricos
hasta que en la pantalla aparezca
la cantidad de tiempo deseada. Por
ejemplo, para establecer 2 horas y
45 minutos, presione 2, 4 y 5 en
dicho orden. El tiempo máximo que
puede ingresarse en minutos es de
59. Los tiempos de cocción mayores
a 59 minutos deben cambiarse a
horas y minutos. Por ejemplo,
ingrese 90 minutos como 1 hora
y 30 minutos. Si comete un error,
presione el botón Kitchen Timer
On/Off y comience nuevamente.
Presione el botón Start.
Después de presionar el botón Start,
SET desaparece; esto le indica que
el tiempo está en cuenta regresiva,
aunque la pantalla no cambie
hasta que haya pasado un minuto.
En la pantalla no se mostrarán
los segundos hasta que el último
minuto esté en cuenta regresiva.
Cuando el temporizador alcance
:00, el control pitará 3 veces seguidas
por un pitido cada 6 segundos hasta
que se presione el botón Kitchen
Timer On/Off.
El tono de 6 segundos puede cancelarse
siguiendo los pasos en las características
especiales de su sección de control del horno
inferior bajo la sección tonos al final de un ciclo
cronometrado.
El temporizador es únicamente un
temporizador de minutos.
El temporizador no controla
las operaciones del horno.
La configuración máxima
en el temporizador es de
9 horas y 59 minutos.
Para reiniciar el temporizador
Si la pantalla todavía está mostrando
el tiempo restante, puede cambiarla
presionando el botón Kitchen Timer
On/Off, luego presione los botones
numéricos hasta que en la pantalla
aparezca el tiempo que desea.
Si el tiempo restante no está en
la pantalla (en la pantalla está reloj,
inicio postergado o tiempo de cocción)
recuerde el tiempo restante presionando
el botón Kitchen Timer On/Off y luego
presionando los botones numéricos hasta
ingresar el nuevo tiempo que desea.
Para cancelar el temporizador
Presione el botón Kitchen Timer On/Off
dos veces.
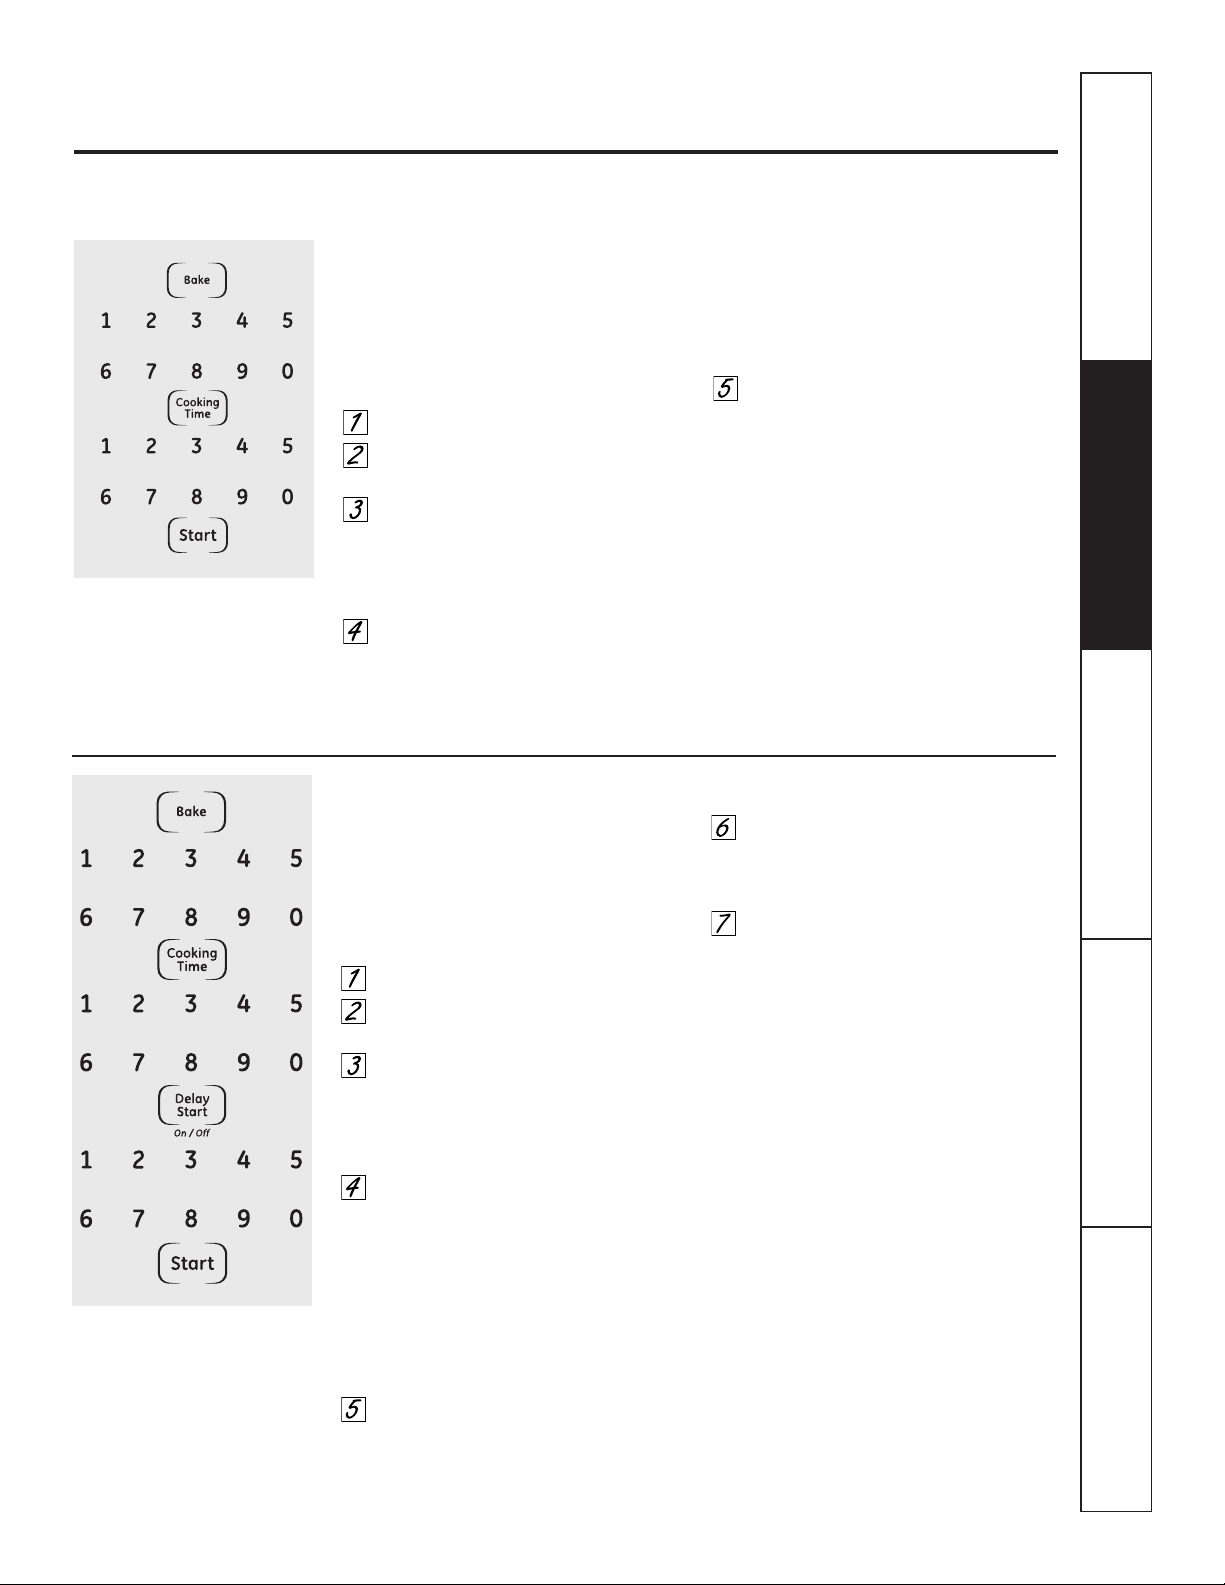
Seguridad
Operación
Cuidado y limpieza
Solucionar problemas Soporte al consumidor
Uso de las características cronometradas de horneado
y asado a la parrilla del horno inferior.
(en algunos modelos) GEAppliances.com
NOTA: no debe permitirse que los alimentos que se echan a perder fácilmente—como leche, huevos, pescado, rellenos, aves y cerdo—
reposen por más de 1 hora antes o después de la cocción. La temperatura ambiente promueve el crecimiento de bacterias peligrosas.
Asegúrese de que la luz del horno esté apagada ya que el calor de la bombilla aceleraría el crecimiento de bacterias peligrosas.
Cómo configurar un Inicio inmediato y una Parada automática
El horno se encenderá inmediatamente y cocinará
durante el tiempo seleccionado. Al final del tiempo
de cocción, el horno se apagará automáticamente.
Asegúrese de que el reloj muestre la hora
correcta del día.
Presione el botón Bake.
Utilizando los botones numéricos,
ingrese la temperatura deseada.
Presione el botón Cooking Time.
NOTA: si su receta requiere de precalentamiento, es
posible que necesite añadir más tiempo al tiempo de
cocción.
Utilizando los botones de los números,
ingrese el tiempo de horneado deseado.
El tiempo máximo que puede ingresarse
en minutos es de 59. Los tiempos de
cocción mayores a 59 minutos deben
cambiarse a horas y minutos. Por
ejemplo, ingrese 90 minutos como
1 hora y 30 minutos. En pantalla
se mostrará la temperatura del horno y
el tiempo de cocción que usted ingresó.
Presione el botón Start.
La pantalla muestra la temperatura
del horno que usted configuró y la cuenta
regresiva del tiempo de cocción. La pantalla
comienza a cambiar una vez la temperatura
alcanza los 100 °F.
El horno continuará cocinando durante
la cantidad de tiempo programada, luego
se apagara automáticamente, a menos que
esté configurada la característica Cook and
Hold. Vea la sección de Características especiales
de control de su horno inferior.
Presione el botón Clear/Off para borrar
la pantalla.
Cómo configurar un Inicio postergado y una Parada automática
Usted puede configurar el control del horno para
que postergue el inicio, cocine durante un periodo
específico de tiempo y luego se apague
automáticamente.
Asegúrese de que el reloj muestre la hora
correcta del día.
Presione el botón Bake.
Utilizando los botones numéricos,
ingrese la temperatura deseada.
Presione el botón Cooking Time.
NOTA: si su receta requiere de precalentamiento,
es posible que necesite añadir más tiempo al tiempo de
cocción.
Utilizando los botones de los números,
ingrese el tiempo de horneado deseado.
El tiempo máximo que puede ingresarse
en minutos es de 59. Los tiempos de
cocción mayores a 59 minutos deben
cambiarse a horas y minutos. Por
ejemplo, ingrese 90 minutos como
1 hora y 30 minutos. En pantalla
se mostrará la temperatura del horno y
el tiempo de cocción que usted ingresó.
Presione el botón Delay Start.
Utilizando los botones numéricos,
ingrese la hora del día en la cual desea
que el horno se encienda e inicie
la cocción.
Presione el botón Start.
NOTA: un tono de atención sonará si está utilizando
el horneado cronometrado y no presiona el botón Start
después de ingresar la temperatura de horneado.
Si desea verificar el tiempo que ha
configurado, presione el botón Delay Start
para verificar la hora de inicio que ha
configurado o presione el botón Cooking Time
para verificar la duración del tiempo de
cocción que ha configurado.
Cuando el horno se encienda a
la hora del día que usted haya establecido,
la pantalla mostrará el cambio de temperatura
(comenzando a 100 °F) y la cuenta regresiva
del tiempo de cocción. La pantalla comienza
a cambiar una vez la temperatura alcanza
los 100 °F.
El horno continuará cocinando durante
la cantidad de tiempo programada, luego
se apagara automáticamente, a menos que
esté configurada la característica Cook and
Hold. Vea la sección de Características especiales
de control de su horno inferior.
Presione el botón Clear/Off para borrar
la pantalla.
27
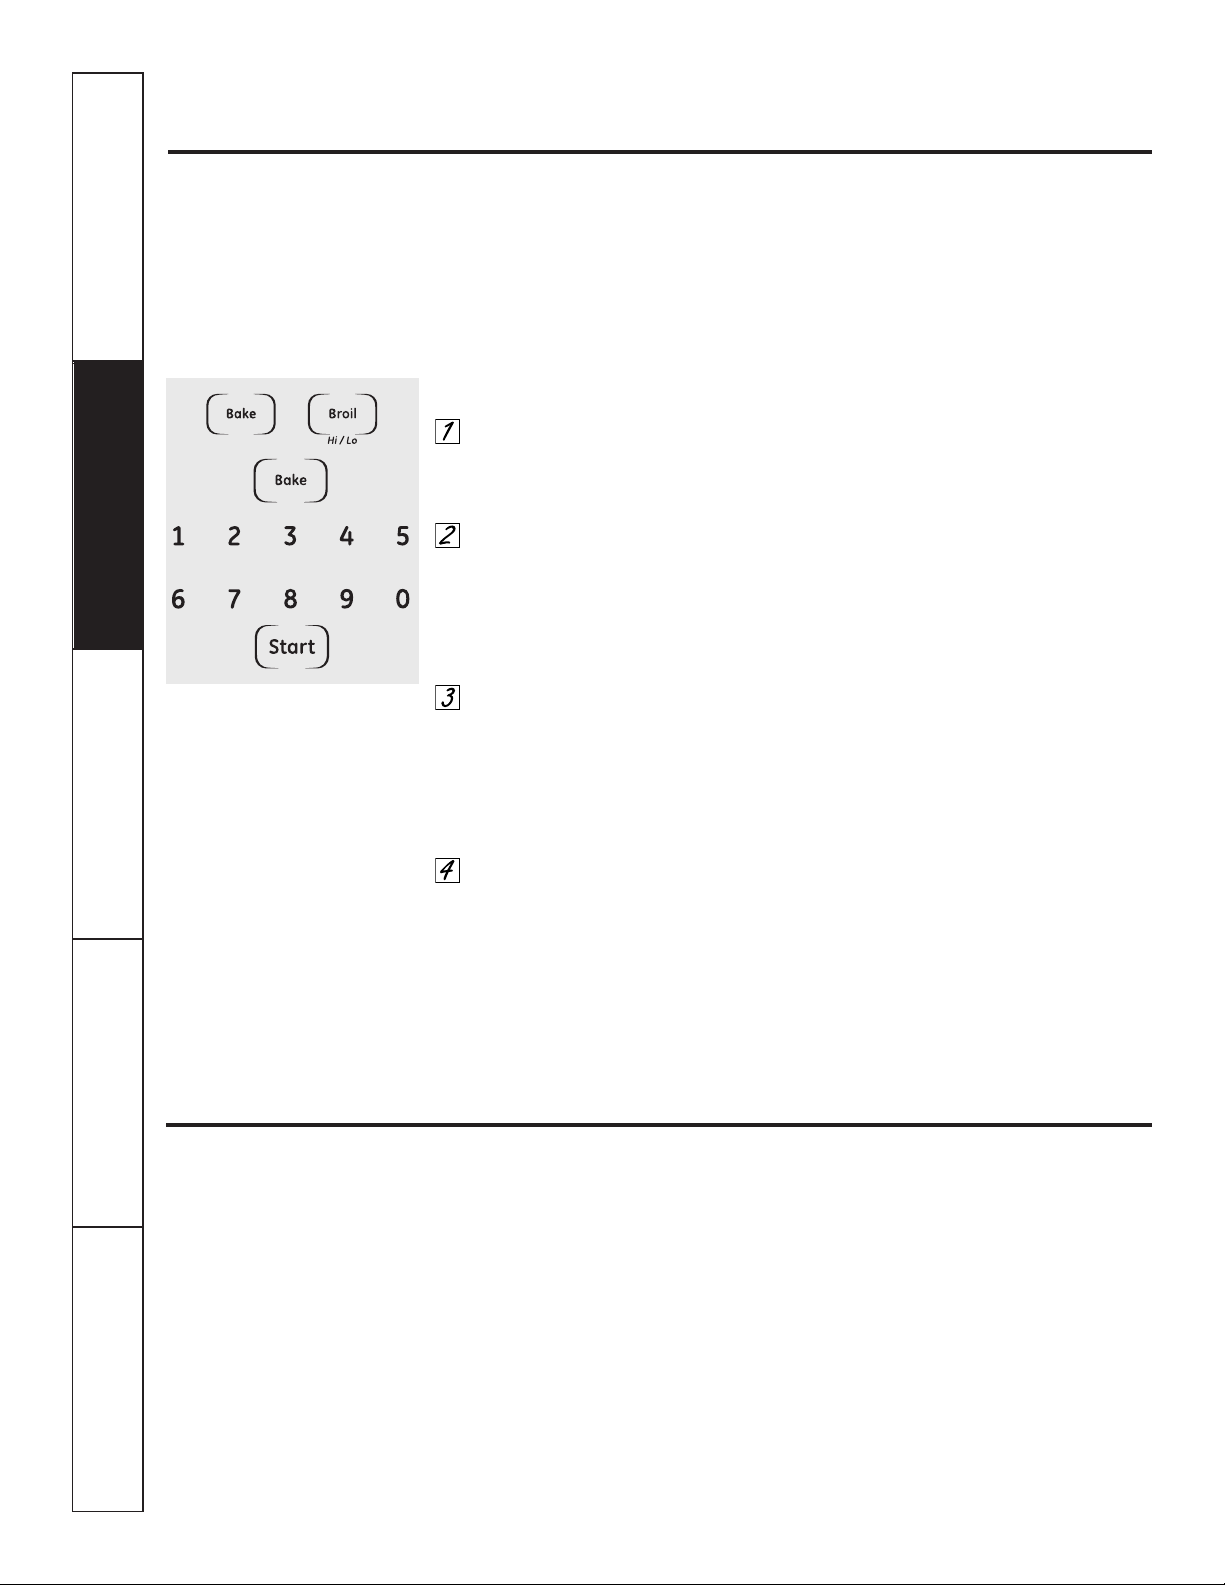
28
SeguridadOperaciónCuidado y limpiezaSolucionar problemasSoporte al consumidor
Ajuste del termostato del horno inferior: ¡Hágalo usted mismo!
Usted se puede percatar que su horno nuevo cocina distinto al que reemplazó. Use su horno nuevo por varias
semanas para familiarizarse con él. Si aún piensa que su horno nuevo es demasiado caliente o demasiado frío, usted
puede ajustar el termostato usted mismo.
No use termómetros, como los que se venden en tiendas de aprovisionamiento para inspeccionar la temperatura
de su horno. Estos termómetros podrían variar de 20 a 40 grados.
NOTA: este ajuste sólo afectará la temperatura de horneado y asado; no afecta las temperaturas de asado
a la parrilla o autolimpieza. El ajuste se almacenará en la memoria después de una falla eléctrica.
Para ajustar el termostato
Presione los botones Bake y Broil
Hi/Lo al mismo tiempo durante
3 segundos hasta que la pantalla
muestre SF.
Presione el botón Bake. En
la pantalla se muestra un número
de dos dígitos.
Presione una vez Bake para disminuir
(-) la temperatura del horno, o dos
veces para aumentarla (+).
La temperatura del horno pueda
ajustarse hasta (+) 35 °F más caliente
o (-) 35 °F más fría. Presione los
botones numéricos en el mismo
sentido que aparecen. Por ejemplo,
para cambiar la temperatura del
horno a 15 °F, presione 1 y 5.
Cuando haya realizado el ajuste,
presione el botón Start para volver
a la pantalla de la hora del día.
Utilice su horno como lo haría
normalmente.
¡El tipo de margarina afectará el desempeño del horneado!
La mayoría de las recetas para hornear se han desarrollado usando productos de alto contenido en grasa como
mantequilla o margarina (80% de grasa). Si disminuye la grasa, es posible que la receta no tenga los mismos
resultados que con un producto de mayor contenido de grasa.
Las recetas pueden fallar si las tortas, pasteles, galletas o dulces se preparan con productos bajos en grasa.
Mientras menos sea el contenido de grasa de un producto tipo mantequilla, más se notarán estas diferencias.
Los estándares federales exigen que los productos marcados como margarinas, contengan por lo menos un 80%
de grasa por peso. Por otra parte, los productos tipo mantequilla bajos en grasa contienen menos grasa y más agua.
El alto contenido de humedad de estos productos afecta la textura y el sabor de los alimentos horneados. Para mejores
resultados con sus viejas recetas favoritas, use margarina, mantequilla u otros productos que contengan por lo menos
un 70% de aceite vegetal.
+
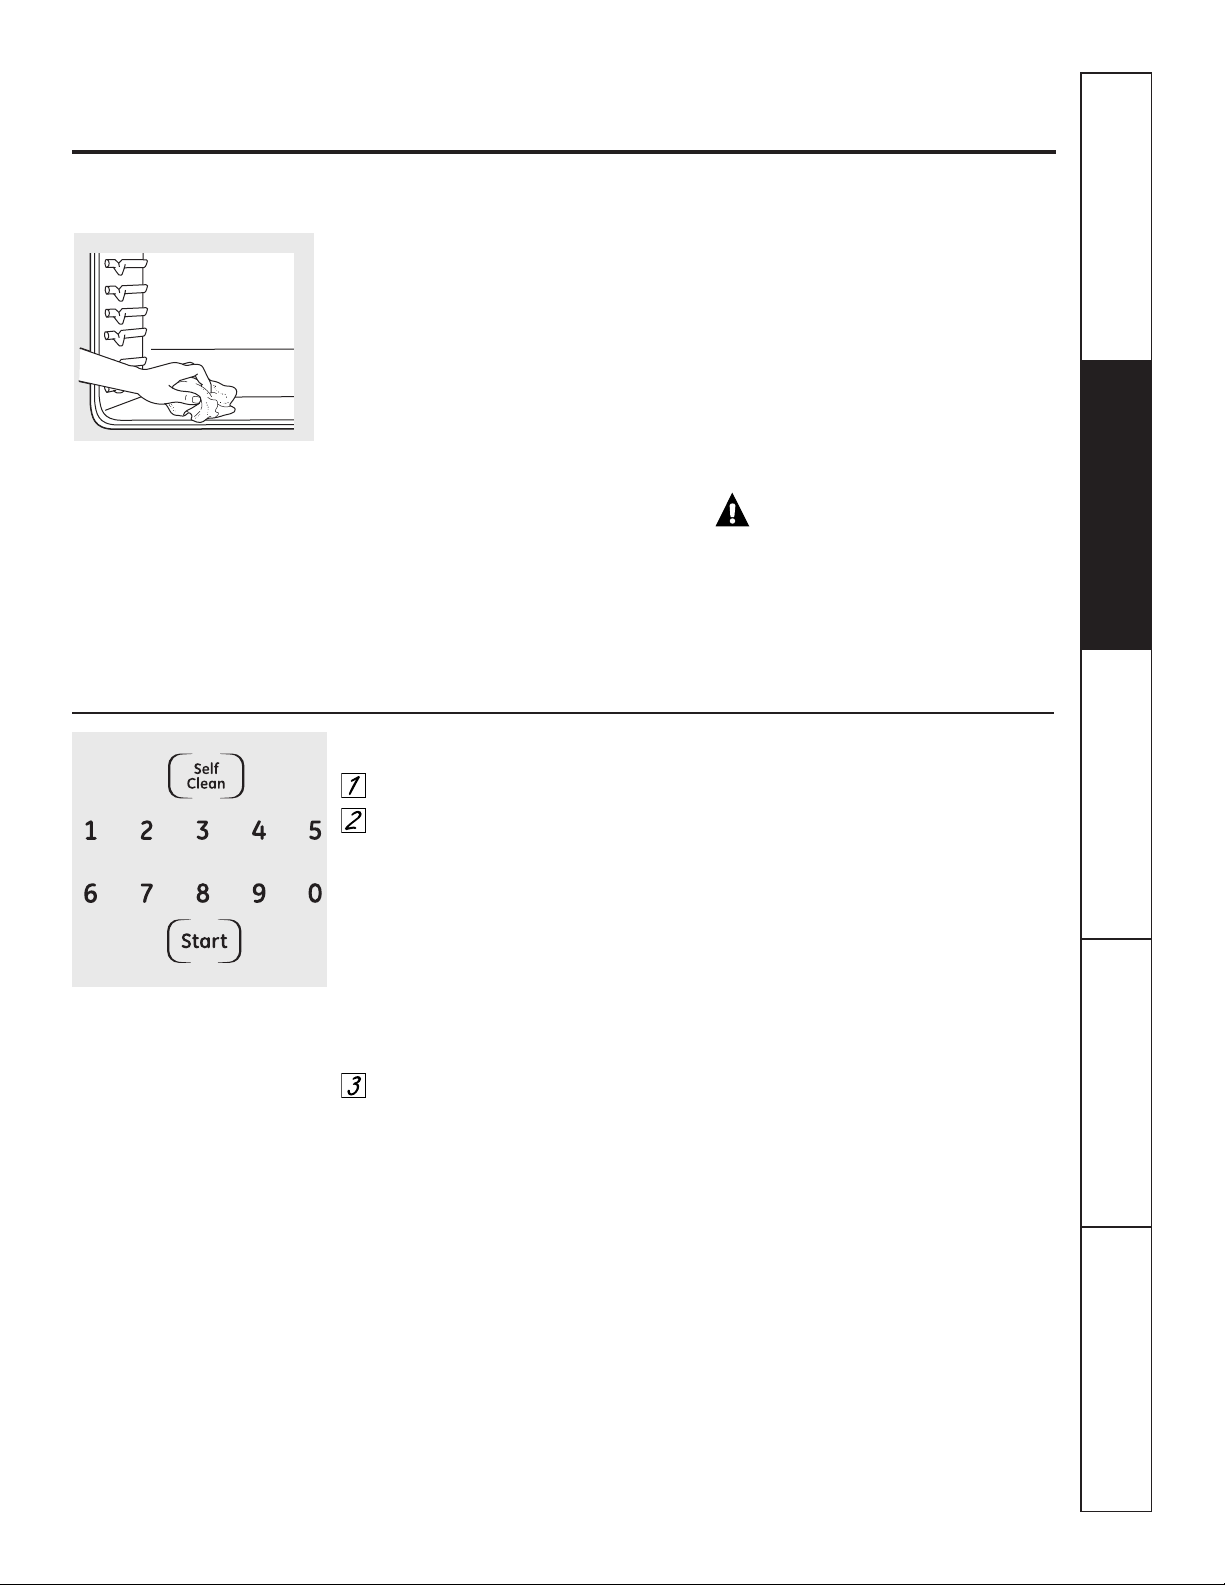
29
Seguridad
Operación
Cuidado y limpieza
Solucionar problemas Soporte al consumidor
Uso de la autolimpieza del horno inferior. GEAppliances.com
La puerta del horno debe estar cerrada y todos los controles deben estar configurados correctamente para
que el ciclo funcione apropiadamente.
Antes de un ciclo de limpieza
Recomendamos ventilar su cocina
dejando una ventana abierta o utilizando
un ventilador o campana extractora
durante el primer ciclo de autolimpieza.
Remueva del horno cualquier bandeja
para parrilla, rejilla para parrilla, todos
los utensilios de cocina y cualquier
residuo de papel aluminio.
Las parrillas del horno pueden
autolimpiarse, pero se oscurecerán,
perderán su brillo y se volverán difíciles
de deslizar.
No utilice abrasivos o limpiadores de
hornos. Limpie la parte superior, lados y
parte exterior de la puerta del horno con
jabón y agua.
Asegúrese de que esté puesta la cubierta
de la bombilla eléctrica (en algunos
modelos) y que la luz esté apagada.
IMPORTANTE: la salud de algunas
aves es extremadamente sensible a las
emanaciones nocivas despedidas durante
el ciclo de autolimpieza de cualquier
horno. Mueva las aves a otro cuarto bien
ventilado.
PRECAUCIÓN:
nunca coloque los utensilios de cocina ni otros
artículos sobre el piso del horno. Existe un
elemento de calentamiento debajo del piso del
horno. Colocar artículos sobre el piso del horno
puede causar que el horno se sobrecaliente,
resultando en daños para el horno y el riesgo
de daños o incendio en los gabinetes.
Limpie el suelo pesado sobre
la parte inferior del horno.
Cómo ajustar el horno para limpieza
Presione el botón Self Clean.
Mediante los botones
numéricos, ingrese el tiempo
deseado de limpieza, si fuera
necesario un lapso de tiempo
mayor o menor de 4 horas.
Generalmente, el tiempo del ciclo
de limpieza es de 4 horas. Usted
puede cambiar el tiempo de
limpieza en cualquier momento entre
3 y 5 horas, dependiendo de qué tan
sucio esté su horno.
Presione el botón Start.
La puerta se bloquea automáticamente.
La pantalla mostrará el tiempo restante
de limpieza. No será posible abrir
la puerta del horno hasta que
la temperatura sea inferior a
la temperatura de bloqueo y se apague
la luz LOCKED o LOCKED DOOR.
Cuando se apague la luz LOCKED o
LOCKED DOOR, podrá abrir la puerta
del horno.
■ La palabra LOCKED o LOCKED DOOR
parpadeará y el control del horno
indicará si configuró el ciclo de
limpieza y olvidó cerrar la puerta
del horno.
■ Para detener un ciclo de limpieza,
presione el botón Clear/Off. Cuando
se apague la luz LOCKED o LOCKED
DOOR, indicando que el horno se ha
enfriado a una temperatura inferior a
la de bloqueo, podrá abrir la puerta
del horno.

30
SeguridadOperaciónCuidado y limpiezaSolucionar problemasSoporte al consumidor
Uso de la autolimpieza del horno inferior.
La puerta del horno debe estar cerrada y todos los controles deben estar configurados correctamente para
que el ciclo funcione apropiadamente.
Cómo posponer el inicio de la limpieza (disponible en modelos JKP86 únicamente)
Presione el botón Self Clean.
Mediante los botones numéricos,
ingrese el tiempo de limpieza
deseado.
Presione el botón Delay Start.
El primer tiempo de inicio que
puede activar aparecerá en la
pantalla.
Utilizando los botones numéricos,
ingrese la hora del día a la cual
desea que comience el ciclo de
limpieza.
Presione el botón Start.
La puerta se bloquea automáticamente.
La pantalla mostrará la hora de inicio.
No será posible abrir la puerta del horno
hasta que la temperatura sea inferior a
la temperatura de bloqueo y se apague
la luz LOCKED o LOCKED DOOR.
Cuando se apague la luz LOCKED o
LOCKED DOOR, podrá abrir la puerta
del horno.
Después de un ciclo de limpieza
Es posible que observe algunas cenizas
blancas en el horno. Límpielas con un
paño húmedo después de que el horno
se enfríe.
Si las manchas blancas permanecen, remuévalas
con un estropajo de acero lleno de jabón y
enjuague generosamente con una mezcla
de vinagre y agua.
Estos depósitos son usualmente residuos
de sal que el ciclo de limpieza no puede
eliminar.
Si el horno no queda limpio después de
un ciclo de limpieza, repita el ciclo.
■ Usted no puede configurar el horno
para cocción hasta que el horno esté
lo suficientemente frío como para que
la puerta se desbloquee.
■ Mientras el horno esté en
autolimpieza, usted puede presionar
el botón Clock para mostrar en
pantalla la hora del día. Para volver
a la cuenta regresiva de limpieza,
presione el botón Cooking Time.
■ Si se dificulta el deslizamiento
de las parrillas, aplique una pequeña
cantidad de aceite vegetal o de cocina
en una toalla de papel y limpie
los bordes de la parrilla con
la toalla de papel.
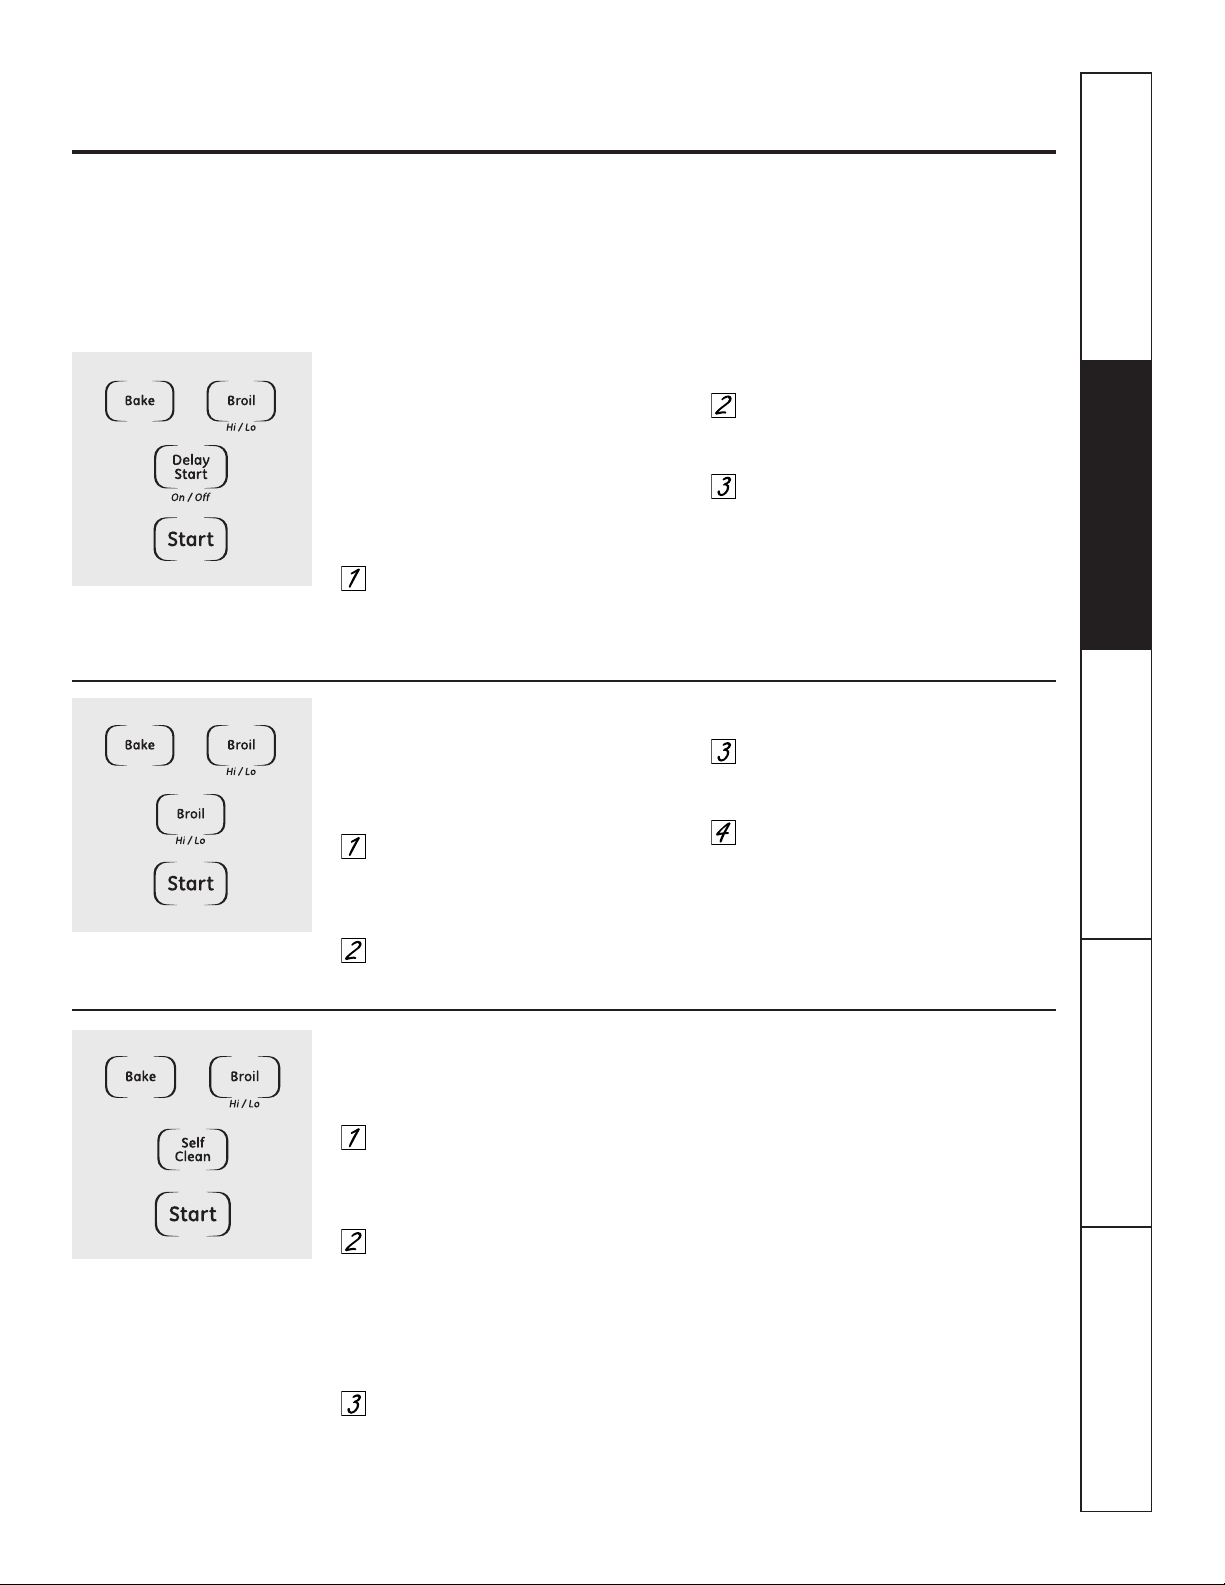
Le permitirá bloquear los controles digitales
para que no se activen al presionarlos.
Presione los botones Bake y
Broil Hi/Lo al mismo tiempo durante
3 segundos, hasta que la pantalla
muestre SF.
Presione el botón Self Clean.
En la pantalla aparecerá LOC OFF
(Bloqueo desactivado).
Presione nuevamente el botón Self
Clean. En la pantalla aparecerá LOC
ON (Bloqueo activado).
Presione el botón Start para activar
la función del control de bloqueo y
deje el control activado en este
modo de función especial.
Cuando esta función esté activada y
se presionen los paneles digitales, en
la pantalla aparecerá LOC.
Para desbloquear el control, repita
los pasos 1 y 2. Presione el botón Start
cuando en la pantalla aparezca LOC OFF.
NOTA: El modo bloqueo no afectará
los controles digitales Clock, Kitchen Timer
On/Off (Encendido/apagado del Temporizador
de cocina) ni Oven Light (Luz del horno).
31
Control de Lockout (Bloqueo)
+
Seguridad
Operación
Cuidado y limpieza
Solucionar problemas Soporte al consumidor
Características especiales de control
de su horno inferior.
GEAppliances.com
Su nuevo control con botones sensibles tiene características adicionales que puede elegir utilizar. A continuación
se describen las características y cómo puede activarlas.
Los modos de característica especial sólo pueden activarse mientras la pantalla esté mostrando la hora del día.
Dichos modos permanecen en la memoria del control hasta que los pasos sean repetidos.
Cuando la pantalla muestre su elección, presione el botón Start. Las características especiales permanecerán
en la memoria después de una falla en el suministro de electricidad.
Apagado después de 12 horas
Con esta característica, si se olvida y deja
el horno encendido, el control apagará el horno
después de 12 horas automáticamente durante
las funciones de horneado o después de 3 horas
durante una función de asado a la parrilla.
Si desea apagar esta característica, siga los
pasos a continuación.
Presione los botones Bake y Broil
Hi/Lo al mismo tiempo durante
3 segundos hasta que la pantalla
muestre SF.
Presione el botón Delay Start hasta
que no apagado (no shdn) aparezca
en la pantalla.
Presione el botón Start para
activar “no apagado” y dejar la
configuración del control en este
modo de característica especial.
Selección de temperatura en grados Fahrenheit o Centígrados
Su control del horno está configurado para
utilizar las selecciones de temperatura en grados
Fahrenheit, pero se puede cambiar utilizando
las selecciones en grados Centígrados.
Presione los botones Bake y
Broil Hi/Lo al mismo tiempo durante
3 segundos, hasta que la pantalla
muestre SF.
Presione el botón Broil Hi/Lo.
La pantalla mostrará F (Fahrenheit).
Presione el botón Broil Hi/Lo
nuevamente. La pantalla mostrará
C (Centígrado).
Presione el botón Start.
+
+
+
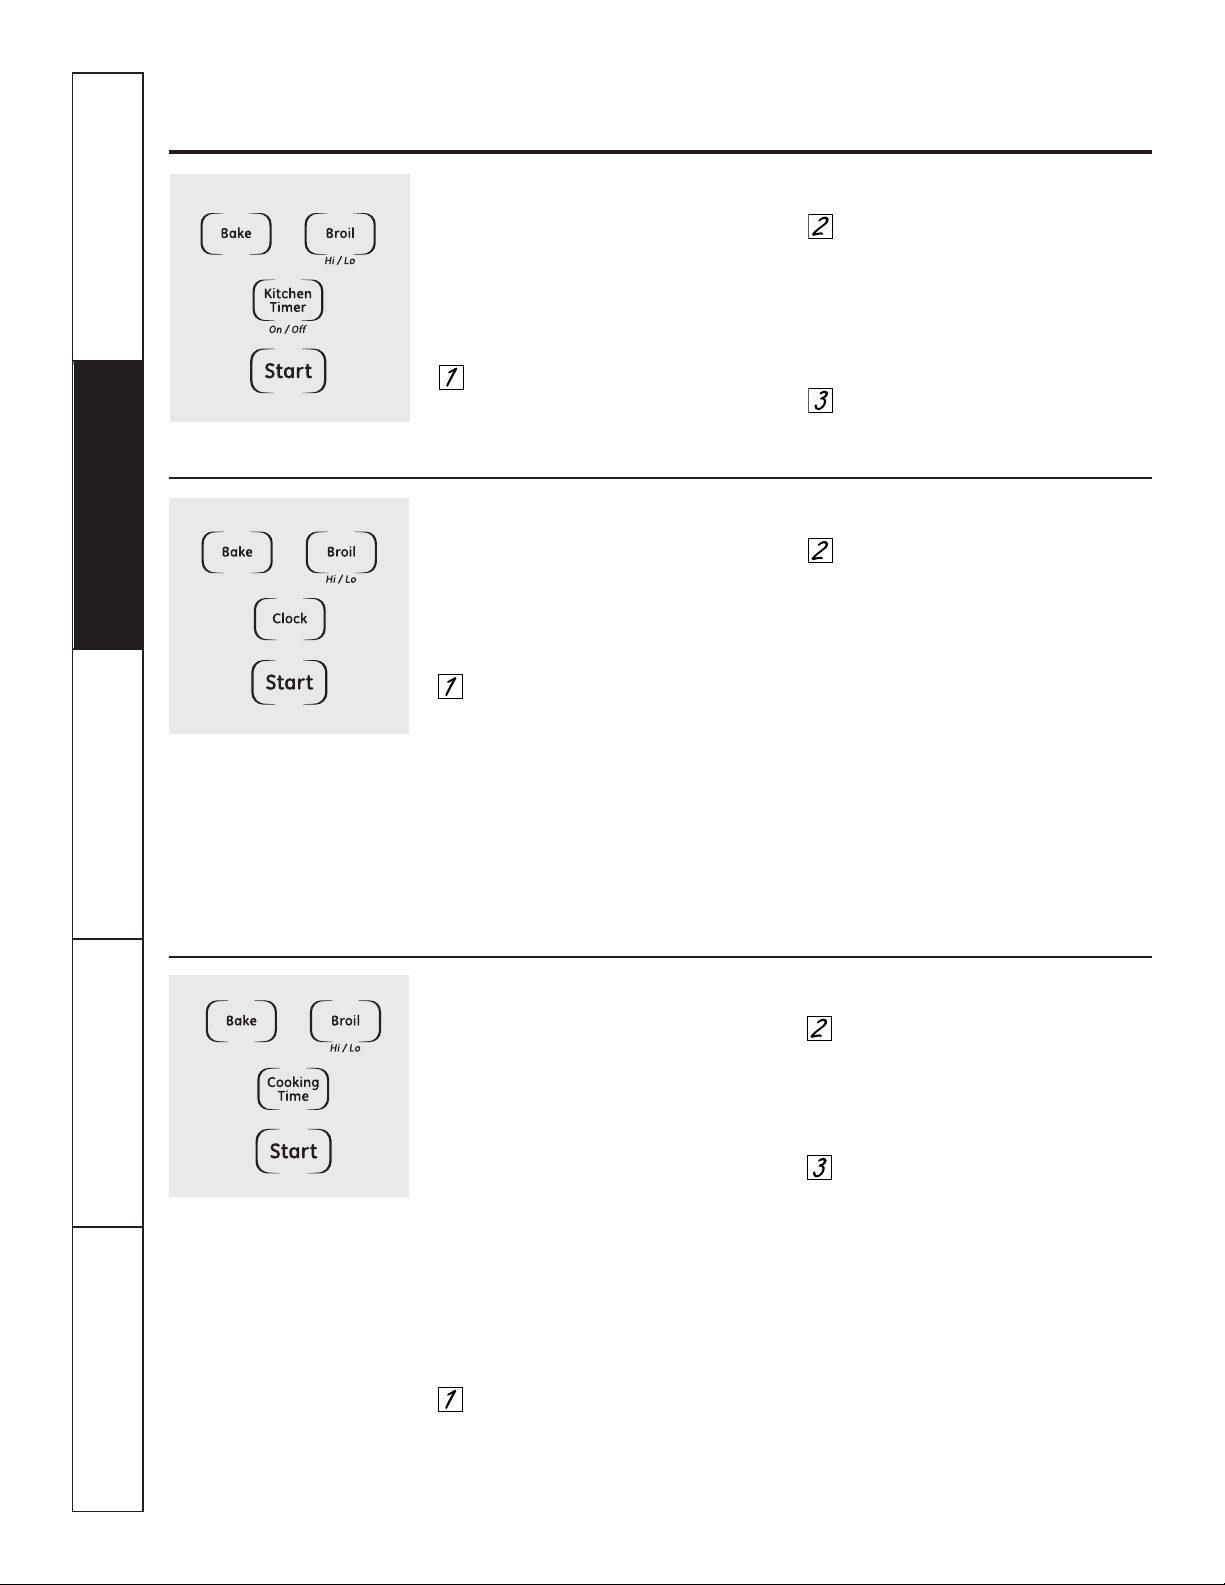
32
SeguridadOperaciónCuidado y limpiezaSolucionar problemasSoporte al consumidor
Características especiales de control de su horno inferior.
Tonos al final de un ciclo cronometrado
Al final de un ciclo cronometrado, sonarán
3 pitidos cortos seguidos por un pitido cada
6 segundos hasta que se presione el botón
Clear/Off. Este pitido continuo cada 6 segundos
puede cancelarse.
Para cancelar el pitido cada 6 segundos:
Presione los botones Bake y Broil
Hi/Lo al mismo tiempo durante
3 segundos hasta que la pantalla
muestre SF.
Presione el botón Kitchen Timer On/Off.
La pantalla muestra CON BEEP
(pitido continuo). Presione
nuevamente el botón Kitchen Timer
On/Off. La pantalla nuestra BEEP.
(Esto cancela el pitido cada
6 segundos).
Presione el botón Start.
Reloj de 12 horas, 24 horas o supresión del reloj
Su control está configurado para utilizar un reloj
de 12 horas.
Si usted preferiría tener un reloj de
24 horas o suprimir el reloj de la pantalla,
siga los pasos a continuación.
Presione los botones Bake y Broil
Hi/Lo al mismo tiempo durante
3 segundos hasta que la pantalla
muestre SF.
Presione una vez el botón Clock.
La pantalla mostrará 12 hr. Si ésta
es la elección que desea, presione
el botón Start.
Presione nuevamente el botón Clock
para cambiar al reloj de
24 horas. La pantalla mostrará 24 hr.
Si ésta es la elección que desea,
presione el botón Start.
Presione nuevamente el botón Clock
para suprimir el reloj de la pantalla.
La pantalla mostrará OFF. Si ésta es
la elección que desea, presione el
botón Start.
NOTA: si el reloj está en el modo suprimido,
no podrá utilizar la función Delay Start.
+
+
Cocción y mantenimiento
Su nuevo control posee una función “cook and
hold” que mantiene los alimentos cocidos
calientes durante un máximo de 3 horas luego de
que finalice el asado u horneado cronometrado.
NOTA: Esta función sólo puede programarse
con el asado u horneado cronometrado.
(Consulte la sección Uso de las característícas
cronometradas de horneado y asado a la parrilla
del horno inferior). Una vez que el asado
u horneado cronometrado haya finalizado
automáticamente, la función “cook and hold”
programada se iniciará automáticamente.
Para activar esta función a fin de
usarla luego del asado u horneado
cronometrado, siga los pasos que figuran
a continuación.
Presione los botones Bake y Broil
Hi/Lo al mismo tiempo durante
3 segundos hasta que la pantalla
muestre SF.
Presione el
botón
Cooking Time.
La pantalla mostrará Hld OFF.
Presione el
botón
Cooking Time
nuevamente para activar la función.
La pantalla mostrará Hld ON.
Presione el
botón
Start para activar
la función “cook and hold” y deje
el control configurado en este modo
de funciones especiales.
+
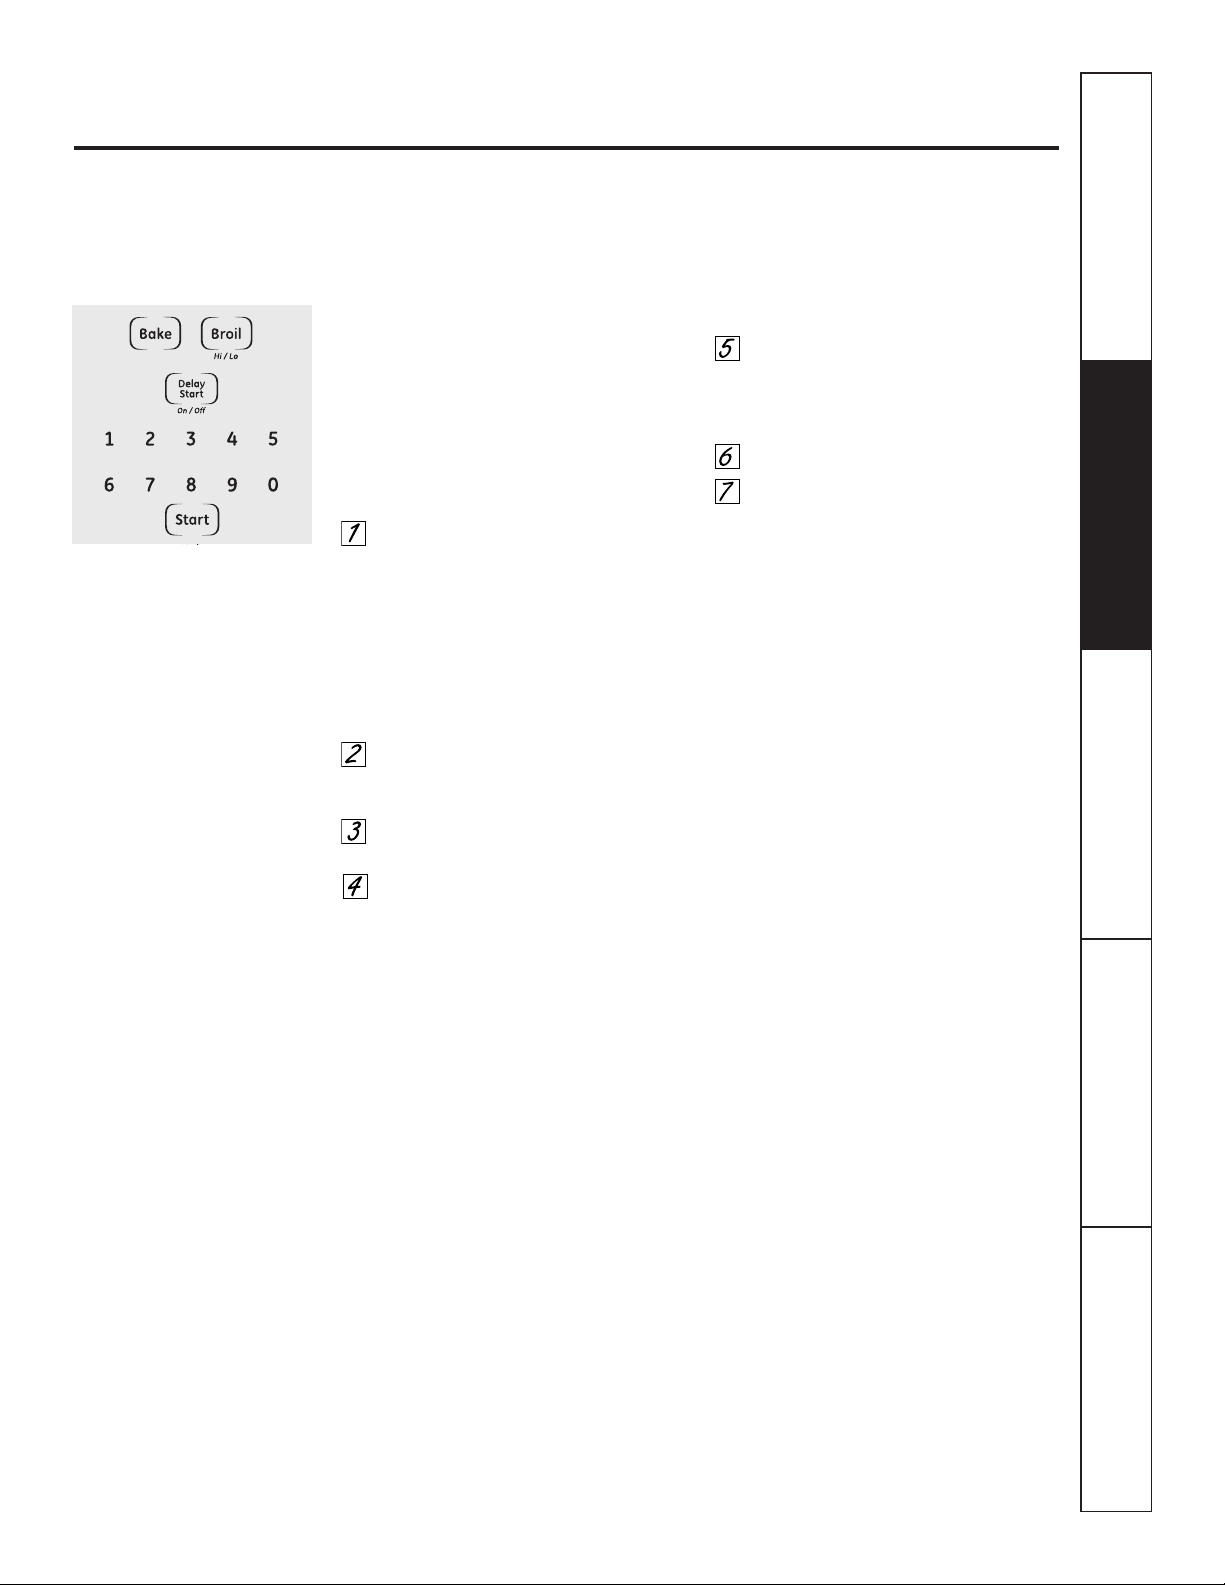
33
+
Seguridad
Operación
Cuidado y limpieza
Solucionar problemas Soporte al consumidor
Uso de la característica Sabbath.
(Diseñada para utilizarse en el Sabbath judío y días festivos). (en algunos modelos) GEAppliances.com
La característica Sabbath puede utilizarse únicamente para horneado/asado. No puede utilizarse para asado a la parrilla,
autolimpieza o Delay Start.
NOTA: la luz del horno se enciende automáticamente (en algunos modelos) cuando la puerta es abierta y se apaga cuando
la puerta es cerrada. Se puede quitar la bombilla. Consulte la sección Reemplazo de la luz del horno. En los modelos con
un interruptor de luz en el panel de control, la luz del horno puede encenderse y dejarse encendida.
Cómo configurar el horneado/asado regular
NOTA: Para entender cómo funciona
el control del horno, practique usando
el horneado normal (no en funcionamiento
para Sabbat) antes de ingresar en el modo
de funcionamiento para Sabbat.
Asegúrese de que el reloj muestre la hora correcta
del día y que el horno esté apagado.
Presione y mantenga sostenidos
los botones Bake y Broil Hi/Lo,
al mismo tiempo, hasta que
la pantalla muestre SF.
NOTA: si en la pantalla aparece bake
o broil, los botones Bake y Broil Hi/Lo
no fueron presionados al mismo
tiempo. Presione el botón Clear/Off
y comience de nuevo.
Presione el botón Delay Start
hasta que SAb bAtH aparezca
en la pantalla.
Presione el botón Start y ⊃ aparecerá
en la pantalla.
Presione el botón Bake. No se dará
ninguna señal.
Presione los botones numéricos para
determinar la temperatura deseada.
No se dará ninguna señal o
temperatura.
Presione el botón Start.
Después de un periodo aleatorio
de espera de aproximadamente
30 segundos a 1 minuto, aparecerá
en la pantalla ⊃ indicando que
el horno está horneando/asando.
Si no aparece ⊃ en la pantalla,
comience de nuevo en el Paso 4.
Para ajustar la temperatura del horno,
presione el botón Bake e ingrese la nueva
temperatura utilizando los botones
numéricos.
Presione el botón Start.
NOTA: los botones Clear/Off y Cooking Time
están activos durante la característica
Sabbath.
⊃
⊃
Cuando la pantalla muestra ⊃
el horno está configurado en
Sabbath. Cuando la pantalla
muestra ⊃ el horno está
horneando/asando.
⊃
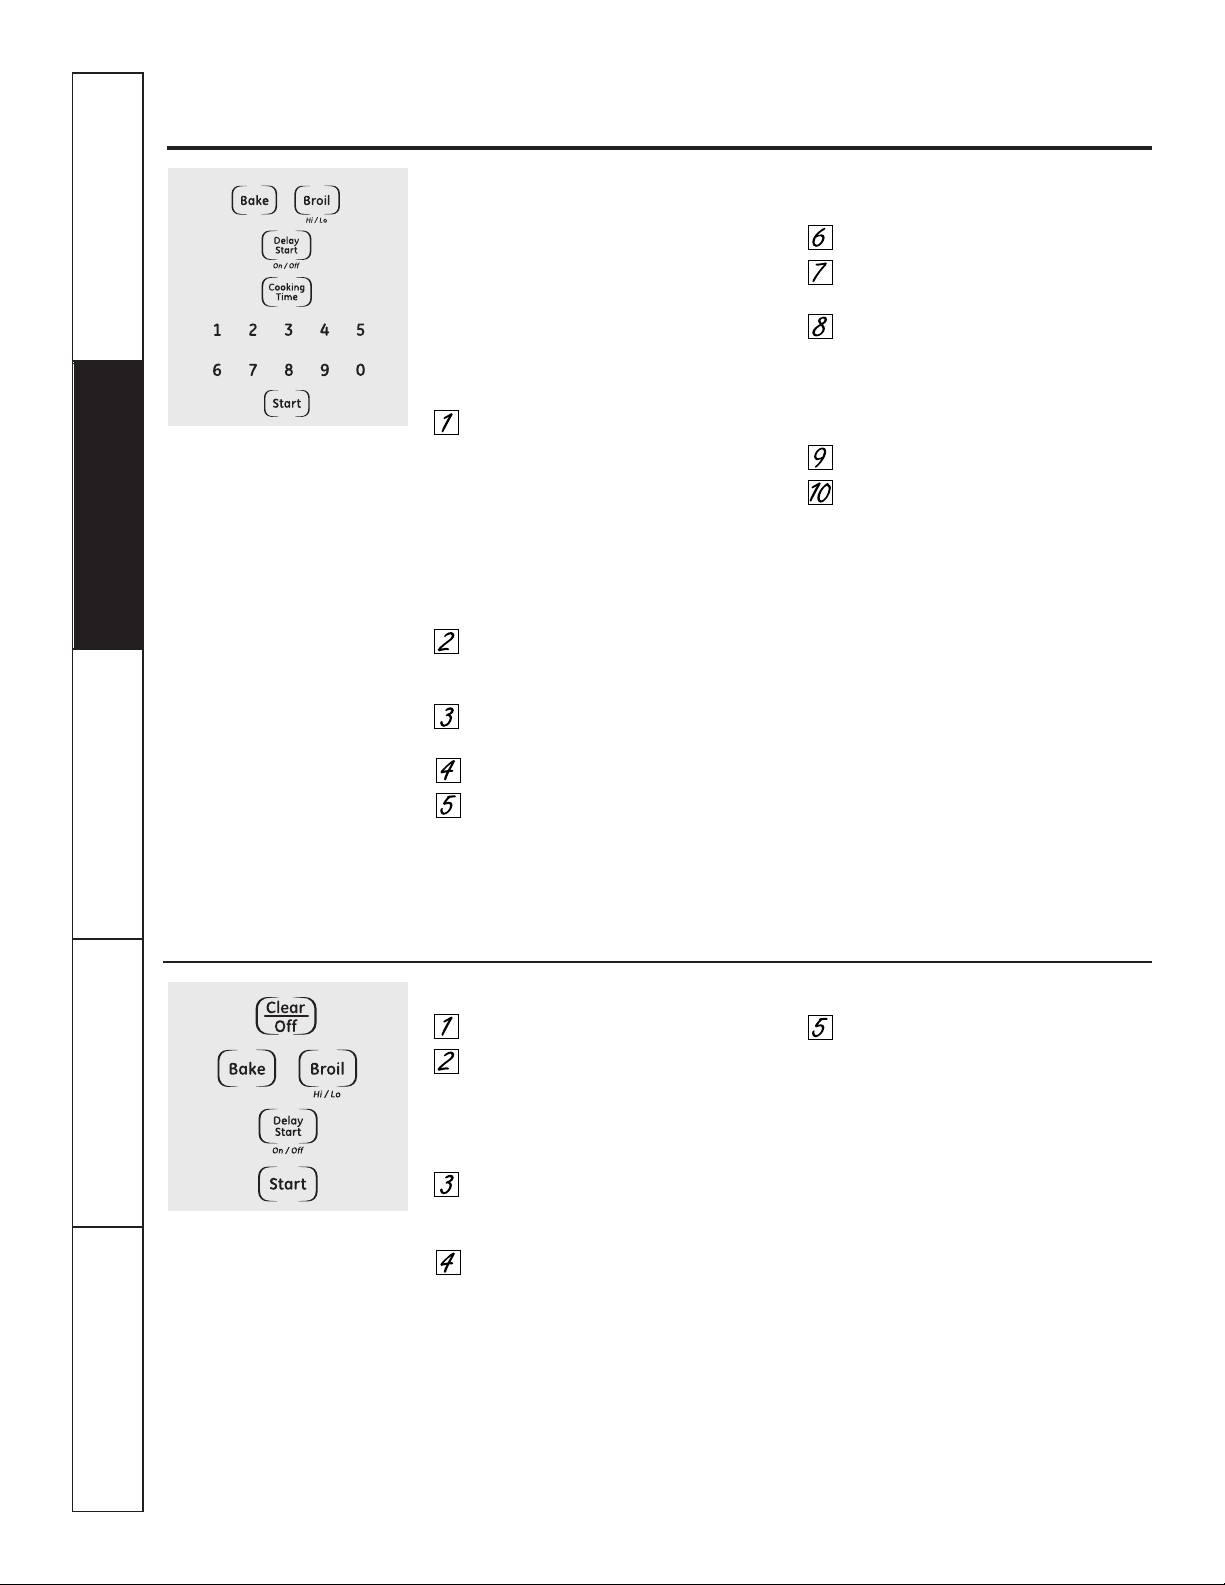
34
+
SeguridadOperaciónCuidado y limpiezaSolucionar problemasSoporte al consumidor
Cómo configurar un horneado/asado cronometrado: Inicio inmediato
y Parada automática
NOTA: Para entender cómo funciona el control del
horno, practique usando Immediate Start (Inicio
inmediato) y Automatic Stop (Parada automática)
normales (no en funcionamiento para Sabbat)
antes de ingresar en el modo de funcionamiento
para Sabbat.
Asegúrese de que el reloj muestre la hora correcta
del día y que el horno esté apagado.
Presione y mantenga sostenidos
los botones Bake y Broil Hi/Lo, al
mismo tiempo, hasta que la pantalla
muestre SF.
NOTA: si en la pantalla aparece Bake
o Broil, los botones Bake y Broil Hi/Lo
no fueron presionados al mismo
tiempo. Presione el botón Clear/Off
y comience de nuevo.
Presione el botón Delay Start
hasta que SAb bAtH aparezca
en la pantalla.
Presione el botón Start y ⊃ aparecerá
en la pantalla.
Presione el botón Cooking Time.
Presione los botones numéricos
para configurar el tiempo de
cocción deseado entre 1 minuto
y 9 horas y 99 minutos.
El tiempo de cocción que ingresó
aparecerá en la pantalla.
Presione el botón Start.
Presione el botón Bake. No se dará
ninguna señal.
Presione los controles numéricos
para determinar la temperatura
deseada.
No se dará ninguna señal o
temperatura.
Presione el botón Start.
Después de un periodo aleatorio
de espera de aproximadamente
30 segundos a 1 minuto, aparecerá
en la pantalla ⊃ indicando que
el horno está horneando/asando.
Si no aparece ⊃ en la pantalla,
comience de nuevo en el Paso 7.
Para ajustar la temperatura del horno,
presione el botón Bake e ingrese la nueva
temperatura utilizando los botones
numéricos.
Presione el botón Start.
Cuando la cocción esté terminada,
la pantalla cambiará de ⊃ a ⊃ y
aparecerá 0:00, indicando que el horno
se ha apagado pero todavía está
configurado en Sabbath. Remueva
la comida cocinada.
⊃
⊃
⊃
Cuando la pantalla muestra ⊃
el horno está configurado en
Sabbath. Cuando la pantalla
muestra ⊃ el horno está
horneando/asando.
⊃
Uso de la característica Sabbath.
(Diseñada para utilizarse en el Sabbath judío y días festivos). (en algunos modelos)
+
Cómo salir de la característica Sabbath
Presione el botón Clear/Off.
Si el horno está cocinando, espere
durante un periodo aleatorio de
aproximadamente 30 segundos a
1 minuto, hasta que solo ⊃ esté en
la pantalla.
Presione y sostenga los botones Bake
y Broil Hi/Lo, al mismo tiempo, hasta
que la pantalla muestre SF.
Presione el botón Delay Start hasta
que aparezca en la pantalla 12 shdn o
no shdn. 12 shdn indica que el horno
se apagará automáticamente
después de 12 horas. no shdn
indica que el horno no
se apagará automáticamente.
Presione el botón Start.
NOTA: si se presentó un corte en
el suministro eléctrico mientras el horno
estaba en Sabbath, el horno se apagará
automáticamente y el control del horno
debe ser reiniciado.
35
Seguridad
Operación
Cuidado y limpieza
Solucionar problemas Soporte al consumidor
Horno microondas
No utilice un limpiador de hornos comercial sobre
ninguna parte de su horno microondas.
Plataforma giratoria removible y apoyo
de la plataforma giratoria
Para evitar rupturas, no coloque
la plataforma giratoria en el agua
justo después de cocinar. Lávela
cuidadosamente en agua caliente
y espumosa o en el lavaplatos.
La plataforma giratoria y el apoyo
puede romperse si se dejan caer. No
opere el horno microondas sin que
estén colocados la plataforma giratoria
y el apoyo.
Para reemplazar el apoyo, coloque su
poste central en el hoyo. Gire el apoyo
sobre su centro hasta que se ubique
en su lugar.
Interior
Mantenga el horno microondas limpio y
con buen olor. Abrir la puerta del horno
unos pocos minutos después de cocinar
ayuda a que el aire circule. Una limpieza
minuciosa ocasional con una solución
de bicarbonato de sodio y agua ayuda
a mantener el interior fresco.
Los derrames y salpicaduras son
fáciles de quitar de las paredes y el piso
si se limpian poco después de remover
los alimentos. Algunas salpicaduras se
pueden limpiar con una toalla de papel,
algunas pueden necesitar un paño
húmedo. Remueva las salpicaduras
de grasa con un paño jabonoso,
luego enjuague y seque.
No limpie con almohadillas metálicas erosivas.
Las piezas pueden despedazar la almohadilla,
causando cortocircuitos.
Limpie diariamente las salpicaduras
en la ventana de la parte interna de
la puerta. Cuando la ventana esté sucia,
lávela con un paño húmedo. Enjuague
completamente y seque.
Limpie frecuentemente las partes
metálicas y plásticas de la parte interna
de la puerta. Utilice un paño húmedo
para eliminar todas las manchas.
No utilice abrasivos, como polvos de limpieza o
almohadillas metálicas y plásticas. Estos pueden
dañar la superficie.
Exterior
Limpie el exterior del horno microondas
con jabón y un paño húmedo, luego
enjuague con un paño húmedo y seque.
Limpie la ventana con un paño húmedo.
Se limpia mejor el cromo con un paño
húmedo y luego con una toalla seca.
Superficie de la puerta
Cuando limpie las superficies de
la puerta y el horno que entran en
contacto al cerrar la puerta, utilice
únicamente jabones suaves y no
abrasivos o detergentes, aplicándolos
con una esponja o un paño suave.
Cuidado y limpieza del centro de cocina. GEAppliances.com
¡
ADVERTENCIA!
Antes de limpiar cualquier parte del centro de cocina, asegúrese de que el
suministro eléctrico esté desconectado y todas las superficies estén frías.
Cómo retirar la película protectora y la cinta adhesiva de empaque
Tome cuidadosamente una esquina
de la película protectora y despéguela
lentamente de la superficie del aparato.
No use ningún objeto puntiagudo para
retirar la película. Retire toda la película
antes de usar el aparato por primera vez.
Para asegurarse de no dañar el acabado
del producto, la manera más segura
de retirar el adhesivo de la cinta de
empaque sobre aparatos nuevos es
la aplicación de un detergente doméstico
líquido para lavar platos. Aplique con
un paño suave y moje.
NOTA: Debe retirar el adhesivo de todas
las partes. No puede retirarse si se quema.
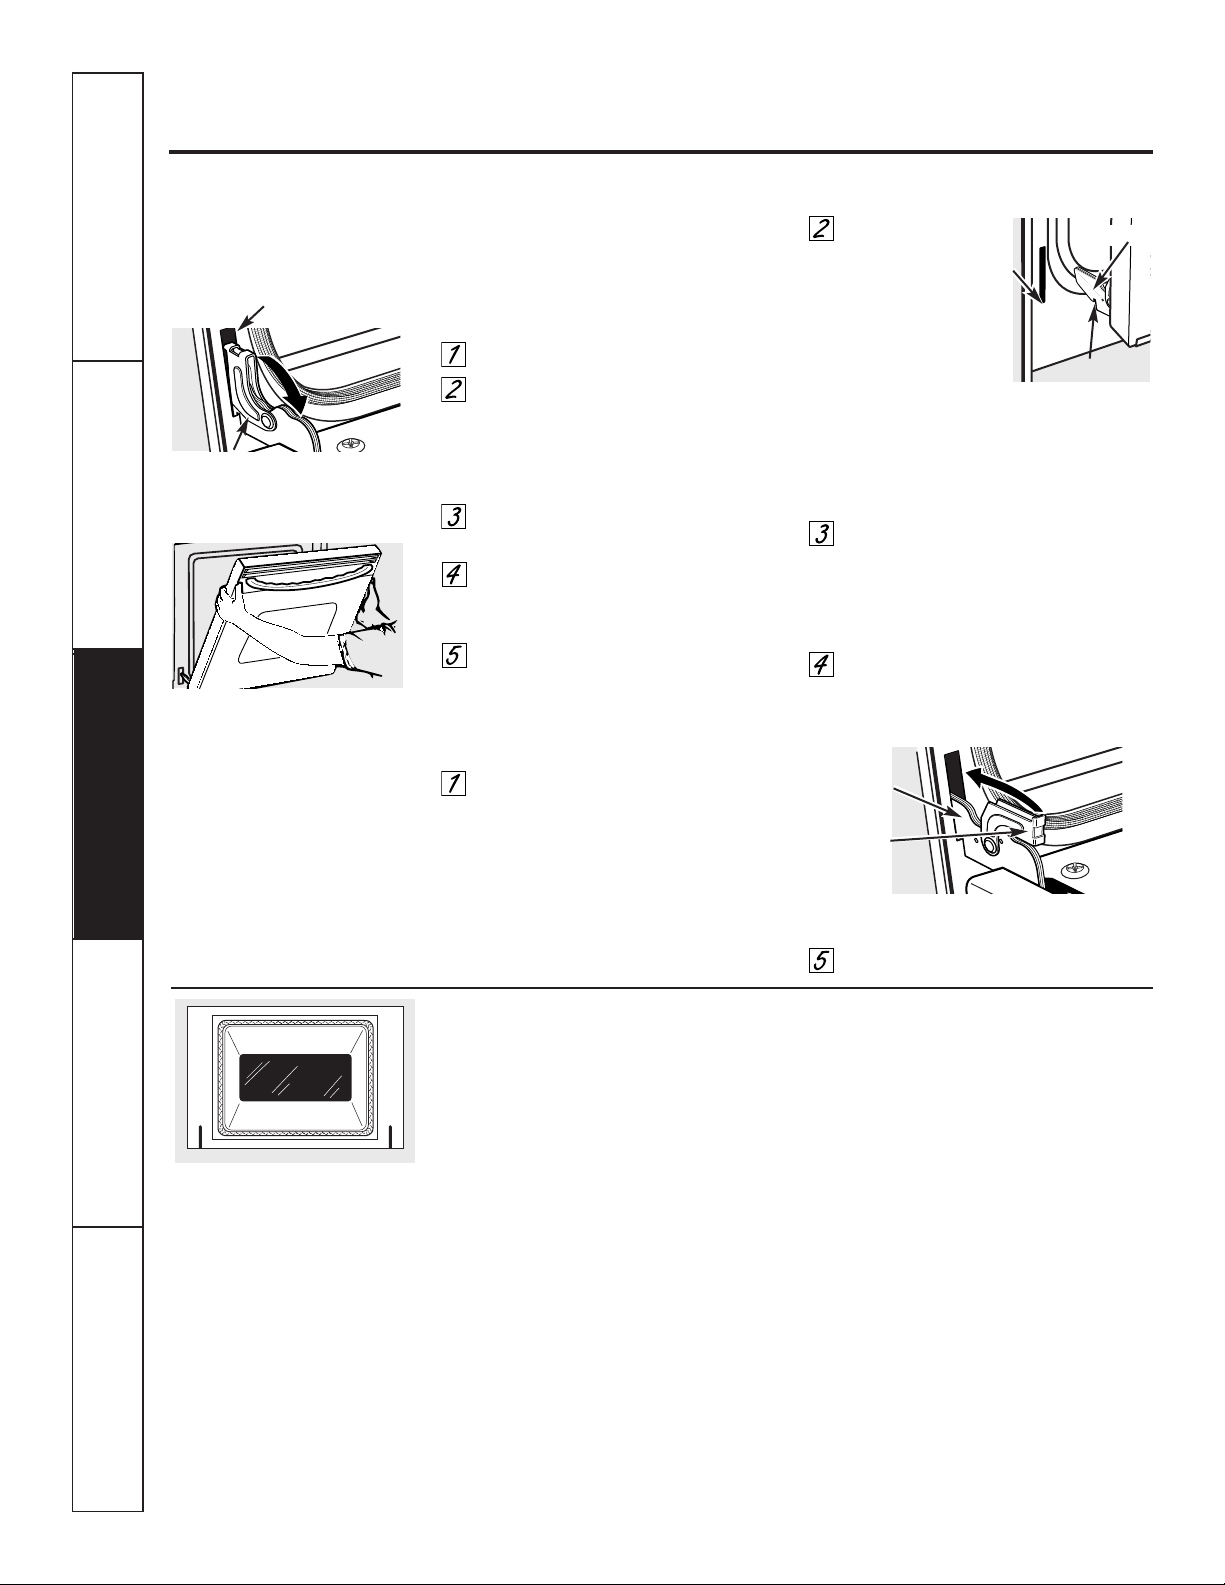
36
SeguridadOperaciónCuidado y limpiezaSolucionar problemasSoporte al consumidor
No frote ni limpie el empaque de la
puerta: el empaque tiene una resistencia
extremadamente baja a la abrasión.
Si se percata que el empaque se está
desgastando, está deshilachado o dañado
de alguna forma y se ha desplazado sobre
la puerta, debe hacer que sea
reemplazado.
Para limpiar el interior del horno:
■ Ya que el área dentro del
empaque se limpia durante el ciclo
de autolimpieza, no necesita limpiarla
a mano.
■ El área fuera del empaque y
el recubrimiento de la puerta pueden
limpiarse con una almohadilla para
refregar plástica o embebida de jabón,
agua caliente y detergente. Enjuague
bien con una solución de vinagre
y agua.
Para limpiar la parte externa de la puerta:
■ Utilice jabón y agua para limpiar
minuciosamente la parte superior, lados
y frente de la puerta del horno. Enjuague
bien. También puede utilizar un
limpiador de vidrios para limpiar
el vidrio en la parte externa de la puerta.
No permita que el agua gotee dentro de
las ranuras de ventilación.
■ Si se encuentra alguna mancha
persistente sobre el adorno del
respiradero de la puerta, utilice
un limpiador abrasivo suave y una
esponja-fregadora para obtener mejores
resultados.
■ Los derrames de condimentos,
jugos de frutas, salsa de tomate y
materiales de los rellenos de tocino
contienen ácidos que pueden causar
decoloración, por lo tanto deben
limpiarse inmediatamente. Cuando
la superficie esté fría, limpie y enjuague.
■ No utilice limpiadores para horno, polvos
de limpieza o abrasivos fuertes sobre
la parte externa de la puerta.
Cuidado y limpieza del centro de cocina.
La puerta es muy pesada. Tenga cuidado
al quitar y levantar la puerta.
No levante la puerta por la agarradera.
Para quitar la puerta:
Abra completamente la puerta.
Jale los cerrojos de la bisagra hacia
abajo del marco de la puerta, a la
posición desbloqueada. Es posible
que se necesite una herramienta
como un destornillador de pala.
Sujete firmemente ambos lados
de la puerta en la parte superior.
Cierre la puerta en la posición
para quitar de la puerta
(vea la ilustración).
Levante la puerta y sáquela hasta
que el brazo de la bisagra esté fuera
de la ranura.
Para reemplazar la puerta:
Sujete firmemente ambos lados de
la puerta en la parte superior.
Con
la puerta
en el mismo
ángulo de
la posición
para quitar, sitúe
la indentación del
brazo de la bisagra
en el borde inferior de la ranura
de la bisagra. La muesca en
el brazo de la bisagra debe estar
completamente asentada dentro
de la parte inferior de la ranura.
Abra completamente la puerta.
Si la puerta no estuviese totalmente
abierta, la indentación no
se asentaría correctamente en
el borde inferior de la ranura.
Empuje los cerrojos de
la bisagra hacia arriba contra
el marco frontal de la cavidad del
horno, a la posición bloqueada.
Cierre la puerta del horno.
Despegue de la puerta del horno
Posición de remoción
Brazo de la bisagra
Indentación
Borde
inferior
de la
ranura
Cerrojo de la bisagra
Ranura
Jale hacia abajo los cerrojos
de la bisagra para desbloquear
Cerrojo
de la
bisagra
Brazo de
la bisagra
Jale hacia arriba los cerrojos
de la bisagra para bloquear
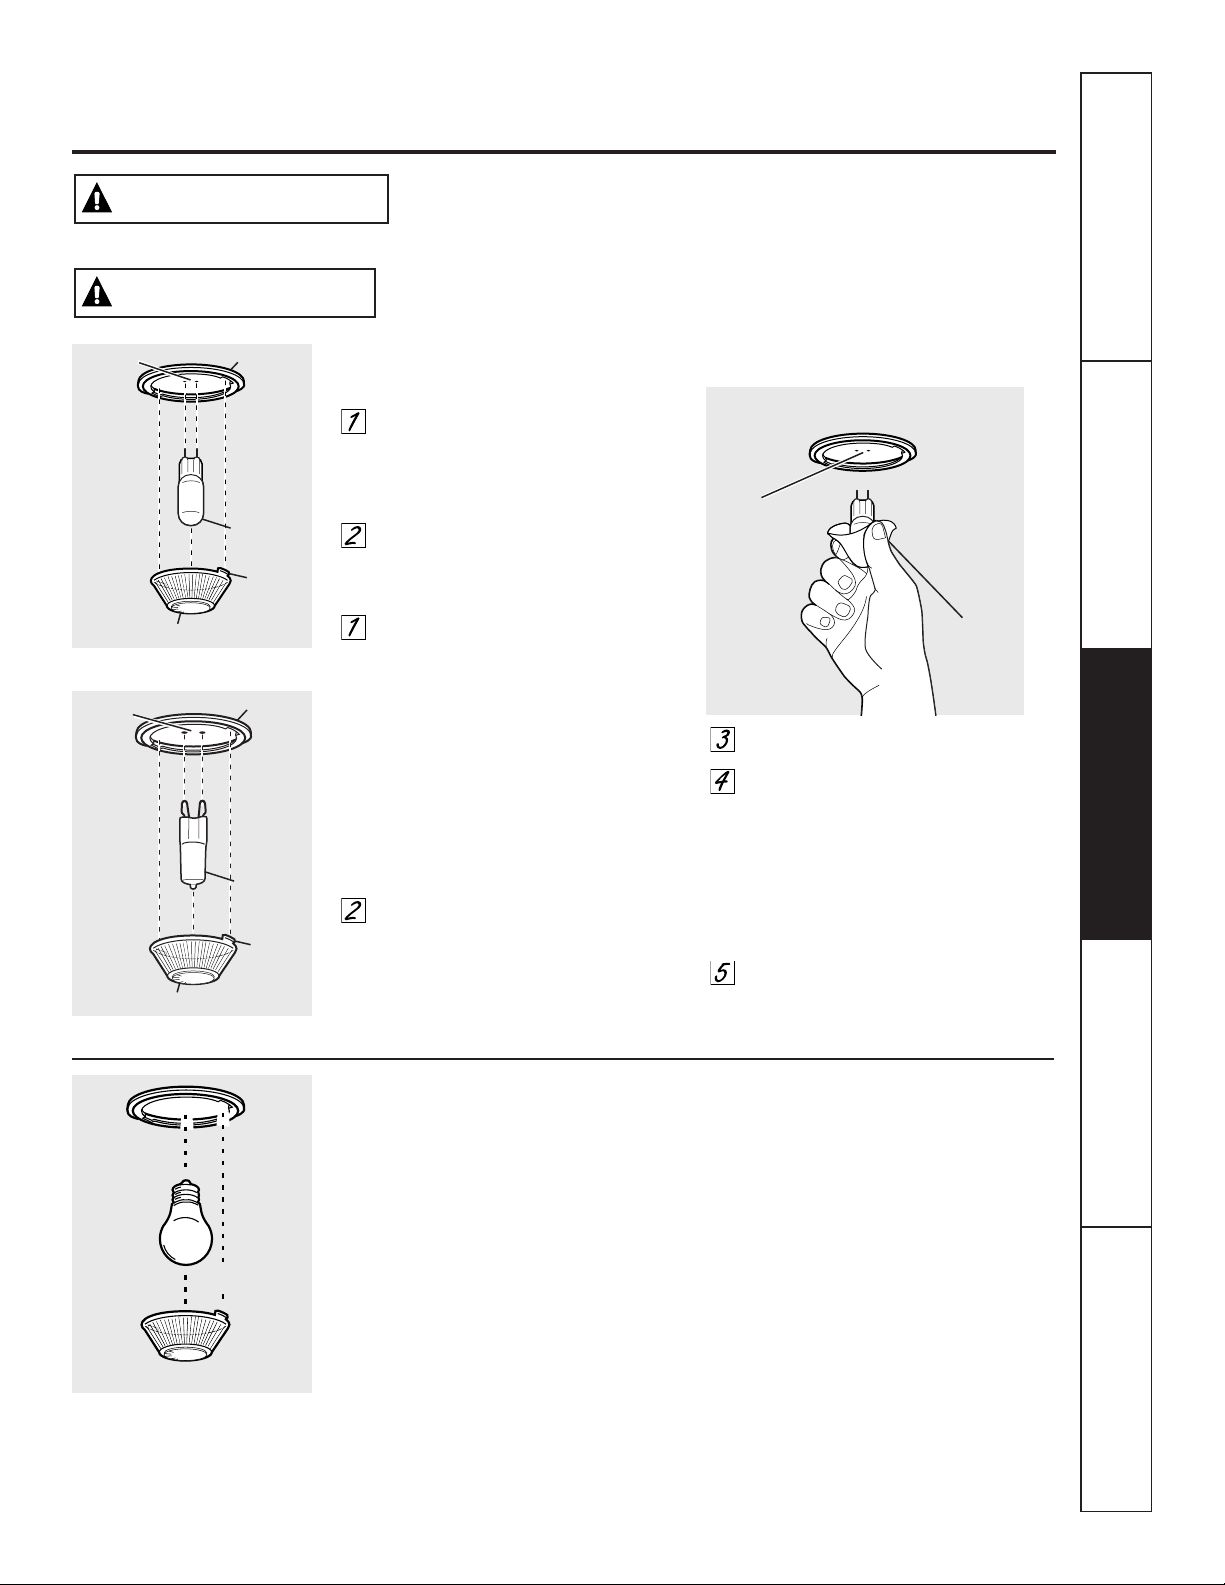
GEAppliances.com
Seguridad
Operación
Cuidado y limpieza
Solucionar problemas Soporte al consumidor
Lámpara de luz del horno inferior (en algunos modelos)
Para retirar:
Gire la cubierta de vidrio 1/4 de vuelta en
sentido opuesto a las agujas del reloj hasta
que las lengüetas de la cubierta de vidrio se
liberen de las ranuras del portalámparas.
Retire la lámpara.
Para volver a colocar:
Coloque una nueva lámpara de 40 vatios
para electrodomésticos. Coloque las
lengüetas de la cubierta de vidrio en
las ranuras del portalámparas. Gire
la cubierta de vidrio 1/4 de vuelta
en el sentido de las agujas del reloj.
NOTAS:
■ Una lámpara para electrodomésticos de
40 vatios es más pequeña que una lámpara
estándar para uso doméstico de 40 vatios.
■ Instale y ajuste la cubierta en el sentido
de las agujas del reloj.
■ Vuelva a conectar la energía eléctrica al horno.
■ Para tener una mejor iluminación dentro del horno,
limpie la cubierta de vidrio con un paño húmedo de
manera frecuente. Esto debería realizarse cuando
el horno esté completamente frío.
Bombilla
Portalámparas
Lengüeta
Longitud
máxima
3
1
⁄2 pulg.
Cubierta de vidrio
37
Retirar la bombilla eléctrica del horno (en algunos modelos)
Para retirar:
Gire la cubierta de vidrio en sentido
contrario a las manecillas del reloj 1/4
de vuelta hasta que las lengüetas de
la cubierta de vidrio liberen los surcos
del portalámparas. Colocarse guantes
de látex puede brindar un mejor agarre.
Utilizando guantes o un paño seco,
remueva la bombilla jalándola en línea
recta.
Para reemplazar:
Utilice una nueva bombilla halógena
de 120/130 voltios, no exceda 50 vatios.
Reemplace la lámpara de luz con el
mismo tipo de lámpara que se retiró.
En su modelo corresponderá uno de
los dos tipos que figuran a la izquierda.
Para determinar cuál es la lámpara
correcta, controle las terminales de la
lámpara. Las lámparas con 2 terminales
con clavijas rectas son lámparas de
G6.35. Las lámparas con 2 terminales
con clavijas con curvas son lámparas
de G9. (No las intercambie.) Asegúrese
al reemplazar la lámpara que sea de
120 volts o 130 volts (NO de 12 volts).
Utilizando guantes o un paño seco,
remueva la bombilla de su paquete.
No toque la bombilla con los dedos
desnudos. El aceite para piel dañará
la lámpara y acortará su tiempo
de duración.
Empuje la bombilla en línea recta
dentro del receptáculo hasta el tope.
Coloque las lengüetas de la cubierta
de vidrio dentro de los surcos del
portalámparas. Gire la cubierta de vidrio
en sentido de las manecillas del reloj
1/4 de vuelta.
Para una mejor iluminación dentro
del horno, limpie frecuentemente la
cubierta de vidrio utilizando un paño
húmedo. Esto debería hacerse cuando
el horno está completamente frío.
Conecte nuevamente el suministro
eléctrico al horno.
Bombilla
de G6.35
Portalámpara
Lengüeta
Cubierta de vidrio
Receptáculo
Use
guantes o
un paño
Receptáculo
Bombilla
de G9
Portalámpara
Lengüeta
Cubierta de vidrio
Receptáculo
(en algunas modelos)
(en algunas modelos)
DESCARGA O PELIGRO DE QUEMADURAS: Antes de reemplazar la lámpara
de luz del horno, desconecte la conexión eléctrica del horno del fusible principal
o del panel del disyuntor. Si esto no se cumple se podrá producir una descarga
eléctrica o quemadura.
ADVERTENCIA
RIESGO DE INCENDIO: La tapa de vidrio y la lámpara de luz se deberán retirar
cuando estén frías. Tocar el vidrio caliente sin protección en las manos o con
un trapo húmedo puede ocasionar quemaduras.
PRECAUCIÓN
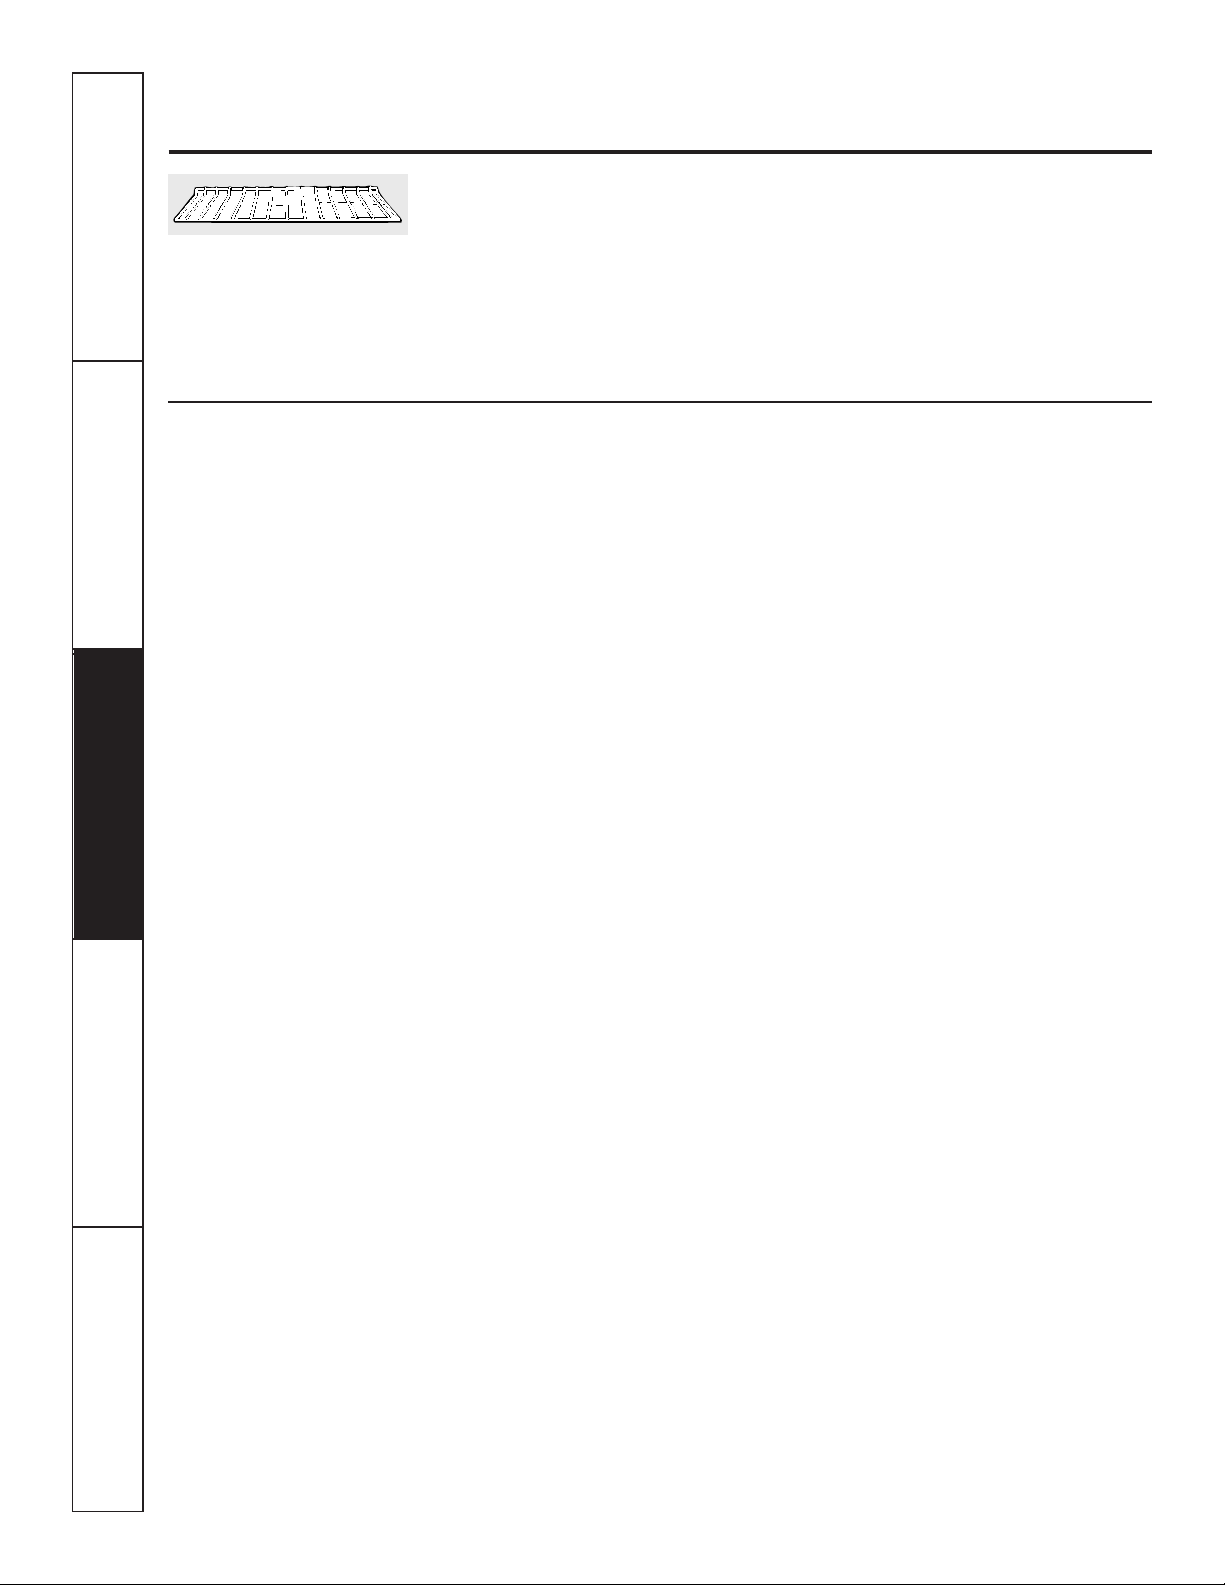
38
NOTA: las parrillas del horno
pueden limpiarse en la autolimpieza
del horno. Sin embargo, los parrillas
se oscurecerán, perderán su lustre
y se volverán difíciles de deslizar
si se limpian durante el ciclo de
autolimpieza.
SeguridadOperaciónCuidado y limpiezaSolucionar problemasSoporte al consumidor
Cuidado y limpieza del centro de cocina.
Panel de control
Es buena idea limpiar el panel de control
después de cada uso. Limpie con jabón
suave y agua o con una solución de
vinagre y agua, enjuague con agua limpia
y lustre en seco con un paño suave.
Cuando haga la limpieza, el panel
de control debe estar a temperatura
ambiente y no bajo la luz solar directa.
No utilice limpiadores abrasivos,
limpiadores líquidos fuertes, almohadillas
plásticas para restregar o limpiadores
para hornos sobre el panel de control:
estos productos dañarán el acabado.
Una solución 50/50 de vinagre y agua
caliente funciona bien.
Parrillas de horno (horno inferior)
Limpie las parrillas del horno con un
limpiador abrasivo o estropajo de acero.
Después de limpiar, enjuague las parrillas
con agua limpia y seque con un paño
limpio.
Para hacer que las parrillas se deslicen
más fácilmente, aplique una pequeña
cantidad de aceite vegetal o aceite de
cocina a una toalla de papel y limpie
los bordes de las parrillas del horno
con la toalla de papel.

Seguridad
Operación
Cuidado y limpieza
Solucionar problemas Soporte al consumidor
Antes de llamar para solicitar
un servicio de mantenimiento…
GEAppliances.com
¡Los consejos para resolución de problemas ahorran tiempo y dinero!
Revise primero las gráficas en las siguientes páginas y es posible que
no tenga que llamar para solicitar servicio de mantenimiento.
Problema Causas posibles Qué hacer
El panel de control en Olvidó presionar el • Presione el botón Start.
el horno microondas botón Start.
no funciona
La puerta no está cerrada • Asegúrese de que la puerta del horno microondas esté
firmemente. cerrada.
Otra función fue presionada. • Presion dos veces el botón Clear/Off para cancelar
y comience de nuevo.
El botón Clear/Off fue • Comience de nuevo.
presionado accidentalmente.
Controles • Mientras utilizaba Time Defrost, los números
del horno configurados no se ingresaron después de presionar el botón
inadecuadamente. Auto Defrost.
“SENSOR ERROR” Durante una función • La puerta del horno microondas no debe
aparece en la pantalla del sensor, la puerta ser abierta antes de que comience la cuenta regresiva
del horno microondas del horno microondas en la pantalla.
fue abierta demasiado pronto.
La luz del horno La bombilla de luz está floja • Llame para solicitar servicio de mantenimiento.
microondas o defectuosa.
no funciona
Los alimentos Variación en la densidad • Variación en la densidad y la cantidad algunas veces
se recocieron o y la cantidad de los alimentos requieren más tiempo de cocción.
faltaban cocción están siendo cocinados.
en el horno microondas
Alimentos no volteados • Voltee o agite los alimentos y comience nuevamente.
o agitados como está indicado
en la receta.
Demasiados platos en • No sobrecargue su horno microondas.
el horno al mismo tiempo.
Los alimentos no • Consulte la sección Uso de las características del sensor
se descongelan completamente. del microondas.
Los utensilios de cocina o • Consulte la sección Utensilios de cocina seguros para
las cubiertas que se están microondas de las instrucciones de seguridad importantes.
utilizando.
La humedad en el horno • Asegúrese de que el interior del horno y el exterior de
hará que el sensor disminuya recipientes estén secos.
el tiempo de cocción.
No se permite que • Se recomienda algo de tiempo de reposo para ciertas
los alimentos reposen. verduras cocinadas con los controles del sensor.
El reloj y el temporizador Un fusible en su casa • Reemplace el fusible o reinicie el disyuntor.
no funcionan o puede estar fundido o
la pantalla queda el disyuntor activado.
en blanco
Controles configurados • Consulte la sección Uso del reloj y temporizador del horno
inadecuadamente. inferior para el reloj del horno inferior.
• Consulte la sección Pantalla On/Off para el reloj del horno
microondas.
El reloj está en el modo • Consulte la sección Características especiales de control
suprimido (black-out). de su horno inferior para el reloj del horno inferior.
• Consulte la sección Pantalla On/Off para el reloj del horno
microondas.
39
SeguridadOperaciónCuidado y limpiezaSolucionar problemasSoporte al consumidor
Problema Causas posibles Qué hacer
“F— y un número o Tiene un código de • Presione el botón Clear/Off. Permita que el horno se
letra” parpadean en error de la función. enfríe durante una hora. Ponga el horno nuevamente la
pantalla del horno en operación.
inferior
Si el código de la función • Desconecte la corriente del centro de cocina durante
se repite. 30 segundos y conecte nuevamente la corriente.
Si el función se repite, llame para solicitar servicio
de mantenimiento.
La pantalla parpadea Falla en el suministro • Reinicie el reloj del horno inferior.
de electricidad.
Imposible lograr Los botones de control del • Los botones Bake y Broil Hi/Lo deben ser
la pantalla del horno horno no fueron presionados presionados que al mismo tiempo y sostenidos
inferior muestre “SF” apropiadamente. durante 3 segundos.
La temperatura El termostato del horno • Consulte la sección Ajuste del termostato del horno inferior:
del horno inferior necesita un ajuste. ¡Hágalo usted mismo!
es demasiado alta
o demasiado baja
El horno inferior Un fusible en su casa puede • Reemplace el fusible o reinicie el disyuntor.
no funciona estar dañado o el disyuntor
activado.
Los controles del horno están • Consulte la sección Uso del horno inferior.
configurados inadecuadamente.
Señales de control Olvidó ingresar una • Presione el botón Bake y la temperatura deseada o
del horno inferior temperatura de horneado o el botón Self Clean y el tiempo de limpieza deseado.
después de ingresar el tiempo de limpieza.
el tiempo de cocción
o Delay Start
(Inicio postergado)
Los alimentos no Controles del horno no • Consulte la sección Uso del horno inferior.
se hornean o configurados apropiadamente.
asan apropiadamente
La posición de la parrilla es • Consulte la sección Uso del horno inferior.
en el horno inferior
incorrecta o la parrilla no
está nivelado.
El termostato del horno • Consulte la sección Ajuste del termostato del horno inferior:
necesita ajuste. ¡Hágalo usted mismo!.
Los alimentos no La puerta del horno está • Cierre la puerta. Este modelo está diseñado para un
se asan a la parrilla abierta. asado únicamente con la puerta cerrada. Siempre ase
apropiadamente en a la parrilla con la puerta cerrada.
el horno inferior
Los controles del horno están • Asegúrese de presionar el botón Broil Hi/Lo.
configurados inadecuadamente.
Se está utilizando una posición • Consulte la Guía para asar a la parrilla.
inadecuada de la parrilla.
Los utensilios de cocina • Para mejores resultados, utilice una bandeja diseñada
no son adecuados para asar para asar a la parrilla.
a la parrilla.
En algunas áreas • Precaliente el elemento de asado a la parrilla durante
el voltaje puede ser bajo. 10 minutos.
• Ase a la parrilla durante un periodo más prolongado
que el recomendado en la Guía para asar a la parrilla.
Los consejos para resolución de problemas
Antes de llamar para solicitar
un servicio de mantenimiento…
40

Problema Causas posibles Qué hacer
La luz del horno inferior
La bombilla está floja o defectuosa.
• Apriete o reemplace la bombilla.
no funciona
El botón de operación • Llame para solicitar servicio de mantenimiento.
de la bombilla está roto.
El horno inferior Los controles del horno están • Consulte la sección Uso de la autolimpieza del horno
no se auto limpiará configurados inadecuadamente. inferior.
La temperatura del horno es • Permita que el horno se enfríe y reinicie los
demasiado alta para establecer controles.
una operación de autolimpieza.
Se escucha un "crujido" Este es el sonido del metal • Esto es normal.
o "estallido" en calentándose y enfriándose
el horno inferior durante las funciones de
cocción y limpieza.
Humo excesivo en Exceso de mugre. • Presione el botón Clear/Off. Abra las ventanas para
el horno inferior dejar salir el humo de la habitación. Espere hasta que
durante el ciclo la luz LOCKED o LOCKED DOOR se apague. Limpie
de limpieza el exceso de mugre y reinicie el ciclo de limpieza.
La puerta del horno El horno está demasiado • Permita que el horno se enfríe por debajo de la
inferior no se abrirá caliente. temperatura de bloqueo.
después de un ciclo
de limpieza
El horno inferior no está Los controles del horno están • Consulte la sección Uso de la autolimpieza del horno
limpio después de configurados inadecuadamente. inferior.
un ciclo de limpieza
El horno tiene mugre difícil • Limpie las sobras pesadas antes de comenzar el ciclo
de eliminar. de limpieza. Es posible que los hornos que tienen
una mugre muy pesada necesiten de autolimpieza
nuevamente o durante un periodo más prolongado.
“LOCKED” o Se ha seleccionado el ciclo • Cierre la puerta del horno.
“LOCKED DOOR” autolimpieza pero la puerta
parpadea en la pantalla no está cerrada.
del horno inferior
La luz “LOCKED” o La puerta del horno • Presione el botón Clear/Off. Deje enfriar el horno.
“LOCKED DOOR” está está bloqueada porque
encendida cuando la temperatura en el horno
desea cocinar en inferior dentro del horno
el horno inferior no ha caído por debajo de
la temperatura de bloqueo.
Corte en el suministro Pico o corte del suministro • Reinicie el reloj. Si el horno estaba en uso,
eléctrico, el reloj eléctrico. debe reiniciarlo presionando el botón Clear/Off,
parpadea configurando el reloj y reestableciendo cualquier
función de cocción.
Olor a “quemado” o Esto es normal en un horno • Para acelerar el proceso, configure un ciclo de
“aceitoso” saliendo nuevo y desaparecerá con autolimpieza durante un mínimo de 3 horas.
del respiradero del el tiempo. Consulte la sección Uso de la autolimpieza del horno
horno cuando se usa inferior.
del horno inferior
Olor fuerte Un olor del aislamiento • Esto es temporal.
en el horno inferior al rededor del interior del
horno es normal las primeras
veces que se utiliza el horno.
Suena un ventilador Un ventilador de enfriamiento • Esto es normal. El ventilador de enfriamiento
puede encenderse se encenderá para refrigerar las partes internas.
automáticamente. Puede funcionar durante 1-1/2 horas en modelos
de 30″ et durante 2 horas en modelos de 27″ después
que el horno esté apagado.
41
GEAppliances.com
Seguridad
Operación
Cuidado y limpieza
Solucionar problemas Soporte al consumidor
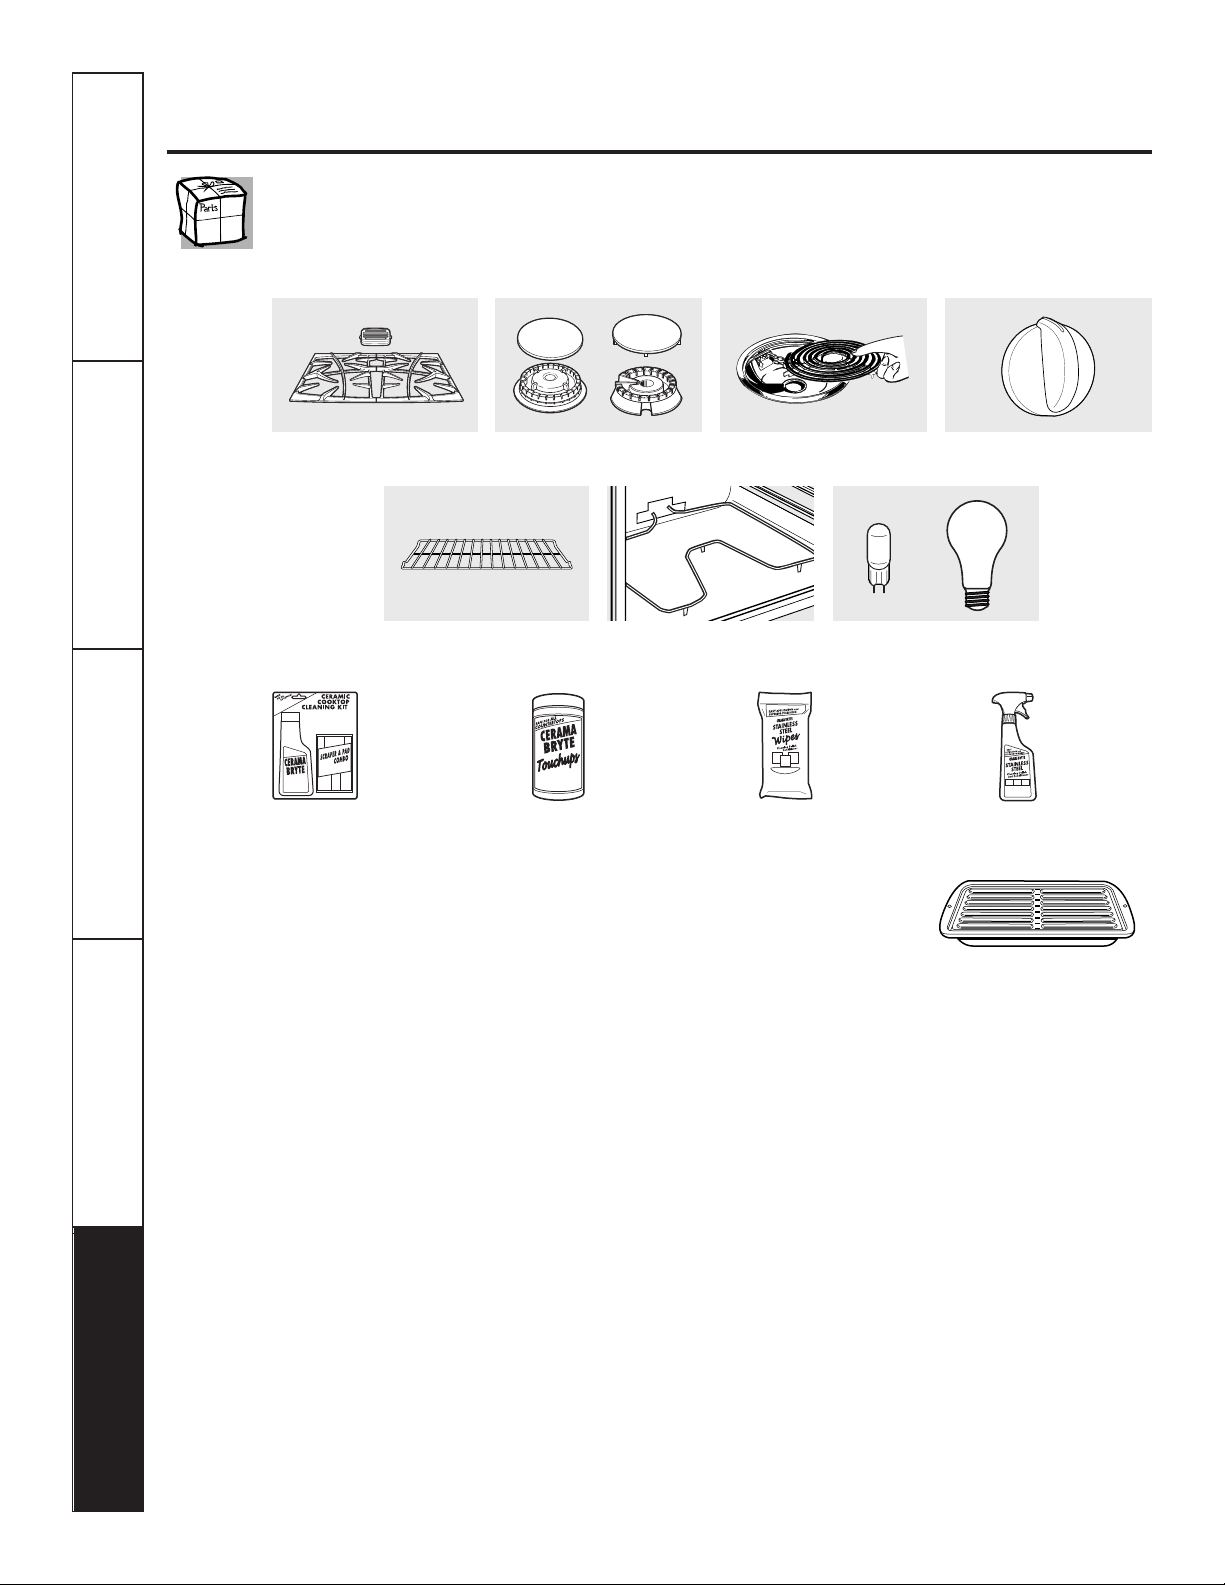
42
SeguridadOperaciónCuidado y limpiezaSolucionar problemasSoporte al consumidor
Accesorios.
¿Desea algo más?
Usted puede encontrar estos accesorios y muchos más en GEAppliances.com, o
llame al 800.626.2002 (en horario de trabajo normal). Tenga listo el número de modelo.
¡Pruebe estos otros excelentes productos para que su cocina se vea estupenda!
¡Aproveche al máximo su bandeja para asar! (No para usar con modelos de cajón asador.)
¡Utilice su bandeja y tapa de rejilla para asar hamburguesas, frutos de mar, filetes, vegetales, panceta,
costillas y mucho más! La bandeja inferior retiene el exceso de grasas y aceites.
• Pieza GE genuina
• Fácil de limpiar
• Garantía de un año
¡Oferta de tiempo limitado! ¡Envío sin cargo!
Cuando solicite la bandeja para asar dentro de los 30 días de haber adquirido su producto de cocina GE.
Pequeña Grande* Extra grande**
N° de pieza WB48X10055 WB48X10056 WB48X10057
Dimensiones 8-3/4" A x 1-1/4" A x 13-1/2" P 12-3/4" A x 1-1/4" A x 16-1/2" P 17" A x 1-1/4" A x 19-1/4" P
Precio US$10.50
†
US$14.50
†
US$16.75
†
† Más impuestos aplicables de venta estatales (PST/HST and GST)
* La bandeja para asar grande (estándar) no entra en cocinas de 20/24 pulgadas.
** La bandeja extra grande no entra en hornos de paredes de 24 pulgadas, empotradas de 27 pulgadas o cocinas de 20/24 pulgadas.
Llame al 800.626.2002 o utilice este formulario para enviar su solicitud por correo:
GE Parts, P.O. Box 221027, Memphis, TN 38122-1027.
Formulario de solicitud de la bandeja para asar
Cantidad ____________________ Número de pieza ______________________________________________________________
____________________ ______________________________________________________________
____________________ ______________________________________________________________
Número de modelo______________ Número de serie__________________ Marca ______________ Fecha de compra __________
Nombre ______________________________________________ Apellido ________________________________________________
Dirección ________________________________________________________________________________________________________
Ciudad ________________________________________________ Estado __________ Código Postal __________________________
Teléfono ______________________________________________ Correo electrónico ________________________________________
Tarjeta de crédito ____ Check____ Giro postal____
Visa ____ MasterCard ____ Discover ____ AmEx ____ N° de Tarjeta de Crédito ________________________________________
Fecha de vencimiento: Mes ________________ Año____________ Firma: ________________________________________________
Elementos de superficie y
bandejas colectoras
Rejillas Cabezales o tapas de
quemadores de superficie
Elementos del horno Bombillas de luz
Perillas
Bandejas del horno
WX10X117GCS
WX10X305
WX10X10001
PM10X311
Kit de limpieza
de anafes
vitrocerámicos:
Incluye limpiador,
rasqueta y paño
Toallitas
de limpieza
de anafes
vitrocerámicos
Toallitas para
pulir artefactos de
acero
inoxidable
Limpiador
de artefactos
de acero
inoxidable
_ _ _ _ _ _ _ _ _ _ _ _ _ _ _ _ _ _ _ _ _ _ _ _ _ _ _ _ _ _ _ _ _ _ _ _ _ _ _ _ _ _ _
✁
o
43
Garantía de GE para su centro de cocina microondas empotrado.
Por el período de: GE reemplazará:
Un año Cualquier parte del centro de cocina microondas que falle debido a defectos en
A partir de la fecha los materiales o en la fabricación. Durante este garantía limitada de un año, GE también
de la compra original proporcioná, sin costo alguno, toda la mano de obra y los servicios internos para reemplazar
partes defectuosas.
■ Viajes de servicio a su casa para enseñarle cómo usar
el producto.
■ Instalación, entrega o mantenimiento inapropiada.
■ Fallas del producto si hay abuso, mal uso, o uso para
otros propósitos que los propuestos, o uso para fines
comerciales.
■ Reemplazo de fusibles de su casa o reajuste de
interruptores de circuito.
■ Daño al producto causado por accidente, fuego,
inundaciones o actos de Dios.
■ Daño incidental o consecuencial causado por posibles
defectos con el aparato.
■ Daño causado después de la entrega.
■ Producto no accesible para facilitar el servicio
requerido.
Lo que no está cubierto por GE:
Esta garantía se extiende al comprador original y cualquier comprador posterior de productos comprados para
uso residencial dentro des Estados Unidos. Si el producto está situado en un área que no dispone de servicio por
parte de un proveedor de servicio autorizado de GE, podría tener que hacerse cargo de los costes de envío o bien
podría solicitársele que lleve el producto a un centro de servicio de GE autorizado para realizar la reparación. En
Alaska, la garantía excluye el costo de envío o las visitas de servicio a su casa.
Algunos estados no permiten la exclusión o las limitaciones de daños incidentales o consecuenciales. Esta garantía
da derechos legales específicos, y usted podría tener otros derechos que variarán de estado a estado. Para saber
cuáles son sus derechos legales, consulte a la oficina de asuntos del consumidor local o la oficina del Prucurador
(Attorney General) en su localidad.
Garante: General Electric Company. Louisville, KY 40225
Todos los servicios de garantía los proporcionan nuestros Centros
de Reparación de Fábrica o nuestros técnicos Customer Care
®
autorizados. Para concertar una cita de reparación, visítenos
en línea en GEAppliances.com, o llame al 800.GE.CARES
(800.432.2737). Cuando llame para solicitar servicio, por favor
tenga a mano el número de serie y el número de modelo.
Pegue aquí su recibo.
Se requiere facilitar prueba
de la fecha de compra original
para obtener un servicio
bajo la garantía.
EXCLUSIÓN DE GARANTÍAS IMPLÍCITAS—Su único y exclusivo derecho es la reparación del producto,
tal y como se indica en esta Garantía limitada. Cualquier garantía implícita, incluyendo las garantías
implícitas de comerciabilidad o adecuación para un fin determinado, están limitadas a un año o el
período de tiempo más breve permitido por la ley.
Seguridad
Operación
Cuidado y limpieza
Solucionar problemas Soporte al consumidor
Soporte al consumidor.
Página Web de GE Appliances
GEAppliances.com
¿Tiene alguna pregunta sobre su electrodoméstico? ¡Pruebe la página Web de GE Appliances 24 horas al
día, cualquier día del año! Para mayor conveniencia y servicio más rápido, ya puede descargar los Manuales
de los Propietarios, pedir piezas o incluso hacer una cita en línea para que vengan a realizar una
reparación.
Solicite una reparación GEAppliances.com
El servicio de expertos GE está a tan sólo un paso de su puerta. ¡Entre en línea y solicite su reparación
cuando le venga bien al día cualquier día del año! O llame al 800.GE.CARES (800.432.2737) durante horas
normales de oficina.
Real Life Design Studio (Estudio de diseño para la vida real)
GEAppliances.com
GE apoya el concepto de Diseño Universal—productos, servicios y ambientes que pueden usar gente de
todas las edades, tamaños y capacidades. Reconocemos la necesidad de diseñar para una gran gama de
habilidades y dificultades físicas y mentales. Para más detalles cobre las aplicaciones de GE Diseño Universal,
incluyendo ideas de diseño para la cocina para personas con discapacidades, mire nuestra página Web hoy
mismo. Para personas con dificultades auditivas, favor de llamar al 800.TDD.GEAC (800.833.4322).
Garantías ampliadas GEAppliances.com
Compre una garantía ampliada y obtenga detalles sobre descuentos especiales disponibles mientras su
garantía está aún activa. Puede comprarla en línea en cualquier momento, o llamar al 800.626.2224
durante horas normales de oficina. GE Consumer Home Services estará aún ahí cuando su garantía termine.
Piezas y accesorios GEAppliances.com
Aquellos individuos con la calificación necesaria para reparar sus propios electrodomésticos pueden
pedir que se les manden las piezas o accesorios directamente a sus hogares (aceptamos las tarjetas
VISA, MasterCard y Discover). Haga su pedido en línea hoy, 24 horas cada día o llamar por teléfono
al 800.626.2002 durante horas normales de oficina.
Las instrucciones descritas en este manual cubren los procedimientos a seguir por cualquier usuario. Cualquier
otra reparación debería, por regla general, referirse a personal calificado autorizado. Debe ejercerse precaución
ya que las reparaciones incorrectas pueden causar condiciones de funcionamiento inseguras.
Póngase en contacto con nosotros GEAppliances.com
Si no está satisfecho con el servicio que recibe de GE, póngase en contacto con nosotros en nuestra página
Web indicando todos los detalles así como su número de teléfono o escríbanos a:
General Manager, Customer Relations
GE Appliances, Appliance Park
Louisville, KY 40225
Registre su electrodoméstico GEAppliances.com
¡Registre su nuevo electrodoméstico en línea—cuando usted prefiera! El registrar su producto a tiempo le
proporcionará, si surgiera la necesidad, una mejor comunicación y un servicio más rápido bajo los términos
de su garantía. También puede enviar su tarjeta de registro pre-impresa que se incluye en el material
de embalaje.

