Loading ...
STR-DA3200ES 2-681-807-12(1) GB/FR
English
Calibrating the appropriate settings automatically
(AUTO CALIBRATION)
You can set up the speakers to obtain the desired sound from all connected speakers automatically by using
the auto calibration function.
1: Before you perform the auto calibration
Notes
• During the calibration, the sound that comes out of the speakers is very loud. Pay attention to the presence of children or
to the effect on your neighborhood
• Perform the auto calibration in a quiet environment to avoid the effect of noise and get a more accurate measurement.
• If there are any obstacles in the path between the optimizer microphone and the speakers, the calibration cannot be
performed correctly. Remove any obstacles from the measurement area to avoid measurement error.
• The auto calibration function does not work in the following cases.
– MULTI IN is selected.
– The ANALOG DIRECT function is being used.
– Headphones are connected.
1
Install and connect the speakers.
For details, see the front page.
2
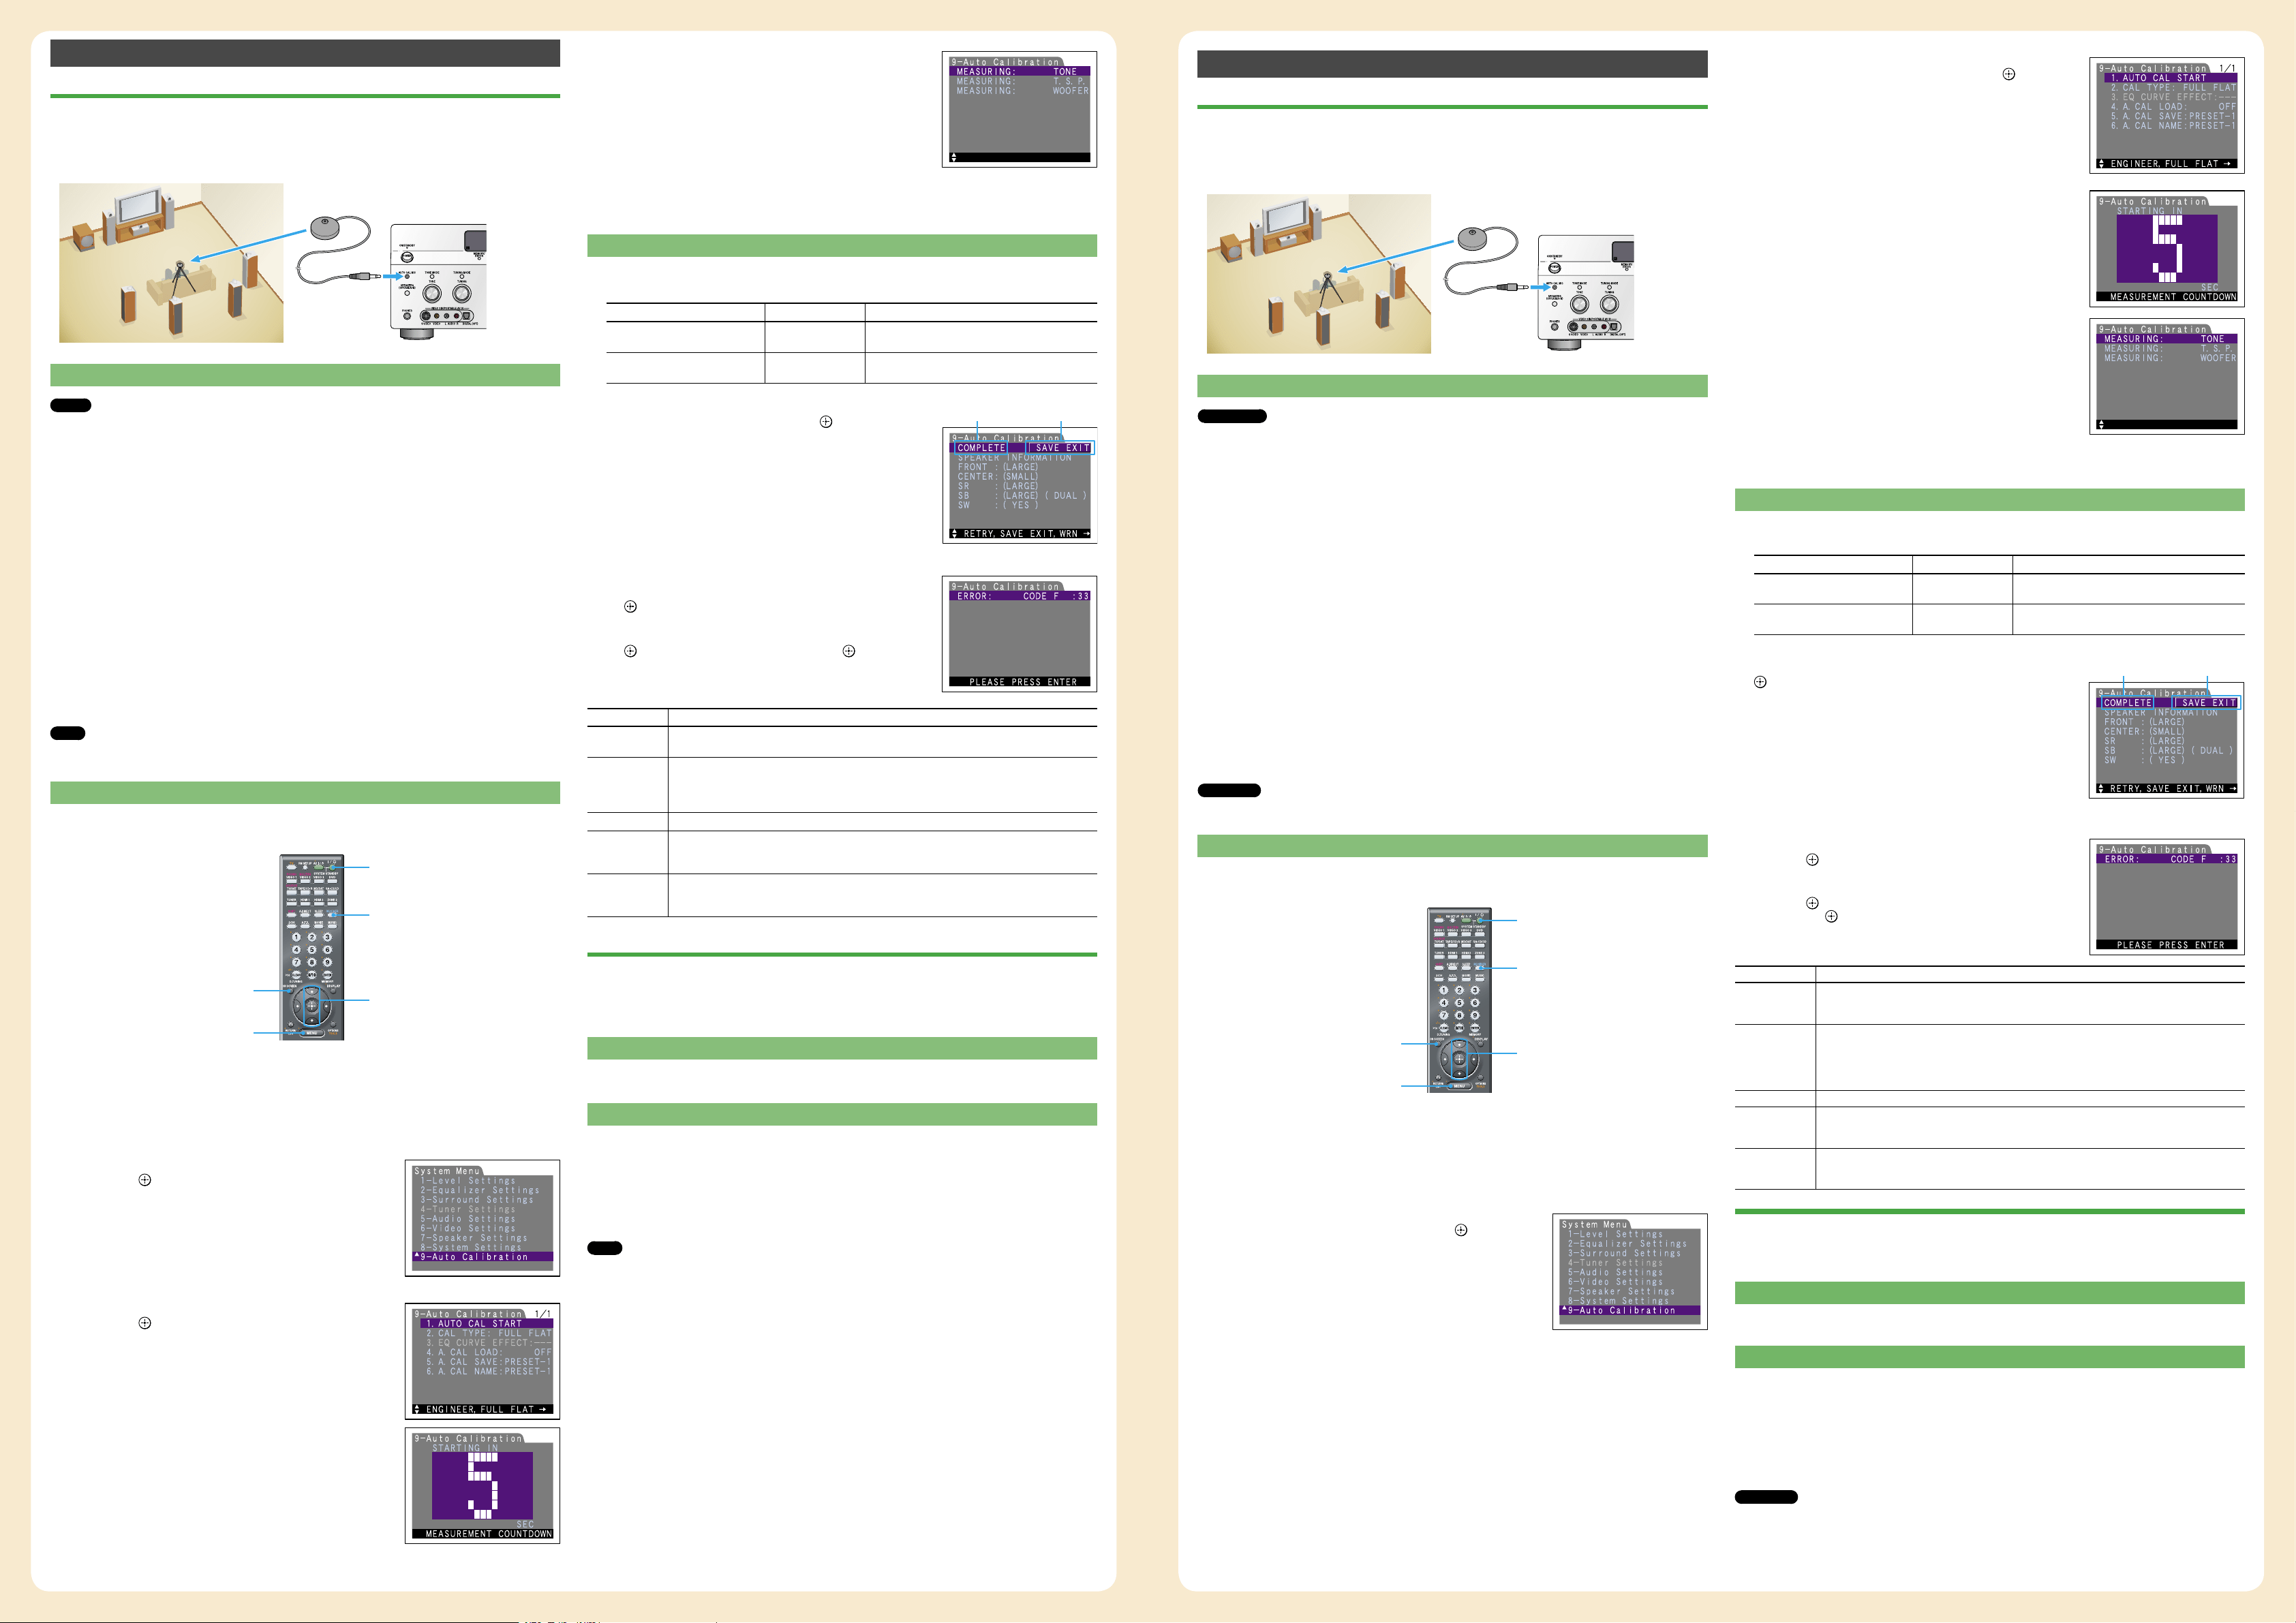
Connect the supplied optimizer microphone to the AUTO CAL MIC jack.
The AUTO CAL MIC jack is used for the supplied optimizer microphone only. Do not connect other
microphones to this jack. Doing so may damage the receiver and the microphone.
3
Set up the optimizer microphone.
Place the optimizer microphone at your listening position. Use a stool or tripod so that the optimizer
microphone remains at the same height as your ears.
On setting up the active subwoofer
• The receiver is now ready to use. Refer to the operating instructions supplied with the receiver for details.
• If you connect a sub woofer with a crossover frequency function, set the value to the maximum.
• If you connect a sub woofer with an auto standby function, set this function to off (deactivated).
Note
Depending on the characteristics of the sub woofer you are using, the setup distance value may be further away from the
actual position.
2: Performing the auto calibration
The Auto Calibration function allows you to measure the following:
Whether or not speakers are connected, terminal types of speakers, distance of each speaker to your listening
position, speaker size, speaker level, frequency level
2
4,5
3
1
3
1
Turn on the receiver and TV.
2
Press ON SCREEN to display the setting menu on TV.
Switch the input of the TV so that the setting menu is displayed on the TV screen connected to this
receiver.
3
Press RECEIVER, and then press MENU.
The list of setting menus appears.
4
Press
/
repeatedly to select “Auto Calibration,”
then press to enter.
5
Press
/
repeatedly to select “AUTO CAL START,”
then press to start the measurement.
Measurement starts in five seconds. A countdown appears on the
TV screen. While the time is counting down, stand away from the
measurement area to avoid measurement error.
6
Measurement starts.
The measurement process will take approximately 30 seconds. Wait
until the measurement process completes.
To cancel the auto calibration
Auto calibration is cancelled when you change the volume, switch functions, change the speaker setting of
the receiver, or connect headphones.
3: Confirming/saving the measurement results
1
Confirm the measurement result.
When the measurement ends, a beep sounds and the measurement result appears on the display.
Measurement results Display Explanation
When the measurement process
completes properly
COMPLETE Proceed to the step 2.
When the measurement process
fails
ERROR CODE
See “When error codes appear.”
2
Save the measurement result.
Press
/
to select “SAVE EXIT,” then press to enter.
For details on the measurement results, refer to “7: Calibrating the
appropriate settings automatically (AUTO CALIBRATION)” in the
operating instructions.
Results Parameter
When error codes appear
Try remedies and re-perform the auto calibration.
• CODE 31
Press
, then retry the measurements from step 1 of “Performing
auto calibration.”
• CODE 32, 33
Press , then press
/
to select “YES,” then press .
Re-perform the measurements from step 5 of “Performing the
auto calibration.”
Error Code Cause and remedies
CODE 31 SPEAKERS (OFF/A/B/A+B) is set to OFF.
Set it to others and re-perform the auto calibration.
CODE 32 None of the speakers were detected. Make sure that the optimizer microphone is
connected properly and reperform the auto calibration.
If the optimizer microphone is connected properly but the error code appears, the
optimizer microphone cable may be damaged or improperly connected.
CODE 33 (F) None of the front speakers are connected or only one surround speaker is connected.
CODE 33 (SR) • Either the left or right surround speakers is not connected.
• Surround back speakers are connected even though surround speakers are not connected.
Connect the surround speaker to the SURROUND terminal.
CODE 33 (SB) The surround back speaker is connected only to the SURROUND BACK SPEAKERS
R terminal. When you connect only one surround back speaker, connect it to the
SURROUND BACK SPEAKERS L terminal.
Setting up other components
You should set up each component so that take out sound is output from speakers correctly when you
play back a connected component. The following case describes Sony components. Refer to the operating
instructions supplied with each component.
Sony Super Audio CD player
Select a suitable playback area (multi-channel or 2 channel). Sound may come out from only the front
speaker left/right when 2 channel is selected.
Sony DVD player
1
Select “AUDIO SETUP” on the setup display of the DVD player.
2
Set “AUDIO DRC” to “WIDE RANGE.”
3
Set “DIGITAL OUT” to “ON.”
4
Set “DOLBY DIGITAL” to “DOLBY DIGITAL.”
5
Set “DTS” to “ON” or “DTS.” (Select the setting depending on the model)
Note
Set up the audio format of the playback disc to listen to multi channel sound.
After the setting
The receiver is now ready to use. Refer to the operating instructions supplied with the receiver for details.
Français
Calibrage automatique aux réglages appropriés (AUTO
CALIBRATION)
La fonction de calibrage automatique vous permet de régler les enceintes de façon à obtenir automatiquement
le son désiré à toutes les enceintes connectées.
1: Avant de commencer le calibrage automatique
Remarques
• Pendant le calibrage, le son émis par les enceintes est très fort. Veillez à ce qu’il n’y ait pas d’enfants à proximité et à ne
pas perturber le voisinage.
• Effectuez le calibrage automatique dans un environnement silencieux pour éviter l’effet de bruit et obtenir une mesure
plus précise.
• S’il y a des obstacles dans la trajectoire entre le microphone d’optimisation et les enceintes, le calibrage ne s’effectuera
pas correctement. Pour éviter des erreurs de mesure, enlevez tout obstacle de la zone de mesure.
• La fonction de calibrage automatique est inopérante lorsque :
– le mode MULTI IN est sélectionné.
– la fonction ANALOG DIRECT est en cours d’utilisation.
– un casque est branché.
1
Installez et raccordez les enceintes.
Pour plus d’informations, voir la première page.
2
Raccordez le microphone d’optimisation fourni à la prise AUTO CAL MIC.
La prise AUTO CAL MIC ne doit être utilisée que pour le microphone d’optimisation fourni. Ne
raccordez pas un autre microphone à cette prise. Ceci pourrait endommager l’ampli-tuner et le
microphone.
3
Installez le microphone d’optimisation.
Placez le microphone d’optimisation sur votre position d’écoute. Utilisez un tabouret ou un trépied pour
que le microphone d’optimisation soit à la même hauteur que vos oreilles.
Réglage du subwoofer amplifié
• L’ampli-tuner est maintenant prêt à être utilisé. Pour plus d’informations, consultez le mode d’emploi de
l’ampli-tuner.
• Si le subwoofer est doté d’une fonction de sélection de la fréquence de recouvrement, choisissez la valeur
maximale.
• Si le subwoofer est doté d’une fonction de mise en veille automatique, désactivez cette fonction.
Remarque
Selon les caractéristiques du subwoofer utilisé, il se peut que la valeur de réglage de la distance soit supérieure à la distance
réelle.
2: Exécution du calibrage automatique
La fonction de calibrage automatique vous permet de déterminer ce qui suit :
absence ou présence d’enceintes connectées, types de bornes des enceintes, distance entre chaque enceinte et
la position d’écoute, taille des enceintes, niveau des enceintes, niveau de fréquence
2
4,5
3
1
3
1
Allumez l’ampli-tuner et le téléviseur.
2
Appuyez sur ON SCREEN pour afficher le menu de réglage sur le téléviseur.
Sélectionnez la source d’entrée du téléviseur raccordé à l’ampli-tuner de façon que le menu de réglage
s’affiche à l’écran.
3
Appuyez sur RECEIVER, puis sur MENU.
La liste des menus de réglage s’affiche.
4
Appuyez plusieurs fois sur
/
pour sélectionner
« Auto Calibration », puis appuyez sur pour
valider.
5
Appuyez plusieurs fois sur
/
pour sélectionner
« AUTO CAL START », puis appuyez sur pour
commencer la mesure.
La mesure commence dans les cinq secondes. Le décompte est affiché
sur l’écran du téléviseur. Pendant le décompte du temps, restez hors de
la zone de mesure pour éviter des erreurs de mesure.
6
La mesure commence.
L’opération de mesure demande environ 30 secondes. Attendez la fin
de l’opération de mesure.
Pour annuler le calibrage automatique
Le calibrage automatique est annulé si vous réglez le volume, changez de fonction, changez les paramètres de
configuration des enceintes sur l’ampli-tuner ou raccordez un casque.
3: Vérification/sauvegarde des résultats de mesure
1
Vérifiez les résultats de mesure.
À la fin de la mesure, un bip est émis et le résultat de mesure apparaît sur l’affichage.
Résultat de mesure Affichage Explication
Quand l’opération de mesure a
été correctement réalisée
COMPLETE Passez à l’étape 2.
Quand l’opération de mesure a
échoué
ERROR CODE
Voir « Si un code d’erreur apparaît ».
2
Sauvegardez les résultats de mesure.
Appuyez sur
/
pour sélectionner « SAVE EXIT », puis appuyez sur
pour valider. Pour plus d’informations sur les résultats de mesure,
voir « 7 : Calibrage automatique aux réglages appropriés (AUTO
CALIBRATION) » dans le mode d’emploi.
Résultats Paramètre
Si un code d’erreur apparaît
Essayez les remèdes indiqués et recommencez le calibrage automatique.
• CODE 31
Appuyez sur
, puis recommencez les mesures depuis l’étape 1
de « Exécution du calibrage automatique ».
• CODE 32, 33
Appuyez sur
, appuyez sur
/
pour sélectionner « YES »,
puis appuyez sur .
Recommencez les mesures depuis l’étape 5 de « Exécution du
calibrage automatique ».
Code d’erreu Causes et remèdes
CODE 31 SPEAKERS (OFF/A/B/A+B) se trouve sur OFF.
Sélectionnez une autre option pour ce paramètre, puis recommencez le calibrage
automatique.
CODE 32 Aucune enceinte n’a été détectée. Assurez-vous que le microphone d’optimisation est
correctement branché, puis recommencez le calibrage automatique.
Si le microphone d’optimisation est correctement branché, mais qu’un code d’erreur
apparaît, il se peut que le câble du microphone d’optimisation soit endommagé ou
incorrectement branché.
CODE 33 (F) Aucune enceinte avant n’est raccordée ou seule une enceinte surround est raccordée.
CODE 33 (SR) • L’enceinte surround gauche ou droite n’est pas raccordée.
• Des enceintes surround arrière sont raccordées alors que des enceintes surround ne le
sont pas. Raccordez l’enceinte surround à la borne SURROUND.
CODE 33 (SB) Une enceinte surround arrière n’est raccordée qu’à la borne SURROUND BACK
SPEAKERS R. Si vous n’utilisez qu’une seule enceinte surround arrière, raccordez-la à la
borne SURROUND BACK SPEAKERS L.
Paramétrage d’autres éléments
Vous devez paramétrer chaque élément de sorte que le son soit sorti correctement des enceintes lorsque vous
utilisez un élément raccordé. Le cas suivant décrit des éléments Sony. Reportez-vous au mode d’emploi
fourni avec chaque élément.
Lecteur CD Super Audio Sony
Sélectionnez une plage de lecture adéquate (multicanaux ou 2 canaux). Il est possible que le son ne sorte que
de l’enceinte avant gauche/droite lorsque 2 canaux est sélectionné.
Lecteur DVD Sony
1
Sélectionnez « AUDIO SETUP » sur l’affichage de paramétrage du lecteur DVD.
2
Réglez « AUDIO DRC » sur « WIDE RANGE ».
3
Réglez « DIGITAL OUT » sur « ON ».
4
Réglez « DOLBY DIGITAL » sur « DOLBY DIGITAL ».
5
Réglez « DTS » sur « ON » ou « DTS ». (Sélectionnez le paramètre en fonction
du modèle)
Remarque
Paramétrez le format audio du disque à lire pour entendre le son multicanaux.
Après le paramétrage
L’ampli-tuner est maintenant prêt à l’utilisation. Reportez-vous au mode d’emploi fourni avec l’ampli-tuner
pour plus d’informations.