FOR MODELS
:
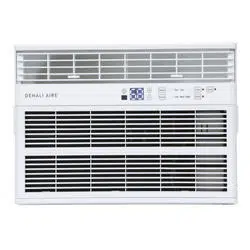
1DAC10K
1DAC12K
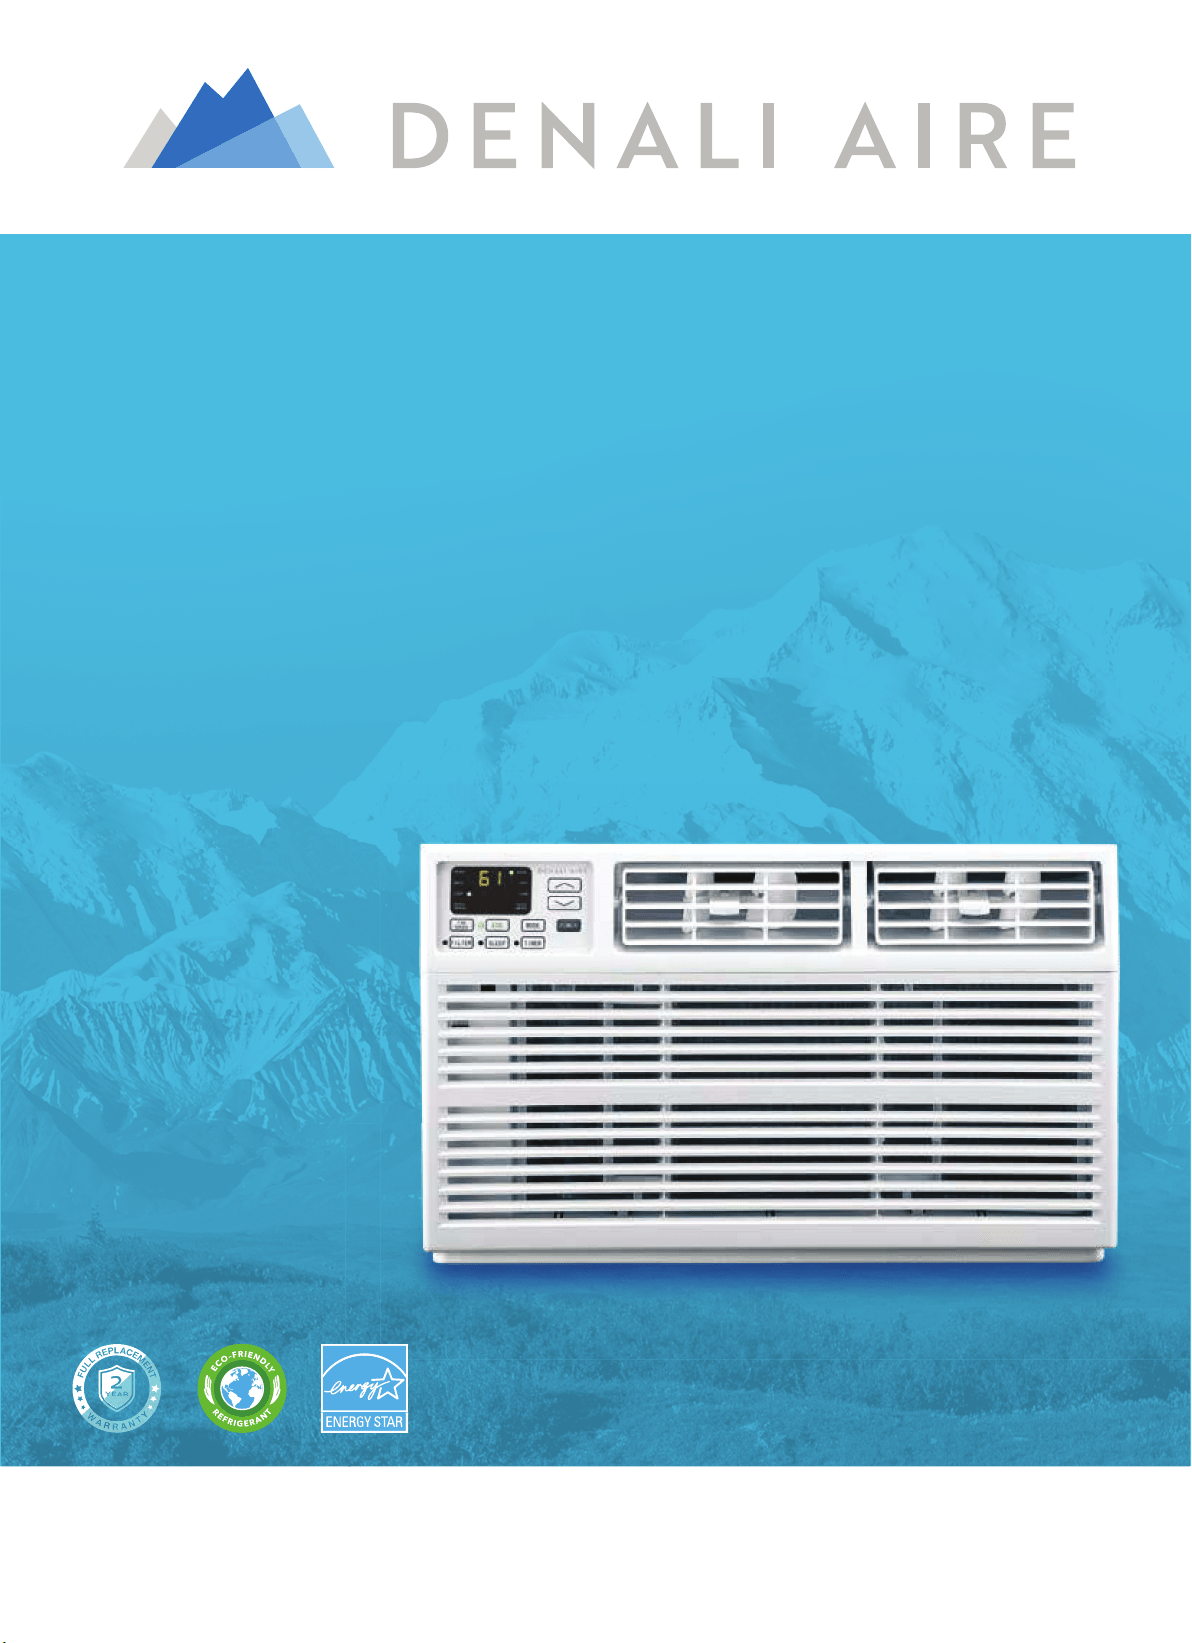
WINDOW AIR CONDITIONER
USER MANUAL
Before using your air conditioner, please read this manual carefully and
keep it for future reference, along with your receipt. Specifications and
performance data is subject to change without notice.

&
&2121668800((5533552'2'8&8&77,,11))250250$$77,,2121
For your own rFor your own r
ecorecords, please attach a copy of your sales rds, please attach a copy of your sales receipt to this manual and complete the following:eceipt to this manual and complete the following:
Model Number:Model Number: _____________________________________ _____________________________________ Serial Number: Serial Number: _______________________________________ _______________________________________
PurPurchase Date: chase Date: ____________________________________ ____________________________________ StorStore Pure Purchased: chased: _____________________________________ _____________________________________
Installation Date: Installation Date: ___________________________________ ___________________________________ Installation Co.: Installation Co.: ______________________________________________________________________________
Installer Name: Installer Name: _____________________________________ _____________________________________ Installer Phone No.: Installer Phone No.: ___________________________________ ___________________________________

7$%/(2)&217(176
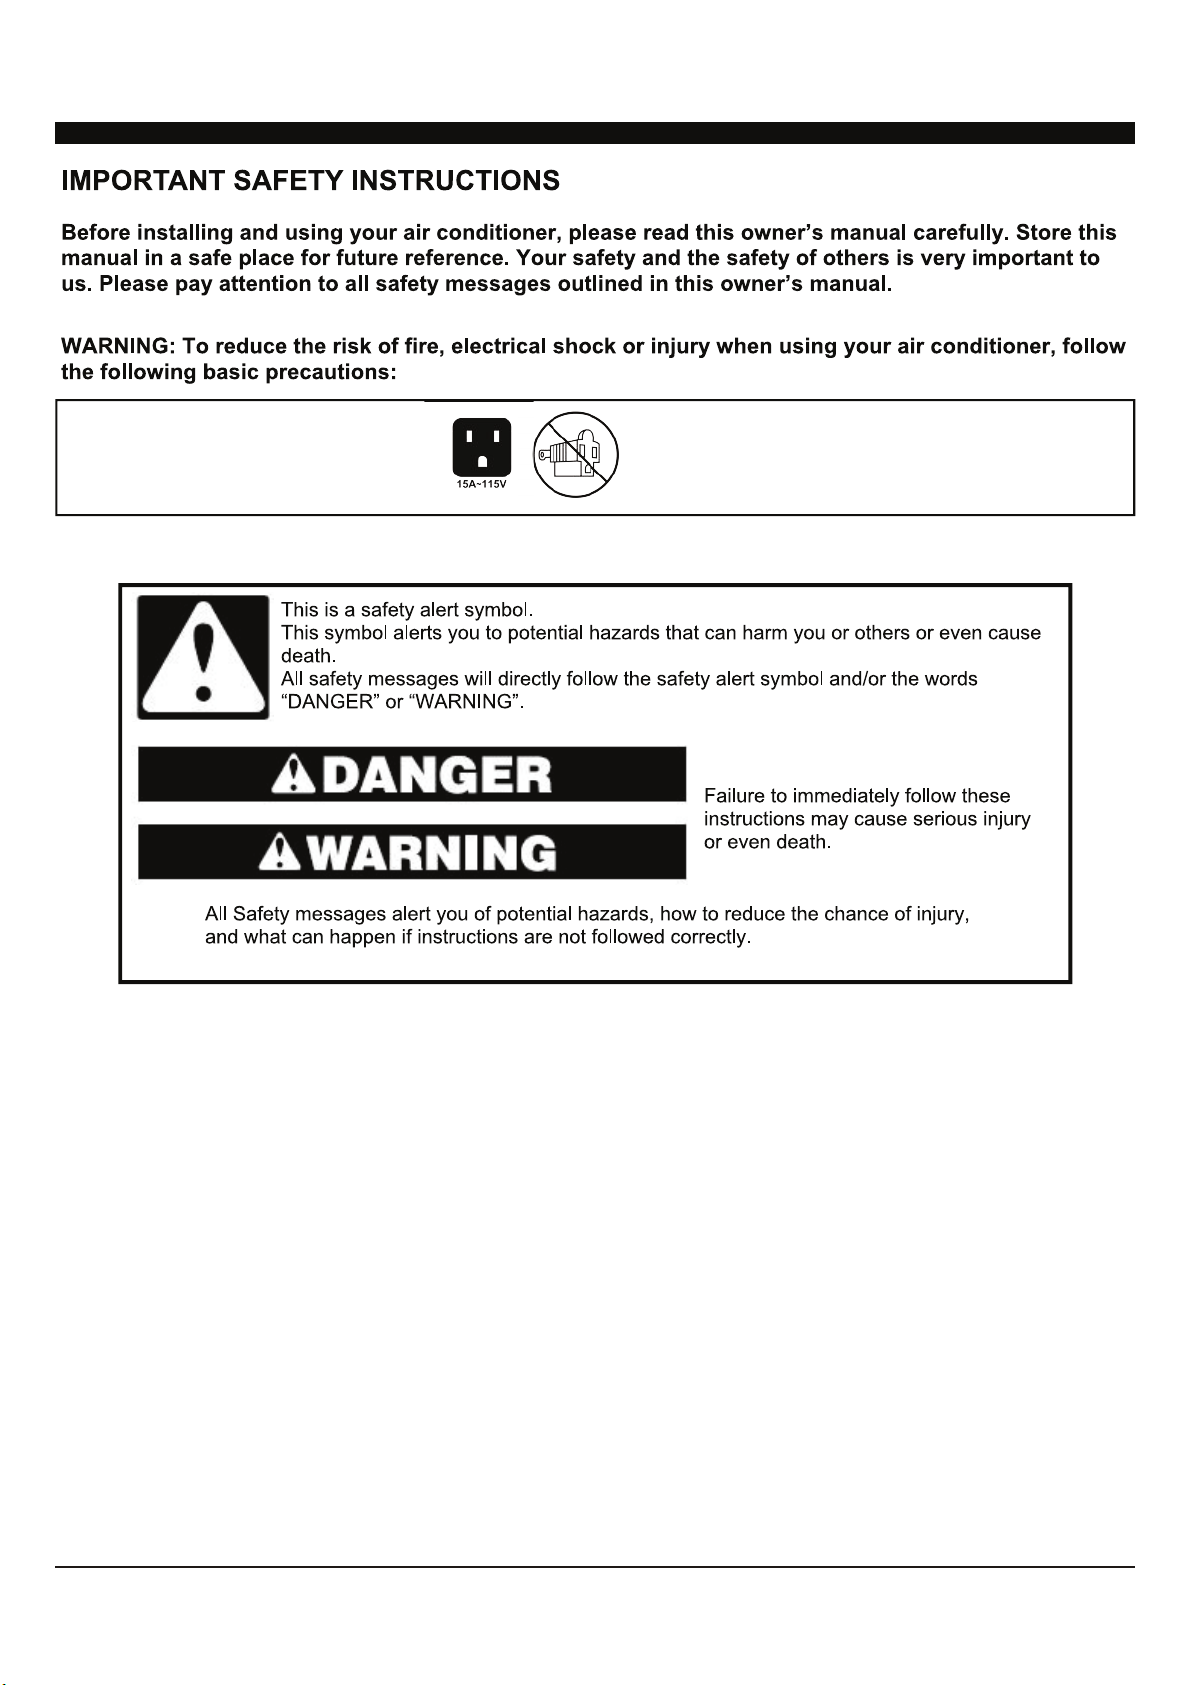
,03257$176$)(7<,16758&7,216
,167$//$7,21+$5':$5(
,167$//$7,21$66(0%/<,16758&7,216
86,1*<285$,5&21',7,21(5
&$5($1'0$,17(1$1&(
7528%/(6+227,1*
(/(&75,&$/5(48,5(0(176
86,1*<2855(027(&21752/
v 3OXJLQWRDJURXQGHGSURQJRXWOHW
v 'R1RWUHPRYHWKHJURXQGSURQJ
v 'R1RWXVHDSOXJDGDSWHU
v 'R1RWXVHDQH[WHQVLRQFRUG
v 8QSOXJWKHDLUFRQGLWLRQHUEHIRUHVHUYLFLQJ
v 8VHWZRRUPRUHSHRSOHWRPRYHDQGLQVWDOOWKHDLU
FRQGLWLRQHU
H
W
FCC Caution.
This device complies with part 15 of the FCC Rules. Operation is subject to the following two
conditions: (1) This device may not cause harmful interference, and (2) this device must accept
any interference received, including interference that may cause undesired operation.
Any Changes or modifications not expressly approved by the party responsible for compliance
could void the user's authority to operate the equipment.

..DPSV
..DPS
(OHFWULFDO6KRFN+D]DUG
3OXJLQWRDJURXQGHGSURQJRXWOHW
'R1RWUHPRYHWKHJURXQGSURQJ
'R1RWXVHDQDGDSWHU
'R1RWXVHDQH[WHQVLRQFRUG
)DLOXUHWRIROORZWKHVHLQVWUXFWLRQV
FDQUHVXOWLQGHDWKILUHRUHOHFWULFDO
VKRFN
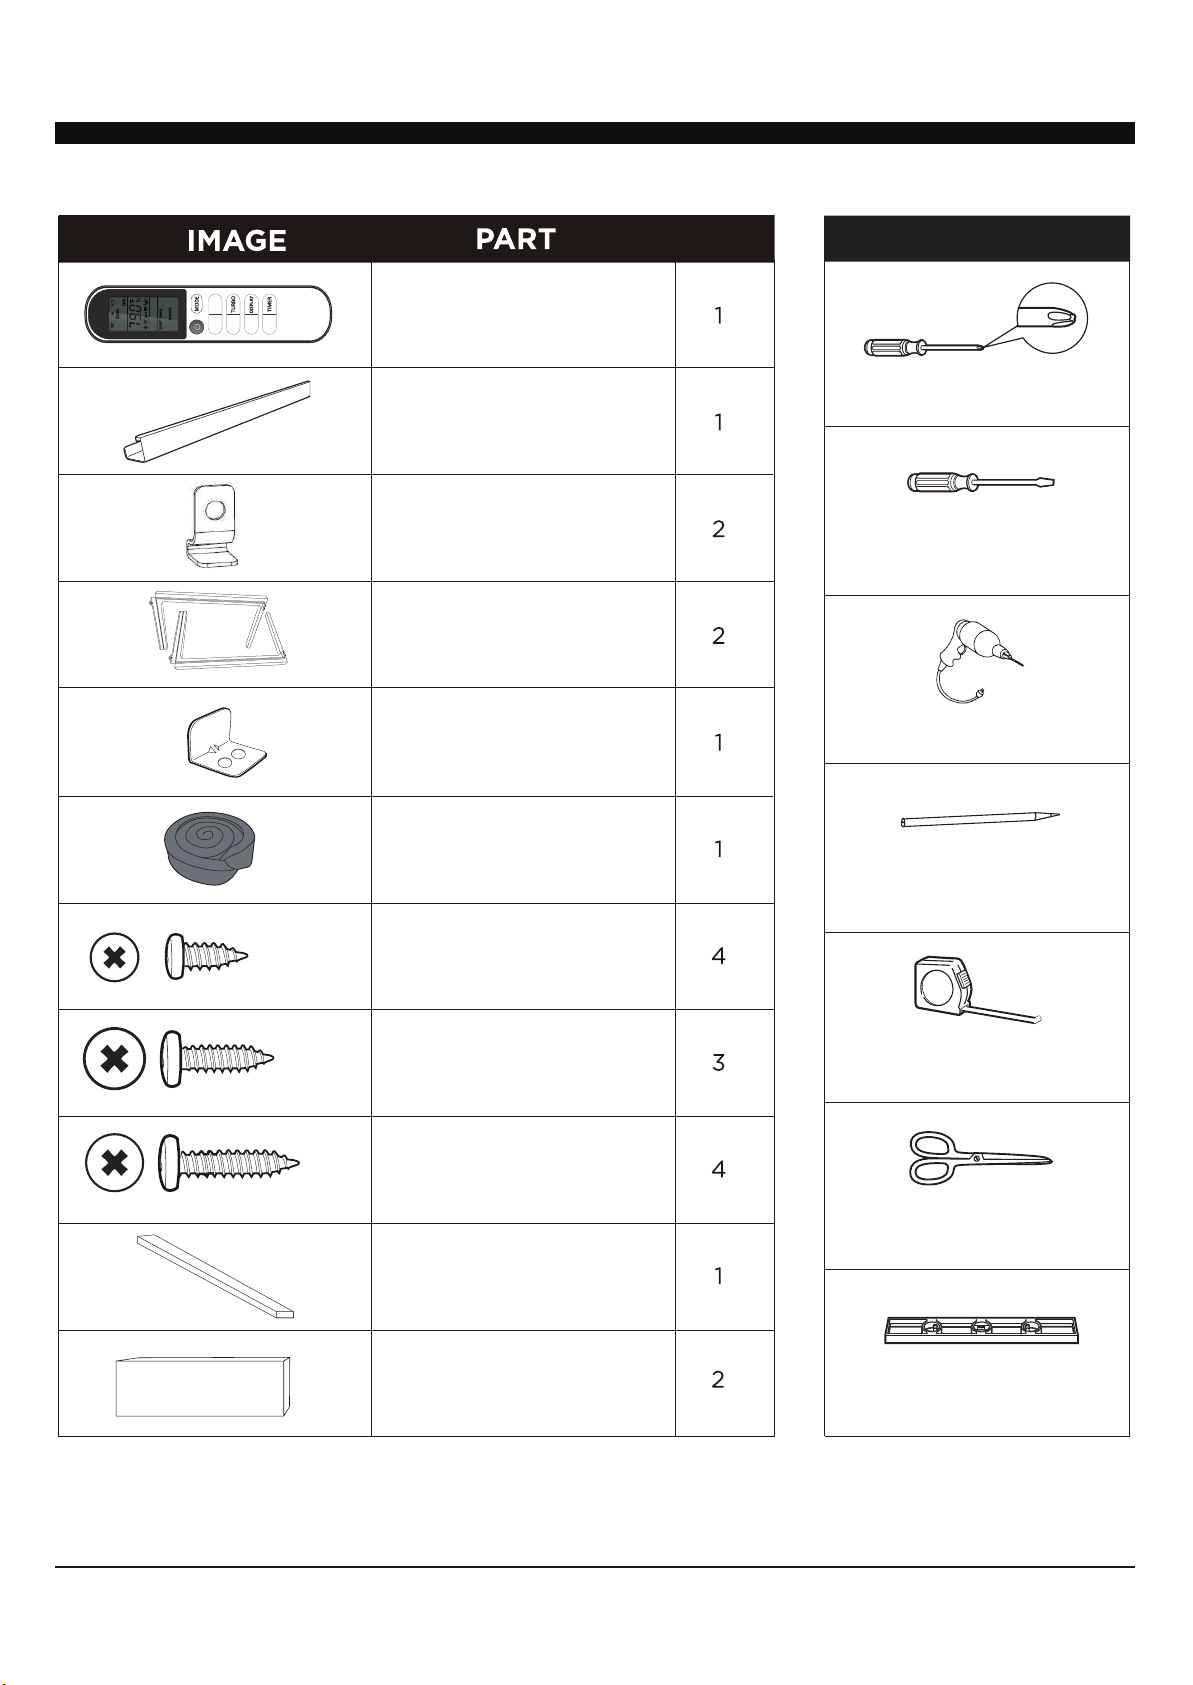
5HPRWH&RQWURO
7RS0RXQWLQJ5DLO
:LWK)RDP
/RFN)UDPH
$FFRUGLRQ3DQHOV
:LWK/HIW5LJKWmarked
RQWKHIURQWIDFH
6DVK/RFN
7ZRKROHV
:LQGRZ6DVK6HDO
)RDP
6FUHZV
6FUHZV
6FUHZV
47<
,QVXODWLRQIRUWKH
$FFRUGLRQ3DQHOV
7KLQVSRQJHIRUEDFNXSXVLQJ
,QVXODWLRQ6WULS
)RDP
722/61(('('
7OPSSPWZ/LHKScrewdriver
-SH[/LHKScrewdriver
+YPSSw+YPSS)P[
Pencil
Tape4LHZ\YL
Scissors or2UPML
3L]LS
127(6DYHFDUWRQDQGWKHVH,QVWDOODWLRQ,QVWUXFWLRQVIRUIXWXUHUHIHUHQFH7KHFDUWRQLVWKHEHVWZD\WRVWRUHXQLWGXULQJZLQWHURUZKHQQRWLQXVH
,167$//$7,21+$5':$5(,1&/8'('
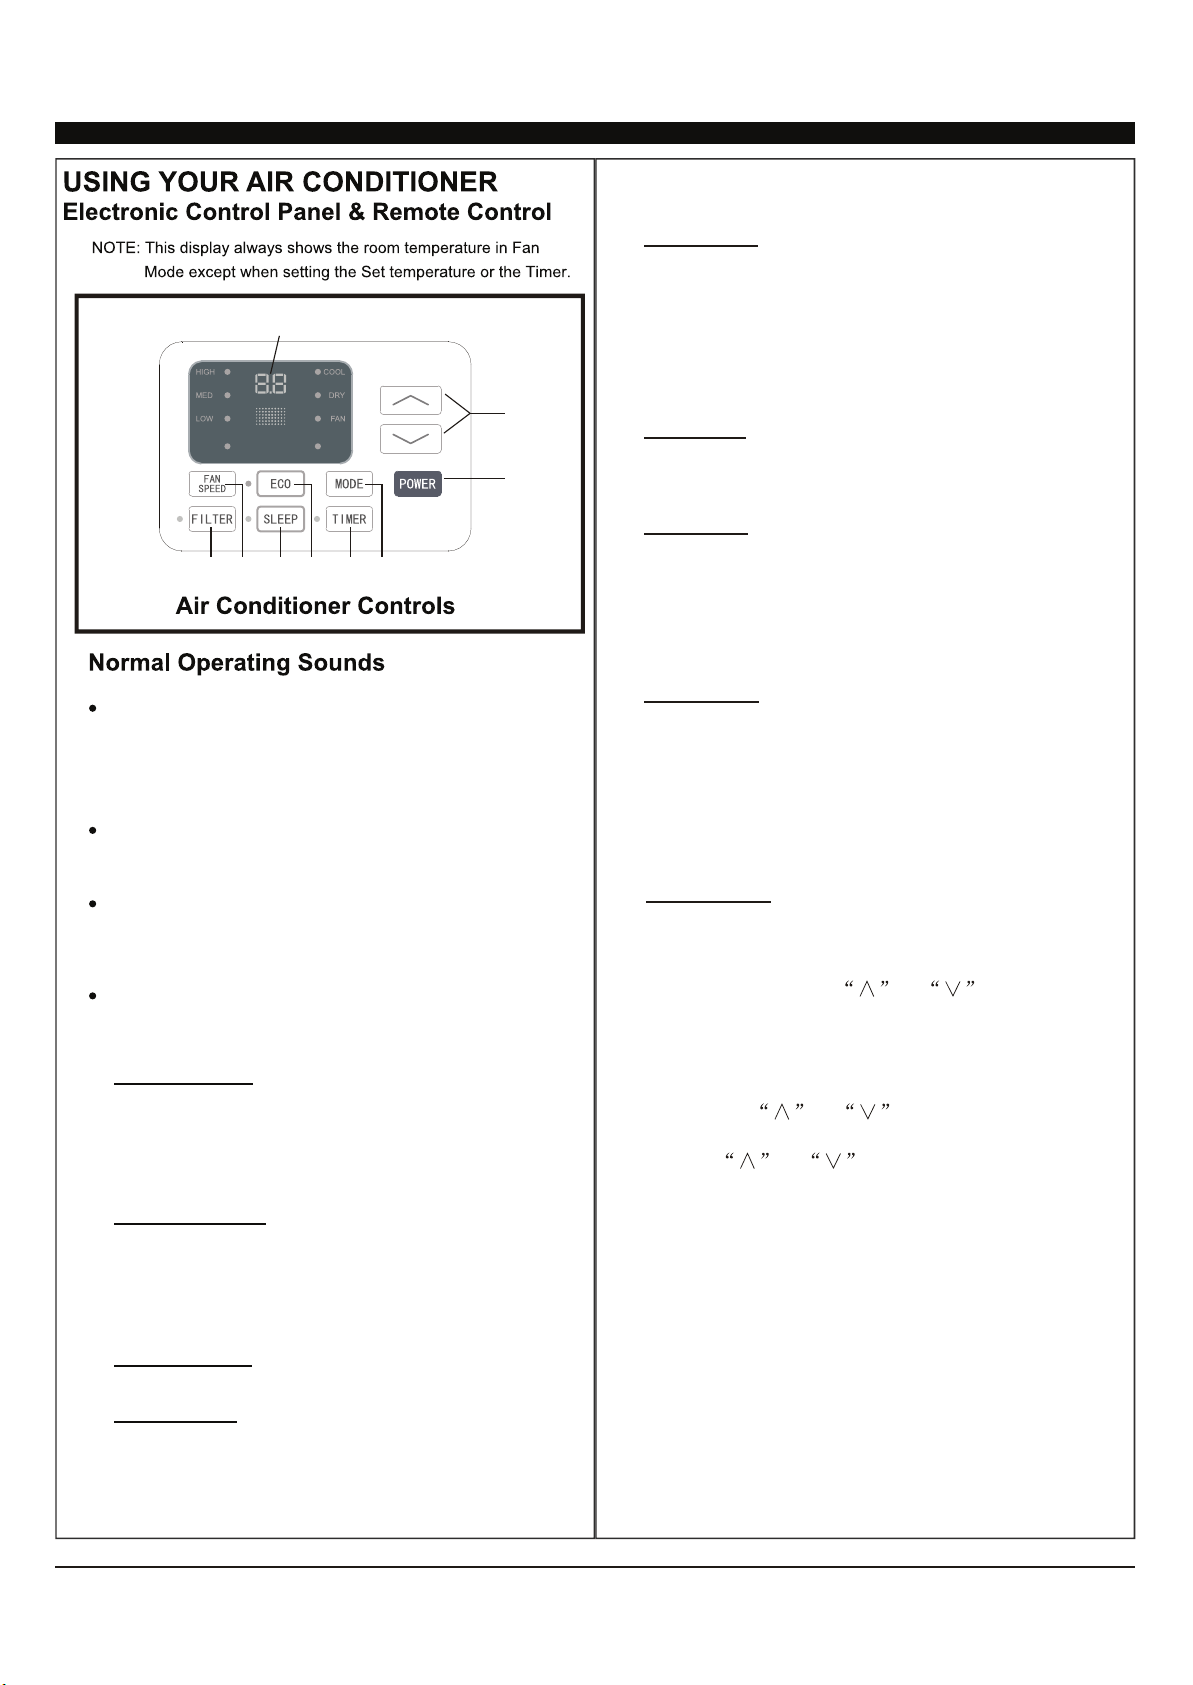
,)((/
(&2
)$1
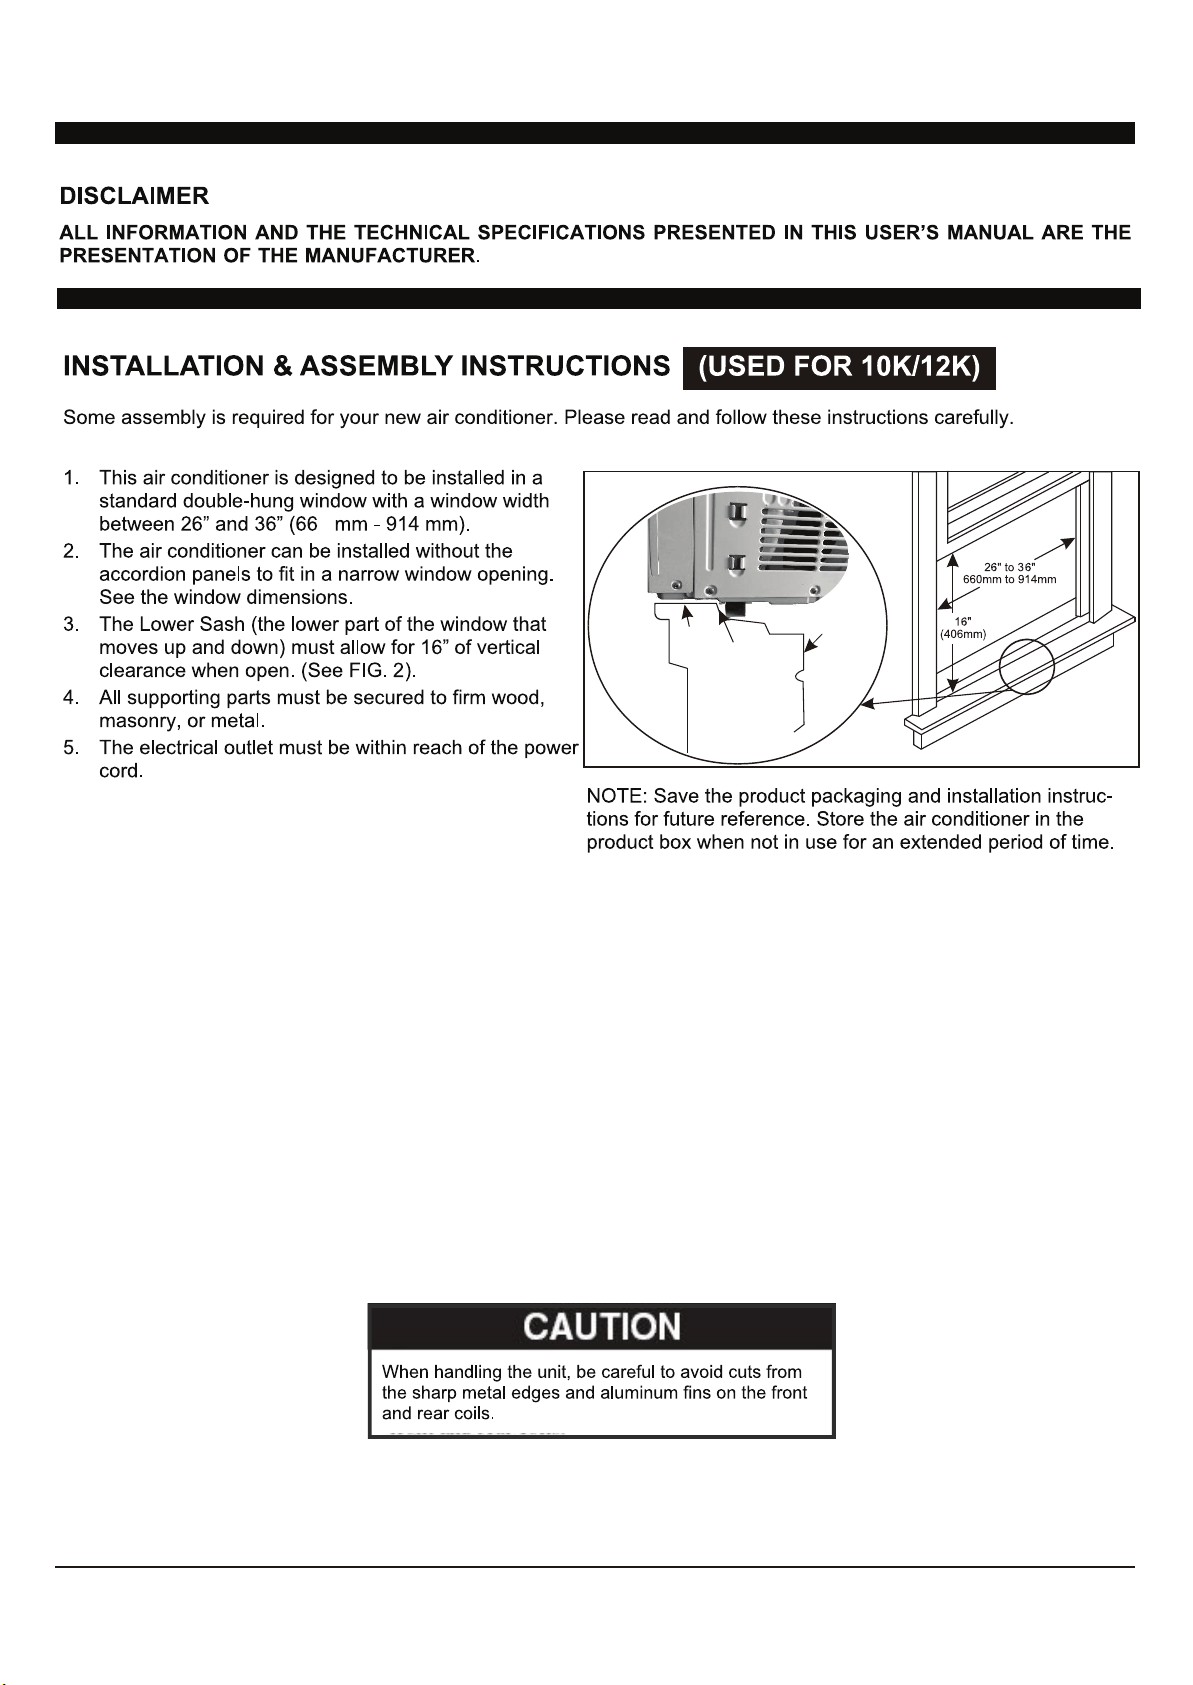
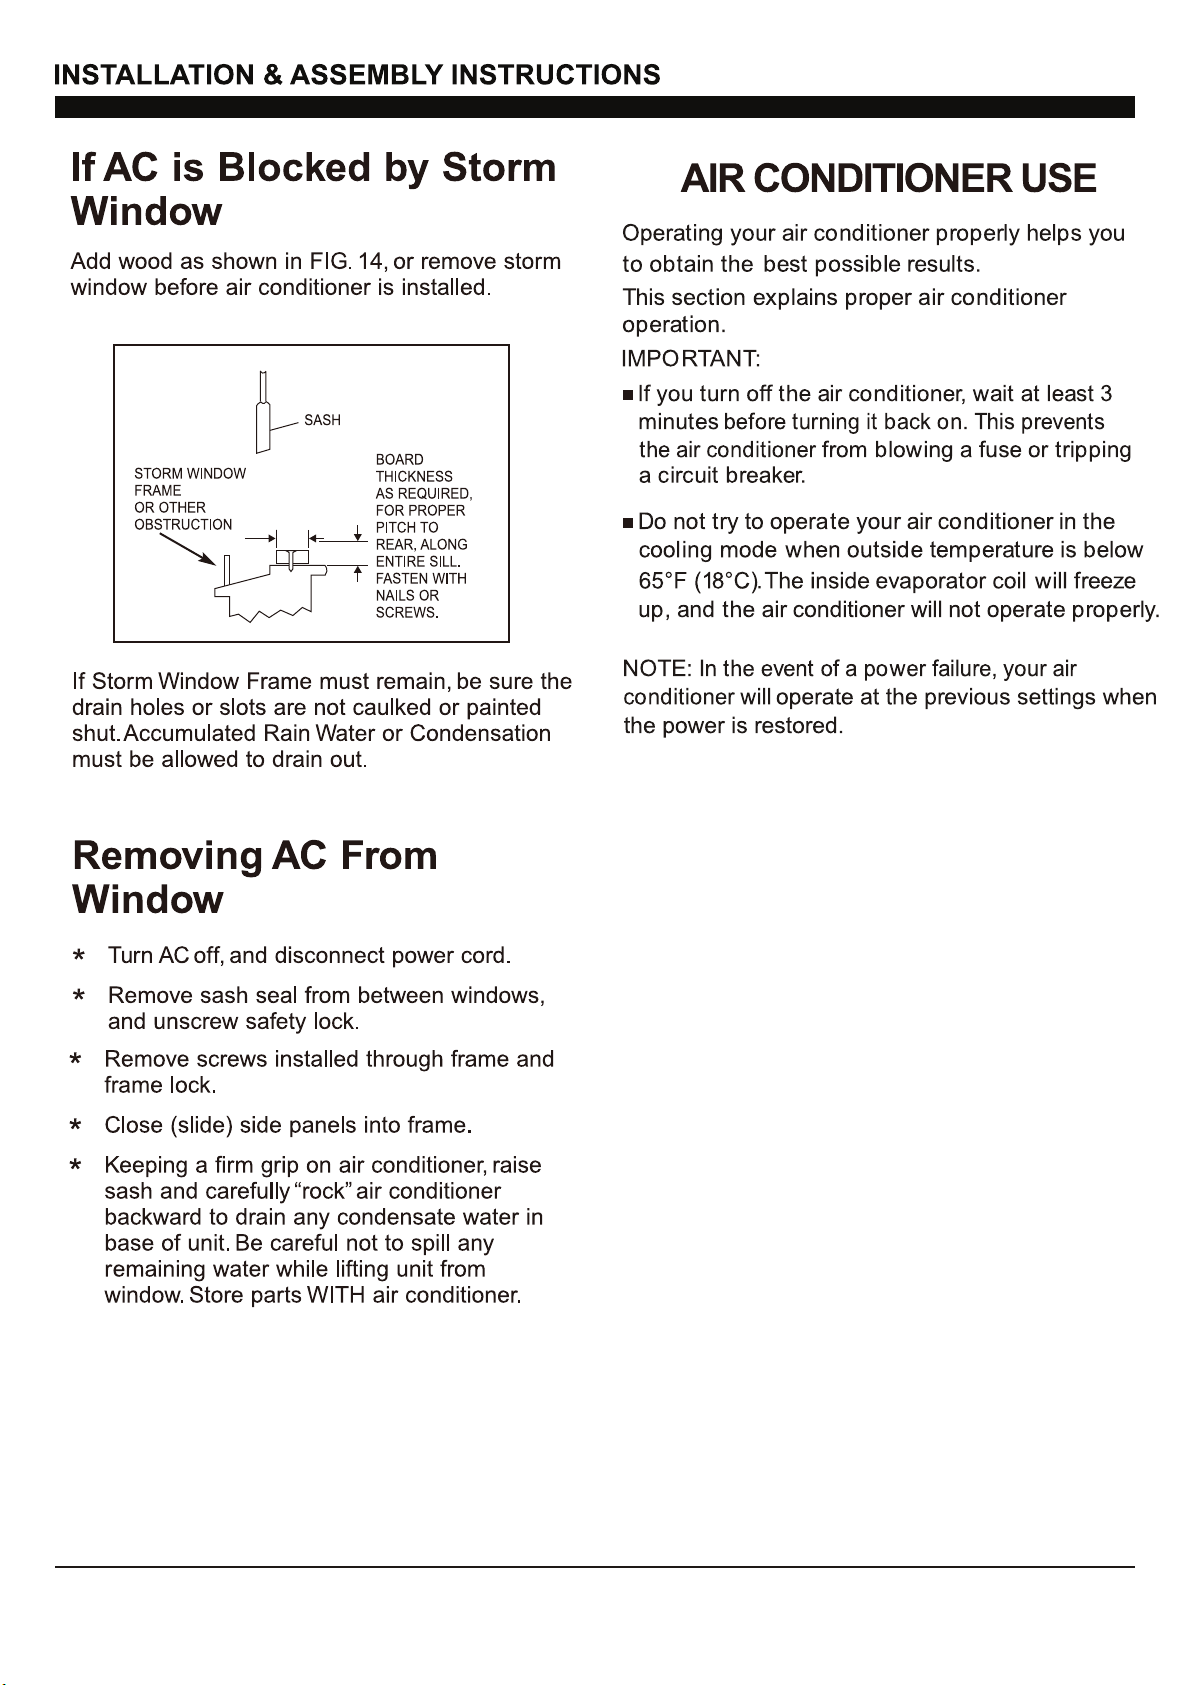
FIG. 2
OFFSET
STOOL
SILL
INTERIOR
WALL
EXTERIOR
WALL
5
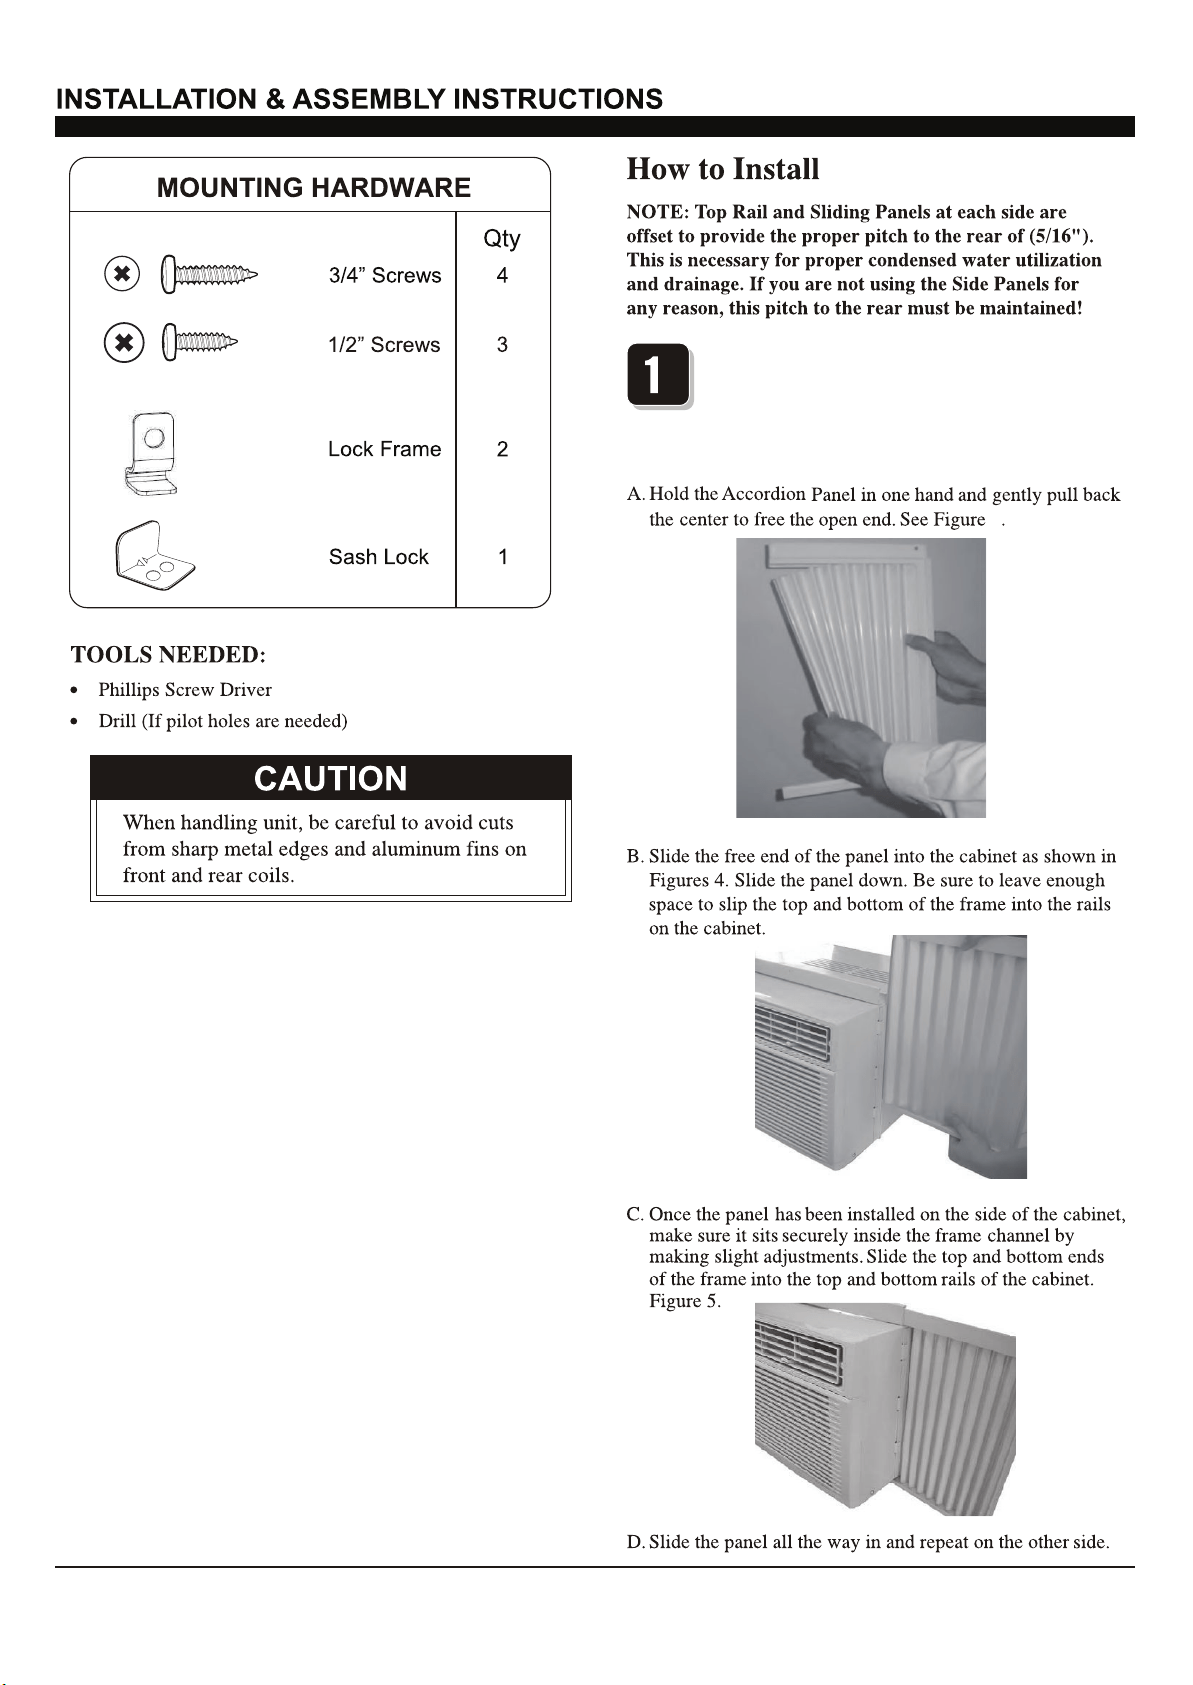
FIG. 3
3
FIG. 4
FIG. 5
3ODFHWKHXQLWRQWKHIORRUDEHQFKRUDWDEOH
7KHUHLVD/HIWDQG5LJKW$FFRUGLRQ3DQHO²EH
VXUHWRXVHWKHSURSHUSDQHOIRUHDFKVLGH:KHQ
LQVWDOOHGWKHIODQJHIRUVHFXULQJWKHSDQHOLQSODFH
WRWKHZLQGRZZLOOEHIDFLQJLQWRWKHURRP
&217
6
(Suggest to keep a downward
oblique, to let accumulated rain water to drain out,
from back side of the unit bottom.)
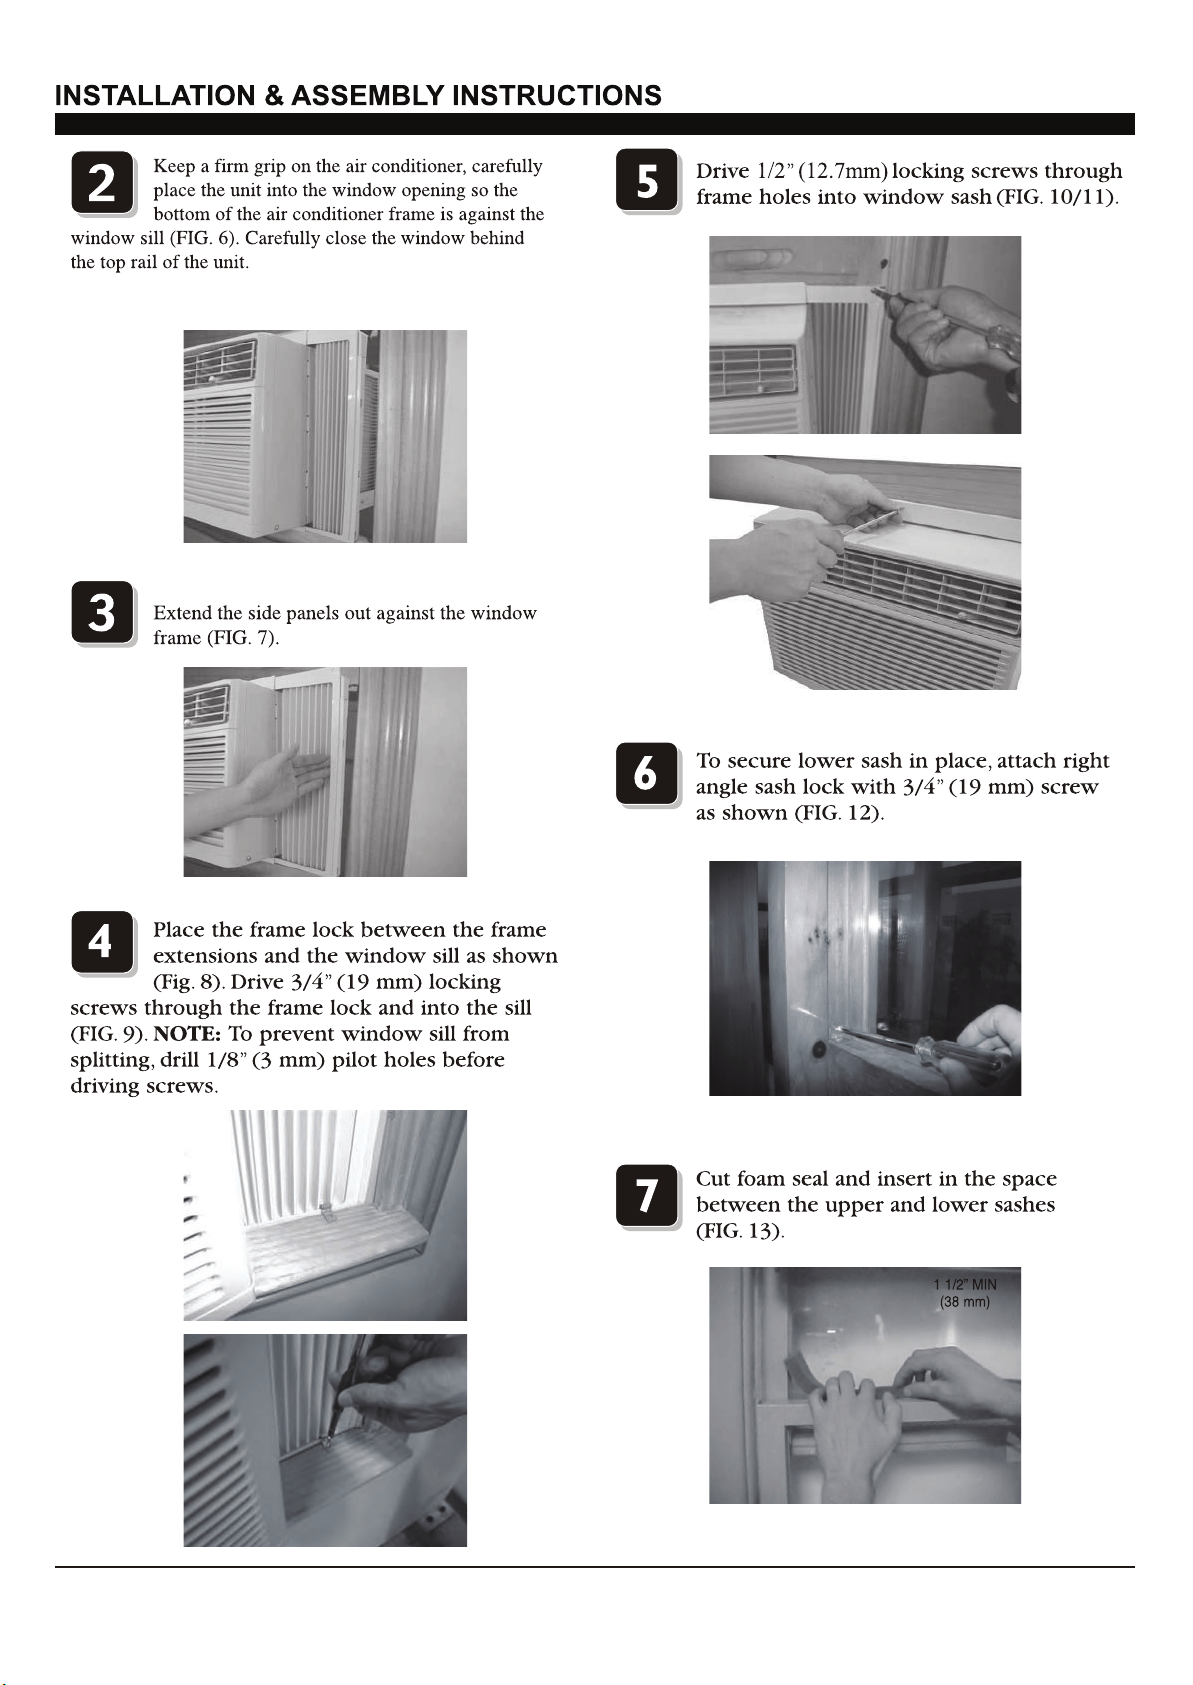
FIG. 6
FIG. 7
FIG. 8
FIG. 9
FIG. 10
FIG. 11
FIG. 12
FIG. 13
&217
7
FIG. 14
&217
8
$872
63(('
$872
02'(
<RXPD\KHDUDSLQJLQJQRLVHFDXVHGE\ZDWHU
KLWWLQJWKHFRQGHQVHURQUDLQ\GD\VRUZKHQWKH
KXPLGLW\LVKLJK7KHGHVLJQIHDWXUHVKHOS
UHPRYHPRLVWXUHDQGLPSURYHHIILFLHQF\
<RXPD\KHDUWKHWKHUPRVWDWFOLFNZKHQWKH
FRPSUHVVRUF\FOHVRQDQGRII
:DWHUZLOOFROOHFWLQWKHEDVHSDQGXULQJUDLQRU
GD\VRIKLJKKXPLGLW\7KHZDWHUPD\RYHUIORZ
DQGGULSIURPWKHRXWVLGHSDUWRIWKHXQLW
7KHIDQPD\UXQHYHQZKHQWKHFRPSUHVVRULV
QRWRQ
Cool Mode: The cooling function allows the air
conditioner to cool the room and at the same time
reduces humidity. Press the MODE button to
activate the cooling function. To optimize this
function, adjust the temperature by pressing the
up and down arrows and the speed by pressing
the Fan Speed button.
Dry Mode: This function reduces the humidity of
the air to make the room more comfortable. Press
MODE button to set the DRY mode.
Fan Mode: This mode will only circulate the air.
Press MODE button to select FAN MODE.
Pressing the FAN SPEED button allows you to
change the fan speed setting from HI, MED and
LO. If using the remote control, it will store the fan
speed setting from the most previous use.
Auto Mode: In AUTO mode the unit automatically
chooses the fan speed and the mode of operation
(COOL, DRY or FAN). In this mode the fan speed
and temperature are set automatically according
to the room temperature (Room temperature is
determined by the temperature sensor located in
the unit.)
7LPHU%XWWRQ8VHWKHVHEXWWRQVRQWKHFRQWURO
panel and remote to set the Timer.
Timer Off:
The timed stop is programmed by
pressing the TIMERbutton. Set the time by
pressing the button or
, set the temperature with pressing
Timer On:
button first
the button or
with pressing the
button or .
stop
until your
desired stop time is displayed, then press TIMER
button again.
When the unit is off, press TIMER
. Press TIMER button
a second time, set the stop time
Press TIMER button a
third time, confirm your settings and stop time.
The display will show the time your machine will
automatically turn on.
Note: It can be set to automatically turn off or on
in 0.5-24 hours. Each press of the
buttons will increase or decrease the timer. The
Timer can be set in 0.5 hours increment below 10
hours and 1 hour increment for 10 hours or
above. The SET light will turn
on while setting.
To cancel the set function, press the TIMER
button again.
'LJLWDO'LVSOD\:LWKRXWWLPHUVHWWLQJWKH
RSHUDWLRQPRGHLV&RROLQJ'U\)DQDQG$XWRDQG
WKHVHWWHPSHUDWXUHZLOOEHGLVSOD\HG7LPHZLOOEH
GLVSOD\HGXQGHUWLPHUVHWWLQJ
ADQG%XWWRQ8VHWKHVHEXWWRQVRQWKHFRQWURO
SDQHODQGUHPRWHWRLQFUHDVHRUGHFUHDVHWKH6HW
7HPSHUDWXUHRU7LPHU7HPSHUDWXUHUDQJHLV
EHWZHHQ)DQG)&&
3RZHU%XWWRQ7XUQWKHDLUFRQGLWLRQHURQDQGRII
0RGH%XWWRQ3UHVVWKHPRGHEXWWRQWRF\FOH
WKURXJKWKHYDULRXVPRGHV&RRO'U\)DQDQG
$XWR
A
9
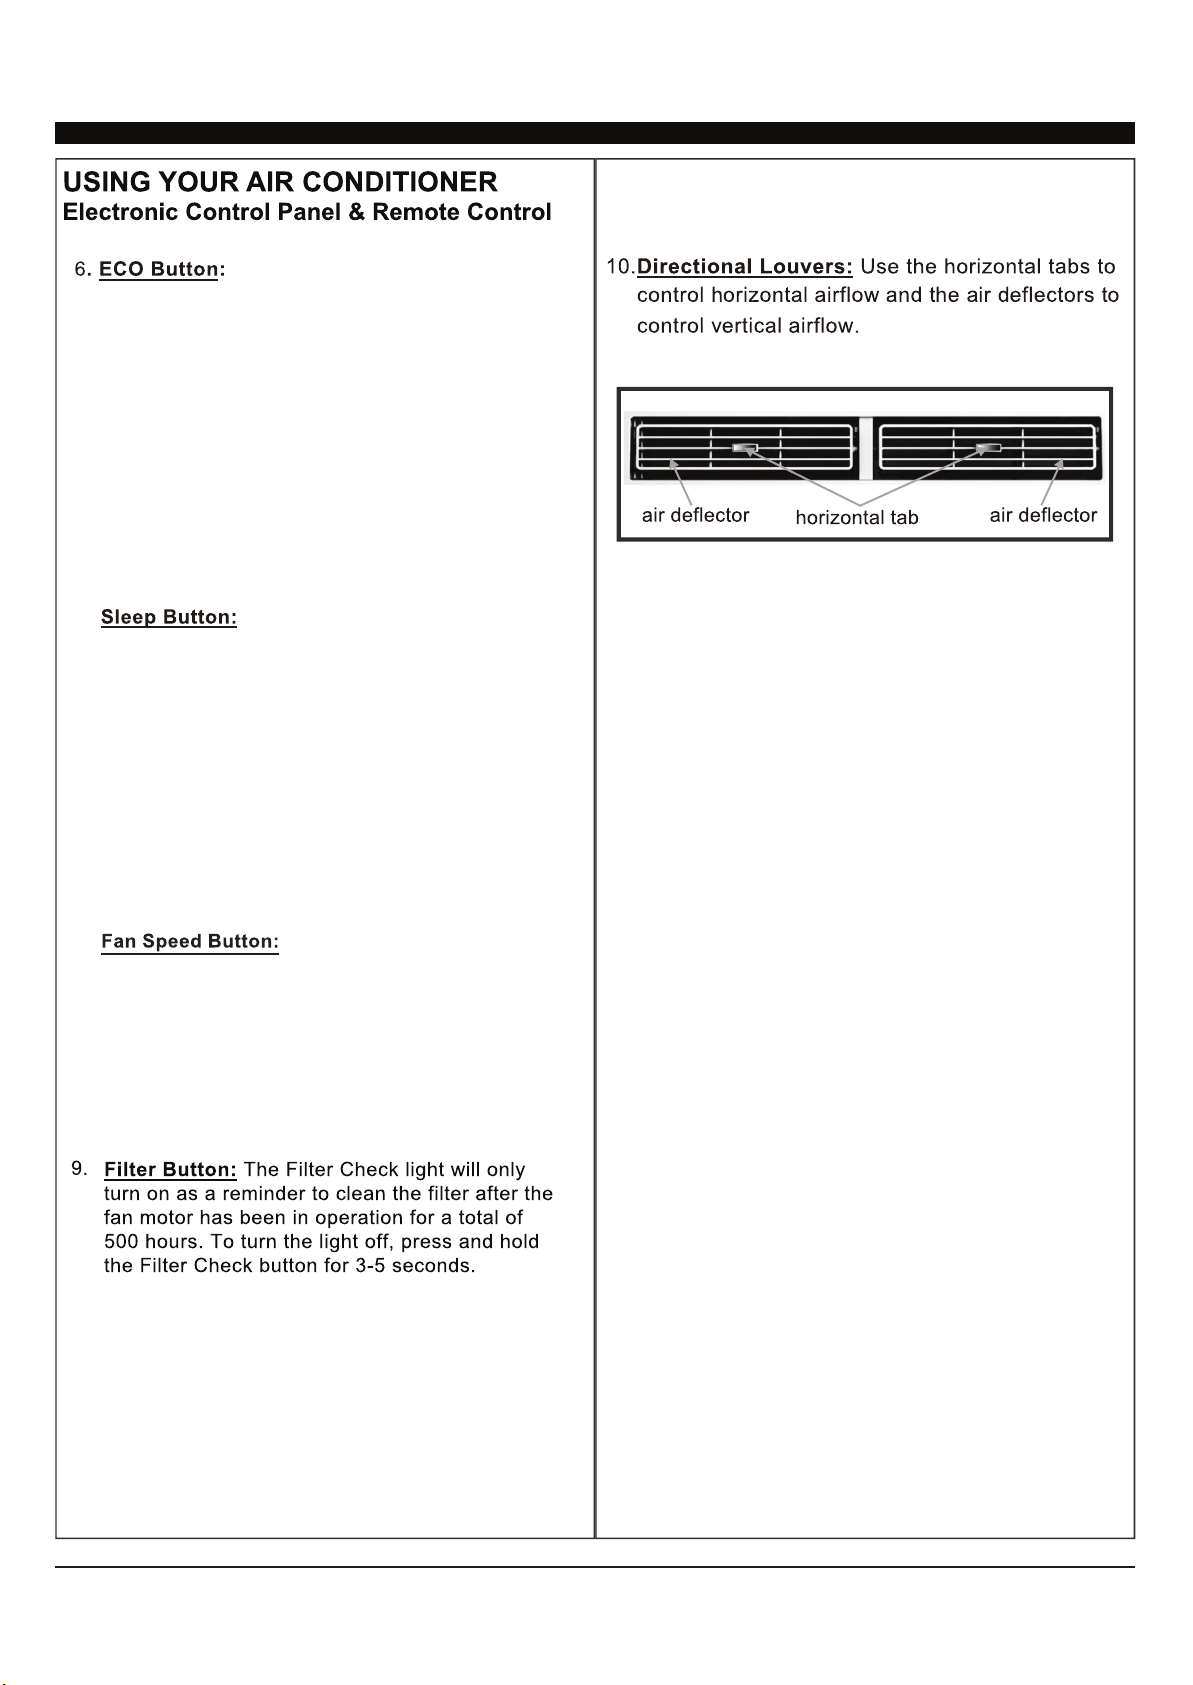
8.
3UHVVWKH6/((3EXWWRQDOORIWKH
display lights will turn off after a while, but the sleep
light is always on. In the mode, the airconditioner
will automatically adjust the temperature and fan
speed to make the room more comfortable during
the night. The set temperature will automatically
change every 30-60 minutes and at most change six
times until the set temperature is 81 or 82 F.
Press the FAN SPEED buttonto
select the fan speed. In COOL MODE you can
choose the following settings: HI, MED, LO, or
AUTO. In Fan MODE you can choose from HI, MED,
and LO.
8.
:KHQWKHXQLWLVLQ(&2PRGHWKH
OLJKWZLOOWXUQRQ,Q(&2PRGHWKHXQLWZLOOWXUQRII
RQFHWKHURRPLVFRROHGWRWKHXVHUVVHW
WHPSHUDWXUH7KHIDQZLOODOVREHRIIDWWKLVSRLQW
7KHXQLWZLOOWXUQEDFNRQZKHQWKHURRP
WHPSHUDWXUHULVHVDERYHWKHXVHUVVHW
WHPSHUDWXUH%HIRUHWKHFRPSUHVVRUVWDUWVWKHIDQ
PRWRUZLOOUXQIRUDZKLOHWKHQLWZLOOVWRSIRUD
ZKLOHDQGZLOOUHSHDWWRSURYLGHDPRUHZLOOUHSHDW
WRSURYLGHPRUHFRPIRUWDQGVDYHHQHUJ\
10
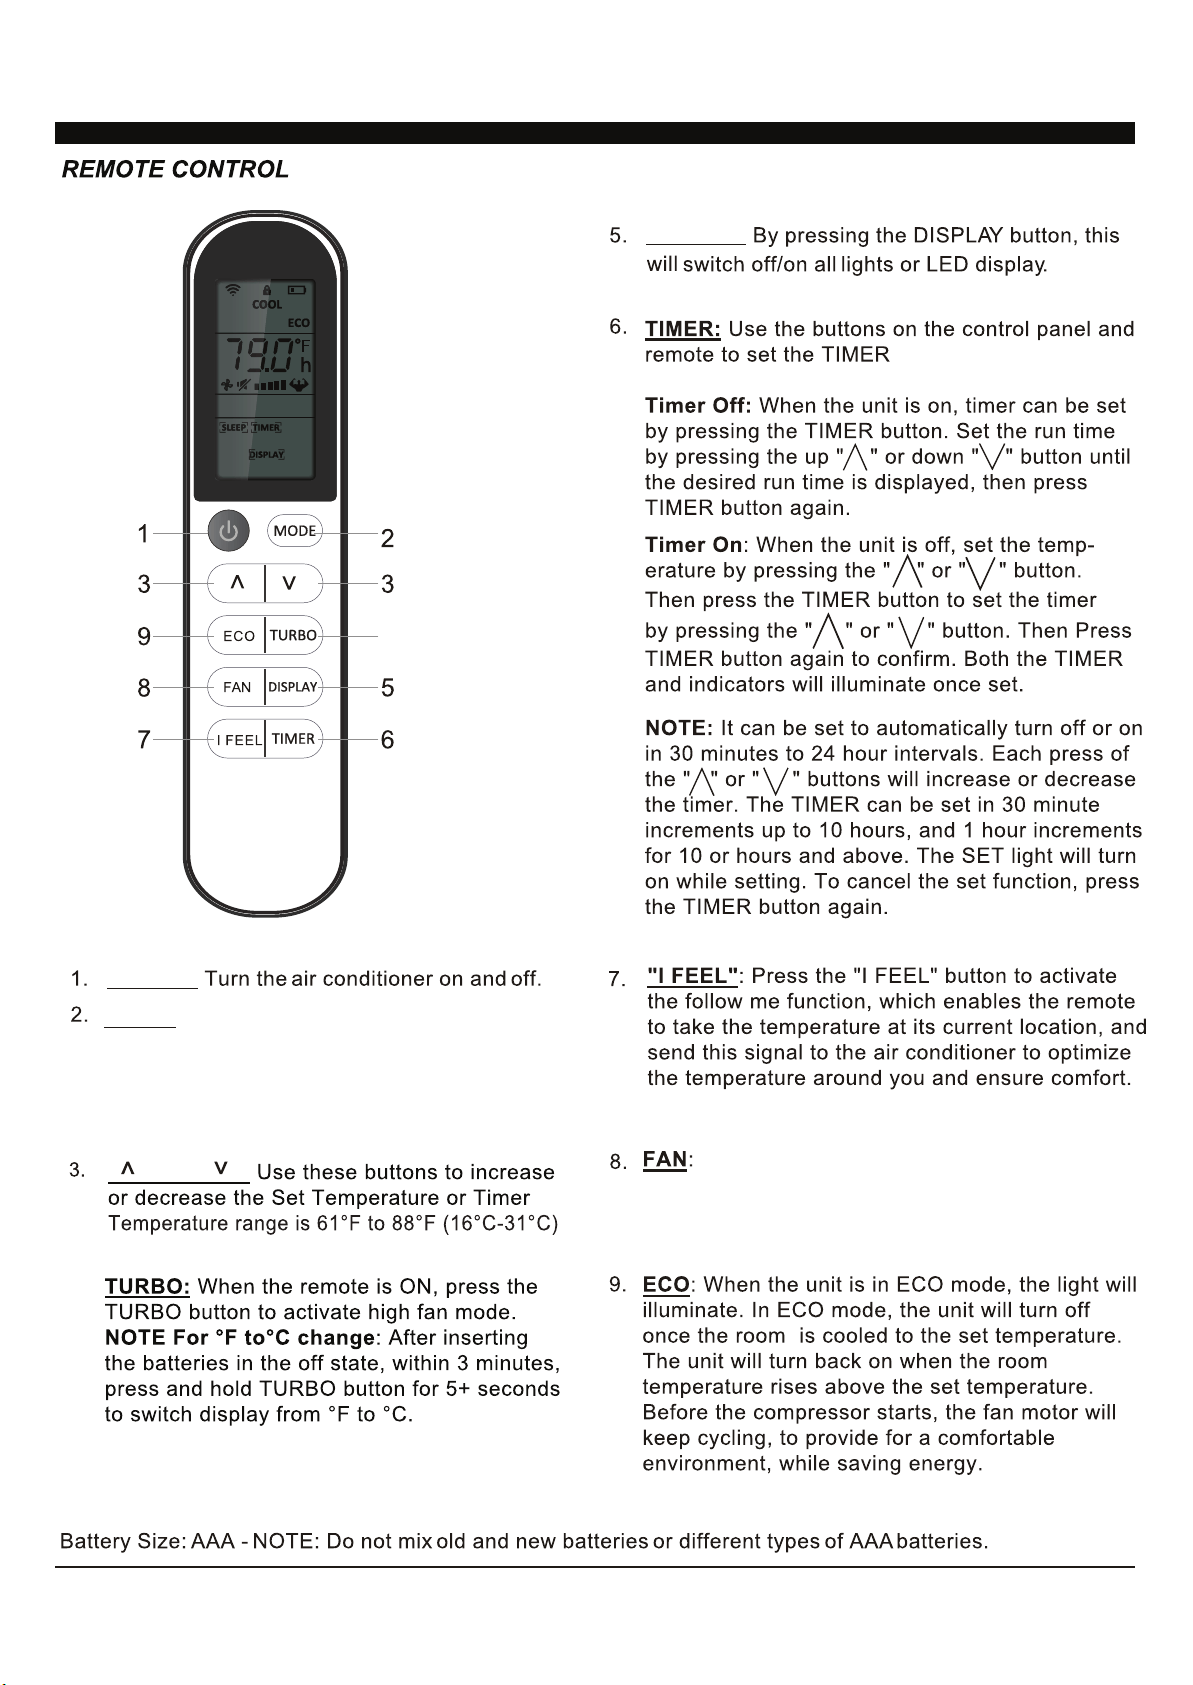
DISPLAY:
POWER:
MODEG
" " and " ":
4.
USING YOUR REMOTE CONTROL
Press the button to select the mode of
operation, AUTO, COOL, DRY, FAN and HEAT
Note: The HEAT mode is inactive for COOL ONLY
models. Press and hold the MODE button for more
than 5 seconds to delete or add the HEAT mode on
remote.
Press the "FAN" speed button to select the fan
options. You can choose HI, MED, LO or AUTO in COOL
MODE or HEAT MODE, and HI, MED, LO in FAN MODE.
1
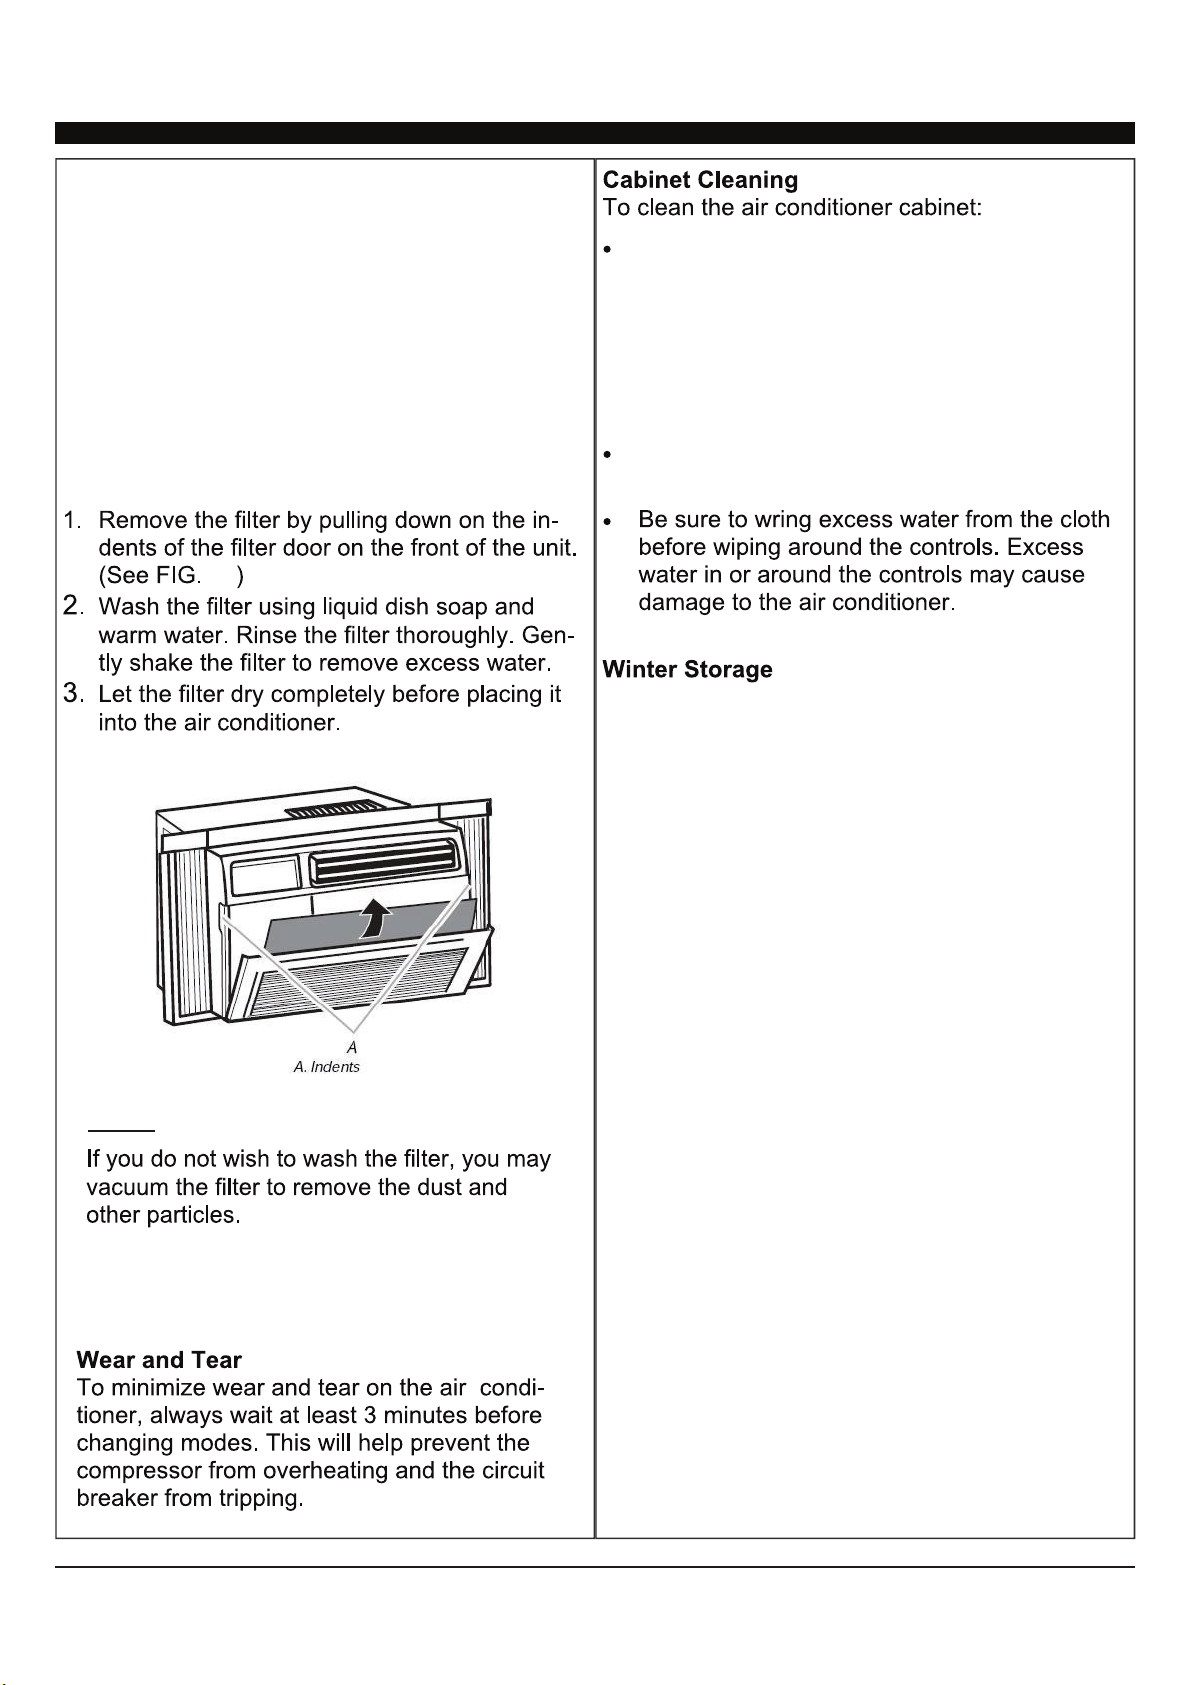
),*
127(
&$5($1'0$,17(1$1&(
&OHDQ\RXUDLUFRQGLWLRQHUWRNHHSLWORRNLQJQHZ
PLQLPL]HGXVWEXLOGXSDQGIRURSWLPDOSHUIRUPDQFH
7KHDLUILOWHUVKRXOGEHFKHFNHGDWOHDVWRQFHD
PRQWKWRVHHLILWQHHGVFOHDQLQJ7UDSSHGSDUWLFOHV
DQGGXVWFDQEXLOGXSLQWKHILOWHUDQGPD\
GHFUHDVHDLUIORZDVZHOODVFDXVHWKHFRROLQJFRLOV
WRDFFXPXODWHIURVW
7RFOHDQWKHDLUILOWHUSRZHUWKHXQLWRIIDQG
3RZHURIIDQXQSOXJWKHDLUFRQGLWLRQHUWR
SUHYHQWVKRFNRUILUHKD]DUG7KHFDELQHWDQG
IURQWSDQHORIWKHDLUFRQGLWLRQHUPD\EHGXVWHG
ZLWKDQRLOIUHHFORWKRUZLSHGGRZQZLWKD
GDPSFORWKLQDVROXWLRQRIZDUPZDWHUDQG
PLOGOLTXLGVRDS5LQVHWKRURXJKO\ZLWKDGDPS
FORWKDQGZLSHGU\
1HYHUXVHKDUVKFOHDQHUZD[RUSROLVKRQWKH
IURQWRIWKHFDELQHW
7RVWRUHWKHDLUFRQGLWLRQHUZKHQLWLVQRWLQXVHIRU
DQH[WHQGHGSHULRGRIWLPHUHPRYHLWFDUHIXOO\IURP
WKHZLQGRZDFFRUGLQJWRWKHLQVWDOODWLRQLQVWUXFWLRQV
DQGFRYHULWZLWKSODVWLFRUSODFHLWLQWKHRULJLQDO
ER[5HPRYHWKHEDWWHULHVIURPWKHUHPRWHEHIRUH
VWRULQJ
2
%DWWHU\6L]H$$$127('RQRWPL[ROGDQGQHZEDWWHULHVRUGLIIHUHQWW\SHVRI$$$EDWWHULHV
7KHWHPSHUDWXUHVHWWLQJPD\QRW
EHVHWFRUUHFWO\
6HH7KH$LU&RQGLWLRQHULV
IUHH]LQJXSEHORZ
3
56;,
(OPNOS`YLJVTTLUKLK[YV\ISLZOVV[MVYHU`PZZ\LPUNLULYHSJVUZPZ[ZVM[\YUPUNVMM\UP[HUK\UWS\NNPUNMVYTPU\[LZ0[PZHSZV
YLJVTTLUKLK[V[Y`HUV[OLY^HSSV\[SL[-VYM\Y[OLYHZZPZ[HUJLJVU[HJ[*VUZ\TLY:LY]PJLZH[VY+,5(30


DA/User_WAC/05112020
DENALI AIRE 5401 DANSHER RD., COUNTRYSIDE, IL 60525 | 888-433-6254 | DENALIAIRE.COM SUPPORT@DENALIAIRE.COM