User Manual GE DWXR485EB0WW Electric Dryer
Operating Instructions
About the control settings.
IMPORTANT: Clean the lint filter each time you use the dryer.
1. Fabric Care
2. Drying Cycles— Automatic cycles automatically determine fabric dryness. Select LESS DRY if you want your clothes slightly damp at the end of the drying cycle. Select MORE DRY if you want them to feel drier. Timed cycles run for the selected time.
3. Start— Close the dryer door. Select START. Opening the door during operation will stop the dryer. To restart the dryer, close the door and select START to complete the cycle.
NOTE: Drying times will vary according to the type of heat used (Electric, Natural or LP gas), size of load, types of fabrics, wetness of clothes and condition of exhaust ducts.
Color Logic
Select the correct FABRIC CARE setting. Match the particular color below the words with the same color on the Cycle Dial.
Example: Drying a load of clothing labeled permanent press.
- Choose the FABRIC CARE setting-—for this load it would be the EASY CARE MED. HEAT (which is a particular color).
- Turn the Cycle Dial to the area that has the same color as the FABRIC CARE setting you have chosen—for this load it would be the EASY CARE AUTOMATIC.
About the dryer features.
Wrinkle Care
Use this option to minimize the wrinkles in clothes. It provides approximately minutes of no-heat tumbling after the clothes are dry.
This option can only be used with the COTTONS, EASY CARE and DELICATES cycles. If you are using the CYCLE SIGNAL and you select the WRINKLE CARE option, a signal will sound at the end of the drying time and several times during the WRINKLE CARE cycle. This will remind you that it is time to remove the clothes.
If WRINKLE CARE is not ON, the dryer will stop once the timer reaches the WRINKLE CARE mark on the cycle dial.
End of Cycle Signal
This signal will sound just before the end of the cycle to remind you to remove the clothes. On some models, the signal sound level can be adjusted.
If you selected the WRINKLE CARE option, the signal will sound at the end of the drying time and will sound several times during the WRINKLE CARE cycle. This will remind you that it is time to remove the clothes.
NOTE:
- Remove garments promptly at the sound of the signal. Place clothes on hangers so wrinkles won’t set in.
- Use the END OF CYCLE SIGNAL especially when drying fabrics like polyester knits and permanent press. These fabrics should be removed so wrinkles won’t set in.
Dryness Sensor Cycle (on some models)
This feature is only activated in the COTTONS, EASY CARE and DELICATES cycles.
The Dryness Sensor provides greater drying accuracy than standard machines, resulting in shorter dry times and better clothes care. As the clothes tumble, they touch a moisture sensor. The sensor will stop the heating cycle as soon as the clothes have reached the selected dryness.
Drum Lamp
Before replacing the light bulb, be sure to unplug the dryer power cord or disconnect the dryer at the household distribution panel by removing the fuse or switching off the circuit breaker. Reach above dryer opening from inside the drum. Remove the bulb and replace with the same size bulb.
Drying Rack (on some models)
A handy drying rack may be used for drying delicate items such as washable sweaters. Hook the rack over the lint filter so the rack extends into the dryer drum.
NOTE:
- The drying rack must be used with the TIMED CYCLE.
- Do not use this drying rack when there are other clothes in the dryer.
About the dryer features.
Stainless Steel Drum (on some models)
The stainless steel used to make the dryer drum provides the highest reliability available in a GE dryer. If the dryer drum should be scratched or dented during normal use, the drum will not rust or corrode. These surface blemishes will not affect the function or durability of the drum.
About reversing the door.
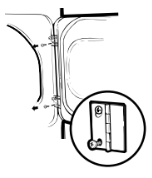
Reversing the Door
Tools needed:
- Standard #2 Phillips screwdriver putty knife
- Tape-tipped
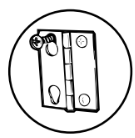
1. Open the door and remove the filler plugs opposite the hinges. With the door completely open, remove the bottom screw from each hinge on the dryer face.Insert these screws about half way into the TOP holes, for each hinge, on the opposite side (where you removed the filler plugs). Apply firm pressure to get the screw started in new holes.
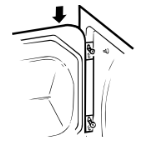
2. Loosen top screw from each hinge on the dryer face half way. With one hand holding the top of the door and the other hand holding the bottom, remove the door from the dryer by lifting it UP and OUT.
3. Rotate the door 180°. Insert it on the opposite side of the opening by moving the door IN and DOWN until the top hinge and the bottom hinge are resting on the top screws inserted in step 1.
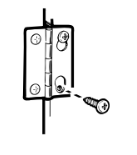
4. Remove the remaining screws from the side of the opening from which the door was removed. With these screws secure each hinge at the bottom. Tighten the two top screws of each hinge. Reinsert the plastic plugs on the side from which the door was removed.
About loading and using the dryer
Always follow the fabric manufacturer’s care label when laundering.
Sorting and Loading Hints
As a general rule, if clothes are sorted properly for the washer, they are sorted properly for the dryer.
Do not add fabric softener sheets once the load has become warm. They may cause fabric softener stains. Bounce® Fabric Conditioner Dryer Sheets have been approved for use in all GE Dryers when used in accordance with the manufacturer’s instructions.
Do not overload. This wastes energy and causes wrinkling.
Do not dry the following items: fiberglass items, woolens, rubber-coated items, plastics, items with plastic trim and foam-filled items.
Care and Cleaning of the Dryer
The Exterior: Wipe or dust any spills or washing compounds with a damp cloth. Dryer control panel and finishes may be damaged by some laundry pretreatment soil and stain remover products. Apply these products away from the dryer. The fabric may then be washed and dried normally. Damage to your dryer caused by these products is not covered by your warranty.
The Lint Filter: Clean the lint filter before each use. Moisten your fingers and reach into the filter opening. Run your fingers across the filter. Have a qualified technician vacuum the lint from the dryer once a year.
Stainless Steel: To clean stainless steel surfaces, use a damp cloth with a mild, non-abrasive cleaner suitable for stainless steel surfaces. Remove the cleaner residue, and then dry with a clean cloth.
The Exhaust Duct: Inspect and clean the exhaust ducting at least once a year to prevent clogging. A partially clogged exhaust can lengthen the drying time.
Follow these steps:
- Turn off electrical supply by disconnecting the plug from the wall socket.
- Disconnect the duct from the dryer.
- Vacuum the duct with the hose attachment and reconnect the duct.
The Exhaust Hood: Check from the outside that the flaps of the hood move freely when operating. Make sure that there is not wildlife (birds, insects, etc.) nesting inside the duct or hood.
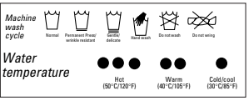
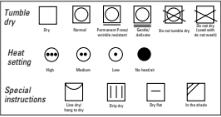
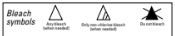
Fabric Care Labels
Below are fabric care label “symbols” that affect the clothing you will be laundering.
WASH LABELS
DRY LABELS
BLEACH LABELS
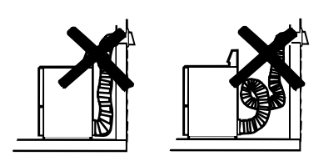
About venting the dryer.
For the best drying performance the dryer needs to be properly vented. The dryer will use more energy and run longer if it is not vented to the below specifications. Carefully follow the details on Exhausting in the Installation Instructions.
- Use only rigid metal 4′′ diameter ductwork inside the dryer cabinet. Use only rigid metal or flexible metal 4′′ diameter ductwork for exhausting to the outside.
- Do not use plastic or other combustible ductwork.
- Use the shortest length possible.
- Do not crush or collapse.
- Avoid resting the duct on sharp objects.
- Venting must conform to local building codes.
Correct Venting

Incorrect Venting
Shooting Tips
Before you call for service...
Problem: Dryer doesn’t start
- Possible Causes: Dryer is unplugged - What To Do: Make sure the dryer plug is pushed completely into the outlet.
- :Fuse is blown/circuit breaker - What To Do Check the house fuse/circuit breaker box and replace is tripped fuse or reset breaker. NOTE: Most electric dryers use two fuses/breakers.
Dryer doesn’t heat
- Fuse is blown/circuit breaker is - Check the house fuse/circuit breaker box and replace tripped, the dryer may tumble both fuses or reset both breakers. Your dryer may tumble but not heat if only one fuse is blown or one breaker is tripped.
- Gas service is off - Make sure gas shutoff at dryer and main shutoff are fully open.
Dryer shakes or makes noise
- Some shaking/noise is normal. - Move dryer to an even floor space, or adjust leveling legs makes noise Dryer may be sitting unevenly as necessary until even.
- Greasy spots on clothes Improper use of fabric softener - Follow directions on fabric softener package.
- Drying dirty items with clean ones - Use your dryer to dry only clean items. Dirty items can with clean ones stain clean items and the dryer.
- Clothes were not - Sometimes stains which cannot be seen when the clothes completely clean are wet appear after drying. Use proper washing procedures before drying.
Lint on clothes
- Lint filter is full - Clean lint screen before each load.
- Improper sorting - Sort lint producers (like chenille) from lint collectors like corduroy).
- Static electricity can attract lint - See suggestions in this section under STATIC.
- Overloading - Separate large loads into smaller ones.
- Paper, tissue, etc., left in pockets - Empty all pockets before laundering clothes.
Static occurs
- No fabric softener was used - Try a fabric softener. Bounce® Fabric Conditioner Dryer Sheets have been approved for use in all GE Dryers when used in accordance with the manufacturer’s instructions.
- Overdrying - Try a fabric softener. Adjust setting to LESS DRY or DAMP DRY.
- Synthetics, permanent press and blends can cause static - Try a fabric softener.
Inconsistent drying times
- Type of heat - Automatic drying times will vary according to the type drying times of heat used (electric, natural or LP gas), size of load, types of fabrics, wetness of clothes and condition of exhaust ducts.
Clothes take too long to dry
- Improper sorting - Separate heavy items from lightweight items (generally, to dry a well-sorted washer load is a well-sorted dryer load).
- Large loads of heavy fabrics - Large, heavy fabrics contain more moisture and take like beach towels) longer to dry. Separate large, heavy fabrics into smaller loads to speed drying time.
- Controls improperly set - Match control settings to the load you are drying.
- Lint filter is full - Clean lint filter before every load.
- Improper or obstructed - Check installation instructions for proper ducting ducting/venting. Make sure ducting is clean, free of kinks and unobstructed. Check to see if outside wall damper operates easily. Check the Installation Instructions to make sure the dryer venting is correct. Blown fuses or tripped •Replace fuses or reset circuit breakers. Since most dryers circuit breaker use 2 fuses/breakers, make sure both are operating.
- Overloading/combining loads - Do not put more than one washer load in the dryer at a time.
- Underloading - If you are drying only one or two items, add a few items to ensure proper tumbling.
Clothes are wrinkled
- Overdrying - Select a shorter drying time. Remove items while they still hold a slight amount of moisture. Select a LESS DRY or DAMP DRY setting.
- Letting items sit in dryer - Remove items when cycle ends and fold or hang after cycle ends immediately.
- Overloading - Separate large loads into smaller ones.
Clothes shrink
- Some fabrics will naturally shrink when washed. Others can be safely washed, but will shrink in the dryer - To avoid shrinkage, follow garment care labels exactly. Some items may be pressed back into shape after drying. If you are concerned about shrinkage in a particular item, do not machine wash or tumble dry it.
Consumer Product Ownership Registration
- Complete and mail your Consumer Product Ownership Registration today. Have the peace of mind of knowing we can contact you in the unlikely event of a safety modification.
- After mailing the registration below, store this document in a safe place. It contains information you will need should you require service. Our service number is GE.CARES
- Read your Owner’s Manual carefully. It will help you operate your new appliance properly.

