Documents: Go to download!
User Manual
- User Manual - (English)
- User Manual - (French)
- User Manual - (German)
- User Manual - (Spanish)
- User Manual - (Portuguese)
- Quick Start Guide - (English)
- Product Information Sheet - (English)
- Quick Guide
- Connections
- Channels
- TV Guide
- Videos, Photos and Music
- Open TV Setting Menus
- Smart TV
- TV on Demand / Video on Demand
- Troubleshooting
Table of contents
User manual Television
Quick Guide
Remote Control
Batteries and Cleaning
Replace batteries
If the TV does not react on a key press on the remote control, the batteries might be empty.
To replace the batteries, open the battery compartment on the back of the remote control.
1 - Slide the battery door in the direction shown by the arrow.
2 - Replace the old batteries with 2 type AAA-R03-1.5V batteries. Make sure the + and the - ends of the batteries line up correctly.
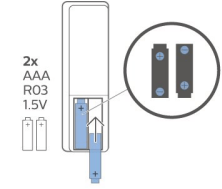
3 - Reposition the battery door and slide it back until it clicks.
• Remove the batteries if you are not using the remote control for a long time.
• Safely dispose of your old batteries according to the end of use directions.
Cleaning
Your remote control is treated with a scratch-resistant coating.
To clean the remote control, use a soft damp cloth. Never use substances such as alcohol, chemicals or household cleaners on the remote control.
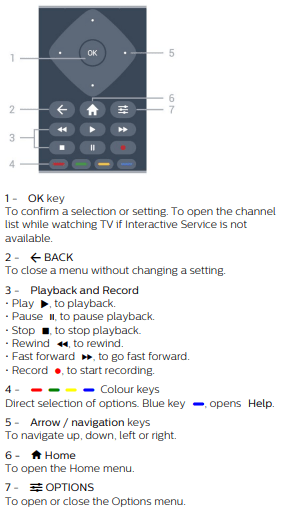
Key Overview
Top
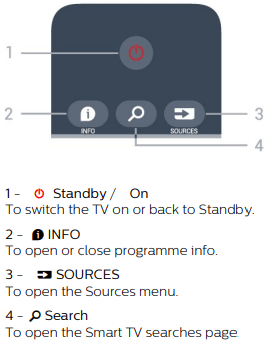
Top (for UK models)
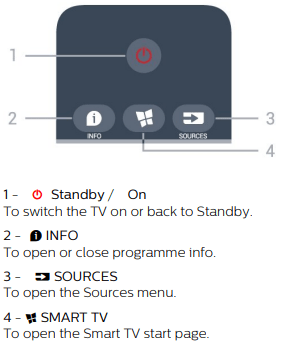
Bottom
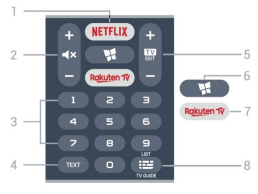
1 - 
To open the Netflix App directly. With the TV switched - on or from standby
• If you have a Netflix membership subscription, you can enjoy Netflix on this TV. Your TV must be connected to the Internet.
• To open Netflix, press  to open the Netflix App. You can open Netflix immediately from a TV in standby.
2 -  Mute / Volume
Press in middle to mute the sound or to restore it. Prese + or - to adjust the volume level.
3 - Number keys
To select a channel directly.
4 - TEXT
To open or close Text/Teletext.
5 -  - EXIT
Press in middle to switch back to watch TV. To stop an interactive TV application. Prese + or - to switch to the next or previous channel in the channel list. To open the next or previous page in Text/Teletext.
6 -  SMART TV
To open the Smart TV start page.
7 - 
To open the Rakuten TV App directly.
8 -  TV Guide / Channel list
To open or close the TV Guide. Long press to open the channel list.
Bottom (for UK models)
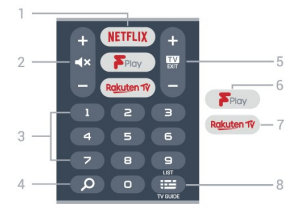
1 - 
To open the Netflix App directly. With the TV switched - on or from standby
• If you have a Netflix membership subscription, you can enjoy Netflix on this TV. Your TV must be connected to the Internet.
• To open Netflix, press  to open the Netflix App. You can open Netflix immediately from a TV in standby.
2 -  Mute / Volume
Press in middle to mute the sound or to restore it.
Prese + or - to adjust the volume level.
3 - Number keys
To select a channel directly.
4 -  Search
Search key for Smart TV and Freeview Play.
5 -  - EXIT
Press in middle to switch back to watch TV. To stop an interactive TV application. Prese + or - to switch to the next or previous channel in the channel list. To open the next or previous page in Text/Teletext.
6 - Freeview Play
To open the Explore Freeview Play page.
7 - 
To open the Rakuten TV App directly.
8 -  TV Guide / Channel list
To open or close the TV Guide. Long press to open the channel list.
Connections
Connectivity guide
Always connect a device to the TV with the highest quality connection available. Also, use good quality cables to ensure a good transfer of picture and sound.
When you connect a device, the TV recognizes its type and gives each device a correct type name. You can change the type name if you wish. If a correct type name for a device is set, the TV automatically switches to the ideal TV settings when you switch to this device in the Sources menu.
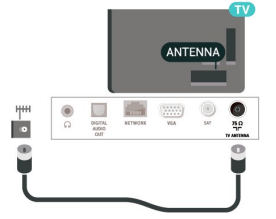
Antenna
Insert the antenna plug firmly into the Antenna socket at the back of the TV.
You can connect your own antenna or an antenna signal from an antenna distribution system. Use an IEC Coax 75 Ohm RF antenna connector.
Use this antenna connection for DVB-T and DVB-C input signals.
Satellite
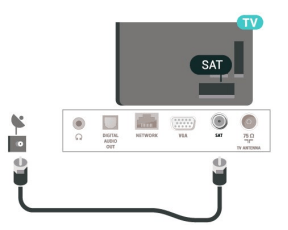
Attach the satellite F-type connector to the satellite connection SAT at the back of the TV.
Audio Device
HDMI ARC
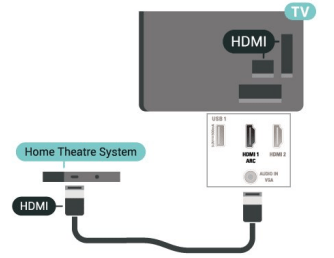
Only HDMI 1 on the TV have HDMI ARC (Audio Return Channel).
If the device, typically a Home Theatre System (HTS), also has the HDMI ARC connection, connect it to HDMI 1 connection on this TV. With the HDMI ARC connection, you do not need to connect the extra audio cable that sends the sound of the TV picture to the HTS. The HDMI ARC connection combines both signals.
Digital Audio Out - Optical
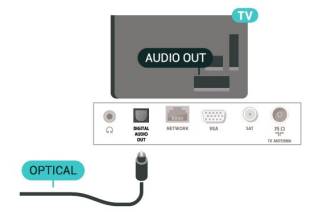
Audio Out - Optical is a high quality sound connection.
This optical connection can carry 5.1 audio channels. If your device, typically a Home Theatre System (HTS), has no HDMI ARC connection, you can use this connection with the Audio In - Optical connection on the HTS. The Audio Out - Optical connection sends the sound from the TV to the HTS.
Headphones
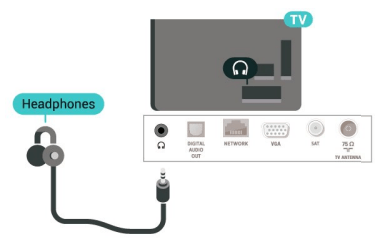
You can connect a set of headphones to the connection on the side of the TV. The  connection is a mini-jack 3.5mm. You can adjust the volume of the headphones separately.
Channels
About Channels and Switch Channels
To watch TV channels
To watch TV channels
• Press  . The TV tunes to the TV channel you last watched.
• Press  (Home) > TV > Channels and press OK.
• Press  + or
+ or  - to switch channels.
• If you know the channel number, type in the number with the number keys. Press OK after you entered the number to switch channels.
• To switch back to the previously tuned channel, press ← BACK.
To switch to a channel from a channel list
• While watching a TV channel, press OK to open the channel lists.
• The channel list can have several pages with channels. To view the next or previous page, press  + or
+ or  -.
-.
• To close the channel lists without switching channels, press ← BACK or  EXIT .
Channel icons
After an Automatic channel update of the channel list, newly found channels are marked with a  (star). If you lock a channel, it will be marked with a
  (lock).
Radio channels
If digital broadcasting is available, digital radio stations are installed during installation. Switch to a radio channel just like you switch to a TV channel.
This TV can receive digital television standard DVB. TV may not work properly with some operators of digital television , non-compliance with requirements of the standard in full.
Channel List
Open Channel List
To open the current channel list…
1 - Press  , to switch to TV.
2 - Press OK to open the channel list if Interactive Service is not available, or long press  TV Guide to open the channel list.
3 - Press  OPTIONS > Select channel list.
4 - Select one channel list you want to watch.
5 - Press ← BACK to close the channel list.
Channel List Options
Open Option Menu
To open the channel list option menu...
• Press  , to switch to TV.
• Long press  TV Guide to open the channel list.
• Press  OPTIONS , and select one of options.
• Press ← BACK to close the channel list.
TV Guide
What You Need
With the TV guide you can view a list of the current and scheduled TV programmes of your channels. Depending on where the TV guide information (data) is coming from, analogue and digital channels or only digital channels are shown. Not all channels offer TV guide information.
The TV can collect TV guide information for the channels that are installed on the TV (e.g the channels you watch with Watch TV). The TV cannot collect the TV guide information for channels viewed from a digital receiver.
Using the TV Guide
Open the TV Guide
To open the TV guide, press  TV GUIDE.
Press  TV GUIDE again to close.
The first time you open the TV Guide, the TV scans all TV channels for programme information. This may take several minutes. TV guide data is stored on TV.
Tune to a Programme
Switch to a programme
• From the TV guide, you can switch to a current programme.
• To select a programme, use the arrow keys to highlight the programme name.
• Navigate to the right to view programmes scheduled later that day.
• To switch to the programme (channel), select the programme and press OK.
View programme details
To call up the details of the selected programme, press  INFO .
Change Day
If the TV guide information comes from the broadcaster, you can press Channel up to view the schedule of one of the next days. Press Channel down to go back to the previous day.
Alternatively, you can press  OPTIONS and select Change day.
Set a Reminder
You can set a reminder for a programme. A message will alert you at the start of the programme. You can tune to this channel immediately.
In the TV Guide a programme with a reminder is marked with a  (clock).
To set a reminder…
1 - Press  TV GUIDE and select an upcoming programme.
2 - Press  Set reminder and press OK.
To clear a reminder…
1 - Press  TV GUIDE and select a programme with the reminder, which is marked with a
  (clock).
2 - Press  Clear reminder, and select Yes, then press OK.
Search by Genre
If the information is available, you can look up scheduled programmes by genre like movies, sports, etc.
To search for programmes by genre, press  OPTIONS and select Search by genre. Select a genre and press OK. A list with the found programmes appears.
Videos, Photos and Music
From a USB Connection
You can view your photos or play your music and videos from a connected USB flash drive or USB Hard Drive.
With the TV switched on, plug in a USB flash drive or a USB Hard Drive to one of the USB connections.
Press  SOURCES, then select
  USB, you can browse your files in folder structure you have organised on the USB Hard Drive.
Warning
If you try to pause or record a programme with a USB Hard Drive connected, the TV will ask you to format the USB Hard Drive. This formatting will delete all current files on the USB Hard Drive.
From a Computer or NAS
You can view your photos or play your music and videos from a computer or a NAS (Network Attached Storage) in your home network.
The TV and computer or NAS must be in the same home network. On your computer or NAS, you need to install Media Server Software. Your Media Server must be set to share your files with the TV. The TV shows your files and folders as they are organised by the Media Server or as they are structured on your computer or NAS.
The TV does not support subtitles on video streams from a computer or NAS.
If the Media Server supports searching for files, a search field is available.
To browse and play the files on your computer…
1 - Press  SOURCES, select Network and press OK.
2 - Once a device is connected, the Network device item will be replaced by connected device name.
3 - You can browse and play your files.
4 - To stop playing videos, photos and music, press  EXIT.
EXIT.
Photos
View Photos
1 - Press  SOURCES, select
  USB and press OK.
2 - Select  USB Flash Drive and press
  (right) to select the USB device you need.
3 - Select Photo, you can press  Sort to browse your photos by date, month, year or alphabetically by name.
4 - Select one of photos, and press OK to view the selected photo.
• To view photos, select Photos in the menu bar, select a photo thumbnail and press OK.
• If there are several photos in the same folder, select a photo and press  Slide show to start a slide show of all photos in this folder.
• Watch a photo and press  INFO to show below: Progress bar, Playback control bar,
  (Jump to the previous photo in a folder),
  (Jump to the next photo in a folder),
  (Start slideshow playback),
  (Pause the playback),
  (Start slideshow),
  (Rotate photo)
When viewing a photo file, press  OPTIONS to…
Shuffle off, Shuffle on
View the pictures in sequential order, or at random.
Repeat, Play once
View the pictures repeatedly or once only.
Stop music
Stop the music if the music playback is in progress.
Slideshow speed
Set the speed of the slideshow.
Slideshow transitions
Set the transition from one picture to the next.
Photo Options
When browsing photo files, press  OPTIONS to…
List/Thumbnails
View photos with list view or thumbnails view.
Shuffle off, Shuffle on
View the pictures in sequential order, or at random.
Repeat, Play once
View the pictures repeatedly or once only.
Stop music
Stop the music if the music playback is in progress.
Slideshow speed
Set the speed of the slideshow.
Slideshow transitions
Set the transition from one picture to the next.
Open TV Setting Menus
Home Menu Overview
Press  (Home) to select one of below menus, then press OK.
Sources
This row contains available sources in this TV.
Watch TV
This row contains TV functions which are available for user.
Apps
This row contains number of apps pre-installed.
Search
This row contains an interface to perform the search within this TV.
Settings
This row contains settings which are available for user.
You can reorder the icons on Home menus. To reposition icons, press OK. Alternatively, you can select the icon you want to reorder, and hold the OK key for 3 seconds until the arrows appear around the icon. Use navigation keys to move the highlighted icon to another location, then press OK. Press the BACK key to exit.
Frequent Settings and All settings
Settings menu:
Press  (Home) > Settings key on the remote control to find frequent settings.
• How to - Instructions on how to install channels, sort channels*, update TV software, connect external devices and use Smart functions on your TV.
• Install channels - Update channels or start a complete new channel installation.
• Picture style - Select one of preset picture styles for ideal picture viewing.
• Picture format - Select one of preset picture format which fits the screen.
• Sound style - Select one of preset sound styles for ideal sound settings.
• Audio out - Set the TV to play the sound on TV or on the connected audio system.
• Ambilight style** - Select one of preset Ambilight styles.
• Ambilight+hue** - Switch Ambilight+hue on or off.
• Sleep timer - Set the TV to switch to standby automatically after a preset time.
• Screen off - If you only listen to music on TV, you can switch off the TV screen.
• Wireless and networks - Connect to your home network or adjust the network settings.
• All settings - View all settings menu.
• Help - Diagnose and get more information about your TV. For more information, in Help, press the colour key  Keywords and look up Help Menu for more information.
All settings menu:
Press  (home) key on the remote control, select Settings > All settings, and press OK.
* Sorting channels is only applicable for certain countries.
** Ambilight setting is only for models which support Ambilight function.
All Settings
Picture Settings
Picture Style
For easy picture adjustment, you can select a preset picture style.
 (Home) > Settings > Picture style, press OK to change to next available option.
The available Picture styles are ...
• Personal - The picture preferences you set during the first start up
• Vivid - Ideal for daylight viewing
• Natural - Natural picture settings
• Standard - Most energy conscious setting
• Movie - Ideal for watching movies
• Game - Ideal for gaming*
• Monitor - Ideal for computer monitor
* Picture style - Game is not available for some video sources.
Colour, Contrast, Sharpness, Brightness
Adjust the picture colour
 (Home) > Settings > All settings > Picture > Colour
Press the arrows ∧ (up) or ∨ (down) to adjust the colour saturation value of the picture.
Adjust the picture contrast
 (Home) > Settings > All settings > Picture > Backlight contrast
Press the arrows ∧ (up) or ∨ (down) (down) to adjust the contrast value of the picture.
You can decrease contrast value to reduce power consumption.
Adjust the picture sharpness
 (Home) > Settings > All settings > Picture > Sharpness
Press the arrows ∧ (up) or ∨ (down) to adjust the sharpness value of the picture.
Adjust the picture brightness
 (Home) > Settings > All settings > Picture > Brightness
Press the arrows ∧ (up) or ∨ (down) to set the level of brightness of the picture signal.
Note: Setting of brightness much away from reference value (50) may result lower contrast.
Sound Settings
Sound Style
Select a style
For easy sound adjustment, you can select a preset sound style.
 (Home) > Settings > All settings > Sound > Sound style
The available sound styles are ...
• Original - Most neutral sound setting
• Movie - Ideal for watching movies
• Music - Ideal for listening to music
• Game - Ideal for gaming
• News - Ideal for speech
• Personal mode - Select to adjust your preferred sound settings
Customise Personal mode
1 - Set the sound style to Personal mode.
2 - Press the colour key  Customise to change Personal mode settings.
Smart TV
Setup Smart TV
The first time you open Smart TV, you need to configure your connection. Read and agree to the terms and conditions to continue.
The Smart TV start page is your link to the Internet. You can rent movies online, read newspapers, watch videos and listen to music, also shop online, or watch TV programmes when it suits you with On-line TV.
Open Smart TV
To open the Smart TV start page, press  Smart TV . Alternatively, you can press
  (Home) > Apps, select
  Smart TV and press OK.
The TV connects to the Internet and opens the Smart TV start page. This may take a few seconds.
Close Smart TV
To close the Smart TV start page, press EXIT.
TP Vision Europe B.V. bears no responsibility regarding the content and the quality of the content provided by the content service providers.
Smart TV Start Page
Your Apps
You start Apps from the Smart TV start page.
Internet
The Internet App opens the World Wide Web on your TV.
On your TV, you can view any Internet website but most of them are not tailored for a TV screen.
- Some plug-ins (e.g. to view pages or videos) are not available on your TV.
- Internet pages are shown one page at a time and full screen.
App Gallery
Open the App Gallery in Smart TV to browse the Apps, the collection of tailored websites for TV.
Find the App for YouTube videos, a national newspaper, an online photo album, etc. There are Apps to rent a video from an online video store and Apps for watching programmes you missed. If the App gallery does not hold what you are looking for, try the World Wide Web and surf the Internet on TV.
Search
With Search, you can search the App Gallery for relevant Apps.
Enter a keyword in the text field, select  and press OK to start searching. You can enter names, titles, genres and description keywords to search. Alternatively, you can leave the text field empty and search for the most popular searches/keywords for a range of categories. In the list of found keywords, select a keyword and press OK to search for items with that keyword.
TV on Demand / Video on Demand
TV on Demand
 (Home) > Apps > TV on Demand
You can watch TV programmes you missed or watch your favourite programmes whenever it suits you best.
Video on Demand
 (Home) > Apps > Video on Demand
You can rent movies from an online rental video store. The app is only available in Russian Federation and India.
Troubleshooting
Tips
If you can't find a solution for your TV problem in Troubleshooting, you can use  Keywords in Help > User manual to find the information you are looking for. Select a keyword to go the most relevant page in the User manual.
If the User manual doen't answer your question, you can go to the support website of Philips.
To solve any Philips TV related problem, you can consult our online support. You can select your language and enter your product model number.
On the support site you can find your country's telephone number to contact us as well as answers to frequently asked questions (FAQs). In some countries, you can chat with one of our collaborators and ask your question directly or send a question by email. You can download new TV software or the manual to read on your computer.
TV Help on your tablet, smartphone or computer
To carry out extended sequences of instructions more easily, you can download the TV Help in PDF format to read on your smartphone, tablet or computer. Alternatively, you can print the relevant Help page from your computer.
Switch On
The TV does not switch on
• Disconnect the power cable from the power outlet. Wait for one minute then reconnect it. Make sure that the power cable is securely connected. Try switching on again.
• Connect the TV to another wall mains socket and try switching on.
• Disconnect all connected devices from the TV and try switching on.
• If the standby light on TV is on, the TV might not respond to the remote control.
Creaking sound at startup or switch off
When you are turning the TV on or standby, you hear a creaking sound from the TV chassis. The creaking sound is due to the normal expansion and contraction of the TV as it cools and warms up. This does not affect performance.
The TV goes back to standby after showing the Philips startup screen
When the TV is in standby, a Philips startup screen is displayed, then the TV returns to standby mode. This is normal behaviour. When the TV is disconnected and reconnected to the power supply, the startup screen is displayed at the next startup. To switch on the TV from standby, press  (Standby / On) the remote control or the TV.
The standby light keeps on blinking
Disconnect the power cable from the power outlet. Wait 5 minutes before you reconnect the power cable. If the blinking reoccurs, contact Philips TV Consumer Care.
In Help > User manual, press the colour key  Keywords and look up Contact Info.
TV switches off by itself
If the TV switches off suddenly, the setting Switch off timer might be switched on. With Switch off timer the TV switches off after 4 hours if no remote control signals were received. To avoid this automatic switch off, you can deactivate this switch off.
In Help > User manual, press the colour key  Keywords and look up Switch Off Timer. Also, if the TV does not receive a TV signal nor a remote control command for 10 minutes, the TV switches off automatically.
Remote Control
TV does not respond to the remote control
• The TV requires some time to start up. During this time, the TV does not respond to the remote control or TV controls. This is normal behaviour.
• The batteries of the remote control might be empty. Replace the batteries with new ones.
Channels
No digital channels found during the installation
• Check if the TV was connected with an antenna or is using a provider signal. Check the cable connections.
• Check if the country where you install the TV, has digital channels available.
• Check if you selected the correct DVB (Digital Video Broadcast) system. Select DVB-T (terrestrial) when you use an antenna or common antenna, select DVBC (cable) if you use a TV cable service.
• Redo the installation and check if you select the correct country and system.
No analogue channels found during the installation
• Check if the TV was connected with an antenna. Check the cable connections.
• Check if you selected the correct DVB (Digital Video Broadcast) system. Select DVB-T (terrestrial) when you use an antenna or common antenna.
• Redo the installation and select Digital and analogue channels during the installation.
Some channels disappeared, cannot find all or some previously installed channels
• Check if you selected the correct Channel list or Favourites list you normally use.
• Some channels might be moved or even deleted by the broadcaster. In the normal channels list, try to search for the channel you're missing. If the channel is still available, you can put it back in the favourites list.
• A channel can be deleted from the channel list during Automatic channel update. These automatic updates are done overnight if the TV is on standby.
Channels that do not exist anymore are deleted and new channels will be added to the channel list.
Exceptionally, a channel can be deleted because the TV could not find it while checking for its presence. It might not broadcast at night.
To avoid channels being deleted during the Automatic channel update because the TV could not find them although these channels are still there, you can switch off Automatic channel update.
 (Home) > Settings > All Settings > Channels > Antenna/cable installlation, Satellite installtion* > Automatic channel update
* Satellite installtion is only for models which support satellite functions.
DVB-T2 HEVC channel
• See the technical specifications to make sure that your TV supports DVB-T2 HEVC in your country and reinstall DVB-T channel.
Satellite
The TV cannot find the satellites I want or the TV installs the same satellite twice
Check if the correct number of satellites is set in settings at the start of the installation. You can set the TV to search for One, Two or 3/4 satellites.
A dual head LNB cannot find a second satellite
• If the TV finds one satellite but cannot find a second one, turn the dish a few degrees. Align the dish to get the strongest signal on the first satellite. Check the signal strength indicator of the first satellite onscreen.
• Check if the settings are set to two satellites.
Changing the installation settings did not solve my problem
All settings, satellites and channels are only stored at the end of the installation when you finish.
All satellite channels are gone
If you use a Unicable system, make sure you assigned two unique user band numbers for both built-in tuners in the Unicable settings. It might be that another satellite receiver in your Unicable system is using the same user band number.
Some satellite channels seem to have disappeared from the channel list
If some channels seem to be gone or displaced, the broadcaster might have changed the transponder location of these channels. To restore the channel positions in the channel list, you can try an update of the channel package.
I cannot remove a satellite
Subscription packages do not allow removing a satellite. To remove the satellite, you have to do a complete installation again and select another package.
Sometimes the reception is poor
• Check if the satellite dish is solidly mounted. Strong winds can move the dish.
• Snow and rain can degrade the reception.
Picture
No picture / distorted picture
• Check if the TV is connected with an antenna or is using a provider signal. Check the cable connections.
• Check if the correct source/input is selected in the sources menu. Press  Sources and select the source/input you need.
• Check if the external device or source is properly connected.
• Check if the reception is poor.
• Check if the picture is set to a minimal value. Select Picture style and select a style and press OK.
 (Home) > Settings > All settings > Picture > Picture style
• To check if the TV is broken, try to play a video clip. Press  (Home) > Settings > Help > Check the TV. If the video clip stays black, call Philips. Wait until the clip ends and select Contact info in the Help menu. Call the telephone number for your country.
Sound but no picture
• Change to other video sources and then change back to current source.
• Select Picture style and select a style and press OK.
 (Home) > Settings > All settings > Picture > Picture style
• Restore picture style, select back to Picture style, then press  Restore style.
• Reset all TV settings, go to  (Home) > Settings > All settings > General settings > Reinstall TV.
• Check the connections of the source/input devices. Poor reception
If the TV picture is distorted or variable in quality, the input signal might be poor. A weak digital signal is seen as a picture that is breaking up in square blocks and freezes occasionally. Much sooner than a bad analogue signal, a bad digital signal will fall away.
• Check if the antenna cable is properly connected.
• Large loudspeakers, unearthed audio devices, neon lights, high buildings and other large objects can influence reception quality when you are using an antenna. Try to improve the reception by changing the antenna direction or moving devices away from the TV. Bad weather might deteriorate the reception.
• Check if all connections, to and from your devices, are properly connected.
• If reception on only one channel is poor, fine-tune this channel with Analogue: manual installation. (Only for analogue channels)
 (Home) > Settings > Install Channels > Antenna/cable installlation > Analogue: manual installation
• Check if the incoming digital signal is sufficiently strong. While watching a digital channel, press  OPTIONS and select Status and press OK. Check the Signal strenght and Signal quality.
Poor picture from a device
• Make sure that the device is connected properly. Make sure that the device's output video setting is the highest possible resolution if applicable.
• Restore picture style or change to another picture style.
Picture settings change after a while
Make sure that Location is set to Home . You can change and save settings in this mode.
 (Home) > Settings > All settings > General settings > Location
A banner appears
If an on screen promotion banner appears occasionally or the Picture style automatically switches back to Vivid at startup, the TV is in Shop location. Set the TV to Home location for use at home.
 (Home) > Settings > All settings > General settings > Location
Picture does not fit the screen / Wrong or unstable picture size / Picture position is incorrect
• If the picture size - its aspect ratio - does not fit the screen, with black bars on the top and bottom or left and right side of the screen, press  (Home) > Settings > All settings > Picture > Picture Format > Fill screen.
• If the picture size changes all the time, press  (Home) > Settings > All settings > Picture > Picture Format > Fit to screen.
• If the position of the picture is incorrect on the screen, try to check the signal resolution and output type of the connected device, press  (Home) > Settings > All settings > Picture > Picture Format > Original.
Computer picture is not stable
Make sure that your PC uses the supported resolution and refresh rate.
 (Home) > Settings > All settings > Picture >
Sound
No sound or poor sound quality
• Check if the sound settings of the TV are OK, press the  volume or
  mute key.
• If you use a digital receiver (set-top box), check if the volume on this receiver is not set to zero or mute.
• Check if the TV - the audio signal - is properly connected with the Home Theatre System, if you use such a system for the TV sound. Check if you connected the HDMI cable to an HDMI1 ARC connection on the Home Theatre System.
• Make sure that the TV audio output is connected to the audio input on the Home Theatre System. Sound should be heard from the HTS (Home Theatre System) speakers.
Sound with loud noise
If you watch a video from a plugged in USB flash drive or connected computer, the sound from your Home Theatre System might be distorted. This noise is heard when the audio or video file has DTS sound but the Home Theatre System has no DTS sound processing. You can fix this by setting the Digital out format of the TV to Stereo.
Press  (Home) > Settings > All settings > Sound > Advanced > Digital out format
HDMI
HDMI
• Note that HDCP (High-bandwidth Digital Content Protection) support can delay the time taken for a TV to display content from an HDMI device.
• If the TV does not recognise the HDMI device and no picture is displayed, switch the source from one device to another and back again.
• If there are intermittent sound disruptions, make sure that output settings from the HDMI device are correct.
HDMI EasyLink does not work
• Check if your HDMI devices are HDMI-CEC compatible. EasyLink features only work with devices that are HDMI-CEC compatible.
No volume icon shown
• When an HDMI-CEC audio device is connected and you use the TV Remote Control to adjust the volume level from the device, this behaviour is normal.
USB
Photos, videos and music from a USB device do not show
• Check if the USB storage device is set to Mass Storage Class compliant, as described in the storage device's documentation.
• Check if the USB storage device is compatible with the TV.
• Check if the audio and picture file formats are supported by the TV. For more information, in Help, press the colour key  Keywords and look up Multimedia.
Choppy playback of USB files
• The transfer performance of the USB storage device may limit the data transfer rate to the TV which causes poor playback.
Wi-Fi and Internet
Wi-Fi network not found or distorted
• Check if the firewalls in your network allow access to the TV's wireless connection.
• If the wireless network does not work properly in your home, try the wired network installation.
Internet does not work
• If the connection to the router is OK, check the router connection to the Internet.
The PC and Internet connection are slow
• Look in your wireless router's user manual for information on indoor range, transfer rate and other factors of signal quality.
• Use a high-speed (broadband) Internet connection for your router.
DHCP
• If the connection fails, you can check the DHCP (Dynamic Host Configuration Protocol) setting of the router. DHCP should be switched on.
Wrong Menu Language
Change the language back to your language.
1 - Press  Home , and press ∨ (up) for once.
2 - Press > (right) for twice, and press ∨ (down) for once.
3 - Press 7 times > (right), make sure the icon is  , and press OK.
4 - Press 7 times ∨ (down), and press > (right) 3 times, select your language and press OK.
See other models: 43PFS6805/12 24PFT5525/05 43PFT5525/05 43PUS9235/12 55PUS9435/12
