Loading ...
Loading ...
Loading ...
1 DESCRIPTION
1.1 PURPOSE
This machine is used to drill in all types of wood materials
(lumber, plywood, paneling, composition board, and hard
board), ceramics, plastics, fiberglass, laminates and metals.
1.2 OVERVIEW
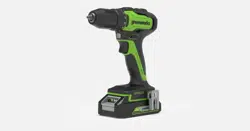
Figure 1.
1
Two-speed gear train
( HI-LO)
2
Torque adjustment ring
3
Keyless chuck
4
LED light
5
Switch trigger
6
Belt clip
7
Reversing button
2 SAFETY
WARNING
Make sure that you do/obey all safety instructions.
Refer to Safety Manual.
3 INSTALLATION
3.1 UNPACK THE MACHINE
WARNING
Make sure that you correctly assemble the machine before
use.
WARNING
• If the parts are damaged, do not use the machine.
• If you do not have all the parts, do not operate the
machine.
• If the parts are damaged or missing, speak to the service
center.
1. Open the package.
2. Read the documentation in the box.
3. Remove all the unassembled parts from the box.
4. Remove the machine from the box.
5. Discard the box and package in compliance with local
regulations.
3.2 INSTALL THE BATTERY PACK
Figure 2.
WARNING
• If the battery pack or charger is damaged, replace the
battery pack or the charger.
• Stop the machine and wait until the motor stops before
you install or remove the battery pack.
• Read, know, and do the instructions in the battery and
charger manual.
1. Align the lift ribs on the battery pack with the grooves in
the battery compartment.
2. Push the battery pack into the battery compartment until
the battery pack locks into place.
3. When you hear a click, the battery pack is installed.
3.3 REMOVE THE BATTERY PACK
Figure 3.
1. Push and hold the battery release button.
2. Remove the battery pack from the machine.
3.4 INSTALL THE BIT
Figure 4.
1. Push reversing button in the center position to lock the
switch trigger.
2. Open or close the chuck jaws to a point.
3. Lift the front of the machine to keep the bit from falling
out of the chuck jaws.
4. Put the bit into the point.
5. Tighten the chuck jaws.
NOTE
Turn the chuck body to close the chuck jaws. Do not use a
wrench to tighten or loosen the chuck jaws.
WARNING
Put the bit straight into the chuck jaws. Do not put the bit
into the chuck jaws at an angle then tighten.
3.5 REMOVE THE BIT
Figure 5.
1. Push reversing button in the center position to lock the
switch trigger.
2. Open the chuck jaws.
3. Remove the drill bit.
WARNING
Be prepared for binding at bit breakthrough. When these
situations occur, drill has a tendency to grab and kick
opposite to the direction of rotation and could cause loss of
control when breaking through material. If not prepared,
this loss of control can result in possible serious injury.
4
English
EN
Loading ...
Loading ...
Loading ...