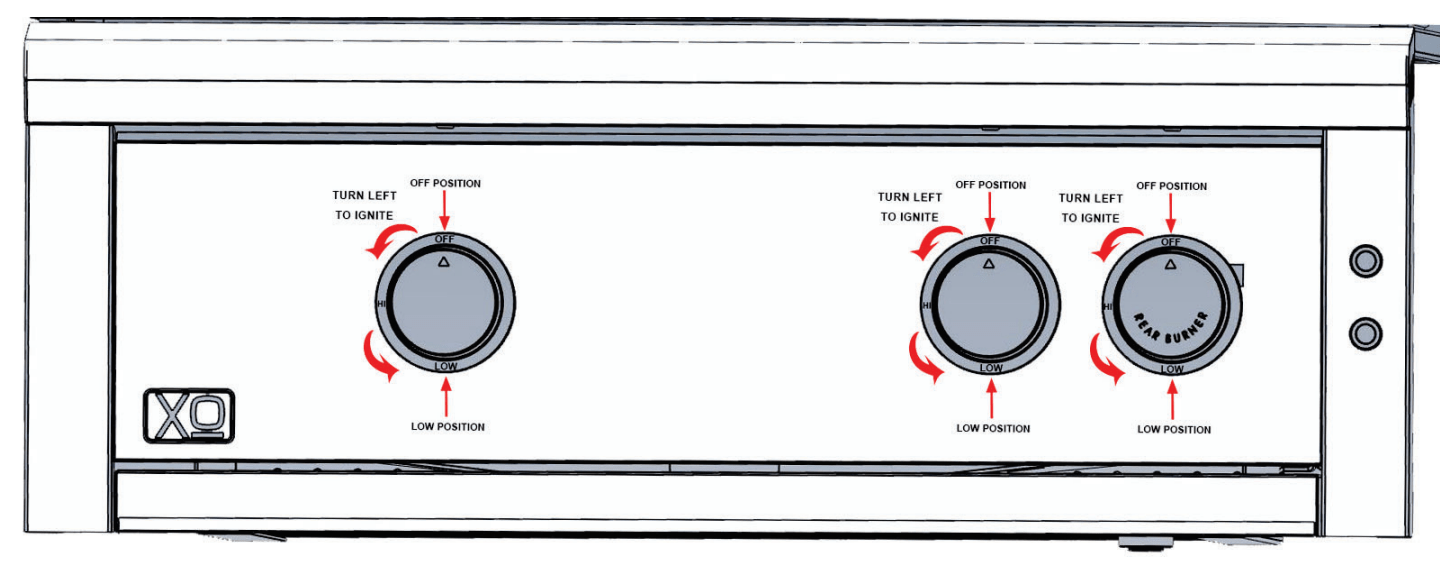
Push Burner control knob "IN" and to the "LEFT". Walt 3 - 5 seconds and Ignite by hearing " CLICK". Always turn to the " OFF" position when done.
GRILL LOCATION
Warning
Never install this product into a combustible enclosure without an insulated jacket. Doing so could result in fire, property damage and personal injur. Combustible material is "anything" that can catch on fire
Never locate the grill under a roof or overhang. in a building. garage. shed or other such enclosed area.
Installation must conform with local codes or, in the absence of local codes, with either the National Fuel Gas Code. ANSI Z223.1/NFPA 54. Natural Gas and propane Installation Code. CSA B149.1, or Propane Storage and Handling Code, B149.2, in Canada.
LOCATION OF YOUR GRILL
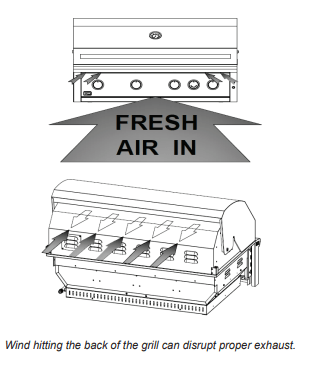
WHERE IS THE WIND COMING FROM?
When selecting a suitable location, consider important factors such as exposure to the wind and foot-traffic patterns
If you have a free standing grill. position it
80 the prevailing wind blows into the front control panel (at your back when grilling), supporting the proper front of BBQ to rear of BBQ airflow. Built-in grills located in areas with prevailing winds should be protected by a wind barrier.
Winds hitting the back of the grill directly may cause problems. as well as wind blowing along the hood opening
HOW LONG IS YOUR GAS RUN GOING TO BE?
Keep all gas supply lines as short as, possible because gas lines lose pressure over distance and with each elbow and tee that is added. This drop in pressure affects grill performance.
CHECK THE BBQ IS LEVEL?
Proper leveling during installation is critical.
Agiill that is out of level will cause erratic burner combustion and inefficient, uneven heating. A carpenter's spirit level should be used to level the grill both front-to-back and side-to-side.
If the floor is uneven or has a decided slope, re-leveling may be required each time you move a freestanding unit.
USING YOUR GRILL IN WINDY CONDITIONS:
As a high-performance gas appliance. your XO grill requires significant amounts of air to support the burner combustion process. Your grill has been engineered to take air in through the control panel area, and exhaust the combustion out through the gap between the front and rear hoods
Using your grill in windy conditions can disrupt the proper flow of air through you grill, leading to reduced performance, or in certain severe cases, causing heat buildup in the control panel area. This can lead to problems such as having the control knobs getting hot or melting, or burn hazards when the control panel surfaces become too hot to touch.
If you have a freestanding grill, itis best to position the unit so the prevailing wind blows into the front control panel (or at your back), thus supporting the proper airflow. Winds hitting the back of the grill directly are the most likely to cause problems, although wind blowing along the hood gap can also be a problem.
Please note that damage to your grill resulting from use in windy conditions, such as melted knobs or igniter wires, or control panel discoloration from heat build-up, are excluded from warranty coverage.
Outdoor griling can create more heat than indoor kitchen ranges.
BUT THERE ARE A FEW THINGS YOU CAN DO TO FURTHER PREVENT THE POSSIBILITY OF IMPROPER HEAT BUILDUP:
If you suspect the grill is overheating, using an heat resistant mitt, open the front hood. Then adjust the burner control knob to a lower setting. Do not grab the knobs without testing the temperature of them.
Install your grill with a wind break behind it. This is a wall, fence or anything that will disrupt the wind directly hitting the gas grill.
Situate the grill so prevailing winds are not blowing into the rear of the grill.
Onwindy days, be careful not to leave the hood down for more than 15 minutes when the burners are on high. (Never leave the grill unattended when in operation)
BUILT IN LOCATION:
The XO Built in model is designed for easy installation into a non combustible masonry enclosure.
The BBQ must be surrounded by non-combustible material like Brick or Hardibacker but should never be installed into a wood island without a insulated sleeve (accessory) surrounding the Gas Grill.
The grill drops into the cutout opening and sits on the sides and back of the grill. There is no need to fasten the grill to the island. The gas grill must be able to be removed for general maintenance so do not grout sides or fasten in.
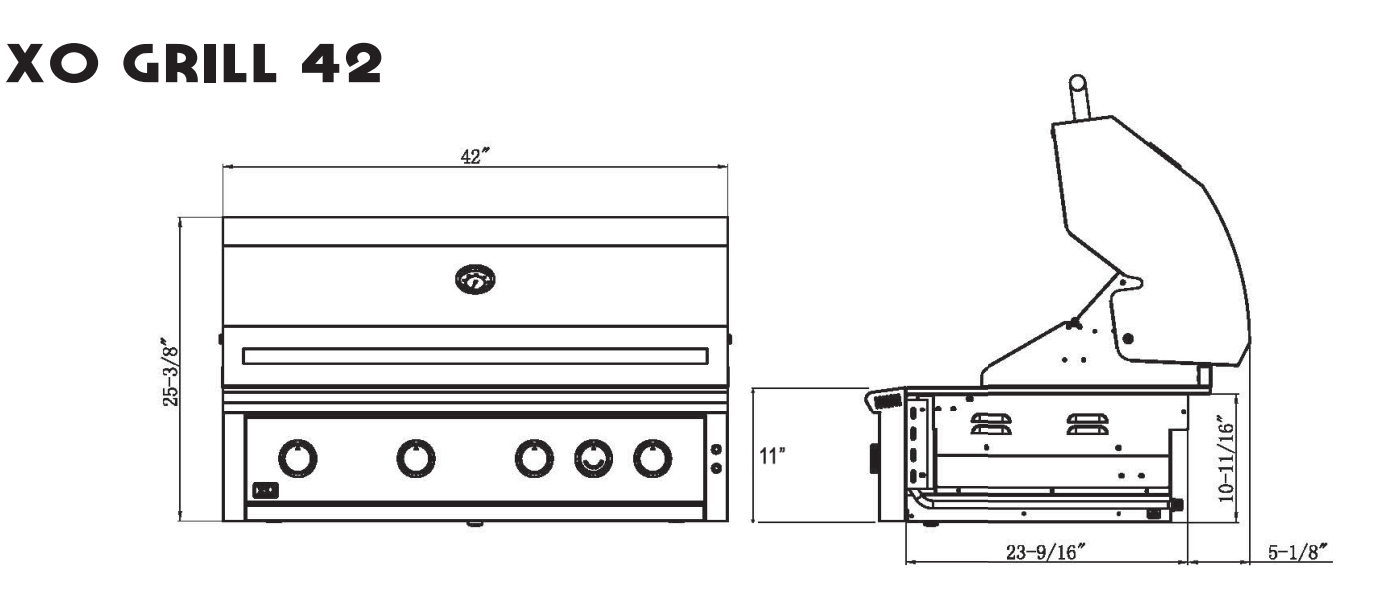
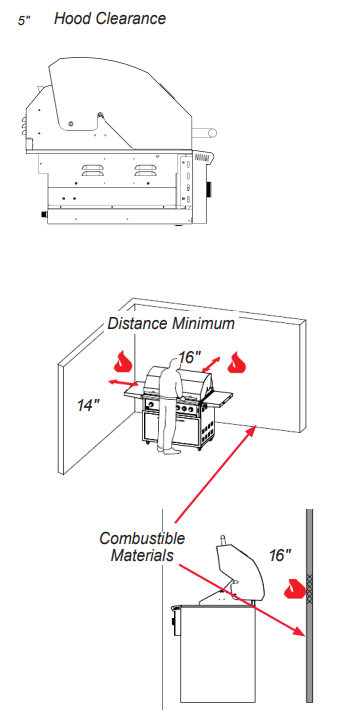
For the hood to open there is a minimum of 5" clearance behind the hood. There is a required 12" clearance on each side of the Gas Grill. Remember that combustible materials should not be located behind the grill. because the 5" space doesn''t satisfy the distance required from a combustible surface. See below clearance to combustibles.
CLEARANCE TO COMBUSTIBLE CONSTRUCTION:
Minimum clearance from sides and back of unit to adjacent combustible construction below top of unit are 14" from sides and 16" from back. Use your grill at least 16" away from any wall or surface.
Use your grill 16” or more away from any combustible objects that can melt or catch fire such as vinyl or wood siding, fences, overhangs, or any other sources of ignition; including pilot lights and live electrical appliances.
Do not use your grill under any overhead combustible construction. Never use your gas grill in a garage, porch, shed, breezeway, or any other enclosed area. Never use your gas grill on a balcony. deck. or patio above the ground floor of your home.
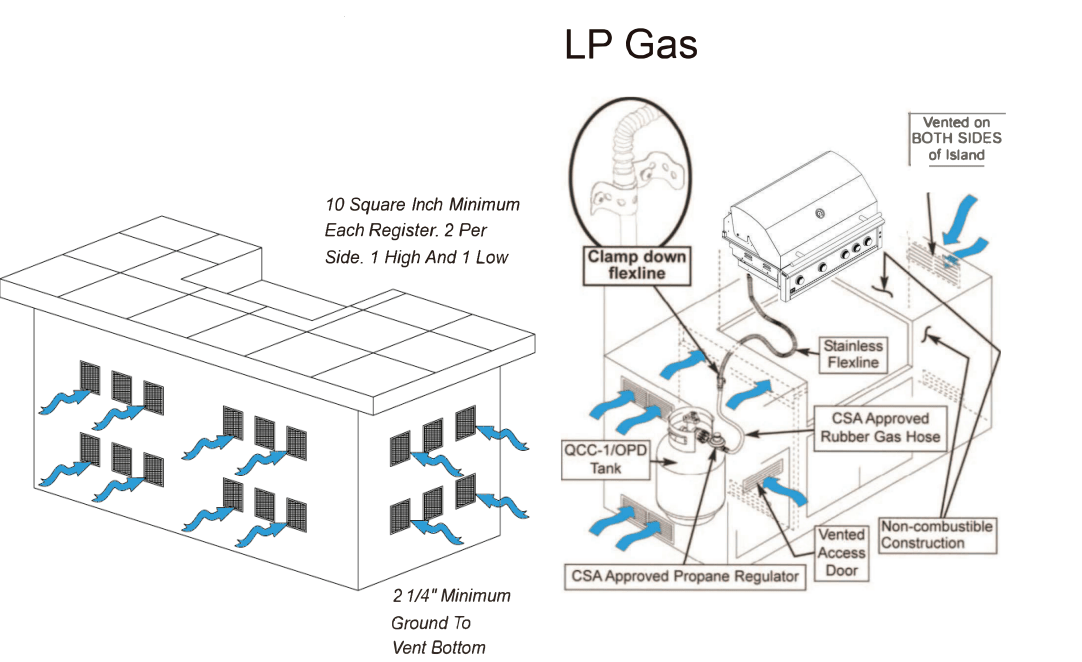
Island venting
Required for natural gas & LP gas
Insulated sleeve installation instructions
IMPORTANT: Before you build the frame, you must take into consideration the total weight of the sleeve, grill and any finishing materials
Review the table on the next page for the proper framing dimensions for the insulation sleeve. Determine the entry point for both the gas inlet and electric connections. Make the 4” square holes for gas and electrical connections (rear or bottom access) based on your requirements. Note that the gas and electrical connections are located on the right side.
A “Level” should be used to assure that the framing is level, both front to back and side to side.
NOTE: Never under any circumstance should you install the transformer or run a gas hose in between the grill and the inside of the insulating sleeve.
SLEEVE INSTALLATION
Position the sleeve into the frame. No part of the combustible enclosure can protrude above the top surface or in front of the face surface of the liner.
GRILL INSTALLATION
Use the proper equipment to support the grill. Place the grill into the sleeve and place it over the sleeve lip across the back and sides. The liner is designed to support the grill without additional fasteners.
FINISHING
If desired any gap remaining between the sleeve and the combustible enclosure may be filled with a non-combustible sealant
NOTE: Do not store any chemicals in the island. Pool chemicals or any chemical will corrode the gas hoses and manifold / valves and may cause a leak resulting in an explosion and/or bodily harm ordeath. Warranty on all equipment will be void if chemicals are stored in the island.
CONVERTING YOUR GAS GRILL
Your XO Gas Grill comes equipped to be converted to the opposite gas. Each grill comes "GAS SPECIFIC". Natural Gas and packed with an LP gas conversion kit. On the side of the GAS BBQ there will be a Rating plate that specifies the "GAS TYPE" and orifice size as well as contains your SERIAL NUMBER for your warranty.
HOW DO! CONVERT MY GRILL GAS TYPE?
A professional plumber or gas grill professional should be used to convert your gas grill. An LP conversion Orifice kit is included in your grill.
GAS PROFESSIONAL INSTALLERS
Main Burners
You must remove all cooking grids, vaporizors and dividers to see the main burners in the appliance.
On the back rear of each burner is a pin. Remove pin with a needle nose pliers.
To remove burner, pull burner upwards, and slide burner toward the rear of the appliance. Repeat this process for each burner.
Where the burner was previously located. sitting over the main valve orifice through the hole in the front basin should now be empty space where you can see the orifice
Inside the space you will find the end of the valve, with an orifice (brass fitting screwed into the end of the valve stem that can be easily removed.
Carefully remove the orifice with a 6m socket set and extension they are brass so be cautious not to strip.
Once the old orifice is removed, replac it with the new orifice provided wit each gas grill. See rating plate chart for size on page 42.
Replace burners and pins making sure that the orifices are inside an centered in the burner tubes.
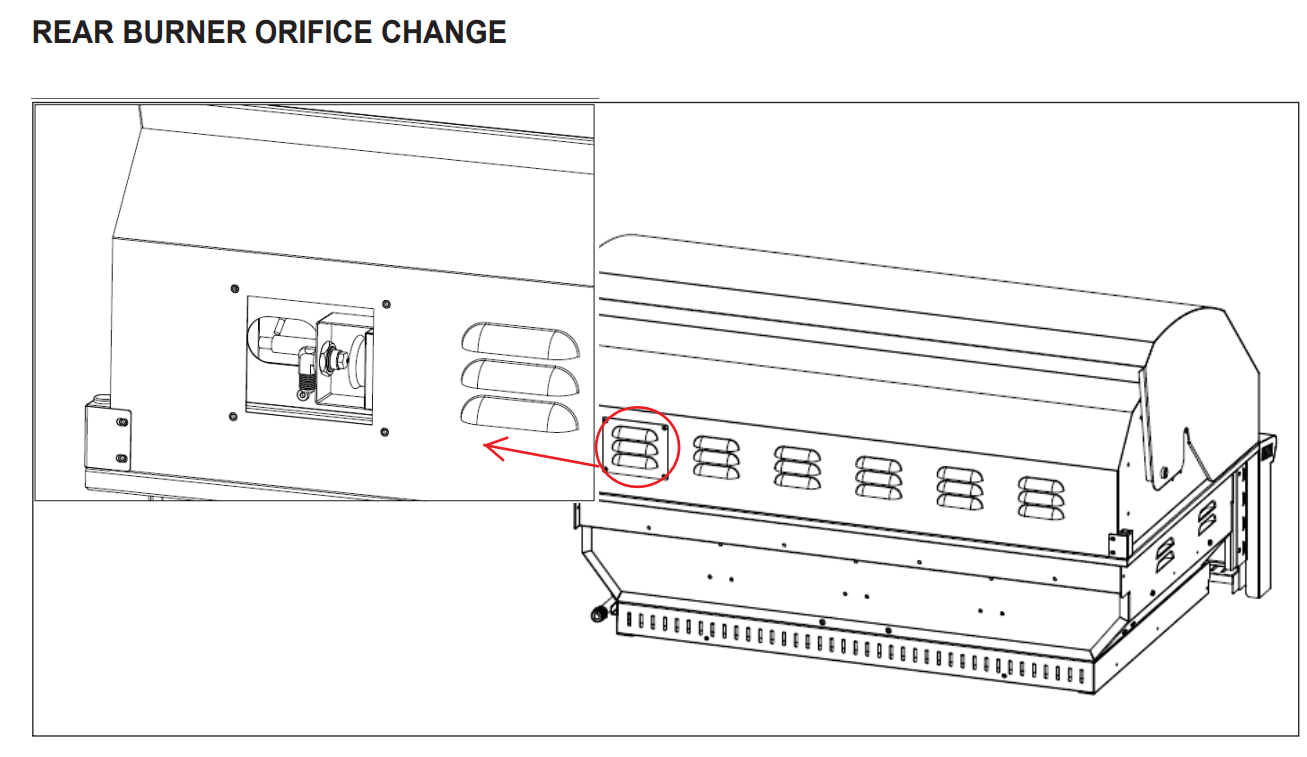
Rear Burner
Remove 2 screws on each side of the cover. then remove the rear cover from the back of the firebox
Remove the orifice
Replace the orifice with the new orifice provided with each gas grill. See spec sheet chart for size on page 5.
Replace rear cover.
Adjust Main Burner And Air Shutters
Light each burner and inspect bumers for proper flame appearance
The best flame appearance is a blue flame with yellow tip
There is an air shutter found at the end of the main burner Venturi, which can be either opened or closed to make adjustments to the flame's appearance. The Air Shutter can be adjusted by loosening the screw and opening the air shutter. then closing it slowly until the flame starts to yellow. STOP and turn back 1/16", then tighten the screw. The flame should be blue with yellow tips
LOW HEAT ADJUSTMENT
The valves on the grill feature an adjustable low setting. Due to fluctuations in gas pressure. heating value or gas conversion. you may feel it necessary to adjust gas flow in the low position. Do not adjust the infrared rear rotis or optional Sear burner. When doing this adjustment you will be wanting a Blue Flame with a Yellow Tip. Adjust the Valve to obtain this flame
Light the bumer.
Tum the control knob to the lowest setting {all the way counterclockwise). Remove the knob.
Insert a small thin flat tipped screw drive into the adjustment screw hole and while viewing the bumer flame. adjust to a minimum stable flame. Increase to left and decrease to right.
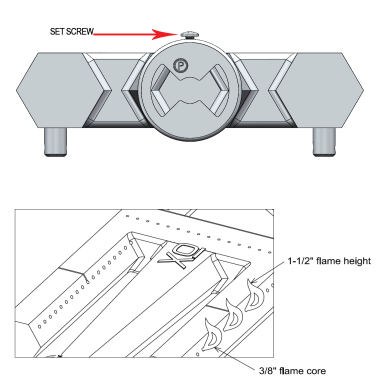
Rear Burner Valve Adjustment:
Read Bumer Valve must be adjusted by one (1) turn anticlockwise from LP to NG and reversed from NG to LP.
Each burner has an air shutter that needs to be adjusted for the correct gas. If you have purchased the grill in the gas type you want then it has been preset at the factory. If you are converting the grill you will need to follow the following steps.
Remove each burner.
Look at the Silver cover that fits over the burners venturi (part that fits onto the Orifice where gas goes into the burner).
Unscrew the small screw that hold the silver part onto the bumer.
There is a hole that has a N or P on it, slide the silver part until you see the correct gas type.
N=Natural gas
P= Propane gas (bottle gas)
Converting your gas grill gas type
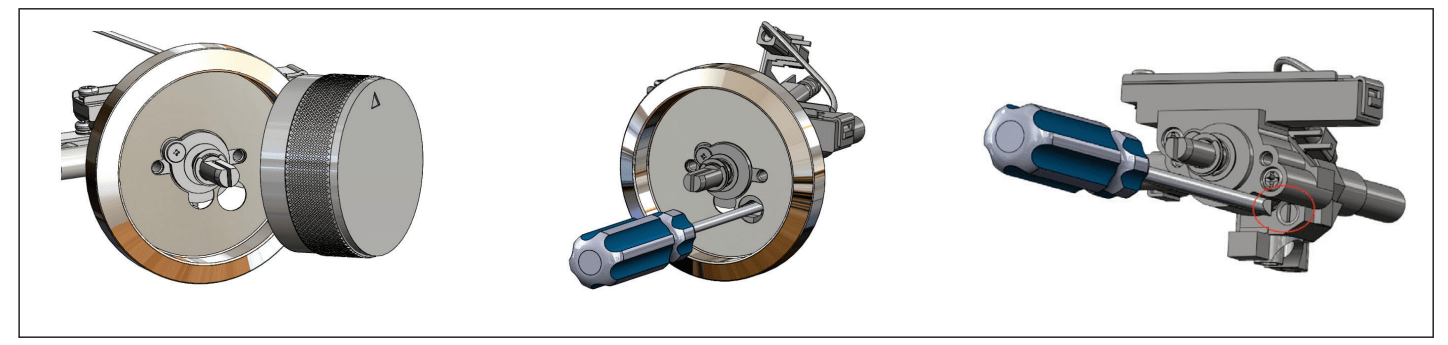
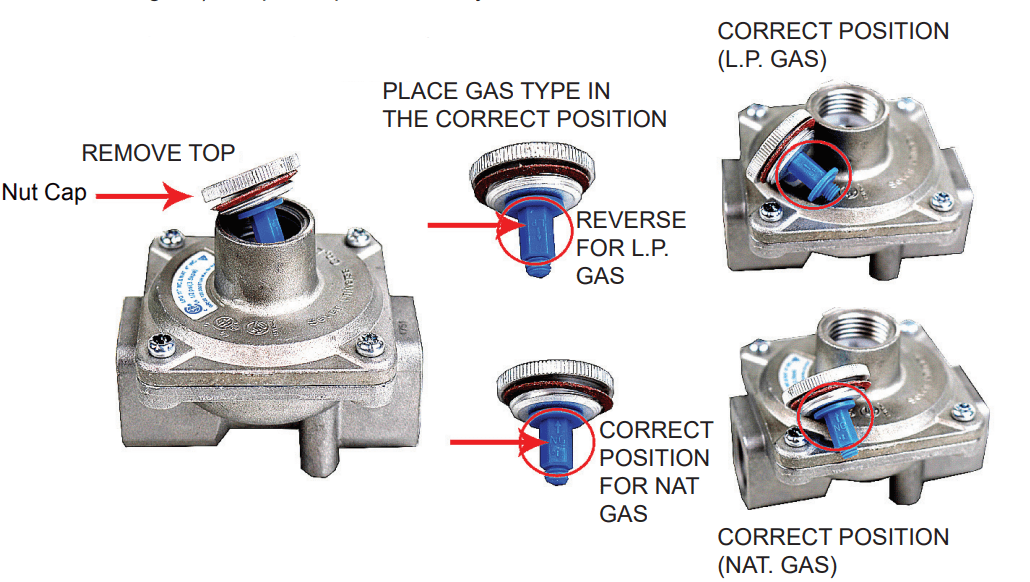
REGULATOR GAS CONVERSION
These instructions describe how to convert a Maxitrol regulator to use either natural gas (NAT- 4") or liquid propane gas (LPG-11")
Carefully remove the top nut cap from the regulator
Remove Nut Cap and review the small Plastic piece inside the regulator
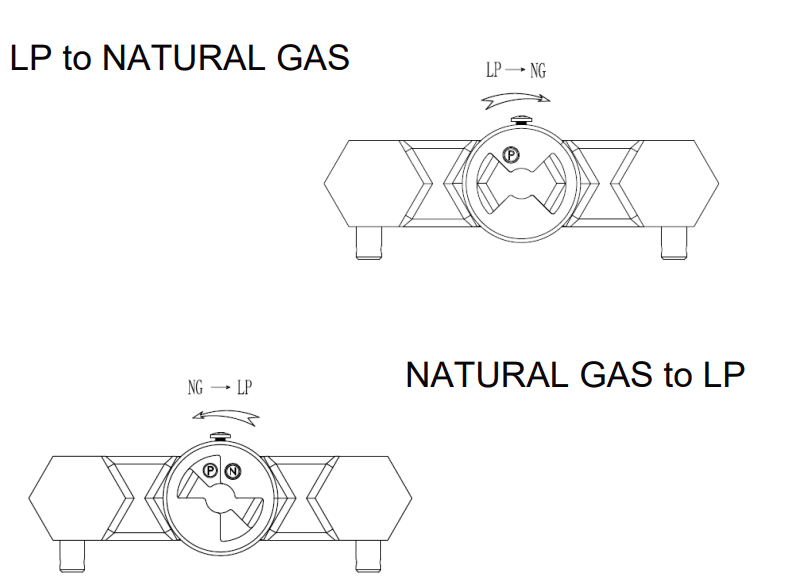
Remove Plastic Piece and turn to the GAS TYPE that you are converting to (see diagram) The plastic piece is clearly market LP or NG.
Replace brass top onto the regulator CORRECT POSITION
CLEANING AND ADJUSTMENT
Burner cleaning and adjustment
Before removing burners ensure the gas supply is off and the knobs are in the “off” position. Make sure the grill has completely cooled before proceeding.
TO REMOVE BURNERS: Remove the grill racks, vaporizers and zone dividers. Remove the pin holding the burner in place. Grasp the burner. pull it up and slightly to the rear of the unit. so the burner head comes off the brass orifice at the front and remove. Be careful not to upset the air shutter position.
BURNER CLEANING: To maximize grill performance, clean the exterior of the burner with a wire brush. Clear stubborn scale with a metal scraper. Clear any clogged ports with a straightened paper clip. Never use a wooden toothpick as it may break off and clog the port. Shake out any debris through the air shutter. Use a flashlight to inspect the burner inlet to ensure it is not blocked. If obstructions can be seen, use a metal wire coat hanger that has been straightened out to clean.
BETTER AIR ADJUSTMENT: Each grill burner is tested and adjusted at the factory prior to shipment; however, variations in the local gas supply or a conversion from one gas to another may make it necessary to adjust the burners. The flames of the Grill burners should be visually checked, adjusting the air shutter by opening the air shutter and slowly closing it until the flame starts to yellow. STOP and turn back 1/16", and tighten the screw. Flame should be blue with yellow tips when adjusted correctly.
Warning:
It is critical to center every burner on its orifice.
For safe operation. make sure the Orifices are inside the Burner Tubes before using your grill. See figure. If the Orifice is not inside the Burner Tube, lighting the Bumer may cause explosion and/or fire resulting in serious bodily injury and/ or property damage.
Please Note that the air mixture for LP gas and NG is different. Your gas BBQ will come preset for your gas type. If you find that you are not getting the best flame you can adjust the air shutter and the O2 mix with gas will change the flame. The flame coming from your burner is extremely important. If the flame is not correct you will be able to adjust the flame as described in the section below.
Warning:
Spiders and small insects can spin webs and nest in the grill burner ventures which can lead to a gas flow obstruction resulting in a fire in and around the burner tubes. This type of "FLASHBACK FIRE" can cause serious grill damage and create an unsafe operating condition for the user.
To reduce the chance of FLASHBACK FIRE you must inspect and clean the ventures at least twice a year in summer and fall or whenever spiders are active in your area, and if your grill has not been used for an extended period of time.
Remove the pin from the rear of each Main Burner using needle-nose pliers. Carefully lift each Burner up and away from the Gas Valve Orifice. Check and clean Burner/Venturi Tubes for insects and insect nests. A clogged tube lead to a fire beneath the grill.
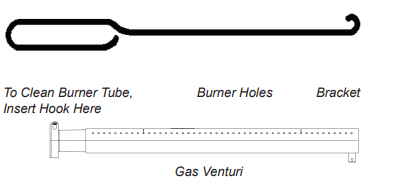
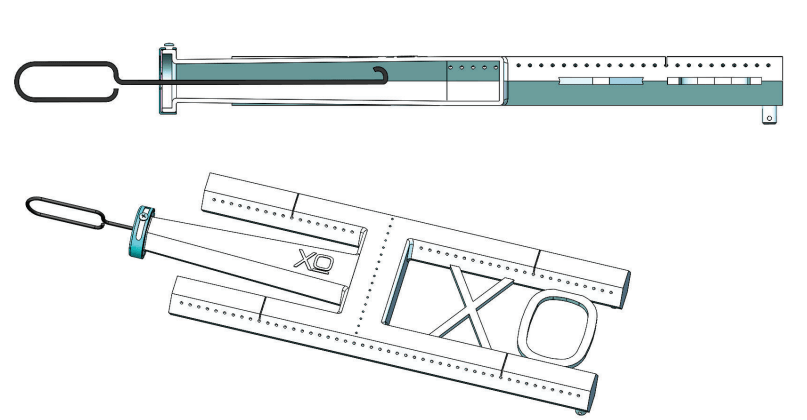
FOR CLEANING, REFER TO METHODS 1-3 BELOW:
METHOD 1: Bend a stiff wire or wire coat hanger into a small hook as shown and run the hook through the Burner Tube and inside the Burner several times to remove debris.
METHOD 2: Use a bottle brush with a flexible handle and run the brush through the Burner Tube and inside the Burner several times to remove any debris.
METHOD 3: Use an air hose to force air through each Burner Tube. The forced air should pass debris or obstructions through the Burner and out the Ports.
Warning: For safe operation ensure the Gas Valve Assembly Orifice is inside the Burner Tube before using your grill. (See figure above). If the Orifice is not inside the Burner Tube, lighting the Burner may cause explosion andlor fire resulting in serious bodily injury and/or property damage.
Cleaning The Grill
Proper care and maintenance will keep your grill in top operating condition and prolong its life. Follow these cleaning procedures on a timely basis and your grill will stay clean and operate with minimum effort. CAUTION: Be sure your grill is OFF and cool before cleaning.
CLEANING THE COOKING GRIDS: Before initial use, and periodically thereafter, wash your Cooking Grids in a mild soap and warm water solution. You can use a wash cloth or vegetable brush to clean your Cooking Grids.
CLEANING THE FLAME TAMERS - You should periodically wash the Flame Tamers in a soap and warm water solution. Use a vegetable brush to remove stubborn burnt-on cooking residue. Dry the Flame Tamers thoroughly before you reinstall them into the grill.
CLEANING THE GREASE TRAY - To reduce the chance of fire, the Grease Tray should be visually inspected before each grill use. Remove any grease and wash Grease Tray with a mild soap and warm water solution.
CLEANING THE INSIDE OF THE GRILL LID - Grease can build up on the inside of the Grill lid over time. This grease can drip onto your deck or patio when the lid is opened. Visually inspect the inside of the Grill Lid before each grill use. Remove any grease and wash with a mild soap and warm water solution.
ROUTINE CLEANING OF THE GRILL INTERIOR - Burning-off excess food after every cookout will keep it ready for instant use. However, at least every 6 months you must give the entire grill a thorough cleaning to minimize your risk of grease fire and keep the grill in top shape.
FOLLOW THESE STEPS:
Turn all Control Knobs to the full OFF Position. Turn the LP gas tank valve to the full OFF position or turn off NAT gas supply.
Remove and clean the Vaporizers, Cooking Grids, Warming Rack, Zone Dividers and Grill Burners as above.
Scrape out and brush the inside and bottom of the grill with a scraper and fiber pad or nylon brush and wash with a mild soap and warm water solution. Rinse thoroughly and let dry.
Check each Orifice for obstruction.
Replace the Burners and adjust the Gas Collector Box. The edge of the collector box should be overlapping the Burner Port.
Replace Burner. Flame Tamer. Zone dividers and cooking grills.
Reconnect the gas source and observe the Burner flame for correct operation.
CLEANING EXTERIOR STAINLESS STEEL SURFACES:
Routine care and maintenance is required to preserve the appearance and corrosion resistance of stainless steel. The fact is stainless steel can corrode, rust and discolor under certain conditions. Rust is caused when regular steel particles in the atmosphere become attached to the stainless steel surface. Steel particles can also become attached to your grill if you use steel wool or stiff wire brushes to clean the grill instead of non-abrasive cloth, sponge or nylon cleaning tools. In coastal areas rust pits can develop on stainless surfaces that cannot be fully removed. Bleach and other chlorine based solutions used for household and pool cleaning can also cause corrosion to stainless steel. Weathering, extreme heat, smoke, from cooking and machine oils used in the manufacturing process of stainless steel can cause stainless steel to turn tan in color. Although there are many factors which can affect the surface appearance of stainless steel, they do not affect the integrity of the steel or the performance of the grill.
TO HELP MAINTAIN THE FINISH OF STAINLESS STEEL FOLLOW THESE CLEANING PROCEDURES FOR THE BEST RESULTS:
After every use (after your grill has cooled down), wipe stainless surfaces with a soft, soapy cloth or sponge then rinse with water.
Be sure to remove all food particles, sauces or marinades from stainless steel because these can be highly acidic and damaging to stainless surfaces. Never use abrasive cleaners. scrubbers or stiff wire brushes of any type on your grill.
Use a heat resistant Stainless Steel Cleaner and rub or wipe in the direction of the stainless steel grain or polish lines. Do not polish against the grain.
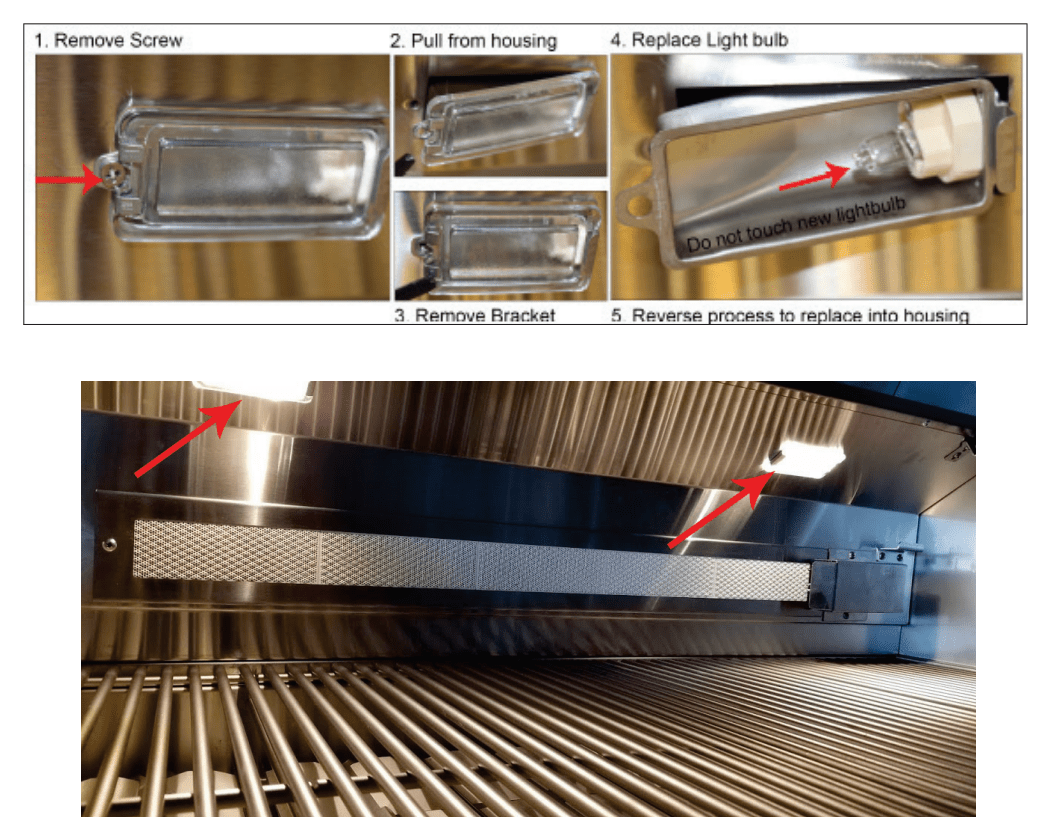
LIGHT BULB REPLACEMENT
DO NOT TOUCH THE GLASS OF THE NEW REPLACEMENT BULB.
Replace The Bulb
Replacement bulbs are halogen, 12 volt, 100W max, T3 type with a G4 bi-pin. and are readily available at most stores. The glass cover is held in place by two spring tension tabs. The bulbs are easily removable without the use of tools.
Simply grasp the glass lens at the outer corners. near the front tension clips and push the lens back.
Then, swing the lens down and pull it loose. You may have to loosen the screw to remove the lens.
Avoid touching the glass of a new bulb. Halogen bulbs are very sensitive to the oils found in human skin. Touching the bulbs. may shorten their life. Pull the bulb straight out from the socket without twisting. Hold the bulb using a paper towel or other cloth and gently press it straight into the socket. The glass cover should be gently snapped back into place.