| PROBLEM |
POSSIBLE CAUSES |
WHAT TO DO |
| Washer not turning on. |
Power not switched on at the wall. |
Switch the power on at the wall. Then press ‘POWER’ |
| Household power supply not working. |
Try plugging in another electrical appliance. |
| Keylock may be activated |
Touch and hold the ‘Keylock’ button for 2 seconds |
Touching  does not start filling or drying. does not start filling or drying. |
Washer dryer door not closed properly |
Open and reclose door. |
| The washer is waiting for a command from you. |
If is flashing then the washer is waiting for a command from you. |
| The washer has detected a fault |
Check if a code is being displayed on the panel |
| Hot and cold taps not turned on. |
Check that both hot and cold taps are turned on (if using cold inlet only ensure inlet valve cap is installed on the hot valve on the machine) |
| Hot and cold taps not connected to the corresponding valve on the machine. |
Check the cold tap is connected to the cold valve on the machine and the hot tap is connected to the hot valve. |
| Blocked hose filters. |
Check the tap end of the inlet hoses for blockages. |
| Inlet hose leaking, twisted or damaged. |
Check the inlet hose for leaks or damage. Check that the inlet hose is not twisted. |
| Faulty water supply. |
Check taps that aren’t connected to the machine are working. |
| Delay start maybe set. |
Refer to page 34. |
| Washer dryer stops working mid cycle. |
The washer dryer has detected a fault. |
Refer to pages 39 – 41. |
| Power or water failure. |
Check the power and/or water is working correctly. |
| Washer dryer has been paused. |
Touch the button to continue. |
| Too many suds. |
Washer dryer is waiting for suds to dissolve before continuing the cycle. |
| Washer drains while filling. |
Drain hose too low. |
Ensure the height of the drain hose is at least 800mm from the floor level (refer to page 10). |
| Drain hose sitting in water |
Clear the drain |
| Washer is not draining. |
Drain hose blocked. |
Clear the drain hose. |
| Pump filter blocked. |
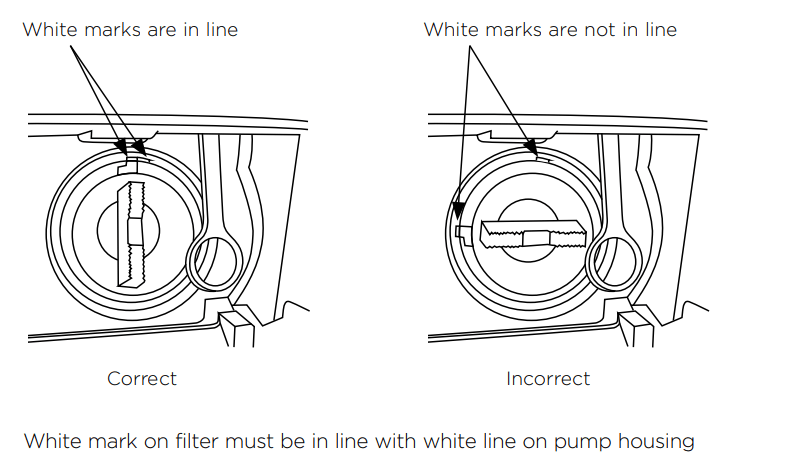
Clear the pump filter (refer to page 37). |
| Drain hose higher than 1200 mm above floor level. |
Lower the level of the drain hose (refer to page 10). |
| Filling continuously |
Drain hose not connected to standpipe or tub. |
Connect drain hose correctly (refer to page 10). |
| Machine siphoning. |
Ensure standpipe or tub is at least 800mm from the floor level. |
| Poor rinsing. |
Incorrect detergent used. |
Use low sudsing, front loader detergent only (refer to page 24) |
| Too much detergent used. |
Ensure the correct dose of detergent is used for the load size and soil level (refer to page 26). |
| Not spinning properly |
Load has gone out of balance. |
Open door and redistribute load, then restart the washer dryer. |
| Machine is not level. |
Ensure machine is correctly levelled |
| Suds build up |
Check the amount of detergent used, reduce if necessary |
| Too many soap suds. |
Incorrect type of detergent used. |
Use low sudsing, front loader detergent only (refer to page 24). |
| Too much detergent used. |
Ensure the correct dose of detergent is used for the load size and soil level (refer to page 26). |
| Small puddle of water from under the machine. |
Inlet hose or drain hose leaking. |
Check inlet hoses and the drain hose are correctly attached and not damaged. |
| Lots of suds. |
Suds may have leaked and then dissolved. |
| Detergent dispenser blocked. |
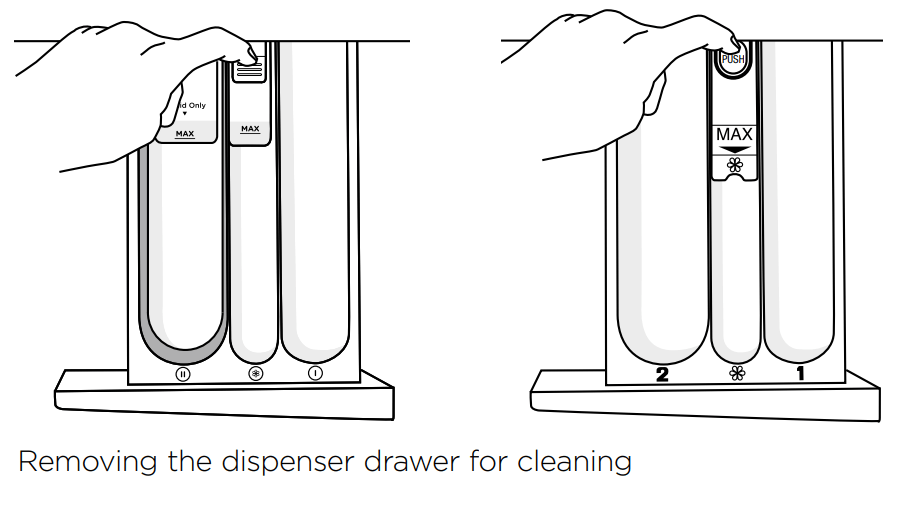
Clean detergent dispenser drawer (refer to page 36). |
| Detergent dispenser drawer not fully closed. |
Close detergent dispenser drawer fully and ensure it remains closed during the cycle. |
| Damage to door seal. |
Check seal inside door for damage. If it sustains any damage it will need to be replaced. |
| Cycle time longer than usual/Inaccurate time reading/ Adjustment of time remaining during cycle. |
Wash time is approximate. |
Wash time may be influenced by a number of factors (refer to page 20) |
| Low water pressure or flow rate. |
Ensure that the inlet hose filter is not blocked. |
| Out of balance or oversudsing. |
Recovery from out of balance or oversudsing will extend cycle time (refer to page 39). |
| Washing a large load |
Be aware that it will take longer for the machine to fill. |
| Selecting various options |
Be aware that some options will extend cycle time. |
| Detergent or fabric softener remaining in detergent dispenser at the end of the cycle. |
Detergent drawer not properly closed or was opened part way through the cycle. |
Ensure the detergent dispenser drawer is fully closed at the start of the cycle and remains closed throughout the cycle. |
| Dirty or blocked detergent dispenser. |
Clean the detergent dispenser (refer to page 36). |
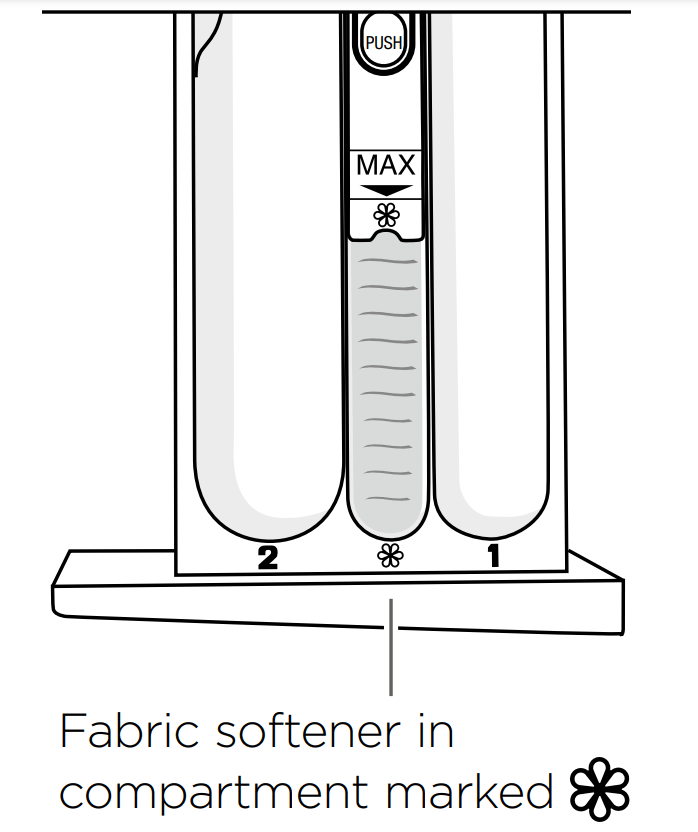
| Liquid sitting at the ‘Max’ level at the end of the cycle indicates a blockage. |
Clean the fabric softener dispenser (refer to page 36). |
| Dispenser over loaded with detergent. |
Clean out remaining detergent and refer to page 26 for dosing information. |
| Washing very wet at the end of the cycle. |
Cycle selected not appropriate. |
Particularly short or delicate cycles have shorter spins which can result in wetter washing at the end of the cycle. |
| Incorrect spin speed for load selected. |
Select a faster spin speed |
| An out of balance load has occurred. |
The washer compensates for the out of balance by using a lower spin speed, to reduce noise and potential damage to itself. |
| Vibrating. |
Transit bolts left in place. |
Ensure transit bolts are removed prior to use of the machine (refer to page 6). |
| Washer may not be level. |
Ensure washer is installed on an appropriate surface and levelled correctly (refer to page 8). |
| Load is out of balance. |
Wash an average sized load rather than a smaller load or a single item. Washing one item at a time is not recommended as it is difficult for the washer to balance a single item during spin. |
| Creasing |
Washer overloaded. |
Do not overload washer |
| Incorrect cycle for load type |
Use the ‘Easy Iron’ or ‘Handwash’ cycle for creasable items |
| Spin speed too fast. |
Select a slower spin speed. |
| Wet clothes left in washer or laundry basket |
Laundry left sitting wet is more likely to crease. If not removing clothes from washer immediately at end of cycle, select the ‘Wrinkle Free’ option (WM1490F, WM1490P and WH1480P models only). Do not leave wet washing sitting in a washing basket |
| Wash temperature too hot for load type. |
Select a lower wash temperature. Check items care label for correct care. |
| Items not sorted correctly |
Sort load so that items of similar weight are washed together (refer to page 22) |
| Poor soil Removal. |
Incorrect wash cycle selected. |
Select a wash cycle that is appropriate for the amount of dirt |
| Insufficient detergent. |
Ensure the correct dose of detergent is used for the load size and soil level |
| Washer overloaded. |
Ensure the washer dryer is not overloaded in terms of its capacity or the cycle selected |
| Items require a longer wash time. |
Select a higher soil level option if available (WM1490P and WM1480P models only). |
| Load was particularly dirty. |
Select ‘Pre Wash’ for particularly dirty loads |
| Items not sorted correctly |
Wash heavily and lightly soiled garments separately. |
| Washer dryer dirty from previous wash or dry cycle. |
After washing particularly dirty clothing, we recommend putting the washer dryer through a ‘Rinse’ cycle after the load has been removed, to wash away any remnants of dirt and to prevent it contaminating future wash or dry cycles |
| Incorrect wash temperature selected in relation to the type of soil. |
Select a wash temperature suitable for the type of soil, eg warm for greasy soils, cold for muddy soils. Increasing the wash temperature generally improves soil removal and overall wash performance |
| Dye transfer. |
Coloured items not washed separately from white/light coloured items. |
Remember to separate whites and colours. |
| New or non-colourfast items not washed separately |
Wash non-colourfast items separately and select ‘Cold’ wash temperature. |
| Wet items have been left sitting for too long |
Remove items from washer as soon as the cycle is finished, or if items are not to be removed from the washer immediately select ‘Wrinkle Free’. |
| Wash temperature. |
Consider the wash temperature you select for your coloured items. Lower the temperature if you are concerned. |
| Black or grey marks on clothes. |
Correct amount of detergent. |
Ensure the correct dose of detergent is used for the load size and soil level (refer to page 26). |
| Washer needs to be cleaned. |
Empty the machine and complete a ‘Drum Clean’ cycle (refer to page 36). |
| Tangling |
Items not sorted correctly |
Separate larger items from smaller items. |
| Washer loaded incorrectly. |
Load items loosely and individually into the washer (ie not folded). |
| Incorrect cycle for load type selected. |
Use the ‘Easy Iron’ cycle to wash shirts |
| Washer overloaded in terms of its capacity or the cycle selected. |
Try washing average to smaller load sizes. |
| Delicate items. |
Wash pantyhose, bras and any other delicate items prone to tangling in a mesh laundry bag |
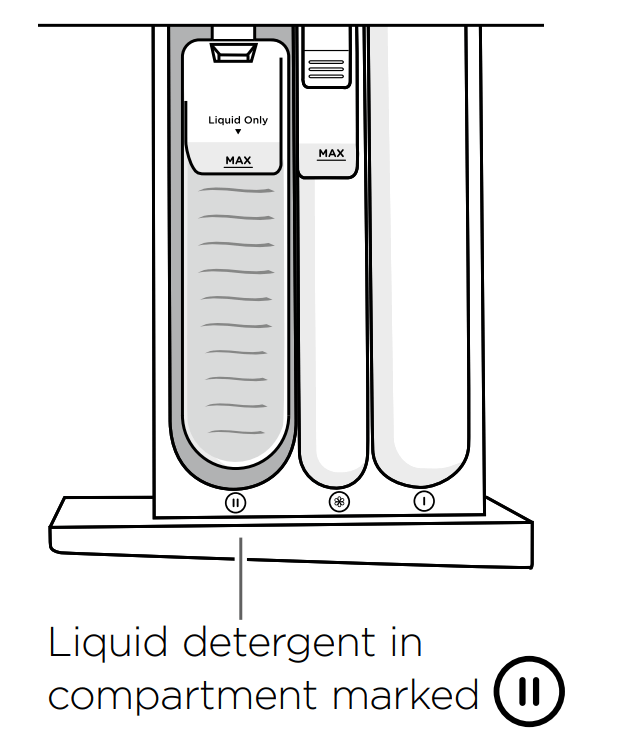
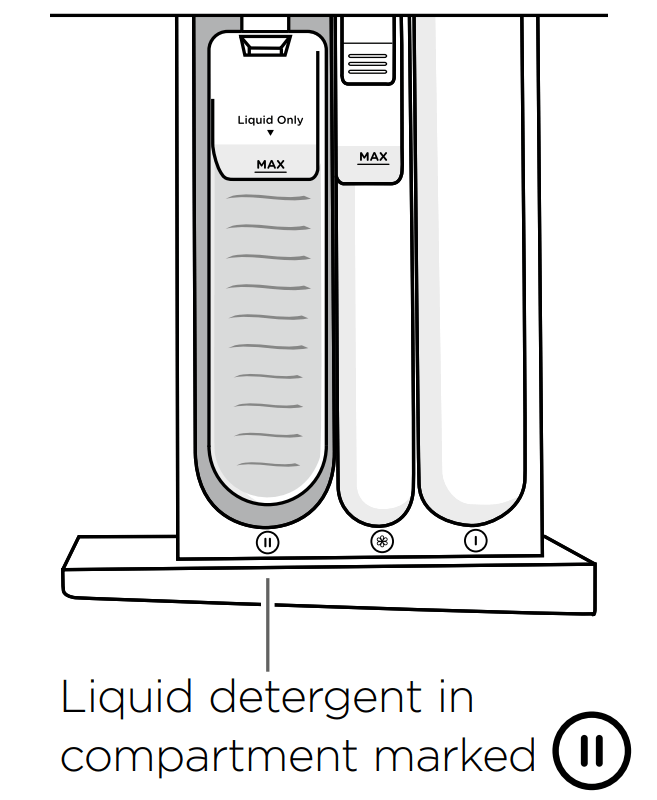
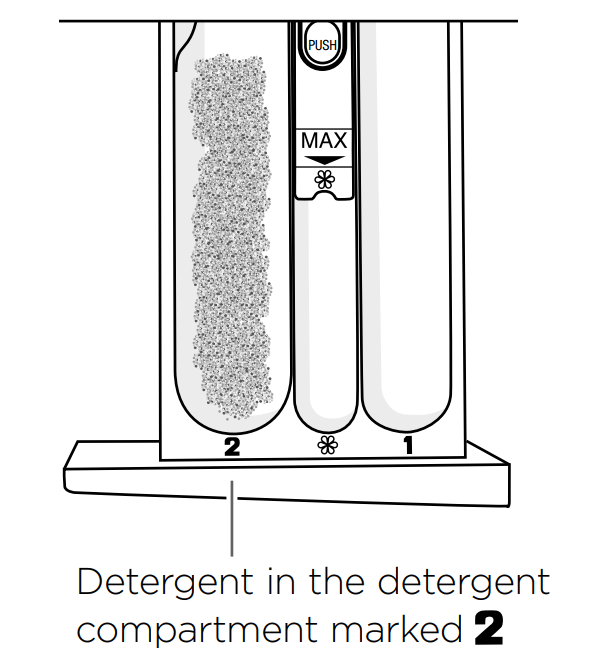
 . If you wish to use powdered detergent you MUST remove the liquid detergent insert by firmly grasping and twisting the left hand side of the internal compartment and pulling upwards. If you are using detergent pods place them at the back of the drum before adding your clothing. For more information on detergent refer to the ‘Detergent and fabric softener’ section.
 . For more information on fabric softener refer to the ‘Detergent and fabric softener’ section.
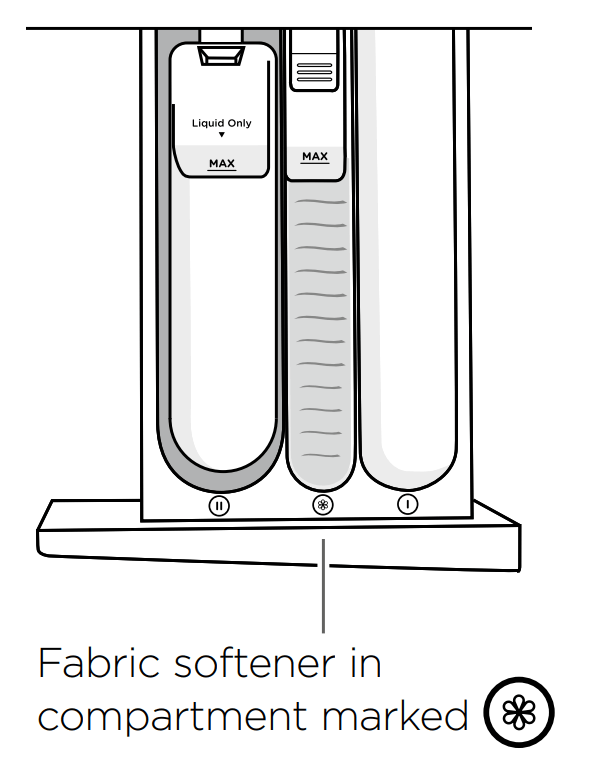
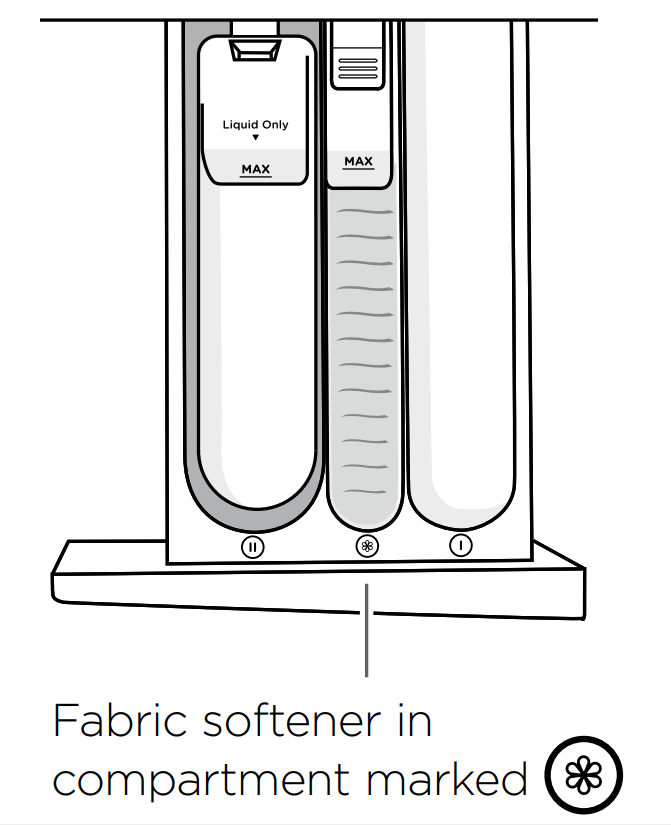

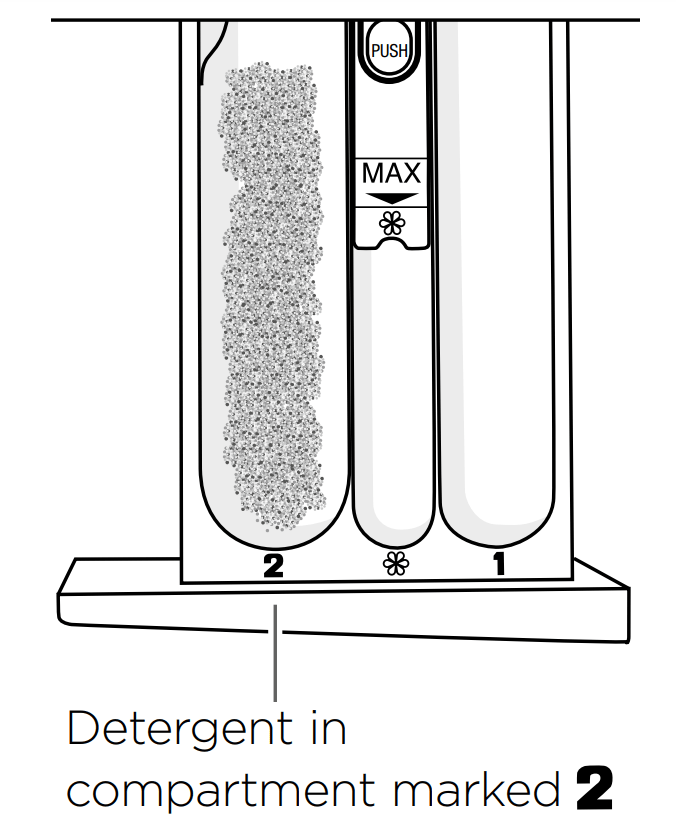
 . Use Low Sudsing or ‘Front Loader’ liquid or powder detergents. Alternatively use detergent pods. Place the pod at the back of the drum before you load in any clothing. For more information on detergent refer to the ‘Detergent and fabric softener’ section.
 . For more information on fabric softener refer to the ‘Detergent and fabric softener’ section.
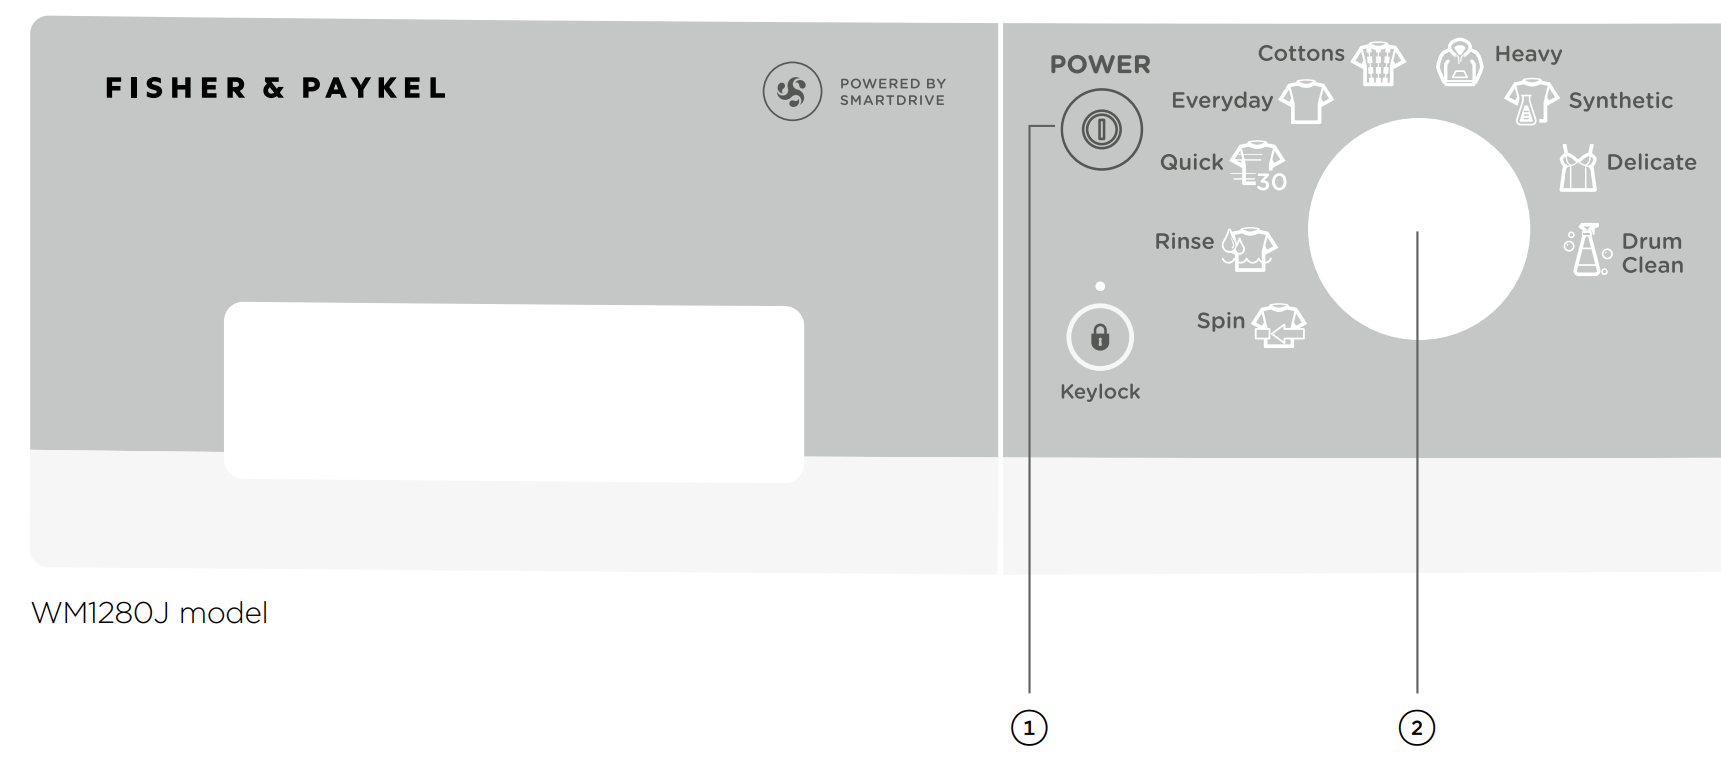


 or
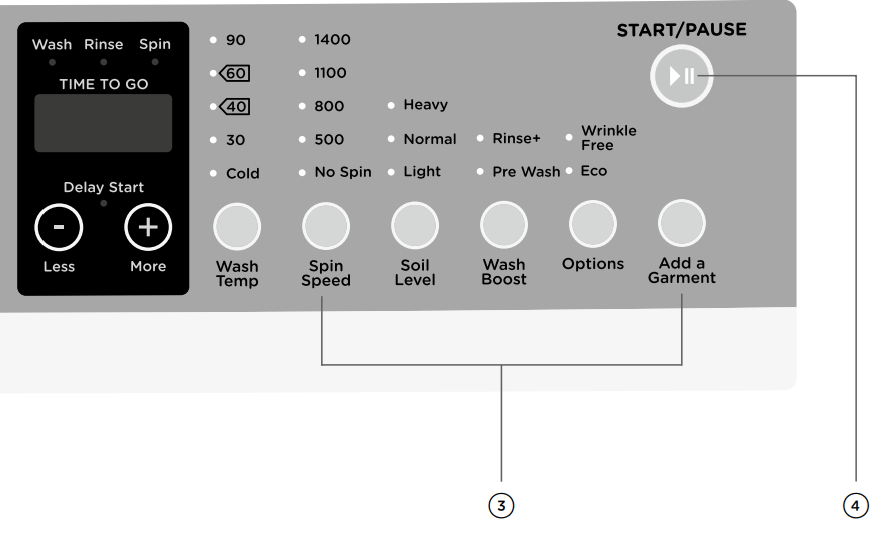
or  . When you select ‘Pre Wash’, the pre wash compartment is flushed at the start of the cycle. For more information refer to ‘Wash cycle options’.
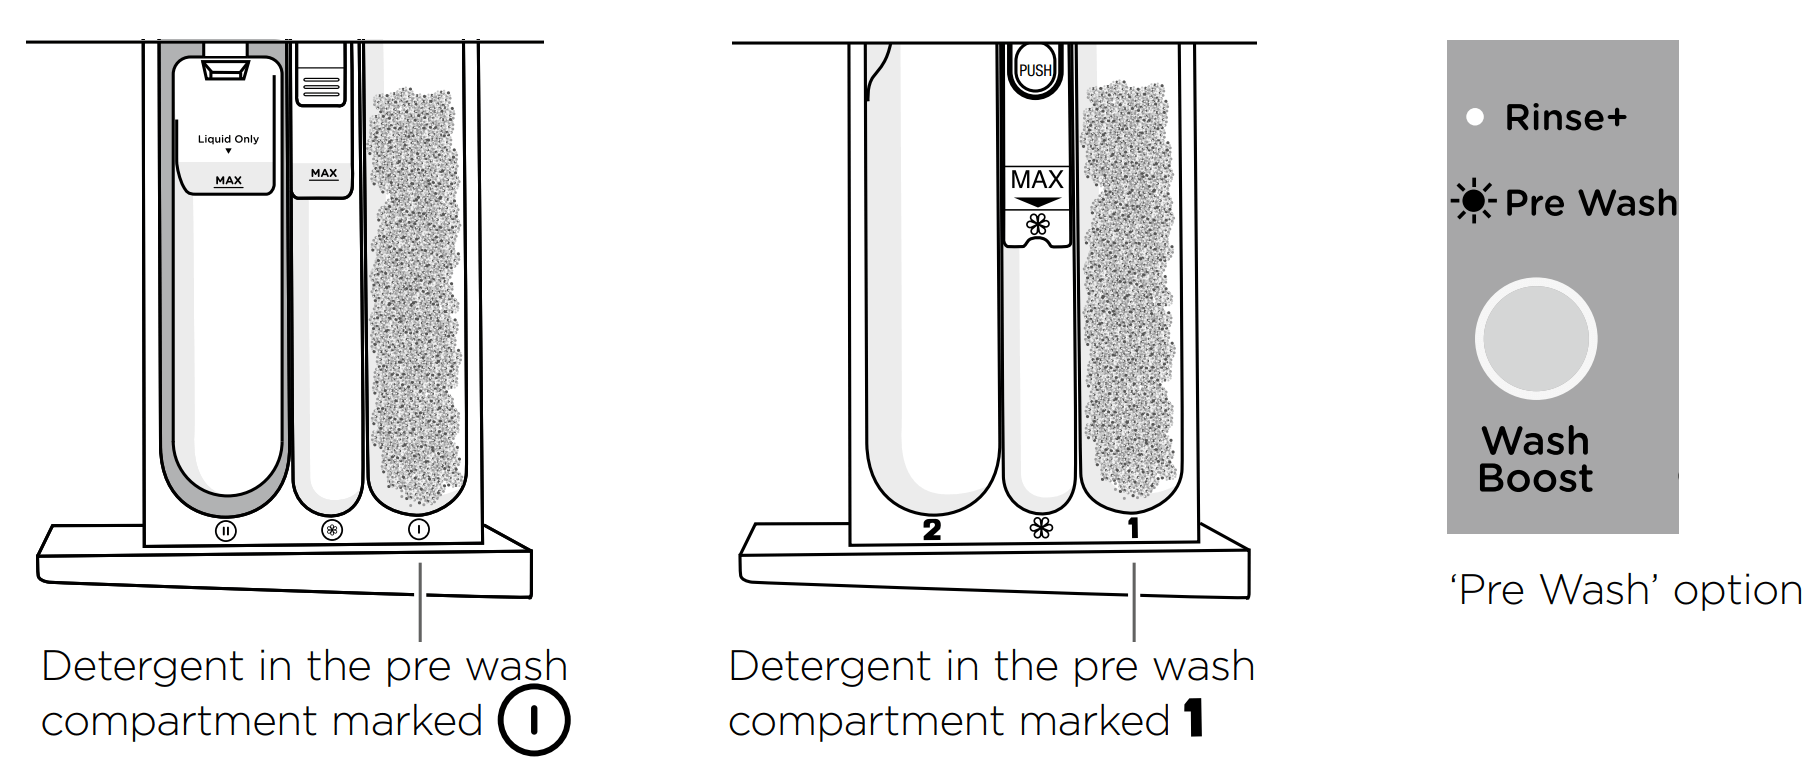

 icon will flash every time you turn your washer dryer on to remind you to do this. If your washer dryer starts to smell this is a sign that you should complete a ‘Drum Clean’ cycle. We recommend that you do not have any items in the washer dryer when you run this cycle.
 or
or 


 while waiting for suds to dissipate. The machine will not beep during this time. When the suds have dissipated, the machine will automatically restart. If a suds event has occurred during a cycle the machine will also display this warning at the end of the cycle, to alert you that this has occurred. This may help to explain any reduction in performance.