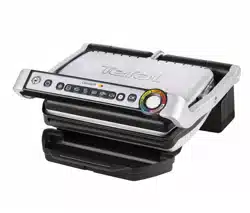
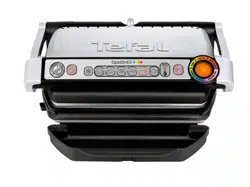
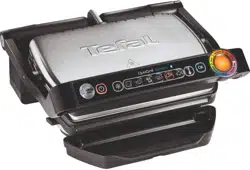
Tefal GC702D.HSE Optigrill
Product's Documents
Below are documents related to this product, you can read online or download:
- Owner's manual - (English) Read Online | Download pdf
- staff kitchen areas in shops, offices and other working environments;
- farm houses;
- by clients in hotels, motels and other residential type environments;
- bed and breakfast type environments.
Never leave the appliance unattended when in use.
 Accessible surface temperatures can be high when the appliance is operating. Never touch the hot surfaces of the appliance.
A Control panel
A1 On/off button
A2 Frozen food mode
A3 Cooking programs
A4 Manual mode
A5 OK button
A6 Cooking level indicator
B Body
C Handle
D Cooking plates
E Juice collection tray
F Power cord


NOTE: Maximum thickness of food 4 cm and minimum thickness of food 4mm for all cooking programs and manual mode.

1 Remove all packaging materials, stickers and accessories from the inside and the outside of the appliance.
The colour sticker on the cooking level indicator can be changed, according to the language. You can replace it with the one on the inside of the packaging.
2 Before using for the first time, thoroughly clean the plates with warm water and a little washing-up liquid, rinse and dry thoroughly.

3-4 Position the removable juice collection tray at the front of the appliance.


5 If desired for the best results you may wipe the cooking plates using a paper towel dipped in a little cooking oil, to improve the non-stick release.
6 Remove any surplus oil using a clean kitchen paper towel

7 Connect the appliance to the mains. (note the cord should be fully unwound).
Close the grill.
8 Press the On/Off button.
Note: It is normal for the program lights to illuminate in succession until a program has been selected.

9 If the food that you wish to cook is frozen, press the button“frozen food”. The cooking time will then be adjusted automatically to allow for this.
10 Select the appropriate cooking mode according to what type of food you wish to cook.

6 cooking programs and a manual mode
 | Select this cooking program if you want to cook burgers. |  | Select this cooking program if you want to cook red meat : steak (off the bone) |
 | Select this cooking program if you want to cook poultry (off the bone): thigh, breast, escalope |  | Select this cooking program if you want to cook fish: salmon steak |
 | Select this cooking program if you want to cook paninis* | ||
 | Select this cooking program if you want to cook sausage |  | If you select Manual Mode, after the pre heating phase and once the food is added, the indicator light is a fixed white after closing the lid. You must then control the cooking time manually. Note: With Manual mode there are no audible beeps and the cooking level indicator does not change colour. |
*For meat less than 4 mm thickness, after preheating the grill and closing the lid, press OK to ensure the appliance recognises the food and that the cooking cycle starts.
If you are uncertain about what cooking mode to use for other foods because it is not listed above, please refer to the “Cooking table for out of program food” page 55.
11 Press the “OK” button: the appliance starts pre-heating and the cooking level indicator flashes purple.
NB: If you have selected the wrong program, return to stage 8.
12 Wait for 4-7 minutes.

13 An audible tone is heard and the cooking level indicator stops flashing purple when the pre-heating mode is complete. Comments: At the end of pre-heating, if the appliance remains closed, the safety system will turn off the product.


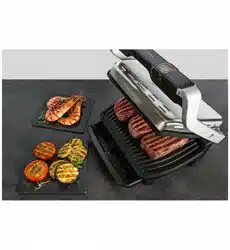
14-15 After pre-heating, the appliance is ready for use.
Open the grill and place the food on the cooking plate.
Note: To ensure correct operation of the automatic sensor you must open the lid fully.
Comments: If the appliance remains open for too long, the safety system will turn off the appliance automatically.

16-17 The appliance automatically adjusts the cooking cycle (time and temperature) according to the food thickness and quantity.

Close the appliance to start the cooking cycle. The cooking level indicator turns blue and then becomes green to indicate the cooking is in progress (for the best results do not open or move your food during the cooking process).
During the cooking in progress stage, a beep sounds at each stage of cooking to warn the user that a cooking level (eg rare/yellow) has been reached. Note for very thin pieces of food: close the appliance, the button OK will flashing and the indicator will stay “fixed purple”, press OK to ensure the appliance recognises the food and that the cooking cycle starts.
18 According to the degree of cooking, the indicator light changes colour. When the indicator light is yellow with a beep, your food is rare, when the indicator light is orange with a beep, your food is medium and when the indicator light is red, your food is well done.
N.B.: if you like your meat very rare, remove the meat when the cooking level indicator turns green.
Please note, especially for meat, it is normal that cooking results may vary depending on type, quality and origin of food.

19 - 20 When the colour of the cooking level indicator (A6) corresponds to the degree of cooking you require, open the appliance and remove the food.


21 Close the appliance. The control panel will light up and set itself to ‘choice of program' mode.

Comment: the security system will turn off automatically if no program selection is made.
How to cook another batch of food: After finishing your first batch of food:
1. Make sure the appliance is closed with no food inside.
2. Select the appropriate cooking mode/program (this step is necessary even if you decide to pick the same cooking mode than for the previous batch of food).
3. Press the “OK” button: the appliance starts pre-heating. The preheating is symbolized by the cooking level indicator that flashes purple.
4. The pre-heating is complete when an audible beep is heard and the cooking level indicator stops flashing purple.
5. After the pre-heating, the appliance is ready for use. Open the grill and place the food inside the appliance.
Important:
- Please note that any new batch of food, the pre-heating phase is mandatory. Remember to always have the grill closed and no food inside in order for the pre-heating to effectively function.
- Then wait for the pre-heating to be complete before opening the grill and place the food inside.
N.B.: if the new pre-heating cycle is carried out immediately after the end of the preceding cycle, the preheating time will be reduced.
22-23-24
Cook the food according to your personal taste (except for cooking food under 4 mm thick where the cooking cycle has been started by pressing ‘OK’)

If you want to cook food to different personal tastes, once you have placed it on the grill, open the lid and remove the food when it has reached the desired level and then close the grill and continue cooking the other food. The program will continue its cooking cycle until it reaches the ‘well done' level.

25 Keeping warm function
When the cooking process has finished, the appliance will start the keep warm function; the indicator will switch to flashing red and will emit a beep signal every 20 seconds. If the food is left on the grill, it will continue cooking while the cooking plates cool down and during the keeping warm function. You can turn of the beep signal by pressing the ‘OK' button. Comment: the safety system will turn the appliance off automatically after a certain amount of time.

26 Press the ON/OFF button.

27 Unplug grill from wall outlet

28 Allow to cool for at least 2 hours with the lid closed.
To avoid accidental burns, allow grill to cool thor oughly before cleaning.

29 Before cleaning, unlock and remove the plates to avoid damaging the cooking surface.

30 The juice collection tray and the cooking plates are dishwasher safe. The appliance and its cord cannot be placed in the dishwasher.
The heating elements, visible and accessible parts, should not be cleaned after removing the plates. If they are very dirty, wait until the appliance has completely cooled down and clean them with a dry cloth.
Note: After cleaning the upper and lower plates should be re-fitted in their original positions and are not interchangeable.

31-32 If you do not use a dishwasher, you can use warm water and a little washing-up liquid to clean the cooking plates, then rinse thoroughly to remove any residue. Dry carefully with a paper towel or dry soft cloth. Do not use metallic scouring pads, steel wool or any abrasive cleaners to clean any part of the grill, only use nylon or non-metallic cleaning sponges.

Empty the juice collection tray and wash in warm water and a little washing-up liquid, then dry it carefully with a paper towel or dry soft cloth.
33 To clean the outside of the grill, wipe with a warm, wet sponge and dry with a soft, dry cloth.
34 Do not immerse the body of the grill in water or any other liquid.

35 Always make sure the grill is clean and dry before storing.

36 Any repairs must be carried out by an approved service representative.
Problem | Cause | Solution |
| The appliance switches to manual mode when starting a cooking cycle. |
| 2 possible options: - allowto cook, but you must monitorthe cooking (white LED = manual mode) - stop the appliance, remove the food, close the appliance properly, reprogram the appliance and wait until end of preheating. |
| The appliance switches to manual modewhen starting a cooking cycle. |
| Contact your local Tefal Customer Service. |
The appliance stops during the pre-heating or cooking cycle. |
| Disconnect the appliance from the mains leave for 2-3 mins, restart the process. The next time you use the appliance, make sure you open and close it briefly for best cooking results. If the problem continues, contact your local Tefal Customer Service. |
Indicator  flashing after placing the food on the cooking plates. flashing after placing the food on the cooking plates. |
| You must confirm the start of the cooking by pressing the button . |
+ button or button |
| Disconnect and reconnect your appliance and immediately restart a preheat cycle. If the problem persists, contact your Customer Service. |
| The appliance no longer beeps. | ||
| I have put in my food and closed the appliance but cooking has not started. |
| Food must not be thicker than 4cm. You must confirm the start of the cooking by pressing the button OK. Wait for the audible beep and the cooking level indicator to flash purple before adding food. |
I have put in my food but the indicator stays on PURPLE  . . |
| Completely open the grill then close it. |
| Confirm the start of the cooking by pressing the button . | |
| The appliance turns itself off during cooking in manual mode. |
| Press the on/off button and re-start the manual mode. |
Tip, especially for meat: the cooking results on the preset programmes may vary depending on origin, cut and quality of the food being cooked, the programmes have been set and tested for good quality food. Similarly, the thickness of the meat has to be taken into account during cooking; you may not cook food that is thicker than 4 cm.
Program table
Dedicated program | Cooking level colour indicator | ||
 |  |  | |
 Red meat Red meat | Rare | Medium | Well-done |
 Burger Burger | Rare | Medium | Well-done |
 Panini Panini | Lightly cooked | Well-done | Crispy |
 Fish Fish | Lightly cooked | Medium | Well-done |
 Chicken* Chicken* | Fully cooked | ||
 Sausage* Sausage* | Fully cooked | ||
* Chicken and sausages must only be cooked well-done.
Tips: if you like your meat blue rare, you can use
Cooking table for out of program food

For frozen food, press  before selecting your program.


 Flashing white indicator light.
 flashing
 flashing