
Register your product and get support at
www.philips.com/TVsupport
User Manual
43PUS8546
50PUS8546
58PUS8546
65PUS8546
70PUS8546
75PUS8546
8546 Series

Contents
1 Home Screen 4
1.1 Home Screen and Channels
4
1.2 Apps and Philips TV Collection
4
1.3 Open the Home Screen
4
1.4 Home Screen Update
5
2 Setting Up 6
2.1 Read Safety
6
2.2 TV Stand and Wall Mounting
6
2.3 Tips on Placement
6
2.4 Power Cable
6
2.5 Antenna Cable
7
2.6 Satellite Dish
7
3 Remote Control 8
3.1 Key Overview
8
3.2 Pair Your Remote Control to TV
10
3.3 Voice Search
11
3.4 IR Sensor
11
3.5 Batteries
11
3.6 Cleaning
11
4 Switching On and Off 12
4.1 On or Standby
12
4.2 Keys on TV
12
5 Channels 13
5.1 Install Channels
13
5.2 Channel Lists
13
5.3 Channel List sorting
13
5.4 Watching channels
14
5.5 Favourite Channels
16
5.6 Text / Teletext
18
5.7 Interactive TV
19
6 Channel Installation 20
6.1 Satellite Installation
20
6.2 Antenna Installation
22
6.3 Channel List Copy
24
7 Connect Devices 26
7.1 About Connections
26
7.2 CAM with Smart Card - CI+
27
7.3 Home Theatre System - HTS
27
7.4 Smartphones and Tablets
28
7.5 Blu-ray Disc Player
28
7.6 Bluetooth
28
7.7 Headphones
29
7.8 Game Console
29
7.9 USB Hard Drive
29
7.10 USB Keyboard
30
7.11 USB Flash Drive
31
7.12 Photo Camera
31
7.13 Camcorder
31
7.14 Computer
32
8 Connect your Android TV 33
8.1 Network and Internet
33
8.2 Google Account
34
8.3 Philips TV Collection App
35
9 Apps 36
9.1 About Apps
36
9.2 Google Play
36
9.3 Start or Stop an App
37
9.4 Lock Apps
37
9.5 Manage Apps
38
9.6 Storage
38
10 Internet 40
10.1 Start Internet
40
10.2 Options on Internet
40
11 Quick Menu 41
12 Sources 42
12.1 Switch to a device
42
12.2 Options for a TV Input
42
12.3 Device Name and Type
42
12.4 Rescan Connections
42
13 Networks 44
13.1 Network
44
13.2 Bluetooth
44
14 Settings 45
14.1 Picture
45
14.2 Sound
48
14.3 Ambilight Settings
51
14.4 Eco Settings
52
14.5 General Settings
52
14.6 Clock, Region, and Language Settings
55
14.7 Android Settings
55
14.8 Universal Access Settings
55
14.9 Lock Settings
56
15 Videos, Photos and Music 58
15.1 From a Computer or NAS
58
15.2 Favourites Menu
58
15.3 Most Popular Menu and Last Played Menu
58
15.4 From a USB Connection
58
15.5 Play your Videos
58
15.6 View your Photos
59
15.7 Play your Music
61
16 TV Guide 62
16.1 What You Need
62
16.2 TV Guide Data
62
16.3 Using the TV Guide
62
17 Recording and Pause TV 64
17.1 Recording
64
17.2 Pause TV
65
18 Smartphones and Tablets 67
2

18.1 Philips TV Remote App
67
18.2 Google Cast
67
19 Games 68
19.1 What You Need
68
19.2 Gamepads
68
19.3 Play a Game From Game Console
68
20 Ambilight 69
20.1 Ambilight Style
69
20.2 Ambilight Off
69
20.3 Ambilight Settings
69
20.4 Lounge Light Mode
69
20.5 Sunrise Alarm
70
20.6 Ambisleep
70
20.7 Ambilight Extension
70
21 Top Picks 73
21.1 About Top Picks
73
21.2 Now on TV
73
21.3 Video on Demand
73
22 Freeview Play 75
22.1 About Freeview Play
75
22.2 Using Freeview Play
75
23 Netflix 76
24 Alexa 77
24.1 About Alexa
77
24.2 Using Alexa
77
25 Software 78
25.1 Update Software
78
25.2 Software Version
78
25.3 Automatic Software Update
78
25.4 View Software Update History
79
25.5 Open Source Software
79
25.6 Open Source License
79
25.7 Announcements
79
26 Specifications 80
26.1 Environmental
80
26.2 Power
80
26.3 Operating System
81
26.4 Reception
81
26.5 Display Type
81
26.6 Display Input Resolution
81
26.7 Connectivity
81
26.8 Sound
81
26.9 Multimedia
81
27 Help and Support 83
27.1 Register your TV
83
27.2 Using Help
83
27.3 Troubleshooting
83
27.4 Online Help
85
27.5 Support and Repair
85
28 Safety and Care 87
28.1 Safety
87
28.2 Screen Care
88
29 Terms of Use 89
29.1 Terms of Use - TV
89
29.2 Terms of Use - Smart TV
89
29.3 Terms of Use - Philips TV Collection
89
30 Copyrights 90
30.1 HDMI
90
30.2 Dolby Audio
90
30.3 Dolby Vision and Dolby Atmos
90
30.4 DTS-HD
90
30.5 DTS Play-Fi
90
30.6 Wi-Fi Alliance
90
30.7 Kensington
91
30.8 Other Trademarks
91
31 Disclaimer regarding services
and/or software offered by third
parties
92
Index 93
3

1
Home Screen
1.1
Home Screen and Channels
To enjoy the benefits of your Android TV, connect the
TV to the Internet. Press HOME on your remote
control to get your Android Home screen. Like on
your Android smartphone or tablet, the Home screen
is the centre of your TV. From the Home sreen you
can decide what to watch by browsing entertainment
options from app and live TV.
Your Home has channels to let you discover great
contents from your favourite apps. You can also add
additional channels or find new apps to get more
contents.
The Home screen is organized in channels. Apps may
populate their recommendation (if available)
according to their own choice as an individual
channels in the home screen.
Apps
Your favourite Apps are placed on the first row. This
row contains number of apps pre-installed. The order
of these apps are according to business agreements
with content service providers. In this row you will
also find the Apps, like Philips TV Collection, Watch
TV, TV Guide, Media and others.
Live TV
Live TV channel shows the currently running
programmes from the installed channels.
Play Next channel
You can always know what to watch next from Play
Next channel on the Home screen. Start watching
from where you left off and get notifications about
new episodes in the Play Next channel. Press and
hold Select on a movie or TV show to add it directly
to the Play Next channel.
Google Play Movies & TV channel
Rent movies or TV shows on this channel from
Google Play Movies & TV.
Help channel
This channel contains "How to…" tutorial videos to let
you know how to unbox, how to connect external
devices, how to install channel, etc.
YouTube channel
This channel contains your Recommended,
Subscriptions or Trending YouTube videos.
Customize channels
Click the CUSTOMIZE CHANNELS button to add and
remove channels from your Home screen.
Accessing settings from Home
You can access All Settings menu via the icon at the
top right corner. You can also find the Frequent
settings menu and common menu items in the Philips
TV Menu, which can be invoked directly from the
remote control.
System bar on Home screen
The System bar on the top of Home screen contains
following features.
- Search button: to trigger Google search with voice
or text input. The search result and its order are
rendered according to business agreements with
content service providers.
- Input source: to launch the input source list and
switch to any of the connected devices.
- Notifications: to provide you the messages about
your Smart TV system.
- Settings: to access all setting menu and adjust the
TV settings.
- Clock: to indicate the system clock.
See also www.support.google.com/androidtv
1.2
Apps and Philips TV
Collection
Apps
You can add more apps as favourite from the Apps
page. The Apps page can be opened by clicking the
Apps icon at the left end of the Apps row. The Apps
page contains all installed Apps that come with the
TV and the Apps you install from Philips TV Collection
or Google Play™ Store yourself.
Philips TV Collection
All your premium apps are available within the Philips
TV Collection app. Launch it using the banner on
the Apps row. The Philips TV Collection app will also
contain recommendations for new Apps and more.
1.3
Open the Home Screen
To open the Home screen and open an item…
1 - Press HOME.
2 - Select an item and press OK to open or start it.
3 - Press Back continuously or press HOME
can go back to Home screen.
4

3
Remote Control
3.1
Key Overview
Top
1 - Standby / On
To switch the TV on or back to Standby.
2 - VOICE microphone
3 -
To select one of the Ambilight style.
4 -
To launch the Amazon prime video App.
5 -
To open the Netflix App directly. With the TV switched
on or from standby.
• If you have a Netflix membership subscription, you
can enjoy Netflix on this TV. Your TV must be
connected to the Internet.
• To open Netflix, press to open the Netflix
App. You can open Netflix immediately from a TV in
standby.
www.netflix.com
6 - Quick Menu
To open the Quick Menu with typical TV functions.
7 - Philips TV Collection
To launch Philips TV Collection App.
8 -
To launch the Rakuten TV App.
9 - SOURCES / PAIR
• To open or close the Sources menu.
• To pair the remote control to the TV.
10 - Google Assistant™
To launch the Google Assistant™.
Top (for UK models)
1 - Standby / On
To switch the TV on or back to Standby.
2 - VOICE microphone
3 -
To select one of the Ambilight style.
4 -
To launch the Amazon prime video App.
5 -
To open the Netflix App directly. With the TV switched
on or from standby.
• If you have a Netflix membership subscription, you
can enjoy Netflix on this TV. Your TV must be
connected to the Internet.
• To open Netflix, press to open the Netflix
App. You can open Netflix immediately from a TV in
standby.
www.netflix.com
6 - Quick Menu
To open the Quick Menu with typical TV functions.
7 - Freeview Play
To launch Freeview Play.
8 -
To launch the Rakuten TV App.
9 - SOURCES / PAIR
• To open or close the Sources menu.
• To pair the remote control to the TV.
10 - Google Assistant™
To launch the Google Assistant™.
8

Middle
1 - OK key
To confirm a selection or setting. To open the channel
list while watching TV.
2 - Back
To switch back to the previous channel you selected.
To return to previous menu.
To go back to the previous App/Internet page.
3 - Playback and Record
• Play , to playback.
• Pause , to pause playback
• Stop , to stop playback
• Rewind , to rewind
• Fast forward , to go fast forward
• Record , to start recording
4 - Colour keys
Direct selection of options. Blue key , opens Help.
5 - Arrow / navigation keys
To navigate up, down, left or right.
6 - HOME
To open the Home menu.
7 - TV Guide / Channel list
To open or close the TV Guide. Long press to open
the channel list.
Middle (for UK models)
1 - OK key
To confirm a selection or setting. To open the channel
list while watching TV.
2 - Back
To switch back to the previous channel you selected.
To return to previous menu.
To go back to the previous App/Internet page.
3 - Playback and Record
• Play , to playback.
• Pause , to pause playback
• Stop , to stop playback
• Rewind , to rewind
• Fast forward , to go fast forward
• Record , to start recording
4 - Colour keys
Direct selection of options. Blue key , opens Help.
5 - Arrow / navigation keys
To navigate up, down, left or right.
6 - HOME
To open the Home menu.
7 - TV Guide
To open or close the TV Guide.
Bottom
9

5.3
Channel List sorting
You can do channel list sorting with all channels. You
can set the channel list to show only TV channels or
only Radio stations. For Antenna/Cable channels you
can set the list to show the Free-to-Air or the
Scrambled channels.
To set a filter on a list with all channels…
1 - Press .
2 - Press OK to open the current channel list.
3 - Press OPTIONS.
4 - Select Select Channel List and press OK.
5 - Select Filter Antenna Channels or Filter Cable
Channels according to the list you want to filter, and
press OK.
6 - In the Options menu, select the filter you want
and press OK to activate. The name of the filter
appears as part of the channel list name on top of the
channel list.
7 - Press (left) to go back one step or press to
close the menu.
5.4
Watching channels
Tune to a Channel
To start watching TV channels, press . The TV tunes
to the channel you last watched.
Switch Channels
To switch channels, press or .
If you know the channel number, type in the number
with the number keys. Press OK after you entered
the number to switch immediately.
If the information is available from the Internet, the TV
shows the current programme name and details
followed by the next programme name and details.
Previous channel
To switch back to the previously tuned channel,
press Back.
You can also tune to channels from a Channel List.
Lock a Channel
Lock and Unlock a Channel
To prevent children from watching a channel, you can
lock a channel. To watch a locked channel, you must
enter the 4 digit Child Lock PIN code first. You
cannot lock programmes from connected devices.
To lock a channel…
1 - Press .
2 - Press OK to open the channel list. If necessary
change the channel list.
3 - Select the channel you want to lock.
4 - Press OPTIONS and select Lock
Channel and press OK.
5 - Enter your 4 digit PIN code if the TV asks for it. A
locked channel is marked with a (lock).
6 - Press (left) to go back one step or
press Back to close the menu.
To unlock a channel…
1 - Press .
2 - Press OK to open the channel list. If necessary
change the channel list.
3 - Select the channel you want to unlock.
4 - Press OPTIONS and select Unlock
Channel and press OK.
5 - Enter your 4 digit PIN code if the TV asks for it.
6 - Press (left) to go back one step or
press Back to close the menu.
If you lock or unlock channels in a channel list, you
only have to enter the PIN code just once until you
close the channel list.
For more information, in Help, press the colour
key Keywords and look up Child Lock for more
information.
Parental Rating
To prevent children from watching a programme not
suitable for their age, you can set an age rating.
Digital channels can have their programmes age
rated. When the age rating of a programme is equal to
or higher than the age you have set as age rating for
your child, the programme will be locked. To watch a
locked programme, you must enter the Parental
Rating (only available for certain countries) code first.
To set an age rating…
1 - Select Settings > Child Lock > Parental
Rating and press OK.
2 - Enter a 4-digit Child lock code. If you did not set
a code yet, select Set Code in Child Lock. Enter a
4-digit Child lock code and confirm. Now you can set
an age rating.
3 - Back in Parental Rating, select the age and
press OK.
4 - Press (left) repeatedly if necessary, to close
the menu.
To switch off the parental age rating, select None.
However, in some countries you must set an age
rating.
For some broadcasters/operators, the TV only locks
programmes with a higher rating. The parental age
rating is set for all channels.
14

(only available for certain countries)
Channel Options
Open Options
While watching a channel, you can set some options.
Depending on the type of channel you are watching
(analogue or digital) or depending on the TV settings
you made, some options are available. For example,
the Screen off option is only available for radio
channels. It is suggested to turn off the TV screen for
saving energy and protecting the screen.
To open the options menu…
1 - While watching a channel, press OPTIONS.
2 - Press OPTIONS again to close.
Subtitles
Switch On
Digital broadcasts can have subtitles for their
programmes.
To show the subtitles…
Press OPTIONS and select Subtitles.
You can switch subtitles On or Off. Alternatively
you can select Automatic.
Automatic
If language information is part of the digital broadcast
and the broadcasted programme is not in your
language (the language set on TV), the TV can show
subtitles automatically in one of your preferred
subtitle languages. One of these subtitle languages
must also be part of the broadcast.
You can select your preferred subtitle languages
in Subtitle Language.
Subtitles from Text
If you tune to an analogue channel, you need to
make the subtitles available for each channel
manually.
1 - Switch to a channel and press TEXT to open
Text.
2 - Enter the page number for subtitles, usually 888.
3 - Press TEXT again, to close Text.
If you select On in the Subtitle menu when watching
this analogue channel, subtitles will be shown if
available.
To know if a channel is analogue or digital, switch to
the channel and open Information in OPTIONS.
Subtitle Language
Preferred Subtitle Languages
A digital broadcast can offer several subtitle
languages for a programme. You can set a preferred
primary and secondary subtitle language. If subtitles
in one of these languages are available, the TV will
show the subtitles you selected.
To set the primary and secondary subtitle language…
1 - Go to Settings > Region and Language and
press OK.
2 - Select Languages > Primary
Subtitles or Secondary Subtitles.
3 - Select the language you need and press OK.
4 - Press (left) to go back one step or
press Back to close the menu.
Select a Subtitle Language
If none of the preferred subtitle languages are
available, you can select another subtitle language if
available. If no subtitle languages are available, you
cannot select this option.
To select a subtitle language when none of your
preferred languages are available…
1 - Press OPTIONS.
2 - Select Subtitle Language and select one of the
languages as subtitles temporarily.
Audio Language
Preferred Audio Language
A digital broadcast can offer several audio languages
(spoken languages) for a programme. You can set a
preferred primary and secondary audio language. If
audio in one of these languages is available, the TV
will switch to the audio language.
To set the primary and secondary audio language…
1 - Go to Settings > Region and Language and
press OK.
2 - Select Languages > Primary
Audio or Secondary Audio.
3 - Select the language you need and press OK.
4 - Press (left) to go back one step or
press Back to close the menu.
15

Select an Audio Language
If none of the preferred audio languages are
available, you can select another audio language if
available. If no audio languages are available, you
cannot select this option.
To select an audio language when none of your
preferred languages are available…
1 - Press OPTIONS.
2 - Select Audio Language and select one of the
languages as audio temporarily.
Common Interface
If you installed a CAM in one of the Common
Interface slots, you can view the CAM and operator
information or do some CAM related settings.
To view the CAM information…
1 - Press SOURCES.
2 - Select the channel type you are using the CAM
for Watch TV.
3 - Press OPTIONS and select Common
Interface.
4 - Select the appropriate Common Interface slot
and press (right).
5 - Select the TV operator of the CAM and press OK.
The following screens come from the TV operator.
HbbTV on this Channel
If you want to avoid access to HbbTV pages on a
specific channel, you can block the HbbTV pages for
this channel only.
Switch on HbbTV
Select Settings > General
settings > Advanced > HbbTV settings > HbbTV
> On.
Programme Info
View programme details
To call up the details of the selected programme…
1 - Tune to the channel.
2 - Press OPTIONS, select Programme Info and
press OK.
3 - To close this screen, press OK.
On Programme Info, press the colour
key SCHEDULED to enter the scheduled
recording list, or press the colour
key OVERVIEW to get the channel overview
information.
View programme information from channel list
To call up the programme information from channel
list…
1 - Tune to the channel, press OK or Channel list
to open the channel list.
2 - Press OPTIONS, select Programme Info and
press OK to view general information of the
programme.
3 - To close this screen, press Back to go bck to
channel list.
Mono / Stereo
You can switch the sound of an analogue channel to
Mono or Stereo.
To switch to Mono or Stereo…
1 - Tune to an analoge channel.
2 - Press OPTIONS, select Mono/Stereo and
press (right).
3 - Select Mono or Stereo and press OK.
4 - Press (left) to go back one step or
press Back to close the menu.
Reorder Channels
Only in a Favourites List you can change the
sequence of channels (reorder).
To change the sequence of channels…
1 - Open the Favourites List you want to reorder.
2 - Press OPTIONS, select Reorder
Channels and press OK.
3 - In the Favourites List, select the channel you
want to reorder and press OK.
4 - With the (up) or (down) keys move the
channel where you want it.
5 - Press OK to confirm the new location.
6 - You can reorder channels with the same method
until you close the Favourites List with the Back
key.
5.5
Favourite Channels
About Favourite Channels
In a favourite channel list, you can collect the
channels you like.
You can create 4 different lists of favourite channels
for easy channel zapping. You can name each
Favourites List individually. Only in a Favourites List
you can reorder channels.
16

With a Favourites List selected, press the
arrows (up) or (down) to select a channel,
then press OK to watch the selected channel. You
only tune to the channels in that list when using
or keys.
* Note: Favourite channel list is not available when
installation country is UK and Italy.
Create a Favourites List
To create a favourite channels list…
1 - Press , to switch to TV.
2 - Press OK to open the current channel list.
3 - Press OPTIONS.
4 - Select Create Favourites List and press OK.
5 - In the list at the left, select a channel you want as
a favourite and press OK. Channels come in the list at
the right in the order you add them. To undo, select
the channel in the list at the left and
press OK again.
6 - If necessary, you can go on selecting and adding
channels as favourites.
7 - To finish adding channels, press Back.
The TV will ask to rename the Favourites List. You can
use the on-screen keyboard.
1 - Use the on-screen keyboard to delete the
current name and enter a new name.
2 - When done, select Close and press OK.
The TV will switch to the newly created Favourites
List.
You can add a range of channels in one go or start a
Favourites List by duplicating the channel list with all
channels and removing the channels you do not
want.
The channels in the Favourites List are renumbered.
Add a Range of Channels
To add a consecutive range of channels to a
Favourites List in one go, you can use Select Range.
To add a range of channels…
1 - Open the Favourites List where you want to add a
range of channels.
2 - Press OPTIONS, select Select Range and
press OK.
3 - In the list at the left select the first channel of the
range you want to add and press OK.
4 - Press (down) to select the last channel of the
range you want to add. The channels are marked at
the left.
5 - Press OK to add this range of channels and
confirm.
You can also start creating a Favourites List from
Select Range.
Edit Favourites
To add a consecutive range of channels to a
Favourites List in one go, you can use Edit favourites.
To add a range of channels…
1 - Open the Favourites List where you want to add a
range of channels.
2 - Press OPTIONS, select Edit favourites and
press OK.
3 - In the list at the left select the first channel of the
range you want to add and press OK.
4 - Press (down) to select the last channel of the
range you want to add. The channels are marked at
the right.
5 - Press OK to add this range of channels and
confirm.
You can also start creating a Favourites List from Edit
favourites.
Rename a Favourites List
To rename a Favourites List…
1 - Open the Favourite List you want to rename.
2 - Press OPTIONS, select Rename Favourites
List and press OK.
3 - Use the on-screen keyboard to delete the current
name and enter a new name.
4 - When done, select Close and press OK.
5 - Press Back to close the channel list.
Remove a Favourites List
To remove a Favourites List…
1 - Open the Favourites List you want to remove.
2 - Press OPTIONS, select Remove Favourites
List and press OK.
3 - Confirm to remove the list.
4 - Press Back to close the channel list.
Reorder Channels
Only in a Favourites List you can change the
sequence of channels (reorder).
To change the sequence of channels…
1 - Open the Favourites List you want to reorder.
2 - Press OPTIONS, select Reorder
Channels and press OK.
3 - In the Favourites List, select the channel you
want to reorder and press OK.
17

4 - With the (up) or (down) keys move the
channel where you want it.
5 - Press OK to confirm the new location.
6 - You can reorder channels with the same method
until you close the Favourites List with the Back
key.
Favourites List on TV Guide
You can link the TV Guide for your Favourite List.
1 - While watching a TV channel, long press >
Select channel List.
2 - Select a Favourites List and press OK.
3 - Press TV GUIDE to open it.
With the TV Guide you can view a list of the current
and scheduled TV programmes of your favourite
channels. Along with your favourite channels, the first
3 most used channels from the broadcasters’ default
list will be appended after your favourite channels for
your preview. You need to add these channels into
your favourite list to enable its operation (refer to "TV
Guide" chapter).
On each page of TV Guide, there is a "Did you know"
grid inserted on your favourite channel list. The "Did
you know"-channel provides useful tips to improve
the way you use your TV.
5.6
Text / Teletext
Text Pages
To open Text/Teletext press TEXT, while you are
watching TV channels.
To close Text, press TEXT again.
Select a Text page
To select a page . . .
1 - Enter the page number with the number keys.
2 - Use the arrow keys to navigate.
3 - Press a colour key to select a colour-coded
subject at the bottom of the screen.
Text sub-pages
A Text page number can hold several subpages. The
subpage numbers are shown on a bar next to the
main page number.
To select a subpage, press or .
T.O.P. Text pages
Some broadcasters offer T.O.P. Text.
To open T.O.P. Text pages within Text,
press OPTIONS and select T.O.P. Overview.
Search Text
You can select a word and scan Text for all
occurences of this word.
1 - Open a Text page and press OK.
2 - Select a word or number with the arrow keys.
3 - Press OK again to jump immediately to the next
occurence of this word or number.
4 - Press OK again to jump to the subsequent
occurence.
5 - To stop searching, press (up) until nothing is
selected.
Text from a connected device
Some devices that receive TV channels can also offer
Text.
To open Text from a connected device . . .
1 - Press SOURCES, select the device and
press OK.
2 - While watching a channel on the device,
press OPTIONS, select Show Device Keys and
select the key and press OK.
3 - Press Back to hide the device keys.
4 - To close Text, press Back again.
Digital Text (UK only)
Some digital broadcasters offer dedicated Digital Text
or interactive TV on their digital TV channels. This
includes normal Text using the number, colour and
arrow keys to select and navigate.
To close Digital Text, press Back.
* The teletext can only be reached when the channels
are installed directly on the TV’s internal tuner and
the set is on TV mode. If a set-top box is being used,
the teletext will be unavailable via TV. In that case,
the set-top box’s teletext can be used instead.
Text Options
In Text/Teletext, press OPTIONS to select the
following…
• Freeze page / Unfreeze page
To start or stop the automatic rotation of subpages.
• Dual screen / Full screen
To show the TV channel and Text alongside each
other.
• T.O.P. overview
To open T.O.P. Text.
• Enlarge / Normal view
To enlarge the Text page for comfortable reading.
• Reveal
To unhide hidden information on a page.
• Language
To switch the group of characters that Text uses to
display correctly.
• Text 2.5
To activate the Text 2.5 for more colours and better
graphics.
18

Text Setup
Text language
Some digital TV broadcasters have several Text
languages available.
To set your primary and secondary Text language . . .
1 - Select Settings > Region and language and
press (right) to enter the menu.
2 - Select Language > Primary Text or Secondary
Text and press OK.
3 - Select your preferred Text languages.
4 - Press (left) repeatedly if necessary, to close
the menu.
Text 2.5
If available, Text 2.5 offers more colours and better
graphics. Text 2.5 is activated as a standard factory
setting.
To switch off Text 2.5…
1 - Press TEXT.
2 - With Text/Teletext open on screen,
press OPTIONS.
3 - Select Text 2.5 > Off and press OK.
4 - Press (left) repeatedly if necessary, to close
the menu.
5.7
Interactive TV
About iTV
With interactive TV, some digital broadcasters
combine their normal TV programme with information
or entertainment pages. On some pages, you can
respond to a programme or vote, do online shopping
or pay for a video-on-demand programme.
HbbTV, MHEG, . . .
Broadcasters use various interactive TV systems :
HbbTV (Hybrid Broadcast Broadband TV) or iTV
(Interactive TV - MHEG). Interactive TV is sometimes
referred to as Digital Text or Red button. But each
system is distinct.
Visit the broadcaster's Internet website for more
information.
What You Need
Interactive TV is only available on digital TV channels.
To enjoy the full benefits of Interactive TV, you need
a high-speed (broadband) Internet connection to the
TV.
HbbTV
If a TV channel offers HbbTV pages, you must first
switch on HbbTV in the TV settings to view the pages.
Settings > General
settings > Advanced > HbbTV settings > HbbTV >
On.
Use iTV
Open iTV pages
Most channels that offer HbbTV or iTV invite you to
press the colour key (red) or OK key to open
their interactive programme.
Navigate iTV pages
You can use the arrow and colour keys, the number
keys and the Back key to navigate the iTV pages.
You can use the (Play), (Pause) and (Stop)
keys to watch videos within iTV pages.
Digital Text (UK only)
To open Digital Text, press TEXT. To close,
press Back.
Close iTV pages
Most iTV pages inform you which key to use to close.
To force an iTV page to close, switch to the next TV
channel and press Back.
19

6
Channel Installation
6.1
Satellite Installation
About Installing Satellites
Up to 4 Satellites
You can install up to 4 satellites (4 LNBs) on this TV.
Select the exact number of satellites you wish to
install at the start of the installation. This will speed up
the installation.
Unicable
You can use a Unicable system* to connect the
antenna dish to the TV. You can select Unicable for
up to 4 satellites at the start of the installation.
* Note: supports Unicable 1 (EN50494) and Unicable 2
(EN50607/JESS).
Start the Installation
Make sure your satellite dish is connected correctly
and is perfectly aligned before you start the
installation.
To start the satellite installation…
1 - Select Settings > Channels > Satellite
Installation and press OK. Enter your PIN code if
necessary.
2 - Select Search for Satellite and press OK.
3 - Select Search and press OK. TV will search for
satellites.
4 - Select Install and press OK. The TV shows the
current satellite installation setup.
If you want to change this setup, select Settings.
If you don't want to change the setup, select Search.
Go to step 5.
5 - In Installation System, select the number of
satellites you want to install or select one of the
Unicable systems. When you select Unicable, you
can choose the User Band Numbers and enter the
User Band Frequencies for each tuner. In some
countries, you can adjust some expert settings for
each LNB in More Settings.
6 - The TV will search for the satellites available on
the alignment of your antenna dish. This may take a
few minutes. If a satellite is found, its name and
reception strength are shown on screen.
7 - When the TV found the satellites you need,
select Install.
8 - If a satellite offers Channel Packages, the TV will
show the available packages for that satellite. Select
the package you need. Some packages offer
a Quick or Full install for their available channels,
select one or the other. The TV will install the satellite
channels and radio stations.
9 - To store the satellite setup and installed channels
and radio stations, select Finish.
Satellite Installation Settings
The satellite installation settings are preset according
your country. These settings determine how the TV
searches and installs satellites and its channels. You
can always change these settings.
To change the satellite installation settings…
1 - Start the satellite installation.
2 - On the screen where you can start searching for
satellites, select Settings and press OK.
3 - Select the number of satellites you want to install
or select one of the Unicable systems. When you
select Unicable, you can choose the User Band
Numbers and enter the User Band Frequencies for
each tuner.
4 - When you're done, select Next and press OK.
5 - On the Settings menu, press the colour
key Done to return to the screen to start
searching for satellites.
Homing Transponder and LNB
In some countries, you can adjust the expert settings
for homing transponder and each LNB. Only use or
change these settings when a normal installation fails.
If you have non-standard satellite equipment, you
can use these settings to overrule the standard
settings. Some providers might give you some
transponder or LNB valeus which you can enter here.
Satellite CAMs
If you use a CAM – a Conditional Access Module with
a smart card – to watch satellite channels, we
recommend to do the satellite installation with the
CAM inserted in the TV.
Most CAMs are used to descramble channels.
Newest generation CAMs can install all the satellite
channels by themselves on your TV. The CAM will
invite you to install its satellite(s) and channels. These
CAMs not only install and descramble the channels
but also handle regular channel updates.
20

Manual Channel Update
You can always start an channel update yourself.
To start a channel update manually…
1 - Select Settings > Channels > Antenna/Cable
Installation or Antenna Installation and press OK.
2 - Enter your PIN code if necessary.
3 - Select Search for Channels and press OK.
4 - Select Start and press OK.
5 - Select Update Digital Channels,
select Next and press OK.
6 - Select Start and press OK to update the digital
channels. This can take a few minutes.
7 - Press (left) to go back one step or
press Back to close the menu.
Reinstall Channels
Reinstall All Channels
You can reinstall all channels and leave all other TV
settings untouched.
If a PIN code is set, you will need to enter this code
before you can reinstall channels.
To reinstall channels…
1 - Select Settings > Channels > Antenna/Cable
Installation or Antenna Installation and press OK.
2 - Enter your PIN code if necessary.
3 - Select Search for Channels and press OK.
4 - Select Start and press OK.
5 - Select Reinstall Channels, select Next and
press OK.
6 - Select the country where you are now and
press OK.
7 - Select Next and press OK.
8 - Select the type of installation you want, Antenna
(DVB-T) or Cable (DVB-C) and press OK.
7 - Select Next and press OK.
10 - Select the type of channels you want, Digital
and Analogue Channels or Only Digital
Channels and press OK.
7 - Select Next and press OK.
12 - Select Start and press OK to update the
digital channels. This can take a few minutes.
13 - Press (left) to go back one step or
press Back to close the menu.
Reinstall TV
You can redo a full TV installation. The TV is
completely reinstalled.
To redo a full TV installation…
1 - Select Settings > General Settings > Reinstall
TV and press OK.
2 - Enter your PIN code if necessary.
3 - Select Yes and press OK to confirm.
4 - The TV will reinstall completely. All settings will
be reset and installed channels will be replaced. The
installation can take a few minutes.
5 - Press (left) to go back one step or
press Back to close the menu.
DVB Settings
DVB-T or DVB-C Reception
During the channel installation, just before you search
for channels, you selected Antenna (DVB-T) or Cable
(DVB-C). Antenna DVB-T searches for terrestrial
analogue channels and digital DVB-T/T2 channels.
Cable DVB-C searches for analogue and digital
channels available from a cable DVB-C operator.
DVB-C Channel Installation
For ease of use, all DVB-C settings are set to
automatic.
If your DVB-C operator gave you specific DVB-C
values, the network ID or network frequency, enter
these values when the TV asks for them during
installation.
Channel Number Conflicts
In some countries, different TV channels
(broadcasters) might have the same channel number.
While installing, the TV shows the list with channel
number conflicts. You need to select which TV
channel you want to install on a channel number with
multiple TV channels.
Network Frequency Mode
If you intend to use the fast Quick Scan method
in Frequency Scan to search for channels,
select Automatic. The TV will use 1 of the predefined
network frequencies (or HC - homing channel) as
used by most cable operator in your country.
If you received a specific network frequency value to
search for channels, select Manual.
Network Frequency
With the Network Frequency Mode set to Manual,
you can enter the network frequency value received
from your cable operator here. To enter the value, use
the number keys.
23

Frequency Scan
Select the method of searching for channels. You can
select the faster Quick Scan method and use the
predefined settings used by most cable operator in
your country.
If this results in having no channels installed or if
some channels are missing, you can select the
extended Full Scan method. This method will take
more time to search for and install channels.
Frequency Step Size
The TV searches for channels in steps of 8MHz.
If this results in having no channels installed or if
some channels are missing, you can search in smaller
steps of 1MHz. Using the 1MHz steps will take more
time to search for and install channels.
Digital Channels
If you know your cable operator is not offering digital
channels, you can skip searching for digital channels.
Analogue Channels
If you know your cable operator is not offering
analogue channels, you can skip searching for
analogue channels.
Free / Scrambled
If you have a subscription and a CAM - Conditional
Access Module for pay TV services, select Free +
Scrambled. If you did not subscribe to pay TV
channels or services, you can select Free
Channels Only .
For more information, in Help, press the colour
key Keywords and look up CAM, Conditional
Access Module.
Reception Quality
You can check the quality and signal strength of a
digital channel. If you have your own antenna, you
can reposition the antenna to try and improve the
reception.
To check the reception quality of a digital channel…
1 - Tune to the channel.
2 - Select Settings > Channels > Antenna/Cable
Installation or Antenna Installation and press OK.
Enter your PIN code if necessary.
3 - Select Digital: Reception Test and press OK.
4 - Select Search and press OK. The digital
frequency is shown for this channel.
5 - Select Search again and press OK to check the
signal quality of this frequency. The test result is
shown on screen. You can reposition the antenna or
check the connections to possibly improve the
reception.
6 - You can also change the frequency
yourself. Select the frequency number one by one
and use the (up) or (down) keys to change
the value. Select Search and press OK to test the
reception again.
7 - Press (left) repeatedly if necessary, to close
the menu.
Manual Installation
Analogue TV channels can be manually installed,
channel by channel.
To install analogue channels manually…
1 - Select Settings > Channels > Antenna/Cable
Installation or Antenna Installation and press OK.
Enter your PIN code if necessary.
2 - Select Analogue: Manual Installation and
press OK.
• System
To set up the TV system, select System.
Select your country or the part of the world where
you are now and press OK.
• Search Channel
To find a channel, select Search Channel and
press OK. You can enter a frequency yourself to find
a channel or let the TV search for a channel.
Press (right) to select Search and press OK to
search for a channel automatically. The found
channel is shown on screen and if the reception is
poor, press Search again. If you want to store the
channel, select Done and press OK.
• Store
You can store the channel on the current channel
number or as a new channel number.
Select Store Current Channel or Store as New
Channel and press OK. The new channel number is
shown briefly.
You can redo these steps until you have found all
available analogue TV channels.
24

6.3
Channel List Copy
Introduction
Channel List Copy is intended for dealers and expert
users.
With Channel List Copy, you can copy the channels
installed on one TV onto another Philips TV of the
same range. With Channel List Copy, you avoid the
time-consuming channel search by uploading a
predefined channel list on a TV. Use a USB flash drive
of minimum 1 GB.
Conditions
• Both TVs are from the same year range.
• Both TVs have the same hardware type. Check the
hardware type on the TV type plate on the back of
the TV.
• Both TVs have compatible software versions.
Current channel version
To check the current version of the channel list…
1 - Select Settings > Channels, select Channel
List Copy, select Current Version and press OK.
2 - Press OK to close.
Current software version
To check the cuurent version of the TV software…
1 - Select Settings > Update Software and
press (right) to enter the menu.
2 - Select Current Software Info and press OK.
3 - The version, release notes and creation date are
shown. Also, the Netflix ESN Number is shown if
available.
4 - Press (left) repeatedly if necessary, to close
the menu.
Copy a Channel List
To copy a channel list…
1 - Switch on the TV. This TV should have channels
installed.
2 - Plug in a USB flash drive.
3 - Select Settings > Channels > Channel List
Copy and press OK.
4 - Select Copy to USB and press OK. You might
be asked to enter the Child Lock PIN code to copy the
channel list.
5 - When copying is done, unplug the USB flash
drive.
6 - Press (left) repeatedly if necessary, to close
the menu.
Now you can upload the copied channel list onto
another Philips TV.
Channel List Version
Check the current version of the channel list...
1 - Select Settings > Channels and
press (right) to enter the menu.
2 - Select Channel List Copy and select Current
Version, then press OK.
3 - Press (left) repeatedly if necessary, to close
the menu.
Upload a Channel List to TV
To not Installed TVs
Depending on whether your TV is already installed or
not, you must use a different method to upload a
channel list.
To a TV that is not yet installed
1 - Plug in the power plug to start the installation and
select language and country. You can skip the
channel search. Finish the installation.
2 - Plug in the USB flash drive that holds the channel
list of the other TV.
3 - To start the channel list upload, select Settings
> Channels > Channel List Copy > Copy to TV and
press OK. Enter your PIN code if necessary.
4 - The TV notifies you if the channel list is copied to
the TV successfully. Unplug the USB flash drive.
To Installed TVs
Depending on whether your TV is already installed or
not, you must use a different method to upload a
channel list.
To an already installed TV
1 - Verify the country setting of the TV. (To verify this
setting, see chapter Reinstall All Channels. Start this
procedure until you reach the country setting.
Press Back to cancel the installation.)
If the country is correct continue with step 2.
If the country is not correct, you need to start a
reinstallation. See chapter Reinstall All Channels and
start the installation. Select the correct country and
skip the channels search. Finish the installation. When
done, continue with step 2.
2 - Plug in the USB flash drive that holds the channel
list of the other TV.
3 - To start the channel list upload, select Settings
> Channels > Channel List Copy > Copy to TV and
press OK. Enter your PIN code if necessary.
4 - The TV notifies you if the channel list is copied to
the TV successfully. Unplug the USB flash drive.
25

key Keywords and look up USB Hard Drive.
Installation
Before you can pause or record a broadcast, you
must connect and format a USB Hard Drive.
Formatting removes all files from the USB Hard Drive.
1 - Connect the USB Hard Drive to one of
the USB connections on the TV. Do not connect
another USB device to the other USB ports when
formatting.
2 - Switch on the USB Hard Drive and the TV.
3 - When the TV is tuned to a digital TV channel,
press (Pause). Trying to pause will start the
formatting.
Follow the instructions on screen.
When the USB Hard Drive is formatted, leave it
connected permanently.
Warning
The USB Hard Drive is formatted exclusively for this
TV, you cannot use the stored recordings on another
TV or PC. Do not copy or change recording files on
the USB Hard Drive with any PC application. This will
corrupt your recordings. When you format another
USB Hard Drive, the content on the former will be lost.
A USB Hard Drive installed on your TV will need
reformatting for use with a computer.
Formatting
Before you can pause or record a broadcast, or store
apps, you must connect and format a USB Hard
Drive. Formatting removes all files from the USB Hard
Drive.
Warning
The USB Hard Drive is formatted exclusively for this
TV, you cannot use the stored recordings on another
TV or PC. Do not copy or change recording files on
the USB Hard Drive with any PC application. This will
corrupt your recordings. When you format another
USB Hard Drive, the content on the former will be lost.
A USB Hard Drive installed on your TV will need
reformatting for use with a computer.
* Connect the USB Hard Drive with size less than 2TB.
To format a USB Hard Drive…
1 - Connect the USB Hard Drive to one of the USB
connections on the TV. Do not connect another USB
device to the other USB ports when formatting.
2 - Switch on the USB Hard Drive and the TV.
3 - Select Recordings if you want to perform Pause
TV and Recordings, otherwise, select Apps to store
apps. Follow the instructions on screen.
4 - All files and data will be removed after formatting.
5 - When the USB Hard Drive is formatted, leave it
connected permanently.
For more information, in Help, press the colour
key Keywords and look up Pause TV,
Recording, or Apps.
7.10
USB Keyboard
Connect
Connect a USB keyboard (USB-HID type) to enter text
on your TV.
Use one of the USB connections to connect.
Configure
Install the keyboard
To install the USB keyboard, switch on the TV and
connect the USB keyboard to one of
the USB connections on the TV. When the TV
detects the keyboard for the first time, you can select
your keyboard lay-out and test your selection. If you
select a Cyrillic or Greek keyboard layout first, you
can select a secondary Latin keyboard layout.
To change the keyboard layout setting when a layout
was selected…
1 - Select Settings > General Settings and
press (right) to enter the menu.
2 - Select USB Keyboard Settings, and press OK to
start the keyboard setup.
30

email address and a password. If you don't have an
Google Account yet, use your computer or tablet to
create one (accounts.google.com). To play games
with Google Play, you need a Google+ profile. If you
did not sign in during the first TV installation, you can
always sign in later.
To sign in after you did the TV installation…
1 - Select Settings > Android Settings and
press OK.
2 - Select Account & Sign-In and press OK.
3 - Select Sign In and press OK.
4 - Select Use your remote and press OK.
5 - With the on-screen keyboard, enter your email
address and press OK.
6 - Enter your password and press OK to sign in.
7 - Press (left) repeatedly if necessary, to close
the menu.
Android Settings
You can set or view several Android specific settings
or information. You can find the list of apps installed
on your TV and the storage space they need. You can
set the language you like to use with Voice
Search. You can configure the onscreen keyboard or
allow apps to use your location. Explore the different
Android settings. You can go
to www.support.google.com/androidtv for more
information on these settings.
To open these settings…
1 - Select Settings > Android Settings, and
press OK.
2 - Explore the different Android settings.
3 - Press Back if necessary, to close the menu.
8.3
Philips TV Collection App
Featured Apps page
All your premium apps are available within the Philips
TV Collection app, under Featured apps section.
Launch it using the banner on the Apps row.
Philips TV Collection apps are made specially for TV.
Downloading and installing Philips TV Collection apps
are free of charge. The Philips TV Collection of apps
can differ per country or region. The Philips TV
Collection will also contain recommendations for new
Apps and more.
Some Philips TV Collection apps are pre-installed on
your TV. To install other apps from Philips TV
Collection, you will be asked to agree to the Terms of
Use. You can set the Privacy Settings according to
your preference.
To install an app from the Philips TV Collection…
1 - Press HOME.
2 - Select Philips TV Collection and press OK. It
will open the Featured apps section.
3 - Select the “All” tab and press OK. It will display all
the apps that are available to the user, including the
installed ones.
4 - Browse through the apps and select the app icon
that you want to install, and press OK. It will open the
App info page.
5 - Select the Install button and press OK to install
the app.
The installed app found in the Apps page, which can
be opened from the Android Home screen by
pressing the Apps icon at the left end of the Apps
row.
Terms of Use
To install and use the Philips TV Collection apps, you
must agree to the Terms of Use. If you did not agree
to these terms during the first TV installation, you can
always agree to them later. The moment you agree to
the Terms of Use, some apps will be available
immediately and you can browse the Philips TV
Collection to install other apps.
To agree on the Terms of Use after you did the TV
installation…
1 - Press HOME, select Philips TV Collection
and press OK. Press the Options key to open the
Options menu.
2 - You can select Terms of Use, then press OK to
read.
3 - Select Accept and press OK. You cannot undo
this approval.
4 - Press Back to close the menu.
Privacy Settings
You can set some privacy settings for the Philips TV
Collection apps.
• You can allow technical statistics to be send to
Philips.
• You can allow personal recommendations.
• You can allow cookies.
• You can switch on the Child Lock for 18+ rated apps.
To set the Philips TV Collection privacy settings…
1 - Press HOME, select Philips TV Collection
and press OK. Press the Options key to open the
Options menu.
2 - You can select Privacy setting, then press OK.
3 - Select each setting and press OK to allow or
disallow. You can read about each setting in detail.
4 - Press Back to close the menu.
35

9
Apps
9.1
About Apps
You can find your favourite Apps on Apps row in the
Home menu.
Like apps on your smartphone or tablet, the apps on
your TV offer specific functions for an enriched TV
experience. Apps like YouTube, games, video stores
or weather forecasts (a.o.). You can use the Internet
Browser app to surf the Internet.
Apps can come from the Philips TV Collection or
the Google Play™ Store . To get you started, some
practical apps are pre-installed on your TV.
To install apps from the Philips TV Collection or
the Google Play™ Store , the TV must be connected
to the Internet. You must agree to the Terms of Use to
use apps from the Philips TV Collection. You must
sign in with a Google Account to use the Google Play
apps and Google Play™ Store .
9.2
Google Play
Movies and TV
With Google Play Movies & TV , you can rent or buy
movies and TV shows to watch on TV.
What You Need
• your TV must be connected with the Internet
• you must sign in with your Google Account on TV
• add a credit card to your Google Account to
purchase movies and TV shows
To rent or buy a movie or TV show…
1 - Press HOME.
2 - Select Google Play Movies & TV.
3 - Select a movie or TV show and press OK.
4 - Select the purchase you want and press OK. You
will be taken through the purchase procedure.
To watch a rented or bought movie or TV show…
1 - Press HOME.
2 - Select Google Play Movies & TV.
3 - Select the movie or TV show from your library in
the app, select the titel and press OK.
4 - You can use
the (stop), (pause), (rewind) or (fast
forward) keys on the remote control.
5 - To stop the Movies & TV app, press Back
repeatedly or press EXIT.
If the App is not on you Home screen, you can add
via the Apps page or by the Add app to favourites
item on the Apps row. Some Google Play products
and features aren't available in all countries.
Find more information on
www.support.google.com/androidtv
Music
With YouTube Music, you can play your favourite
music on TV.
What You Need
• your TV must be connected with the Internet
• you must sign in with your Google Account on TV
To start YouTube Music…
1 - Press HOME.
2 - Select YouTube Music.
3 - Select the music you want and press OK.
4 - To stop the Music app, press Back
repeatedly or press EXIT.
If the App is not on you Home screen, you can add
via the Apps page or by the Add app to favourites
item on the Apps row. Some Google Play products
and features aren't available in all countries.
Find more information
on www.support.google.com/androidtv
Games
With Google Play Games, you can play games on TV.
Online or offline.
You can see what your friends are playing currently or
you can join the game and compete. You can track
your achievements or start wherever you left off.
What You Need
• your TV must be connected with the Internet
• you must sign in with your Google Account on TV
• add a credit card to your Google Account to
purchase new games
Start the Google Play Games app to select and install
new game apps on your TV. Some games are free of
charge. A message appears if a particular game needs
a gamepad to play the game.
To start or stop a Google Play Game…
1 - Press HOME.
2 - Select Google Play Games.
3 - Select a game to play or select a new game to
install and press OK.
4 - When done, press Back repeatedly or
press EXIT or stop the app with its dedicated
exit/stop button.
If the App is not on you Home screen, you can add
36

via the Apps page or by the Add app to favourites
item on the Apps row. Some Google Play products
and features aren't available in all countries.
Find more information
on www.support.google.com/androidtv
Google Play Store
From the Google Play Store you can download and
install new apps. Some apps are free of charge.
What You Need
• your TV must be connected with the Internet
• you must sign in with your Google Account on TV
• add a credit card to your Google Account to
purchase apps
To install a new app…
1 - Press HOME.
2 - Select Google Play Store and press OK.
3 - Select the app you want to install and press OK.
4 - To close the Google Play Store, press Back
repeatedly or press EXIT.
Parental controls
In the Google Play Store, you can hide apps
according to users/buyers maturity. You need to enter
a PIN code to select or change the level of maturity.
To set the parental control…
1 - Press HOME.
2 - Select Google Play Store and press OK.
3 - Select Settings > Parental controls.
4 - Select the level of maturity you want.
5 - On request, enter the PIN code.
6 - To close the Google Play Store, press Back
repeatedly or press EXIT.
If the App is not on you Home screen, you can add
via the Apps page or by the Add app to favourites
item on the Apps row. Some Google Play products
and features aren't available in all countries.
Find more information
on www.support.google.com/androidtv
Payments
To make a payment on Google Play on TV, you must
add a form of payment - a credit card (outside the
United States) - to your Google Account. When you
purchase a movie or TV show, you will be charged on
this credit card.
To add a credit card …
1 - On your computer, go to accounts.google.com
and sign in with the Google Account you will use with
Google Play on TV.
2 - Go to wallet.google.com to add a card to your
Google Account.
3 - Enter your credit card data and accept the terms
and conditions.
9.3
Start or Stop an App
You can start an app from the Home screen.
To start an app…
1 - Press HOME.
2 - Move to Apps row, select the app you want and
press OK.
3 - To stop an app, press Back or press EXIT
or stop the app with its dedicated exit/stop button.
When opening the Home screen, the background
application/content playback will stop. You have to
select the application or content from the Home
screen to resume.
9.4
Lock Apps
About App Locks
You can lock apps unsuited for children. You can lock
18+ rated apps or set up a restricted profile in the
Home menu.
18+
The 18+ app lock will ask for a PIN code when you try
to start an 18+ rated app. This lock is only valid for 18+
rated apps from the Philips apps.
Restricted profile
You can set up a restructed profile for the Home
menu where only the apps you allow are available.
You need to enter a PIN code to set up and switch on
the restricted profile.
Google Play Store - Maturity
In the Google Play Store, you can hide apps
according to users/buyers maturity. You need to enter
a PIN code to select or change the level of maturity.
The level of maturity will determine which apps are
available for instalation.
37

9.6
Storage
You can see how much storage space - the internal
TV memory - you are using for your apps, videos,
music, etc. You can see how much free space you still
have available for installing new apps. Check your
storage if apps start to run slow or in case of app
trouble.
To see how much storage you are using…
1 - Select Settings > Android Settings and
press OK.
2 - Select Device Preferences > Storage and
press OK.
3 - View the storage usage of the TV memory.
4 - Press Back to go back one step or press
EXIT to close the menu.
USB Hard Drive
If you connect a USB Hard Drive, you can use the
drive to extent the TV memory to store more apps.
Allow the USB Hard Drive to be used as an additional
TV memory during the formatting process. The TV will
try to store new apps on the USB Hard Drive first.
Some apps do not allow to be stored on a USB Hard
Drive.
To migrate your existing data, go to Settings >
Android Settings > Device Preferences > Storage and
select the USB Hard Drive.
39

10
Internet
10.1
Start Internet
You can browse the Internet on your TV. You can
view any Internet website but most of them are not
prepared for a TV screen.
• Some plug-ins (e.g. to view pages or videos) are not
available on your TV.
• You cannot send or download files.
• Internet pages are shown one page at a time and
full screen.
To start the Internet browser…
1 - Press HOME.
2 - Select Apps > Internet Browser and press OK.
3 - Enter an Internet address and select to confirm.
4 - To close Internet, press HOME or EXIT.
* Note: If Internet Browser is not on your Apps row,
you can press + icon on the end of the row to add the
app.
10.2
Options on Internet
Some extras are available for the Internet.
To open the extras…
1 - With the website open, press OPTIONS.
2 - Select one of the items and press OK.
• Add to speed dial: To enter a new Internet address.
• Add to bookmarks: Add the page as bookmark
• Page security: To view the security level of the
current page.
• New private tab: Open new private tab, and have
private browsing
• Settings: Settings for Zoom, Text size, Accessibility
mode, Always show menu bar, and clear (browsing)
history
• About: Internet browser information
• Exit Internet browser: Close Internet browser
40

12
Sources
12.1
Switch to a device
From the list of Sources, you can switch to any of the
connected devices. You can switch to a tuner to
watch TV, open the content of a connected USB Flash
Drive or see the recordings you made on a connected
USB Hard Drive. You can switch to your connected
devices to watch their programme, a digital receiver or
a Blu-ray Disc player.
To switch to a connected device…
1 - Press SOURCES to open the Sources menu.
2 - Select one of the item in the source list and
press OK. The TV will show the programme or
content of the device.
One Touch Play
With the TV in standby, you can switch on a disc
player with your TV remote control.
To switch on both disc player and TV from standby
and start playing the disc immediately,
press (play) on the TV remote control. The device
must be connected with an HDMI cable and both TV
and device must have HDMI CEC switched on.
12.2
Options for a TV Input
Some TV input devices offer specific settings.
To set the options for a specific TV input…
1 - Press SOURCES.
2 - Select the TV input in the list and press OK.
3 - Press OPTIONS. You can set the options for
the selected TV input here.
4 - Press OPTIONS again to close the Options
menu.
Possible options…
Controls
With this option you can operate the connected
device with the TV remote control. The device must
be connected with an HDMI cable and both TV and
device must have HDMI CEC switched on.
Screen off
Select Screen off to switch off the TV screen. To
switch the TV screen back on, press any key on the
remote control.
Device Info
Open this option to view information on the
connected device.
12.3
Device Name and Type
When you connect a new device to the TV and the TV
detects the device, you can assign an icon that fits the
device type. If you connect a device with an HDMI
cable and HDMI CEC, the TV detects the device type
automatically and the device gets an appropriate
icon.
The device type determines picture and sound styles,
resolution values, specific settings or the position
within the Sources menu. You don't have to worry
about the ideal settings.
Rename or Change Type
You can always change the name or change the type
of a connected device. Look for the icon at the
right of the device name in the Sources menu. Some
TV input sources do not allow a name change.
To change the device type…
1 - Select the device in the Sources menu and press
OPTIONS .
2 - Press Back to hide the on-screen keyboard.
3 - Press (down) to find all available device
types. Select the type you want and press OK.
4 - If you want to reset the type of the device to the
original connector type, select Reset and press OK.
5 - Select Close and press OK to close this menu.
To change the device name…
1 - Select the device in the Sources menu and Press
OPTIONS .
2 - Use the on-screen Keyboard to delete the
current name and enter a new one. Press to
confirm.
3 - Press Back to hide the on-screen keyboard.
4 - If you want to reset the name of the device to the
original connector name, select Reset and
press OK.
5 - Select Close and press OK to close this menu.
12.4
Rescan Connections
You can rescan all TV connections to update the
Sources menu with recently connected devices.
To rescan the connections…
1 - Press SOURCES to open the Sources menu.
2 - Press (up) to select the icon at the top
right of the Sources menu.
3 - Press OK to start scanning the connections.
42

Newly connected devices will be added to the
Sources menu.
43

level for removing the noise in video content.
Noise is mostly visible as small moving dots in on-
screen picture.
MPEG Artefact Reduction
Settings > Picture > Advanced > Picture
clean > MPEG Artefact Reduction.
Select Maximum, Medium, or Minimum to have
different degress of smoothing the artefects in digital
video content.
MPEG artefacts are mostly visible as small blocks or
jagged edges in on-screen images.
Advanced Sharpness Settings
Ultra Resolution
Settings >
Picture > Advanced > Sharpness > Ultra
Resolution.
Select On to have a superior sharpness in line edges
and details.
Colour Settings
Advanced Colour Settings
Settings > Picture > Advanced > Colour.
Adjust the colour enhancement
Settings > All settings
> Picture > Advanced > Colour > Colour
enhancement.
Select Maximum, Medium, or Minimum to set the
level of the colour intensity and the details in bright
colours.
Note: Not available when Dolby Vision signal is
detected.
Adjust the colour gamut
Settings > All settings
> Picture > Advanced > Colour > Colour gamut.
Select Normal or Wide to set the type of colour
gamut.
Note: Not available when wide colour gamut signal is
detected.
Select the preset colour temperature
Settings > Picture > Advanced > Colour > Co
lour temperature.
Select Normal, Warm, or Cool to set the colour
temperature for your preference.
Whitepoint alignment
Settings > Picture > Advanced > Colour >
Whitepoint alignment.
Customise the whitepoint alignment based on the
selected colour temperature of the picture. Press the
arrows (up) or (down) to adjust the value.
Colour control (Hue and Saturation)
Settings
> Picture > Advanced > Colour > Colour control.
Press the arrows (up) or (down) to adjust the
value of Hue and Saturation for the colour Red,
Yellow, Green, Cyan, Blue and Magenta. Press the
colour key Reset to rest the picture style. If you
want to reset all value to default, select Reset all.
Note: Available only when picture style is ISF Day or
ISF Night.
RGB only mode
Settings
> Picture > Advanced > Colour > RGB only
mode.
Select Red, Green or Blue to switch picture as
selected colour only, or select Off to turn off RGB
mode.
Note: Available only when picture style is ISF Day or
ISF Night.
Advanced Contrast Settings
Contrast Modes
Settings >
Picture > Advanced > Contrast > Contrast mode.
Select Normal, Optimized for picture, or Optimized
for energy savings to set the TV automatically
reduces the contrast, for best power consumption or
for best picture experience, or select Off to switch
off the adjustment.
HDR Settings
If you are watching HDR programmes - programmes
recorded in HDR - there is no need to upscale to HDR
and the HDR Upscaling Control is unavailable. The TV
will automatically switched to HDR mode with
46

indication.
TV supports following HDR formats: Hybrid Log
Gamma, HDR10, HDR10+, and Dolby Vision but it is
subject to the availability of such HDR format in
content providers.
HDR Upscaling
Settings >
Picture > Advanced > Contrast > HDR Upscaling.
Select On to boost the brightness and contrast of
the picture. The picture is much brighter and has a
higher level of contrast between lighter and darker
parts. HDR upscaling keeps colours rich and
saturated. Not available when video content is
supported HDR.
HDR Plus
Settings
> Picture > Advanced > Contrast > HDR Plus.
Select HDR Plus for superior contrast and brightness
effect.
Note: Available when HDR (High-Dynamic Range)
signal is detected.
Dynamic Contrast
Settings >
Picture > Advanced > Contrast > Dynamic
contrast.
Select Maximum, Medium, or Minimum to set the
level at which the TV automatically enhances the
details in the dark, middle and light areas of the
picture.
Note: Not available when HDR signal is detected. Not
available in Monitor mode.
Video Contrast, Gamma
Video contrast
Settings
> Picture > Advanced > Contrast > Video
contrast.
Press the arrows (up) or (down) to adjust the
video contrast level.
Gamma
Settings
> Picture > Advanced > Contrast > Gamma.
Press the arrows (up) or (down) to set a non-
linear setting for picture luminance and contrast.
Light Sensor
Settings >
Picture > Advanced > Contrast > Light sensor.
Select On to adjust the picture settings
automatically to the lighting conditions of the room.
Motion Settings
Motion Styles
Motion Styles
Settings >
Picture > Advanced > Motion > Motion styles.
Motion styles provides optimised motion setting
modes for different video content.
Select one of the motion styles to have different
viewing experience on motion video. (Off, Pure
Cinema, Movie, Standard, Smooth, Personal)
Not available for below cases:
• Settings > Picture > Picture style > Monitor
• Settings > Picture > Picture style > Game
Natural Motion
Natural Motion
Settings
> Picture > Advanced > Motion > Natural Motion.
Natural Motion makes any movement smooth and
fluent.
Select from 0 to 10 to have different degress
for reducing the motion judder, visible in movies on
TV. Select 0 when noise appears in playing moving
picture on-screen.
Note: Only available when Motion styles set
to Personal.
Picture Format
If the picture is not filling the whole screen, if black
bars are showing on the top or bottom or at both
sides, you can adjust the picture to fill the screen
completely.
To select one of the basic settings to fill the screen…
1 - While watching a TV channel,
select Settings > Picture Format > Fill
Screen, Fit to Screen, Wide Screen and Original, and
press OK.
47

2 - Press (left) repeatedly if necessary, to close
the menu.
• Fill Screen – automatically enlarges the picture to
fill the screen. Picture distortion is minimal, subtitles
remain visible. Not suitable for PC input. Some
extreme picture content can still show black bars.
Picture content aspect ratio may change.
• Fit to Screen – automatically zooms in the picture
to fill the screen without distortion. Black bars may be
visible. Not suitable for PC input.
• Wide Screen – automatically zooms in the picture
to 16:9 full screen. Picture content aspect ratio may
change.
• Original – automatically zooms in the picture to fit
the screen with original aspect ratio. No content lost
visible.
To format the picture manually…
1 - While watching a TV channel, select Settings >
Picture Format > Advanced and press OK.
2 - Use Shift, Zoom, and Stretch to adjust the
picture.
3 - Or select Undo to return to the setting the
picture had when you opened Picture Format.
• Shift – Select on the arrows to shift the picture. You
can only shift the picture when it is zoomed in.
• Zoom – Select on the arrows to zoom in.
• Stretch – Select on the arrows to stretch the
picture vertically or horizontally.
• Undo – Select to return to the picture format you
started with.
Some Picture format setting selections may not be
available in some conditions. For example, in video
steaming, Android app application, gaming mode, etc.
Dolby Vision Notification
Settings > Picture > Dolby Vision notification.
Switch On or Off the Dolby Vision notification when
Dolby Vision content begins to play on your TV.
Quick Picture Setting
During the first installation, you did some picture
settings in a few easy steps. You can redo these steps
with Quick Picture Setting.
To set the picture in a few easy steps…
1 - Select Settings > Picture and press (right)
to enter the menu.
2 - Select Quick Picture Setting, and press OK.
3 - Use the navigation keys to select your preferable
brightness, contrast, colour and sharpness settings.
4 - Select Finish or press (left) repeatedly if
necessary, to close the menu.
14.2
Sound
Sound Style
Select a style
Settings > Sound > Sound style.
For easy sound adjustment, you can select a preset
setting with sound style.
• AI mode - There are ideal styles for watching
movies, listening to music or playing a game. Select AI
mode for intelligent switching of sound style base on
audio content.
• Original - Most neutral sound setting
• Movie - Ideal for watching movies
• Music - Ideal for listening to music
• Game - Ideal for gaming
• Dialogue - Ideal for speech
• Personal mode - Access to a more in depth sound
settings.
Restore Personal mode
1 - Set the sound style to Personal mode.
2 - Press the colour key Restore Style, and
press OK. The style is restored.
Customise Personal mode
1 - Set the sound style to Personal mode.
2 - Press the colour key Customise, and press OK
to change Personal mode settings.
Personal Mode Settings
Speaker virtualizer
Settings > Sound > Personal mode settings >
Speaker virtualizer.
Select On or Auto (Dolby Atmos) to enable Dolby
Atmos which can add height dimension in sound.
With height dimension, sound can be precisely placed
and moved in three-dimensional space.
Clear dialogue
Settings > Sound > Personal mode settings
> Clear dialogue > On.
Select On to get an improved sound quality for
speech programme.
AI Equalizer
Settings > Sound > Personal mode settings > AI
Equalizer.
Select On to enable intelligent equalizer adjustment
based on audio content and custom settings.
48

1 - Hold your remote control at the listening position
and point it towards the TV during the tuning process.
2 - Select Calibrate now or Calibrate again to start
the calibration.
3 - A test sound will be played and measured
through your remote control. Hold your remote
control and point it towards the TV, this can take
several seconds.
4 - Once your TV speakers are successfully
calibrated, select Test to listen to the sound before
and after the TV speakers are calibrated. Select Apply
to accept the setting or select Try again to redo the
calibration.
5 - When room calibration setup is successful and
applied, TV shall return to the Settings menu. Now go
to Settings > Sound > Room calibration and
select Apply calibration to tune the audio output from
TV speakers.
Advanced Sound Settings
Volume Control
Auto volume
Settings > Sound > Advanced > Auto volume.
Select On or Off to switch on or off the auto volume
adjustment.
Select Night Mode for a more comfortable quiet
listening experience.
Delta volume
Settings > Sound > Advanced > Delta volume.
The Delta volume setting can be used to adjust to
balance the sound level difference between the TV
channel and the HDMI source input. Press the
arrows (up) or (down) to adjust the delta
value for TV speaker volume.
* Note: Delta volume is available when the input
source is set to HDMI or Analogue sources and the
Audio out is set to TV speakers or HDMI sound
system.
Audio Out Settings
Audio out
Settings > Sound > Advanced > Audio out.
Set the TV to play the sound on TV or on the
connected audio system.
You can select where you want to hear the TV sound
and how you want to control it.
• If you select TV speakers off, you permanently
switch off the TV speakers.
• If you select TV speakers, the TV speakers are
always on.
With an audio device connected with HDMI CEC,
select HDMI sound system. The TV will switch off
the TV speakers when the device is playing the
sound.
If there is a Bluetooth speaker already paired with
your TV, it will be available on the audio out device
list with its device name.
eARC
Settings > Sound > Advanced > eARC.
Set eARC mode to Automatic or Off.
Digital Output Settings
Digital output settings are available for optical and
HDMI ARC sound signals.
Digital out format
Settings > Sound > Advanced > Digital out
format.
Set the audio out signal of the TV to fit the sound
capabilities of the connected Home Theatre System.
• Stereo (uncompressed): If your audio playback
devices have no multichannel sound processing,
select to only output stereo content to your audio
playback devices.
• Multichannel: Select to output multichannel audio
content (compressed multichannel sound signal) or
stereo audio content to your audio playback devices.
• Multichannel (bypass): Select to output Dolby
Digital Plus or DTS content to your audio playback
devices or Home theatre system.
- Make sure your audio playback devices support
Dolby Atmos feature.
- SPDIF output (DIGITAL AUDIO OUT) will be
disabled when streaming Dolby Digital Plus content.
Digital out levelling
Settings > Sound > Advanced > Digital out
levelling.
Adjust the loudness level from device which is
connected to digital audio output (SPDIF) or HDMI.
• Select More to have louder volume.
• Select Less to have softer volume.
Digital out delay
Settings > Sound > Advanced > Digital out
delay.
50

Advanced Ambilight Settings
Brightness
Settings > Ambilight > Advanced > Brightness.
Press the arrows (up) or (down) to set the
level of Ambilight brightness.
Saturation
Settings > Ambilight > Advanced > Saturation.
Press the arrows (up) or (down) to set the
level of Ambilight saturation.
Neutralise the influence of a coloured wall on the
Ambilight colours
Settings > Ambilight > Advanced > Wall colour.
Select the colour of the wall behind the TV and the TV
will modify the Ambilight colours to appear as they
are intended.
Set Ambilight to switch off immediately or slowly
fade out when you switch off the TV
Settings > Ambilight > Advanced > TV switch
off > Fade out to off / Immediate switch off.
ISF Tuning
Settings > Ambilight > Advanced > ISF
tuning.
The ISF Calibration expert tunes and locks your
preferred colour for Ambilight. When the ISF
Calibration is done, select Settings > Ambilight >
Ambilight style > Follow colour > Warm white /
ISF to use ISF tuning for Ambilight.
14.4
Eco Settings
Set screen off to save energy consumption
Settings > Eco settings > Screen off.
Select Screen off, the TV screen is switched off, to
switch the TV screen back on, press any key on the
remote control.
Switch on built-in ambient light sensor
Settings > Eco settings > Light sensor.
Select Light sensor, the built-in ambient light sensor
lowers the brightness of the TV screen when the
surrounding light darkens. The built-in light sensor
automatically adjusts the picture, to the lighting
conditions of the room.
Set TV switch off timer
Settings > Eco settings > Switch off timer.
Press the arrows (up) or (down) to adjust the
value. The value 0 (Off) deactivates the automatic
switch off.
Select Switch off timer, the TV switches off
automatically to save energy.
* TV switches off if receiving a TV signal but you don't
press a key on the remote control during a 4 hour
period.
* TV switches off if not receiving a TV signal nor a
remote control command for 10 minutes.
* If you use the TV as a monitor or use a digital
receiver to watch TV (a Set-Top Box - STB) and you
do not use the remote control of the TV, you should
deactivate this automatic switch off, to set the value
to 0.
14.5
General Settings
USB Hard Drive
You need to set up and format a USB Hard Drive
before you record a channel.
Settings > General settings > USB Hard Drive.
Before you can pause or record a broadcast, or store
apps, you must connect and format a USB Hard
Drive. Formatting removes all files from the USB Hard
Drive.
Warning
The USB Hard Drive is formatted exclusively for this
TV, you cannot use the stored recordings on another
TV or PC. Do not copy or change recording files on
the USB Hard Drive with any PC application. This will
corrupt your recordings. When you format another
USB Hard Drive, the content on the former will be lost.
A USB Hard Drive installed on your TV will need
reformatting for use with a computer.
* Connect the USB Hard Drive with size less than 2TB.
To format a USB Hard Drive…
1 - Connect the USB Hard Drive to one of
the USB connections on the TV. Do not connect
another USB device to the other USB ports when
formatting.
2 - Switch on the USB Hard Drive and the TV.
3 - Select Recordings if you want to perform Pause
52

• The setting Standard allows maximum up to Ultra
HD (50 Hz or 60Hz) YCbCr 4:2:0 signals.
Maximum supported video timing format for HDMI
Ultra HD options:
• Resolution: 3840 x 2160
• Frame rate (Hz): 50Hz, 59.94Hz, 60Hz
• Video data sub-sampling (bit-depth)
- 8 bit: YCbCr 4:2:0, YCbCr 4:2:2*, YCbCr 4:4:4*, RGB
4:4:4*
- 10 bit: YCbCr 4:2:0*, YCbCr 4:2:2*
- 12 bit: YCbCr 4:2:0*, YCbCr 4:2:2*
* Supported only when HDMI Ultra HD is set to
Optimal.
Select Standard if the picture or sound are distorted.
• Set Optimal (Auto Game) to enable TV to support
the HDMI Variable Refresh Rate* video (on some
models only and the Picture style setting is not
Monitor). This option also enables TV to automatically
set Picture/Sound style to Game whenever it is
informed by the HDMI device connected to TV.
* With HDMI Variable Refresh Rate supported, the TV
changes its refresh rate in real time according to the
frame rate signal to synchronize with every picture. It
is applied to reduce the lag, judder and frame tearing
for better gaming experience.
Note:
To watch HDR10+ or Dolby Vision content from HDMI
source, you may need to power off your player and
power on again when the player connected to TV
playing such content for the first time. HDR10+
content is supported only when HDMI Ultra HD is set
to Optimal . Dolby Vision content is supported only
when HDMI Ultra HD is set to Optimal or Optimal
(Auto Game).
Auto Movie Mode
Set the Auto movie mode
Settings > General settings > Auto movie mode.
Set Auto movie mode to On, if you want TV to
automatically set Picture style to Movie when movie
contents is detected.
Advanced
HbbTV Settings - Hybrid Broadcast Broadband TV
Switch on HbbTV
Settings > General
settings > Advanced > HbbTV settings > HbbTV
> On.
Switch off HbbTV History Tracking
Settings > General
settings > Advanced > HbbTV settings > HbbTV
tracking > Off.
Remove HbbTV Cookies
Settings > General
settings > Advanced > HbbTV settings > HbbTV
cookies > On.
Clear approved app listing
Settings > General
settings > Advanced > HbbTV settings >
Clear approved app listing.
To clear all User's approved HbbTV applications.
HbbTV Device ID reset
Settings > General
settings > Advanced > HbbTV settings > HbbTV
Device ID reset.
You can reset your TV unique device identifier. A new
identifier will be created. This will replace your Device
ID with a new identifier.
CAM Profile Name and CAM Priority
Set profile name for installed CI+/CAM
Settings > General settings > CAM profile name.
Select the type of CI+/CAM
Settings > General settings > CAM priority.
Select USB to enable the USB CAM, then the PCMCIA
CAM will be disabled. Select PCMCIA to enable the
PCMCIA CAM, then the USB CAM will be disabled.
Reset TV Settings and Reinstall TV
Reset all settings value to original TV settings
Settings > General settings > Factory settings.
Redo full TV installation , and set TV status back to
the first time you switch on
Settings > General settings > Reinstall TV.
Enter PIN code and select Yes, the TV will reinstall
completely.
All settings will be reset and installed channels will be
54

Lock for CAM
Set CAM PIN for recording
Settings > Child lock > CAM PIN.
57

15.5
Play your Videos
Play Videos
Open video folder
1 - Press SOURCES, select USB and
press OK.
2 - Select USB Devices and press (right) to
select the USB device you need.
3 - Select Videos, you can press Mark
favourite to add the video folder to favourite menu
- Favourites.
Play a video
1 - Press SOURCES, select USB and
press OK.
2 - Select USB Devices and press (right) to
select the USB device you need.
3 - Select Videos and select one of video, you
can press Play all to play all files in the folder or
press Mark as favourite to add the selected
video to favourite menu - Favourites.
Control bar
1 - Progress bar
2 - Playback control bar
- : Jump to the previous video in a folder
- : Jump to the next video in a folder
- : Rewind
- : Fast forward
- : Pause the playback
3 - Mark as favourites
4 - Play all videos
5 - Subtitle: switch subtitles On, Off or On During
Mute.
6 - Subtitle language: select a Subtitle Language
7 - Audio language: select an audio language
8 - Shuffle: play your files in a random order
9 - Repeat: plays all videos in this folder once or
continuously
Video Options
Browse video files...
• List/Thumbnails – List or thumbnails views
• Shuffle – Play your files in a random order
• Repeat – Plays all videos in this folder once or
continuously
• Info – Show video information
Playing video files...
• Mark as favourites – Mark the video as favourites
• Subtitle setting – Set subtitle font size, colour,
position, etc.
• Info – Show video information
15.6
View your Photos
View Photos
Open photo folder
1 - Press SOURCES, select USB and
press OK.
2 - Select USB Devices and press (right) to
select the USB device you need.
3 - Select Photos, you can press Mark
favourite to add the photo folder to favourite menu.
View a photo
1 - Press SOURCES, select USB and
press OK.
2 - Select USB Devices and press (right) to
select the USB device you need.
3 - Select Photos and select one of photos, you
can press Slide show to play all files in the
folder or press Mark favourite to add the
selected photo to favourite menu - Favourites.
Control bar
59
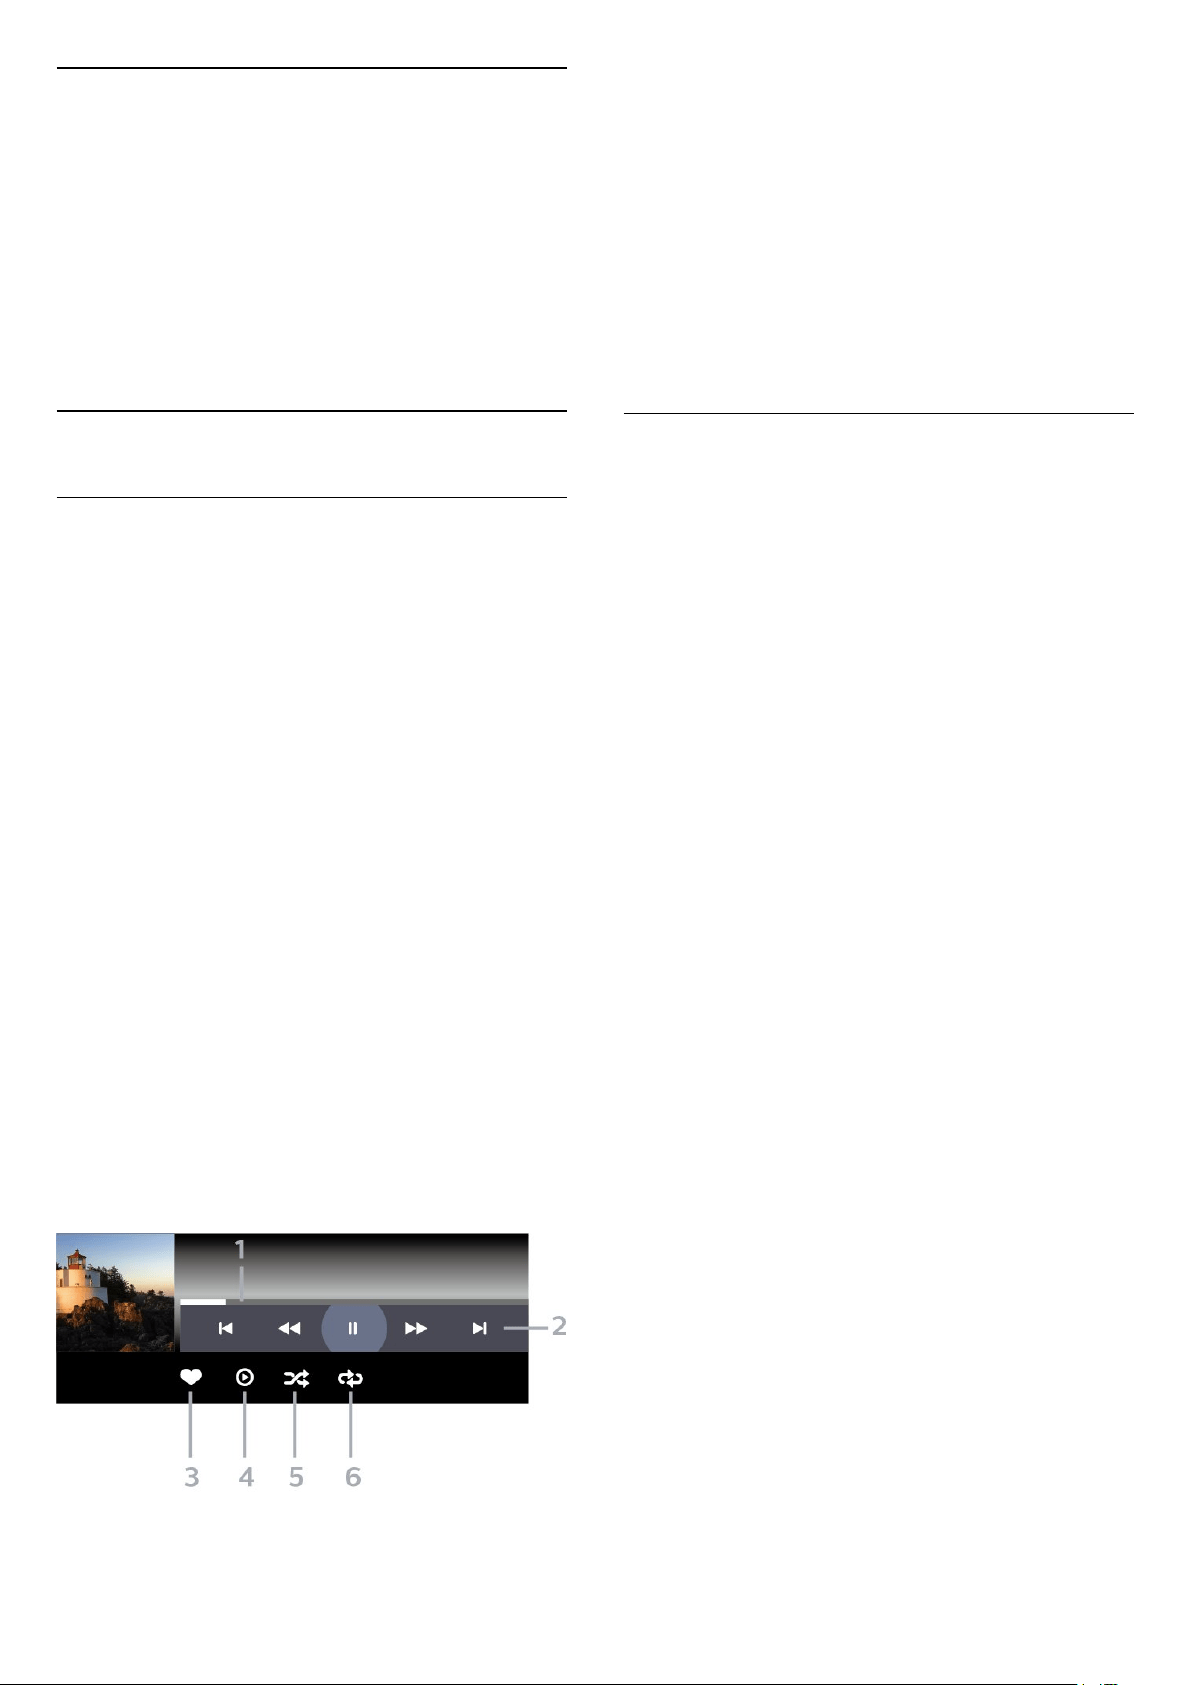
360 Photo Options
Browse 360 photo files...
• List/Thumbnails – List or thumbnails views
• Shuffle – Play your files in a random order
• Repeat – Play your files once or continuously
• Stop music – Stop background music playing
Playing 360 photo files...
• Reset view – Reset the angle of view
• Info – Show 360 photo information
15.7
Play your Music
Play Music
Open music folder
1 - Press SOURCES, select USB and
press OK.
2 - Select USB Devices and press (right) to
select the USB device you need.
3 - Select Music, you can press Mark
favourite to add the music folder to favourite menu
- Favourites.
4 - You can quickly find a music using classification
- Genres, Artists, Albums, Tracks.
Play music
1 - Press SOURCES, select USB and
press OK.
2 - Select USB Devices and press (right) to
select the USB device you need.
3 - Select Music and select one of classifications to
view music files.
4 - Select a music and you can press Play
all to play all files in the folder or press Mark
favourite to add the selected music to favourite
menu - Favourites.
Control bar
1 - Progress bar
2 - Playback control bar
- : Jump to the previous music in a folder
- : Jump to the next music in a folder
- : Rewind
- : Fast forward
- : Pause the playback
3 - Mark as favourites
4 - Play all music
5 - Shuffle: play your files in a random order
6 - Repeat: plays all music in this folder once or
continuously
Music Options
Browse music files...
• Shuffle – Play your files in a random order.
• Repeat – Plays all songs in this folder once or
continuously.
Playing music files...
• Mark as favourites – Mark the music as favourites
61

List of Reminders
You can view a list of the reminders you have set.
List of Reminders
To open the list of reminders…
1 - Press TV GUIDE.
2 - Press the colour key Scheduled .
3 - At the top of the screen,
select Scheduled and press OK.
4 - In the list of scheduled recordings and reminders,
select the tab Reminders and press OK to view the
reminders only.
5 - Press the colour key Remove to remove the
selected reminder. Press the colour
key Record to record the selected programme.
6 - Press Back to close the menu.
Set a Recording
You can set a recording in the TV Guide*.
To see the recording list, press Recordings , a
programme set to be recorded is marked with
a (red dot) on the front of the programme name.
To record a programme…
1 - Press TV GUIDE and select a future or
ongoing programme.
2 - Press the colour key Record .
3 - Press Back to close the menu.
To cancel a recording…
1 - Press TV GUIDE and select the programme
set for recording.
2 - Press the colour key Clear Recording .
3 - Press Back to close the menu.
* To record a TV programme you need…
• a connected USB Hard Drive formatted on this TV
• digital TV channels installed on this TV
• to receive channel information for the on screen TV
Guide
• a reliable TV clock setting. If you reset the TV clock
manually, recordings may fail.
63

5 - Press Back to close the menu.
Broadcasters can limit the number of days a recording
can be viewed. When this period expires, the
recording will be marked as expired. A recording in
the list can show the number of days before it expires.
When a scheduled recording was prevented by the
broadcaster or when the broadcast was interrupted, a
recording is marked as Failed.
Recording Conflicts
When two scheduled recordings are overlapping in
time, there is a recording conflict. To solve a recording
conflict, you can adjust the start and end time of one
or both scheduled recordings.
To adjust the start or end time of a scheduled
recording…
1 - Press TV GUIDE.
2 - Press the colour key Recordings .
3 - At the top of the screen,
select Scheduled and press OK.
4 - In the list of scheduled recordings and reminders,
select the tab Recordings and press OK to view
the scheduled recordings only.
5 - Select the scheduled recording that conflicts with
another scheduled recording and press the colour
key Adjust Time .
6 - Select the start or end time and change the time
with the (up) or (down) keys.
Select Apply and press OK.
7 - Press Back to close the menu.
Auto End Margin
You can set the time margin that the TV will add
automatically at the end of each scheduled recording.
To set the automatic end time margin…
1 - Press TV GUIDE.
2 - Press the colour key Recordings .
3 - Press OPTIONS and select Auto End
Margin and press OK.
4 - Press (up) or (down) and press OK to
set the time margin added to a recording
automatically. You can add up to 45 minutes to a
recording.
5 - Press Back to close the menu.
Manual Recording
You can schedule a recording that is not linked to a
TV programme. You set the tuner type, channel and
the start and end time yourself.
To schedule a recording manually…
1 - Press TV GUIDE.
2 - Press the colour key Recordings .
3 - At the top of the screen,
select Scheduled and press OK.
4 - Press OPTIONS, select Schedule and
press OK.
5 - Select the tuner from where you want to record
and press OK.
6 - Select the channel to record from and press OK.
7 - Select the day of the recording and press OK.
8 - Set the start and end time of the recording. Select
a button and use the (up) or (down) keys to
set the hours and minutes.
9 - Select Record and press OK to schedule the
manual recording.
The recording will appear in the list of scheduled
recordings and reminders.
Watch a Recording
To watch a recording…
1 - Press TV GUIDE.
2 - Press the colour key Recordings .
3 - In the list of recordings, select the recording you
need and press OK to start watching.
4 - You can use the
keys (pause), (play), (rewind), (fast
forward) or (stop).
5 - To switch back to watch TV, press EXIT.
17.2
Pause TV
What You Need
You can pause a digital TV broadcast and resume
watching it a bit later.
To pause a TV programme you need…
• a connected USB Hard Drive formatted on this TV
• digital TV channels installed on this TV
• to receive channel information for the on screen TV
Guide
With the USB Hard Drive connected and formatted,
the TV continuously stores the TV broadcast you are
watching. When you switch to another channel, the
broadcast of the former channel is cleared. Also
when you switch the TV to standby the broadcast is
cleared.
You cannot use Pause TV when you are recording.
For more information, in Help, press the colour
key Keywords and look up USB Hard Drive.
65

19
Games
19.1
What You Need
On this TV, you can play games…
• from the Philips TV Collection in the Home menu
• from the Google Play Store in the Home menu
• from a connected Game Console
Games from the Philips TV Collection or the Google
Play Store must be downloaded and installed on TV
before you can play them. Some games need a
gamepad to play.
To install game apps from the Philips TV Collection
or the Google Play Store, the TV must be connected
to the Internet. You must agree to the Terms of Use to
use apps from the Philips TV Collection. You must
sign in with a Google Account to use the Google Play
apps and Google Play Store.
19.2
Gamepads
To play games from the Internet on this TV, you can
connect a selected range of wireless Gamepads. The
TV can support 2 connected Gamepads at a time.
When you connect the Gamepad, you can use it
immediately.
19.3
Play a Game From Game
Console
To start a game from a Game Console…
1 - Switch on the Game Console.
2 - Press SOURCES and select a game console
or the name of the connection.
3 - Start the game.
4 - Press Back repeatedly or press EXIT or
stop the app with its dedicated exit/stop button.
For more information on connecting a Game Console,
in Help, press the colour key Keywords and
look up Game Console, connect.
68

> Ambilight+Philips Wireless Home Speakers > Reset
configuration.
Reset current setup of the Ambilight+Philips Wireless
Home Speakers.
72

21
Top Picks
21.1
About Top Picks
With Top Picks your TV recommends…
• current TV programmes in Now on TV
• the latest rental videos in Video on Demand
• online TV services (Catch Up TV) from Freeview in
Freeview Play*
To enjoy Top Picks, connect your TV to the
Internet. Make sure you agree to the Terms of Use.
The Top Picks information and services are only
available in selected countries.
Terms of Use
To allow the TV to make these recommendations, you
must agree to the Terms of Use. To get personalised
recommendations based on your viewing habits,
make sure you checked the box for Personalized
Recommendations Service Opt-In.
To open the Terms of Use…
1 - Press to open Quick Menu.
2 - Select Top Picks.
3 - Press OPTIONS, select Terms of Use and
press OK.
4 - Select Privacy Settings and press OK.
5 - Select Personalized Recommendations Service
Opt-In and press OK to check the box.
Press OK again to uncheck.
6 - Press Back to close the menu.
* Freeview Play is only for UK models.
21.2
Now on TV
About Now on TV
With Now on TV , the TV recommends the 10
most popular programmes to watch at this moment.
The TV recommends programmes on TV now or
starting within 15 minutes. The recommended
programmes are selected from the channels you
installed. The selection is made from channels of your
country. Also, you can let Now on TV do some
personalised recommendations for you, based on
programmes you watch regularly.
To make the Now on TV information available…
• the Now on TV information must be available in your
country.
• the TV must have channels installed.
• the TV must be connected to the Internet.
• the TV Clock must be set to Automatic or Country
Dependent.
• you must accept the Terms of Use (You might have
accepted already when you connected to the
Internet.).
The icon will only appear at the top of the screen
when Now on TV is available.
The TV does not store former recommendations.
Using Now on TV
To open Now on TV…
1 - Press to open Quick Menu.
2 - Select Top Picks to open the Top Picks menu.
3 - Select Now on TV at the top of the screen
and press OK.
4 - Press Back to close.
When you open Now on TV, the TV may need a few
seconds to refresh the page information.
In Now on TV you can…
• select and press OK on a programme icon to tune
to the ongoing programme.
• select and press OK on a scheduled programme
icon to tune to the channel already.
You can use the colour keys on the remote control to
start, stop or clear a scheduled recording. You can
also set or remove a reminder that warns you when a
programme starts.
To leave Now on TV without tuning to another
channel, press Back.
21.3
Video on Demand
About Video on Demand
With Video on Demand , you can rent movies
from an online rental video store.
You can let Video on Demand do some personalised
recommendations of movies, based on your country,
the TV installation and the programmes you watch
regularly.
The icon will only appear at the top of the screen
when Video on Demand is available.
Payment
When you rent or buy a movie, you can pay the video
store securely with your credit card. Most video
stores ask you to create a login account the first time
you rent a movie.
Internet Traffic
73

22
Freeview Play
22.1
About Freeview Play
To enjoy Freeview Play*, you need to connect your
TV to Internet first.
Freeview Play offers:
• Watch TV programmes you missed from the last
seven days.
• Watch live TV and on demand, all in one place
without entering an app, you can search Freeview
Play programmes in TV Guide.
• Watch over 70 standard channels and upto 15 HD
channels.
• Enjoy on demand services like BBC iPlayer, the ITV
Hub, All 4, Demand 5, BBC NEWS and BBC SPORT.
• There are no contracts and no monthly costs, you’re
in control.
For detail, please visit: https://www.freeview.co.uk
* Freeview Play is only for UK models.
22.2
Using Freeview Play
To open Freeview Play*…
1 - Press to open Quick Menu.
2 - Select Top Picks.
3 - Select Recommendation or Box Sets tab at the
top of the screen.
4 - Select a genre from the second row and
press OK to filter the corresponding programmes.
5 - Select a programme and press OK to start
watching.
6 - Press Back to close.
* Freeview Play is only for UK models.
75

25.3
Automatic Software Update
To switch on Automatic software update to update
your TV software automatically. Leave the TV in
standby.
1 - Select Settings > Update
Software > Automatic Software Update > On, and
press OK.
2 - Follow the on-screen instruction.
3 - Press (left) repeatedly if necessary, to close
the menu.
When the setting is enabled, the upgrade gets
downloaded when the TV is powered ON and
installed 15min after the TV has gone to standby (as
long as there are no recordings or other alarms
scheduled).
When the setting is disabled, the "Upgrade Now" /
"Later" OSD will be shown.
25.4
View Software Update
History
Display the list of software versions that are
successfully update on the TV.
To view the software update history…
1 - Select Settings > Update Software > View
software update history and press OK.
2 - The software update history on this TV will be
listed.
25.5
Open Source Software
This television contains open source software. TP
Vision Europe B.V. hereby offers to deliver, upon
request, a copy of the complete corresponding
source code for the copyrighted open source
software packages used in this product for which such
offer is requested by the respective licences.
This offer is valid up to three years after product
purchase to anyone in receipt of this information.
To obtain the source code, please write in English to .
. .
25.6
Open Source License
About Open Source License
README for the source code of the parts of TP Vision
Netherlands B.V. TV software that fall under open
source licenses.
This is a document describing the distribution of the
source code used on the TP Vision Netherlands B.V.
TV, which fall either under the GNU General Public
License (the GPL), or the GNU Lesser General Public
License (the LGPL), or any other open source license.
Instructions to obtain copies of this software can be
found in the Directions For Use.
TP Vision Netherlands B.V. MAKES NO WARRANTIES
WHATSOEVER, EITHER EXPRESS OR IMPLIED,
INCLUDING ANY WARRANTIES OF
MERCHANTABILITY OR FITNESS FOR A PARTICULAR
PURPOSE, REGARDING THIS SOFTWARE. TP Vision
Netherlands B.V. offers no support for this software.
The preceding does not affect your warranties and
statutory rights regarding any TP Vision Netherlands
B.V. product(s) you purchased. It only applies to this
source code made available to you.
25.7
Announcements
You can receive an announcement on new TV
software available for download or other software
related issues.
To read these announcements…
1 - Select Settings > Update
Software > Announcements, and press OK.
2 - If there is an announcement, you can read it or
select one of the announcements available.
79

26
Specifications
26.1
Environmental
European Energy Label
The European Energy Label informs you on the
energy efficiency class of this product. The greener
the energy efficiency class of this product is, the
lower the energy it consumes.
On the label, you can find the energy efficiency class,
the average power consumption of this product in
use. You can also find the power consumption values
for this product on the Philips website for your
country at www.philips.com/TVsupport.
EPREL Registration Number
EPREL registration number
43PUS8506 : 441328
43PUS8536 : 441329
43PUS8546 : 441330
43PUS8556 : 441331
50PUS8506 : 470779
50PUS8536 : 470799
50PUS8546 : 470802
50PUS8556 : 470805
58PUS8506 : 476382
58PUS8536 : 476402
58PUS8546 : 476406
58PUS8556 : 476410
65PUS8506 : 591419
65PUS8536 : 591441
65PUS8546 : 591443
65PUS8556 : 591447
70PUS8506 : 494803
70PUS8536 : 494823
70PUS8546 : 494825
70PUS8556 : 494826
75PUS8506 : 597504
75PUS8536 : 597511
75PUS8546 : 597512
75PUS8556 : 597513
End of Use
Disposal of your old product and batteries
Your product is designed and manufactured with high
quality materials and components, which can be
recycled and reused.
When this crossed-out wheeled bin symbol is
attached to a product it means that the product is
covered by the European Directive 2012/19/EU.
Please inform yourself about the local separate
collection system for electrical and electronic
products.
Please act according to your local rules and do not
dispose of your old products with your normal
household waste. Correct disposal of your old
product helps to prevent potential negative
consequences for the environment and human
health.
Your product contains batteries covered by the
European Directive 2006/66/EC, which cannot be
disposed with normal household waste.
Please find out for yourself about the local rules on
separate collection of batteries because correct
disposal will help to prevent negative consequences
for the environment and human health.
UK Declaration of Conformity
Hereby, TP Vision Europe B.V. declares that this
television is in compliance with the essential
requirements and other relevant provisions of
Directives Radio Equipment Regulations 2017 and the
Ecodesign for Energy-Related Products and Energy
Information (Amendment) (EU Exit) Regulations 2019
and the Restriction of the Use of Certain Hazardous
Substances in Electrical and Electronic Equipment
Regulations 2012.
80

26.2
Power
Product specifications are subject to change without
notice. For more specification details of this product,
see www.philips.com/TVsupport
Power
• Mains power : AC 220-240V +/-10%
• Ambient temperature : 5°C to 35°C
• Power saving features : Eco mode, Picture mute (for
radio), Auto switch-off timer, Eco settings menu.
26.3
Operating System
Android OS :
Android 10
26.4
Reception
• Aerial input : 75 ohm coaxial (IEC75)
• Tuner bands : Hyperband, S-Channel, UHF, VHF
• DVB : DVB-T2, DVB-C (cable) QAM
• Analogue video playback : SECAM, PAL
• Digital video playback : MPEG2 SD/HD (ISO/IEC
13818-2), MPEG4 SD/HD (ISO/IEC 14496-10), HEVC
• Digital audio playback (ISO/IEC 13818-3)
• Satellite aerial input : 75 ohm F-type
• Input frequency range : 950 to 2150MHz
• Input level range : 25 to 65 dBm
• DVB-S/S2 QPSK, symbol rate 2 to 45M symbols,
SCPC and MCPC
• LNB : DiSEqC 1.0, 1 to 4 LNBs supported, Polarity
selection 13/18V, Band selection 22kHz, Tone burst
mode, LNB current 300mA max
26.5
Display Type
Diagonal screen size
• 108 cm / 43 inch
• 126 cm / 50 inch
• 146 cm / 58 inch
• 164 cm / 65 inch
• 177 cm / 70 inch
• 189 cm / 75 inch
Display resolution
• 3840 x 2160
26.6
Display Input Resolution
Supported Video only resolution
Resolution — Refresh rate
• 480i - 60 Hz
• 576i - 50 Hz
• 1080i - 50 Hz, 60 Hz
Supported Computer/Video resolution
Resolution — Refresh rate
• 640 x 480 - 60Hz
• 576p - 50Hz
• 720p - 50 Hz, 60 Hz
• 1920 x 1080p - 24 Hz, 25 Hz, 30 Hz, 50 Hz, 60 Hz
• 2560 x 1440 - 60 Hz
• 3840 x 2160p - 24 Hz, 25 Hz, 30 Hz, 50 Hz, 60 Hz
• 4096 x 2160p - 24 Hz, 25 Hz, 30 Hz, 50 Hz, 60 Hz
26.7
Connectivity
TV Side
• Common Interface slot: CI+/CAM
• USB 2 - USB 3.0
• Headphones - Stereo mini-jack 3.5mm
• HDMI 4 in - ARC - Ultra HD - HDR
TV Bottom
• Digital audio out - Optical Toslink
• Network LAN - RJ45
• Satellite tuner
• Antenna (75 ohm)
• HDMI 1 in - ARC - Ultra HD - HDR
• HDMI 2 in - ARC/eARC - Ultra HD - HDR
• HDMI 3 in - ARC - Ultra HD - HDR
• USB 1 - USB 2.0
26.8
Sound
Output power (RMS) : 20W
Dolby MS12 V2.5
• Dolby Atmos
• DTS – HD (M6)
• DTS Play-Fi
• Surround Virtualizer + Height Virtualizer
• Dolby Bass Enhancement
• Dolby Dialogue Enhancement
• Dolby Volume (AVL/Night Mode)
• AI Sound
• AI EQ
• Mimi Health Hearing
81

26.9
Multimedia
Connections
• USB 2.0 / USB 3.0
• Ethernet LAN RJ-45
• Wi-Fi 802.11a/b/g/n/ac, Dual Band
• BT 5.0
Supported USB file systems
• FAT 16, FAT 32, NTFS
Playback formats
• Containers: PS, TS, M2TS, TTS, AVCHD, MP4, M4V,
MKV, ASF, AVI, 3GP, Quicktime
• Video Codecs : AVI, MKV, H.264/MPEG-4 AVC,
MPEG1, MPEG2, MPEG4, VP9, HEVC (H.265), AV1
• Audio Codecs : MP3, WAV, AAC, WMA (v2 up to
v9.2), WMA-PRO (v9 and v10)
• Subtitles :
– Formats : SRT, SUB, TXT, SMI
– Character encodings : UTF-8, Central Europe and
Eastern Europe (Windows-1250), Cyrillic
(Windows-1251), Greek (Windows-1253), Turkish
(Windows-1254), Western Europe (Windows-1252),
Hebrew(CP-1255), Arabic(CP-1256), Baltic(CP-1257),
Korean(Windows-949)
• Maximum Supported Data Rate :
– MPEG-4 AVC (H.264) is supported up to High
Profile @ L5.2 80Mbps
– H.265 (HEVC) is supported up to Main / Main 10
Profile up to High Profile @ L5.1 80Mbps
• Image Codecs : JPEG, GIF, PNG, BMP, HEIF, 360
Photo
Supported media server software
• You can use any DLNA V1.5 certified media server
software.
• You can use the Philips TV Remote app (iOS and
Android) on mobile devices.
Performance may vary, depending on the capabilities
of the mobile device and the software used.
82

27
Help and Support
27.1
Register your TV
Register your TV and enjoy a range of benefits
including full support (including downloads),
privileged access to information about new products,
exclusive offers and discounts, the chance to win
prizes and even participate in special surveys about
new releases.
Go to www.philips.com/TVsupport
27.2
Using Help
This TV offers help on screen .
Open Help
Press the key (blue) to open Help immediately.
Help will open on the chapter that is most relevant to
what you are doing or what is selected on TV. To look
up topics alphabetically, press the colour
key Keywords .
To read the Help as a book, select Book.
You can also open Help in the Quick menu.
Before you execute the Help instructions, close Help.
To close Help, press the colour key Close .
For some activities, like Text (Teletext), the colour
keys have specific functions and cannot open Help.
TV Help on your tablet, smartphone or computer
To carry out extended sequences of instructions more
easily, you can download the TV Help in PDF format
to read on your smartphone, tablet or
computer. Alternatively, you can print the relevant
Help page from your computer.
To download the Help (user manual) go
to www.philips.com/TVsupport
Quick Menu > Help
You can use more Help functions to diagnose and get
more information about your TV.
• TV information - View the Model name, Serial
number and Software version of your TV.
• How to - You can see instructions on how to
install channels, sort channels, update TV software,
connect external devices and use Smart functions on
your TV.
• Check the TV - You can check if the picture, sound,
Ambilight* are working fine.
• Check the network - Check the network
connection.
• Check the remote control - Perform the test to verify
the TV bundled remote control functionality.
• View weak signal history - Display the list of
channel numbers that were automatically saved
when signal strength was weak.
• Optimize internal storage - Free up space in TV’s
internal storage for optimal performance.
• Update software - Check available software
updates.
• User manual - Read the user manual for TV
information.
• Troubleshooting - Find a solution for frequent ask
questions.
• Factory settings - Reset all settings to factory
settings.
• Reinstall TV - Reinstall and redo the complete TV
installation.
• Contact info - Show the telephone number or web
address for your country or region.
* Ambilight setting is only for models which support
Ambilight function.
27.3
Troubleshooting
Switch On and Remote Control
The TV does not switch on
• Disconnect the power cable from the power outlet.
Wait for one minute then reconnect it.
• Make sure that the power cable is securely
connected.
Creaking sound at startup or switch off
When you are switching the TV on, off or to standby,
you hear a creaking sound from the TV chassis. The
creaking sound is due to the normal expansion and
contraction of the TV as it cools and warms up. This
does not affect performance.
TV does not respond to the remote control
The TV requires some time to start up. During this
time, the TV does not respond to the remote control
or TV controls. This is normal behaviour.
If the TV continues to be unresponsive to the remote
control, you can check if the remote control is working
by means of a mobile phone camera. Put the phone
in camera mode and point the remote control to the
camera lens. If you press any key on the remote
control and you notice the infra red LED flicker
through the camera, the remote control is working.
The TV needs to be checked.
If you do not notice the flickering, the remote control
might be broken or its batteries are low.
This method of checking the remote control is not
83

• If the picture and sound of a device connected to
HDMI is distorted, connect the device to another
HDMI port on TV and power reboot your source
device.
• If the picture and sound of a device connected with
HDMI is distorted, check if a different HDMI Ultra
HD setting can solve this problem. In Help, press the
colour key Keywords and look up HDMI Ultra
HD.
• If there are intermittent sound disruptions, make
sure that output settings from the HDMI device are
correct.
• If you use an HDMI-to-DVI adapter or HDMI-to-DVI
cable, make sure that an additional audio cable is
connected to AUDIO IN (mini-jack only), if available.
HDMI EasyLink does not work
• Make sure that your HDMI devices are HDMI-CEC
compatible. EasyLink features only work with devices
that are HDMI-CEC compatible.
No volume icon shown
• When an HDMI-CEC audio device is connected and
you use the TV Remote Control to adjust the volume
level from the device, this behaviour is normal.
Photos, videos and music from a USB device do not
show
• Make sure that the USB storage device is set to Mass
Storage Class compliant, as described in the storage
device's documentation.
• Make sure that the USB storage device is compatible
with the TV.
• Make sure that the audio and picture file formats are
supported by the TV.
Choppy playback of USB files
• The transfer performance of the USB storage device
may limit the data transfer rate to the TV which
causes poor playback.
Network
Wi-Fi network not found or distorted
• Microwave ovens, DECT phones or other Wi-Fi
802.11b/g/n/ac devices in your proximity might
disturb the wireless network.
• Make sure that the firewalls in your network allow
access to the TV's wireless connection.
• If the wireless network does not work properly in
your home, try the wired network installation.
Internet does not work
• If the connection to the router is OK, check the
router connection to the Internet.
The PC and Internet connection are slow
• Look in your wireless router's user manual for
information on indoor range, transfer rate and other
factors of signal quality.
• Use a high-speed (broadband) Internet connection
for your router.
DHCP
• If the connection fails, you can check the DHCP
(Dynamic Host Configuration Protocol) setting of the
router. DHCP should be switched on.
Bluetooth
Unable to pair
• Make sure the device is in pairing mode. Read the
user manual of the device.
• Keep the wireless speaker as close to the TV as
possible.
• Trying to pair several devices with the TV at the
same time, may not work.
Bluetooth lost connection
• Always position the wireless speaker within a range
of 5 meters from the TV.
Bluetooth Audio and Video syncronisation
• Before you purchase a wireless Bluetooth speaker,
inform yourself about its quality of Audio to Video
syncronisation, commonly called 'lip sync'. Not all
Bluetooth devices perform correctly. Ask your dealer
for advice.
Wrong Menu Language
Wrong menu language
Change the language back to your language.
1 - Press HOME to go to Home screen .
2 - Select the icon (Settings) from System bar on
the top of Home screen and press OK.
3 - Press 5 times (down).
4 - Press 3 times (right), select your language and
press OK.
5 - Press Back to close the menu.
27.4
Online Help
To solve any Philips TV related problem, you can
consult our online support. You can select your
language and enter your product model number.
Go to www.philips.com/TVsupport
On the support site you can find your country's
telephone number to contact us as well as answers to
frequently asked questions (FAQs). In some countries,
you can chat with one of our collaborators and ask
your question directly or send a question by email.
You can download new TV software or the manual to
read on your computer.
85

29
Terms of Use
29.1
Terms of Use - TV
2021 © TP Vision Europe B.V. All rights reserved.
This product was brought to the market by TP Vision
Europe B.V. or one of its affiliates, hereinafter referred
to as TP Vision, which is the manufacturer of the
product. TP Vision is the warrantor in relation to the
TV with which this booklet was packaged. Philips and
the Philips Shield Emblem are registered trademarks
of Koninklijke Philips N.V.
Specifications are subject to change without notice.
Trademarks are the property of Koninklijke Philips N.V
or their respective owners. TP Vision reserves the right
to change products at any time without being obliged
to adjust earlier supplies accordingly.
The written material packaged with the TV and the
manual stored in the memory of the TV or
downloaded from the Philips
website www.philips.com/TVsupport are believed to
be adequate for the intended use of the system.
The material in this manual is believed adequate for
the intended use of the system. If the product, or its
individual modules or procedures, are used for
purposes other than those specified herein,
confirmation of their validity and suitability must be
obtained. TP Vision warrants that the material itself
does not infringe any United States patents. No
further warranty is expressed or implied. TP Vision
cannot be held responsible neither for any errors in
the content of this document nor for any problems as
a result of the content in this document. Errors
reported to Philips will be adapted and published on
the Philips support website as soon as possible.
Terms of warranty - Risk of injury, damage to TV or
void of warranty!
Never attempt to repair the TV yourself. Use the TV
and accessories only as intended by the
manufacturer. The caution sign printed on the back of
the TV indicates risk of electric shock. Never remove
the TV cover. Always contact Philips TV Customer
Care for service or repairs. Find the telephone number
in the printed documentation that came with the
TV. Or consult our website
www.philips.com/TVsupport and select your country
if needed. Any operation expressly prohibited in this
manual, or any adjustments and assembly
procedures not recommended or authorised in this
manual, shall void the warranty.
Pixel characteristics
This TV product has a high number of colour pixels.
Although it has effective pixels of 99.999% or more,
black dots or bright points of light (red, green or blue)
may appear constantly on the screen. This is a
structural property of the display (within common
industry standards) and is not a malfunction.
CE compliance
Hereby, TP Vision Europe B.V. declares that this
television is in compliance with the essential
requirements and other relevant provisions of
Directives 2014/53/EU (RED), 2009/125/EC (Eco
Design) and 2011/65/EC (RoHS).
Compliance with EMF
TP Vision manufactures and sells many products
targeted at consumers which, like any electronic
apparatus, in general have the ability to emit and
receive electromagnetic signals. One of TP Vision’s
leading business principles is to take all necessary
health and safety measures for our products, to
comply with all applicable legal requirements and to
stay well within the Electro Magnetic Field (EMF)
standards applicable at the time of producing the
products.
TP Vision is committed to developing, producing and
marketing products that cause no adverse health
effects. TP Vision confirms that, as long as its products
are handled properly for their intended use, they are
safe to use according to scientific evidence available
today. TP Vision plays an active role in the
development of international EMF and safety
standards, enabling TP Vision to anticipate further
developments in standardisation for early integration
in its products.
29.2
Terms of Use - Smart TV
You can see the terms of use, privacy policy, and also
set privacy settings of your Smart TV.
To open the terms of use of Smart TV page…
1 - Press HOME to open the Home menu.
2 - Select Apps to open apps.
29.3
Terms of Use - Philips TV
Collection
In Help, press the colour key Keywords and look
up Terms of Use, Philips TV Collection for more
information.
89

30
Copyrights
30.1
HDMI
HDMI
The terms HDMI, HDMI High-Definition Multimedia
Interface, and the HDMI Logo are trademarks or
registered trademarks of HDMI Licensing
Administrator, Inc.
30.2
Dolby Audio
Dolby Audio
Dolby, Dolby Audio, and the double-D symbol are
trademarks of Dolby Laboratories Licensing
Corporation.
Manufactured under license from Dolby Laboratories.
Confidential unpublished works.
Copyright © 1992-2021 Dolby Laboratories. All rights
reserved.
30.3
Dolby Vision and Dolby
Atmos
Dolby Vision and Dolby Atmos
Dolby, Dolby Vision, Dolby Atmos, Dolby Audio, and
the double-D symbol are registered trademarks of
Dolby Laboratories Licensing Corporation.
Manufactured under license from Dolby Laboratories.
Confidential unpublished works. Copyright ©
2012–2021 Dolby Laboratories.
All rights reserved.
30.4
DTS-HD
DTS-HD
For DTS patents, see http://patents.dts.com.
Manufactured under license from DTS Licensing
Limited. DTS, the Symbol, DTS and the Symbol
together, DTS-HD, Play-Fi, the DTS-HD logo, and the
DTS Play-Fi logo are registered trademarks or
trademarks of DTS, Inc. in the United States and/or
other countries. © DTS, Inc. All Rights Reserved.
30.5
DTS Play-Fi
DTS Play-Fi
For DTS patents, see http://patents.dts.com.
Manufactured under license from DTS Licensing
Limited. DTS, the Symbol, DTS and the Symbol
together, DTS-HD, Play-Fi, the DTS-HD logo, and the
DTS Play-Fi logo are registered trademarks or
trademarks of DTS, Inc. in the United States and/or
other countries. © DTS, Inc. All Rights Reserved.
30.6
Wi-Fi Alliance
Wi-Fi
The Wi-Fi CERTIFIED® Logo is a registered trademark
of Wi-Fi Alliance®.
90
30.7
Kensington
Kensington
(If applicable)
Kensington and Micro Saver are registered US
trademarks of ACCO World Corporation with issued
registrations and pending applications in other
countries throughout the world.
30.8
Other Trademarks
All other registered and unregistered trademarks are
the property of their respective owners.
91