
OWNER'S
MANUAL
30" Single Twin Convection with Direct Air
French Door Wall Oven
30" Double Twin Convection with Direct Air
French Door Wall Oven
Para consultar una version en español
de este manual de instrucciones, visite nuestro
sitio de internet monogram.com.
MONOGRAM.COM

2 49-2000712 Rev. 0
MODEL INFORMATION
WRITE DOWN THE MODEL AND SERIAL NUMBERS
You can find them on a label on the side trim or on the
front of the (lower) oven behind the oven door.
Use these numbers in any correspondence or service calls
concerning your appliance.
Please write these numbers here:
Model Number
Serial Number
MODEL NUMBERS
ZTSX1FPSN1SS
ZTDX1FPSN1SS
TABLE OF CONTENTS
MODEL INFORMATION .....................................................................................2
CONSUMER SUPPORT .....................................................................................3
SAFETY INFORMATION ....................................................................................4
USING THE OVEN .........................................................................................6
Oven Controls ..........................................................................................7
Double Wall Oven Control ................................................................................8
Settings ...............................................................................................8
Sabbath .............................................................................................10
Oven Racks ..........................................................................................11
Aluminum Foil and Oven Liners ...........................................................................12
Cooking Modes ........................................................................................13
Probe ...............................................................................................15
Cookware ............................................................................................16
Cooking Guide ........................................................................................17
CARE AND CLEANING ....................................................................................19
Oven ................................................................................................19
Probe ...............................................................................................20
Oven Racks ..........................................................................................20
Oven Handle Replacement ..............................................................................20
Oven Doors ..........................................................................................20
Oven Light ...........................................................................................21
TROUBLESHOOTING .....................................................................................22
MONOGRAM LIMITED WARRANTY ..........................................................................24
ACCESSORIES ..........................................................................................25

49-2000712 Rev. 0 3
CONSUMER SUPPORT
MONOGRAM WEBSITE
Have a question or need assistance with your appliance? Try the Monogram website 24 hours a day, any day of the year! You can
also shop for more great Monogram products and take advantage of all our on-line support services designed for your convenience. In
the US: monogram.com.
REGISTER YOUR APPLIANCE
Register your new appliance on-line at your convenience! Timely product registration will allow for enhanced communication and
prompt service under the terms of your warranty, should the need arise. You may also mail in the pre-printed registration card included
in the packing material. In the US: monogram.com/register.
SCHEDULE SERVICE
Expert Monogram repair service is only one step away from your door.
To request service in the US, visit our website at monogram.com/contact
REMOTE CONNECTIVITY
For assistance with wireless network connectivity (for models with remote enable),
visit our website at monogram.com/connect
PARTS AND ACCESSORIES
Individuals qualified to service their own appliances can have parts or accessories sent directly to their homes
(VISA, MasterCard and Discover cards are accepted). Order on-line today 24 hours every day.
In the US: monogram.com/use-and-care/parts
Instructions contained in this manual cover procedures to be performed by any user. Other servicing generally should be
referred to qualified service personnel. Caution must be exercised, since improper servicing may cause unsafe operation.
CONTACT US
If you are not satisfied with the service you receive from Monogram, contact us on our website with all the details including your phone
number, or write to:
In the US: General Manager, Customer Relations | Monogram Appliances, Appliance Park | Louisville, KY 40225
monogram.com/contact
4 49-2000712 Rev. 0
WARNING
Read all safety instructions before using the product. Failure to follow these instructions may result
in fire, electrical shock, serious injury or death.
WARNING
GENERAL SAFETY INSTRUCTIONS
Ŷ 8VHWKLVDSSOLDQFHRQO\IRULWVLQWHQGHGSXUSRVHDV
described in this Owner’s Manual.
Ŷ %HVXUH\RXUDSSOLDQFHLVSURSHUO\LQVWDOOHGDQG
grounded by a qualified installer in accordance with
the provided installation instructions.
Ŷ 'RQRWDWWHPSWWRUHSDLURUUHSODFHDQ\SDUWRI\RXU
oven unless it is specifically recommended in this
manual. All other servicing should be performed by a
qualified technician.
Ŷ %HIRUHSHUIRUPLQJDQ\VHUYLFHGLVFRQQHFWWKH
power supply at the household distribution panel by
removing the fuse or switching off the circuit breaker.
Ŷ 'RQRWOHDYHFKLOGUHQDORQH²FKLOGUHQVKRXOGQRW
be left alone or unattended in an area where an
appliance is in use. They should never be allowed to
climb, sit or stand on any part of the appliance.
Ŷ
CAUTION
Do not store items of interest to
children in cabinets above an oven - children climbing
on the oven to reach items could be seriously injured.
Ŷ 8VHRQO\GU\SRWKROGHUV²PRLVWRUGDPSSRWKROGHUV
on hot surfaces may result in burns from steam. Do
not let pot holders touch hot heating elements. Do not
use a towel or other bulky cloth in place of pot holders.
Ŷ 1HYHUXVH\RXUDSSOLDQFHIRUZDUPLQJRUKHDWLQJWKH
room.
Ŷ 'RQRWWRXFKWKHKHDWLQJHOHPHQWVRUWKHLQWHULRU
surface of the oven. These surfaces may be hot enough
to burn even though they are dark in color. During and
after use, do not touch, or let clothing or other flammable
materials contact any interior area of the oven; allow
sufficient time for cooling first. Other surfaces of the
appliance may become hot enough to cause burns.
Potentially hot surfaces include the oven vent opening,
surfaces near the opening and crevices around the oven
door.
Ŷ 'RQRWKHDWXQRSHQHGIRRGFRQWDLQHUV3UHVVXUH
could build up and the container could burst, causing
an injury.
Ŷ 'RQRWXVHDQ\W\SHRIIRLORUOLQHUWRFRYHUWKHRYHQ
bottom or anywhere in the oven, except as described
in this manual. Oven liners can trap heat or melt,
resulting in damage to the product and risk of shock,
smoke or fire.
Ŷ $YRLGVFUDWFKLQJRULPSDFWLQJJODVVGRRUVRUFRQWURO
panels. Doing so may lead to glass breakage. Do not
cook on a product with broken glass. Shock, fire or
cuts may occur.
Ŷ &RRNPHDWDQGSRXOWU\WKRURXJKO\²PHDWWRDWOHDVW
an internal temperature of 160°F and poultry to at
least an internal temperature of 180°F. Cooking
to these temperatures usually protects against
foodborne illness.
WARNING
KEEP FLAMMABLE MATERIALS AWAY FROM THE OVEN
Failure to do so may result in fire or personal injury.
Ŷ 'RQRWVWRUHRUXVHIODPPDEOHPDWHULDOVLQRUQHDU
an oven, including paper, plastic, pot holders, linens,
wall coverings, curtains, drapes and gasoline or other
flammable vapors and liquids.
Ŷ 1HYHUZHDUORRVHILWWLQJRUKDQJLQJJDUPHQWVZKLOH
using the appliance. These garments may ignite if
they contact hot surfaces, causing severe burns.
Ŷ 'RQRWOHWFRRNLQJJUHDVHRURWKHUIODPPDEOH
materials accumulate in or near the oven. Grease in
the oven or near the oven may ignite.
Ŷ Remote Operation - This appliance is configurable to
allow remote operation at any time. Do not store any
flammable materials or temperature sensitive items
inside of the appliance.
IMPORTANT SAFETY INFORMATION
READ ALL INSTRUCTIONS BEFORE USING THE APPLIANCE
READ AND SAVE THESE INSTRUCTIONS
49-2000712 Rev. 0 5
WARNING
IN THE EVENT OF A FIRE, TAKE THE FOLLOWING
STEPS TO PREVENT INJURY AND FIRE SPREADING
Ŷ 'RQRWXVHZDWHURQJUHDVHILUHV1HYHUSLFNXSD
flaming pan.
Ŷ ,IWKHUHLVDILUHLQWKHRYHQGXULQJEDNLQJVPRWKHUWKH
fire by closing the oven door and turning the oven off
or by using a multi-purpose dry chemical or foam-type
fire extinguisher.
Ŷ ,IWKHUHLVDILUHLQWKHRYHQGXULQJVHOIFOHDQWXUQWKH
oven off and wait for the fire to go out. Do not force
the door open. Introduction of fresh air at self-clean
temperatures may lead to a burst of flame from the
oven. Failure to follow this instruction may result in
severe burns.
WARNING
OVEN SAFETY INSTRUCTIONS
Ŷ 6WDQGDZD\IURPWKHRYHQZKHQRSHQLQJWKHRYHQ
door. Hot air or steam which escapes can cause
burns to hands, face and/or eyes.
Ŷ .HHSWKHRYHQYHQWXQREVWUXFWHG
Ŷ .HHSWKHRYHQIUHHIURPJUHDVHEXLOGXS*UHDVHLQ
the oven may ignite.
Ŷ 3ODFHRYHQUDFNVLQGHVLUHGORFDWLRQZKLOHRYHQLV
cool. If rack must be moved while oven is hot, do not
let pot holder contact hot heating element in oven.
Ŷ :KHQXVLQJFRRNLQJRUURDVWLQJEDJVLQWKHRYHQ
follow the manufacturer’s directions.
Ŷ 3XOOLQJRXWWKHVWDQGDUGUDFNVWRWKHLUVWRSORFNV
or the extension rack to its fully open position is a
convenience in lifting heavy foods. It is also a precaution
against burns from touching hot surfaces of the door or
oven walls.
Ŷ 'RQRWOHDYHLWHPVVXFKDVSDSHUFRRNLQJXWHQVLOVRU
food in the oven when not in use. Items stored in an
oven can ignite.
Ŷ 1HYHUSODFHFRRNLQJXWHQVLOVSL]]DRUEDNLQJVWRQHV
or any type of foil or liner on the oven floor. These
items can trap heat or melt, resulting in damage to the
product and risk of shock, smoke or fire.
WARNING
SELF-CLEANING OVEN SAFETY INSTRUCTIONS
The self-cleaning feature operates the oven at temperatures high enough to burn away food soils in the oven. Follow
these instructions for safe operation.
Ŷ 'RQRWWRXFKRYHQVXUIDFHVGXULQJVHOIFOHDQ
operation. Keep children away from the oven during
self-cleaning. Failure to follow these instructions may
cause burns.
Ŷ %HIRUHVHOIFOHDQLQJWKHRYHQUHPRYHVKLQ\VLOYHU
colored oven racks (on some models), the probe, any
aluminum foil, and any broiler pan, grid, and other
cookware. Only porcelain coated oven racks may be
left in the oven.
Ŷ %HIRUHRSHUDWLQJWKHVHOIFOHDQF\FOHZLSHJUHDVHDQG
food soils from the oven. Excessive amount of grease
may ignite, leading to smoke damage to your home.
Ŷ ,IWKHVHOIFOHDQLQJPRGHPDOIXQFWLRQVWXUQWKHRYHQ
off and disconnect the power supply. Have it serviced by
a qualified technician.
Ŷ 'RQRWFOHDQWKHGRRUJDVNHW7KHGRRUJDVNHWLV
essential for a good seal. Care should be taken not to
rub, damage or move the gasket.
Ŷ 'RQRWXVHRYHQFOHDQHUV1RFRPPHUFLDORYHQ
cleaner or oven liner protective coating of any kind
should be used in or around any part of the oven.
IMPORTANT SAFETY INFORMATION
READ ALL INSTRUCTIONS BEFORE USING THE APPLIANCE
READ AND SAVE THESE INSTRUCTIONS

6 49-2000712 Rev. 0
The remote enable equipment installed on this oven has
been tested and found to comply with the limits for a Class
%GLJLWDOGHYLFHSXUVXDQWWRSDUWRIWKH)&&5XOHV
These limits are designed to:
(a) provide reasonable protection against harmful
interference in a residential installation. This equipment
generates, uses and can radiate radio frequency energy
and, if not installed and used in accordance with the
instructions, may cause harmful interference to radio
communications. However, there is no guarantee that
interference will not occur in a particular installation. If this
equipment does cause harmful interference to radio or
television reception, which can be determined by turning
the equipment off and on, the user is encouraged to try
to correct the interference by one or more of the following
measures:
Ŷ5HRULHQWRUUHORFDWHWKHUHFHLYLQJDQWHQQD
Ŷ,QFUHDVHWKHVHSDUDWLRQEHWZHHQWKHHTXLSPHQWDQG
receiver.
Ŷ&RQQHFWWKHHTXLSPHQWLQWRDQRXWOHWRQDFLUFXLW
different from that to which the receiver is connected.
Ŷ&RQVXOWWKHGHDOHURUDQH[SHULHQFHGUDGLR79WHFKQLFLDQ
for help.
(b) accept any interference received, including interference
that may cause undesired operation of the device.
Note that any changes or modifications to the wireless
communication device installed on this oven that are not
expressly approved by the manufacturer could void the
user's authority to operate the equipment.
HOW TO REMOVE PROTECTIVE SHIPPING FILM AND PACKAGING TAPE
Carefully grasp a corner of the protective shipping film with
your fingers and slowly peel it from the appliance surface.
Do not use any sharp items to remove the film. Remove all
of the film before using the appliance for the first time.
To assure no damage is done to the finish of the product,
the safest way to remove the adhesive from packaging
tape on new appliances is an application of a household
liquid dishwashing detergent. Apply with a soft cloth and
allow to soak.
NOTE: The adhesive must be removed from all parts. It
cannot be removed if it is baked on.
IMPORTANT SAFETY INFORMATION
READ ALL INSTRUCTIONS BEFORE USING THE APPLIANCE
READ AND SAVE THESE INSTRUCTIONS
49-2000712 Rev. 0 7
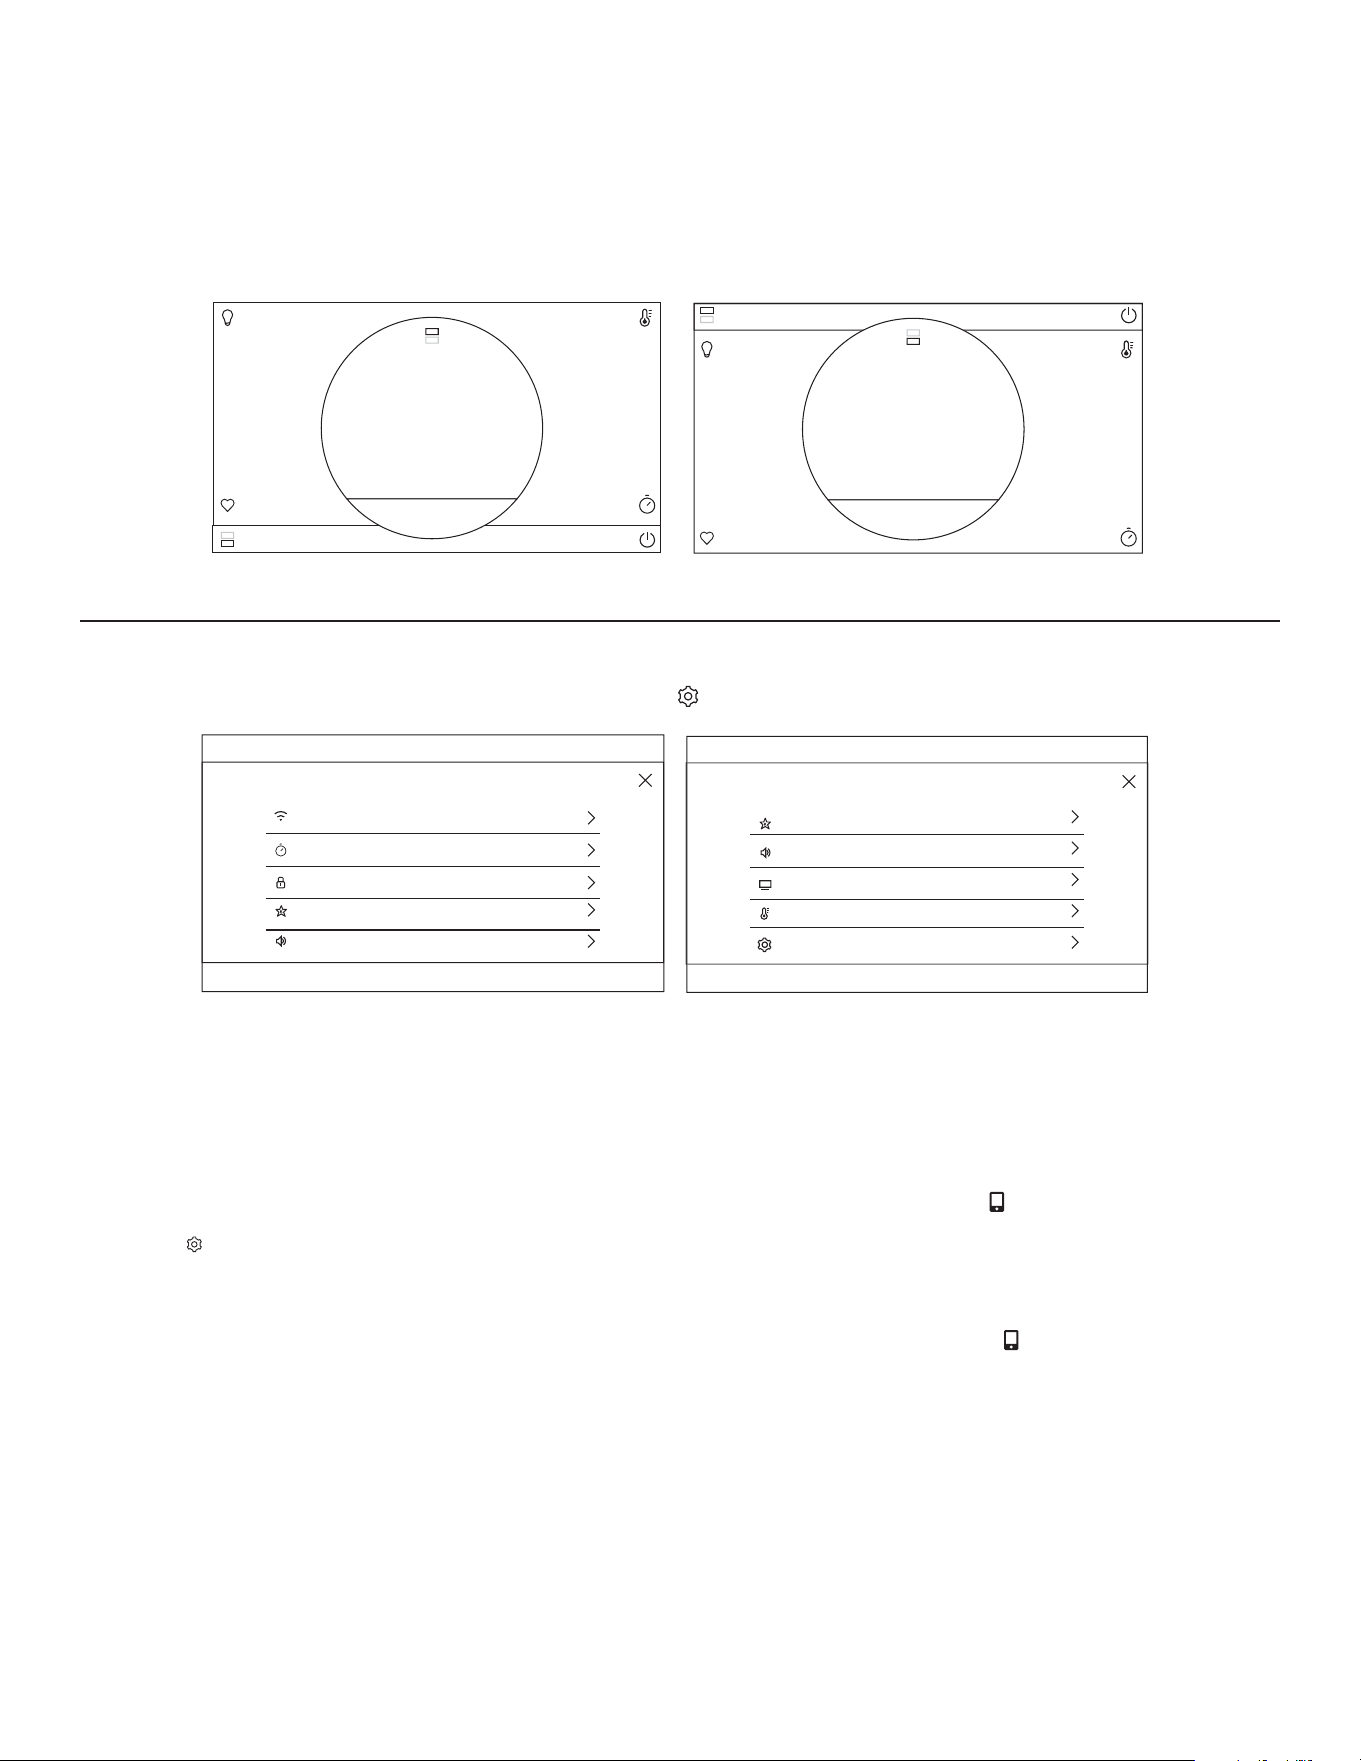
OVEN CONTROLS
Control graphics are representative; your oven may have alternate graphic appearances.
Upper Oven and Lower Oven
When using a double oven you can set separate modes
in each oven. The selected oven will appear above the
cooking modes. NOTE: If using a single oven, there will
not be an oven selection.
Bake
This option allows the user to access traditional the
traditional bake mode.
Broil
%URLO FDQEHVHOHFWHGWRDFFHVV%URLO/RZDQG%URLO+LJK
See the Cooking Modes section for more information.
Convection
7KLVRSWLRQDOORZV\RXWRXWLOL]HWKHFRQYHFWLRQV\VWHP
to cook in a variety of modes. See the Cooking Modes
section for more information.
More
Select this option to access the Proof, Air Fry, Warm, Self
Clean, and Steam Clean options.
Precision Cooking
3UHFLVLRQ&RRNLQJLVDVXLWHRIFXVWRPL]HGFRRNLQJF\FOHV
that have been designed for specific foods. The display will
guide you through setting the oven and food appropriately
for the cycle selected. Precision cooking cycles vary based
on food type; see the Cooking Modes section for more
detailed information.
Smart Home
This option connects you to resources detailing GE
Appliances Smart Home solutions and connected partners.
Life’s more convenient when you’re connected.
It enables you to manage everyday tasks with ease when
you can control your appliances from your smart device.
With our WiFi Connect appliances and our SmartHQ
mobile app, among other things you can:
ƒ3UHKHDW\RXURYHQRQ\RXUZD\KRPHIURPZRUN
ƒ&KDQJHWKHRYHQWHPSHUDWXUHZKLOH\RXKHOSZLWK
homework.
ƒ6HWDQGDGMXVWFRRNLQJWLPHUVGXULQJ\RXUIDYRULWH79
show.
See the WiFi Connect section for instructions on
connecting your smart device.
Oven Light
To turn on or off the oven cavity lights, press the %RWK
cavity lights will be illuminated if using a double oven.
Settings
Press the to access the Settings. See the Settings
section for more information.
Favorite
This option allows the user to save their favorite cycles for
easy access in the future. After selecting a cooking mode
and setting the temperature and any timers, press the
to save it as a favorite for future use. After saving a cycle,
press the on the main menu to quickly access the saved
mode.
Kitchen Timer
This feature works as a countdown timer. Press the
, select the amount of time for the timer to operate, and
press Start. The oven will continue to operate once the
timer countdown is complete. To turn off the timer, select
the and press Clear.
Cook Time
This function counts down cooking time and turns off the
oven when the cooking time is complete. Press the
during a cycle, select the amount of cooking time, and
press Start.
Delay Time
This feature delays the start time for an oven cycle. Use
this feature to set a time when you want the oven to start.
Select a cycle, then press the . Select the time of day for
the oven to turn on and press Start. A cook time can also
be programmed if desired.
Wi-Fi & Remote Enable
Press
GET CONNECTED
to connect your oven to Wi-Fi.
This option allows you to download content to your oven
and control it remotely. The oven must be connected
to Wi-Fi before Remote Enable can be activated. For
instructions on how to connect your oven, see the Wi-Fi
Connect/Remote Enable section under Settings in this
manual.
USING THE OVEN
Single Wall Oven Main Menu
12:30 PM
GET CONNECTED
Bake Broil Convection
Precision
Cooking
More
Smart
Home
Double Wall Oven Main Menus
Bake Broil Convection
Precision
Cooking
More
Smart
Home
UPPER OVEN
12:30 PM
Bake Broil Convection
Precision
Cooking
More
Smart
Home
LOWER OVEN
12:30 PM
12:30 PM
UPPER OVEN
LOWER OVEN
GET CONNECTED
8 49-2000712 Rev. 0
DOUBLE WALL OVEN CONTROLS
When using both cavities to cook, the control will allow you to switch back and forth between the upper and lower oven
to review the cycle selection for each. When viewing the cooking mode screen you can access the alternate cavity by
pressing on the banner at the top or bottom of the screen.
TO LOWER OVEN
BAKE 400°F
12:30 PM
350
°F
PREHEATED
BAKE
CANCEL
BAKE 350°F
TO UPPER OVEN
12:30 PM
BAKE
400
PREHEATED
°F
CANCEL
8SSHU2YHQ%DNH&\FOH /RZHU2YHQ%DNH&\FOH
SETTINGS
There are numerous settings that are accessed by pressing in the top right corner of the main screen.
SETTINGS
LOCK CONTROL
SABBATH
SOUND
SET CLOCK
Wi-Fi & REMOTE ENABLE
12:30 PM
COOKING
SYSTEM
SETTINGS
SABBATH
SOUND
DISPLAY
12:30 PM
Slide up and down to access all the settings
Wi-Fi & Remote Enable
This appliance is configurable to allow remote operation
at any time. Do not store any flammable materials or
WHPSHUDWXUHVHQVLWLYHLWHPVLQVLGH%\XVLQJWKH:L)L
Connect feature, you will be able to control essential
oven operations such as temperature settings, timers and
cooking modes using your smartphone or tablet.*
Select the then Wi-Fi & Remote Enable - follow the
instructions on your oven display and phone app. It is
necessary to turn on Wi-Fi before using Remote Enable on
your oven.
Connecting your Wi-Fi Connect Enabled oven
1. Have your smart phone or tablet ready with the ability to
access the internet and download apps.
2. You will need to know the password of your home Wi-Fi
router. Have this password ready while you are setting
up your Monogram oven.
3. On your smart phone or tablet, visit monogram.com/
connect to learn more about connected appliance
features and to download the app to connect to your oven.
4. Follow the onscreen instructions in the app to connect
your Monogram oven. When connected, your oven should
show that it is connected to your home Wi-Fi network.
5. If there are issues connecting wirelessly to your oven,
please call 800.220.6899 and ask for assistance
regarding oven wireless connectivity.
To connect additional smart devices, repeat steps 3 and 4.
Remote Starting your Oven
To be able to start the oven remotely once connected to
Wi-Fi, press Remote Enable on the main menu or access
Wi-Fi & Remote Enable in the settings menu and turn
Remote Enable on. The oven can now be started remotely
using a connected device. The icon must be active to
start the oven remotely. To disconnect your phone from
Remote Enable, access the Wi-Fi & Remote Enable
settings and turn Remote Enable off.
NOTE: )RRGVWKDWVSRLOHDVLO\²VXFKDVPLONHJJVILVK
VWXIILQJVSRXOWU\DQGSRUN²VKRXOGQRWEHDOORZHGWR
sit for more than 1 hour before or after cooking. Room
WHPSHUDWXUHSURPRWHVWKHJURZWKRIKDUPIXOEDFWHULD%H
sure that the oven light is off because heat from the bulb
will speed harmful bacteria growth.
USING THE OVEN

49-2000712 Rev. 0 9
Set Clock
This feature allows you to set the clock and specifies
how the time of day will be displayed. Options are for a
standard 12-hour clock with AM and PM selections or
24-hour military time display.
Lock Control
Select this option in order to lock the LCD from any
undesired screen selections. To unlock the screen, press
and press Unlock on the next screen.
Sabbath
Sabbath mode disables the oven lights (the oven light
will not turn on when the door is opened), all sounds
(the control will not beep when the screen is pressed),
&RQYHFWLRQPRGHV%URLOPRGHV:DUP3URRIDQGDOOWLPH
functions. Sabbath mode can only be used with traditional
%DNH7KLVIHDWXUHFRQIRUPVWRWKH6WDU.-HZLVK6DEEDWK
requirements. Please reference the Sabbath Mode section
for more information.
Sound
This setting screen allows you to change the volume, the
end of cycle tone, and turn on or off the touch sound.
Display
This screen shows the options for brightness, clock off,
and energy saver. Clock off will remove the clock from the
display when the screen is inactive, but it will be shown
after pressing the screen.
Cooking
Ŷ The oven is set to Fahrenheit, however, in this setting
the cooking unit can be changed to Celsius.
Ŷ Auto Recipe Conversion can be turned on in order
to automatically reduce the programmed cooking
WHPSHUDWXUHIRU&RQYHFWLRQ%DNHRU&RQYHFWLRQ%DNH
Multi. Note that this will only reduce the cooking
temperature, not the baking time.
Ŷ When the 12 Hour Shut Off option is turned on, it
will automatically shut off the oven after 12 hours of
continuous use.
Ŷ Adjust Temperature allows the oven temperature to be
adjusted up to 35°F hotter or down to 35°F cooler. Use
this feature if you believe your oven temperature is too
hot or cold and wish to change it. For double ovens,
the upper and lower oven temperatures are adjusted
separately. Do not use thermometers, such as those
found in grocery stores, to check the temperature
setting of your oven. These thermometers may vary
20–40 degrees.
System
This screen allows you to clear your saved user data and
shows the current software version.
SETTINGS (Cont.)
USING THE OVEN
10 49-2000712 Rev. 0
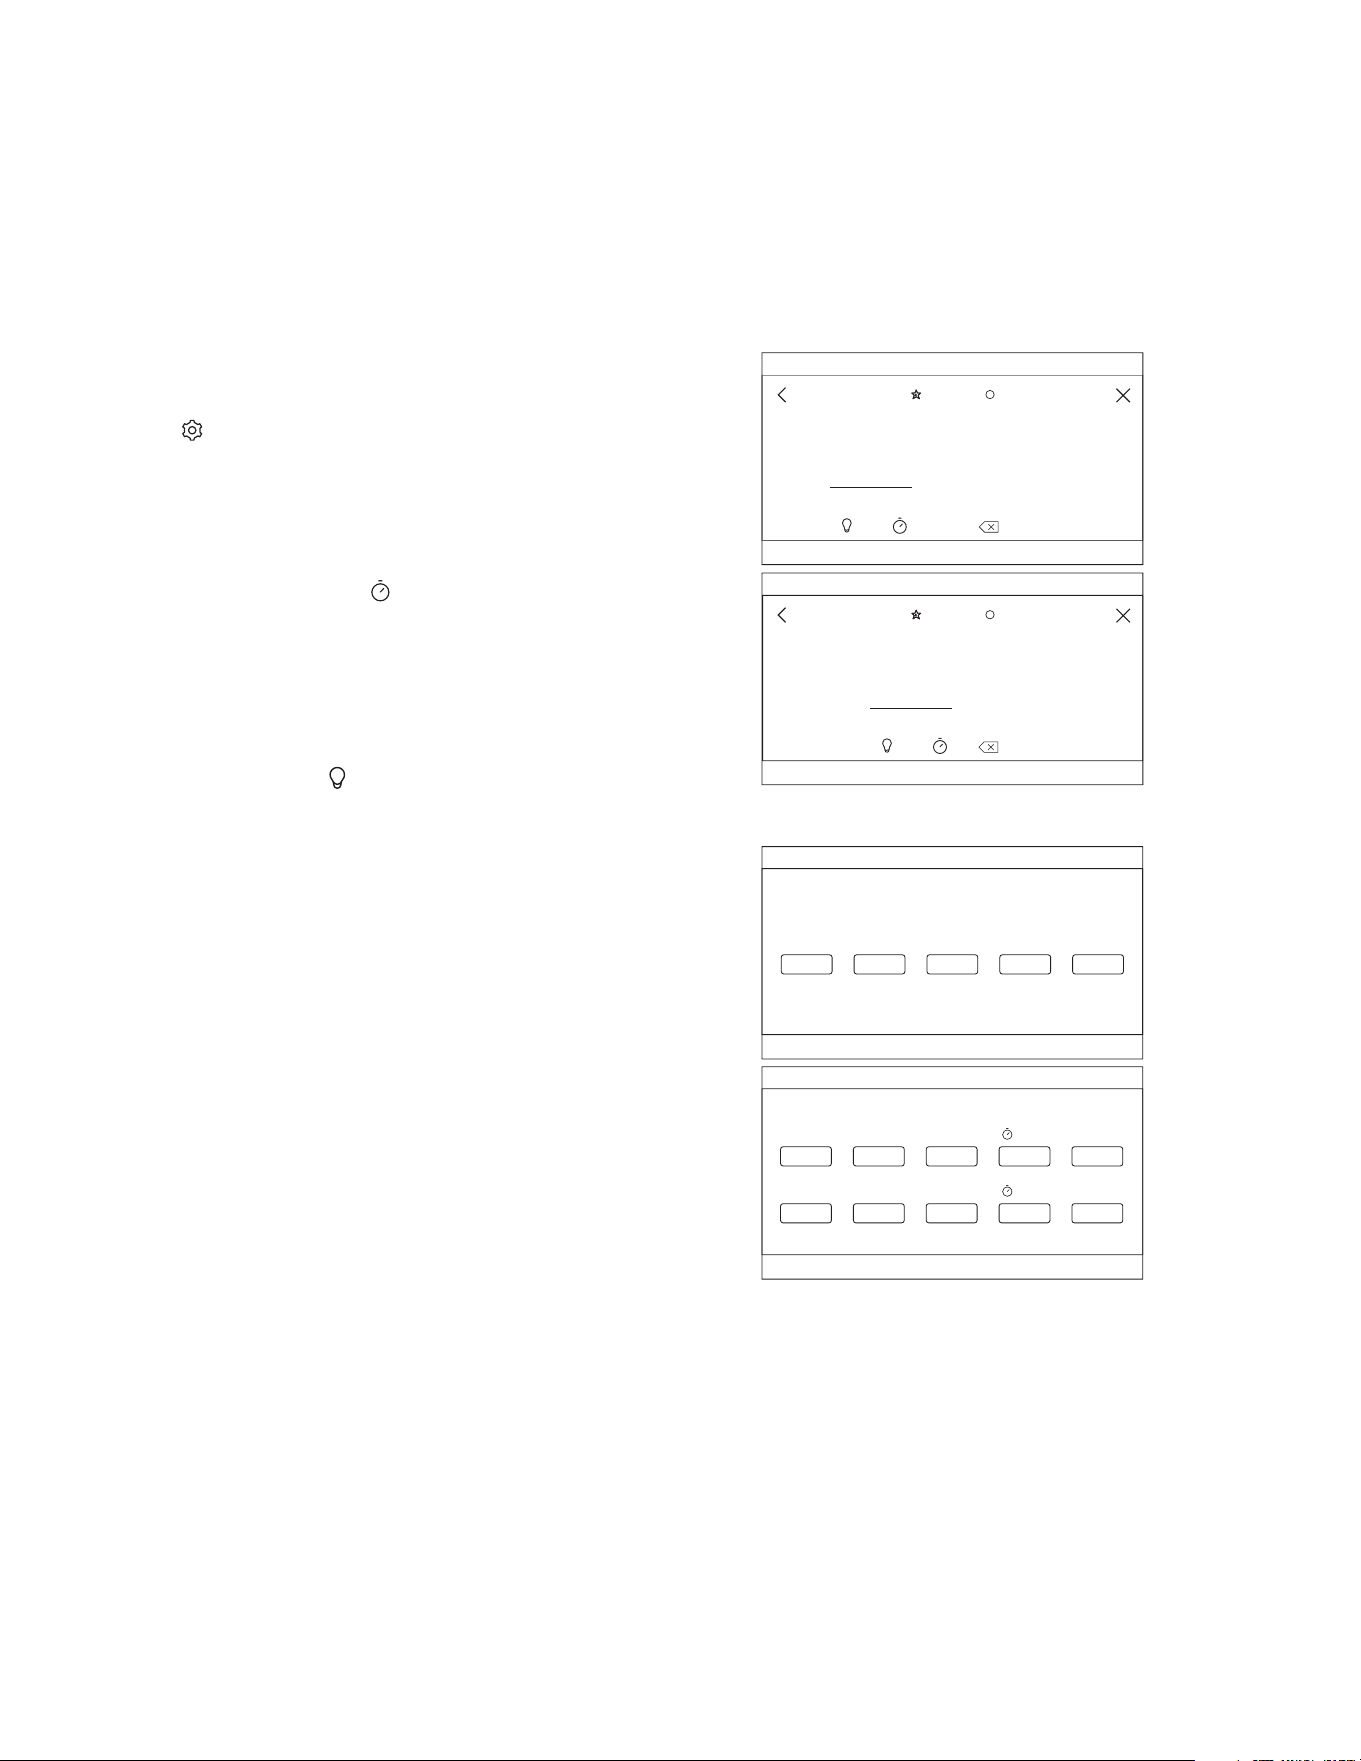
SABBATH (SAbbAtH)
Sabbath mode disables the oven lights (the oven light will not turn on when the door is opened and the notification light
EDUZLOOEHGLVDEOHGDOOVRXQGV WKHFRQWUROZLOOQRWEHHSZKHQDSDGLVSUHVVHG&RQYHFWLRQPRGHV%URLOPRGHV
:DUP3URRIDQGDOOWLPHIXQFWLRQV6DEEDWKPRGHFDQRQO\EHXVHGZLWK7UDGLWLRQDO%DNH7KLVIHDWXUHFRQIRUPVWR
WKH6WDU.-HZLVK6DEEDWKUHTXLUHPHQWV
NOTE: If a power outage occurs during when the oven is in Sabbath Mode, the unit will return to Sabbath Mode when
power is restored.
Enter the Sabbath Mode
Press the on the main screen to access the Settings
menu and scroll down to Sabbath.
Start a Sabbath Bake
Use the keypad on the screen to enter the temperature
WKDW\RXZRXOGOLNHWRXVHIRU6DEEDWK%DNH2QFHWKH
temperature is set, press the
to set the cook time for
the cycle in hours and minutes. If using a double oven,
you can then set the temperature and time desired for the
other cavity by selecting it to the left of the temperature
display. If a timer is not set, the oven will start a bake cycle
during Sabbath mode and continue until Sabbath mode is
turned off. You can also set whether the oven light will be
on or off by pressing the
on this screen. Once you have
programmed the temperature and time, press Start. The
next screen will display the settings that you programmed
IRU\RXU6DEEDWK%DNH
Adjust the Temperature During a Sabbath Bake
If the temperature needs to be adjusted after programming
WKHRYHQIRUD6DEEDWK%DNHSUHVVRQHRIWKHWHPSHUDWXUH
icons displayed on the Sabbath cycle screen and press
Enter. This will allow you to adjust the temperature for the
cycle. Note that the display will not show that the oven
temperature has been changed.
Exit the Sabbath Mode
To exit Sabbath mode, either press the X in the upper right
corner if in the programming screen, or press Exit Sabbath
if in the cycle screen. There is also an option to turn off the
cycle when on the cycle screen by pressing Turn Off, but
your oven will still remain in Sabbath mode until you exit
the mode. NOTE: If a power outage occurs while the oven
is in Sabbath Mode, the unit will return to Sabbath Mode
when power is restored, however the oven will return to the
off state even if it was in the middle of a bake cycle when
the power outage occurred.
SABBATH
ENTER TURN OFFOven On
EXIT SABBATH
12:30 PM
Select temperature, then press ENTER to edit.
200°F 250°F 300°F 350°F 400°F
SABBATH
EXIT SABBATH
Select temperature, then press ENTER to edit.
5:30ENTER TURN OFFUpper Oven On
250°F200°F 300°F 350°F 400°F
5:30ENTER TURN OFFLower Oven On
250°F200°F 300°F 350°F 400°F
12:30 PM
Programming Screens
Single and Double Oven
Sabbath Cycle Screens
12:30 PM
SABBATH
BAKE TEMP
UPPER OVEN
LOWER OVEN
123
456
789
0
i
---
°F
START
12:30 PM
SABBATH
BAKE TEMP
123
456
789
0
i
---
°F
START
USING THE OVEN
49-2000712 Rev. 0 11
USING THE OVEN
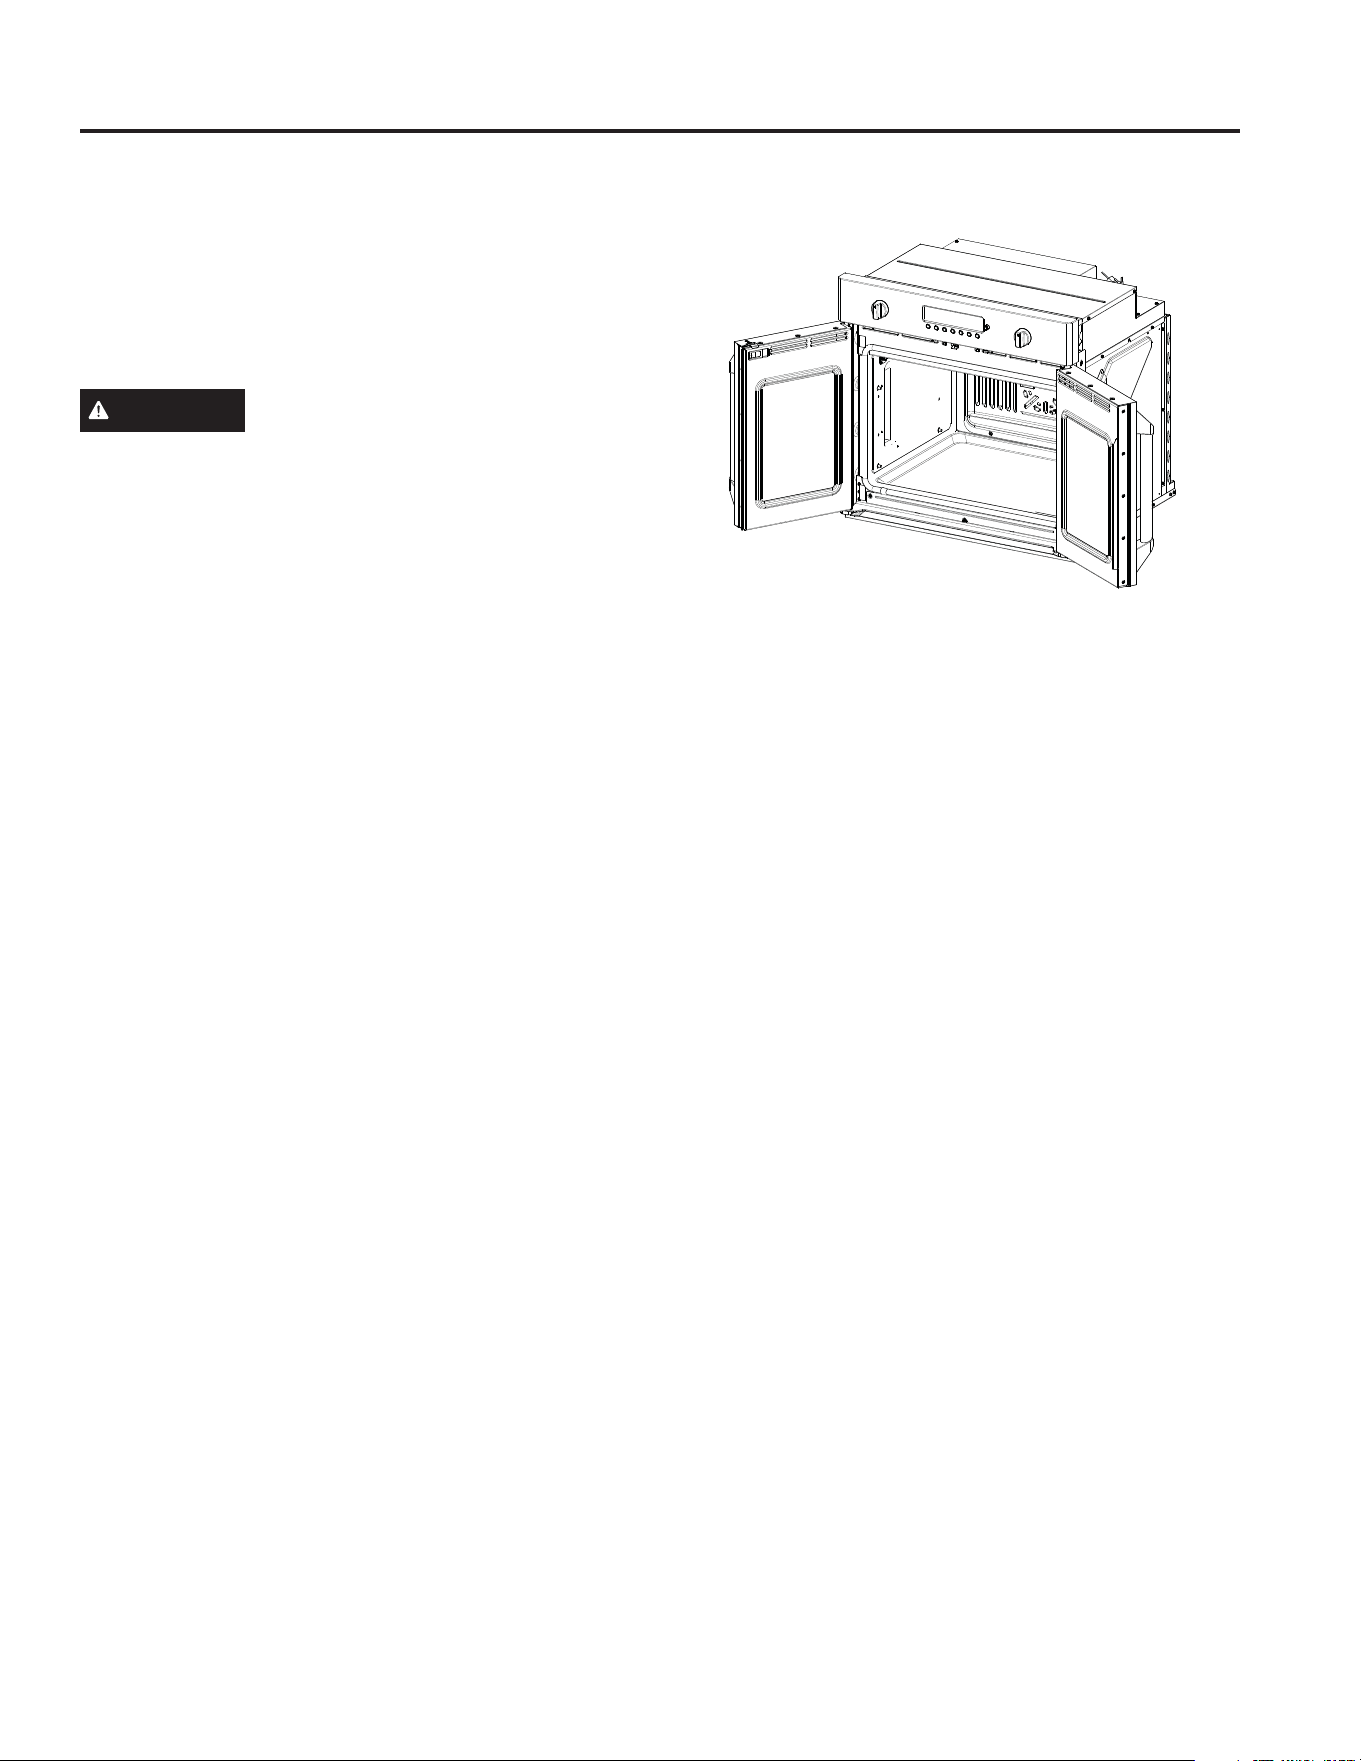
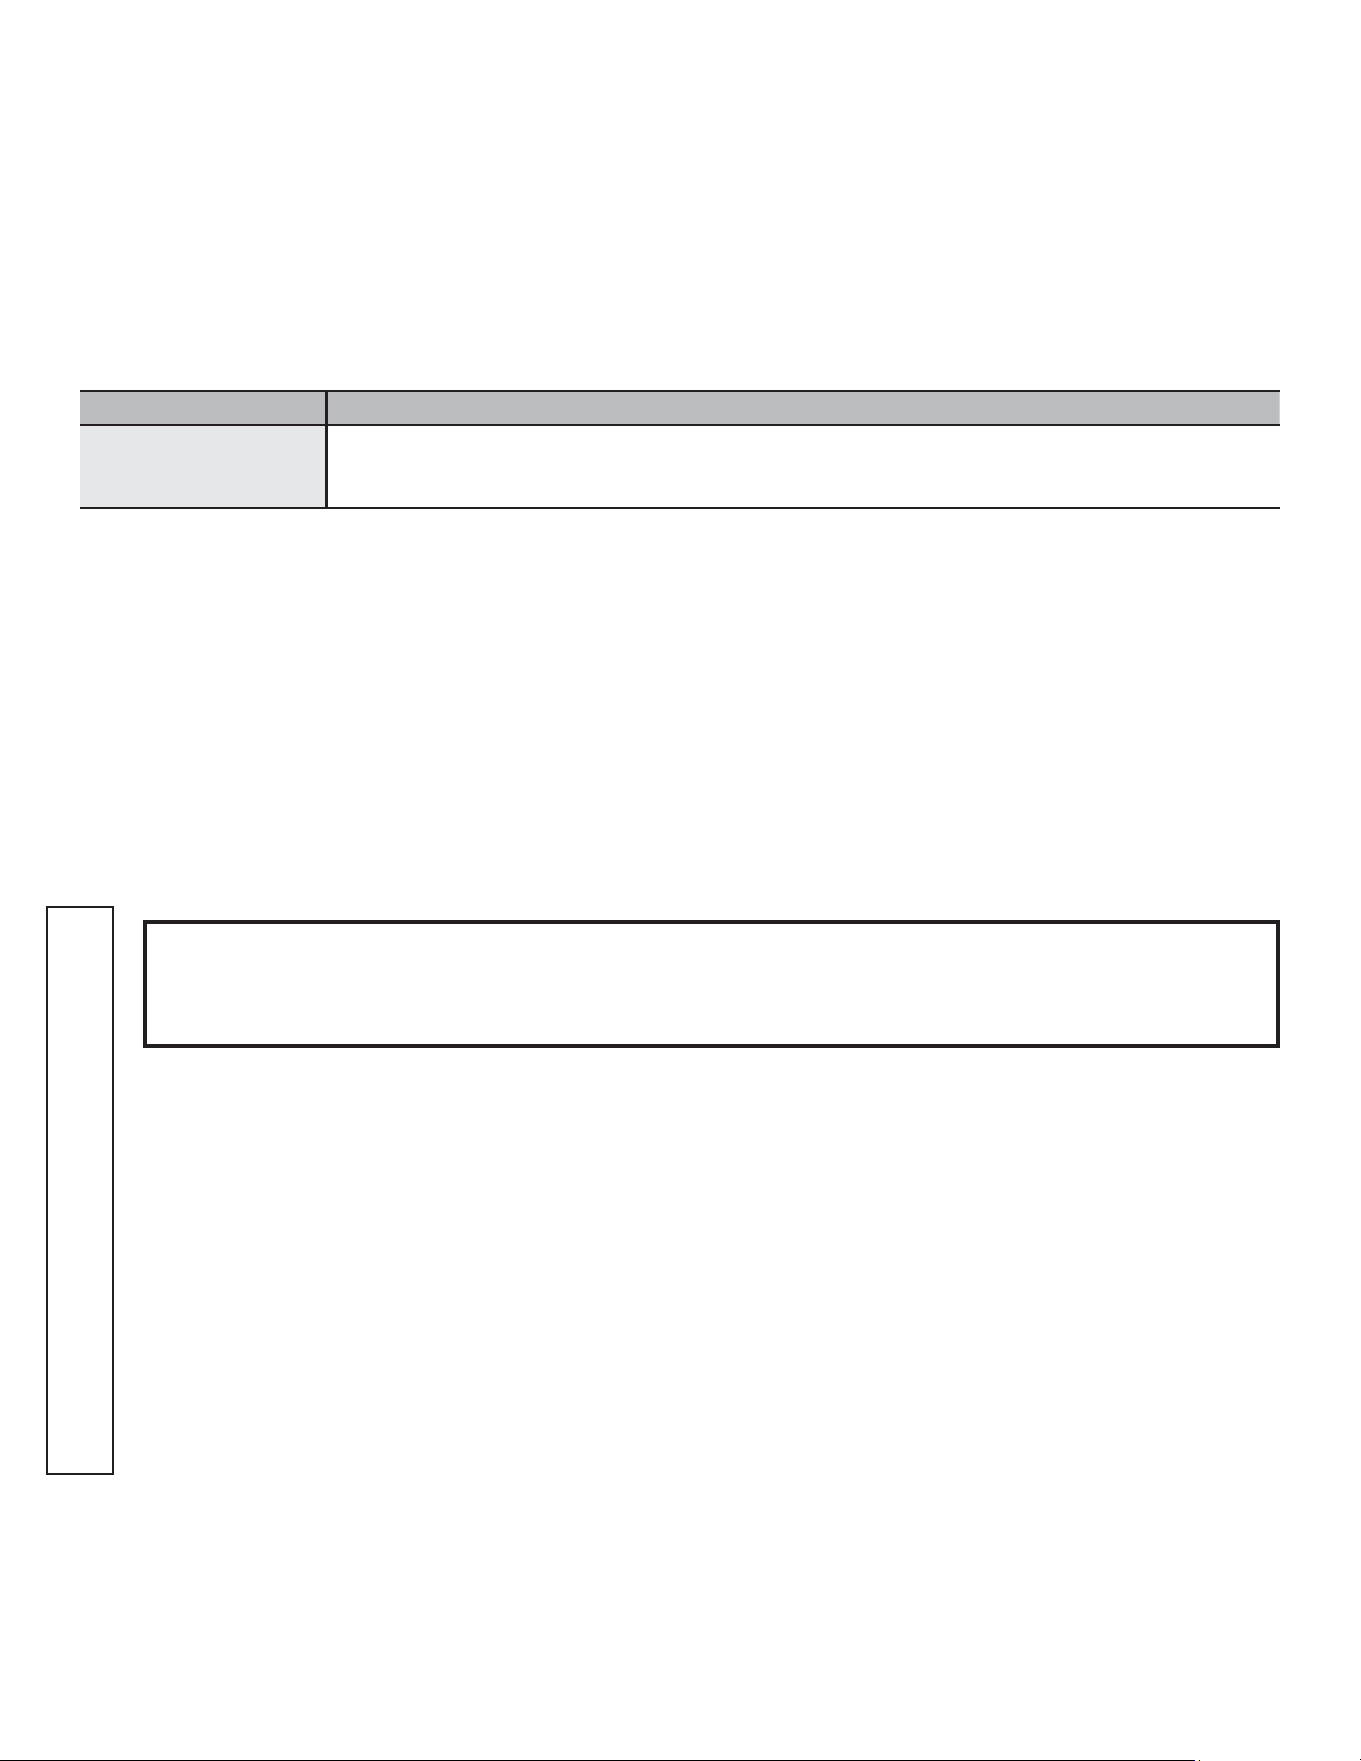
FRENCH DOORS
The French oven doors on this oven are unique. The
doors open out to the side of the unit and they open
together. Make sure that the area to each side of the
oven is clear when opening the oven doors so that the
doors can open fully and do not hit any open doors,
open drawers, or other items to the side of the oven.
Pulling on one handle will make both doors open.
CAUTION
Make sure that the doors are fully
open to prevent burning self.
Pushing on one door will make both doors close. If
pushing the doors closed with only one of the handles,
please use the left handle. The center door seal requires
the right door to close slightly before the left door.
Make sure oven doors are fully closed when cooking.
If the doors are open or not shut all the way for more
than 30 seconds during a cooking mode, the oven will
turn off and the control will ask you to close the doors
to resume cooking.
12 49-2000712 Rev. 0
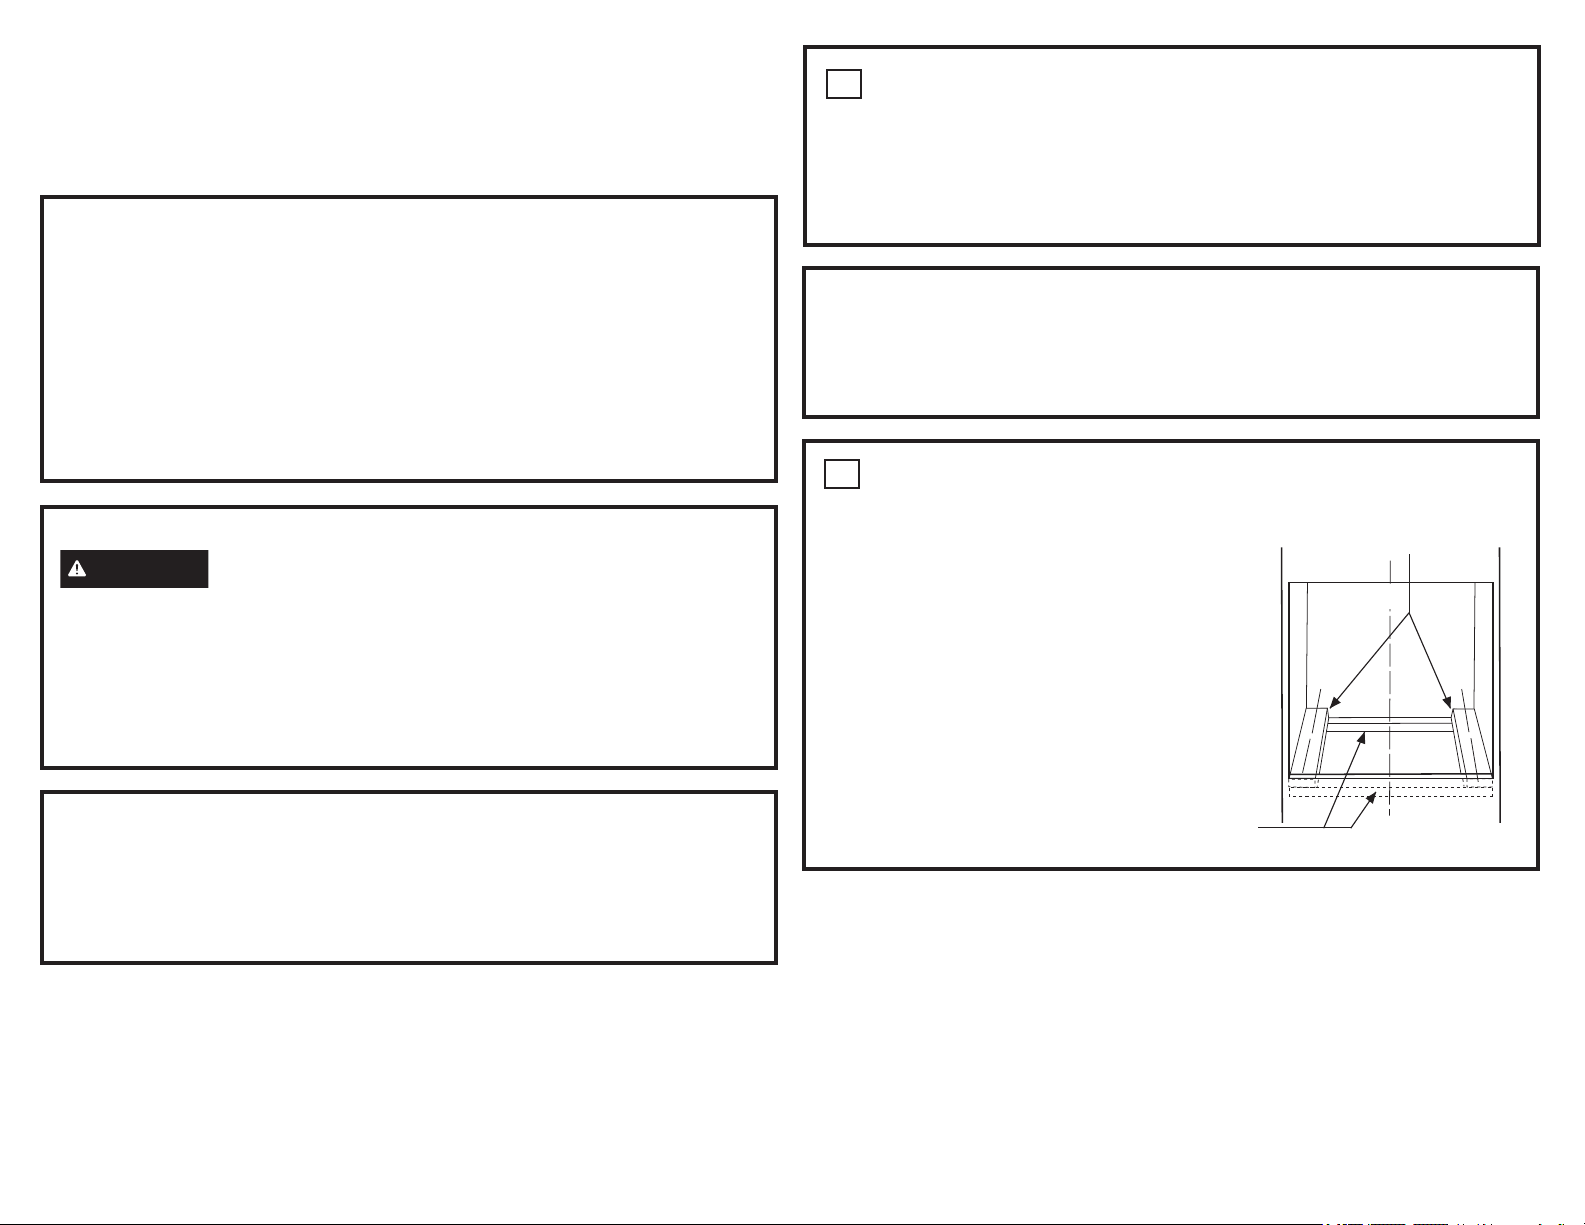
OVEN RACKS
Your oven has six rack positions. Recommended rack
positions for various types of foods are provided in the
Cooking Guide. Adjusting rack position is one way to
impact cooking results. For example, if you would prefer
darker tops on cakes, muffins, or cookies, try moving food
one rack position higher. If you find foods are too brown on
top try moving them down next time.
When baking with multiple pans and on multiple racks,
ensure there is at least 1½" between pans to allow
sufficient space for air to flow.
Your oven may have extension racks and/or traditional flat
racks.
To avoid possible burns, place the racks in the desired
position before you turn the oven on.
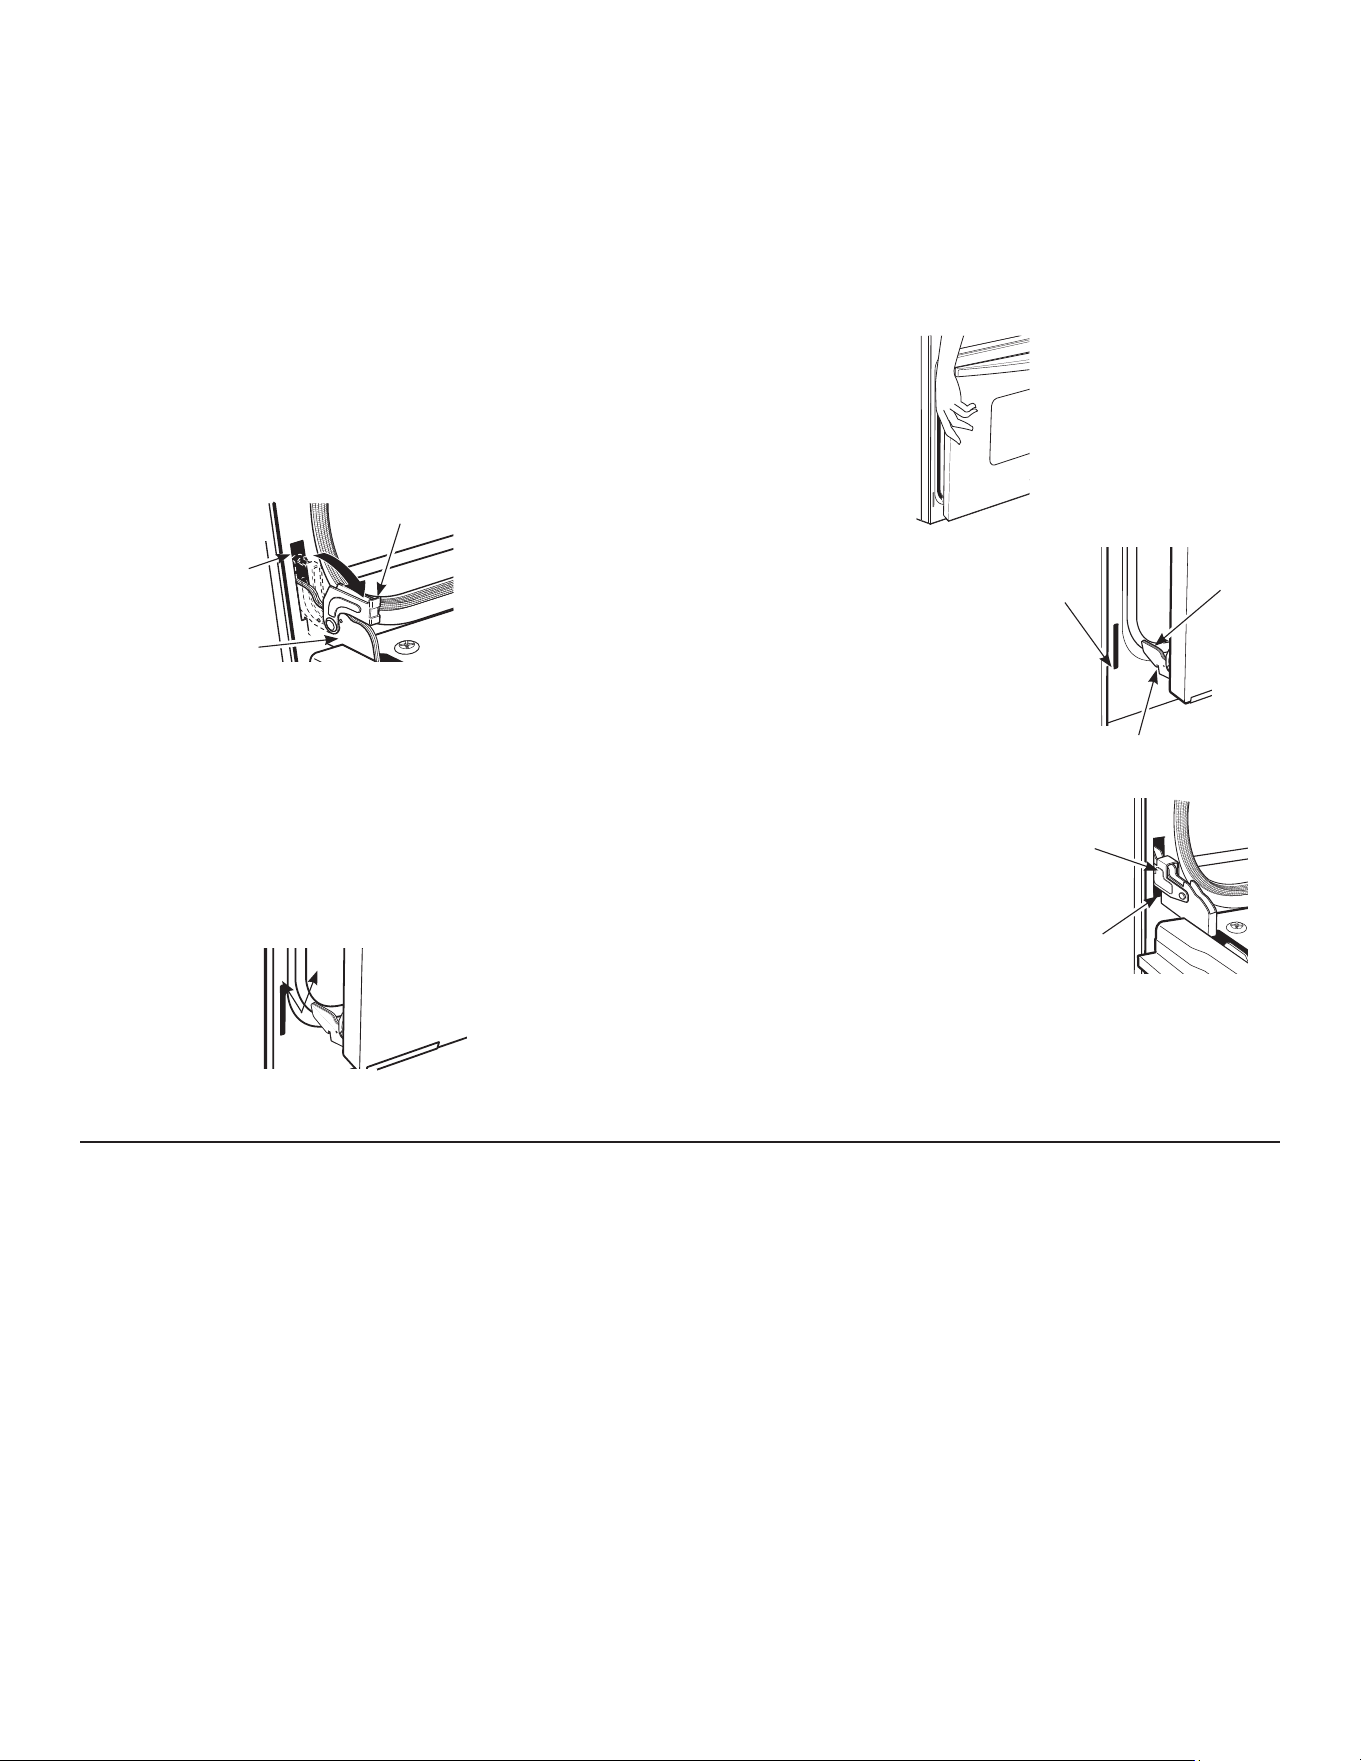
Extension Racks
Extension racks have an install feature that locks into the
rack supports (guides) on both sides. Once the install
feature is locked into place, always pull the rack out, by
its upper front rail, to its full extension stop position, when
placing or removing cookware.
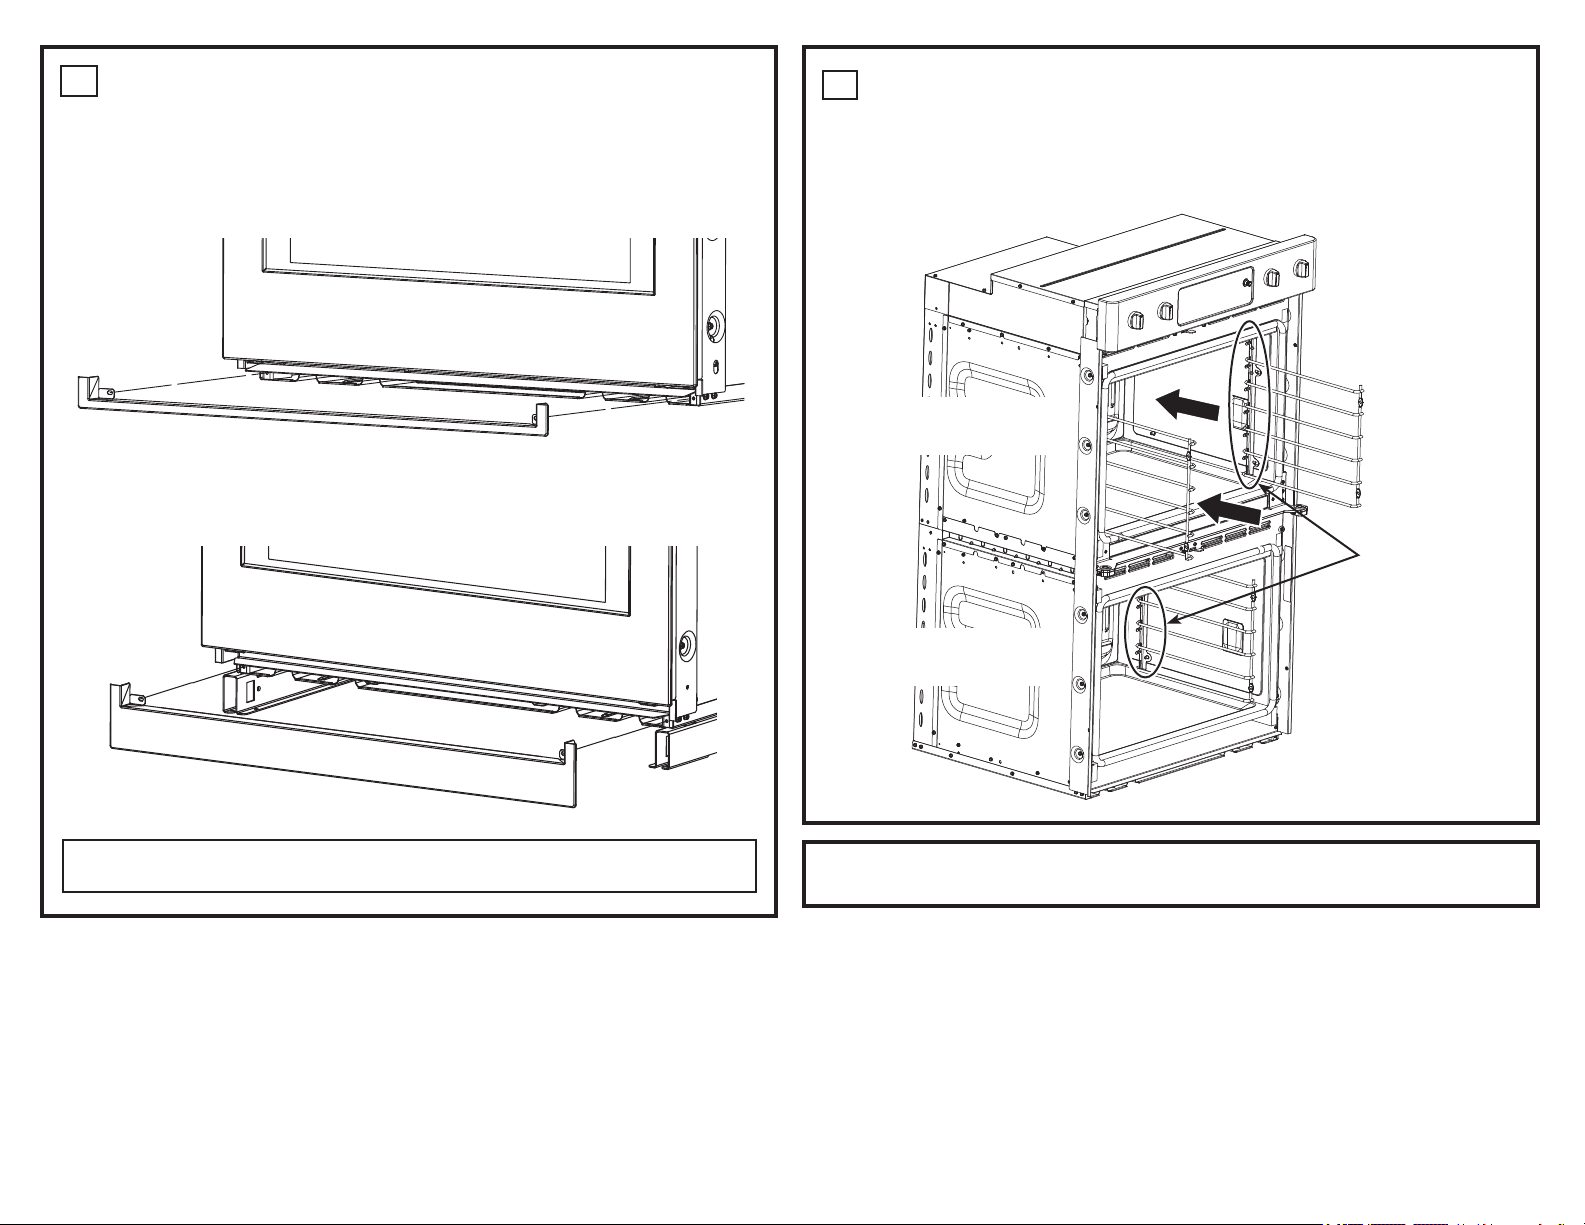
To Remove An Extension Rack:
1. Make sure the rack is pushed all the way into the oven.
2. Grasp the rack by both its upper front rail and lower
front rail and lift straight up to unlock the rack from the
rack supports.
3. Firmly holding onto both the upper front rail and lower
front rail, pull the rack forward. Grasp the rack on both
sides if necessary. Then remove it from the oven.
To Replace An Extension Rack:
1. Place the rear portion of the rack onto the rack supports
(guides) as shown in the picture.
2. Hold the upper front rail and lower front rail and push
the rack all the way in until the install feature locks
into the front rack support.
If extension racks are difficult to replace or remove, wipe
the oven rack supports with vegetable oil. Do not wipe oil
on the rack slides.
NOTE: Using other cooking oils will cause a discoloring or
a rust like color residue on the racks and cavity sides. To
clean this residue, use a soap and water or a vinegar and
water solution. Rinse with clean water and dry with a soft
cloth.
The oven
has 6 rack
positions
Lower Front Rail
Upper Front Rail
Upper Front Rack
Upper Front Rack
Lift to
unlock from
the rack
support
Install Feature
USING THE OVEN
Front
Rack Lock
Hold the upper front rail and
lower front rail and push the rack
all the way in until the install
feature locks on the front support

49-2000712 Rev. 0 13
Traditional Flat Racks
The racks have stops so that when placed correctly on the
supports they will stop before coming completely out and
will not tilt. When placing and removing cookware, pull the
rack out until it stops.
To Remove a Rack
Pull it toward you, tilt the front end up and pull it out.
To Replace a Rack
Tilt the front of the rack up, hook the rear locating posts
under the rack supports, push the rack back (past the
stoppers) and lower it into position. Push the rack all the
way in.
Racks may become difficult to slide, especially after a
self-clean. Put some vegetable oil on a soft cloth or paper
towel and rub onto the left and right edges.
NOTE: Using other cooking oils will cause a discoloring or
a rust like color residue on the racks and cavity sides. To
clean this residue, use a soap and water or a vinegar and
water solution. Rinse with clean water and dry with a soft
cloth.
CAUTION
Use caution when removing a rack from lowest position as door may be hot.
ALUMINUM FOIL AND OVEN LINERS
CAUTION
Do not use any type of foil or oven liner to cover the oven bottom. These items can trap heat or
melt, resulting in damage to the product and risk of shock, smoke or fire. Damage from improper use of these
items is not covered by the product warranty.
Foil may be used to catch spills by placing a sheet on a lower rack, several inches below the food. Do not use more foil
than necessary and never entirely cover an oven rack with aluminum foil. Keep foil at least 1-1/2” from oven walls to
prevent poor heat circulation.
Flat Rack
Stopper
Rack
Support
Locating Post
USING THE OVEN
OVEN RACKS (Cont.)

14 49-2000712 Rev. 0
COOKING MODES
Your new oven has a variety of cooking modes to help you get the best results. These modes are described below.
Refer to the Cooking Guide section for recommendations for specific foods. Remember, your new oven may perform
differently than the oven it is replacing.
Baking and Roasting Modes
Select a mode for baking and roasting based on the type
and quantity of food you are preparing. When preparing
baked goods such as cakes, cookies, and pastries always
preheat the oven first. Follow recipe recommendations for
food placement. If no guidelines are provided, center food
in the oven.
Traditional Bake
The traditional bake mode is intended for single rack
cooking. This mode uses heat primarily from the lower
element but also from the upper element to cook food.
To use this mode press the Bake pad under Traditional,
enter a temperature, and then press Start. Preheating is
generally recommended when using this mode.
Convection Bake with Direct Air
7KH&RQYHFWLRQ%DNHPRGHLVLQWHQGHGIRUVLQJOHUDFN
cooking. This mode uses heat from the lower element
and also the upper and rear elements, along with air
movement directly down from the top of the oven to
enhance evenness. Your oven is equipped with Auto
Recipe Conversion, so it is not necessary to convert
the temperature when using this mode. To use this
mode press the Bake pad under Convection, enter a
temperature, and then press Start. Preheating is generally
recommended when using this mode.
Convection Bake Multi Rack
7KH&RQYHFWLRQ%DNH0XOWL5DFNPRGHLVLQWHQGHGIRU
baking on multiple racks at the same time. This mode uses
heat primarily from the rear element but also heat from
the upper and lower elements, along with air movement
from the convection fan to enhance cooking evenness.
Your oven is equipped with Auto Recipe Conversion, so
it is not necessary to convert the temperature when using
WKLVPRGH%DNLQJWLPHPLJKWEHVOLJKWO\ORQJHUIRUPXOWLSOH
racks than what would be expected for a single rack. To
use this mode press the Bake Multi Rack pad under
Convection, enter a temperature, and then press Start.
Always preheat when using this mode.
Convection Roast with Direct Air
The Convection Roast mode is intended for roasting
whole cuts of meat on a single rack. This mode uses
heat from the lower, upper, and rear elements along with
air movement directly down from the top of the oven
to improve browning and reduce cooking time. It is not
necessary to convert temperature. Check food earlier than
the recipe suggested time when using this mode, or use
the probe. To use this mode press the Roast pad under
Convection, enter a temperature, and then press Start. It
is not necessary to preheat when using this mode.
Broiling Modes
Always broil with the door closed. The broil element in this
oven is very powerful. Monitor food closely while broiling.
Use caution when broiling on upper rack positions as
placing food closer to the broil element increases smoking,
spattering, and the possibility of fats igniting. Broiling on
rack position 6 is not recommended.
Try broiling foods that you would normally grill. Adjust
rack positions to adjust the intensity of the heat to the
food. Place foods closer to the broil element when a
seared surface and rare interior is desired. Thicker foods
and foods that need to be cooked through should be
broiled on a rack position farther from the broiler or by
XVLQJ7UDGLWLRQDO%URLO/RRU&RQYHFWLRQ%URLO/R)RUEHVW
performance, center food below the broil heating element.
Traditional Broil Hi
7KH7UDGLWLRQDO%URLO+LPRGHXVHVLQWHQVHKHDWIURP
WKHXSSHUHOHPHQWWRVHDUIRRGV8VH%URLO+LIRUWKLQQHU
cuts of meat and/or foods you prefer less done on the
interior. To use this mode press the Broil pad once under
Traditional and then press Start. It is not necessary to
preheat when using this mode.
Traditional Broil Lo
7KH7UDGLWLRQDO%URLO/RPRGHXVHVOHVVLQWHQVHKHDWIURP
the upper element to cook food thoroughly while also
SURGXFLQJVXUIDFHEURZQLQJ8VH%URLO/RIRUWKLFNHUFXWV
of meat and/or foods that you would like cooked all the
way through. To use this mode press the Broil pad twice
under Traditional and then press Start. It is not necessary
to preheat when using this mode.
USING THE OVEN
49-2000712 Rev. 0 15
COOKING MODES (Cont.)
Convection Broil Hi with Direct Air
7KH&RQYHFWLRQ%URLO+LPRGHXVHVLQWHQVHKHDWIURPWKH
upper element along with air movement directly down from
the top of the oven for improved searing and browning. To
use this mode press the Broil pad once under Convection
and then press Start. For best results preheat 5 minutes
when using this mode.
Convection Broil Lo with Direct Air
7KH&RQYHFWLRQ%URLO/RPRGHXVHVOHVVLQWHQVHKHDWIURP
the upper element along with air movement directly down
from the top of the oven. To use this mode press the Broil
pad twice under Convection and then press Start. For
best results preheat 5 minutes when using this mode.
Air Fry
This mode is a special convection mode that is designed to
produce foods with a crispier exterior than traditional oven
cooking. The Air Fry mode uses hot, fast-moving air directed
from above the food and is intended for single rack baking
only. Select More, then Air Fry, then input the desired set
temperature and press Start. The temperature can be set
between 300°F and 500°F. Preheating is not necessary
for this mode. Follow recipe or package guidelines for set
temperatures and cook times; adjust cook time to achieve
your desired crispness. Additional guidelines for using this
mode can be found in the Cooking Guide.
Proof
Proof mode is designed for rising (fermenting and proofing)
bread doughs. Press the Proof pad and then press Start.
&RYHUGRXJKZHOOWRSUHYHQWGU\LQJRXW%UHDGZLOOULVH
more rapidly than at room temperature.
Warm
Warm mode is designed to keep hot foods hot for up to 3
hours. To use this mode, press the Warm pad then press
Start. Cover foods that need to remain moist and do not
cover foods that should be crisp. Preheating is not required.
Do not use warm to heat cold food other than crisping
crackers, chips or dry cereal. It is also recommended that
food not be kept warm for more than 2 hours.
Precision Cooking
These modes provide guidance or pre-set cooking
algorithms to assist the user in cooking various types of
food. The selection you make in the Precision Cooking
menu will guide you
to input the information required to
help cook your food. At the end of estimated cooking time,
check the food to see if it is done to your liking. Note that
differences in food shape, preparation and preferences for
doneness can impact the time required to cook the food.
Some cycles require the food temperature probe supplied
with your oven. The target temperature for the probe is
automatically set based on selections made for each food.
Always check foods using a secondary food thermometer
as probe placement can impact the measured temperature.
See Probe section for more details on using and
positioning the probe properly.
On some screens
i
will show up. Press
i
to access
additional information that pertains to the cooking cycles
within the category.
Additional cycles will be available through software
updates. Connect your oven to have access to these
updates. See the WiFi Connect section for details on how
to connect your oven.
USING THE OVEN

16 49-2000712 Rev. 0
WARNING
Consuming undercooked food can result in foodborne illness. Use probe according to
the following instructions to ensure all portions of the food reach minimum safe cooking temperatures.
Recommendations for minimum safe food temperatures can be found at foodsafety.gov or IsItDoneYet.gov.
Always check the temperature at multiple locations in the food with a food thermometer after cooking to ensure
that all portions of the food have reached the minimum safe internal temperature for that food.
Proper Probe Placement
After preparing the meat and placing it on the cooking pan
follow these instructions for proper probe placement.
Ŷ ,QVHUWWKHSUREHLQWRWKHIRRGVRWKDWWKHWLSRIWKH
probe will rest in the center of the thickest part of
the food. For best performance the probe should
be fully inserted into the food. If the probe is not
located properly, it may not accurately measure the
temperature of the coolest portion of the food. Some
foods, particularly small items, are not well suited for
FRRNLQJZLWKWKHSUREHGXHWRWKHLUVKDSHRUVL]H
Ŷ 7KHSUREHVKRXOGQRWWRXFKERQHIDWRUJULVWOH
Ŷ )RUZKROHSRXOWU\LQVHUWWKHSUREHLQWRWKHWKLFNHVWSDUW
of the breast.
Ŷ )RUERQHOHVVURDVWVLQVHUWWKHSUREHLQWRWKHFHQWHURI
the roast.
Ŷ )RUERQHLQKDPRUODPELQVHUWWKHSUREHLQWRWKH
center of the lowest large muscle or joint.
Ŷ )RUFDVVHUROHVRUGLVKHVVXFKDVPHDWORDILQVHUWWKH
probe into the center of the dish.
Ŷ )RUILVKLQVHUWWKHSUREHIURPMXVWDERYHWKHJLOOLQWR
the meatiest area, parallel to the backbone.
Probe Usage
To use the probe without preheating:
1. Insert the probe into the food (see Proper Probe
Placement).
2. Place the food in the oven and connect the probe into
the probe outlet in the oven.
3. Select the desired cooking mode and temperature.
%HIRUHSUHVVLQJVWDUWSUHVVWKHProbe icon at the bottom
right of the screen. The probe setting screen will be
displayed. Enter the desired internal food temperature
and press Start. The probe temperature can be set
between 100°F and 200°F.
To use the probe with preheating:
1. Press the desired cook mode (Traditional Bake,
Convection Bake, or Convection Roast) pad and enter
the desired cooking temperature.
2. Insert the probe into the food (see Proper Probe
Placement).
3. Once the oven is preheated, place the food in the oven
and connect the probe to the probe outlet, making sure
it is fully inserted. Use caution, the oven walls and
probe outlet are hot.
4. The oven will detect that the probe has been inserted
and the probe setting screen will be displayed. Enter
the desired internal food temperature and press Start.
The probe temperature can be set between 100°F and
200°F.
Probe Care Guidelines
NOTE: some double oven models have a probe in the
upper oven only.
Ŷ 8VHRISUREHVRWKHUWKDQWKHRQHSURYLGHGZLWKWKLV
product may result in damage to the probe.
Ŷ 8VHWKHKDQGOHVRIWKHSUREHDQGSOXJZKHQLQVHUWLQJ
and removing them from the meat and outlet
Ŷ 7RDYRLGGDPDJLQJ\RXUSUREHGRQRWXVHWRQJVWRSXOO
on the cable when removing it.
Ŷ 7RDYRLGEUHDNLQJWKHSUREHPDNHVXUHIRRGLV
completely defrosted before inserting the probe.
Ŷ 7RSUHYHQWSRVVLEOHEXUQVGRQRWXQSOXJWKHSUREH
from the outlet until the oven has cooled.
Ŷ 1HYHUOHDYHWKHSUREHLQVLGHWKHRYHQGXULQJDVHOIRU
steam clean cycle.
Ŷ 'RQRWVWRUHWKHSUREHLQWKHRYHQ
USING THE OVEN
PROBE
Internal food temperature is frequently used as an indicator of doneness, especially for roasts and poultry. The Probe mode
monitors the internal food temperature and turns the oven off when the internal food temperature reaches the programmed
temperature.
49-2000712 Rev. 0 17
Cookware Guidelines
7KHPDWHULDOILQLVKDQGVL]HRIFRRNZDUHDIIHFWEDNLQJ
performance.
Dark, coated and dull pans absorb heat more readily than
light, shiny pans. Pans that absorb heat more readily can
result in a browner, crisper, and thicker crust. If using dark
and coated cookware check food earlier than minimum
cook time. If undesirable results are obtained with this type
of cookware consider reducing oven temperature by 25º F
next time.
Shiny pans can produce more evenly cooked baked goods
such as cakes and cookies.
Glass and ceramic pans heat slowly but retain heat well.
These types of pans work well for dishes such as pies and
custards.
Air insulated pans heat slowly and can reduce bottom
browning.
Keep cookware clean to promote even heating.
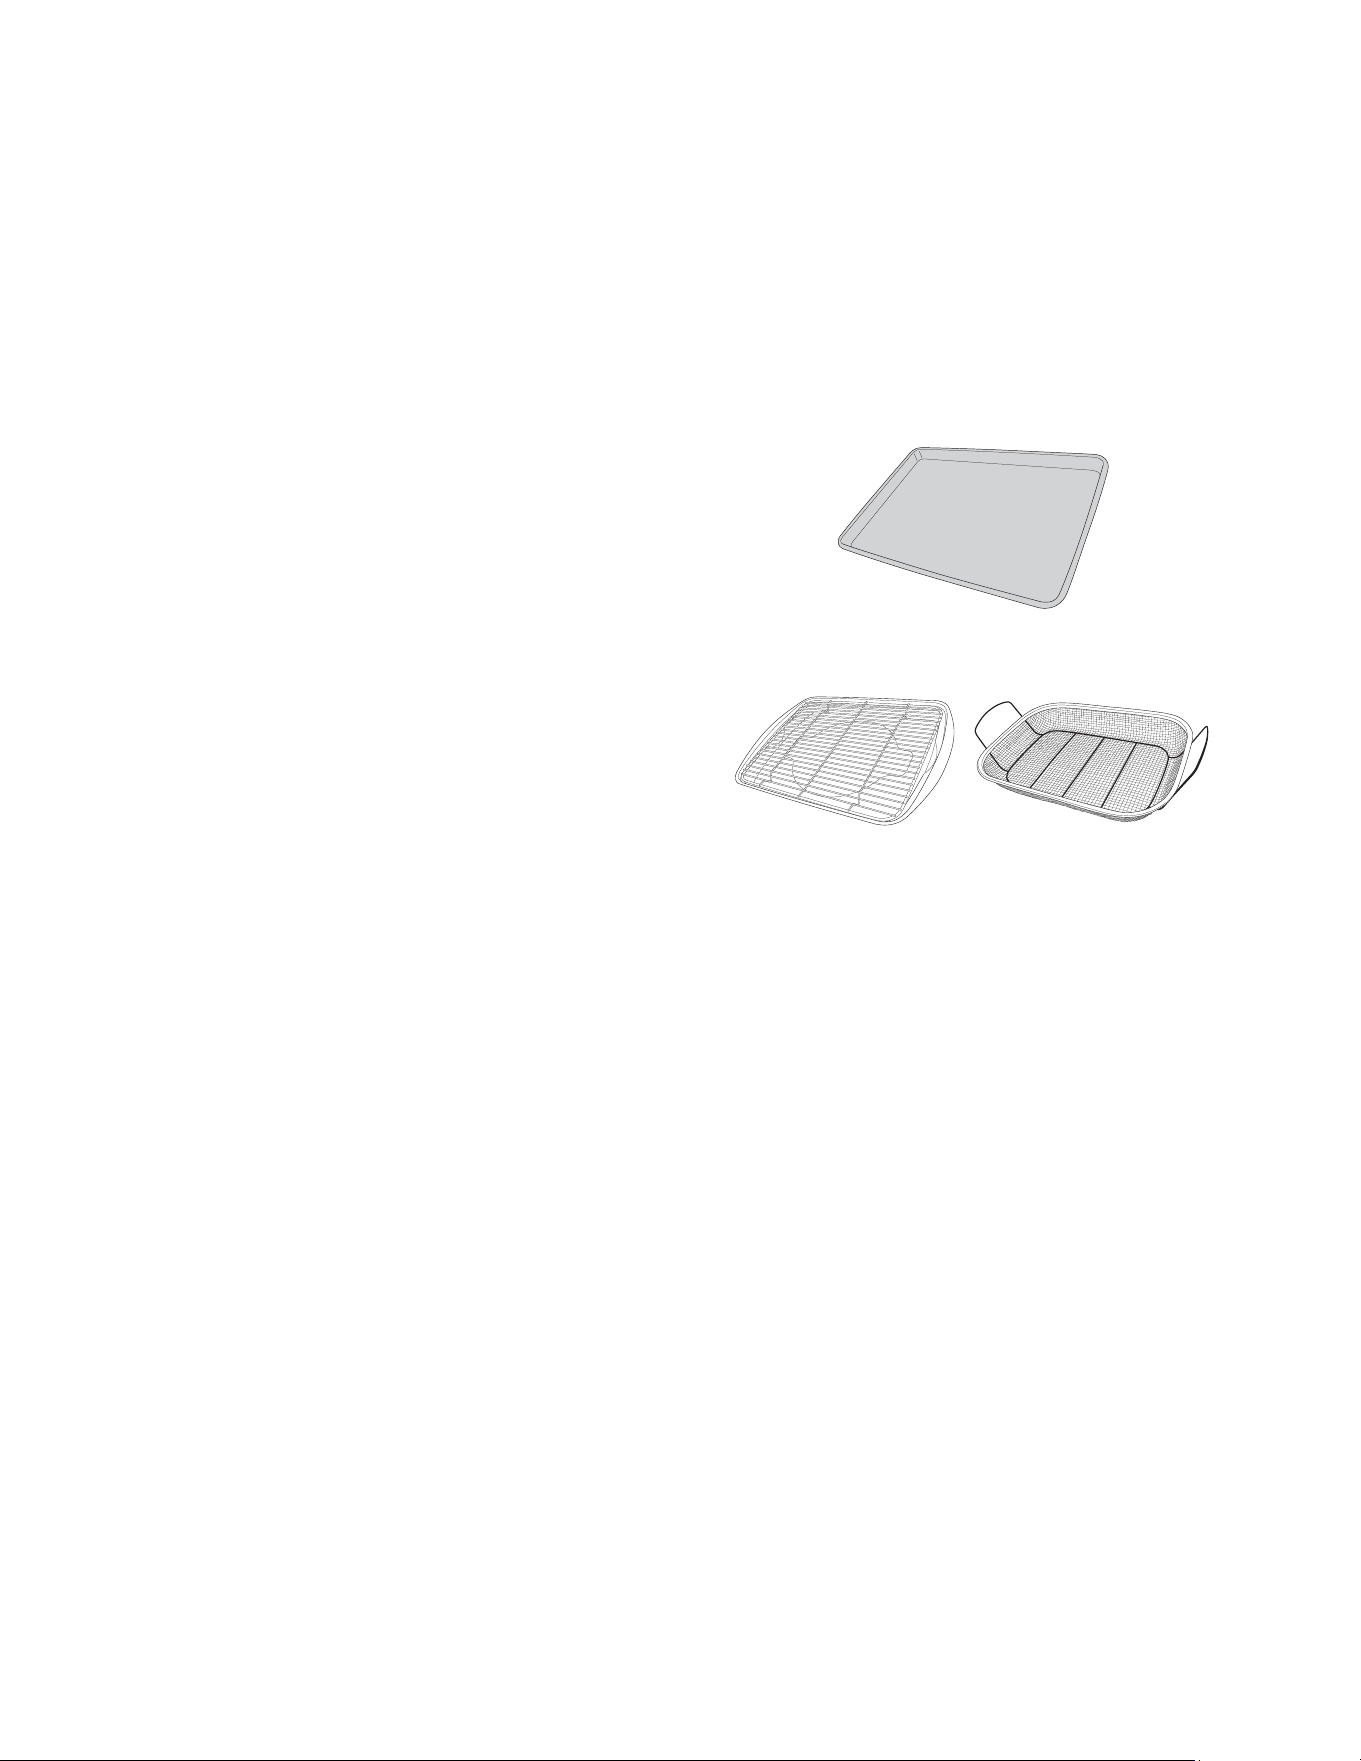
Air Fry Cookware
Only use broil safe cookware when using Air Fry mode. A
dark surface, solid baking pan with low rimmed sides, such
as a sheet pan, is recommended for use with Air Fry. The
darker pan surface promotes better browning and crisping.
Oven baking baskets and baking grids can also be used,
but a sheet pan should be placed on the rack below the
foods to catch any drippings when using a baking basket.
Primary recommended cookware
Alternate cookware options
USING THE OVEN
COOKWARE
18 49-2000712 Rev. 0
FOOD TYPE
RECOMMENDED
MODE(S)
RECOMMENDED
RACK POSITION(S) ADDITIONAL SUGGESTIONS
Baked Goods
Layer cakes, sheet cakes,
bundt cakes, muffins, quick
breads on a Single Rack
&RQYHFWLRQ%DNH
7UDGLWLRQDO%DNH
3 Use shiny cookware.
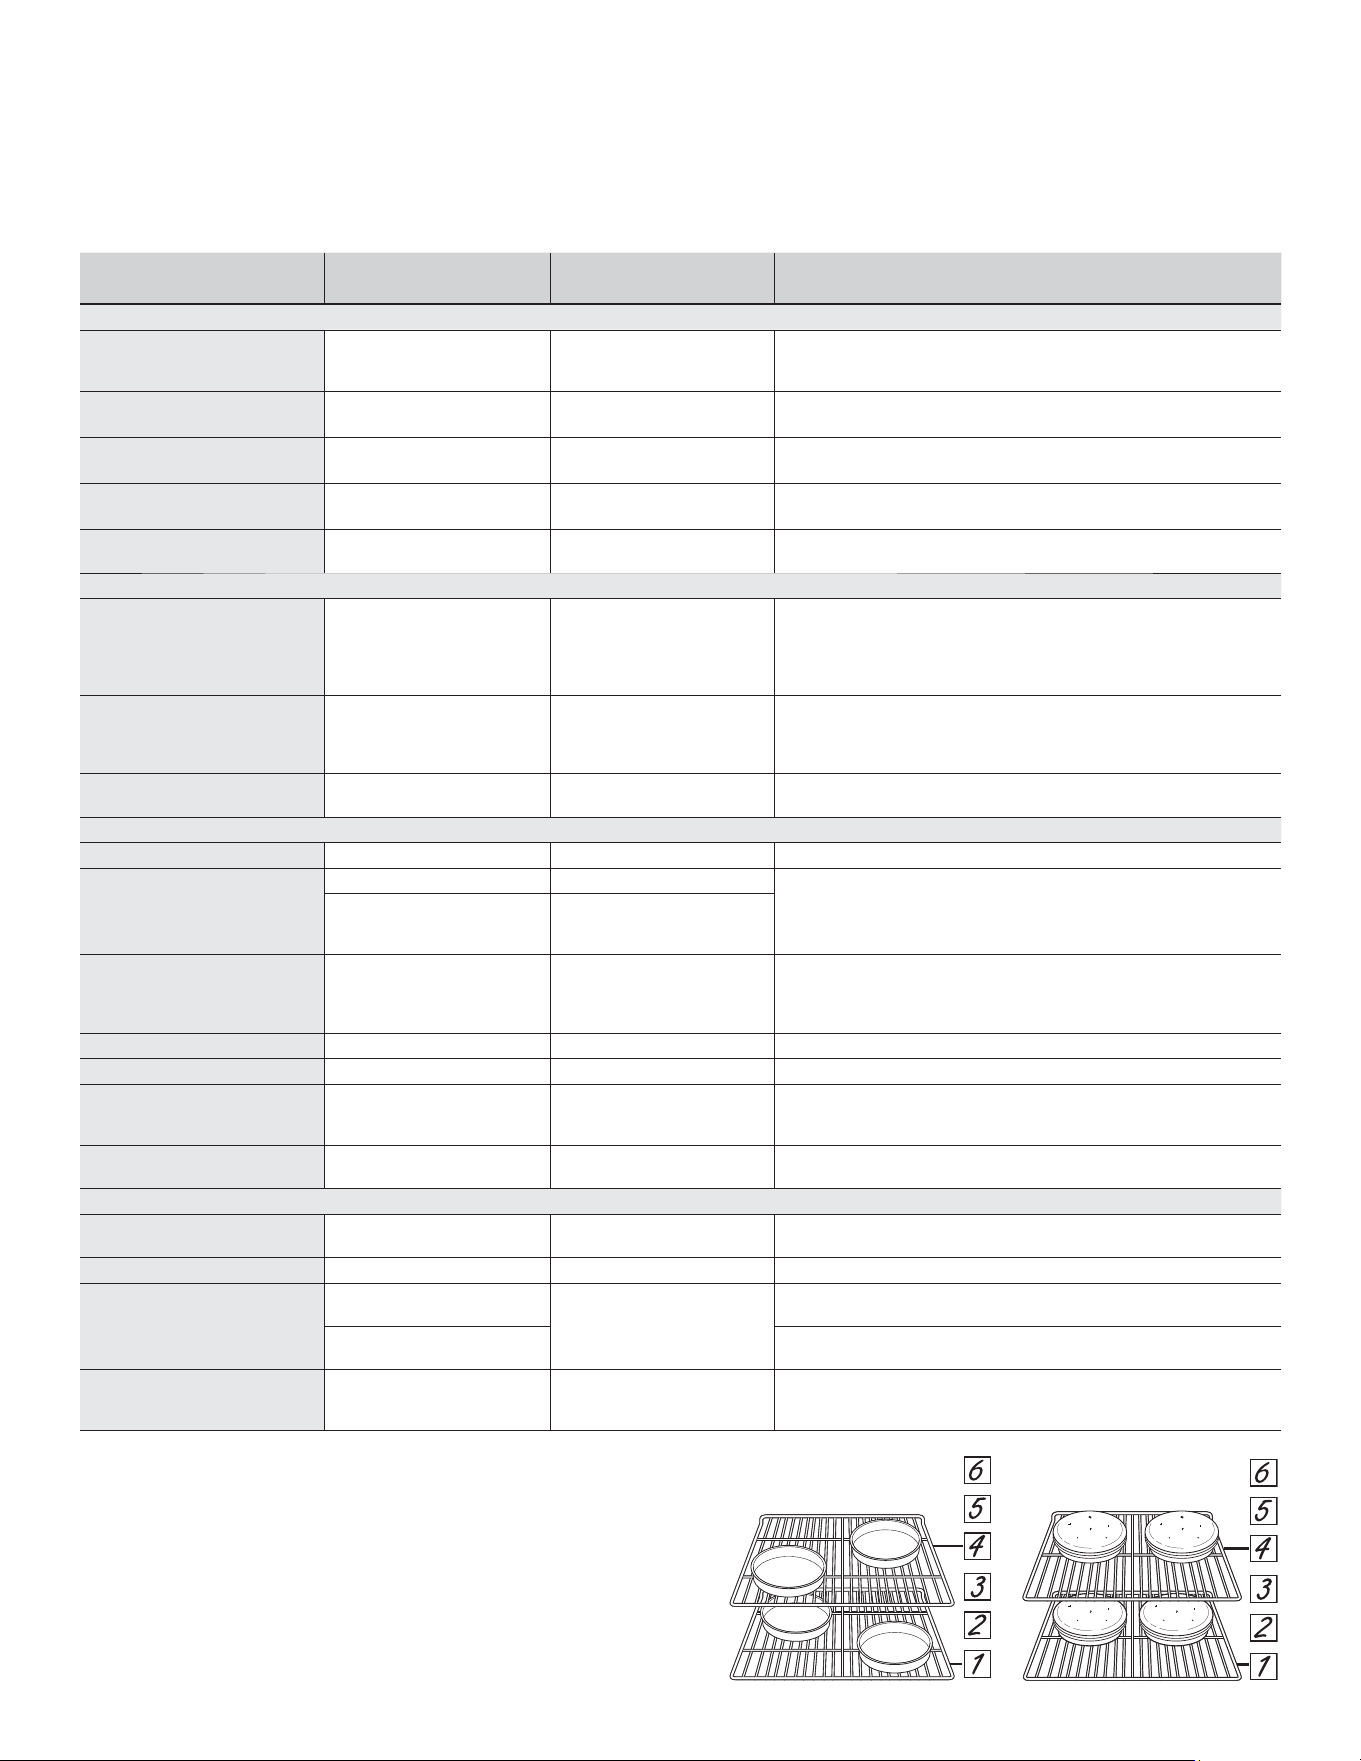
Layer cakes* on Multiple Racks
&RQYHFWLRQ%DNH0XOWL5DFN
7UDGLWLRQDO%DNH
1 and 4 extension Ensure adequate airflow (see illustration below).
Chiffon cakes (angel food)
&RQYHFWLRQ%DNH
7UDGLWLRQDO%DNH
1 Use shiny cookware.
Cookies, biscuits, scones on a
Single Rack
&RQYHFWLRQ%DNH 3 Use shiny cookware.
Cookies, biscuits, scones on
Multiple Racks
&RQYHFWLRQ%DNH
Multi Rack
1 and 4 extension
1, 3 and 5
Flat rack position 5 for 3 racks. Ensure adequate airflow.
Beef & Pork
Hamburgers 7UDGLWLRQDO%URLO+L 5
Use extension rack; for patties spaced equally on broil pan grid to get a
well seared exterior and a rare interior cook the first side approximately
3 minutes and cook the second side approximately 4 minutes. Move
food down for more doneness/less searing. For best performance,
center food below the broil heating element.
Steaks & Chops
&RQYHFWLRQ%URLO+L
7UDGLWLRQDO%URLO+L
5
8VHDEURLOSDQ3UHKHDWPLQXWHVLIXVLQJ&RQYHFWLRQ%URLO0RGH
Move food down for more doneness/less searing. Watch food closely
when broiling. For best performance, center food below the broil
heating element.
Roasts Convection Roast 2 or 3
Use a low sided pan such as a broil pan. Preheating is not necessary.
Use probe feature.
Poultry
Whole chicken Convection Roast 2 or 3 Use a low sided pan such as a broil pan. Use probe feature.
%RQHLQFKLFNHQEUHDVWVOHJV
thighs
%URLO+L 1
,IEUHDGHGRUFRDWHGLQVDXFHDYRLG%URLO+LPRGHV%URLOVNLQVLGH
down first. Watch food closely when broiling. For best performance
when broiling, center food below the broil heating element.
%URLO/R
&RQYHFWLRQ%DNH
7UDGLWLRQDO%DNH
3
%RQHOHVVFKLFNHQEUHDVWV
&RQYHFWLRQ%URLO/R
&RQYHFWLRQ%DNH
7UDGLWLRQDO%DNH
3
3UHKHDWPLQXWHVLIXVLQJ&RQYHFWLRQ%URLO0RYHIRRGGRZQIRUPRUH
doneness/less searing and up for greater searing/browning when
broiling. For best performance when broiling, center food below the
broil heating element.
Whole turkey Convection Roast 1 or 2 Use a low sided pan such as a broil pan. Use the probe feature.
7XUNH\%UHDVW Convection Roast 2 or 3 Use a low sided pan such as a broil pan. Use the probe feature.
Fish
&RQYHFWLRQ%URLO/R
%URLO/R
5 (1/2 thick or less)
4 (>1/2 inch)
3UHKHDWPLQXWHVZKHQ&RQYHFWLRQ%URLOLQJ:DWFKIRRGFORVHO\ZKHQ
broiling. For best performance, center food below the broil heating
element.
Casseroles
&RQYHFWLRQ%DNH
7UDGLWLRQDO%DNH
3
8VH&RQYHFWLRQ%URLO&ULVSPRGHGXULQJODVWPLQXWHVRIEDNLQJWR
melt/brown cheese or crisp surface.
Frozen Convenience Foods
3L]]DRQD6LQJOH5DFN
&RQYHFWLRQ%DNH
7UDGLWLRQDO%DNH
3 Use shiny cookware.
3L]]DRQ0XOWLSOH5DFNV &RQYHFWLRQ%DNH0XOWL 1 and 4 extension Use shiny cookware.
Potato products, chicken
QXJJHWVDSSHWL]HUVRQVLQJOH
racks
&RQYHFWLRQ%DNH
7UDGLWLRQDO%DNH
3
Use shiny cookware when using traditional bake and convection bake.
Air Fry (on single and upper
ovens only)
Use dark cookware or cookie sheet when using Air Fry.
Potato products, chicken
QXJJHWVDSSHWL]HUVRQPXOWLSOH
racks
&RQYHFWLRQ%DNH0XOWL 1 and 4 extension
Use shiny cookware. Switch food location partially through cooking for
more even cooking results.
*When baking four cake layers at a time, use racks 1 and 4
extension. Place the pans as shown so that one pan is not directly
above another. For convection bake multi, center the cakes on
each rack as shown.
Cook food thoroughly to help protect against food borne illness.
Minimum safe food temperature recommendations for food safety
can be found at IsItDoneYet.gov. Make sure to use a food
thermometer to take food temperatures.
USING THE OVEN
COOKING GUIDE
Recommended settings for many foods can also be accessed through the Precision Cooking menu on the oven display. In some
FDVHVDFXVWRPPRGHSDUWLFXODUO\WDLORUHGWRWKHVSHFL¿FIRRGVHOHFWHGLVXVHGZKHQVHOHFWLQJWKURXJKWKH3UHFLVLRQ&RRNLQJPHQX
&RQYHFWLRQ%DNH0XOWL
%DNH&RQ¿JXUDWLRQ

49-2000712 Rev. 0 19
CARE AND CLEANING
%HVXUHHOHFWULFDOSRZHULVRIIDQGDOOVXUIDFHVDUHFRROEHIRUHFOHDQLQJDQ\SDUWRIWKHRYHQ
CONTROL PANEL
To lock the controls, press in the bottom left corner and
follow instructions on the display. Instructions for unlocking
are visible when the display is locked. It’s a good idea to
wipe the control panel after each use. Clean with mild soap
and water or vinegar and water, rinse with clean water and
polish dry with a soft cloth. Do not use abrasive cleansers,
strong liquid cleansers, plastic scouring pads or oven
FOHDQHUVRQWKHFRQWUROSDQHO²WKH\ZLOOGDPDJHWKHILQLVK
OVEN EXTERIOR
Do not use oven cleaners, abrasive cleansers, strong
liquid cleansers, steel wool, plastic scouring pads, or
cleaning powders on the interior or exterior of the oven.
Clean with a mild soap and water or vinegar and water
solution. Rinse with clean water and dry with a soft cloth.
When cleaning surfaces, make sure that they are at room
temperature and not in direct sunlight.
If stain on the door vent trim is persistent, use a mild
abrasive cleaner and a sponge-scrubber for best results.
Spillage of marinades, fruit juices, tomato sauces and
basting liquids containing acids may cause discoloration
and should be wiped up immediately. Let hot surfaces
cool, then clean and rinse.
Painted Surfaces And Black Stainless Steel (on
some models)
Painted surfaces may include the door and trim around
the control panel. Clean these with soap and water or a
vinegar and water solution.
Do not use commercial oven cleaners, cleaning powders,
steel wool or harsh abrasives on any painted surface,
LQFOXGLQJ%ODFN6WDLQOHVV6WHHO
Stainless Steel - Excluding Black Stainless Steel
(on some models)
Do not use a steel wool pad; it will scratch the surface.
To clean the stainless steel surface, use warm sudsy
water or a stainless steel cleaner or polish. Always wipe
the surface in the direction of the grain. Follow the cleaner
instructions for cleaning the stainless steel surface.
&OHDQHUVZLWKR[DOLFDFLGVXFKDV%DU.HHSHUV)ULHQG6RIW
Cleanser™ will remove surface rust, tarnish and small
blemishes. Use only a liquid cleanser free of grit and rub in
the direction of the brush lines with a damp, soft sponge.
To inquire about purchasing cleaning products including
stainless steel appliance cleaner or polish, see the
Accessories and Consumer Support sections at the end of
this manual.
OVEN INTERIOR
The interior of your new oven can be cleaned manually or by
using Steam Clean or Self Clean modes.
Spillage of marinades, fruit juices, tomato sauces and basting
liquids containing acids may cause discoloration and should
be wiped up immediately. Let hot surfaces cool, then clean
and rinse.
Manual Cleaning
Do not use oven cleaners, strong liquid cleansers, steel
wool, or scouring pads on the interior of the oven. Clean
with a mild soap and water, or vinegar and water solution.
Rinse with clean water and dry with a soft cloth. When
cleaning surfaces, make sure that they are at room
temperature.
Steam Clean Mode
Steam clean is intended to clean small spills using water
and a lower cleaning temperature than Self-Clean.
To use the Steam Clean feature, wipe grease and soils
from the oven. Pour one cup of water into the bottom of
the oven. Close the door. Press the More option, then
select Steam Clean, and press Start to the right of the
screen. The oven door will lock. You cannot open the door
during the 30 minute steam clean as this will decrease the
steam clean performance. At the end of the steam clean
cycle the door will unlock. Wipe out any excess water and
any remaining soil. NOTE: Water in the bottom of the oven
may be hot right after finishing the cycle.
Self Clean Mode
Read Self-Cleaning Oven Safety Instructions at the
beginning of this manual before using Self Clean Mode.
Self clean uses very high temperatures to clean the oven
interior. The oven door will lock when using this feature.
%HIRUHRSHUDWLQJWKHVHOIFOHDQF\FOHZLSHXSJUHDVHDQG
soils from the oven. Remove all items from the oven other
than enameled (dark color) racks. Shiny or silver racks,
the meat probe, and any cookware or other items should
all be removed from the oven before initiating a self clean
cycle. Close the door. If using a double oven, select which
oven you would like to clean. Select the More option, then
Self Clean. Choose a 3, 4, or 5 hour cycle, and select
the illuminated Start pad to the right of the screen. For
heavily soiled ovens, the maximum 5 hour clean time is
recommended. If you wish to use the default time, press
Start immediately after selecting Self Clean.
The oven will show that the door has locked and display the
amount of time remaining in the cycle. Press the illuminated
Cancel pad to the right of the screen if you wish to stop
the cycle. The oven will turn off automatically when the self
clean cycle is complete. The door will stay locked until the
oven has cooled down. After the oven has cooled down
wipe any ash out of the oven.
20 49-2000712 Rev. 0
OVEN INTERIOR (Cont.)
Self Clean Mode (Cont.)
We recommend venting your kitchen with an open window
or using a ventilation fan or hood during the first self-clean
cycle.
Soil on the front frame of the oven and outside the gasket
on the door will need to be cleaned by hand. Clean
these areas with hot water, soap-filled steel wool pads or
cleaners such as Soft Scrub®. Rinse well with clean water
and dry.
Do not clean the gasket. The fiberglass material of the
oven door gasket cannot withstand abrasion. It is essential
for the gasket to remain intact. If you notice it becoming
worn or frayed, replace it.
Make sure the oven light bulb cover is in place and the
oven light is off. When using the Self Clean Mode in a
GRXEOHRYHQRQO\WKHXSSHURUORZHURYHQFDQXWLOL]HWKH
cycle at one time. Additionally, no other mode may be
started in the alternate oven cavity while self clean is in
progress.
IMPORTANT: The health of some birds is extremely
sensitive to the fumes given off during the self-cleaning
cycle of any range. Move birds to another well-ventilated
room.
PROBE
The temperature probe may be cleaned with soap and
water or a soap-filled scouring pad. Cool the temperature
probe before cleaning. Scour stubborn spots with a
soap-filled scouring pad, rinse and dry.
To order additional temperature probes, see the
Accessories and Consumer Support sections at the end of
this manual.
Ŷ Do not immerse the temperature probe in water.
Ŷ Do not store the temperature probe in the oven.
Ŷ Do not leave the temperature probe inside the oven
during a self or steam clean cycle.
OVEN RACKS
The racks that were provided with your oven (dark
enameled racks, not shiny) may remain in the oven during
the self-cleaning cycle without being damaged.
To manually clean racks, use warm, soapy water. Make
sure not to wash the rack slides on an extension rack.
If racks become more difficult to remove from the oven,
put some vegetable oil on a soft cloth or paper towel and
rub onto the oven rack supports. Do not wipe the oil on an
extension rack slide.
NOTE: Using other cooking oils will cause a discoloring or
a rust like color residue on the racks and cavity sides. To
clean this residue, use a soap and water or a vinegar and
water solution. Rinse with clean water and dry with a soft
cloth.
FRENCH OVEN DOOR CENTER SEALS
If you notice discoloring of the two door center seals that cannot
be removed with warm sudsy water and a soft cloth, use a
stainless steel cleaner that removes heat discoloration and/or
tarnishing.
Do not use abrasive cleaners, metal scouring pads, commercial
oven cleaners or sharp objects to try and clean the center seals
since this can damage these door parts.
FRENCH OVEN DOORS
The French oven doors are not removable or consumer
serviceable. Please schedule service on-line at
monogram.com
CARE AND CLEANING
Oven Door Center Seals
49-2000712 Rev. 0 21
CARE AND CLEANING
LOWER OVEN DOOR REMOVAL
(Recommended)
NOTE: Door removal is not a requirement for installation of
the product but is an added convenience.
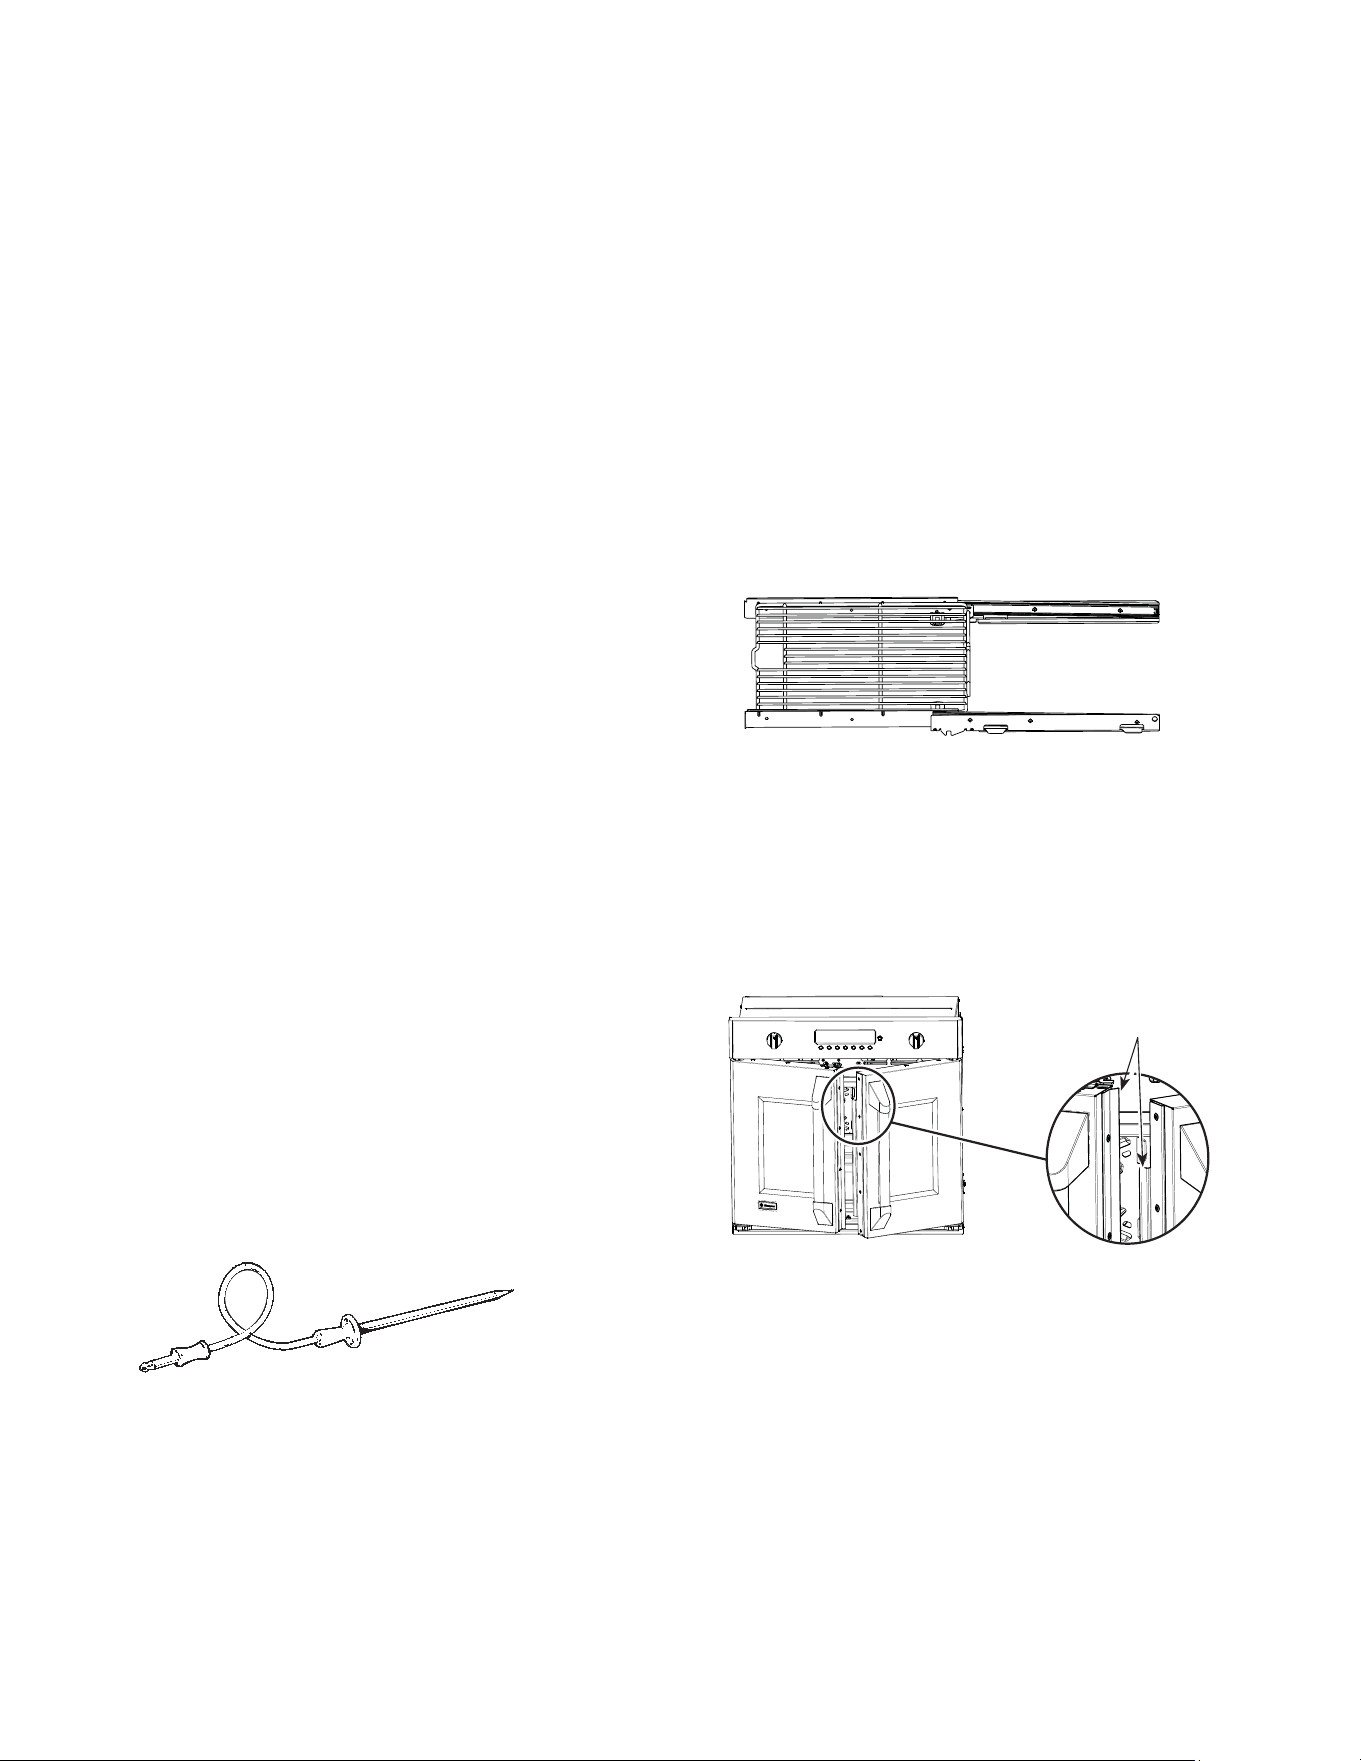
To remove the door:
1. Open the oven door as far as it will go.
2. Push both hinge locks down toward the door frame to
the unlocked position. This may require a flat-blade
screwdriver. DO NOT LIFT THE DOOR BY THE
HANDLE!
3. Place hands on both sides of the door and close the
oven door to the removal position (approximately 1”–2”
[2.5 cm–5.1 cm] from the closed position).
4. Lift the door up and out until the hinge arms clear the
slots. NOTE:7KHRYHQGRRULVYHU\KHDY\%HVXUH
you have a firm grip before lifting the oven door off the
hinges. Use caution once the door is removed. Do not
lay the door on its handle. This could cause dents or
scratches.
REPLACING THE LOWER OVEN DOOR
NOTE: The oven door is heavy. You may need help lifting
the door high enough to slide it into the hinge slots. Do not
lift the door by the handle.
1. Lift the oven door by grasping each side.
2. With the door at the same
angle as the removal position
(approximately 1”–2” [2.5
cm–5.1 cm] from the closed
position), seat the notch of
the hinge arm into the bottom
edge of the hinge slot. The
notch of the hinge arm must
be fully seated into the
bottom of the slot.
3. Fully open the door. If
the door will not fully
open, the indentation is
not seated correctly in
the bottom edge of the
slot.
4. Push the hinge locks up against the front frame of the
oven cavity, to the locked position.
5. Close the oven door.
Hinge in
Locked
Position
Notch of Hinge
Securely Fitted
,QWR%RWWRPRI
Hinge Slot
%RWWRP
Edge of
Slot
Hinge
Arm
Hinge Notch
Hinge
Slot
Hinge
Arm
Hinge Unlocked
Position
Hinge Clears Slot
OVEN LIGHT
Oven lights are not consumer replaceable. Visit
monogram.com

22 49-2000712 Rev. 0
Save time and money! Review the charts on the following pages first and you may not need to call for service.
TROUBLESHOOTING TIPS
Problem Possible Cause What To Do
My new oven doesn't
cook like my old one.
Is something wrong
with the temperature
settings?
Your new oven has a different cooking system from
your old oven and therefore may cook differently than
your old oven.
For the first few uses, follow your recipe times
and temperatures carefully. If you still think your
new oven is too hot or too cold, you can adjust the
temperature yourself to meet your specific cooking
preference. See the Special Features Section to
adjust the oven temperature. NOTE: This adjustment
DIIHFWV7UDGLWLRQDO%DNH&RQYHFWLRQ%DNHDQG
&RQYHFWLRQ%DNH0XOWLWHPSHUDWXUHVLWZLOOQRWDIIHFW
&RQYHFWLRQ5RDVW7UDGLWLRQDO%URLO&RQYHFWLRQ%URLO
or Clean.
Food does not bake
properly
Oven controls improperly set. See the Cooking Modes section.
Rack position is incorrect or rack is not level. See the Cooking Modes section and Cooking Guide.
,QFRUUHFWFRRNZDUHRUFRRNZDUHRILPSURSHUVL]HEHLQJ
used.
See the Cookware section.
Oven temperature needs adjustment. See the Cooking option under the Settings section.
Ingredient substitution Substituting ingredients can change the recipe
outcome.
Food does not broil
properly
Oven controls improperly set. Make sure you select the appropriate broil mode.
NOTE: Convection crisp is not for broiling foods.
Improper rack position being used. See the Cooking Guide for rack location
suggestions.
Food being cooked in a hot pan. Make sure cookware is cool
Cookware not suited for broiling. Use a pan specifically designed for broiling
Aluminum foil used on the broiling pan and grid has not
been fitted properly and slit as recommended.
If using aluminum foil conform to pan slits.
In some areas the power (voltage) may be low. Preheat the broil element for 10 minutes.
Oven temperature too
hot or too cold
Oven temperature needs adjustment. See the Cooking option under the Settings section.
Oven does not work or
appears not to work
A fuse in your home may be blown or the circuit breaker
tripped.
Replace the fuse or reset the circuit breaker.
Oven controls improperly set. See the Using the Oven section.
Oven is in Sabbath Mode Verify, that the oven is not in Sabbath Mode. See
the Sabbath option under the Settings section.
“Crackling” or
“popping” sound
This is the sound of the metal heating and cooling
during both the cooking and cleaning functions.
This is normal.
Why is my range making
a "clicking" noise when
using my oven?
Your range has been designed to maintain a tighter
control over your oven's temperature. You may hear
your oven's heating elements "click" on and off more
frequently than in older ovens to achieve better results
during baking, broiling, convection, and self-clean
cycles.
This is normal.
Clock and timer do not
work
A fuse in your home may be blown or the circuit breaker
tripped.
Replace the fuse or reset the circuit breaker.
Oven light does not
work
Light bulb is loose or defective. Tighten or replace bulb.
Oven will not self-clean The temperature is too high to set a self-clean
operation.
Allow the oven to cool and reset the controls.
Oven controls improperly set. See the Cleaning the Oven section.

49-2000712 Rev. 0 23
TROUBLESHOOTING TIPS
Problem Possible Cause What To Do
Excessive smoking during
clean cycle
Excessive soil or grease. Press Cancel on the pad to the right of the screen
to stop the cycle. Open the windows to rid the room
of smoke. Wait until the door unlocks. Wipe up the
excess soil and reset the clean cycle.
Excessive smoking during
broiling
Food too close to burner element. Lower the rack position of the food.
Oven door will not open after
a clean cycle
Oven too hot. Allow the oven to cool below locking temperature.
Oven not clean after a clean
cycle
Oven controls improperly set. See the Cleaning the Oven section.
Oven was heavily soiled. Clean up heavy spillovers before starting the clean
cycle. Heavily soiled ovens may need to self-clean
again or for a longer period of time.
“F— and a number or letter”
are displayed on LCD screen
You have a function error code. Press Dismiss on the LCD screen. Allow the
oven to cool for one hour. Put the oven back into
operation.
If the function code repeats. Disconnect all power to the oven for at least 30
seconds and then reconnect power. If the function
error code repeats, call for service.
LCD is not functioning
properly
A fuse in your home may be blown or the circuit
breaker tripped.
Replace the fuse or reset the circuit breaker.
Oven controls improperly set. See the Cooking Modes or Settings section to
ensure proper use. Ensure unit is updated to the
most recent software update.
LCD screen is locked. Unlock the screen by pressing the Unlock icon. If
this does not correct the issue, cycle power at the
circuit breaker and ensure unit is updated to the
most recent software update.
LCD is faulty. Cycle power at the circuit breaker and ensure unit is
updated to the most recent software update. If issue
persists, call service to assess the issue.
Power outage, clock resets Power outage or surge Reset the clock. If the oven was in use, you must
reset it by pressing Cancel, setting the clock and
resetting any cooking function.
“Burning” or “oily” odor
emitting from the vent
This is normal in a new oven and will disappear in
time.
To speed the process, set a self-clean cycle for a
minimum of 3 hours. See the Cleaning the Oven
section.
Strong odor An odor from the insulation around the inside of
the oven is normal for the first few times the oven
is used.
This is temporary and will go away after several
uses or a self-clean cycle.
Fan noise A cooling fan may automatically turn on. This is normal. The cooling fan will turn on to cool
internal parts. It may run for up to 1-1/2 hours after
the oven is turned off.
My oven door glass appears
to be "tinted" or have a
"rainbow" color. Is this
defective?
No. The inner oven glass is coated with a heat
barrier to reflect the heat back into the oven to
prevent heat loss and keep the outer door cool
while baking.
This is normal. Under certain light or angles, you
may see this tint or rainbow color.
Sometimes the oven takes
longer to preheat to the
same temperature
Cookware or food in oven The cookware or food in the oven will cause the
oven to take longer to preheat. Remove items to
reduce preheat time.
Number of racks in oven Adding more racks to the oven will cause the oven
to take longer to preheat. Remove some racks.
Different cooking modes The different cooking modes use different preheat
methods to heat the oven for the specific cooking
mode. Some modes will take longer than others (i.e.
convection bake multi).
Oven will not work remotely Router issues, no wireless signal, etc. For assistance with oven wireless network
connectivity, please call 1-800-220-6899.
Oven is not connected.
24 49-2000712 Rev. 0
Ŷ6HUYLFHWULSVWR\RXUKRPHWRWHDFK\RXKRZWRXVHWKH
product.
Ŷ,PSURSHULQVWDOODWLRQGHOLYHU\RUPDLQWHQDQFH
Ŷ)DLOXUHRIWKHSURGXFWLILWLVDEXVHGPLVXVHGPRGLILHG
or used for other than the intended purpose or used
commercially.
Ŷ5HSODFHPHQWRIKRXVHIXVHVRUUHVHWWLQJRIFLUFXLW
breakers.
Ŷ'DPDJHWRWKHSURGXFWFDXVHGE\DFFLGHQWILUHIORRGV
or acts of God.
Ŷ,QFLGHQWDORUFRQVHTXHQWLDOGDPDJHFDXVHGE\SRVVLEOH
defects with this appliance.
Ŷ'DPDJHFDXVHGDIWHUGHOLYHU\
Ŷ3URGXFWQRWDFFHVVLEOHWRSURYLGHUHTXLUHGVHUYLFH
Ŷ6HUYLFHWRUHSDLURUUHSODFHOLJKWEXOEVH[FHSWIRU/('
lamps.
MONOGRAM LIMITED WARRANTY
Monogram.com
$OOZDUUDQW\VHUYLFHLVSURYLGHGE\RXU)DFWRU\6HUYLFH&HQWHUVRUDQDXWKRUL]HG&XVWRPHU&DUH
®
technician. To schedule
service online, visit us at monogram.com/contact. In Canada, visit monogram.ca.
EXCLUSION OF IMPLIED WARRANTIES
Your sole and exclusive remedy is product repair as provided in this Limited Warranty. Any implied warranties, including the
implied warranties of merchantability or fitness for a particular purpose, are limited to one year or the shortest period allowed
by law.
This limited warranty is extended to the original purchaser and any succeeding owner for products purchased
IRUKRPHXVHZLWKLQWKH86$,IWKHSURGXFWLVORFDWHGLQDQDUHDZKHUHVHUYLFHE\DQ$XWKRUL]HG6HUYLFHULVQRW
DYDLODEOH\RXPD\EHUHVSRQVLEOHIRUDWULSFKDUJHRU\RXPD\EHUHTXLUHGWREULQJWKHSURGXFWWRDQ$XWKRUL]HG
Service location. In Alaska, the limited warranty excludes the cost of shipping or service calls to your home.
Some states do not allow the exclusion or limitation of incidental or consequential damages. This limited warranty
gives you specific legal rights, and you may also have other rights which vary from state to state. To know what
your legal rights are, consult your local or state consumer affairs office or your state’s Attorney General.
Warrantor: GE Appliances, a Haier company
Louisville KY,40225
For the period of Monogram Appliances will replace
Limited two-year
warranty
For two years from date of original purchase, we will provide, free of charge, parts and service
labor in your home to repair or replace any part of the appliance that fails because of a
manufacturing defect.
What Monogram will not cover:
Staple your receipt here. Proof of the original purchase
date is needed to obtain service under the warranty.
Servicing your appliance may require the use of the onboard data port for diagnostics. This gives a Monogram
Factory Service technician the ability to quickly diagnose any issues with your appliance and helps Monogram
improve its products by providing Monogram with information on your appliance. If you do not want your
appliance data to be sent to Monogram, please advise your technician NOT to submit the data to Monogram at
the time of service.

49-2000712 Rev. 0 25
Accessories
;/%URLOHU3DQ´[ó´[³
Parts
Oven racks
Oven elements
Light bulbs
Probe
ACCESSORIES
Looking For Something More?
Monogram offers a variety of accessories to improve
your cooking and maintenance experiences!
Refer to the Consumer Support page for phone numbers
and website information.
The following products and more are available:

49-2000712 Rev. 0
01-20 GEA
Printed in the United States

