Loading ...
Loading ...
Loading ...
For the cookers below written adjustment have to be done by qualified
technician.
Follow the steps given below to convert the appliance from the factory
set up to that for a different gas type.
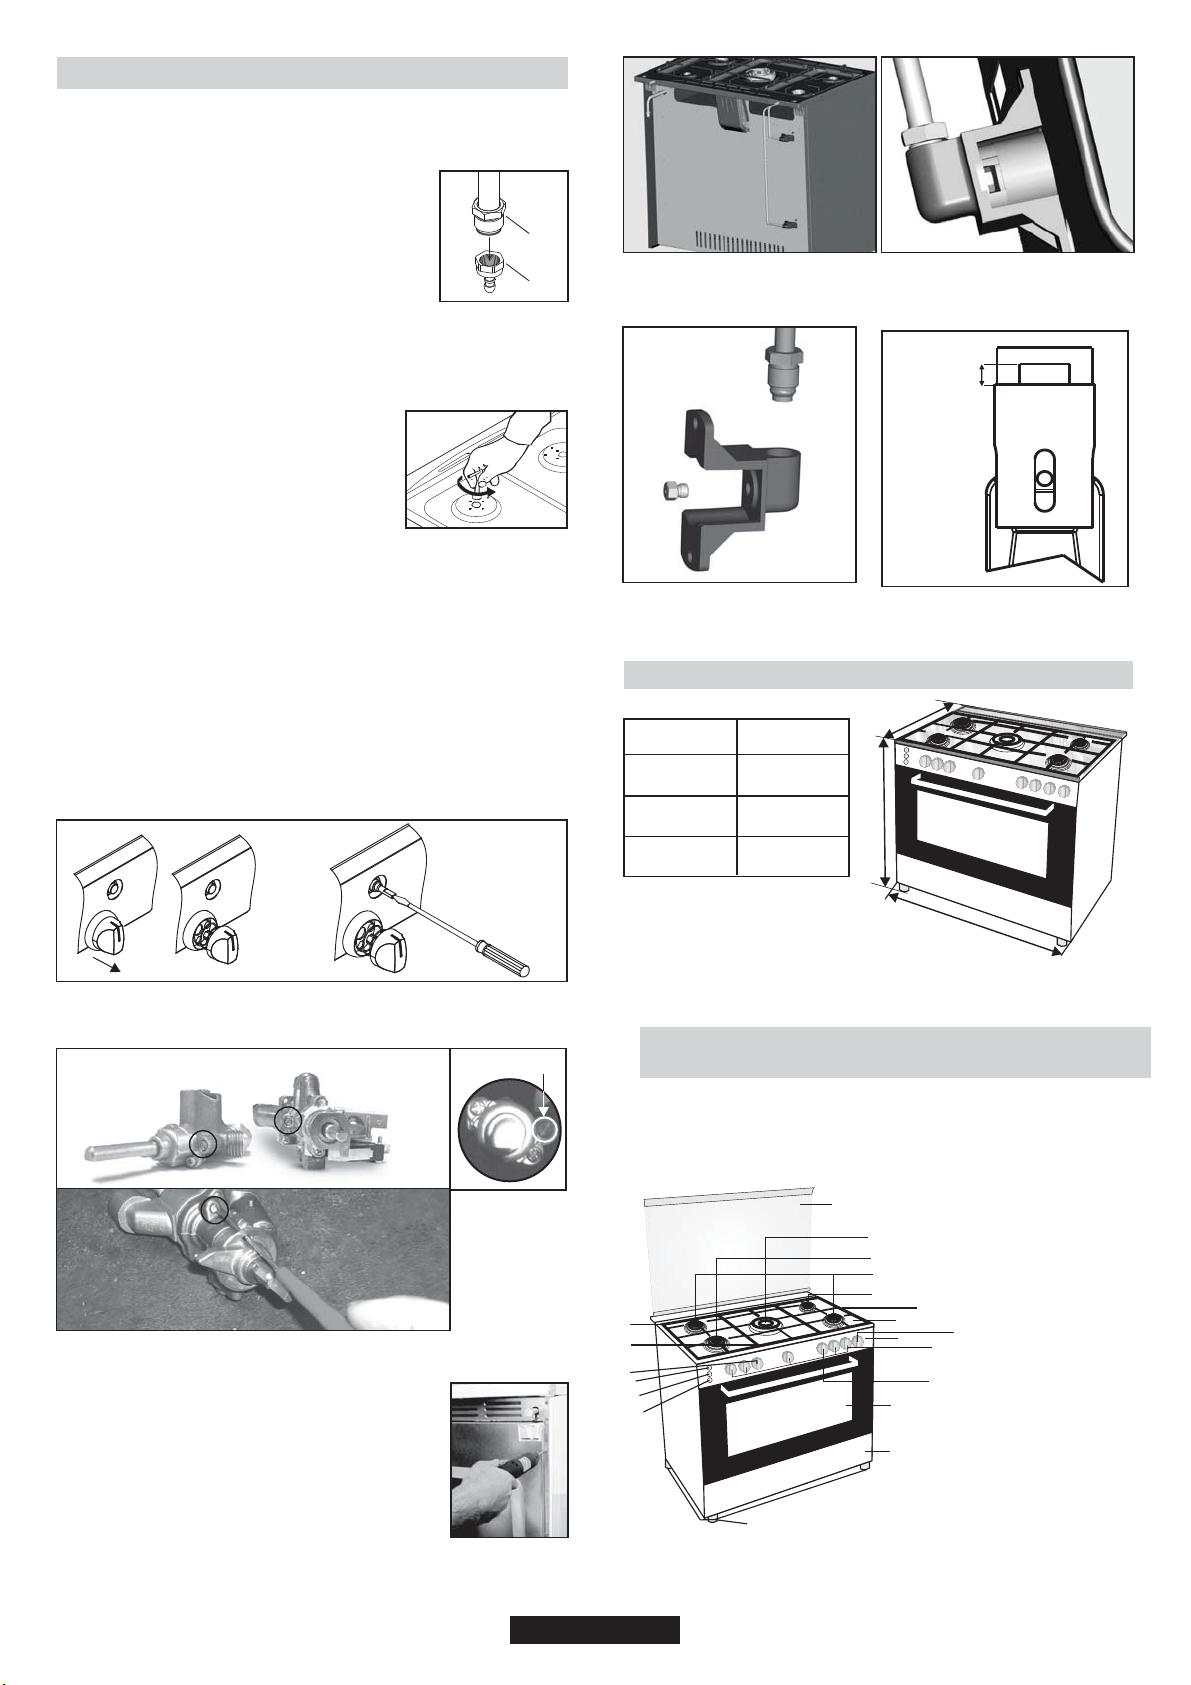
Cookers are adjusted NG and connection type is
cylindric (1).
For LPG connection, LPG hose adapter (2) can be
fixed to cylindric adapter with seal.
Adjustments and changing injectors
Changing Injectors
•Remove grates.
•Remove burner caps and burners.
•Remove injectors by using a 7 mm wrench, then screw on the correct
injector selected from gas type category table (last page in this user
manual) according to the gas to be used.
•Follow the above steps in the reverse order
after completing the assembly of the new
injector.
Stand by Adjustment
Stand by adjustment for the cookers
without safety devices and with safety
devices and button ingition
•Turn the burner control knob to the small flame
position and remove the knob.
•If conversion from natural gas to LPG is required, turn clockwise the
by-pass screw of the gas valves with a screw driver to their final
position.
•If conversion from LPG to natural gas is required, turn anti-clockwise
the by-pass screw of the gas valves with a screw driver till a smaller
flame of ¼ size is obtained.
•After completing the adjustment, insert the knobs again.
•Check the adjustment by turning the burner control knob quickly from
maximum to minimum position. If the flame does not go out, it means
that the adjustment is correct.
•For safety devices, idle flame setting can be done with screw on valve
body. If there is ignition on the knob for idle flame setting cooktop,
toplid and panel must be removed.
2.8. CONVERSION FOR DIFFERENT GAS TYPES
2
1
By-pass screw for the burner
Gas Oven
•Remove rear cover ( Figure3)
•Remove injector adapter.(Figure 4)
•Remove injectors by using a 7 mm wrench, then
screw on the correct injector selected from gas
type category table according to the gas to be used.
(Figure 5)
•Follow the above steps in the reverse order after
completing the assembly of the new injector.
•Burner Gap is 5 mm for LPG and 10 mm for NG.
(Figure 6)
Figure3
Figure4
safety devices
•For thermostat valve idle frame setting cooktop, top lid and panel
must be removed.
07 GB
without safety
devices
Figure5
Figure6
2.9. DIMENSIONS OF THE APPLIANCE
Height (mm)
Width (mm)
Depth (mm)
900-920
900
600
90 x 60
2.10. GENERAL APPEARANCE AND DEFINITION
OF THE APPLIANCE
This User Manual has been drawn up as a guide for several models.
Some of the properties mentioned in this manual may not exist in your
appliance.
D
H
W
5
2
1
7
6
4
3
8
9
10
11
12
13
14
15
16
17
18
19
20
1- Cook top
2- Control panel
3- Drawer
4- Oven door (Front door)
5- Glass top lid or metallic
top lid
6- Auxilary burner
7- Rapid burner
8- Semi rapid burner
9- QC
10- Left grate
11- Centre grate
12- Right grate
13- Burners control knobs
14-Thermostat oven knob
15- Upper oven burner, grill
16- Timer knob
17- Ignition button
18- Lamp knob
19- Turn spit
20- Bolt Foot
(Adjustable Feet)
(Toplid closed)
LPG 5mm
NG 10 mm
Burner Gap
Loading ...
Loading ...
Loading ...