© 2003 Sony Corporation
Portable
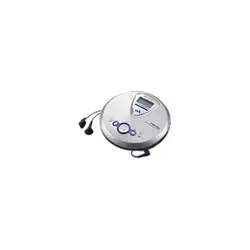
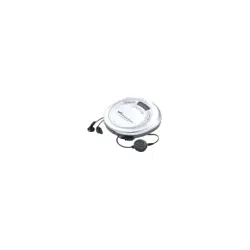
CD Player
3-253-128-21 (1)
D-NE718CK
“WALKMAN” is a registered trademark of Sony Corporation to represent Headphone
Stereo products.
is a trademark of Sony Corporation.
Operating Instructions

2
WARNING
To prevent fire or shock
hazard, do not expose the unit
to rain or moisture.
Do not install the appliance in a confined
space, such as a bookcase or built-in
cabinet.
To prevent fire, do not cover the ventilation
of the apparatus with newspapers, table-
cloths, curtains, etc. And don’t place lighted
candles on the apparatus.
To prevent fire or shock hazard, do not place
objects filled with liquids, such as vases, on
the apparatus.
CAUTION
The use of optical instruments with this
product will increase eye hazard.
Certain countries may regulate disposal of
the battery used to power this product. Please
consult with your local authority.
CAUTION
• INVISIBLE LASER RADIATION
WHEN OPEN
• DO NOT STARE INTO BEAM OR
VIEW DIRECTLY WITH OPTICAL
INSTRUMENTS
The validity of the CE marking is restricted
to only those countries where it is legally
enforced, mainly in the countries EEA
(European Economic Area).
ATRAC3plus and ATRAC3 are trademarks
of Sony Corporation.
Owner’s Record
The model and serial numbers are located at
the rear of the CD player. Record the serial
number in the space provided below. Refer to
these numbers whenever you call upon your
Sony dealer regarding this product.
Model No. D-NE718CK
Serial No. ___________________________
For the customers in the USA
This equipment has been tested and found to comply
with the limits for a Class B digital device, pursuant to
Part 15 of the FCC Rules. These limits are designed to
provide reasonable protection against harmful
interference in a residential installation. This equipment
generates, uses, and can radiate radio frequency energy
and, if not installed and used in accordance with the
instructions, may cause harmful interference to radio
communications. However, there is no guarantee that
interference will not occur in a particular installation.
If this equipment does cause harmful interference to
radio or television reception, which can be determined
by turning the equipment off and on, the user is
encouraged to try to correct the interference by one or
more of the following measures:
– Reorient or relocate the receiving antenna.
– Increase the separation between the equipment and
receiver.
– Connect the equipment into an outlet on a circuit
different from that to which the receiver is connected.
– Consult the dealer or an experienced radio/TV
technician for help.
You are cautioned that any changes or modifications not
expressly approved in this manual could void your
authority to operate this equipment.
Product registration
For the customers in the USA
Please register this product on line at www.sony.com/
walkmanreg
<http://www.sony.com/walkmanreg>
Proper registration will enable us to send you periodic
mailings about software upgrades, new products,
services and other important announcements. Thank
you.
If you have any questions about this product,
contact:
www.sony.com/walkmansupport
Sony Network Portable Audio Support Line
1-(866)-456-7669
Sony Customer Information Service Center
12451 Gateway Blvd., Ft. Myers, FL 33913

3
Table of Contents
Enjoy your ATRAC CD
Walkman!
Create original ATRAC CDs! ...................... 4
Music sources playable on this CD player .. 6
ATRAC3plus and ATRAC3 ......................... 6
MP3 files ..................................................... 6
Difference between ATRAC3plus/ATRAC3
and MP3 .................................................. 8
Getting started
Locating the controls ................................... 9
Checking the supplied accessories ............ 10
Playing an audio CD or
ATRAC3plus/ATRAC3/MP3 files
1.Connect your CD player. ....................... 11
2.Insert a CD. ........................................... 11
3.Play a CD. ............................................. 11
Playback options
Playing tracks in random order
(Shuffle play)......................................... 17
Playing all files in a selected group in
random order (Group shuffle play)
(ATRAC/MP3 CD only)........................ 17
Playing your favorite tracks by adding
Bookmarks (Bookmark track play) ....... 18
Playing your favorite play lists
(m3u play list play)
(MP3 CD only)...................................... 19
Searching for your favorite tracks/files/
groups quickly using the jog dial .......... 20
Playing tracks in your favorite order
(PGM play)............................................ 21
Available features
The G-PROTECTION function................. 23
Checking the time remaining on the CD and
the number of tracks left (audio CD) .... 23
Checking information on a CD with
ATRAC3plus/ATRAC3/MP3 files ........ 24
Emphasizing the bass sound (SOUND) .... 24
Protecting your hearing (AVLS)................ 25
Locking the controls (HOLD) ................... 25
Turning off the operation beep sound........ 25
Using in a car
Installing in a car ....................................... 26
Where to place your CD player ................. 26
Mounting your CD player ......................... 26
Replacing the fuse of the car battery cord . 27
Mounting the rotary commander ............... 28
Connecting to a power source
Using the batteries ..................................... 29
Notes on the power source ........................ 31
Connecting your CD player
Connecting a stereo system ....................... 32
Additional information
Precautions ................................................ 33
Maintenance .............................................. 33
Troubleshooting ......................................... 34
Specifications ............................................ 37
Optional accessories .................................. 38
4
Enjoy your ATRAC CD Walkman!
Thank you for purchasing the D-NE718CK. This CD Walkman is called an “ATRAC CD
Walkman,” because you can enjoy “ATRAC CDs” on it.
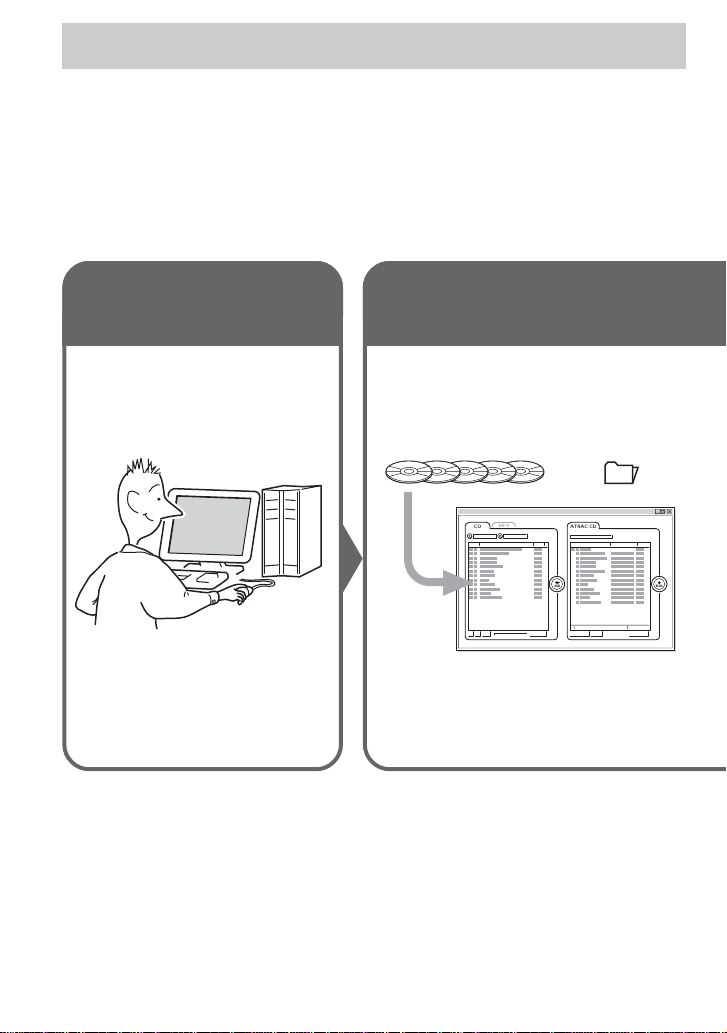
Create original ATRAC CDs!
You can make your own ATRAC CD.
The procedure is very simple. Just perform Steps 1, 2 and 3.
How to use the SonicStage Simple Burner
Refer to the supplied booklet “SonicStage Simple Burner.”
,
Audio CDs MP3 files
Audio data is converted to the ATRAC3plus/
ATRAC3 format by the SonicStage Simple
Burner.
Step 1
Install
Install the supplied
“SonicStage Simple Burner”
software.
Step 2
Burn
Create a disc image and burn it on
a CD-R/RW using your PC.
or
5
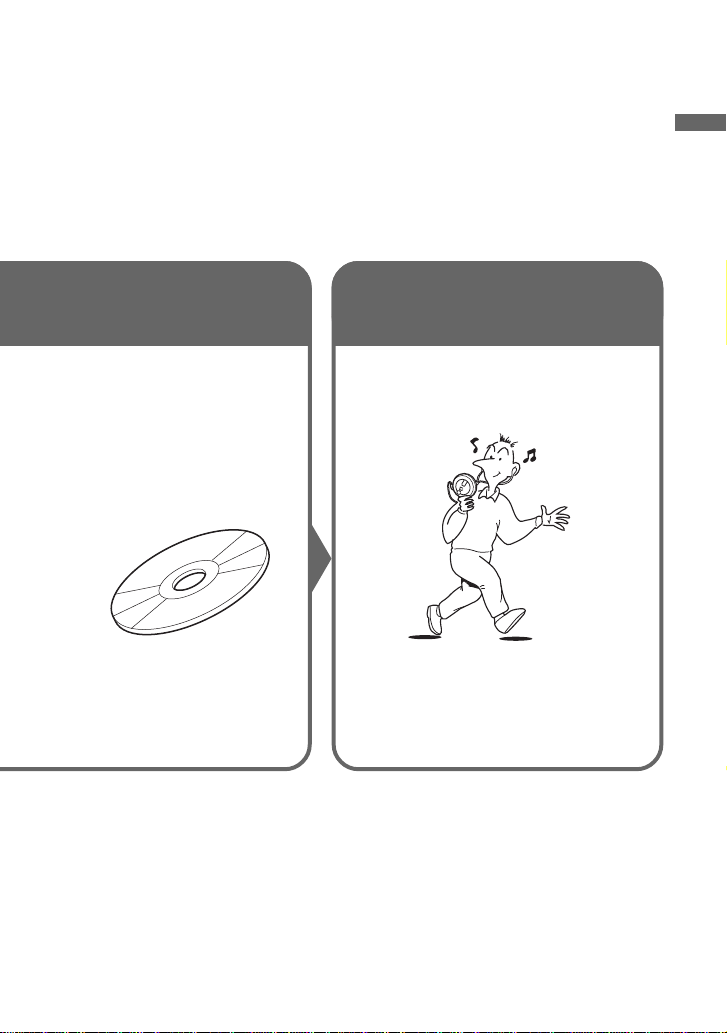
Enjoy your ATRAC CD Walkman!
What is an ATRAC CD?
An ATRAC CD is a CD-R/RW on which audio data compressed in the ATRAC3plus/ATRAC3
format has been recorded. About 30 audio CDs* can be recorded on a CD-R/RW. You can also
record MP3 files by converting the files to the ATRAC3plus/ATRAC3 format.
*When recorded at 48 kbps (ATRAC3plus)
What is the ATRAC3plus/ATRAC3
format?
Refer to pages 6 - 8 of this manual.
,
ATRAC CD
You can also enjoy audio CDs on
your CD Walkman.
Step 3
Listen
You can enjoy listening to your
own ATRAC CDs on your ATRAC
CD Walkman.

6
Music sources playable on this CD player
You can play the following 3 music sources on this CD player:
• Audio CDs
•ATRAC3plus/ATRAC3 format files
• MP3 files
Usable disc formats
You can use ISO 9660 Level 1/2, Joliet extension and UDF 1.5 (Packet write) format discs only.
ATRAC3plus and ATRAC3
“ATRAC3plus,” which stands for “Adaptive Transform Acoustic Coding3plus” is audio
compression technology, developed from the ATRAC3 format. Though the ATRAC3plus format
can compress music content to about 1/20 of its original size, you can still enjoy high quality
sound. The available transfer bit rates are 64 kbps and 48 kbps.
“ATRAC3,” which stands for “Adaptive Transform Acoustic Coding3” is audio compression
technology that satisfies the demand for high sound quality and high compression rates. The
ATRAC3 format can compress music content to about 1/10 of their original size, which
contributes to reduction of the media volume. The available transfer bit rates are 132 kbps,
105 kbps and 66 kbps.
The usable number of groups and files
• Maximum number of groups: 255
• Maximum number of files: 999
For details, refer to the supplied booklet “SonicStage Simple Burner.”
MP3 files
MP3, which stands for MPEG-1 Audio Layer3, a standard for audio files compression supported
by the Motion Picture Experts Group, an ISO (International Organization for Standardization)
working group, enables compression of audio files to about 1/10 of the data size of a standard
compact disc. Since the MP3 encoding algorithm is public, there are various encoders/decoders
that are compliant with this standard, including freeware that is available for no charge. Thus, the
MP3 standard is widely used in the computer field.

7
The major specifications of the acceptable disc format are:
• Maximum directory levels: 8
• Acceptable characters for a file/folder name:
A - Z, a - z, 0 - 9, _ (underscore)
Notes
• When naming files, be sure to add the file extension “mp3” to the file name.
• If you add the extension “mp3” to a file other than an MP3 file, the player will not be able to recognize the
file properly.
• The file name does not correspond to the ID3 tag.
The usable number of groups and files
• Maximum number of groups: 100
• Maximum number of files: 400
Settings for compression and writing software
• This CD player supports MP3 files with the following specifications: transfer bit rate:
16 - 320 kbps and sampling frequencies: 32/44.1/ 48 kHz. Variable Bit Rate (VBR) is also
supported.
To compress a source for an MP3 file, we recommend setting the transfer bit rate of the
compression software to “44.1 kHz,” “128 kbps,” and “Constant Bit Rate.”
•To record up to the maximum capacity, set to “halting of writing.”
•To record at one time up to the maximum capacity on media that has nothing recorded on it,
set to “Disc at Once.”
Note on saving files on the media
When a disc is inserted, the CD player reads all the files on that disc. If there are many groups or
if there are files in a different format on the disc, it may take a long time for play to begin or for
the next file to start play.
We recommend that you do not save files in other formats or unnecessary groups on a disc that
has MP3 files.
Enjoy your ATRAC CD Walkman!

8
Difference between ATRAC3plus/ATRAC3 and
MP3
Groups and folders
The ATRAC3plus/ATRAC3 format has a very simple structure. It consists of “files” and
“groups.” A “file” is equivalent to a “track” of an audio CD. A “group” is a bundle of files and is
equivalent to an “album.” A “group” has no directory-type structure (a new group cannot be
made within an existing group). This CD player is designed to recognize an MP3 file folder as a
“group” so that it can play CD-Rs/RWs recorded in both the ATRAC3plus/ATRAC3 format and
those recorded in the MP3 format with the same operation.
Displaying the track name, etc.
When playing a CD having ATRAC3plus/ATRAC3 files or MP3 files on this CD player, track
names, artist names and album names are displayed. This CD player conforms to Version 1.1/2.2/
2.3 of the ID3 tag format*.
*ID3 tag is a format for adding certain information (track name, album name, artist name, etc.) to MP3 files.
Notes
• This CD player cannot record music content on recordable media, such as CD-Rs/RWs.
• CD-Rs/RWs recorded in the ATRAC3plus/ATRAC3 format cannot be played on your computer.
• Playback capability may vary depending on the quality of the disc and the condition of the recording device.
9
Getting started
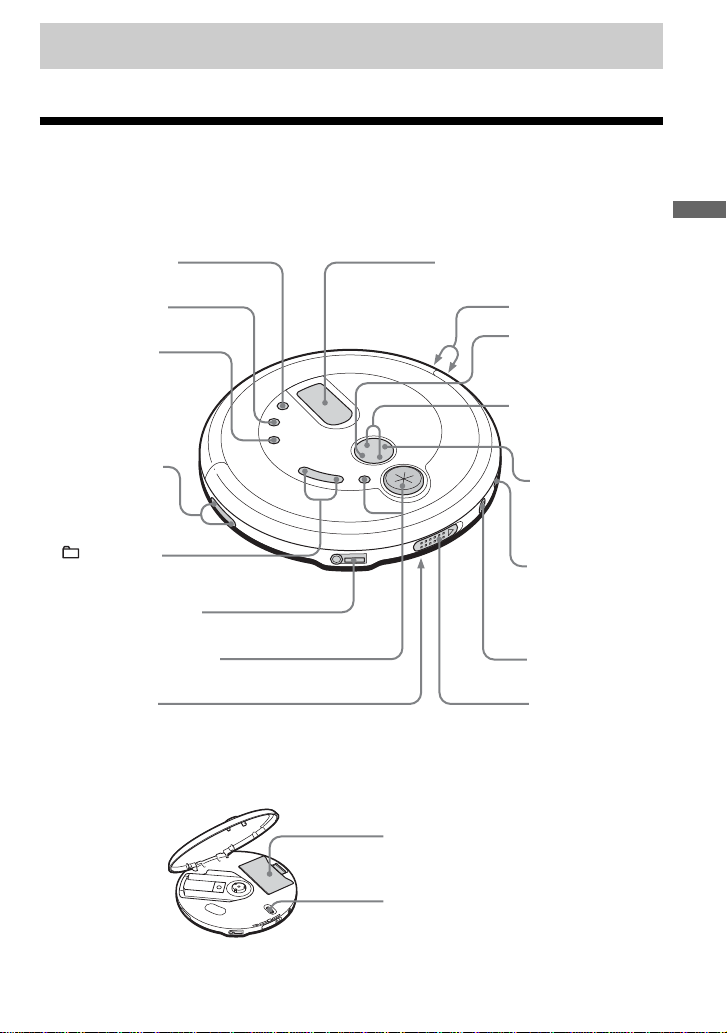
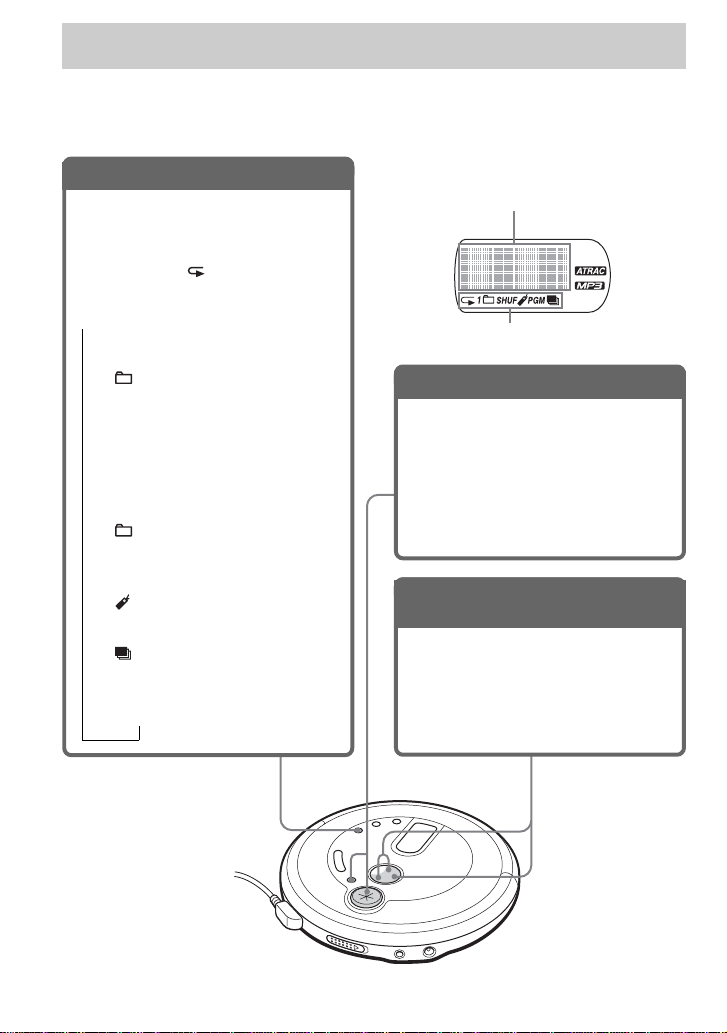
Locating the controls
For details, see pages in parentheses.
CD player (front)
CD player (inside)
6 i (headphones) jack
(pages 11, 26)
1 DISPLAY button
(pages 23, 24)
qj Battery compartment
(pages 29, 30)
8 HOLD switch
(page 25)
qh OPEN switch
(page 11)
7 Jog dial•ENTER button
(pages 16, 20 - 22)
qf DC IN 4.5 V
(external power
input) jack
(pages 11, 26)
qd u* (play/pause)
button
(pages 11, 12, 16,
18, 19, 21)
qa x (stop)/CHARGE
button
(pages 12, 25, 29)
qs ./> (AMS/
search) buttons
(pages 12, 16, 19, 21)
qk G-PROTECTION
switch (page 23)
5 +/– buttons
(page 12)
4 VOL (volume)
+*/– buttons
(page 11)
3 PLAY MODE
(play mode/repeat)
button (pages 16 - 19,
21, 22)
2 SOUND button
(pages 24, 25)
9 Display
(pages 13, 16, 19 - 21, 23 - 25)
q; Strap holes
*The button has a tactile dot.
Getting started
qg LINE OUT jack
(pages 26, 32)
(Continued)
10
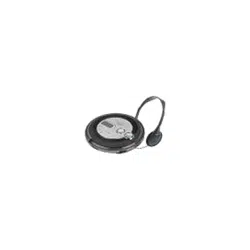
Rotary commander
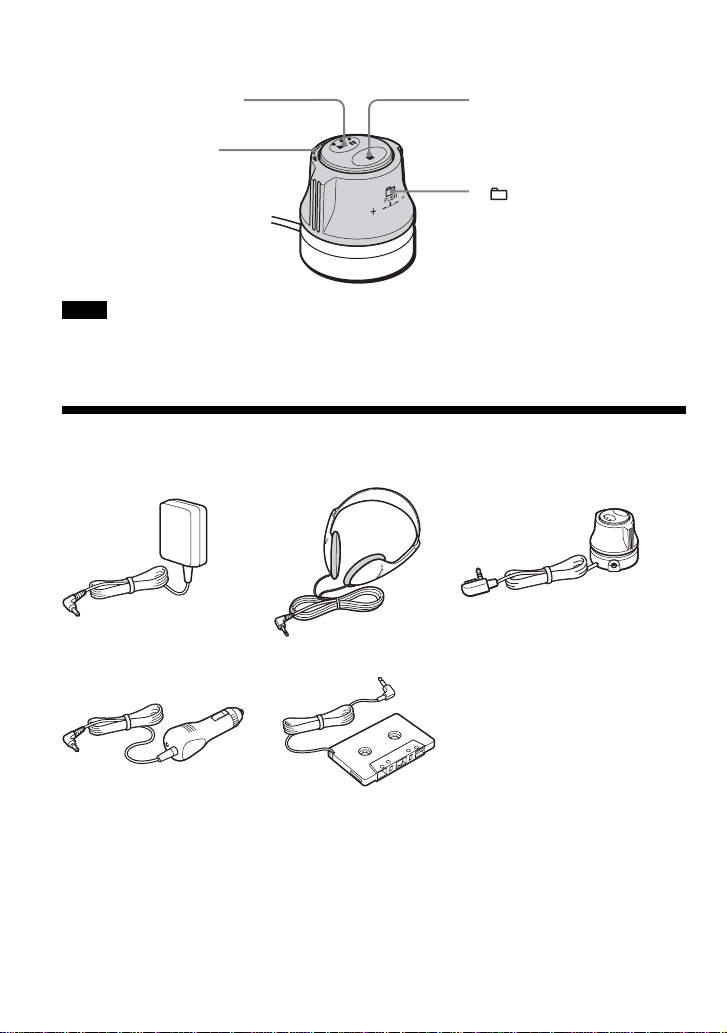
Checking the supplied accessories
AC power adaptor (1) Headphones (1) Rotary commander (1)
Car battery cord (1) Car connecting pack (1)
Velcro tapes for the CD player (2)
Velcro tape for the rotary commander (1)
CD-ROM (SonicStage Simple Burner) (1)
User’s guide for SonicStage Simple Burner (1)
For US customers
The AC power adaptor supplied is not intended to be serviced. Should the AC power adaptor cease to function
in its intended manner, during the warranty period, the adaptor should be returned to your nearest Sony Service
Center or Sony Authorized Repair Center for replacement, or after warranty period, it should be discarded.
Note
The supplied rotary commander should be used with this player only.
wa x (stop) button
(page 12)
w; .(AMS/search)•
> (AMS/search)
control
(pages 12, 19)
ql u (play/pause) button
(pages 12, 18, 19)
ws +/– control
Push down and turn.
(page 12)
11
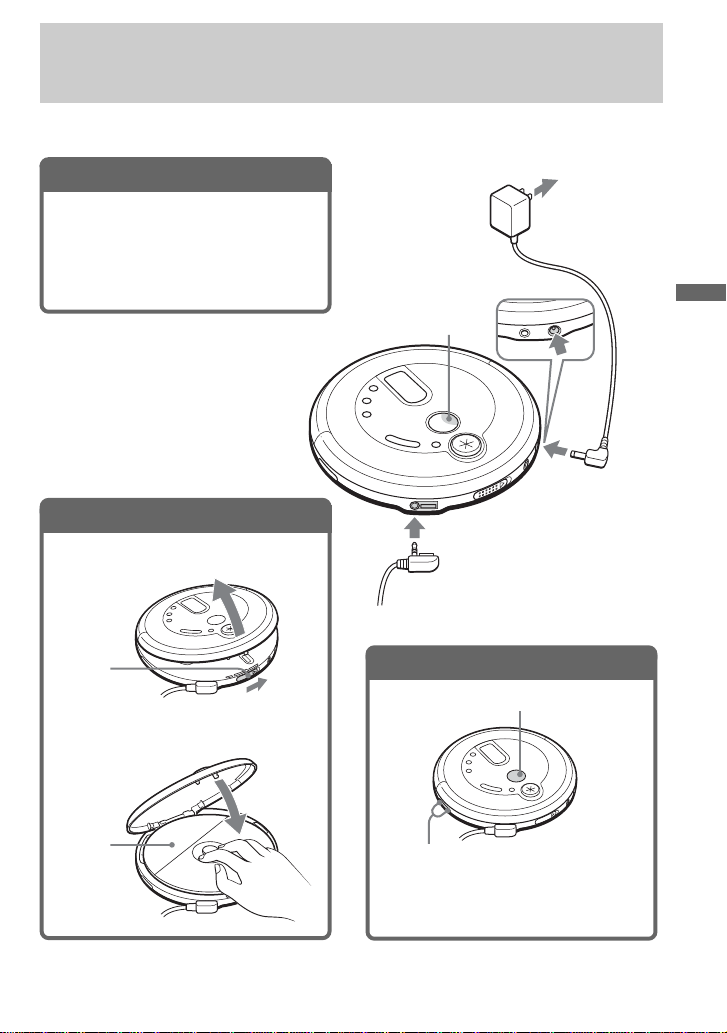
1
. Connect your CD player.
1 Connect the AC power adaptor.
2 Connect the headphones/earphones.
You can also use rechargeable batteries
or dry batteries as a power source. (See
page 29.)
3
. Play a CD.
Adjust the volume by
pressing VOL + or –.
Press u.
Playing an audio CD or
ATRAC3plus/ATRAC3/MP3 files
When using your CD player in a car, see page 26.
to i (headphones)
Headphones or earphones
to an AC outlet
to DC IN 4.5V
u
AC power
adaptor
2
. Insert a CD.
1 Slide OPEN to open the lid.
2 Place the CD on the tray and close
the lid.
Label
side up
Playing an audio CD or ATRAC3plus/ATRAC3/MP3 files
(Continued)
OPEN
switch
You can also adjust the volume on the
car casette deck.
12
Basic operations
To Do this
Play (from the point you stopped) Press u.
Playback starts from the point you stopped.
Play (from the first track) While the CD player is stopped, press and
hold u until the play of the first track starts.
Pause/resume play after pause Press u.
Stop Press x.*
2
Find the beginning of the current track (AMS*
1
) Press . once quickly.*
2
Find the beginning of previous tracks (AMS) Press . repeatedly.*
2,
*
3
Find the beginning of the next track (AMS) Press > once quickly.*
2,
*
3
Find the beginning of succeeding tracks (AMS) Press > repeatedly.*
2,
*
3
Go backwards quickly*
4
Hold down ..*
2
Go forward quickly*
4
Hold down >.*
2
Jump to succeeding groups*
5
Press + repeatedly.
Jump to previous groups*
5
Press – repeatedly.
*1 Automatic Music Sensor
*2 These operations can be done during both play and pause.
*3 After you have played the last track, you can return to the beginning of the first track by pressing > .
Similarly, if you are at the first track, you can locate the last track by pressing ..
*4 Does not function when you play an MP3 CD recorded in the UDF 1.5 (Packet write) format.
*5 Only when you play an ATRAC/MP3 CD
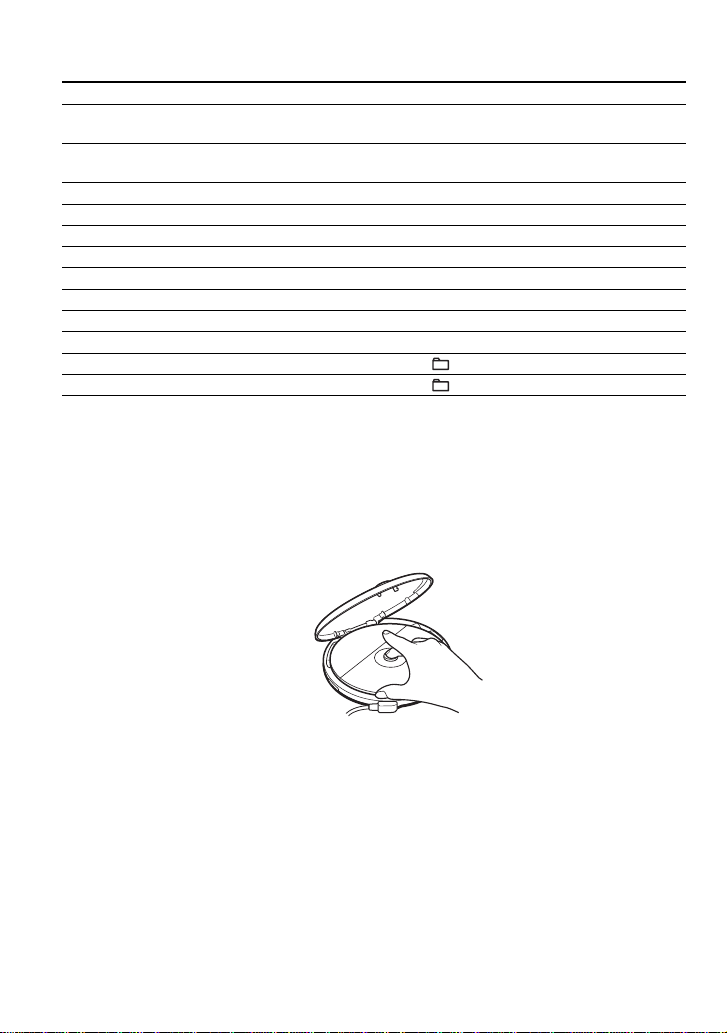
Removing the CD
Remove the CD while pressing the pivot
in the center of the tray.
About CD-Rs/RWs
This CD player can play CD-Rs/RWs recorded in the CD-DA format*, but playback capability
may vary depending on the quality of the disc and the condition of the recording device.
* CD-DA is the abbreviation for Compact Disc Digital Audio. It is a recording standard used for the Audio
CDs.
Music discs encoded with copyright protection technologies
This product is designed to play back discs that conform to the Compact Disc (CD) standard.
Recently, various music discs encoded with copyright protection technologies are marketed by
some record companies. Please be aware that among those discs, there are some that do not
conform to the CD standard and may not be playable by this product.
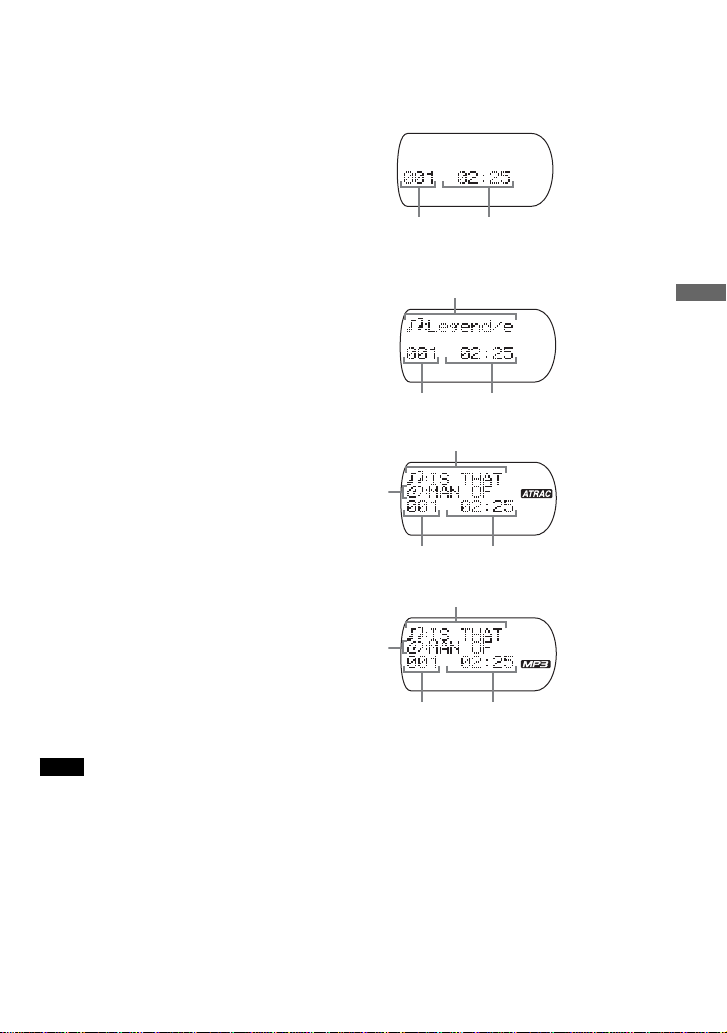
13
Track number Playing time
File number Playing time
Track number Playing time
Track name
File number Playing time
Playing an audio CD or ATRAC3plus/ATRAC3/MP3 files
About the display
While the CD player is playing, the following indications appear in the display.
You can also check the remaining time, track name, etc. using DISPLAY (see pages 23 and 24.)
While playing an audio CD
While playing an audio CD
containing CD text information
While playing an ATRAC3plus/
ATRAC3 file
When playing an MP3 file
Note
Before playing a file, the CD player reads all file and group information on the CD. “READING” is displayed.
Depending on the content of the CD, it may take some time to accomplish this reading.
(Continued)
File name
File name
Group name
Group name
14
Example of ATRAC3plus/ATRAC groups and files
1
2
3
4
1
2
3
4
5
6
7
8
9
q;
qa
qs
ATRAC3plus/ATRAC3
file
Group
File mode Plays all ATRAC3plus/ATRAC3 files from 1, 2, 3...qa, qs.
Group mode Plays all ATRAC3plus/ATRAC3 files in the selected group.
Notes
• Maximum number of groups: 255
Maximum number of files: 999
• The characters A - Z, a - z, 0 - 9, and _ can be displayed on this CD player.
• When referring to ATRAC CDs, “group” is equivalent to an “album” and “file” is equivalent to a “track.”
15
Playing an audio CD or ATRAC3plus/ATRAC3/MP3 files
CD-R
CD-RW
1
4
2
1
3
5
6
4
7
8
9
5
q;
6
3
2
MP3 file
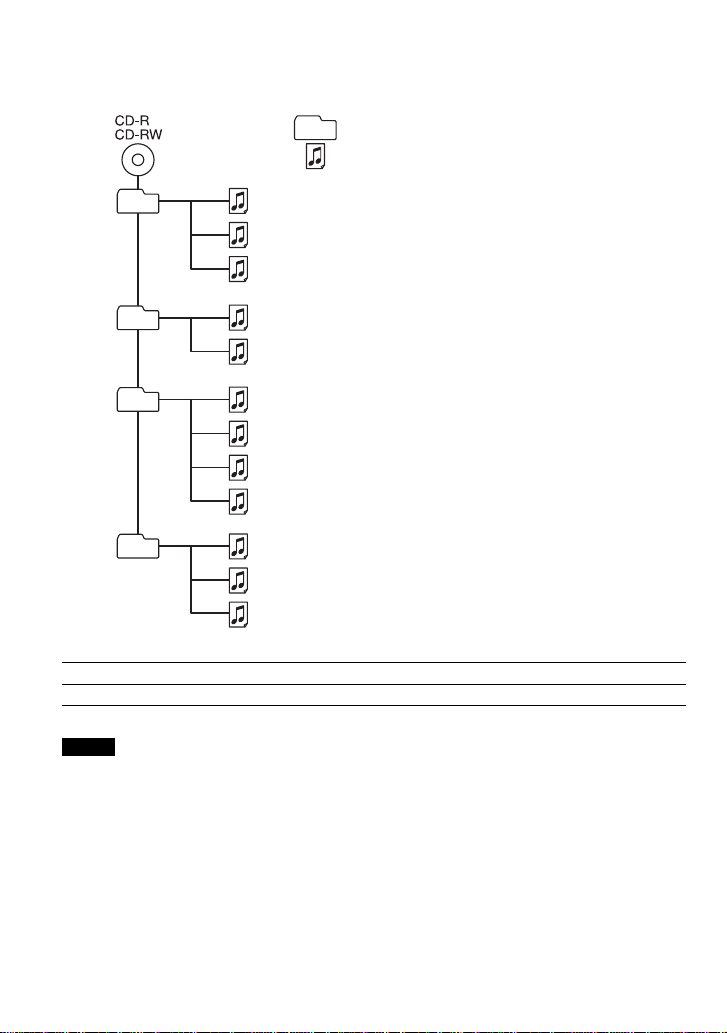
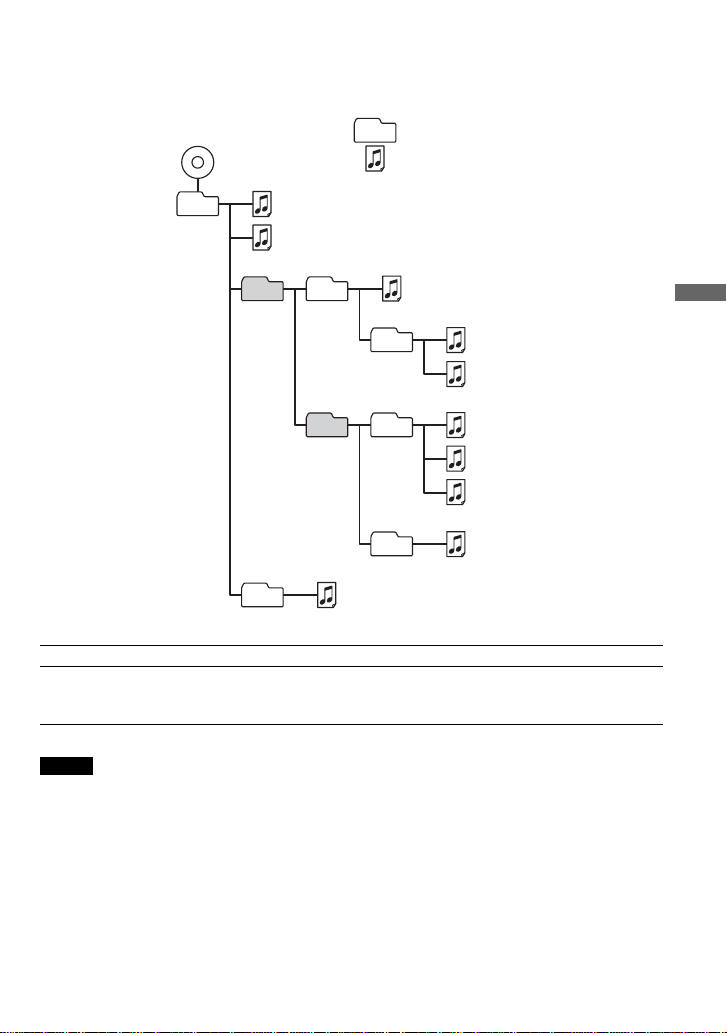
Example of group structure and playing order (MP3 CD)
The playing order of groups and files is as follows:
File mode Plays all MP3 files from 1, 2, 3...9, 0.
Group mode Plays all MP3 files in the selected group.
(Example: If you select group 3, the CD player plays file 4. If you select group 4,
the CD player plays file 5 and 6.)
Notes
•A group that does not include an MP3 file is skipped.
• Maximum number of groups: 100
Maximum number of files: 400
• Maximum directory levels: 8
• The characters A - Z, a - z, 0 - 9, and _ can be displayed on this CD player.
• When referring to MP3 CDs, “group” is equivalent to an “album” and “file” is equivalent to a “track.”
Group
16
Playback options
You can enjoy various playback options using PLAY MODE (play mode/repeat), jog dial•
ENTER, ./> and u.
PLAY MODE button
If you press the button, you can change
the play mode.
During playback, if you press and hold
the button until “ ” appears, you can
play tracks repeatedly in the play mode
that was selected using PLAY MODE.
./>
buttons and
u
button
• Press > or ..
You can select a play list you want.
• Press u.
You can add Bookmarks and also start
bookmark track play and play list play.
*1 ATRAC/MP3 CD only
*2 Only when Bookmarks have been
added to the tracks/files
*3 MP3 CD only
*4 Play lists (m3u) recorded in MP3
format only
*5 During playback, “PGM”
appears only when certain
tracks or files have been
stored in memory.
t No indication
(Normal play)
r
“ ”*
1
(Play all files in a selected group)
r
“1”
(Play a single track)
r
“SHUF”
(Play tracks in random order)
r
“ SHUF”*
1
(Play files in a selected group in
random order)
r
“ ”*
2
(Play tracks with Bookmarks)
r
“ ”*
3
(Play play lists*
4
selected)
r
“PGM”*
5
(Play tracks in your favorite order)
CD text information, ATRAC3plus/ATRAC3/
MP3 file information, playing time, etc. are
displayed.
Play mode
Display
Jog dial and ENTER button
•Turn the jog dial.
You can select tracks, files or groups
you want.
• Press ENTER.
You can switch the file/group search
mode and also start play. You can also
enter selected tracks for PGM play.

17
Playing tracks in random order (Shuffle play)
During playback, press PLAY MODE repeatedly until “SHUF” appears.
When playing ATRAC3plus/ATRAC3/MP3 files
In shuffle mode, the CD player plays all files on a CD in random order.
Playing all files in a selected group in random
order (Group shuffle play) (ATRAC/MP3 CD only)
During playback, press PLAY MODE repeatedly until “ SHUF” appears.
When playing ATRAC3plus/ATRAC3/MP3 files
The CD player plays all files in a selected group in random order.
Playback options

18
Playing your favorite tracks by adding
Bookmarks (Bookmark track play)
You can add Bookmarks to up to 99 tracks for each CD. You can use this function for up to 10
CDs.
While playing ATRAC3plus/ATRAC3 files
You can add Bookmarks to up to 999 tracks for each CD (up to 5 CDs).
While playing MP3 files
You can add Bookmarks to up to 400 tracks for each CD (up to 10 CDs).
To add Bookmarks
1 During playback of the track to which you want to add a Bookmark, press and hold u until
“ (Bookmark)” flashes in the display.
When the Bookmark has been added successfully, “ ” flashes slower.
2 Repeat step 1 to add Bookmarks to the tracks you want.
To listen to tracks with Bookmarks
1 Press PLAY MODE repeatedly until “ ” flashes.
2 Press u.
“ ” lights up in the display and the playback of the tracks with the Bookmarks starts.
To remove Bookmarks
During playback of a track with a Bookmark, press and hold u until “ ” disappears from the
display.
To check tracks with Bookmarks
During playback of tracks with Bookmarks, “ ” flashes slowly in the display.
Notes
• During playback of tracks with Bookmarks, tracks are played in order of track number, and not in the order
you added the Bookmarks.
• If you try to add Bookmarks to tracks on an 11th CD (on a 6th CD when playing ATRAC CDs), the
Bookmarks of the CD you played back first will be erased.
• If you remove all power sources, all Bookmarks stored in memory will be erased.
• If you continue playing the CD player on the rechargeable batteries without charging the batteries even
though “Lo batt” is displayed, all Bookmarks stored in memory will be erased.
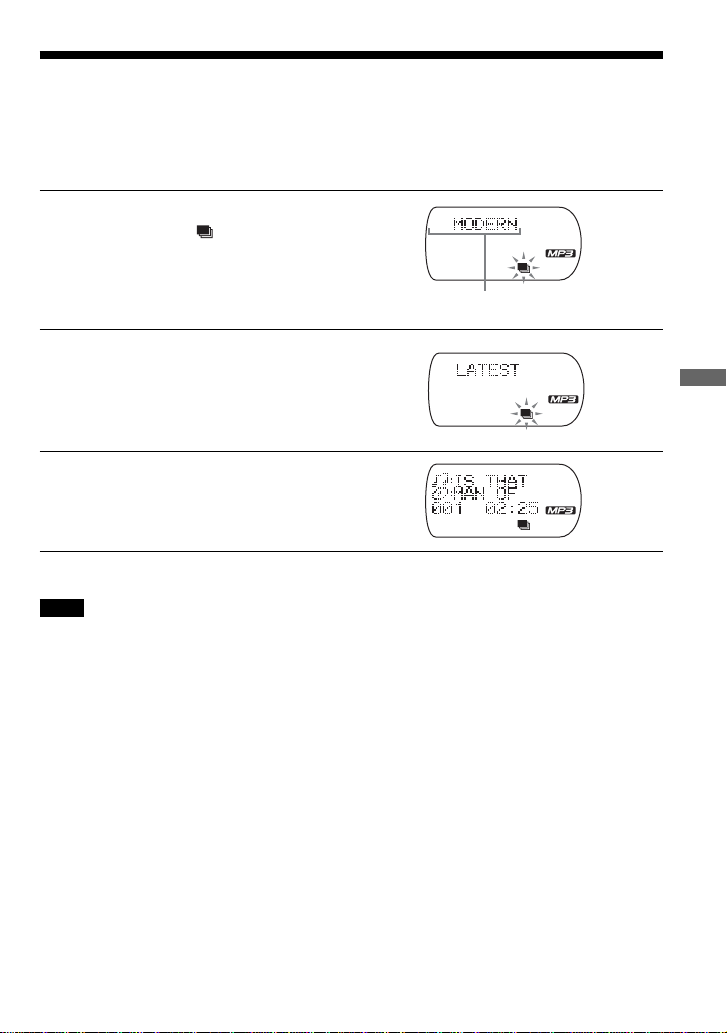
19
Playing your favorite play lists (m3u play list play)
(MP3 CD only)
You can play your favorite m3u play lists.*
* An “m3u play list” is a file for which an MP3 file playing order has been encoded. To use the play list
function, record MP3 files on a CD-R/RW using encoding software that supports the m3u format.
1
During playback, press PLAY MODE
repeatedly until “ ” appears.
2
Press . or > to select a play list
you want.
3
Press u.
Note
You can only play the top two play lists displayed on your screen on this CD player.
Play list
Playback options

20
Searching for your favorite tracks/files/groups
quickly using the jog dial
When using an audio CD
Turn the jog dial to select the track you want, then press ENTER.
The CD player starts play.
When using an ATRAC CD or MP3 CD
While the CD player is stopped
1 Turn the jog dial to select the group you
want, then press ENTER.
The CD player enters the file search mode.
2 Turn the jog dial to select the file you want,
then press ENTER.
The CD player starts play.
While the CD player is playing
Turn the jog dial to select the file you want, then
press ENTER.
The CD player starts play.
To select another group while the CD player is in the file search mode
1 Turn the jog dial until “ :” appears, then press ENTER.
“ : group name” appears and the CD player enters the group search mode.
2 Turn the jog dial to select the group you want, then press ENTER.
3 Turn the jog dial to select the file you want, then press ENTER.
To cancel the search
While the CD player is in the group search mode:
Turn the jog dial until “CANCEL” appears, then press ENTER.
While the CD player is in the file search mode:
1 Turn the jog dial until “ :” appears, then press ENTER.
2 Turn the jog dial until “CANCEL” appears, then press ENTER.
Note
When using an ATRAC or MP3 CD, up to 400 file names or up to 100 group names can be displayed. If the
number of files or groups surpasses these figures, a file number such as “401” or a group number such as
“101” will be displayed instead of names.
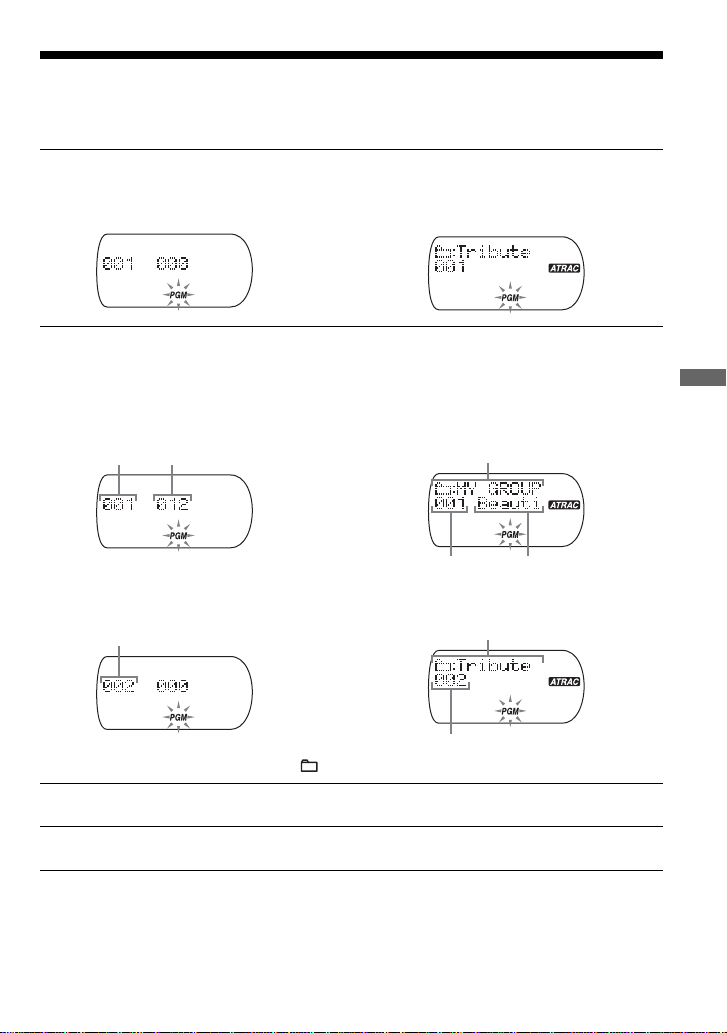
21
Playing tracks in your favorite order (PGM play)
You can program the CD player to play up to 64 tracks (“files” when playing an ATRAC/MP3
CD) in your favorite order.
1
While the CD player is stopped, press PLAY MODE repeatedly until “PGM”
appears.
2
Turn the jog dial (or press . or >) to select your favorite track or file, then
press ENTER.
The playing order increases by one.
mm
*You can also select another group using + or –.
3
Repeat step 2 to select the tracks or files in your favorite order.
4
Press u, or press and hold ENTER until play starts.
Track numberPlaying order
Audio CD
Playing order
Audio CD
Group name
ATRAC/MP3 CD*
Playback options
(Continued)
File name
Group name
Playing order
Playing order
ATRAC/MP3 CD

22
To check the program
During programming:
Press ENTER repeatedly before step 4.
During stop:
Press PLAY MODE repeatedly until “PGM” flashes, then press ENTER.
Each time you press ENTER, the track number appears.
Notes
• When you finish entering the 64th track in step 2, the first track selected appears in the display.
• If you select more than 64 tracks, the first tracks selected are erased.
When playing ATRAC3plus/ATRAC3/MP3 files
In PGM mode, you can program up to 64 files the same as you would for audio CD tracks.

23
B
Available features
The G-PROTECTION
function
The G-PROTECTION function has been
developed to provide excellent protection
against sound skipping during many active
uses.
When you set the G-PROTECTION switch
on your CD player to “2”, the G-
PROTECTION function will be enhanced
compared to “1.”
To walk with the CD player and enjoy high
quality CD sound using the G-
PROTECTION
function, set the G-PROTECTION switch to
“1.” While taking harder exercise, it is
recommended that you set it to “2.”
Note
Sound may skip:
– if the CD player receives stronger continuous
shock than expected,
– if a dirty or scratched CD is played or
– when using poor-quality CD-Rs/CD-RWs or
if there is a problem with the original recording
device or application software.
Checking the time
remaining on the CD
and the number of
tracks left (audio CD)
Each time you press DISPLAY, the display
changes as follows.
For an audio CD containing CD text
information, information in parentheses also
appears.
t Track number and elapsed playing time
(name of the current track)
r
Track number and remaining time of the
current track
(name of the current track/artist name)
r
The number of tracks left* and the time
remaining on the CD*
(album name/artist name)
* Not displayed during Single play, Shuffle play or
Bookmark track play.
Available features
24
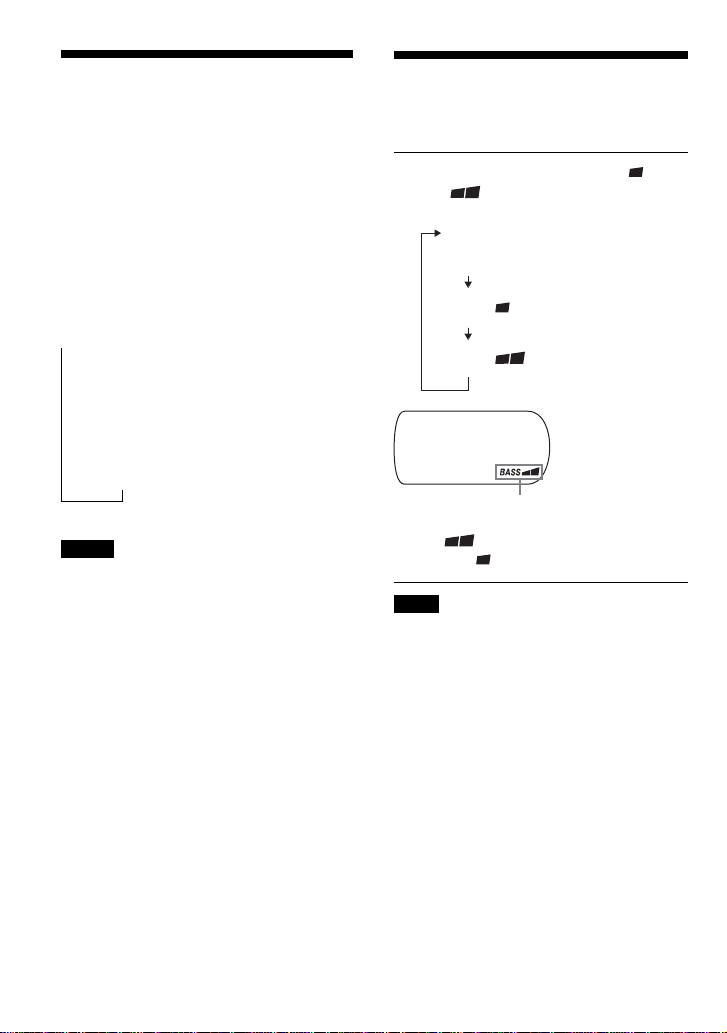
Emphasizing the bass
sound
(SOUND)
You can emphasize the bass-boosted sound.
Press SOUND to select “BASS ” or
“BASS .”
“BASS ” enhances the bass sound more
than “BASS .”
Note
If the sound is distorted when using the SOUND
function, turn down the volume.
The selected sound mode is displayed.
“BASS ”
“BASS ”
No indication
(Normal play)
Checking information
on a CD with
ATRAC3plus/ATRAC3/
MP3 files
You can check information on a CD with
ATRAC3plus/ATRAC3/MP3 files using
DISPLAY.
You can also check ID3 tag information if
the file has that information stored.
Each time you press DISPLAY, the display
changes as follows:
t File name, group name and elapsed
playing time
r
Artist name, CODEC information*,
remaining time of the current file
r
The total number of groups and the total
number of files
*Variable bit rate and sampling frequencies
Notes
• If the group does not have a group name,
“ROOT” appears in the display.
• If the file does not have ID3 tag information,
“- - - -” appears in the display.

25
Protecting your hearing
(AVLS)
The AVLS (Automatic Volume Limiter
System) function keeps down the maximum
volume to protect your hearing.
Press and hold SOUND until “AVLS
ON” appears in the display.
To turn off the AVLS function
Press and hold SOUND until “AVLS OFF”
appears in the display.
Note
If you use the SOUND function and the AVLS
function at the same time, sound may be distorted.
If this happens, turn down the volume.
Locking the controls
(HOLD)
You can lock the controls on your CD player
to prevent accidental button presses.
Slide HOLD in the direction of the
arrow.
“HOLD” flashes when the HOLD function is
activated.
To unlock the controls
Slide HOLD in the opposite direction of the
arrow.
Flashes when the volume is turned up
beyond a certain level.
Available features
Turning off the
operation beep sound
You can turn off the beep sound that is heard
from your headphones/earphones when you
operate your CD player.
1
Remove the power source (AC
power adaptor, rechargeable
batteries or dry batteries) from the
CD player.
2
Connect the power source while
pressing x/CHARGE for about
one second or more.
To turn on the beep sound
Remove the power source and then connect
the power source without pressing
x/CHARGE.
26
B
Using in a car
Console box
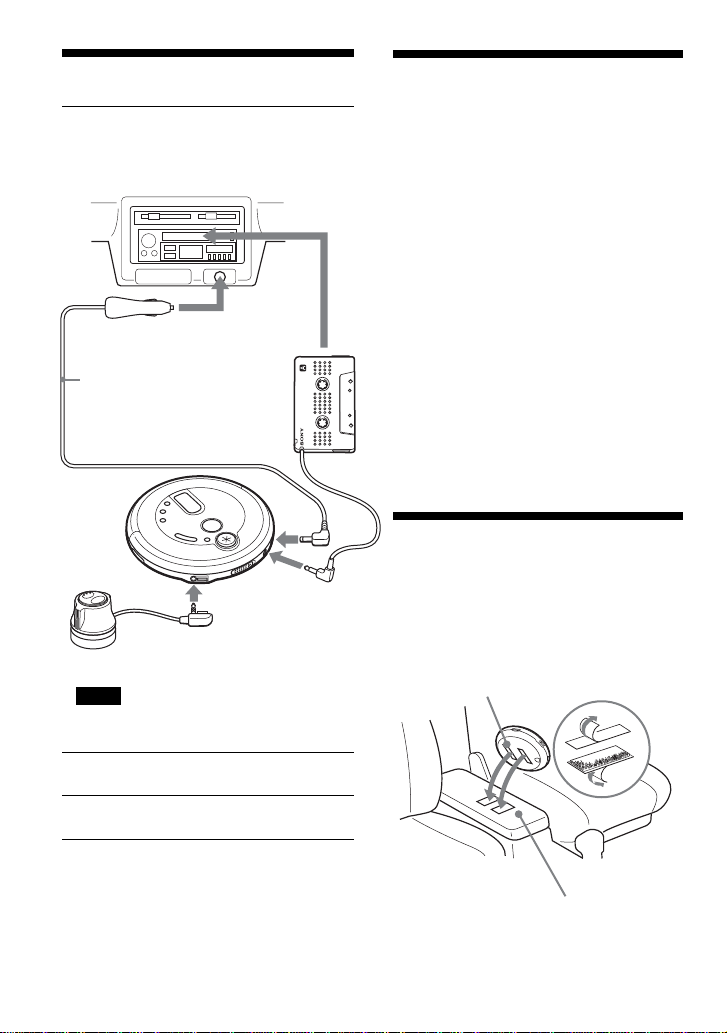
Installing in a car
1
Connect your CD player as shown
below.
Note
Turn down the volume of the car cassette deck
before inserting the car connecting pack.
2
Insert a CD.
3
Play a CD.
Bottom of the CD player
Car cassette deck
to a cigarette
lighter socket
to DC IN 4.5 V
Car
connecting
pack
Car battery
cord
Rotary
commander
to i
(headphones)
Where to place your CD
player
• Install the CD player in a location which:
– does not interfere with your driving.
– is not dangerous for passengers.
– does not interfere with the glove box lid
or ashtray.
– is stable, and where nothing around it
may interfere with installation.
• Do not install the CD player near heat
sources or where subject to direct sunlight,
excessive dust, or moisture (especially on
a dashboard.)
Please understand that we will not incur any
obligations for troubles caused by incorrect
installation.
If you have any questions or problems
concerning your CD player, please contact
your nearest Sony dealer.
Mounting your CD
player
Attach the CD player to the console box
with the supplied Velcro tapes. Affix the
narrow tapes to the CD player and the broad
tapes to the console box, etc.
to LINE OUT
27
Notes
• Do not affix Velcro tapes to the name plate or any
control.
• When you are going to park your car for a long
period of time, remove the CD player from the
console box and place it where it will not be
exposed to direct sunlight.
Note on the car battery cord
The 4.5V DC plug supplied with car battery cord
conforms to the proposed standards of the Japan
Electronics and Information Technology Industries
Association (JEITA). Do not connect it to other
players.
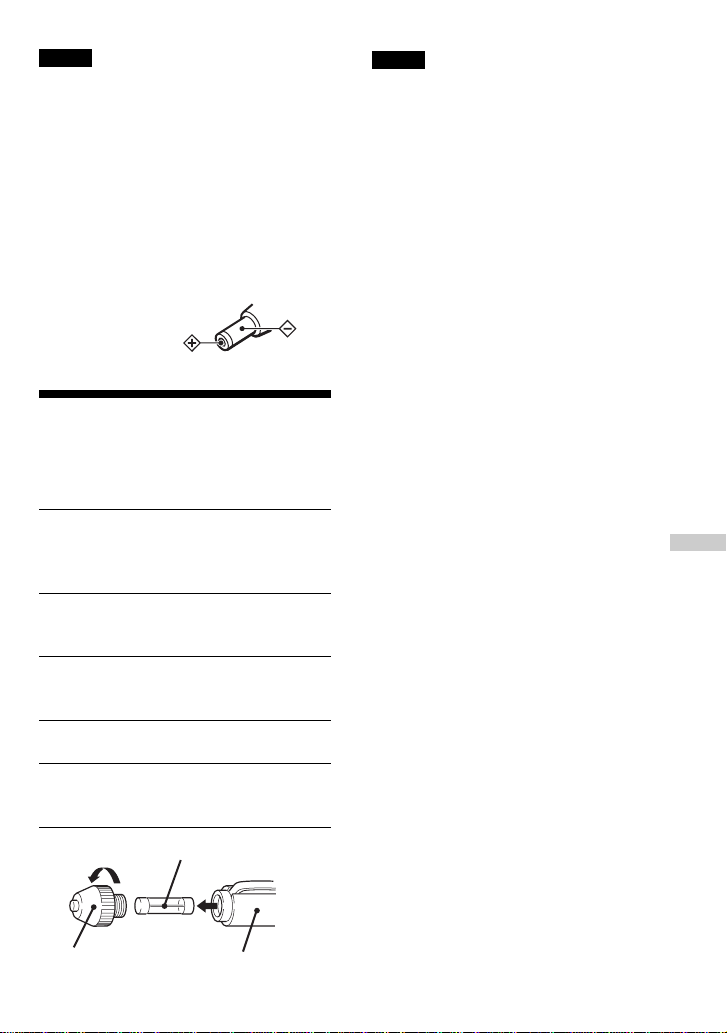
Replacing the fuse of
the car battery cord
If the CD player does not operate, check the
fuse. If it is blown, replace it as follows:
1
Turn off the CD player and remove
the cigarette lighter plug from the
cigarette lighter socket.
2
Remove the plug end by turning it
counterclockwise.
3
Remove the defective fuse from
the plug.
4
Insert a new fuse into the plug.
5
Replace the plug end by turning it
clockwise.
Notes
• Be sure to use a fuse of the same amperage and
length as the one to be replaced. Never use a
piece of wire as a substitute for the fuse.
• If the fuse is blown again after replacing it,
contact your nearest Sony dealer. In such a case,
bring the defective fuse to the dealer with you.
Notes on the car connecting pack
• If no sound is heard or the car connecting pack is
ejected, change the direction of playback on the
car cassette deck.
•Never insert the cord end of the car connecting
pack into the cassette insertion door. Otherwise,
the cord may break or the car cassette deck may
be damaged.
•You cannot use the car connecting pack with
some car cassette deck.
• The cord should be placed so that it does not
hinder driving.
•To disconnect the cord from the CD player, pull it
out by grasping the plug. Never pull the plug out
by the cord.
•With some car cassette decks, you may hear some
rattling noise from the car connecting pack.
However, this is not a sign of malfunction.
Remove
Plug end
Fuse
Cigarette lighter plug
Polarity of the plug
(JEITA standards)
Using in a car
28
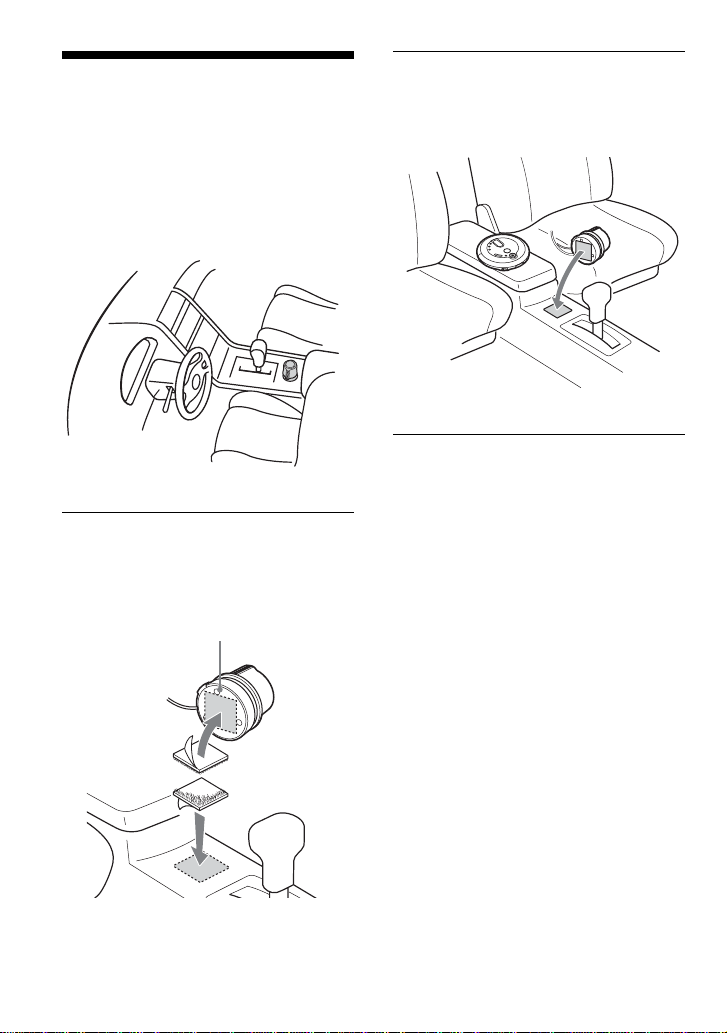
Mounting the rotary
commander
If you use the supplied rotary commander,
you can control your CD player as easily as
you would control the headlight or the wiper
switch of your car while driving.
Attach the rotary commander to a flat place
as illustrated below.
1
Attach the supplied Velcro tapes
to the bottom of the rotary
commander and to a flat place.
2
Secure the rotary commander to
the flat place by pressing the
Velcro tapes firmly together.
Bottom of the rotary
commander
29
You can use the following power sources:
•AC power adaptor (see “Playing an audio
CD or ATRAC3plus/ATRAC3/MP3 files”)
• Rechargeable batteries
• LR6 (size AA) alkaline batteries
For the battery life, see “Specifications.”
Using the batteries
Use only the following batteries for your CD
player.
Rechargeable batteries (not supplied)
Charge the rechargeable batteries before
using them for the first time.
• NH-WM2AA (NH-WMAA × 2)
Dry batteries
• LR6 (size AA) alkaline batteries
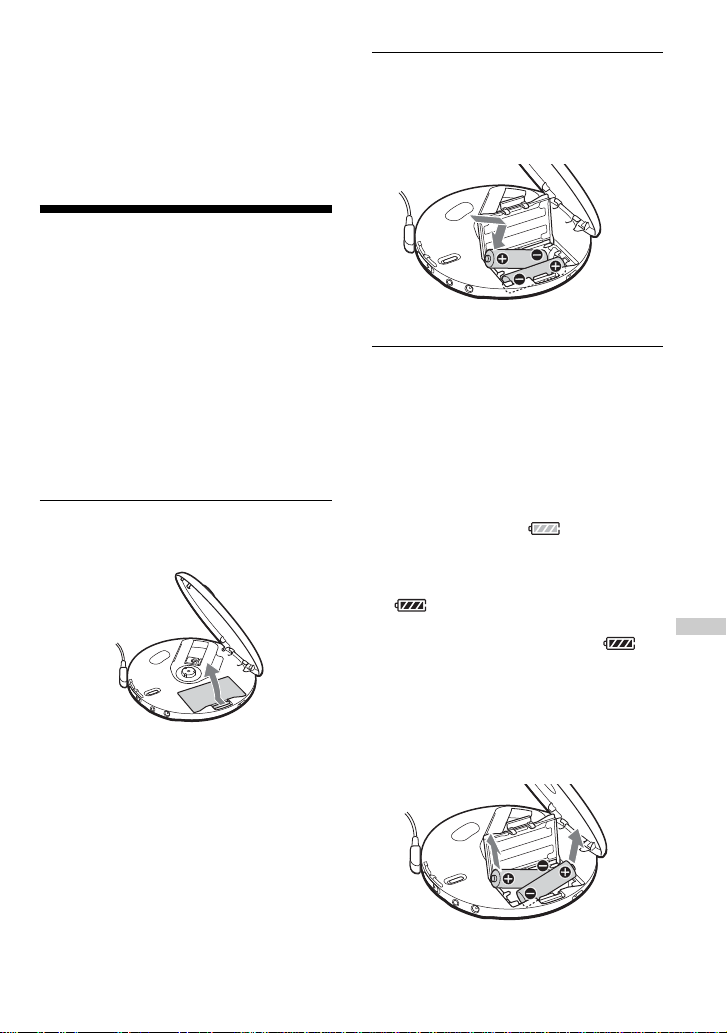
To insert the batteries
1
Open the battery compartment lid
inside your CD player.
B
Connecting to a power source
Insert # end first
(for both batteries).
Connecting to a power source
2
Insert two batteries by matching
the 3 to the diagram in the battery
compartment and close the lid
until it clicks into place.
To charge the rechargeable
batteries (not supplied)
1 Connect the AC power adaptor to the DC
IN 4.5 V jack of your CD player and an
AC outlet.
2 Press x/CHARGE to start charging.
The CD player charges the batteries. The
indicator sections of light up in
succession and “Charging” appears in the
display. When the batteries are
completely charged, “Charging” and the
indicator get turned off.
If you press x/CHARGE after the charge
has already been completed, the
indicator flashes and “FULL” appears in
the display.
3 Disconnect the AC power adaptor.
To remove the batteries
Remove the batteries as illustrated below.
(Continued)
30
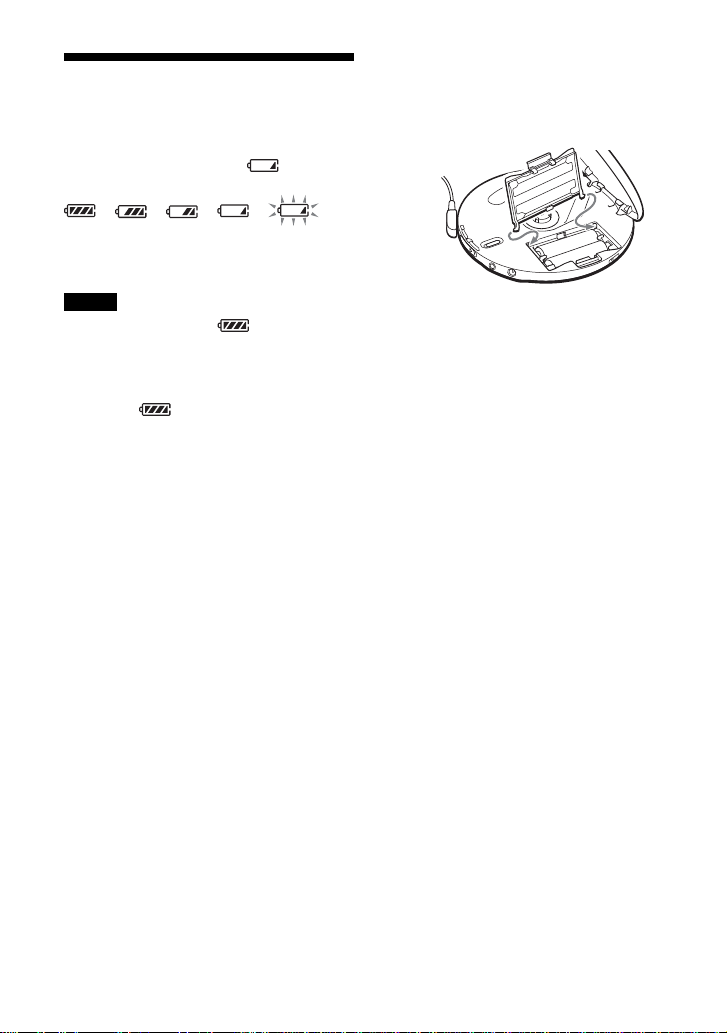
Using the batteries
To check the remaining power of the
batteries
You can check it in the display.
Replace the batteries when “ ” flashes.
t t t t t
Lo batt*
* Beep sounds.
Notes
• The indicator sections of roughly shows
the remaining battery power. One section does
not always indicate one-fourth of the battery
power.
• Depending on operating conditions, the indicator
sections of
may increase or decrease.
When to replace the rechargeable
batteries
If the battery life becomes shorter by about
half, replace the batteries with new
rechargeable batteries.
Notes on the rechargeable batteries
•To keep the original battery capacity for a
long time, charge the batteries only when
they are completely depleted.
• If the battery is new or has not been used
for a long time, it may not be charged
completely until you charge and discharge
it several times.
• When carrying the rechargeable batteries,
use the supplied battery carrying case to
prevent unexpected heat. If the
rechargeable batteries and the metallic
objects get contacted, heat or fire may
occur due to a short circuit.
Notes on using the dry batteries
• Be sure to remove the AC power adaptor.
• When the batteries are depleted, replace
both batteries with new ones.
To attach the battery compartment lid
If the battery compartment lid is detached by
an accidental drop, excessive force, etc.,
attach it as illustrated below.

31
Notes on the power
source
Disconnect all power sources when the CD
player is not used for a long time.
On AC power adaptor
• Use only the AC power adaptor supplied.
If your CD player is not supplied with the
one, use the AC-E45HG AC power
adaptor. Do not use any other AC power
adaptor. It may cause a malfunction.
Polarity of the plug
• Do not touch the AC power adaptor with
wet hands.
• Connect the AC power adaptor to an easily
accessible AC outlet. Should you notice an
abnormality in the AC power adaptor,
disconnect it from the AC outlet
immediately.
On rechargeable batteries
and dry batteries
• Do not charge the dry batteries.
• Do not throw the batteries into fire.
• Do not carry the batteries with coins or
other metallic objects. It can generate heat
if the positive and negative terminals of the
battery are accidentally contacted by a
metallic object.
• Do not mix rechargeable batteries with dry
batteries.
• Do not mix new batteries with old ones.
• Do not use different types of batteries
together.
• When the batteries are not to be used for a
long time, remove them.
• If battery leakage occurs, wipe off any
deposit in the battery compartment, and
install new batteries. In case the deposit
adheres to you, wash it off thoroughly.
Connecting to a power source
32
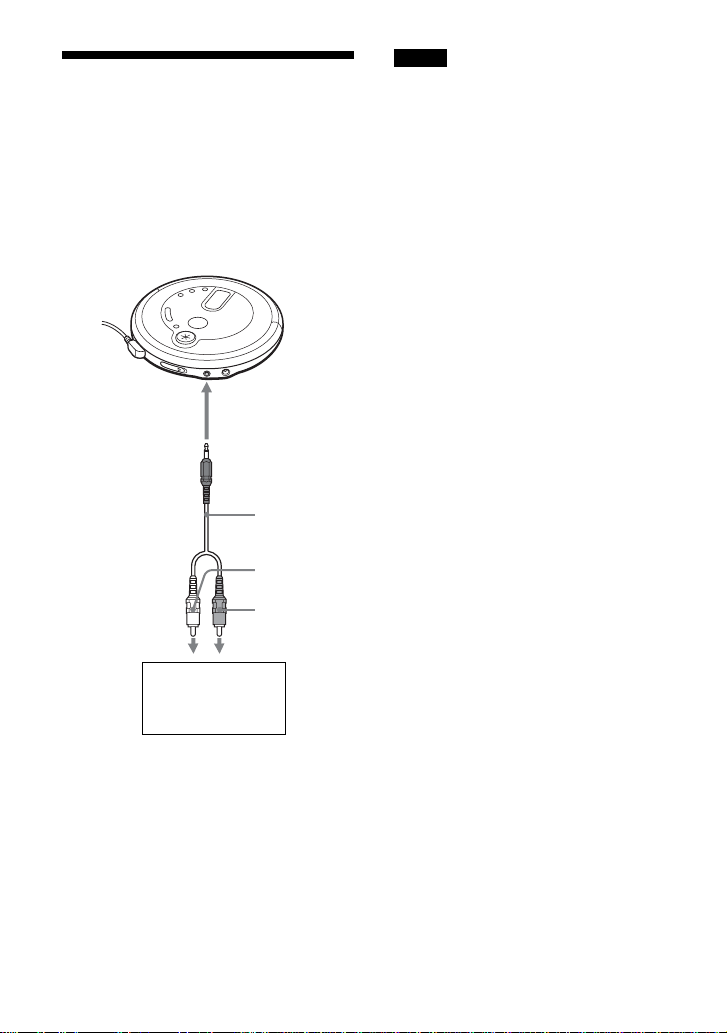
Connecting a stereo
system
You can listen to CDs through a stereo
system and record CDs on a cassette tape.
For details, see the instruction manual that
comes with the connected device.
Be sure to turn off all connected devices
before making connections.
Notes
• Before you play a CD, turn down the volume of
the connected device to avoid damaging the
connected speakers.
• Use the AC power adaptor for recording. If you
use dry batteries as a power source, batteries may
become completely depleted during recording.
• Adjust the volume properly on the connected
device so that the sound will not be distorted.
When using the connecting cord
If the sound is distorted, connect the device
to the i jack.
About the G-PROTECTION and
SOUND functions when using the
connecting cord
•To record high quality CD sound, set the
G-PROTECTION switch to “1.”
• The SOUND function works only on the
output sound from the i jack and not work
on the output sound from the LINE OUT
jack.
Stereo system,
cassette recorder,
radio cassette
recorder, etc.
B
Connecting your CD player
Connecting cord
(not supplied)
Left (white)
Right (red)
to LINE OUT
33
Precautions
On safety
• Should any solid objects or liquid fall into
the CD player, unplug it and have it
checked by qualified personnel before
operating it any further.
• Do not put any foreign objects in the DC
IN 4.5 V (external power input) jack.
On the CD player
•Keep the lens on the CD player clean and
do not touch it. If you do so, the lens may
be damaged and the CD player will not
operate properly.
• Do not put any heavy object on top of the
CD player. The CD player and the CD may
be damaged.
• Do not leave the CD player in a location
near heat sources, or in a place subject to
direct sunlight, excessive dust or sand,
moisture, rain, mechanical shock,
unleveled surface, or in a car with its
windows closed.
• If the CD player causes interference to the
radio or television reception, turn off the
CD player or move it away from the radio
or television.
• Discs with non-standard shapes (e.g.,
heart, square, star) cannot be played on this
CD player. Attempting to do so may
damage the CD player. Do not use such
discs.
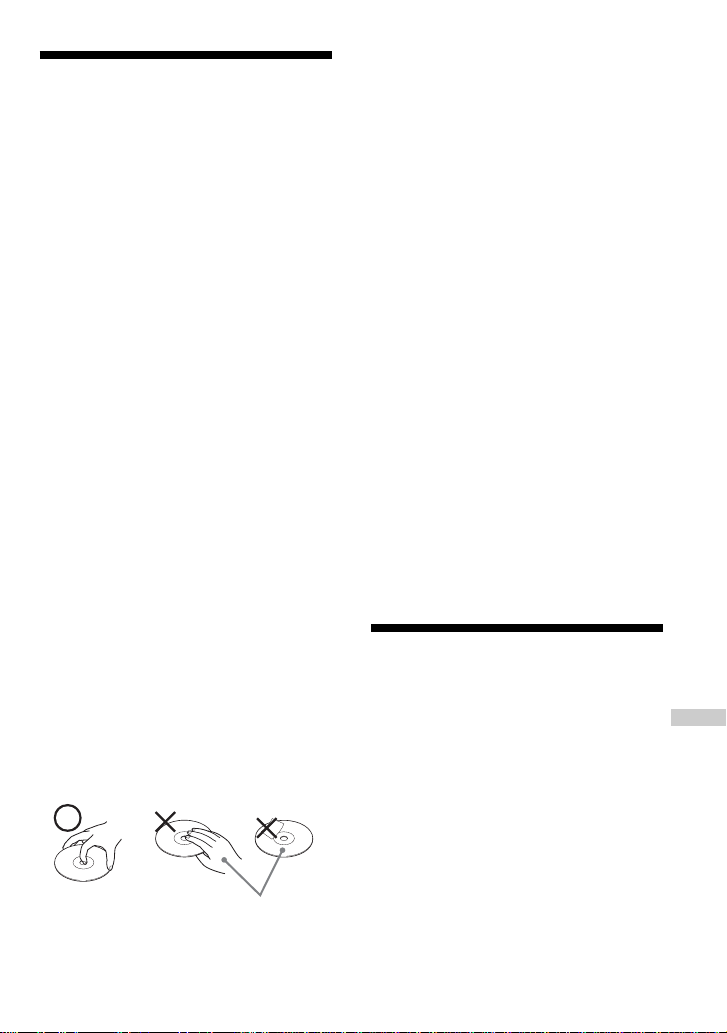
On handling CDs
•To keep the CD clean, handle it by its
edge. Do not touch the surface.
• Do not stick paper or tape onto the CD.
• Do not expose the CD to direct sunlight or
heat sources such as hot air ducts. Do not
leave the CD in a car parked under direct
sunlight.
On headphones/earphones
Road safety
Do not use headphones/earphones while
driving, cycling, or operating any motorized
vehicle. It may create a traffic hazard and is
illegal in some areas. It can also be
potentially dangerous to play your headsets
at high volume while walking, especially at
pedestrian crossings. You should exercise
extreme caution or discontinue use in
potentially hazardous situations.
Preventing hearing damage
Avoid using headphones/earphones at high
volume. Hearing experts advise against
continuous, loud and extended play. If you
experience a ringing in your ears, reduce
volume or discontinue use.
Consideration for others
Keep the volume at a moderate level. This
will allow you to hear outside sounds and to
be considerate to the people around you.
Maintenance
To clean the casing
Use a soft cloth slightly moistened in water
or a mild detergent solution. Do not use
alcohol, benzine or thinner.
B
Additional information
Not these ways
Additional information

34
Troubleshooting
Should any problem persist after you have checked these symptoms, consult your nearest Sony
dealer.
Symptom
The volume does not
increase even if you press
the VOL + button repeatedly.
Cannot adjust the volume.
No sound, or noise is heard.
Certain files cannot be
played.
The playing time is too short
when powered with the dry
batteries.
The playing time is too short
when powered with the
rechargeable batteries.
“Lo batt” appears in the
display. The CD does not
play.
“HI dc In” appears in the
display.
Cause and/or corrective actions
c If “AVLS” flashes in the display, press and hold SOUND until
“AVLS OFF” appears in the display. (page 25)
c The headphones/earphones are connected to the LINE OUT jack.
Connect them to the i (headphones) jack. (page 11)
c The headphones/earphones are connected to the LINE OUT jack.
Connect them to the i (headphones) jack. (page 11)
c Connect the plugs firmly. (page 11)
c Plugs are dirty. Clean the plugs with a dry soft cloth periodically.
c You tried to play files saved in a format that is not compatible with
this CD player. (page 6)
c Check that you are using alkaline batteries and not manganese
batteries. (page 29)
c Replace the batteries with new LR6 (size AA) alkaline batteries.
(page 29)
c Charge and discharge the rechargeable batteries several times.
(page 29)
c The rechargeable batteries are used up completely. Charge the
batteries. (page 29)
c Replace the batteries with new LR6 (size AA) alkaline batteries.
(page 29)
c Use only the AC power adaptor or car battery cord in “Optional
accessories.” (page 38)
c Remove all power sources, then insert the batteries or connect the
AC power adaptor again. (pages 11, 29)

35
Symptom
The CD does not play or
“No disc” appears in the
display when a CD is placed
in the CD player.
“HOLD” flashes on the
display when you press a
button, and the CD does not
play.
Cannot adjust the volume
with VOL +/– on the CD
player.
The CD player does not start
charging.
Playback starts from the point
you stopped. (resume
function)
Rustling noise is heard from
the CD.
Cause and/or corrective actions
c The buttons are locked. Slide the HOLD switch back. (page 25)
c The CD is dirty or defective.
c Check that the CD is inserted with the label side up. (page 11)
c Moisture condensation has occurred.
Leave the CD player aside for several hours until the moisture
evaporates.
c Close the lid of the battery compartment firmly. (page 29)
c Make sure the batteries are inserted correctly. (page 29)
c Connect the AC power adaptor to an AC outlet securely. (page 11)
c Press u after one second or more has passed since the AC power
adaptor was connected.
c The CD-R/RW is blank.
c There is a problem with the quality of the CD-R/RW, recording
device, or application software.
c Files in two or more formats have been recorded on the CD-R/RW.
(page 7)
c The buttons are locked. Slide the HOLD switch back. (page 25)
c The CD player is connected to an audio device. Adjust the volume
using the volume control on the connected device. (page 32)
c During stop, press x/CHARGE. (page 29)
c
The resume function is working. To start play from the first track,
press u during stop until the first track starts playing, or open the
lid of the CD player. Or remove all power sources, then insert the
batteries or connect the AC power adaptor again.
(pages 11, 12, 29)
c
Close the lid of the battery compartment firmly. (page 29)
Additional information
(Continued)
36
Troubleshooting
Symptom
During playback of an
ATRAC
CD or
MP3 CD, the CD does
not rotate but you can hear
the sound normally.
“NO FILE” appears in the
display after u is pressed
or the lid of the CD player is
closed.
When closing the lid of the
CD player, the CD starts to
rotate.
The LCD display becomes
hard to see or slows down.
“ ” is flashing quickly in
the display, and you cannot
locate the beginning of the
track or the specific point in
the track.
Cause and/or corrective actions
c
The CD player is designed to stop the rotation of an ATRAC CD or
MP3 CD during playback to reduce the power consumption. The
player is not malfunctioning.
c There are no ATRAC3plus/ATRAC3/MP3 files in the CD.
c A CD-RW from which the data has been erased is being used.
c The CD is dirty.
c
The CD player is reading the information on the CD. The player is
not malfunctioning.
c You are using your CD player at high temperatures (above 40°C/
104°F) or at low temperatures (below 0°C/32°F). At room
temperature, the display will return to its normal operating
condition.
c The CD player has entered the Bookmark track play. Press
PLAY MODE repeatedly until “ ” disappears from the display.

37
Specifications
System
Compact disc digital audio system
Laser diode properties
Material: GaAlAs
Wavelength: λ = 780 nm
Emission duration: Continuous
Laser output: Less than 44.6 µW
(This output is the value measured at a distance
of 200 mm from the objective lens surface on
the optical pick-up block with 7 mm aperture.)
D-A conversion
1-bit quartz time-axis control
Frequency response
20 - 20 000 Hz
+1
–2
dB (measured by JEITA CP-
307)
Output (at 4.5 V input level)
Line output (stereo minijack)
Output level 0.7 V rms at 47 kΩ
Recommended load impedance over 10 kΩ
Headphones (stereo minijack)
Approx.5 mW + Approx. 5 mW at 16 Ω
Power requirements
For the area code of the model you
purchased, check the upper left side of the
bar code on the package.
• Sony NH-WM2AA rechargeable batteries:
1.2 V DC × 2
•Two LR6 (size AA) batteries: 1.5 V DC × 2
•AC power adaptor (DC IN 4.5 V jack):
U, U2, CA, CA2, E92, MX2, TW2 and
CA2/C models: 120 V, 60 Hz
CED, CED/4, CE7, CE7/C, EE, EE1, E, E13
and E13/2 models: 220 - 230 V, 50/60 Hz
CEK model: 230 V, 50 Hz
AU2 model: 240 V, 50 Hz
EU8, EU8/C, JE.W, E18, KR4 and EE8
models:
100 - 240 V, 50/60 Hz
HK4 model: 230 V, 50 Hz
CNA model: 220 V, 50 Hz
Battery life*
1
(approx. hours)
(When you use the CD player on a flat and stable
surface)
Playing time varies depending on how the CD
player is used.
When using two Sony alkaline batteries
LR6 (SG) (produced in Japan)
G-PROTECTION function
“1” “2”
Audio CD 55 50
ATRAC3plus files*
2
95 95
MP3 files*
3
85 85
*1 Measured value by the standard of JEITA
(Japan Electronics and Information Technology
Industries Association)
*2 When recorded at 48 kbps or 64 kbps
*3 When recorded at 128 kbps
Operating temperature
5°C - 35°C (41°F - 95°F)
Dimensions (w/h/d) (excluding
projecting parts and controls)
Approx. 136.0 × 28.7 × 136.0 mm
(5
3
⁄8 × 1
3
⁄16 × 5
3
⁄8 in.)
Mass (excluding accessories)
Approx. 199 g (7.1 oz.)
Design and specifications are subject to change
without notice.
Additional information

38
Optional accessories
AC power adaptor AC-E45HG
Active speaker system SRS-Z1
Car battery cord DCC-E345
Car battery cord with car connecting pack
DCC-E34CP
Car connecting pack CPA-9C
Rechargeable battery NH-WM2AA
Earphones MDR-E931LP
MDR-EX71SL
MDR-Q55SL
Your dealer may not handle some of the
accessories listed above. Please ask the
dealer for detailed information about the
accessories in your country.

39
Sony Corporation Printed in Malaysia
This warranty is valid only in the United States.