NOTE: The Use and Care Guide applies to several versions of this appliance. Accordingly, you may find descriptions of individual features that do not apply to your specific appliance.
IMPORTANT: DO NOT use cooktop, rangetop, or range while hood is disassembled.
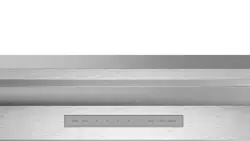
Chimney Wall Hood
HPCNxxWS
24'' (610 mm) in depth, with widths of 36'' (914 mm) 48'' (1,219 and mm). This model series features brushed stainless-steel canopy with LED lights.
Hood canopy
Touch control panel
LED lights
Baffle filters
Grease trays
Grease tray trough
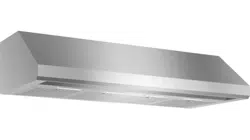
Wall Hood
PHxxGWS
27'' (686 mm) in depth, with widths of 36'' (914 mm), 42'' (1,067 mm), 48'' (1,219 mm), 54'' (1,372 mm) and 60" (1,524 mm). This model series features brushed stainless- steel canopy with LED lights and heat lamps.
Hood canopy
LED lights
Touch control panel
Heat lamps
Baffle filters
Grease trays
Grease tray trough
Filter spacers
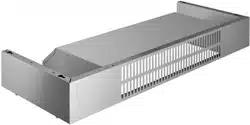
PHxxGWS
24'' (610 mm) in depth, with widths of 30'' (762 mm), 36'' (914 mm), and 48'' (1,219 mm). This model series features brushed stainless-steel canopy with LED lights.
Hood canopy
LED lights
Touch control panel
Baffle filters
Grease trays
Grease tray trough
Filter spacers
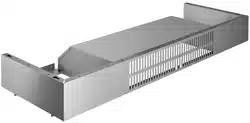
Island Hood
HPINxxWS
27'' (686 mm) in depth, with widths of 42'' (1,067 mm) and 54'' (1,372 mm). This model series features brushed stainless-steel canopy with LED lights.
Hood canopy
Touch control panel
LED lights
Baffle filters
Grease trays
Grease tray trough
Filter spacers
Telescopic flue
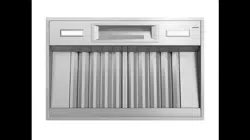
Custom Insert Hood
VCINxxGWS
22'' (559 mm)in depth, and with widths of 321⁄4'' (820 mm),39 3⁄4'' (1,010 mm),44 1⁄4'' (1,125 mm), 50-3/8 ‘’ (1,281 mm), or 561⁄4'' (1,429 mm). This model series features brushed stainless-steel filters and LED lights.
LED lights
Touch control panel
Baffle filters
Grease trays
Grease tray trough
Filter spacers
Filter spacers
Touch Control Panel
NOTE: Not all features referred to in this manual applies to all models.
a) LH LAMP
Left Heat Lamp (PHxxGWS only)
Independently controls the left infrared heating lamp, turning the lamp on or off.
b) FILTER
Clean Filter Reminder
After 40 hours of operation, the FILTER button will illuminate indicating that the filters need to be cleaned. When this indicator illuminates clean the filters as instructed on page 14.
To receive a reminder notification to clean the filters through the Home ConnectTM app, activate the feature in the Settings section of the app. You may also review the status of the filter saturation within the Home Connect app.
To turn OFF the Clean Filter Reminder:
After cleaning, press and hold the FILTER button for 3 seconds until it beeps to reset the 40-hour period and to turn the reminder off.
c) DELAY
Delay Shut Off
If the blower is off when the DELAY button is pressed, the blower will turn on to the high speed setting for 10 minutes. At the end of the 10 minutes the blower will automatically turn off. If the blower is on when the DELAY button is pressed, the blower runs for 10 minutes from the time the DELAY button was pressed at the current speed then turns off. During the 10 minute timed period, the DELAY button is illuminated. To interrupt a timed period, press one of the fan speed buttons or 0 button to turn off.
An ability to choose a different time period other than the default setting is also possible through the Home ConnectTM app in the SETTINGS menu.
d) 0
OFF
Touch ‘0’ once to turn the blower off and reset the control.
e) 1 – 4
Fan Speed
Increases or decreases the blower speeds. The chosen blower speed LED will remain illuminated while in operation.
Low
Medium
Medium/High
High
You may also remotely control and monitor hood fan speeds through the Home Connect app. An ability to choose a different speed other than the default setting is also possible through the Home Connect app in the SETTINGS menu.
f) AUTO
Automatic Mode
When in AUTO mode, the hood automatically turns the blower on, depending on the amount of heat the control senses. It automatically adjusts every 5 minutes. If the control does not sense a high level of heat, it will turn the blower off.
g) LIGHTS
LED Light Control
This button controls the LED lighting. The first press turns the lights on. A second press dims the lights. A third press turns the lights off. An 0 –100% light slider in Home Connect app allows additional control to obtain the perfect level of light.
h) CONNECT
Home ConnectTM
This function allows the user to connect the hood with a mobile device.
i) RH LAMP
Right Heat Lamp (PHxxGWS only)
Independently controls the right infrared heating lamp, turning the light on or off.
Control Tone
To turn the control tone off or on, hold the FILTER and LIGHTS button for 3 seconds. The control tone may also be turned off or on through the SETTINGS section of the Home Connect app.
Operating the Hood
For Better Results
The blower should be turned on for about 5 minutes before cooking in order to establish air currents upward through the hood. Thus when heat, smoke, moisture, grease and cooking odors are produced, they will be carried outside instead of drifting into other rooms.
Use the lower speeds for normal use and the higher speeds for strong odors or fumes.
Drafts across the range or cooktop will reduce the effectiveness of the hood. Such drafts should be prevented when possible.
The best job of ventilation in the kitchen is done where the only air currents are those created by the blower itself.
Regular use of the fan system while cooking helps keep the kitchen comfortable and less humid.
Use a rear burner when browning or pan frying meat.
For optimal performance, the width of the hood should equal that of the cooktop or rangetop or exceed it by 3 inches on either side. Install these hoods only with Thermador blowers.
Home ConnectTM
With Home ConnectTM, the appliance is Wi-Fi capable and can be remotely controlled using a mobile device (e.g. tablet or smartphone). The Home Connect app offers additional functions which are a perfect complement to the networked appliance.
Home Connect does not work over Wi-Fi networks that require browser registration, i.e. a user name and password entered via a web browser.
You should have a stable wireless network with good reception and access to the internet.
If the appliance is not connected to the WLAN network home network), it functions in the same way as a typical appliance with no network connection and can be operated as usual.
NOTE: Please ensure that you follow the safety instructions given at the beginning of this instruction manual and that these are also observed when operating the appliance via the Home Connect app and when away from home. Please also follow the instructions in the Home Connect app.
NOTE: Operation on the appliance itself always takes priority, and during this time it is not possible to operate the appliance using the Home Connect app.
Setup
To implement settings via Home ConnectTM, you must have installed the Home Connect app on a mobile device e.g. tablet or smartphone). Please observe the supplied
Home Connect documents that came with your appliance with regard to this feature.
Follow the steps specified by the app to implement the settings.
What do you need to connect your appliance to Home ConnectTM?
Your appliance must be installed properly.
A smartphone or tablet equipped with the latest version of iOS or Android operating system.
Your home appliance within the Wi-Fi signal of your home network.
The name of your Wi-Fi network (SSID) and its password (key).
IMPORTANT INFORMATION ABOUT DATA SECURITY:
The transfer of data is always encrypted. Home Connect meets the highest security standards, which are continuously reviewed.
Information:
We are constantly working to improve the Home
Connect app, which may lead to differences in the setup steps. Please rely on the instructions in the latest version of the Home Connect app to guide you through the setup process.
STEP 1: Download the Home Connect app and create a user account
Open the App Store (Apple® devices) or Google PlayTM store (AndroidTM devices) on your smartphone or tablet.
Search for the HOME CONNECT app in the store's search and install it. The Home Connect app:
Open the app and register to create a Home Connect account.
Write down your Home Connect account credentials user account and password). You will need them later.
The app will guide you through the steps of adding your appliance to Home Connect.
STEP 2: Connect your appliance to your home network
Your appliance must be installed properly.
Open your Home Connect app to add an appliance.
Please follow the directions in the app and refer to the Home Connect Guide only when prompted by the app.
STEP 2.1: Connect your appliance to your home network with WPS
Please enter STEP 2.1 only when prompted by the app. The following steps describe operations at the appliance itself.
NOTE: To connect the hood to your home network, the hood and the lights must be OFF.
You can cancel the process at any time by pressing 0.
1. Press and hold the CONNECT button until 0 and CONNECT flash.
2. Press 1.
1 and CONNECT will flash.
3. Press the WPS button on your router.
Please consult your router's manual to locate the WPS button.
When CONNECT and 3 flashes your appliance is connected to the home network.
The app will get notified once your appliance has been successfully connected to your Wi-Fi network.
4. Follow the directions in the app.
NOTICE:
ERROR: If the CONNECT and 2 light flashes then the appliance could not establish a connection with your home Wi-Fi within 2 minutes.
FIX: Check whether your appliance is in range of your Wi-Fi and repeat the process. If unsuccessful, refer to STEP 2.2 to connect the appliance manually.
STEP 2.2: Connect your appliance to your home network step-by-step
Please enter STEP 2.2 only when prompted by the app.
The following steps describe operations at the appliance itself.
NOTE: To connect the hood to your home network, the hood and the light must be OFF.
You can cancel the process at any time by pressing 0.
1. Press and hold the CONNECT button until 0 and CONNECT flash.
2. Press 2.
2 and CONNECT will flash.
The appliance will open a temporary Wi-Fi network called “HomeConnect” with the password “HomeConnect” for 2 minutes.
The app provides your home Wi-Fi network name (SSID) and its password via this temporary Wi-Fi network to the appliance enabling the appliance to connect to your home Wi-Fi network.
When CONNECT and 3 flashes your appliance is connected to the home network.
3. Follow the directions in the app.
STEP 3: Connect your appliance to the Home ConnectTM app
Please enter STEP 3 only when prompted by the app. The following steps describe operations at the appliance itself.
Press and hold the CONNECT button until 0 and CONNECT flash.
Follow the directions in the app.
The registration process is complete once CONNECT stops flashing on the hood.
You have successfully connected your appliance. You can now benefit from all the advantages of the Home ConnectTM app!
NOTICE:
ERROR: The appliance fails to connect to the app (the CONNECT light will turn OFF).
FIX: Ensure your smartphone or tablet is connected to the same home network (Wi-Fi). Check that your wireless connection is stable and has a strong signal.
Then repeat the process from STEP 2.2.
Connecting your appliance to another Home Connect account
If you want to change the wireless home network that is connected to the hood, reset the connection to your hood by:
1. Press and hold the CONNECT and 0 buttons on your hood for at least 3 seconds.
The CONNECT button will turn off.
2. Repeat the connection to your home network.
Software update
Using the software update function, your appliance's software can be updated (e.g. for the purpose of optimization, troubleshooting or security updates). To do this, you need to be a registered Home ConnectTM user, have installed the app on your mobile device and be connected to the Home ConnectTM server.
As soon as a software update is available, you will be informed through the Home ConnectTM app and will be able to start the software update via the app.
Once the update has been successfully downloaded, you can start installing it via the Home ConnectTM app if you are on your local area network.
The Home ConnectTM app will inform you once installation is complete.
Notes:
You can continue to use your appliance as normal while updates are downloading.
Depending on your personal settings in the app, software updates can also be set to download automatically.
We recommend that you install security updates as soon as possible.
About Data Protection
When your appliance is connected for the first time to a
WLAN network, which is connected to the Internet, your appliance transmits the following categories of data to the
Home Connect server (initial registration):
Unique appliance identification (consisting of appliance codes as well as the MAC address of the installed Wi-Fi communication module).
Security certificate of the Wi-Fi communication module (to ensure a secure IT connection).
The current software and hardware version of your domestic appliance.
Status of any previous resetting to factory settings.
This initial registration prepares the Home Connect functions for use and is only required when you want to use these Home Connect functions for the first time.
NOTE: Ensure that the Home Connect functions can be used only in conjunction with the Home Connect app.
Information on data protection can be accessed in the Home Connect app.
Declaration of Conformity
BSH Home Appliances hereby declares that the appliance which features Home Connect is in accordance with the basic requirements and the other relevant provisions of the directive 1999/5/EC.
Care and Cleaning
Filter and Grease Tray Cleaning
WARNING
Be sure the entire appliance (including the filters and lights) has cooled and grease has solidified before attempting to clean any part of the appliance.
CAUTION
DO NOT use the cooktop, rangetop, or range while hood is disassembled.
Your hood has removable stainless steel filters and stainless steel grease trays. They must be cleaned when the FILTER light illuminates on the Touch Control Panel or whenever they collect grease. When used over a grill, wok or other high grease applications, more frequent cleaning may be required.
The filters and grease trays can be washed by hand or in the dishwasher. Soak the ventilation filters in hot water using a mild detergent. Rinse well and shake to dry.
Slight discoloration can occur when cleaning the filters in a dishwasher. This has no influence on the function of the grease filters.
NOTE: Reverse the directions below to remove the filters and grease trays. Ensure filters are cool and grease has congealed before removal.
To Install Filters and Grease Trays:
1. Turn the appliance OFF.
2. Grease trays must be in place before installing the filters.
Push the grease tray in and down inside the grease tray trough.
3. Start with an outside filter. Slide the filter up, toward the front of the hood, then push down on top of the grease tray.
Hood Surface Cleaning
For general care, wipe the outside of the stainless steel with mild, lukewarm, soapy water. Always wipe and dry in the direction of the stainless steel grain. Avoid using too much pressure, which may mar the surface.
DO NOT use abrasive products such as steel wool.
DO NOT use cellulose sponges. Some sponges are processed with salt and can cause corrosion by leaving salt deposits on the metal.
DO NOT allow any cleaning compounds to remain in contact with stainless steel for extended periods.
DO NOT USE CHLORINE-BASED CLEANERS.
To remove fingerprints and produce added shine, use a stainless steel cleaner or conditioner. The Thermador Stainless Steel Conditioner can be purchased online (US only) at: www.store.thermador.com (order part number
Heat Lamps (PHxxGWS only)
WARNING
Heat lamps might be hot. Disconnect from power and allow to cool before servicing.
DO NOT operate the appliance without the heat lamps installed.
Turn off the heat lamps and blower. Allow the heat lamps to cool before handling.
If new heat lamps do not operate, be sure lamps are inserted correctly before calling for service.
Heat Lamp Installation
1. Turn heat lamp clockwise to install.
Heat Lamp Replacement
Turn heat lamp counterclockwise to remove.
Replace lamp with either a PAR-38 175W heat lamp or a PAR-40 250W heat lamp.
The PAR-38 175W heat lamp provides a tighter seal within the enclosure and produces the same amount of effective heat with lower energy consumption. These lamps may not be readily available at local retail outlets. The PAR-40 250W heat lamp is more widely available. It can be used instead.
Service
Troubleshooting
Problem
Suggested Cause and Solution
Noise during operation
Some noise is normal due to vibration and air movement.
Excessive noise could indicate one of the following:
ductwork is too small / undersized
ductwork is too large / oversized
ductwork is loose
transition is too small or is loose
wood screws are not fully tightened
loose screws in trim parts, etc.
Check Installation Manual to verify that ductwork is the proper size. Tighten screws.
Noise when unit is off
Backflow flap on outside of duct wall cap moves with the wind. This is normal.
Lights and fan blower do not work
Hood circuit breaker may be tripped. Reset breaker.
Fan blower does not work
Power supply is insufficient.
Electrical wiring is incorrectly connected.
See the Installation Manual for more information.
Hood trips breaker
Electrical wiring is incorrectly connected.
Circuit is not sufficient.
See the Installation Manual for more information.
The hood is not venting properly
The hood may be too high from the cook top.
The hood may not be centered above the cook top.
Make up air not sufficient.
The wind from opened windows or opened doors in the surrounding area is affecting the ventilation of the hood. Close all the windows and doors to eliminate the outside air flow.
Blockage in the duct opening or ductwork. Remove all blockage from the duct- work or duct opening.
Duct length too long, too many elbows, “back to back” elbows, or too small roof or wall cap, will all cause issues with air draw.
See the Installation Manual for more information.
Fault tone
Two short beeps will sound whenever the pressing of a button by the user results in a possible function that is not possible by the system.
The beep tone can be disabled by pressing the FILTER and LIGHTS buttons simultaneously for at least 3 seconds. Pressing the FILTER and LIGHTS buttons simultaneously when the beep sound is turned off will turn on the beep sound.


 Control Tone