Loading ...
IMPORTANT: The power plug contains a
transformer. Do not cut o the power plug
to replace it with another plug as this will
cause a hazardous condition.
Introduction
Congratulations on your purchase and
welcome to Philips Norelco!
To fully benet from the support that
Philips Norelco oers, register your
product at www.norelco.com/register.
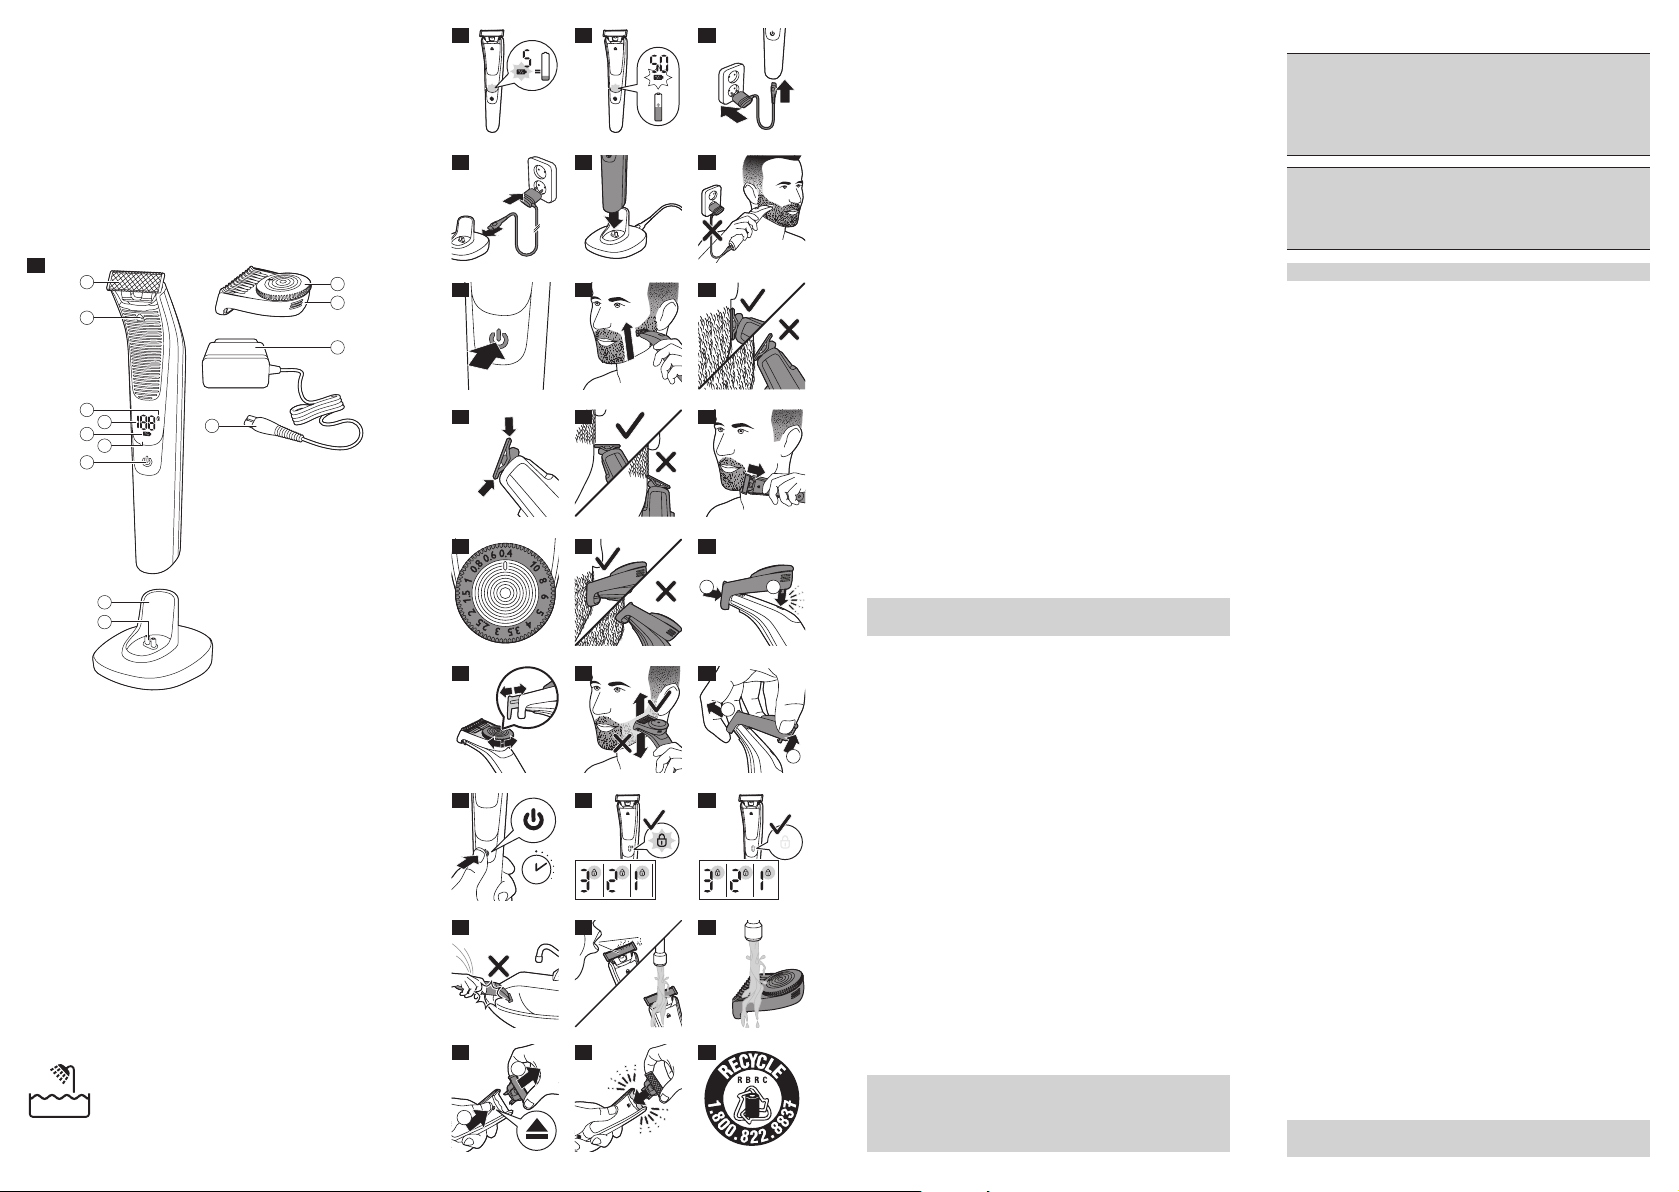
General description (Fig. 1)
1 Blade
2 Blade release slide switch
3 Travel lock
4 Battery status percentage
5 Charge symbol
6 LED Digital display
7 On/o button
8 Charging stand
9 Small plug of the charging stand
10 Small plug
11 Power plug
12 Precision trimming comb
13 Hair length setting wheel
Not shown: pouch
This symbol indicates that the
product can be used in the bath
or shower.
Charging
Charging takes approx. 1 hour. Charge the
product before rst use and when the
charge symbol blinks orange.
- Charging or using the product at
temperatures below 40°F (4,5°C) or
higher than 95°F (35°C) adversely
aects the lifespan of the battery.
- If the product is subjected to a major
change in temperature, pressure or
humidity, let the product acclimatize for
30 minutes before use.
Battery status indications
- When the product is almost empty, the
charge symbol blinks orange (Fig. 2).
- The remaining battery capacity
is indicated by the battery status
percentage on the display.
- When the product is charging, the
charging symbol blinks white (Fig. 3).
- Quick charge: after approx. 5 minutes
charging, the product contains enough
energy for 5 minutes use. During quick
charge the charge symbol blinks white
quickly until quick charge is nished.
- When the battery is fully charged, the
battery status percentage shows 100% and
the charge symbol lights up continuously.
Note: After approx. 30 minutes, the light
goes out automatically.
Charging with the power cord
1 Make sure the product is switched o.
2 Insert the small plug into the product
and put the power plug in any 120V AC
outlet (Fig. 5).
3 After charging, remove the power plug
from the wall outlet and pull the small
plug out of the product.
Charging in the charging stand
1 Insert the small plug into the charging
stand and put the power plug in any
120V AC outlet (Fig. 5).
2 Put the product in the charging stand
(Fig. 6).
3 After charging, remove the power plug
from the wall outlet and pull the small
plug out of the charging stand.
Operating time
When the product is fully charged, it has a
cordless operating time of up to 90 minutes.
Note: An adapter plug may be necessary
for cord usage in some foreign countries.
Use an attachment plug adapter of the
proper conguration for power outlet.
Using the product
Always check the product and all
accessories before using. Do not use the
product or any accessory if it is damaged,
as this may cause injury. Always replace a
damaged part with one of the original type.
This product is for use on facial hair only.
It is not intended for shaving, edging or
trimming hairs on lower body parts or
scalp hair.
Note: This product is for cordless use (Fig. 7).
- Use this product for its intended
household use as described in this
manual.
- For hygienic reasons, the product
should only be used by one person.
- Trimming is easier when the skin and
hair are dry.
- Be careful when trimming without a
comb as the product will trim every hair
it touches when it is turned on.
- Before using the product, always check
the blade for damage or wear. If the
blade is damaged or worn, do not
use the product, as injury may occur.
Replace a damaged blade before you
use the product (see ‘Replacement’).
- Use the product to trim, edge or shave
facial hair (beard, moustache and
sideburns). Shave for a smooth result,
trim to obtain a certain length and edge
to create perfect edges and sharp lines.
Take your time when you rst start to
use the product. You have to acquire
practice with the product.
Turning the product on and o
1 Press the on/o button once to turn the
product on or o (Fig. 8).
Shaving
- Make sure that the blade is in full contact
with the skin by placing it at on the skin.
- For the best result, move the product
against the grain.
- Make long strokes while pressing lightly.
- Use the product dry or wet with gel or
foam, even in the shower.
- Shaving a clean beard and face gives
the best results.
1 Switch on the product (Fig. 8).
2
Place the blade on the skin and move the
product up or against the grain in long
strokes while pressing lightly (Fig. 9).
Note: Make sure you hold the surface of
the blade at against your skin (Fig. 10).
1
2
3
4
5
7
6
8
9
13
12
11
10
1
432
1098
75 6
1311 12
1 2
161514
2221
3 sec.
20
1
2
1917 18
25
28
23
2
1
26
24
27
Loading ...
Loading ...