
INSTALLATION GUIDE/USER GUIDE
NZ AU GB IE EU AE HK SG
E72B, E402B, E442B, E522B, RF72B, RF402B, RF442B,
RF522B, RF522W, RF522A, RF610A & RF540A models
ACTIVESMART™ REFRIGERATOR
ICE & WATER, AUTOMATIC ICE
AND NON-ICE & WATER MODELS


1
CONTENTS
IMPORTANT!
SAVE THESE INSTRUCTIONS
The models shown in this user guide may not
be available in all markets and are subject
to change at any time. For current details
about model and specification availability
in your country, please go to our website
fisherpaykel.com or contact your local
Fisher & Paykel dealer.
Note: the word ‘refrigerator’, throughout this
user guide, refers to the combination
of refrigerator/freezer products.
Registration
Register your product with us so we can
provide you with the best service possible.
To register your product visit our website:
fisherpaykel.com
Introduction 2
Safety and warnings 3
Installation instructions 12
Moving or storing your appliance 25
ActiveSmart™ operating instructions 26
All about the external display (Ice & Water models only) 30
Using your water dispenser (Ice & Water models only) 31
Water filter (Ice & Water and Automatic Ice models only) 32
Using your ice maker (Ice & Water and Automatic Ice models only) 33
ActiveSmart™ special features 34
Cleaning and caring for your refrigerator 37
Foodcare 41
Moving or storing your appliance 42
ActiveSmart™ user warnings and sounds 43
Troubleshooting 44
Manufacturer’s Service & Warranty 49
European Directive 2012/19/EU on
Waste Electrical and Electronic Equipment (WEEE) 50
2
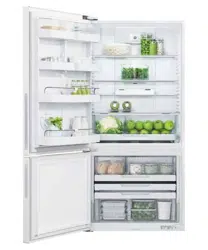
INTRODUCTION
Thank you for buying a Fisher & Paykel ActiveSmart™ refrigerator.
At Fisher & Paykel we are very proud of this refrigerator. This refrigerator combines size and
storage space with the latest features and functions.
Thousands of hours of food care research and refrigeration experience has been
programmed into your refrigerator to give you the best possible performance.
We hope you enjoy your new refrigerator.
Note: Automatic Ice and non-Ice & Water models do not have an external water dispenser.
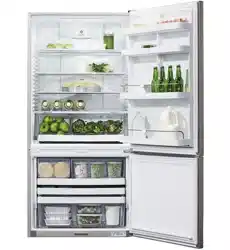
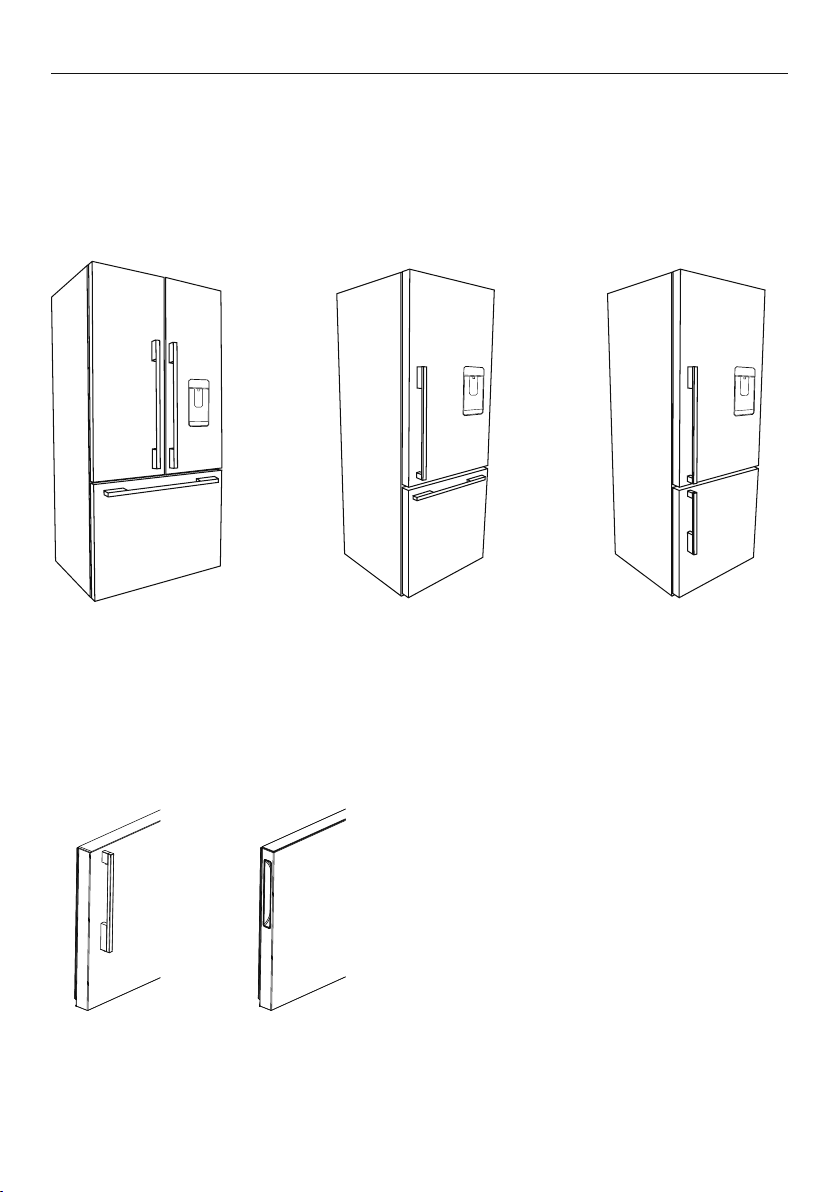
Refrigerator French door
and freezer drawer
Refrigerator door
and freezer door
Refrigerator door
and freezer drawer
ActiveSmart™ refrigerators have two handle
options, shown below.
Pocket handlesDesigner handles
3
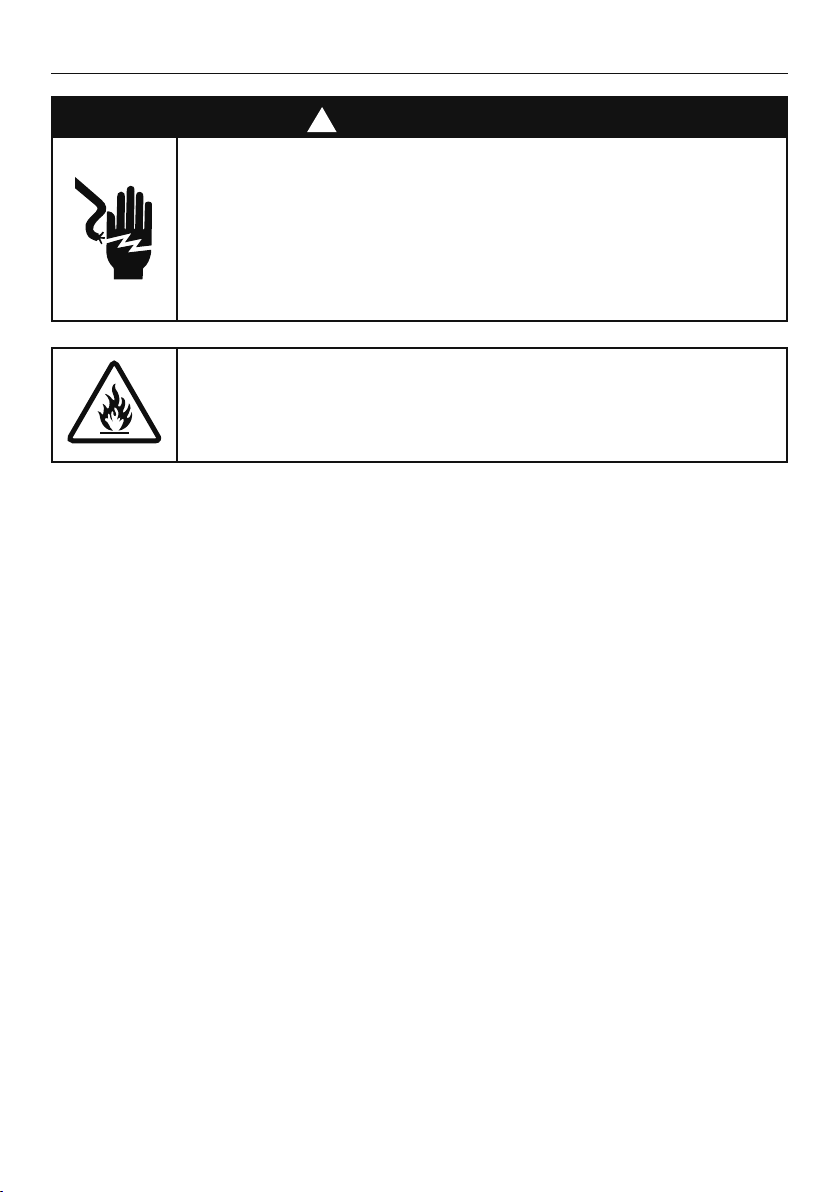
SAFETY AND WARNINGS
!
WARNING!
Electric Shock Hazard
Read and follow the safety and warnings
outlined in this User guide before operating
this appliance.
Failure to do so can result in death, electric
shock, fire or injury to persons.
WARNING: Risk of fire/flammable material
This refrigerator contains flammable
refrigerant isobutane (R600a).
Use this appliance only for the intended purpose as
described in the user guide.
IMPORTANT SAFETY INSTRUCTIONS
WARNING!
When using this appliance always exercise basic safety
precautions including the following:
• This appliance can be used by children aged 8years
and above and persons with reduced physical,
sensory or mental capabilities or lack of experience
and knowledge if they have been given supervision
or instruction concerning use of the appliance in a
safe way and understand the hazards involved.
• Children aged 3 to 8 years may load and unload this
appliance under supervision.
• Children should be supervised to ensure that they do
not play with the appliance.
• Cleaning and user maintenance shall not be made by
children without supervision.

4
SAFETY AND WARNINGS
• The manufacturer’s installation instructions for
product and cabinetry ventilation must be followed
when installing the appliance.
• To avoid hazard due to instability of the
appliance, it must be fixed in accordance with
installation instructions.
• WARNING: Keep ventilation openings, in the
appliance enclosure or the built-in structure, clear
of obstruction.
• WARNING: Do not use mechanical devices or other
means to accelerate the defrosting process, other
than those recommended by the manufacturer.
• WARNING: Do not damage the refrigerant circuit.
• In case of damage to the refrigerant circuit, ventilate
the area by opening all windows. Do not operate
electrical equipment or any other equipment that
may produce arcs, sparks or flames in the area.
Contact your Fisher & Paykel trained and supported
service technician immediately to arrange for the
appliance to be repaired.
• It is hazardous for anyone other than a Fisher &
Paykel trained and supported service technician to
service thisappliance.
• In Queensland the authorised service person
must hold a gas work licence or authorisation for
hydrocarbon refrigerants to carry our service or
repairs which involve removal of covers.
• Opening the door for long periods can cause a
significant increase of the temperature in the
compartments of the appliance.
• WARNING: Connect to safe drinking water only.

5
SAFETY AND WARNINGS
Electrical WARNING
• This appliance must be installed in accordance with
the installation instructions before use.
• To allow disconnection of the appliance from the
supply after installation, incorporate a switch in the
fixed wiring in accordance with the wiring rules.
• Never unplug your refrigerator by pulling on the
power cord. Always grip the plug firmly and pull
straight out from the outlet.
• Do not plug in any other appliance at the same
power point as your refrigerator or use extension
cords or double adapters.
• Repair or replace immediately all electric service
cords that have become frayed or otherwise
damaged. Do not use a cord that shows cracks or
abrasion along its length or at either the plug or
appliance end.
• If the power supply cord is damaged, it must only
be replaced by your Fisher & Paykel trained and
supported service technician because special
purpose tools are required.
• When moving your appliance away from the wall, be
careful not to roll over or damage the power cord.
• Do not use electrical appliances inside the food
storage compartments of the appliance, unless they
are of the type recommended by the manufacturer.

6
SAFETY AND WARNINGS
• When positioning the appliance, ensure the power
cord is not trapped or damaged.
• Do not locate multiple portable socket-outlets or
portable power supplies at the rear of the appliance.
IMPORTANT!
Your refrigerator is designed to operate for many years
without the need for service checks. However, if your
refrigerator is malfunctioning, have it attended to by
your Fisher & Paykel trained and supported service
technician as soon as possible. All electrical repairs
must be carried out by an adequately trained service
technician or qualified electrician.
Cleaning
• Many commercially available cleaning products
contain solvents that may attack the plastic
components of your refrigerator and cause them
tocrack.
• Avoid using anti-bacterial cleaning products on
either the interior or exterior of the cabinet as they
may cause rusting of metal components and cracking
of plastic components.
• Please refer to the ‘Cleaning and caring for
your refrigerator’ section of this user guide for
further information.
Disposal
• Extreme care must be taken when disposing of your
old appliance to avoid hazards:
– The flammable refrigerant gas must be
safely removed.

7
SAFETY AND WARNINGS
– The thermal insulation foam in this appliance
contains flammable insulation blowing gases, any
exposed foam may be highly flammable and must
be carefully treated during disposal.
– The doors and panels should be removed and
the shelves left in place so that children may not
easily climb inside.
• Your Fisher & Paykel trained and supported
service technician will be able to give advice on
environmentally friendly methods of disposing of
your old refrigerator or freezer.
Food Safety
• Regularly clean accessible draining systems and
surfaces that come in contact with food.
• Store raw meat and fish in suitable containers in the
refrigerator, so that it is not in contact with or drip
onto other food.
• If the appliance will be left empty for long periods,
switch off, defrost, clean, dry, and leave the
door open to prevent mould developing within
the appliance.
Storing food and drinks
• Do not store explosive substances such as aerosol
cans with a flammable propellant in this appliance.
• Never store volatile or flammable materials in your
refrigerator as they may explode.
• Never freeze liquids in glass containers. Liquid
expands during freezing, which may cause the
container to explode.

8
SAFETY AND WARNINGS
• Never freeze carbonated drinks. They may explode.
• Do not consume food if it is too cold. Food removed
from the freezer compartment may be cold enough
to cause damage when brought into contact with
bare skin, eg frozen ice cubes.
Power failure — food safety
• Do not refreeze frozen foods that have thawed
completely. The food may be dangerous to eat.
Follow the recommendations below if you discover
food in your freezer has thawed:
– Ice crystals still visible—food may be refrozen
but should be stored for a shorter period
than recommended.
– Thawed but refrigerator cold—refreezing
generally not recommended. Fruits and some
cooked food can be refrozen but use as soon as
possible. Meat, fish, poultry—use immediately or
cook then refreeze. Vegetables—discard as they
usually go limp and soggy.
– Thawed and warmer than 5°C—discard all food.

9
SAFETY AND WARNINGS
Water filter
IMPORTANT!
• The water connection to your Ice & water refrigerator
must be installed by a qualified plumber or Fisher &
Paykel trained and supported service technician and
comply with all state and local laws.
• Installation and use MUST comply with all state
and local plumbing codes. Checkwith your local
public works department for plumbing codes. You
must follow their guidelines as you install the water
filtration system.
• To avoid serious illness or death, only connect your
water filter to safe drinking water.
• The water filter cartridge needs to be changed when
the replacement indicator icon illuminates. This will
happen every 6 months.
• If the water filtration system has been allowed to
freeze, replace filter cartridge. Failure to replace
the disposable filter at recommended intervals may
lead to reduced filter performance and failure of the
filter, causing property damage from water leakage
or flooding.
• In cases of excessively reduced filter life—we
recommend that you consult a local plumber or
your water supplier for advice on suitable filtration
requirements for the water supplied to your home.
• Filter replacement is the consumer’s responsibility
and will not be covered by the warranty except
in the case of faulty parts or materials within the
filter cartridge.

10
SAFETY AND WARNINGS
• If the water has not created ice for some time or ice
has an unpleasant taste or odour dispose of ice and
refer to ‘Before you start using the Ice & Water or
Automatic Ice function’ for flushing instructions. If
unpleasant taste or odour persists, you may wish to
fit a new filter cartridge.
• Use new tubing supplied with the refrigerator.
DO NOT reuse old tubing from old water
and ice connections.
• Your water filtration system can withstand up to
120psi (827kPa) of water pressure. Ensure the
supplied pressure reducing valve is installed before
installing the water filtration system. DO NOT install
if water pressure exceeds 120psi (827kPa).
• To reduce the risk associated with property damage
due to water leakage or flooding:
• DO NOT install systems in areas where ambient
temperatures may go above 100°F (38°C) or drop
below 33°F (0.6°C).
• DO NOT install on hot water supply lines. The
maximum operating water temperature of this filter
system is 100°F (38°C).
• DO NOT install where water hammer conditions may
occur. If water hammer conditions exist, you must
install a water hammer arrester.
• Clean the water tanks if they have not been used for
48 hours. Flush the water system connected to the
water supply if water has not been used for 5 days.

11
SAFETY AND WARNINGS
Ice making
IMPORTANT!
• Avoid contact with the moving parts of the ice maker
ejector mechanism, and do not place your fingers
on the automatic ice-making mechanism while the
appliance is inoperation.
• Do not use ice cubes that may have become
discoloured, usually with a green-blue colour. If such
discolouration is noted, discard the ice cubes and
contact your Fisher&Paykel trained and supported
service technician.

12
INSTALLATION INSTRUCTIONS
Please follow the installation steps below to ensure your appliance operates correctly.
1. Power
z
The appliance must be installed so the plug is accessible.
z
To ensure that the appliance is not accidentally switched off, connect your refrigerator
to its own power point. Do not plug in any other appliance at this power point or use
extension cords and double adaptors, as the combined weight of both power cords can
pull the double adaptor from a wall outlet socket.
z
For power requirements, refer to the information on the serial plate located at the front
bottom right-hand side of the refrigerator when the door is open.
z
It is essential that the appliance is properly grounded (earthed).
2. Location
z
Your refrigerator should not be located in direct sunlight or next to any heat generating
appliance such as a cooktop, oven or dishwasher.
3. Ice & Water and Automatic Ice models
z
Your Ice & Water and Automatic Ice refrigerator must be installed by an authorised
plumber or Fisher & Paykel trained and supported service technician as incorrect
plumbing can lead to water leaks.
z
Fisher & Paykel Appliances does not accept responsibility for damage (including water
damage) caused by faulty installation or plumbing.
13
INSTALLATION INSTRUCTIONS
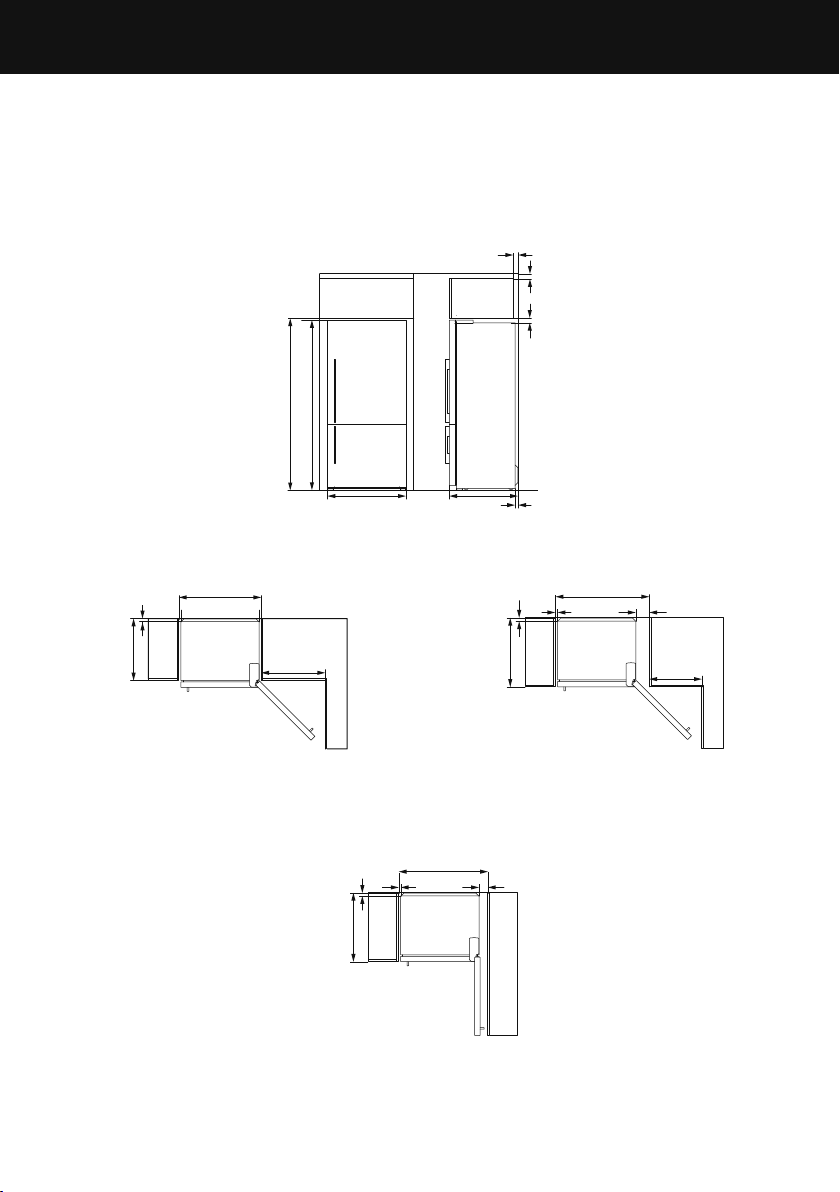
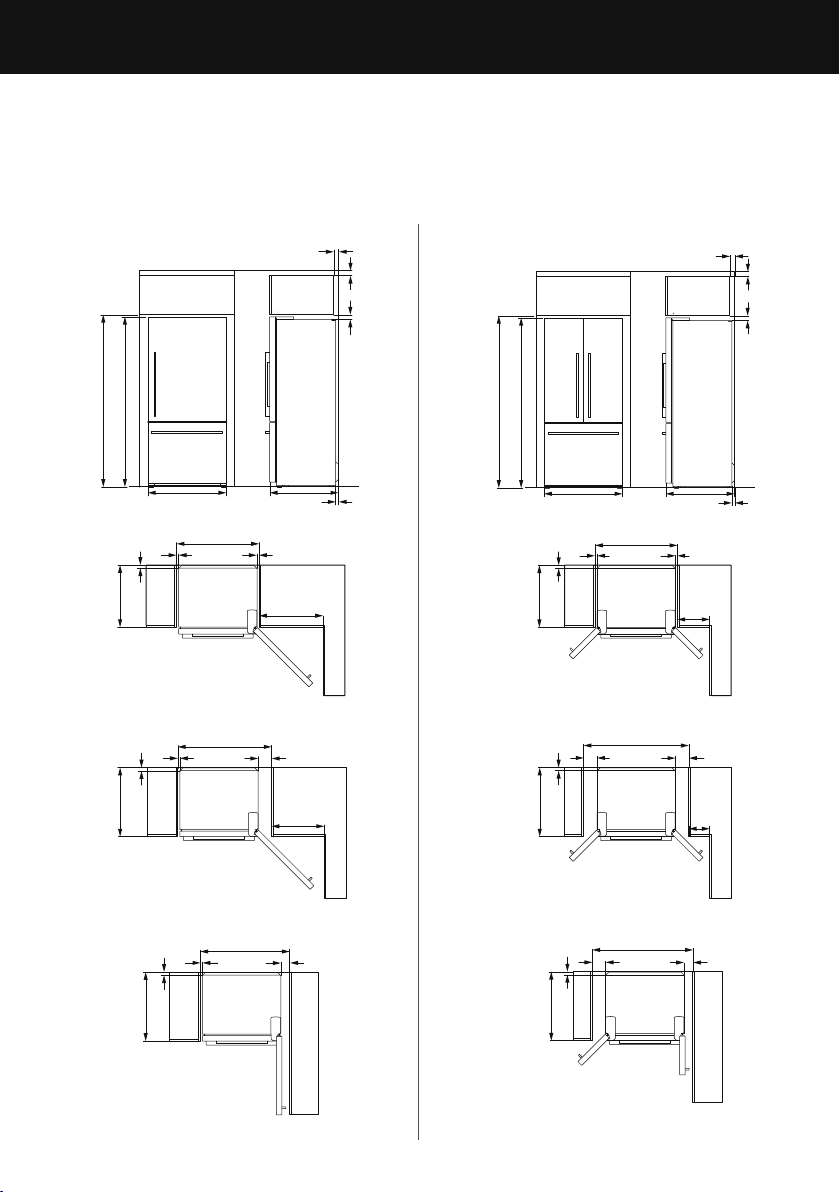
4. Product and cabinetry dimensions
If integrating your refrigerator, please follow installation instructions provided with the
integration kits.
Freezer door models (E372B, RF372B, E402B, RF402B, E442B, RF442B, E522B, RF522B)
(Ice & Water, Automatic Ice and non-Ice & Water models)
Flush with refrigerator
chassis — full door rotation
Flush with refrigerator
door — full door rotation
Flush with refrigerator
door — 90° door rotation
A
B C
GE
I
R
Q
P
O
O
N
N
N
N
KK
K
LK
M
H
F
J
D
14
E372B
RF372B
E402B
RF402B
E442B
RF442B
E522B
RF522B
PRODUCT DIMENSIONS MM
A Overall height of product 1620 1720 1720 1720
B Overall width of product 1620 1720 1720 1720
C Overall depth of product
(excl. handle, includes evaporator)
n/a 695 695 695
CABINETRY DIMENSIONS (incl. minimum clearances) MM
D Inside height of cavity 1645 1735 1735 1735
Flush with refrigerator chassis—full door rotation
E Inside width 675 675 720 830
F Inside depth 620 620 620 620
Flush with refrigerator door—full door rotation
G Inside width 790 790 835 945
H Inside depth flush to door n/a 695 695 695
Flush with refrigerator door—90° door rotation
(for full drawer/shelf access, the doors need to be open past 90°)
I Inside width 745 745 790 900
J Inside depth flush to door n/a 695 695 695
MINIMUM CLEARANCES MM
K Side clearance 20 20 20 20
L Side clearance — hinge side flush with
door — full rotation
135 135 135 135
M Side clearance — hinge side flush with
door — 90° rotation
90 90 90 90
N Rear clearance
(incl. evaporator tray) 30 30 30 30
O Vent — around top of cupboard
(optional) 50 50 50 50
P Top clearance — above refrigerator cabinet 50 50 50 50
Q Door clearance — hinge side flush with
chassis — full rotation
520 520 555 645
R Door clearance — hinge side flush with
door — full rotation
405 405 440 530
INSTALLATION INSTRUCTIONS
15
4. Product and cabinetry dimensions
If integrating your refrigerator, please follow installation instructions provided with the
integration kits.
Freezer drawer models (RF522W, RF522A, RF610A/RF540A)
(Ice & Water, Automatic Ice and non-Ice & Water models)
Flush with refrigerator door — full door rotation
Flush with refrigerator door — 90° door rotation
Flush with refrigerator door — full door rotation
Flush with refrigerator door — 90° door rotation
RF522A, RF610A/RF540ARF522W
Flush with refrigerator chassis — full door rotation Flush with refrigerator chassis — full door rotation
INSTALLATION INSTRUCTIONS
A A
B
B
C
C
O
O
P P
O
O
N
N
D D
E
E
G
G
I
I
Q
Q
R
R
N
N
N N
N
N
K
K
K L
K
L
K
K
L L
M
M
F F
H H
J J
16
RF522W RF522A
RF610A/
RF540A
PRODUCT DIMENSIONS MM
A Overall height of product 1720 1720 1800
B Overall width of product 790 790 900
C Overall depth of product
(excl. handle, incl. evaporator)
695 695 695
CABINETRY DIMENSIONS (incl. minimum air clearances) MM
D Inside height of cavity 1735 1735 1810
Flush with refrigerator chassis—full door rotation
E Inside width 830 830 940
F Inside depth 620 620 620
Flush with refrigerator door—full door rotation
G Inside width 945 1060 1170
H Inside depth flush to door 695 695 695
Flush with refrigerator door—90° door rotation
(for full drawer/shelf access, the doors need to be open past 90°)
I Inside width 900 1015 1125
J Inside depth flush to door 695 695 695
MINIMUM CLEARANCES MM
K Side clearance 20 20 20
L Side clearance — hinge side flush with
door — full rotation
135 135 135
M Side clearance — hinge side flush with
door — 90° rotation
90 90 90
N Rear clearance
(incl. evaporator tray) 30 30 30
O Vent — around top of cupboard
(optional) 50 50 50
P Top clearance — above refrigerator cabinet 50 50 50
Q Door clearance — hinge side flush with
chassis — full rotation
645 325 365
R Door clearance — hinge side flush with
door — full rotation
530 210 250
INSTALLATION INSTRUCTIONS
17
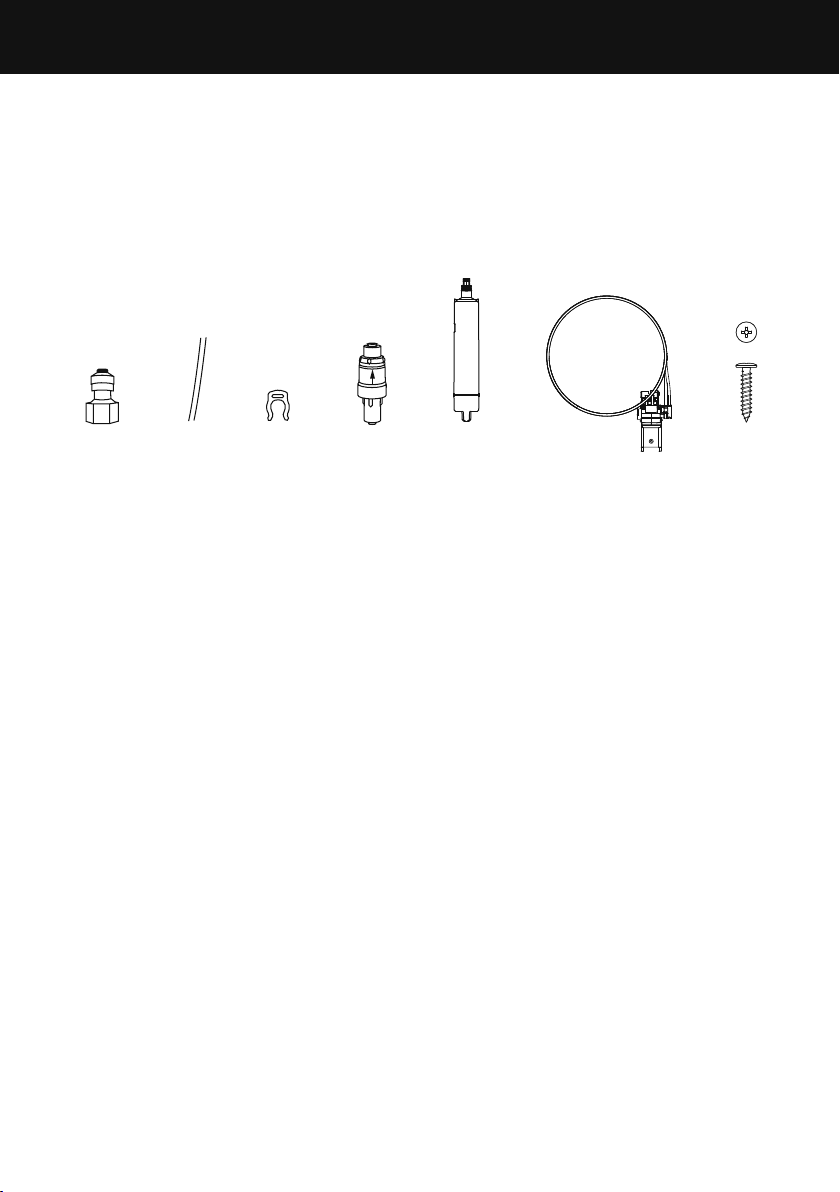
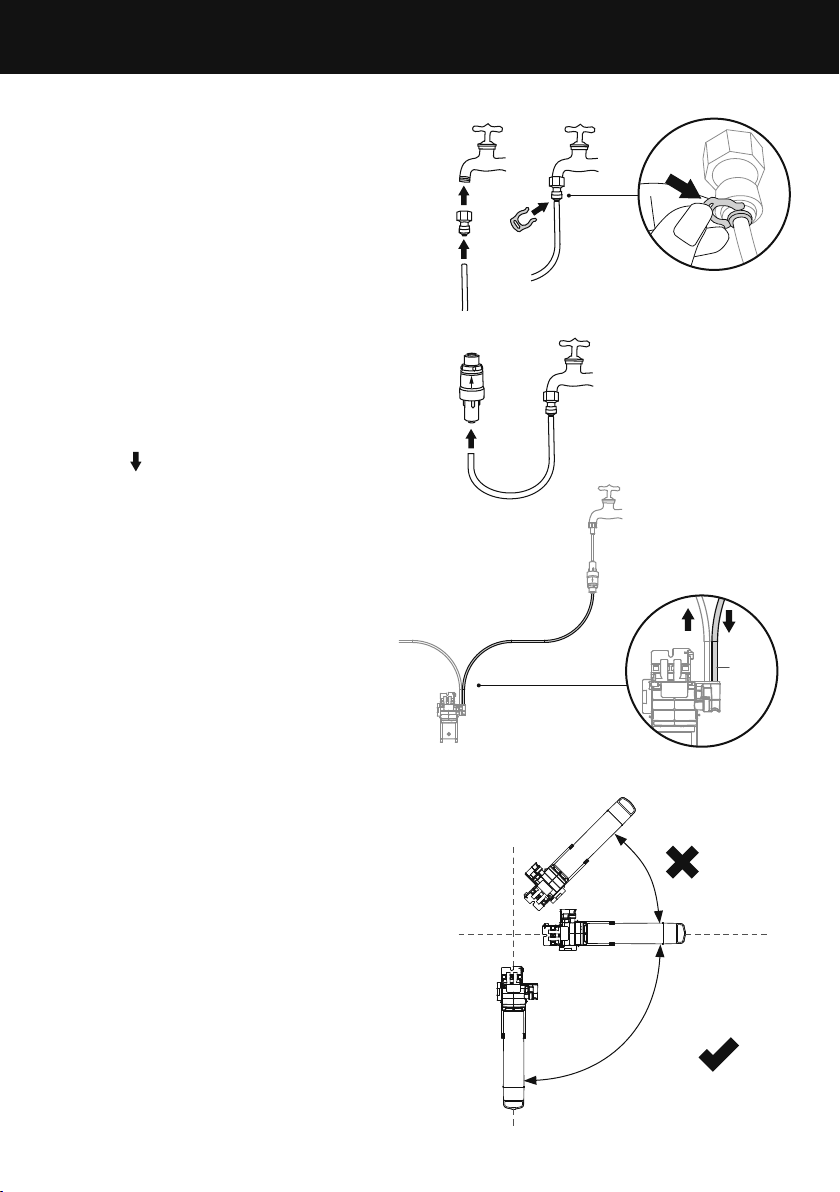
5. Connecting water (Ice & Water and Automatic Ice models)
Cotents of filter kit
A 1 x tap connection
B 1 x short tubing
C 1 x locking key
D 1 x pressure limiting valve (PLV)
E 1 x water filter cartridge
F 1 x wall mounting bracket, filter head and tubing
G 2 x screws
IMPORTANT!
z
A pressure limiting valve (PLV) must be fitted prior to the water filter. The PLV protects
your refrigerator from damage. If the PLV is not fitted to the connection line your
warranty will be void and the product may leak.
z
The water connection instructions below are intended only for the professional installer.
z
The new tubing supplied with the refrigerator is to be used, old tubing from old water
and ice connections should not be used.
z
Ensure the inlet tubing is correctly connected to the PLV. Failure to do so may result in
serious injury.
z
Replacement parts are available through Customer Care or online at fisherpaykel.com
(this service is available to selected markets only).
INSTALLATION PRECAUTIONS/WARNING
z
DO NOT cut any length of tube shorter than 500mm.
z
DO NOT install near electrical wires or water pipes that will be in the path of drilling
when selecting the location of filter system.
z
DO NOT mount the water filter in such a position so that it will be struck by other
items, such as wastebaskets.
z
DO NOT install the water filter or any water tubing in direct sunlight as prolonged
exposure to light can weaken plastic components.
z
DO NOT install in a location that is susceptible to freezing temperatures as damage to
the housing could occur.
z
DO NOT screw water filter mounting bracket to the refrigerator.
z
DO NOT install the filter or any water tubing in high temperature areas eg in a
ceiling cavity.
z
AVOID contamination of pipes during installation.
z
DO NOT continuously dispense water for longer than 2minutes.
BA
¾” OD x 3/16” ID
Flat Washer
#10-32
Pan Head
Pozi Drive
Wall Plug
#8 x 3/4”
Truss Head
Philips Drive
Self Tapping Screw
¼-20 x ½”
Pan Head
Philips Drive
Machine Screw
M4 x8
Pan Head
Torx Drive
Machine Screw
#10x 3”
Countersunk
Pozidrive
Self tapping Screw
FP Pro Hood Fasteners
GC FD E
INSTALLATION INSTRUCTIONS
18
Installation instructions:
1 Ensure the refrigerator is NOT plugged into
a powersupply.
2 Locate a cold water supply/feed that is
suitable for a water connection.
3 Connect the tap connection fitting (A) to
the tap. Connect the short tubing (B) to
the outlet of the tap and secure with the
locking key (C) (refer to Diagram 1)
4 Connect the inlet of the PLV (D) to the
tubing connected to the tap (refer to
Diagram 2). Ensure the arrow on the PLV
is pointing away from the tap. The arrow
indicates the direction of waterflow.
5 Connect the inlet tube from the filter head
to the PLV (refer to Diagram 3). The inlet
tube can be identified by the downward
arrow
on the filter head and a red
mark on the tube.
IMPORTANT!
Ensure the outlet tubing is correctly
connected to the refrigerator water valve.
Refer to Diagram 3.
6 Determine the mounting position for the
water filter noting the following:
z
The water filter MUST not be mounted
with the filter head position below the
base of the filter (refer to Diagram 4). We
recommend fitting the water filter in a
vertical orientation with the filter head at
the top. This will minimise water leakage
during replacement of the waterfilter.
z
Ensure the water filter is in a convenient
location to access every 6months for
replacement. We recommend that this
location is beside the water filter supply tap
in a cupboard beside the refrigerator.
z
A minimum clearance of 50mm from the
bottom of the water filter is required to
perform filter removal.
Diagram 1
Diagram 2
Diagram 3
0° – 90°
Diagram 4
Inlet
tube
water flow
from PLV
water flow to
refrigerator
INSTALLATION INSTRUCTIONS
19
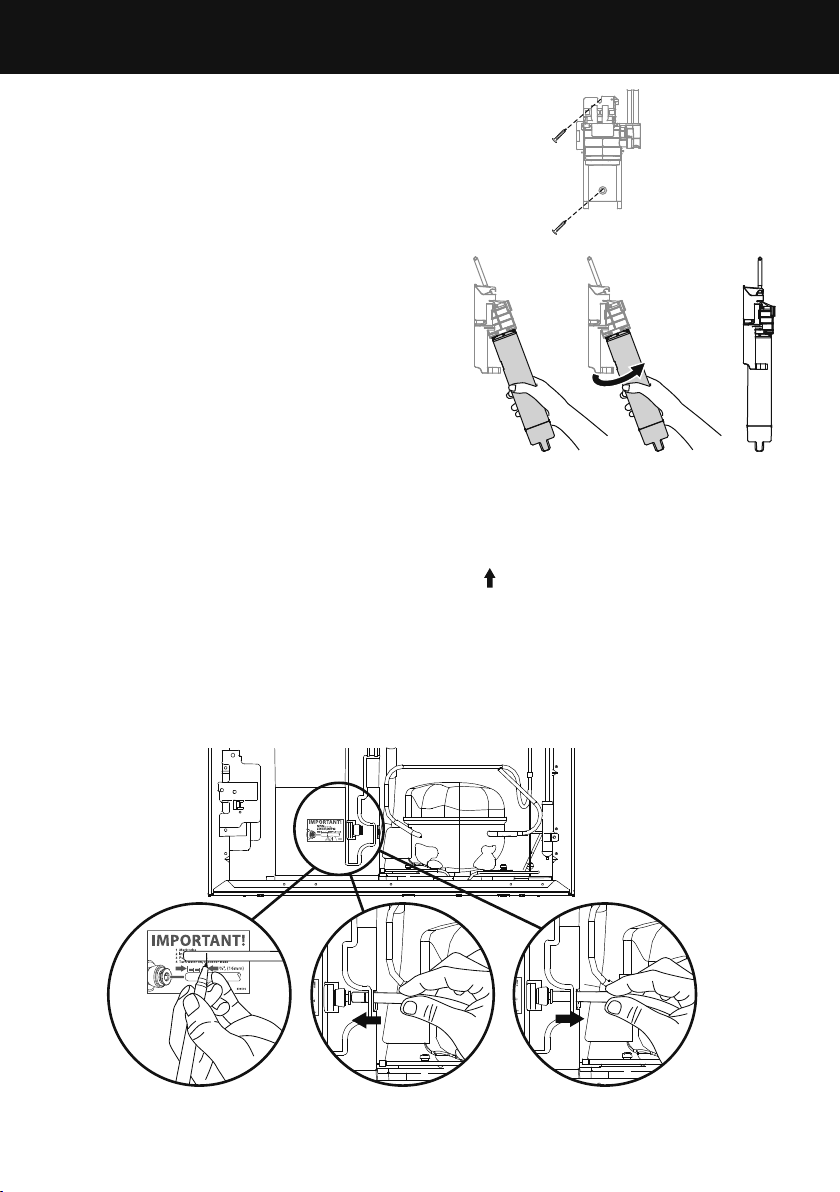
7 Attach the wall mounting bracket with the
two screws provided, attach the bottom
screw first then the top screw (refer
to Diagram5).
8 Insert the filter water into the filter head.
Push the filter firmly into the filter head and
turn in a clockwise direction until it locks into
place (refer to Diagram 6).
9 To flush the water filter of any trapped air,
harmless carbon fines and check for leaks:
Aim the end of the filter outlet tubing into a
bucket, turn on the tap and run 8L of water
through. Once complete, turn the tap off.
Note: Further flushing is required before first
use of your ice or water functions, please refer
to ‘Before you start using the Ice & Water or
Automatic Ice function’ for details.
!0 Run the 6mm tubing to the back of the
refrigerator ensuring there is enough tubing to
pull the refrigerator out for service.
!1 Using the measurement guide shown in Diagram 7, mark out 16mm, on the end of the
tubing as shown in Diagram 8.
!2 Insert the outlet tubing to the water (solenoid) valve up to the marked line. The
outlet tube can be identified by the upward arrow
on the filter head and a blue
mark on the tube.
!3 Pull gently on tubing to ensure it is locked in as shown in Diagram 10.
!4 Turn the tap on and check that all connections are dry and free of drips.
!5 Coil water line tubing behind the refrigerator. Pushyour refrigerator into place being
careful notto kink or squash the water line tube.
!6 Read pages 17 – 18 carefully and then turn refrigeratoron.
¾” OD x 3/16” ID
Flat Washer
#10-32
Pan Head
Pozi Drive
Wall Plug
#8 x 3/4”
Truss Head
Philips Drive
Self Tapping Screw
¼-20 x ½”
Pan Head
Philips Drive
Machine Screw
M4 x8
Pan Head
Torx Drive
Machine Screw
#10x 3”
Countersunk
Pozidrive
Self tapping Screw
FP Pro Hood Fasteners
¾” OD x 3/16” ID
Flat Washer
#10-32
Pan Head
Pozi Drive
Wall Plug
#8 x 3/4”
Truss Head
Philips Drive
Self Tapping Screw
¼-20 x ½”
Pan Head
Philips Drive
Machine Screw
M4 x8
Pan Head
Torx Drive
Machine Screw
#10x 3”
Countersunk
Pozidrive
Self tapping Screw
FP Pro Hood Fasteners
Diagram 7
Diagram 9
Diagram 10Diagram 8
Completed installation
INSTALLATION INSTRUCTIONS
Diagram 5
Diagram 6

20
IMPORTANT!
z
All connections must be checked for leaks.
z
Ensure 6mm tubing is routed away from sharp objects, sharp
corners (beware of kinking the tube as this will stop water
flow), clear of the refrigerator rear compartment and not in a
location where it can be kinked or squashed.
z
Ensure all push-fit connections are firmly pushed into place.
The tube should push in 16mm before reaching the stop.
z
If tubing is removed at any point, re-cut the end and
re-insert. Tubing must be fully inserted to avoid leaks.
z
To remove tube from connection points first turn off the
isolating faucet. Gently push the dispensing pad a few times
using a glass or container to remove the static line pressure.
Push in the collet firmly while pulling back on the tubing at
the same time, as shown in Diagram11.
847200 – Certified by: IAPMO R&T against NSF/ANSI Standards 43, 53, 401 and CSA
B4831.1 for the reduction of claims specified on the performance data sheet and at iapmort.
org. 847200 compounds certified under NSF/ANSI 401 have been deemed as incidental
contaminants/emerging compounds. Incidental contaminants are those compounds that
have been detected in drinking water supplies at trace levels. While occurring at only trace
levels, these compounds can affect the public acceptance of drinking quality water.”
847201 – Certified by: IAPMO R&T against NSF/ANSI Standards 43 and CSA B4831.1 for the
reduction of claims specified on the performance data sheet and at iapmort.org.
Rated capacity:
847200 – 102 gallons (386 litres)
847201 – 170 gallons (643.5 litres)
Diagram 11
INSTALLATION INSTRUCTIONS

21
Before you start using the Ice & Water or Automatic Ice function
z
Check your refrigerator is switched on.
z
Allow at least 2hours for your refrigerator to cool before use.
z
Complete all the flushing steps detailed in this installation/user guide to ensure
optimum performance of your water filter.
For Ice & Water models only:
1 Press the water dispenser pad to dispense 2L of water.
z
There may be carbon residue dispensed together
with water. This is not harmful, and normal during
flushing process.
2 Wait for 2 minutes before dispensing again.
3 Dispense another 2L of water. Your water dispenser is
now ready for use.
4 Water will continue to drip from the dispenser for a
few more days after installation to clear remaining
trapped air in the dispenser. Check the drip tray
regularly and empty when required.
For Ice & Water and Automatic Ice models:
1 Turn the ice maker on by pressing the
button.
Thelight above the button will be illuminated
whenthe ice maker is on.
2 Press the
, and together for 4seconds then
close the doors. The ice tray will empty the water into
the bin below. The ice tray will only empty after the
doors are closed.
3 Repeat step 2 to remove dust in the ice tray collected
during manufacture and transport.
4 Empty the water, dry the bin and return it correctly
(refer to diagrams 1 and 2 for placement of ice bins
for your refrigerator).
5 Once your ice maker is turned on the first bin of ice
may be discoloured, this is not harmful and normal
during the flushing process. Discard the first full bin
ofice made. Your ice maker is now ready for use.
z
For Ice & Water models: the water filter will
reach optimum performance after two to three
full bins of ice.
z
For Ice only models: the water filter will reach
optimum performance after four to five full binsof ice.
Ice storage bin and scoop
in correct position
Diagram 1
Diagram 2
Water dispenser
INSTALLATION INSTRUCTIONS

22
6. Installation (all models)
Your Fisher & Paykel ActiveSmart™ refrigerator is
fitted with front and rear rollers, designed for moving
the product in the forwards and backwards direction.
Avoid moving the product in a sideways direction
as this may damage the rollers or the floor
covering/surface.
A Your refrigerator will arrive with the front feet
wound up making moving the product into its
final location a simple task.
B Roll the refrigerator into its final position making
sure there is the correct air gap between the
product and surrounding cabinetry. See minimum
clearance in cabinetry dimensions table.
C Adjust the front feet down until the refrigerator
is leaning backward with the front approximately
10mm higher than the back. This will ensure a
good door closing action.
(Non French door models only)
D Aligning your refrigerator with cabinetry.
z
Align the sides of the refrigerator with the cabinetry
by adjusting the hinge side front foot.
z
Adjust the handle side foot until it touches the floor
and takes a small amount of weight.
z
Once the refrigerator is in place and aligned with
cupboards/alcove gently push on the front top and
check if the product is rocking or stable.
7. Levelling of refrigerator doors
(French door models only)
z
For uneven surfaces, front feet can be used to
align the 2 doors.
z
If left hand door is too low, then unscrew the left hand
foot to lift up the cabinet until the two doors top
edges are aligned.
z
If right hand door is too low, then adjust the right
hand foot in the same way.
Even door alignment
Uneven door alignment
Raise the
front of the
refrigerator
Lower the
front of the
refrigerator
Refrigerator feet
INSTALLATION INSTRUCTIONS
23
8. What to do if your product is unstable
A Gently push the refrigerator back until the rear
rollers contact the floor.
z
Measure the gap under the front foot, which has
come off the floor.
z
Obtain some solid packing material (hardwood,
plastic,etc.) which fits firmly into the gap
under the foot.
Note: do not use metallic materials that may corrode,
stain and/or damage floor coverings.
B Wind both front feet up and roll the product
out ofposition.
z
Place the packing material in the location diagonally
opposite the front roller that lifts off the floor.
z
Make sure the packing material stays in place when
the product is pushed back into position.
z
Ideally, the packing material is large enough to
rest against the back wall so as to prevent it from
moving when the cabinet is pushed into position.
Wall behind refrigerator
For example: if this foot lifts off the floor when
pushing gently on the top front of the refrigerator
Packing material goes under rear roller
diagonally opposite front foot that lifts
Stabilising your refrigerator
C Roll the refrigerator back into position and adjust front feet as per step 6
C
.
(Check alignment and door closing action are satisfactory).
z
Make small adjustments to front feet where necessary.
z
Check that the product is stable (all 4 feet are on the floor).
If not, repeat 8
A
and 8
B
.
This foot lifts off the floor
when top front is gently
pushed back
Example only
Unlevel floor
Unstable refrigerator
INSTALLATION INSTRUCTIONS

24
Before placing food in the fresh food or freezer compartments
z
Remove all internal packaging. Ensure that all transit clips are removed from the
refrigerator. These are small rubber stoppers located at the back of the shelves.
z
Clean the inside of the appliance with a mix of warm water and a small amount of liquid
detergent, and a soft cloth to remove manufacturing and transportation dust.
z
Allow the refrigerator and freezer to run empty for 2 – 3 hours to allow each
compartment to cool to the appropriate temperature.
z
The appliance may have an odour on its initial operation, but this will go when the
refrigerator and freezer have cooled sufficiently.
Energy efficiency
For the most energy efficient use of your appliance:
z
Ensure your refrigerator has adequate ventilation.
z
Do not cover your appliance with any material that will prevent air from flowing around
the cabinet sides.
z
Ensure you vacuum around the appliance to remove dust and possible pet hair
accumulation. Also keep the appliance and its cabinetry free of dust by wiping down
with a dry, lint-free cloth (refer to section ‘Cleaning and caring for your refrigerator’,
‘Cabinet surround’).
z
Allow good clearances in front of air ducts within the cabinet for maximum cold
air distribution.
z
Cool hot foods down before placing them in the appliance.
z
Do not overfill the compartments.
z
Keep door openings to a minimum.
z
Select a temperature setting that isn’t too cold.
z
Check your door seals for leaks.
INSTALLATION INSTRUCTIONS

25
MOVING OR STORING YOUR APPLIANCE
If your refrigerator is turned off for any reason, wait 10minutes before turning it back on.
This will allow the refrigeration system pressures to equalise before restarting.
Moving your refrigerator
z
Turn off the appliance and unplug from the power point. Remove all food.
z
Turn the adjustable feet to the right as far as they will turn.
z
Ease the refrigerator out of its position. Tuck the power cord away, tape the shelves in
place and tape the doors closed. If the cabinet needs to be placed at an angle or laid
down, carefully lay it on its side (the right hand side when viewed from the front).
z
Relocate and install. If the appliance has been left on its side for any length of time, leave
it standing upright as long as you can (a few hours) before turning on.
Storing your refrigerator
z
When storing your cleaned appliance, leave the doors open. This allows air to circulate
and prevents the build up of bacteria and moulds.
z
Before using again, clean well using a mixture of warm water and a small amount of
liquid dishwashing detergent. Rinse with clean water and dry with a soft lint-free cloth.
Holiday time
We recommend you leave your refrigerator operating while you are on holiday.
26
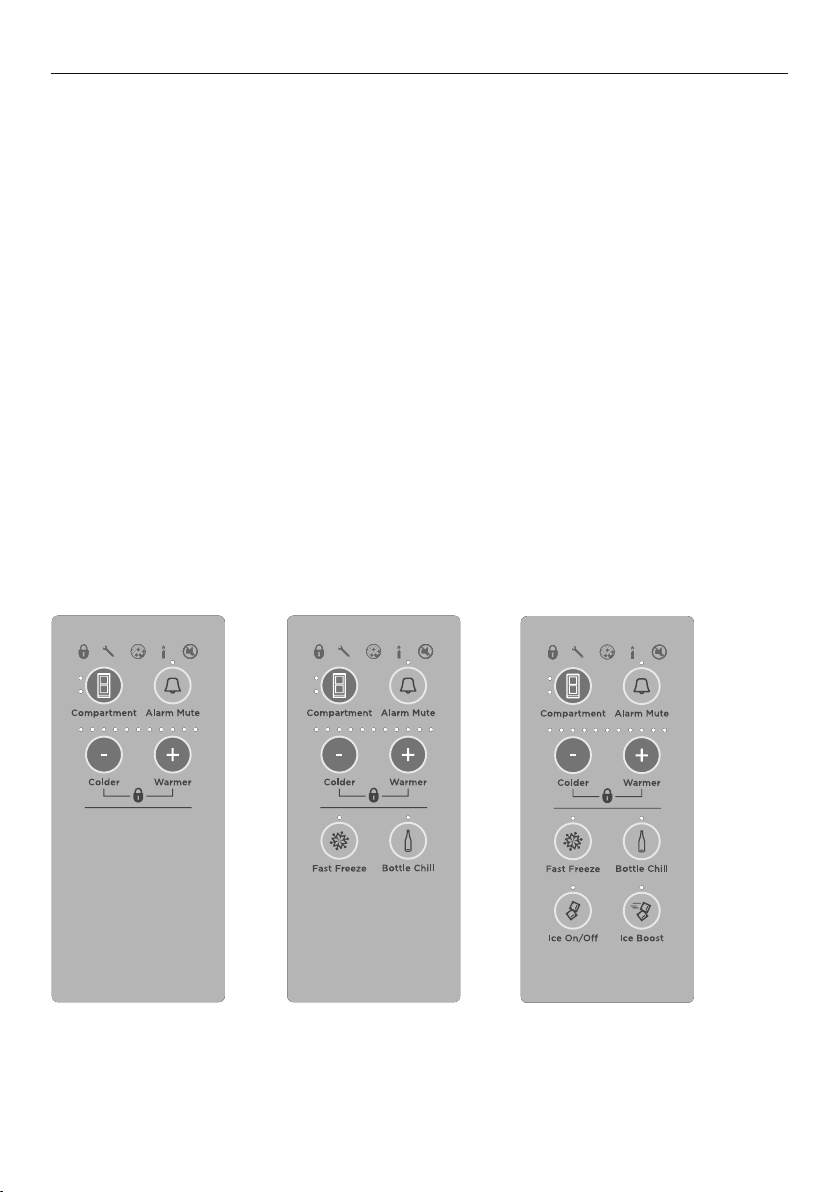
ACTIVESMART™ OPERATING INSTRUCTIONS
Models:
635mm wide E372B, E402B, RF372B, RF402B
680mm wide E442B, RF442B
790mm wide E522B, RF522A, RF522W, RF522B
900mm wide RF610A/RF540A
The control panel enables you to view and modify features and options on
your refrigerator.
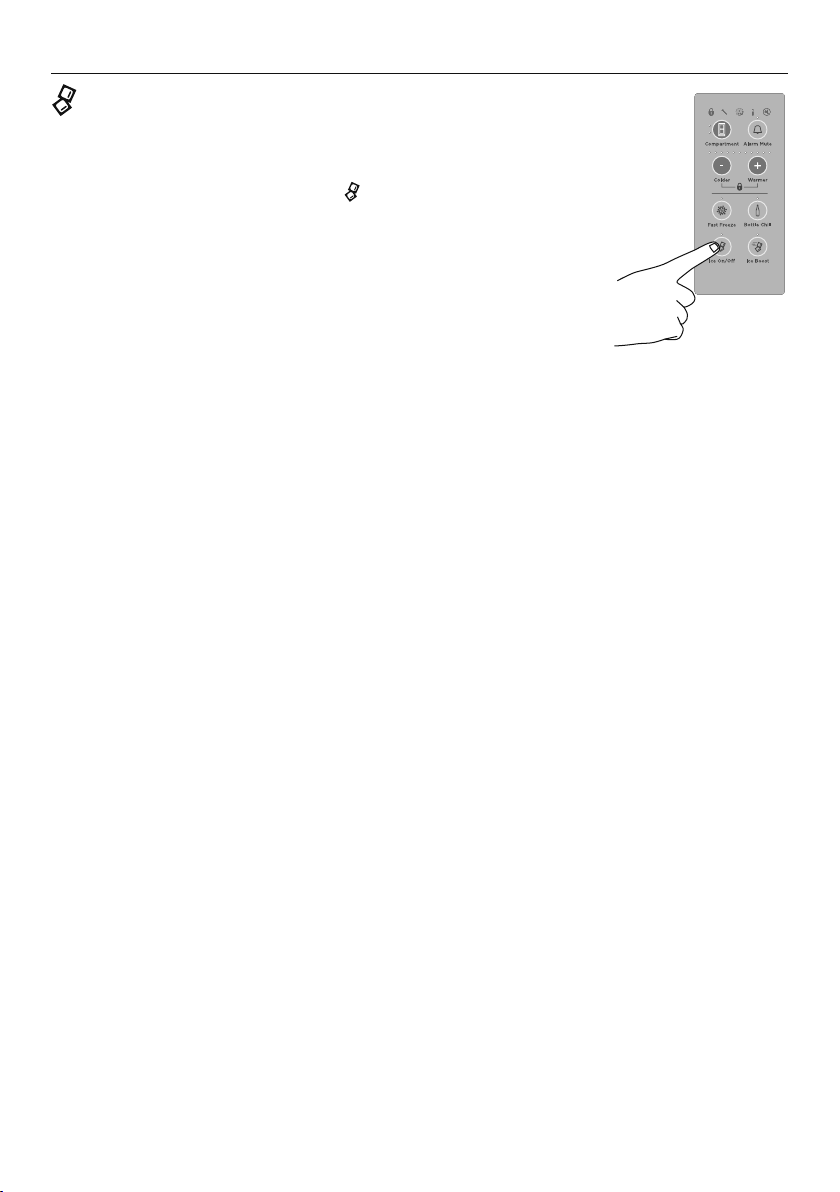
Temperature control (all models)
z
The powerful cooling system will automatically cool both refrigerator and freezer
compartments to their recommended ideal temperatures — 3°C refrigerator and -18°C
freezer. This will take between 2 – 3hours.
z
The two compartment temperatures are accurately and independently controlled
and do not change with the temperature or humidity of the surroundings; whether
summer or winter.
z
If you wish to alter the temperature of either the fresh food compartment or freezer
compartment, this can be easily done by using the internal control panel located at the
front right of the refrigerator compartment.
Internal control panel to adjust temperatures
Control panel variants for ActiveSmart™ refrigerators.
Extra features available on selected models.

27
ACTIVESMART™ OPERATING INSTRUCTIONS
Fresh food compartment (all models)
z
The fresh food compartment light will automatically be illuminated. The temperature for
this compartment will show as a series of lights.
z
The temperature may be altered by pressing the or buttons. One press on either of
these buttons will reduce or increase the number of lights by one which indicates a small
change in temperature.
z
Fewer lights illuminated means a cooler temperature for the compartment selected.
Freezer food compartment (all models)
z
To adjust the freezer temperature press the button once so the freezer compartment
light is illuminated.
z
The freezer temperature can be altered by pressing the or buttons.
z
One press on either of these buttons will reduce or increase the number of lights
illuminated which indicates a small change in temperature.
z
Fewer lights illuminated means a cooler temperature for the compartment selected.
Note: successively pressing the button will automatically scroll between
the compartments.
z
When the door is re-opened the control panel will return automatically to the fresh food
compartment setting.
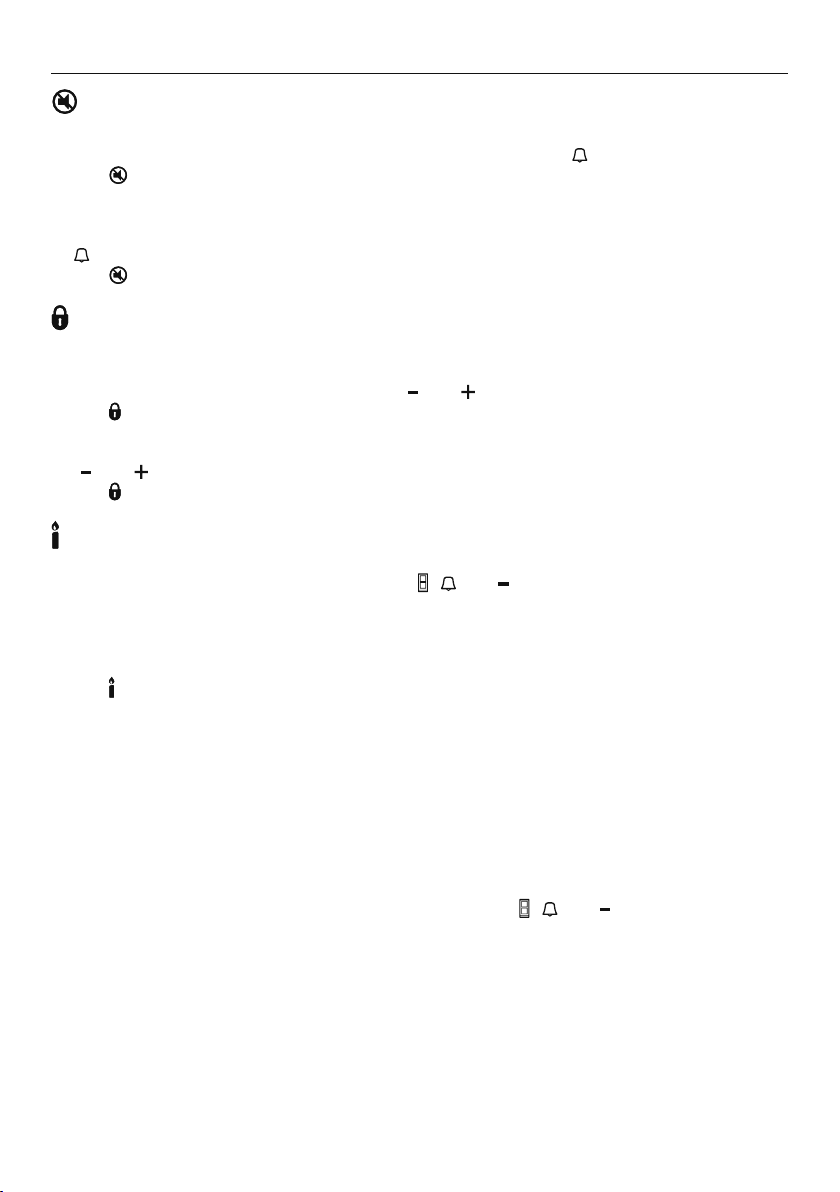
Alarm Mute (all models)
For times when you require the door to be open longer than normal eg when cleaning
the interior of your refrigerator press the ‘Alarm Mute’ button to silence the door alarm
for 20minutes.
z
To activate, press the button once. The ‘Alarm Mute’ light will be illuminated when the
function is activated.
z
‘Alarm Mute’ will deactivate after 20minutes and the door alarms will return to normal.
z
To deactivate ‘Alarm Mute’ manually, press the button again. When ‘Alarm Mute’ is
deactivated the light is off.
Note: when the fresh food or freezer compartment door is left open for long periods of
time food quality and / or safety may be compromised.
Door alarms (all models)
z
If the fresh food compartment door is left open the alarm will beep after 90seconds and
if the freezer door is left open the alarm will beep after 60seconds.
z
While either door remains open, subsequent beeps will sound every
30seconds for 5minutes.
z
A continuous alarm will sound if either of the doors have been left open for 5minutes or
longer and the interior compartment light(s) will turn off. The alarm will stop only when
the door(s) is closed.
Note: if ‘Alarm Mute’ has been activated the door alarms will be silenced for 20minutes.
After 5minutes of the doors being left open the compartment light will turn off however
the normal door alarms will be suspended. The ‘Alarm Mute’ light will be illuminated to
indicate that the appliance is in this mode.
28
ACTIVESMART™ OPERATING INSTRUCTIONS
Key Mute (all models)
‘Key Mute’ allows you to silence all button presses.
z
To activate ‘Key Mute’ and silence buttons, press and hold the button for 4seconds.
z
The icon on the internal control panel will be illuminated.
z
The keys will be silenced when ‘Key Mute’ is activated.
z
Door alarms and ‘Bottle Chill’ alarm will still operate.
z
‘Key Mute’ will not automatically deactivate. To manually deactivate, press and hold the
button for 4seconds.
z
The icon will no longer be illuminated.
Key Lock (all models)
‘Key Lock’ allows you to disable the buttons on the internal control panel. This is useful
when cleaning your refrigerator.
z
To activate ‘Key Lock’ press and hold the and buttons for 4seconds.
z
The icon on the internal control panel will be illuminated.
z
Pressing any of the buttons will cause a raspberry beep to tell you that they are disabled.
z
‘Key Lock’ will not automatically deactivate. To manually deactivate, press and hold the
and buttons for 4 seconds.
z
The icon will no longer be illuminated.
Sabbath Mode activation (all models)
z
To activate ‘Sabbath Mode’, open the door(s) of the fresh food compartment and freezer
compartment and then press and hold the , and buttons on the internal control
panel for 4seconds.
z
The candle icon will illuminate when ‘Sabbath Mode’ has been activated.
When the product is in Sabbath Mode:
z
The icon on the internal control panel will be illuminated.
z
All lights on the internal control panel except for the candle icon will be off.
z
The fresh food or freezer compartment lights will not operate when the
door(s) is opened.
z
The door alarms will not operate.
z
The internal control panel will not function except to indicate ‘Sabbath Mode’ is active
as stated above.
z
Opening the door(s) will not affect the compressor or fans.
z
If the power to the refrigerator is turned off whilst in this mode, the product will continue
in ‘Sabbath Mode’ when the power is restored.
z
‘Sabbath Mode’ will automatically de-activate 80 hours after activation.
z
To de-activate earlier than 80 hours press and hold the , and buttons for
4seconds. The candle icon will no longer illuminate on the internal control panel (and
external display for Ice & Water models) and functionality of the internal control panel
will return to normal.
29
ACTIVESMART™ OPERATING INSTRUCTIONS
Special Functions
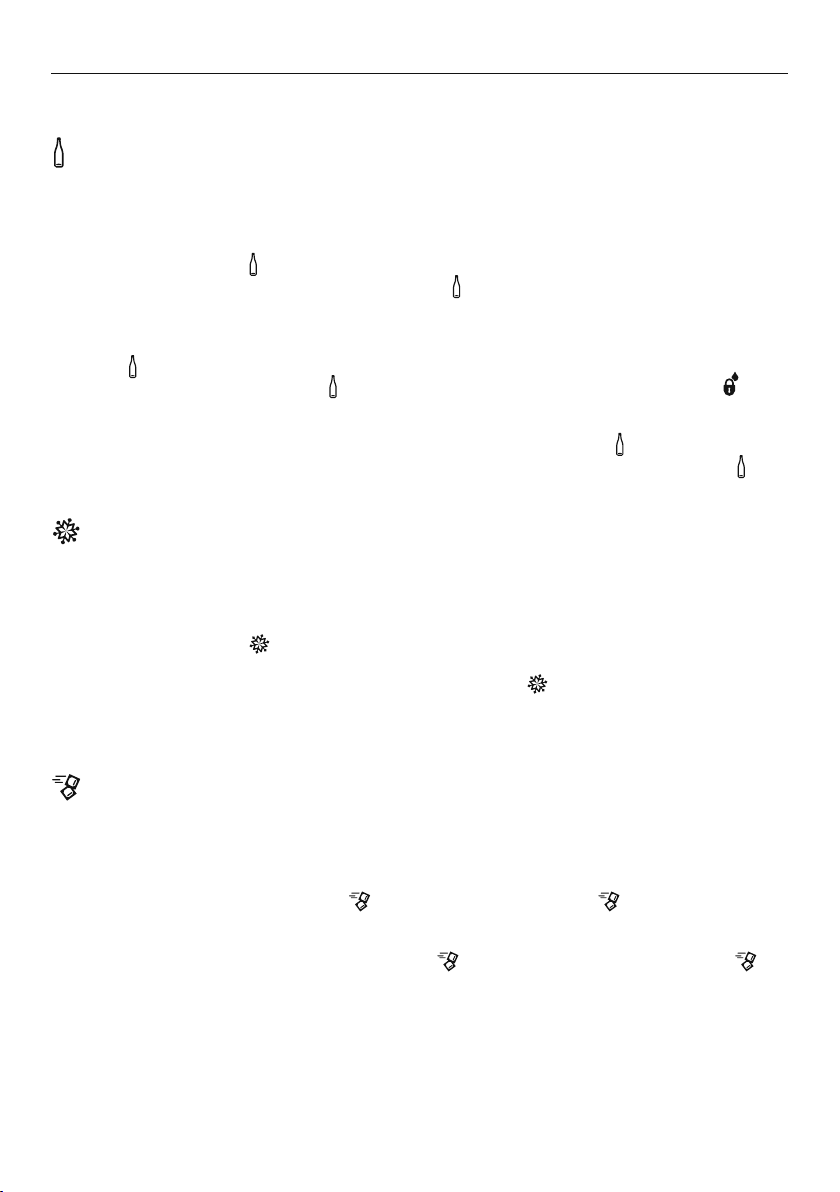
Bottle Chill (selected models only)
This function allows you to chill your beverages more rapidly in the freezer without the
worry of forgetting them. The timer is set for 15minutes however the time taken to chill
depends on the size of your beverage. If after 15minutes your beverage is not cold enough,
simply place it back in the freezer and reset the ‘Bottle Chill’ function.
z
To activate, press the button on the internal display. The ‘Bottle Chill’ light will be
illuminated when the function isactivated. The icon will be illuminated on the external
display (Ice & Water and Automatic Ice models only).
z
An alarm will sound after the 15minute time has elapsed.
z
For non-Ice & Water models: open the fresh food compartment door and press
the button on the internal control panel to silence the alarm.
z
For Ice & Water models: the icon will flash on the external display. Press the
button on the external display to silence the alarm.
z
Remember to remove your beverage from the freezer.
z
To deactivate ‘Bottle Chill’ before 15minutes has elapsed, press the button again on
the internal control panel. When ‘Bottle Chill’ is deactivated the light is off and the icon
is not visible on the external display (Ice & Water and Automatic Ice models only).
Fast Freeze (selected models only)
We have created the ‘Fast Freeze’ feature to help you get the best possible results when
freezing fresh food. ‘Fast Freeze’ boosts the freezing speed by dropping the freezer to its
coldest temperature for 12 hours, which helps to ensure vital freshness, texture and taste
are retained during the freezing process.
z
To activate, press the button on the internal display. The ‘Fast Freeze’ light will be
illuminated when the function isactivated.
z
To deactivate before the 12hours has elapsed, press the button again. When ‘Fast
Freeze’ is deactivated the light is off.
z
For best results we recommend that you activate the function before it is required.
Alternatively, activate it when placing food into the freezer.
Ice boost function (selected models only)
This function is designed to be used for times when you require more ice eg when you
are having a party. The ‘Ice Boost’ function will increase ice production up to 30% from
standard ice making and deactivate automatically after 24hours.
z
When you first turn your ice maker on, the ‘Ice Boost’ function will be off.
z
To turn this function on, press the button. The light above the button will be
illuminated when the ‘Ice Boost’ function is on.
z
The ‘Ice Boost’ function is paused once your ice bin is full.
z
To manually deactivate this feature press the button again. The light above the
button will be off when the ‘Ice Boost’ function is off.
z
Activating the ‘Ice Boost’ function will automatically turn ice making on.
z
Deactivating ice making will automatically deactivate the ‘Ice Boost’ function.

30
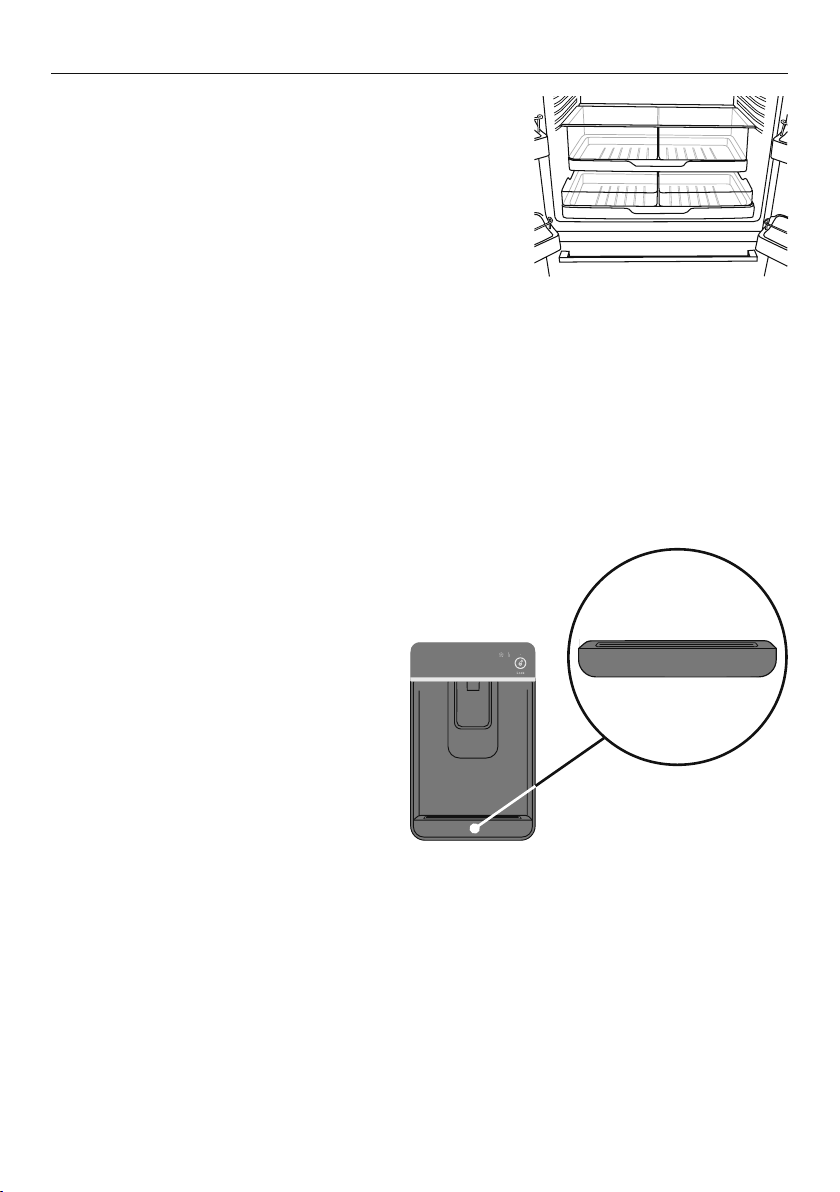
ALL ABOUT THE EXTERNAL DISPLAY
(ICE & WATER MODELS ONLY)
This screen enables you to lock the water dispenser, indicates to you when ‘Bottle Chill’ is
activated and when your water filter requires changing.
EXTERNAL DISPLAY FEATURES
Dispenser lock button
and LED light
Locks/unlocks the water dispenser.
When locked the LED above the button
will illuminate.
Bottle Chill indicator Icon will illuminate indicating when ‘Bottle Chill’ is
activated and flashes when beverage is ready.
Filter change
indicator
Icon will illuminate indicating when water filter
requires changing.
31
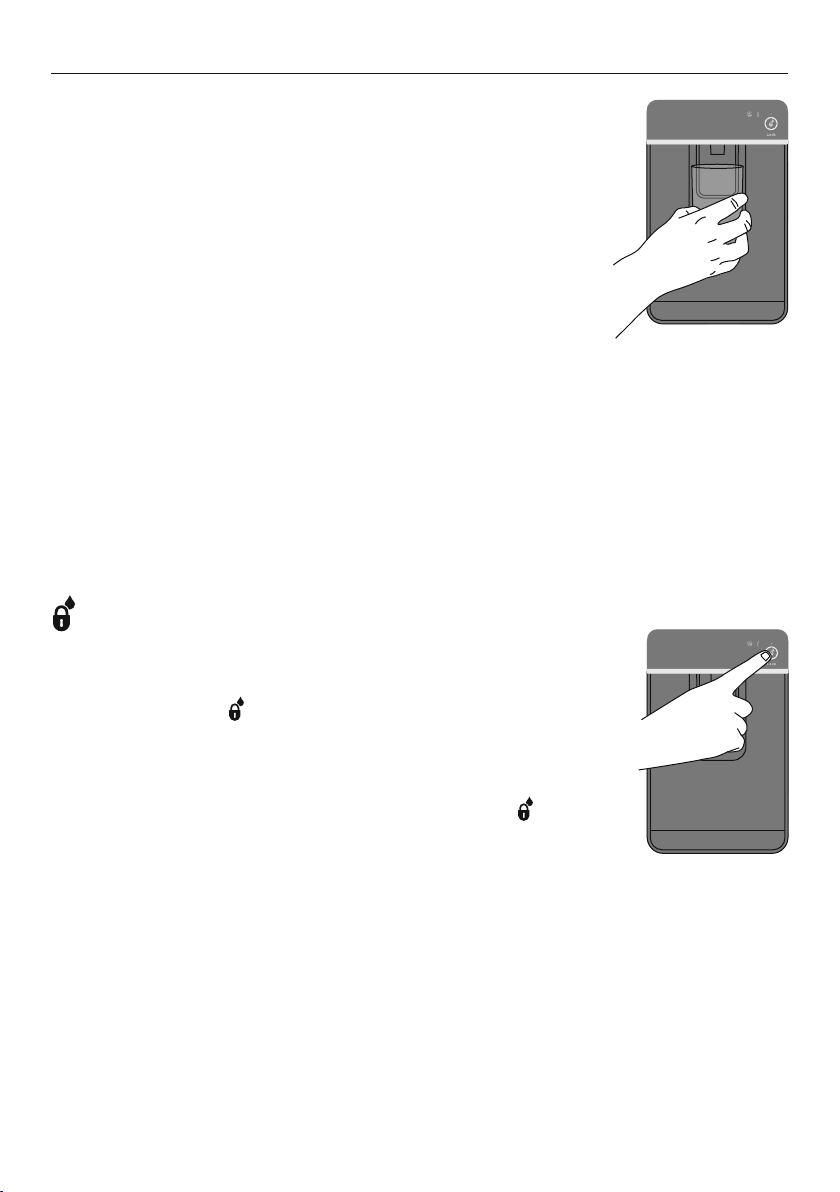
USING YOUR WATER DISPENSER
(ICE & WATER MODELS ONLY)
Dispensing
z
Your water dispenser has been designed for one-
handed operation.
z
To dispense water push the dispensing pad gently, using a glass
or container. This pad requires only a gentle press to activate.
z
To stop the flow of water, simply pull your glass away from the
dispensing pad.
Please remember that pressing very hard against the dispensing
pad will not encourage the dispenser to operate faster or produce
greater quantities of water.
First use
Before using your water dispenser, the water filter must be installed and flushed to remove
any impurities or trappedair inthe filter system. Refer to ‘Before you start using the Ice &
Water or Automatic Ice function’ for details.
IMPORTANT!
To avoid damage to property or personal injury do not put hands, fingers or objects up
the dispenser opening.
Please note that once installation is complete a few drips may appear out of the dispenser
over the next few days as the remaining trapped air is cleared.
Dispenser Lock
The ‘Dispenser Lock’ prevents water from being dispensed. This is
useful when you are cleaning the external display or when there are
small children around.
z
Press and hold the button for 4 seconds to activate
‘Dispenser Lock’.
z
The light above the ‘Dispenser Lock’ icon will be illuminated.
z
Pressing the water dispenser pad will cause a raspberry sound
indicating to the user that water cannot be dispensed.
z
To de-activate the ‘Dispenser Lock’, press and hold the button
for 4 seconds. The light above the ‘Dispenser Lock’ icon will no
longer be illuminated and water dispensing will be enabled.
Water dispenser
Dispenser Lock
32
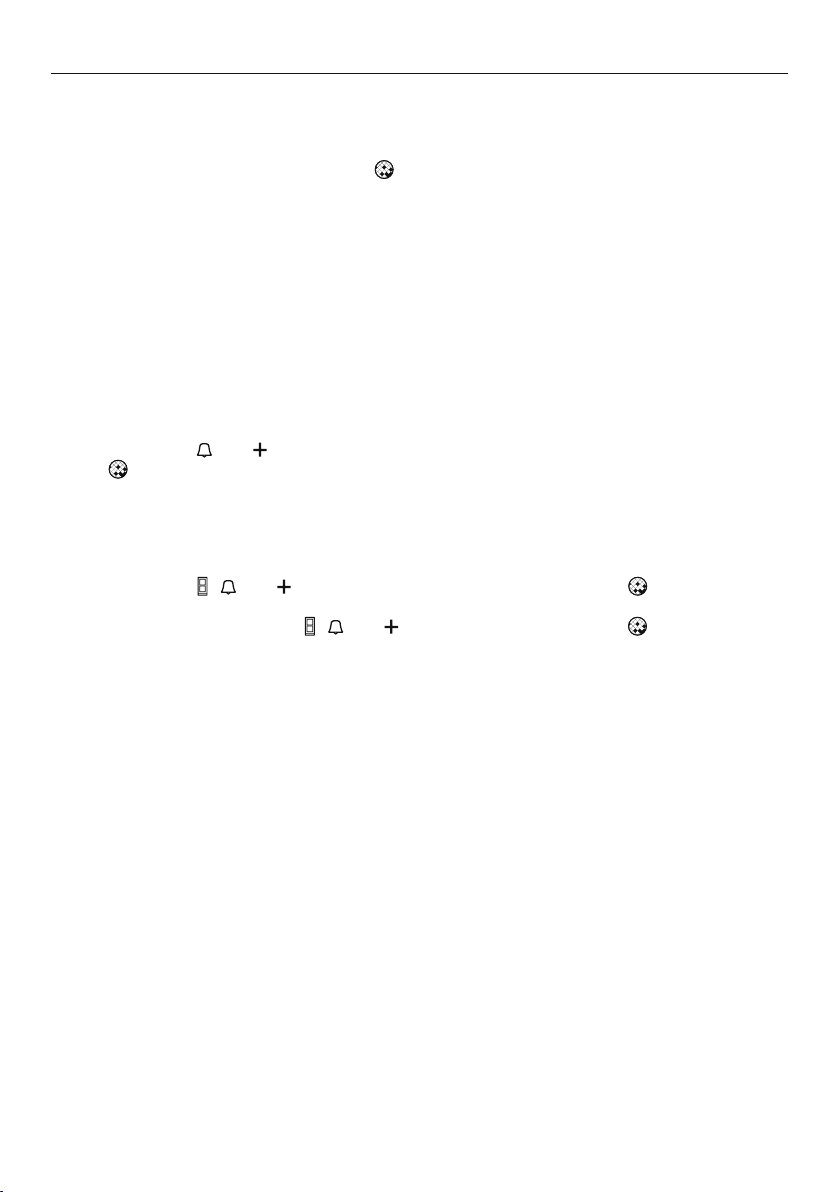
WATER FILTER
(ICE & WATER AND AUTOMATIC ICE MODELS ONLY)
All the water to your refrigerator is filtered to remove impurities through a filter cartridge
located in a position of your choice outside the refrigerator. This will need changing
approximately every 6months.
z
There is a replacement indicator icon on the internal control panel (Ice & Water and
Automatic Ice models) and external display (Ice & Water models only) which will appear
when the filter needs replacing. It will flash, as a reminder, when water is dispensed.
z
Replacement filter cartridges can be purchased online from fisherpaykel.com or by
calling Fisher & Paykel Customer Care. Details of the replacement filter cartridge are
labelled on the cartridge. Instructions on how to install your replacement water filter are
provided with the filter.
To reset the filter indicator
IMPORTANT!
z
We recommend the water filter to be used from the time of installation.
z
Do not reset indicator before filter is changed or filter monitoring will be inaccurate.
z
Press and hold and for 4seconds to reset the internal and external filter indicators.
z
The icon on the internal and external displays will turn off when reset.
To disable the filter indicator
Note: if disabled, you will not be reminded to next change your filter.
z
When no filter is fitted, you can disable the filter indicator.
z
Press and hold , and for 4seconds to turn this feature off, the icon will flash
once on the internal and external displays.
z
To turn this feature on press , and together for 4seconds, the icon on the
internal and external displays will flash twice.
33
USING YOUR ICE MAKER
(ICE & WATER AND AUTOMATIC ICE MODELS ONLY)
Ice On/Off
Your ice maker is designed to automatically dispense ice
until itsenses that the bin is full. So the more ice you use,
the more itmakes.
To turn your ice maker on, press the
button. The light
above the ‘Ice On/Off’ icon will be illuminated when the
icemaker is on.
IMPORTANT!
Ensure all bins are in place when the ice making
functionisactivated.
First use
Before using your automatic ice maker, the water filter must be installed and flushed to
remove any impurities or trappedair inthe filter system. Refer to ‘Before you start using the
Ice & Water or Automatic Ice function’ for details.
Turn your ice maker off if:
z
There is no water supply for several hours.
z
You are removing the ice storage bin for a period of time.
z
You are going on holiday/vacation.
Information about your ice maker
z
Your automatic ice maker will produce approximately eight cubes of ice every 3 – 4hours,
depending on the freezer compartment temperature and the number of door openings.
z
When the ‘Ice Boost’ function is activated, ice production will increase up to 30% from
standard ice making.
z
The ice cube tray will fill with water.
z
When cubes are frozen, they will be ejected from the ice tray into the ice storage bin.
z
Ice making will continue until the storage bin is full.
z
Ice making will resume once you start to use the stored ice.
z
Your Ice & Water product comes with a smaller ice bin inside the larger freezer bin.
Attached to the ice storage bin is the hygienic scoop for the ice. This scoop provides
hygienic access to the ice.
z
If a large amount of ice is required, remove an ice storage bin and allow ice to fall into
the larger bin.
z
For maximum ice storage, level the stored cubes with the ice scoop.
z
If ice is not used often, old cubes will become cloudy, taste stale, will shrink and may
stick together. Empty the ice storage bin periodically and wash in lukewarm water. Dry
thoroughly and place back into the correct position.
Turning ice maker on
34
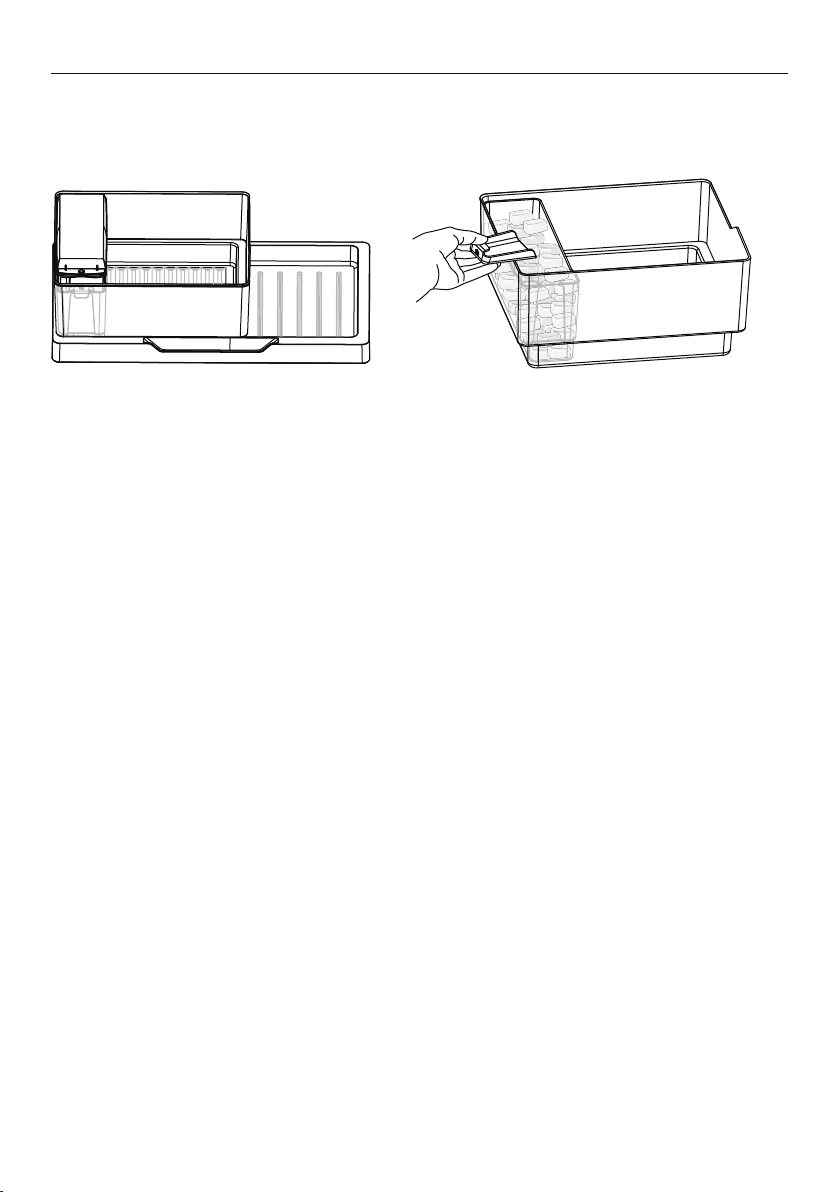
ACTIVESMART™ SPECIAL FEATURES
Manual ice system (selected models only)
An ice storage bin which sits inside the upper top freezer bin provides storage for and gives
you access to clean, clear ice cubes.
Upper left freezer bin, ice storage bin, ice
tray, lid and scoop in correct position
Accessing your ice
Information about your manual ice system
z
To make ice, take the ice tray and lid from the top of the ice storage bin. Remove the
lid from the ice tray and fill the tray with water. Place the lid back on the ice tray and
carefully position it back onto the ice storage bin.
z
Once the ice is solid, take the ice tray and lid off the ice storage bin, remove the lid from
the tray and twist the ice tray at each end in opposite directions. Turn the ice tray over
the ice storage bin to dislodge the cubes into the bin.
z
Fill the ice tray with clean water and repeat to fill the ice storage bin.
z
Attached to the ice storage bin is the ice scoop which provides hygienic access to ice.
z
To access ice cubes, take the ice tray and lid from the top of the ice storage bin and
place onto a flat surface. Take the scoop from the front of the bin, scoop cubes into
vessel and then replace the scoop, tray and lid back to the top of the bin.
z
For maximum ice storage, level the stored cubes around the bin with the ice scoop.
z
If ice is not used often, old cubes will become cloudy, taste stale, will shrink and may
stick together. Empty the ice storage bin periodically and wash in lukewarm water. Dry
thoroughly and place back in the correct position.
35
ACTIVESMART™ SPECIAL FEATURES
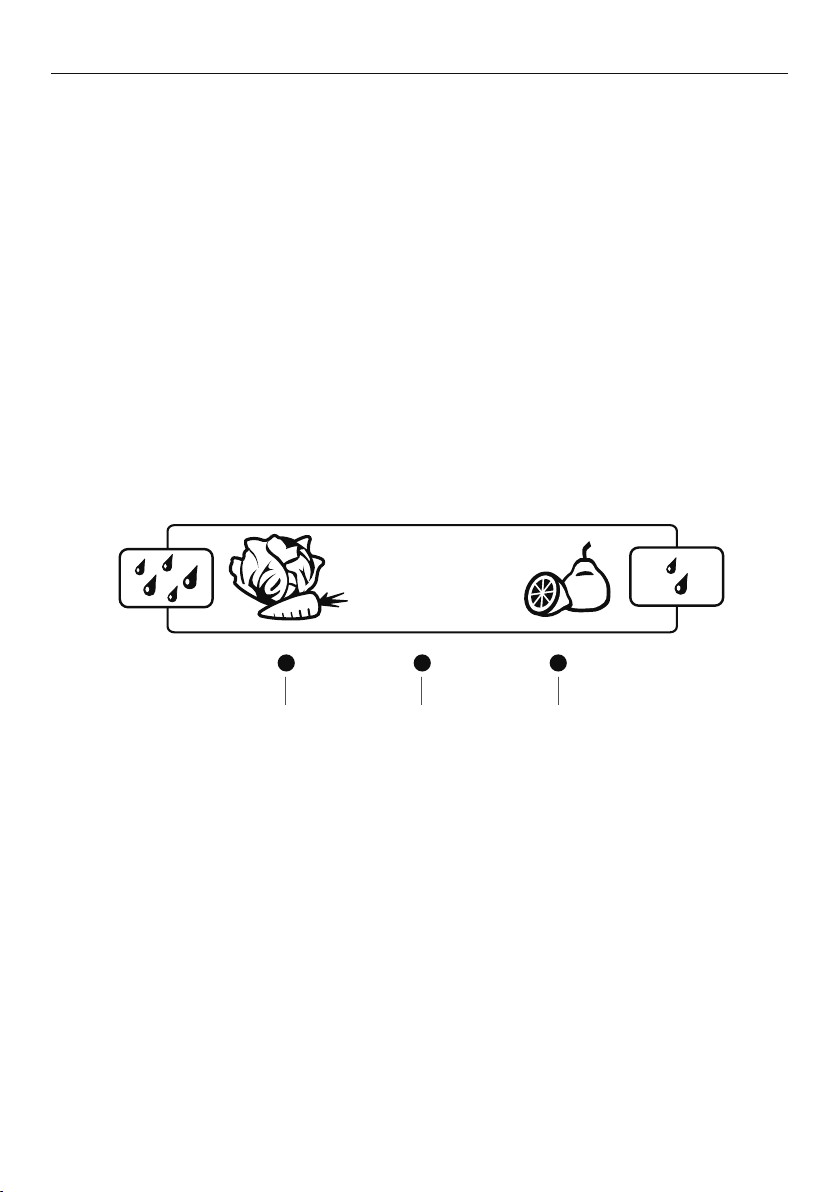
Fruit and vegetable bins and humidity control lid
The fruit and vegetable bins feature a unique lid which provides two functions:
z
The humidity lid seals the bins and provides a humid microclimate to extend storage
times of fruit and vegetables.
z
The humidity lid prevents condensation, which forms at high humidities, from dripping
down onto the fruit and vegetables by retaining it in the grooves of the lid.
Fruit and vegetable bins and humidity slide (selected models only)
z
Each fruit and vegetable bin has a humidity slide control that can be adjusted to a fruit
or vegetable setting depending on what is stored in the bins.
z
If possible try to store fruit and vegetables separately. This will help extend
their storage life.
z
If there is a mixture of fruit and vegetables in the bin adjust the position of the
control to thecentre.
z
If there is too much water in the bins (due to the high humidity in the bins), the control
can be adjusted towards the setting with fewer drips (fruit setting) and/or the water
can be wiped out as required.
z
Remember a minimum amount of water in the bins is beneficial for fruit and
vegetable storage.
Salad
greens
Mixed fruit
& vegetables
Fruit with
skin/peel
Lettuce
Spinach
Broccoli
Cabbage
Carrots
Oranges
Lemons
Limes
Suitable for:
36
ACTIVESMART™ SPECIAL FEATURES
Slim storage drawer (where fitted)
The slim bins at the bottom of the fresh food
compartment provide storage space for items that
you may want to keep separate from the rest of the
refrigerator. These slim storage bins can be used for deli
item storage, beverages or for defrosting foods.
Bottle holder (where fitted)
z
The bottle holders can be used to store
a variety of bottles.
z
To position the bottle holder in your refrigerator, simply slot the back edge of the bottle
holder onto the back trim of any shelf in the fresh food compartment.
z
If you are not using all or some of the bottle holders, the unused bottle holders can be
stacked up on top of one another so they do not take up unnecessary shelf space.
z
Bottles are best stored with the neck of the beverage facing the front of the refrigerator.
Glass shelves
z
Glass shelves can be repositioned in the cabinet as desired.
z
Remove shelves by lifting up the back of the shelf and then pulling the shelf forward.
Drip tray (Ice & Water models only)
z
The drip tray is designed to fit
into the bottom of the water
dispenser panel.
z
To insert the tray always ensure that
the rounded sides are fitted into the
dispenser panel first.
z
The purpose of the tray is to capture
any odd drips of water that may fall
after dispensing.
z
The tray can be easily
removed for cleaning.
Slim storage drawer
Drip tray
37
CLEANING AND CARING FOR YOUR REFRIGERATOR
Exterior (all models)
Stainless exterior doors
z
Clean the exterior door with liquid dishwashing detergent dissolved in warm water
and a soft cloth.
z
Dry the door with a lint-free cloth.
z
The use of any abrasive or stainless steel cleaners and solvents will damage the door surface.
Other exterior surfaces (all models)
z
Clean all other exterior surfaces with a mix of warm water and liquid dishwashing
detergent, and a soft cloth.
z
If necessary, clean the magnetic door gasket, the centre door gasket and the pocket
handles with an old toothbrush, warm water and liquid dishwashing detergent.
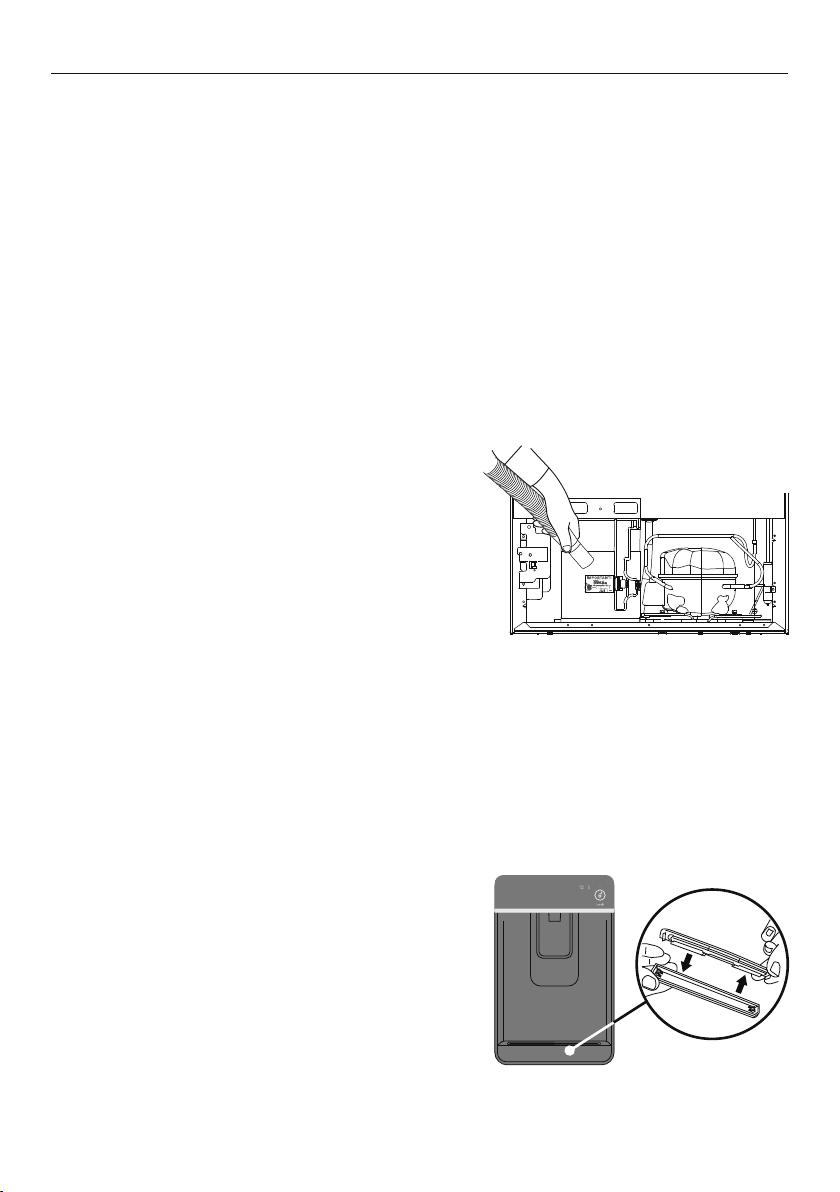
Cabinet surround
z
To maximise operating efficiency regularly
vacuum the flooring around your appliance.
z
Cleaning behind the appliance is required once
or twice a year. More frequent cleaning may
be necessary for dusty homes or those with
pets shedding hair.
z
To do this wind up the feet and carefully ease
the refrigerator out of its position. Switch
off andunplug.
z
Vacuum the flooring behind your appliance and the
rear compartment cover (where fitted) to remove
dust accumulation. Use a dry lint-free cloth to clean
the appliance walls and surrounding cabinetry.
z
After cleaning, plug in and switch on. Push the
appliance into position and wind feet down.
WARNING!
Electric Shock Hazard. Do not remove rear compartment cover. This may expose you to
the risk of an electric shock.
Water dispenser pad and interface (Ice & Water models only)
z
We have incorporated a Dispenser and ‘Key Lock’ function in your refrigerator to make
cleaning easier. This will help you to avoid
accidental water dispensing while you clean.
z
Clean the pad and interface panel with a
soft damp cloth.
Drip tray (Ice & Water models only)
z
To clean, take the tray out of the dispenser
panel and pull the two halves of the tray apart.
z
Clean in warm water with a mild detergent. Dry
and clip back together.
Cleaning the rear compartment cover
Cleaning the drip tray

38
CLEANING AND CARING FOR YOUR REFRIGERATOR
Interior (all models)
z
It is important to keep the interior of the refrigerator and freezer clean to help prevent
food from becoming contaminated during storage.
z
The amount and types of food stored determines how often cleaning should be carried
out in the refrigerator (ideally once every 1 to 2 weeks).
z
Remove the shelves from cabinet and door. Wash shelves and storage bins in warm
water and detergent; rinse in clean water and dry before replacing.
z
Wipe over the interior surfaces with warm water and liquid dishwashing detergent.
Alternatively you can use 1tsp baking soda dissolved in 500ml of warm water. Rinse
with cleanwater.
z
To help remove “old stale refrigerator” smells add a few drops of vanilla essence or
vinegar to the water before cleaning.
z
Clean interior surfaces with warm water and liquid dishwashing detergent. Use a
toothbrush for the magnetic door gasket.
z
Do not use harsh, abrasive cloths on any part of the refrigerator or freezer.
Glass shelves (all models)
Clean with warm water and detergent or a glass cleaner.
Bottle holder (where fitted)
Clean with warm water and detergent. The use of abrasive cleaners and solvents
may cause damage.
Automatic ice dispenser (Ice & Water and Automatic Ice models only)
z
We do not recommend you clean the ice maker componentry, but it is important to clean
the bins occasionally.
z
The storage bin should be cleaned regularly and the old ice in the bottom of
the bin discarded.
z
Wash bin in lukewarm water. Dry thoroughly and replace.
z
When replacing the bin ensure that the scoop is on the right hand side or at the front of
the bin (model dependent).
IMPORTANT!
Many commercially available cleaning products contain solvents that may attack the
plastic components of your refrigerator and cause them to crack. It is important to use
only warm water and a small amount of liquid dishwashing detergent on any components
inside and outside your refrigerator. Avoid using anti-bacterial cleaning products
on either the interior or exterior of the cabinet as they may cause rusting of metal
components and cracking of plastic components.
39
CLEANING AND CARING FOR YOUR REFRIGERATOR
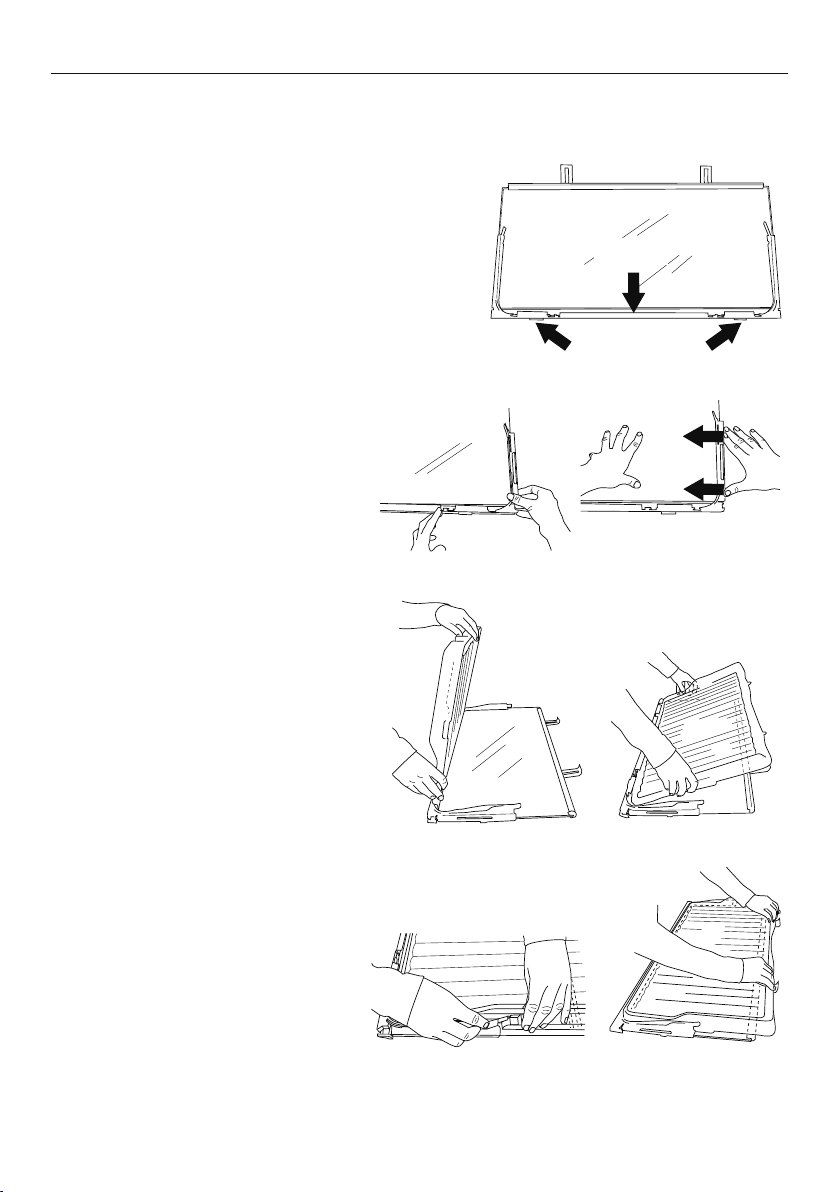
Humidity Control System
IMPORTANT!
When cleaning the shelf above the vegetable
bins, we recommend that you do not disassemble
the Humidity Control System from the shelf.
In the event that the humidity control lid
(plastic lid) and humidity slides become
separated from the glass shelf, follow these
instructions to reassemble.
Humidity
Slides
Retainer
Humidity Control System cleaning
1 Turn shelf upside down.
2 To attach humidity slides onto
shelf front corners, fit bottom
clips into shelf front trim. Next,
slide sideways towards shelf
until arm clips onto glass.
3 To attach humidity control lid —
with text facing you, align lid
with front of shelf. Hold lid
vertically and fit front end
into retainer on shelf. Ensure
lid fits into retainer as well as
underneath humidity slides.
4 At the sides of the shelf, adjust
humidity slide tabs so that
the plastic lid is between the
shelf and the tabs.
5 If clips on back of shelf are
present, fasten lid with rear clips.
Ensure that the cover is fully
secure at front and back of shelf.
40
CLEANING AND CARING FOR YOUR REFRIGERATOR
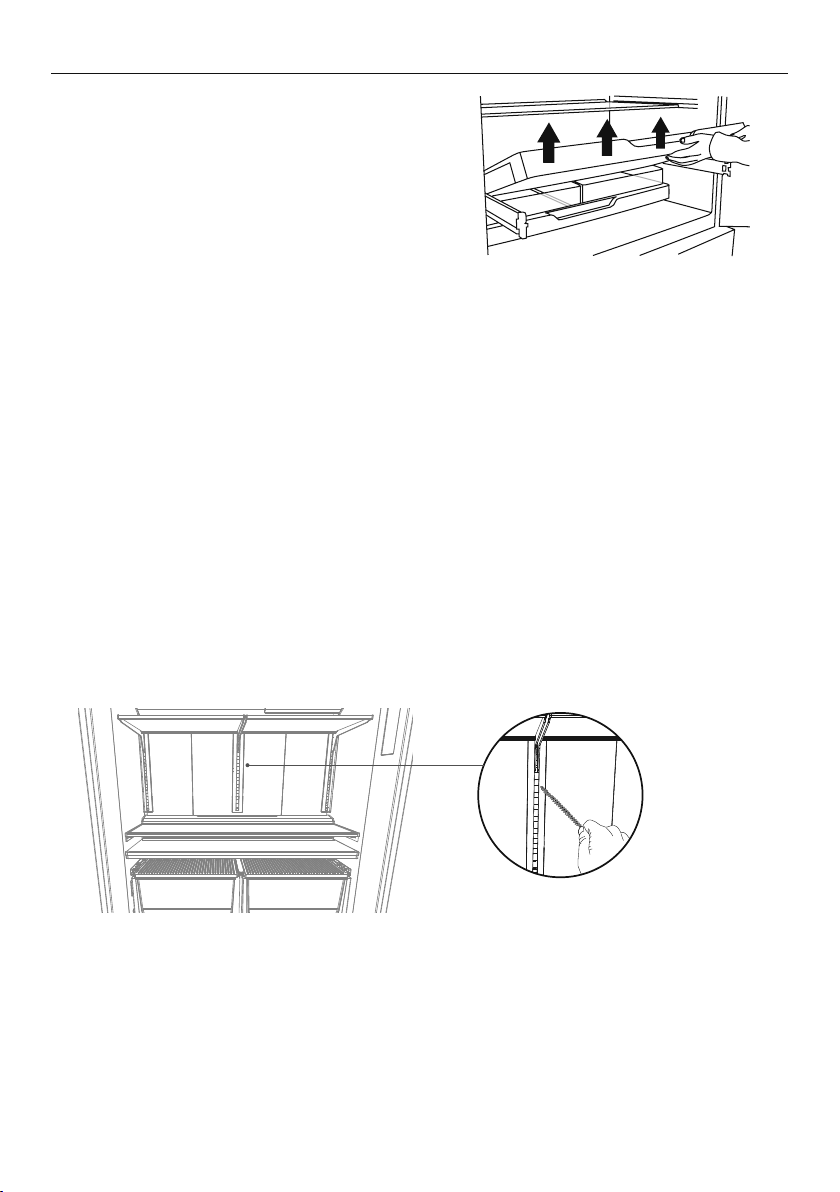
To remove trays or fixed bins
z
For ease of removal, empty food from
tray/bin first.
z
Hold the centre front of the tray/bin handle.
z
Lift vertically to unclip from the runners and
pull tray/bin towards you to remove.
z
Push both runners back into refrigerator.
To replace trays or fixed bins:
With the runners pushed back into the
refrigerator, place the tray/bin on top of the runners. Push the tray/bin back slowly until you
feel it clip back onto the runners.
IMPORTANT!
z
Ensure that trays and bins are securely clipped onto the runners before use.
z
Bin and tray runners are pre-lubricated, and will not need to be re-lubricated during
their life. Do not attempt to clean grease from the runners, as this will affect their
ability to function. Do not immerse runners in water.
Permanently fixed bins and trays (Freezer drawer models only)
The freezer bins and trays in this model are permanently fixed. They cannot be removed
from the freezer compartment. To clean simply wipe with a soft, damp cloth.
Cleaning the support lugs
1
Remove all shelving
2
Clean the support lugs with liquid detergent dissolved in water and a tube brush or a
clean lint-free cloth.
On holiday
z
Turn the ice maker to OFF on the internal control panel.
z
Shut off the water supply to the refrigerator.
z
On your return, turn on the water supply to the refrigerator.
z
Dispense 4L of water and discard to ensure the water tank is refilled with fresh water.
z
Turn on the ice maker.
z
Discard the first 3harvests of ice (8ice cubes are produced per harvest).
Tray removal

41
For best food care
z
Store only high-quality, fresh food in your appliance.
z
Store perishable foods in the appliance immediately after purchase. Storingatroom
temperature increases the rate of deterioration and can allow harmfulmicrobialgrowth.
z
Foods such as meat, poultry and seafood should be well wrapped or sealed in
suitablepackaging to prevent dehydration, color deterioration, loss of flavor, and
transfer ofodour.
z
We recommend storing these foods on the bottom shelf of your appliance orinone of
the bins to prevent potential spills and cross-contamination with otherfoods.
z
Ensure hot foods and beverages are cooled sufficiently before placing them into
theappliance. Hot items may cause other foods to warm to unsafe temperatures.
Itmayalso cause sealed items to sweat/condensate — which is undesirable.
z
Beverages are best stored standing upright in the door shelves or on the bottle
racksprovided.
z
Ensure raw and cooked foods are stored separately to avoid cross-contamination.
z
Consume food items within the recommended storage times. Discard foods that
showsign of spoilage.
z
Keep door openings to a minimum to maintain optimum storage temperatures inside
your appliance.
z
We recommend using ‘Max Cool’ or ‘Fast Freeze’ when you are adding food items
toyour appliance, such as after grocery shopping. This feature will ensure the
food ischilled/frozen within the shortest period of time, locking in the freshness
andextending the shelf life of your food.
Items stored in your refrigerator
z
Dairy items such as butter and cheeses should be stored in the covered door shelf
tominimize any transfer of odor or odor absorption from other foods.
z
Eggs should be stored in their carton to avoid absorption of strong odors through
theirporous shell structure.
Items stored in your freezer
z
We recommended cooling carbonated beverages only when the ‘Bottle Chill’
function isactive.
z
Do not store carbonated drinks without this function in the freezer.
Failure toremove beverages could lead to freezing liquid and the likelihood
ofbottle/canexplosion.
z
Ensure air is removed from packaging to avoid large formation of ice crystals and
prevent freezer burn.
z
To maintain freshness and quality, we recommend defrosting foods in the refrigerator.
Ensure partially or fully defrosted foods are never re-frozen — cook immediately.
FOODCARE

42
If your refrigerator is turned off for any reason, wait 10 minutes before turning it back on.
This will allow the refrigeration system pressures to equalise before restarting.
Moving your refrigerator
z
Turn off the refrigerator and unplug from the power point. Remove all food.
z
Turn the adjustable feet to the right as far as they will turn.
z
Ease the refrigerator out of its position. Tuck the power cord away, tape the shelves in
place and tape the doors closed. If the cabinet needs to be placed at an angle or laid
down, carefully lay it on its side (the left hand side when viewed from the front).
z
Relocate and install. If the appliance has been left on its side for any length of time, leave
it standing upright as long as you can (a few hours) before turning on.
Storing your refrigerator
z
When storing your cleaned appliance, leave the doors open. This allows air to circulate
and prevents the build up of bacteria and moulds.
z
Before using again, clean well using a mixture of warm water and a small amount of
liquid dishwashing detergent. Rinse with clean water and dry with a soft lint-free cloth.
Holiday/Vacation time
Leave your refrigerator operating while you are on holiday/vacation.
MOVING OR STORING YOUR APPLIANCE

43
ACTIVESMART™ USER WARNINGS AND SOUNDS
User warnings
Faults
In the unlikely event a fault occurs the
icon will illuminate on the internal control panel
and an alarm will sound when the fresh food compartment door is opened.
z
Please count the number of beeps made when the fresh food compartment door
is opened. Please also take note of the number and sequence of temperature lights
displayed on the internal control panel and contact our Customer Care Centre.
z
To silence the fault alarm press any button on the internal control panel. The icon will
remain illuminated until the fault is corrected.
Normal refrigerator sounds
ActiveSmart™ refrigerators, with their excellent energy ratings and cooling performance, can
produce sounds somewhat different to your old refrigerator.
Normal operational sounds include:
z
Fan air flow sound. ActiveSmart™ refrigerators have fans which change speed depending
on demand. During cooling periods, such as after frequent door openings, fans circulate
the cold air in the refrigerator and freezer compartments producing some air flow sound.
This is quite normal.
z
Cracking or popping which may occur when the defrost function is operating.
z
Running water sound. This is the liquid refrigerant in the system and can be heard as a
boiling or gurgling noise.
z
An audible hissing sound after closing the freezer door. This is due to the pressure
difference between the warm air that has entered the cabinet and suddenly cooled, and
the outside airpressure.
Other sounds may be heard for the following reasons:
z
Cabinet not level.
z
Floor uneven or weak.
z
Bottles or jars rattling on shelves.
If this is your first refrigerator with an ice maker, you will hear occasional sounds that may
be unfamiliar. They are normal ice making sounds and are not cause for concern.
The following sounds are normal with the operation of an ice maker:
z
Motor operation (low humming).
z
Running water as the ice maker and/or water tank fills.
z
Water valve opening and closing (hissing sound).
z
Ice being loosened from the ice moulding tray (cracking).
z
Ice dropping into bin (clunking).
44
TROUBLESHOOTING
If there is a problem with your appliance, please check the following points before
contacting your local Fisher & Paykel trained and supported service technician or the
Customer Care Centre.
Product parts and accessories can be purchased through Fisher&Paykel Customer Care
Centre or online at fisherpaykel.com (this service is available to selected markets only).
All models
PROBLEM POSSIBLE CAUSES WHAT TO DO
Appliance does
not operate.
No electricity at power outlet. Check that the plug is correctly connected
and power switched on.
Check another appliance at the same
outlet.
Check house fuse.
Light not working. Light not functioning. The LED light cannot be serviced by the
user. Contact your Fisher & Paykel Dealer
or Fisher & Paykel trained and supported
service technician.
Refrigerator not working. Check refrigerator is turned on at wall.
Light and display
not working.
Product in ‘Sabbath Mode’.
Press and hold
, and together for
4 seconds.
Motor operates for
long periods.
Hot weather. Minimise door openings to allow
temperature to stabilise.
Frequent door openings.
Large amount of food
recentlyadded.
Temperature control set toolow. Refer to section ‘Temperature control’.
Doors not sealing properly. Check that cabinet is level and gasket seals
are clean.
Storage
compartments
too warm.
Temperature setting not correct. Refer to section ‘Temperature control’.
Frequent door openings. Minimise door openings to allow
temperature to stabilise.
Large amount of food
recentlyadded.
Food freezing in
the refrigerator.
Temperature setting not correct. Refer to section ‘Temperature control’.
Food placed directly in front of
air outlets.
Move chill sensitive foods away from the
centre back of the shelves.
Unfamiliar noises. Cabinet not stable or level. Refer to sections ‘Installation instructions’
or ‘ActiveSmart™ user warnings and
sounds’.
Freezer is defrosting.
45
TROUBLESHOOTING
All models
PROBLEM POSSIBLE CAUSES WHAT TO DO
Water in the
vegetable bins.
Condensation is formed by
the water produced by fruit
and vegetables.
A small amount of condensation is
beneficial for fruit and vegetable storage.
Wipe out water with a cloth.
Set humidity slide to
low humidity setting
Exterior of cabinet
is warm.
This is normal.
Warm spot on
central door seal.
(French door
models only).
You may feel a warm spot at times
on the central seal between the
two refrigerator doors.
This is perfectly normal and is part of the
normal refrigerator operation.
Condensation
on outside of
refrigerator/freezer.
Not unusual during periods of
high humidity.
Wipe dry.
Condensation
inside fresh food
compartment.
Frequent or long door openings. Minimise door openings.
Door gasket leaking. Check that gasket is sitting flat and
sealing tightly.
Not unusual during periods of
high humidity.
Wipe dry.
Door handles out
of alignment.
With time and usage, movement
may occur.
Refer to section ‘Installation instructions’.
Tray/bin does
not slide in and
out evenly.
Packaging trapped. Check to ensure no food or packaging is
trapped behind the tray/bin.
Runners not extending fully. Holding onto sides of tray/bin, extend the
runners fully by using a firm pull — this will
reset the runner.
Appliance
operating
inefficiently.
Accumulation of dust on or behind
the rear compartment cover.
Refer to section ‘Cleaning and caring for
your refrigerator’.
If problem persists please contact
Customer Care.

46
TROUBLESHOOTING
Ice & Water and Automatic Ice models only
PROBLEM POSSIBLE CAUSES WHAT TO DO
Automatic ice
maker does
notwork.
Ice maker has not been turned on. Switch on ice maker.
Bin is in the wrong way or there is no
bin in place.
Place bin so scoop is on the right side.
Ice bin sits directly under ice maker on
top left side of freezer.
Water supply turned off
or not connected.
Connect water supply.
Freezer compartment not working. Contact Customer Care.
Water pressure too low. Check water pressure.
Water line kinked/squashed. Check water line for kinks/squashing.
Filter clogged. Water filter may need replacing.
Ice cubes have
odour/taste.
Unsealed packages may be
transmitting odour/taste.
Old cubes need to be discarded.
Ensure food packaging is sealed.
Interior of freezer needs cleaning. Ice storage bin needs to be emptied
and washed.
Clean refrigerator.
Poor taste from incoming water. Filter may need changing.
A new filter may need to be installed.
Force 2
– 3 ice tray flips.
Slow ice cube
freezing.
Door may have been left ajar. Close door.
Freezer compartment too warm. Turn temperature to a colder setting.
Taste of odour in
ice cubes.
Transfer of odour/taste from strong
smelling foods.
Wrap or cover strong smelling foods.
47
TROUBLESHOOTING
Ice & Water and Automatic Ice models only
PROBLEM POSSIBLE CAUSES WHAT TO DO
Wet ice/
iceclumping.
Low water pressure. Check water pressure.
Filter blocked. Replace filter.
Long freezer door openings. Gently tap ice with scoop to unstick
or, if large clumps occur, empty ice bin
and make new ice.
High ambient temperature.
Ice bin left out of freezer compartment
for a length of time.
Ice will stick together over time.
Filter warning light
is flashing.
Filter needs replacing. Replace filter as soon as possible.
Ice buildup
inside freezer
compartment.
Freezer door not closing tightly. Arrange items in freezer so door can
close tightly.
Check and clean door gasket seal.
Ice maker makes
unfamiliar sounds
or seems too loud.
Normal ice maker operation. Refer to section ‘ActiveSmart™ user
warnings and sounds’.
Ice boost function
not increasing rate
of ice production.
Ambient temperature very warm. Minimise door openings.
Refrigerator is in high usage.
48
TROUBLESHOOTING
Ice & Water models only
PROBLEM POSSIBLE CAUSES WHAT TO DO
Water has poor
taste/odour.
Refrigerator not used for an
extended period.
Dispense 4L of water so fresh water
supply is replenished.
Water dispenser
does not work.
Water supply turned off or
not connected.
Turn water on.
Press dispenser for 2 minutes to
remove trapped air from water line and
to fill the water system.
Supply line may be blocked. Check supply for kinks or leaks.
On first installation there may be air in
water system.
To remove air, run 3L of water through
the dispenser.
Filter may be blocked and
need replacing.
Replace filter. (Replacement filter
cartridges can be purchased online
from fisherpaykel.com or by calling
Fisher & Paykel Customer Care.)
‘Dispenser Lock’ activated. Press and hold the button for
4seconds.
Water frozen in tank. Increase temperature to a warmer
setting in fresh food compartment
andfreezer.
Water in first glass
is warm.
Water dispenser not used for
extended period.
Discard first glass of water dispensed.
Tank capacity used recently. Allow water time to cool.
Drips overflow
drip-shelf.
Air trapped in tank. Flush 3L water through dispenser,
stopping intermittently.
New filter installed. Flush 4L water through filter and then
3L through dispenser.
Water flow rate has
slowed down.
Filter cartridge is restricted. Replace filter as soon as possible.

49
MANUFACTURER’S SERVICE & WARRANTY
For details of your manufacturer’s warranty and contacts for servicing, please refer to your
separate ‘Service & Warranty’ book provided with your refrigerator.
Complete and keep for safe reference:
Model
Serial No.
Purchase Date
Purchaser
Dealer
Suburb
Town
Country

50
EUROPEAN DIRECTIVE 2012/19/EU ON
WASTE ELECTRICAL AND ELECTRONIC EQUIPMENT (WEEE)
GB This appliance is marked according to the European directive 2012/19/EU on Waste
Electrical and Electronic Equipment (WEEE). By ensuring this product is disposed of
correctly, you will help prevent potential negative consequences for the environment and
human health, which could otherwise be caused by inappropriate handling of this product.
The symbol
marked on the serial plate, or on the documents accompanying the product,
indicates that this appliance cannot be treated as household waste. It shall be handed over
to the applicable collection point for the recycling of electrical and electronic equipment.
Disposal of the appliance shall be carried out in accordance with the local environment
regulations for waste disposal and ensure the refrigerant circuit is not damaged.
For more detailed information about treatment, recovery and recycling of this product,
please contact your local city office, your household waste disposal service or your
Fisher & Paykel retailer/dealer from whom you purchased this product.


NZ AU GB IE EU AE HK SG
86186A 06.19
FISHERPAYKEL.COM
© Fisher & Paykel Appliances 2019 All rights reserved.
The product specifications in this document apply to the specific
products and models described at the date of issue. Under our policy
of continuous product improvement, these specifications may change
at any time. You should therefore check with your Dealer to ensure this
document correctly describes the product currently available.