GB
F
SA
FA
ZHS
KO
TH
1800118598 -02/10
p. 4 - 7
p. 8 - 11
p. 12 - 15
p. 16 - 19
p. 20 - 23
p. 24 - 27
p. 28 - 31
1800118598FTHGB-ASIE_1800118598FTHGB/ASIE13/04/1015:38PageCouv1
GB
F
SA
FA
ZHS
KO
TH
1800118598FTHGB-ASIE_1800118598FTHGB/ASIE13/04/1015:38Page1
1
2
3
5
4
6
16
7
8
9
11
10
12
13
14
15
1800118598FTHGB-ASIE_1800118598FTHGB/ASIE13/04/1015:38Page2
fig.1.1 fig.1.2 fig.2
fig.3
fig.4
CLIC !
CL
fig.5
fig.6
fig.7
fig.8
fig.9
fig.10 fig.11
fig.12
fig.13
fig.14
fig.15
fig.16 fig.17
1800118598FTHGB-ASIE_1800118598FTHGB/ASIE13/04/1015:38Page3

4
For your safety
This appliance complies with the technical rules and standards for safety currently in force (Electromagnetic Compatibility,
Low Voltage, Environnement).
• Please read these instructions carefully and keep them for future reference.
•
This appliance is not designed to be used by people (including children) with a physical, sensory or mental impairment, or people
without knowledge or experience, unless they are supervised or given prior instructions concerning the use of the appliance by someone
responsible for their safety. Children must be supervised to ensure that they do not play with the appliance.
• Warning ! The voltage of your electrical installation must correspond to that of the iron (220V-240V or 127V
depending on model). Connecting to the wrong voltage may cause irreversible damage to the iron and will
invalidate the guarantee.
• This iron must always be plugged into an earthed socket. If using a mains extension lead, ensure that it is correctly rated
(16A, depending on model), with an earth connection.
•
If the electrical cord becomes damaged, it must be immediately replaced by an Approved Service Centre to avoid any danger.
• The appliance should not be used if it has fallen, if it has obvious damage, if it leaks or has functional anomalies. Never
dismantle your appliance : have it inspected by an Approved Service Centre, so as to avoid any danger.
• Never immerse your iron in water !
• Do not unplug your appliance by pulling on the cord.Always unplug your appliance: before filling
- fig. 3
or rinsing the
reservoir, before cleaning it, after each use.
• Never leave the appliance unattended when it is connected to a power source; if it has not cooled down for
approximately 1 hour.
• Your appliance gives off steam, which may cause burns, especially when you are ironing on a corner of your ironing
board. Never direct the steam towards people or animals.
• Your iron should be used and placed on a flat, stable, heat-resistant surface.When you put your iron onto its iron rest,
make sure that the surface on which you put it is stable.
• This product has been designed for domestic use only. Any commercial use, inappropriate use or failure to comply with
the instructions, the manufacturer accepts no responsibility and the guarantee will not apply.
Description
1 Spray
2 Thermostat indicator
3 Antiscale valve grip
4 Dry/Steam control
5 Spray Button
6 Shot of Steam Button
7 Auto-Stop safety warning light
(depending on model)
8 Gel comfort handle (depending on model)
9 Electric power cord
10 Extra-large heel with non-slip pad
11 Opening button to water tank
12 Integral anti-scale system
13 Thermostat indicator light
14 Autosteam Control Thermostat
15 Autoclean Catalys® Soleplate
16 Water tank filler hole
Before using for the first time
Warning! Before using your iron with the steam function for the first time, we
recommend that you operate it in a horizontal position for a few moments, away
from your linen, i.e. press the Shot of Steam button a few times.
During the first few uses, a harmless odour and a small amount of smoke may be
given off.
This has no effect on the use of the iron and will disappear quickly.
What water to use?
Your appliance has been designed to function with untreated tap water. However, it is necessary to operate the Self-Clean
function regularly in order to eliminate hard water deposits from the steam chamber.
If your water is very hard (check with your local water authority), it is possible to mix tap water with store-bought distilled
or demineralised water in the following proportions :
- 50% tap water, - 50% distilled or demineralised water.
Types of water not to use?
Heat concentrates the elements contained in water during evaporation.The types of water listed below contain organic
waste or mineral elements that can cause spitting, brown staining, or premature wear of the appliance : water from
clothes dryers, scented or softened water, water from refrigerators, batteries or air conditioners, pure distilled or
demineralised water or rain water should not be used in your Tefal iron. Also do not to use boiled, filtered or bottled water.
Warning !
Remove any labels
from the soleplate
before heating up the
iron (depending on
model).
1800118598FTHGB-ASIE_1800118598FTHGB/ASIE13/04/1015:38Page4
5
Use
Steam ironing
1. Filling the water tank
- Unplug your iron before filling it.
- Set the steam control to DRY
- fig. 1.1
.
- Take the iron in one hand and tilt it slightly, so that you can see the water tank filling hole
-
fig. 3.
- To open the water tank, press the button
- fig. 2.
- Fill the water tank
- fig. 3
up to the mark “MAX”. The mark MAX corresponds to a capacity
of 350 cc.
- Close the water tank cover until you hear a click
- fig. 4.
- You can now plug in your iron.
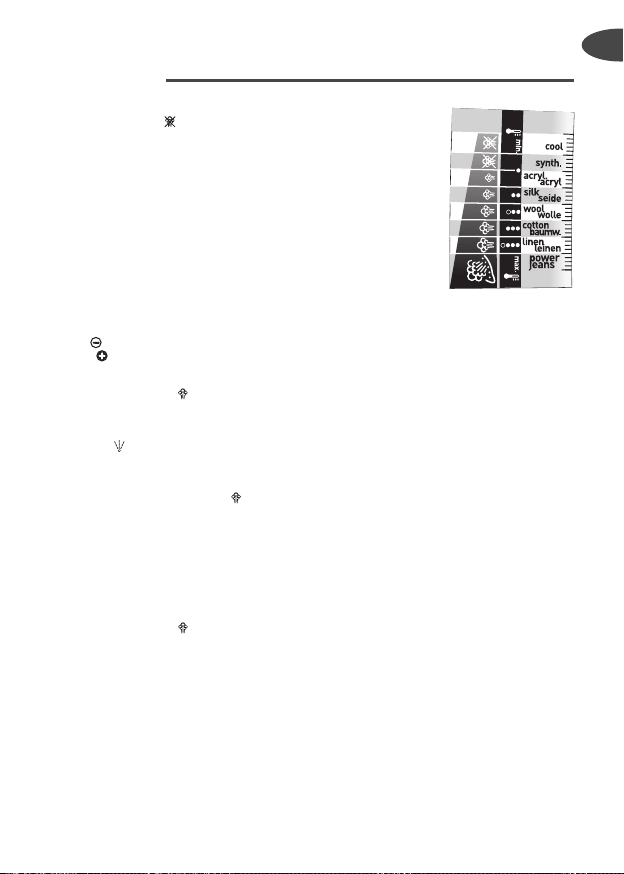
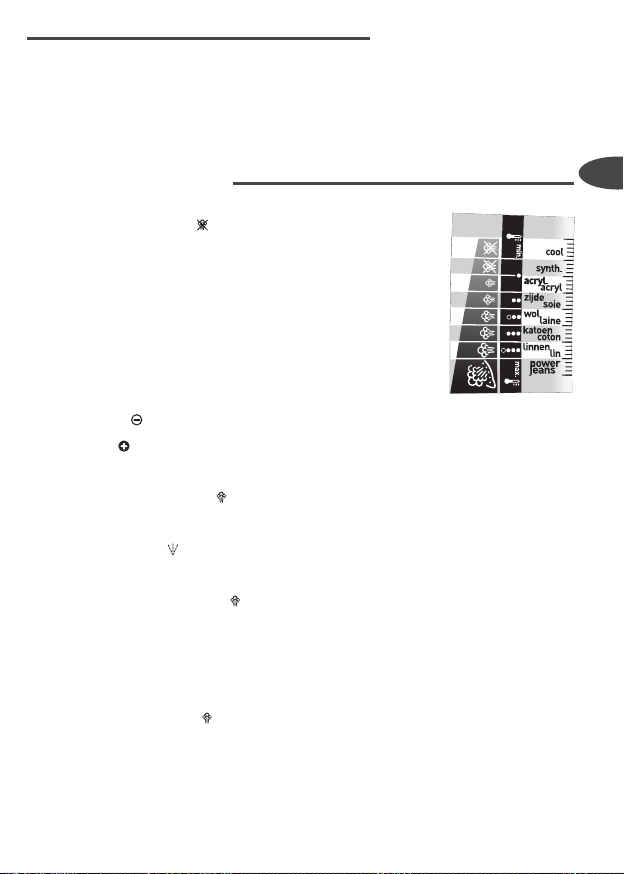
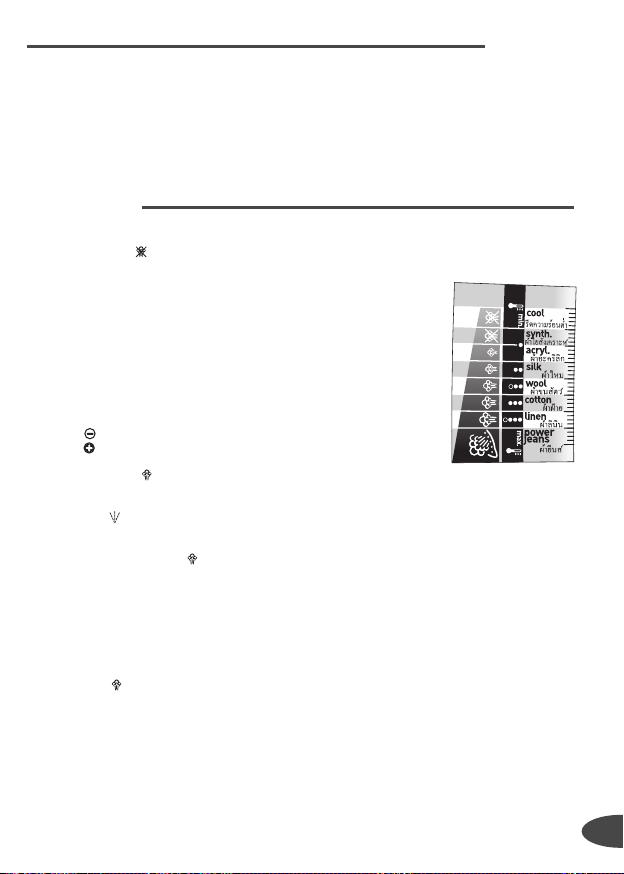
2. Choose your ironing programme
- Your iron has the Autosteam Control function, which recommends 8 different ironing
programmes:
• Set the Autosteam Control Thermostat to match the type of textile you wish to iron. Your
iron automatically and accurately determines the exact temperature and steam flow that
are suitable, in order to guarantee the best results.
• To select the appropriate ironing programme, activate the thermostat located under the
handle
- fig. 5.
- Rotation left : selects the programs requiring low temperature and steam levels.
- Rotation right : selects the programs requiring high temperature and steam levels.
- The program selected appears automatically on the indicator panel at the front of the
iron
- fig. 6.
- Set the steam control to STEAM
- fig. 1.2.
- When your iron reaches the required temperature, the thermostat indicator goes out
-
fig. 7.
You can start ironing.
3. Spray Function
- While ironing, press a few times in succession on the Spray button to dampen the fabric
-
fig. 8
and iron out awkward creases.
4. For more steam (shot of steam button)
- Press the Shot of Steam button from time to time
- fig. 9.
- Wait a few seconds between each shot before pressing the button again.
5. Vertical steam ironing
- Ideal for removing creases from suits, jackets, skirts, hanging curtains etc
- Hang the garment on a hanger and hold the fabric slightly taut with one hand. The
steam is very hot, so you should always do this with the garment on a hanger – never
while someone is wearing it.
- Set your thermostat to MAX
- fig. 10.
- Press the Shot of Steam button ( ) repeatedly
- fig. 9
moving the iron from top to
bottom
- fig. 11.
- Hold the iron a few centimetres from the fabric to avoid burning delicate fabrics.
6. Anti-Calc Plus System
- You iron is equipped with an integral anti-scale system
- fig. 12.
- This system will help to provide :
• a better ironing quality with a constant flow of steam,
• a longer life for your iron.
7. Anti-drip function
- Autosteam Control, i.e. the automatic selection of the ironing programme depending on
the fabrics elected, makes it possible to reduce steam flow at low temperatures and
prevents your iron from dripping water onto your linen.
Recommendations:
Fabrics and ironing
temperatures:
• Your iron heats up
quickly: so begin by
ironing fabrics that are
ironed at low
temperatures first, then
go on to those requiring
a higher temperature,
• if you change to a
program requiring lower
temperatures, wait for
the thermostat light to
come on again before
continuing to iron.
• when ironing fabrics
with mixed fibres, set
the ironing temperature
for the most delicate
fibre. For delicate fabrics
we recommend testing
the fabric first on an
inconspicious place eg
(inside them).
• For best results we
recommend you use a
vented ironing board to
allow the powerful
steam to penetrate
through the fabric more
efficiently.
• Ensure that the fabric
you are ironing is flat to
avoid steam venting
sideways whilst ironing.
GB
F
SA
FA
ZHS
KO
TH
1800118598FTHGB-ASIE_1800118598FTHGB/ASIE13/04/1015:38Page5
6
8. Auto-Stop safety feature (depending on model)
- For your safety, the electronic system cuts off the power and the autostop indicator light
flashes
- fig. 13
when:
• The iron remains motionless for more than 8 minutes on its heel.
• The iron remains flat or on its side for more than 30 seconds.
- To restart the iron, just move it gently until the warning light stops flashing.
9. Autoclean Catalys® Soleplate
- Your iron is equipped with a self-cleaning soleplate
- fig. 14
which works by catalysis.
- Its exclusive coating helps continuously eliminate all the impurities generated by normal use.
It is recommended that you always stand your iron on his heel to preserve its self-cleaning coating.
Dry Ironing
- Choose your ironing program.
- Set the steam control to DRY
- fig. 1.1.
- You may start ironing when the thermostat light goes out.
Caring for your iron
BE CAREFUL ! Unplug your iron and let it cool down before cleaning it.
Cleaning the anti-calc valve (once per month)
- Unplug your iron and empty the water tank.
- To remove the antiscale valve, set your thermostat on the position MAX
- fig. 10
,
place the steam control on STEAM ,
- fig. 1.2
and the valve can now be removed
from your iron
- fig. 15.
Never touch the end of the valve
- Soak the valve in a cup of white vinegar or plain lemon juice for 4 hours
- fig. 16
.
- Rinse the valve under running water.
- Replace the anti-calc valve.
The iron will not function without the anti-calc valve
1. Self-cleaning
In order to extend the life of your iron, use the Self-Cleaning function once a month.
- Set the iron to DRY
- fig. 1.1
.
- Fill the water tank to maximum.
- Set the iron on his heel, with the water tank full, and set the thermostat to MAX
- fig. 10.
- When the thermostat light goes out, unplug the iron and hold it in a horizontal position, over a
sink.
- Set the steam control to STEAM ,
- fig. 1.2
- Remove the anti-calc valve.
- Shake the iron gently, over the sink, until some of the water in the water tank (with the
impurities) has flowed out through the soleplate.
- At the end of the operation, push the anti-calc valve back into position.
- Turn the iron back on for 2 minutes, setting it on its heel, to dry the soleplate.
- Unplug the iron, and when the soleplate is just warm, wipe it with a soft cloth.
2. Cleaning the soleplate
Your iron is equipped with a self-cleaning soleplate, which works by catalysis.
Its exclusive active coating helps continuously eliminate all the impurities generated by the
normal day-to-day use of the iron.
However, if you iron using an unsuitable programme, some traces may be left which require
manual cleaning. In this case, it is recommended that you use a soft damp cloth on the warm
soleplate, in order not to damage the surface.
Storing your iron
- Unplug the iron and wait for the soleplate to cool down.
- Empty the water tank and set the steam control to DRY
- fig. 1.1
. A little water may remain in the tank.
- Wind the cord not too tightly around the heel at the back of the iron.
- Store the iron on its heel.
When the Auto-Stop
warning light is on, it is
normal for the
thermostat light to
remain off.
Recommendations: the
self-cleaning function
helps to slow down the
scaling up of your iron.
Note!
The steam control
position must
necessarily be on
STEAM
(fig.1.2)
in
order to remove or
replace the iron's
antiscale rod.
Attention!
The use of a scouring
pad will cause damage
to your soleplate's
self-cleaning coating
(fig.17)
Warning ! the steam
control must be set to
STEAM (fig.1.2) during the
cleaning phase and the
thermostat must be set to
MAX (fig.10).
1800118598FTHGB-ASIE_1800118598FTHGB/ASIE13/04/1015:38Page6
7
GB
F
SA
FA
ZHS
KO
TH
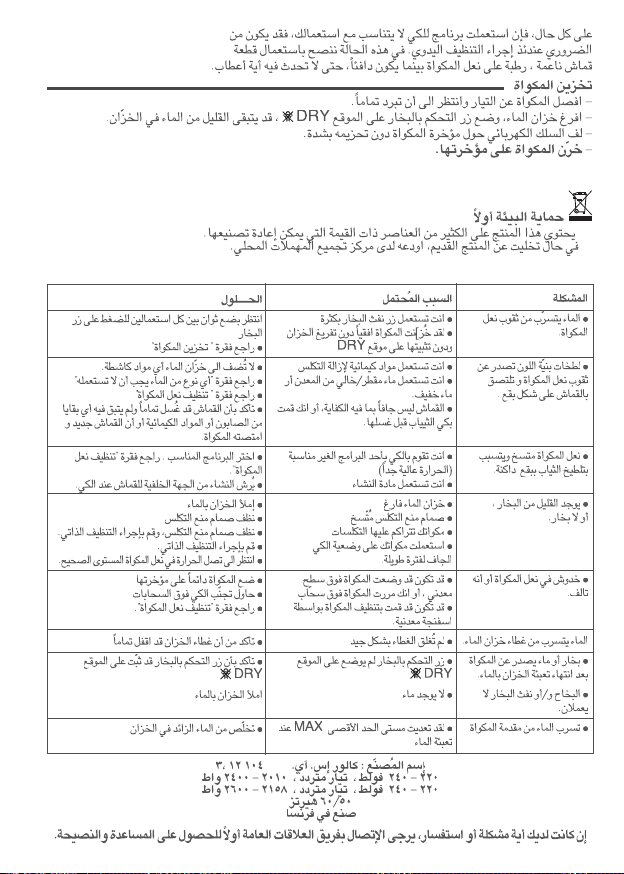
Environment
Environment protection first !
i Your appliance contains valuable materials which can be recovered or recycled.
‹ Leave it at a local civic waste collection point.
If there is a problem?
Problem Possible causes Solutions
• Water drips from the
holes in the soleplate.
• You are using the Shot of Steam button too often.
• You have stored the iron horizontally, without
emptying it and without setting it to DRY.
• Wait a few seconds between each use
of the button.
• See the section "Storing your iron".
• Brown streaks come
through the holes in
the soleplate and
stain the linen.
• You are using chemical descaling agents.
• You are using pure distilled/demineralised or
softened water.
• Your linen is not rinsed sufficiently or you have
ironed a new garment before washing it.
• Do not add any descaling agents to
the water in the water tank.
• See section “Types of water not to use?”.
• See section "Cleaning the soleplate".
• Ensure linen is rinsed thoroughly to
remove any soap deposits or
chemicals on new garments which
may be sucked up by the iron.
• The soleplate is dirty
or brown and can
stain the linen.
• You have ironed with an unsuitable
programme (temperature too high).
• You are using starch.
• Select the appropriate program.
Refer to the chapter “Clean the
soleplate“
• Spray starch on the underside of the
fabric to be ironed.
• There is little or no
steam.
• The water tank is empty.
• The anti-calc valve is dirty.
• Your iron has a build-up of scale.
• Your iron has been used dry for too long.
• Fill it.
• Clean the anti-calc valve.
• Clean the anti-calc valve and carry out
a self-clean.
• Carry out a self-clean.
• Wait for the soleplate to reach the
correct temperature.
• The soleplate is
scratched or
damaged.
• You have placed your iron flat on a metallic
rest-plate or ironed over a zip.
• You have cleaned your soleplate with an
abrasive or metal pad.
• Always set your iron on its heel.
• Try to avoid ironing over zips.
• Refer to the chapter “Clean the
soleplate”.
• Water is leaking out
through the water
tank cover.
• You have not closed the water tank cover
properly.
• Make sure the water tank cover has
clicked shut.
• Steam or water come
from the iron as you
finish filling the tank.
• The steam control is not set to the DRY
position .
• Check that the steam control is
set to the DRY position .
• The spray and/or shot
of steam do not work.
• The water is empty. • Fill the water.
• Water leaks out of the
front of the iron.
• You have exceeded the level MAX when filling
the water tank.
• Empty the surplus water out of the
water tank.
If you have any problem or queries, please contact our
Customer Relations team first for expert help and advice.
845 602 1454 - UK / (01) 677 4003 - Ireland
or consult our website - www.tefal.co.uk
Name of manufacturer : CALOR S.A. 3.12 104
220-240V a.c. 2010-2400W
220-240 V a.c. 2185-2600W
50/60Hz
Made in France
1800118598FTHGB-ASIE_1800118598FTHGB/ASIE13/04/1015:38Page7

8
Pour votre sécurité
Pour votre sécurité, cet appareil est conforme aux normes et réglementations applicables (Directives Basse Tension,
Compatibilité Electromagnétique, Environnement …).
• Merci de lire attentivement ce mode d’emploi et de le conserver.
• Cet appareil n’est pas prévu pour être utilisé par des personnes (y compris les enfants) dont les capacités physiques,
sensorielles ou mentales sont réduites, ou des personnes dénuées d’expérience ou de connaissance, sauf si elles ont pu
bénéficier, par l’intermédiaire d’une personne responsable de leur sécurité, d’une surveillance ou d’instructions
préalables concernant l’utilisation de l’appareil. Il convient de surveiller les enfants pour s’assurer qu’ils ne jouent pas
avec l’appareil.
• Attention ! la tension de votre installation électrique doit correspondre à celle du fer (220-240V). Toute erreur
de branchement peut causer un dommage irréversible au fer et annule la garantie.
• Ce fer doit être obligatoirement branché sur une prise de courant avec terre. Si vous utilisez une rallonge, assurez-vous
que celle-ci soit de 16A .
• Si le câble d’alimentation est endommagé, il doit être immédiatement remplacé par un Centre Service Agréé, afin
d’éviter un danger.
• L’appareil ne doit pas être utilisé s’il a chuté, s’il présente des dommages apparents, s’il fuit ou présente des anomalies
de fonctionnement. Ne démontez jamais votre appareil : faites-le examiner dans un Centre Service Agréé, afin d’éviter
un danger.
• Ne plongez jamais le fer dans l’eau !
• Ne débranchez pas l’appareil en tirant sur le cordon. Débranchez toujours votre appareil : avant de le remplir
- fig. 3
ou
de rincer le réservoir, avant de le nettoyer, après chaque utilisation.
• Ne laissez jamais l’appareil sans surveillance lorsqu’il est raccordé à l’alimentation électrique ; tant qu’il n’a pas refroidi
environ 1 heure.
• La semelle du fer peut être très chaude : ne la touchez jamais et laissez toujours refroidir votre fer avant de le ranger.
Votre appareil émet de la vapeur qui peut occasionner des brûlures, spécialement lorsque vous repassez sur un angle de
votre table à repasser. Ne dirigez jamais la vapeur sur des personnes ou des animaux.
• Votre fer doit être utilisé et posé sur une surface stable. Lorsque vous posez votre fer sur son repose-fer, assurez-vous que
la surface sur laquelle vous le posez est stable.
• Ce produit a été conçu pour un usage domestique uniquement. Pour tout usage inapproprié ou contraire aux
instructions, la marque décline toute responsabilité et la garantie n’est plus valable.
Description
1 Spray
2 Tableau de bord thermostat
3 Préhension tige anti-calcaire
4 Commande Sec / Vapeur
5 Touche Spray
6 Touche Superpressing
7 Voyant Auto-Stop (selon modèle)
8 Poignée confort gel (selon modèle)
9 Cordon d’alimentation
10 Talon extra large avec coussin
anti-dérapant
11 Ouverture du réservoir
12 Système anti-calcaire intégré
13 Voyant de thermostat
14 Thermostat Autosteam Control
15 Semelle Autoclean Catalys®
16 Orifice de remplissage du réservoir
Avant la première utilisation
Attention ! Avant la première utilisation de votre fer en position vapeur, nous vous
recommandons de le faire fonctionner quelques instants en position horizontale et
en dehors de votre linge. Dans les mêmes conditions, actionner plusieurs fois la
commande Superpressing.
Durant les premières utilisations, il peut se produire un dégagement de fumée et une
odeur sans nocivité.
Ce phénomène sans conséquence sur l’utilisation disparaîtra rapidement.
Quelle eau utiliser ?
Votre appareil a été conçu pour fonctionner avec l’eau du robinet. Il est cependant nécessaire de procéder régulièrement à
l’auto-nettoyage de la chambre de vaporisation, afin d’éliminer le calcaire accumulé. Si votre eau est très calcaire (ceci est
vérifiable auprès de votre mairie ou du service des eaux), il est possible de mélanger l’eau du robinet avec de l’eau
déminéralisée du commerce dans les proportions suivantes :
- 50% d’eau du robinet, - 50% d’eau déminéralisée.
Attention !
Retirez les éventuelles
étiquettes de semelle
avant de faire chauffer
le fer (selon modèle).
1800118598FTHGB-ASIE_1800118598FTHGB/ASIE13/04/1015:38Page8
9
GB
F
SA
FA
ZHS
KO
TH
Quelles eaux éviter ?
La chaleur concentre les éléments contenus dans l’eau, lors de l’évaporation. Les eaux ci-dessous contiennent des déchets
organiques ou des éléments minéraux qui peuvent provoquer des crachements, des coulures brunes ou un vieillissement
prématuré de votre appareil : eau déminéralisée du commerce pure, eau des sèche-linges, eaux parfumées, eau adoucie,
eau des réfrigérateurs, eau des batteries, eau des climatiseurs, eau distillée, eau de pluie. Nous vous demandons donc de
ne pas utiliser de telles eaux.
Utilisation
Repasser à la vapeur
1. Remplissez le réservoir
- Débranchez votre fer avant de le remplir.
- Placez la commande vapeur sur SEC
- fig. 1.1
.
- Prenez le fer d’une main, inclinez-le légèrement, semelle vers le bas
- fig. 3.
- Pour ouvrir la trappe du réservoir appuyez sur le bouton
- fig. 2.
- Remplissez le réservoir
- fig. 3
jusqu’au repère «MAX». Le repère MAX correspond à une
capacité de 350 cc.
- Refermez la trappe du réservoir jusqu’à entendre le clic
- fig. 4.
- Vous pouvez brancher votre fer.
2. Choisissez votre programme de repassage
- Votre fer dispose de la fonction Autosteam Control qui préconise
8 programmes de repassage :
•
En fonction du type de textile sélectionné, votre fer détermine automatiquement et avec précision
les niveaux de température et de débit vapeur adaptés, pour garantir le meilleur résultat.
• Pour sélectionner le programme de repassage approprié, actionnez le thermostat situé sous
la poignée
- fig. 5.
- Rotation côté gauche : vous accédez aux programmes nécessitant
des niveaux de température et de vapeur bas.
- Rotation côté droit : vous accédez aux programmes nécessitant des niveaux de
température et de vapeur élevés.
- Le programme sélectionné s’affiche automatiquement sur le tableau de bord situé à
l’avant du fer
- fig. 6.
- Placez la commande vapeur sur VAPEUR
- fig. 1.2.
- Lorsque votre fer atteint la température requise, le voyant du thermostat s’éteint
- fig. 7.
Vous pouvez repasser.
3. Humidifiez le linge (spray)
- Quand vous repassez, appuyez plusieurs fois de suite sur le bouton Spray pour humidifier
le linge
- fig. 8
et enlever les plis résistants.
4. Obtenir plus de vapeur (Superpressing)
- Appuyez de temps en temps sur la touche Superpressing
- fig. 9.
- Respectez un intervalle de quelques secondes entre deux appuis.
5. Défroisser verticalement
- Idéal pour éliminer les plis sur les costumes, les vestes, les jupes, les rideaux,…
- Suspendez le vêtement à un cintre et tendez le tissu d’une main. La vapeur étant très
chaude, ne défroissez jamais un vêtement sur une personne mais toujours sur un cintre.
- Réglez votre thermostat sur MAX
- fig. 10.
- Appuyez sur la touche Superpressing ( ) par impulsions
- fig. 9
et effectuez un
mouvement de haut en bas
- fig. 11.
- Maintenez le fer à quelques centimètres du tissu pour ne pas brûler les textiles délicats.
6. Système Anti-Calc Plus
- Votre fer vapeur est équipé d’un système anti-calcaire intégré
- fig. 12.
- Ce système permet :
• une meilleure qualité de repassage : débit vapeur constant pendant toute la durée du
repassage.
• de prolonger la durée de vie de votre fer.
Notre conseil : Tissus et
température de
repassage :
• Votre fer chauffe vite :
commencez d’abord
par les tissus qui se
repassent à basse
température, puis
terminez par ceux qui
demandent une
température plus
élevée ;
• Si vous passez à un
programme
nécessitant des
températures moins
élevées, attendez que
le voyant de
thermostat se rallume
avant de repasser à
nouveau.
• Si vous repassez un
tissu fait de fibres
mélangées : réglez la
température de
repassage sur la fibre
la plus fragile.
1800118598FTHGB-ASIE_1800118598FTHGB/ASIE13/04/1015:38Page9
10
7. Fonction Anti-goutte
- L’Autosteam Control, c’est-à-dire le principe de sélection automatique de la vapeur en
fonction du tissu sélectionné, permet de réduire le débit vapeur à basse température et
d’éviter que votre fer ne goutte sur le linge.
8. Sécurité Auto-Stop (selon modèle)
- Pour votre sécurité, le système électronique coupe l'alimentation
et le voyant de l'auto-stop clignote
- fig. 13
lorsque :
• Le fer reste plus de 8 minutes immobile sur le talon
• Le fer reste plus de 30 secondes posé à plat ou sur le coté.
- Pour remettre le fer en marche, il suffit de l’agiter légèrement jusqu’à ce que le voyant ne
clignote plus.
9. Semelle Autoclean Catalys®
- Votre fer est équipé d’une semelle autonettoyante
- fig. 14
fonctionnant par catalyse.
- Son revêtement exclusif permet d'éliminer en continu toutes les impuretés générées par un
usage normal. Il est recommandé de toujours poser votre fer sur son talon pour préserver son
revêtement autonettoyant.
Repasser à sec
- Choisissez votre programme de repassage.
- Placez la commande vapeur sur SEC
- fig. 1.1.
- Vous pouvez repasser lorsque le voyant s’éteint.
Entretenir votre fer
ATTENTION ! Débranchez et laissez refroidir votre fer avant de le nettoyer.
Nettoyez la tige anti-calcaire
(une fois par mois)
- Débranchez votre fer et videz le réservoir.
- Pour retirer la tige anti-calcaire, réglez votre thermostat sur la position MAX
- fig. 10
,
placez la commande vapeur sur VAPEUR ,
- fig. 1.2
la tige de votre fer peut alors
être extraite
- fig. 15.
Ne jamais toucher l’extrémité de la tige
- Laissez tremper la tige pendant 4 heures dans un verre de vinaigre d’alcool blanc ou bien du jus de citron nature
-
fig. 16
.
- Rincez la tige sous l’eau du robinet.
- Remettez la tige anti-calcaire en place.
Le fer ne fonctionne pas sans la tige anti-calcaire
1. Faites un auto-nettoyage
Pour prolonger la durée de vie de votre fer, faites un auto-nettoyage une fois par mois.
- Placez la commande vapeur sur SEC .
- fig. 1.1.
- Placez le fer sur son talon, réservoir plein et réglez le thermostat sur la position MAX
- fig. 10.
- Lorsque le voyant s’éteint, débranchez le fer et placez-le au-dessus d’un évier.
- Enlevez la tige anti-calcaire.
- Placer la commande vapeur sur vapeur (fig. 1.2)
- Secouez le fer légèrement et horizontalement, au-dessus d’un évier, jusqu’à ce qu’une partie
de l’eau (avec les impuretés) se soit écoulées par la semelle.
- A la fin de l’opération, replacez la tige anti-calcaire.
- Rebranchez votre fer 2 minutes sur son talon pour sécher la semelle.
- Débranchez votre fer et lorsque la semelle est tiède, essuyez-la avec un chiffon doux.
2. Nettoyez la semelle
Votre fer est équipé d’une semelle autonettoyante fonctionnant par catalyse.
Son revêtement actif exclusif lui permet d'éliminer en continu toutes les impuretés qui peuvent
être générées au quotidien dans des conditions normales d’utilisation.
Un repassage avec un programme inadapté peut néanmoins laisser des traces nécessitant un
nettoyage manuel. Dans ce cas, il est conseillé d’utilisez un chiffon doux et humide sur la
semelle encore tiède afin de ne pas endommager le revêtement.
Quand la sécurité auto-
stop est activée, il est
normal que le voyant
de thermostat reste
éteint.
Notre conseil : L’auto-
nettoyage permet de
retarder l’entartrage
de votre fer.
Attention !
La commande vapeur
doit obligatoirement
être sur vapeur (fig.
1.2) pour pouvoir
retirer ou remettre la
tige anticalcaire de
votre fer.
Attention ! L’utilisation
d’un tampon abrasif
endommage le
revêtement
autonettoyant
de votre semelle
(fig. 17)
Attention! La comman-
de vapeur doit être
maintenue sur la
position vapeur (fig. 1.2)
durant l'opération de
nettoyage et le ther-
mostat doit être main
-tenu sur MAX (fig. 10)
1800118598FTHGB-ASIE_1800118598FTHGB/ASIE13/04/1015:38Page10
11
GB
F
SA
FA
ZHS
KO
TH
Ranger votre fer
- Débranchez-le et attendez que la semelle refroidisse.
- Videz le réservoir et placez la commande vapeur sur SEC
- fig. 1.1.
. Un peu d’eau peut rester dans le réservoir.
- Enroulez le cordon autour de l’arceau arrière du fer.
- Rangez le fer sur son talon.
Environnement
Participons à la protection de l’environnement !
i Votre appareil contient de nombreux matériaux valorisables ou recyclables.
‹ Confiez celui-ci dans un point de collecte pour que son traitement soit effectué.
Un problème avec votre fer ?
Problèmes Causes possibles Solutions
• L’eau coule par les
trous de la semelle.
• Vous utilisez la commande Superpressing trop
souvent.
• Vous avez rangé le fer à plat, sans le vider et
sans placer la commande sur SEC.
• Attendez quelques secondes entre
chaque utilisation.
• Consultez le chapitre «Ranger votre
fer».
• Des coulures brunes
sortent de la semelle
et tachent le linge.
• Vous utilisez des produits détartrants
chimiques.
• Vous utilisez une des eaux déconseillées.
• N’ajoutez aucun produit détartrant à
l’eau du réservoir.
• Consultez le chapitre «Quelles eaux
éviter ?».
• La semelle est sale ou
brune et peut tacher
le linge.
• Vous avez repassé avec un programme
inadapté (température trop élevée).
• Votre linge n’est pas suffisamment rincé ou
bien vous utilisez de l’amidon.
• Choisissez le programme adéquate.
Reportez vous au chapitre «Nettoyez
la semelle».
• Pulvérisez l’amidon à l’envers de la
face à repasser.
• Votre fer produit peu
ou pas de vapeur.
• Le réservoir est vide.
• La tige anti-calcaire est sale.
• Votre fer est entartré.
• Votre fer a été utilisé trop longtemps à sec.
• Remplissez-le.
• Nettoyez la tige anti-calcaire.
• Nettoyez la tige anti-calcaire
et faites un auto-nettoyage.
• Faites un auto-nettoyage.
• La semelle est rayée
ou abîmée.
• Vous avez posé votre fer à plat sur un repose-
fer métallique.
• Vous avez nettoyé votre semelle avec un
tampon abrasif ou métallique.
• Posez toujours votre fer sur son talon.
• Reportez vous au chapitre «Nettoyez
la semelle».
• L’eau s’écoule par la
trappe du réservoir.
• Vous avez mal refermé la trappe du réservoir.
• Vérifiez que la trappe du réservoir est
bien fermée (jusqu’au clic).
• Le fer vaporise en fin
de remplissage du
réservoir.
• Le curseur de commande vapeur n’est pas sur
la position SEC . (fig. 1.1)
• Vérifiez que la commande vapeur est
sur la position SEC .. (fig. 1.1)
• Le spray et/ou le
superpressing ne
fonctionnent pas.
• Le réservoir est vide. • Remplissez le réservoir.
• De l’eau coule à
l’avant du fer.
• Vous avez dépassé le niveau MAX lors
du remplissage du réservoir.
• Videz le surplus par le réservoir.
Pour tout autre problème, adressez-vous à un centre
service agréé pour faire vérifier votre fer.
1800118598FTHGB-ASIE_1800118598FTHGB/ASIE13/04/1015:38Page11
12
«∞∂OµW
i
‹
≠w •U‰ ˧uœ ±AJKW
1800118598FTHGB-ASIE_1800118598FTHGB/ASIE13/04/1015:38Page12
13
GB
F
SA
FA
ZHS
KO
TH
- «∞AJq 41
- «∞AJq 1
«∞FMU¥W °LJu«¢p
- «∞AJq 01
- «∞AJq 51.
- «∞AJq 61 .
- «∞AJq 31
«∞AJq 01
- «∞AJq 61.
- «∞AJq 71
1800118598FTHGB-ASIE_1800118598FTHGB/ASIE13/04/1015:38Page13
14
«ùß∑FLU‰
- «∞AJq 1
- «∞AJq 3
- «∞AJq 2
- «∞AJq 4
- «∞AJq 5
- «∞AJq 6
«∞AJq 1
«∞AJq 7
- «∞AJq 8
- «∞AJq 9
- «∞AJq 01.
( )
-«∞AJq 9
-«∞AJq 11.
- «∞AJq 21
1800118598FTHGB-ASIE_1800118598FTHGB/ASIE13/04/1015:38Page14
15
GB
F
SA
FA
ZHS
KO
TH
±s √§q ߇‡ö±∑‡‡p
- «∞AJq 3.
ËÅn «_§e«¡
Æ∂q «ùß∑FLU‰ ∞KLd… «_Ë∞v
1800118598FTHGB-ASIE_1800118598FTHGB/ASIE13/04/1015:38Page15
16
±∫}j “|ºX
i
‹
œ¸ Åu¸‹ °dË“ ±AJKv
1800118598FTHGB-ASIE_1800118598FTHGB/ASIE13/04/1015:38Page16
17
F
GB
SA
FA
ZHS
KO
TH
- ¢Bu|d 31
- ¢Bu|d 41
- ¢Bu¥d 1.
±d«Æ∂X «“ «¢uÈ ®LU
- ¢Bu|d 01
- ¢Bu|d 51.
- ¢Bu|d 61.
- ¢Bu|d 01.
- ¢Bu¥d 71.
1800118598FTHGB-ASIE_1800118598FTHGB/ASIE13/04/1015:38Page17

18
©d“ «ß∑HUœÁ
- ¢Bu|d 1.
- ¢Bu|d 3.
- ¢Bu¥d 2
- ¢Bu|d 3
- ¢Bu|d 4.
- ¢Bu|d 5.
- ¢Bu|d 6.
- ¢Bu|d 1.
- ¢Bu|d
7.
- ¢Bu|d 8
- ¢Bu¥d 9.
- ¢Bu|d 01.
- ¢Bu|d 9
- ¢Bu¥d 11.
- ¢Bu|d 21.
1800118598FTHGB-ASIE_1800118598FTHGB/ASIE13/04/1015:38Page18
19
GB
F
SA
FA
ZHS
KO
TH
°d«È «|LMv ®LU
®dÕ
Ä}g «“ «ß∑HUœÁ °d«È «Ë∞}s °U¸
1800118598FTHGB-ASIE_1800118598FTHGB/ASIE13/04/1015:38Page19

20
安全注意事项
本产品符合现行安全技术规范和标准(电磁兼容性、低电压、环境)。
•
使用产品前,请仔细阅读并妥善保管此说明书。
•
本产品不适用于以下人群(包括儿童)使用:身体或精神方面的残障人士、丧失感官能力、 缺乏经验和使用常识
的人士。除非另有能负责其安全的人士监督或指导他们使用产品。 须确保儿童不将其用于玩耍。
•
警告!确保熨斗铭牌上的额定电源电压与供电电源电压相符(根据型号,220伏至240伏或 127伏)。连接
至错误的电压将造成熨斗损坏,且不在保修范围内。
• 熨斗必须插在已接地的插座上。如使用延长线,应使用与熨斗功率相符(根据型号,16安 培)并已接地
的电源插座。
•
如电源线受损,必须立即由本公司认可的客户服务中心进行更换,以避免可能造成的危险。
•
如熨斗跌落,出现明显破损、渗漏或功能故障则不可使用。切勿自行拆开熨斗,请将其送至 本公司认可的客户
服务中心进行检查及维修,以避免可能造成的危险。
•
切勿将熨斗浸入水中!
• 切断电源时请直接拔掉插头,不可拉拽电源线。注水前
- fig. 3
、冲洗水箱前、清洁熨斗前 或使用后,都
必须切断电源。
• 当熨斗在接通电源时或底板尚热时(冷却时间未满1小时),切勿将其置于无人监管状态。
• 熨斗产生蒸汽,可能非常烫。小心避免被热蒸汽烫伤,特别是熨烫至烫衣板边缘时。 切勿将蒸汽正对人或
动物。
• 必须在平稳、耐热的表面上使用或放置熨斗。当熨斗在被放置在支架上时, 应先确保放置支架的表面平稳
。
• 本产品设计仅供家庭使用。任何专业用途、不当使用或未按照本说明书使用而引起的故障, 本公司概不负
责,且不在保修范围内。
各部分名称
1 喷水嘴
2 加热指示灯
3 防钙阀门
4 干式熨烫/蒸汽控制滑键
5 喷水按钮
6 强蒸汽喷射按钮
7 自动断电保护指示灯(根据型号)
8 胶质舒适手柄(根据型号)
9 电源线
10 超大防滑底座
11 水箱开启按钮
12 内置防垢系统
13 温度指示灯
14 自动蒸汽温度调节钮
15 自动清洁(催化)底板
16 水箱注水口
首次使用前
警告!首次使用电熨斗蒸汽功能前,我们建议您先将其水平放置操作数分钟, 注
意不要置于熨烫衣物上,可按压蒸汽喷射按钮数次。
前几次使用过程中,可能会有少量烟或气味产生,属正常现象, 并不影响使用效
果,且会很快消失。
可使用的水
您的熨斗可直接使用未经处理的自来水,但必须定期使用自动清洗功能以清除蒸汽室内的污垢和水垢。
如果当地水质较硬(可咨询当地水质管理部门),请将自来水与蒸馏水或去除矿物质的水按如下比例配制使
用:
-50%自来水
-50%蒸馏水或去除矿物质的水
不可使用的水
热力令水蒸发时,会把水中的物质浓缩。下列含有有机杂质或矿物质元素的水会导致滴漏、 棕色污点或令
熨斗提前损耗:干衣机的水、加入香剂的水、软化水、冰箱剩水、电池液、空 调排水、蒸馏水和除去矿物
质的水或雨水,不可使用以上列出的水。此外,请勿使用煮沸的水、经过滤的 水和瓶装水。
警告!加热电熨斗前,
请先揭去底板保护贴纸
(根据型号)。
1800118598FTHGB-ASIE_1800118598FTHGB/ASIE13/04/1015:39Page20
21
GB
F
SA
FA
ZHS
KO
TH
产品使用
蒸汽熨烫
1.
水箱注水
-水箱注水时,请先切断电源。
-将蒸汽控制滑键设定于干熨位置
- fig. 1.1
.
-一手拿起熨斗,微微倾斜,便能看到水箱注水口
- fig. 3.
-按下按钮打开水箱盖
- fig. 2.
-给水箱注水至“MAX”最高水位线位置
- fig. 3
最高水位线对应350毫升水量。
-盖上水箱盖,盖好时应听到咔哒声
- fig. 4.
-请接通电源。
2.
选择熨烫程序
-您的电熨斗有自动蒸汽控制功能,可提供8档预设熨烫程序:
•
每种熨烫程序都对应有相应的织物类型,您的熨斗会自动设定相对应的最佳温度和蒸汽
量,以保证最佳的熨烫效果。
• 通过手柄下方的熨烫程序选择按键,设定适合的熨烫程序
- fig. 5.
- 旋动左边程序选择键 : 选择需较低温度及较低蒸汽量的熨烫程序。
- 旋动右边程序选择键 : 选择需较高温度及较高蒸汽量的熨烫程序。
- 所选程序会自动显示于熨斗前端的程序显示面板上
- fig. 6.
- 将蒸汽控制滑键设定于蒸汽档
- fig. 1.2.
-当底板达到足够温度时,指示灯熄灭
- fig. 7.
可以开始使用。
3.
喷水功能
-熨烫时,连续按喷水按钮数次以润湿织物
- fig. 8
,帮助熨平顽固褶皱。
4.
强蒸汽喷射
-间歇地按下强蒸汽喷射按钮
- fig. 9.
-每次按钮间应暂停数秒。
5.
立体蒸汽熨烫
-可理想去除套装、夹克、裙子、窗帘上的褶皱。
-将衣物悬挂在衣架上,用手轻轻拉直。蒸汽非常烫, 立体垂直熨烫只可用于
熨烫挂在衣架上的衣物, 切勿直接熨烫穿在身上的衣物。
-将温度调节钮设定于“MAX(最高)”位置
- fig. 10.
-重复按压强蒸汽喷射按钮 ( )
- fig. 9
从上而下移动熨斗以熨烫衣物
- fig. 11.
-熨斗与织物间应保持适当距离,以免烫坏易损织物。
6.
增效防钙系统
-熨斗已配备增效防钙系统
- fig. 12.
-系统可提供:
• 更流畅的强蒸汽效果带来更好的熨烫品质。
• 更长使用寿命。
7.
防滴漏功能
-自动蒸汽控制功能可以根据面料自动设定所需蒸汽强度。 在低温熨烫时蒸汽
流量减少,可以避免水滴落在衣物上。
对织物和熨烫温度的建议:
•
由于熨斗加热非常快,
熨斗应先从需低温熨烫
的织物开始,然后再熨
烫需高温熨烫的织物。
•
如需降低熨烫温度, 应
待加热指示灯再次亮起
后才可继续熨烫。
•
如需熨烫混合织物, 选
择的熨烫温度应根据耐
热性较低的纤维来设定
。对于纤细织物,建议
先对衣物非显著部位(
如:内缝边)进行熨烫
试验。
•
为保证熨烫效果, 建议
您使用带网眼的烫衣板
,以便强蒸汽更有效地
渗透至织物内。
•
请将熨烫的衣物平整放置,
以免蒸汽从缝隙中溢出。
1800118598FTHGB-ASIE_1800118598FTHGB/ASIE13/04/1015:39Page21
22
8.
自动断电保护(根据型号)
-在以下情况下,电子安全系统会自动切断电源,自动断电保护指示灯将闪烁
-
fig. 13
,以保证您的安全:
• 熨斗竖放不动8分钟。
• 熨斗平放或侧放不动30秒。
-重新使用时,只需轻轻晃动熨斗,直到自动断电保护指示灯停止闪烁, 即可恢复
使用。
9.
自动清洁(催化)底板
-本产品配有自动清洗底板
- fig. 14
,在催化剂的作用下生效。
-在正常使用的过程中,底板上独特的涂层能不断地除去底板上的杂质。
建议将熨斗竖放以保护具有自动清洁功能的涂层。
干式熨烫
-选择熨烫程序。
-将蒸汽控制滑键设定于干式熨烫
- fig. 1.1.
-当温度指示灯熄灭时,可以开始熨烫。
保养
注意!在清洁电熨斗前,请先切断电源并待其冷却。
清洗防钙阀门(至少每月一次)
-切断电源并清空水箱。
-将温度设定于“MAX(最大)”位置
- fig. 10
,
将蒸汽控制滑键设定于“STEAM
- fig. 1.2
”位置后,拔出
防钙阀门
- fig. 15.
请勿触摸防钙阀门末端
-将阀门放在盛有白醋或柠檬酸的容器中浸泡4小时
- fig. 16
.
-将浸泡过的阀门用清水冲洗干净。
-将防钙阀门重新安装回原处。
若未安装防钙阀门,熨斗无法正常工作
1.
自动清洗
每月使用一次自动清洗功能,可延长熨斗使用寿命。
-将熨斗设定于干式熨烫
- fig. 1.1
。
-在水箱中注水至“MAX(最高)”位置。
-将注满水的熨斗竖直放置,温度设定于“MAX(最大)”位置
- fig. 10.
-待加热指示灯灭,切断电源,水平提握熨斗于水槽上方。
-拔出防钙阀门。
-在水槽上方轻微晃动熨斗,直至蒸汽室中的污物和水垢碎渣通过底板随水箱中的
水一起清理排出。
-清洗结束后,将防钙阀门重新安装回原处。
-接通电源两分钟,将熨斗竖直放置,以干燥底板。
-切断电源,当底板尚有余温时,用湿布轻轻擦拭干净。
2.
清洁底板
本产品配有自动清洗底板,在催化剂的作用下生效。
在日常使用的过程中,底板上独特的活性涂层能不断地除去底板上的杂质。
但是,如果没有选择正确的熨烫程序,则会留下手工清洗的痕迹。在这种情况下,
建议用湿布擦拭尚有余温的底板,以避免其表面受损。
储藏熨斗
-切断电源,待底板冷却。
-清空水箱,将蒸汽控制滑键设定于干式熨烫
- fig. 1.1
, 可能有少许的水留在水箱中。
-请勿将电源线过紧地缠绕在熨斗底部。
-将冷却后的熨斗以竖直方式储藏。
当自动断电保护指示灯
亮时,温度指示灯灭。
建议:自动清洗功能可
减缓污垢积聚的速度。
注意:若要拔出或重新
安装防钙棒,请将蒸汽
控制滑键置于
STEAM
- fig. 1.2
(蒸汽)”
位置.
注意:使用百洁布会损
坏底板上的自动清洁涂
层
- Fig. 17
1800118598FTHGB-ASIE_1800118598FTHGB/ASIE13/04/1015:39Page22
23
GB
F
SA
FA
ZHS
KO
TH
环境
环境保护
i 您的产品含有多种可回收利用的有价值材料。
‹ 请将废弃的电熨斗送至当地指定的废品处理中心进行处理。
常见问题处理
故障现象 产生原因 解决方法
• 水从底板蒸汽孔 中
流出.
• 使用强蒸汽喷射按钮频率过高
• 储藏熨斗时水平放置,水箱未倒空, 蒸汽控
制滑键未设定于干式熨烫位置
• 每次按钮间应暂停数秒
•参见“储藏”部分
• 从蒸汽孔渗漏出褐
色斑点污物并弄脏织
物
•使用了化学除垢剂
•使用了蒸馏水、去除矿物质的水或软化水
•织物未彻底洗净或熨烫的是未洗过的新衣物
•不要在水箱的水中注入任何除垢剂
•参见“不可使用的水”部分
•参见“清洁底板”部分
•确保织物已被彻底洗净,以除去新衣
物黏附在熨斗(底板)上的的肥皂残
留及化学物质
•底板变脏或发黄,
弄脏衣物
•温度设定过高
•使用了浆粉
•选择合适的温度(参见“清洁底板”的
部分)
•将浆粉喷在熨烫衣物的背面
•无蒸汽或者蒸汽量少
•水箱无水
•防钙阀门脏
•熨斗积聚水垢
•使用干式熨烫方式时间太久
•注水于水箱
•清洁防钙阀门
•清洁防钙阀门并进行自动清洗
•进行自动清洗
•等待底板达到合适的温度
•底板刮花或破损
•熨斗可能曾被水平放置于金属物体表面或熨
烫过拉链等
•使用粗糙或金属百洁布擦拭过熨斗底板
•将熨斗竖直放置
•不要熨烫拉链
•参见“清洁底板”
• 水从水箱盖周围漏出 • 水箱盖没有完全关好 •确保水箱盖盖好
•当水箱注满水时,蒸
汽或水从熨斗中冒出
•蒸汽控制滑键没有设定于干式熨烫 .位置
• 确认蒸汽控制滑键设订于干式熨烫
位置
•不能喷水或强蒸汽不
能工作
•水箱无水 •注水于水箱
•熨斗前端漏水 •水箱中的水超过最高水位线 •将水箱中高于最高水位线的水倒出
1800118598FTHGB-ASIE_1800118598FTHGB/ASIE13/04/1015:39Page23
24
1800118598FTHGB-ASIE_1800118598FTHGB/ASIE13/04/1015:39Page24
25
GB
F
SA
FA
ZHS
KO
TH
1800118598FTHGB-ASIE_1800118598FTHGB/ASIE13/04/1015:39Page25
26
1800118598FTHGB-ASIE_1800118598FTHGB/ASIE13/04/1015:39Page26
27
GB
F
SA
FA
ZHS
KO
TH
1800118598FTHGB-ASIE_1800118598FTHGB/ASIE13/04/1015:39Page27

28
- fig. 3
1
2
3
4
5
6
7
8
9
10
11
12
13
14
15
16
®
1800118598FTHGB-ASIE_1800118598FTHGB/ASIE13/04/1015:39Page28
29
1.
- fig. 1.1
- fig. 3
- fig. 2
- fig. 3
- fig. 4
2.
- fig. 5
:
:
- fig. 6
- fig. 1.2
- fig. 7
3.
- fig. 8
4.
- fig. 9
5.
- fig. 10
( ) - fig. 9 - fig. 11
6.
- fig. 12
7.
GB
F
SA
FA
ZHS
KO
TH
1800118598FTHGB-ASIE_1800118598FTHGB/ASIE13/04/1015:39Page29
30
8.
- fig. 13
9.
- fig. 14
- fig. 1.1
- fig. 10,
- fig. 1.2
- fig. 15
- fig. 16
1.
- fig. 1.1
- fig. 10
2.
®
1800118598FTHGB-ASIE_1800118598FTHGB/ASIE13/04/1015:39Page30
31
GB
F
SA
FA
ZHS
KO
TH
- fig. 1.1
i
‹
9
1800118598FTHGB-ASIE_1800118598FTHGB/ASIE13/04/1015:39Page31