
User instructions
Instrucciones para el uso
CDF 735 P
DISHWASHER
LAVAVAJILLAS
EN
ES
Congratulations!
Thank you for choosing a Candy
appliance; quality dishwashers which
guarantee high performance and
reliability.
Candy manufacture a vast range
of domestic appliances: washing
machines, washer/dryers, cookers,
microwave ovens, ovens and hobs,
refrigerators and freezers.
Ask your dealer for the catalogue with
the complete range of Candy products.
Please read this booklet carefully as
it provides important information
regarding the safe installation, use,
and maintenance of the machine,
together with some useful advice on
how to achieve the best results from
your dishwasher.
For future reference please keep this
instruction booklet in a safe place.
CUSTOMER SERVICE AND
GUARANTEE
Your new appliance is fully guaranteed
by the manufacturer for 12 months
against electrical/mechanical break-
down excluding:
A. Any faults which occur due to bad
installation or misuse of the machine.
B. Any faults which occur due to repair
of, or interference with, the machine
by any person not authorised by the
manufacturer to carry out service.
C. Any faults which occur due to
any parts which are fitted to the
machine which are not the original
manufacturers parts.
D. Any faults arising from non-domestic
use or unusual or abnormal use of
the machine.
E. Any faults arising from operation at
incorrect voltage.
F. Any faults arising from incorrect
operation of the machine.
The guarantee applies to Gt Britain
and Northern Ireland only, and is an
addition to your statutory rights.
AFTER SALES SERVICE
For service and repairs call your local engineer on our national telephone number:
GIAS Service Tel: 08705 400 600
Support Service (Eire 018301 666)
2
3
CONTENTS
Safety advice
Setting up, installation
Water softener unit
Loading the salt
Adjusting the upper basket
Loading the dishes
Information for test laboratories
Loading the detergent
Types of detergent
Loading the rinse aid
Cleaning the filters
Some practical hints
Routine cleaning and maintenance
Description of the control panel
Technical data
Programme selection and special functions
The Waterblock system
Programme guide
Identifying minor faults
pag. 4
pag. 5
pag. 10
pag. 11
pag. 12
pag. 13
pag. 15
pag. 16
pag. 17
pag. 18
pag. 19
pag. 20
pag. 21
pag. 22
pag. 22
pag. 23
pag. 27
pag. 28
pag. 30
Please read the instructions in this booklet carefully because they contain important
information on how to install, use and maintain your dishwasher safely as well as
containing useful tips on how to make the most of it.
Keep this booklet safe for future reference.
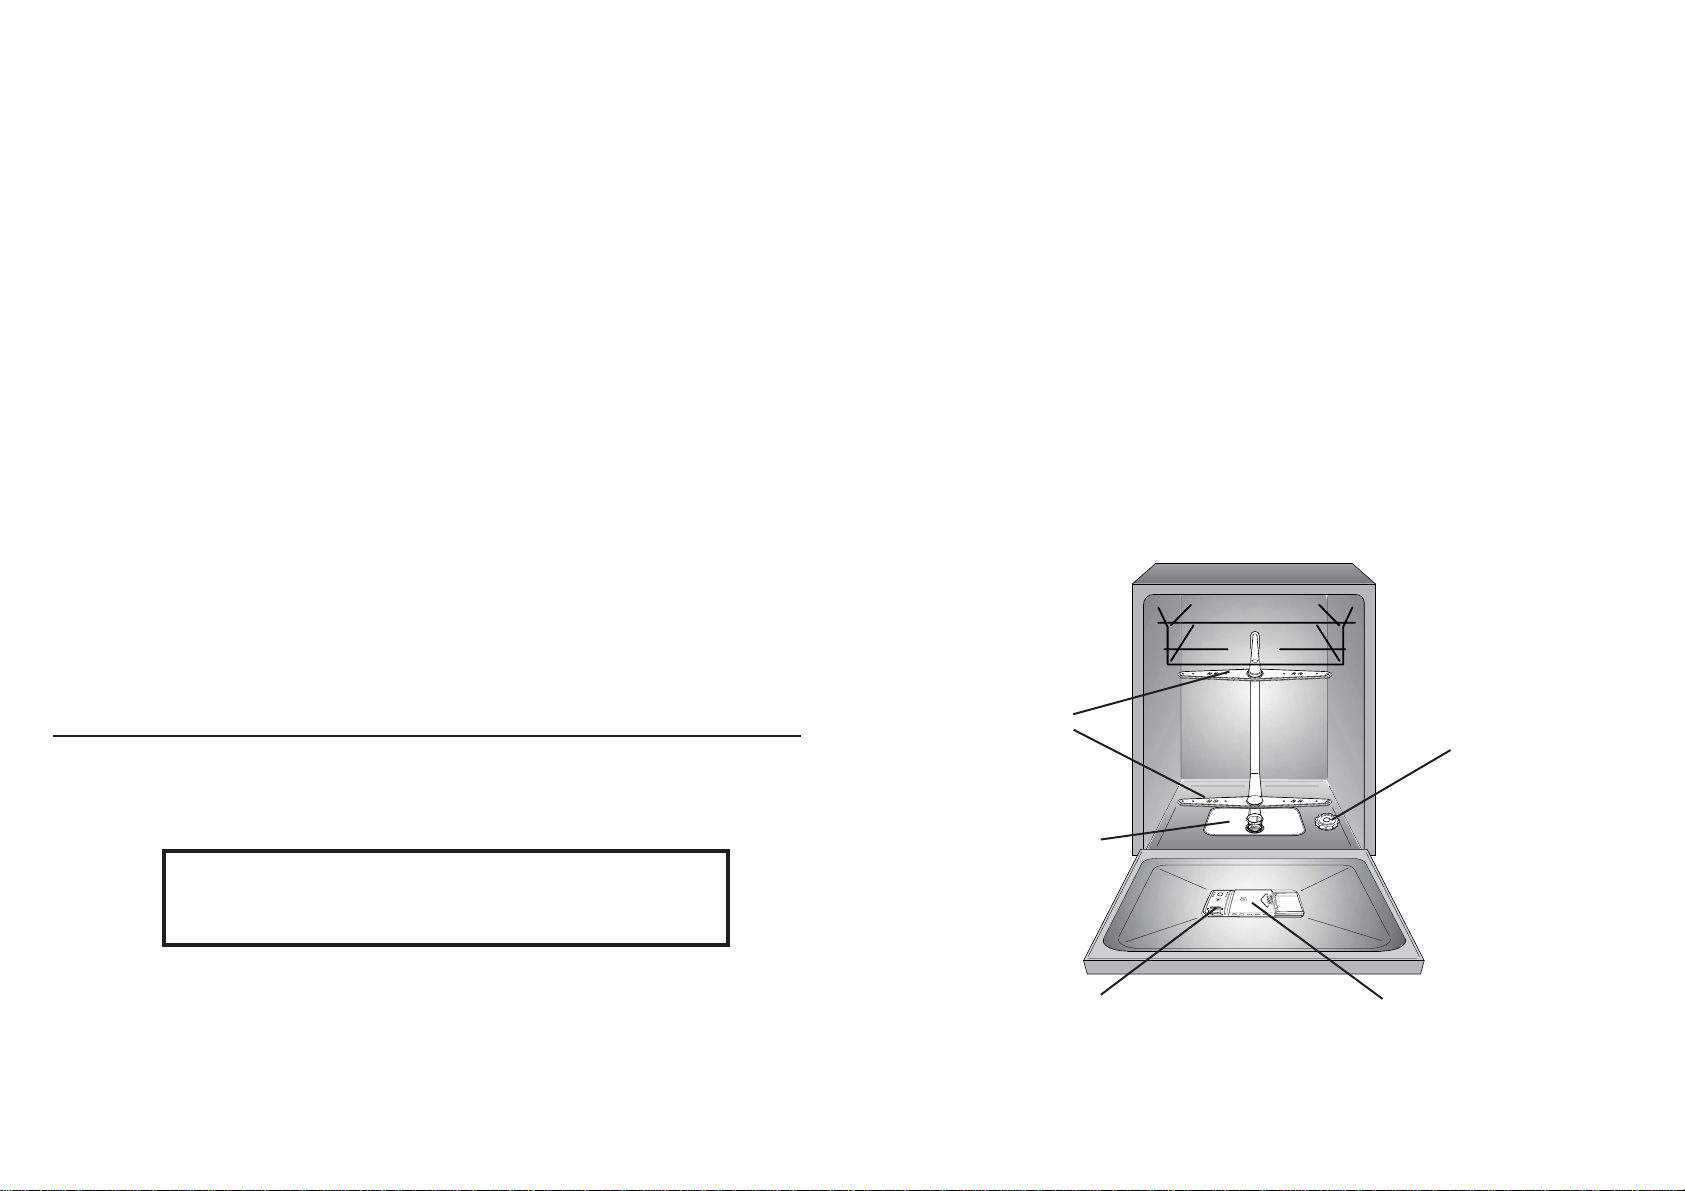
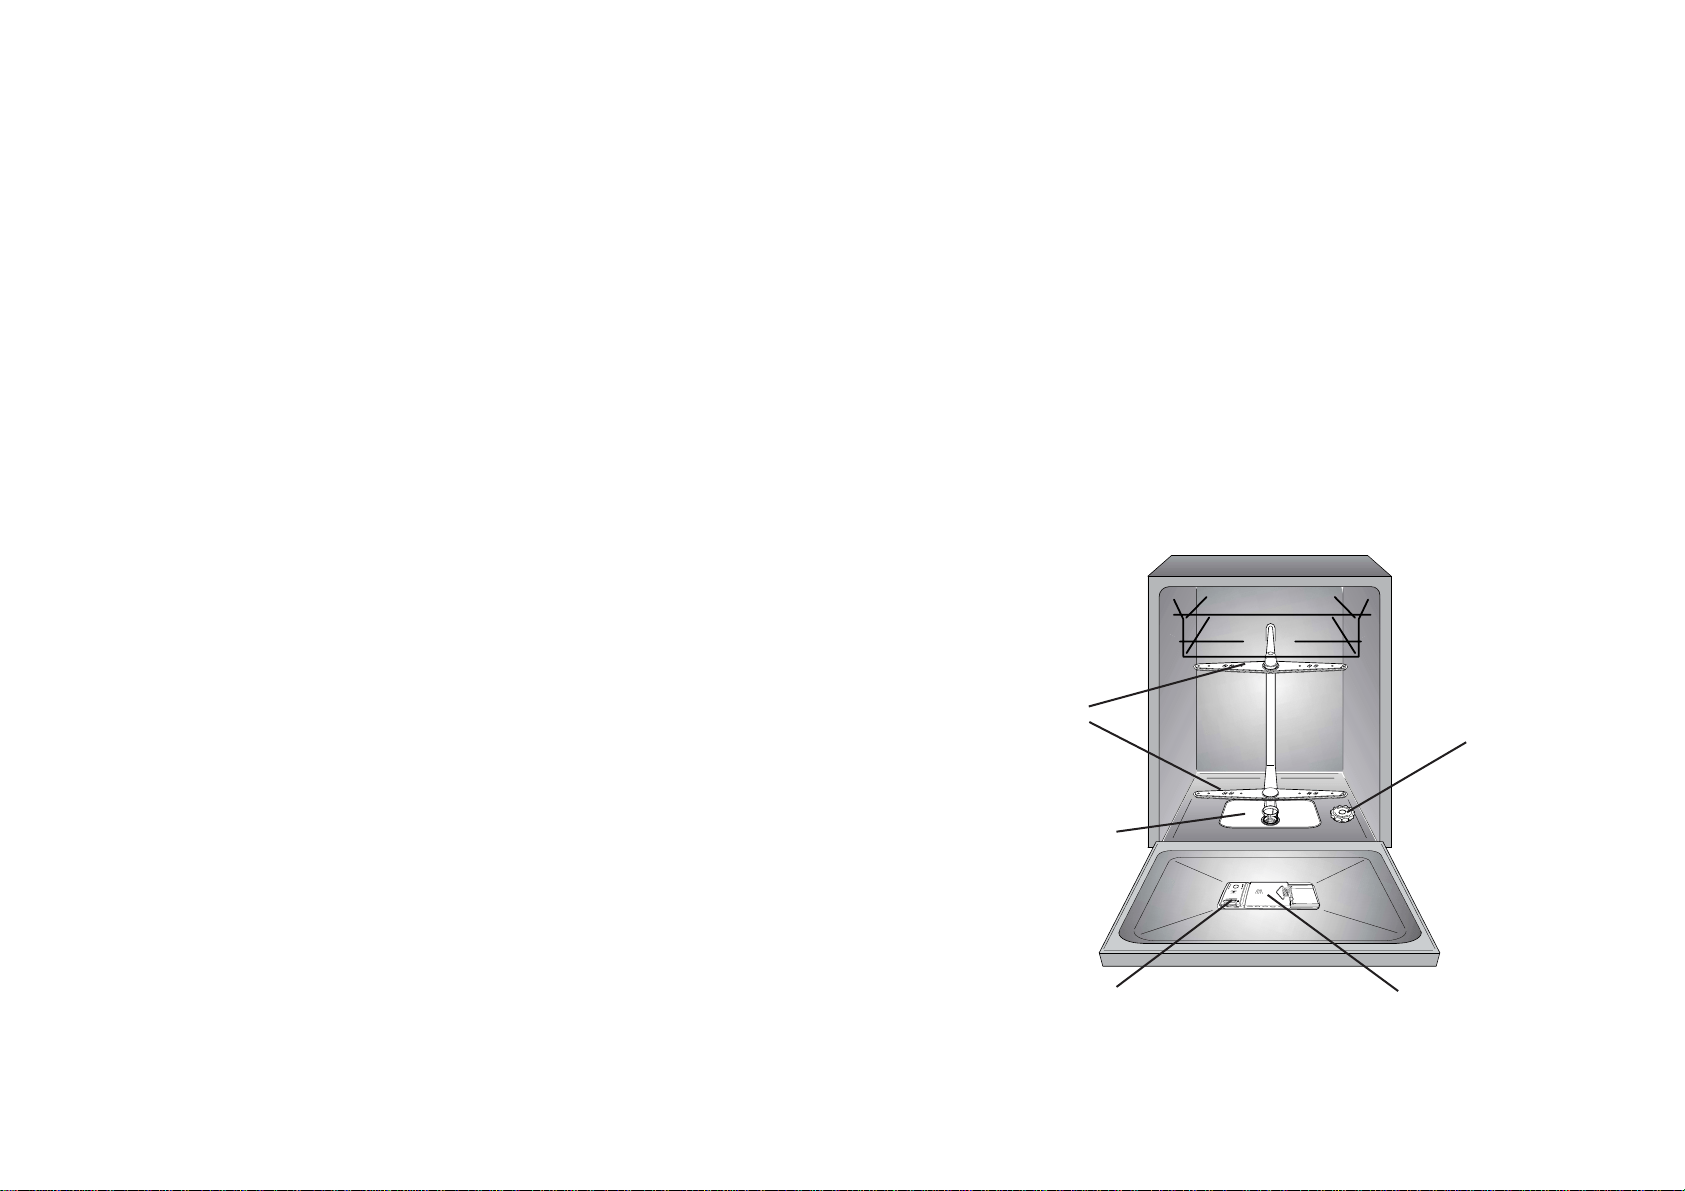
Fig. A
3
2
1
4
5
4
SAFETY INSTRUCTIONS
There are certain basic safety rules
which are valid for any domestic
appliance.
Installation
■ Make sure that the plug fitted to the
machine is compatible with the power
supply socket. If it is not, get a suitably
qualified person to fit the correct type,
and to make sure that the cables to the
mains socket are able to cope with the
power rating of the appliance.
■ Ensure that the dishwasher does not
crush power cables.
■ In general it is not advisable to use
adaptors, multiple plugs and/or extension
cables.
■ Should it be necessary to replace the
supply cord, call the After Sales Service
Centre.
Safety
■ Never touch the appliance when your
hands or feet are wet or damp.
■ Do not use when your feet are bare.
■ Do not remove the plug from the mains
supply socket by pulling the mains cable
or the machine itself.
■ Do not leave the appliance exposed to
the elements (rain, sun etc).
■ Do not let children (or others incapable
of operating it) use the machine without
supervision.
■ Water left in the machine or on the
dishes at the end of the wash programme
should not be swallowed.
■ The door should not be left in the open
position since this could present a potential
hazard ( es. tripping ).
■ Leaning or sitting on the open door of
the dishwasher could cause it to tip over.
WARNING !
Knives and other utensils with sharp
points must be loaded in the basket
with their points down or placed in a
horizontal position.
Daily use
■ This appliance is be designed for domestic
use only.
■ The dishwasher is designed for normal
kitchen utensils.
Objects that have been contamined by
petrol, paint, traces of steel or iron,
corrosive chemicals, acids or alkalis
must not be washed in the dishwasher.
■ If there is a water softening device installed
in the home there is no need to add
salt to the water softener fitted in the
dishwasher.
■ Cutlery is washed best if it is placed in
the basket with the handles downwards.
■ If the appliance breaks down or stops
working properly, switch it off, turn off the
water supply and do not tamper with it.
Repair work should only be carried out
by an approved service agent and only
genuine spare parts should be fitted. Any
failure to follow the above advice may
have serious consequences for the safety
of the appliance.
Disposal
■ The dishwasher has been made from
materials which can be recycled so that it
can be disposed of in an environmentally
friendly way.
■ If you wish to dispose of an old dishwasher
be careful to remove the door to
eliminate the risk of children becoming
trapped inside it.
5
INSTALLATION
(Technical notes)
■ After unpacking, adjust the height of the
dishwasher. For the dishwasher to work
correctly it must be level. Adjust the feet
so that the machine does not tilt by more
than 2 degrees.
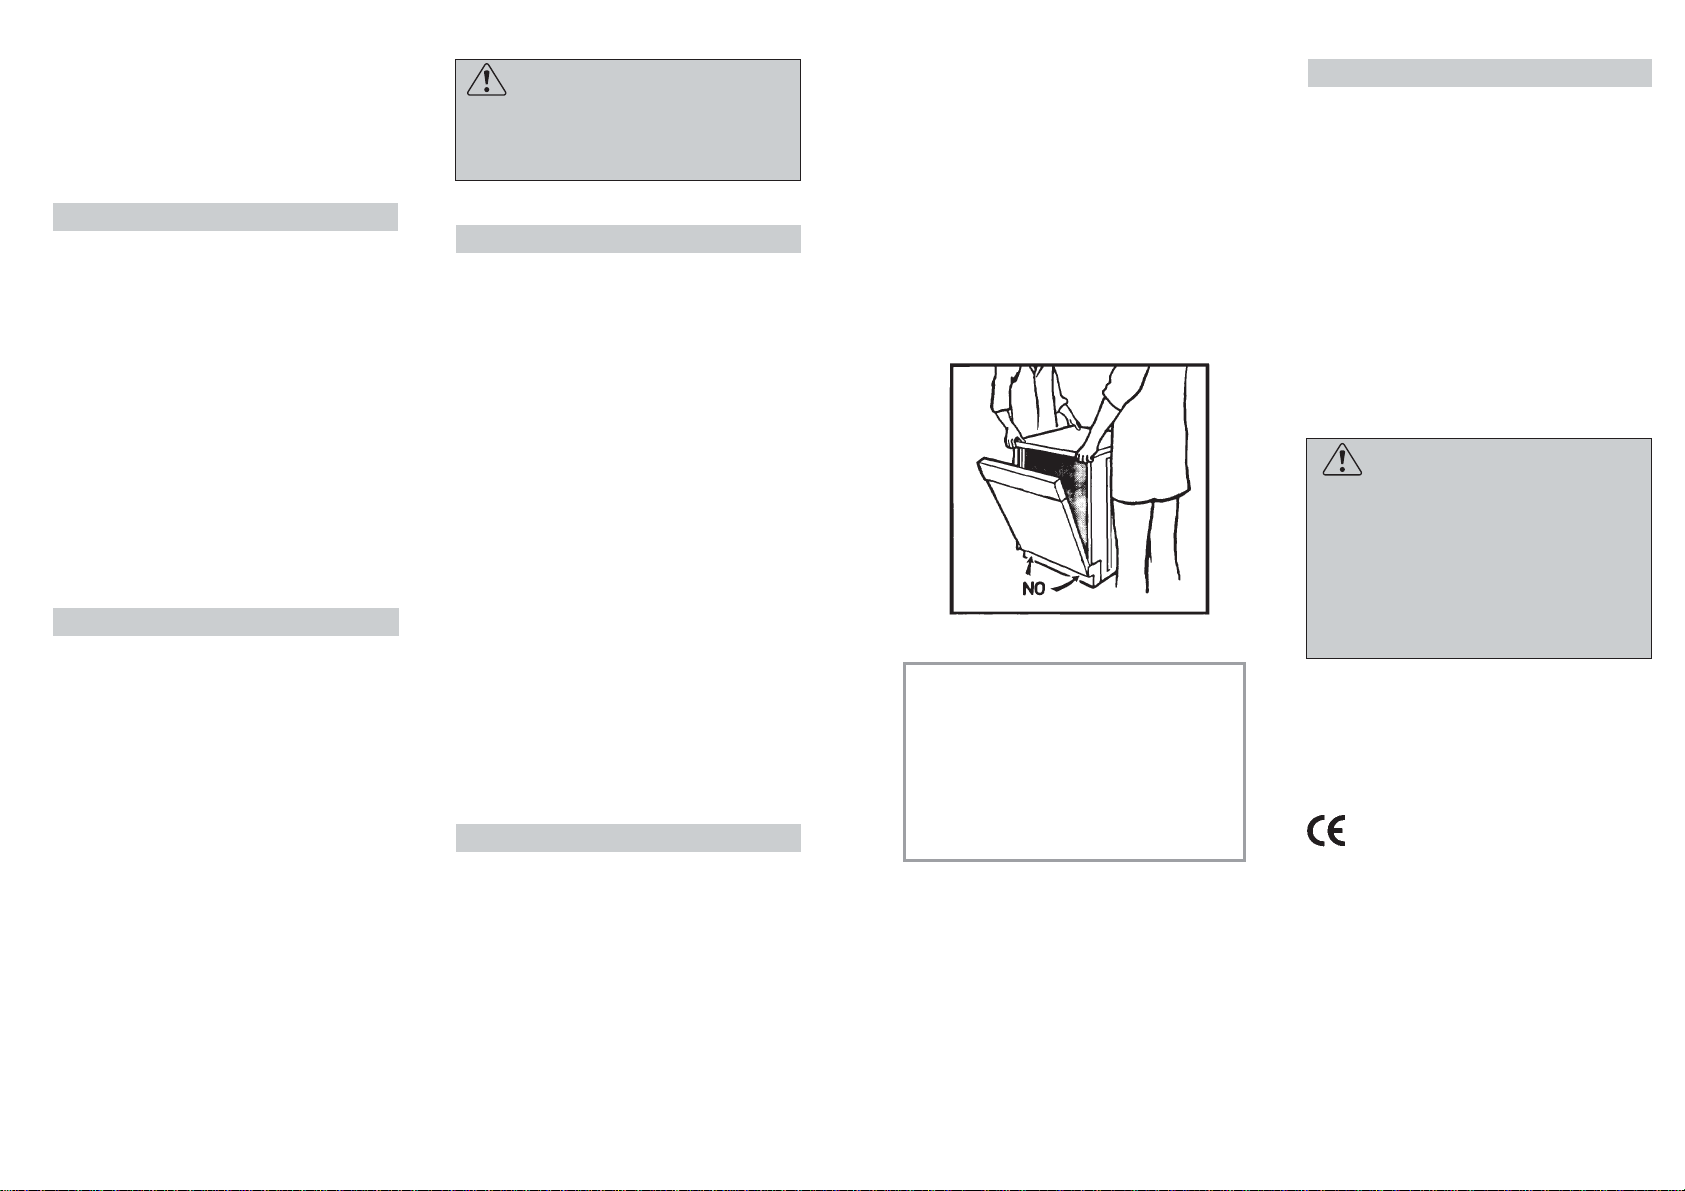
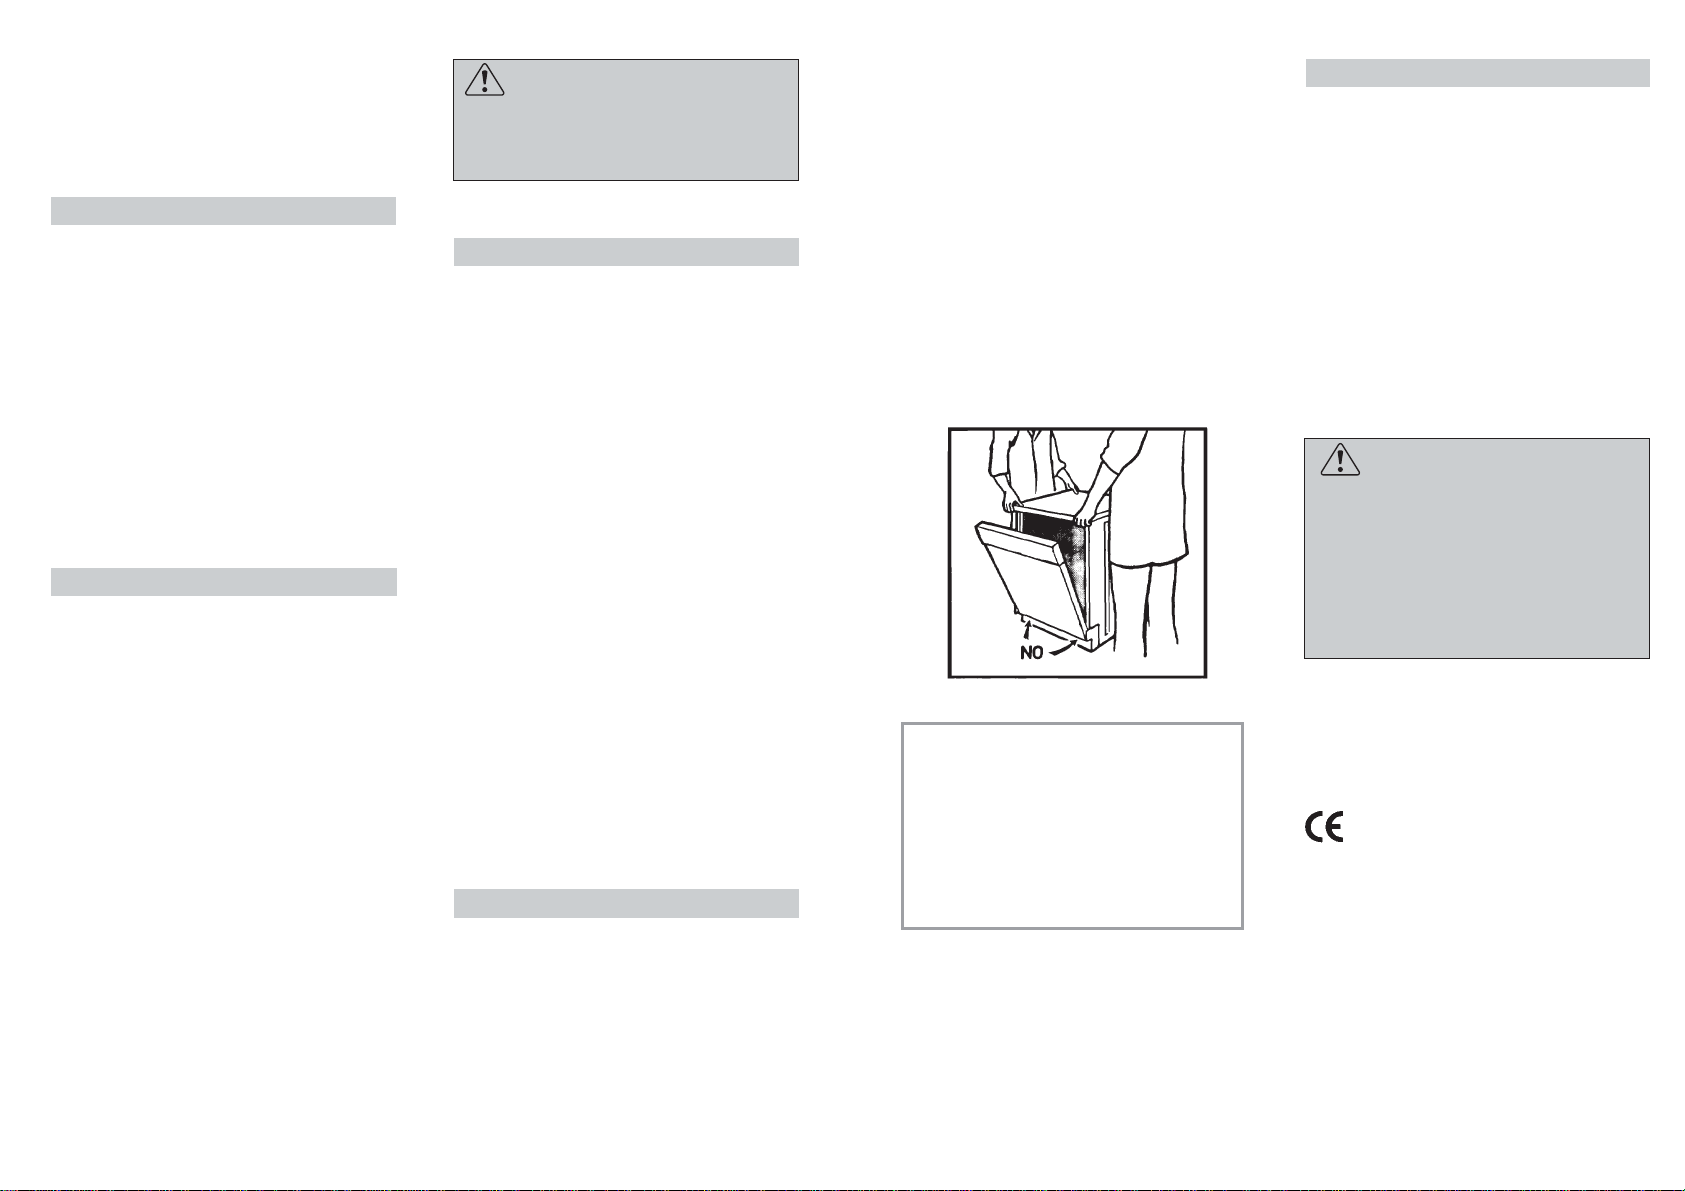
■ If it you need to move the machine after
removing the packaging, do not try to lift
it by the bottom of the door. Follow the
instructions in the figure below. Open the
door slightly and lift the machine by
holding on the top.
IMPORTANT
When the appliance is located on a
carpet floor, attention must be paid to
ensure that there is no obstruction to
the bottom vents.
Make sure that the plug on the
appliance remains accessible after
installation.
Electrical connection
This appliance complies with international
safety standards, and is fitted with a 3 pin
plug with earth connection to ensure
complete earthing of the product.
Before connecting the appliance to the
mains supply it is important to ensure:
1. that the supply socket is properly
earthed;
2. that your electricity supply is capable of
meeting the consumption requirements
listed on the rating plate of your
appliance.
WARNING!
Ensure that your product is properly
earthed.
In the absence of adequate earthing
you will notice that when touching
the metal parts of your appliance an
electrical dispersion can be felt, due
to the presence of a radio interference
suppressor.
Manufacturer declines all responsibility
for any damage due to non-earthing of
the machine.
This appliance complies with
Directives 89/336/EEC, 73/23/EEC
and following changes.
6
Electrical connection (for U.K. only)
Plug your dishwasher into the power
socket.
If the plug we supply does not fit :
■ CUT IT OFF AND DESTROY IT!
You can't use it on other appliances, and
the exposed wires could be dangerous if
anyone plugged it in.
■ Fit a suitable plug, as follows:
WARNING!
THIS APPLIANCE MUST BE EARTHED.
Fuses and plugs
This appliance should be used only on a
socket with a minimum rating of 13 Amp.
Our ready-fitted plug is already equipped
with a 13 amp fuse which is BS 1362 ASTA
approved.
Any replacement should be exactly the
same.
If the fuse cover is lost, do not use the plug
until it is replaced.
A correct replacement fuse cover (obtaina-
ble from your dealer or Electricity board)
must be the same colour as shown or
named on the insert on the base of the
plug.
Green and
yellow wire
Marked with the letter E,
OR marked with the Earth
symbol,
OR coloured green,
OR coloured green and
yellow.
Blue wire
Brown wire
Marked N,
OR coloured black.
Marked L,
OR coloured red.
Connect to the terminal in the plug
Water connection
IMPORTANT
The appliance must be connected to
the water mains using new hose-sets.
The old hose-sets should not be reused.
■ The inlet and drain hoses can be directed
to left or right.
IMPORTANT
The dishwasher can be connected to
either cold or hot water, as long as it
is no hotter than 60 °C.
■ Water pressure must be between
0,08 MPa and 0,8 MPa. If the pressure is
below the minimum consult our service
department for advice.
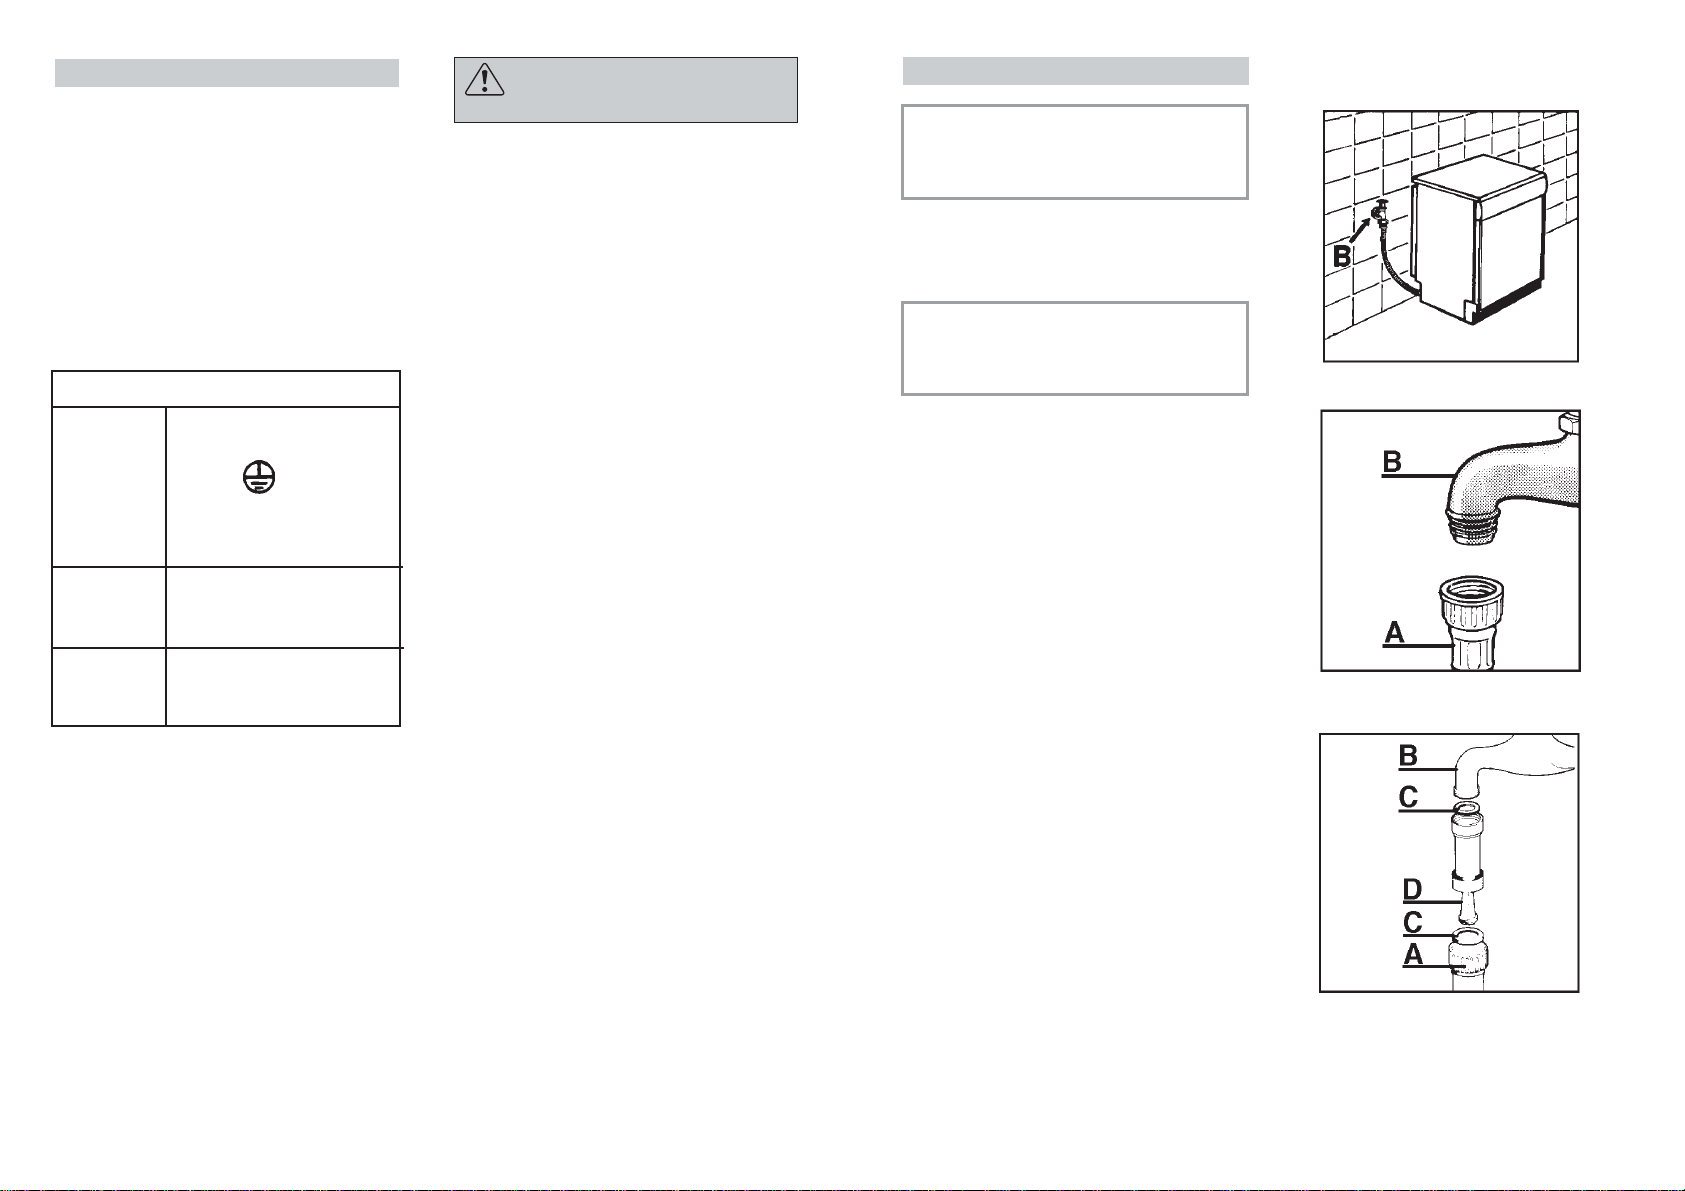
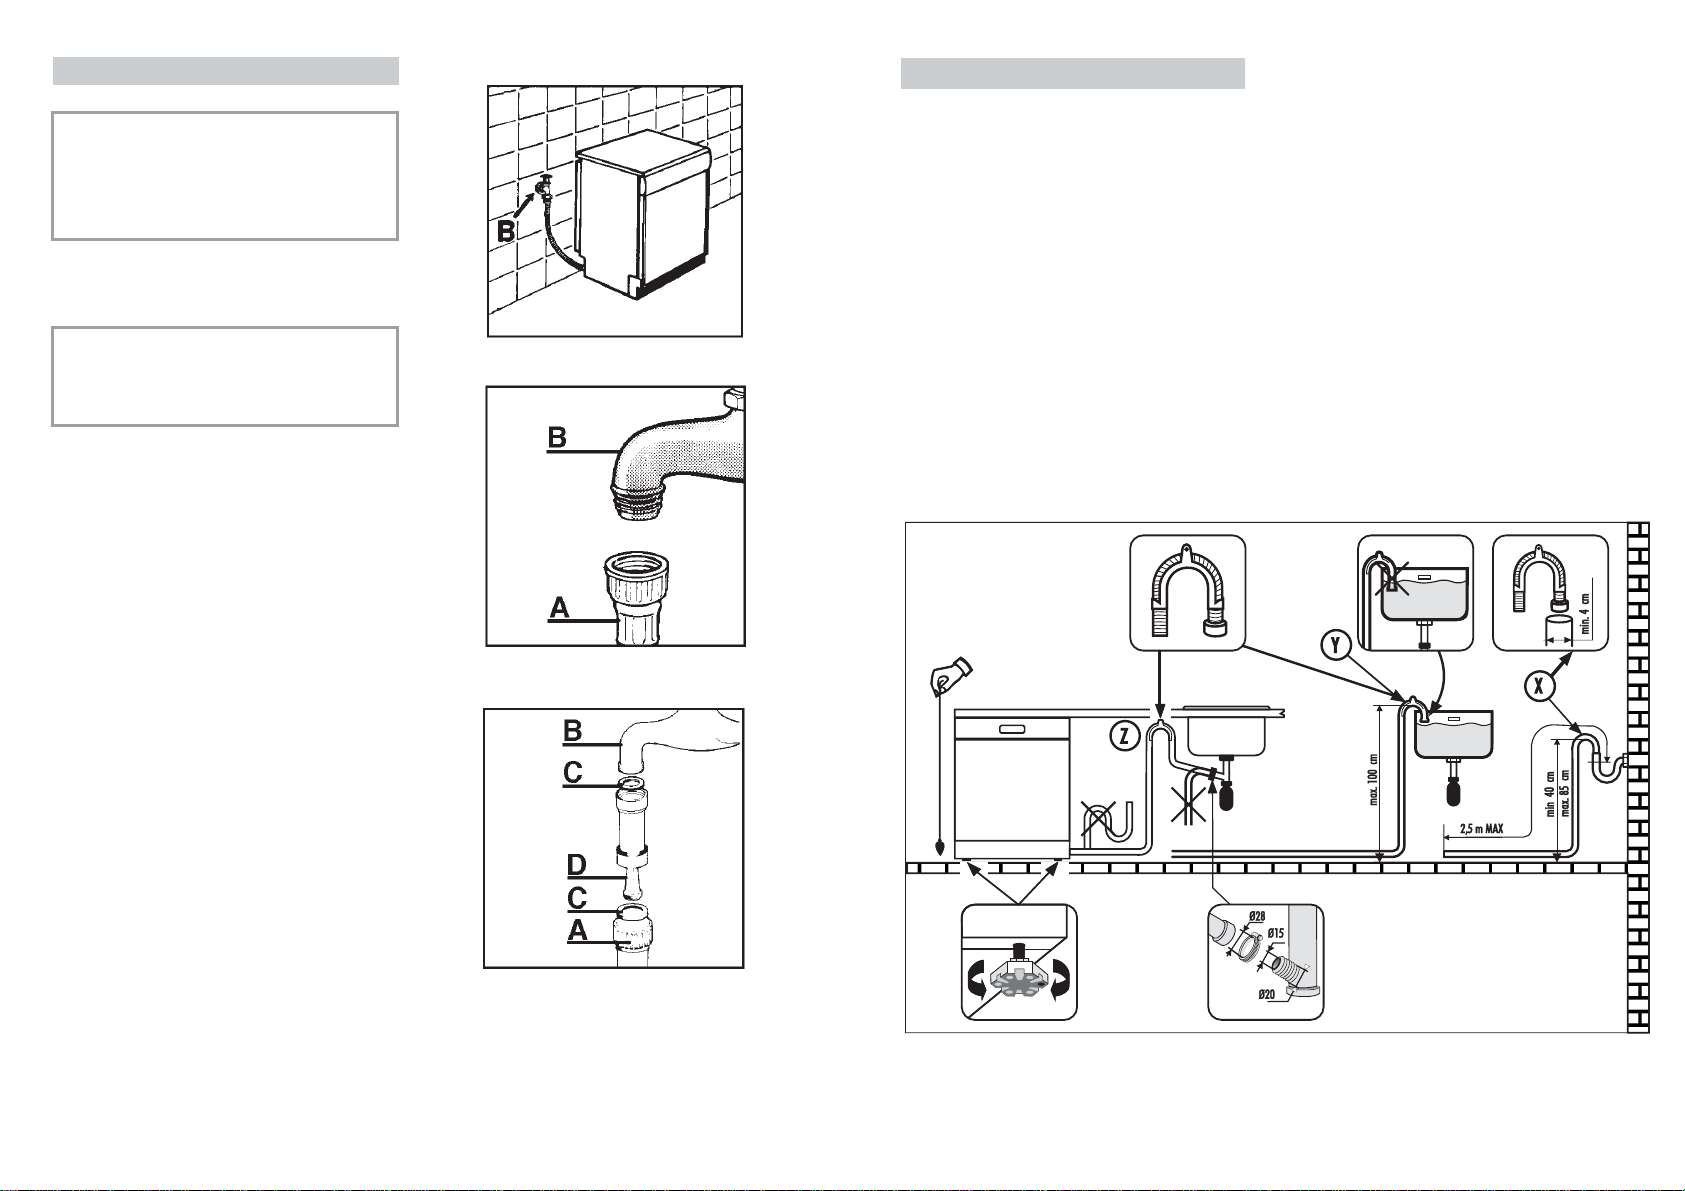
■ The inlet hose must be connected to a
tap so that the water supply can be cut
off when the machine is not in use
(fig. 1 B).
■ The dishwasher is fitted with 3/4" threaded
connector (fig. 2).
■ Connect inlet hose “A” to water tap “B”
with a 3/4" attachment making sure that
it has been properly tightened.
■ If it is necessary, the inlet pipe can be
lengthened up to 2,5 m. The extension
pipe is available from the After Sales
Service Centre.
■ If limescale deposits or sand are present
in the water, it is advisable to obtain the
appropriate filter, art. 9226085, from the
After Sales Service Centre (fig. 3). The
filter “D” must be inserted between the tap
“B” and the inlet hose “A”, remembering
to fit the washer “C”.
■ If the dishwasher is connected to new
pipes or to pipes which have not been in
use for a long time run water through for
a few minutes before connecting the
inlet hose. In this way no deposits of
sand or rust will clog up the water inflow
filter.
1
2
3
7
8
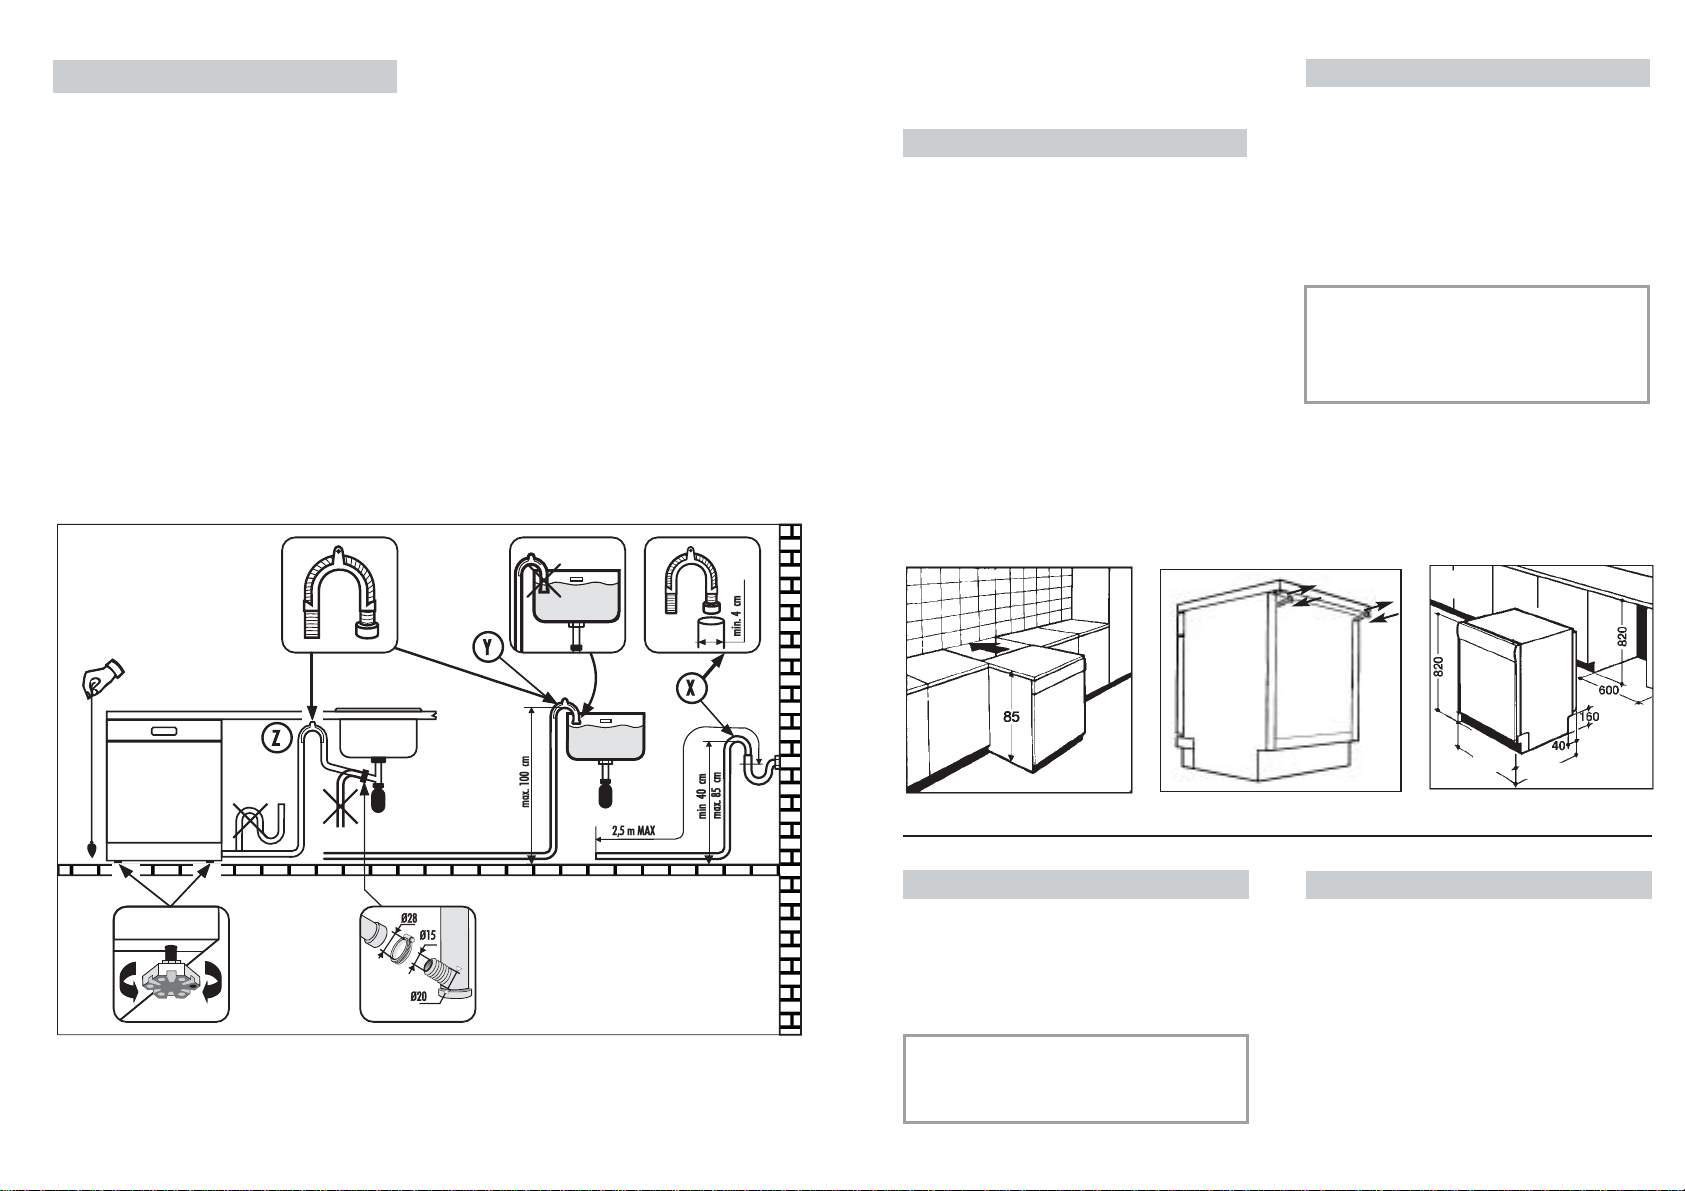
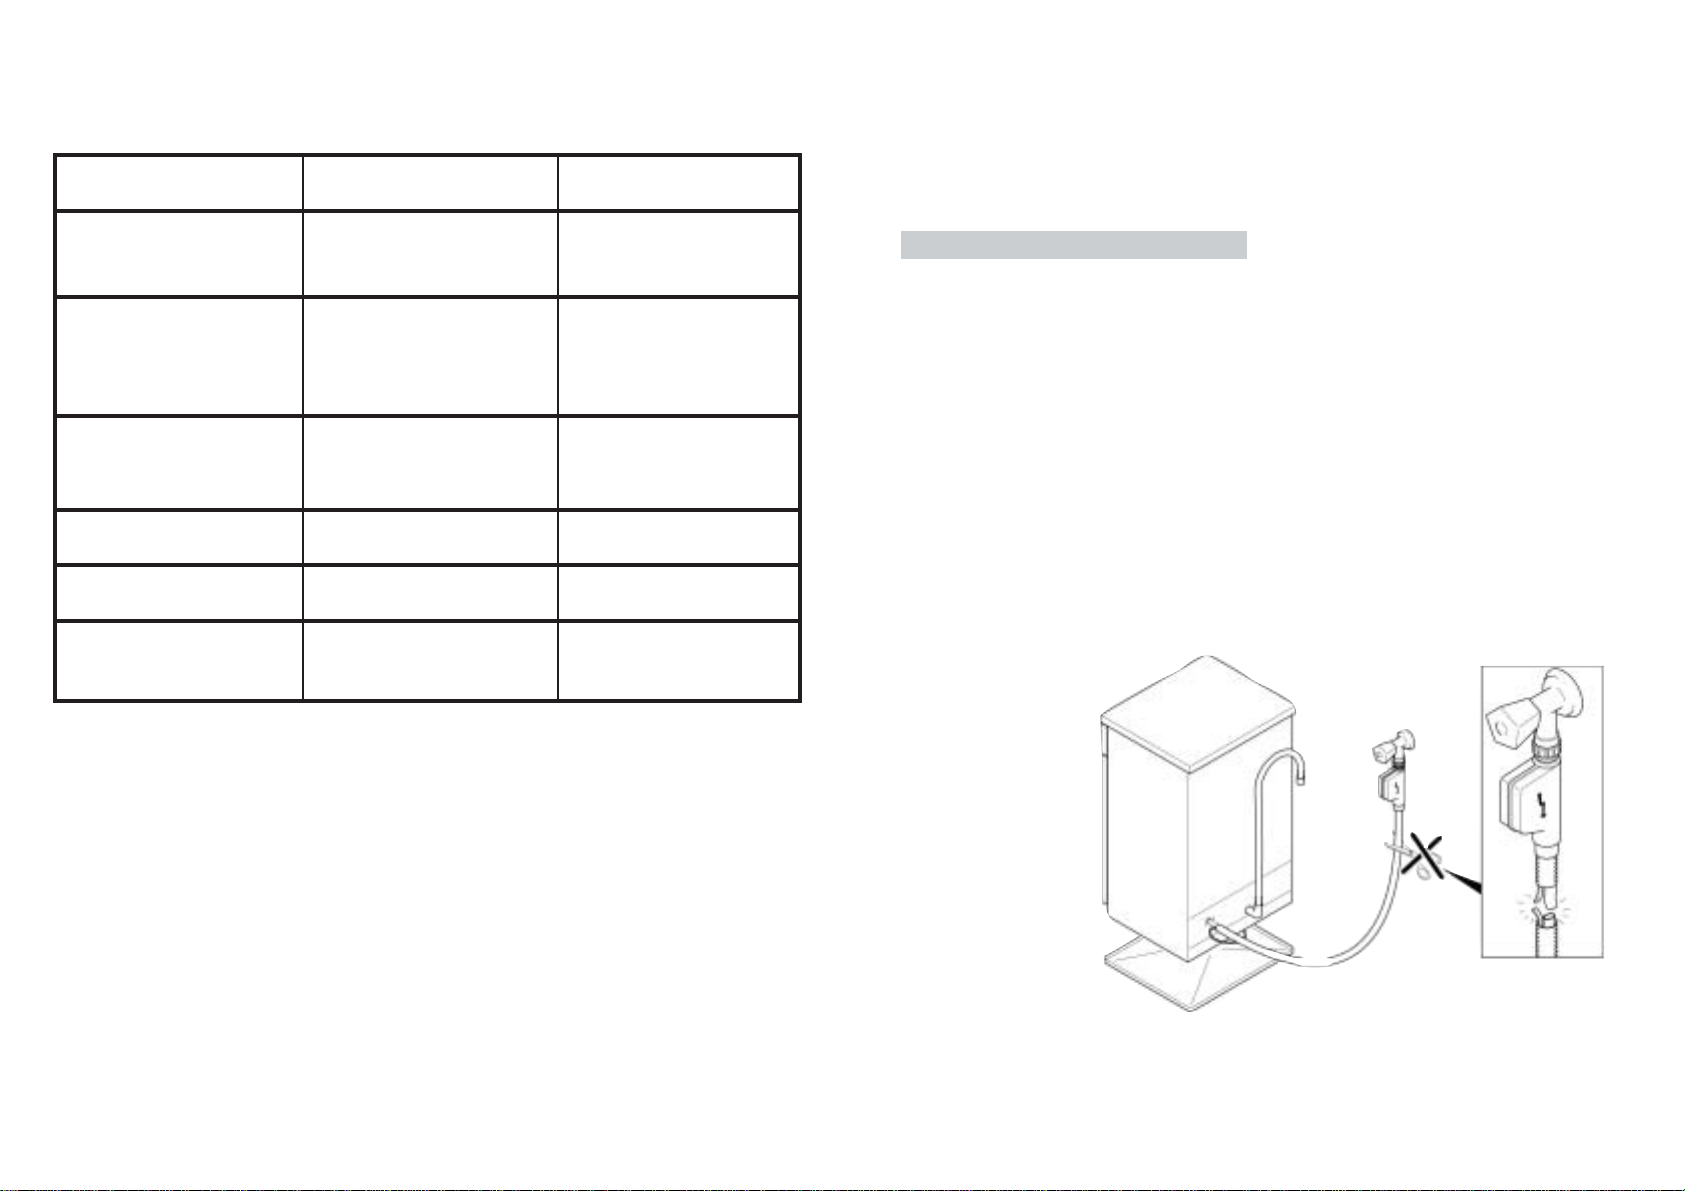
Connecting the outlet hose
■ The outlet hose should disharge into a
standpipe, making sure that there are no
kinks (fig. 4).
■ The standpipe must be at least 40 cm
above floor level and it must have an
internal diameter of at least 4 cm.
■ It is advisable to fit an anti-odour air trap
(fig. 4X).
■ If necessary the outlet hose can be
extended up to 2,5 m, provided that it is
kept at a maximum height of 85 cm
above floor level. The extension pipe is
available from the After Sales Service
Centre.
■ The hose can be hooked over the side of
the sink, but it must not be immersed in
water, in order to prevent water from
being syphoned back to the machine
when this is in operation (fig. 4Y).
■ When installing the appliance under a
worktop the hose pipe clamp must be
attached to the wall in the highest possible
position under the worktop (fig. 4Z).
■ Check that there are no kinks in the inlet
and outlet hoses.
4
9
7
598
556/573
5
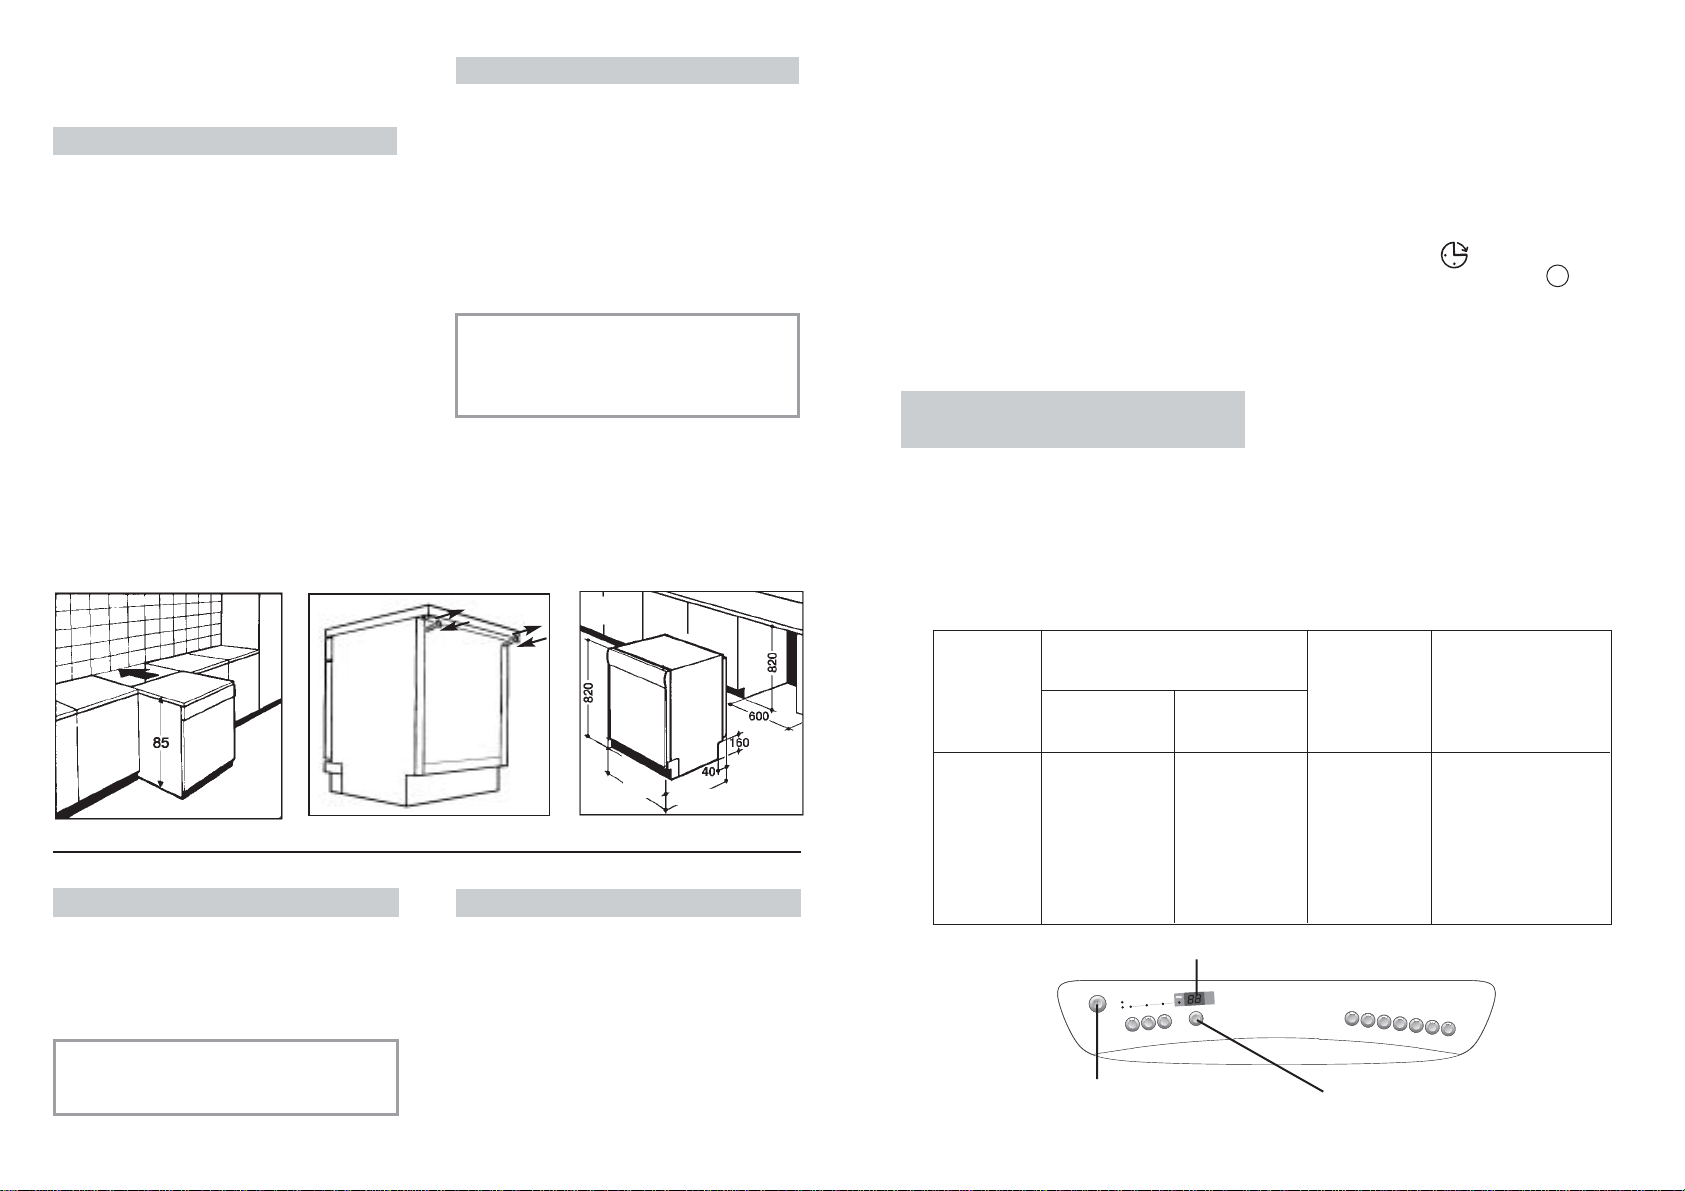
INSTALLATION IN FITTED
KITCHENS
Fitting between existing cabinets
■ The height of the dishwasher, 85 cm, has
been designed in order to allow the
machine to be fitted between existing
cabinets of the same height in modern
fitted kitchens. The feet can be adjusted
so that correct height is reached.
■ The laminated top of the machine does
not require any particular care since it is
heatproof, scratchproof and stainproof
(fig. 5).
Opening the door
Put your hand into the recess and pull.
If the machine comes open while it is working,
an electrical safety device automatically
switches everything off.
IMPORTANT
For the machine to work properly,
the door should not be opened while
it is in operation.
Closing the door
Place the baskets in the machine.
Make sure that both the spray arms are
free to rotate and are not obstructed by
cutlery, crockery or pans. Close the door,
pressing on it to make sure it is firmly shut.
Underneath existing work top
(when fitting beneath a work top)
■ In most modern fitted kitchens there is
only one single work top under which
cabinets and electrical appliances are
fitted. In this case remove the work top
of the dishwasher by unscrewing the
screws under the rear edge of the top
(fig. 6a).
IMPORTANT
After removing the work top, the
screws MUST BE screwed again
under the rear edge of the top
(fig. 6b).
■ The height will then be reduced to 82 cm,
as scheduled by the International
Regulations (ISO) and the dishwasher
will fit perfectly under the kitchen
working top (fig. 7).
6
a
b
a
b
LOADING THE SALT
■ On the bottom of the machine there is a
container for the salt for regenerating
the softener.
■ It is important to use only a salt that is
specifically designed for dishwasher.
Other types of salt contain small quantities
of insoluble particles which over a long
period of time may affect and deteriorate
the softener performance.
■ To add salt, unscrew the cap of the con-
tainer on the bottom and then refill the
container.
■ During this operation a little water will
overflow; but keep adding salt until the
container is full. When the container is
full, clean the thread of salt residue and
retighten the tap.
■ After loading the salt, it is recommended
running a complete washing cycle,
or COLD RINSE programme. The salt
dispenser has a capacity of between 1.5
and 1.8 kg and, for efficient use of the
appliance, it should be refilled from time
to time according to the regulation of the
water softener unit.
11
IMPORTANT
(Only for first start up)
When the appliance is used for the
first time, after completely filling the
salt container, it is necessary to add
water until the container overflows.
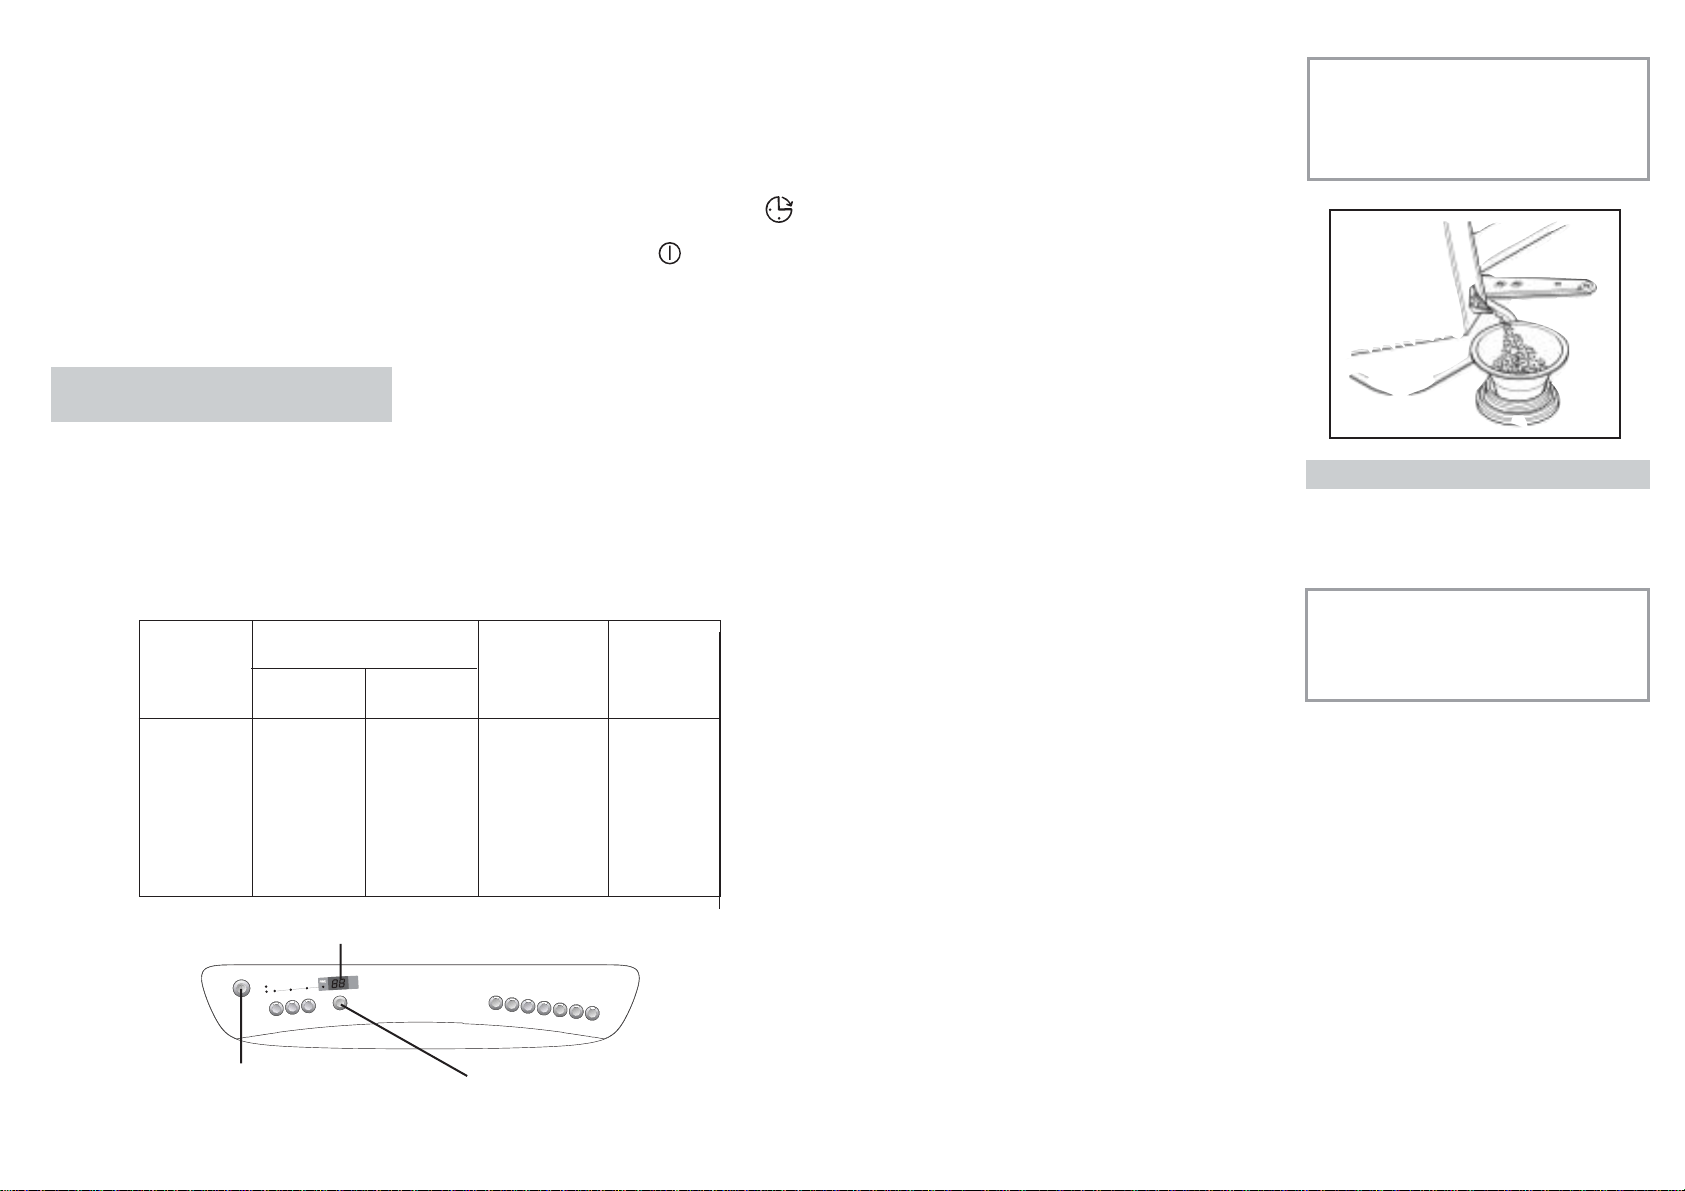
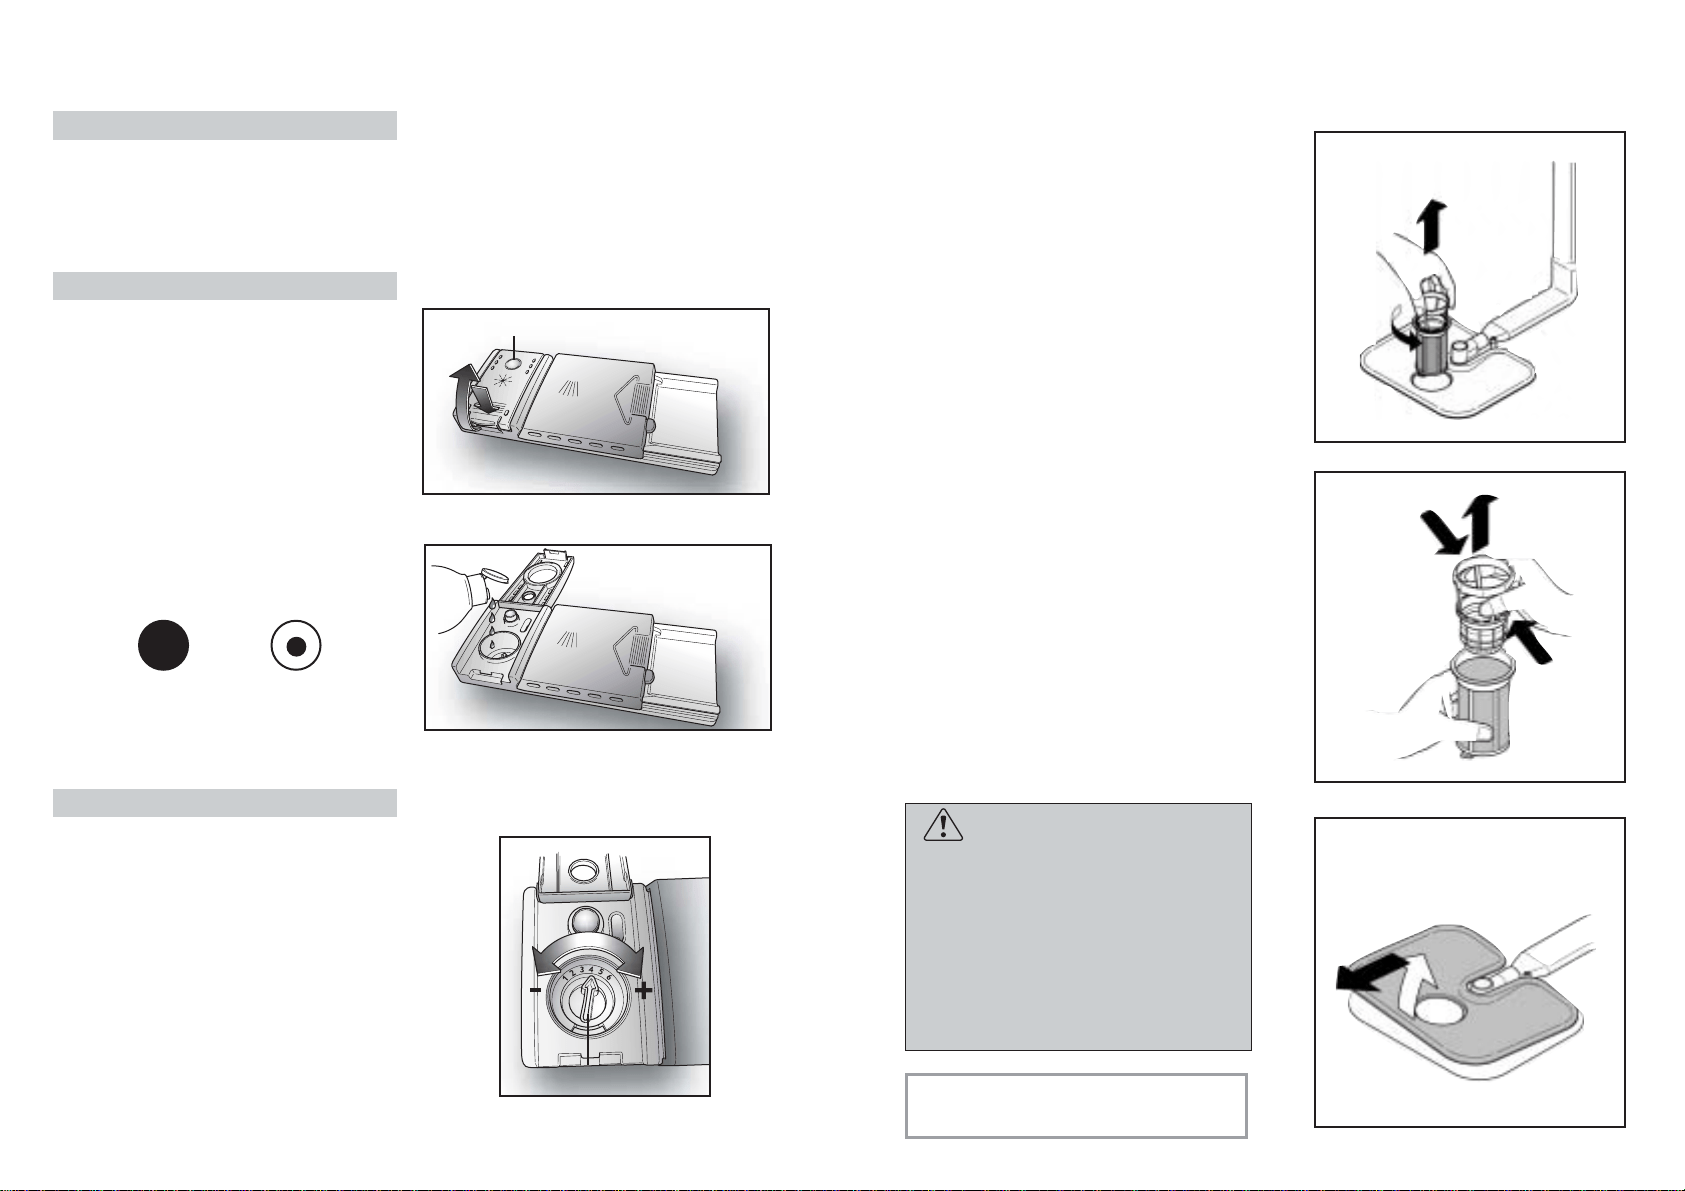
Salt loading indicator
This model is provided with an indicator light
on the control panel which will light up
when it is necessary to reload the salt
container.
IMPORTANT
The appearance of white stains on
dishes is generally an important
sign that the salt container needs
filling.
“ON/OFF”
button
“DELAY START”
button
Digital display
*The softener unit is set in the factory
at level 4 (d4) as this satisfies the
requirements of the majority of users.
Regulate the setting of your water softener
unit according to the degree of hardness
of your water as follows:
1. Keep the "DELAY START" button
pressed in and at the same time press
the "ON/OFF" button .
The factory setting "d4" will appear on
the display.
2. To change the setting, press the
"DELAY START" button. Each time you
press that button the setting will increase
by one level.
When you have reached "d7", the
display will go back to "d1".
3. When the required setting appears on
the display, wait for an audible signal to
confirm that the new setting has been
stored in memory.
10
WATER SOFTENER UNIT
Depending on the source of the supply,
water contains varying amounts of limestone
and minerals which are deposited on the
dishes leaving whitish stains and marks.
The higher the level of these minerals
present in the water, the harder the water is.
The dishwasher is fitted with a water
softener unit which, through the use of
special regenerating salt, supplies
softened water for washing the dishes.
The degree of hardness of your water can
be obtained from your water supply
company.
Regulating the water softener
with electronic programmer
The water softener can treat water with a
hardness level of up to 90°fH (French
grading) or 50°dH (German grading)
through 8 settings.
The settings are listed in the table below:
Level
0
1
2
3
*4
5
6
7
°fH
(French)
0-5
6-10
11-20
21-30
31-40
41-50
51-60
61-90
Water
hardness
°dH
(German)
0-3
4-6
7-11
12-16
17-22
23-27
28-33
34-50
Use of
regenerating
salt
NO
YES
YES
YES
YES
YES
YES
YES
Water
softener
setting
d1
d1
d2
d3
d4
d5
d6
d7
12
1
3
a
b
a
b
2
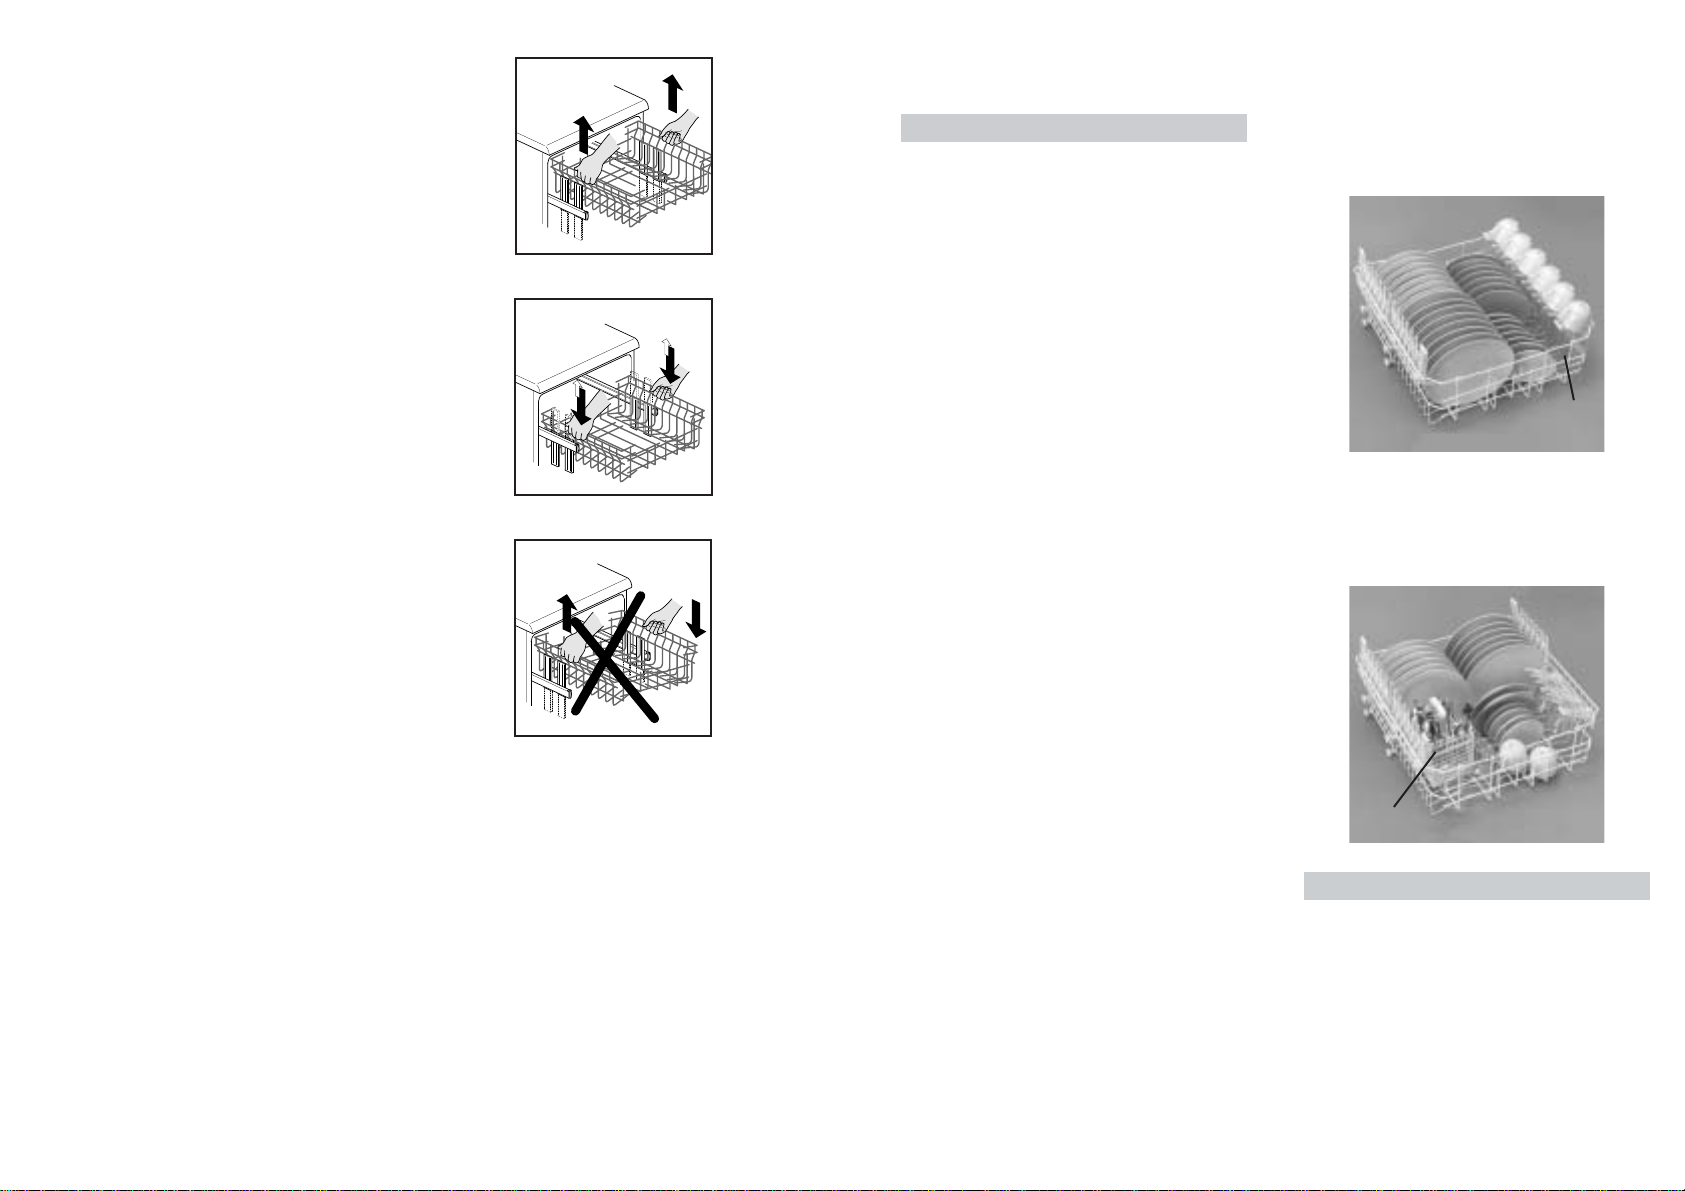
ADJUSTMENT OF THE
UPPER BASKET
If 27 cm to 31 cm plates are normally used,
load them onto the lower basket after the
upper basket has been placed in its upper
position and proceed as detailed below:
1. Pull out the upper basket;
2. Then grasp the basket from both sides
and lift it upwards (fig. 1).
Dishes that are bigger than 20 cm in
diameter can no longer be loaded onto the
upper basket and the mobile supports
cannot be used when the basket is in the
upper position.
ADJUST BASKET TO THE LOWER
POSITION:
1. Grasp the basket from both sides and lift
slightly upwards (fig. 2a);
2. Then slowly release into the correct
position (fig. 2b).
N. B. : NEVER LIFT OR LOWER THE
BASKET BY ONE SIDE ONLY (fig.3).
Attention :
it is advisable to adjust the basket before
loading the dishes.
13
LOADING DISHES
Using the upper basket
■ The upper basket is provided with
mobile racks hooked to the sides of the
basket which can be regulated in two
positions: upright and lowered. In the
lowered position the racks may be used
for tea and coffee cups, kitchen knives
and ladles. Glasses with stems may be
safely hung on the ends of the racks.
Glasses, cups, saucers and dessert
plates may be loaded under the racks.
■Soup plates and ordinary plates may be
loaded with the rack in the upright
position. Plates should be loaded
vertically with the underside of the plate
towards the back of the dishwasher with
a space between each plate to allow
water to pass freely.
■ It is advisable to load plates of the same
size together in order to utilize maximum
basket capacity.
■ Plates may be loaded in a single row
(fig. 1) or on both rows (fig. 2).
■ It is advisable to load large plates
(approx. 27 or more cm) slightly tilted
towards the rear to facilitate introduction
of the basket into the machine.
■ Salad bowls and plastic bowls may also
be loaded on the upper basket. It is
advisable to block these in place so that
the jets of water do not make them
overturn.
■ The upper basket has been designed to
offer maximum flexibility in use and can
be loaded with up to 24 plates on two
rows, up to 30 glasses on five rows or a
mixed load.
A standard daily load is represented in
figs. 1 and 2.
Upper basket (fig. 1)
A = soup plates
B = dinner plates
C =dessert plates
Upper basket (fig. 2)
A = soup plates
B = dinner plates
C =dessert plates
D = saucers
E = cups
Using the lower basket
■ Saucepans, oven dishes, tureens, salad
bowls, lids, serving dishes, dinner
plates, soup plates and ladles can be
loaded on the lower basket.
■ Place the cutlery in the plastic cutlery
holder with the handles pointing
upwards.
■ Place the cutlery holder on the lower
basket (fig. 6), making sure that the
cutlery does not get in the way of the
rotating arms.
D = saucers
E = cups
F = glasses
F = glasses
with stems
G = glass
H = cutlery basket
1
A
B
C
D
E
F
A
B
C
D
F
E
G
H
2
F
14
15
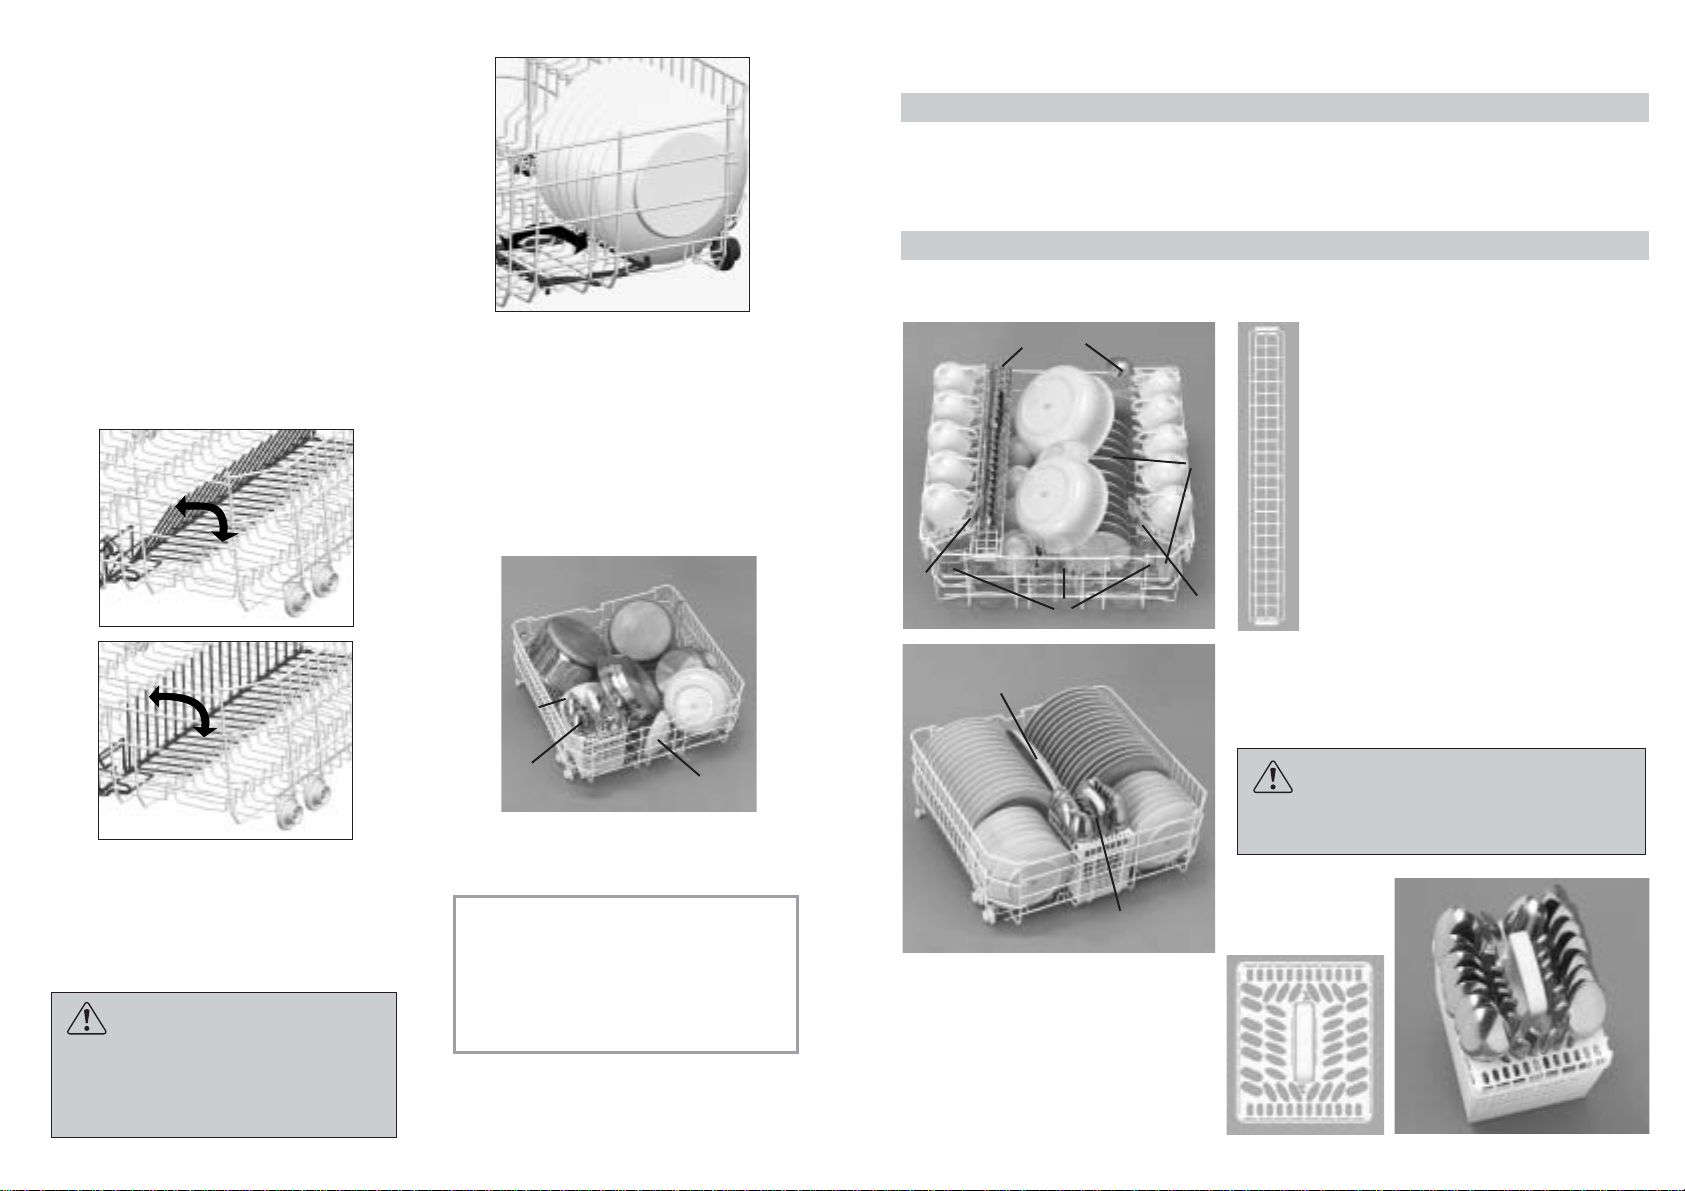
■ The lower basket is fitted with a special
adjustable central rack (fig. 3 and 4).
This permits stable and optimum
loading, even when the size and/or
shape of the dishes is non-standard.
- POSITION “A”: for a standard load, or
one that excludes pans, salad bowls and
the like.
- POSITION “B”: for dishes which,
although standard size, have a particular
shape (very deep bowls, square dishes
or ones without borders etc.).
- POSITION “C”: for larger than average
flat plates and/or ones with non-
standard shapes (square, hexagonal,
oval, pizza dishes etc.).
■ The small plates, as those used for
desserts for example, must be placed in
the lower basket as shown in the figure 5,
with the support flap placed outwards ("B").
For normal or large plates the flap must
be in the position ("A").
WARNING!
If the small plates are placed in the
basket with the support flap in the
incorrect position, the plates will
interfere with the lower spraying arm
preventing it to rotate.
A standard daily load is represented in
fig. 6.
Lower basket (fig. 6)
A = medium-sized
saucepan
B = large saucepan
C = frying pan
D = tureens,
serving dishes
Please load the dishwasher sensibly to
ensure the best wash results.
IMPORTANT
The lower basket has a safety-stop
device, for its safe extraction, also
especially useful with a full load.
For loading salt, cleaning filter and for
ordinary maintenance, the complete
extraction of the basket is necessary.
Cutlery basket
The top of cutlery basket can be removed,
for enable various loading options.
A
B
5
E = cutlery
F = oven dishes
G = medium bowl
H = small bowl
D
F
A
B
C
E
H
6
G
A
B
A
C
3
4
Lower basket (fig. 2)
M = 15 soup plates
N = 15 dinner plates
O = 7 + 7 dessert plates
Upper basket (fig. 1)
A = 5 + 5 + 5 glasses
B = 12 + 3 saucers
C = 5 + 5 + 5 cups
D = small bowl
E = medium bowl
F = large bowl
G = dessert plate
H = 1 + 1 serving spoons
I =
ladle
L = cutlery
3
Cutlery basket (fig. 3)
Insert the cutlery as indicated in
figure.
3 = teaspoons
4 = serving fork
1 =
15 dessert spoons
2 =
15 forks
3 =
12 teaspoons
1 = spoons
2 = knives
A
F
C
C
G
L
E
D
B
1
H
P
M
Q
O
N
2
I
O
H
C
1
2
2
2
2
2
2
2
2
2
2
2
2
222
4
333
1
1
1
1
1
1
1
1
1
1
1
1
1
1
11
11
11
11
11
11
12
12
12
32
32
32
32
32
32
32
32
32
32
32
32
P = serving dish
Q = cutlery
ATTENTION!
Before loading the lower basket, please
remove the adjustable central rack.
INFORMATION FOR THE TEST LABORATORIES
General programme comparison (Ref. EN 50242 Standards)
(see programmes selection)
1. Upper basket position: low
2. Normal load
3. Shine setting: 6
15 international place load (Ref. EN 50242 Standards)
Correct loading is indicated, in fig. 1 for the upper basket, in fig. 2 for the lower basket and in
fig. 3 for the cutlery basket.
4. Amount of detergent:
- 9,5 g for pre-wash;
- 28 g for wash.
17
LOADING THE DETERGENT
The detergent
IMPORTANT
It is essential to use a detergent
that is specifically designed for
dishwashers either in powder, liquid
or tablet form.
“FINISH” gives very good results and can
be easily obtained.
Unsuitable detergents (like those for
washing up by hand) do not contain the
proper ingredients for use in a dishwasher,
and stop the dishwasher from working
correctly.
Filling the detergent container
The detergent container is inside the door
(fig. A “2”). If the lid of the container is
closed, press the button (A) to open.
At the end of every wash cycle the lid is
always open and ready for the next time
the dishwasher is used.
WARNING!
When loading the lower basket, please
ensure that the plates or others do not
obstruct the detergent dispenser.
The amount of detergent to be used varies
according to how dirty the dishes are and
on the type of dishes to be washed.
We advise using 20÷30 g of detergent in the
wash section of detergent compartment (B).
16
After pouring the detergent into the container,
close the lid, firstly pushing (1) and then
pressing on it (2) until you hear the click.
Since not all detergents are the same the
instructions on the boxes of detergent can
vary. We should just like to remind users
that too little detergent does not clean the
dishes properly whilst too much detergent
will not produce better results and is also a
waste.
IMPORTANT
Do not use an excessive amount of
detergent and help limit damage to
the environment at the same time.
A
B
TYPES OF DETERGENT
Detergent tablets
Detergent tablets of different manufacturers
dissolve at different speeds, for this
reason, during short programmes, some
detergent tablets may be not fully effective,
because they are not completely dissolved.
If these products are used, is recommended
to choose longer programmes to guarantee
the complete use of the detergent.
IMPORTANT
To get satisfactory washing results,
the tablets MUST be placed in the
wash section of the detergent
container and NOT directly in the
tub.
Concentrated detergents
The concentrated detergents, with reduced
alkalinity and with natural enzymes, in
conjunction with 50°C wash programmes,
have a smaller impact on the environment
and they protect the dishes and the
dishwasher.
The 50°C wash programmes purposely
exploit the dirt-dissolving properties of the
enzymes, allowing therefore, with the use
of the concentrated detergents, to achieve
the same results of the 65°C programmes
but at a lower temperature.
Combined detergents
The detergents that also contain the rinse
aid must be placed in the wash section of
the detergent container. The rinse aid
container must be empty (if it is not empty,
set the rinse aid regulator to lowest position
before using combined detergents).
"3 in 1"/"4 in 1"/"5 in 1"
combined detergents
If you are planning to use combined detergents
i.e. those with built in salt and/or rinse
agent, we would advise the following:
■ read carefully and follow the manufacturer’s
instructions given on the packaging;
■ the effectiveness of detergents containing
the built in water softener/salt depends
on the hardness of your water supply.
Check that the hardness of your water
supply is within the effective range given
on the detergent packaging.
If when using this type of product, you
don't get satisfactory washing results,
please contact the detergent
manufacturer.
In certain circumstances use of combined
detergents can cause:
■ limescale deposits on dishes or in the
dishwasher;
■ a reduction in washing and drying
performance.
IMPORTANT
Any problems which arise as a direct
result of the use of these products
are not covered by our warranty.
Please note that using the "3 in 1"/
"4 in 1"/”5 in 1" combined detergents,
the rinse aid and salt indicator lights
(only used on selected models) are
superfluous, so you must ignore the lights.
If washing and/or drying problems occur,
we recommend you return to use traditional
separate products (salt, detergent and
rinse agent). This will ensure that the water
softener in the dishwasher operates
correctly.
In this case, we recommends that you:
■ refill both the salt and rinse aid container;
■ run one normal washing cycle without a
load.
Please note that on return to the use of
conventional salt, a number of cycles will
be required before the system becomes
fully efficient again.
19
1
2
3
CLEANING THE FILTERS
The filter system (fig.A “4”) consists of:
a central container that traps the larger
particles;
a flat gauze that continuously filters the
wash water;
a micro filter, located beneath the gauze,
that traps the tiniest particles ensuring a
perfect rinse.
■ To achieve excellent results every time,
the filters should be checked and
cleaned after each wash.
■ To remove the filter unit, simply turn the
handle anticlockwise (fig. 1).
■ For ease of cleaning, the central container
is removable (fig. 2).
■ Remove the gauze filter (fig.3) and
wash the whole unit under a jet of
water. If necessary a small brush can
be used.
■ With the Self-cleaning Micro filter,
maintenance is reduced and the filter
unit need only be checked every two
weeks. Nevertheless, after each wash it
is advisable to check that the central
container and the gauze filter are not
clogged.
WARNING!
After cleaning the filters, make sure
that they are correctly reassembled
and that the gauze filter is properly
positioned at the bottom of the
dishwasher.
Make sure that the filter is screwed
back, clockwise, into the gauze, as
poor seating of the filter unit could
have an adverse effect on the
efficiency of the appliance.
IMPORTANT
Never use the dishwasher without
the filters.
LOADING THE RINSE AID
The rinse aid
The rinse aid, which is automatically
released during the last rinsing cycle, helps
the dishes to dry quickly and prevents
spots and stains forming.
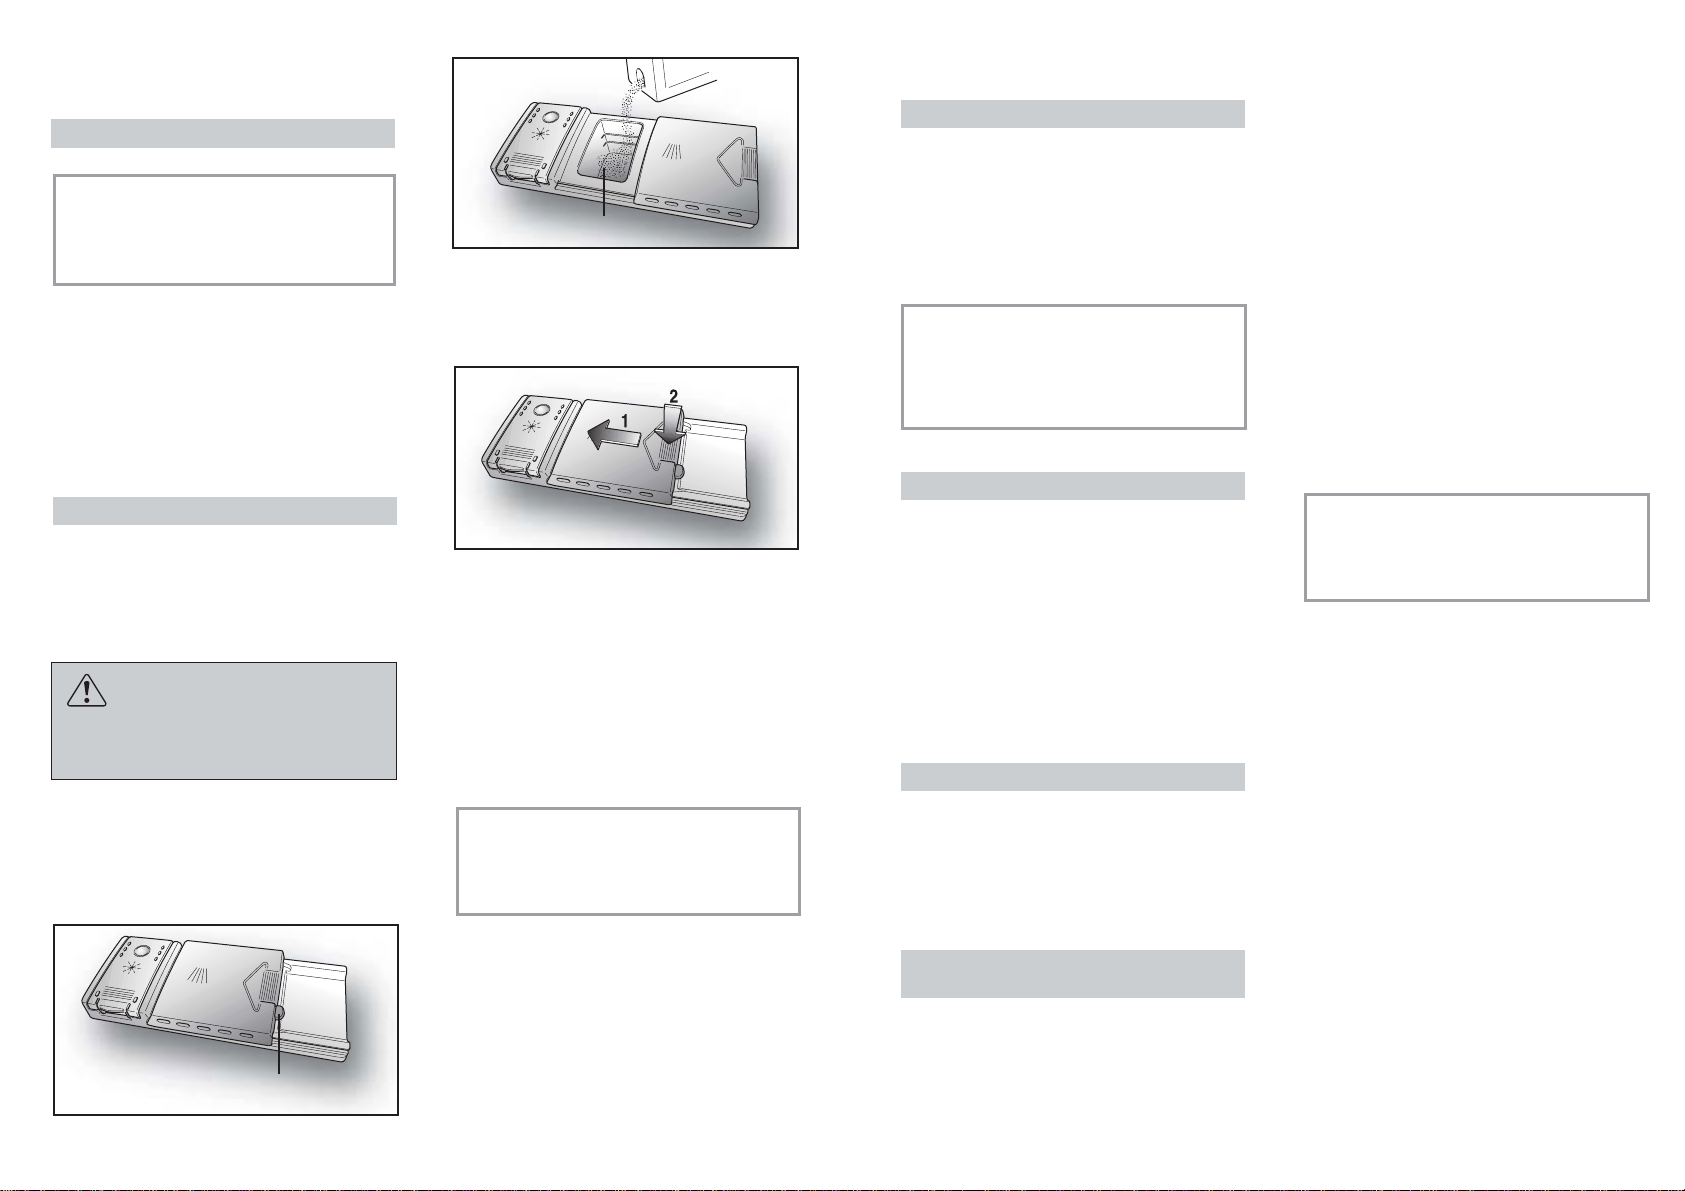
Filling the rinse aid container
The rinse aid container can be found to the
left of the detergent container (fig. A "3").
To open the lid, push the reference mark
and, in the same time, pull the tab of
opening.
It is always advisable to use rinse aid that
is specifically designed for dishwasher.
Check the rinse aid level through the
indicator eye (C) which is located on the
dispenser.
Regulating the rinse aid from 1 to 6
The regulator (D) is placed under the lid
and can be turned using a coin.
The recommended position is 4.
The limestone content of the water
considerably affects the formation of
limescale and the drying performance.
It is therefore important to regulate the
quantity of rinse aid to achieve good
washing results.
If, after the wash, streaks occur on the
dishes, decrease the amount by one
position. If whitish spots occur, increase the
amount by one position.
18
FULL EMPTY
dark light
C
D

20
PRATICAL HINTS
How to get really good wash
results
■ Before placing the dishes in the
dishwasher, remove any remaining
food (bones, shells, pieces of meat or
vegetables, coffee grounds, skin of fruit,
cigarette ash, tooth picks etc. to avoid
blocking the filters, water outlet and
washing arm nozzles.
■ Try not to rinse the dishes before
loading them into the dishwasher.
■ If saucepans and oven dishes are
encrusted with the remains of burnt or
roast food, it is advisable to leave them
to soak before washing.
■ Place the dishes face downwards.
■ Try to place the dishes in such a way
that they are not touching one another.
If they are loaded properly you will get
better results.
■ After loading the dishes check that the
washing arms can rotate freely.
■ Pans and other dishes that have
particularly stubborn food particles or
remnants of burnt food should be left to
soak in water with dishwasher
detergent.
■ To wash silver properly:
a) rinse the silver immediately after
use, especially if it has been used for
mayonnaise, eggs, fish etc.;
b) do not sprinkle detergent onto it;
c) keep it separate from other metals.
How to make savings
■ If you want the dishwasher to give a
complete wash, place the dishes in the
dishwasher at the end of each meal and
if necessary turn on the COLD RINSE
cycle to soften the food remains and
remove bigger particles of food from the
new load of dishes.
When the dishwasher is full start the
complete wash cycle programme.
■ If the dishes are not very dirty or if the
baskets are not very full select an
ECONOMY programme, following the
instructions in the program list.
What not to wash
■ It should be remembered that not all
dishes are suitable for washing in a
dishwasher.We advise against using
the dishwasher to wash items in
thermoplastic, cutlery with wooden or
plastic handles, saucepans with
wooden handles, items in aluminium,
crystal, leaded glass unless otherwise
stated.
■ Certain decorations may fade. It is
therefore a good idea before loading the
whole batch to wash just one of the
items first so as to be sure that others
like it will not fade.
■ It is a good idea not to put silver cutlery
with non-stainless steel handles into
the dishwasher as there could be a
chemical reaction between them.
IMPORTANT
When buying new crockery or
cutlery always make sure that they are
suitable for washing in a dishwasher.
Useful hints
■ In order to avoid any dripping from the
top rack, remove the lower rack first.
■ If the dishes are to be left in the
machine for some time, leave the door
ajar, to let some air circulate and to
improve the drying performance.
21
WHEN CYCLE IS FINISHED
After every wash it is essential to turn off
water supply and to switch off the machine
by pressing the On/Off button to the off
position.
If the machine is not going to be used for
some time, it is advisable to follow these
rules:
1. do an empty wash with detergent in order
to clean the machine of any deposits;
2. pull out the electric plug;
3. turn off the water tap;
4. fill the rinse aid container;
5. Ieave the door ajar;
6. keep the inside of the machine clean;
7. If the machine is left in places where the
temperature is below 0°C any water left
inside the pipes may freeze. Wait until
the temperature rises above zero and
then wait for about 24 hours before
starting up the dishwasher.
CLEANING AND
MAINTENANCE
■ To clean the dishwasher outside, do not
use solvents (degreasing action) neither
abrasives, but only a cloth soaked with
water.
■ The dishwasher does not require special
maintenance, because the tank is
self-cleaning.
■ Regularly wipe the door gasket with a
damp cloth to remove any food remains
or rinse aid.
■ It is advisable to remove limestone
deposits or dirt periodically, by doing an
empty wash; pour a glass of vinegar on
the bottom of the tank and select the
light wash.
■ If, in spite of the routine cleaning of the
filters, you notice that the dishes or pans
are not properly washed or rinsed, check
that all the spray heads on the rotor
arms (fig. A “5”) are clear.
If they are blocked, clean them in the
following way:
1. to remove the upper rotor arm, turn it
until it lines up with the stop marked
by the arrow (fig. 1). Push it upwards
(fig. 1b) and, keeping it pushed in,
unscrew it in a clockwise direction
(to reassemble it repeat the same
operation, but turn it anticlockwise).
The lower rotor arm can be removed
simply by pulling it upwards (fig. 2);
2. wash the rotor arms under a jet of water
to clear any blockage in the spray
heads;
3. when you have finished, refit the rotor
arms in the same position, remembering
to re-align the arrow and screw into
position.
■ Both the door lining and the tank lining
are in stainless steel; however, should
spots caused by oxidation occur, this is
probably due to a high level of iron salts
presents in the water.
■ The spots can be removed with a mild
abrasive agent; never use chlorine
based materials, steel wool, etc.
1
2
1b
22
EN 50242 place load
Capacity with pans and dishes
Water supply pressure
Fuse
Power input
Supply voltage
15
9 persons
Min. 0,08 - Max 0,8 MPa
(see rating plate)
(see rating plate)
(see rating plate)
TECHNICAL DATA:
DIMENSIONS:
Height
Depth
Width
Depth with door open
cm
cm
cm
cm
with working top
85
60
60
120
without working top
82
57,3
59,8
117
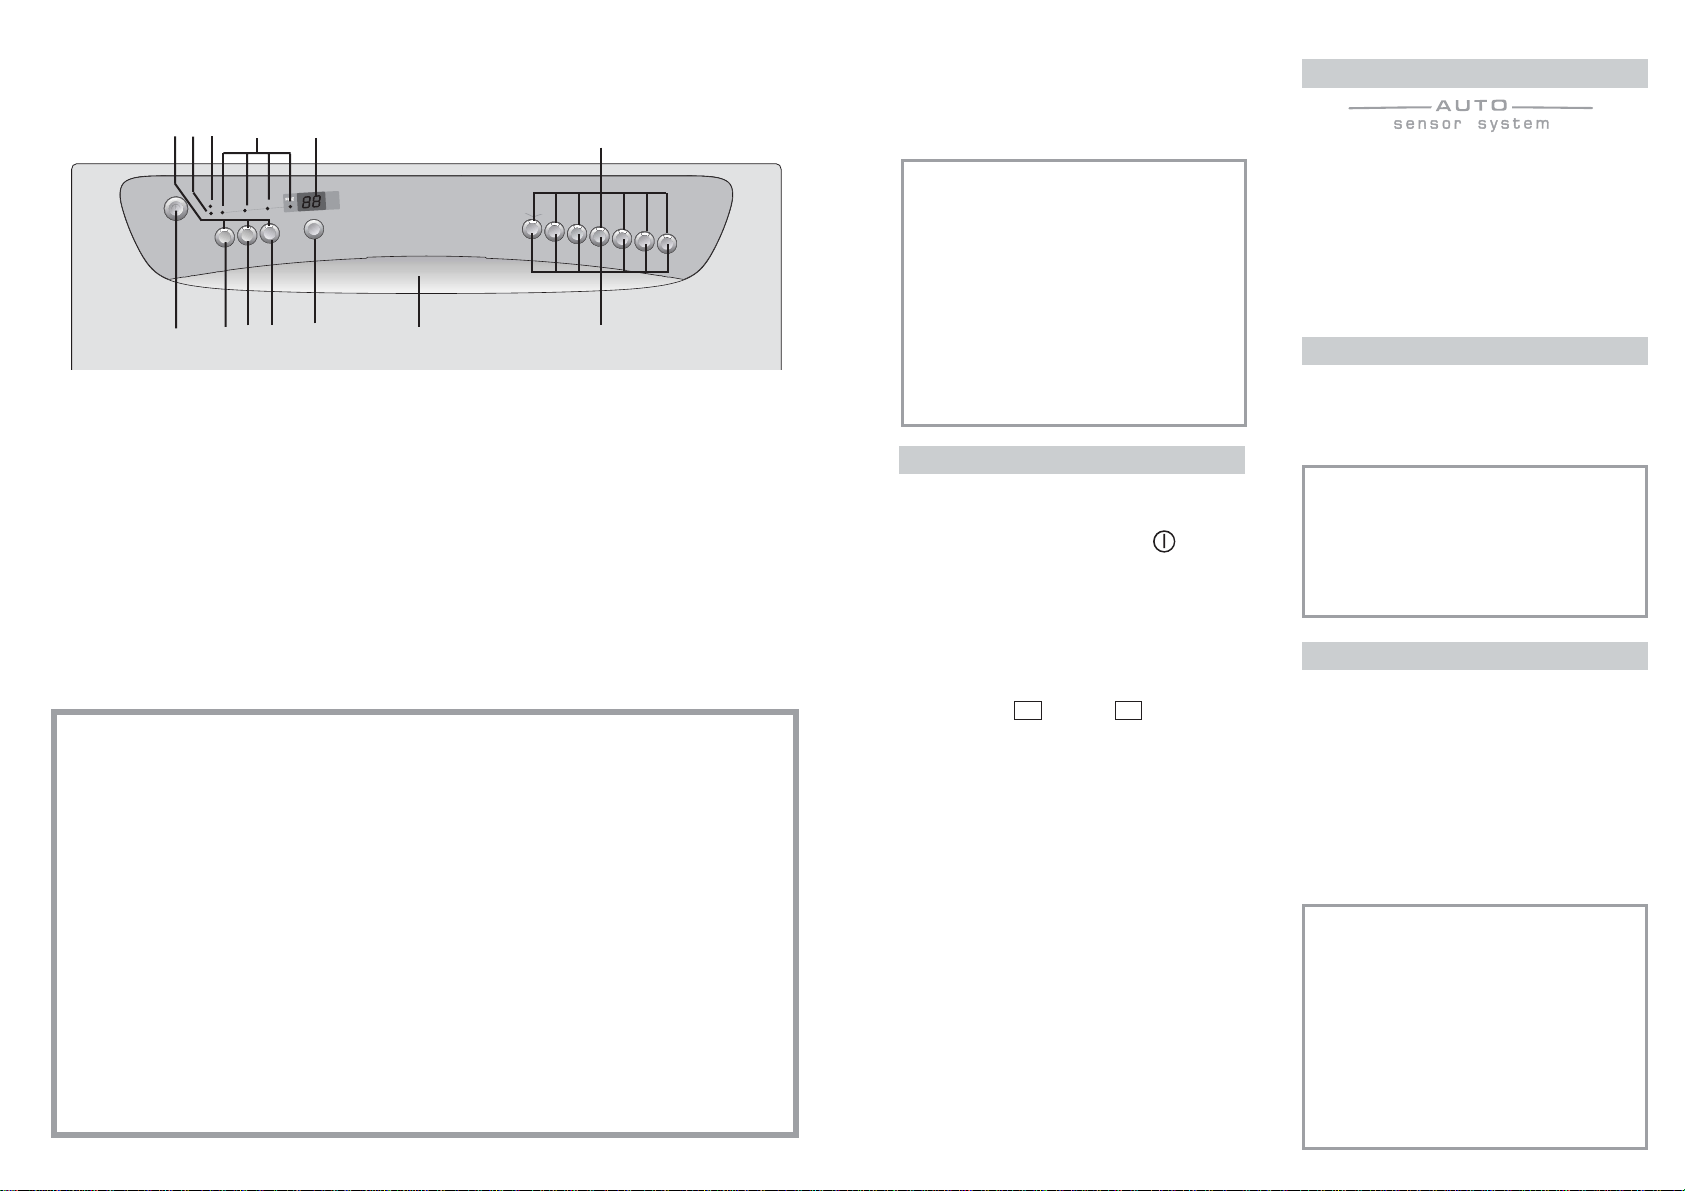
A "ON/OFF" button
B "3 in 1" option button
C "HPS" option button
D "1/2" option button
E "DELAY START" button
F Open door
G "PROGRAMME" buttons
H "SALT EMPTY" light
I "RINSE AID EMPTY" light
L "PROGRAMME STATUS" lights
M DIGITAL DISPLAY
N "PROGRAMME SELECTION" lights
O "OPTION SELECTION" lights
DESCRIPTION OF THE CONTROL PANEL
23
PROGRAMME SELECTION
AND SPECIAL FUNCTIONS
(Use in conjunction with programme guide)
IMPORTANT
The dishwasher has two very practical
functions:
- the "recommended" programme
(which is ideal for full load daily use)
for quick and accurate selection;
- the "Auto’ Memory", function saves
any programme used at least 3 times
consecutively, so that if you regularly
use the same washing cycle you
do not have to continually set the
programme thereby saving time and
effort.
Programme settings
■ Open the door and place the dirty dishes
inside the appliance.
■ Press the "ON/OFF" button .
■ After pressing the "ON/OFF" button,
the indicator light which is factory set at
"recommended”, or the indicator light
for the “Auto Memory” programme will
flash.
The length of the program will be shown on
the display alternating hours with
minutes [I.e: 1 h (1 hour) / 25 (25 minutes)].
■ To select an option, press the
corresponding button (the indicator light
will light up).
Option buttons must be pressed
BEFORE starting the programme for
them to be accepted.
■ To choose another programme, press
the corresponding button (the relevant
indicator light will flash to confirm the
selection).
■ To start the programme, press the selected
programme button again to confirm.
The programme starts automatically, the
relevant indicator light will stop flashing
and remain on and the cycle length will
appear on the display.
If the previously described operations
were performed with the door open, the
programme will not start until the door
is closed.
“AUTOMATIC” programmes
The dishwasher is equipped with a dirt
sensor, able to analyse water murkiness
during all "AUTOMATIC" programme
phases (see programme list); thanks to
this sensor the washing cycle parameters
are automatically adapted to the real quantity
of dirt on dishes. Thus excellent washing
results are guaranteed while optimising
water and energy consumption.
"IMPULSE" programmes
The “IMPULSE” programmes use an
impluse washing technology, which reduces
consumption, noise and increases
performances.
IMPORTANT
The “intermittent” working of the
washing pump MUST NOT BE consi-
dered a malfunction, it is a characte-
ristic of the impulse washing so must
be considered a normal function of
the programme.
Programme interruption
Opening the door when a programme is
running is not recommended especially
during the main wash and final hot rinse
phases. However, if the door is opened
while a programme is running (for example,
to add dishes) the machine stops
automatically and the display will flash the
remaining time before the end of the cycle.
Close the door, without pressing any
buttons. The cycle will start from where it
left off.
IMPORTANT
A running programme can be
interrupted without opening the door
by pausing the dishwasher.
To pause, hold the running programme
button down for at least 2 seconds
and release when the corresponding
indicator light starts flashing.
Simply press the programme button
again to restart the cycle from where
it left off (the indicator light will stop
flashing and remain on).
B C D E F G
N
I
L
H
M
A
O

24
WARNING!
If you open the door during the
drying cycle, an audible audio signal
advises you that the drying cycle has
not yet finished.
Changing a running programme
Proceed as follows to change or cancel a
running programme:
■ Hold down the current programme
button (with the indicator light on) for at
least 5 seconds. All programme indicator
lights will turn on for one second. The
running programme will be cancelled
and the corresponding indicator light will
start to flash. The display will go blank
and the programme end indicator light
will turn on in the display.
■ At this point a new programme can be set.
WARNING!
Before starting a new programme,
you should check that there is still
detergent in the dispenser.
If necessary, top up the dispenser.
If there is any break in the power supply
while the dishwasher is operating, a
special memory stores the selected
programme and, when the power is
restored, it continues where it left off.
Programme operations
When a programme is running, the time
until the end of the cycle will be displayed
and the 4 “PROGRAM STATUS” indicator
lights:
= "WASH"
= "RINSE"
= "DRY"
= "END"
will light singularly and in sequence to
indicate the current phase
Programme end
The display will go blank and the last
“PROGRAMME STATUS” indicator light
will light to indicate that the cycle has
ended.
A5 second alarm will sound (if not muted)
3 times at 30 second intervals to signal that
the programme has ended. The programme
end indicator light will light up and the
display will go blank.
Dishes can now be removed and the
dishwasher turned off by pressing the
"ON/OFF" button or dishes can be loaded
for a new cycle.
Option buttons
IMPORTANT
All options MUST be turned on or off,
BEFORE starting the programme.
“3 in 1” button
This option optimises the use of “3 in 1”/
“4 in 1”/“5 in 1” combined detergents. By
pressing this button, the selected washing
programme is modified to get the best
performance from combined detergents;
furthermore, the salt and rinse aid shortage
lights are de-activated.
WARNING!
Once selected, this option keeps
being on (light on) also for next
washing cycles and it can be de-activate
(light off) only by pressing the button
once again.
IMPORTANT
When this option is selected, the
"RAPID" cycle is 10 minutes longer.
"HPS" button
The "HPS" option always guarantees the
best results by more effectively dealing
with heavier soiling. By using this option,
the strength of the selected cycle will be
increased, adding one rinse and increasing
the temperature and water pressure in the
washing phase where foreseen.
This option is recommended for very dirty
dishes or when dirty dishes may not have
been pre-treated allowing the soiling to dry up.
IMPORTANT
With this option selected the “IMPULSE”
wash is turned off.
25
"1/2" button
In response to your everyday washing
requirement in addition to the normal wash
functions this dishwasher is equipped with
the “1/2” function. This function enables
the uses to wash a reduced number of
dishes yet retaining the freedom of loading
them both on the top and bottom basket.
When this function is activated the dishwasher
will automatically reduce the water and
energy consumption and the wash time.
When selecting the “1/2” ensure a reduced
amount of detergent is used.
"DELAY START" button
Dishwasher start time can be set with this
button, delaying start from 1 to 23 hours.
Proceed as follows to set a delayed start:
■ Press the "DELAY START" button ("00"
will appear on the display).
■ Press the button again to increase the
delay in hours (each time the button is
pressed the delay is increased by 1 hour
to a maximum of 23).
■ To start the countdown, press the
selected programme button (the relevant
indicator light will stop flashing and
remain on and the start time delay will be
shown in the display).
At the end of the countdown, the programme
will automatically start and the length of the
selected cycle will be shown in the display.
Proceed as follows to cancel a delayed
start:
■ Hold the selected programme button
down for at least 5 seconds.
■ Delayed start cancellation is confirmed
when the selected programme indicator
light starts to flash. The display will go
blank and the programme end indicator
light will light (any selected options will
also be cancelled and the corresponding
indicator lights will turn off).
■ At this point, a new programme and
option buttons must be set to start a
new programme as indicated in the
"PROGRAMME SETTINGS" section.
Alarm mute for the PROGRAMME
END
The alarm for the programme end may be
muted as follows:
■ With the dishwasher off, hold down the
second option button (from the left) while
simultaneously pushing the "ON/OFF"
button.
■ "b1” will appear on the display to indicate
that the alarm is on.
■ Press the same option button (second
from the left) within 5 seconds ("b0" will
appear on the display to indicate that the
alarm is off).
■ Wait for the alarm to sound to indicate
that the settings were saved.
■ To turn the alarm on again, follow the
same procedure ("b1" will appear on the
display to indicate that the alarm is on).
WARNING!
To ensure the correct operation of
the anti-overflow safety device, we
recommend that the dishwasher is
not moved or tilted during operation.
If however it is necessary to tilt or
move the dishwasher, please ensure
that the washing cycle is complete
and that there is no remaining water
inside the dishwasher.
27
THE WATERBLOCK SYSTEM
Fig. 1
A
The waterblock system has been designed to improve the safety of your appliance,
particularly when the machine is left unattended.
The waterblock system actually prevents flooding which might be caused by a
machine malfunction or as a result of a fracture on the pipes.
How does waterblock work
The sump located in the base of the appliance collects any possible water leakage
and operates a sensor which subsequently activates a valve placed under the water
tap and stops any water from the supply even with the tap fully opened. If the box
containing the electrical parts is damaged, remove the plug from the socket
immediately.
To ensure perfect operation of the safety system, box “A” with the hose, should be
connected to the tap as shown in figure “1”. The inlet hose should not be cut, as it
contains parts under load. If the hose is not long enough for correct connection, it
must be replaced with a longer one. The hose can be obtained from your Service
Agent.
This dishwasher is also equipped with an anti-overflow safety device which, if water
exceeds normal levels due to malfunctions, automatically blocks water flow and/or
drains excess quantities.
AUTOMATIC FAULT SIGNALS
26
Turn off the dishwasher, open the
inlet hose and reset the cycle.
Check if the drain tube is bent or if
the siphon or filters are clogged.
If the problem persists, contact
Customer Service.
Check if the drain tube is bent or if
the siphon or filters are clogged.
If the problem persists, contact
Customer Service.
Contact Customer Service.
Contact Customer Service.
Clean the filter plate.
If the problem persists, contact
Customer Service.
FAULTS CAUSE SOLUTION
E2 appears on the display and
the alarm sounds.
E3 appears on the display and
the alarm sounds.
E4 appears on the display and
the alarm sounds.
E5 appears on the display and
the alarm sounds.
E6 appears on the display and
the alarm sounds.
E8 or Ei appear on the display
and the alarm sounds.
No water (inlet hose closed).
The machine cannot drain water.
Water leak
Electronic temperature control fault.
Electronic control fault.
The water heating element is not
working correctly or the filter plate is
clogged.
The dishwasher is able to signal a series of faults in the display.
29
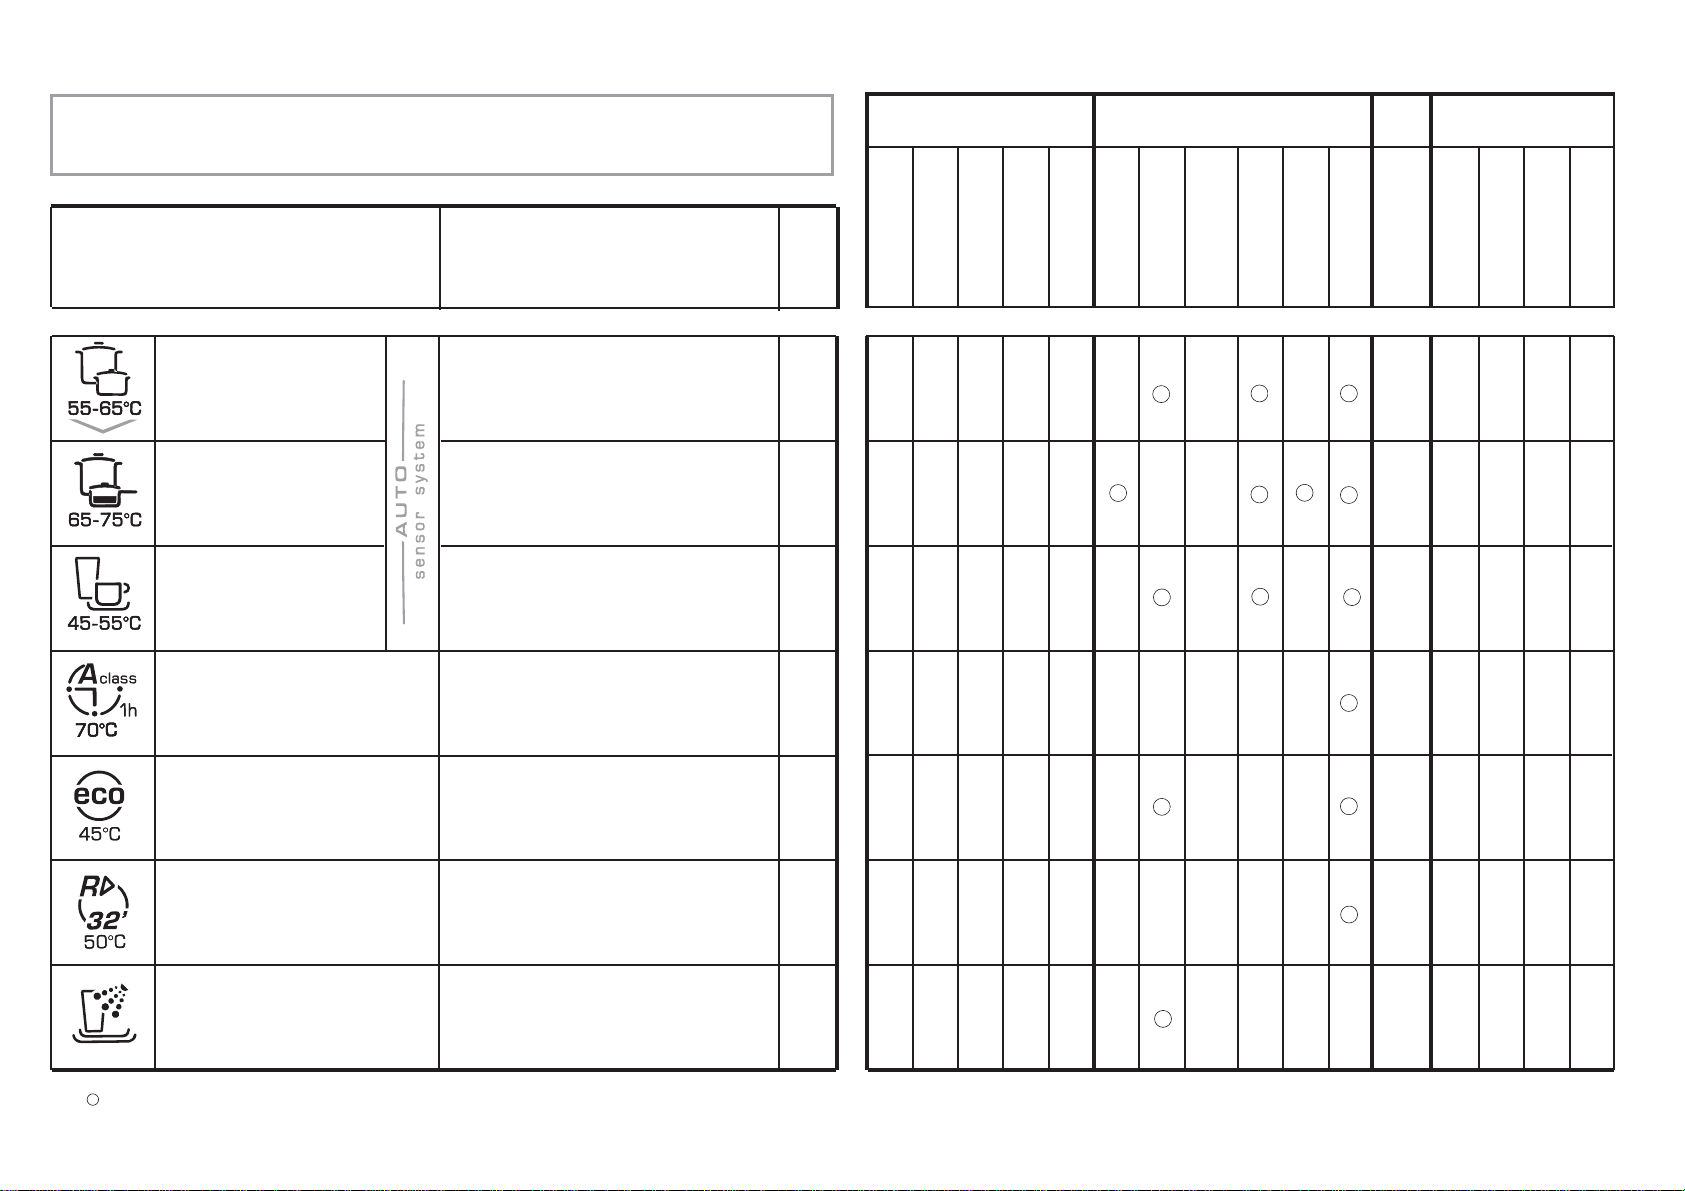
55°C/
65°C
80/
95
••••
110/
120
••••
••••
60
70°C
•••••
140
45°C
•••••
N/A
32
5
•
**WITH HOT WATER THE TIME REMAINING UNTIL THE END OF THE PROGRAMME IS AUTOMATICALLY
DISPLAYED WHILE THE PROGRAMME IS RUNNING.
N/A = OPTION NOT AVAILABLE
••
28
Programme Description
PROGRAMME GUIDE
(“RECOMMENDED” PROGRAMME)
Once a day - for normal soiled pans and
any other items that have been left all
day for washing.
Once a day - for heavily soiled pans and
any other items that have been left all
day for washing.
Suitable for delicate crockery and
glassware. Also for less soiled items
excluding pans.
Suitable for heavily soiled items that are
to be washed straight after a meal (Max
8 place load).
- WASHING CLASS A-
Energy Saving Programme suitable for
normal soiled items. Using detergents
with enzyme.
Programme standardised to EN
50242.
Quick wash for dishes which are to be
washed immediately after the meal.
Wash load of 4/6 persons.
Short cold pre-wash for items that are
stored in the dishwasher until you are
ready to wash a full load.
/( ) = "AUTOMATIC" PROGRAMMES (AUTO sensor system) ARE OPTIMISED THANKS TO THE DIRT
SENSOR THAT ADAPTS WASHING PARAMETERS TO DISH DIRT LEVELS.
YES
N/A
N/A
N/A
•
••••
( )
65°C/
75°C
45°C/
55°C
70/
80
50°C
UNIVERSAL
INTENSIVE
DELICATE
A CLASS 1h
ECO
RAPID 32’
COLD RINSE
Wash with prewash
If setting the INTENSIVE wash programme, a second dose of about 20 g of detergent
(1 table-spoon) must be added directly in the machine. For
A CLASS 1h programme add 5 g.
*
*
( )
( )
( )
( )
YES YES
YES
YES
YES
YES
YES
YES YES
YES
YES
YES
YES
YES
YES YES
YES
YES
YES
YES
Check list
Avarage
duration
in minutes
Special function
buttons
available
Detergent for soaking
(Prewash)
Detergent for washing
Clean filter
Check rinse aid
dispenser
Check salt container
Hot pre-wash
Cold pre-wash
Main wash
First cold rinse
Second cold rinse
Hot rinse with rinse aid
With cold water (15°C)**
-Tolerance ± 10%-
"3 in 1" button
"HPS" button
"1/2" button
"DELAY START" button
Programme contents
••
••
••
••
“IMPULSE”
Programmes
YES
YES
N/A

31
N.B.: Should any of the situations
occur and should the machine give a bad wash performance, it is necessary to remove the
deposits from the dishes by hand since the final drying cycle hardens the deposits which a second wash
in the machine would not be able to remove.
If the malfunction continues contact a Service Centre quoting the serial number of the dishwasher.
This is found on the plaque on the inside of the dishwasher door at the top or on the guarantee.
This information will make it possible to take more effective action more quickly.
The manufacturers decline any responsibility for any printing mistakes in this instruction booklet.
They also reserve the right to modify their own appliances as necessary without altering the
essential characteristics.
FAULT CAUSE REMEDY
7 - Load of dishes is only
partially washed
8 - Detergent not dispensed
or partially dispensed
9 - Presence of white spots
on dishes
10 -Noise during wash
11 - The dishes are not
completely dry
See causes for no. 5
Bottom of saucepans have not
been washed well
Edge of saucepans have not
been washed well
Spray arms are partially blocked
The dishes have not been
properly loaded
The end of the outlet hose is in
the water
The incorrect amount of
detergent has been measured
out; the detergent is old and hard
The wash programme is not
thorough enough
The lower basket dishes have
not been washed
Cutlery, dishes, pans, etc... stop
the detergent dispenser opening
Water is too hard
The dishes knock against one
another
The revolving arms knock against
the dishes
Inadequate air flow
Rinse aid missing
Check
Burnt on food remains must
be soaked before putting pans
in dishwasher
Reposition saucepans
Remove spray arms by
unscrewing ring nuts clockwise
and wash under running water
Do not place the dishes too
closely together
The end of the outlet hose
must not come into contact
with the outflow water
Increase the measure
according to how dirty the
dishes are and change detergent
Choose a more vigorous
programme
Depress half load button
Position dishes not to obstruct
the dispenser
Check salt and rinse aid level
and regulate amount.
Should the fault persist,
Contact Service Centre
Re-check loading of dishes in
the basket
Again re-check loading
Leave the dishwasher door ajar
at the end of the wash program
to allow the dishes to dry naturally
Fill the rinse aid dispenser
IDENTIFYING MINOR FAULTS
Should the dishwasher fail to operate, before contacting the Service Centre, make
the following checks:
30
FAULT CAUSE REMEDY
1 - Machine completely dead
2 - Machine does not
draw water
3 - Machine does not
discharge water
4 - Machine discharges
water continuously
5 - Spray arms are not heard
to rotate
6 - On electronic appliances
without a display: one
or more indicator lights
flashing quickly.
Plug is not connected to wall
socket
O/I button has not been pressed
Door is open
No electricity
See causes for no. 1
Water tap is turned off
Programme selector is not at
correct position
The inlet hose is bent
The inlet hose filter is not
correctly connected
Filter is dirty
Outlet hose is kinked
The outlet hose extension is
not correctly connected
The outlet connection on the
wall is pointing downwards not
upwards
Position of outlet hose is too
low
Excessive amount of detergent
Item prevents arms from rotating
Plate and cup filter very dirty
Water inlet tap turned off
Connect electric plug
Press button
Close door
Check the fuse in the plug and
the electricity supply
Check
Turn water tap on
Turn programme selector to
correct position
Eliminate the bends in the hose
Clean the filter at the end of the
hose
Clean filter
Straighten outlet hose
Follow the instructions for
connecting the outlet hose
carefully
Call a qualified technician
Lift outlet hose to at least 40 cm
above floor level
Reduce amount of detergent
Use suitable detergent
Check
Clean plate and cup filter
Switch off the appliance.
Turn on the tap.
Re-set the cycle.
32
Enhorabuena,
con la compra de este electrodoméstico
Candy, Usted ha demostrado que no
acepta promesas: Usted desea lo
mejor.
Candy le ofrece este nuevo lavavajillas,
fruto de años de investigación y
experiencia en el mercado gracias al
contacto directo con los Consumidores.
Usted ha escogido la calidad, la
duración y las grandes prestaciones
que le ofrece este lavavajillas.
Candy le propone además una amplia
gama de electrodomésticos: lavadoras,
lavavajillas, lavadoras - secadoras,
cocinas, hornos microondas, hornos y
encimeras, frigorîficos y congeladores.
Pida a su Vendedor el catálogo
completo de los productos Candy.
Le rogamos que lea atentamente las
instrucciones que contiene este
manual ya que le proporcionarán
importantes indicaciones relacionadas
con la seguridad de la instalación, el
uso, el mantenimiento así como
ciertos consejos útiles para una mejor
utilización del lavavajillas.
Conserve este manual para consultarlo
siempre que lo necesite.
GARANTÍA
Su producto está garantizado por las
condiciones y términos especificados
en el certificado de garantía del
mismo.
La garantía deberá ser conservada,
debidamente rellenada, para ser
mostrada al Servicio de Asistencia
Técnica Autorizado, en caso de
intervención conjuntamente con la
factura o ticket de compra expedido
por el establecimiento vendedor.
* Rellenar la garantía que viene en
Castellano.
33
INDICE
Prescripciones de seguridad
Puesta en Marcha, instalación
Sistema de la regulación de la descalcificación del agua
Cargar la sal
Regulación del cesto superior
Carga del lavavajillas
Información para los laboratorios de pruebas
Carga de detergente
Tipo de detergente
Carga de abrillantador
Limpieza del filtro
Consejos prácticos
Limpieza y manutención ordinaria
Descripción de los mandos
Datos técnicos
Selección de los programas y funciones especiales
Relación de los programas
Waterblock
Búsqueda de pequeñas anomalías
Fig. A
Le rogamos lea atentamente las advertencias contenidas en el presente libro porque
reportan importantes indicaciones en lo que respecta a la seguridad de instalación,
de uso, de mantenimiento y algunos consejos útiles para mejorar la utilización
del lavavajillas.
Conserve con cuidado este libro para cualquier ulterior consulta.
3
2
1
4
5
pág. 34
pág. 35
pág. 39
pág. 40
pág. 41
pág. 42
pág. 44
pág. 45
pág. 46
pág. 47
pág. 48
pág. 49
pág. 50
pág. 51
pág. 51
pág. 52
pág. 56
pág. 58
pág. 59
35
INSTALACION
(NOTAS TÉCNICAS)
■ Después del desembalaje, proceder a la
regulación en altura del lavavajillas.
Para un correcto funcionamiento es
importante que el lavavajillas esté bien
nivelado, regulando los pies de forma
que una eventual inclinación del aparato
no supere los 2 grados.
■ En caso de que fuera necesario
transportar manualmente la máquina
desembalada, no coger la puerta por la
parte inferior, proceder como en la
figura; abrir ligeramente la puerta y
elevar la máquina cogiéndola por la
parte superior.
IMPORTANTE
Si se va a instalar el aparato sobre
una alfombra o moqueta, es necesario
tener cuidado para evitar que se
obstruyan las rejillas de ventilación
situadas en la base del lavavajillas.
Asegurese de poder acceder al enchufe
del aparato incluso despues de la
instalacion.
Alimentación eléctrica
El aparato cumple las normas de seguridad
de la CEE y está provisto de clavija tripolar
que asegura su completa puesta a tierra.
Antes de conectar eléctricamente el
lavavajillas, verificar:
1. que la toma tenga una correcta
conexión a tierra;
2. que la capacidad amperimétrica del
contador eléctrico sea apta para la
absorción indicada en los datos de la
placa del lavavajillas.
ATENCIÓN!
La completa seguridad depende
también de la correcta puesta a tierra
de la instalación eléctrica de la casa.
La falta de una buena instalación
puede provocar una leve difusión de
corriente a través de las partes metálicas
del lavavajillas debido a la presencia
del filtro anti radiointerferencias.
La firma fabricante no se responsabiliza
de posibles daños a personas o cosas,
producidos por la falta de conexión de
la toma de tierra.
Estos aparatos cumplen con las
Directivas EEC 89/336, EEC 73/23
y modificaciónes siguientes.
34
INSTRUCCIONES PARA UN
USO SEGURO
El uso de cualquier aparato eléctrico
comporta tener en cuenta algunas
reglas fundamentales.
Instalación
■ En caso de incompatibilidad entre la toma
de corriente y el enchufe del aparato,
sustituir
la toma por personal especializado.
Este último deberá comprobar que la
sección de los cables sea la idónea para
la potencia absorbida.
■ Tener cuidado que la instalación no aplaste,
roce o deteriore el cable de alimentación.
■ En general, no es aconsejable el uso de
adaptadores, tomas múltiples y/o alargos.
■ En caso que fuera necesaria la sustitución
del cable de alimentación del aparato,
dirijase al Servicio de Asistencia Técnica
autorizado.
Seguridad
■ No tocar el aparato con las manos o los
pies mojados o húmedos.
■ No utilizar el aparato con los pies
descalzos.
■ No estirar el cable de alimentación, o del
aparato, para desconectar el enchufe de
la toma de corriente.
■ No dejar expuesto el aparato a los agentes
atmosféricos (lluvia, sol, etc...).
■ No permitir que el aparato sea utilizado
por niños o personas no capacitadas,
sin vigilancia.
■ No se debe beber el agua que resta en
el aparato en la vajilla al final de los
programas de lavado. Apoyarse o sentarse
sobre la puerta abierta del lavavajillas,
puede causar su vuelco.
■ No dejar la puerta abierta en posición
horizontal, con el fin de evitar posibles
accidentes (ej tropiezos).
■ Apoyarse o sentarse sobre la puerta
abierta del lavavajillas, puede causar su
vuelco.
ATENCIÓN!
Cuchillos y otros utensilios con punta
tienen que ser colocados hacia abajo
o en posición horizontal en alguna
otra zona de los cestos.
Utilización cotidiana
■ Este aparato deberá destinarse únicamente
al uso doméstico.
■ El lavavajillas está proyectado para el
lavado de utensilios domésticos normales.
Objetos contaminados de gasolina,
pintura, restos o virutas de hierro o
metálicas, productos químicos corrosivos,
ácidos o alcalinos no deben ser lavados
en el lavavajillas.
■ Si la instalación de la habitación está
provista con un descalcificador de agua no
es necesario añadir la sal en el contenedor
montado al efecto en el lavavajillas.
■ Los cuchillos y cubiertos, obtienen un
mejor lavado si se sitúan en el cesto con
los mangos hacia abajo.
■ En caso de daños y/o mal fúncionamiento
del aparato, desconectarlo, cerrar el grifo
del agua y no tocar el electrodoméstico.
Para eventuales reparaciones remitirse a
un Centro de Asistencia Técnica y solicitar
la utilización de recambios originales.
El no cumplimiento de todo lo arriba
indicado puede comprometer la seguridad
del aparato.
Fin de uso del aparato
■ Este aparato está fabricado con materiales
reciclables para permitir una correcta
chatarrización.
■ Si se quiere eliminar un lavavajillas viejo
se debe tener cuidado de eliminar el
cierre de la puerta para evitar que los
niños puedan quedar encerrados en la
máquina. Después de haber desenchufado
la clavija de la toma de corriente, es
importante cortar el cable de alimentación.
37
Instalación salida de agua
■ Colocar el tubo en la instalación de salida,
evitando pliegues o arrugas (fig. 4).
■ El tubo de desague fijo debe tener un
diámetro interior de al menos 4 cm, y
debe estar colocado a una altura mínima
de 40 cm.
■ Se recomienda colocar un sifón contra
malos olores (fig. 4X).
■ Si fuera necesario, se puede alargar
el tubo de salida hasta 2,5 m, pero
manteniéndolo siempre a una altura
máxima de 85 cm del suelo. Para tal fin
contactar con el Centro de Asistencia
Técnica.
■ La extremidad curvada del tubo puede
ser apoyada en el borde de un lavadero,
pero no debe permanecer inmerso en
el agua, para evitar efectos de sifón
durante el lavado (fig. 4Y).
■ En el caso de una instalación bajo un
plano continuo, la curva debe ser fijada
inmediatamente debajo del citado plano,
en el punto más alto posible (fig. 4Z).
■ Al instalar la máquina, debe controlarse
que los tubos de carga y descarga no
estén doblados.
4
Alimentación hidráulica
IMPORTANTE
El aparado debe ser conectado a la
red idraulica sólo con los nuevos
tubos de carga disponibles en
dotación. Los viejos tubos de carga
no tienen que ser reutilizados.
■ Los tubos de carga y descarga pueden
ser orientados indistintamente hacia la
derecha o la izquierda.
IMPORTANTE
El lavavajillas puede ser conectado a la
instalación de agua fría o caliente,
siempre que ésta no supere a los 60°C.
■ La presíon hidráulica debe estar
comprendida entre un mínimo de 0,08
MPa y un máximo de 0,8 MPa. Para
presiones inferiores diríjarse al Centro
de Asistencia.
■ Es necesario un grifo en el extremo del
tubo de carga para aislar la máquina de
la red cuando no está en funcionamiento
(fig. 1 B).
■ El lavavajillas está dotado de un tubo
para la toma de agua que acaba en un
codo de 3/4" (fig. 2).
■ El tubo entrada agua "A" debe ser
enroscado a un grifo o toma de agua
"B" de rosca 3/4", asegurándose que la
tuerca esté bien apretada.
■ Si es necesario, se puede alargar el
tubo de carga hasta 2,5 m. Para tal fin
contactar con el Centro de Asistencia
Técnica.
■ Si el agua de la red presentase resíduos
calcáreos o arenilla, es aconsejable
colocar un filtro como accesorio
art. 9226085 (fig. 3).
Este filtro "D" va colocado entre la toma
de agua de 3/4" "B" y el tubo de
entrada "A". No olvidar de colocar la
guarnición "C".
■ Si la máquina va a ser conectada a una
nueva instalación o a una instalación
que ha estado inutilizada por largo
tiempo, es aconsejable dejar correr el
agua algunos minutos antes de colocar
el tubo de entrada de agua. De esta
manera, se evitará que los residuos
materiales o de óxido depositados en la
tubería obturen el filtro de entrada agua.
1
2
3
36
38
7
598
556/573
5
INSTALACIÓN EN COCINAS
MODULARES
Acoplamiento
■ El lavavajillas tiene la altura modular de
85 cm y por consiguiente puede ser
acoplado a los muebles de las modernas
cocinas modulares de análoga altura.
Para una perfecta alineación, maniobrar
en los pies regulables.
■ La tapa superior es de laminado de alta
resistencia que puede utilizarse sin
ninguna particular precaución ya que es
resistente al calor, a la abrasión y es
anti-manchas (fig. 5).
Apertura de la puerta
Introducir la mano en la cavidad de apertura
y tirar. Si la puerta se abre durante el
funcionamiento de la máquina, un sistema
de seguridad eléctrico hace que todas las
funciones se interrumpan automáticamente.
IMPORTANTE
Evitar abrir la puerta del lavavajillas
mientras éste funcione.
Para cerrar la puerta
Introducir los cestos.
Verificar que todas las aspas de lavado
puedan girar y no hayan cubiertos,
cacerolas o platos que impidan su rotación.
Cerrar la puerta y presionar con fuerza
hasta el cierre del dispositivo de seguridad.
Encastre
(Para su colocación debajo de la
encimera)
■ Las cocinas modulares más modernas
tienen un plano de trabajo único, bajo el
que son encastrados los muebles y los
electrodomésticos. En este caso basta
quitar la tapa superior, sacando los
tornillos que se encuentran bajo el
mismo en la parte posterior (fig. 6a).
IMPORTANTE
Después de haber quitado el plano
de trabajo, los tornillos HAN de ser
reposicionados en su sede (fig. 6b).
■ La altura se reduce de esta forma a
82 cm, tal como está previsto en
las Normas Internacionales (ISO) y el
lavavajillas se encastra perfectamente
bajo el plano contínuo de la cocina
(fig. 7).
6
a
b
a
b
*
La regulación ha sido introducida en
fábrica al nivel 4 (d4) en tanto que
esto satisface a la mayor parte de
usuarios.
Según el nivel de dureza del agua,
introducir el valor de descalcificador del
siguiente modo:
1. Mantener apretada la tecla "INICIO
DIFERIDO" y a la vez, apretar la
tecla "MARCHA/PARO" .
Sobre el visor aparecerá el valor "d4"
introducido en fábrica.
2. Para cambiar el valor, apretar la tecla
"INICIO DIFERIDO" (con cada
presion sobre la tecla, el valor aumenta
1 grado).
Después de la aparición del valor "d7", el
indicador salta de nuevo al valor "d1".
3. A la aparición del valor deseado,
esperar la señal acústica que indicará
que el valor introducido ha estado
memorizado.
39
SISTEMA DE REGULACIÓN
DE LA DESCALCIFICACIÓN
DEL AGUA
El agua contiene de forma variable, según
la localidad, sales calcáreas y minerales
que se depositan en la vajilla dejando
manchas blanquecinas.
Cuanto más elevado sea el contenido de
estas sales, mayor es la dureza del agua.
El lavavajillas contiene un descalcificador
que, utilizando sales regenerantes
especiales para lavavajillas, permite lavar
la vajilla con agua sin agentes clacáreos.
Puede solicitar el grado de dureza de su
agua al Ente distribuidor de su zona.
Regulación descalcificación
del agua con el descalcificador
El descalcificador puede tratar agua con
dureza hasta 90ºfH (grados franceses),
50°dH (grados alemanes) a través de 8
niveles de regulación.
Los niveles de regulación se relacionan en
la siguiente tabla en relación al agua de la
red a tratar.
Nivel
0
1
2
3
*4
5
6
7
°fH (grados
franceses)
0-5
6-10
11-20
21-30
31-40
41-50
51-60
61-90
°dH (grados
alemanes)
0-3
4-6
7-11
12-16
17-22
23-27
28-33
34-50
Uso
Sal
Regenerante
NO
SI
SI
SI
SI
SI
SI
SI
Regulación
de
descalcificación
d1
d1
d2
d3
d4
d5
d6
d7
I
Dureza del agua
Tecla
“MARCHA/PARO”
Tecla
“INICIO DIFERIDO”
Display digital

CARGAR LA SAL
■ En la parte inferior de la máquina esta
situado el depósito de la sal.
La sal sirve para regenerar el aparato
descalcificador.
■ Es importante utilizar exclusivamente sal
específico para lavavajillas, otros tipos de
sal contienen sensibles porcentajes de
sustancias insolubles que con el tiempo
podrían hacer ineficiente la instalación de
descalcificación.
■ Para la introducción de la sal, desenroscar
el tapón del depósito que se encuentra
en la parte inferior. Después llenar el
depósito.
■ Durante esta operación saldrá un poco
de agua, aun así continue echando sal
hasta llenarlo. Una vez lleno, limpiar la
rosca de granos de sal y roscar el
tapón.
■ Se aconseja que, después del rellenado,
se realice un ciclo de lavado completo,
o también el programa “REMOJO
FRÍO”.
El contenedor tiene una capacidad de
cerca de 1,5-1,8 kg de sal y, para
una eficaz utilización del aparato, es
necesario rellenarlo periódicamente
según la regulación del nivel de
descalcificación elegido.
40
IMPORTANTE
Después de haber instalado el
lavavajillas, y haber llenado el depósito
de sal, es necesario añadir agua hasta
llenar completamente el deposito. Esta
operación solo es preciso realizarla la
primera vez.
Indicador del llenado de sal
Este modelo está dotado de piloto eléctrico
en el cuadro de mandos, que se enciende
cuando es necesario rellenar el contenedor
de la sal.
IMPORTANTE
La aparición de manchas blanquecinas
en la vajilla es generalmente un índi-
ce importante de falta de sal.
41
1
3
a
b
a
b
2
REGULACIÓN DEL CESTO
SUPERIOR
Utilizando habitualmente platos de 27 a
31 cm de diámetro cargarlos en el cesto
inferior después de haber colocado
el superior en la posición más alta,
procediendo del siguiente modo:
1. Extraer el cesto superior;
2. Sujetar el cesto a ambos lados y
levantarlo hacia arriba (fig. 1).
Con esta operación en el cesto superior no
se puede cargar vajilla con diámetro
superior a 20 cm y no se pueden utilizar los
soportes móviles en la posición alta.
PARA LLEVARLO DE NUEVO HACIA LA
POSICIÓN BAJA:
1. Sujetar el cesto a ambos lados y
levantarlo ligeramente hacia arriba
(fig. 2a);
2. Dejar caer lentamente el cesto
acompañándolo (fig. 2b).
N. B. : NO LEBANTAR O BAJAR NUNCA
EL CESTO DE UN SOLO LATERAL
(fig. 3).
Atención:
Es aconsejable efectuar la regulación del
cesto antes de la carga de las vajillas.
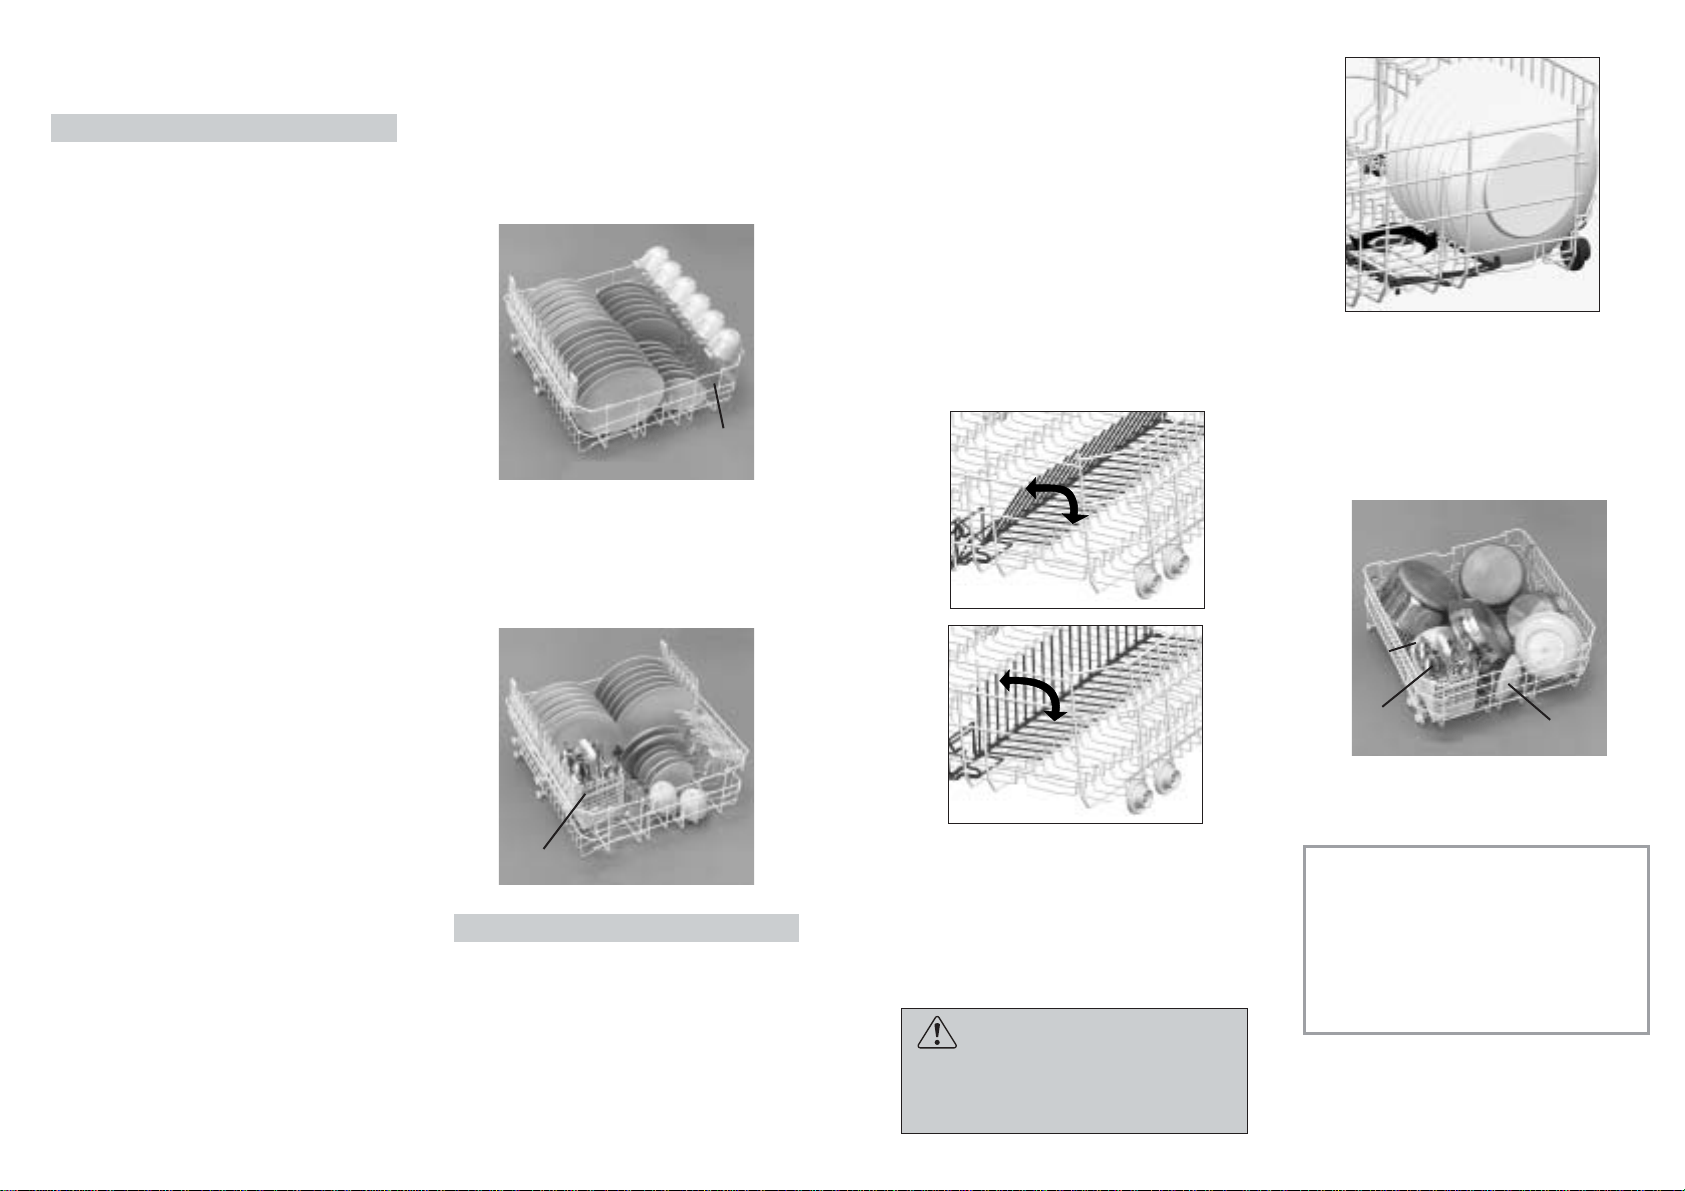
42
43
COLOCAR LA VAJILLA
Uso del cesto superior
■ El cesto superior esta dotado de unos
soportes móviles fijados al panel lateral,
y que pueden adoptar dos posiciones:
levantada y bajada. En posición bajada
los soportes sirven para poner tazas de
té, café, cuchillos largos y cucharones.
En los extremos de tales soportes se
pueden colgar los vasos con forma de
copa.
Por debajo de ellos, se pueden poner
los vasos pequeños, tazas, los platos de
las tazas y los de postre.
■En posición levantada, los soportes
permiten el alojamiento de los platos
llanos y hondos.
Estos ultimos se colocan en posición
vertical con el lado cóncavo dirigido
hacia el interior, y dejando siempre un
espacio entre plato y plato para que el
agua pueda pasar sin dificultad.
■ Para aprovechar al máximo la capacidad
del cesto se aconseja reagrupar los
platos que sean iguales.
■ Los platos pueden colocarse en una
sola fila (fig. 1), o en las dos (fig. 2).
■ Es aconsejable colocar los platos
grandes, con un diámetro de unos
270 mm, un poco inclinados hacia el
interior y así poder meter el cesto sin
problemas.
■ En el cesto superior pueden colocarse
también elementos como ensaladeras y
cuencos de plástico, que se recomienda
fijar para que no se den la vuelta con la
presión de los chorros de agua.
■ El cesto superior ha sido estudiado para
poder ofrecer la máxima flexibilidad de
uso. Éste puede llenarse únicamente
con platos, colocados en doble fila hasta
un máximo de 24 piezas, únicamente
con vasos, en cinco filas hasta un
máximo de 30 piezas, o bien con una
carga mixta.
Una carga estandard diaria está representada
en la fig. 1 y 2.
Cesto superior (fig. 1)
A = platos hondos
B = platos llanos
C = platos
de postre
Cesto superior (fig. 2)
A = platos hondos
B = platos llanos
C = platos de postre
D = platos de
las tazas
Uso del cesto inferior
■ En el cesto inferior se colocan las
cacerolas, sartenes, soperas, ensaladeras,
tapas, fuentes, platos planos, platos
hondos y cucharones.
■ Los cubiertos se colocarán con el mango
hacia abajo en el depósito contenedor
de plástico que después se introducirá
en el cesto inferior (fig. 6) asegurándose
que no bloqueen la rotación del rociador.
D = platos de
las tazas
E = tazas
F = vasos
E = tazas
F = copas
G = vaso
H = cesto para
los cubiertos
1
A
B
C
D
E
F
A
B
C
D
F
E
G
H
2
F
■ El cesto inferior está dotado de una
especial rejilla extraible central (fig. 3 y 4),
util para tener siempre la carga de
platos perfectamente estable y optimizada,
incluso cuando la dimensión y/o la forma
de los mismos es diversa de la estandard.
- POSICIÓN "A": Para una carga de platos
estandard o para una carga exclusiva de
cacerolas, ensaladeras, etc...
- POSICIÓN "B": Para platos de forma
particular aunque de dimensiones
estandard (fondo muy profundo,
cuadrados, sin borde, etc...)
- POSICIÓN "C": Para platos planos mas
grandes de la media y/o de forma
particular (cuadrados, hexagonales,
ovales, platos de pizza, etc..)
■ Los platos de reducidas dimensiones,
como por ejemplo los de postre, deben
ser posicionados en el cesto inferior
como se indica en la figura 5, con los
soportes móviles posicionados hacia el
externo (“B”).
Para platos de normal o grandes
dimensiones, los soportes deben
encontrarse en posición interna ("A”).
ATENCIÓN!
Si los platos pequeños se posicionan
sin el correcto uso de los soportes
mobiles, la rampa inferior se bloquea
interfiriendo con los platos.
Una carga estandard diaria está representada
en la fig. 6.
Cesto inferior (fig. 6)
A = cacerola media
B = cacerola grande
C = sartén
D = soperas, fuentes
E = cubiertos
Una posición racional y correcta de la vajilla es
condición esencial para un buen resultado
en el lavado.
IMPORTANTE
El cesto inferior está dotado de un
dispositivo de “bloqueo de recorrido”
para obtener una segura operación de
extracción aún en el caso de cargas
plenas.
Para las operaciones de carga de sal,
limpieza del filtro y manutención
ordinaria se necesita la completa
extracción del cesto.
Cesto de cubiertos
La parte superior del cesto para los cubiertos,
puede ser removida, para poder ofrecer
distintas posibilidades de carga.
A
B
5
F = cazuelas llanas,
cazuelas
de barro
G = copa media
H = copa pequeña
D
F
A
B
C
E
H
6
G
A
B
A
C
3
4
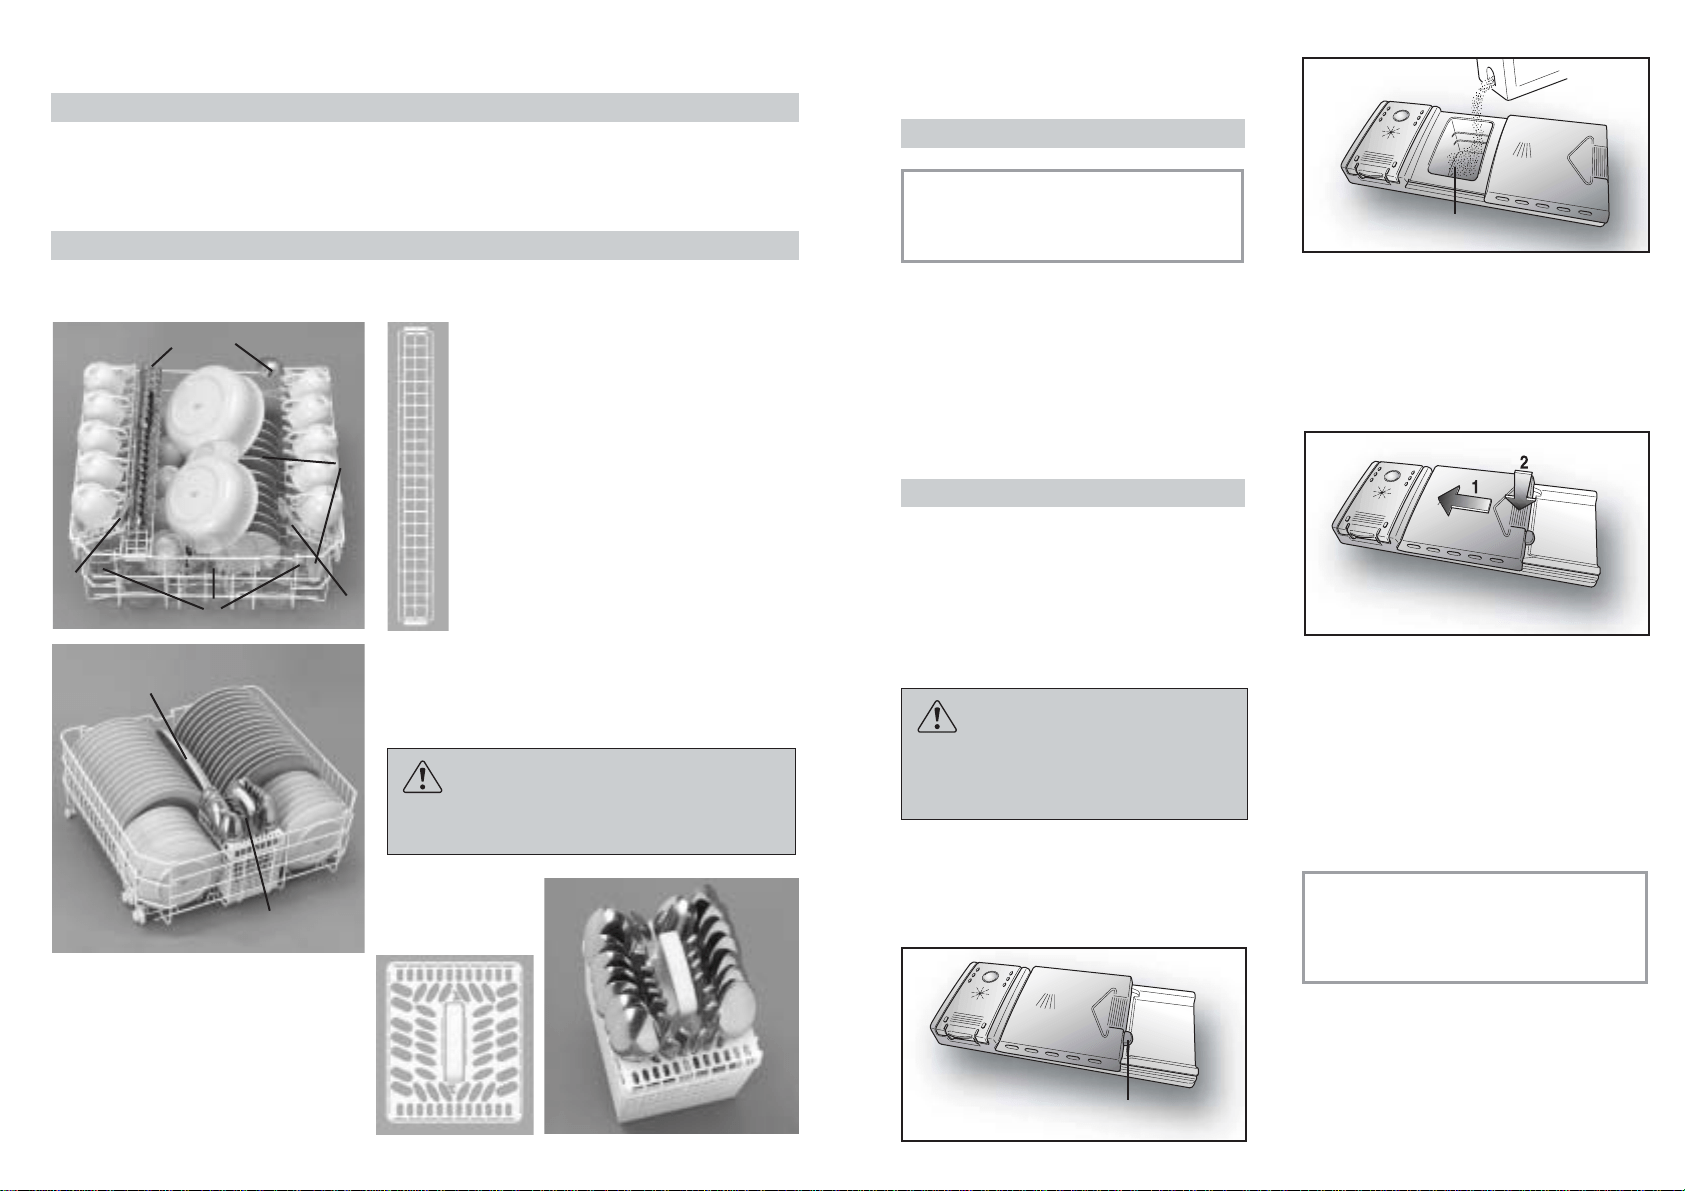
44
CARGA DE DETERGENTE
El detergente
IMPORTANTE
Es indispensable utilizar un detergente
específico en polvo, líquido o en
pastillas para el lavado de vajillas.
"CALGONIT" asegura óptimos resultados
de lavado y lo encontrará fácilmente.
No deben emplearse detergentes para el
lavado de la ropa. Detergentes no idóneos
(como los de uso para lavado a mano), no
contienen los ingredientes adaptados al
lavado en lavavajillas e impiden el correcto
funcionamiento de la máquina.
Carga del detergente
La caja para el detergente de lavado está
situada en el interior de la puerta
(fig. A "2"). Si la tapa del contenedor
resultase cerrada, para abrirla basta
accionar sobre el pulsante de enganche
(A): al término de cualquier programa de
lavado la puerta debe estar siempre
abierta, y lista para su sucesiva utilización.
ATENCIÓN!
En el cesto inferior, no carge vajilla en
posición tal que impida la apertura de la
tapa del contenedor de detergentes y la
extracción del detergente.
La dosis de detergente puede variar en
función del grado de suciedad y tipo de
vajilla. Nosotros le aconsejamos utilizar de
20 ÷ 30 g de detergente en la cubeta
lavado (B).
45
Después de haber introducido el detergente
en el depósito, cerrar la tapa, primero
empujando (1) y después apretando
ligeramente el mismo (2) hasta escuchar
un sonido de cierre.
Puesto que los detergentes no son
todos iguales, consulte las instrucciones del
fabricante. Recordamos que una cantidad
insuficiente de detergente provoca una
incompleta eliminación de la suciedad,
mientras, un exceso de detergente, no sólo
no mejora el resultado del lavado, sino
además, representa un despilfarro.
IMPORTANTE
No excederse en el uso de detergente
representa una contribución al
mantenimiento del medio ambiente.
A
B
Cesto inferior (fig. 2)
M = 15 platos hondos
N = 15 platos llanos
O = 7 + 7 platos de postre
Cesto superior (fig. 1)
A = 5 + 5 + 5 vasos
B = 12 + 3 platos para tazas
C = 5 + 5 + 5 tazas
D = copa pequeña
E = copa media
F = copa grande
G = plato de postre
H = 1 + 1 cucharas de servicio
I = cazos
L = cubiertos
3
Cesto de cubiertos (fig. 3)
Introducir los cubiertos como se indica
en la figura.
3 = cucharitas
4 = tenedores
de servicio
1 = 15 cucharas de postre
2 = 15 tenedores
3 = 12 cucharas de café
1 = cucharas
2 = cuchillos
A
F
C
C
G
L
E
D
B
1
H
P
M
Q
O
N
2
I
O
H
C
1
2
2
2
2
2
2
2
2
2
2
2
2
222
4
333
1
1
1
1
1
1
1
1
1
1
1
1
1
1
11
11
11
11
11
11
12
12
12
32
32
32
32
32
32
32
32
32
32
32
32
P = fuentes
Q = cubiertos
ATENCIÓN!
Antes de cargar el cesto inferior, extraer la
rejilla central.
INFORMACIÓN PARA LABORATORIOS DE PRUEBA
Programa comparativo general (según normas EN 50242)
(ver tabla programas de lavado)
1. Posición cesto superior: baja
2. Carga normalizada
3. Posición regulador abrillantador: 6
Carga normalizada 15 cubiertos internacionales (según normas EN 50242)
La correcta disposición de la carga es la que se indica en la fig. 1 para el cesto superior, en
la fig. 2 para el cesto inferior y en la fig. 3 para el cesto de cubiertos.
4. Cantidad detergente:
– 9,5 g para el prelavado;
– 28 g para el lavado.
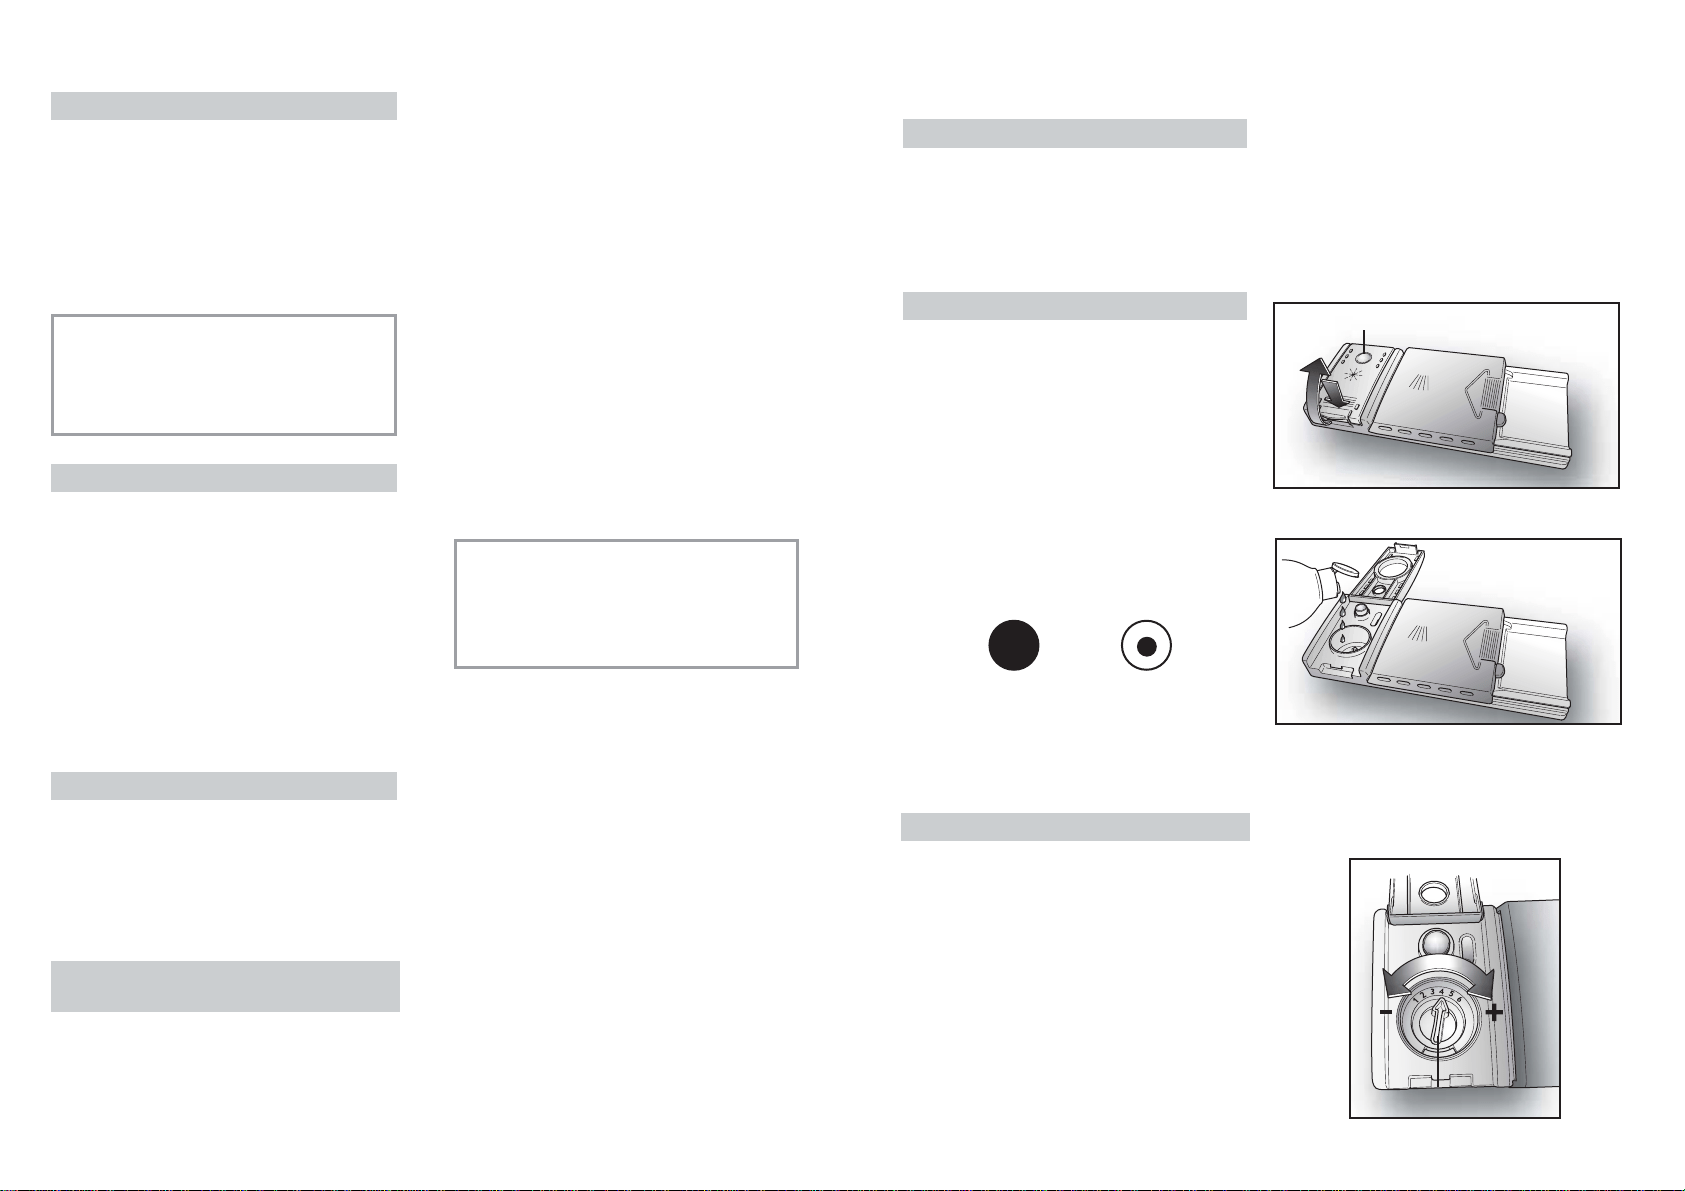
46
CARGA DE ABRILLANTADOR
El abrillantador
Este aditivo se introduce automáticamente
en la última fase del aclarado y favorece un
rápido secado de la vajilla evitando que se
formen manchas o sedimentos opacos.
Carga del abrillantador
A la izquierda del recipiente detergente se
encuentra el del abrillantador (fig. A "3").
Para abrir la tapa, apretar en la zona para
tal fin y simultáneamente tirar la lengüeta
de apertura.
Utilizar siempre aditivos especiales para
lavavajillas automáticos.
Es posible controlar el nivel del abrillantador
por medio del visualizador óptico (C) situado
sobre el distribuidor.
Regulación del abrillantador de 1 a 6
El regulador (D) está situado bajo el tapón
y se puede manipular con una moneda.
Se aconseja la posición 4.
El contenido calcáreo del agua repercute
notablemente tanto en la formación de
incrustaciones como en el grado de secado.
Es muy importante regular la dosificación
del abrillantador para conseguir óptimos
resultados.
En caso de que la vajilla presente estrías al
finalizar el lavado, disminuir la dosis en una
posición. Si la vajilla presenta manchas o
rastros blanquecinos, aumentarla un poco.
47
LLENO VACIO
reflejo oscuro reflejo claro
C
D
TIPO DE DETERGENTE
Detergentes en pastillas
Los detergentes en pastillas de diferentes
fabricantes, se disuelven a velocidades
diversas, por tanto en los programas
breves, algunas pastillas pudieran no ser
totalmente eficientes al no disolverse
completamente.
Si se utiliza este tipo de detergente se
recomienda seleccionar el programa mas
largo para garantizar la completa
disolución del mismo.
IMPORTANTE
Para obtener resultados de lavado
óptimos, las pastillas DEBEN ser
introducidas en el dispensador del
detergente, NO directamente en la
cuba.
Detergentes concentrados
Los detergentes concentrados, con reducida
alcalinidad y enzimas naturales, combinados
con programas de lavado a 50ºC, permiten
tener un menor impacto en el ambiente y
preservan los cubiertos y el propio
lavavajillas.
Los programas de lavado a 50ºC han sido
ideados para disfrutar completamente
de las propiedades de disolución de la
suciedad por parte de las enzimas,
permitiendo por tanto, con la utilización de
detergentes concentrados obtener los
mismos resultados de los programas a
65ºC pero a una temperatura inferior.
Detergentes combinados
Los detergentes que contienen además
abrillantador, deben ser introducidos en el
dispensador para el detergente de lavado.
El contenedor del abrillantador debe estar
vacio (si no fuera así antes de utilizar
detergentes combinados, regular al mínimo
el dosificador de abrillantador).
Detergentes combinados
(“3 en 1”/“4 en 1”/“5 en 1”)
Si decide utililizar detergentes combinados
que pudiera dar como resultado un menor
consumo de sal o abrillantador, se deben
respetar las siguientes advertencias:
■
l
leer atentamente y abstenerse
escrupulosamente a las instrucciones
de uso y a las advertencias indicadas
en el envase del detergente combinado
que se va a utilizar;
■ la eficacia de los productos que dan
lugar a la no necesaria utilización de sal,
dependen de la dureza del agua de
alimentación del aparato. Verificar que la
dureza del agua se compensa con el
intervalo de funcionamiento indicado en
el paquete del detergente.
Si con el uso de este tipo de producto
se obtuvieran resultados de lavado no
sadisfactorios, dirijase al fabricante del
detergente.
La utilización inadecuada de estos productos
podría llevar a:
■ formación de depositos calcáreos en el
aparato y vajilla;
■ una empeoramiento del grado de
secado y/o lavado.
IMPORTANTE
En el caso de reclamaciones que
puedan estar ligadas a la utilización
imprópia de estos productos, no
serán validas las prestaciones
especificadas en la garantia.
Se recuerda que el uso de los detergentes
combinados (“3 en 1”/“4 en 1”/“5 en 1”)
convierte en superflua la señalación de
falta de sal y abrillantador (prevista en
algunos modelos).
En el caso que se dieran problemas de
lavado y/o secado se aconseja el uso de
productos tradicionales (sal, abrillantador,
detergente en polvo).
En este caso se aconseja que:
■ rellenar nuevamente el contenedor de
sal y abrillantador;
■ continuar con un normal ciclo de lavado
sin carga.
Se comunica que volviendo al uso de sal
tradicional, serán necesarios algunos
ciclos de lavado antes de que el sistema
de desclacificación del agua vuelva a
funcional de modo correcto.
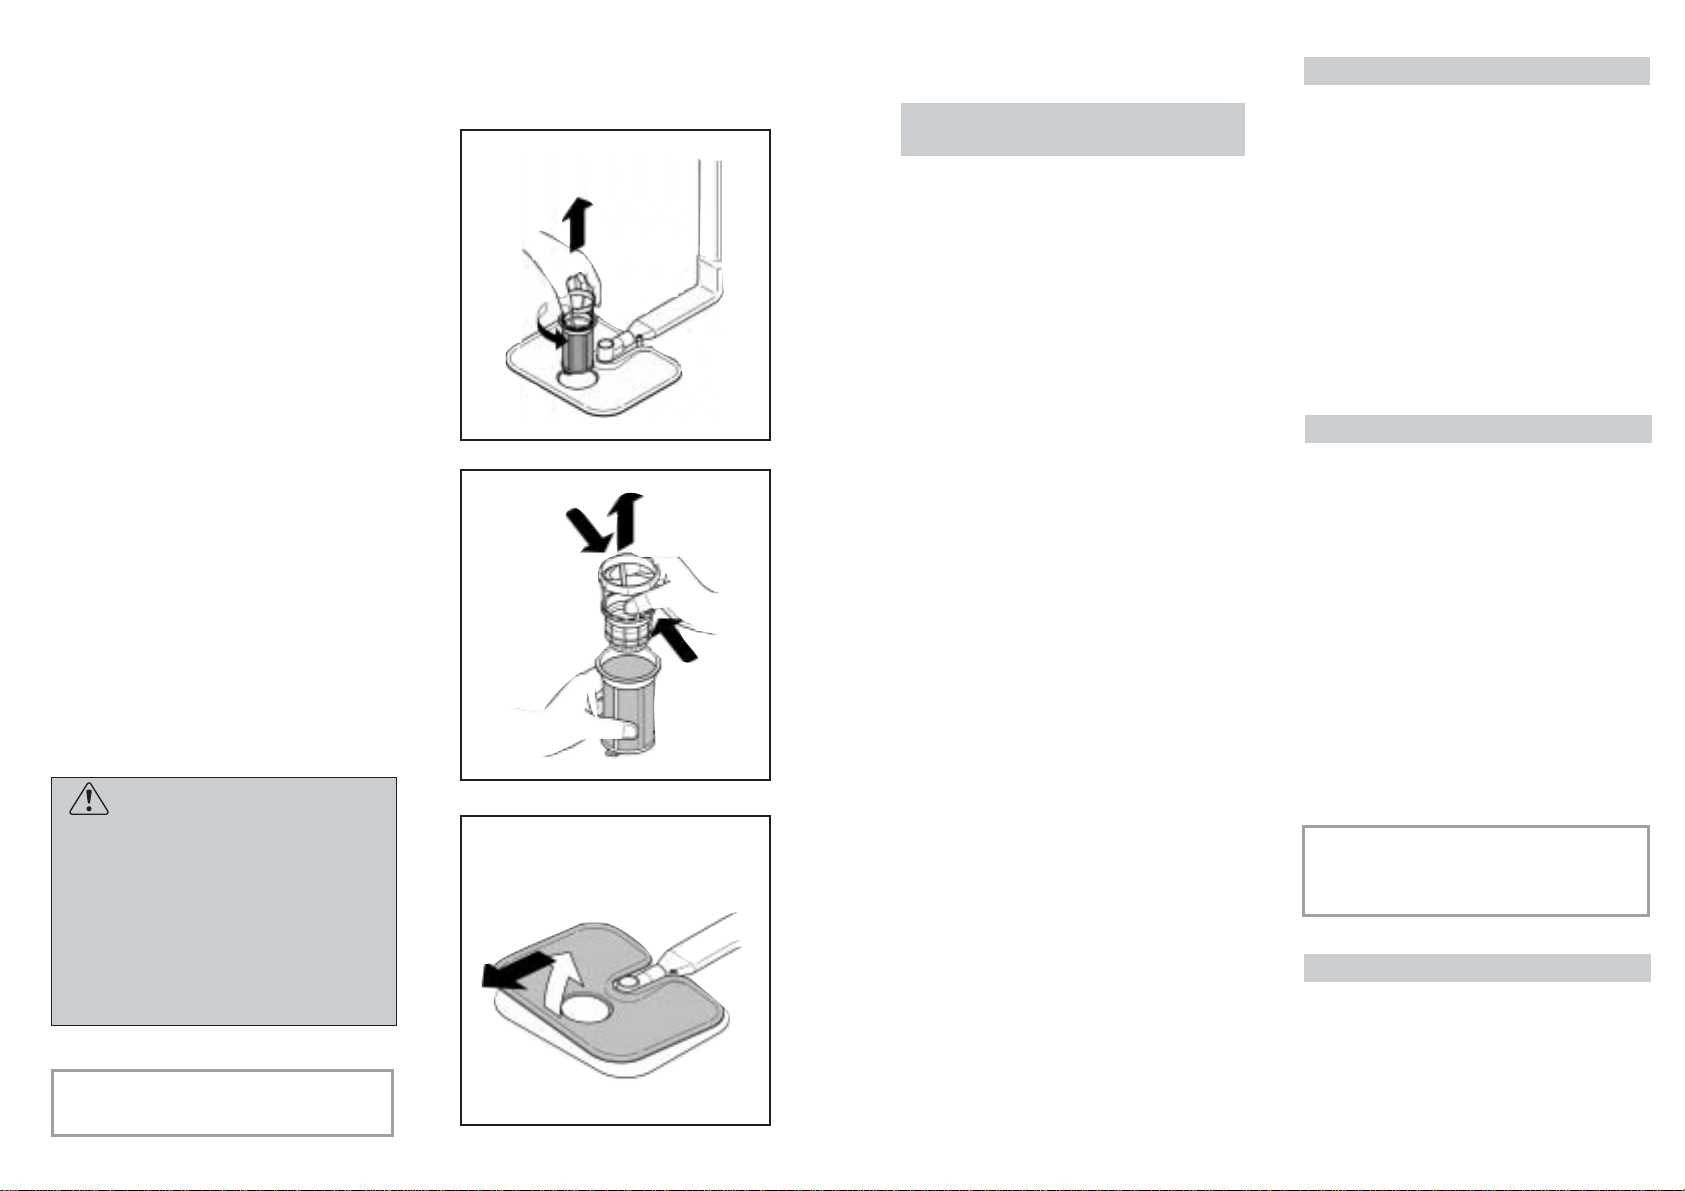
49
CONSEJOS PRÁCTICOS
Qué hacer para obtener
óptimos resultados de lavado
■ Antes de colocar la vajilla en la
máquina, eliminar los residuos de
comida más grandes (huesecillos,
espinas, residuos de carne o verdura,
residuos de café, peladuras de fruta,
ceniza de cigarrillos, palillos, etc.) para
evitar que se atasquen los filtros, el
desague y los rociadores de los brazos
de lavado.
■ Evitar enjuagar la vajilla antes de
colocarla en la máquina.
■ En caso de residuos de comida quemados
o asados muy incrustados, en cacerolas
y sartenes, se aconseja ponerlas en
remojo antes del lavado.
■ Colocar la vajilla con la boca vuelta
hacia abajo.
■ A ser posible evitar que la vajilla esté
en contacto una contra la otra, una
correcta colocación le dará mejores
resultados de lavado.
■ Después de haber colocado la vajilla,
verificar que los brazos de lavado
pueden girar libremente.
■ Las ollas y otra vajilla que presentan
residuos de comida muy tenaces o
requemadas, deberán ser puestas en
remojo con agua y detergente para
lavavajillas.
■ Para el perfecto lavado de la plata es
necesario:
a) aclarar apenas usada, sobre todo si
ha estado empleada para mayonesa,
huevos, pescados, etc.;
b) no rociarla con detergente;
c) no ponerla en contacto con otros
metales.
Qué hacer para ahorrar
■ En el caso que se desee lavar a plena
carga, reponer la vajilla en la máquina
apenas terminada la comida, poniendo
en marcha lo más pronto posible,
efectuando eventualmente el programa
REMOJO FRIO para reblandecer la
suciedad y eliminar los residuos
mayores entre una carga y otra en
espera de continuar el programa de
lavado completo.
■ En presencia de suciedad poco
consistente o del cesto no muy cargado
seleccionar un programa ECONOMICO
siguiendo las indicaciones de la lista de
programas.
Qué cosa no se debe lavar
■ Es bueno recordar que no todo tipo de
vajilla puede ser lavado en el lavavajillas;
se desaconseja introducir piezas en
material termoplástico, cubiertos con
mando de madera o plástico, pucheros
con asas de madera, vajilla de
aluminio, de cristal o vidrio aplomado si
no está específicamente indicado.
■ Ciertas decoraciones pueden tender a
decolorarse, por tanto, se aconseja
efectuar el lavado en máquina varias
veces de una sola pieza y sólo después
de comprobar que no se decolora, lavar
la totalidad de las piezas.
■ Es aconsejable no lavar cubiertos de
plata con cubiertos de acero para evitar
que se produzca una reacción química
entre ambas.
IMPORTANTE
Cuando se compre nueva vajilla
cerciorarse siempre que es idónea
para su lavado en lavavajillas.
Sugerencias para ahorrar
■ Para evitar posibles derrames del cesto
superior, sacar primero el cesto inferior.
■ Si se ha de dejar la vajilla en la
máquina durante un cierto tiempo,
entreabrir la puerta para favorecer la
circulación del aire y mejorar el ulterior
secado.
48
1
2
3
LIMPIEZA DEL FILTRO
El sistema filtrante (fig A “4”) está
constituido de:
Un contenedor central, que retiene las
particulas más gruesas de suciedad;
Una placa que filtra continuamente el
agua;
Un microfiltro situado debajo de la placa
que impide el paso de las partículas de
suciedad más pequeñas asegurando así
un alcarado perfecto.
■ Para lograr siempre los mejores
resultados hay que controlar la limpieza
de los filtros antes de cada lavado.
■ Para extraer el sistema filtrante basta
levantarlo estirando del mismo (fig. 1).
■ El contenedor central puede ser extraído
para facilitar las operaciones de limpieza
(fig. 2).
■ Extraer la placa (fig. 3) y lavarlo bajo
un chorro de agua ayudándose
eventualmente con un cepillo.
■ Con el microfiltro autolimpiante, la
manutención es mínimo y la revisión
del grupo de filtros puede realizarse
cada 15 días. No obstante se aconseja
controlar, después de cada lavado la
parte central para cerciorarse que no
quede atascada.
ATENCIÓN!
Una vez limpiados los filtros, debe
asegurarse que los mismos hayan
sido acoplados correctamente y que
la placa se encuentre perfectamente
colocada en el fondo del lavavajillas.
Tener la precaución de girar, en sentido
horario, el filtro en la rejilla superior
porque una inserción imprecisa del
grupo filtrante puede perjudicar el
correcto funcionamiento de la máquina.
IMPORTANTE
No usar el lavavajillas sin el filtro.
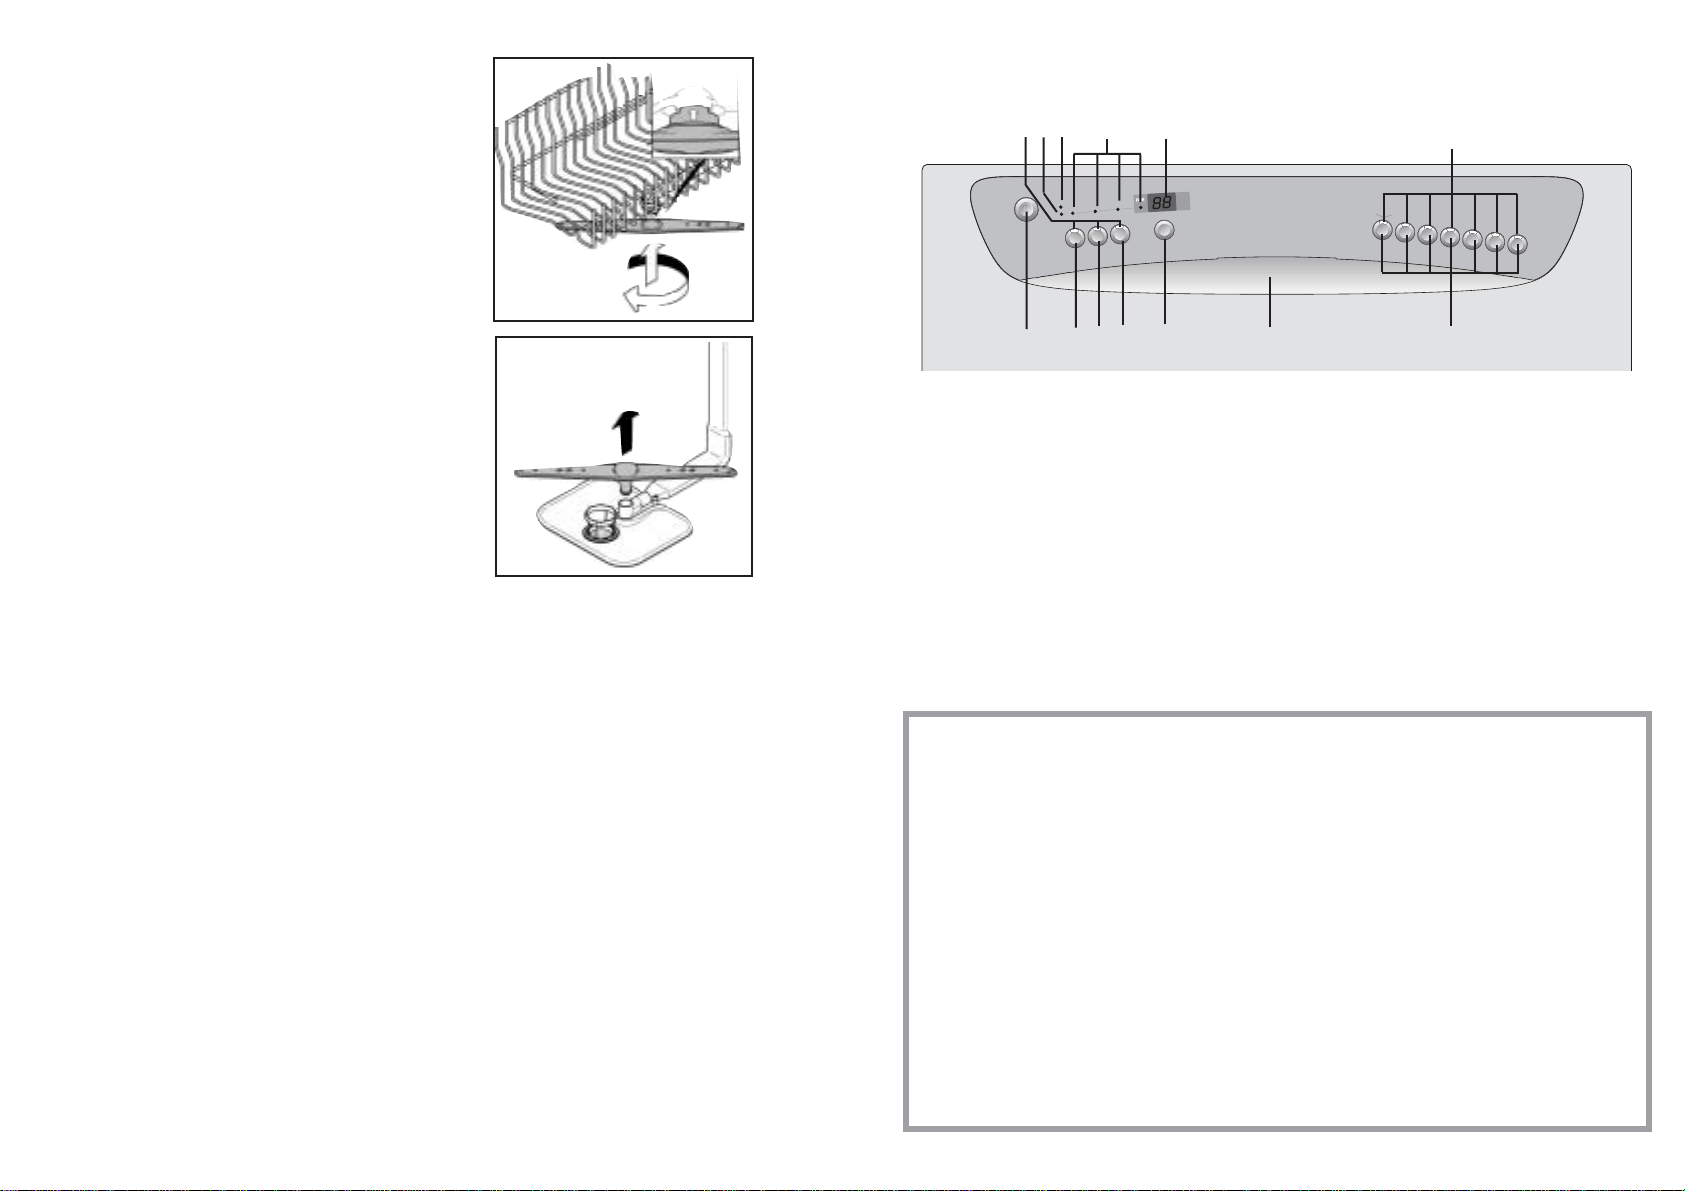
50
1
2
1b
DESPUES DEL USO
Después de cada lavado cerrar
perfectamente el grifo del agua, para aislar
el lavavajillas de la red hidráulica de
alimentación y desconectar el mando
paro/marcha para aislar la máquina de la
red eléctrica.
Si el lavavajillas debe permanecer parado
largo tiempo, aconsejamos las siguientes
operaciones:
1. realizar un programa de lavado sin
vajilla, pero con detergente, para
desengrasar la máquina;
2. desenchufar la toma corriente;
3. cerrar el grifo del agua;
4. rellenar el recipiente del abrillantador;
5. dejar la puerta ligeramente abierta;
6. dejar el interior de la máquina limpio;
7. si la máquina se encuentra en un
ambiente donde la temperatura es
inferior a 0°C, el agua residual de los
conductos puede congelarse. Por eso
se debe trasladar la máquina a un lugar
donde la temperatura ambiente sea
superior a 0°C y esperar 24 horas antes
de ponerla en marcha.
LIMPIEZA EXTERIOR Y
MANTENIMIENTO
■ Para limpiar el exterior del lavavajillas
no se deben usar, ni disolventes
(desengrasantes) ni abrasivos.
Unicamente un paño de agua tíbia.
■ El lavavajillas no requiere ningún
mantenimento especial, ya que la cuba
de lavado es autolimpiante.
■ Periódicamente limpiar la guarnición de
goma de la puerta, con un paño húmedo
eliminando cuidadosamente cualquier
resíduo de alimentos o abrillantador.
■ Para garantizar una mejor eliminación
de pequeños depósitos calcáceros o
de suciedad, se aconseja realizar
periódicamente un lavado completo
vertiendo previamente un vaso de
vinagre en el interior del lavavajillas y
hacer el programa delicado.
■ Si a pesar de la normal limpieza de
placa y filtro, se notasen vajillas o
cacerolas insuficientemente lavadas o
aclaradas, se debe controlar que todos
los rociadores de los brazos (fig. A “5”)
estén libres de restos de suciedad.
Si este no fuese el motivo, proceder a su
limpieza de la siguiente forma:
1.Para extraer el brazo superior, es
necesario girarlo hasta llevarlo a la
posición de “tope” señalada por la flecha
(fig. 1b). Empujarlo hacia arriba (fig. 1) y
manteniéndolo apretado girar en sentido
horario (para montarlo, repita la
operación, pero girando en sentido
contrario a las agujas del reloj).
El aspersor inferior, se extrae
simplemente estirando hacia arriba (fig. 2).
2.Lavar el aspersor bajo un chorro de agua
eliminando de suciedad los inyectores
obstruidos.
3.Al término de la operación, monte de nuevo
los aspersores en la idéntica posición.
■ Tanto la cuba como el interior de la
puerta son de acero inoxidable. Si se
produjeran manchas de óxido, ello se
debería únicamente a una fuerte
presencia de sales de hierro en el agua.
■ Para quitar estas manchas se aconseja
el uso de un abrasivo de grano fino. No
utilizar nunca substancias con cloro,
cepillos de acero, etc.
51
Cubiertos (EN 50242)
Capacidad con cacerolas y platos
Presión admitida en la instalación eléctrica
Amperios fusibles
Potencia máxima absorbida
Tensión
15
9 personas
Min. 0,08 - Max 0,8 MPa
(véase placa de características)
(véase placa de características)
(véase placa de características)
DATOS TÉCNICOS:
DIMENSIONES:
Altura
Profundidad
Ancho
Medida con puerta abierta
cm
cm
cm
cm
con plano de trabajo
85
60
60
120
sin plano de trabajo
82
57,3
59,8
117
A Tecla “MARCHA/PARO”
B Tecla opción "3 in 1"
C Tecla opción "HPS"
D Tecla opción “1/2”
E Tecla “INICIO DIFERIDO”
F Apertura puerta
G Teclas “PROGRAMA”
H Piloto "FIN SAL"
I Piloto "FIN ABRILLANTADOR"
L Pilotos “FASES DE PROGRAMAS"
M DISPLAY DIGITAL
N Pilotos “SELECCIÓN PROGRAMA”
O Pilotos “SELECCIÓN OPCIÓN”
DESCRIPCION DE LOS MANDOS
B C D E F G
N
I
L
H
M
A
O
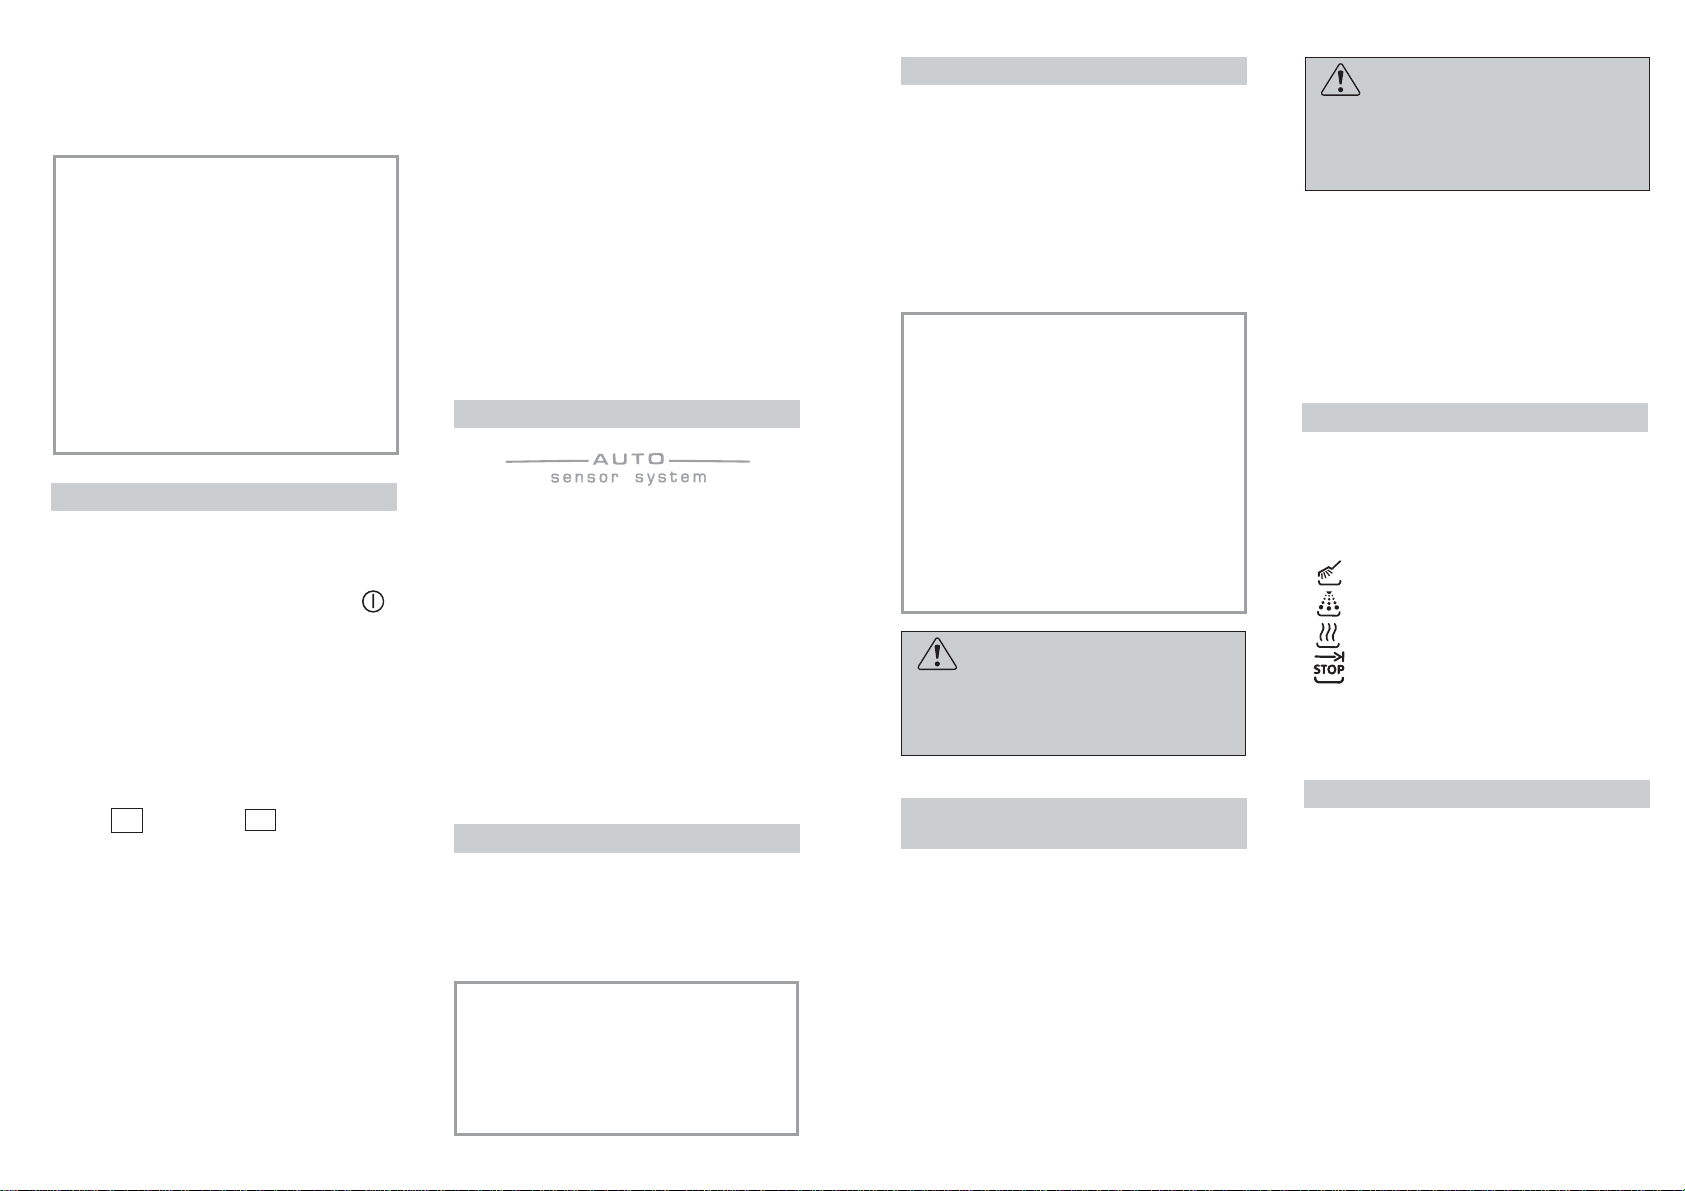
52
SELECCION DE LOS
PROGRAMAS Y FUNCIONES
ESPECIALES
IMPORTANTE
El lavavajillas dispone de dos funciones
muy útiles:
- el programa “aconsejado” (introducido
desde fábrica, es ideal para el uso
cuotidiano a plena carga) para una
selección más rápida y segura;
-la función "Auto-aprendizaje", gracias
a la cual el programa usado al menos
3 veces consecutivas se memoriza
permitiendo, a quien utiliza siempre
el mismo ciclo de lavado, no tener
que repetir cada vez la programación
y por tanto ahorrar tiempo.
Selección de los programas
■ Abrir la máquina e introducir los
utensilios a lavar.
■ Accionar la tecla “MARCHA/PARO” .
■ Después de haber accionado la
tecla “MARCHA/PARO”, se iluminara
intermitentemente el piloto correspondiente
al programa “aconsejado” o en su
lugar el correspondiente al programa
que ha sido utilizado al menos 3 veces
consecutivas.
El display visualizará el tiempo de
duración del programa, alternando la
indicación de la hora y minutos
[Ej: 1 h (1 hora) / 25 (25 minutos)]
■ Si se desea seleccionar una opción,
accionar la tecla correspondiente
(el piloto se iluminará).
Las teclas opción se tiene que
seleccionar ANTES del inicio del
programa, con el fin de que la opción
sea aceptada.
■ Si desea seleccionar otro programa, es
necesario accionar la tecla
correspondiente al programa deseado
(el correpondiente piloto se iluminara
intermitentemente, confirmando la
selección efectuada).
■ Para iniciar el programa de lavado, es
necesario confirmar, accionando
nuevamente la tecla del programa
seleccionado.
El programa se iniciará automáticamente,
el correspondiente piloto pasará de
intermitente a fijo y en el display
aparecerá el tiempo de duración del
ciclo.
Si las operaciones anteriormente
descritas se han realizado con la puerta
abierta, el programa no iniciará hasta el
cierre de la misma.
Programas "AUTOMATICOS"
El lavavajillas está dotado de un sensor de
suciedad, en grado de analizar la
turbiedad del agua durante todas las fases
de los programas "AUTOMATICOS" (ver
elenco de programas); gracias a este
dispositivo, los parametros del ciclo de
lavado se adaptan automáticamente, en
base a la real cantidad de suciedad
presente en la vajilla. El grado de turbiedad
del agua está de hecho relacionado con la
cantidad de suciedad presente en la vajilla.
De esta manera se garantiza un mejor
lavado, optimizando los consumos de agua
y energía.
Programas "IMPULSE"
Los programas "IMPULSE" utilizan una
técnica de lavado a impulsos que reduce
los consumos, el ruido y mejora las
prestaciones.
IMPORTANTE
El funcionamiento "intermitente" de
la bomba de lavado NO es indicador
de un mal funcionamiento, sino una
característica peculiar del lavado a
impulsos; es por tanto señal del
correcto desarrollo del programa.
53
Interrupción de un programa
Se desaconseja la apertura de la puerta
durante el desarollo de los programas, en
particular, durante las fases centrales del
lavado y del aclarado caliente. La máquina,
de todas formas, se para automáticamente
con la apertura de la puerta y en el display
aprece de manera intermitente el tiempo
restante hasta el fin de ciclo.
Cerrando de nuevo la puerta, sin accionar
ninguna tecla el ciclo continuará desde el
momento en el que fue interrumpido.
IMPORTANTE
Es posible interrumpir el programa
en curso aún sin abrir la puerta,
llevando al lavavajillas a la posición
pausa.
Para realizar esto, es necesario
accionar al menos durante 2 segundos
la tecla correspondiente al programa
en curso hasta el momento en el que
el piloto correspondiente pasa de luz
fija a intermitente.
Con el fin de que el ciclo siga lavando
desde el momento en que ha sido
interrumpido, es suficiente accionar
nuevamente la tecla del programa (el
piloto pasara de intermitente a fijo).
ATENCION!
Si se abre la puerta mientras el
lavavajillas está en la fase de secado,
se activa una señal acústica para
avisar que el ciclo no ha finalizado.
Modificación del programa en
curso
Si se quiere cambiar o anular un programa en
curso, efectuar las siguientes operaciones:
■ Tener apretada al menos durante 5
segundos la tecla del programa que se
esté utilizando (el que se corresponde al
piloto iluminado de manera fija).
Todos los pilotos de los programas se
iluminarán por un instante, el programa
en curso se anulará y el correspondiente
piloto iniciará su intermitencia.
El Display se apagará y se iluminara el
piloto de fin programa.
■ En este momento es posible realizar una
nueva programación.
ATENCION!
Antes de introducir un nuevo programa
es aconsejable comprobar la existencia
de detergente y, en caso contrario
rellenar el contenedor.
Si se interrumpiera la corriente durante
el funcionamiento del lavavajillas, una
especial memoria conservará la
elección efectuada. Al restablecimiento
de la corriente, el lavavajillas continuará
en el punto donde se paró.
Desarrollo del programa
Durante el desarrollo del programa, en el
display aparece el tiempo restante hasta el
fin de ciclo y los 4 pilotos de visualización
“FASES DE PROGRAMAS”:
= "LAVO"
= "ACLARO"
= "SECO"
= "FIN"
se iluminarán singularmente y
secuencialmente para indicar la fase en
curso.
Final del programa
El apagado del display y el encendido del
último piloto de visualización “FASES DE
PROGRAMAS” señalarán que el ciclo ha
finalizado.
La finalización del programa se indicará
mediante una señal acústica (si no se ha
desactivado) de una duración de 5 segundos,
repetido durante 3 veces con intervalos de
30 segundos. El piloto de fin de programa
se iluminará y el display se apagará.
Por tanto será posible retirar los utensilios
lavado y apagar el lavavajillas mediante la
tecla “MARCHA/PARO” o en su lugar
realizar una nueva carga de cubiertos para
otro programa de lavado, siguiendo las
operaciones anteriormente descritas.
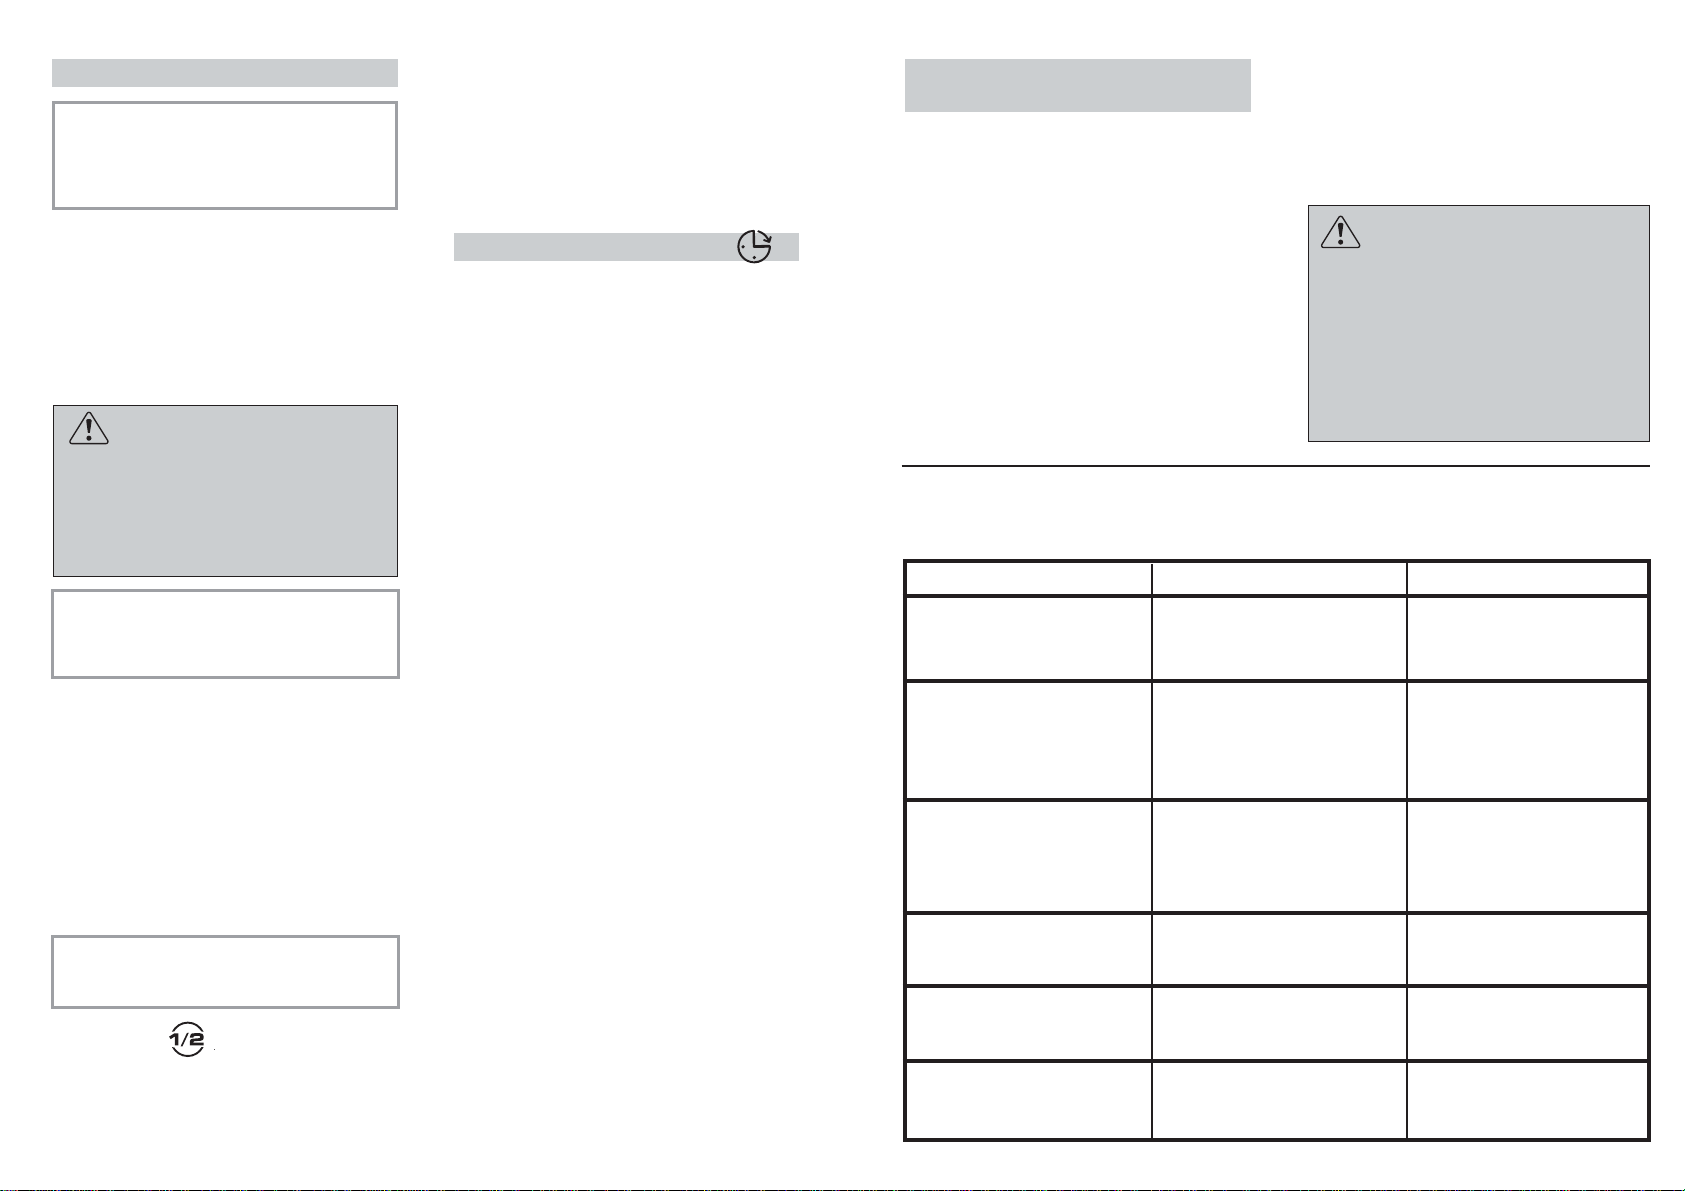
54
Teclas opciónes
IMPORTANTE
Las opciones eventualmente
seleccionadas DEBEN ser activadas
o desactivadas, ANTES de iniciar el
programa.
Tecla "3 in 1"
Esta opción permite la utilización óptima
de los detergentes combinados ("3
en 1"/
"4
en 1"/"5 en 1"). Accionando esta opción,
el programa de lavado seleccionado se
modifica, de manera que se obtienen las
mejores prestaciones de los detergentes
combinados, además, se desactivan los
indicadores de falta de sal y abrillantador.
ATENCION!
Una vez seleccionada, la opción queda
activada (indicador correspondiente
encendido) también para los
sucesivos programas de lavado y
podrá ser desactivada (indicador
correspondiente apagado) solamente
accionando de nuevo la tecla.
IMPORTANTE
Con esta opción seleccionada, la
duración del programa “RAPIDO” se
alarga alrededor de 10 minutos.
Tecla "HPS"
Presionando esta tecla se aumenta la
intensidad del ciclo elegido, añadiendo un
enjuague y, en los casos en que está
previsto, aumentando la temperatura y la
presión del agua en la fase de lavado.
La tecla “HPS” permite eliminar con mayor
intensidad la suciedad dificil, garantizando
siempre los mejores resultados.
Se aconseja para vajilla muy sucia o cuando
no habiéndo efectuado rapidamente un
lavado, la suciedad se haya secado.
IMPORTANTE!
Seleccionando esta opción, se
desactiva el lavado a impulsos.
Tecla "1/2"
Para una mejor adaptación a sus
exigencias, además de la función normal
de lavado de la vajilla en carga compelta,
gracias a la tecla “1/2”, este lavavajillas le
permite lavar una cantidad reducida de
vajilla, situándola de manera libre tanto en
el cesto superior como inferior.
Gracias a esta función, el lavavajillas reduce
automáticamente el consumo de agua y
energía y la duración del ciclo de lavado.
Para el lavado, dosifique el detergente en
cantidad menor respecto a la aconsejada
para un lavado normal.
Tecla "INICIO DIFERIDO"
Esta tecla permite programar el inicio del
ciclo de lavado, con una antelación
comprendida entre 1 y 23 horas.
Para introducir el inicio diferido proceder
de la siguiente manera:
■ Accionar la tecla "INICIO DIFERIDO"
(en el display aparecerá"00").
■ Accionar nuevamente la tecla para
incrementar el inicio diferido en horas
(cada presión se incrementa la antelación
en 1 hora, hasta un máximo de 23).
■ Para iniciar la cuenta atrás, accionar la
tecla del programa seleccionado
(el piloto correspondiente pasará de luz
intermitente a luz fija y en el display se
visualizará el tiempo que falta para el
inicio del ciclo de lavado).
Al final de la cuenta atrás, el programa
iniciará automáticamente y en el display se
verá la duración del ciclo seleccionado.
Si se desea anular el inicio diferido
proceder de la siguiente manera:
■ Accionar la tecla del programa seleccionado
durante al menos 5 segundos.
■ La confirmación de la anulación de inicio
diferido, se obtendrá en el momento en
el que el piloto del programa seleccionado
pasa de luz fija a intermitente, el display
se apagará y el piloto de fin programa
se iluminará (también las opciones
eventualmente seleccionadas serán
anuladas y los pilotos correspondientes
se apagarán).
■ En este momento, si se desea iniciar
un ciclo de lavado, será necesario
introducir nuevamente el programa
deseado y eventualmente seleccionar
las teclas opción, como se indica en el
párrafo "SELECCIÓN DE LOS
PROGRAMAS".
55
Exclusión alarma acústica de
FIN PROGRAMA
La función de alarma acústica de fin
programa puede ser desactivada del
siguiente modo:
■ Con el lavavajillas apagado, mantener
accionado por unos instantes la segunda
tecla opción (desde la izquierda) y
simultáneamente accionar la tecla
"MARCHA/PARO".
■ En el display aparecerá "b1" que significa
que la alarma está activada.
■ Accionando nuevamente (durante los
siguientes 5 segundos) la misma tecla
opción (segunda desde la izquierda)
aparecerá en el display "b0" que
significará que la alarma está desactivada.
■ Esperar la señal acústica que indicará
que la modificación ha sido memorizada.
■ Para reactivar la alarma, seguir el
mismo procedimiento ( aparecerá "b1"
en el display, que significará que la
alarma ha sido activada).
ATENCION!
Para evitar que se dispare el dispositivo
de seguridad anti-desbordamiento,
se recomienda no mover o inclinar el
lavavajillas durante el funcionamiento.
En el caso que sea necesario mover
o inclinar el lavavajillas, asegurarse
primero que haya completado el ciclo
de lavado y que no quede agua en la
cuba.
SEÑALES AUTOMÁTICAS DE ANOMALIAS
Apagar la lavadora, abrir el grifo,
reintroducir el ciclo a utilizar.
Verificar si el tubo de descarga esta
doblado o el sifón y/o filtros estan
obstruidos.
Si la anomalia persiste, llamar al
Servicio de Asistencia Técnica
Verificar si el tubo de descarga esta
doblado o el sifón y/o filtros estan
obstruidos.
Si la anomalia persiste, llamar al
Servicio de Asistencia Técnica
Es necesario dirigirse al Servicio de
Asistencia Técnica.
Es necesario dirigirse al Servicio de
Asistencia Técnica.
Limpiar placa filtrante.
Si la anomalia persiste, llamar al
Servicio de Asistencia Técnica
ANOMALIA CAUSA REMEDIO
En el display aparece E2
acompañado de una señal
acústica.
En el display aparece E3
acompañado de una señal
acústica.
En el display aparece
E4
acompañado de una señal
acústica.
En el display aparece
E5
acompañado de una señal
acústica.
En el display aparece
E6
acompañado de una señal
acústica.
En el display aparece E8 o Ei
acompañados de una señal
acústica.
Falta de agua (grifo del agua cerrado).
La machina no puede descargar el
agua de la cuba.
Pérdida de agua.
Rotura del control electrónico de la
temperatura.
Rotura del control electrónico.
El elemento calentador del agua no
funciona correctamente o placa
filtrante sucia.
El lavavjillas está en grado de señalar un serie de funcionamientos anómalos
visualizados en el diplay.
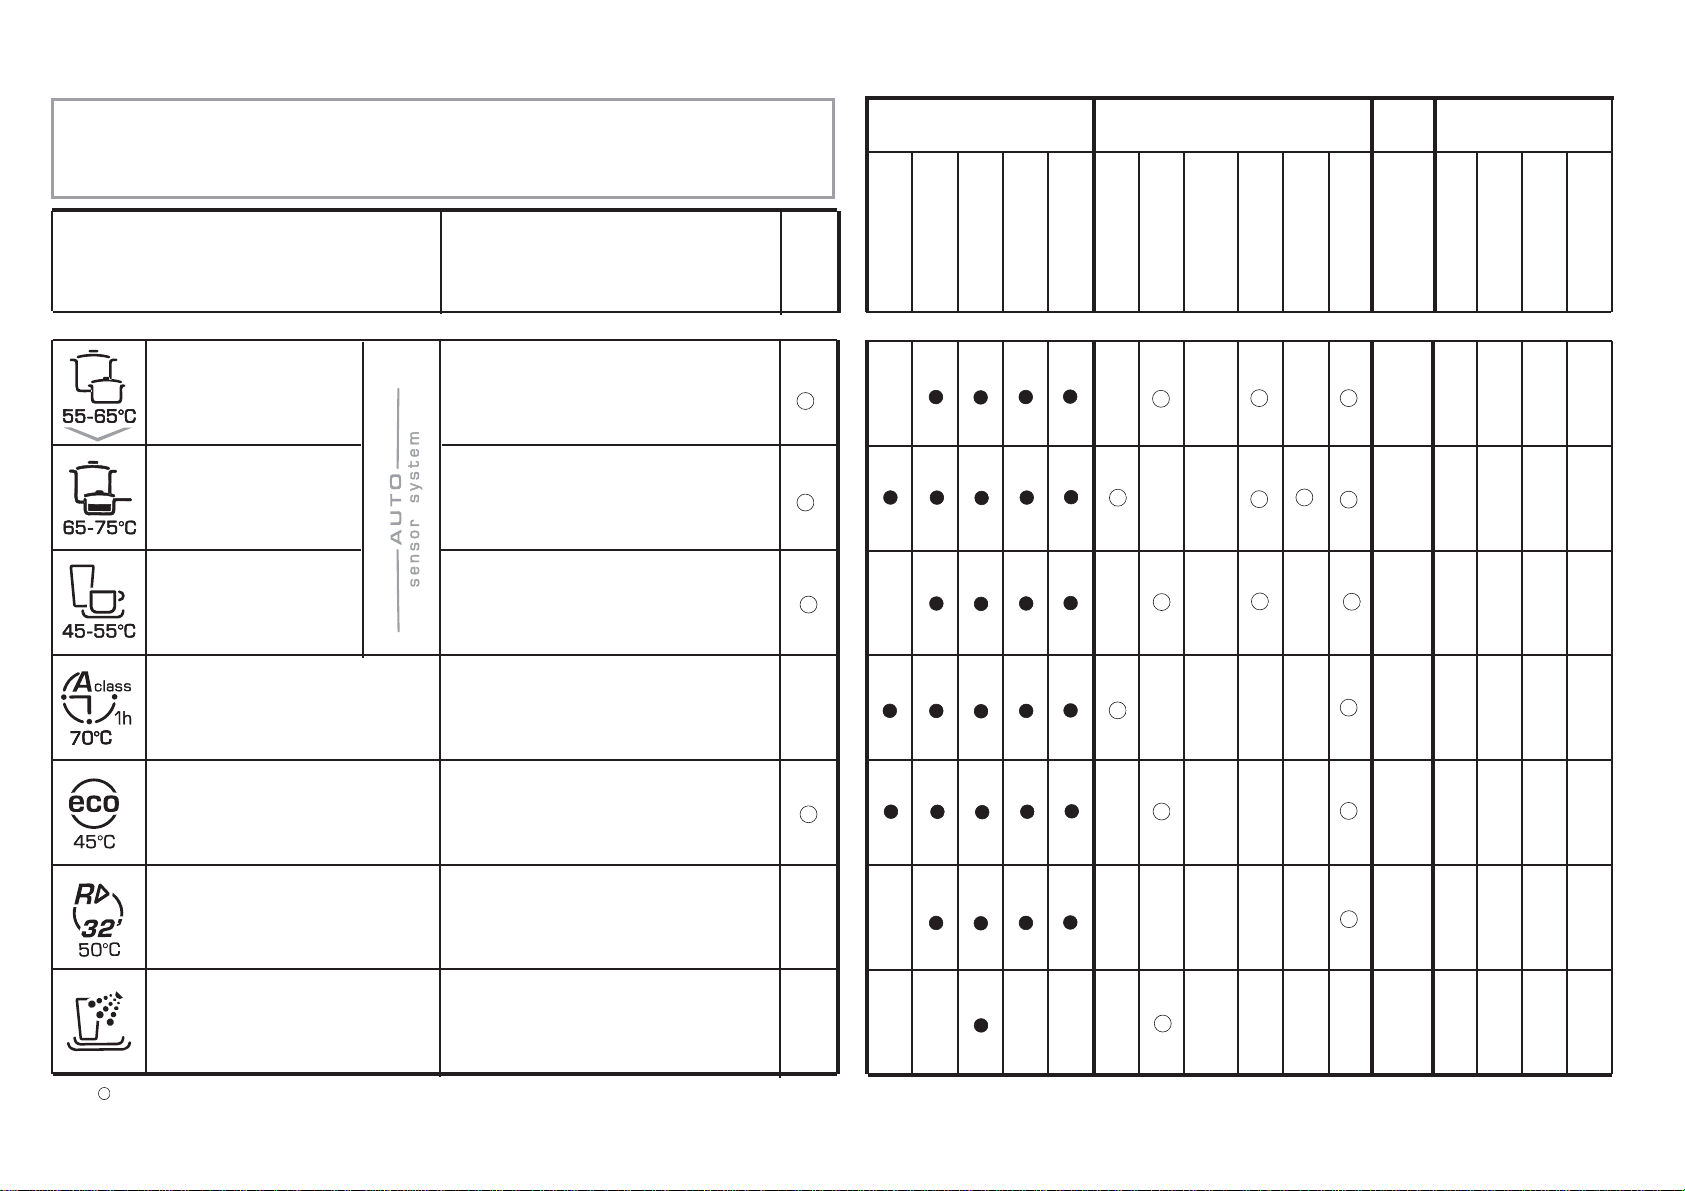
57
SI SI
55°C/
65°C
80/
95
110/
120
SI
SI
SI
SI60
70°C
SI140
45°C
N.D.
32
SI5
** CON EL AGUA CALIENTE EL TIEMPO RESTANTE AL TERMINO DEL PROGRAMA SE AJUSTA
AUTOMÁTICAMENTE DURANTE EL DESARROLLO DEL MISMO.
N.D.= OPCIÓN NO DISPONIBLE
SISI
SI
SI
SI SI
SI SISI
SI SISI
N.D.
SI
N.D.
N.D.
( )
65°C/
75°C
45°C/
55°C
70/
80
50°C
( )
( )
( )
( )
Operaciones a realizar
Duración
media en
minutos
Funciones
facultativas
Detergente prelavado
Detergente lavado
Limpieza filtro y placa
Control nivel del
abrillantador
Control nivel de la sal
Prelavado caliente
Prelavado frío
Lavado
Primer aclarado en frío
Segundo aclarado
en frío
Aclarado caliente con
abrillantador
Con agua fría (15°C)**
-Tolerancia ± 10%-
Tecla "3 in 1"
Tecla "HPS"
Tecla "1/2"
Tecla "INICIO DIFERIDO"
Desarrollo del programma
56
(PROGRAMA “ACONSEJADO”)
Apto para lavar la vajilla y cacerolas con
suciedad normal.
Apto para lavar cacerolas y toda la
vajilla especialmente sucia.
Apto para el lavado de vajillas delicada
y/o decorada, así como la cristalería.
Indicado también para el lavado
cotidiano de vajilla delicada poco sucia,
a excepción de las sartenes.
Apto para el lavado cotidiano,
inmediatamente después de la comida,
de vajillas y cacerolas con suciedad
normal (MAX 8 cubiertos).
- CLASE A DE LAVADO -
Indicado para el lavado de vajillas y
ollas con suciedad normal, utilizando
detergentes con enzimas.
Programa normalizado EN 50242.
Ciclo superrápido que se efectua al final
de la comida, indicado para un lavado de
vajilla para 4/6 personas.
Breve prelavado para la vajilla usada en
la mañana o al mediodía, cuando se
quiere realizar un sólo lavado completo.
/( ) = EL DESARROLLO DE LOS PROGRAMAS “AUTOMÁTICOS” (AUTO sensor system) SE
DESARROLLARÁN DE MANERAOPTIMIZADA, GRACIAS ALAINTERVENCIÓN DE UN SENSOR DE SUCIEDAD
QUE ADAPTA LOS PARÁMETROS DE LAVADO EN FUNCIÓN DEL GRADO Y TIPO DE SUCIEDAD DE LOS
UTENSILIOS A LAVAR.
UNIVERSAL
INTENSIVO
DELICADO
CLASE
A 1h
ECO - BIO
RAPIDO 32’
REMOJO FRIO
Lavado con prelavado
En caso de programa INTENSIVO, hay que añadir una segunda dosis de detergente, unos 20 gramos
(1 cucharada sopera) directamente en la lavavajillas.
Para el programa CLASE A 1h añada 5 gramos.
*
Programa
RELACION DE LOS PROGRAMAS
Descripción
*
Programas
“IMPULSE”
SI
SI
N.D.
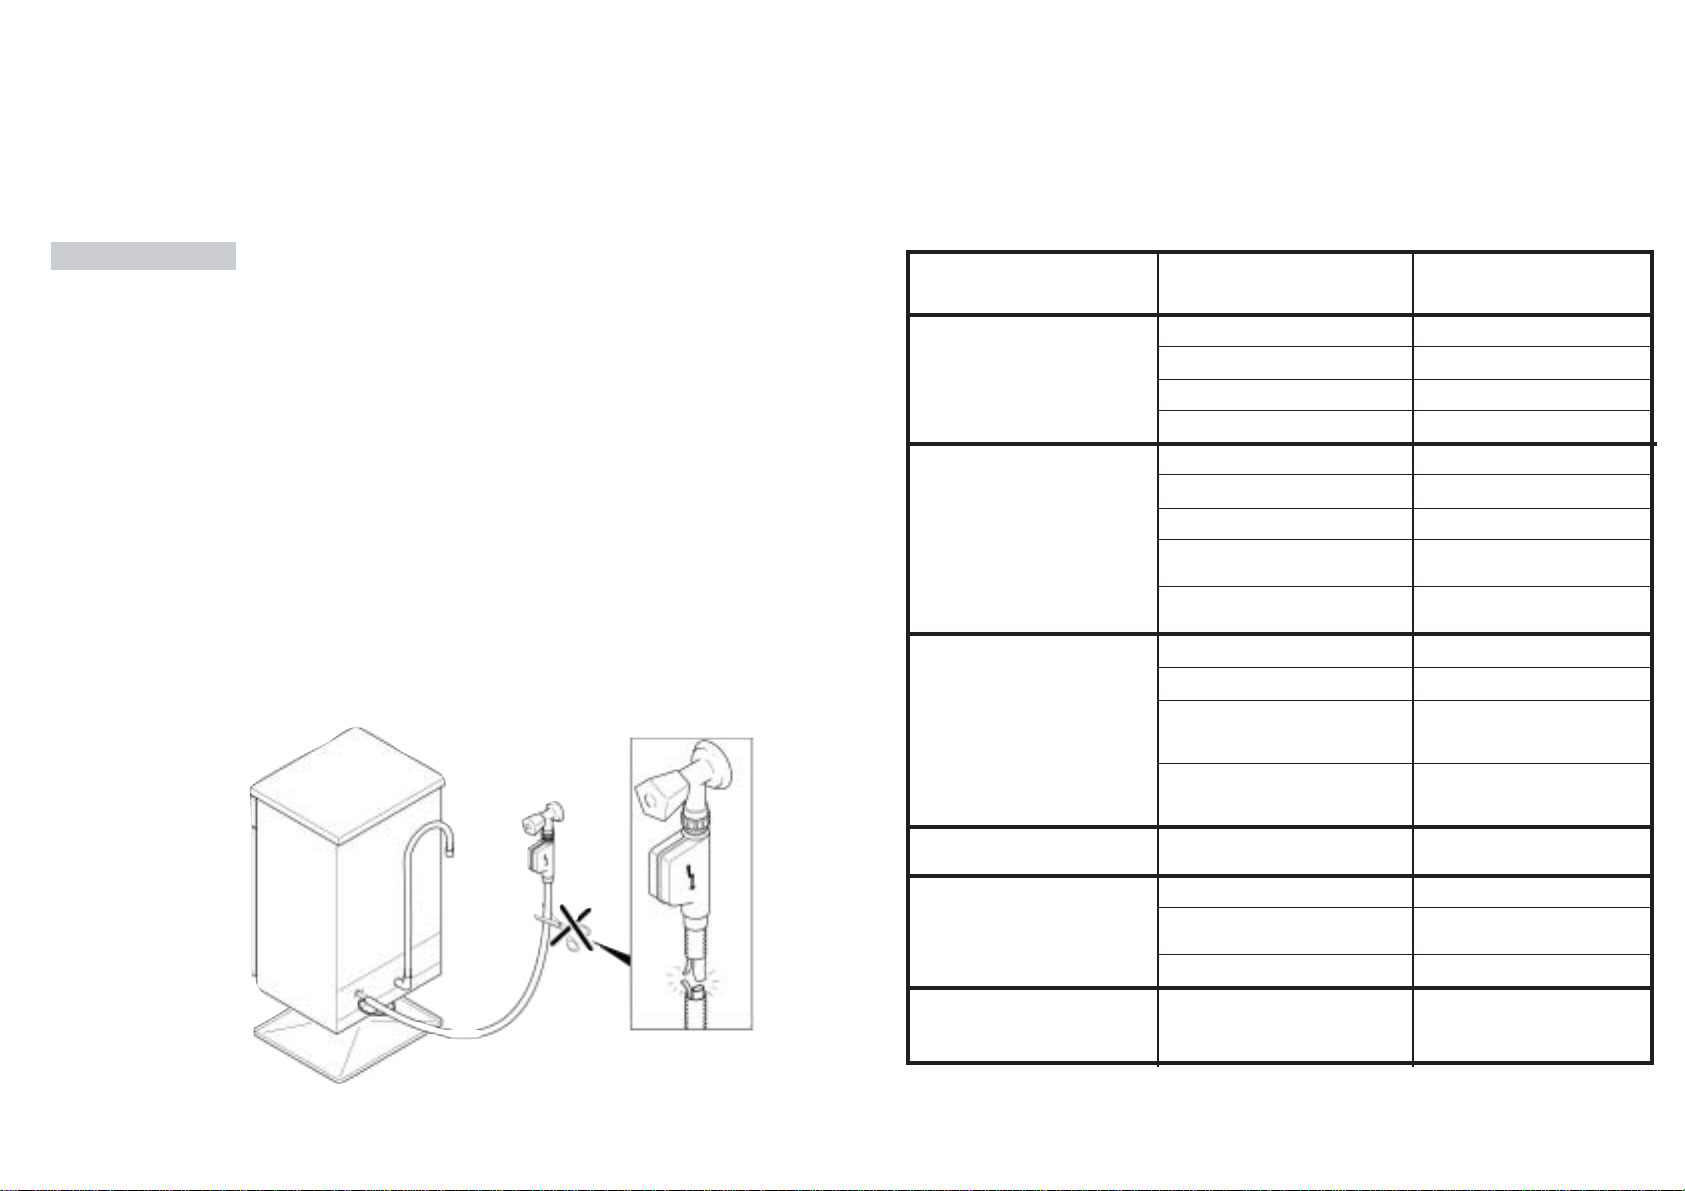
58
WATERBLOCK
Fig. 1
A
El objetivo del waterblock es conseguir que su aparato resulte todavía más seguro
sobre todo cuando no hay nadie en casa. Con el waterblock se elimina cualquier
posibilidad de pérdidas de agua y de los transtornos derivados por anomalías en el
funcionamiento de la maquina o por cortes en los tubos de goma, especialmente del
tubo de carga.
Como funciona
El fondo colocado debajo del electrodoméstico recoge las posibles pérdidas de
agua, y, a través de un sensor, neumáticamente, se cierra la válvula de seguridad
situada debajo del grifo. De esta manera se impide que salga el agua con el grifo
abierto.
Si la caja eléctrica quedara dañada, desenchufe inmediatamente la toma de conexión
a la red eléctrica.
Para garantizar un perfecto funcionamiento de la seguridad, la caja de seguridad
"A" con el tubo tiene que estar conectada al grifo de entrada de agua como se
indica en la figura 1.
El tubo de alimentación no debe ser cortado en cuanto contiene elementos de tensión.
Si la longitud del tubo no es suficiente para una correcta conexión, la totalidad del
tubo debe ser sustituido por uno de longitud adecuada. Solicite en este caso el tubo
al Servicio Técnico.
Este lavavajillas está además dotado de un sistema de seguridad antidesbordamiento
que, en el caso que el agua supere el nivel normal, a causa de un eventual
malfuncionamiento, se bloquea automáticamente la carga de agua y / o se vacia la
cantidad en exceso.
BÚSQUEDA DE PEQUEÑAS ANOMALÍAS
Si el lavavajillas no funcionase, antes de llamar al Servicio Asistencia Técnica, realizar
los siguientes controles:
59
ANOMALIA CAUSA REMEDIO
1 - No funciona en ningún
programa
2 - No entra agua
3 - No desagua
4 - Desagua
continuamente
5 - No se oye ruido del giro
de las aspas
6 - En los lavavajillas
electrónicos sin visor: una o
mas indicadores luminosos
en rápida intermitencia
Clavija no enchufada
Tecla O/I desconectada
Puerta abierta
Falta energía eléctrica
Ver causa 1
Grifo cerrado
Programador mal seleccionado
El tubo de entrada agua tiene un
pliegue
El filtro del tubo entrada agua está
sucio
Filtro sucio
Tubo desagüe doblado
La prolongación del tubo de
desagüe no es correcta
El desagüe de la pared no permite
un respiradero con el tubo de
desagüe de la máquina
Tubo desagüe en posición
demasiado baja
Excesiva carga detergente
Algún objeto que impide rotación
aspas
Placa filtrante y filtro sucios
Grifo del agua cerrado
Enchufar
Conectar
Cerrar puerta
Verificar
Verificar
Abrir
Seleccionar bien
Eliminar el pliegue del tubo
Limpiar el filtro colocado al extremo
del tubo
Limpiar filtro
Desdoblar
Seguir exactamente las
instrucciones para la instalación
del tubo de desagüe
Consultar a un técnico cualificado
Alzar tubo desagüe minimo
40 cm del suelo
Reducir dosis
Colocar bien
Limpiar placa y filtro
Apagar el lavavajillas
Abrir el grifo
Reintroducir el ciclo

60
NOTA: Si algún inconveniente de los citados provocase un mal lavado o un insuficiente aclarado, es
necesario remover manualmente la suciedad de la vajilla, ya que la fase final del secado provocaria el
desecado de la suciedad que, en un segundo lavado, la máquina no tiene la posibilidad de sacar.
Si la avería persiste llamar al centro de asistencia, comunicando el modelo de lavavajillas indicado sobre
la placa de características colocada en el interior de la puerta, en la parte superior o sobre la tarjeta de
garantía. Indicando toda la información obtendrá una intervención más rápida y eficaz.
El Fabricante declina cualquier responsabilidad por posibles errores de imprenta contenidos en el presente
libro. Se reserva, además, el derecho de de aportar modificaciones que sean útiles a los propios productos sin
comprometer las caracteristicas esenciales.
ANOMALIA CAUSA REMEDIO
7-Si lava solo parcialmente
8 - Falta o parcial uso del
detergente
9-Manchas blancas en la
vajilla
10 - Ruido durante el lavado
11 - La vajilla no está
perfectamente seca
Ver causa 5
Fondo de cacerolas no
perfectamente limpio
Borde cacerolas no perfectamente
limpio
Rociadores parcialmente
obturados
La vajilla no está colocada
correctamente
El extremo del tubo de desagüe está
inmerso en el agua
El detergente no está dosificado
adecuadamente, es viejo y/o está
endurecido
La tapa del contenedor de la sal no
está bien cerrada
El programa de lavado elegido es
muy suave
Vajillas cesto inferior no lavadas
Cubiertos, platos, cacerolas, etc.
interfieren con la apertura del
contenedor de detergentes
Agua de red con excesiva
dureza
La vajilla golpea entre sí
Los brazos girantes golpean sobre
la vajilla
Falta de circulación de aire
Falta abrillantador
Comprobar
Costras demasiado tenaces
Ablandar antes lavado
Colocar mejor
Desmontar y limpiar los brazos de
lavado
No acercar excesivamente la vajilla
una contra la otra
La extremidad del tubo desagüe no
debe tocar el agua
desaguada
Adecuar la dosis en función de la
cantidad de suciedad o sustituir el
producto
Enroscarla hasta el fondo
Elegir un programa más
enérgico
Desinsertar tecla media carga
Cargar la vajilla de manera que no
interfiera con la apertura del cajetín
detergente
Controlar nivel sal y abrillantador
y regular dosificacion
Si la anomalia persiste, solicitar
intervencion Asistencia Técnica
Adecuar mejor la vajilla en el cesto
Colocar mejor la vajilla
Dejar entreabierta la puerta de la
máquina al final del programa de
lavado para favorecer el secado
natural
Utilizar abrillantador
SERVICIO POST VENTA
☎
902.100.150

The manufacturer declines all responsibility in the event of any printing mistakes in this
booklet. The manufacturer also reserves the right to make appropriate modifications to
its products without changing the essential characteristics.
El fabricante declina toda responsabilitad por los posibles errores de impresión que
puedan haber en este libreto. Asímismo, se reserva el derecho de efectuar las
modificaciones que se consideren ùtiles a sus propios productos sin comprometer las
caraterìsticas esenciales.
06.11 - 41023184 - www.graficaestampa.it - Printed in Italy - Imprimé en Italie
EN
ES
This appliance is marked according to the European directive 2002/96/EC on Waste Electrical and Electronic
Equipment (WEEE).
By ensuring this product is disposed of correctly, you will help prevent potential negative consequences for the
environment and human health, which could otherwise be caused by inappropriate waste handling of this
product.
The symbol on the product indicates that this product may not be treated as household waste. Instead it shall
be handed over to the applicable collection point for the recycling of electrical and electronic equipment
Disposal must be carried out in accordance with local environmental regulations for waste disposal.
For more detailed information about treatment, recovery and recycling of this product, please contact your local
city office, your household waste disposal service or the shop where you purchased the product.
Este electrodomestico está marcado conforme a la directiva Europea 2002/96/CE sobre los residuos
de aparatos eléctricos y electrónicos (WEEE).
Asegurándose que este producto ha sido eliminado correctamente, ayudará a evitar posibles
consecuencias negativas en el ambiente y la salud de las personas, que pudiera verificarse por
causa de un anómalo tratamiento de este producto
El simbolo sobre el producto indica que este aparato no puede ser tratado como un residuo
doméstico normal, en su ligar deberá ser entregado al centro de recogidas para reciclaje de
aparatos eléctricos y electrónicos.
La eliminación debe ser efectuada de acuerdo con las reglas medioambientales vigentes para el
tratamiento de los residuos.
Para informacion más detallada sobre el tratamiento,recuperación y reciclaje de este producto,por
favor contacte con la oficina compentente (del departamento de ecología y mediomabiente),o su
servicio de recogida a domicilio si lo hubiera o el punto de venta donde compró el producto.

