
Loading ...
Loading ...
Loading ...
8 9
KNOW yOUR 40V CORDLESS HEDGE TRIMMER
Fig. 1
KNOW YOUR HEDgE TRIMMER (See Figure 1.)
The safe use of this product requires an understanding of the information on the product and in
this operator’s manual as well as a knowledge of the project you are attempting. Before use of
this product, familiarize yourself with all operating features and safety rules.
gUARD
The guard helps to deect chips or other debris away from the operator’s hands and eyes.
TRIggER SWITCH
The switch trigger, located beneath the rear handle, and the lock-off button, located behind the
auxiliary handle, must be depressed simultaneously to allow blade rotation.
Battery
pack
latch
Battery pack
Blade
Blade
support
rod
Guard
Auxiliary
handle
Lock out
button
Lock button
for rotating
handle
Trigger
switch
ASSEMBLy INSTRUCTION
BATTERY
IMPORTANT! The battery pack is not charged when it is purchased. Before using the hedger
for the rst time, place the battery pack in the battery charger and charge. Make sure to read all
safety precautions, and follow the instructions in the Battery Charger section.
WARNINg
Follow these instructions in order to avoid injury and to reduce the risk of electric shock or re:
• Replace the battery pack or the charger immediately if the battery case or charger cord is
damaged.
• Verify that the switch is in the Off position before inserting or removing the battery pack.
• Verify that the battery pack is removed and the switch is in the Off position before
inspecting, adjusting, or performing maintenance on any part of the hedger.
• Read, understand, and follow the instructions contained in the section entitled Charging
Procedure.
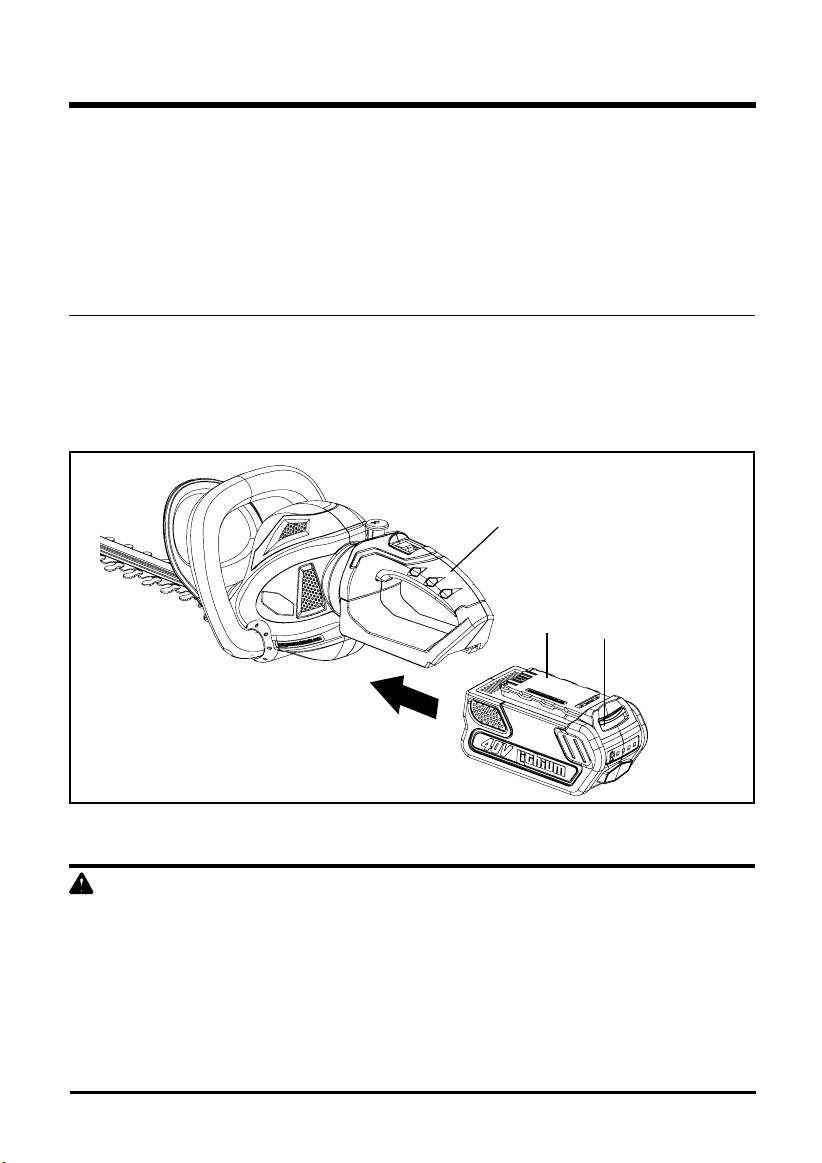
To remove the battery
(See Figure 2.) :
1. Slide the latch button on the battery pack down (1) and hold.
2. Grasp the trigger handle (2) rmly. Pull the battery pack out of the handle.
NOTE:
The battery pack ts snugly into the handle to prevent accidental dislodging. It may require
a strong pull to remove.
To install the battery
(See Figure 2.):
1. Align the tongue (3) of the battery pack with the cavity in the handle housing.
2. Grasp the trigger handle (2) rmly.
3. Push the battery pack into the handle until the latch locks into place.
Fig. 2
IMPORTANT! DO NOT remove the blade assembly unless it needs sharpening, straightening, or
replacing. Take it to a qualied person for repair.
1
2
3
Loading ...
Loading ...
Loading ...