Ref.5085935
5085935-YA4:NOTICE 7/01/09 10:29 Page C1
www.groupeseb.com
EN
RICE COOKER
SIMPLY
ZH
MS
TH
5085935-YA4:NOTICE 7/01/09 10:29 Page C2
N
H
S
H
Control box
1
8
9
14
15
13e
13d
11
12
13
2
3
4
5
6
13a
13b
13c
10
7
13f
5085935-YA4:NOTICE 7/01/09 10:30 Page C3
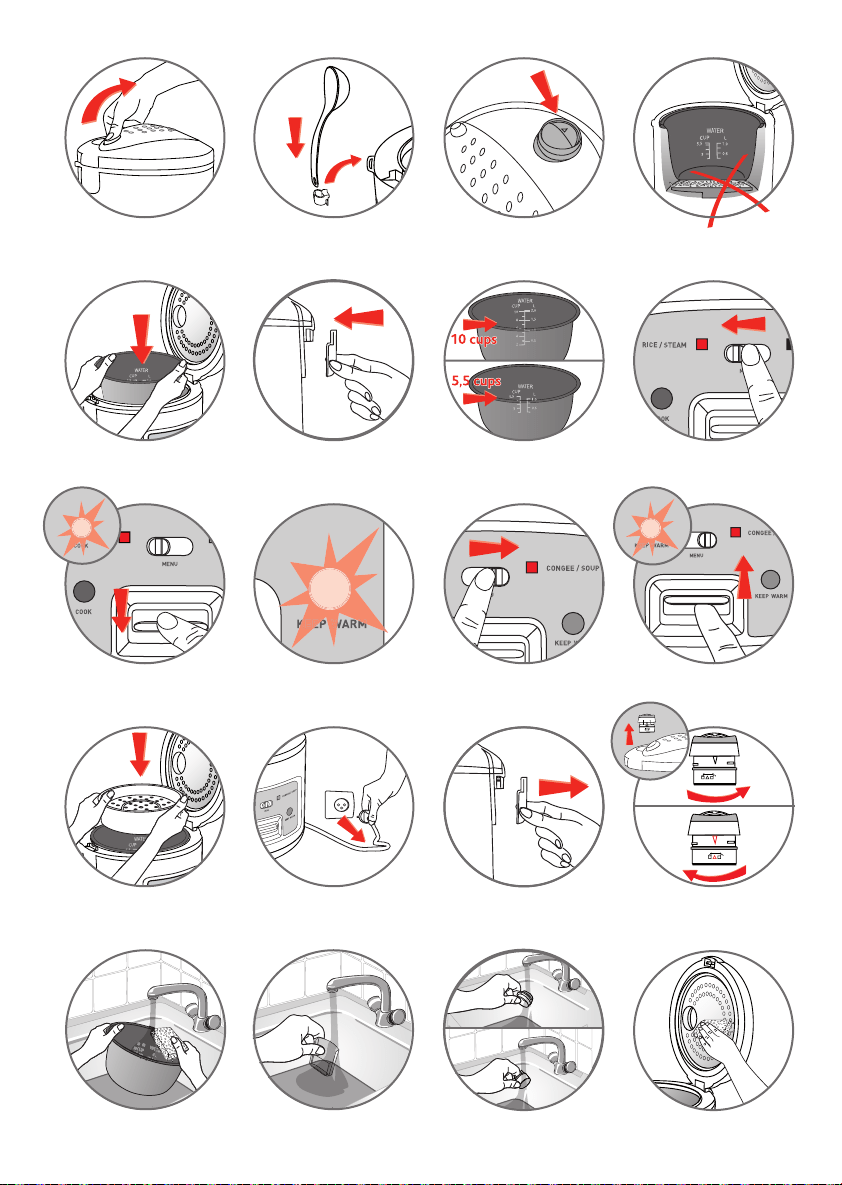
Fig.1 Fig.2 Fig.3 Fig.4
Fig.5 Fig.6 Fig.7 Fig.8
Fig.9 Fig.10 Fig.11 Fig.12
Fig.13 Fig.14 Fig.15 Fig.16
Fig.17 Fig.18 Fig.19 Fig.20
5085935-YA4:NOTICE 7/01/09 10:30 Page C4

2
Unpack the appliance
• Remove the appliance from the packaging and unpack all the accessories
and printed documents.
• Open the lid by pressing the opening button located on the handle – Fig. 1.
• Install the spoon support: insert the plastic hook of the support in the hole
located under product ring, and slide it downwards – Fig. 2. Make sure the
micro pressure valve is correctly in position -
Fig. 3.
Clean the appliance
• Remove the non-stick bowl and the micro pressure valve.
• Clean the bowl and the micro pressure valve with a sponge and washing-up liquid.
Wipe the outside of the appliance and the metal parts of the lid with a damp cloth.
• Dry off carefully.
Using your rice cooker
For all 4 functions
• Carefully wipe the outside of the bowl (especially the bottom). Make
sure that there are no foreign residues or liquid underneath the bowl
and on the hotplate – Fig. 4.
• Place the bowl into the appliance – Fig. 5, making sure that it is correctly positioned.
• Slightly rotate the bowl in both directions, so as to ensure good contact
between the bottom of the bowl and the hotplate.
• Check that the condensation collector is correctly in position, if not, please
install it by pushing firmly into the groove –
Fig. 6.
• Close and lock the lid.
• Plug in the appliance.
• Do not switch on the appliance until all of the above stages have been
completed.
• Avoid to switch on the appliance with cooking bowl empty.
Never place your hand on the
steam vent during cooking, as
there is a danger of burns.
Read the instructions and
carefully follow the operating
method.
Before the first use
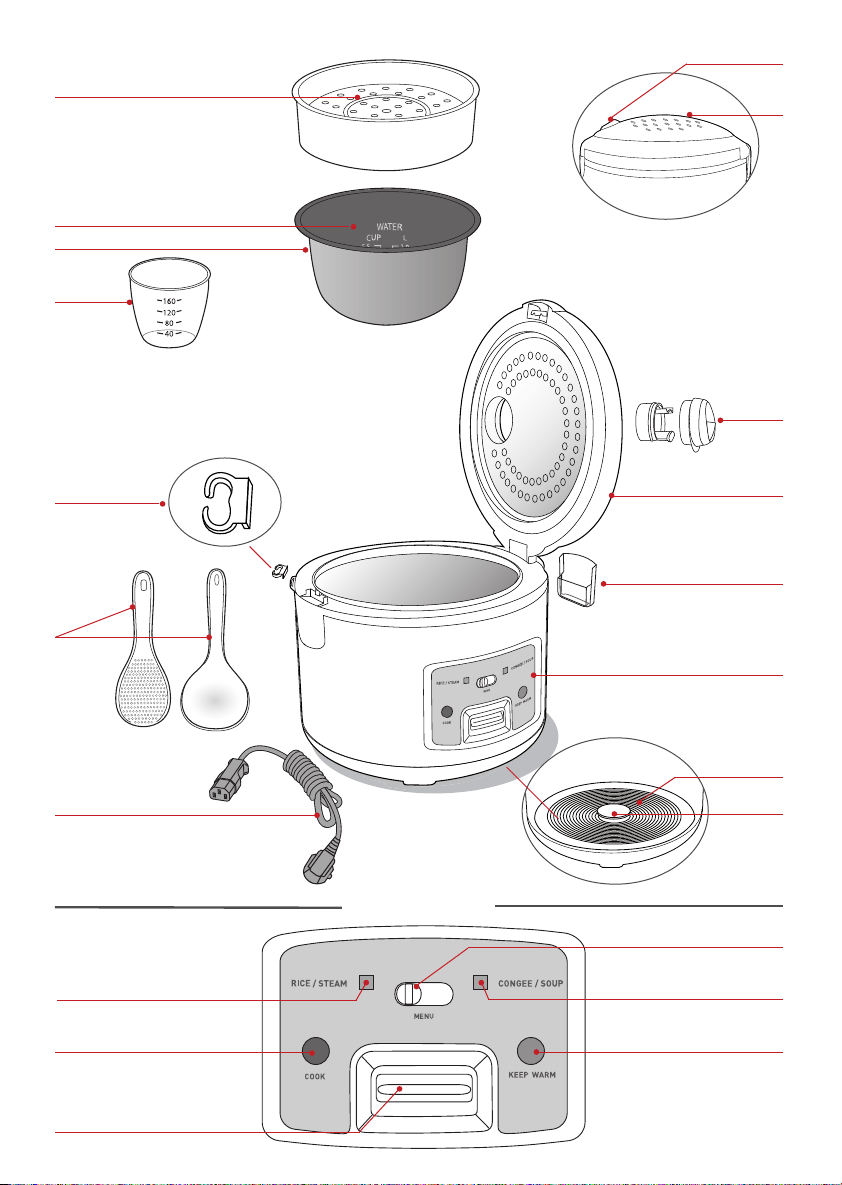
Description
1. Steam basket
2. Graduation for water and rice
3. Removable non-stick bowl
4. Measuring cup
5. Spoon support
6. Spoons
7. Power cord
8. Lid opening button
9. Lid Handle
10. Micro pressure valve
11. Lid
12. Condensation collector
13. Control box
a. RICE/STEAM cooking mode
(red when chosen and black when not chosen)
b. Cooking indicator light (red)
c. Control switch
d. Keep warm indicator light (orange)
e. CONGEE/SOUP cooking mode
(red when chosen and black when not chosen)
f. Mode switch
14. Hotplate
15. Sensor
5085935-YA4:NOTICE 7/01/09 10:30 Page 2
3
EN
Rice Cooking
Measuring the ingredients - Max capacity of the bowl
• The graduated markings on the inside of the bowl are given in litres and cups,
these are used for measuring the amount of water when cooking rice – Fig. 7.
• The plastic cup provided with your appliance is for measuring rice and the table
states the quantity of rice required for the number of servings. 1 level measuring
cup of rice weighs about 150 g.
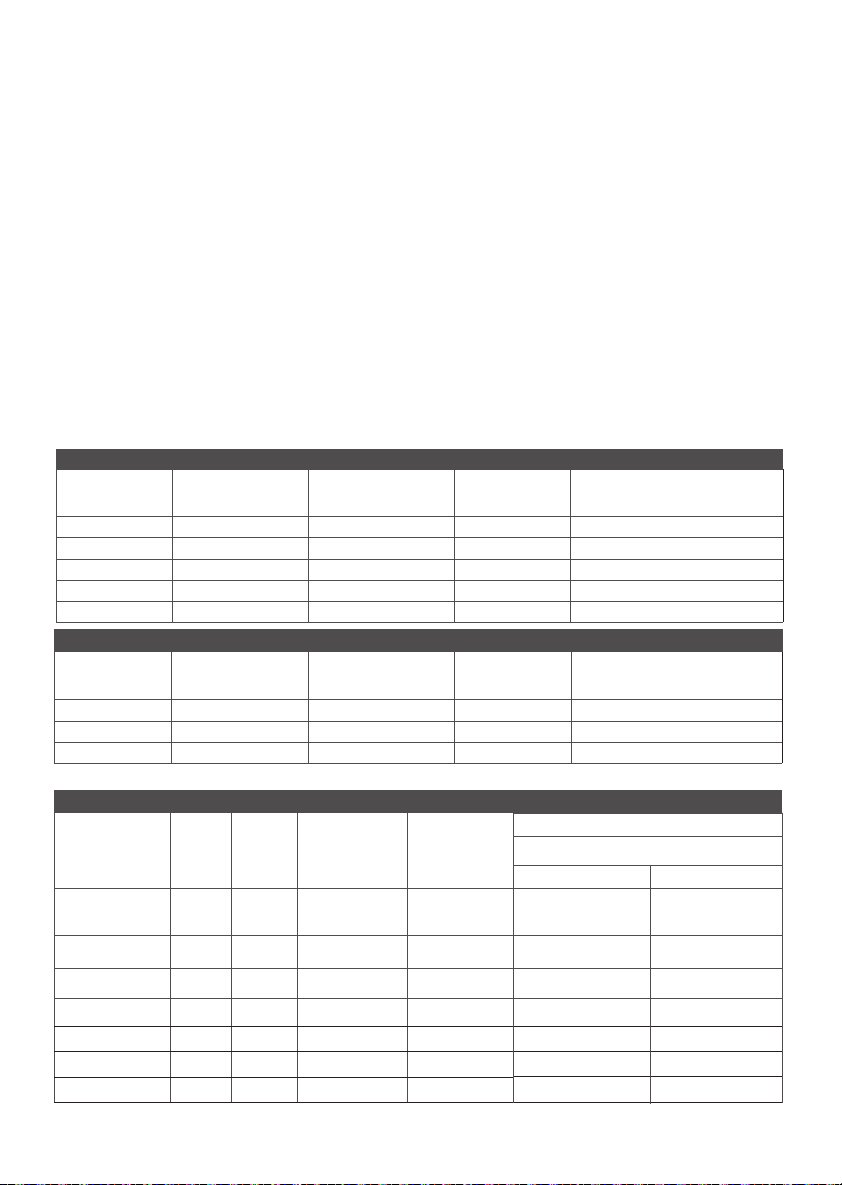
• The table below gives a guide to cooking different kinds of rice. For best results, we
recommend using ordinary rice rather than ‘easy cook’ type rice which tends to give
a stickier rice and may adhere to the base. With other types of rice, such as brown
or wild rice, the quantities of water need adjustment see the table below.
• To cook only 1 cup of white rice (serves 2 small or 1 large portion) because there
isn't the mark of 1 cup in the cooking pot, you should use 1 measuring cup of
white rice and then add 1 1/2 measuring cup of water. With some types of rice it
is normal for a little rice to stick on the base when cooking 1 cup of rice. To cook
other quantity of white rice, refer to cooking guide below.
• The maximum quantity of water + rice should not exceed the 5,5 or 10 cup mark
(depend on product) inside the bowl (depend on product)
– Fig. 7
. Depending of the
type of rice, quantities of water may need adjustment. See the tabel below.
• Rinse the rice thoroughly before cooking.
*The rice cooker will automatically determine the exact cooking time depending on the quantity of water and rice
placed in the bowl.
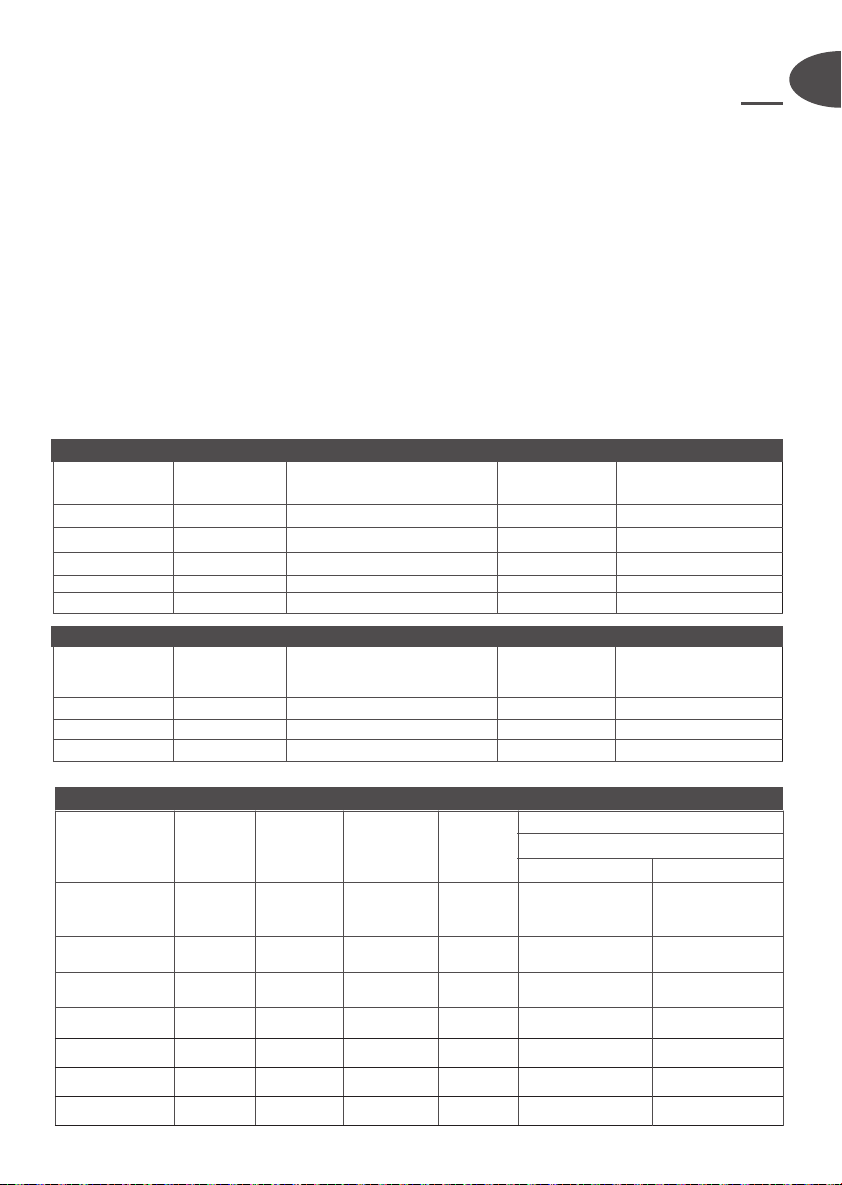
Type of rice
Measuring
cup of rice
Weight
of white rice
Water level
in the bowl
( + the rice)
Serves
Approximative cooking time*
Rice cooking
5,5 cups 10 cups
Round white rice
(Italian rice - often
a stickier rice)
4 600 g 4 cup mark 5per.-6per. 23 min 23 min
Whole grain
Brown rice
4 600 g 4,5 cup mark 5per.-6per. 36 min 32 min
Risotto rice
(Arborio type)
4 600 g 4 cup mark 4per.-5per. 24 min 22 min
Glutinous rice 4 620 g 4 cup mark 5per.-6per. 22 min 20 min
Brown rice 4 570 g 4,5 cup mark 5per.-6per. 42 min 38 min
Japanese rice 4 580 g 4 cup mark 5per.-6per. 27 min 25 min
Fragrant rice 4 640 g 4 cup mark 5per.-6per. 24 min 23 min
COOKING GUIDE FOR OTHER TYPES OF RICE
Measuring cups
of white rice
Weight
of white rice
Water level
in the bowl ( + the rice)
Serves
Approximative
cooking time*
2 300 g 2 cup mark 3per.-4per. 15 min
4 600 g 4 cup mark 5per.-6per. 21 min
6 900 g 6 cup mark 8per.-10per. 25 min
8 1200 g 8 cup mark 11per.-14per. 29 min
10 1500 g 10 cup mark 13per.-17per. 31 min
COOKING GUIDE FOR WHITE RICE -10 CUPS
Measuring cups
of white rice
Weight
of white rice
Water level
in the bowl ( + the rice)
Serves
Approximative
cooking time*
2 300 g 2 cup mark 3per.-4per. 19 min
4 600 g 4 cup mark 5per.-6per. 26 min
5,5 900 g 5,5 cup mark 8per.-10per. 29 min
COOKING GUIDE FOR WHITE RICE - 5,5 CUPS
• Rinse the rice thoroughly before cooking except for risotto rice.
5085935-YA4:NOTICE 7/01/09 10:30 Page 3

4
Some recommendations
for best results when cooking rice
• Measure out the rice and rinse it thoroughly under running water in a sieve for
a long time (except for risotto rice which should not be rinsed). Then place the
rice in the bowl together with the corresponding quantity of water.
• Make sure that the rice is well distributed around the whole surface of the bowl,
in order to allow even cooking.
• Add salt to your personal taste if required.
• Water may be substituted to stock. If using stock, there is the risks of rice
browning a bit in the bottom.
• Do not open the lid during cooking as steam will escape and this will affect the
cooking time and the taste.
• On completion of cooking, when the “KEEP WARM” indicate light is on, stir the
rice and then leave it in the rice cooker for a few minutes longer in order to get
perfect rice with separate grains.
Soup Cooking
To cook soup
• Turn the mode switch to the right to choose "CONGEE/SOUP" mode
– Fig. 11
and
then press downwards on the control switch, the red cooking indicator
illuminates showing that cooking has begun
– Fig. 9
.
• To finish cooking procedure, you must turn upwards on the control switch to its
top position. The orange "KEEP WARM” indicate light comes on and the
appliance turn to keep warm function
– Fig. 12
.
Rice cooking
The cooking times given in the tables are only approximate and for your guidance.
• Place the appliance on a flat, stable, heat-resistant work surface away from water
splashes and any other sources of heat.
• Pour the required quantity of rice into the bowl using the measuring cup
provided. Then fill with cold water up to the corresponding “CUP” mark printed in
the bowl (See cooking guide above) – Fig. 7.
• Close the lid.
Note: Always add the rice first otherwise you will have too much water.
• Check that the appliance is plugged in. Turn the mode switch to the left to choose
"RICE/STEAM" mode
– Fig. 8
and then press downwards on the control switch, the
red cooking indicator illuminates showing that cooking has begun
– Fig. 9
.
• When cooking finished, it will turn to keep warm automatically, the "KEEP
WARM" indicate light is on
– Fig. 10
.
• After each use empty and clean the condensation collector.
The rice cooker itself
determines the exact
cooking time depending on
the quantity of water and
ingredients placed in the
bowl (see cooking table
above for a guide to
times).
When the volume of water
has been absorbed by the
rice, the appliance stops
the cooking process
automatically and passes
into the “KEEP WARM"
mode (the orange “KEEP
WARM” indicate light
comes on).
Note: When using risotto rice for milk rice pudding or dessert puddings follow the proportions in the
recipe book as more water is needed.
When cooking milk rice pudding, use Arborio risotto rice instead of pudding rice, as it cooks quicker and
gives better results. Follow the instructions in the recipes. Do not cook the rice directly in milk as it will
froth up and boil up through the lid.
5085935-YA4:NOTICE 7/01/09 10:30 Page 4

5
EN
Steam cooking (for vegetables, fish, etc.)
Measuring the ingredients
• The maximum quantity of water in the bowl should not exceed the maximum CUP mark shown in “CUP” on
the bowl – Fig. 7. Exceeding this level may cause overflows during use.
• The water should be lower than the steam basket.
Preparation
• Pour water into the bowl, never exceed the maximum CUP mark.
• Place the steam basket in the bowl – Fig. 13.
• Add the ingredients in the steam basket.
To steam cook
• Turn the mode switch to the left to choose "RICE/STEAM" mode
– Fig. 8
and then press downwards on the
control switch, the red cooking indicator illuminates showing that cooking has begun
– Fig. 9
.
• You have to adjust the cooking time as you want, just turn upwards on the control switch to its top position to
finish cooking procedure. The orange "KEEP WARM” indicate light comes on and the appliance trun to keep
warm function.
• When there is no more water in the cooking pot, it will turn to keep warm automatically, the "KEEP WARM"
indicate light is on
– Fig. 10
.
Congee cooking
To cook congee
•
Turn the mode switch to the right to choose "CONGEE/SOUP" mode – Fig. 11 and
then press downwards on the control switch, the red cooking indicator illuminates
showing that cooking has begun – Fig. 9.
•
You must turn upwards on the control switch to its top position to finish cooking
procedure. The orange "KEEP WARM” indicate light comes on and the appliance
turn to keep warm function – Fig. 12.
• You can adjust the water accoding to your taste. Generally, it needs about 8 cups
of water for a cup of rice.
Keep warm function
On completion of cooking, for rice or steam cooking, the appliance passes automatically to the “KEEP WARM”
function. The control switch comes up to its top position and the orange “KEEP WARM” indicate light comes on
For congee or soup cooking, it will turn to keep warm function when you turn upwards on the control switch to its
top position and the orange "KEEP WARM” indicate light comes on. The food is thus kept warm and ready to serve.
Be careful that keep warm long time would affect the quality of rice. We suggest not to keep warm more than I
hour and a half for this product. To switch off this function, unplug the appliance
– Fig. 14
.
On completion of cooking
• Open the lid.
• Serve the food using the plastic spoon supplied with the appliance and
reclose the lid.
• The food remaining in the bowl will keep warm for any second servings.
• Don't forget to unplug the appliance after keep warm.
The escaping steam is very
hot.
5085935-YA4:NOTICE 7/01/09 10:30 Page 5

6
Cleaning and Maintenance
Condensation collector
• The condensation collector should be emptied and cleaned after each use.
• To remove the collector, press on each side of the plastic cover and remove – Fig. 15.
• To put the collector back, push firmly into the groove.
Bowl, steam basket, condensation collector,
micro pressure valve and the steam basket
• When clean the micro-pressure valve, please remove it from the lid – Fig. 16
and open it by rotating in the direction of “open”– Fig. 16.
After cleaning it, please wipe dry it and meet the two triangle in the two
parts together – Fig. 16, and rotate it in the direction of “close” until you
heard “ka”, then put it back to the lid of the rice cooker.
• Use hot water, washing up liquid and a sponge to clean the bowl – Fig. 17, the
condensation collector – Fig. 18, the micro computer valve – Fig. 19, the spoons
and the cup. Scouring powders and metal sponges are not recommended.
• If food has stuck to the bottom, allow the bowl to soak for a while before washing it.
• Dry the bowl carefully.
•
Do not immerse the appliance in water, nor pour water into it, only into the bowl.
Cleaning in a dishwasher
You can also wash the bowl, the steam basket and the spoons in the bottom shelf of
the dishwasher. For the bowl, carefully follow the instructions below :
• When putting the bowl into the machine, be careful not to damage the non-
stick coating on the dish washer racks.
• After being washed several times in the dish washer, to renew the surface, it is
recommended to wipe the whole of the inner surface of the bowl with a little
vegetable oil on some paper towel.
• Make sure you put the bowl back into the Rice Cooker.
Taking care of the non-stick bowl
• To keep the non stick quality of the bowl for as long as possible, it is
recommended not to cut food in it.
• Use plastic or wooden utensils and not metal ones when stirring or serving
food to avoid damaging the bowl surface.
• To avoid any risk of corrosion, do not pour vinegar into the bowl.
• The colour of the bowl surface may change after using for the first time or
after longer use. This change in colour is due to the action of steam and
water and does not have any effect on the use of the Rice Cooker, nor is it
dangerous for your health. It is perfectly safe to continue using it.
Cleaning and care of the other parts of the appliance
• Unplug the appliance before cleaning.
• Clean the outside of the Rice Cooker, the inside of the lid – Fig. 20 and
the cord with a damp cloth and wipe dry. Do not use abrasive products.
• Do not use water to clean the interior of the appliance body as it could
damage the heat sensor.
Any brown marks and
scratches that may appear
after many hours use are not
a problem. We guarantee
that the non stick coating
COMPLIES WITH THE RULES
on materials suitable for
contact with food.
5085935-YA4:NOTICE 7/01/09 10:30 Page 6

7
1. 蒸盤
2. 水和米刻度
3. 可拆式不黏塗層內鍋
4. 量杯
5. 湯勺支架
6. 湯勺
7. 電源線
8. 開蓋按鈕
9. 煲蓋手挽
10. 微壓閥
11. 煲蓋
12. 露水收集器
13. 控制面板
a.“飯/蒸煮”煮食模式
(紅色代表已選, 黑色代表未選)
b.煮食指示燈(紅色)
c 開關掣
d 保溫指示燈(橙色)
e “粥/湯”煮食模式
(紅色代表已選, 黑色代表未選)
f 模式掣
14. 發熱板
15. 感應器
目錄
初次使用前
電飯煲開封
• 從包裝中取出電飯煲, 拆除各附件和包裝資料。
• 按下手挽上的按鈕, 打開電飯煲蓋。
Fig. 1
• 安裝湯勺支架:將架的勾插入固定環下的洞中,
然後向下滑動
Fig. 2
, 確保微壓閥位置正確
Fig. 3
。
閱讀使用書,
按照操作方法小心操作。
清洗電飯煲
• 取出不黏塗層內鍋及微壓閥。
• 用海綿及洗潔精清洗不黏塗層內鍋和微壓閥。
用濕布擦拭產品外部及煲蓋的金屬部份。
• 小心擦乾。
使用全部4種功能
• 仔細擦拭不黏塗層內鍋外部(尤其是煲底)。
確保煲底和發熱板上沒有異物或液體
Fig. 4
。
• 將不黏塗層內鍋放入電飯煲
Fig. 5
, 確保內鍋位置正確。
• 輕輕將不黏塗層內鍋朝兩邊轉動, 確保煲底和發熱板接觸良好。
• 檢查露水收集器的位置是否正確。
如否, 請將露水收集器穩固地裝入安裝槽內。
• 關上並扣好電飯煲蓋。
• 電飯煲插上電源。
• 避免於內鍋清空的情況下開啟電飯煲。
烹飪過程中, 切勿將手放在排氣
孔上, 以防燙傷。
如果想改變誤選的烹飪功能, 按下
“取消”鍵, 然後選擇所需功能
使用電飯煲
ZH
5085935-YA4:NOTICE 7/01/09 10:30 Page 7
8
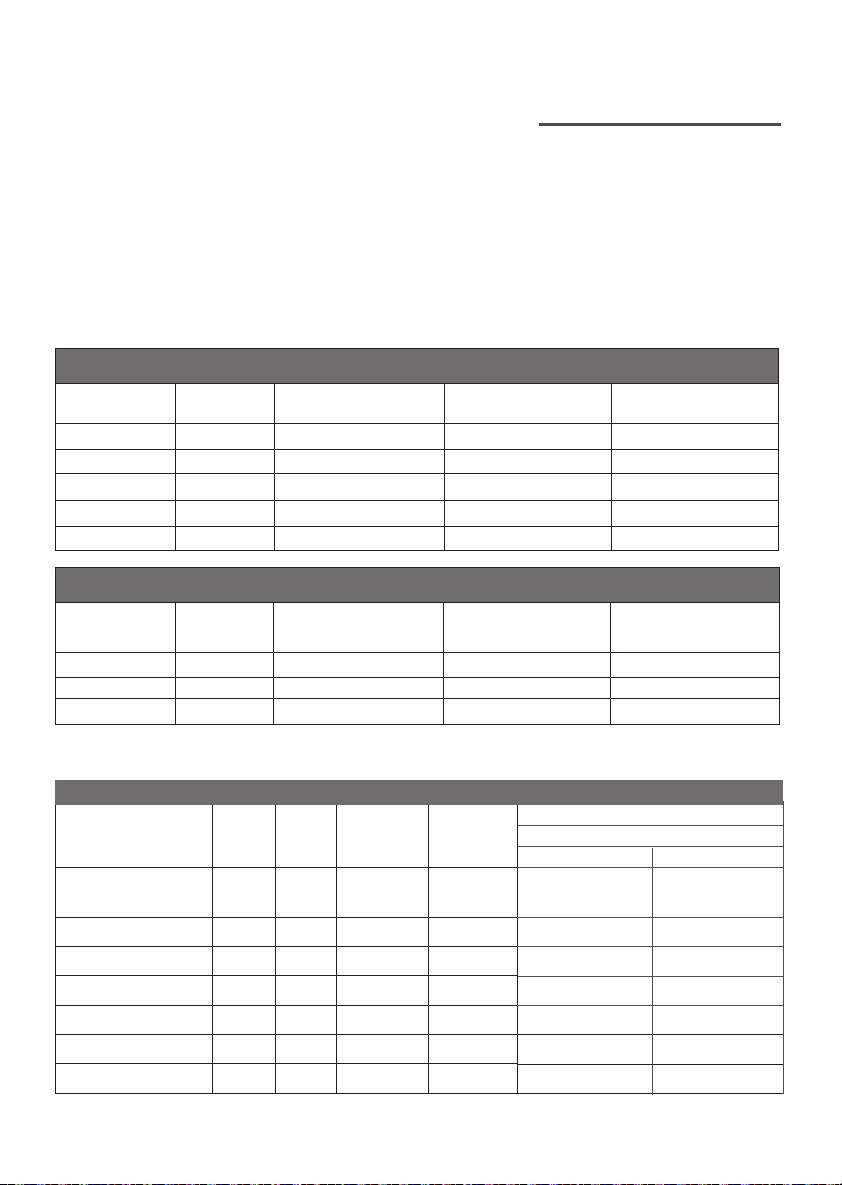
大約烹調時間
*
煮飯功能
5,5 杯米 10 杯米
23 分鐘 23 分鐘
36 分鐘 32 分鐘
24 分鐘 22 分鐘
22 分鐘 20 分鐘
42 分鐘 38 分鐘
27 分鐘 25 分鐘
24 分鐘 23 分鐘
量度米和水 – 不黏塗層內鍋的最大容量
• 不黏塗層內鍋內側有“升”及“杯”兩種刻度標記, 用於煮飯時測量水的份量
Fig. 7
。
• 電飯煲附帶塑膠杯用來量米。表中列出不同人數所需的米量。1量杯平杯的米約重150克。
• 下表提供不同類型的米的煮法。為達到最佳效果, 建議烹調一般的米,
而非黏身、可能黏煲底的“易煮”米。烹調其他種類的米時, 如糙米或野米, 所需水量應亦應有所調節,
請見下表。
• 煮1量杯白米(供2小份量或1份量), 用1量杯白米, 然後加入1.5量杯水。
某些種類的米煮1量杯米時可能會黏煲底。煮食其他份量的白米請參考以下煮食建議。
• 米和水的總量最多不應超過內鍋內側(視乎不同產品)5.5或10杯水位線(視乎不同產品)
Fig. 7
。
視乎不同種類的米需要加入的水量也不同。詳見下表。
• 米煮前應徹底淘洗。
煮飯
白米的烹調方法 - 10 杯米
白米的量杯數量 白米重量 內鍋中的水位(加入米) 可供享用人數 大約烹調時間
*
2
300 克 2 杯刻度 3 到5人
15分鐘
4
600 克 4 杯刻度 5 到 6 人
21分鐘
6
900 克 6 杯刻度 8 到 10 人
25分鐘
8
1200 克 8 杯刻度 11 到 14 人.
29分鐘
10
1500 克 10 杯刻度 13 到.17 人.
31分鐘
• 除了意大利米外, 米煮前應徹底淘洗。
米的類型
用米數量
(量杯)
白米重量
內鍋中的水位
(加入米)
可供享用人數
圓白大米 (意大利大米
–通常為較黏身米)
4
600 克 4 杯刻度 5 到 6 人
全粒糙米
4
600 克 4,5 杯刻度 5 到 6 人.
意大利米(短圓梗米)
4
600 克 4 杯刻度 4 到 5 人
糯米
4
620 克 4 杯刻度 5 到 6 人
糙米
4
570 克 4,5 杯刻度 5 到 6 人
日本米
4
580 克 4 刻度 5 到 6 人
香米
4
640 克 4 杯刻度 5 到 6 人
*
電飯煲根據不黏塗層內鍋中米量和水量自行決定準確的烹調時間。
不同種類米的烹調方法
白米的烹調方法 - 5,5 杯米
白米的量杯數量 白米重量 內鍋中的水位(加入米) 可供享用人數 大約烹調時間
*
2
300 克 2 杯刻度 3 到5人 19分鐘
4
600 克 4 杯刻度 5 到 6 人 26分鐘
5,5
900 克 5,5 杯刻度 8 到 10 人 29分鐘
5085935-YA4:NOTICE 7/01/09 10:30 Page 8

9
注意:用意大利米製作牛奶米布甸或一般布甸時, 由於需要更多水, 因此應按照食譜中的比例。
製作牛奶布甸時, 用意大利短圓梗米代替布甸米煮得更快更好。按照食譜指示。切勿用牛奶直接和米烹調,
否則會起泡並溢出煲蓋。
表中只列出大約的烹調時間並僅供參考。
• 將電飯煲置放在平坦、穩固、耐熱、
遠離被水濺濕及其他熱源的平面。
• 用電飯煲附送的量杯將所需的米倒入內鍋中。
然後將凍水加入至內鍋中相應的水位(詳見上表)
Fig. 7
。
• 蓋上煲蓋。 注意:先加米以防水加太多。
• 檢查電飯煲是否插上電源。
將模式制調至左邊選擇“飯/蒸煮”模式
Fig.8
, 按下開關掣,
紅色指示燈會著,開始煮飯
Fig. 9
。
• 煮飯完成, 電飯煲自動保溫, “保溫”指示燈會著
Fig. 10
。
• 每次使用後, 清空及清洗露水收集器。
電飯煲會根據內鍋中的水量和材
料份量自行決定準確的烹調時間
(有關具體煮飯時間,
請參閱上表)。
當米吸收水後, 電飯煲會自動停
止煮飯, 進入“保溫”模式
(紅色“保溫”指示燈亮著)。
煮飯
達到煮飯最佳效果的建議
• 米量好後, 用筲箕在水喉下徹底沖洗一段長時間(不用淘洗的意大利米除外)。
然後將洗淨的米和相應份量的水加入內鍋中。
• 確保米均勻攤鋪在煲中以使烹調均勻。
• 可根據個人味道加鹽調味。
• 可用清湯代替水, 但煲底的米有可能會輕微燒焦。
• 煮飯時切勿打開煲蓋, 否則蒸汽溢出會影響烹調時間及米飯味道。
• 煮飯完成, “保溫”指示燈亮著時, 攪拌米飯, 然後讓米飯放煲中數分鐘, 這樣能讓米飯粒粒分明。
煲湯
• 將模式掣調至右邊選擇“粥/湯”模式
Fig. 11
, 並按下開關掣,
紅色指示燈會著,開始煲湯
Fig. 9
。
• 要結束煲湯, 你必需把開關掣撥向上。橙色“保溫”指示燈會著,
電飯煲會進入保溫功能
Fig. 12
。
煲湯
量度材料
• 內鍋中的最大水量不應超過內鍋的最大“杯”
刻度中的最高水位
Fig. 7
。超過該水位有可能導致煮食過程中溢出水。
• 水面應低於蒸盤。
蒸煮(如蔬菜、魚類等)
ZH
5085935-YA4:NOTICE 7/01/09 10:30 Page 9

10
準備運作
• 內鍋中加入水。水量不能超過內鍋的最大“杯”
刻度中的最高水位。
• 將蒸盤放入內鍋中
Fig. 13
。
• 將材料放入蒸盤。
蒸煮
• 將模式掣調至左邊選擇“飯/蒸煮”模式
Fig. 8
, 並按下開關掣, 紅色指示燈會著,開始蒸煮
Fig. 9
。
• 可隨時根據需要改變煮食時間, 要結束蒸煮只需把開關掣撥向上。橙色“保溫”指示燈會著,
電飯煲會進入保溫功能。
• 鍋中沒有水時, 電飯煲會自動進入保溫狀態, “保溫”指示燈會著
Fig. 10
。
煲粥
• 將模式掣調至右邊選擇“粥/湯”模式
Fig. 11
, 並按下開關掣, 紅色指示燈會著,開始煲粥
Fig. 9
。
• 要結束煲粥, 只需要將開關掣撥向上。橙色“保溫”指示燈會著, 電飯煲會進入保溫功能
Fig. 12
。
• 可根據個人口味調節水量。一般而言, 1杯米需要 8 杯水。
煲粥
烹調過程完成後, 於煮飯或蒸煮模式中, 電飯煲會自動啟動“保溫”功能。開關制轉向上, 橙色“保溫”
指示燈會著。於煲粥或煲湯模式中, 將開關掣向上撥, 電飯煲會進入保溫狀態, 同時橙色“保溫”指示
燈會著。煮好的食物處於保溫狀態並隨時可享用。請注意長時間保溫會影響米飯的口感。
我們建議保溫時間少於1.5小時。要結束功能, 拔除電飯煲電源
Fig. 11
。
保溫功能
烹調完成
• 打開煲蓋。
• 用電飯煲附設的膠湯勺將食物取出, 然後再蓋上煲蓋。
• 煲內的食物將處於保溫狀態,可再次享用。
• 保溫後拔除電源。
溢出的蒸汽非常高溫。
5085935-YA4:NOTICE 7/01/09 10:30 Page 10

11
清潔和保養
露水收集器
• 每次使用後清空及清洗露水收集器。
• 按露水收集器的塑膠蓋兩端將其取出
Fig. 15
。
• 將露水收集器穩固地插回固定槽中。
內鍋、蒸盤、露水收集器、微壓閥及蒸盤
• 清洗微壓閥時, 請將微壓閥從煲蓋上取下
Fig. 16
,
然後沿“開啟”方向旋轉, 將微壓閥打開
Fig. 16
。
清洗完畢後, 擦乾微壓閥, 並對準兩個配件中的三角形
Fig. 16
,
沿“關閉”方向旋轉, 直到發出“咔”聲, 然後將其放回電飯煲蓋。
• 用熱水、洗潔精及海綿清洗內鍋
Fig. 17
、露水收集器
Fig. 18
、微壓閥
Fig. 19
、湯勺及量杯。
不建議使用去污粉及金屬百潔布。
• 如果煲底上黏上食物, 清洗前先將內鍋浸泡一會兒。
• 小心擦乾內鍋。
• 切勿將電飯煲放在水中, 或將水倒入其中, 只能將水倒入內鍋中。
用洗碗機清洗
內鍋、蒸盤、湯勺亦可放洗碗機底層清洗。清洗內鍋時, 請按照
以 下說明小心進行:
• 將內鍋放入洗碗機時, 小心放於洗碗機架上,
以免損壞內鍋的不黏塗層。
• 在洗碗機中清洗幾次後需翻新內鍋的表層。
建議用抺手紙蘸少許植物油擦拭內鍋的整個內部表面。
• 確保將內鍋放回電飯煲內。
電飯煲使用一段時間後出現的啡色
蹟、刮痕, 這並不會造成問題。本
公司保證不黏塗層符合有關接觸食
物的合適材料的各項規定。
不黏塗層內鍋的保養
• 為能長期保持內鍋的不黏特性, 建議切勿在煲中切食物。
• 攪拌食物或取出食物時請使用塑膠或木制器具, 切勿使用金屬器具,以免損壞內鍋表面。
• 為防止腐蝕, 切勿將醋加入內鍋。
• 初次使用或多次使用後, 內鍋表面的顏色可能會產生變化。這是由於蒸汽及水的作用造成,
不會影響電飯煲的使用, 亦不會對人體有害。電飯煲仍可繼續放心使用。
• 清洗電飯煲前將電源拔除。
• 用濕布擦拭電飯煲外部、煲蓋內側
Fig. 20
及電源線, 然後擦乾。
切勿使用腐蝕性或具磨損性的清潔產品。
• 切勿用水清洗電飯煲內部, 以免損壞熱力感應器。
電飯煲其他配件的清洗及保養
ZH
5085935-YA4:NOTICE 7/01/09 10:30 Page 11

12
- Fig. 1.
- Fig. 2.
-
- Fig. 3.
-
-
4
()
- Fig. 4.
- Fig. 5
- Fig. 6.
1.
2.
3.
4.
5.
6.
7.
8.
9.
10. -
11.
12.
13.
a. / (
)
b. ()
c.
d. ()
e. // (
)
f.
14.
15.
5085935-YA4:NOTICE 7/01/09 10:30 Page 12
13
TH
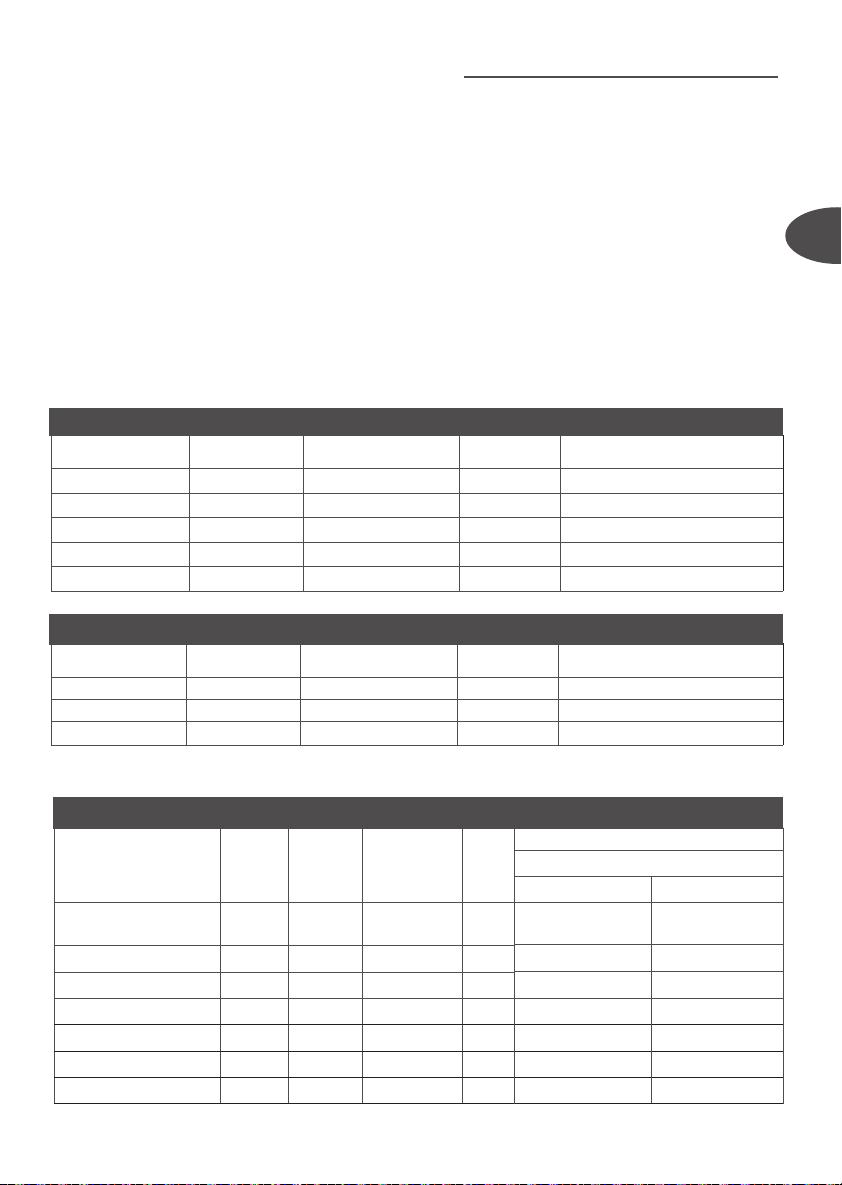
*
5.5
(1.0 ) 10 (1.8 )
23 23
36 32
24 22
22 20
42 38
27 25
24 23
– Fig. 7
150
(easy cook)
( 2 1 )
1 1.5
5.5 10 ()
()
– Fig. 7
*
()
()
(Round white rice)
4 600 4 5-6
4 600 4.5 5-6
() 4 600 4 4-5
4 620 4 5-6
4 570 4.5 5-6
4 580 4 5-6
4 640 4 5-6
()
()
*
2 300 2 3-4 15
4 600 4 5-6 21
6 900 6 8-10 25
8 1200 8 11-14 29
10 1500 10 13-17 31
- 10 (1.8 )
()
()
*
2 300 2 3-4 19
4 600 4 5-6 26
5.5 900 5.5 8-10 29
- 5.5 (1.0 )
5085935-YA4:NOTICE 7/01/09 10:30 Page 13

14
( )
2-3
//
– Fig. 11
– Fig. 9
– Fig. 12
()
– Fig. 7
:
/
– Fig. 8
– Fig. 9
– Fig. 10
(
)
()
:
5085935-YA4:NOTICE 7/01/09 10:30 Page 14

15
TH
( )
– Fig. 7
– Fig. 13
/
– Fig. 8
– Fig. 9
– Fig. 10
/
/
//
– Fig. 11
– Fig. 9
/
– Fig. 12
8
//
– Fig. 14
5085935-YA4:NOTICE 7/01/09 10:30 Page 15

16
– Fig. 15
-
-
– Fig. 16
– Fig. 16
– Fig. 17
– Fig. 18
-
– Fig .19
– Fig. 20
5085935-YA4:NOTICE 7/01/09 10:30 Page 16

17
MS
Keluarkan peralatan
• Alihkan peralatan daripada bungkusan dan keluarkan kesemua aksesori dan
dokumen.
• Buka penutup dengan menekan butang pembuka yang terletak di atas
pemegang – Fig. 1.
• Pasang pemegang senduk: masukkan cangkuk plastik pemegang ke dalam
lubang di bawah gegelang produk dan tolak ke bawah – Fig. 2. Pastikan
injap tekanan mikro berada pada kedudukan yang betul -
Fig. 3.
Cuci peralatan
• Alihkan mangkuk masakan tidak lekat dan injap tekanan mikro.
• Cuci mangkuk dan injap tekanan mikro dengan span dan cecair pencuci. Lap
bahagian luar peralatan dan bahagian logam penutup dengan kain lembap.
• Keringkan dengan berhati-hati.
Menggunakan periuk nasi anda
Untuk kesemua 4 fungsi
• Lap bahagian luar mangkuk (terutama bahagian bawah) dengan
berhati-hati. Pastikan tidak ada bendasing atau cecair di bawah
mangkuk dan di atas plat panas – Fig. 4.
• Letakkan mangkuk ke dalam peralatan – Fig. 5, pastikan ia diletakkan pada
kedudukan yang betul.
• Pusingkan sedikit mangkuk ke kedua-dua belah arah untuk memastikan
bahagian bawah mangkuk bersentuhan dengan plat panas.
• Periksa sama ada pengumpul wap diletakkan dengan betul, jika tidak sila
tekan dengan kemas ke dalam alurnya – Fig. 6.
• Tutup dan kunci penutup.
• Pasangkan plag peralatan.
• Jangan buka suis peralatan sehinggalah kesemua langkah di atas telah
dilengkapkan.
• Elakkan memasang suis peralatan sekiranya mangkuk masakan kosong.
Jangan sesekali meletakkan
tangan di atas corong wap
ketika memasak untuk
mengelakkan bahaya melecur.
Sekiranya anda hendak
menukar menu yang tersalah
pilih, tekan kekunci “BATAL”
dan pilih menu yang
dikehendaki.
Baca arahan dan ikut
kaedah memasang dengan
berhati-hati.
Sebelum penggunaan kali pertama
Keterangan
1. Bakul kukusan
2. Pembahagi air dan nasi
3. Mangkuk masakan tidak lekat
4. Cawan penyukat
5. Pemegang senduk
6. Senduk
7. Wayar kuasa
8. Butang penutup
9. Pemegang penutup
10. Injap tekanan mikro
11. Penutup
12. Pengumpul wap
13. Kotak kawalan
a. Mod memasak NASI/KUKUS (merah apabila
dipilih dan hitam jika tidak dipilih)
b. Lampu penunjuk memasak (merah)
c. Suis kawalan
d. Lampu penunjuk kekal panas (oren)
e. Mod memasak BUBUR/SUP (merah apabila
dipilih dan hitam jika tidak dipilih)
f. Suis mod
14. Plat panas
15. Sensor
5085935-YA4:NOTICE 7/01/09 10:30 Page 17
18
Anggaran masa memasak*
Memasak nasi
5,5 cawan 10 cawan
23 min 23 min
36 min 32 min
24 min 22 min
22 min 20 min
42 min 38 min
27 min 25 min
24 min 23 min
Memasak Nasi
Menyukat bahan-bahan – Kapasiti mangkuk yang maksimum
• Penanda di dalam mangkuk adalah dalam ukuran liter dan cawan untuk
mengukur sukatan air semasa memasak nasi – Fig. 7.
• Cawan plastik yang disertakan adalah untuk menyukat beras dan jadual di
bawah menyatakan kuantiti beras yang diperlukan untuk jumlah hidangan. 1
paras sukatan beras mempunyai berat lebih kurang 150g.
• Jadual di bawah memberi panduan untuk memasak pelbagai jenis beras. Untuk
hasil yang terbaik, kami menyarankan penggunaan beras biasa berbanding jenis
beras ‘senang masak’ yang biasanya lebih lembik dan mungkin melekat pada
dasar mangkuk. Sekiranya menggunakan jenis beras yang lain seperti beras
perang atau beras liar, kuantiti air perlu diubahsuai seperti jadual di bawah.
• Untuk memasak hanya 1 cawan nasi putih (untuk 2 hidangan kecil atau 1
hidangan besar) disebabkan tiada tanda 1 cawan di dalam mangkuk masakan,
anda perlu menggunakan 1 cawan beras putih dan tambahkan 1 ½ cawan air.
Bagi sesetengah jenis beras, adalah normal sekiranya sedikit nasi melekat pada
dasar mangkuk semasa memasak 1 cawan nasi. Untuk memasak nasi putih
dalam kuantiti yang lain, rujuk kepada panduan memasak di bawah.
• Sukatan maksimum air+beras tidak boleh melebihi tanda 5,5 atau 10
(bergantung kepada produk) di dalam mangkuk – Rajah 7. Bergantung kepada
jenis beras, kuantiti air perlu diubahsuaikan. Lihat jadual di bawah.
• Cuci beras sepenuhnya sebelum memasak.
*Periuk nasi akan menentukan masa memasak secara automatik bergantung kepada kuantiti air dan beras di dalam mangkuk.
Jenis beras
Sukatan
beras
(cawan)
Berat
beras
Paras air dalam
mangkuk
(+ beras)
Hidangan
Beras putih bulat
(Beras Itali - biasanya
lebih melekat)
4 600 g Paras 4 cawan 5-6 hidangan
Beras perang
wholegrain
4 600 g Paras 4,5 cawan 5-6 hidangan
Beras risotto
(Jenis Arborio)
4 600 g Paras 4 cawan 4-5 hidangan
Beras pulut 4 620 g Paras 4 cawan 5-6 hidangan
Beras perang 4 570 g Paras 4,5 cawan 5-6 hidangan
Beras jepun 4 580 g Paras 4 cawan 5-6 hidangan
Beras wangi 4 640 g Paras 4 cawan 5-6 hidangan
PANDUAN MEMASAK UNTUK JENIS BERAS YANG LAIN
Sukatan beras
putih (cawan)
Berat beras putih
Paras air dalam
mangkuk (+ beras)
Hidangan
Anggaran masa memasak*
2 300 g Paras 2 cawan 3-4 hidangan 15 min
4 600 g Paras 4 cawan 5-6 hidangan 21 min
6 900 g Paras 6 cawan 8-10 hidangan 25 min
8 1200 g Paras 8 cawan 11-14 hidangan 29 min
10 1500 g Paras 10 cawan 13-17 hidangan 31 min
PANDUAN MEMASAK UNTUK BERAS PUTIH - 10 CAWAN
• Cuci beras sepenuhnya sebelum memasak kecuali beras risotto.
Sukatan beras
putih (cawan)
Berat beras putih
Paras air dalam
mangkuk (+ beras)
Hidangan
Anggaran masa memasak*
2 300 g Paras 2 cawan 3-4 hidangan 19 min
4 600 g Paras 4 cawan 5-6 hidangan 26 min
5,5 900 g Paras 5,5 cawan 8-10 hidangan 29 min
PANDUAN MEMASAK UNTUK BERAS PUTIH - 5,5 CAWAN
5085935-YA4:NOTICE 7/01/09 10:30 Page 18

19
Memasak nasi
Masa memasak yang diberikan dalam jadual hanyalah anggaran dan
sebagai panduan sahaja.
• Letakkan peralatan di atas permukaan yang rata, stabil, tahan panas dan
jauh daripada percikan air dan sumber haba.
• Tuangkan kuantiti beras yang dikehendaki ke dalam mangkuk dengan
menggunakan cawan penyukat yang disediakan. Kemudian isikan air sejuk
sehingga ke tanda “CAWAN” di dalam mangkuk tersebut. (Sila rujuk kepada
panduan memasak di atas) – Fig. 7.
• Tutup penutup.
Nota: Sentiasa masukkan beras terlebih dahulu untuk mengelakkan
air yang berlebihan.
• Periksa sama ada plag peralatan telah disambung, Tolak suis mod ke kiri
untuk memilih mod “NASI/KUKUS” –
Fig. 8
dan kemudian tekan suis
kawalan ke bawah, lampu penunjuk memasak berwarna merah akan
menyala menandakan proses memasak telah bermula
– Fig. 9
.
• Apabila selesai memasak, peralatan akan bertukar ke mod kekal panas secara
automatik dan lampu penunjuk kekal panas akan menyala –
Fig. 10
.
• Setiap kali selepas penggunaan, kosongkan dan bersihkan pengumpul wap.
Saranan untuk mendapatkan
hasil terbaik apabila memasak nasi
• Sukat nasi dan dengan menggunakan penapis, cuci dengan sempurna di bawah air yang
mengalir untuk satu jangkamasa (kecuali beras risotto yang tidak perlu dibilas). Kemudian
masukkan beras ke dalam mangkuk bersama-sama dengan kuantiti air yang mencukupi.
• Pastikan beras diratakan sepenuhnya di atas permukaan mangkuk untuk masakan yang sekata.
• Tambah garam mengikut rasa.
• Air boleh diganti dengan stok. Jika menggunakan stok, berkemungkinan nasi di bahagian
bawah mangkuk akan sedikit perang.
• Jangan buka penutup semasa memasak kerana wap akan keluar dan akan mengganggu
masa memasak dan rasa masakan.
• Setelah selesai memasak, apabila lampu penunjuk “KEKAL PANAS” menyala, kacau nasi dan
biarkan di dalam periuk untuk beberapa minit lagi untuk memperolehi biji-biji nasi yang
sempurna.
Memasak Sup
Untuk memasak sup
• Tolak suis mod ke kanan untuk memilih mod “BUBUR/SUP”
– Fig. 11
dan
kemudian tekan suis kawalan ke bawah, lampu penunjuk memasak berwarna
merah akan menyala menandakan proses memasak telah bermula
– Fig. 9
.
• Untuk menamatkan proses memasak, anda hendaklah menolak suis kawalan
ke kedudukan teratas. Lampu penunjuk “KEKAL PANAS” berwarna oren akan
menyala dan peralatan akan bertukar ke mod kekal panas
– Fig. 12
.
Periuk nasi akan menentukan
masa memasak bergantung
kepada kuantiti air dan bahan-
bahan yang dimasukkan ke dalam
mangkuk (sila rujuk jadual
memasak di atas untuk panduan
masa memasak.)
.
Apabila air telah diserap ke
dalam nasi, peralatan akan
memberhentikan proses
memasak secara automatik dan
menukar status ke mod “KEKAL
PANAS” (lampu oren penunjuk
“KEKAL PANAS” akan menyala).
MS
Nota: Apabila memasak beras risotto untuk puding beras susu atau puding pencuci mulut ikut nisbah
seperti yang terdapat dalam buku resepi kerana lebih banyak air diperlukan.
Apabila memasak puding beras nasi, gunakan beras risotto Arbario untuk menggantikan beras puding
kerana ia lebih cepat dimasak dan memberikan hasil yang lebih baik. Ikut arahan dalam resepi. Jangan
masak beras secara langsung di dalam susu kerana ia akan berbuih dan mendidih keluar melalui penutup.
5085935-YA4:NOTICE 7/01/09 10:30 Page 19

20
Mengukus (untuk sayuran, ikan dan sebagainya)
Menyukat bahan-bahan
• Kuantiti air yang maksimum di dalam mangkuk tidak boleh melebihi paras maksimum “CAWAN” yang ditanda
pada mangkuk – Fig. 7. Melebihi paras ini mungkin mengakibatkan limpahan semasa penggunaan.
• Paras air sepatutnya lebih rendah daripada bakul kukusan.
Penyediaan
• Masukkan air ke dalam mangkuk tetapi jangan melebihi paras maksimum
“CAWAN”.
• Letakkan bakul kukusan ke dalam mangkuk – Fig. 13.
• Masukkan bahan-bahan ke dalam bakul kukusan.
Wap yang keluar adalah
sangat panas.
Untuk mengukus
• Tolak suis mod ke kiri untuk memilih mod “NASI/KUKUS” –
Fig. 8
dan
kemudian tekan suis kawalan ke bawah, lampu penunjuk memasak berwarna
merah akan menyala menunjukkkan proses memasak telah bermula –
Fig. 9
.
• Anda perlu mengubahsuai masa memasak mengikut keperluan anda, cuma
tolak suis kawalan ke atas ke kedudukan teratas untuk menamatkan proses
memasak. Lampu penunjuk “KEKAL PANAS” berwarna oren akan menyala dan
peralatan akan bertukar ke mod kekal panas
– Fig. 10
.
Memasak bubur
Untuk memasak bubur
• Tolak suis mod ke kanan untuk memilih mod “BUBUR/SUP” –
Fig. 11
dan
kemudian tolak suis kawalan ke bawah, lampu penunjuk memasak berwarna
merah menyala menandakan proses memasak telah bermula –
Fig. 9
.
• Anda perlu menolak suis kawalan ke kedudukan teratas untuk menamatkan
proses memasak. Lampu penunjuk “KEKAL PANAS” berwarna oren akan
menyala dan peralatan bertukar ke mod kekal panas –
Fig. 12
.
• Anda boleh mengubahsuai paras air mengikut kesukaan. Secara amnya, ia
memerlukan lebih kurang 8 cawan air untuk satu cawan beras.
Fungsi kekal panas
Apabila selesai memasak, untuk mod memasak nasi atau kukus, peralatan akan bertukar ke mod “KEKAL PANAS”
secara automatik. Suis kawalan akan naik ke kedudukan teratas dan lampu penunjuk “KEKAL PANAS” berwarna
oren akan menyala. Untuk mod memasak bubur atau sup, ia akan bertukar ke mod kekal panas apabila anda
menolak suis kawalan ke kedudukan teratas dan lampu penunjuk “KEKAL PANAS” berwarna oren menyala.
Makanan akan kekal panas dan sedia untuk dihidangkan. Berhati-hati kerana terlalu lama di dalam mod kekal panas
akan mengurangkan kualiti nasi. Kami mencadangkan agar tidak membiarkan nasi dalam mod kekal panas lebih
daripada satu jam setengah untuk produk ini. Untuk mematikan suis fungsi ini, tanggalkan plag peralatan
– Fig. 14
.
Setelah selesai memasak
• Buka penutup.
• Hidangkan makanan dengan menggunakan senduk plastik yang dibekalkan
bersama-sama dengan peralatan dan tutup penutup.
• Baki makanan yang berada di dalam mangkuk akan kekal panas untuk
hidangan kedua.
• Jangan lupa menanggalkan plag peralatan selepas kekal panas.
5085935-YA4:NOTICE 7/01/09 10:30 Page 20

21
MS
Mencuci dan menyelenggara
Pengumpul wap
• Pengumpul wap perlu dikosongkan dan dicuci selepas setiap penggunaan.
• Untuk membuka pengumpul, tekan kedua-dua belah penutup plastik dan keluarkannya – Fig. 15.
• Untuk memasang kembali pengumpul wap, tekan dengan ketat ke dalam alur.
Mangkuk, bakul kukusan,
pengumpul wap dan injap tekanan mikro
• Apabila mencuci injap tekanan mikro, sila alihkan daripada penutup – Fig. 16 dan buka
dengan memutarnya ke arah “buka” – Fig. 16.
Selepas mencuci, sila keringkannya dan cantumkan kedua-dua segitiga bersama – Fig. 16, dan putarkan ke
arah “tutup” sehingga bunyi “ka” kedengaran kemudian letakkan ia kembali ke dalam penutup periuk nasi.
• Gunakan air panas, cecair pencuci dan span untuk mencuci mangkuk – Fig. 17, pengumpul
wap – Fig. 18, injap tekanan mikro – Fig. 19, senduk dan cawan. Serbuk penyental dan span
keluli tidak disarankan.
• Sekiranya makanan terlekat di dasar, rendamkan mangkuk seketika sebelum mencuci.
• Keringkan mangkuk dengan berhati-hati.
• Jangan rendam peralatan di dalam air atau tuangkan air ke atasnya, hanya ke dalam mangkuk.
Mencuci dengan mesin pencuci pinggan
Anda juga boleh mencuci mangkuk, bakul kukusan dan senduk dalam rak paling bawah
mesin pencuci pinggan. Untuk mangkuk, ikut langkah-langkah di bawah dengan betul:
• Apabila meletakkan mangkuk ke dalam mesin, berhati-hati supaya tidak
merosakkan lapisan tidak lekat.
• Setelah dicuci beberapa kali di dalam mesin pencuci pinggan, untuk
menjadikan permukaan kelihatan baru semula, adalah disarankan untuk
mengelap keseluruhan permukaan dalam mangkuk dengan sedikit minyak
sayuran yang disapu ke atas tuala kertas.
• Pastikan anda meletakkan kembali mangkuk ke dalam periuk nasi.
Menjaga mangkuk tidak lekat
• Untuk memastikan kualiti mangkuk tidak lekat tahan selama yang mungkin adalah
disarankan untuk tidak memotong makanan di dalamnya.
• Gunakan alatan memasak plastik atau kayu dan bukan yang diperbuat daripada keluli
apabila mengacau atau menghidang makanan untuk mengelakkan permukaan mangkuk
daripada sebarang kerosakan.
• Untuk mengelakkan mangkuk daripada berkarat, jangan masukkan cuka ke dalamnya.
• Warna permukaan mangkuk mungkin berubah selepas penggunaan kali pertama atau selepas
digunakan untuk satu jangkamasa tertentu. Perubahan warna ini adalah disebabkan oleh
tindakbalas di antara wap dan air dan tidak akan mengakibatkan sebarang kesan terhadap
penggunaan periuk nasi dan tidak membahayakan kesihatan. Ia masih selamat untuk digunakan.
Mencuci dan menjaga bahagian-bahagian lain peralatan
• Tanggalkan plag peralatan sebelum mencuci.
• Cuci bahagian luar periuk nasi, bahagian dalam penutup – Fig. 20 dan wayar
dengan kain lembap dan keringkan. Jangan gunakan produk yang kesat.
• Jangan gunakan air untuk mencuci bahagian dalam peralatan kerana ia
mungkin mengakibatkan kerosakan kepada sensor haba.
Apa sahaja kesan perang
dan calar yang mungkin
kelihatan selepas beberapa
jam digunakan adalah tidak
menjadi masalah. Kami
menjamin yang lapisan tidak
lekat adalah mematuhi
peraturan-peraturan
pengendalian bahan-bahan
yang sesuai digunakan
dengan makanan.
5085935-YA4:NOTICE 7/01/09 10:30 Page 21