
www.tefal.com.au
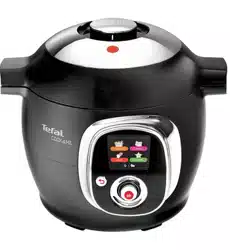
The One-Touch Easy&Fast
Multicooker, FULL OF IDEAS
Cook4me
connect

SAFETY INSTRUCTIONS
Take the time to read all the following
instructions carefully.
• The appliance can be used up to an altitude
of 2000m
• Indoor use only.
• For cleaning your appliance, please refer
instructions for use. You can wash the
cooking bowl and steam basket in soapy hot
water or in the dishwasher. Clean the body
of the appliance using a damp cloth.
• Do not immerse the appliance in water.
• Improper use of the appliance and its
accessories may damage the appliance and
cause injury.
• Do not touch hot parts of the appliance.
After use, heating element surface is subject
to residual heat after use.
• For your safety, this product conforms to
all applicable standards and regulations
(Low Voltage Directive, Electromagnetic
Compatibility, Food Compliant Materials,
Environment, ...).
• This appliance is not intended for use by
persons (including children) with reduced
physical, sensory or mental capabilities,
or lack of experience and knowledge,
unless they have been given supervision or
instruction concerning use of the appliance
by a person responsible for their safety.
Children should be supervised to ensure that
they do not play with the appliance.
• Cleaning and maintenance shall not be
made by children.
• If the supply cord is damaged, it must be
replaced by the manufacturer, its service
agent or similary qualified persons in order

to avoid a hazard. Do not replace the power
cord supplied with other cords.
• This appliance is intended for domestic
household use only. It is not intended to be
used in the following applications, and the
guarantee will not apply for:
− staff kitchen areas in shops, offices and
other working environments;
− farm houses;
− by clients in hotels, motels and other
residential type environments;
− bed and breakfast type environments.
• This appliance shall not be used by children.
Keep the appliance and its cord out of reach
of children.
• Appliances can be used by persons with
reduced physical, sensory or mental
capabilities or lack of experience and
knowledge if they have been given
supervision or instruction concerning use
of the appliance in a safe way and if they
understand the hazards involved.
• Children shall not play with the appliance.
• Do not fill your appliance more than the
MAX mark on the pot. Do not fill it more
than half full for food that expands during
cooking, such as rice, dehydrated vegetables.
Reduce the volume of water to avoid the
risk of boiling over.
• Please follow the recommendations on the
volume of food and water to avoid the risk
of boiling over which can damage your
appliance and cause injury.
• Do not spill liquid on the connector
(depending on model).
• Before using your appliance, check that
the float valve and the pressure limit
valve are clean (see section Cleaning and
maintenance).
• Do not place any foreign objects in the
pressure relief system. Do not replace the
valve.
• When you open the lid, always hold it by the
lid handle. Position your arms in alignment
with the side carrying handles. Boiling water
could remain trapped between the gasket
support and the lid and could cause burns.
• Be careful also about the risk of scalding
from the steam coming out of the appliance
when you open the lid. First open the lid

very slightly to allow the steam to escape
gently.
• Never force the appliance open. Make
sure that the inside pressure has returned
to normal. Do not open the lid when the
product is under pressure. To do so, see the
Instructions for use.
• Only use manufacturer’s spare parts in
accordance with the relevant model. In
particular, use a body and a lid from the
same manufacturer indicated as bein
compatible.
• Do not damage the sealing gasket. If it is
damaged, have it replaced in an Approved
Service Centre.
• The heat source necessary for cooking is
included in the appliance.
• Do not place the appliance in a heated oven
or on a hot hob. Do not place the appliance
close to an open flame or a flammable
object.
• Do not heat the cooking pot with any
other heat source than the heating plate
of the appliance and do not use any other
pot. Do not use the cooking pot with other
appliances.
• Move the appliance with great care when
it is under pressure. Do not touch the hot
surfaces. Use the carrying handles when
moving it and wear oven mitts, if necessary.
Do not use the lid handle to lift the
appliance.

• Do not use appliance for other than the
intended purpose.
• This appliance is not a steriliser. Do not use
it to sterilise jars.
• The appliance cooks food under pressure.
Incorrect use may cause risks of burns due
to steam.
• Make sure that the appliance is properly
closed before bringing it up to pressure (see
Instructions for use).
• Do not use the appliance empty, without
its pot or without liquid inside the pot.
This could cause serious damage to the
appliance.
• After cooking meat which has an outer layer
of skin (such as ox tongue), which could
swell due to the effects of pressure, do not
pierce the skin after cooking if it appears
swollen: you could get burnt. Pierce it before
cooking.
• When cooking food with a thick texture
(chick peas, rhubarb, compotes, etc.), shake
the appliance slightly before opening it to
ensure that the food or cooking juices do
not spurt out.
• Do not use the appliance to fry food in oil.
Only browning is allowed.
• In browning mode, be careful of risks of
burns caused by spattering when you add
food or ingredients into the hot pot.
• During cooking and automatic steam
release at the end of cooking, the appliance
releases heat and steam. Keep your face
and hands away from the appliance to
avoid scalding. Do not touch the lid during
cooking.
• Do not use a cloth or anything else between
the lid and the housing to leave the lid ajar.
This can permanently damage the gasket.
• Do not touch the safety devices, except
while cleaning and maintaining the
appliance in accordance with the
instructions given.
• Make sure that the bottom of the cooking
pot and the heating element are always
clean. Make sure that the central part of the
heating plate is mobile.
• Do not fill up your appliance without its
cooking pot.
• Use a plastic or wooden spoon to prevent any

damage to the non-stick coating of the pot.
Do not cut food directly in the cooking pot.
• If a great deal of steam is released from
the rim of the lid, unplug the power cord at
once and check whether the appliance is
clean. If necessary, send the appliance to an
Approved Service Centre for repair.
• Do not carry the appliance by holding it by
the handles of the removable pot. Always
use the two side handles on the housing
of the appliance. Wear oven mitts if the
appliance is hot. For more safety, makesure
that the lid is locked before transporting the
appliance.
• If pressure is released continuously through
the valve of the appliance (for more than 1
minute) while pressure] cooking, send the
appliance to a service centre for repair.
• Do not use a damaged appliance. Take it to
your approved service centre.
SAVE THESE INSTRUCTIONS CAREFULLY.
• Use only spare parts sold in an approved
service centre.
• The warranty does not cover the abnormal
wear and tear of the cooking pot.
• Read these instructions for use carefully
before using your appliance for the first
time. Any use which does not conform
to these instructions will absolve the
manufacturer from any liability and void the
warranty.
• In accordance with current regulations,
before disposing of an appliance no longer
needed, the appliance must
• be rendered inoperative (by unplugging it
and cutting off the supply cord).
Environment protection first!
Your appliance contains valuable materials which can be recovered or recycled.
Leave it at a local civic waste collection point.

P. 9-11 INGREDIENTS & RECIPES PROGRAMS
P. 12-13 BEFORE USE
P. 14-15 OPERATION AND USE
P. 16 ON/OFF MENU
P. 17-18 SETTINGS MENU
P. 19-21 CONNECTION
P. 22-27 PRESSURE COOKING/ CLASSIC
COOKING
(gentle cooking/simmer/brown)/
REHEATING/
KEEP WARM/ DELAYED START
P. 28-29 INGREDIENTS MENU
P. 30-31 RECIPES MENU
P. 32-33 LIBRARY MENU
P. 34-35 GOLDEN RULES OF COOKING
P. 36-39 CLEANING MAINTENANCE
P. 40-41 SAFETY FEATURES
P. 42-43 TROUBLESHOOTING
SERIE EPC09-A
Low pressure 40kPa/5.8psi (109°C) / High pressure: 70kPa/10.2psi (115°C)
Product capacity: 6L / Useful capacity: 4L
Frequency: 2.40 GHz. Maximum transmitted power: 7.7 dBm
Built-in heating
The operational pressure is achieved 10 minutes after the beep.
CONTENTS
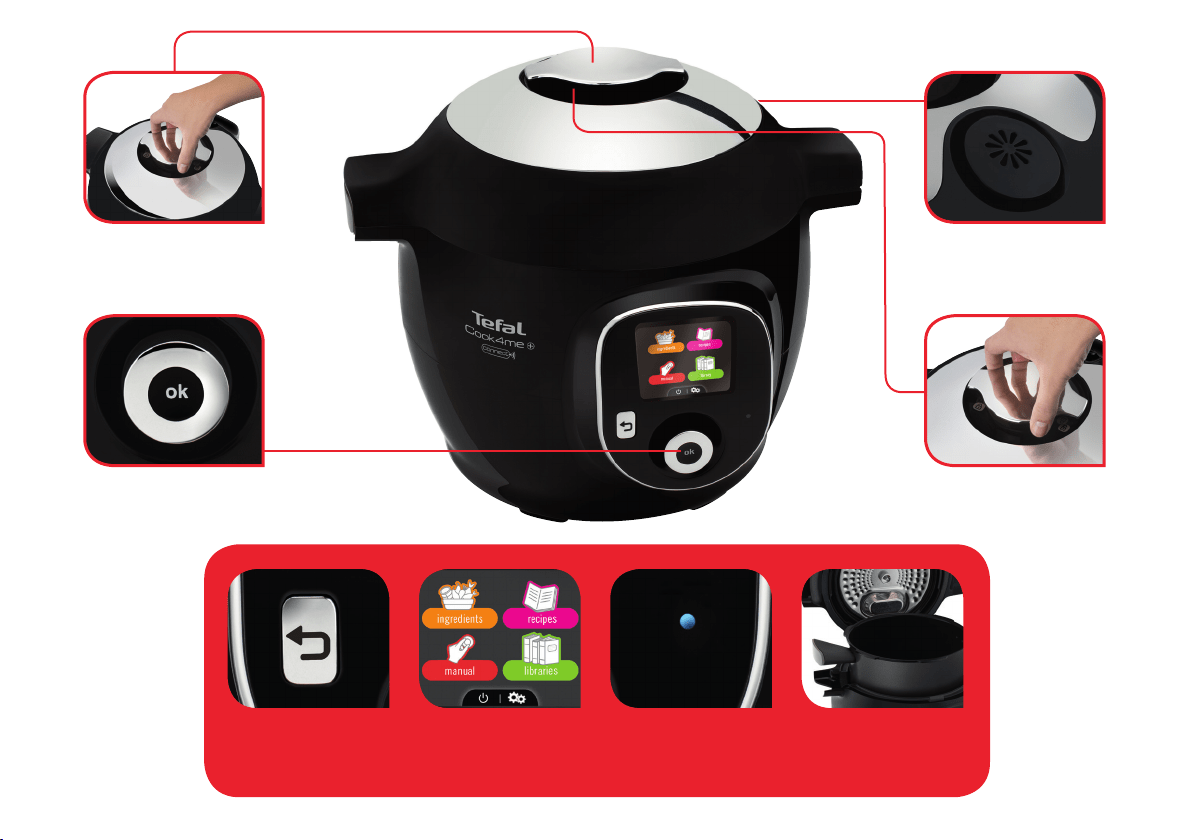
Lid open/close handle Silent pressure valve
Open/close markerMain operation button
Cooking bowlControl panelReturn button
Blue light indicates that
the Bluetooth connection
is activated

9
FISH & SHELLFISH
RICE & CEREALS
MEAT
FRUITS &
VEGETABLES
Beef
Lamb
Pork
Poultry
Rabbit
Veal
Barley
Brown rice
Buckwheat
Bulgur
Quinoa
Wheat
White rice
Apples
Asparagus
Beetroot
Broccoli
Brussel sprouts
Cabbage
Carrot
Cauliflower
Celery
Eggplant
Fennel
Green bean
Green cabbage
Leek
Lentils
Mushrooms
Peas
Pear
Pepper/ capsicum
Potatoes
Spinach
Turnip
Zucchini
Sweet potatoes
Fish
Mussels
Prawns
Scallops
INGREDIENTS

*
www.tefal.com.au
RECIPE LIST
STARTER MAIN
Bacon and olive risotto
Beetroot dip
Broccoli with almonds
Cauliflower soup
Chilli jam
Crab and corn soup
Cranberry relish
Creamy broccoli soup
Creamy mashed potato
Cumin ratatouille
Dahl
Fish and cauliflower soup
Fish cakes
French onion soup
Glazed carrots
Greek potato salad
Greek quinoa salad
Greek style mushrooms
Ham and mustard flans
Hot spicy tom yum soup
Hummus
Indian-style cauliflower
Lentil and smoked bacon soup
Minestrone
Miso soup
Mushroom soup
Porridge
Potato and leek soup
Pumpkin dip
Pumpkin soup
Quinoa salad with orange
Rice and prawn salad
Speedy vegetable chowder
Spinach and ricotta tortellini
Split pea soup
Summer succotash
Sweet potatoes and chickpea
Vegetarian pumpkin
White sauce
Asian pork meatballs
Balsamic chicken wings
Barbecue chicken drumsticks
Beef and cheddar potatoes
Beef and stuffed peppers
Beef bolognaise sauce
Beef bourguignon
Beef casserole
Beef massaman curry
Beef stew with beer
Beef stroganoff
Beef tacos
Beef teriyaki stir-fry
Bibimbap
Braised pork with tofu
Bulgur wheat pilaf
Chicken cacciatore
Chicken drumsticks chickpeas
Chicken paella
Chicken satay
Chicken teriyaki
Chicken tikka curry
Chicken wings with curry
Chicken with creamy
mushroom
Chicken with lime and
coconut
Chicken with rice
Chilli con carne
Coq au vin
Coriander prawns
Corned beef
Creamy polenta
Curried rice, chickpeas & tofu
Duck breast with peaches
Eggplant biryani rice
Fettucine carbonara
Fish curry
Fish with lemon and herbs
Gnocchi with pancetta
Greek lamb
Green chicken curry
Ham and parmesan tortellini
Ham and pea risotto
Hungarian goulash
Lamb koftas
Lamb rogan josh curry
Lamb shanks
Lamb, tomatoes and
rosemary
Ling fillet with prawns
Macaroni cheese
Meatballs with tomato sauce
Montreal BBQ brisket
Mushroom and spinach
risotto
Mustard pot roast beef
One pot pizza style pasta
Pesto chicken risotto
Poached salmon
Pork spare ribs
Pork with harvest vegetables
Potato Bake Express

11
DESSERT
Bread and butter pudding
Caramel pudding
Chocolate orange cheesecake
Chocolate sponge pudding
Cream with apple compote
Golden syrup steamed puddings
Lemon delicious
Light chocolate cream
Madeleines with lemon syrup
Mint chocolate cheesecake
Peach puddings
Spiced pears
Steamed fruit pudding
Steamed golden cake
Sticky rice with mango
Traditional cheesecake
Upside-down chocolate cream
Vanilla custard
MAIN
Prawn marinara
Pulled pork
Pumpkin risotto
Quick and easy moussaka
Quinoa and vegetables
Quinoa salad with cucumber
Rice vermicelli with prawns
Roast pork with pineapple
Saffron salmon
Salmon white asparagus sauce
San choy bow
Sausage and bean stew
Savory mince
Seafood couscous
Spicy chicken and capsicum
Spicy mince pork with beans
Spring lamb stew
Steamed mussels
Steamed sweet chilli salmon
Stuffed zucchini
Sweet and sour pork ribs
Tandoori spiced chicken
Thai chicken and rice
Thai vegetable curry
Tomato calamari
Tomato passata sauce
Tuna mornay
Veal goulash
Veal osso bucco
Veal roast and carrots prunes
Veal rolls with tomato sauce
Veal with lemon and oregano
Vietnamese soup with chicken
Whole chicken with potatoes
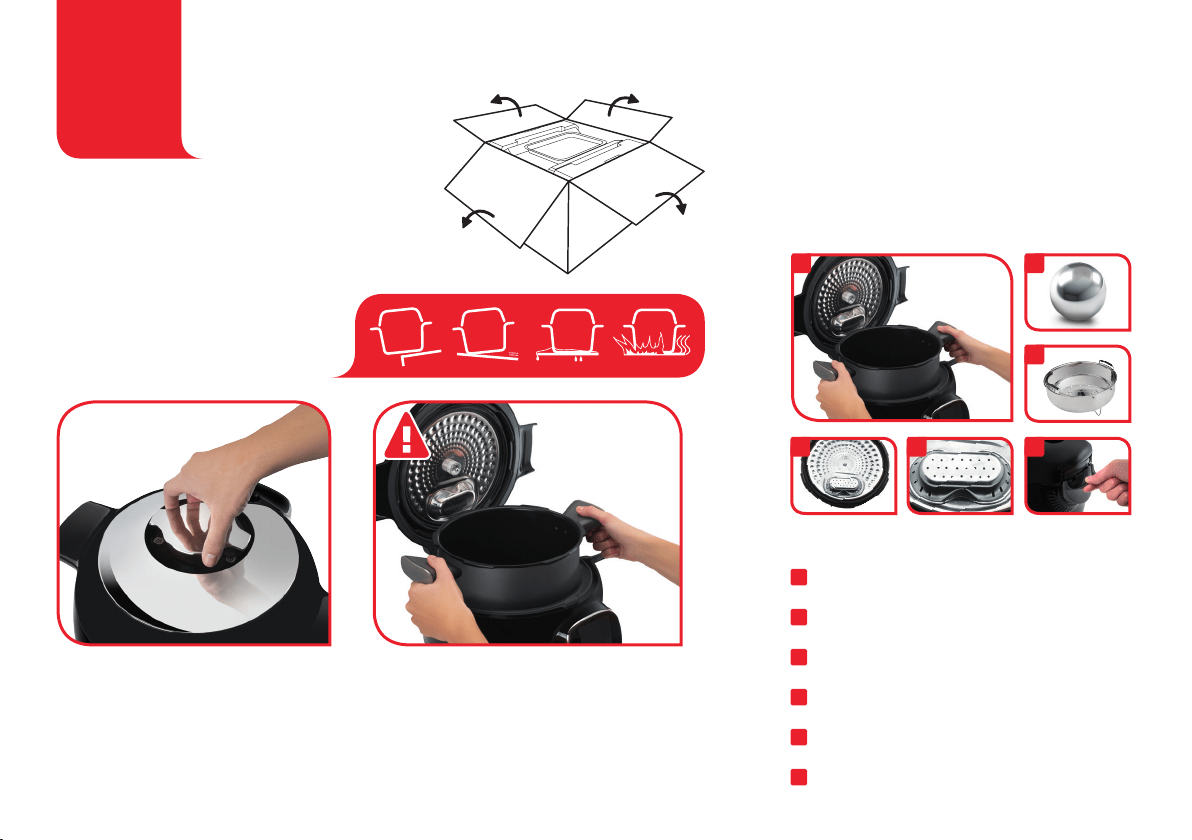
Remove the appliance from its packaging and
read the instructions carefully before using the
product for the first time.
Install the appliance on a flat dry surface
that is not hot. Remove all the packaging,
stickers or different accessories inside and
outside the appliance.
To open the product, turn the open/
close handle on top of the lid, until
the marking is in line with the open
padlock.
CLEAN THE DIFFERENT COMPONENTS
1
Cooking bowl
2
Metal lid
3
Valve cover
4
Condensation trap
5
Steam basket
6
Decompression ball
1
2 3 4
5
6
BEFORE USE
HOW TO
DISASSEMBLE
AND REASSEMBLE
THE LID
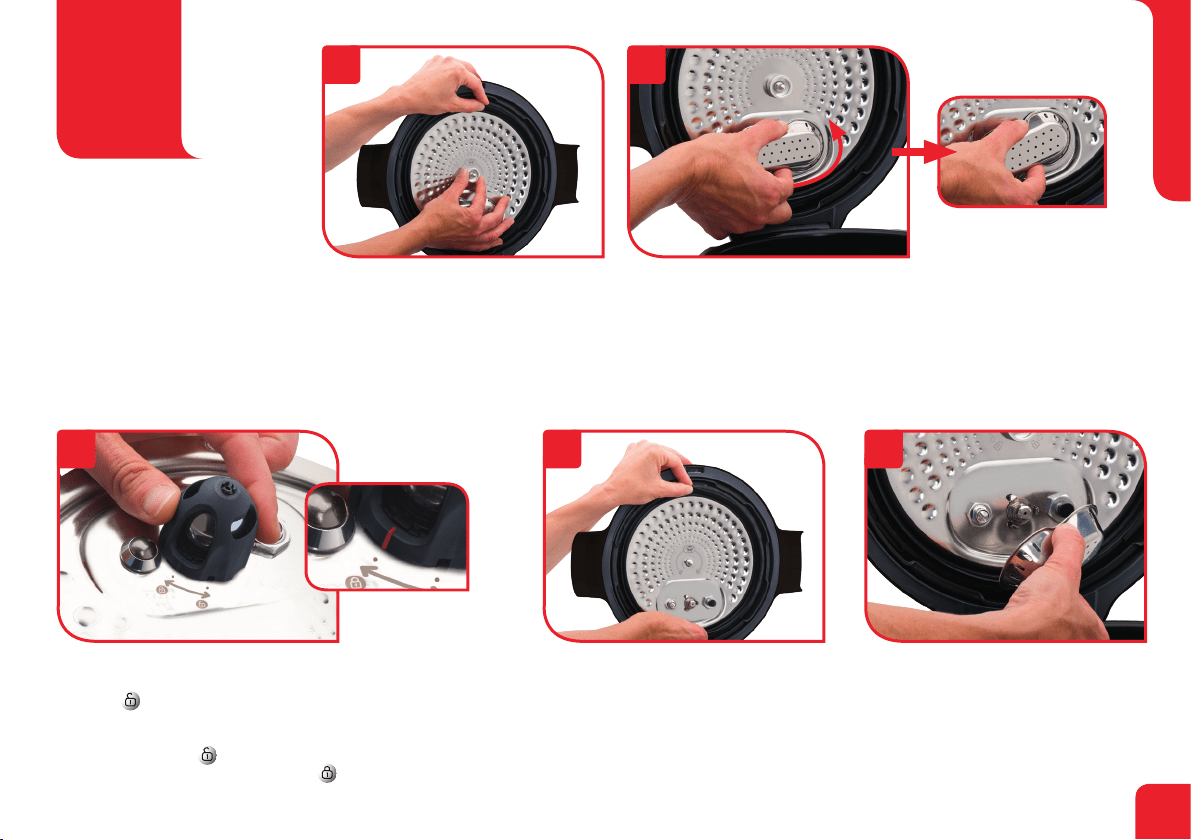
HOW TO DISASSEMBLE
THE METAL LID:
Grip the lid sub-assembly holding it by the seal,
and unscrew the central nut in an anti-clockwise
direction. Remove the nut then the lid.
PUTTING THE METAL LID
SUB-ASSEMBLY BACK IN TO PLACE:
Grip the lid sub-assembly by the seal as shown
in the picture.
Line up the lid with the central axis and press
it flat against the sub-assembly.
Put the nut back on and turn it clockwise,
tightening it as far as it will go.
HOW TO TAKE THE VALVE COVER OFF:
Clasp the valve cover by its middle part (as shown) ;
Then turn it slightly to unclip it.
Clean the valve cover, paying special attention to the inside
(check that there is no left over food).
PUTTING THE VALVE COVER BACK:
Take the valve cover as shown in the picture
(gripping the middle).
Line up the interior circular shape with the three
hooks and then push so that the valve cover clips
on (you should hear a “click” sound).
The valve cover must be right up against
the inside of the lid.
ACCESSING THE DECOMPRESSION BALL:
Turn the ball cover, anti-clockwise, so the I marker is positioned on the
pictogram . Lift the cover up. Remove the ball, and gently clean it, along
with its cover, with water and some washing-up liquid. Dry the ball using a
soft cloth, then put it back in position. Put the ball cover back in place, and
the marker I in position . Lock it by turning the ball cover clockwise, so
the I marker is positioned on the pictogram .
3 4 5
1 2
13
BEFORE USE
When turning on for the first time, you will first see the
settings menu:
Select your language
ok
ok
+
LANGUAGE
Italian
English
French
Deutsch
Spanish
COUNTRY
UNIT
Italy
United Kingdom
France
Germany
Spain
cups / oz gr / ml
UNIT
cups / oz gr / ml
Select your country
ok
ok
+
LANGUAGE
Italian
English
French
Deutsch
Spanish
COUNTRY
UNIT
Italy
United Kingdom
France
Germany
Spain
cups / oz gr / ml
UNIT
cups / oz gr / ml
INTERFACE CONTROLS
OPERATION
1
2
ok
ok
ok
ok
3 secs
SELECT CONFIRM BACK RESTART
When using your appliance
for the first time, the bowl
can release a slight odour.
This is normal.
When cooking under pressure it is normal
for the Cook4me connect to vent steam
during cooking.
After each use check the safety valve and
manometric rod move freely and clean if
necessary as instructed on page 38.
Never use the appliance
without the cooking bowl.
OPEN THE LID:
To open the appliance, turn the
open/close handle so that the
open padlock is showing. Never
try to force the lid to open if it
is stuck.
POSITIONING THE
BOWL IN THE
APPLIANCE:
Wipe the bottom of the cooking
bowl. Make sure there are no
food remains or liquid under the
bowl or on the heating plate.
INSTALLING THE
STAND UNDER THE
STEAM BASKET:
Pinch the stand between
your thumb and index finger
to install it under the steam
basket as shown.
Then install the bowl in the
appliance by positioning the
bowl handles into the slots.
INSTALLING THE
CONDENSATION COL-
LECTOR:
Check that the condensation
collector is empty then install it
behind the appliance.
15
USE

Selecting Yes or No will allow you to
switch the appliance on and off.
Select and confirm
ok
ok
+
do you want to switch off
the appliance?
YES NO
YES NO
do you want to switch off
the appliance?
recipes
manual
ingredients
libraries
do you want to switch off
the appliance?
YES NO
YES NO
do you want to switch off
the appliance?
recipes
manual
ingredients
libraries
do you want to switch off
the appliance?
YES NO
YES NO
do you want to switch off
the appliance?
recipes
manual
ingredients
libraries
ok
ok
+
ok
ok
+
ok
ok
ok
ON/OFF MENU
17
SETTINGS MENU
ok
ok
+
Select “language/country”
libraries
recipesingredients
manual
COUNTRY
Australia
France
United-Kingdom
LANGUAGE
English
Français
Nederlands
screen
sounds
BRIGHTNESS
demo mode
brightness
DEMO MODE
OFF ON
DEMO MODE
3424
RECIPE 2
Do you want to delete
this recipe?
YES NO
Please select the recipe
you want to delete
recipe 1
SOUNDS
OFF ON
language/country
delete libraries
screen/sounds
Connect
recipe 2
OFF ON
Connect
language/country
delete libraries
screen/sounds
Connect
language/country
delete libraries
screen/sounds
Connect
recipes
libraries
Please select the library
you want to delete
library 1
library 2
LIBRARY 2
Do you want to delete
this library?
YES NO
demo mode
brightness
screen
sounds
language/country
delete libraries
screen/sounds
Connect
Select your language
libraries
recipesingredients
manual
COUNTRY
Australia
France
United-Kingdom
LANGUAGE
English
Français
Nederlands
screen
sounds
BRIGHTNESS
demo mode
brightness
DEMO MODE
OFF ON
DEMO MODE
3424
RECIPE 2
Do you want to delete
this recipe?
YES NO
Please select the recipe
you want to delete
recipe 1
SOUNDS
OFF ON
language/country
delete libraries
screen/sounds
Connect
recipe 2
OFF ON
Connect
language/country
delete libraries
screen/sounds
Connect
language/country
delete libraries
screen/sounds
Connect
recipes
libraries
Please select the library
you want to delete
library 1
library 2
LIBRARY 2
Do you want to delete
this library?
YES NO
demo mode
brightness
screen
sounds
language/country
delete libraries
screen/sounds
Connect
Select your country
libraries
recipesingredients
manual
COUNTRY
Australia
France
United-Kingdom
LANGUAGE
English
Français
Nederlands
screen
sounds
BRIGHTNESS
demo mode
brightness
DEMO MODE
OFF ON
DEMO MODE
3424
RECIPE 2
Do you want to delete
this recipe?
YES NO
Please select the recipe
you want to delete
recipe 1
SOUNDS
OFF ON
language/country
delete libraries
screen/sounds
Connect
recipe 2
OFF ON
Connect
language/country
delete libraries
screen/sounds
Connect
language/country
delete libraries
screen/sounds
Connect
recipes
libraries
Please select the library
you want to delete
library 1
library 2
LIBRARY 2
Do you want to delete
this library?
YES NO
demo mode
brightness
screen
sounds
language/country
delete libraries
screen/sounds
Connect
Select “delete libraries”
libraries
recipesingredients
manual
COUNTRY
Australia
France
United-Kingdom
LANGUAGE
English
Français
Nederlands
screen
sounds
BRIGHTNESS
demo mode
brightness
DEMO MODE
OFF ON
DEMO MODE
3424
RECIPE 2
Do you want to delete
this recipe?
YES NO
Please select the recipe
you want to delete
recipe 1
SOUNDS
OFF ON
language/country
delete libraries
screen/sounds
Connect
recipe 2
OFF ON
Connect
language/country
delete libraries
screen/sounds
Connect
language/country
delete libraries
screen/sounds
Connect
recipes
libraries
Please select the library
you want to delete
library 1
library 2
LIBRARY 2
Do you want to delete
this library?
YES NO
demo mode
brightness
screen
sounds
language/country
delete libraries
screen/sounds
Connect
Select “recipe 2”
libraries
recipesingredients
manual
COUNTRY
Australia
France
United-Kingdom
LANGUAGE
English
Français
Nederlands
screen
sounds
BRIGHTNESS
demo mode
brightness
DEMO MODE
OFF ON
DEMO MODE
3424
RECIPE 2
Do you want to delete
this recipe?
YES NO
Please select the recipe
you want to delete
recipe 1
SOUNDS
OFF ON
language/country
delete libraries
screen/sounds
Connect
recipe 2
OFF ON
Connect
language/country
delete libraries
screen/sounds
Connect
language/country
delete libraries
screen/sounds
Connect
recipes
libraries
Please select the library
you want to delete
library 1
library 2
LIBRARY 2
Do you want to delete
this library?
YES NO
demo mode
brightness
screen
sounds
language/country
delete libraries
screen/sounds
Connect
Do you want to delete this
recipe?
libraries
recipesingredients
manual
COUNTRY
Australia
France
United-Kingdom
LANGUAGE
English
Français
Nederlands
screen
sounds
BRIGHTNESS
demo mode
brightness
DEMO MODE
OFF ON
DEMO MODE
3424
RECIPE 2
Do you want to delete
this recipe?
YES NO
Please select the recipe
you want to delete
recipe 1
SOUNDS
OFF ON
language/country
delete libraries
screen/sounds
Connect
recipe 2
OFF ON
Connect
language/country
delete libraries
screen/sounds
Connect
language/country
delete libraries
screen/sounds
Connect
recipes
libraries
Please select the library
you want to delete
library 1
library 2
LIBRARY 2
Do you want to delete
this library?
YES NO
demo mode
brightness
screen
sounds
language/country
delete libraries
screen/sounds
Connect
Select “libraries”
libraries
recipesingredients
manual
COUNTRY
Australia
France
United-Kingdom
LANGUAGE
English
Français
Nederlands
screen
sounds
BRIGHTNESS
demo mode
brightness
DEMO MODE
OFF ON
DEMO MODE
3424
RECIPE 2
Do you want to delete
this recipe?
YES NO
Please select the recipe
you want to delete
recipe 1
SOUNDS
OFF ON
language/country
delete libraries
screen/sounds
Connect
recipe 2
OFF ON
Connect
language/country
delete libraries
screen/sounds
Connect
language/country
delete libraries
screen/sounds
Connect
recipes
libraries
Please select the library
you want to delete
library 1
library 2
LIBRARY 2
Do you want to delete
this library?
YES NO
demo mode
brightness
screen
sounds
language/country
delete libraries
screen/sounds
Connect
Select “library 2”
libraries
recipesingredients
manual
COUNTRY
Australia
France
United-Kingdom
LANGUAGE
English
Français
Nederlands
screen
sounds
BRIGHTNESS
demo mode
brightness
DEMO MODE
OFF ON
DEMO MODE
3424
RECIPE 2
Do you want to delete
this recipe?
YES NO
Please select the recipe
you want to delete
recipe 1
SOUNDS
OFF ON
language/country
delete libraries
screen/sounds
Connect
recipe 2
OFF ON
Connect
language/country
delete libraries
screen/sounds
Connect
language/country
delete libraries
screen/sounds
Connect
recipes
libraries
Please select the library
you want to delete
library 1
library 2
LIBRARY 2
Do you want to delete
this library?
YES NO
demo mode
brightness
screen
sounds
language/country
delete libraries
screen/sounds
Connect
Do you want to delete this
library?
libraries
recipesingredients
manual
COUNTRY
Australia
France
United-Kingdom
LANGUAGE
English
Français
Nederlands
screen
sounds
BRIGHTNESS
demo mode
brightness
DEMO MODE
OFF ON
DEMO MODE
3424
RECIPE 2
Do you want to delete
this recipe?
YES NO
Please select the recipe
you want to delete
recipe 1
SOUNDS
OFF ON
language/country
delete libraries
screen/sounds
Connect
recipe 2
OFF ON
Connect
language/country
delete libraries
screen/sounds
Connect
language/country
delete libraries
screen/sounds
Connect
recipes
libraries
Please select the library
you want to delete
library 1
library 2
LIBRARY 2
Do you want to delete
this library?
YES NO
demo mode
brightness
screen
sounds
language/country
delete libraries
screen/sounds
Connect
Select “recipes”
recettes
manuel
ingrédients
PAYS
Allemagne
Espagne
France
Italie
Pays-Bas
LANGUE
allemand
espagnol
français
italien
néerlandais
écran
son
son
LUMINOSITÉ
mode démo
luminosité
mode démo
luminosité
MODE DÉMO
OFF ON
MODE DÉMO
3424
RECETTE 2
souhaitez-vous supprimer
cette recette ?
OUI NON
veuillez sélectionner la
recette à supprimer
recette 1
BIBLIOTHÈQUE 2
souhaitez-vous supprimer
cette bibliothèque ?
OUI NON
veuillez sélectionner la
bibliothèque à supprimer
bibliothèque 1
bibliothèque 2
SON
OFF ON
écran
langues/pays
suppression
recettes
écran/son
Connect
langues/pays
suppression
recettes
écran/son
Connect
langues/pays
suppression
recettes
écran/son
Connect
langues/pays
suppression
recettes
écran/son
Connect
bibliothèques
recettes
libraries
recipes
recette 2
libraries
recipesingredients
manual
COUNTRY
Australia
France
United-Kingdom
LANGUAGE
English
Français
Nederlands
screen
sounds
BRIGHTNESS
demo mode
brightness
DEMO MODE
OFF ON
DEMO MODE
3424
RECIPE 2
Do you want to delete
this recipe?
YES NO
Please select the recipe
you want to delete
recipe 1
SOUNDS
OFF ON
language/country
delete libraries
screen/sounds
Connect
recipe 2
OFF ON
Connect
language/country
delete libraries
screen/sounds
Connect
language/country
delete libraries
screen/sounds
Connect
recipes
libraries
Please select the library
you want to delete
library 1
library 2
LIBRARY 2
Do you want to delete
this library?
YES NO
demo mode
brightness
screen
sounds
language/country
delete libraries
screen/sounds
Connect
N.B.: even if the sound
is deactivated, the alert
sounds remain active.
ok
ok
+
ok
ok
+
ok
ok
+
ok
ok
+
ok
ok
+
ok
ok
+
ok
ok
+
ok
ok
+
ok
ok
+

Select “screen/sounds”
libraries
recipesingredients
manual
COUNTRY
Australia
France
United-Kingdom
LANGUAGE
English
Français
Nederlands
screen
sounds
BRIGHTNESS
demo mode
brightness
DEMO MODE
OFF ON
DEMO MODE
3424
RECIPE 2
Do you want to delete
this recipe?
YES NO
Please select the recipe
you want to delete
recipe 1
SOUNDS
OFF ON
language/country
delete libraries
screen/sounds
Connect
recipe 2
OFF ON
Connect
language/country
delete libraries
screen/sounds
Connect
language/country
delete libraries
screen/sounds
Connect
recipes
libraries
Please select the library
you want to delete
library 1
library 2
LIBRARY 2
Do you want to delete
this library?
YES NO
demo mode
brightness
screen
sounds
language/country
delete libraries
screen/sounds
Connect
Select “screen”
libraries
recipesingredients
manual
COUNTRY
Australia
France
United-Kingdom
LANGUAGE
English
Français
Nederlands
screen
sounds
BRIGHTNESS
demo mode
brightness
DEMO MODE
OFF ON
DEMO MODE
3424
RECIPE 2
Do you want to delete
this recipe?
YES NO
Please select the recipe
you want to delete
recipe 1
SOUNDS
OFF ON
language/country
delete libraries
screen/sounds
Connect
recipe 2
OFF ON
Connect
language/country
delete libraries
screen/sounds
Connect
language/country
delete libraries
screen/sounds
Connect
recipes
libraries
Please select the library
you want to delete
library 1
library 2
LIBRARY 2
Do you want to delete
this library?
YES NO
demo mode
brightness
screen
sounds
language/country
delete libraries
screen/sounds
Connect
Select “brightness”
libraries
recipesingredients
manual
COUNTRY
Australia
France
United-Kingdom
LANGUAGE
English
Français
Nederlands
screen
sounds
BRIGHTNESS
demo mode
brightness
DEMO MODE
OFF ON
DEMO MODE
3424
RECIPE 2
Do you want to delete
this recipe?
YES NO
Please select the recipe
you want to delete
recipe 1
SOUNDS
OFF ON
language/country
delete libraries
screen/sounds
Connect
recipe 2
OFF ON
Connect
language/country
delete libraries
screen/sounds
Connect
language/country
delete libraries
screen/sounds
Connect
recipes
libraries
Please select the library
you want to delete
library 1
library 2
LIBRARY 2
Do you want to delete
this library?
YES NO
demo mode
brightness
screen
sounds
language/country
delete libraries
screen/sounds
Connect
Adjust the light
libraries
recipesingredients
manual
COUNTRY
Australia
France
United-Kingdom
LANGUAGE
English
Français
Nederlands
screen
sounds
BRIGHTNESS
demo mode
brightness
DEMO MODE
OFF ON
DEMO MODE
3424
RECIPE 2
Do you want to delete
this recipe?
YES NO
Please select the recipe
you want to delete
recipe 1
SOUNDS
OFF ON
language/country
delete libraries
screen/sounds
Connect
recipe 2
OFF ON
Connect
language/country
delete libraries
screen/sounds
Connect
language/country
delete libraries
screen/sounds
Connect
recipes
libraries
Please select the library
you want to delete
library 1
library 2
LIBRARY 2
Do you want to delete
this library?
YES NO
demo mode
brightness
screen
sounds
language/country
delete libraries
screen/sounds
Connect
Select “demo mode”
libraries
recipesingredients
manual
COUNTRY
Australia
France
United-Kingdom
LANGUAGE
English
Français
Nederlands
screen
sounds
BRIGHTNESS
demo mode
brightness
DEMO MODE
OFF ON
DEMO MODE
3424
RECIPE 2
Do you want to delete
this recipe?
YES NO
Please select the recipe
you want to delete
recipe 1
SOUNDS
OFF ON
language/country
delete libraries
screen/sounds
Connect
recipe 2
OFF ON
Connect
language/country
delete libraries
screen/sounds
Connect
language/country
delete libraries
screen/sounds
Connect
recipes
libraries
Please select the library
you want to delete
library 1
library 2
LIBRARY 2
Do you want to delete
this library?
YES NO
demo mode
brightness
screen
sounds
language/country
delete libraries
screen/sounds
Connect
To activate or deactivate the demo mode,
please enter the code: 3424
libraries
recipesingredients
manual
COUNTRY
Australia
France
United-Kingdom
LANGUAGE
English
Français
Nederlands
screen
sounds
BRIGHTNESS
demo mode
brightness
DEMO MODE
OFF ON
DEMO MODE
3424
RECIPE 2
Do you want to delete
this recipe?
YES NO
Please select the recipe
you want to delete
recipe 1
SOUNDS
OFF ON
language/country
delete libraries
screen/sounds
Connect
recipe 2
OFF ON
Connect
language/country
delete libraries
screen/sounds
Connect
language/country
delete libraries
screen/sounds
Connect
recipes
libraries
Please select the library
you want to delete
library 1
library 2
LIBRARY 2
Do you want to delete
this library?
YES NO
demo mode
brightness
screen
sounds
language/country
delete libraries
screen/sounds
Connect
libraries
recipesingredients
manual
COUNTRY
Australia
France
United-Kingdom
LANGUAGE
English
Français
Nederlands
screen
sounds
BRIGHTNESS
demo mode
brightness
DEMO MODE
OFF ON
DEMO MODE
3424
RECIPE 2
Do you want to delete
this recipe?
YES NO
Please select the recipe
you want to delete
recipe 1
SOUNDS
OFF ON
language/country
delete libraries
screen/sounds
Connect
recipe 2
OFF ON
Connect
language/country
delete libraries
screen/sounds
Connect
language/country
delete libraries
screen/sounds
Connect
recipes
libraries
Please select the library
you want to delete
library 1
library 2
LIBRARY 2
Do you want to delete
this library?
YES NO
demo mode
brightness
screen
sounds
language/country
delete libraries
screen/sounds
Connect
Select “sounds”
libraries
recipesingredients
manual
COUNTRY
Australia
France
United-Kingdom
LANGUAGE
English
Français
Nederlands
screen
sounds
BRIGHTNESS
demo mode
brightness
DEMO MODE
OFF ON
DEMO MODE
3424
RECIPE 2
Do you want to delete
this recipe?
YES NO
Please select the recipe
you want to delete
recipe 1
SOUNDS
OFF ON
language/country
delete libraries
screen/sounds
Connect
recipe 2
OFF ON
Connect
language/country
delete libraries
screen/sounds
Connect
language/country
delete libraries
screen/sounds
Connect
recipes
libraries
Please select the library
you want to delete
library 1
library 2
LIBRARY 2
Do you want to delete
this library?
YES NO
demo mode
brightness
screen
sounds
language/country
delete libraries
screen/sounds
Connect
Adjust the volume
libraries
recipesingredients
manual
COUNTRY
Australia
France
United-Kingdom
LANGUAGE
English
Français
Nederlands
screen
sounds
BRIGHTNESS
demo mode
brightness
DEMO MODE
OFF ON
DEMO MODE
3424
RECIPE 2
Do you want to delete
this recipe?
YES NO
Please select the recipe
you want to delete
recipe 1
SOUNDS
OFF ON
language/country
delete libraries
screen/sounds
Connect
recipe 2
OFF ON
Connect
language/country
delete libraries
screen/sounds
Connect
language/country
delete libraries
screen/sounds
Connect
recipes
libraries
Please select the library
you want to delete
library 1
library 2
LIBRARY 2
Do you want to delete
this library?
YES NO
demo mode
brightness
screen
sounds
language/country
delete libraries
screen/sounds
Connect
Select “Connect”
libraries
recipesingredients
manual
COUNTRY
Australia
France
United-Kingdom
LANGUAGE
English
Français
Nederlands
screen
sounds
BRIGHTNESS
demo mode
brightness
DEMO MODE
OFF ON
DEMO MODE
3424
RECIPE 2
Do you want to delete
this recipe?
YES NO
Please select the recipe
you want to delete
recipe 1
SOUNDS
OFF ON
language/country
delete libraries
screen/sounds
Connect
recipe 2
OFF ON
Connect
language/country
delete libraries
screen/sounds
Connect
language/country
delete libraries
screen/sounds
Connect
recipes
libraries
Please select the library
you want to delete
library 1
library 2
LIBRARY 2
Do you want to delete
this library?
YES NO
demo mode
brightness
screen
sounds
language/country
delete libraries
screen/sounds
Connect
Activate or deactivate the
connect mode (Bluetooth, BLE)
libraries
recipesingredients
manual
COUNTRY
Australia
France
United-Kingdom
LANGUAGE
English
Français
Nederlands
screen
sounds
BRIGHTNESS
demo mode
brightness
DEMO MODE
OFF ON
DEMO MODE
3424
RECIPE 2
Do you want to delete
this recipe?
YES NO
Please select the recipe
you want to delete
recipe 1
SOUNDS
OFF ON
language/country
delete libraries
screen/sounds
Connect
recipe 2
OFF ON
Connect
language/country
delete libraries
screen/sounds
Connect
language/country
delete libraries
screen/sounds
Connect
recipes
libraries
Please select the library
you want to delete
library 1
library 2
LIBRARY 2
Do you want to delete
this library?
YES NO
demo mode
brightness
screen
sounds
language/country
delete libraries
screen/sounds
Connect
N.B.: DEMO mode allows
you to operate the
appliance without heating
or pressurising it.
ok
ok
+
ok
ok
+
ok
ok
+
ok
ok
+
ok
ok
+
ok
ok
+
ok
ok
+
ok
ok
+
ok
ok
+
ok
ok
+
ok

919
CONNECTION
Validate the connection request
and press OK
OK
Your Cook4me connect is
operational, you can now
use your appliance with the
150 pre-programmed recipes
even without the app.
When you turn on your
Cook4me connect, the
blue light will start flashing
(awaiting connection),
unless you manually
deactivate the connect
function
(See ‘Settings’ chapter).
Download the My Cook4me app
(on the App Store and on Google Play)
via your tablet or mobile.
When you use the appliance for the first time, pair your product to your tablet or mobile
by following the instructions on screen.
If the connection is
successful,
the light will stay blue.

CONNECTION
Connection problem:
If the connection failed, you will
see an error message. Follow the
instructions on your screens to
establish a new connection.
Creating an account:
Follow the instructions on the app.
Search bar:
Type the key words in the search bar
and access the search filter.
N.B.: if you don’t use your Cook4me connect for 30 minutes, it will switch to stand-by mode
and the connection will be lost. When exiting stand-by mode, it will automatically re-connect.
N.B.: only one connection possible at any
time.

921
CONNECTION
Browsing:
You can also browse via the app by
accessing the Menu:
• welcome
• recipes
• my shopping
• tools
• guide
• my account
From the app, you can either:
• view the step by step
• launch the recipe step by step in
interaction with your Cook4me connect
No information about the cooking
time can be provided if there is no
connection.
You will always have a direct access
to the 150 programmed recipes and
ingredients. The cooking continues
even if you do not have connection.
N.B.: you can start the cooking from your Cook4me connect
by pressing the OK button (as instructed on the app).
NB: Ensure that you never leave the appliance unattended
whilst in operation.
Recipes in your Cook4me
connect
Favourites
Library
WARNING
PRESSURE COOKING
PRESSURE COOKING
PRESSURE COOKING
keep
warm
pressure
cooking
reheat
classic
cooking
insert the bowl
00:10
COOKING
immediate
start
delayed
start
WARNING
close and bolt the lid
PREHEATING
please wait
PRESSURE COOKING
PRESSURE COOKING
PRESSURE COOKING
COOKING
00:02
END OF COOKING
please wait
12:20
Serve !
ENJOY !
Beware of the steam while opeing the lid
favorites
recipesingredients
manual
00:02
KEEP WARM
WARNING
PRESSURE COOKING
PRESSURE COOKING
PRESSURE COOKING
keep
warm
pressure
cooking
reheat
classic
cooking
insert the bowl
00:10
COOKING
immediate
start
delayed
start
WARNING
close and bolt the lid
PREHEATING
please wait
PRESSURE COOKING
PRESSURE COOKING
PRESSURE COOKING
COOKING
00:02
END OF COOKING
please wait
12:20
Serve !
ENJOY !
Beware of the steam while opeing the lid
favorites
recipesingredients
manual
00:02
KEEP WARM
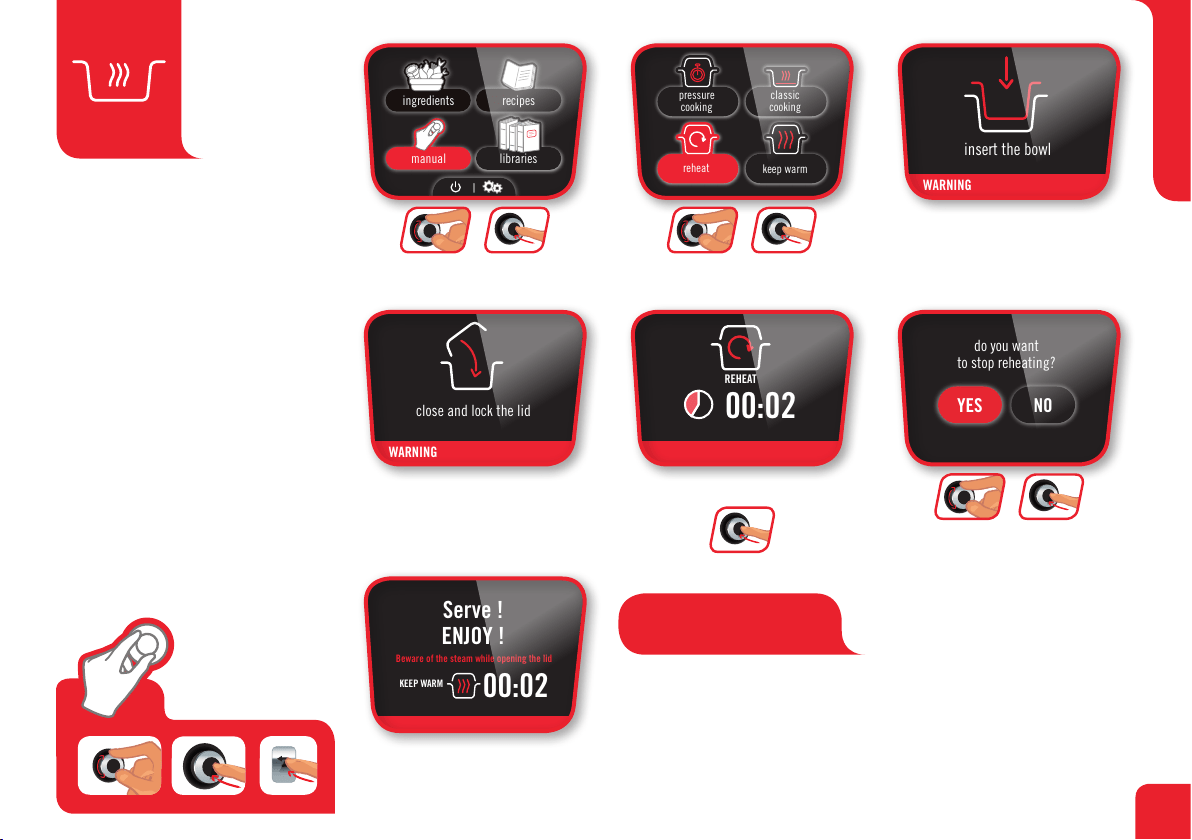
MANUAL MENU:
With the manual menu, you
set the cooking yourself. Select
the cooking mode: pressure
cooking, classic cooking
(gentle cooking, simmer,
brown), reheat or keep warm,
as well as the cooking time.
ok
ok
+
Select the
«manual» menu
Close and bolt the lid
Set the cooking time Select immediate or
delayed start
Select the
«pressure cooking» mode
Insert the bowl then
add the ingredients
ok
ok
+
ok
ok
+
ok
ok
+
recipes
manual
ingredients
WARNING
PRESSURE COOKING
PRESSURE COOKING
PRESSURE COOKING
insert the bowl
00:10
COOKING
immediate
start
delayed
start
WARNING
close and lock the lid
PREHEATING
please wait
PRESSURE COOKING
PRESSURE COOKING
COOKING
00:02
END OF COOKING
please wait
12:20
keep warm
pressure
cooking
reheat
classic
cooking
00:02
ENJOY !
Serve !
KEEP WARM
Beware of the steam while opening the lid
libraries
PRESSURE COOKING
ok
ok
ok
MANUAL
MENU
COOKING
MODE
PRESSURE
COOKING
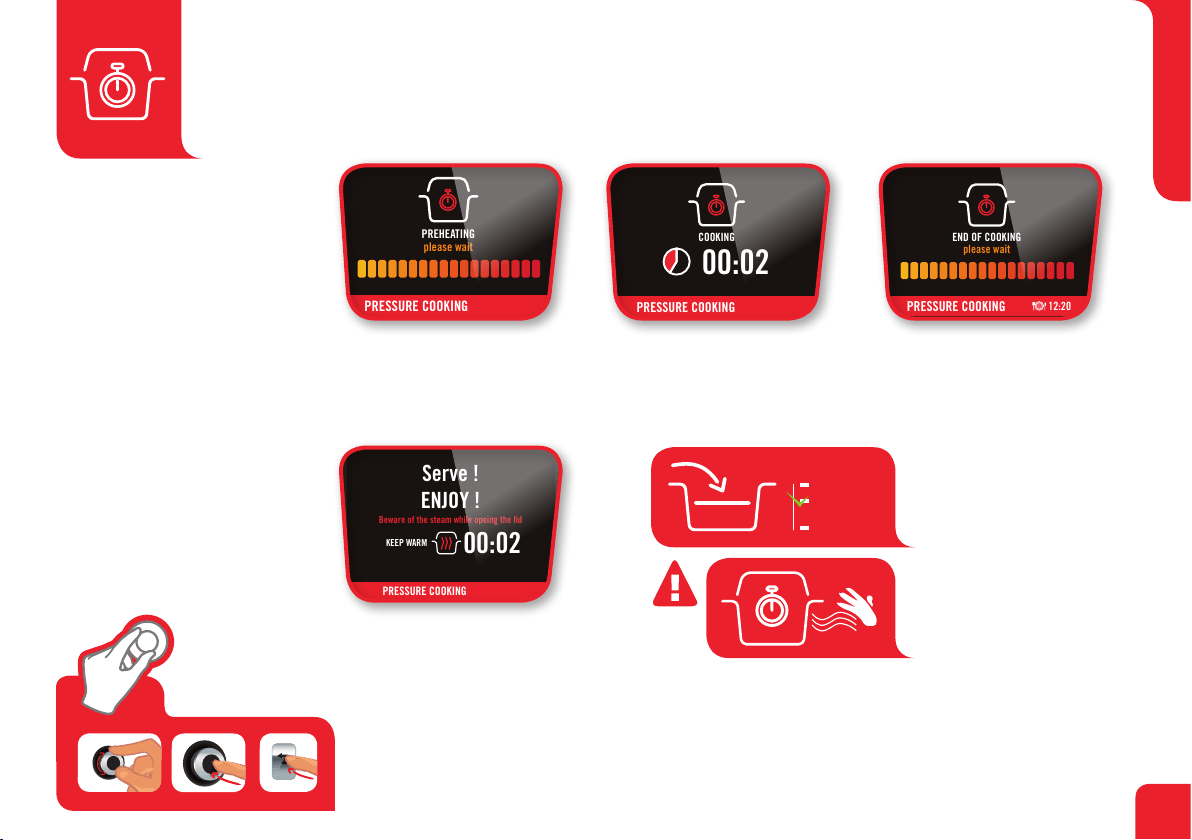
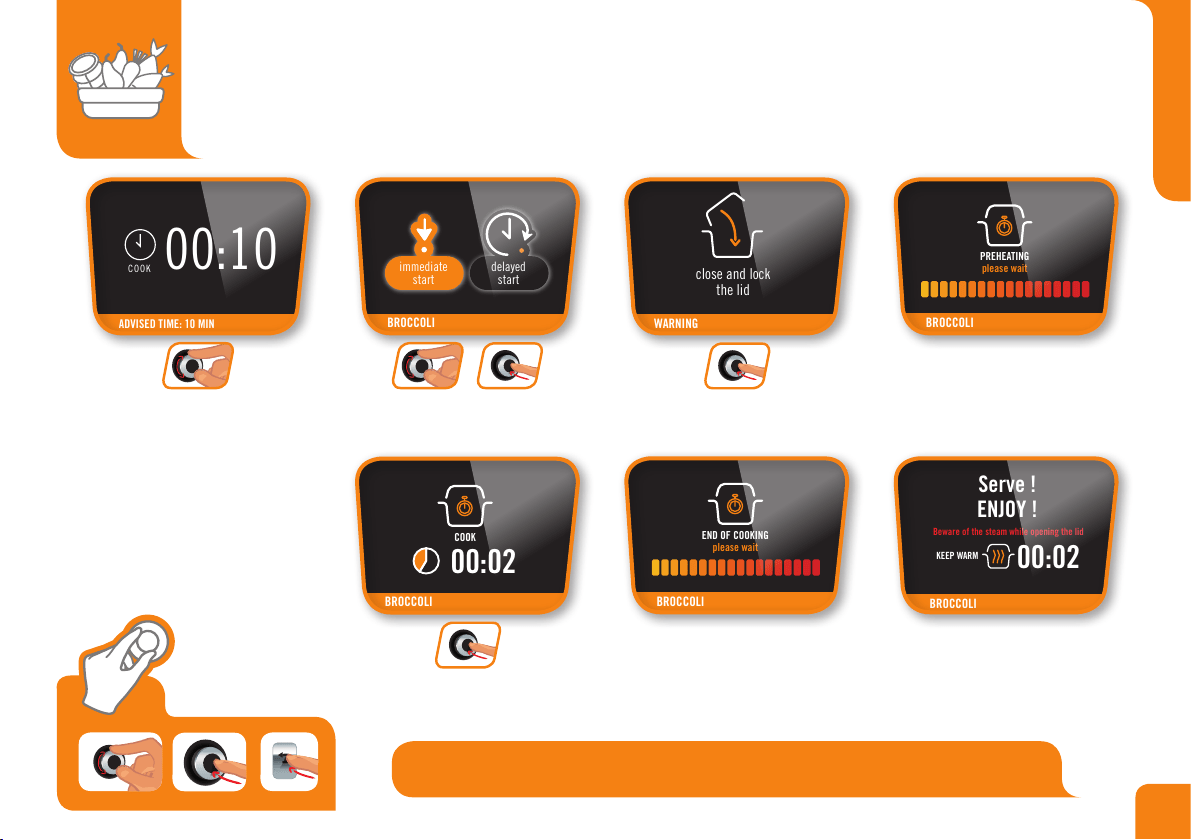
The preheating time will vary between
3-10 minutes depending on the
quantity of food, the quantity of liquid
and whether the food is fresh or frozen
Cooking has started (the
cooking time counts up)
Cooking has finished
It’s ready to eat! The
appliance automatically
goes to keep warm mode
WARNING
PRESSURE COOKING
PRESSURE COOKING
PRESSURE COOKING
keep
warm
pressure
cooking
reheat
classic
cooking
insert the bowl
00:10
COOKING
immediate
start
delayed
start
WARNING
close and bolt the lid
PREHEATING
please wait
PRESSURE COOKING
PRESSURE COOKING
PRESSURE COOKING
COOKING
00:02
END OF COOKING
please wait
12:20
Serve !
ENJOY !
Beware of the steam while opeing the lid
favorites
recipesingredients
manual
00:02
KEEP WARM
WARNING
PRESSURE COOKING
PRESSURE COOKING
PRESSURE COOKING
keep
warm
pressure
cooking
reheat
classic
cooking
insert the bowl
00:10
COOKING
immediate
start
delayed
start
WARNING
close and bolt the lid
PREHEATING
please wait
PRESSURE COOKING
PRESSURE COOKING
PRESSURE COOKING
COOKING
00:02
END OF COOKING
please wait
12:20
Serve !
ENJOY !
Beware of the steam while opeing the lid
favorites
recipesingredients
manual
00:02
KEEP WARM
4 L (max)
3,5L
200 ml (min)
Note: 4 litre max and
200 ml min capacity
for pressure cooking.
Do not touch the
hot appliance during
cooking.
23
MANUAL
MENU
COOKING
MODE
PRESSURE
COOKING
ok
ok
ok
WARNING
WARNING
insert the bowl
GENTLE COOKING
GENTLE COOKING
open the lid
GENTLE COOKING
PREHEATING
please wait
add the ingredients
OK
00:02
GENTLE COOKING
OK
Do you want to stop
the gentle cooking ?
YES NO
stop
pressure
cooking
favorites
recipesingredients
manual
keep
warm
pressure
cooking
reheat
classic
cooking
GENTLE COOKING
To stop classic cooking select ok and then confirm by
selecting yes.
Select the
«manual» menu
Select the
«classic cooking» function
The appliance is preheating
Insert the bowl
Open the lid
WARNING
WARNING
insert the bowl
GENTLE COOKING
GENTLE COOKING
open the lid
GENTLE COOKING
PREHEATING
please wait
add the ingredients
OK
00:02
GENTLE COOKING
OK
Do you want to stop
the gentle cooking ?
YES NO
stop
pressure
cooking
favorites
recipesingredients
manual
keep
warm
pressure
cooking
reheat
classic
cooking
GENTLE COOKING
WARNING
WARNING
insert the bowl
GENTLE COOKING
GENTLE COOKING
open the lid
GENTLE COOKING
PREHEATING
please wait
add the ingredients
OK
00:02
GENTLE COOKING
OK
Do you want to stop
the gentle cooking ?
YES NO
stop
pressure
cooking
favorites
recipesingredients
manual
keep
warm
pressure
cooking
reheat
classic
cooking
GENTLE COOKING
NB: The operation is the same, only
the temperature is different.
ok
ok
+
ok
ok
+
ok
ok
+
With classic cooking mode,
you can:
gentle cooking
simmering
browning
The lid remains open for these
types of cooking.
ATTENTION
ATTENTION
insert the pot
GENTLE COOKING
open the lid
GENTLE COOKING
PREHEATING
please wait
add the ingredients
OK
00:02
(slow cooking)
OK
Do you want to stop
the slow cooking?
YES NO
stop
pressure
cooking
GENTLE COOKING
pressure
cooking
reheat
classic
cooking
keep warm
favorites
recipesingredients
manual
GENTLE COOKING
GENTLE COOKING
Select the
desired function
ok
ok
+
ok
Add the ingredients
ok
+
ok
WARNING
WARNING
insert the bowl
GENTLE COOKING
open the lid
GENTLE COOKING
PREHEATING
please wait
add the ingredients
OK
00:02
GENTLE COOKING
OK
Do you want to stop
the gentle cooking?
YES NO
stop
pressure
cooking
GENTLE COOKING
recipesingredients
manual
pressure
cooking
reheat
classic
cooking
keep warm
libraries
MANUAL
MENU
COOKING
MODE
CLASSIC
COOKING
ok
ok
ok
WARNING
insert the bowl
do you want
to stop reheating?
YES NO
WARNING
close and lock the lid
00:02
REHEAT
pressure
cooking
reheat
classic
cooking
keep warm
recipesingredients
manual
libraries
00:02
ENJOY !
Serve !
KEEP WARM
Beware of the steam while opening the lid
Select the “manual” menu
WARNING
insert the bowl
do you want
to stop reheating?
YES NO
WARNING
close and lock the lid
00:02
REHEAT
pressure
cooking
reheat
classic
cooking
keep warm
recipesingredients
manual
libraries
00:02
ENJOY !
Serve !
KEEP WARM
Beware of the steam while opening the lid
Select the “reheat” mode
Insert the bowl
WARNING
insert the bowl
do you want
to stop reheating?
YES NO
WARNING
close and lock the lid
00:02
REHEAT
pressure
cooking
reheat
classic
cooking
keep warm
recipesingredients
manual
libraries
00:02
ENJOY !
Serve !
KEEP WARM
Beware of the steam while opening the lid
Close and lock the lid
WARNING
insert the bowl
do you want
to stop reheating?
YES NO
WARNING
close and lock the lid
00:02
REHEAT
pressure
cooking
reheat
classic
cooking
keep warm
recipesingredients
manual
libraries
00:02
ENJOY !
Serve !
KEEP WARM
Beware of the steam while opening the lid
Reheat has started
Press OK to interrupt
WARNING
insert the bowl
do you want
to stop reheating?
YES NO
WARNING
close and lock the lid
00:02
REHEAT
pressure
cooking
reheat
classic
cooking
keep warm
recipesingredients
manual
libraries
00:02
ENJOY !
Serve !
KEEP WARM
Beware of the steam while opening the lid
Do you want to stop reheat?
To stop reheating select yes.
Ensure food is piping hot
before serving
WARNING
insert the bowl
do you want
to stop reheating?
YES NO
WARNING
close and lock the lid
00:02
REHEAT
pressure
cooking
reheat
classic
cooking
keep warm
recipesingredients
manual
libraries
00:02
ENJOY !
Serve !
KEEP WARM
Beware of the steam while opening the lid
It’s ready to eat!
The appliance automatically
goes to keep warm mode
WARNING
insert the bowl
do you want
to stop reheating?
YES NO
WARNING
close and lock the lid
00:02
REHEAT
pressure
cooking
reheat
classic
cooking
keep warm
recipesingredients
manual
libraries
00:02
ENJOY !
Serve !
KEEP WARM
Beware of the steam while opening the lid
N.B.: Reheating starts and
the time increases.
ok
ok
+
ok
ok
+
ok
ok
+
ok
25
MANUAL
MENU
COOKING
MODE
REHEAT
ok
ok
ok
ATTENTION
insert the pot
do you want to stop
the keep warm function?
YES NO
KEEP WARM
PREHEAT
please wait
KEEP WARM
00:02
pressure
cooking
reheat
classic
cooking
keep warm
favorites
recipesingredients
manual
ATTENTION
insert the pot
do you want to stop
the keep warm function?
YES NO
KEEP WARM
PREHEAT
please wait
KEEP WARM
00:02
pressure
cooking
reheat
classic
cooking
keep warm
favorites
recipesingredients
manual
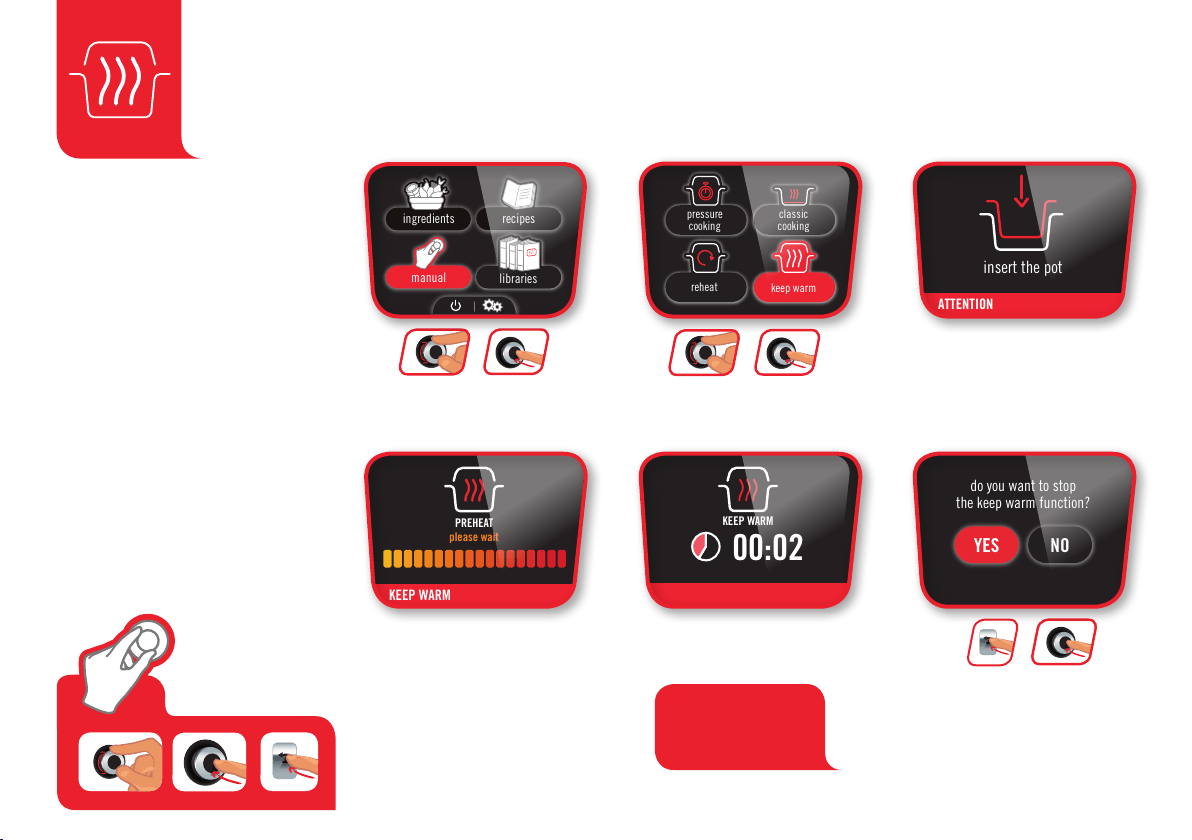
Select the
«manual» menu
Insert the bowl
The appliance
is preheating
The keeping warm
function has started
To stop the keep warm
function, press the «back»
button and select «yes»
Select the
«keep warm» function
ok
+
ok
ATTENTION
insert the pot
do you want to stop
the keep warm function?
YES NO
KEEP WARM
PREHEAT
please wait
KEEP WARM
00:02
pressure
cooking
reheat
classic
cooking
keep warm
favorites
recipesingredients
manual
ATTENTION
insert the pot
do you want to stop
the keep warm function?
YES NO
KEEP WARM
PREHEAT
please wait
KEEP WARM
00:02
pressure
cooking
reheat
classic
cooking
keep warm
favorites
recipesingredients
manual
ATTENTION
insert the pot
do you want to stop
the keep warm function?
YES NO
KEEP WARM
PREHEAT
please wait
KEEP WARM
00:02
pressure
cooking
reheat
classic
cooking
keep warm
favorites
recipesingredients
manual
ok
ok
+
ok
ok
+
N.B.: Reheating
starts and the
time increases
WARNING
WARNING
insert the bowl
GENTLE COOKING
open the lid
GENTLE COOKING
PREHEATING
please wait
add the ingredients
OK
00:02
GENTLE COOKING
OK
Do you want to stop
the gentle cooking?
YES NO
stop
pressure
cooking
GENTLE COOKING
recipesingredients
manual
pressure
cooking
reheat
classic
cooking
keep warm
libraries
MANUAL
MENU
COOKING
MODE
KEEP WARM
ok
ok
ok
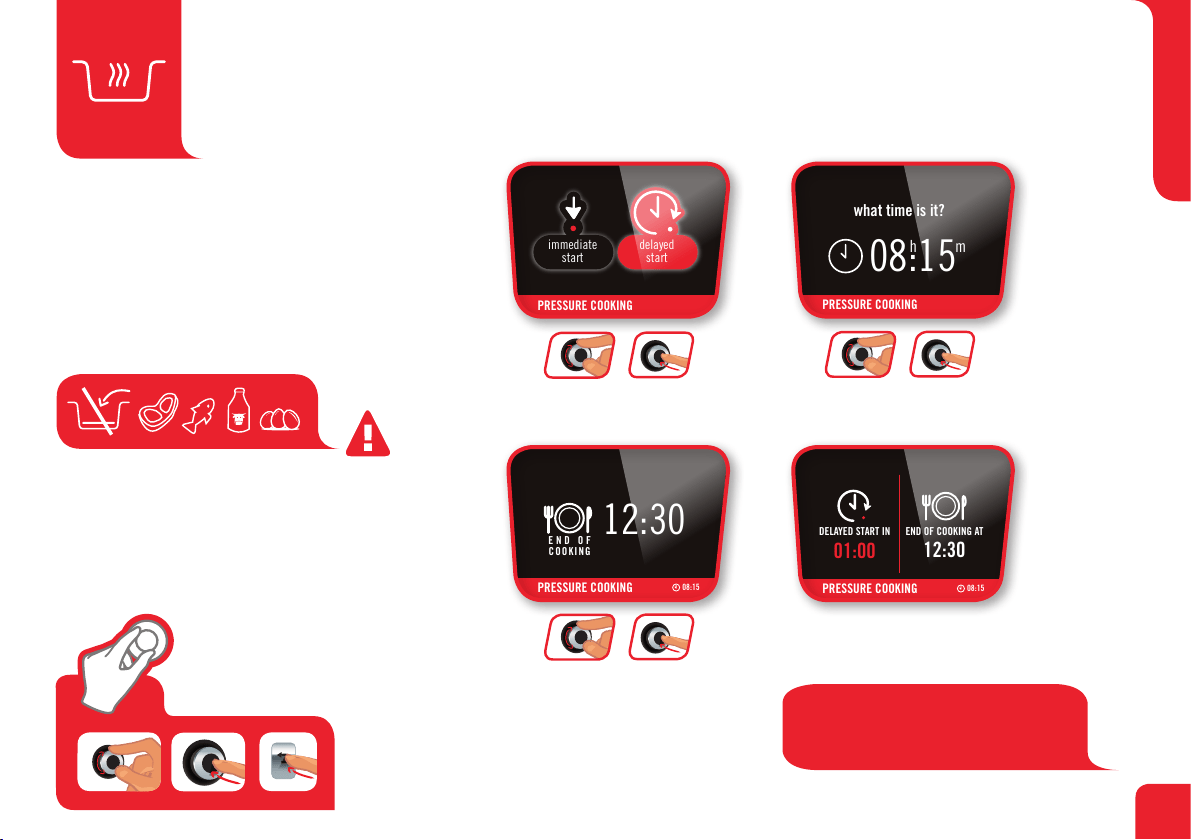
Select
«delayed start»
Select the end
of cooking
The end of cooking time may vary depending
on the amount of food in the product
Do not use delayed start for recipes containing meat,
chicken, fish, milk or eggs as these foods can deteriorate if
left at room temperature before cooking.
Delayed start
is programmed
Select the
current time
PRESSURE COOKING
PRESSURE COOKING
PRESSURE COOKING
h m
what time is it?
END OF
COOKING
12:30
08:15
08:15
01:00
DELAYED START IN END OF COOKING AT
12:30
08:15
immediate
start
delayed
start
PRESSURE COOKING
PRESSURE COOKING
PRESSURE COOKING
PRESSURE COOKING
h m
what time is it?
END OF
COOKING
12:30
08:15
08:15
01:00
DELAYED START IN END OF COOKING AT
12:30
08:15
immediate
start
delayed
start
PRESSURE COOKING
PRESSURE COOKING
PRESSURE COOKING
PRESSURE COOKING
h m
what time is it?
END OF
COOKING
12:30
08:15
08:15
01:00
DELAYED START IN END OF COOKING AT
12:30
08:15
immediate
start
delayed
start
PRESSURE COOKING
PRESSURE COOKING
PRESSURE COOKING
PRESSURE COOKING
h m
what time is it?
END OF
COOKING
12:30
08:15
08:15
01:00
DELAYED START IN END OF COOKING AT
12:30
08:15
immediate
start
delayed
start
PRESSURE COOKING
ok
ok
+
ok
ok
+
ok
ok
+
NB : The delayed start time always
includes 15 minutes for the
appliance to preheat.
27
MANUAL
MENU
COOKING
MODE
DELAYED START
(pressure cooking mode)
The delayed start feature is only
possible with the manual menu “pressure
cooking” and the ingredients menu “fruits &
vegetables” or “Rice & Cereals”.
ok
ok
ok
ok
ok
+
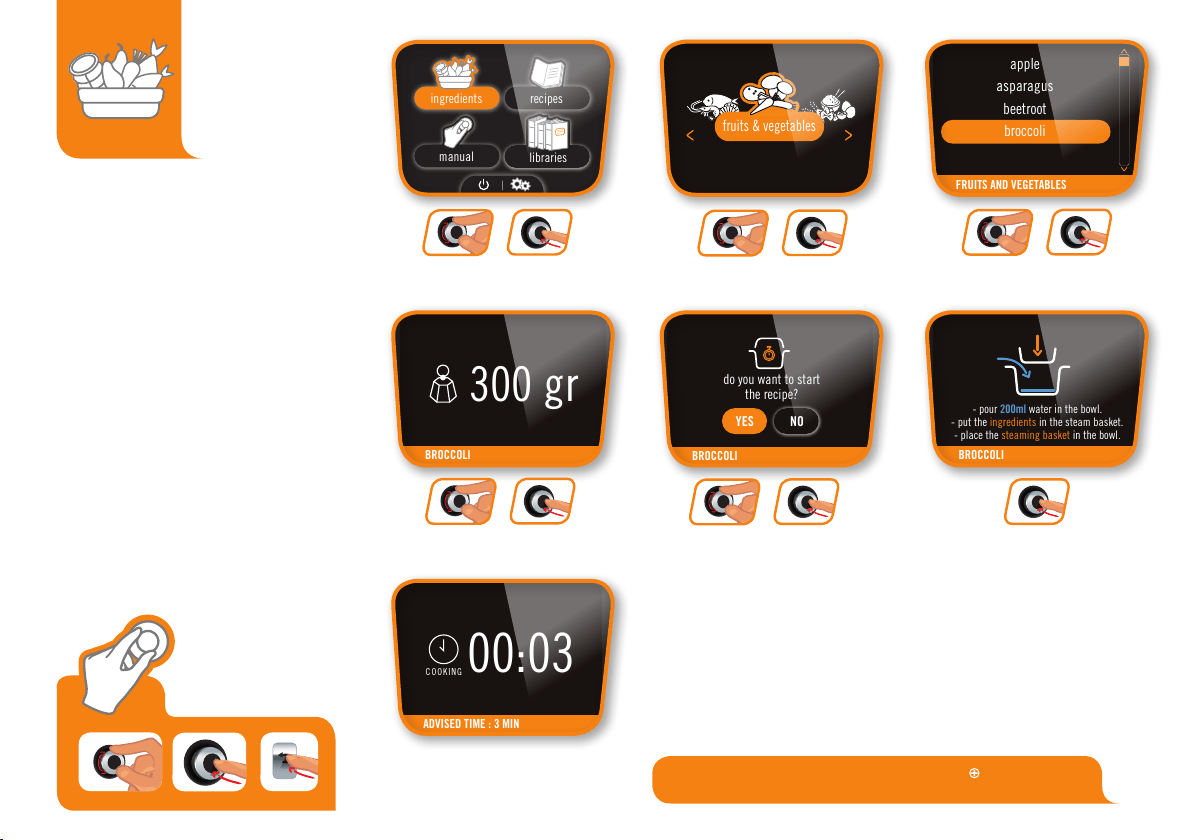
Select the
«ingredients» menu
Start the recipeSelect the quantity
of ingredients
Select the
required ingredient
Select
«fruits & vegetables»
Follow the instructions
on screen
The recommended cooking time is displayed.
You can adjust the cooking time to your
personal taste by turning the OK button.
ADVISED TIME : 3 MIN
PREHEATING
please wait
FRUITS AND VEGETABLES
BROCCOLI
BROCCOLI
apple
asparagus
beetroot
broccoli
do you want to start
the recipe?
COOKING
fruits & vegetables
BROCCOLI
YES NO
- pour 200ml water in the bowl.
- put the ingredients in the steam basket.
- place the steaming basket in the bowl.
00:03
BROCCOLI
BROCCOLI
END OF COOKING
please wait
BROCCOLI
immediate
start
delayed
start
COOKING
00:02
ENJOY !
Beware of the steam while opening the lid
favorites
recipesingredients
manual
00:02
KEEP WARM
BROCCOLI
300 gr
INGREDIENTS
MENU:
With the ingredients menu,
cook single ingredients
without having to program
the cooking mode or time:
Cook4me connect provides
you with instructions for
different weights and
types of ingredients: meat,
fish, vegetables, fruits and
cereals.
ok
ok
+
ok
ok
+
ok
ok
+
ok
ok
+
ok
Note: The weights displayed on the Cook4me connect are the
prepared weight of the ingredients.
ADVISED TIME: 10 MIN
PREHEATING
please wait
FRUITS AND VEGETABLES
BROCCOLI
BROCCOLI
artichoke
asparagus
aubergine
beetroot
broccoli
do you want
to start the recipe?
COOK
BROCCOLI
YES NO
- pour 200ml of water in the bowl.
- place the steam basket in the bowl.
00:10
BROCCOLI
WARNING
BROCCOLI
END OF COOKING
please wait
BROCCOLI
BROCCOLI
immediate
start
delayed
start
COOK
00:02
300 gr
close and lock
the lid
fruits & vegetables
recipesingredients
manual
libraries
00:02
ENJOY !
Serve !
KEEP WARM
Beware of the steam while opening the lid
BROCCOLI
ok
ok
ok
INGREDIENTS
MENU
29
ADVISED TIME: 10 MIN
PREHEATING
please wait
FRUITS AND VEGETABLES
BROCCOLI
BROCCOLI
artichoke
asparagus
aubergine
beetroot
broccoli
do you want
to start the recipe?
COOK
BROCCOLI
YES NO
- pour 200ml of water in the bowl.
- place the steam basket in the bowl.
00:10
BROCCOLI
WARNING
BROCCOLI
END OF COOKING
please wait
BROCCOLI
BROCCOLI
immediate
start
delayed
start
COOK
00:02
300 gr
close and lock
the lid
fruits & vegetables
recipesingredients
manual
libraries
00:02
ENJOY !
Serve !
KEEP WARM
Beware of the steam while opening the lid
BROCCOLI
The recommended cooking time is displayed.
You can adjust the cooking time to your
personal taste by turning the OK button.
ADVISED TIME: 10 MIN
PREHEATING
please wait
FRUITS AND VEGETABLES
BROCCOLI
BROCCOLI
artichoke
asparagus
aubergine
beetroot
broccoli
do you want
to start the recipe?
COOK
BROCCOLI
YES NO
- pour 200ml of water in the bowl.
- place the steam basket in the bowl.
00:10
BROCCOLI
WARNING
BROCCOLI
END OF COOKING
please wait
BROCCOLI
BROCCOLI
immediate
start
delayed
start
COOK
00:02
300 gr
close and lock
the lid
fruits & vegetables
recipesingredients
manual
libraries
00:02
ENJOY !
Serve !
KEEP WARM
Beware of the steam while opening the lid
BROCCOLI
Select immediate or
delayed start (p.27)
ADVISED TIME: 10 MIN
PREHEATING
please wait
FRUITS AND VEGETABLES
BROCCOLI
BROCCOLI
artichoke
asparagus
aubergine
beetroot
broccoli
do you want
to start the recipe?
COOK
BROCCOLI
YES NO
- pour 200ml of water in the bowl.
- place the steam basket in the bowl.
00:10
BROCCOLI
WARNING
BROCCOLI
END OF COOKING
please wait
BROCCOLI
BROCCOLI
immediate
start
delayed
start
COOK
00:02
300 gr
close and lock
the lid
fruits & vegetables
recipesingredients
manual
libraries
00:02
ENJOY !
Serve !
KEEP WARM
Beware of the steam while opening the lid
BROCCOLI
Follow the instructions
ADVISED TIME: 10 MIN
PREHEATING
please wait
FRUITS AND VEGETABLES
BROCCOLI
BROCCOLI
artichoke
asparagus
aubergine
beetroot
broccoli
do you want
to start the recipe?
COOK
BROCCOLI
YES NO
- pour 200ml of water in the bowl.
- place the steam basket in the bowl.
00:10
BROCCOLI
WARNING
BROCCOLI
END OF COOKING
please wait
BROCCOLI
BROCCOLI
immediate
start
delayed
start
COOK
00:02
300 gr
close and lock
the lid
fruits & vegetables
recipesingredients
manual
libraries
00:02
ENJOY !
Serve !
KEEP WARM
Beware of the steam while opening the lid
BROCCOLI
The appliance is preheating
Note: depending on the type of
ingredient and the quantity the
preheating time will take between
3-10 minutes
Cooking has started
Cooking has finished It’s ready to eat! The
appliance automatically
goes to keep warm mode
ADVISED TIME: 10 MIN
PREHEATING
please wait
FRUITS AND VEGETABLES
BROCCOLI
BROCCOLI
artichoke
asparagus
aubergine
beetroot
broccoli
do you want
to start the recipe?
COOK
BROCCOLI
YES NO
- pour 200ml of water in the bowl.
- place the steam basket in the bowl.
00:10
BROCCOLI
WARNING
BROCCOLI
END OF COOKING
please wait
BROCCOLI
BROCCOLI
immediate
start
delayed
start
COOK
00:02
300 gr
close and lock
the lid
fruits & vegetables
recipesingredients
manual
libraries
00:02
ENJOY !
Serve !
KEEP WARM
Beware of the steam while opening the lid
BROCCOLI
Note: The delayed start can be used on the Ingredients Menu with the Fruits & Vegetables
and Rice & Cereals programs.
ok
ok
ok
ok
ok
+
ok
ok
ok
INGREDIENTS
MENU
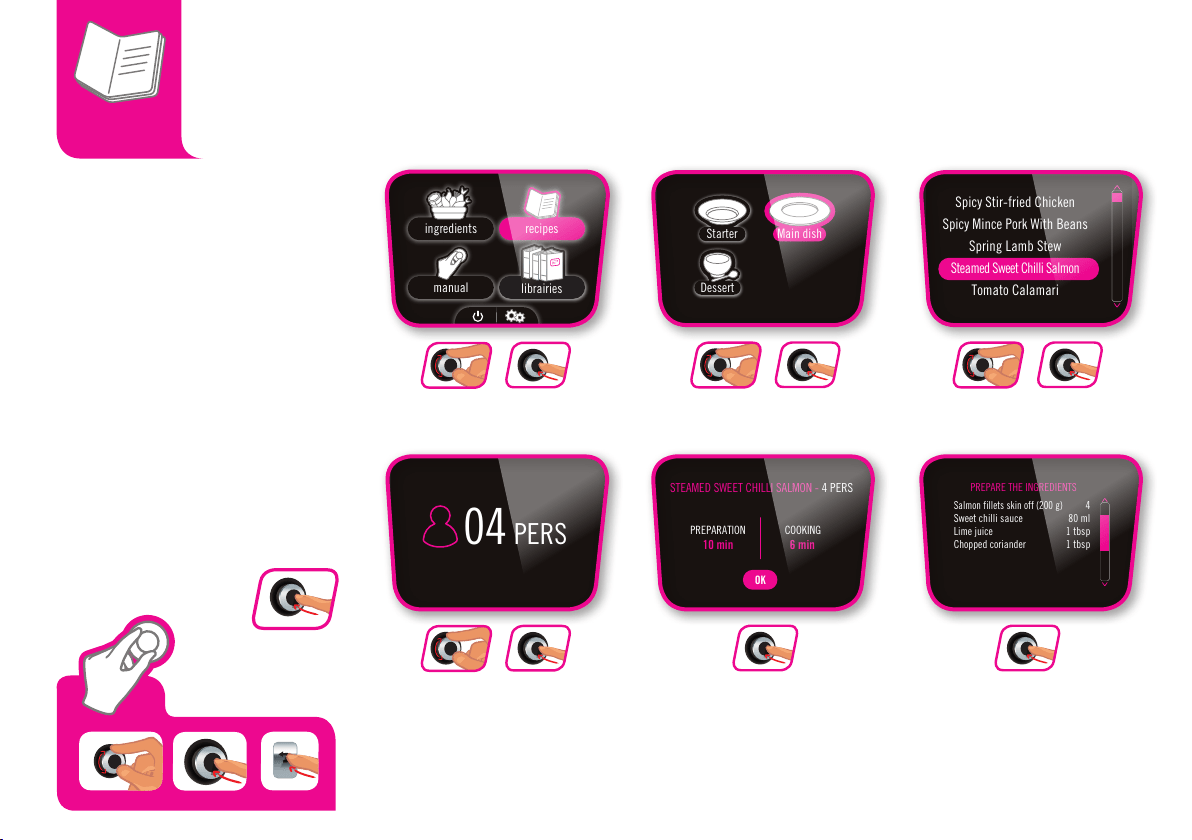
RECIPES MENU:
With the recipes menu, choose
from 150 savoury or sweet
recipes divided into three categories:
starters / main dish / desserts.
You can go back to the initial
menu by pressing the return
button for 3 seconds, or back
one step by pressing the return
button once.
Select the
«recipes» menu
Select the
number of people
Prepare the ingredientsShow recipe
Select
a recipe
Select the
type of recipe
STEAMED SWEET CHILLI SALMON
Spicy Stir-fried Chicken
Spicy Mince Pork With Beans
Spring Lamb Stew
Steamed Sweet Chilli Salmon
Tomato Calamari
STEAMED SWEET CHILLI SALMON - 4 PERS
PREPARATION
10 min 6 min
COOKING
STEAMED SWEET CHILLI SALMON
04
PERS
Starter
Dessert
OK
Salmon fillets skin off (200 g)
Sweet chilli sauce
Lime juice
Chopped coriander
4
80 ml
1 tbsp
1 tbsp
PREPARE THE INGREDIENTS
do you want to start
the recipe?
YES NO
STEAMED SWEET CHILLI SALMON
do you want to start
the cooking?
YES NO
Combine sweet chillii sauce, lime juice
and coriander in a separate bowl and stand
OK
STEAMED SWEET CHILLI SALMON
Place 300ml water in the bowl.
Place 2 or 3 fillets in steamer basket lined with
baking paper. Drizzle over some of the sauce.
OK
favorites
recipesingredients
manual
STEAMED SWEET CHILLI SALMON
STEAMED SWEET CHILLI SALMON
ENJOY!
Beware of the steam while opening the lid
00:06
END OF COOKING
please wait
STEAMED SWEET CHILLI SALMON
PREHEATING
please wait
COOKING
STEAMED SWEET CHILLI SALMON
PUMKIN DIP
Main dish
00:02
KEEP WARM
STEAMED SWEET CHILLI SALMON
Spicy Stir-fried Chicken
Spicy Mince Pork With Beans
Spring Lamb Stew
Steamed Sweet Chilli Salmon
Tomato Calamari
STEAMED SWEET CHILLI SALMON - 4 PERS
PREPARATION
10 min 6 min
COOKING
STEAMED SWEET CHILLI SALMON
04
PERS
Starter
Dessert
OK
Salmon fillets skin off (200 g)
Sweet chilli sauce
Lime juice
Chopped coriander
4
80 ml
1 tbsp
1 tbsp
PREPARE THE INGREDIENTS
do you want to start
the recipe?
YES NO
STEAMED SWEET CHILLI SALMON
do you want to start
the cooking?
YES NO
Combine sweet chillii sauce, lime juice
and coriander in a separate bowl and stand
OK
STEAMED SWEET CHILLI SALMON
Place 300ml water in the bowl.
Place 2 or 3 fillets in steamer basket lined with
baking paper. Drizzle over some of the sauce.
OK
favorites
recipesingredients
manual
STEAMED SWEET CHILLI SALMON
STEAMED SWEET CHILLI SALMON
ENJOY!
Beware of the steam while opening the lid
00:06
END OF COOKING
please wait
STEAMED SWEET CHILLI SALMON
PREHEATING
please wait
COOKING
STEAMED SWEET CHILLI SALMON
PUMKIN DIP
Main dish
00:02
KEEP WARM
ok
ok
+
ok
ok
+
ok
ok
+
ok
ok
+
ok
ok
GREEN THAI CHICKEN CURRY
GREEN THAI CHICKEN CURRY
Gammon joint
Greek Lamb
Green thai chicken curry
Korma chicken wings
Lamb rogan josh curry
GREEN THAI CHICKEN CURRY - 4 PERS
PREPARATION
express recipe
10 min 4 min
COOKING
GREEN THAI CHICKEN CURRY
GREEN THAI CHICKEN CURRY
GREEN THAI CHICKEN CURRY
ENJOY!
KEEP WARM
SEASON TO TASTE AND SERVE !
00:10
00:04
04
PERS
starter
dessert
OK
Groundnut oil
Finely chopped onion
Diced chicken breast fillets
Thai green curry paste
Coconut milk
Trimmed fine green beans
cut in half
11/2 tbsp
150 g
600 g
4 tsp
300 ml
200 g
PREPARE THE INGREDIENTS
do you want to start
the recipe?
YES NO
END OF COOKING
please wait
GREEN THAI CHICKEN CURRY
PREHEATING
please wait
do you want to start
the cooking?
YES NO
do you want to stop
browning?
YES NO
add oil
OK
GREEN THAI CHICKEN CURRY
Add remaining ingredients
Stir well to combine
OK
GREEN THAI CHICKEN CURRY
GREEN THAI CHICKEN CURRY
Brown onion and chicken
for 3 minutes
OK
COOKING
GREEN THAI CHICKEN CURRY
recipesingredients
manual
GREEN THAI CHICKEN CURRY
PREHEATING
please wait
main
librairies
libraries
RECIPES MENU
STEAMED
SWEET CHILLI
SALMON
ok
ok
ok
ok
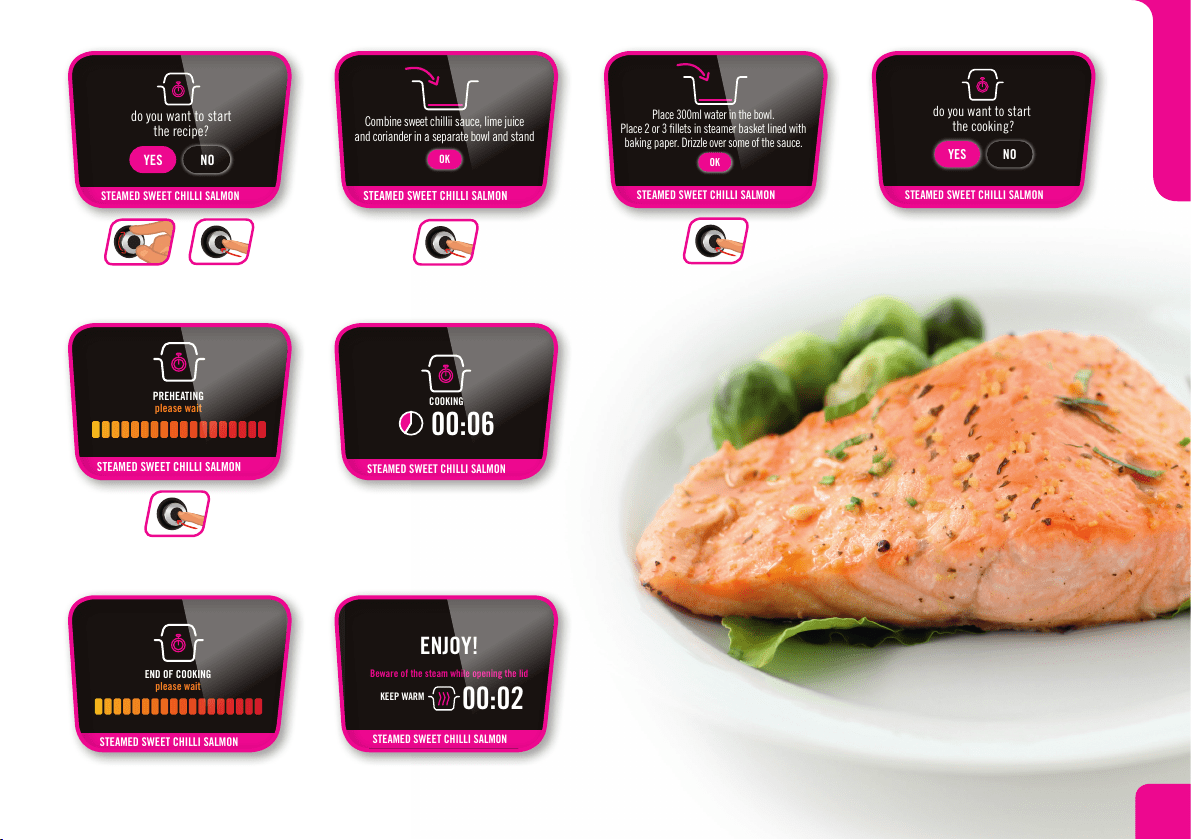
STEAMED SWEET CHILLI SALMON
Spicy Stir-fried Chicken
Spicy Mince Pork With Beans
Spring Lamb Stew
Steamed Sweet Chilli Salmon
Tomato Calamari
STEAMED SWEET CHILLI SALMON - 4 PERS
PREPARATION
10 min 6 min
COOKING
STEAMED SWEET CHILLI SALMON
04
PERS
Starter
Dessert
OK
Salmon fillets skin off (200 g)
Sweet chilli sauce
Lime juice
Chopped coriander
4
80 ml
1 tbsp
1 tbsp
PREPARE THE INGREDIENTS
do you want to start
the recipe?
YES NO
STEAMED SWEET CHILLI SALMON
do you want to start
the cooking?
YES NO
Combine sweet chillii sauce, lime juice
and coriander in a separate bowl and stand
OK
STEAMED SWEET CHILLI SALMON
Place 300ml water in the bowl.
Place 2 or 3 fillets in steamer basket lined with
baking paper. Drizzle over some of the sauce.
OK
favorites
recipesingredients
manual
STEAMED SWEET CHILLI SALMON
STEAMED SWEET CHILLI SALMON
ENJOY!
Beware of the steam while opening the lid
00:06
END OF COOKING
please wait
STEAMED SWEET CHILLI SALMON
PREHEATING
please wait
COOKING
STEAMED SWEET CHILLI SALMON
PUMKIN DIP
Main dish
00:02
KEEP WARM
Start the cooking
Preheating
It’s ready to eat!Cooking has finished
Cooking time
Start the recipe Follow the instructions
STEAMED SWEET CHILLI SALMON
Spicy Stir-fried Chicken
Spicy Mince Pork With Beans
Spring Lamb Stew
Steamed Sweet Chilli Salmon
Tomato Calamari
STEAMED SWEET CHILLI SALMON - 4 PERS
PREPARATION
10 min 6 min
COOKING
STEAMED SWEET CHILLI SALMON
04
PERS
Starter
Dessert
OK
Salmon fillets skin off (200 g)
Sweet chilli sauce
Lime juice
Chopped coriander
4
80 ml
1 tbsp
1 tbsp
PREPARE THE INGREDIENTS
do you want to start
the recipe?
YES NO
STEAMED SWEET CHILLI SALMON
do you want to start
the cooking?
YES NO
Combine sweet chillii sauce, lime juice
and coriander in a separate bowl and stand
OK
STEAMED SWEET CHILLI SALMON
Place 300ml water in the bowl.
Place 2 or 3 fillets in steamer basket lined with
baking paper. Drizzle over some of the sauce.
OK
favorites
recipesingredients
manual
STEAMED SWEET CHILLI SALMON
STEAMED SWEET CHILLI SALMON
ENJOY!
Beware of the steam while opening the lid
00:06
END OF COOKING
please wait
STEAMED SWEET CHILLI SALMON
PREHEATING
please wait
COOKING
STEAMED SWEET CHILLI SALMON
PUMKIN DIP
Main dish
00:02
KEEP WARM
STEAMED SWEET CHILLI SALMON
Spicy Stir-fried Chicken
Spicy Mince Pork With Beans
Spring Lamb Stew
Steamed Sweet Chilli Salmon
Tomato Calamari
STEAMED SWEET CHILLI SALMON - 4 PERS
PREPARATION
10 min 6 min
COOKING
STEAMED SWEET CHILLI SALMON
04
PERS
Starter
Dessert
OK
Salmon fillets skin off (200 g)
Sweet chilli sauce
Lime juice
Chopped coriander
4
80 ml
1 tbsp
1 tbsp
PREPARE THE INGREDIENTS
do you want to start
the recipe?
YES NO
STEAMED SWEET CHILLI SALMON
do you want to start
the cooking?
YES NO
Combine sweet chillii sauce, lime juice
and coriander in a separate bowl and stand
OK
STEAMED SWEET CHILLI SALMON
Place 300ml water in the bowl.
Place 2 or 3 fillets in steamer basket lined with
baking paper. Drizzle over some of the sauce.
OK
favorites
recipesingredients
manual
STEAMED SWEET CHILLI SALMON
STEAMED SWEET CHILLI SALMON
ENJOY!
Beware of the steam while opening the lid
00:06
END OF COOKING
please wait
STEAMED SWEET CHILLI SALMON
PREHEATING
please wait
COOKING
STEAMED SWEET CHILLI SALMON
PUMKIN DIP
Main dish
00:02
KEEP WARM
ok
ok
+
ok
ok
ok
31
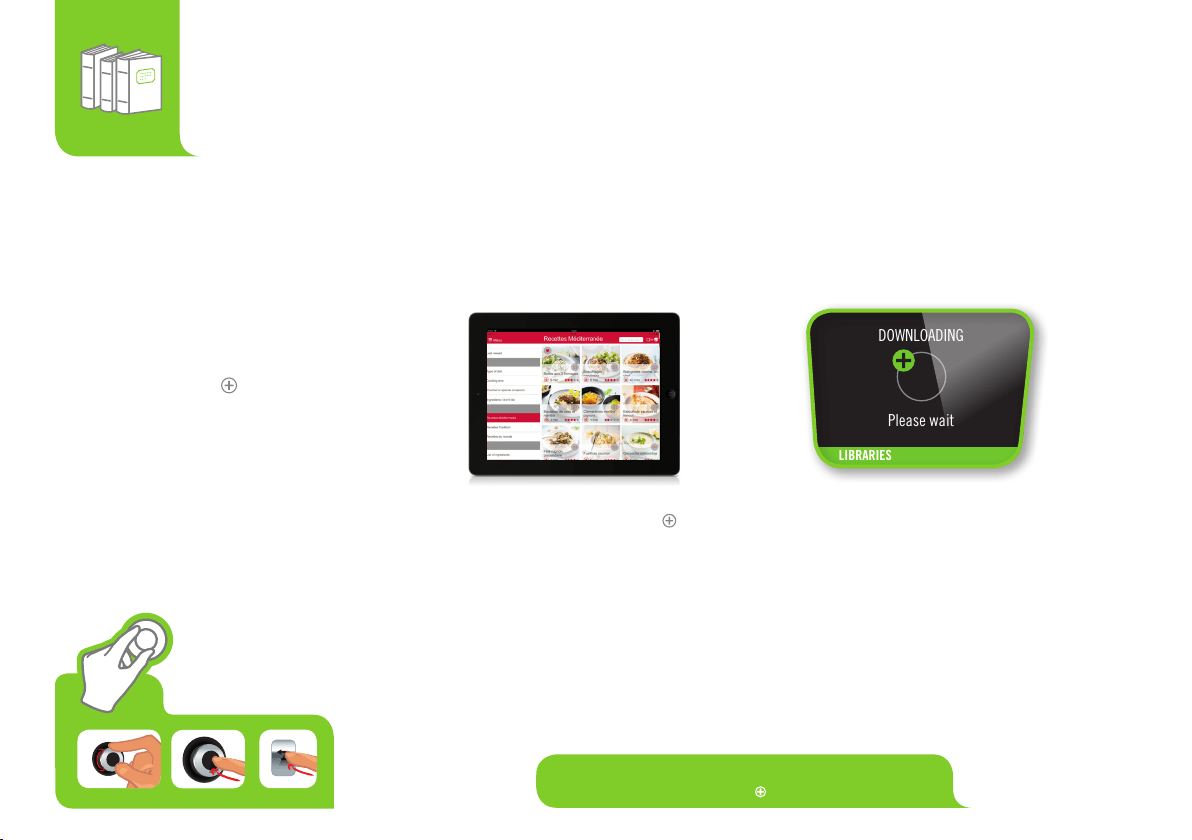
DOWNLOADING
RECIPE PACKS:
When the app is connected
to your Cook4me Connect,
you can download the recipe
packs.
Please wait
DOWNLOADING
LIBRARIES
Select a pack and press the
“Download on Cook4me
connect” button
Download in progress
N.B.: You can stop the transfer at any time by pressing
the return button on Cook4me connect.
LIBRARIES
ok
ok
ok

LIBRARIES
33
ok
ok
ok
ACCESS THE
LIBRARIES:
You can find your
downloaded packs. Launch
your recipes from your
Cook4me Connect by
accessing your library.
ok
ok
+
Select the
“libraries” sub-menu
Select the desired theme Select “starter”, “main” or
“dessert” and choose
your recipe
mainstarter
dessert
mainstarter
dessert
libraries
Asian recipes
Bistro recipes
Mediterranean recipes
Soup recipes
mainstarter
dessert
mainstarter
dessert
libraries
Asian recipes
Bistro recipes
Mediterranean recipes
Soup recipes
mainstarter
dessert
mainstarter
dessert
libraries
Asian recipes
Bistro recipes
Mediterranean recipes
Soup recipes
ok
ok
+
ok
ok
+

• Always use plastic or wooden utensils to avoid damaging
the non-stick coating of the cooking bowl. Never cut food
in the bowl.
Liquid quantities
• Programs that cook under pressure – pressure cooking,
ingredients menu and recipes menu – always require some
liquid. See the cooking guides on pages 30-33 for advice on
the quantity of liquid to use or follow the instructions on the
Cook4me connect display screen.
• Always use a liquid that gives off steam when boiled e.g.
water, stock, wine, beer, cider, etc. Never use oil or fat. Do
not used milk as it can froth up under pressure.
• When steaming foods in the basket always use a minimum
of 200 ml of water in the Cook4me connect.
Maximum Filling level
• The ingredients plus liquid must not exceed the maximum
filling level.
• Some foods such as rice and pulses (e.g. dried beans and
dried peas) swell up and tend to froth during cooking and
the bowl should not be more than half full with these
ingredients and liquid.
Foods which require special care when cooking in Cook4me
connect
• See the point above about cooking rice & pulses.
• Take care when cooking fruit which froths during pressure
cooking, such as stewed apple. Instead steam some fruits,
such as apple, in the steaming basket instead.
• Never cook dumplings in the Cook4me connect connect
under pressure, as they could rise up and block the safety
devices.
Cooking times
• The cooking times programmed into the Cook4me connect
are only a guide and can be adjusted to your personal taste
by manually adjusting the advised cooking time.
• For the programs that cook under pressure – pressure
cooking, ingredients menu and recipes menu – the pressure
cooking time will vary according to the size of the individual
pieces or thickness of the food, not the weight.
• To prevent overcooking with delicate foods such as
vegetables, fruit and fish the suggested cooking times may
need slight adjustment for your personal taste.
• Cook4me connect is not a slow cooker. The “gentle
cooking” mode operates using a low temperature (approx
75°C) for gentle cooking such as melting butter.
• The “simmer” mode operates using a temperature of
approximately 90°C and can be used for such things as
reducing sauces.
Cook4me connect Meat & Chicken Cooking Tips
• Choose meat joints of an even shape and thickness to
ensure they cook evenly. Boneless joints which are tied into
an even cylindrical shape are ideal.
• The maximum recommended weight for meat joints is 1 kg.
GOLDEN RULES OF COOKING WITH YOUR COOK4ME CONNECT

• The maximum recommended weight for a whole chicken is
1.5 kg.
• Choose pieces of meat, such as chops, cubed meat for stews,
of the same size and thickness to ensure they cook evenly.
• Before browning meat joints dry the outside with kitchen
paper towel if it is moist on the outside. This helps reduce
spitting during browning,
• Use about ½ – 1 tablespoon sunflower or vegetable oil when
browning joints of meat.
• During browning, turn joints or meat using a spatula so
it browns on all sides. Take care as hot oil may spit from
the bowl. For pieces of meat, e.g. chops, or chicken, e.g.
drumsticks, brown in batches, if necessary.
• After browning, take care when adding liquid to the hot
bowl as it may spit or give off hot steam.
• Meat or joints with a layer of fat on the outside, such as
chops or pork joints, will not turn crisp when cooked in the
Cook4me connect.
Adapting your own recipes for use in Cook4me connect
• For the programs that cook under pressure – pressure cooking
and ingredients menu – reduce the liquid quantity when
adapting a conventional recipe as there is less evaporation
in Cook4me connect.
• The cooking time will be shorter than in a conventional oven
or on the hob. Find a similar recipe in the Recipe Menu as a
guide to the cooking time.
• Recipes are best thickened after cooking using Instant
Thickening Granules available in larger supermarkets and
are usually sold in the aisle near to cornflour. Just stir the
thickening granules into the boiling hot dish or liquid until
all the granules dissolve and the liquid thickens.
Alternatively, blend cornflour with a little cold liquid to
form a smooth paste (see packet instructions for advice on
quantities); stir into the hot dish and then bring to the boil in
a separate saucepan.
• To remove any unpleasant odours left in the Cook4me
connect after cooking strong foods, such as fish or curry,
clean the appliance afterwards including dismantling the
metal plate and cleaning all safety parts. Reassemble and
leave the lid open for a few hours.
About the recipe program
• The cooking times in the recipes are approximate and may
need adjustment to suit your personal taste.
• Eggs used in the recipes are medium size unless stated
otherwise.
• All spoon measures are level unless stated otherwise.
• The weight stated in the recipes are for the prepared weight
of the food, for example, 100 g sliced carrots is the weight of
carrots after peeling and trimming off the top and bottom.
• The recipes have been specifically developed for use in
Cook4me . If the recipes are prepared in an appliance
other than this, the results and cooking times may vary.
35
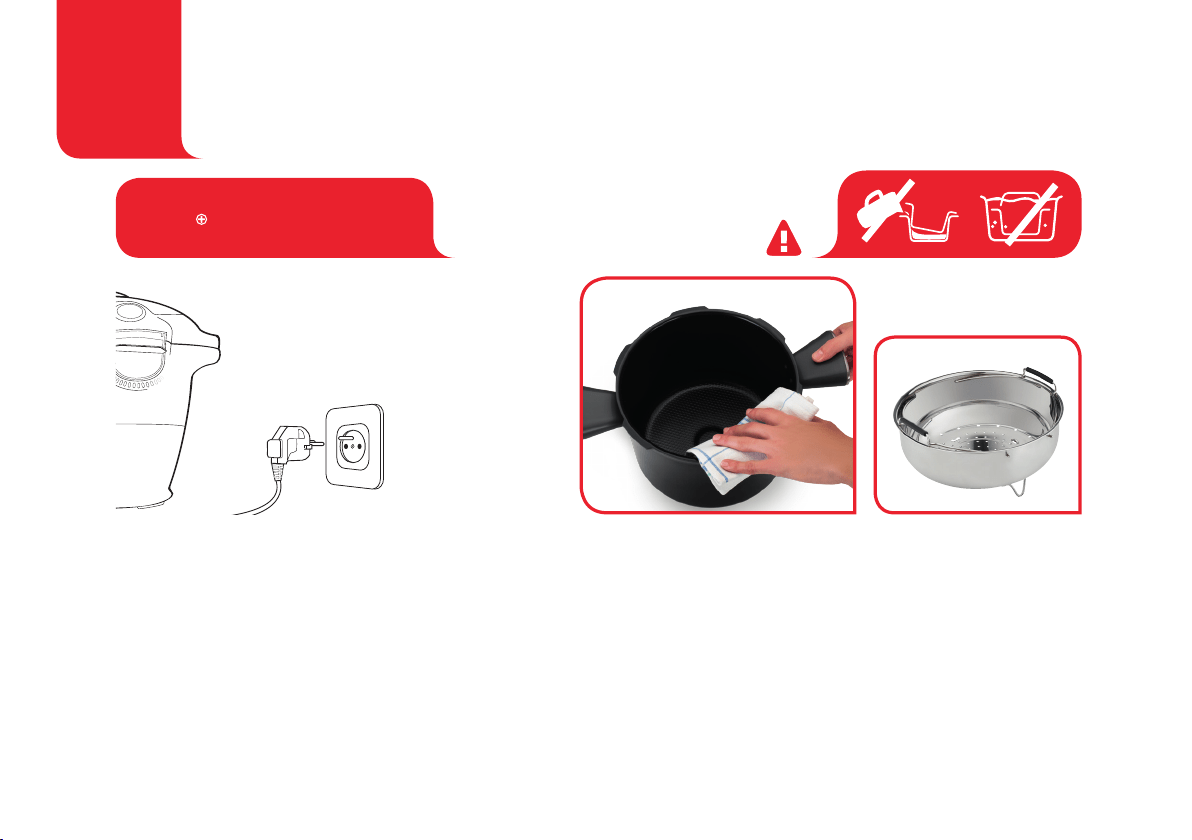
Once you have finished cooking your dish,
disconnect the appliance to clean. Clean
the appliance after each use.
You can wash the cooking bowl and steam basket in hot water and washing up
liquid or in the dishwasher. Clean the body of the appliance using a damp cloth.
After several washes in the dishwasher, the exterior of the bowl may become
discoloured.
Note: To ensure the correct operation of your
Cook4me connect, follow these cleaning
and maintenance instructions after each use.
CLEANING
MAINTENANCE

After each use, remove the condensation
collector and wash carefully in soapy water
or in the dishwasher. Take care to dry it well.
Return to its original position.
CLEANING IN THE DISHWASHER:
you can place the metal plate in the
dishwasher, without removing the valves.
After placing in the dishwasher, remove
the decompression ball and blow in the
pipe to check that it is not blocked. Dry
the ball and its support carefully using a
soft cloth.
CLEANING BY HAND:
you can clean the metal plate using
washing up liquid and hot water. Firstly,
remove the ball then clean completely.
Dry the ball and its support using a soft
cloth.
To clean the metal plate, by hand or in the
dishwasher, you need to remove the valve
cover.
1
Unscrew the screw at the centre of the
metal plate and keep it in a safe place
2
Take off the metal plate
3
Remove the valve cover
1
3
2
37
CLEANING
MAINTENANCE
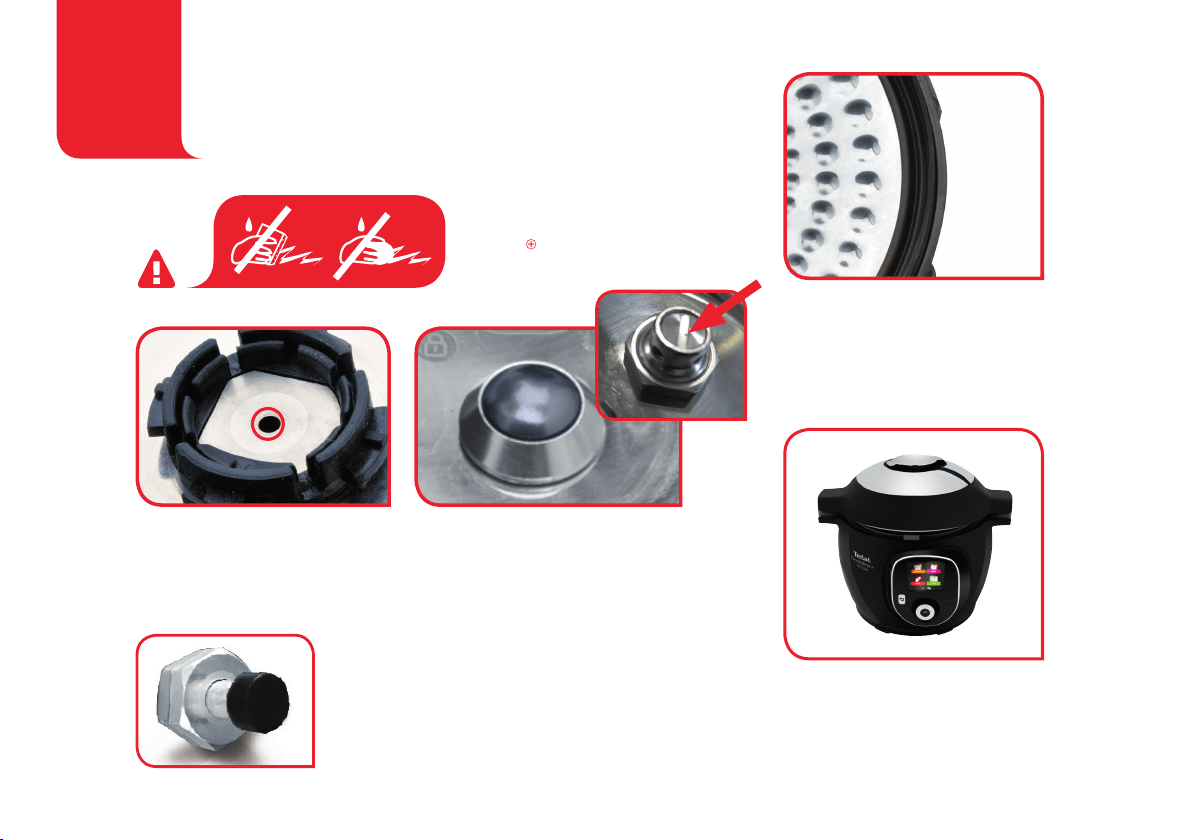
Before reinstalling the ball, check that the
pipe is not blocked by blowing into it, from
the opposite side to the picture above.
Press on the internal part of the safety valve
spring, from the opposite side to the picture
shown above, to check that it is not clogged.
Clean the metal plate using a damp sponge and check
that the manometric rod (shown in picture to the left) is
not blocked and correctly positioned.
Rinse with water and check it moves freely.
Replace the watertight seal at least every
three years. This seal can only be replaced
by an Approved Service Centre.
Do not clean any part of the
Cook4me connect with abrasive
sponges or wire wool.
Do not store the appliance with the lid
closed. Leave open or half open or slightly
ajar. This will prevent unpleasant odours.
CLEANING
MAINTENANCE
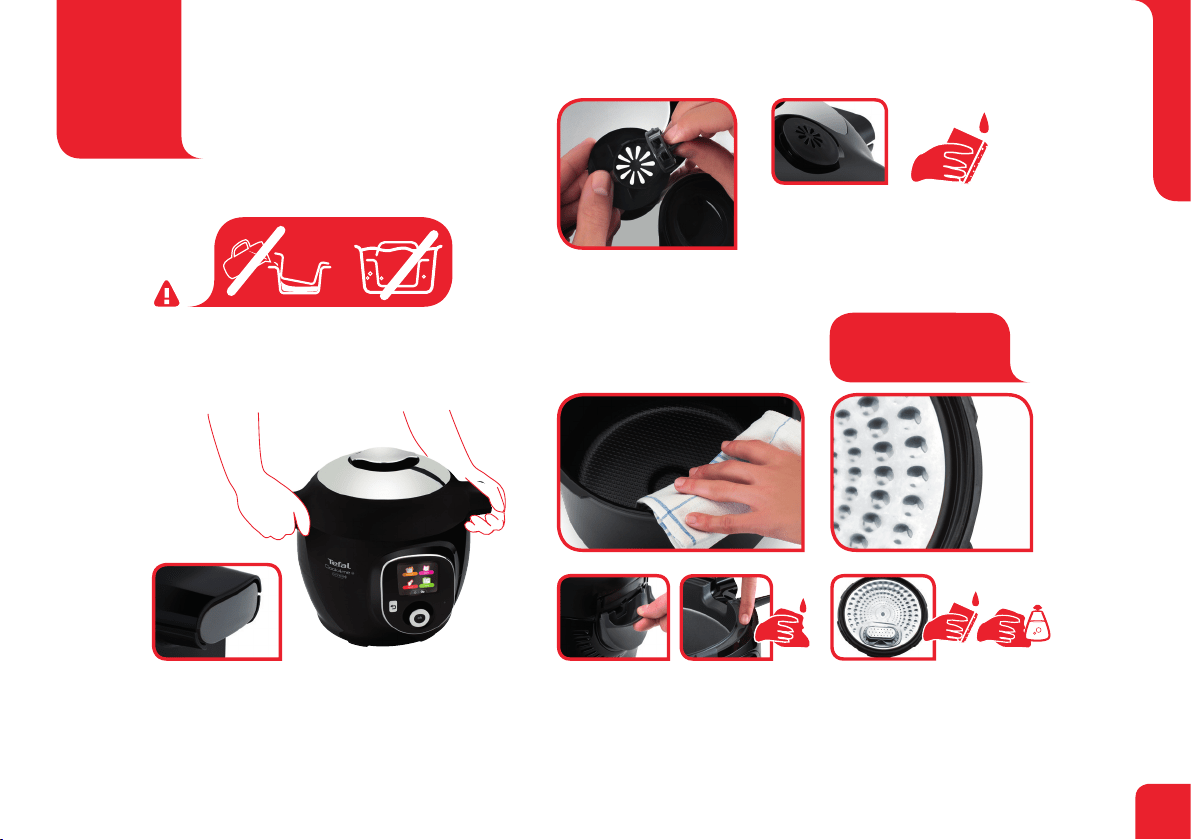
Transport the appliance using the two side handles. To carry
the appliance, close the lid and lock it.
• In the event of accidental immersion of the appliance or if
water is spilt directly on the heating element when the bowl is
not in position, take the appliance to an Approved Service Centre.
Clean the outside of the appliance’s lid
using a damp cloth. Clean the silencing
pressure valve at the back of the lid. Pull out
the valve cover from the lid, then take out
the valve and clean it under running water.
Reassemble the valve and return it to its
original position in the lid.
Clean the upper part of the cooking bowl
using a damp cloth. Clean the area behind
the condensation collector using a damp
cloth. Rinse the condensation collector and
replace.
Clean the seal on the metal plate
using a damp cloth then rinse
thoroughly. Do not use sharp objects.
Note: The seal is non-
removable from the
metal plate.
39
CLEANING
MAINTENANCE

SAFETY FEATURES
Your pressure cooker contains several safety features:
Safety When Opening:
- If your pressure cooker is under pressure, the manometric rod is in the upper locking position, which prevents the cover
from opening. Never try to force open your pressure cooker.
- It is especially important not to apply pressure to the manometric rod.
- Ensure that the internal pressure has fallen (additional steam escaping from the safety valve) prior to trying to open the
cover.
Overpressure Safety Features:
- The safety valve releases the pressure – see chapter on Cleaning and Maintenance, page 36

41
If one of the overpressure safety features is triggered:
Turn off your appliance.
Let your pressure cooker completely cool down.
Open it.
Check and clean the safety valve, decompression ball and gasket. See chapter on Cleaning and Maintenance.
If your product leaks or is no longer operational after having performed these checks and cleaning,
return it to a SEB authorised Service Centre.
Regulating your appliance:
The pressure is regulated by the heating element that automatically switch on or off to ensure the adapted pressure level.
To minimise the effects of thermal inertia and improve regulation accuracy, the decompression ball can be automatically
triggered to briefly release steam from time to time.

PROBLEMS POSSIBLES CAUSES SOLUTION
The lid does not close. There are foreign bodies between the
bowl and the heating plate.
Remove the bowl, check that the heating plate, central element and under
the bowl are clean. Also check that the central element can move around.
The lid open/close handle is not
correctly positioned.
Check that the open/close handle is completely open.
The metal plate and/or the tightening
screw are not properly installed or fully
tightened.
Check that the nut is fully tightened and that the notches on the rotating
inner part of the lid are correctly aligned with the notches on the rim of the
bowl and then try locking the lid closed. The nut must be fitted with the flat
side facing the metal plate.
The appliance does not
depressurise.
The ball cover is not in place. Let the appliance cool completely and then remove the metal plate and
correctly position the ball cover (fixed in the lock position).
The lid does not open
once the steam is
released.
The manometric rod is still in the high
position.
After ensuring that no more steam is released and that the appliance is
completely cold, insert a fine metal skewer into the hole located between the
open handle and the silencing valve. Be careful of hot steam being released
once the skewer is pushed in. When no more steam is released, try to open
the appliance.
The appliance does not
become pressurised.
Check that the seal, purple safety valve
and manometric rod are clean.
Clean your appliance by following the cleaning and maintenance instructions
in this book.
Check that the lid is locked and the
marking is properly aligned with
the closed padlock. Check that the
manometric rod can move around and
if it needs cleaning.
Clean the manometric rod as instructed in the Cleaning and Maintenance
section.
The decompression ball is not
positioned correctly or dirty.
Check that the ball is correctly positioned and that the cover is in the locked
position. Clean and dry the ball and its support.

PROBLEMS POSSIBLES CAUSES SOLUTION
ERROR CODES Code 24: the pressure decreases while
pressure cooking.
Code 21 and 26: pressure fails to raise.
Add liquid to your recipe (water, stock or a liquid sauce) 50-100ml at a time
and re-start the recipe.
Steam is released from
the sides of the lid
during cooking (leaks).
The seal of the metal plate and/or the
edges of the bowl are dirty.
Clean the sides of the bowl and seal using a damp cloth. Do not use any
sharp instruments.
Wear, cuts and deformation of the seal. The seal must be changed at least every 3 years. Take your appliance to an
Approved Service Centre.
Bowl edges damaged. Take your appliance to an approved service centre.
The nut for the metal plate was not
tightened enough.
Fully tighten the nut so the metal plate is correctly positioned. The nut must
be fitted with the flat side facing the metal plate.
Water flows behind the
appliance.
The condensation collector is not in
position or is overflowing.
Make sure that the condensation collector is properly positioned behind the
appliance and that the flow channel is not blocked. The nut must be fitted
with the flat side facing the metal plate.
The safety valves and/or openings are
obstructed.
Check that the bowl is not too full with food or that foods have been cooked
which expand (see Safety Instructions pages).
The control panel does
not light up.
The appliance is not connected or is on
standby.
Check that the power lead is connected both to the appliance and the mains.
Check that the appliance is not on standby by pressing the “OK” button.
The appliance is damaged. Take your appliance to an Approved Service Centre.
Condensation appears
on the indicator.
There is condensation on the lid. Let the appliance dry in fresh air for a few hours.
The metal plate can
not be removed, it is
blocked.
The ball cover was not well positioned
on the metal plate.
Unscrew the nut on the metal plate, then press the spring loaded
screw spindle to release the metal plate. Check that the ball cover and
decompression ball are correctly positioned and re-fit if necessary.
43

For any connection-related problems, go to www.tefal.com.au or the My Cook4me
app (Menu/ guide/ FAQ).
Trademarks
The Bluetooth® brand and logo are the property of Bluetooth SIG, Inc.; use by SEB SAS is subject to licensing.
The other commercial brands and brand names are the property of their respective owners.

NOTE
45


47

NC00155925
02/2020