606
546
1
~
30
~64
~61
en
Installation instructions
fr
Instructions d'assemblage
60
30
15
CLIC
2
3
4
5
8
9
10
6
7
10a
12
13
11

en
Instructions for the
installation technician
All operations relating to installation,
regulation and conversion to other
gas types must be carried out by an
authorised installation engineer,
respecting all applicable regulations,
standards and the specifications of
the local gas and electricity
suppliers.
It is recommended you contact the
Technical Assistance Service to
convert to another gas type.
Before you begin, turn off the
appliance's electricity and gas
supply.
This appliance has been designed for
home use only, not for commercial or
professional use. This appliance
cannot be installed on yachts or in
caravans. The warranty will only be
valid if the appliance is used for the
purpose for which it was designed.
Before connecting the appliance to the
installation, first check that it has been
adjusted for the gas type to be
supplied.
Our cooking hobs leave the factory
designed to function with the gas type
that is indicated on the specifications
plate.
This appliance can only be installed in
a well-ventilated place in accordance
with existing regulations and ventilation
specifications. The appliance must not
be connected to a combustion product
removal device.
It is vital that the place in which the
appliance is installed has suitable
ventilation in accordance with
regulations so that the combustion
gases are piped outside.
Check the dimensions of the cooking
hob as well as the dimensions of the
gap to be cut in the kitchen unit.
The panels on the work surface, in the
immediate vicinity of the cooking hob,
must be made of non-flammable
material. Both the laminated covering
and the glue used to secure it should
be heat resistant, to prevent
deterioration.
Electrical cables must not come into
contact with hot areas.
The power cable must be secured to
the kitchen unit to prevent it from
touching any hot parts of the oven or
the cooking hob.
All appliances containing any electrical
components must be earthed.
Read these instructions before
installing or using the appliance.
IF THESE RECOMMENDATIONS ARE
NOT OBSERVED, THE
INSTALLATION TECHNICIAN WILL
BE RESPONSIBLE FOR ANY
DAMAGE CAUSED, AND THE
MANUFACTURER WILL BE EXEMPT
FROM ALL RESPONSIBILITY.
Installing the hob on the
kitchen unit
The option of locating the cooking hob
in a kitchen unit (in accordance with
gas appliances regulation EN 30-1) is
Type 3.
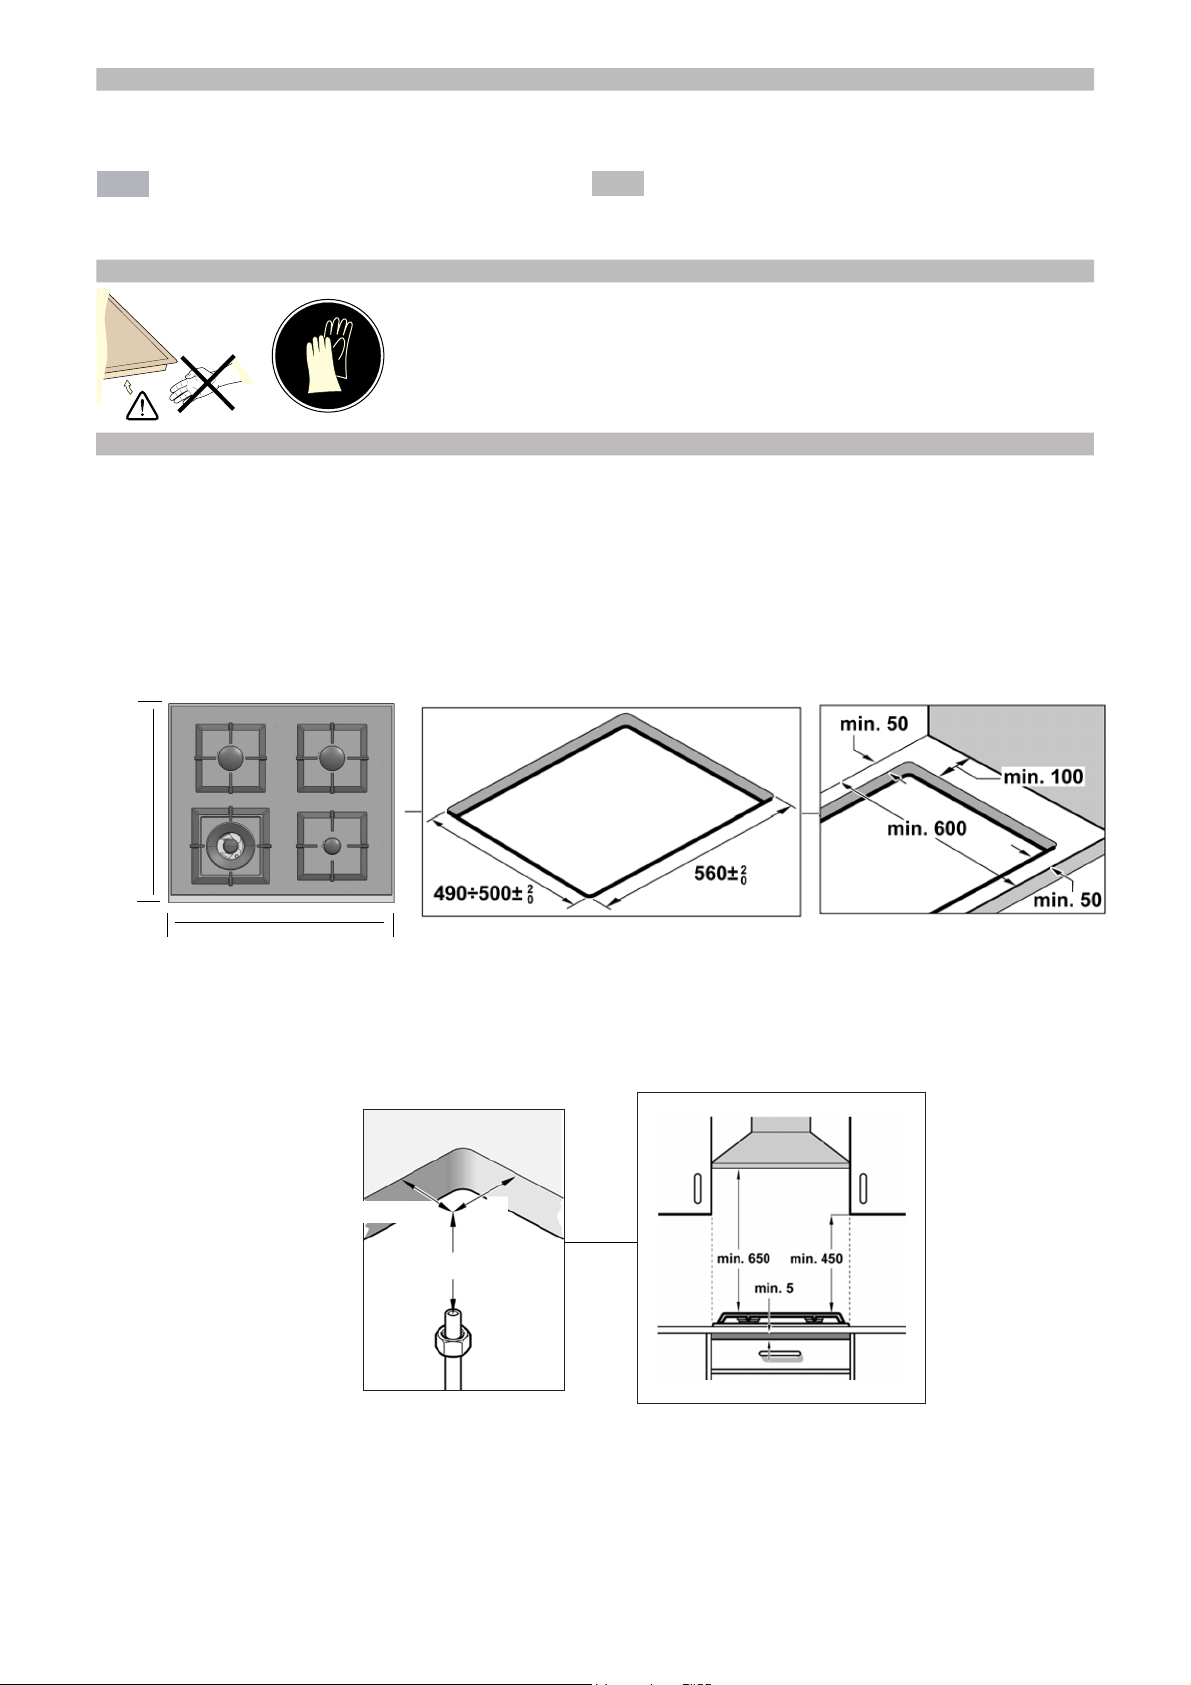
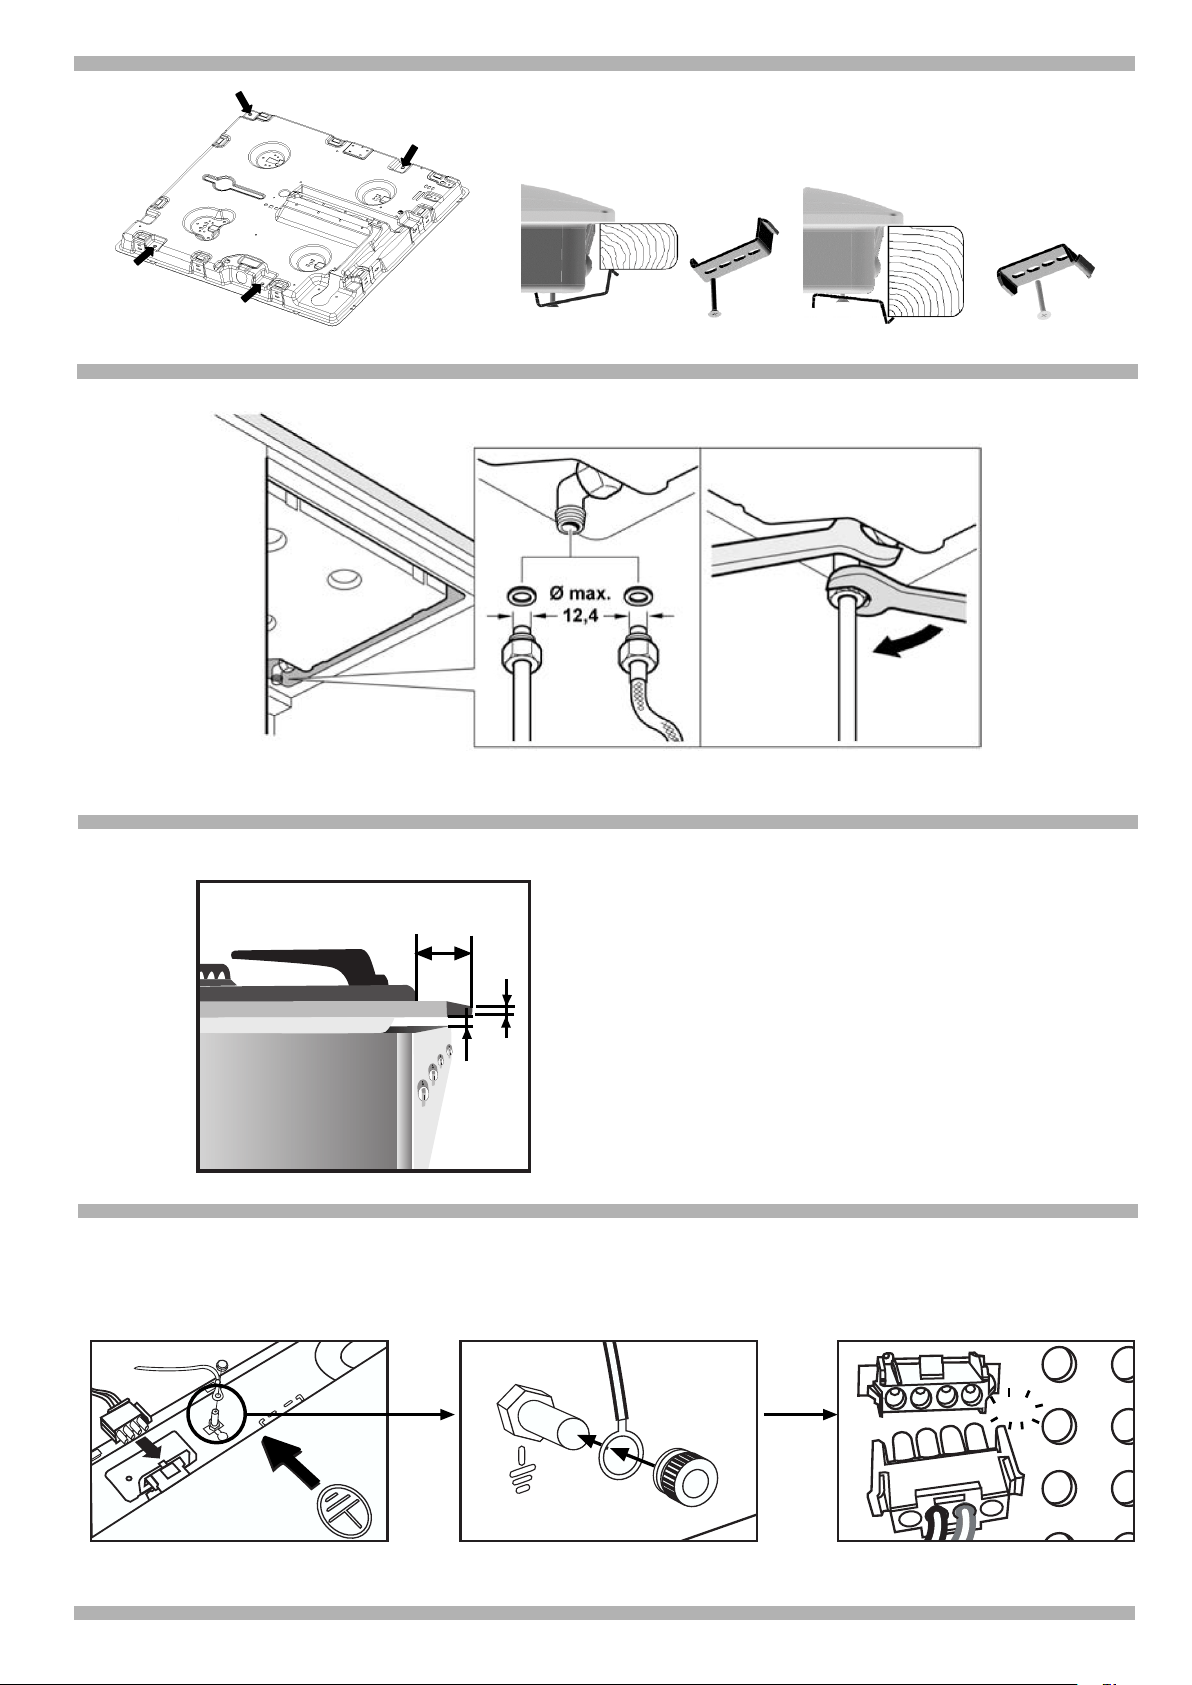
Fitting measurements
1 - Minimum distances (mm). Cut a
suitable sized opening in the work
surface. Fig. 1.
To install the hob over an oven, check
the dimensions given in the installation
manual.
An oven must have forced ventilation
to install a hob above it.
If while using a hob with a control
module it is possible to access its
lower part, a separator will be needed
in order to avoid possible contact. The
minimum distance of this separator to
the support level of the hob must be
130 mm.
Place the cooking hob in the gap cut
into the kitchen unit.
2 - The wood fibres that have been
used to make the cooking hob
modules tend to swell quite quickly
when they come into contact with
moisture. It is therefore recommended
that the cut edges be treated with a
special glue to protect them against
steam or any condensation that might
drip down beneath the work surface of
the kitchen unit.
The adhesive seal (underside of the
hob) is factory-fitted. Do not remove
under any circumstances. The seal
ensures that the entire work surface
will be watertight, and prevents water
seepage.
3 - Remove the clips from the
accessory bag provided.
Fasten them to the lower points
especially prepared for this purpose,
with the clip facing inwards so it can be
subsequently inserted into the kitchen
unit. Fig. 2. Press all of the edges
simultaneously so that the hob is
supported along its entire perimeter.
Turn the clips and tighten until fastened
properly.
The end of the gas hob's inlet manifold
has a 1/2" (20.955 mm) thread
(Fig. 3). This permits:
- Fixed connection
- Connection using a flexible pipe
(L min. 1 m - max. 3 m).
In this case, you must prevent the pipe
from coming into contact with moving
parts of the kitchen unit being inserted
(for example, a drawer) and prevent
access to any spaces which might
become obstructed. If the hob is
combined with an oven (Fig. 4), or if
there is interference between the
flexible pipe and the oven, turn the
L-tube so as to avoid creating pressure
in the pipe, bearing in mind the
position of the L-tube as in Fig. 1. Make
sure there are no leaks after turning the
L-tube.
Except in the conditions outlined, it is
not possible to move or turn the L-tube
from its factory-fitted position.
If for any reason the L-tube is turned,
you must ensure that area is sealed
correctly. Make sure that all
connections are watertight.
The manufacturer declines any
responsibility for leaks if the L-tube is
turned and for any connections
performed by the installation
technician.
5 - The following must be checked on
the specifications plate: the voltage
and the total power. The appliance
must be earthed.
Always make certain that all
connections made are in accordance
with national legal requirements.
Observe all the requirements of the
local electrical supply company.
To comply with normal safety
requirements, the installation
technician should provide an
omni-pole cut-off switch with a contact
opening of at least 3 mm.
This appliance is type "Y", which
means that the supply cable MUST
NOT BE REPLACED BY THE USER;
this can only be done by the
manufacturer's technical assistance
service. The section and type of cable
must be observed.
Do not make any adjustments to the
interior of the appliance. If this should
be necessary, call our technical
assistance service.
Installing the oven and
connecting it to the hob
1 - Prepare the oven:
Actuators are supplied with the hob
and must be attached to the back of
the oven. Fig. 6.
2 - Preparing the hob:
a) Check the gas type:
Check that the appliance was
factory-fitted with the gas type it
requires. If this is not the case, the
nozzles must be changed, and the taps
must be set to their lowest level (see
Changing the gas type in these
Assembly instructions).
b) Check the insertion position: kitchen
unit and distances to the insertion
aperture.
3 - Installing the hob:
If you have not yet positioned the hob
in its insertion aperture, do so now,
ensuring that it is properly attached to
the kitchen unit, and complete the gas
connection as described above.
Lift and attach the universal joint to the
underside of the hob using adhesive
tape or glue if the hob does not already
have one of the two.
4 - Electric connection:
Complete the oven's electric
connection.
The hob's connection cable must be
connected to the oven, and the
earthing cable must be screwed in
place as shown in Fig. 5. If necessary,
place the oven in the kitchen unit.
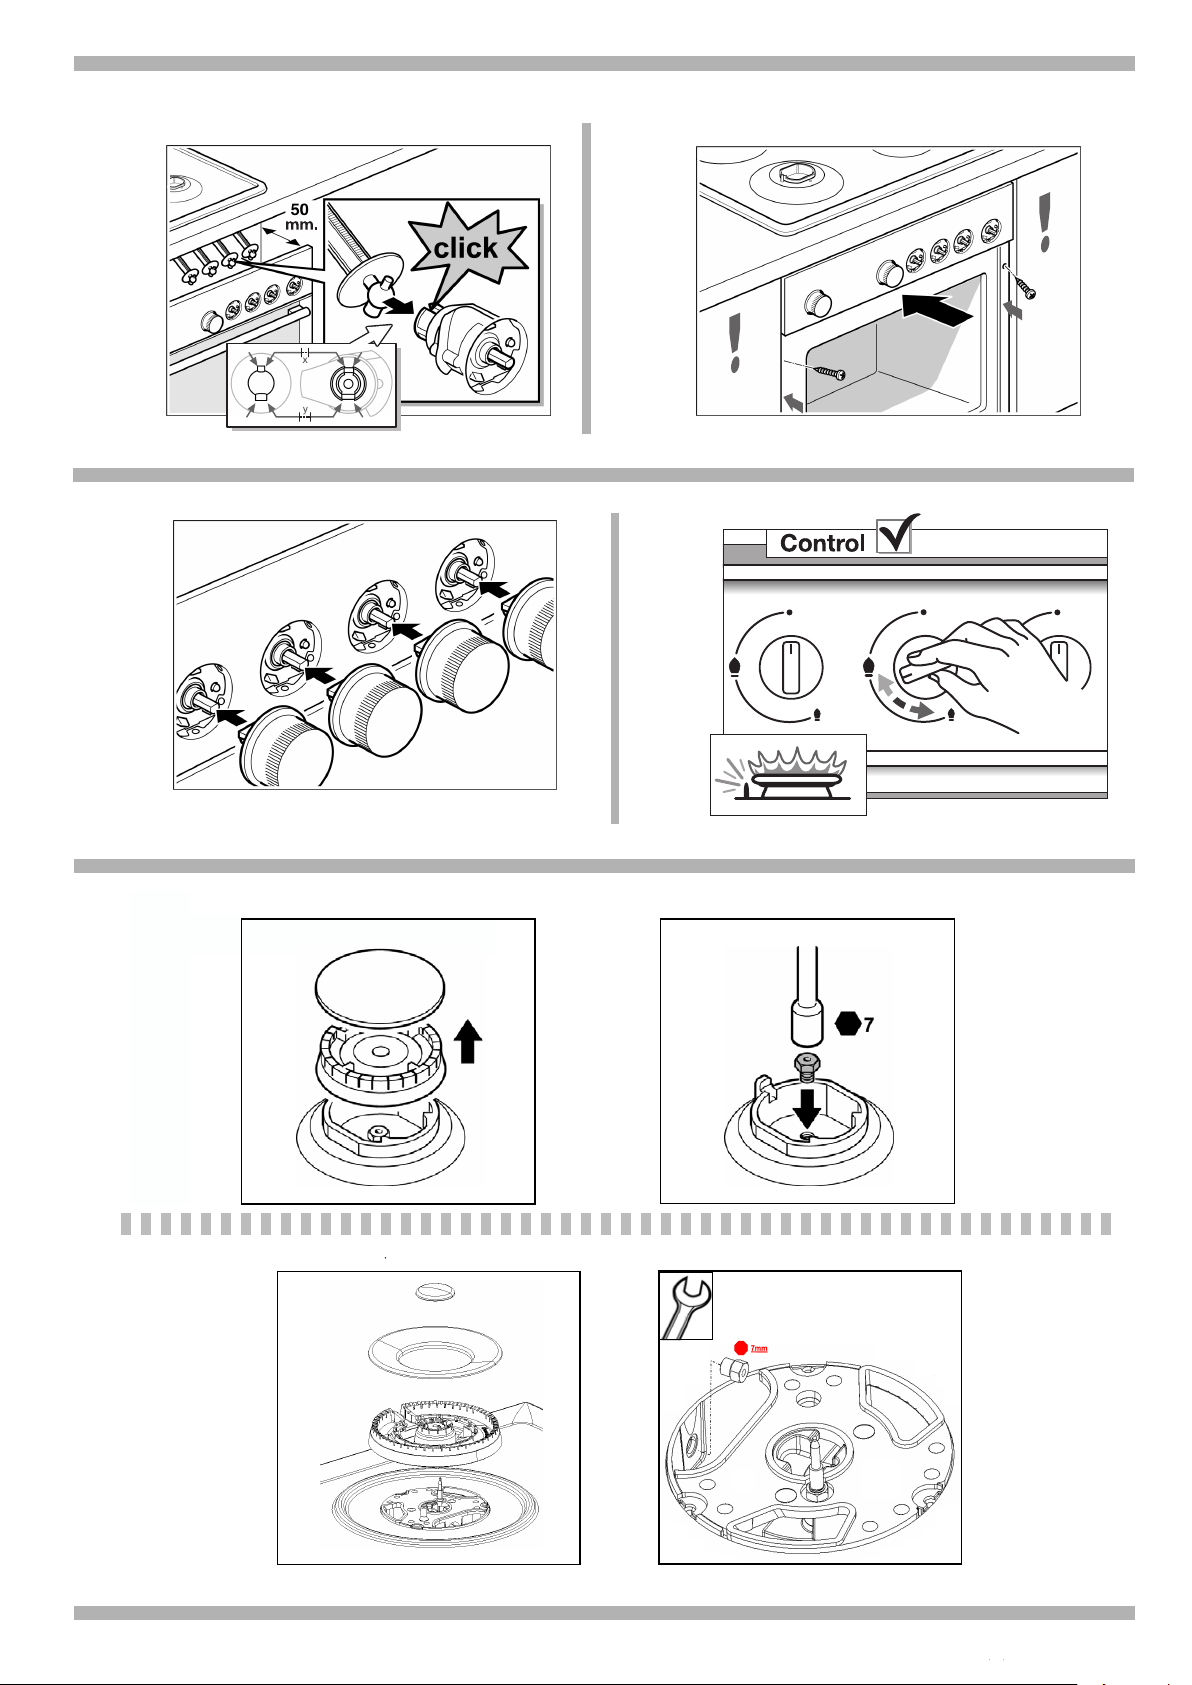
5 - Mechanical bond/universal joint:
Move the oven towards the universal
joint (see Fig. 6). Leave a space of
about 50 mm so that the universal
joints can be connected to the oven by
hand. Remove the adhesive tape or
glue from all of the universal joints and
connect them to the actuators. Fig. 6.
Note: Wear protective gloves to fit the
hob.

6 - Mounting the oven:
Insert the oven and push it all the way
in, and use the two screws to attach it
to the side walls of the kitchen unit.
Fig. 7.
7 - Completing the assembly and
checking for proper operation:
The control knobs bearing gas
symbols provided with the oven must
be placed on the shafts. Fig. 8
Open the gas supply to the hob and
turn on the burners. Fig. 9. After
ignition, check that the burners do not
go out when the control knobs are
released. (Burners are equipped with
thermocouple safety; move the control
knobs from maximum to minimum
flame to check flame stability).
Disassembling the oven
If the oven needs to be disassembled,
for example to set taps to their lowest
levels, adjust the length of the universal
joints, or for a new mounting, the
following steps must be followed:
1 - Remove the control knobs.
2 - Oven mounting: remove the two
screws on each side of the oven.
3 - Carefully pull the oven out 50 mm.
Warning: only pull the oven out as far
as necessary to access the rear part of
the control panel. If you continue
pulling the oven any further, the
universal joints could loosen around
the taps.
4 - Remove the universal joints from
the actuators.
5 - Remove the oven from the kitchen
unit. If necessary (for example, if the
kitchen unit has a base cabinet), you
may have to disconnect the electric
and earthing connections.
6 - Special cases with universal joints:
If the universal joint has come off of the
tap or actuator shaft, it must be
mounted again:
a) Mounting the actuator shaft: you
must bear in mind the position of the
universal joint's thin and wide pivots.
b) If the plastic part of the tap shaft has
fallen off: put it back in place, making
sure that the shaft is correctly aligned
with the "D" shaped cavity, then press
all the way in.
Changing the gas type
All operations relating to installation,
regulation and conversion to other
gas types must be carried out by an
authorised installation engineer,
respecting all applicable regulations,
standards and the specifications of
the local gas and electricity
suppliers.
It is recommended that you contact
the Technical Assistance Service to
convert to another gas type.
Before you begin, turn off the
appliance's electricity and gas
supply.
Provided national laws allow it (see
specifications plate), this cooking hob
may be adapted to function with other
types of gas. For this, follow all the
steps below:
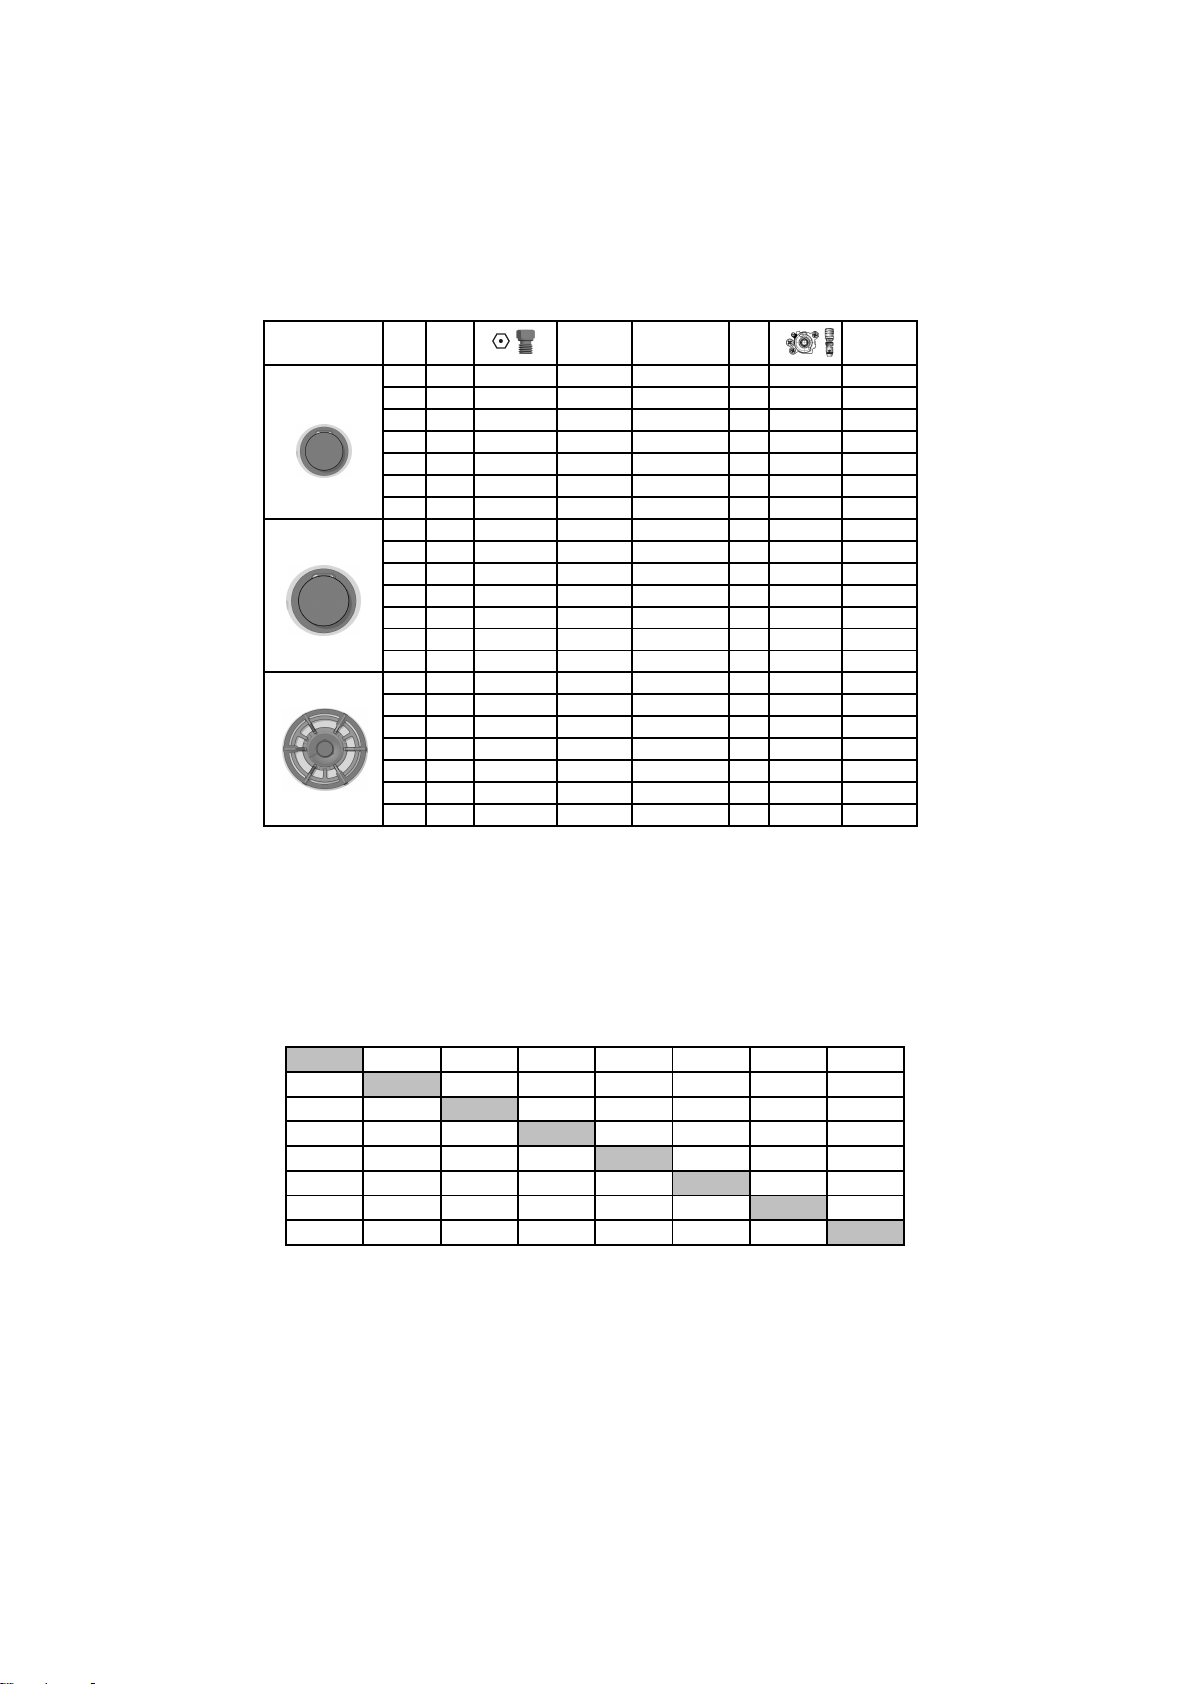
A) Change the nozzles of the
burners on the cooking hob.
Fig. 10-10a)
- Remove the pan supports, burner
caps and body.
- Change the nozzles using the
spanner provided by our Technical
Assistance Service (code 340847 or
340808 for double-flame and
triple-flame burners), see table II,
taking special care to ensure that the
nozzle does not fall when removed
from or fitted to the burner.
Ensure that they are completely
tightened to guarantee the seal.
Primary air adjustment is not necessary
with these burners.
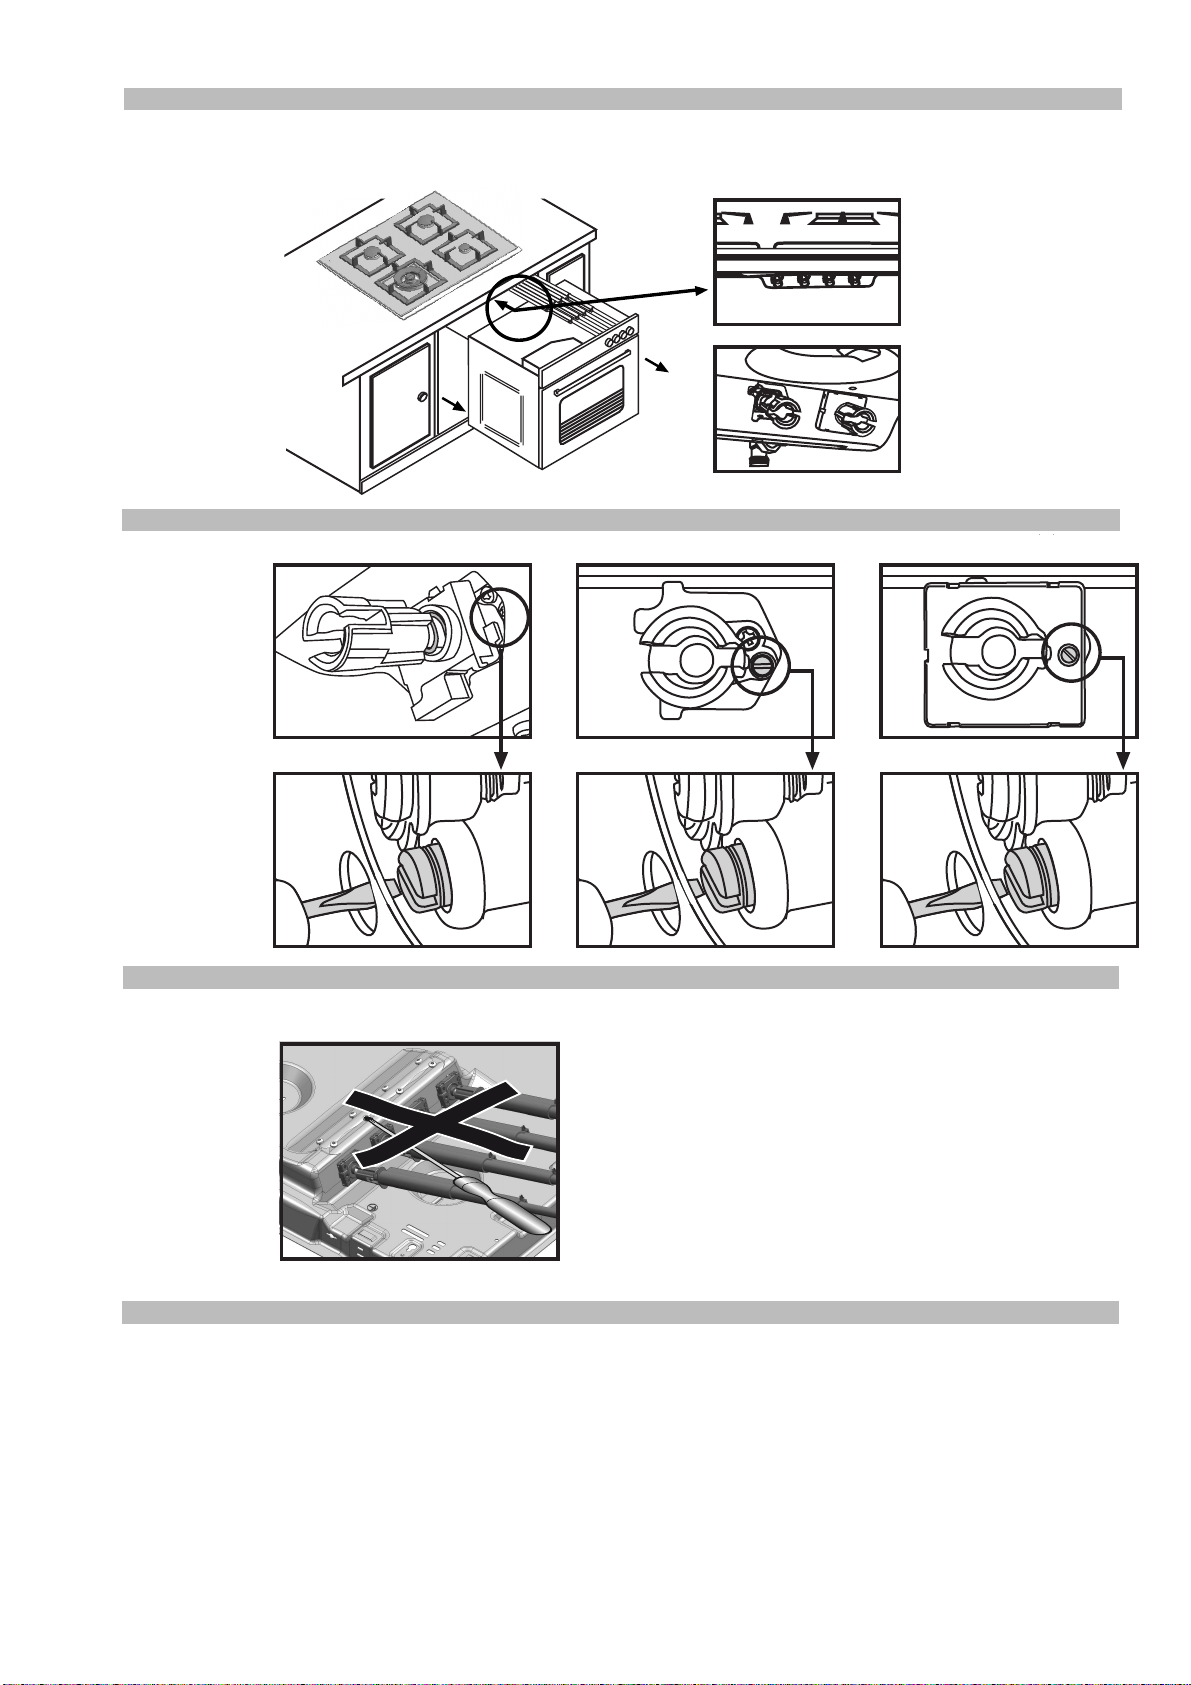
B) Adjust the hob burner taps for
reduced consumption
1 - Set the taps to minimum.
2 - Remove the oven or control unit,
Fig. 11, without disconnecting it from
the electricity supply, following the
disassembly sequence.
3 - Remove the three body universal
joint array from its position in the tap
shank.
4 -If the hob has a safety and ignition
switch, the flow adjusting screw will
always be visible.
5 - Adjust the minimum ring setting by
turning the by-pass screw using a flat
head screwdriver (Fig. 12).
Depending on the gas to which your
appliance will be adapted, see table III,
carry out the corresponding action:
A: firmly tighten the by-pass screws.
B: loosen the by-pass screws until the
gas flow from the burners is correct:
check that when adjusting the control
knob between maximum and
minimum, the burner does not go out
or a flame backdraught is created.
C: the by-pass screws need to be
changed by an authorised engineer.
D: do not touch the by-pass screws.
6 - Once you have completed these
actions, put the parts back together.
Never dismantle the tap shaft
(Fig. 13). In the event of a malfunction,
replace the entire tap.
Warning! After finishing, you must
affix the sticker indicating the new
gas type close to the specifications
plate.
fr
Instructions pour
l'installateur
Tous les travaux d'installation, de
réglage et d'adaptation à un autre
type de gaz doivent être réalisés par
un technicien agréé qui doit
respecter les normes et la législation
applicables, ainsi que les
prescriptions des sociétés locales
fournisseuses d'électricité et de gaz.
Il est recommandé d'appeler notre
Service Technique pour l'adaptation
à un autre type de gaz.
Avant toute action, coupez
l'alimentation électrique et de gaz de
l'appareil.
Cet appareil a été conçu pour une
utilisation domestique ; son utilisation
à titre commercial ou professionnel est
interdite. Cet appareil ne peut pas être
installé dans des yachts ou des
caravanes. La garantie ne sera valable
que si l'utilisation pour laquelle il a été
conçu a été respectée.
Avant de connecter l'appareil à
l'installation, il faut vérifier qu'il a été
conçu pour le type de gaz qui
l'alimentera.
Nos plaques de cuisson sont
préparées en usine pour fonctionner
avec le type de gaz indiqué sur la
plaque signalétique.
Cet appareil ne peut être installé que
dans un endroit bien ventilé, en
respectant les règlements en vigueur
et les dispositions relatives à la
ventilation. L'appareil ne doit pas être
connecté à un dispositif d'évacuation
des produits de combustion.
Il est indispensable que le lieu dans
lequel l'appareil va être installé dispose
d'une ventilation réglementaire. À cet
effet, il est nécessaire que les gaz de la
combustion soient évacués vers
l'extérieur.
Vérifiez les dimensions de la plaque de
cuisson ainsi que les dimensions de
l'ouverture à réaliser sur le meuble.
Les panneaux se trouvant sur la
surface de travail, à proximité de la
plaque de cuisson, doivent être d'un
matériau non inflammable. Autant les
revêtements stratifiés que la colle qui
les fixe doivent être résistants à la
chaleur pour éviter des détériorations.
Les câbles électriques ne doivent pas
se trouver au contact des zones de
chaleur.
Le câble d'alimentation doit être fixé au
meuble pour éviter d'entrer en contact
avec des parties chaudes du four ou
de la plaque de cuisson.
Les appareils ayant un composant
électrique doivent être connectés,
obligatoirement, à la terre.
Lisez les instructions avant de
procéder à son installation et à son
utilisation.
SI LES DISPOSITIONS
CONCERNANT L'APPAREIL NE
SONT PAS RESPECTÉES,
L'INSTALLATEUR SERA TENU POUR
RESPONSABLE ET LE FABRICANT
SERA ENTIÈREMENT DÉGAGÉ DE
TOUTE RESPONSABILITÉ.
Installation de la plaque de
cuisson dans le meuble
La possibilité d'installation de la plaque
de cuisson dans le meuble est, selon
la norme pour les appareils à gaz EN
30-1-1, de Classe 3.
Mesures de l'encastrement
1- Écarts minimums (mm). Effectuez
une découpe des dimensions
nécessaires sur le plan de travail.
Fig. 1.
Pour l’installation sur un four, vérifiez
les dimensions d'après votre manuel
d’assemblage.
Remarque: Pour l'encastrement de
l'appareil, utiliser des gants de protection.

Pour installer la plaque de cuisson sur
un four, celui-ci doit disposer d'une
ventilation forcée.
S'il est possible d'accéder à la partie
inférieure d'une plaque de cuisson
dotée d'un module de boutons de
commande pendant son utilisation, il
faut placer un séparateur afin d'éviter
d'éventuels contacts. La distance
minimum entre ce séparateur et le plan
d'appui de la plaque de cuisson doit
être de 130 mm.
Centrez la plaque de cuisson dans la
cavité d'encastrement du meuble.
2- Les fibres en bois utilisées pour la
confection des meubles du plan de
travail, gonflent assez rapidement au
contact de l'humidité. Il est donc
recommandé de vernir les surfaces de
coupe à l'aide d'un produit adapté,
dans le but de les protéger de la
vapeur ou de l'eau condensée qui
pourrait se déposer sous le plan de
travail du meuble de cuisine.
Le joint adhésif (bord inférieur de la
plaque de cuisson) est posé en usine.
Ne le retirez sous aucun prétexte. Le
joint garantit l'imperméabilisation de
toute la surface de travail et évite les
infiltrations.
3 - Retirez les agrafes de la poche des
accessoires jointe.
Vissez-les sur les points inférieurs
préparés à cet effet, l'agrafe tournée
vers l'intérieur pour faciliter son
encastrement arrière dans le meuble.
Fig. 2. Emboîtez et pressez en même
temps les extrémités de sorte que la
plaque de cuisson s'appuie sur tout
son périmètre.
Tournez les agrafes et vissez-les afin
de bien les fixer.
L’extrémité du collecteur d’entrée de la
plaque de cuisson à gaz est dotée d’un
filet de 1/2 pouce (20,955 mm)
(Fig. 3), permettant :
- Une connexion rigide.
- Une connexion à un tuyau flexible
métallique (L min. 1 m - max. 3 m).
Dans ce cas, il faut éviter le contact de
ce tuyau avec des parties mobiles de
l'unité d'encastrement (un tiroir par
exemple) et le passage à travers des
espaces qui pourraient s'obstruer. Si la
plaque de cuisson est combinée à un
four, d'après la Fig. 4 ou si vous
constatez la présence d'une
interférence entre le tuyau flexible et le
four, tournez le coude afin qu'il n'y ait
pas de tensions sur le tuyau, en
prenant en considération
l'emplacement du coude d'après la
Fig. 1. Vérifiez qu'il n'y ait pas de fuites
après avoir tourné le coude.
À l'exception des conditions décrites, il
ne faut pas bouger ni tourner le coude
de la position d'usine.
Si pour quelque raison que ce soit, le
coude est tourné, il faudra s'assurer de
l'étanchéité de cette zone.
Assurez-vous de l'étanchéité de tous
les raccordements réalisés.
Le fabricant décline toute
responsabilité de fuite si le coude est
déplacé ou tourné, ainsi que dans le
cas où des connexions auraient été
réalisées par l'installateur.
5- Il faut vérifier sur la plaque
signalétique : la tension et la
puissance totale. L'appareil devra être
raccordé à la terre.
Il faut vous assurer que le
raccordement a été effectué
conformément aux dispositions légales
du pays. Respectez toutes les
dispositions de la compagnie locale
fournissant l'électricité.
Afin de respecter les dispositions de
sécurité habituelles, l'installateur doit
prévoir l'installation d'un interrupteur
de coupure omnipolaire avec
ouverture de contact d'au moins 3 mm.
L'appareil est de type « Y », ce qui
signifie que le câble d'entrée NE PEUT
PAS ÊTRE CHANGÉ PAR
L'UTILISATEUR, mais uniquement par
le service technique de la marque. La
section et le type de câble doivent être
respectés.
Ne manipulez pas l'intérieur de
l'appareil. Le cas échéant, appelez
notre service technique.
Installation du four et
branchement à la plaque de
cuisson
1 - Préparation du four :
Avec la plaque de cuisson, vous
recevrez les actionneurs qui doivent
être fixés à la partie arrière du four.
Fig. 6.
2 - Préparation de la plaque de
cuisson :
a) Vérifier le type de gaz :
Vérifiez qu'à sa sortie d'usine, l'appareil
a été adapté au type de gaz dont vous
avez besoin. Si ce n'est pas le cas, il
faut remplacer les injecteurs et régler
le minimum des robinets (Cf. volet
Changement du type de gaz de cette
notice de montage).
b) Vérifier la situation de
l'encastrement : Meuble et distances
au creux d'encastrement.
3 - Installation de la plaque de
cuisson :
Si vous n'avez pas encore placé la
plaque de cuisson dans sa cavité,
placez-la et assurez-vous qu'elle a été
fixée au meuble puis réalisez le
branchement de gaz de la manière
décrite précédemment.
Soulevez et fixez les cardans à la partie
inférieure de la plaque de cuisson à
l'aide d'un ruban adhésif ou d'un
caoutchouc, si la plaque de cuisson
n'en est pas équipée.
4 - Connexion électrique :
Réalisez la connexion électrique du
four.
Le câble de raccordement de la plaque
de cuisson doit être connecté au four
et le câble de prise de terre vissé
comme le montre la Fig. 5. Le cas
échéant, placez le four dans le meuble.
5 - Union mécanique/Cardans :
Approchez le four des cardans (Cf.
Fig. 6) Il doit y avoir un espace ouvert
d'environ 50 mm pour que l'on puisse,
avec les mains, connecter les cardans
au four. Retirez le caoutchouc ou le
ruban adhésif de tous les cardans puis
connectez-les aux actionneurs. Fig. 6.
6 - Fixation du four :
Introduisez le four jusqu'au fond et, à
l'aide des deux vis, fixez-le aux parois
latérales du meuble. Fig. 7.
7 - Fin du montage et vérification du
fonctionnement.
Les boutons de commande reçus avec
le four présentant les symboles de gaz
doivent être placés sur les axes. Fig. 8.
Ouvrez le robinet de gaz vers la plaque
de cuisson puis faites fonctionner les
brûleurs. Fig. 9. Vérifiez que les
brûleurs ne s'éteignent pas après leur
connexion et après avoir relâché les
boutons de commandes. (Pour les
brûleurs munis de sécurité par
thermocouple, passez les boutons de
commande de la flamme maximum à
la flamme minimum afin de vérifier la
stabilité de la flamme).
Démontage du four
Si le four doit être démonté, par
exemple pour régler le minimum des
robinets, régler la longueur des
cardans ou réaliser une nouvelle
fixation, les étapes suivantes devront
être respectées :
1 - Retirez les boutons de commande.
2 - Fixation du four : retirez les deux vis
situées des deux côtés du four.
3 - Sortir doucement le four d'environ
50 mm. Attention, sortez le four juste
assez pour accéder à la partie arrière
du bandeau de commandes. Si nous
continuons à sortir le four, les cardans
peuvent se libérer de la zone des
robinets.
4 - Retirez les cardans des
actionneurs.
5 - Retirez le four du meuble. Il peut
parfois être nécessaire de retirer la
connexion électrique et celle de mise à
la terre (par exemple en cas de socle
haut du meuble).
6 - Cas particuliers avec les cardans :
Si le cardan a été retiré de l'axe du
robinet ou de l'actionneur, il doit être
remonté :
a) Fixation du cardan à l'actionneur : Il
faut respecter la position des pivots du
cardan, la largeur et la longueur.
b) Si la pièce en plastique de l'axe du
robinet est tombée : reconnectez-le
mais en respectant l'orientation
correcte de l'axe en forme de « D »
puis serrez à fond.
Changement du type de gaz
Tous les travaux d'installation, de
réglage et d'adaptation à un autre
type de gaz doivent être réalisés par
un technicien agréé qui doit
respecter les normes et la législation
applicables, ainsi que les
prescriptions des sociétés locales
fournisseuses d'électricité et de gaz.
Il est recommandé de faire appel au
Service Technique pour l'adaptation
à un autre type de gaz.
Avant toute intervention, coupez
l'alimentation électrique et de gaz de
l'appareil.
Dans la mesure permise par la
réglementation en vigueur de votre
pays (Cf. la plaque signalétique), cette
plaque de cuisson peut être adaptée
pour fonctionner avec d'autres gaz.

Pour cela, il faut réaliser les opérations
suivantes :
A) Changement d'injecteurs des
brûleurs de la plaque de cuisson.
Fig. 10-10a.
- Retirez les grilles, les couvercles et le
corps de brûleur.
- Changez les injecteurs en utilisant la
clé disponible auprès de notre Service
Technique, réf. 340847 (pour brûleurs
double ou triple flamme, réf. 340808,
Cf. tableau II), en faisant
particulièrement attention à ne pas
déloger l’injecteur en le retirant ou en
le fixant au brûleur.
Prenez soin de les fixer à fond pour
garantir leur étanchéité.
Il ne faut réaliser aucun réglage de l'air
primaire dans ces brûleurs.
B) Réglage de la consommation
réduite des robinets des brûleurs
de la plaque de cuisson
1 - Placez les robinets sur la position
minimum.
2 - Retirez le four ou le bouton de
commandes (Fig. 11), sans le
débrancher du courant électrique, en
suivant la séquence de démontage.
3 - Enlevez l'ensemble du cardan
(3 pièces) de sa position dans la tige
du robinet.
4 - Si la plaque de cuisson, en plus de
l'allumage, dispose d'une sécurité, la
vis de réglage de débit sera toujours
visible.
5 - Réglez le feu minimum en tournant
la vis by-pass à l'aide d'un tournevis à
bout plat (Fig. 12).
En fonction du type de gaz auquel vous
adapterez votre appareil (Cf.
tableau III), réalisez l'action
correspondante :
A : serrez les vis by-pass à fond.
B : desserrez les vis by-pass jusqu'à ce
que le gaz sorte correctement des
brûleurs : vérifiez, en réglant le bouton
de commande entre le maximum et le
minimum, que le brûleur ne s'éteint pas
et qu'il n'y a aucun retour de flamme.
C : les vis by-pass doivent être
changées par un technicien agréé.
D : ne manipulez pas les vis by-pass.
6 - Une fois que ces opérations ont été
effectuées, installez de nouveau les
pièces.
Ne démontez jamais l'axe du robinet
(Fig. 13). En cas d'incident, changez
complètement le robinet..
Attention ! À la fin, placez l'étiquette
autocollante, en indiquant le nouveau
type de gaz, près de la plaque
signalétique.

I
COUNTRIES/GASES GAS ADJUSTED MODEL TYPE
∑
Qn
(
kW
)
G20
(
m3/h
)
G25
(
m3/h
)
G30
(g
/h
)
G31
(g
/h
)
WV~ Hz
M66R36N1 HSE-G6P3V3F 8,5 0,81 0,942 617 607 3 W 220-240 V~ 50/60 Hz
G-20/20 mbar ERDGAS / ERDGAS E /
NATURGAS / GAS NATURAL /
MAAKAASU NATURGAS / Φυοικ_αεοιο /
NATURAL GAS / GAS METANO / GAS
NATUREL / GAZ ZIEMNY
G-20/G-25-20/25 mbar AARDGAS / GAZ
NATUREL LACQ
Cat.
Cat.
II
II
2E+3+
2H3B/P
20-50
20/25-28-30/37
AT
II
2H3B/P
20-30
I
2E
20
II
2H3+
IT/PT
20-30/37
LV
I
2H
20
DE
20-50
II
2H3+
20-28/37
BE/FR
ES/GB/GR/IE
LU/PL
II
2ELL3B/P
DK/FI/SE/CZ/SK/EE/LT/SI/RO/BG/NO/CY
p(mbar)
p(mbar)
II
III
GAS mbar Qn (Kw) m3/h g/h Qr (kW)
G20 20 72 1,00
0,095 -
27
≤ 0,33
G20 25 68 1,00
0,095 - 27 ≤ 0,33
G25 20 80 1,00
0,111 - 27 ≤ 0,33
G25 25 77 1,00
0,111 - 27 ≤ 0,33
G30 29 50 1,00
-73
27
≤ 0,33
G30 50 43 1,00
-73
24
≤ 0,33
G31 37 50 1,00
-71
27
≤ 0,33
G20 20 97 1,75
0,167 -
39
≤ 0,50
G20 25 91 1,75
0,167 -
39
≤ 0,50
G25 20 100 1,75
0,194 -
39
≤ 0,50
G25 25 98 1,75
0,194 - 39 ≤ 0,50
G30 29 67 1,75
- 127
39
≤ 0,60
G30 50 58 1,75
- 127
33
≤ 0,60
G31 37 67 1,75
- 125
39
≤ 0,60
G20 20 150 4,00
0,381
-67 ≤ 1,8
G20 25 141 4,00
0,381
-67 ≤ 1,8
G25 20 160 4,00 0,443 - 67 ≤ 1,8
G25 25 151 4,00
0,443 -
67 ≤ 1,8
G30 29 100 4,00
- 290
67 ≤ 1,8
G30 50 91 4,00
- 290
56 ≤ 1,8
G31 37 100 4,00
- 285
67 ≤ 1,8
G20/20 G20/25 G25/20 G25/25 G30/29 G30/50 G31/37
G20/20 DDDACA
G20/25 D DDACA
G25/20 DD DACA
G25/25 DDD ACA
G30/29 BBBB CD
G30/50 CCCCC C
G31/37 BBBBDC


Cod. 9000684500 C