WINE DISPENSER TAP KIT INSTRUCTIONS
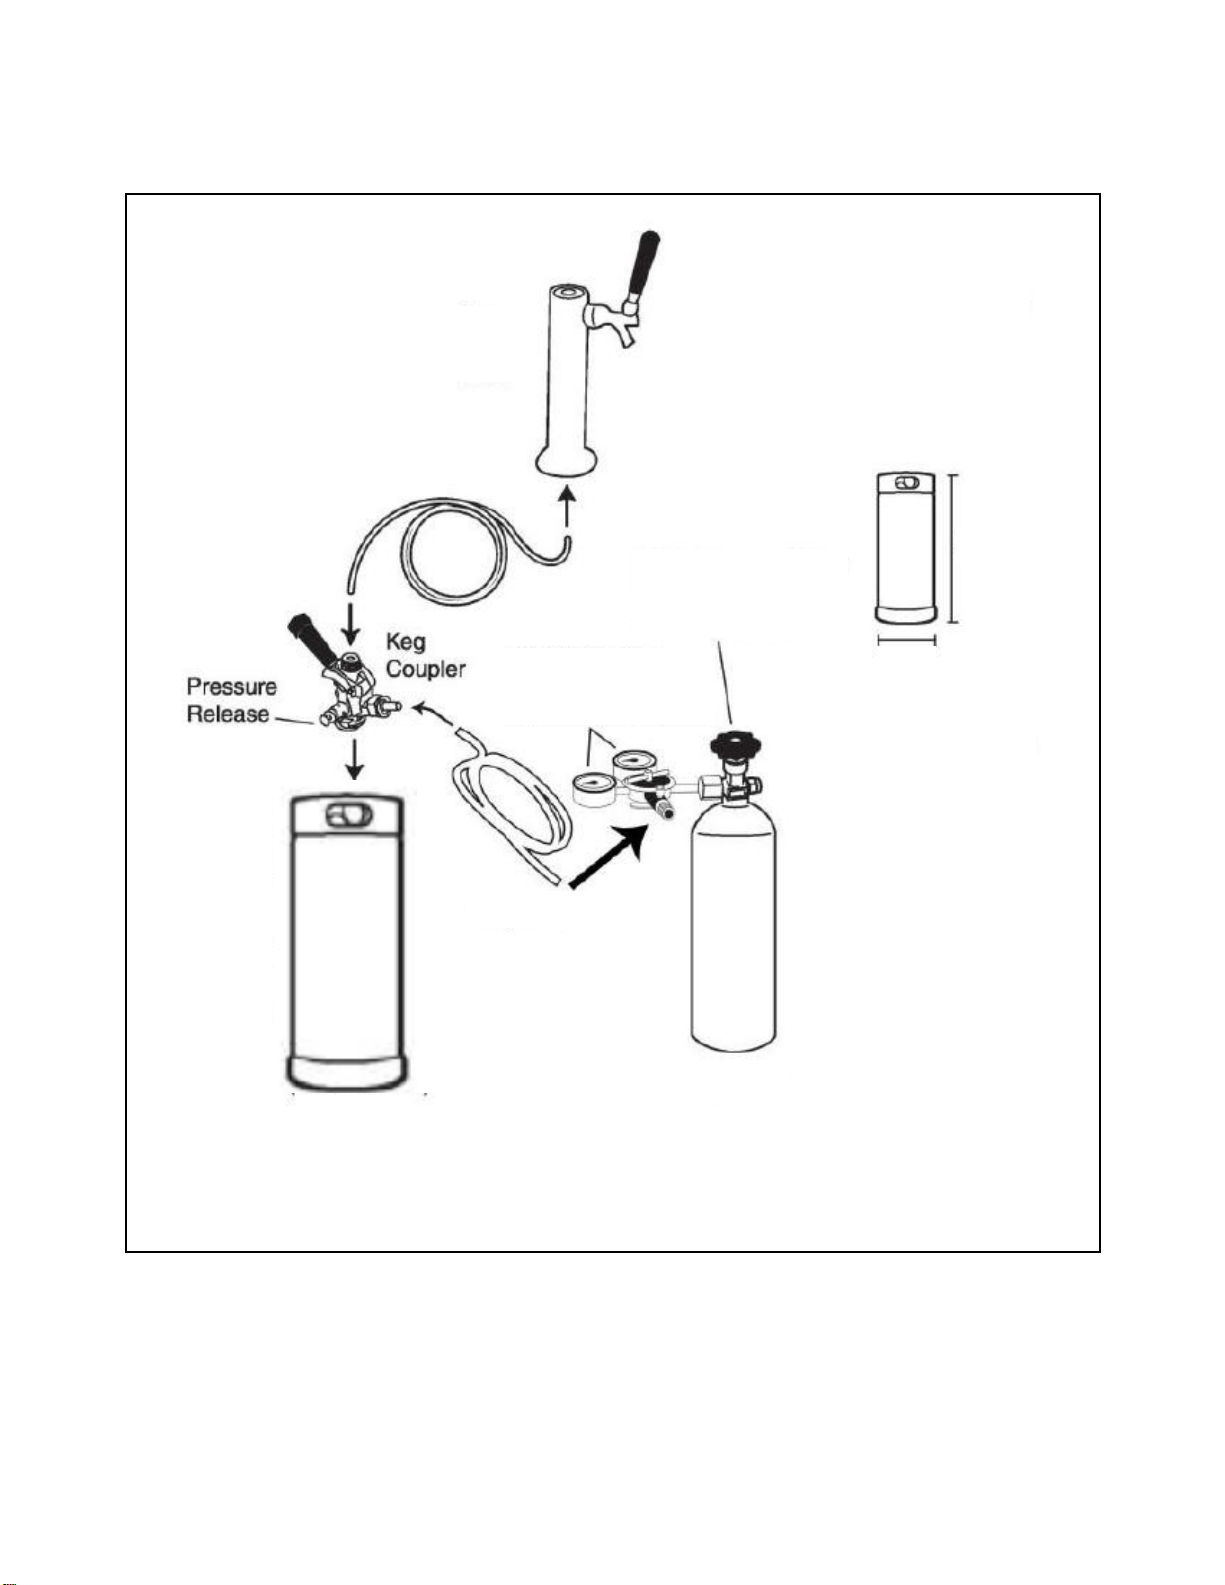
Wine
Dispenser
Tower
Wine Line
(NSF-certified
Barrier Tubing)
High-Pressure Valve
Gas Canister
Shut Off Safely
Double Gauge
Gas Regulator
Low Pressure Valve
Gas Line
Gas Tank
1/6 Barrel Wine Keg
(Not Included)
23⅜”
9¼”
Wine Keg
Dimensions
WINE KEG DISPENSER FLOW AND PARTS
WINE KEG DISPENSER ASSEMBLY
Be sure you have a thorough familiarity with the
assembly and installation process before turning
on your wine keg dispenser.
NOTE: Once casters are assembled, place your
unit in an upright position and allow it to sit for at
least 8-10 hours before plugging into an outlet.
This will allow the refrigerant to settle before
operation.
Caster Assembly
1. Remove every-
thing from the
cabinet and lay
the unit on a
clean, dry and
padded surface.
2. Install casters
into holes on
bottom of unit
as shown and
tighten with a wrench. Two of the four casters
provided are equipped with locks to prevent
slippage of the unit on smooth surfaces such
as hardwood floors, linoleum or tile. These
casters should be installed on the front of
the unit.
3. Once all four casters are attached, return the
wine keg dispenser to an upright position and
allow to remain for at least 8-10 hours. (See
Note above.)
Guardrail Installation
To install the guardrail,
1. Place the guardrail on top of the wine keg
dispenser and line up the feet of the guardrail
with the holes on top of the cabinet.
2. Using the screws provided, secure each foot to
the cabinet.
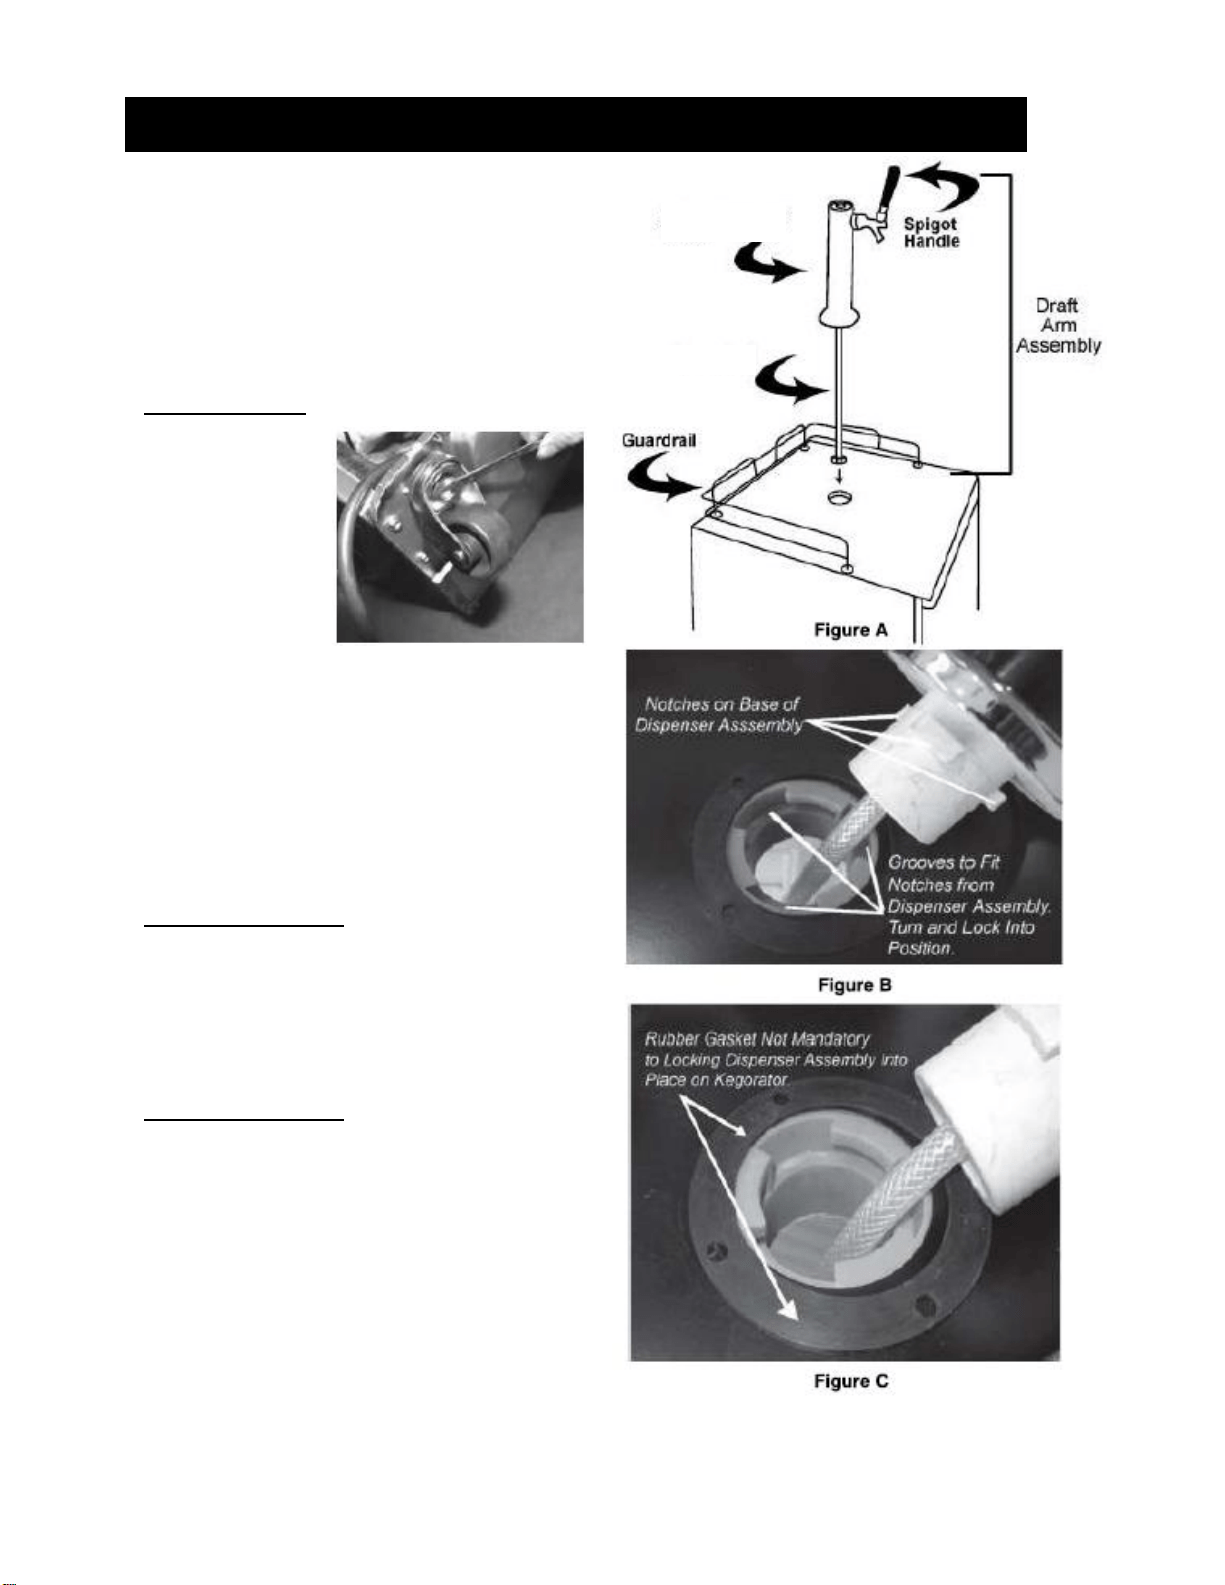
Wine Tap Installation
To install the wine tap, first line up the draft arm
notches with the notches in the hole in the top of
the wine keg dispenser. Feed the arm into the
hole, making sure that the notches are aligned
properly. Slide arm down and twist until the arm is
secure. (No screws or fasteners are necessary.)
While not required, we recommend the use of the
black rubber gasket when installing the wine tap.
Using the gasket will provide a more secure
seating for the arm assembly. (See figures A, B
and C in the next column.)
Wine Dispenser
Tower
Wine Duct
WINE KEG DISPENSER ASSEMBLY, continued
Use a gas mixture consisting of 75% nitrogen (N
2
) and 25% carbon dioxide (CO
2
).
Gas Regulator Installation
Proper installation of your gas
regulator and a thorough
understanding of gas canisters are
essential to the safe use of this
product. Review and follow
instructions for handling gas cylinders
and this section in particular to ensure
your safety and the safety of others.
NEVER CONNECT A GAS
CANISTER DIRECTLY TO THE
UNIT! To avoid potential explosion
that could result in grave injury or
even death, ALWAYS CONNECT
THE CANISTER TO THE GAS
REGULATOR.
IMPORTANT! The gas canister is shipped to you EMPTY for safety reasons. You will need to get this
canister filled before you can use your unit. In most areas, you can get canisters filled at:
stores that sell kegs
party stores or convenience stores
fire and welding supply stores.
DO NOT ATTEMPT TO REFILL GAS CANISTERS YOURSELF!
DANGER! Any pressurized gas is potentially dangerous. Canisters or cylinders are under
pressure and proper handling is essential to safety. ALWAYS HANDLE WITH CARE!
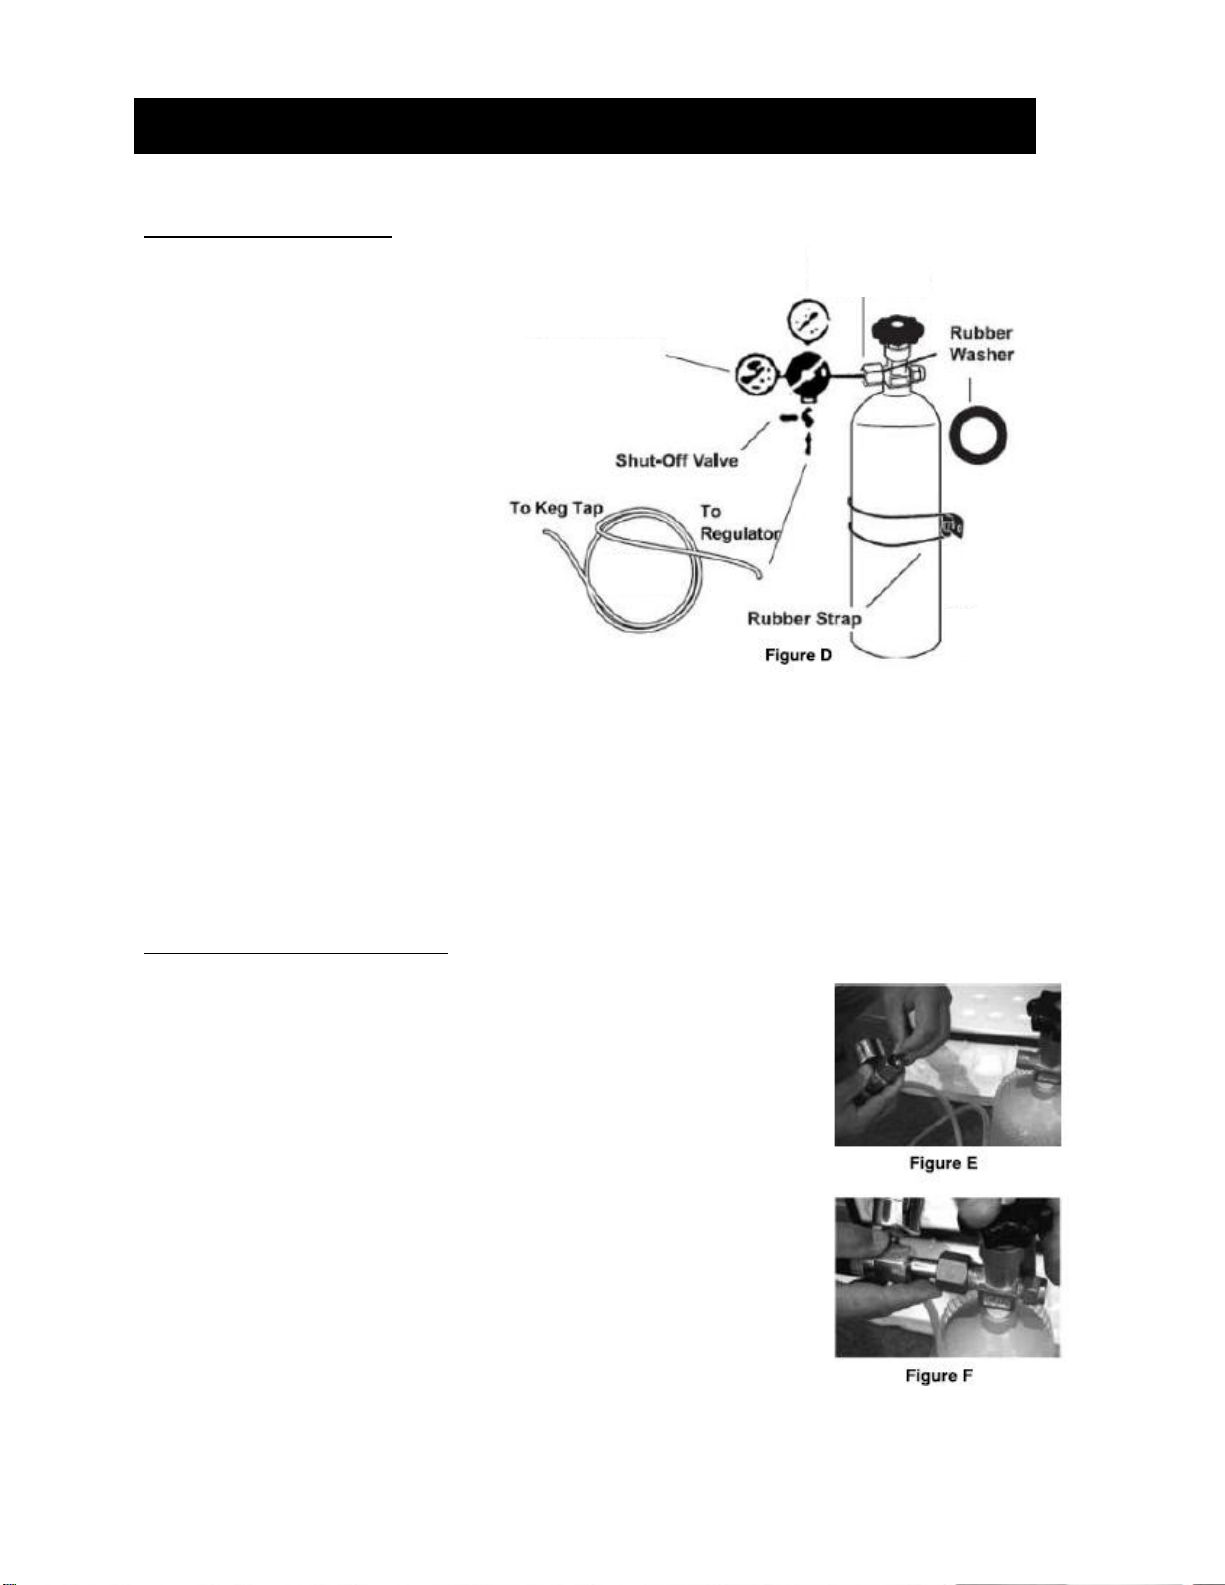
To install the dual-gauge regulator:
1. Insert the end of the gas line with the green coupler onto the bottom end
of the regulator. (See Figure D above and Photo 1, next page.) Secure
line to regulator by tightening the green coupler.
2. Next, insert the black rubber washer that comes with this unit into the
attachment nut on the regulator (as shown in figure E).
3. Connect the regulator to the canister by screwing the attachment nut
onto the canister valve (see Figure F). Tighten with an adjustable
wrench (not provided), but DO NOT OVERTIGHTEN.
4. Secure the canister with the rubber restraining strap (on side of wine
keg dispenser cabinet) as shown in Figure D. Be sure to situate the
canister so that the gauges are easily readable and the shut-off valves
are easily accessible.
See following page for examples of correct connections.
SPECIAL PRECAUTIONS: Ensure that the safety devices for your
pressurized system are installed and remain installed. Once installed,
NEVER remove the rubber washers in the regulator attachment nut to the
canister or in the tap mechanism. NEVER bypass these safety features.
Failure to comply will void your warranty and could result in serious injury or death!
Gas Regulator
Gas
Cylinder
Connect to
Gas Cylinder
75% N
2
25% CO
2
Gas Line

WINE KEG DISPENSER ASSEMBLY, continued
Gas Regulator & Tap Connection Examples
PLEASE NOTE: Your gas hose comes equipped and assembled with coupling connections for the
regulator (green coupler) and the tap connection (silver coupler). The photos below show correct
connections.
Gas
gas
gas
Wing Nut Connecting Wine Hose to Tap
HOW TO TAP A WINE KEG
INSTALLING KEG TAP ON SINGLE BARREL TYPE KEG
This wine dispenser's coupler is compatible only with a single 1/6 barrel keg, although a second untapped
keg can be stored behind the tapped keg to keep it cold. Each 1/6 barrel keg holds approximately 5
gallons of wine.
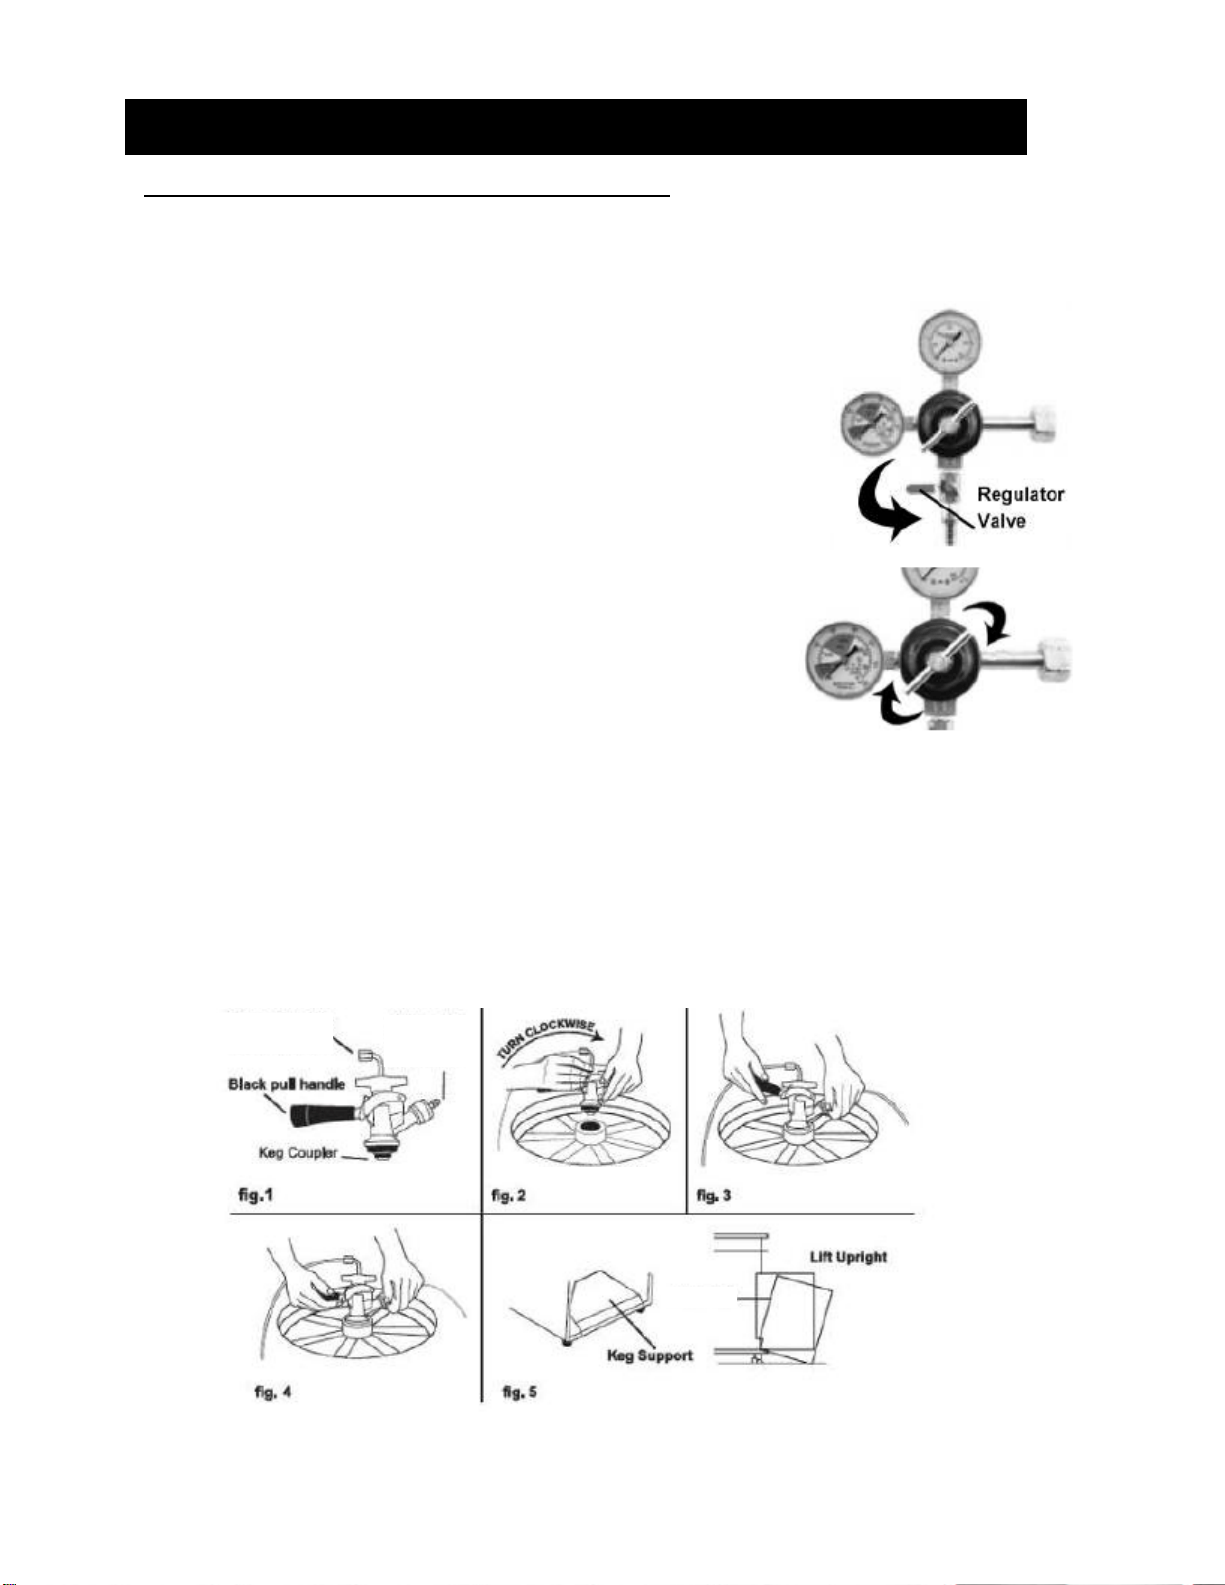
To tap a keg:
1. First be sure that the black dispenser handle of the keg coupler is
closed (pushed up, see Fig. 1 below). Also, make sure the tower
dispenser (on top of wine dispenser) handle is closed before
proceeding with tap-to-keg connection.
2. Insert the keg coupler mechanism into the top of the keg neck and
perform a quarter-turn clockwise to lock the coupler and keg together
(Fig. 2).
3. Before proceeding, make sure that you insert a black rubber washer
into the wing nut connector for the wine line (see page 7, bottom
photo) before connecting the line to the tap. Take off the black
protective cap from the tap and screw the wing nut with the washer
to a firm finger-tightness.
4. Insert the end of the gas line with the silver coupler to the gas
connection on the tap. Make sure the coupler connection is secure.
Next, secure the connection between the wine line and tap with
pliers (Fig. 3 and Photo 2, previous page). Make sure there are no
leaks.
5. To finalize the connection, pull the black tap handle out and push down until it clicks securely. There
will be an audible click, signaling that the gas and wine connections have been opened and that your
keg is tapped (Fig. 4). Now you may open the regulator valve (top right photo) and open the valve on
the gas tank itself as well. Set the regulator to read 5-7 psi by turning the regulator handle (bottom
photo, right) clockwise.
6. Carefully tilt the keg onto the lip of the cabinet (using the keg support shown in Fig. 5) and position
slowly into the cabinet body until the door can close. HANDLE CAREFULLY. Do not jostle or bang
keg on gas canister.
Note: The left regulator gauge indicates total tank pressure.
Connect to the
Wine Line Tube
Connect to
Gas Line
Tube
Wine Keg Neck
Wine Keg