Tel: 1-888-641-8862
Web: www.baseaire.com
E-mail: [email protected]
Installation & Operations Manual
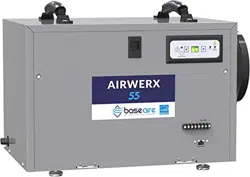
AirWerx 55
Patented
Specifications subject to change without notice.


Warranty Registration
Safety Notes
Identification
Electrical Supply
Principle of Operation
Installation
Key Functions
Indicator Lights
Remote Control
Operating Instructions
Diagram
Maintenance
Dehumidifier Storage
Ducted Applications
Troubleshooting
Spare Parts
Warranty Information
2
2
3
3
3
3
5
6
6
7
8
8
9
9
10
11
12
1
......................................
...................................................
...................................................
..............................................
.......................................
......................................................
.................................................
...............................................
...............................................
......................................
.........................................................
...................................................
.......................................
.........................................
..............................................
....................................................
........................................
Table of Contents

Warranty Registration
CongratulationsonpurchasinganewAirWerxDehumidifier. Yournewdehumidifiercomeswithan
extensivewarrantyplan. Toregister, simplyfilloutandreturnthewarrantyformprovidedinthe
dehumidifierbox.
Besuretonoteyourdehumidifierserialnumberasyouwillneeditforregistration.
SafetyNotes
TheAirWerxSeriesDehumidifiermustalwaysbeconnectedusingagroundedelectricalconnection
(asrequiredforallelectricalappliances).Ifnon-groundedwiringisused,allliabilityrevertstotheowner
andthewarrantyisvoided.
AirWerxDehumidifiersshouldonlybemaintainedandrepairedbyaqualifiedtechnician.
AirWerxDehumidifiersareonlyintendedforoperationwhenorientedwiththeunitsittingonitsfeetand
level.Operatingtheunitinanyotherorientationcouldallowwatertofloodelectricalcomponents.
Alwaysunplugdehumidifierbeforemoving.
Ifthereisachancethatwaterfloodedthedehumidifier,itshouldbeopenedand allowedtodry
thoroughlybeforereconnectingtoelectricalpowerandrestarting.
Toensureproperoperation,neithertheinletnordischargeshouldbepositionedagainstawall.The
inletrequiresaminimumof12"clearanceandthedischargerequiresaminimumof36"clearance.
Thebestoptionforproperdiffusionofairthroughouttheroomistohavethe dischargeblowingaway
fromawallandtheinletpullingairinparalleltoawall.
Donotinsertyourfingersoranyobjectintotheinletordischarge.
Allworkonthedehumidifiershouldbedonewiththeunit "off"andunplugged.
Donotusewatertocleantheexteriorofthemachine.Tocleanunit,unplugfrompower,thenusea
dampclothtowipetheexterior.
Donotstandonthemachineoruseitasadevicetohangclothes.
2
Identification
Forfuturereference,writedownthemodel,serialnumber,anddateofpurchaseforyourdehumidifier.
Thisisextremelyhelpfulifyouneedtoseekassistanceinthefuture.Thedatalabelonthesideofyour
unithasthekeycharacteristicsofyourspecificmachine.
Modelnumber:AirWerx55
SerialNumber:______________DateofPurchase:_____________
Foradditionalquestionsconcerningyourdehumidifier,thefollowingoptionsareavailable:
·Contactyourinstallingcontractor
· E-mail:sales@baseaire.com
3
ElectricalSupply
PowerSupply:115V,60HzAC,SinglePhase
OutletRequirement:3-Prong,GFI
CircuitProtector:15Amp
WARNING:240VoltsACmaycauseseriousinjuryfromelectricshock.
Toreduce the riskofinjury:
1.Disconnectelectricalpowerbeforeservicing.
2.Onlyplugunitintogroundedelectricalcircuit.
3.Donotuseanextensioncord.
4.Donotuseaplugadapter.
PrincipleofOperation
TheAirWerxSeriesDehumidifierutilizesitsintegralhumidistattomonitortheconditionedspace.When
therelativehumiditygoesabovetheselectedsetpoint,thedehumidifierwillenergize.Airisdrawn
acrossanevaporatorcoil,whichiscoolerthanthedewpointofair.Thismeansmoisturewillcondense
outoftheair.Theairisthenreheatedthroughthecondensercoilanddistributedbackintotheroom.
Installation
Theareatobecontrolledshouldbesealedwithavaporbarrier.If the unitisinstalledinacrawlspace,all
ventsshouldbesealed.
WARNING:Donotinstallyourdehumidifierinacorrosiveenvironment.Someliquidvaporbarriers
dryvia "solventevaporation".Alwaysmakesurethatbarrieriscompletelydryandareaisthroughly
ventilatedbeforeinstallingdehumidifier.
4
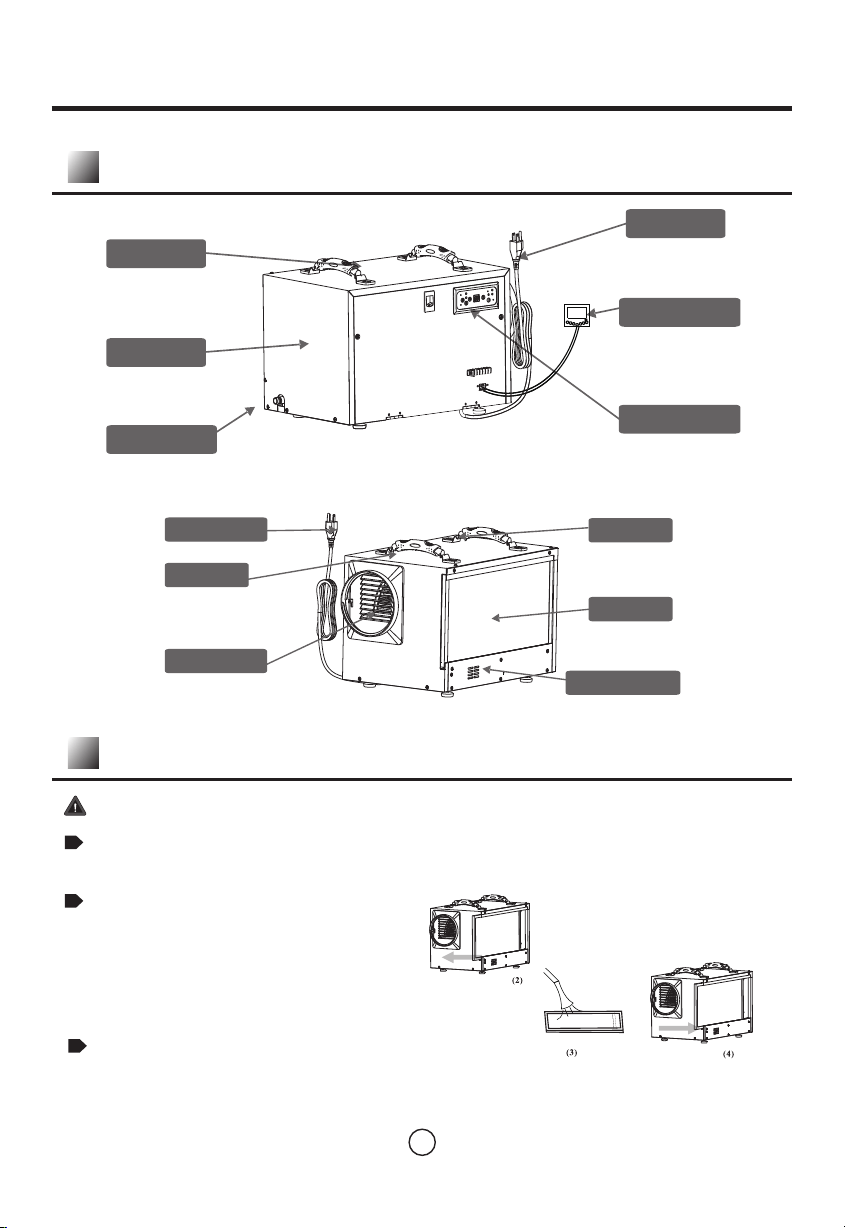
Step#1:Placedehumidifieronalevelsurface.
Donotplacedirectlyonvaporbarrier.Forexample,useblocks,orpaverstocreatealevelsurface.
Iftheunitishandledinsuchamannerthatthecompressordidnotremainintheuprightposition,itis
necessarytoplaceonalevelsurfaceandwaitaminimumof2hoursbeforeturningtheunit "on".
NOTE:AirWerx55Dehumidifierscan'tsitdirectlyonthefloorunlesstheunitisfeedingdirectlyintoasump
pumpnexttoit.Elevationisrequiredtoallowgravityflowofcondensatewaterdrain.
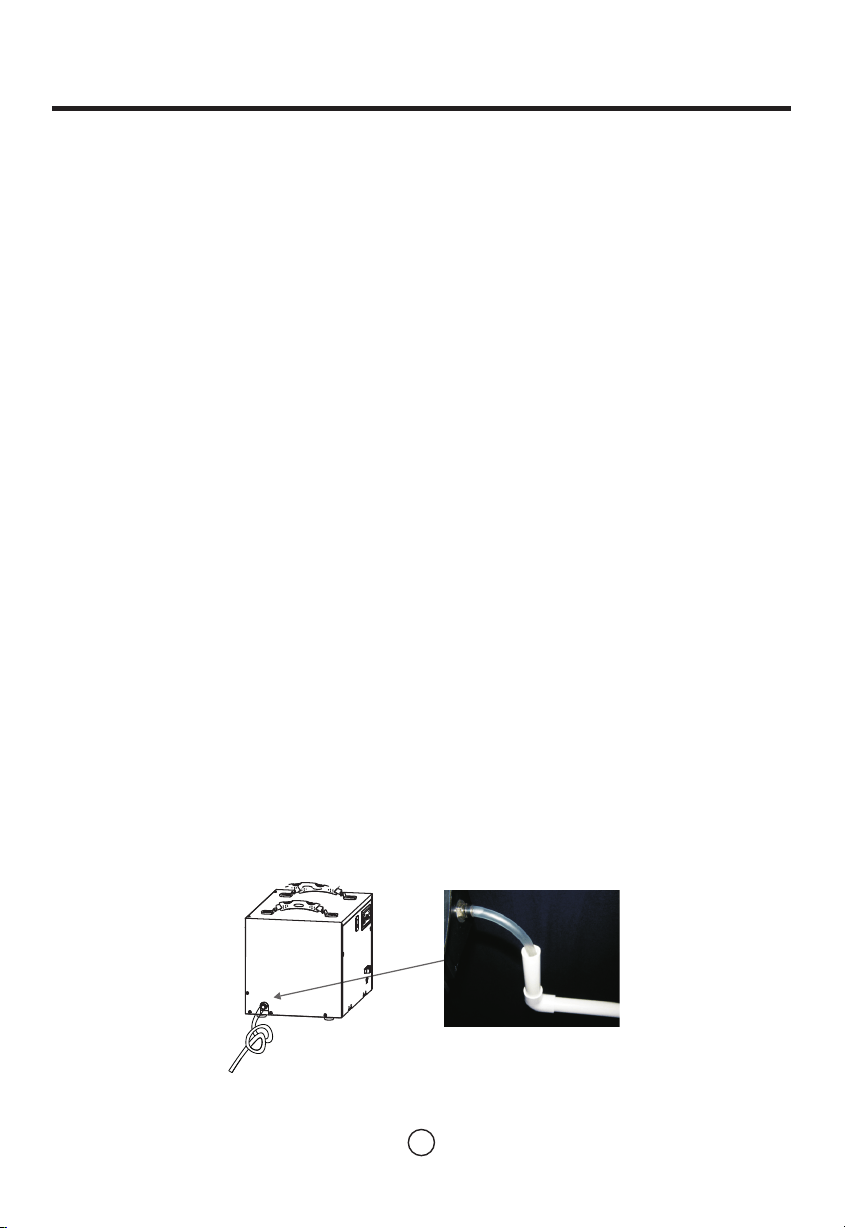
Step#2:SetUpDrainLine
Thedrainlineshouldberoutedtoasuitabledrainontheoutside.Itmustflowdowntoadrain
withoutanyloops,dips,orvalleys.
1.Cutapieceof3/4"ODPVCthatisapprox.6"long.
2.InsertPVCintoa3/4"elbow,thenattachtoa3/4"ODlengthofPVCtodrain.
(Note:KeepthelengthofPVCdrainpipetoaminimum).
3.Inserttheopenendofthetubingintothe3/4"pipesothatitdoesnotextendintotheelbow
fitting.Forproperflow,aminimumdownwardslopeof1"per10'runsisrequired.(Note:Ifa
properdownwardangleisnotpossible,thenitisrecommendedtouseanAirWerx90Xwhich
includesanintegratedpump.Alternatively,youcanuseanexternalcondensatepump).
4.SupportthePVCtubingsothatitmaintainsasmoothdownwardflowtodrain.
5.Alwaystestthedrainbeforeleavingtheinstallationarea.
Recommended Drain Option-Transition to PVC Pipe
Drain Tube - 12 inches Long. 19mm OD.
Step#3:Plugunitinto15ampgroundedcircuit.
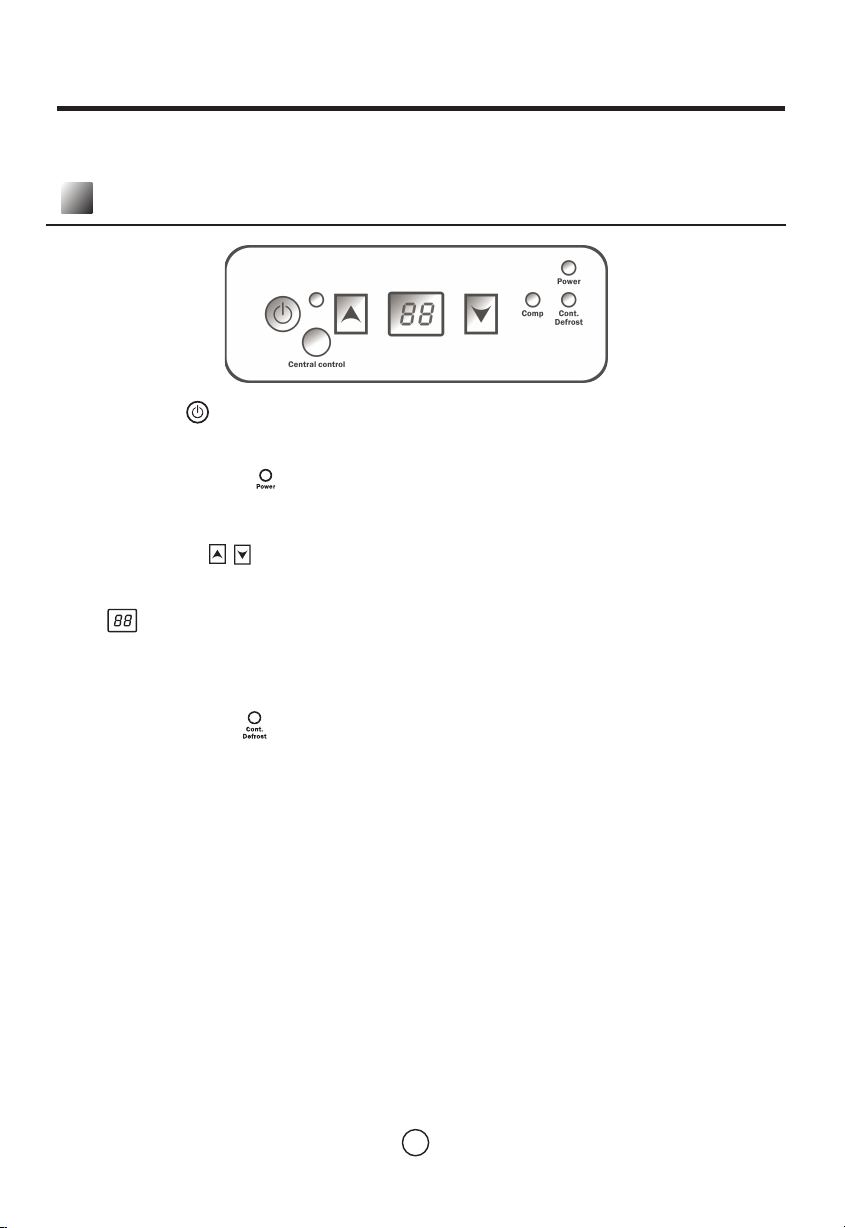
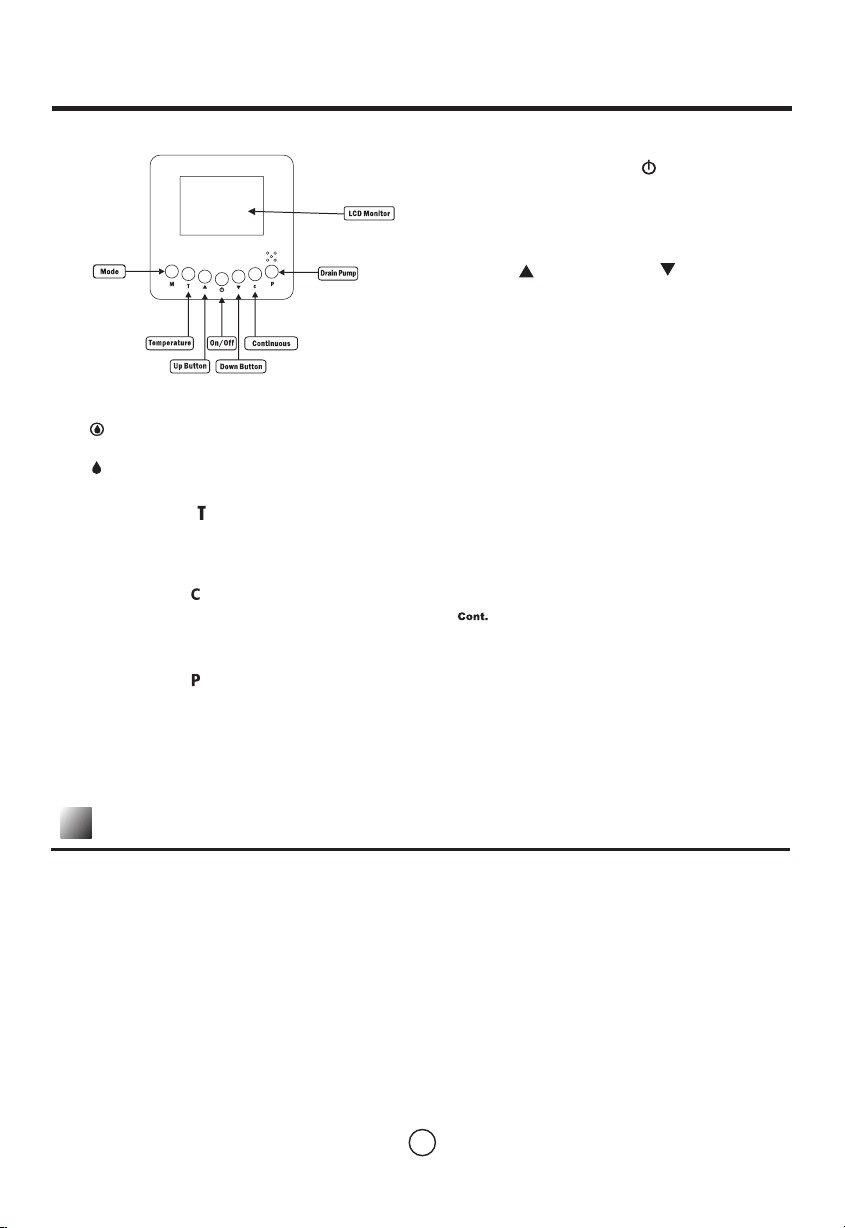
Key Functions
1.PowerKey
·Usethisbuttontoturnthedehumidifieronandoff.Pressoncetoturnthemachineon.Youwill
heartwobeepsandthelightwillilluminategreen.Pressthepowerbuttonasecondtimeandyou
willhearonebeepasthemachineshutsdown.Notethatthereisaoneminutefandelayon
shutdown.
2.ArrowButtons
·Usetheupanddownarrowbuttonstosetthedesiredhumiditysetpointonthedisplayscreen.
Thesetpointcanbeanynumberbetween36-90%.Creatingasetpointmeansthatwhenthe
indoorhumidityislowerthanthesetpoint,themachinewillstopautomatically.Conversely,when
theindoorhumidityishigherthanthesetlevel,theunitwilloperate.NOTE:Thehumiditylevels
displayedareapproximateonly(+/-5%)
3.ContinuousMode
·Toswitchintocontinuousmode,simplyusethedownarrowtosetthehumiditybelow 36%.The
Cont.lightshouldilluminategreenonthedisplayboardtoindicatethatyouhavesuccessfully
switchedintocontinuousmode.Thedisplayscreenwillshow "CO".
·Whensettocontinuous,thedehumidifierwillrunconstantly,regardlessofthehumiditylevel.To
stopthemachine,turntheunitofforswitchbacktonormalhumidistatoperation.Ifyouwouldliketo
switchbacktonormalhumidistatoperation,simplymovethesetpointabove 36%.
4.CentralControl
·ThismodeisnotapplicableontheAirWerx55.
5. Auxillary Terminals A5/A6
·The A5/A6 on the terminal strip can be used as a safety switch for external condensate pumps.
It should be set to N/O (normally open) at the dehumidifier. If an E4 error occurs, switch the wiring
to N/C (normally closed).
5
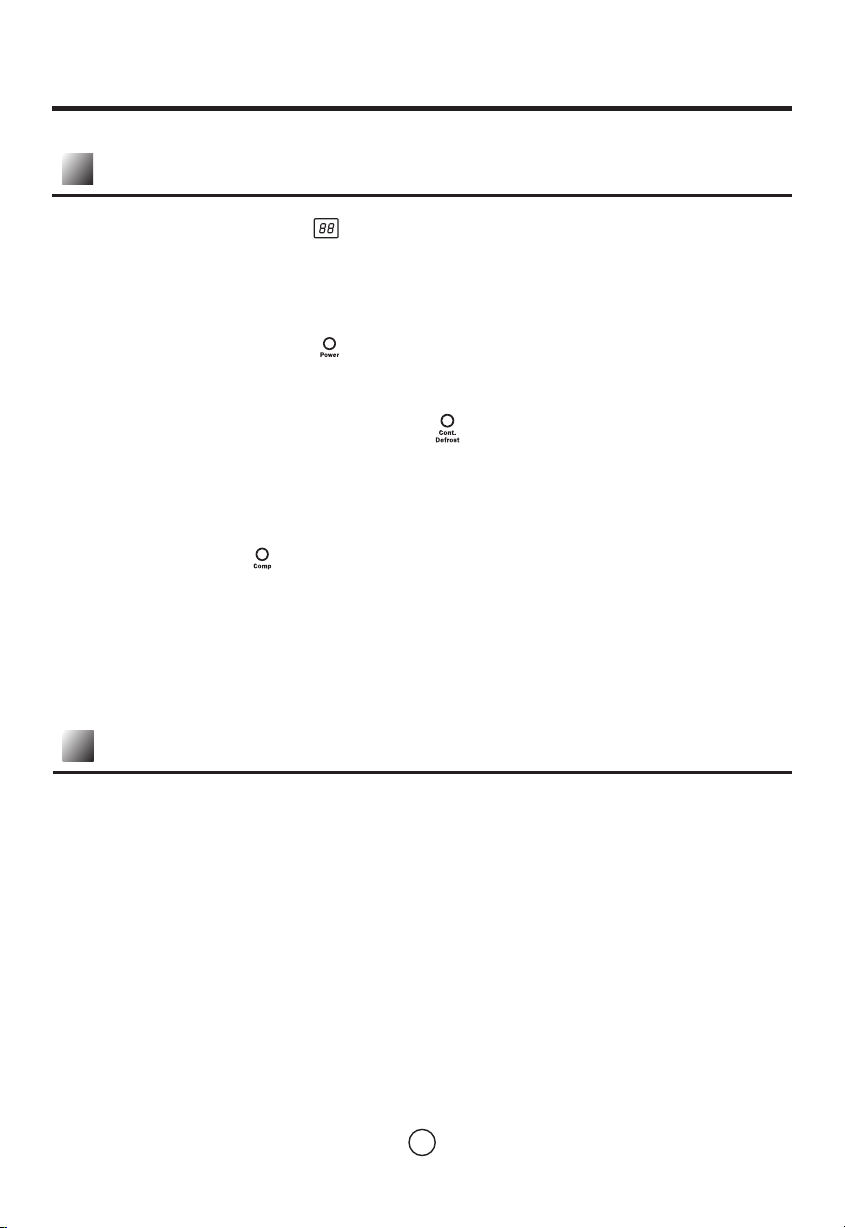
Indicator Lights
1. Humidity Display Screen
·The display screen has two functions:
1. When the unit is powered on, it shows the humidity of the space.
2. While setting the desired humidity level, the screen will show the set humidity.
After a brief delay, the display will revert to the current humidity level.
2. Power Indicator Light
·This light indicates that the unit is properly powered on and ready to operate. Always make sure the unit
is "off" prior to performing any service.
3.ContinuousMode /AutoDefrostLight
·When this light illuminates green, it indicates that the dehumidifier is set to continuous operation mode.
·When the light glows red, it means the unit is in auto defrost mode and clearing the evaporator coil of
any ice buildup.
4.CompressorLight
·Whenthecompressorlightglowsred,itindicatesthecompressorhasbeeninitiatedbutiscurrently
warmingup.
·Oncethecompressorlightswitchestogreen,itindicatesthecompressorisinworkingstatus.
6
AirWerxDehumidifierscanbecontrolledusinganoptionalremoteaccessory.TheAirWerxRemote
ControlconnectstoyourAirwerxSeriesDehumidifierviaa25'CAT5cable.Theremotecontrolcontains
anintegratedsensorwhichgivesyoumultipleoptionsforremotelycontrollingyourunit,inadditionto
monitoringtheconditionssurroundingthedehumidifier.
Oneapplicationfortheremotecontrolistoinstallthedehumidifierinoneroomwiththeconditionedair
ductedintoasecondroomthatcontainstheremote.Forexample,thedehumidifiercouldbeinstalledina
laundryroomandductedintoalivingroom.Theremotewouldthenbemountedinthelivingroomsothe
remotesensorcancontrolthehumidityandprovideeasycontrolsfortheuser.
Anotherusefulapplicationfortheremotecontrolisifthedehumidifierisinareathat'sdifficulttoaccesson
aregularbasis.Forinstance,ifyourdehumidifierisinstalledinyourcrawlspace,theremotecouldbe
mountedinyourlivingspaceorgarage.Thisprovidesyouwithaneasywaytomonitorthedehumidifier.
RemoteControlInstructions
Operating Instructions
1.Startthemachine
Press the power key to turn the machine on.
2.Adjust theSettings
Use the up and down arrow keys to adjust your desired setpoint ( typically 50-55%) .
3.StoptheMachine
Press the power key again and the machine will stop. Note the fan will continue to operate for 1
minute after the unit has turned off. NOTE: Do not disconnect the power cord to force the unit to stop.
Always use the power button.
4.WaterDrainage
During normal operation, the AirWerx 55 will automatically drain by the force of gravity. If you want to
move or store your machine, wait at least 10 minutes to allow the machine to completely defrost, then
lean unit gently towards drain to ensure that it is completely drained.
7
1.On/Off(Power)Button
Presstheon/offbuttonandthemachinewillstart
running (onebeep).Pressthebuttonagaintotheturn
themachineoff.
2.UpButton /DownButton
UsetheUpandDownarrowbuttonstoadjustthe
humiditylevel.
3.ModeM
UsetheModebuttontoswitchbetween
dehumidificationandaductedapplication.
The symbolonthedisplayboardindicatesthesensorontheremotecontrolisbeingutilized.
The symbolonthedisplayboardindicatesthesensoronthedehumidifierisbeingutilized.
4.Temperature
Pressthetemperaturebuttontodisplaythecurrenttemperatureonthescreen.Pressthebuttonagainto
turnoffthedisplay.
5.Continuous
Pressthisbuttontoswitchtheunitintocontinuousmode. willappearonthedisplaytoindicate
continuousmode.
6.DrainPump
Usethisbuttoniftheunitwillnotbe in useforanextendedperiodoftime.Pressingthedrainpump
buttonwillremovewaterfromthepumpreservoir,sotheunitcansafelymovedorstored.THIS
FUNCTIONISONLYAVAILABLEONTHEAirwerx90Xmodel.
NOTE:Symbolsindicatedabovewillonlyappearwhenthedehumidifierispoweredon.
8
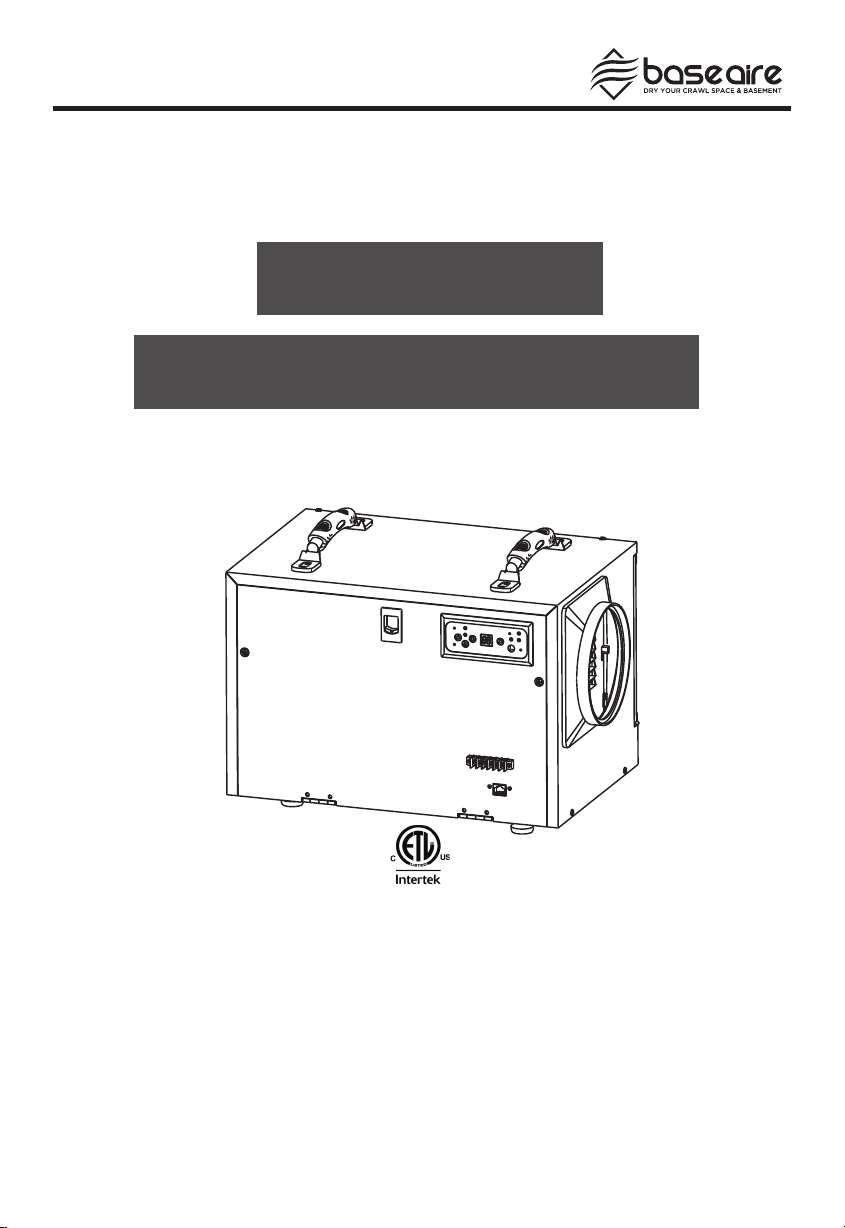
AirWerx55Diagram
FrontView
BackView
Maintenance
WARNING: Always unplug the unit before doing any maintenance.
Cleaningthemachinebody
Use a soft damp cloth to clean the exterior of unit. Do not use any soap or solvents.
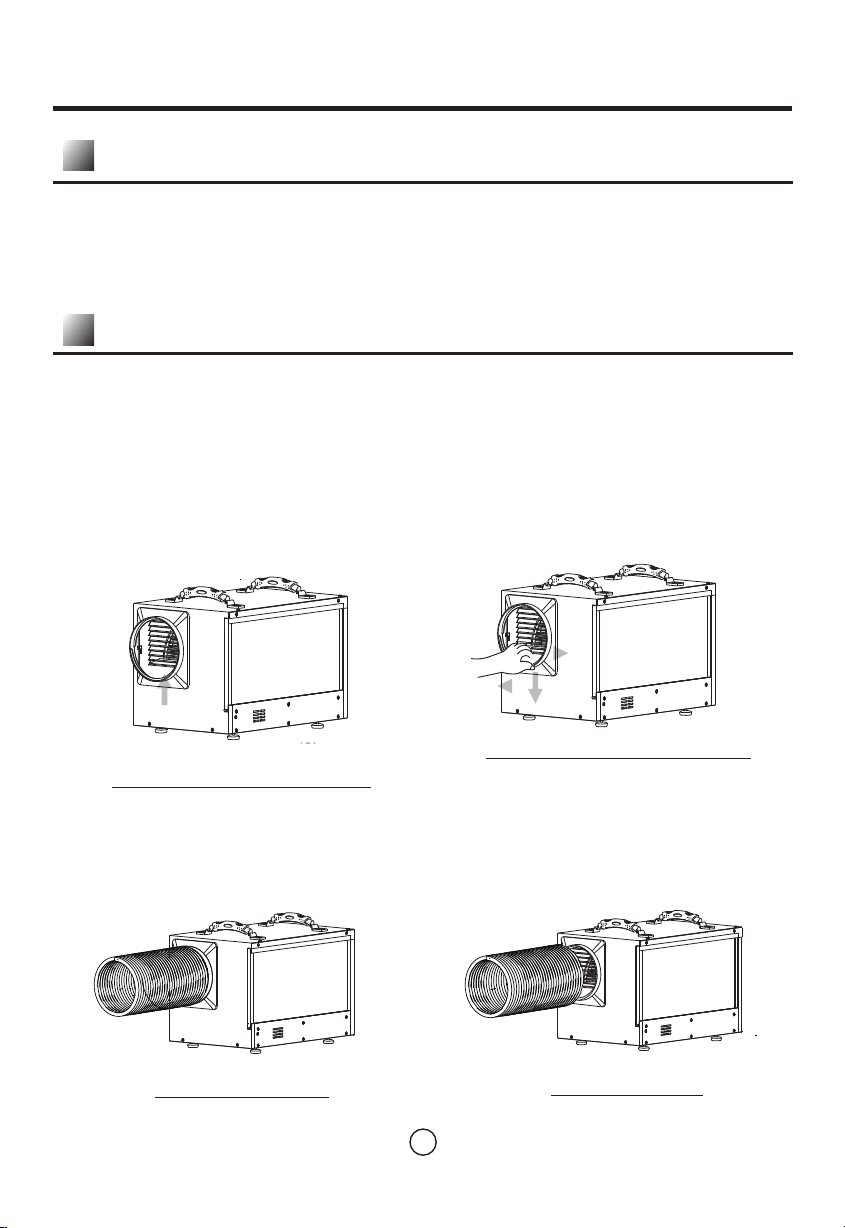
Cleaningthefilter
1.Unplugtheunit.
2.Slideoutthefilter.
3.Cleanthefiltermeshbyvacuumingor
washingwithwarmwater (nosoaporsolvents).
4.Besurefilteriscompletelydrybefore restartingtheunit.
Coil Maintenance
·Onceperyear,cleanthecoilswithanapprovedcoilcleaner.
·Coilcleanershouldbeaself-rinsing,foamingcleanersuchasWEB®CoilCleaner.
Power cord
Unit Cover
Outlet End Cap
Handle
MERV 8 Filter
Humidity Sensor
Handle
Unit Cover
Drain Connect
Power cord
Remote control
Control panel
9
DehumidifierStorage
If the unit will be stored for an extended period of time, complete the following steps:
1. Turn off the unit and allow to dry.
2. Wrap and secure the power cord.
3. Cover the filter mesh.
4. Store in a clean, dry space.
DuctedApplications
Ductingthedehumidifierallowstheunittobeinoneroomwhileconditioninganadjacentroom.The
supplygrilleisdesignedfor6"flexducting.Besuretosecuretheductingwithtiewrap.Also,keepin
mindthatthesupplyductingcanbescrewedintoanadapterifnecessary.
Ducting Installation
·Maximumlengthforducting=6’
Note:Thesupplyductadapterisstandardonallunits.
RemovingSupplyductAdapter
Ifitisnecessarytoremovethe
adapter,placehandatbottomof
adapteranduseyourfingerstopull
outanddownonbaseofadapter. This
willlifthooksoutof coverholes.
InstallingSupplyDuctAdapter
Toinstalladapter,lineupwithholes
onthesideofunitandpushupfrom
thebaseofadapter.
FlexDuctInstallation
Rotatetheflexductcounter-clockwise.
FlexDuctRemoval
Rotateflexductclockwise.
10
Troubleshooting
SolutionCause
Symptom
Power Supply
Verifythatthereispowertotheoutletand
thattheplugisproperlyinstalledinoutlet.
RoomTemperatureOver
105℉(DisplayHI)orBelow
33℉(DisplayLO)
Theunitidoutsidetheoperating
temperaturerange.Modifytheroom
conditionssothetemperatureisbetween
33°-105℉andoperationwillcommence.
Trouble Code: HI or LO
Cleanthefiltermeshaccordingto
instructionslistedinmanual.
Clear the blockage from inlet or outlet.
Air Filter is Clogged
AirInletorOutletisBlocked.
MachineWon’tRun
LowAirFlow
Trouble Code :E1
LoudNoise
Filter Mesh is Blocked
E1=HumiditySensorIssues
Room Temperature Over
105 or Below33 ( Display
LO)
MachineIsNotlevel
Move the dehumidifier to flat, firm ground.
Cleanthefiltermeshaccordingto
instructionslistedinmanual.
Checktoensurethatwireisconnectedat
bothends.Ifnoissuesarevisible,the
sensormaybefaulty.
Theunitisoutsidetheoperating
temperaturerange.Modifytheroom
conditionssothetemperatureisbetween
33°-105℉andoperationwillcommence.
Ifroomconditionsarewithintemperature
range,replacethedefectivesensor.

AirWerx55SpareParts
AllAirWerxModels-Parts
Part#Description
A-100
RemoteControlPackage (cable+remote)
A-101
A-102
A-107
A-108
A-109
A-110
A-500
AirWerx55-Parts
Part#Description
RemoteControl
RemoteControlCable,26’
FlexibleSupplyDuct,72”
MainControlBoard
DisplayBoard
RH/TemperatureSensor
A-501
A-502
A-503
A-504
A-505
A-506
A-508
A-509
A-510
A-513
A-517
A-518
A-519
FanMotor
CompleteFanAssembly
FanCapacitor
Compressor
CompressorCapacitor
CoilAssembly
HotGasBypassCoil
RH/TemperatureSensorCable
DisplayCable
CAT5ProtInternalCable
Foot,adjustable
MERV-8Filter
HEPAFilter
CarbonFilter
AirWerx55-Filters
Part#Description
11

Limited Warranty
All warranty benefits apply to the original owner only. Warranty cannot be transferred or assigned.
1 YEAR ( FROM DATE OF PURCHASE): BaseAire warrants the dehumidifier will operate free of defects in
workmanship and materials. At its discretion, BaseAire will repair or replace any malfunctioning components, free
of charge (excluding transportation costs)
3 YEARS (FROM DATE OF PURCHASE): BaseAire warrants the refrigeration circuit (compressor, condenser and
evaporator) will operate free of defects in material or workmanship. At its discretion, BaseAire will replace
defective parts, including factory labor or refrigerant. This does not include transportation.
5 YEARS (FROM DATE OF PURCHASE): BaseAire warrants the compressor, condenser, and evaporator will
operate free of any defects in material or workmanship. At its discretion, BaseAire will repair or replace the
defective parts. This does not include labor, transportation, or refrigerant.
CUSTOMER RESPONSIBILITIES: In order to take advantage of the warranty service, the customer must do the
following:
1. Customer must provide normal care and maintenance (including, but not limited to cleaning filters, coils and
pumps)
2. Removal and re-installation of unit is the sole responsibility of owner.
3. If customer cannot return unit to certified repair center, all costs associated with freight shipment are borne by
the customer. In addition, all duties related to freight shipments, including but not limited to palletizing, wrapping,
labeling and pickup are associated with customer.
4. If shipped, customer is responsible for all risk of loss or damage.
BaseAire Warranty Steps:
1. Once receive the goods, customers must log in www.baseaire.com to fill out the warranty Registration form and
submit to BaseAire company. We will receive your purchasing and installation information and save it.
If no warranty registration is sent to us, warranty period will begin the day the shipment left the warehouse.
Please be sure to record serial # and date of installation. You will need this information to receive theRA number.
2. If warranty service is necessary, customers must contact BaseAire Tech Support by sales@baseaire.com or
local technical service phone to receive a Return Authorization (RA number). Once an RA has been issued,
customers should bring the unit to a certified repair center. BaseAire will arrange the shipping to bring the unit
back to the BaseAire warehouse (at the expense of the customers) if customers are not available.
3. After the unit has been received by BaseAire (whether at a repair center or the warehouse), BaseAire will have
an initial inspection If it is determined to be invalid warranty claim (see exclusions below), customers have to pay
for all associated repair costs and shipping costs for units repair.
4. Customers can pick up the unit after repair at their own expense for shipping. Units will have a rigorous testing
before sending it back to customers.
5. If the unit can no longer be fixed, and it is in the warranty period and determined to be valid claim, we will ship
the customer a new unit within the same year warranty from the date of replacement.
6. After parts are repaired or replaced by BaseAire, the original warranty period continues to applies until meet its
deadline. No extensions to the original warranty period.
12

Limited Warranty Exclusions
EXCLUSIONS:
DAMAGE DUE TO THE FOLLOWING IS NOT COVERED UNDER WARRANTY
1. ACTS OF NATURE- INCLUDING BUT NOT LIMITED TO:
● FLOODING
● FIRE
● WATER DAMAGE
● HURRICANE STORM DAMAGE
2. IMPROPERUSAGE-INCLUDING BUT NOT LIMITED TO:
● POOL/SPA/TUB APPLICATIONS
● MISUSE, ABUSE OR TAMPERING WHETHER INTENTIONAL OR ACCIDENTAL
● IMPROPER INSTALLATION OR DESIGN
● MPROPER VOLTAGE
● LACK OF NORMAL CARE
● FAILURE TO FOLLOW INSTRUCTIONS
3. CORROSION
4. FREEZING
5. ANY ADDITIONAL COSTS DUE TO CHANGES IN LAWS OR BUILDING CODES
6. FREIGHT CHARGES
7 ANY COSTS DUE TO LOST PROFIT OR DELAY
8. DAMAGE TO PROPERTY
9. CAUSE BEYOND CONTROL
10. CONSUMABLE PARTS INCLUDING BUT NOT LIMITED TO:
● FILTERS
● BATTERIES
● POWER CORDS
● VALVES
● SWITCHES
● RUBBER PARTS
11. DIRECT, INDIRECT, COLLATERAL OR INCONSEQUENTIAL DAMAGES OF ANY KIND
THE WARRANTIES AND LIABILITIES SET FORTH ARE IN LIEU OF ALL OTHER WARRANTIES
EXPRESSED OR IMPLIED IN LAW OR IN FACT, INCLUDING IMPLIED WARRANTIES OF MERCHANTABILITY
AND FITNESS FOR PARTICULAR PURPOSE. BaseAire's total liability, regardless of nature of claim shall not
exceed original purchase exceed original purchase price of the product, if a product or component is replaced
while under warranty, the applicable warranty period shall not be extended beyond the original warranty time
period.
The foregoing shall constitute the total liability of seller in the case of defective performance of all or any of the
equipment or services provided to buyer. Buyer agrees to accept and hereby accepts the foregoing as the sole and
exclusive remedy for any breach or alleged breach of warranty by seller.
Any dishonesty or fraud in connection with BaseAire warranty thoroughly voids all warranty policies. BaseAire
expressly reserves the right to pursue legal action in the event of dishonesty, fraud, or attempted fraud.
13

Scan QR Code to Register Warranty