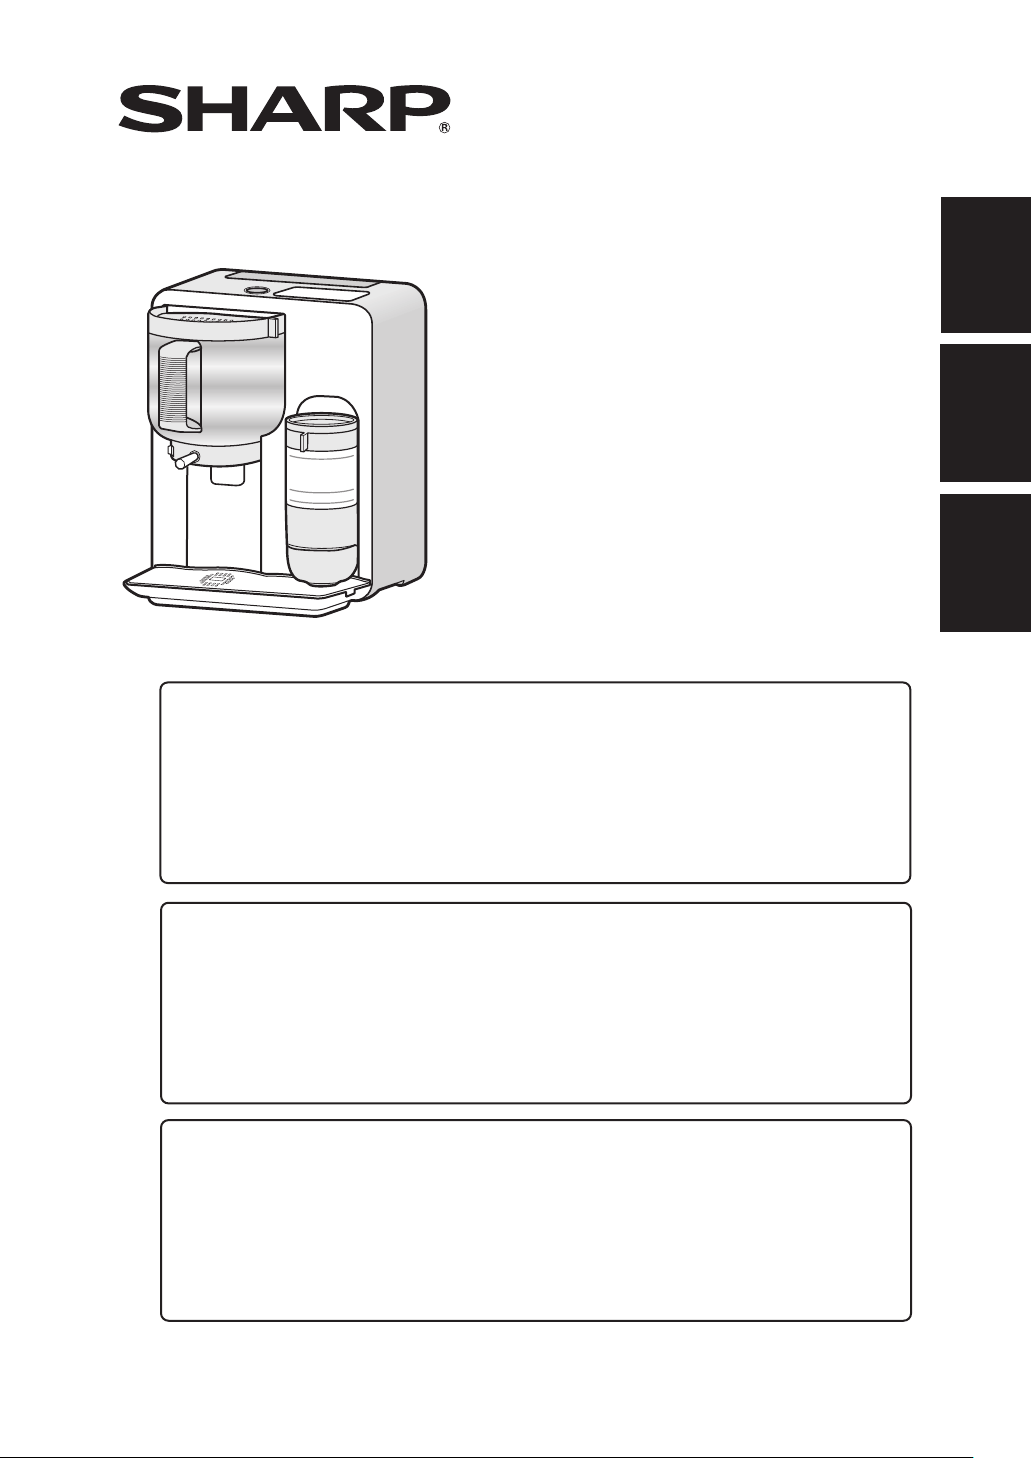
Tea maker
Operation Manual
Machine à thé
Manuel d'utilisation
お茶メーカー
取扱説明書
TE-T56U
CONTENTS
Important Safeguards
Information You Need to Know
Parts and Handling
Features of the Tea Maker
Before Use
Grinding the Tea Leaves
Making Hot Tea
…………………
E-1
………
E-2
………………………
E-3
……………
E-7
………………………………
E-8
………………
E-9
………………………
E-11
Making a Latte
Making Cold Tea
Care and Cleaning
Troubleshooting
Specifications
For Customer Assistance
Limited Warranty
……………………
E-15
…………………
E-16
………………
E-17
……………………
E-23
………………………
E-23
………
E-25
…………………
E-26
TABLE DES MATIÈRES
Informations Importantes Relatives À La Sécurité
Informations Que Vous Devez Connaître
Pièces et Manipulation
Caractéristiques de la Machine à thé
Avant Toute Utilisation
Moudre les Feuilles de Thé
Faire du Thé Bouillant
…
F-1
…
F-2
…………………
F-3
…
F-7
…………………
F-8
……………
F-9
…………………
F-11
Faire un Latte
Faire du Thé Glacé
Entretien et Nettoyage
Dépannage
Spécifications
Aide à la Clientèle
Garantie Limitée
……………………
F-15
………………
F-16
……………
F-17
………………………
F-23
……………………
F-23
………………
F-25
…………………
F-26
もくじ
重要な安全上のご注意
知っておいていただきたいこと
各部のなまえと扱いかた
お茶メーカーでできること
お使いいただく前に
茶葉を挽く
温かいお茶をつくる
…………………
J-1
………
J-2
………………
J-3
……………
J-7
……………………
J-8
………………………………
J-9
……………………
J-11
ラテをつくる
冷たいお茶をつくる
お手入れ
故障かな?
仕様
※保証とアフターサービスについては、
E-25〜27ページをご覧ください。
………………………
J-15
………………
J-16
……………………………
J-17
…………………………
J-23
…………………………………
J-23
ENGLISH
FRANÇAIS日本語

IMPORTANT SAFEGUARDS
E-1
When using electrical appliances, basic safety precautions should always be followed to reduce the risk of fire,
electric shock, and/or injury to persons, including the following:
1. Read all instructions.
2. Do not touch hot surfaces. Use handles or
knobs.
3. To protect against fire, electric shock and injury
to persons do not immerse cord, plugs, or
appliance in water or other liquid.
4. Close supervision is necessary when this
appliance is used by or near children.
5. Unplug from outlet when not in use and
before cleaning. Allow to cool before putting on
or taking off parts, and before cleaning the
appliance.
6. Do not operate any appliance with a damaged
cord or plug or after the appliance malfunctions,
or has been damaged in any manner.
Contact a SHARP AUTHORIZED SERVICER.
7. The use of accessory attachments not
recommended by the appliance manufacturer
may result in fire, electric shock or injury to
persons.
8. Do not use outdoors.
9. Do not let cord hang over edge of table or counter,
or touch hot surfaces.
10. Do not place on or near a hot gas or electric
burner, or in a heated oven.
11. To disconnect, press “STOP” and remove plug
from wall outlet.
12. Do not use this appliance for other than intended
use.
13. Be certain lids are securely in place before
operating appliance.
14. Scalding may occur if the lids are removed
during the brewing cycle.
15. The Tea Container is designed for use with this
appliance. It must never be used on a range top.
16. Do not set a hot Tea Container on a wet or
cold surface.
17. Do not use a cracked Tea Container or a Tea
Container having a loose or weakened handle.
18. Do not clean Tea Container with cleansers,
steel wool pads, or other abrasive materials.
19. Check Tea Mortar for presence of foreign
objects before using.
SAVE THESE INSTRUCTIONS
For Household Use Only
WARNING
RISK OF FIRE OR ELECTRIC SHOCK
DO NOT OPEN
WARNING: TO REDUCE THE RISK OF FIRE OR ELECTRIC SHOCK,
DO NOT REMOVE COVER (OR BACK)
NO USER-SERVICEABLE PARTS INSIDE
REPAIR SHOULD BE DONE BY AUTHORIZED SERVICE PERSONNEL ONLY

INFORMATION YOU NEED TO KNOW
E-2
Please make reading this Operation Manual your first step prior to using your tea maker.
This important booklet explains exactly how the appliance works and what you need to know to operate it
successfully.
The electrical power input requirement should be
a protected 15amp 120Vac 60 Hz electrical outlet.
It is recommended that a separate circuit serving
only this appliance be provided.
This appliance has a polarized plug (one blade is
wider than the other). To reduce the risk of electric
shock, this plug is intended to fit into a polarized
outlet only one way. If the plug does
not fit fully in the outlet, reverse the plug. If it still
does not fit, contact a qualified electrician.
Do not attempt to modify the plug in any way.
6. Do not operate the appliance if the water
reservoir is cracked and/or leaking water.
Contact a SHARP AUTHORIZED SERVICER.
7.
Do not try to adjust or repair the appliance yourself.
8. To prevent burns when the water is boiling:
a. Do not touch the tea container.
b. Do not put your hands and face directly next to
the steam outlet.
9. Do not place or use the appliance under direct
sunlight.
10. Do not place or use the appliance anywhere
water may splash onto it.
11. Do not insert any objects in the air intake openings.
12. Accessible parts
(e.g.: tea container,
hot water supply port)
will become hot during use.
Do not touch them during or
immediately after operation.
Changes or modifications to the appliance not
expressly approved by the party responsible for
compliance could void the user’s authority to
operate the appliance.
NOTE: This appliance has been tested and found
to comply with the limits for a Class B digital
device, pursuant to part 15 of the FCC Rules.
These limits are designed to provide reasonable
protection against harmful interference in a
residential installation.
This appliance generates, uses and can radiate
radio frequency energy and, if not installed and
used in accordance with the instructions, may
cause harmful interference to radio
communications.
However, there is no guarantee that interference
will not occur in a particular installation.
If this appliance does cause harmful interference
to radio or television reception, which can be
determined by turning the appliance off and on,
the user is encouraged to try to correct the
interference by one or more of the following
measures:
・
Reorient or relocate the receiving antenna.
・
Increase the separation between the appliance
and receiver.
・
Connect the appliance into an outlet on a circuit
different from that to which the receiver is
connected.
・
Consult the dealer or an experienced radio/TV
technician for help.
Electrical Requirements
A short power-supply cord is provided to reduce
the risks resulting from becoming entangled in
or tripping over a longer cord.
Longer extension cords may be used if care is
exercised.
If a long extension cord is used, its designated
electrical rating must be at least equal to the
electrical rating of the appliance. The extension
cord should also be positioned so that it does
not hang over a countertop or tabletop where it
can be pulled on by children or tripped over.
Extension Cord
1. Do not touch the plug with wet hands when
inserting or removing from the outlet.
Plug securely into the electric wall socket
and remove by gripping the plug.
Never pull on just the cord when unplugging
from the wall.
2. Put fresh cold water in the water reservoir.
Do not put hot water or any other liquids like milk,
in the water reservoir, except as instructed in the
operation manual to clean the appliance.
With regular use, hard water may clog your tea
maker. Carry out descaling is recommended.
See page E-20.
3. The appliance should not be left unattended
during operation.
4. Do not place anything on the top of appliance
during operation.
Additional Important Safeguards
5. Do not attempt to move the appliance when it
contains hot liquids. Allow the appliance to cool
completely before moving. Remove the Tea
Mortar and tea container before moving.
Hot water
supply port
ENGLISH
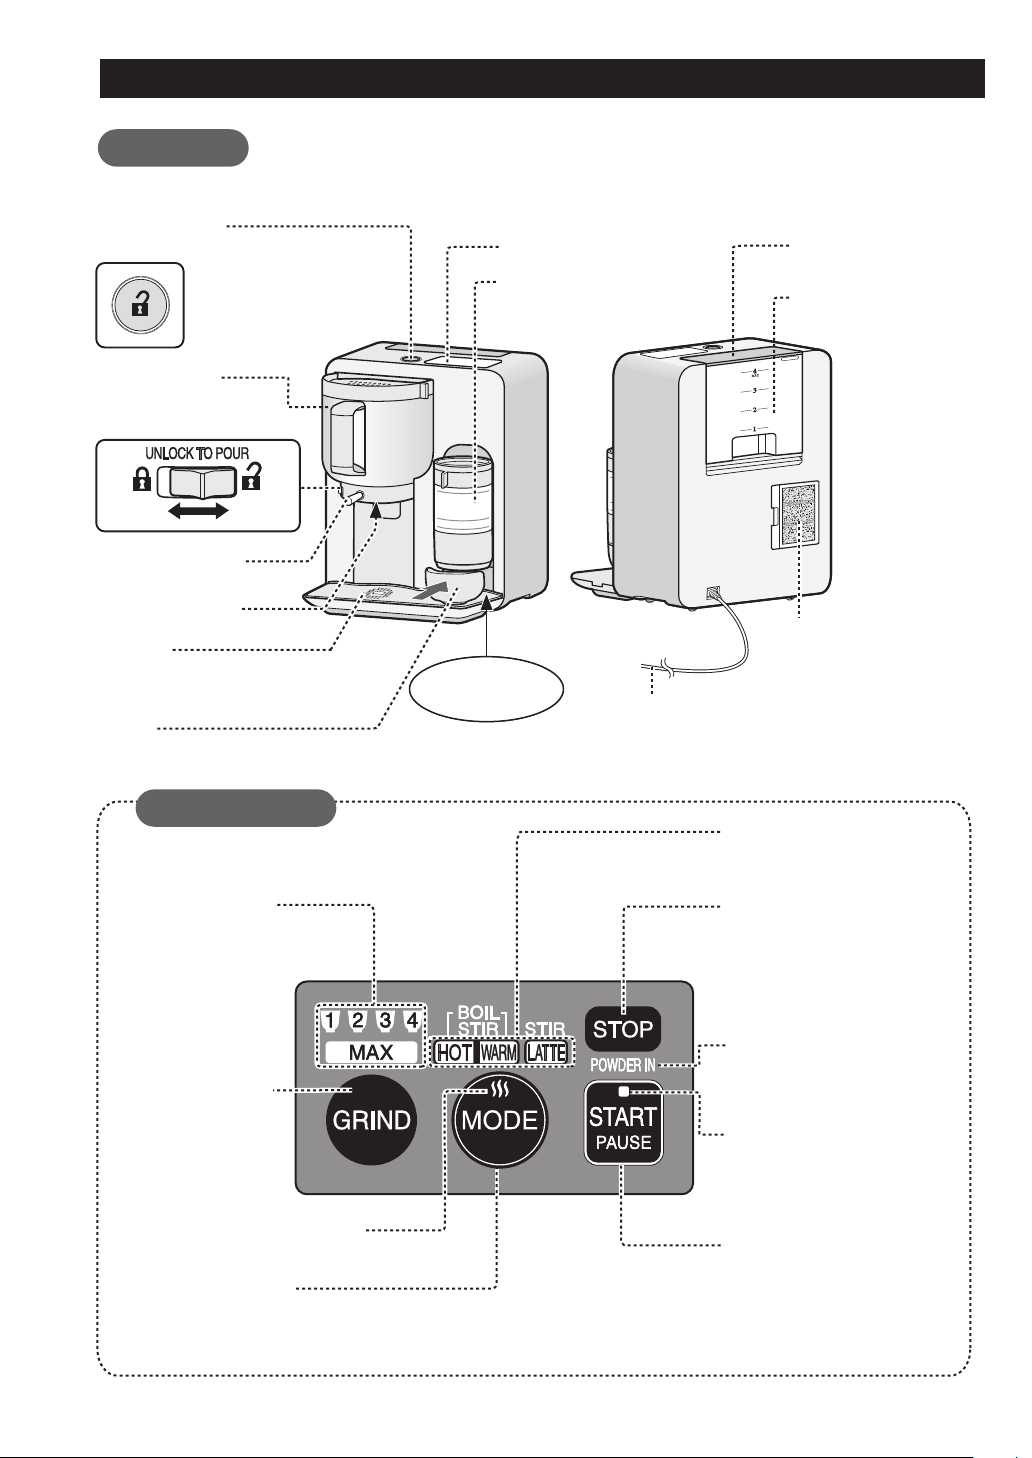
Power-supply cord
Tea pouring lever
Tea pouring port
Cup Tray
Saucer
Control panel
Main Unit
Press to select your mode.
(Hot, Warm, Latte)
Press the STOP button to
cancel any mistakes made
during programming, or to stop
an operation. Also press when
turning the Tea maker off.
Press to start an operation.
To pause, press again during
the operation.
Water boiling indicator
Flashes while water is boiling.
Tea container
Tea mortar
Water reservoir
Air filter
(Air intake openings)
LOCK
UNLOCK
Press to select
the quantity of
tea leaves for
grinding.
Mode lamp
Indicates your selected
mode (Hot, Warm, Latte)
Quantity lamp
Indicates the total amount
of tea leaves for grinding.
PARTS AND HANDLING
FRONT VIEW
Tea container
removal button
Tea pouring lever lock
(See page E-5)
Flashes when powdered tea
should be added.
Flashes when ready.
Remains lit while operating.
Lid
BACK VIEW
E-3
(container*)
GRIND button
(A Drip Tray sits under the Cup Tray)
MODE button
STOP button
POWDER IN indicator
START/PAUSE button
START indicator
Control Panel
Set the
saucer here.
* The operation manual will refer to the tea container as 'container' for short.
WATER ONLY

Handle
Water
level
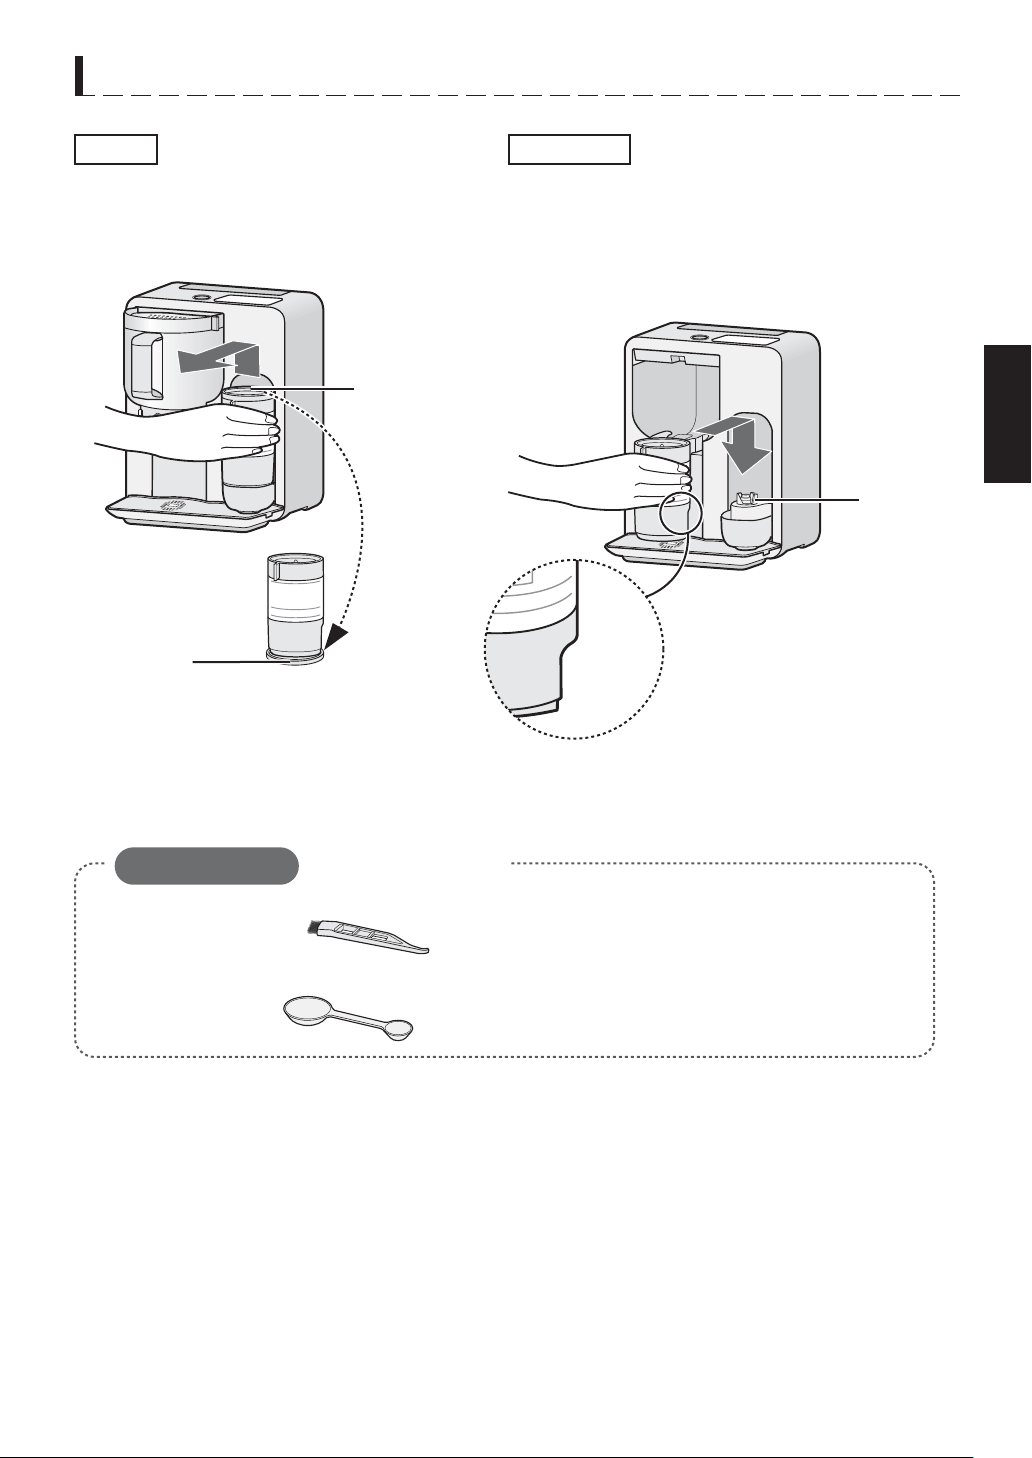
Hold down the tea container
removal button, and
carefully pull the container
toward you.
Removal
Lid cover
Adding the powdered tea
Adding the powdered tea to water/milk
(for cold tea and latte)
Installation
Lid / Lid cover
Rotary blade
(with a magnet)
Lid
Lid cover
Handle
Securely insert the water
reservoir into the main
unit.
Rubber seal
(Do not remove)
Water
Grip the handle while
holding the main unit with
your other hand.
PARTS AND HANDLING
NOTES:
1. Water level markings indicate water needed for
the corresponding cups of brewed tea.
2. Do not fill the water reservoir over the MAX mark (4)
3. Do not add any liquid (milk, etc.) other than fresh cold
water into the water reservoir.
4. Do not add water into the water reservoir during the
boiling process. (Exceeding the maximum number of
cups will cause the tea container to overflow.)
5. Do not pour water into the water reservoir while it is in ma
in unit.
6. Do not remove the water reservoir from the main unit after it has been filled with water.
7. After use, empty the water reservoir and wash the water reservoir and lid.
(See page E-18)
Inside the container, there are 2 kinds
of lines, 冷茶(cold tea) and ラテ(latte)
MAX
NOTE:
To prevent scalding yourself, do not remove
the container while the water is boiling or
immediately after.
Push the container in until
you feel it click into place.
1. Keep the container secure in
the main unit. Slide the lid
cover to reveal an oval
opening on the right side.
2. Add the powdered tea
into the container through
the opening.
1. Remove the
container from
the main unit.
2. Open the lid. Add the
liquid and the powdered
tea into the container.
3. Return the lid to its
original position.
(Do not remove)
E-4
NOTES:
1. The markings indicate water/ milk
required for the corresponding cups
of brewed tea.
2. Do not fill the container over line 4 for
cold tea, and line 3 for latte.
3. Do not put any ice in the container.
4. Do not pour water/milk into the container
while it is inserted in the main unit.
Removal
Installation
Tea Container
Water Reservoir
W
A
T
E
R
O
N
L
Y
WA
T
E
R
ON
L
Y
ENGLISH

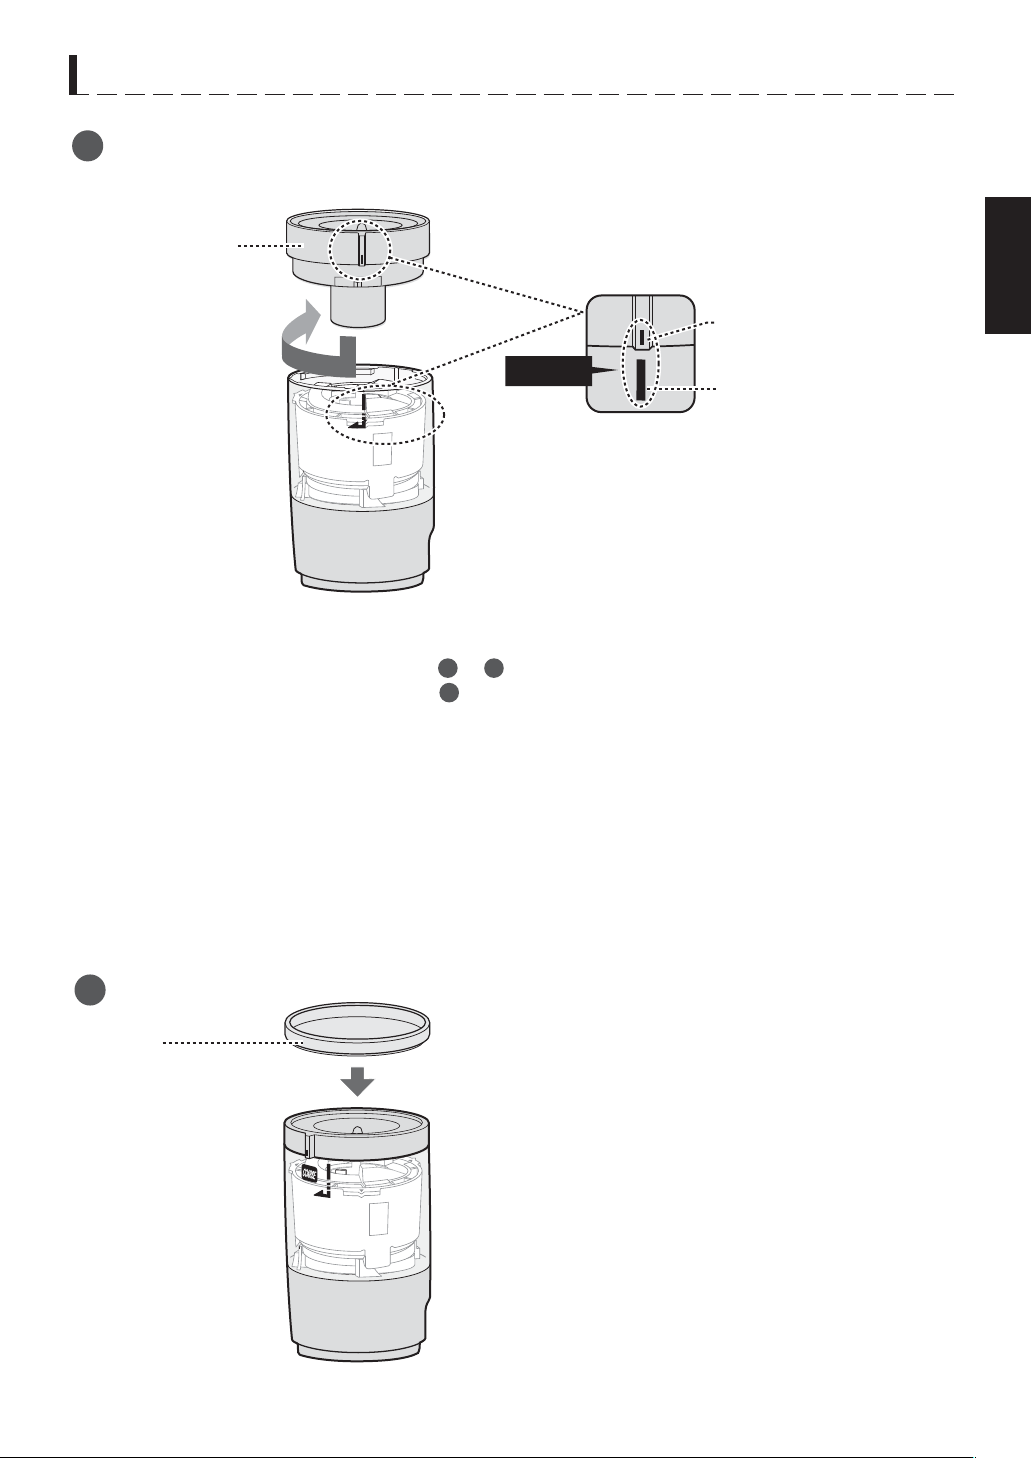
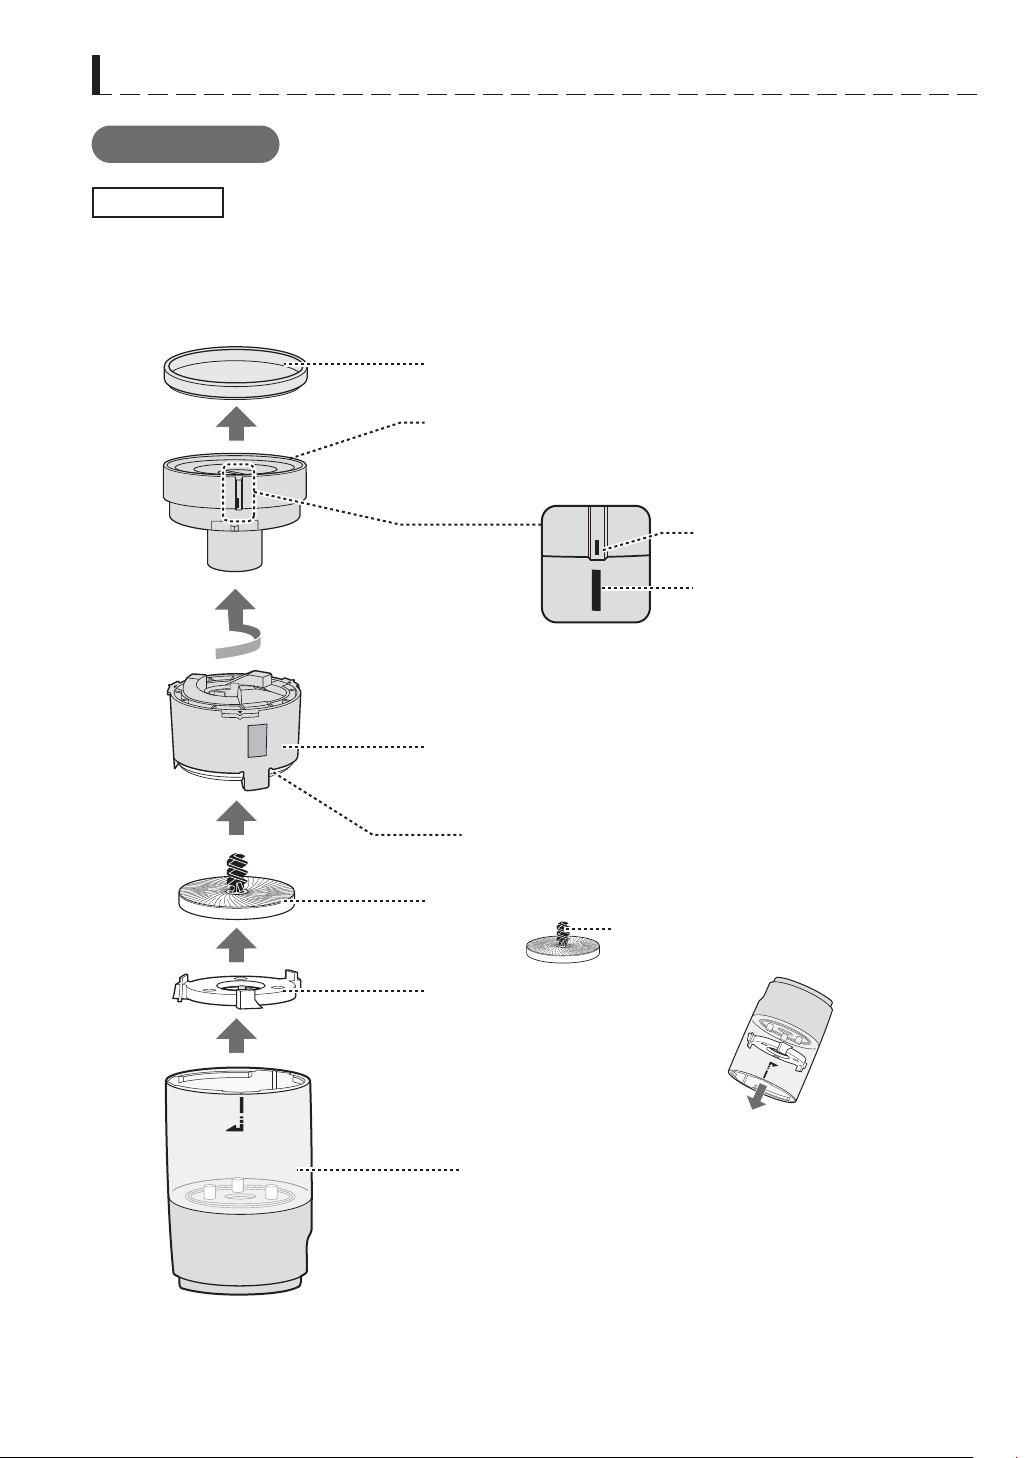
Tea case
Grinding adjustment dial (dial*)
Lower mortar
Spatula
Shaft
(NOT removable)
Upper mortar
(NOT removable)
Upper mortar unit
Lid
To remove the spatula,
turn the tea case upside
down.
Ridge of the dial
White line of the tea case
①
②
③
④
⑤
PARTS AND HANDLING
Tea Mortar
When disassembling the Tea Mortar, remove each part in the following numerical order.
(For assembly, see page E-21)
Disassembly
Rotate the dial counter-clockwise until it clicks.
(The ridge of the dial should align with the white line
of the tea case)
E-5
* The operation manual will refer to Grinding Adjustment Dial as
‘dial’ for short.

Face the Tea Mortar in the correct direction
and place it securely onto the receiver unit.
(Make sure to remove anything left on the
receiver unit and bottom of the Tea Mortar)
Receiver
unit
Lift the Tea Mortar up and away
from the main unit.
After grinding, remove the lid first.
Use the lid to cover the bottom of
the Tea Mortar and catch the
excess powdered tea.
→Face in
Large (for tea leaves)
Small (for powdered tea)
(one of each included)
・Cleaning brush
(for the Tea Mortar)
・Operation manual
(with warranty)
・Menu book
・Tea spoon
Installation
Removal
Lid
You can mute the Tea Maker.
First, make sure that the Tea Maker is plugged in.
Sound ON/OFF
Correct direction
To mute the tea maker, press and hold the START button until it beeps.
To cancel the mute setting, press and hold the START button until it beeps.
NOTES:
1. The sound setting will be stored in memory even if AC power is interrupted or disconnected.
2. Alarm sounds will remain active even when in the sound OFF setting.
E-6
PARTS AND HANDLING
Lid
Accessories
ENGLISH

*
Grind (Tea Mortar)
Boil
(Water reservoir)
Quantity*
Time
Things to prepare
1 to 4 cups
Hot tea
Drink
Cold tea
Latte
Use whole milk. Low fat and skim milk
cannot produce sufficient foam.
・Powdered tea** (0.02 - 0.085oz/0.6 - 2.4g)
・
・
Tea leaves** (0.035 - 0.1oz/1.0 - 2.8g)
・
1 to 3 cups
・
・
1 to 4 cups
・
・
Stir
(Tea container)
DO NOT USE THE WATER RESERVOIR.
FEATURES OF THE TEA MAKER
E-7
For boiling fresh cold water
For making powdered tea from tea leaves.
Adjusting the dial can make two kinds
of powdered tea.
FINE: For drinking
COARSE: For cooking
For making tea with hot/cold
water or warm/cold milk
Boil and stir:
3-5 min
Water (Fill the water reservoir to the
desired water level)
Grind, boil and stir:
3 min 30 sec -
7 min 25 sec
Stir:
Approx. 1 min 30 sec
Stir:
Approx. 1 min 30 sec
Water (Fill the water reservoir to the
desired water level)
Powdered tea** (0.07 - 0.2 oz/2 - 6g)
Milk (Pour into the container to the
desired ラテ [Latte] line)
Powdered tea** (0.02 - 0.085oz/0.6 - 2.4g)
Cold water (Pour in the container to the
desired 冷茶 [Cold tea] line)
DO NOT USE THE WATER RESERVOIR.
1 cup (Level/line 1): Approx. 5.1oz/150mL, 2 cups (Level/line 2): Approx. 9.6oz/285mL
3 cups (Level/line 3): Approx. 14.2oz/420mL, 4 cups (Level/line 4): Approx. 19oz/560mL
You can make hot tea while grinding tea leaves. (See page E-13)
Moreover, you can make latte and cold tea while grinding tea leaves.
The appliance has no heat-retention function. Flavors will be ideal just after the drink is made.
You can try various ideas from our menu book including teas, lattes, savory dishes and sweet
desserts.
・
・
・
** In case of green tea. The quantity will vary depending on a type of tea leaves.
Dial Settings
~ For Authentic Matcha ~
1 cup Boil and stir:
Approx. 3 min
・Matcha Powder (0.1oz/3.0g)
・Water (Fill the water reservoir to the
water level 1)
~ For Authentic Matcha ~
1 cup Stir:
Approx. 1 min 30 sec
・Matcha Powder (0.1oz/3.0g)
・Cold water (Pour in the container to
冷茶 [Cold tea] line 1)

●
Do not use with a gas or electric burner, or in microwave oven.
Heat will cause it to warp or melt.
●
●
●
●
●
●
Tea Mortar
●
A Japanese tea, Chinese tea, and black tea are fit for use. The following items may cause
mechanical failure:
・Tea made of anything other than tea leaves (e.g.: barley tea, black bean tea)
・
Long tea leaves that cannot be ground by the Tea Mortar. (They can be used if cut into short pieces)
・
Tea leaves already ground into powdered form.
●
●
Do not attempt to grind wet tea leaves.
E-8
BEFORE USE
・Tea that includes anything other than tea leaves (e.g.: brown rice tea)
For more information, please refer to the attached menu book.
Store the tea leaves in a tea caddy. Metallic tea caddies are recommended.
Set the lid and lid cover correctly when making a drink. Otherwise, the contents in the
container may splash out during stirring.
The inside of the container is coated with fluorine. Do not scratch the coating to extend
its lifespan.
The rotary blade has a magnet at its base. Do not place the cup close to items that are
sensitive to magnets.
Do not place on or near a gas or electric burner, or on any other high temperature surface.
●
After use, empty the water reservoir and wash the water reservoir and lid.
Heat will cause it to warp or melt.
The upper and lower mortars are made of ceramic. Extreme shocks will break them.
Handle with care.
After cleaning, always dry thoroughly.
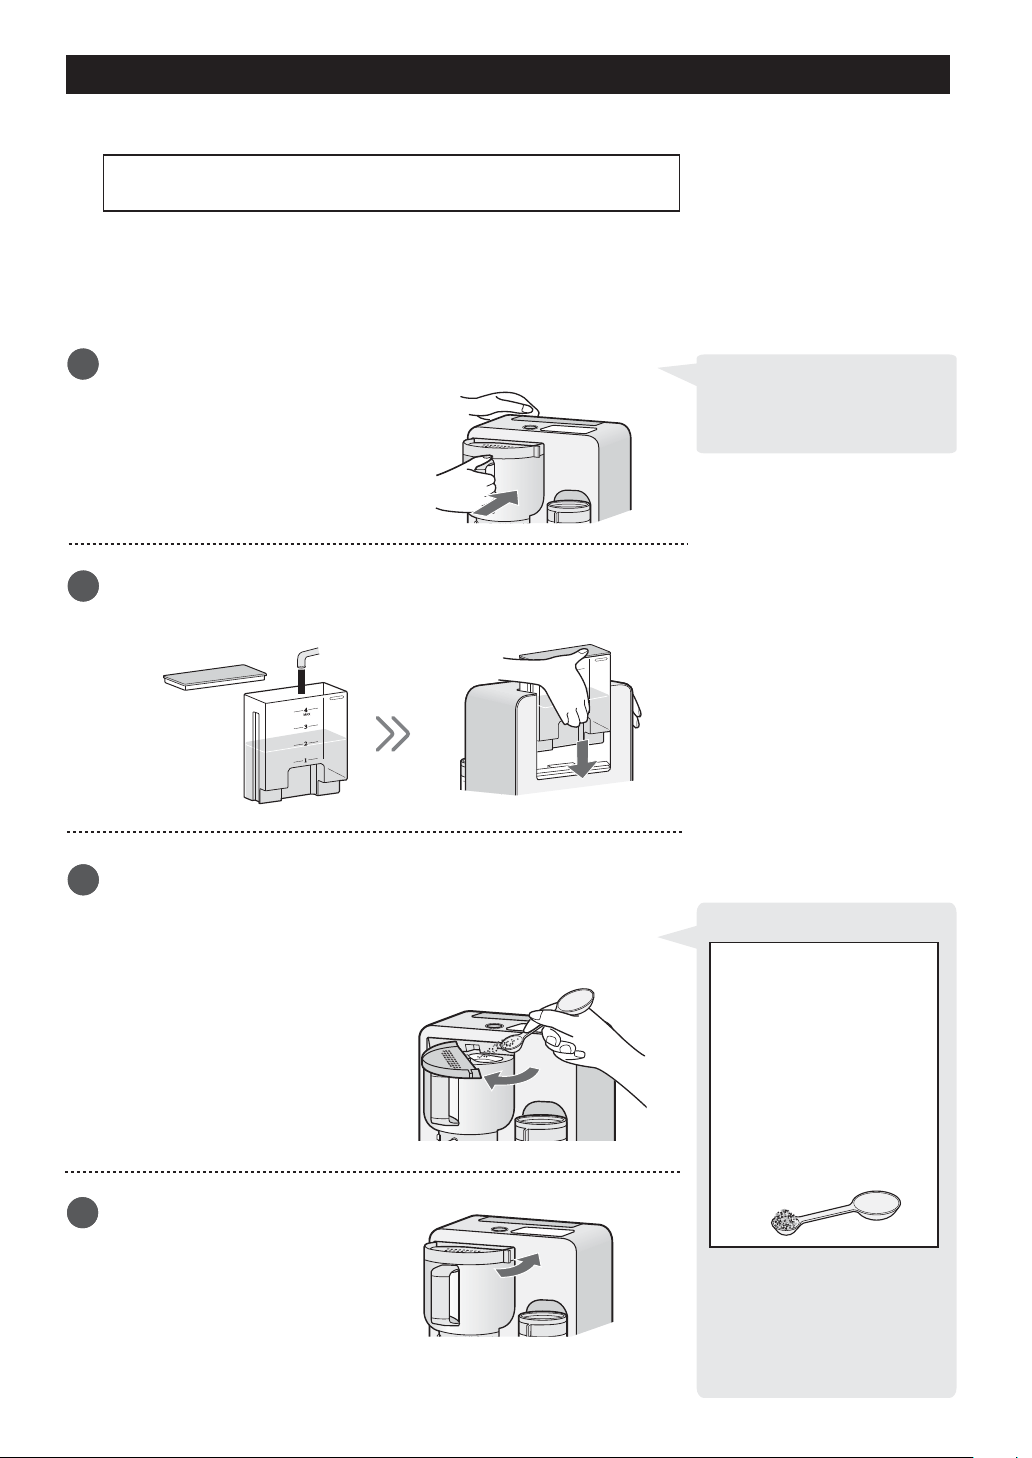
1. Carefully unpack your tea maker, and remove all packing materials.
2. Place the tea maker on a flat and sturdy surface.
3. Clean the container and insert it into the main unit.
4. Clean the water reservoir. Fill it to the MAX mark with fresh cold water. Do not fill over the MAX mark.
Set the lid and insert into the main unit.
5. Press the MODE button once, and press the START button.
6. When 4 beeps sound, place a cup on the cup tray under the container. Unlock the tea pouring lever.
Hold down the tea pouring lever and fill the cup. Discard the water.
7. Repeat pouring and discarding hot water, until it no longer flows from the tea pouring port.
Before First Use
Points to Remember
Tea Container
Water Reservoir
Tea Leaves
ENGLISH

Add tea leaves slowly into the Tea Mortar using the large spoon.
Place the lid on the Tea Mortar.
If you are using powdered
tea for cooking, set the dial
to COARSE.
Set the saucer.
Remove the lid of the Tea Mortar.
Then remove the Tea Mortar
and place it on the lid.
1
2
(Initial setting of the mortar is COARSE)
1
1
2
Lid
Large tea spoon
GRINDING THE TEA LEAVES
E-9
* Suppose you want to grind tea leaves for 2 cups of tea.
33
34
Set the dial to FINE and place the
Tea Mortar on the receiver unit.
Quantity
Powdered tea*
Time
(1 cup)
(2 cups)
(3 cups)
(4 cups)
Approx. 0.02 oz/0.6 g
Grinding
Tea leaves
1/2 spoonful
Slightly less than
1 spoonful
Slightly more than
1 spoonful
1 1/2 spoonful
3 1/2 spoonful
(Grind more)
Approx. 1 min 40 sec
Approx. 0.04 oz/1.2 g
Approx. 3 min 15 sec
Approx. 4 min 50 sec
Approx. 6 min 25 sec
Approx. 15 min
Approx. 0.06 oz/1.8 g
Approx. 0.08 oz/2.4 g
Approx. 0.21oz/6.0 g
* With green tea, quantity will vary depending on the type of tea leaves.

●
ひ
●
Tap the lid of the Tea Mortar
to clear the powdered tea
from the bottom of the Tea
Mortar.
●
If you do not immediately
use the powdered tea, store
in a sealed container and
refrigerate. Using the
powdered tea soon after
grinding is recommended.
●
1→2→3→4→MAX→
off
:0 to 1 min 39 sec
:1 min 40 sec -
3 min 14 sec
:3 min 15 sec -
4 min 49 sec
:4 min 50 sec -
6 min 24 sec
:6 min 25 sec -
15 min
ひ
ひ
GRINDING THE TEA LEAVES
E-10
35
36
35
36
Press the START button once. The Tea Mortar will
begin grinding the tea leaves. The ground tea powder
will collect in the saucer.
Plug the unit into an outlet. Select the quantity
by pressing the GRIND button twice.
×2
×1
The quantity lamp will
change every time you
press the GRIND button.
37
After grinding is complete, 4 beeps
will sound and the Tea Mortar will
stop automatically.
Tap the lid of Tea Mortar and
pull out the saucer.
If you press the GRIND
button during operation,
the flashing quantity
lamp will indicate the
remaining time.
If there are tea leaves still left in the Tea Mortar, press the GRIND
button once and the START button once.
Sometimes quantity lamps will flash and alert sounds will sound when pressing the GRIND button.
This means that cooling time is necessary to avoid overheating the mechanical components.
See page E-24 and allow the Tea Mortar to cool down.
After use, disconnect the plug from the outlet and carry out any cleaning or maintenance.
NOTE:
Do not re-grind already powdered tea in the Tea Mortar.
Issues with grinding tea leaves continually
ENGLISH
●
[ Amount of powdered tea* ]
In the case of green tea
1 cup… 1 tea spoon
2 cups… 2 tea spoons
3 cups… 3 tea spoons
4 cups… 4 tea spoons
Measure powdered tea
with small heaping
tea spoons.
MAKING HOT TEA
E-11
34
Ensure the container is empty, and insert it into the main unit.
31
There are two methods for making hot or warm tea:
Wipe off any moisture
before inserting the
container.
* Suppose you want to make 2 cups of hot tea.
Fill the water reservoir to water level 2 with fresh cold water,
and insert it into the main unit.
Open the lid cover of the container by sliding it clockwise.
Using the small tea spoon, add powdered tea into the tea
container through the oval opening.
Close the lid cover.
* Amount will vary depending
on the type of tea leaves.
See the attached menu book.
1. Boil and stir: Making tea with powdered tea ground in advance.
2. Grind, boil and stir: Boiling water while grinding tea leaves.
The temperature of the warm tea is about 59 - 68°F (15 - 20℃) less than the hot tea.
32
33
1. Boil and stir:
WATER ONLY
WATER ONLY
●
Adjust the amount of
powdered tea according
to taste.
In the case of
Authentic Matcha
1 cup... 5 tea spoons

●
●
The time varies depending on
the water temperature.
HOT→WARM→LATTE→
OFF
●
Before pouring tea, unlock the
tea pouring lever lock. After
pouring tea, lock it again for
your safety.
LOCK
UNLOCK
MAKING HOT TEA
E-12
35
Plug the unit into an outlet. Select HOT
by pressing the MODE button once.
36
Press the START button once. The tea maker
will start to heat the water. The boiled water
will automatically empty into the container and
be stirred with powdered tea.
35
36
x1 x1
The mode lamp will change
every time you press the
MODE button.
●
To make warm tea, press the
MODE button twice at step 5.
After making tea, 4 beeps will sound and the tea maker
will stop automatically.
Put a tea cup on the cup tray under the container.
Unlock the tea pouring lever lock.
Hold down the tea pouring lever and pour the tea.
37
After using, disconnect the plug from the outlet, and carry out any
cleaning or maintenance.
NOTE:
All water in the water reservoir will automatically empty into the container. If the container is
not empty prior to brewing, it may overflow.
ENGLISH

Large tea spoon
●
●
When using the appliance
for the first time, or after
cleaning/maintenance,
the resulting volume of
powdered tea will be less
than usual.
When you want to grind
one or two spoonfuls of
tea leaves, increase the
quantity of tea leaves
by one tea spoonful.
E-13
MAKING HOT TEA
* Suppose you want to grind tea leaves and make 2 cups of hot tea at the same time.
Set the saucer.
Remove the lid of the Tea Mortar. Then remove
the Tea Mortar and place it on the lid.
1
2
Ensure the container is empty, and insert it into
the main unit.
33
●
Wipe off any moisture
before inserting the
container.
Fill the water reservoir to water level 2 with fresh cold
water, and insert it into the main unit.
34
(Initial setting of the mortar is
COARSE)
Set the dial to FINE and place the
Tea Mortar on the receiver unit.
35
Add tea leaves slowly into the Tea Mortar using the large
spoon. Place the lid on the Tea Mortar.
36
To measure the amount
of tea leaves, see page
E-9.
2. Grind, boil and stir:
WAT
ER
O
NL
Y
W
A
TE
R
O
NL
Y
1
1
2
3
Lid

Small tea spoon
…Approx. 2 min
…
Approx. 3 min 20 sec
…Approx. 5 min
…
Approx. 6 min 40 sec
[ Time until the tea is made ]
…
Approx. 15 min 30 sec
●
The surface of the container
will be hot. When you add
the powdered tea to the
container, take care not to
burn yourself.
ひ
E-14
MAKING HOT TEA
37
Plug the unit into an outlet. Select quantity
by pressing the GRIND button twice.
Select HOT by pressing the MODE button once.
38
Press the START button once. The Tea Mortar will
start to grind the tea leaves, and water will be heated.
39
3
7 38
39
x1 x1x2
After grinding is complete, 4 beeps
will sound and the Tea Mortar will
stop automatically. Tap the lid of
the Tea Mortar and pull out the
saucer.
3
10
When "POWDER IN" is flashing, open the lid cover of
the container by sliding it clockwise.
Using the small tea spoon, add the powdered tea into the
container through the oval opening. Close the lid cover
and then press the START button once. The tea maker
will begin to stir the hot water and powdered tea.
3
11
x1
After making tea, 4 beeps will sound
and the tea maker will stop
automatically.
Put a tea cup on the cup tray
under the container. Unlock the tea
pouring lever lock. Hold down the tea
pouring lever and pour the tea.
3
12
●
Before pouring tea, unlock the
tea pouring lever. After pouring
tea, lock it again for your safety.
LOCK
UNLOCK
After use, disconnect the plug from the outlet and carry out an
y
cleaning or maintenance.
To make warm tea,
press the MODE button
twice at step 8.
“POWDER IN” will flash and indicate the time to
add the powdered tea into the container.
●
Press the START button within
30 minutes of when “POWDER
IN” is
flashing.
NOTE:
All water in the Water Reservoir will automatically empty into the container. If there is any liquid in the
container prior to brewing, it may overflow.
●
ENGLISH

●
Pour milk into the container
first to make a smooth
textured latte.
[ Amount of powdered tea* ]
●
Do not use
the water
reservoir.
●
Cold milk that has been
stored in a refrigerator is
also acceptable.
●
When you pour warm
milk into the container,
take care not to burn
yourself.
1 cup… 3 - 4 tea spoons
2 cups… 6 - 7 tea spoons
3 cups…10 tea spoons
●
MAKING A LATTE
E-15
31
You can make a latte by stirring milk with powdered tea ground in advance.
* Suppose you want to make one cup of green tea latte.
Open the lid of the container. Pour in the desired amount
of warm milk (for 1 cup, pour to line1 of ラテ [latte])
32
Add powdered tea in the container using the small spoon
(for 1 cup, add 3-4 heaping spoons)
31
Small tea spoon
32
33
Close the lid and insert the container into the main unit.
33
Plug the unit into an outlet. Select LATTE
by pressing the MODE button 3 times.
35
36
x3 x1
Press the START button once. The tea maker will begin
to stir.
34
35
34
After making the latte, 4 beeps
will sound and the tea maker
will stop automatically.
Put a tea cup on the cup tray
under the container.
Unlock the tea pouring lever.
Hold down the tea pouring lever
to pour the tea.
Before pouring tea, unlock
the tea pouring lever lock.
After pouring tea, lock it
again.
After use, disconnect the plug from the outlet and carry out any cleaning or maintenance.
Measure the quantity of
powdered tea using
small heaping tea spoons.
In the case of green tea
* Amount will vary depending
on the type of tea leaves.
See the attached menu
book.
NOTES:
1. You can scoop out any remaining foam in the container to top off your latte.
Do not use a metallic spoon.
2. Do not use milk that has been stored at room temperature.
3. The quality of foam will vary depending on the temperature, or the types of tea leaves or milk.
LOCK
UNLOCK
●
Adjust the amount of
powdered tea according
to taste.
WAT
ER ONLY

Small tea spoon
●
E-16
MAKING COLD TEA
31
You can make cold tea by stirring cold water with powdered tea ground in advance.
* Suppose you want to make one cup of cold green tea.
Open the lid of the container. Pour in the desired amount
of cold water (for 1 cup, pour to line1 of 冷茶 [cold tea])
32
Add powdered tea into the container using the small spoon
(for 1 cup, add 1 heaping tea spoon)
33
Close the lid and insert the container into the main unit.
Do not use
the water
reservoir.
31
32
33
Plug the unit into an outlet. Select LATTE
by pressing the MODE button 3 times.
35
36
x3 x1
Press the START button once.
The tea maker will begin to stir.
34
35
34
After making tea, 4 beeps will sound
and the tea maker will stop
automatically. Put a tea cup
on the cup tray under
the container.
Unlock the tea pouring lever.
Hold down the tea pouring lever
to pour the tea.
●
Before pouring tea, unlock
the tea pouring lever.
After pouring tea, lock it
again for your safety.
After use, disconnect the plug from the outlet and carry out any cleaning or maintenance.
●
Pour water into the container
first to make a smooth
textured cold tea.
[ Amount of powdered tea* ]
1 cup… 1 tea spoon
2 cups… 2 tea spoons
3 cups… 3 tea spoons
Measure the quantity of
powdered tea using heaping
small tea spoons.
In the case of green tea
* Amount will vary depending
on the type of tea leaves.
See the attached menu
book.
4 cups… 4 tea spoons
WAT
ER ONLY
●
Adjust the amount of
powdered tea according
to taste.
ENGLISH
In the case of
Authentic Matcha
1 cup... 5 tea spoons
LOCK
UNLOCK

Receiving unit
Control panel
Using a soft cloth moistened only with
water, gently wipe the panel until it
becomes clean. Avoid using excessive
amounts of water. Do not use any sort
of chemical or abrasive cleaner.
Remove the cup tray and drip tray.
Wipe the base plate.
Drip tray
Cup tray
Water Reservoir / Lid
Base plate
CARE AND CLEANING
E-17
Before cleaning, turn the Tea Maker off. Unplug and allow it to cool completely.
An authorized service representative should perform any other servicing, except for
specific cases detailed in the operation manual.
CAUTION: Do not use commercial cleaners, abrasive, harsh cleaners, solutions that contain sodium
hydroxide, or scouring pads on any part of the tea maker.
Dishwashers cannot be used to clean your tea maker.
Take extreme care when
cleaning the control panel
and receiver units. Using a
cloth moistened only with
water, gently wipe until they
become clean. Avoid using
excessive amounts of water.
Do not use any sort of
chemical or abrasive cleaner.
After use, wash in a mild soap or detergent solution with
a damp soft cloth or sponge. Rinse and dry. Do not wash
in the dishwasher. Do not use harsh cleaners, sharp metal
scrapers, or stiff brushes on the water reservoir and lid.
Main Unit
WA
T
E
R
ON
LY
After Use
After Use

Cup traySaucer
Rotary
Blade
Rubber seal
Lid
Container
UNLOCK
Drip tray
Tea pouring lever
CARE AND CLEANING
E-18
Wash with warm or cold water using a soft sponge and then let dry.
For heavier spills and dirt, use a mild soap or detergent solution.
Wash with warm or cold water using a soft sponge and then
let dry. Remove the rotary blade in the container.
For heavier spills and dirt, use a mild soap or detergent solution.
For tea stains, use oxygen bleach.
Clean around the rubber seal with running water while holding
down the tea pouring lever. Any remaining dirt may cause
water leakage. Make sure to unlock the tea pouring lever
before cleaning.
NOTES:
1. If the rubber seal is removed, unlock the tea pouring lever, hold down the lever, and securely re-attach the rubber
seal to the bottom of the container. Then fill the container with water to check whether any water leakage occurs.
2. Do not remove the rubber seal and the lid cover by force.
Rotary Blade
Removal
Carefully pull out the rotary blade. (It may be firmly attached to the
container)
Projection
Installation
Carefully push the rotary blade onto the projection that is
at the bottom of the container.
NOTE:
To prevent misplacement or accidental swallowing, do not forget to reinstall the rotary blade after cleaning.
Saucer / Cup Tray / Drip Tray
Tea Container
After Use
After Use
ENGLISH

●
●
●
After Use
When the Upper Mortar unit and Lower Mortar are stuck together
ether.
Removing them by force may cause damage to
the appliance. Immerse them in warm water and
wait until they can be taken apart easily.
(standing time: 2 to 3 min.)
NOTE:
Never separate the upper mortar unit and lower mortar with force.
Tea Mortar
Monthly Maintenance
2 to 3min
Upper
mortar
unit
Lower mortar
●
●
E-19
CARE AND CLEANING
Disassemble the Tea Mortar. (See page E-5) Remove the remaining powdered tea using the
supplied cleaning brush. After cleaning, re-assemble the parts. (See page E-21)
Disassemble the Tea Mortar. (See page E-5) Remove the remaining powdered tea using the
supplied cleaning brush. Then wash in a mild soap or detergent solution with a soft sponge.
Rinse and dry thoroughly.
In the following cases, carry out maintenance before a month has passed:
The upper mortar unit and lower mortar seem to be clogged, and powdered tea is not
coming out smoothly.
●
When you wish to grind a different type or flavor of tea leaf.
All quantity lamps are flashing and the appliance stops grinding.
(upper mortar unit and lower mortar may be stuck together)
An unusual sound is being produced during grinding.
The Tea Mortar is extremely dirty.
You will not use the appliance for a long period of time.
After they are separated, remove the powdered tea
using the supplied cleaning brush, then wash and
dry thoroughly. After drying, re-assemble the parts. (See page E-21)
IMPORTANT:
Air dry the Tea Mortar (8 hours or more) even after removing moisture with a dry cloth.
If any moisture remains, powdered tea may become clogged on the surface of upper and
lower tea mortars. This will reduce the amount of powdered tea produced.
Special note for cleaning the Tea Mortar:
When drying, do not use electric dish dryers or microwave ovens, etc. Such devices may
cause damage to components.

1. Fill the water reservoir to the MAX mark with fresh cold
water. Do not fill past the MAX mark.
After frequent use, mineral content from water may build up in the pipe or other parts
of the appliance. This is called "scale". If scale becomes an issue, water will begin
taking longer to boil or remain in the water reservoir. Remove any scale build-up with
the following method:
Air Filter
Push the tab to
the right.
(Boiling time : Approx. 5 min)
Tab
InstallationRemoval
Insert the 2 tabs of the air filter
panel into the corresponding slits
on main unit. Press the air filter
until it snaps into place.
Slits
Tabs
Monthly Maintenance
2. Dissolve 1 tablespoon of pure citric acid crystals in the
water. Stir well. Set the lid and insert into the main unit.
3. Insert the empty container into the main unit. Plug in.
4. Press the MODE button once, and then press the
START button.
5. When 4 beeps sound, remove the container and discard
the hot water.
6. Fill the water reservoir to the MAX mark with fresh cold
water, and set the lid. Insert the water reservoir into the
main unit.
7. Insert the empty container into the main unit.
8. Press the MODE button once, and then press the START button.
9. When 4 beeps sound, remove the container and discard
the hot water.
10.
Repeat steps 6 to 9 two or three times. After use, disconnect
the plug from the outlet.
CARE AND CLEANING
E-20
Remove the air filter panel from the back of the main unit. Wash in warm or cold water, and wipe
dry. Reinstall on the main unit immediately.
WARNING:
The container and its lid will become hot. To PREVENT BURNS,
remove while using potholders.
NOTES:
1. Frequency of descaling will vary depending on the hardness of the water. If you use hard water
(high in mineral content), regular descaling is recommended.
2. Pure citric acid is available at numerous drugstores.
Descaling
W
A
T
E
R
O
N
L
Y
W
A
T
E
R
O
N
L
Y
ENGLISH

Match
1
2
1
2
3
Lower mortar
Spatula
Tea case
Upper mortar unit
There are three ▼ on the upper mortar unit. Match any of them with the white line “ ”
of the tea case.
Hole
Protrusion
Bottom of the lower mortar
Protrusion
Hole
E-21
CARE AND CLEANING
Assembling the Tea Mortar
Position the “ オモテ[front]” side of the spatula face-up and insert it into the tea case.
Make sure to align the holes of the spatula with the protrusions of the tea case.
Insert the lower mortar into the tea case. (-a) Align the holes on the bottom of the
lower mortar with the protrusions, rotating the lower mortar slowly until it fits
securely. (-b)
2
-a
-b
Place the upper mortar unit onto the lower mortar.
Align "▼" of the upper mortar unit with the white line “ ” of the tea case.
NOTE:
Make sure to face the
“ オモテ(front)” of the
spatula upward
2
2
4
5
Lid
Dial
●
●
●
Match
E-22
CARE AND CLEANING
Insert the dial into the tea case so that the ridge of the dial align with the white line on the tea case.
Then press the dial into the tea case and turn the dial clockwise.
Ridge of the dial
White line of the tea case
NOTES:
1. If you cannot insert the dial, then steps to have not been carried out properly.
2. We recommended setting the dial to “COARSE” when you store the Tea Mortar.
Re-assemble the Tea Mortar from step while paying attention to the following:
Spatula: Make sure that “オモテ[front]” is face-up.
Lower Mortar: Make sure to align the holes on the bottom with the protrusions of
the tea case.
Upper Mortar unit: Make sure it is in the correct position.
(This prevents the upper mortar unit and lower mortar from sticking together.)
Set the lid.
ENGLISH
1 3
1

TROUBLESHOOTING
The following situations are normal and are not signs that the tea maker is malfunctioning.
PROBLEM
ANSWER
The Tea Mortar is making
a squeaking sound.
When grinding for the first time or right after cleaning the Tea Mortar,
hearing a squeaking sound is common.
The Tea Mortar suddenly stops
during grinding. An unusual
sound is coming out of the
Tea Mortar.
Check that you are using an appropriate type of tea leaves.
Disassemble the Tea Mortar. See page E-5. Remove the remaining
powdered tea using the supplied cleaning brush.
After cleaning, re-assemble the parts. See page E-21.
See page E-19 for the details of maintenance for the Tea Mortar.
No sound when buttons are
pressed. No beeps when
operations are completed.
Sound is turned OFF. See page E-6 to turn sound back on.
Follow step-by-step instructions for descaling.
See page E-20.
The tea maker boils water slowly.
The water reservoir does not fully
empty out during use.
There is no powdered tea in
the saucer.
It will take about 30 seconds for powdered tea to come out after
pressing the START button.
Remove the tea leaves in the Tea Mortar. Shorten any long tea leaves
prior to re-grinding.
Make sure the assembly of the spatula in the Tea Mortar is correct.
SPECIFICATIONS
AC Line Voltage:
AC Power Required:
Main unit
Tea mortar
Outside Dimensions (WxHxD):
Weight:
Single phase 120V, 60Hz, AC only
940 W
910 W
30 W
9 1/4” x 11 3/4” x 8 7/8”
233 mm x 296 mm x 225 mm
Approx. 6.6 lbs. / 3.0 kg
E-23
●
●
●
●
●
Coarse powdered tea comes
out.
Check the dial setting.
●
There are lumps in the latte/
cold tea.
Make sure to add liquid prior to adding the powdered tea.
●
Quantity of the powdered tea
coming out from the Tea Mortar
is less than usual.
If you still require service, disconnect the plug from the outlet and CONTACT YOUR NEAREST SHARP
AUTHORIZED SERVICER.
When using a new Tea Mortar, or after a cleaning, the resulting
amount of powdered tea may be less than usual.
●
Quantity will vary depending on the type of tea leaves.
●
Fineness of the powdered tea will vary depending on the type of tea
leaves.
●
●
●
Disassemble the Tea Mortar. See page E-5. Remove the remaining
powdered tea using the supplied cleaning brush.
After cleaning, re-assemble the parts. See page E-21.
See page E-19 for the details of maintenance for the Tea Mortar.
●

The quantity Lamp you selected flashes
when you press the START button.
TROUBLESHOOTING
Make sure that the Tea Mortar is set correctly.
Remove the Tea Mortar, and then place it back
on the receiver unit properly and press the
START button.
E.g.: Suppose you want to grind tea
leaves for 1 cup.
Cooling time (max.)
1cup : 3min 20sec, 2cups : 6min 30sec,
3cups : 9min 40sec, 4cups : 12min 50sec,
MAX : 30min
The Quantity Lamp flashes when you
press the GRIND button.
E.g.: Suppose you want to grind tea
E.g.: Suppose you want to select “HOT”.
“MAX” and “LATTE” are flashing.
leaves for 4 cups.
(This indicates you are unable to grind
tea leaves for 4 cups/MAX)
Mode lamp you selected flashes when
you press the START button.
Make sure that the container is set correctly.
Remove the container, place it back into the main
unit properly and then press the START button.
There is no water in the Water Reservoir.
Press the STOP button and remove the water
reservoir. Fill the water reservoir and insert it back
into the main unit and re-program.
All Quantity Lamps are flashing and
the Tea Maker stops.
Upper mortar unit and lower mortar may be stuck
together. See page E-19 for maintenance directions.
All lamps light up in sequence.
The Tea Maker does not work when
you press the START button.
The Tea Maker is in demonstration mode.
This feature is mainly for use by retail outlets,
and only allows for trial operation.
To cancel, press and hold the STOP button until
it beeps and then press it 4 times.
If you notice unusual flashing lights and you believe that the Tea Maker is not working properly, check the chart
below before consulting a Sharp Authorized Servicer.
This will help prevent unnecessary service calls.
DISPLAY
ANSWER
E-24
The Tea Mortar has overheated. Allow it to cool
down for the following time (depending on the
number of cups corresponding cups)
If you still require service, disconnect the plug from the outlet and CONTACT YOUR NEAREST SHARP
AUTHORIZED SERVICER.
ENGLISH

FOR CUSTOMER ASSISTANCE
E-25
To aid in reporting this Tea Maker in case of loss or theft, please record below the model number and
serial number located on the unit. We also suggest you record all the information listed and retain for future
reference.
Please provide the following information when you write or call: model number, serial number, date
of purchase, your complete mailing address (including zip code), your daytime telephone number
(including area code) and description of the problem.
TO PHONE:
For the United States
For Canada
DIAL 1-800- BE-SHARP ( 237-4277 ) for :
SERVICE (for your nearest Sharp Authorized Servicer)
PARTS (for your authorized parts distributor)
ADDITIONAL CUSTOMER INFORMATION
DIAL 1-800-642-2122 for :
REPLACEMENT ACCESSORIES
TO WRITE:
Sharp Electronics Corporation
Customer Assistance Center
Attn:
Sharp Plaza Blvd
Memphis, Tennessee 38193
TO ACCESS OUR WEB SITE:
www.sharpusa.com
TO PHONE:
Dial 1-905-568-7140 for:
TO WRITE:
TO ACCESS OUR WEB SITE:
MODEL NUMBER _______________________ SERIAL NUMBER _____________
DATE OF PURCHASE ______________________
DEALER ___________________________ TELEPHONE ________________
SERVICER ___________________________ TELEPHONE ________________
SERVICE (for your nearest Sharp Authorized Servicer)
PARTS (for your Authorized Parts Distributor)
ACCESSORIES
ADDITIONAL CUSTOMER INFORMATION
For service problems, warranty information, missing items an
other assistance:
Sharp Electronics of Canada Ltd.
Customer Care
335 Britannia Road East
Mississauga, Ontario L4Z 1W9
www.sharp.ca
E-26
LIMITED WARRANTY
SHARP ELECTRONICS CORPORATION warrants to the fi rst consumer purchaser that this Sharp brand
product (the Product), when shipped in its original container, will be free from defective workmanship and
materials, and agrees that it will, at its option, either repair the defect or replace the defective Product or
part thereof with a new or remanufactured equivalent at no charge to the purchaser for parts or labor for
the period(s) set forth below.
This warranty does not apply to any appearance items of the Product nor to any Product the exterior
of which has been damaged or defaced, which hasbeen subjected to improper voltage or other misuse,
abnormal service or handling, or which has been altered or modifi ed in design or construction.
In order to enforce the rights under this limited warranty, the purchaser should follow the steps set forth
below and provide proof of purchase to the servicer.
The limited warranty described herein is in addition to whatever implied warranties may be
granted to purchasers by law. ALL IMPLIED WARRANTIES INCLUDING THE WARRANTIES OF
MERCHANTABILITY AND FITNESS FOR USE ARE LIMITED TO THE PERIOD(S) FROM THE DATE
OF PURCHASE SET FORTH BELOW. Some states do not allow limitations on how long an implied
warranty lasts, so the above limitation may not apply to you.
Neither the sales personnel of the seller nor any other person is authorized to make any warranties other
than those described herein, or to extend the duration of any warranties beyond the time period described
herein on behalf of Sharp.
The warranties described herein shall be the sole and exclusive warranties granted by Sharp and shall
be the sole and exclusive remedy available to the purchaser. Correction of defects, in the manner and for
the period of time described herein, shall constitute complete fulfi llment of all liabilities and responsibilities
of Sharp to the purchaser with respect to the Product, and shall constitute full satisfaction of all claims,
whether based on contract, negligence, strict liability or otherwise. In no event shall Sharp be liable,
or in any way responsible, for any damages or defects in the Product which were caused by repairs or
attempted repairs performed by anyone other than an authorized servicer. Nor shall Sharp be liable or in
any way responsible for any incidental or consequential economic or property damage. Some states do
not allow the exclusion of incidental or consequential damages, so the above exclusion may not apply to
you.
THIS WARRANTY GIVES YOU SPECIFIC LEGAL RIGHTS. YOU MAY ALSO HAVE OTHER RIGHTS
WHICH VARY FROM STATE TO STATE.
TE-T56U-GR or TE-T56U-RD, Tea Maker. Be sure to have this
information available when you need service for your Product.
One (1) year parts and labor.
From a Sharp Authorized Servicer located In the United States.
To fi nd the location of the nearest Sharp Authorized Servicer, call
Sharp toll free at 1-800-BE-SHARP (1-800-237-4277).
Ship prepaid or carry in your Product to a Sharp Authorized Servicer.
Be sure to have Proof of Purchase available. If you ship the
Product, be sure it is insured and packaged securely.
Your Product Model Number
& Description:
Warranty Period for this Product:
Where to Obtain Service:
What to do to Obtain Service:
TO OBTAIN PRODUCT INFORMATION OR PURCHASE ACCESSORIES, CALL 1-800-BE-SHARP
OR VISIT www.SharpUSA.com
ENGLISH
THIS LIMITED WARRANTY IS VALID ONLY IN THE FIFTY (50) UNITED STATES, THE DISTRICT
OF COLUMBIA. AND PUERTO RICO.

E-27
T
O
B
E
T
H
E
B
E
S
T
T
H
R
O
U
G
H
C
U
S
T
O
M
E
R
S
A
T
I
S
F
A
C
T
I
O
N
SERVICE
LIMITED WARRANTY
Consumer Electronics Products
Congratulations on your purchase!
WARRANTY PERIODS: (calculated from the date of original purchase): Parts & Labour (exceptions noted)
Audio Product 1 year
Blu-Ray Product 1 year
LCD/LED TV 1 year
Microwave Oven 1 year (magnetron - 4 additional years)
Air Purifier 1 year
3D Glasses 1 year
Wireless LAN Adapter 1 year
Small home appliances 1 year
• By writing to Sharp Electronics Of Canada Ltd. at 335 Britannia Road
East Mississauga, Ontario L4Z 1W9
• Calling: at 905-568-7140
• Visiting our Web site: www.sharp.ca
To obtain the name and address of the nearest Authorized Sharp Service Centre or Dealer, or for more information on this
Limited Warranty, Sharp Extended Warranty Offers, Sharp Canada Products or Accessory Sales, please contact Sharp:
®
Sharp Electronics of Canada Ltd. ( “Sharp” ) warrants to the first purchaser for this Sharp brand product ( “Product” ), when shipped in its
original container and sold or distributed in Canada by Sharp or by an authorized Sharp dealer, and Product was not sold “as is” or “sales
final” that the Product will during the applicable warranty period, be free from defects in material and workmanship, and will within the
applicable warranty period, either repair the defective Product or provide the first purchaser a replacement of the defective Product.
Conditions:
This limited warranty shall not apply to:
(a) Any defects caused or repairs required as a result of abusive operation, negligence, accident, improper installation or inappropriate use
as outlined in the owner’ s manual or other applicable Product documentation.
(b) Any defects caused or repairs required as a result of any Product that has been tampered with, modified, adjusted or repaired by any
person other than Sharp, a Sharp authorized service centre or a Sharp authorized servicing dealer.
(c) Any defects caused or repairs required as a result of the use of the Product with items not specified or approved by Sharp, including but
not limited to chemical cleaning agents.
(d) Any replacement of accessories required through normal use of the Product, including but not limited to, earphones, remote controls,
AC adapters, batteries, temperature probe, trays, filters, belts, ribbons, cables and paper.
(e) Any cosmetic damage to the Product surface or exterior that has been defaced or caused by normal wear and tear.
(f) Any defects caused or repairs required as a result of damage caused by any external or environmental conditions, including but not
limited to, transmission line/power line voltage or liquid spillage or acts of God.
(g) If the serial number or model number affixed to Product has been removed, defaced, changed, altered or tampered with.
(h) This limited warranty will not apply if the Product has been used or is being used in a commercial setting or application; this warranty is
meant solely for the non-commercial, household use of the Product by consumers in their home or residence.
(i) Any installation, delivery, setup and/or programming charges
(j) The removal and reinstallation of Over-The-Range Microwave or Microwave Drawer if it is installed in an inaccessible location or
requiring removal of cupboards, handles or other cosmetic parts, or is not installed in accordance with installation instructions included
with Product.
How to get service:
Warranty service may be obtained upon delivery of the Product, together with proof of purchase (including date of
purchase) and a copy of this limited warranty statement, to an authorized Sharp service centre or an authorized Sharp servicing dealer. In
home warranty service will be carried out to locations accessible by on-road service vehicle and within 50 km of an authorized Sharp
service centre on any Sharp Television with the screen size of 42” or larger and on any Over-The-Range Microwave Oven or Microwave
Drawer Oven. The servicer may if necessary take the unit for repair at the servicer's facility. No other person (including any Sharp dealer
or service centre) is authorized to extend, enlarge or transfer this warranty on behalf of Sharp. The purchaser will be responsible for any
and all removal, reinstallation, transportation and insurance costs incurred with exception for Over-The-Range Microwave Oven or
Microwave Drawer Oven whereby Sharp will be responsible for the removal and reinstallation.
The express warranties in this limited warranty are, except for consumer purchasers domiciled in Quebec, in lieu of and, except to the
extent prohibited by applicable law, Sharp disclaims all other warranties and conditions, express or implied, whether arising by law, statute,
by course of dealing or usage of trade, including, without limitation, implied warranties or conditions of merchantability and/or quality,
fitness for a particular use or purpose, and/or non-infringement. Limitations (not applicable to consumer purchasers domiciled in Quebec to
the extent prohibited under Quebec law): (a) Sharp shall not be liable for any incidental, special, consequential, economic, exemplary or
indirect damages of any kind or nature (including lost profits or damages for loss of time or loss of use or loss of data) arising from or in any
connection with the use or performance of a Product or a failure of a Product, even if Sharp is aware of or has been advised of the
possibility of such damages; (b) the remedies described in this limited warranty constitute complete fulfillment of all obligations and
responsibilities of Sharp to the purchaser with respect to the Product and shall constitute full satisfaction of all claims, whether based on
contract, negligence, strict liability or otherwise. Some provinces may not allow the exclusion or limitation of certain damages, or limits on
the duration or voiding of implied warranties or conditions; in such provinces, the exclusions and limits herein may not apply. This limited
warranty is, except for consumer purchasers domiciled in Quebec, governed by the laws of the Province in Canada in which the purchaser
has purchased the Product. For consumer purchasers domiciled in Quebec this limited warranty is governed by the laws of Quebec.
THIS LIMITED WARRANTY IS VALID ONLY IN CANADA

NOTE

INFORMATIONS IMPORTANTES RELATIVES À LA SÉCURITÉ
F-1
Lors de l’utilisation d’appareils électriques, les précautions de sécurité doivent toujours être respectées afin
de réduire le risque d’incendie, d'électrocution et / ou de préjudices corporels, y compris les suivantes :
1. Lisez toutes les instructions.
2. Ne jamais toucher les surfaces chaudes.
Utiliser les poignées et boutons.
3. Pour éviter tout incendie, électrocution et préjudices
corporels, ne jamais immerger le cordon, les prises
ou l'appareil dans l’eau ou dans tout autre liquide.
4. Faire extrêmement attention lorsque cet appareil est
utilisé par ou à proximité d'enfants.
5. En cas de non utilisation et avant tout nettoyage,
débrancher l'appareil de la prise. Laisser refroidir
avant de mettre ou retirer des pièces et avant
de nettoyer l’appareil.
6. Ne jamais utiliser un appareil avec un cordon ou une
prise endommagé(e), après tout dysfonctionnement ou
endommagement de l’appareil.
Contacter un TECHNICIEN AGRÉÉ SHARP.
7. Toute utilisation des fixations accessoires
déconseillées par le fabricant de l’appareil peut
provoquer un incendie, une électrocution ou
des préjudices corporels.
8. Ne jamais utiliser à l'extérieur.
9.
Ne laisser jamais le cordon pendre au-dessus de latable
ou du comptoir et ne jamais toucher les surfaces chaudes.
10.
Ne jamais placer l'appareil sur ou à proximité d'un
brûleur à gaz ou électrique ou dans un four chaud.
11. Avant de le débrancher, appuyer sur « STOP »
et retirer la fiche de la prise murale.
12. Ne jamais utiliser cet appareil pour une
utilisation autre que celle prévue.
13.
Veillez à ce que les couvercles soient correctement placés
avant d'utiliser l'appareil.Lors de l’utilisation d’appareils électriques,
les précautions de sécurité doivent toujours être
respectées afin de réduire le risque d’incendie, d'électrocution
et / ou de préjudices corporels, y compris les suivantes :
14.
Tout retrait des couvercles au cours du processus
d'infusion risque d'engendrer des brûlures.
15.
Le conteneur à thé a été conçu pour une utilisation avec
cet appareil. Il ne doit jamais être utilisé sur une cuisinière.
16. Ne jamais placer le conteneur à thé chaud sur une
surface humide ou froide.
17. Ne jamais utiliser un conteneur à thé fissuré ou
dont la poignée est desserrée ou abimée.
18.
Ne jamais nettoyer le conteneur à thé avec de la poudre à nettoyer,
un tampon en laine de verre ou tout autre matériau abrasif.
19. Vérifier si le mortier à thé ne contient aucun corps
étranger avant toute utilisation.
CONSERVER CE MODE D'EMPLOI
Pour une utilisation domestique uniquement
AVERTISSEMENT
RISQUE D’INCENDIE OU D’ÉLECTROCUTION
NE JAMAIS OUVRIR
AVERTISSEMENT: AFIN DE RÉDUIRE LES RISQUES D'INCENDIE OU D'ÉLECTROCUTION,
NE JAMAIS RETIRER LE CAPOT (OU L'ARRIÈRE)
NE CONTIENT AUCUNE PIÈCE RÉPARABLE PAR L'UTILISATEUR
TOUTE RÉPARATION DOIT ÊTRE UNIQUEMENT EFFECTUÉE
PAR UN TECHNICIEN AGRÉÉ

INFORMATIONS QUE VOUS DEVEZ CONNAÎTRE
F-2
Veillez tout d'abord lire ce mode d'emploi avant toute utilisation de votre machine à thé.
Ce livret important vous donnera des explications sur la manière dont fonctionne
l'appareil et sur ce que vous devez savoir pour le faire fonctionner correctement.
L'exigence électrique consiste à utiliser une alimentation
électrique protégée 120 volt, 60 Hz, CA uniquement
et 15 amp. minimum. Il est conseillé d'utiliser un circuit
distinct desservant uniquement cet appareil.
Cet appareil est doté d'une fiche polarisée (une des lames
de contact est plus large que l'autre). Afin de réduire
tout risque d’électrocution, cette fiche ne peut être introduite
dans une fiche polarisée que d'une seule façon. Si la fiche ne
s'introduit pas complètement dans la prise, retournez-la. Si elle ne
rentre toujours pas dans la prise, contactez un électricien qualifié.
Ne jamais essayer de modifier la fiche de quelque façon que ce soit.
Toute modification à l'appareil non expressément
approuvée par la partie responsable de
l’homologation est susceptible d’entraîner la levée
du droit de l'utilisateur à utiliser l'appareil.
Remarque : cet appareil a été testé et s'est avéré
être conforme aux limites définies pour les appareils
numériques de classe B, en vertu de la section 15 de
la réglementation de la FCC. Ces limites sont conçues
pour assurer une protection adéquate contre les
interférences nuisibles dans une installation
résidentielle. Cet appareil génère, utilise et peut
émettre de l'énergie de fréquence radio et, en cas
d'installation ou d'utilisation non conforme aux
instructions, il est susceptible d'occasionner
des interférences nuisibles aux communications radio.
Cependant, il n’existe aucune garantie
qu'aucune interférence ne se produira dans une
installation particulière.
Si cet appareil engendre des interférences nuisibles
à la réception radio ou télévisée, ce qui peut être
déterminé en éteignant et rallumant l’appareil,
l'utilisateur est invité à essayer de corriger les
interférences en adoptant une ou plusieurs des
mesures suivantes :
・
Réorienter ou déplacer l'antenne de réception.
・
Augmenter la distance entre l'appareil et le receveur.
・
Brancher l'appareil sur une prise d’un circuit
différent de celui sur lequel le récepteur est connecté.
・
Demander l'aide du distributeur ou d'un technicien
radio / TV expérimenté
Exigences électriques
Un court cordon d’alimentation est fourni pour éviter de
s'emmêler ou de trébucher sur un cordon plus long.
Des rallonges peuvent être utilisées avec précautions.
En utilisant une rallonge, les caractéristiques électriques
mentionnées sur la rallonge doivent au moins être aussi
grandes que les caractéristiques de l'appareil et la
rallonge doit être installée de manière à ne pas dépasser
de comptoir ou de la table, d'où un enfant pourrait tirer
ou trébucher dessus.
Câble d’extension
1. Ne jamais toucher la fiche avec des mains mouillées
pour introduire ou retirer la prise du secteur. Brancher
correctement dans la prise murale et retirer en saisissant
l'extrémité de la fiche.
Ne jamais tirer uniquement sur le cordon.
2. Remplir le réservoir d'eau froide du robinet. Ne jamais
remplir le réservoir d'eau chaude ou de tout autre
liquide comme du lait, sauf si indiqué dans le mode
d'emploi pour le nettoyage de l'appareil.
Après une utilisation fréquente, le contenu minéral
de l'eau peut s'accumuler dans le tuyau et les autres
pièces de l'appareil. Dans ce cas, il est recommandé
de faire un détartrage. Se reporter à la page F-20.
3. L'appareil ne doit jamais rester sans
surveillance pendant l'utilisation.
4. Ne jamais déposer d'objets au-dessus de
l'appareil pendant l'utilisation.
Autres informations importantes relatives à la sécurité
5.
Ne jamais essayer de déplacer un appareil rempli de
liquides chauds. Laisser l’appareil refroidir
complètement avant de le déplacer.
Retirer le mortier à thé et le conteneur à thé avant de
le déplacer.
7. Ne pas essayer de modifier ou réparer l'appareil
vous-même.
8.
Pour éviter de vous brûler la peau quand l'eau est bouillante :
a. Ne pas toucher le conteneur à thé.
b. Ne pas rapprocher les mains ni le visage à la
buse vapeur.
9.
Ne pas mettre ni utiliser l'appareil directement au soleil.
10. Ne pas mettre ni utiliser l'appareil dans un
endroit où il serait éclaboussé par de l'eau.
11.
Ne pas insérer des objets dans les conduits d'entrée d'air.
12. Les pièces accessibles (par exemple le
conteneur à thé, le port de distribution d'eau
chaude) deviennent
chauffées pendant
l'utilisation.
Ne pas toucher
ces pièces durant
ou immédiatement
après l'opération.
Le port
de distribution
d'eau chaude
6. Ne pas utiliser l'appareil si le réservoir d'eau est
fissuré et/ou fuit. Contacter un FOURNISSEUR
AGRÉÉ DE SERVICE APRÈS-VENTE SHARP.
FRANÇAIS

Cordon d'alimentation
Levier de distribution de thé
Port de distribution de thé
Plateau à tasse
Soucoupe
Panneau de commande
Unité principale
Appuyer dessus pour sélectionner votre mode.
(Bouillant, chaud, Latte)
Appuyer sur le bouton STOP pour
annuler toute erreur faite lors de la
programmation ou arrêter une
opération. Appuyer dessus également
pour éteindre la machine à thé.
Appuyer dessus pour démarrer
une opération.Pour mettre l'appareil
en pause, appuyer de nouveau dessus
pendant le fonctionnement.
Témoin d'ébullition de l'eau
Clignote lorsque l’eau bout.
Conteneur à thé
Mortier à thé
Réservoir d'eau
Filtre à air
(Entrées d’air)
(VERROUILLER)
(DÉVERROUILLER)
(DÉVERROUILLER POUR DISTRIBUER DU THÉ)
Appuyez dessus
pour sélectionner
la quantité de feuilles
de thé à moudre.
Témoin du mode
Indique le mode sélectionné
(Bouillant, Chaud, Latte)
Témoin de quantité
Indique la quantité totale
de feuilles de thé à moudre.
PIÈCES ET MANIPULATION
VUE DE FACE
Bouton de retrait
du conteneur à thé
Verrou du levier de distribution de thé
(Se reporter à la page F-5)
Clignote lorsqu'il faut ajouter
du thé en poudre.
Clignote lorsque l'appareil est prêt.
Reste allumé pendant
le fonctionnement.
Couvercle
VUE DE DOS
F-3
(conteneur*)
Bouton GRIND (moudre)
(un bac de récupération est
installé sous le plateau à tasse)
Bouton MODE
Bouton STOP (arrêt)
Témoin POWDER IN (poudre à l'intérieur)
Bouton START / PAUSE
(démarrage / arrêt)
Indicateur START (démarrage)
Panneau de commande
Placer la
soucoupe ici.
*L'abréviation « conteneur » sera désormais utilisée dans ce mode d'emploi pour faire référence au conteneur à thé.
WATER ONLY
LOCK
UNLOCK

Poignée
Niveau
d’eau
Maintenir le bouton de retrait
du conteneur de thé enfoncé
et tirer délicatement le
conteneur vers vous.
Retrait
Capot du couvercle
Ajout de thé en poudre
Ajout de thé en poudre dans l'eau / lait
(pour le thé glacé et le latte)
Installation
Couvercle / capot du couvercle
Lame rotative
(avec un aimant)
Couvercle
Capot du couvercle
Poignée
Insérer correctement le
réservoir d'eau dans l'unité
principale.
Joint en caoutchouc
(ne jamais retirer)
eau
Attraper la poignée tout en
maintenant l’unité
principale avec l’autre main.
PIÈCES ET MANIPULATION
REMARQUES :
1. Les repères de niveau d'eau indiquent la quantité d'eau nécessaire
pour le nombre correspondant de tasses de thé infusé.
2.
Ne jamais remplir le réservoir d'eau au-dessus du repère MAX (4)
3. Ne jamais ajouter de liquides (lait, etc.) autres que de l'eau
froide du robinet dans le réservoir d'eau.
4. Ne pas ajouter d’eau dans le réservoir pendant le processus
d'ébullition. (si le nombre maximum de tasses est dépassé,
le conteneur de thé débordera.)
5. Ne jamais verser d'eau dans un réservoir placé sur l'unité principale.
6. Ne jamais retirer le réservoir d'eau de l'unité principale une fois rempli d'eau.
(Se reporter à la page F-18)
Deux types de lignes se trouvent à l'intérieur
du conteneur, 冷茶(thé glacé) et ラテ(latte)
MAX
REMARQUE :
Pour éviter toute brûlure, ne jamais retirer le
récipient alors que l’eau bout ou juste après.
Pousser le conteneur jusqu'à
le sentir cliquer en position.
1. Permet de maintenir la position
du conteneur dans l'unité
principale. Glisser le capot du
couvercle pour découvrir une
ouverture ovale sur le côté droit.
2. Ajouter du thé en poudre
dans le conteneur à travers
l'ouverture.
1. Retirer le conteneur
de l'unité principale.
2. Ouvrir le couvercle.
Ajouter le liquide et le
thé en poudre dans le
conteneur.
3. Remettre le couvercle
dans sa position initiale.
(ne jamais retirer)
F-4
REMARQUES :
1. Les repères indiquent la quantité d'eau / lait
nécessaire pour le nombre correspondant
de tasses de thé infusé.
2. Ne jamais remplir le conteneur au-dessus
de la ligne 4 pour le thé glacé et la ligne 3 pour le latte.
3. Ne jamais mettre de glace dans le conteneur.
4. Ne jamais verser d'eau / lait dans le conteneur
alors qu'il est inséré dans l'unité principal.
Retrait
Installation
Conteneur de thé
Réservoir d'eau
W
A
T
E
R
O
N
L
Y
WA
T
E
R
ON
L
Y
7. Après l'utilisation, vider le réservoir d'eau et laver le réservoir d'eau et le couvercle.
FRANÇAIS
Boîtier à thé
Molette de réglage du broyage (molette*)
Mortier inférieur
Spatule
Arbre
(NON retirable)
Mortier supérieur
(NON retirable)
Unité supérieure du mortier
Couvercle
Retourner le boîtier
à thé pour retirer la
spatule.
Saillie de la molette
Ligne blanche sur le boîtier à thé
①
②
③
④
⑤
PIÈCES ET MANIPULATION
Mortier à thé
Lors du démontage du thé mortier, retirer toutes les pièces suivantes dans l'ordre indiqué ci-après.
(Se reporter à la page F-21 pour le montage)
Démontage
Tourner la molette vers la gauche jusqu'au clic.
(la saillie de la molette doit être alignée avec la ligne
blanche du boîtier à thé)
F-5
*L'abréviation « molette » sera désormais utilisée dans ce
mode d'emploi pour faire
Orienter le mortier à thé dans la bonne position
et le placer correctement sur le réceptacle.
(Veiller à retirer tout objet laissé sur le
réceptacle et le fond du mortier à thé)
Récepteur
Soulever et éloigner le mortier à thé
de l'unité principale.
Après le broyage, retirer tout d'abord
le couvercle. Utiliser le couvercle pour
recouvrir le dessous du mortier à thé et
attraper l'excédent de thé en poudre.
→
Face
d'insertion
Grande (pour les feuilles de thé)
Petite (pour thé en poudre)
(un de chaque est inclus)
・Brosse de nettoyage
(pour le thé à mortier)
・Mode d'emploi
(avec garantie)
・Livret de recettes
・Cuillère à thé
Installation
Retrait
Couvercle
Vous pouvez régler la machine à thé sur silencieux.
Tout d'abord, veillez à ce que la machine à thé soit bien branchée.
Marche / arrêt du son
Bonne direction
Pour mettre la machine à thé sur silencieux, appuyer et maintenir le bouton START enfoncé jusqu'au signal sonore.
Pour annuler le réglage de silencieux, appuyer et maintenir le bouton START enfoncé jusqu'au signal sonore.
REMARQUES :
1. Le réglage du son sera enregistré en mémoire même si le courant est coupé ou l'appareil débranché.
2. Les signaux d'alarmes restent actifs, même si le son est à l'arrêt.
F-6
PIÈCES ET MANIPULATION
Couvercle
Accessoires
FRANÇAIS

*
Moudre (mortier à thé)
Bouillir
(Réservoir d'eau)
Quantité*
Durée
Ingrédients à préparer
1〜4 tasses
Thé bouillant
Boisson
Thé glacé
Latte
Utiliser du lait entier. Le lait à faible teneur en graisse
et le lait écrémé ne produisent pas assez de mousse.
・
Thé en poudre** (0,02 à 0,085 oz / 0,6 à 2,4 g)
・
・
Feuilles de thé** (0,035 à 0,1 oz / 1,0 à 2,8 g)
・
1〜3 tasses
・
・
1〜4 tasses
・
・
Mélanger
(conteneur de thé)
NE JAMAIS UTILISER LE RÉSERVOIR D'EAU.
CARACTÉRISTIQUES DE LA MACHINE À THÉ
F-7
Pour faire bouillir de l'eau froide
Pour transformer des feuilles de thé en poudre.
Le réglage de la molette permet d'avoir deux
types de thé en poudre.
FINE (fin) : Pour boire
COARSE (grossier): Pour la cuisine
Pour faire du thé avec de l'eau
chaude / froide ou du lait
chaud / froid
Bouillir et mélanger :
3 à 5 min
Eau (remplir le réservoir d'eau au niveau
souhaité)
Moudre, bouillir et
mélanger :
3 min 30 sec à
7 min 25 sec
Mélanger :
Environ 1 min 30 sec
Mélanger :
Environ 1 min 30 sec
Eau (remplir le réservoir d'eau au niveau
souhaité)
Thé en poudre** (0,02 à 0,085 oz / 0,6 à 2,4 g)
Lait (remplir le conteneur jusqu'à la ligne ラテ
[Latte] souhaitée)
Thé en poudre** (0,07 à 0,2 oz / 2 à 6 g)
Eau froide (remplir le conteneur jusqu'à la
ligne 冷茶 [thé glacé] souhaitée)
NE JAMAIS UTILISER LE RÉSERVOIR D'EAU.
1 tasse (niveau / ligne 1) : environ 5,1 oz / 150 mL, 2 tasses (niveau / ligne 2) : environ 9,6 oz / 285 mL
3 tasses (niveau / ligne 3) : environ 14,2 oz / 420 mL, 4 tasses (niveau / ligne 4) : environ 19 oz / 560 mL
On peut préparer du thé chaud tout en moulant les feuilles de thé. (Se reporter à la page F-13)
En plus, on peut préparer du latte ou du thé glacé tout en moulant les feuilles de thé.
L'appareil ne dispose pas d'une fonction de rétention de chaleur. Les saveurs seront idéales juste après la
préparation de la boisson.
Vous pouvez essayer les différentes idées données dans notre carnet de recettes qui contient des recettes
de thés, lattes, plats et desserts sucrés.
・
・
・
** Pour le thé vert. La quantité variera en fonction du type de feuilles de thé.
Réglages de la molette
~ Pour Matcha authentique ~
1 tasse Bouillir et mélanger:
Environ 1 min
・Matcha en poudre (0,1oz / 3,0g)
・Eau (remplir le réservoir d'eau au niveau 1)
~ Pour Matcha authentique ~
1 tasse Mélanger:
Environ 1 min 30 sec
・Matcha en poudre (0,1oz / 3,0g)
・Eau froide (remplir le conteneur jusqu'à la
ligne 冷茶 [thé glacé] 1)

●
Ne jamais utiliser avec un brûleur à gaz ou électrique ou dans un micro-ondes.
La chaleur le déformera ou le fera fondre.
●
●
●
●
●
●
Mortier à thé
●
Le thé japonais, le thé chinois et le thé noir peuvent être utilisés. Les éléments suivants peuvent
provoquer une panne mécanique :
・Le thé ne contient pas uniquement des feuilles de thé (par ex : thé de riz brun)
・Le mortier à thé ne peut pas moudre les feuilles longues de thé. (vous pouvez les utiliser en les
découpant en petits morceaux)
・
Feuilles de thé déjà transformées en poudre.
●
●
Ne jamais essayer de moudre les feuilles de thé mouillées.
F-8
AVANT TOUTE UTILISATION
・Un thé fabriqué avec autre chose que des feuilles de thé (par ex : thé à l'orge, thé à haricots noirs)
Pour plus d’informations, consulter le Carnet de recettes.
Ranger les feuilles de thé dans une boîte à thé. Les boîtes à thé métalliques sont recommandées.
Placer le couvercle et le capot du couvercle correctement pour faire votre boisson.
Sinon, les contenus du conteneur risquent d'éclabousser pendant le mélange.
L'intérieur du conteneur est revêtu de fluorine.
Ne jamais rayer le revêtement pour prolonger sa durée de vie.
La lame rotative est dotée d'un aimant à sa base.
Ne jamais placer de tasse à proximité d'objets sensibles aux aimants.
Ne jamais placer sur ou à proximité d'un brûleur à gaz ou électrique ou toute autre surface à haute température.
La chaleur le déformera ou le fera fondre.
●
Après l'utilisation, vider le réservoir d'eau et laver le réservoir d'eau et le couvercle.
Les mortiers supérieurs et inférieurs sont fabriqués en céramique. Tout choc extrême les casserait.
Les manipuler avec précautions.
Toujours sécher correctement après le nettoyage.
1. Déballez soigneusement votre machine à thé et retirez tous les matériaux d'emballage.
2. Placer la machine à thé sur une surface plane et solide.
3. Nettoyer le conteneur et l’insérer dans l’unité principale.
4. Nettoyer le réservoir d'eau. Le remplir d'eau froide du robinet jusqu’au repère MAX.
Ne jamais dépasser le repère MAX. Placer le couvercle et l’insérer dans l’unité principale.
5. Appuyer une fois sur la touche Mode, puis appuyer sur la touche START (démarrage).
6. Au bout de 4 bips, placer la tasse sur le plateau à tasse sous le conteneur. Déverrouiller le levier de
distribution de thé. Faire descendre le levier de distribution de thé et remplir la tasse. Jeter l'eau.
7. Verser et jeter l'eau chaude jusqu’à qu'il n'y ait plus d'écoulement par le bec verseur .
Avant la première utilisation
Points à retenir
Conteneur de thé
Réservoir d'eau
Feuilles de thé
FR
ANÇ
AIS

Ajouter lentement des feuilles de thé dans le mortier à thé à l'aide d'une grande cuillère.
Placer le couvercle sur le mortier à thé.
Pour utiliser du thé en poudre
pour cuisiner, régler la
molette sur COARSE.
Placer la soucoupe.
Retirer le couvercle du mortier à thé.
Retirer ensuite le mortier à thé et le placer
sur le couvercle.
1
2
(Le mortier est initialement réglé sur COARSE)
1
1
2
Couvercle
Grande cuillère à café
MOUDRE LES FEUILLES DE THÉ
F-9
* dans le cas où vous souhaitez moudre du thé pour 2 tasses.
33
34
Régler la molette sur FINE (fin) et placer le
mortier à thé sur le réceptacle.
Quantité
Thé en poudre*
Durée
(1 tasse)
(2 tasses)
(3 tasses)
(4 tasses)
Environ 0,02 oz / 0,6 g
Broyage
Feuilles de thé
1/2 cuillère
Légèrement
moins qu'1 cuillère
Légèrement plus
qu'une cuillère
1 1/2 cuillère
3 1/2 cuillères
(Moudre plus)
Environ 1 min 40 sec
Environ 0,04 oz / 1,2 g
Environ 3 min 15 sec
Environ 4 min 50 sec
Environ 6 min 25 sec
Environ 15 min
Environ 0,06 oz / 1,8 g
Environ 0,08 oz / 2,4 g
Environ 0,21 oz / 6,0 g
* Avec du thé vert, la quantité variera en fonction du type de feuilles de thé.

●
ひ
●
Taper sur le couvercle du
mortier à thé pour retirer le
thé en poudre du fond du
mortier à thé.
●
Si vous n'utilisez pas le thé
en poudre immédiatement,
rangez-le dans votre réfrigérateur
dans un récipient hermétique.
Il estconseillé d'utiliser le thé
en poudre le plus tôt possible.
●
1→2→3→4→MAX→
off
:0 à 1 min 39 sec
:1 min 40 sec à
3 min 14 sec
:3 min 15 sec à
4 min 49 sec
:4 min 50 sec à
6 min 24 sec
:6 min 25 sec à
15 min
ひ
ひ
MOUDRE LES FEUILLES DE THÉ
F-10
35
36
35
36
Appuyer une fois sur le bouton START. Le mortier à thé
commencera à moudre les feuilles de thé. La poudre de thé
moulue sera récupérée dans la soucoupe.
Brancher l’appareil dans une prise de courant.
Sélectionnez la quantité en appuyant
deux fois sur la touche GRIND.
×2
×1
Le témoin de quantité
changera à chaque fois que
vous appuierez sur GRIND.
37
Après que le broyage soit terminé,
4 bips retentiront et le mortier à thé
s'arrêtera automatiquement.
Taper sur le couvercle du mortier
à thé et retirer la soucoupe.
En appuyant sur le bouton
GRIND pendant l'opération,
le témoin de quantité lumineux
indiquera la durée restante.
S'il reste encore des feuilles de thé dans le mortier, appuyer une fois sur
les boutons GRIND et START.
En appuyant sur la touche GRIND, il arrive parfois que les témoins de quantité clignote et que les signaux
d'alarme retentissent. Cela signifie qu'une période de refroidissement est nécessaire pour éviter la surchauffe
des composants électriques. Se reporter à la page F-24 et laisser refroidir le mortier à thé.
Après avoir utilisé l'appareil, débrancher la fiche de la prise de courant et procéder au nettoyage ou à l'entretien.
REMARQUE :
Ne jamais broyer à nouveau du thé déjà en poudre dans le mortier à thé.
Problèmes avec le broyage continu de feuilles de thé
FRANÇAIS

●
[Quantité de thé en poudre*]
Pour le thé vert
Pour le Matcha authentique
1 tasse… 1 cuillère à café
1 tasse… 5 cuillères à café
2 tasses…2 cuillères à café
3 tasses…3 cuillères à café
4 tasses…4 cuillères à café
Mesurer le thé en poudre
avec une cuillère
à dosage.
FAIRE DU THÉ BOUILLANT
F-11
34
Veiller à ce que le conteneur soit vide et l’insérer dans
l’unité principale.
31
Il existe deux manières de faire du thé bouillant (HOT) ou chaud (WARM) :
Essuyer toute trace
d'humidité avant
d’insérer le conteneur.
* Dans le cas où vous souhaitez faire 2 tasses de thé bouillant.
Remplir le réservoir d'eau au niveau 2 d’eau douce froide et l'insérer
dans l'unité principale.
Ouvrir le capot du couvercle du container en le faisant coulisser dans
le sens horaire.
Avec une petite cuillère à café, ajouter du thé en poudre dans le
conteneur
de thé à travers l'ouverture ovale.
Fermer le capot du couvercle.
* La quantité variera en fonction
du type de feuilles de thé.
Voir le livret de recettes inclus.
1. Faire bouillir et mélanger : faire un thé avec du thé en poudre préalablement moulu.
2. Moudre, faire bouillir et mélanger : pour faire bouillir l'eau tout en moulant des feuilles de thé.
La température du thé chaud est inférieure de 59 à 68 F° (15 à 20 C°) que celle du thé bouillant.
32
33
1. Bouillir et mélanger :
WATER ONLY
WATER ONLY
●
Ajuster la quantité de thé
en poudre en fonction
de votre goût.

●
●
La durée varie en fonction
de la température de l'eau.
(BOUILLANT)
HOT
→
(CHAUD)
WARM
→
LATTE
→
ARRÊT
●
Avant de verser le thé,déverrouiller le
verroudu levier de distribution de thé.
Une fois le thé versé, le verrouiller à
nouveau pour votre sécurité.
LOCK
UNLOCK
FAIRE DU THÉ BOUILLANT
F-12
35
Brancher l’appareil dans une prise de courant.
Sélectionner HOT en appuyant une fois sur la touche MODE.
36
Appuyer une fois sur le bouton START.
La machine à thé commencera à chauffer l'eau.
L'eau bouillie se videra automatiquement dans
le conteneur et mélangée avec le thé en poudre.
35
36
x1 x1
Le témoin de mode changera
à chaque fois que vous appuierez
sur MODE.
●
Pour faire un thé chaud, appuyer
deux fois sur MODE à l'étape 5.
Une fois le thé prêt, 4 bips retentiront et la machine à thé s'arrêtera automatiquement.
Placer une tasse de thé sur le plateau à tasse sous le conteneur.
Déverrouiller le verrou du levier de distribution de thé.
Faire descendre le levier de distribution de thé et verser le thé.
37
Après avoir utilisé l'appareil, débrancher la fiche de la prise de courant et procéder au nettoyage ou à l'entretien.
REMARQUE :
La totalité de l'eau dans le réservoir sera automatiquement vidée dans le conteneur.
Le conteneur risque de déborder s'il est encore plein avant l'infusion.
FRANÇAIS

Grande cuillère à café
●
●
Le volume de thé en poudre
obtenu peut être moindre lors
de la première utilisation de
l'appareil ou après un
nettoyage / entretien.
Pour moudre une ou deux
cuillères à café de
feuilles de thé,ajouter une
cuillère à café de feuilles
de thé supplémentaire.
F-13
FAIRE DU THÉ BOUILLANT
* Dans le cas où vous souhaitez moudre des feuilles de thé et faire 2 tasses de thé bouillant en même temps.
Placer la soucoupe.
Retirer le couvercle du mortier à thé. Retirer ensuite le
mortier à thé et le placer sur le couvercle.
1
2
Veiller à ce que le conteneur soit vide et l’insérer dans
l’unité principale.
33
●
Essuyer toute trace
d'humidité avant d’insérer
le conteneur.
Remplir le réservoir d'eau au niveau 2 d’eau douce froide et
l'insérer dans l'unité principale.
34
(Le mortier est initialement réglé sur
COARSE)
Régler la molette sur FINE (fin) et placer le mortier
à thé sur le réceptacle.
35
Ajouter lentement des feuilles de thé dans le mortier à thé à
l'aide d'une grande cuillère. Placer le couvercle sur le mortier à thé.
36
Se reporter à la page F-9
pour mesurer la quantité
de feuilles de thé.
2. Moudre, bouillir et mélanger :
WAT
ER
O
NL
Y
W
A
TE
R
O
NL
Y
1
1
2
3
Couvercle

Petite cuillère à café
…environ 2 min
…
environ 3 min 20 sec
…environ 5 min
…
environ 6 min 40 sec
[Durée pour faire le thé]
…
environ 15 min 30 sec
●
●
La surface du conteneur sera
chaude. Veillez à ne pas vous
brûler au moment d'ajouter le
thé en poudre dans le conteneur.
ひ
F-14
FAIRE DU THÉ BOUILLANT
37
Brancher l’appareil dans une prise de courant.
Sélectionner la quantité en appuyant deux fois sur la touche GRIND.
Sélectionner HOT en appuyant une fois sur la touche MODE.
38
Appuyer une fois sur le bouton START. Le mortier à thé
commencera à moudre les feuilles de thé et l'eau à chauffer.
39
37 38
39
x1 x1x2
Après que le broyage soit terminé,
4 bips retentiront et le mortier à thé
s'arrêtera automatiquement.
Taper sur le couvercle du mortier à
thé et retirer la soucoupe.
3
10
Quand «POWDER IN» clignotera, ouvrir le capot du couvercle
du container en le faisant coulisser dans le sens horaire.
Avec une petite cuillère à café, ajouter du thé en poudre dans le
conteneur à travers l'ouverture ovale.
Fermer le couvercle puis appuyer une fois sur la touche START.
La machine à thé commencera à mélanger l'eau chaude et le thé en poudre.
3
11
×1
Une fois le thé prêt, 4 bips retentiront et
la machine à thé s'arrêtera automatiquement.
Placer une tasse de thé sur le plateau
à tasse sous le conteneur.
Déverrouiller le verrou du levier de
distribution de thé. Faire descendre le
levier de distribution de thé et
verser le thé.
3
12
●
Avant de verser le thé, déverrouiller
le levier de distribution de thé.
Une fois le thé versé, le verrouiller
à nouveau pour votre sécurité.
Après avoir utilisé l'appareil, débrancher la fiche de
la prise de courant et procéder au nettoyage ou à l'entretien.
Pour faire un thé chaud,
appuyer deux fois sur
MODE à l'étape 8.
« POWDER IN » clignotera et indiquera le moment
où le thé en poudre doit être ajouté dans le conteneur.
●
Appuyer sur le START dans
les 30 minutes qui suivent le
moment où « POWDER IN » clignote.
REMARQUE :
La totalité de l'eau dans le réservoir sera automatiquement vidée dans le conteneur. Le conteneur risque de
déborder s'il reste du liquide dedans après l'infusion.
FRANÇAIS
LOCK
UNLOCK

●
Verser tout d'abord le lait
dans le conteneur pour
obtenir un latte à la texture
onctueuse.
[Quantité de thé en poudre*]
●
Ne jamais
utiliser le
réservoir
d'eau.
●
Le lait froid placé au
réfrigérateur peut également
être utilisé.
●
Veillez à ne pas vous brûler
au moment de verser le lait
chauffé dans le conteneur.
1 tasse … 3 à 4 cuillères à café
2 tasses … 6 à 7 cuillères à café
3 tasses … 10 cuillères à café
●
FAIRE UN LATTE
F-15
31
Vous pouvez faire un latte en mélangeant du lait avec le thé en poudre moulu à l'avance.
* Dans le cas où vous souhaitez faire une tasse de latte de thé vert.
Ouvrir le couvercle du conteneur. Verser la quantité de lait chaud
souhaitée (pour 1 tasse, remplir jusqu'à la ligne 1 de ラテ [latte])
32
Ajouter du thé en poudre dans le conteneur avec une petite cuillère
(pour 1 tasse, ajouter 3 à 4 cuillères à dosage)
31
Petite cuillère à café
32
33
Fermer le couvercle et insérer le conteneur dans l’unité principale.
33
Brancher l’appareil dans une prise de courant.
Sélectionner LATTE en appuyant 3 fois sur la touche MODE.
35
36
x3 x1
Appuyer une fois sur le bouton START.
La machine à thé commencera le mélange.
34
35
34
Une fois le latte prêt, 4 bips retentiront et
la machine à thé s'arrêtera automatiquement.
Placer une tasse de thé sur le
plateau à tasse sous le conteneur.
Déverrouiller le levier de
distribution de thé.
Faire descendre le levier de
distribution de thé pour verser le thé.
Avant de verser le thé, déverrouiller
le verrou du levier de distribution
de thé.Une fois le thé versé,
le verrouiller à nouveau.
Après avoir utilisé l'appareil, débrancher la fiche de la prise de courant et procéder au nettoyage ou à l'entretien.
Mesurer la quantité de thé
en poudre avec des petites
cuillères à dosage.
Pour le thé vert
*
La quantité variera en fonction
du type de feuilles de thé.
Voir le livret de recettes inclus.
REMARQUES
1. La mousse qui reste dans le conteneur peut être récupérée pour garnir le latte.
Ne pas utiliser de cuillère métallique.
2. Ne jamais utiliser de thé conservé à température ambiante.
3. La qualité de la mousse variera en fonction de la température, ou du type de feuilles de thé ou de lait.
●
Ajuster la quantité de thé
en poudre en fonction
de votre goût.
WAT
ER ONLY
LOCK
UNLOCK

Petite cuillère à café
●
F-16
FAIRE DU THÉ GLACÉ
31
Vous pouvez faire un thé glacé en mélangeant de l'eau froide avec le thé en poudre moulu à l'avance.
* Dans le cas où vous souhaitez faire une tasse de thé glacé.
Ouvrir le couvercle du conteneur. Verser la quantité souhaitée
d'eau froide (pour 1 tasse, remplir jusqu'à la ligne 1 de 冷茶 [thé glacé])
32
Ajouter du thé en poudre dans le conteneur avec une petite cuillère
(pour 1 tasse, ajouter 1 cuillère à dosage)
33
Fermer le couvercle et insérer le conteneur dans l’unité principale.
Ne jamais
utiliser le
réservoir
d'eau.
31
32
33
Brancher l’appareil dans une prise de courant. Sélectionner
LATTE en appuyant 3 fois sur la touche MODE.
35
36
x3 x1
Appuyer une fois sur le bouton START.
La machine à thé commencera le mélange.
34
35
34
Une fois le thé prêt, 4 bips retentiront
et la machine à thé s'arrêtera
automatiquement. Placer une
tasse de thé sur le plateau à
tasse sous le conteneur.
Déverrouiller le levier de
distribution de thé.
Faire descendre le levier de distribution
de thé pour verser le thé.
●
Avant de verser le thé, déverrouiller
le levier de distribution de thé.
Une fois le thé versé, le verrouiller
à nouveau pour votre sécurité.
Après avoir utilisé l'appareil, débrancher la fiche de la prise de courant et procéder au nettoyage ou à l'entretien.
●
Verser tout d'abord l'eau dans
le conteneur pour obtenir un
thé glacé à la texture onctueuse.
[Quantité de thé en poudre*]
1 tasse … 1 cuillère à café
2 tasses … 2 cuillères à café
3 tasses … 3 cuillères à café
4 tasses … 4 cuillères à café
Mesurer la quantité de thé
en poudre avec des petites
cuillères à dosage.
Pour le thé vert
* La quantité variera en
fonction du type de feuilles
de thé.
Voir le livret de recettes inclus.
WAT
ER ONLY
●
Ajuster la quantité de thé
en poudre en fonction
de votre goût.
FRANÇAIS
Pour le Matcha authentique
1 tasse … 5 cuillères à café
LOCK
UNLOCK
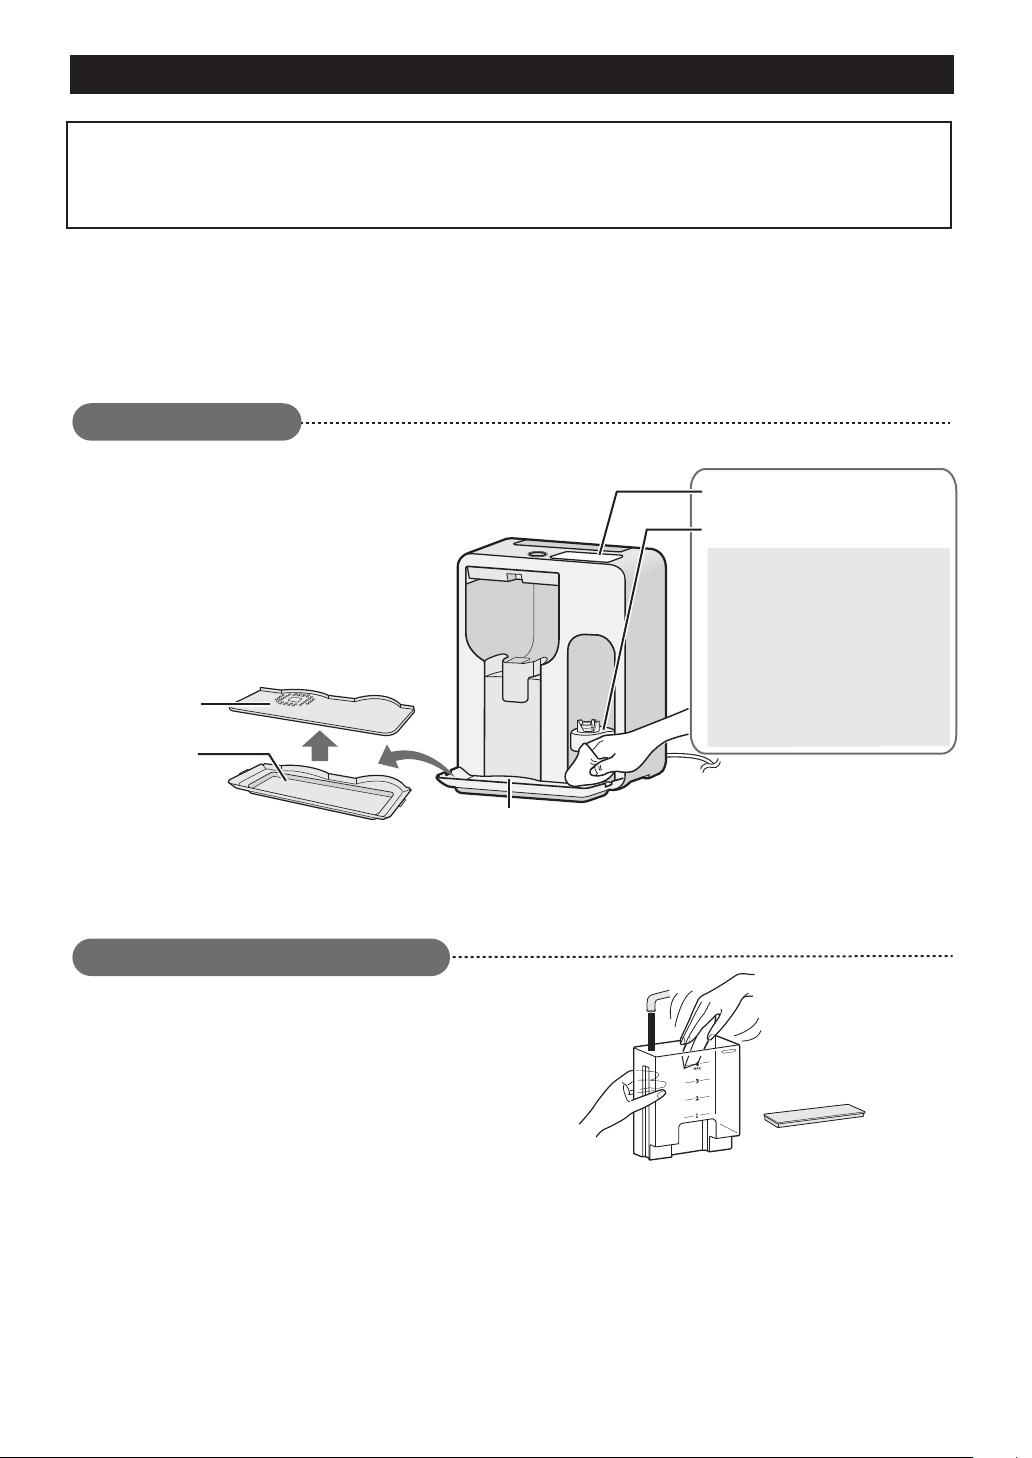
Réceptacle
Panneau de commande
À l'aide d'un chiffon doux humidifié d'eau uniquement,
essuyer délicatement pour nettoyer le panneau.
Éviter d'utiliser trop d’eau. Ne jamais utiliser de
détergents chimiques ou abrasifs.
Retirer le plateau à tasse et le bac de récupération.
Essuyer la plaque de base.
Bac de
récupération
Plateau à
tasse
Réservoir d'eau / Couvercle
Plaque de base
ENTRETIEN ET NETTOYAGE
F-17
Éteindre la machine à thé avant le nettoyage. La débrancher et la laisser refroidir complètement.
Un technicien agréé devra procéder à toute autre réparation, à l'exception des cas
spécifiques détaillés dans le mode d'emploi.
ATTENTION: ne jamais utiliser de détergents disponibles dans le commerce, d'abrasifs,
de détergents corrosifs, des solutions qui contiennent du hydroxyde de sodium ou de tampons
abrasifs sur les pièces de la machine à thé.
Ne jamais utiliser de lave-vaisselle pour nettoyer la machine à thé.
Être extrêmement prudent lors
du nettoyage du panneau de
commande et du réceptacle.
À l'aide d'un chiffon doux humidifié
d'eau uniquement, les essuyer
délicatement pour les nettoyer.
Éviter d'utiliser trop d’eau.
Ne jamais utiliser de détergents
chimiques ou abrasifs.
Après utilisation, laver avec un savon doux ou une solution
détergente avec un chiffon doux ou une éponge humide.
Rincer et sécher. Ne jamais laver dans un lave-vaisselle.
Ne jamais utiliser de détergents corrosifs, grattoirs métalliques
ou de brosses à poils durs sur le réservoir d'eau et le couvercle.
Unité principale
WA
T
E
R
ON
LY
Après utilisation
Après utilisation

Plateau à tasse Soucoupe
Lame
rotative
Joint en caoutchouc
Couvercle
Conteneur
UNLOCK
Bac de récupération
Levier de distribution de thé
ENTRETIEN ET NETTOYAGE
F-18
Laver à l'eau chaude ou froide avec une éponge douce et laisser sécher.
Pour les écoulements et tâches plus importants, utiliser un savon doux ou une solution détergente.
Laver à l'eau chaude ou froide avec une éponge douce et
laisser sécher. Retirer la lame rotative dans le conteneur.
Pour les écoulements et tâches plus importants,
utiliser un savon doux ou une solution détergente.
Pour les tâches de thé, utiliser un agent de blanchiment oxygéné.
Nettoyer le pourtour du joint en caoutchouc à l'eau courante
tout en maintenant le levier de distribution de thé vers le bas.
Toute saleté restante peut engendrer des fuites d'eau.
Veiller à déverrouiller le levier de distribution
de thé avant le nettoyage.
REMARQUES :
1. Si le joint en caoutchouc est retiré, déverrouiller le levier de distribution de thé, maintenir le levier vers le bas et
remettre correctement le joint en caoutchouc au bas du conteneur. Ensuite remplir le conteneur d'eau pour
vérifier s'il y a des fuites d'eau.
2. Ne jamais forcer pour retirer le joint en caoutchouc et le couvercle.
Lame rotative
Retrait
Extraire doucement la lame rotative. (elle peut être fermement
fixée au conteneur)
Projection
Installation
Pousser avec précautions la lame rotative sur la projection situé
au fond du conteneur.
REMARQUE :
Pour éviter un mauvais positionnement ou l'avalement accidentel, ne pas oublier de réinstaller la lame
rotative après le nettoyage.
Soucoupe / Plateau à tasse / Bac de récupération
Conteneur de thé
Après utilisation
Après utilisation
FRANÇAIS
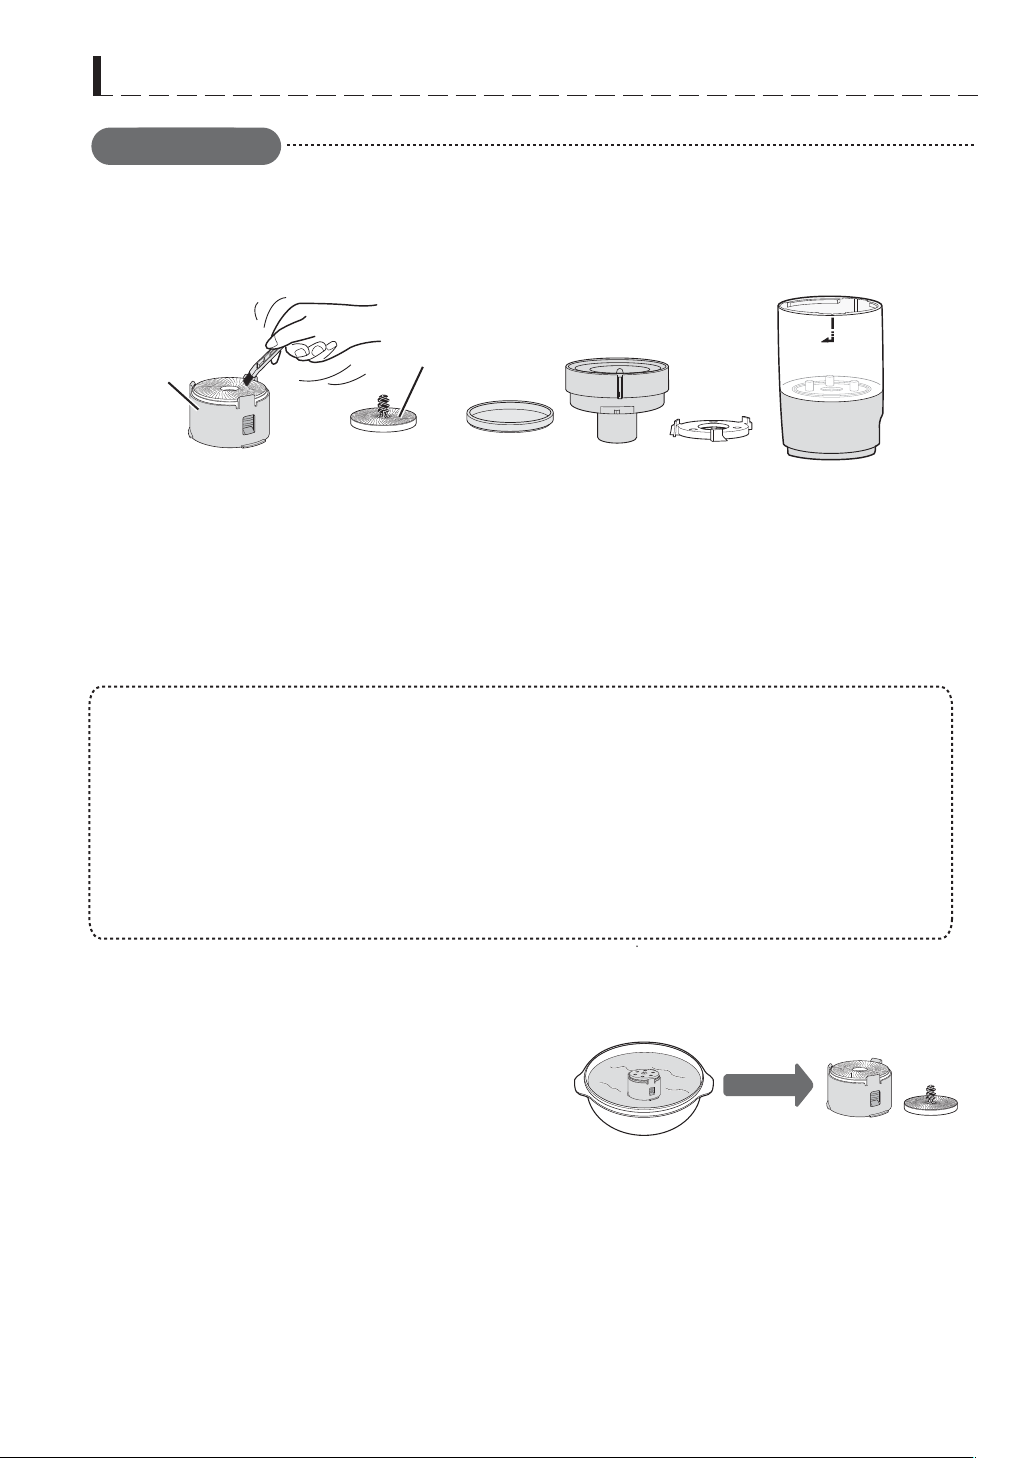
●
●
●
Après utilisation
Lorsque l'unité supérieure du mortier et le mortier inférieur sont collés ensemble
Les retirer avec force risque d'endommager l'appareil.
Les immerger dans de l'eau chaude et attendre qu'ils
se détachent facilement.(temps de repos : 2 à 3 min)
REMARQUE :
N'utiliser jamais la force pour démonter l'unité supérieure du mortier et le mortier inférieur.
Mortier à thé
Entretien mensuel
2 to 3min
Unité
supérieure
du mortier
Mortier inférieur
●
●
F-19
ENTRETIEN ET NETTOYAGE
Démonter le mortier à thé. (Se reporter à la page F-5) Retirer le thé en poudre restant avec la brosse de
nettoyage incluse. Après le nettoyage, remonter les pièces. (Se reporter à la page F-21)
Démonter le mortier à thé.
(Se reporter à la page F-5)
Retirer le thé en poudre restant avec la brosse de nettoyage
incluse.
Ensuite, laver avec un savon doux ou une solution détergente avec une éponge douce humide.
Rincer et sécher complètement.
Dans les cas suivants, effectuer l'entretien avant qu'un mois se soit écoulé.
L’unité supérieure du mortier et le mortier inférieur semblent être obstrués et le thé en poudre
est extrait avec difficulté.
●
Vous souhaitez moudre un différent type ou saveur de feuilles de thé.
Tous les témoins de quantité clignotent et l'appareil arrête de moudre.
(il se peut que l'unité supérieure du mortier et le mortier inférieur soient collés ensemble)
Un son inhabituel est émis pendant le meulage.
Le mortier à thé est extrêmement sale.
Vous n'utiliserez pas l'appareil pendant longtemps.
Une fois séparés, retirer le thé en poudre à l’aide
de la brosse de nettoyage incluse et nettoyer et sécher
complètement. Après le séchage, remonter les pièces. (Se reporter à la page F-21)
IMPORTANT :
Laisser le mortier à thé sécher à l'air libre (8 heures ou plus) même après avoir retiré
l'humidité avec un chiffon sec. En présence d'humidité, le thé en poudre risque de
s'engorger sur la surface des mortiers à thé supérieur et inférieur.
Ceci réduira la quantité de thé en poudre produite.
Remarque spéciale pour le nettoyage du mortier à thé :
Lors du séchage, ne jamais utiliser de lave-vaisselle ou de micro-ondes, etc.
Ces appareils peuvent endommager les composants.

1. Remplir d'eau froide le réservoir d'eau jusqu'au repère MAX.
Ne jamais dépasser le repère MAX.
Après une utilisation fréquente, le contenu minéral de l'eau peut s'accumuler dans le tuyau et les autres
pièces de l'appareil. C'est ce qui s'appelle le « tartre ». Si le tartre devient problématique, l'eau
commencera à prendre plus de temps pour bouillir ou restera dans le réservoir d'eau. Retirer toute
accumulation de tartre en utilisant la méthode suivante :
Filtre à air
Appuyer sur la languette
vers la droite.
(temps d’ébullition : environ 5 min)
Languette
InstallationRetrait
Insérer les 2 languettes du panneau du
filtre à air dans les fentes correspondantes
sur l'unité principale. Appuyer sur le filtre à
air jusqu'à ce qu'il s'emboîte.
Fentes
Languettes
Entretien mensuel
2. Dissoudre 1 cuillère à soupe de cristaux d'acide citrique dans l'eau.
Bien mélanger. Placer le couvercle et l’insérer dans l’unité principale.
3. Insérer le conteneur vide dans l’unité principale. Brancher l'appareil.
4. Appuyer une fois sur la touche MODE, puis ensuite sur la
touche START (démarrage).
5. Après 4 bips, retirer le conteneur et jeter l'eau chaude.
6. Remplir d'eau froide le réservoir d'eau jusqu'au repère MAX
et placer le couvercle. Insérer le
réservoir d'eau dans l’unité principale.
7. Insérer le conteneur vide dans l’unité principale.
8. Appuyer une fois sur la touche MODE, puis ensuite sur la
touche START (démarrage).
9. Après 4 bips, retirer le conteneur et jeter l'eau chaude.
10.
Répéter les étapes 6 à 9 deux ou trois fois.
Après avoir utilisé l'appareil, débrancher la fiche de la prise de courant.
ENTRETIEN ET NETTOYAGE
F-20
Retirer le panneau du filtre arrière à l'arrière de l'unité principale. Laver à l'eau chaude ou froide et sécher
avec un chiffon. Réinstaller sur l'unité principale immédiatement.
Avertissement :
Quand vous jetez l'eau chaude, faites attention de ne pas vous brûler.
Enlever le couvercle lorsque vous utilisez la manique.
REMARQUE :
Détartrage
W
A
T
E
R
O
N
L
Y
W
A
T
E
R
O
N
L
Y
1. L'intervalle de détartrage variera en fonction du contenu minéral dans l'eau. Si vous utilisez de l'eau
avec une forte teneur en minéraux, il est recommandé de faire le détartrage régulièrement.
2. De nombreuses pharmacies vendent de l'acide citrique pur.
FRANÇAIS

Correspondance
1
2
1
2
3
Mortier inférieur
Spatule
Boîtier à thé
Unité supérieure du mortier
Il y a trois “ ” sur l'unité supérieure du mortier. Faire correspondre l'un d'eux avec la ligne
blanche « | » du boîtier à thé.
Trou
Partie saillante
Fond du mortier inférieur
F-21
ENTRETIEN ET NETTOYAGE
Montage du mortier à thé
Positionner le côté « オモテ [avant] » de la spatule dirigée vers le haut et l'insérer dans le boîtier à thé.
Assurez-vous d’aligner les trous de la spatules avec les protubérances du boîtier à thé.
Insérer le mortier inférieur dans le boîtier à thé. ( -a) Aligner les trous sur le fond du mortier inférieur avec
les saillies, en tournant doucement le mortier inférieur jusqu'à son insertion. ( -b)
2
-a
-b
Placer l'unité supérieure du mortier sur le mortier inférieur.
Aligner le haut du mortier “ ” et la ligne blanche du boîtier à thé « ».
REMARQUE :
Veiller à placer la face
« オモテ (avant) de la
spatule vers le haut
Partie saillante
Trou
2
2

4
5
Couvercle
Molette
●
●
●
Correspondance
F-22
ENTRETIEN ET NETTOYAGE
Insérer la molette dans le le boîtier à thé afin que la saillie de la molette s'aligne avec la ligne
blanche du boîtier à thé.
Puis presser la molette dans le boîtier à thé et la tourner dans le sens horaire.
Saillie de la molette
Ligne blanche sur le
boîtier à thé
REMARQUES :
1. Si vous ne pouvez pas insérer la molette, cela signifie que les étapes à n’ont pas été
effectuées correctement.
Remonter le mortier à thé de l'étape en faisant attention à ce qui suit :
2. Nous vous recommandons de positionner la molette sur « COARSE » lors du rangement du
mortier à thé.
(Ceci empêche l'unité supérieure du mortier et le mortier inférieur de coller ensemble.)
Spatule: veiller à ce que la face « オモテ [avant] » soit vers le haut.
Mortier inférieur : veiller à aligner les trous au fond avec les saillies du boîtier à thé.
Unité supérieure du mortier : veiller à ce qu'elle soit dans la bonne position.
Placer le couvercle.
FRANÇAIS
1 3
1

DÉPANNAGE
Les situations suivantes sont normales et ne sont pas des signes de dysfonctionnement de la machine à thé.
PROBLÈME
SOLUTION
SPÉCIFICATIONS
Tension de ligne :
Puissance requise:
Unité principale
Mortier à thé
Dimensions extérieures (LxHxP) :
Poids:
monophasée 120 V, 60 Hz, CA uniquement
940 W
910 W
30 W
9,25 po x 11,75 po x 8,875 po
233 mm x 296 mm x 225 mm
environ 6,6 lb / 3,0 kg.
F-23
Le mortier grince.
Lors du premier broyage ou juste après le nettoyage du mortier à thé,
il est commun d'entendre un son de grincement.
Le mortier à thé s'arrête
soudainement pendant le
broyage. Le mortier à thé émet
un son inhabituel.
Vérifier si les feuilles de thé utilisées sont les bonnes.
Le démontage du Mortier à Thé. Se reporter à la page F-5. Nettoyer les poudres
de thé restantes en utilisant la brosse de nettoyage fournie avec la machine.
Après le nettoyage, ré-assembler les parties. Se reporter à la page F-21.
Se reporter à la page F-19 pour les détails d'entretien du Mortier à Thé.
Aucun son en appuyant sur les
touches. Pas de bips lorsque
les opérations sont terminées.
Le son est éteint. Se reporter à la page F-6 pour remettre le son.
Suivez les instructions étape par étape pour le détartrage.
Se reporter à la page F-20.
La machine à thé fait bouillir l'eau lentement.
Le réservoir d'eau ne se vide pas
complètement pendant l'utilisation.
Il n'y a pas de thé en poudre
dans la soucoupe.
Cela prendra environ 30 secondes pour que le thé en poudre sorte
une fois le bouton START enfoncé.
Retirer les feuilles de thé du mortier à thé. Découper les longues
feuilles de thé avant le nouveau broyage.
Veiller à ce que la spatule soit correctement montée dans le mortier à thé.
●
●
●
●
●
Un thé en poudre grossière
sort.
Vérifier le réglage de la molette.
●
Il y a grumeaux dans le latte/
le thé glacé.
Ne pas manquer d'ajouter du liquide avant d'ajouter le thé en poudre.
●
La quantité de thé en poudre
qui sort du mortier à thé est
moins que la normale.
S'il reste encore un problème, débrancher l'appareil de la prise murale et
COMMUNIQUER AVEC VOTRE FOURNISSEUR AGRÉÉ DE SERVICE APRÈS-VENTE SHARP.
À l'emploi d'un mortier à thé neuf, ou après un entretien, les quantités
de thé en poudre pourraient baisser temporairement.
●
La quantité variera en fonction du type de feuilles de thé.
●
La finesse du thé en poudre variera en fonction du type de feuilles
de thé.
●
●
●
Démonter le mortier à thé. Se reporter à la page F-5. Retirer le thé en
poudre qui reste à l'aide de la brosse de nettoyage fournie avec l'appareil.
Après le nettoyage, remonter les pièces. Se reporter à la page F-21.
Se reporter à la page F-19 pour la procédure d'entretien du mortier à thé.
●

Le témoin de quantité que vous avez sélectionné
clignote lorsque vous appuyez sur le bouton START.
DÉPANNAGE
Vérifier si le mortier à thé est réglé correctement.
Retirer le mortier à thé et le replacer sur le
réceptacle correctement et appuyer
sur le bouton START.
Par ex : dans le cas où vous souhaitez
moudre du thé pour 1 tasse.
Temps de refroidissement (max.)
1 tasse : 3 min 20 sec, 2 tasses : 6 min 30 sec,
3 tasses : 9 min 40 sec, 4 tasses : 12 min 50 sec
MAX : 30 min
Le témoin de quantité clignote lorsque
vous appuyez sur le bouton GRIND.
Par ex : dans le cas où vous souhaitez
moudre du thé pour 4 tasses.
Par ex : si vous souhaitez sélectionner « HOT ».
« MAX » et « LATTE » clignotent.
(ceci indique que vous ne pouvez pas moudre les
feuilles de thé nécessaires pour 4 tasses et MAX)
Le témoin de mode que vous avez sélectionné
clignote lorsque vous appuyez sur le bouton START.
Vérifier si le conteneur est réglé correctement.
Retirer le conteneur et le replacer correctement sur
l'unité principale et appuyer ensuite sur le bouton START.
Il n'y a pas d'eau dans le réservoir d'eau.
Il n'y a pas d'eau dans le réservoir d'eau.
Appuyer sur le bouton STOP et retirer le réservoir d'eau.
Remplir le réservoir d'eau et le réinsérer dans
l'unité principale et reprogrammer l'appareil.
Tous les voyants de sélection de quantité
clignotent et la Machine à Thé s'est arrêtée.
L'unité supérieure du mortier et le mortier inférieur sont
peut-être collés ensemble. Voir la page F-19
pour les instructions d'entretien.
Tous les témoins s'allument l'un après l'autre.
La machine à thé ne fonctionne pas lorsque
vous appuyez sur le bouton START.
La machine à thé est en mode démonstration.
Cette fonction est principalement utilisée dans les points de
vente et seulement pour faire des essais ou démos.
Pour annuler, appuyer et maintenir le bouton STOP
enfoncé jusqu'au signal, appuyer ensuite 4 fois dessus.
Si vous voyez des témoins clignoter de manière inhabituelle et si vous pensez que la machine à thé ne
fonctionne pas correctement, vérifier le tableau suivant avant de contacter technicien agréé Sharp.
Ceci vous évitera d'appeler inutilement un technicien.
AFFICHAGE
SOLUTION
F-24
Le mortier à thé a surchauffé. Le laisser refroidir
pendant la durée suivante (en fonction du nombre
de tasses correspondant)
S'il reste encore un problème, débrancher l'appareil de la prise murale et
COMMUNIQUER AVEC VOTRE FOURNISSEUR AGRÉÉ DE SERVICE APRÈS-VENTE SHARP.
FRANÇAIS

AIDE À LA CLIENTÈLE
F-25
Pour vous aider à mettre les mains sur les détails de cette machine à thé si l'appareil est perdu ou volé,
veuillez inscrire ci-dessous le numéro de modèle et le numéro de série de l'appareil, pour référence ultérieure.
Nous recommandons que vous inscriviez toutes les infos indiquées et les gardiez pour référence ultérieure.
POUR TÉLÉPHONER:
Composer le 1-905-568-7140 pour:
SERVICE (pour repérer le fournisseur agréé de service après-vente le plus près)
PIÈCES (pour savoir les coordonnées de votre revendeur agréé de pièces)
ACCESSOIRES
AUTRES INFOS FOR LES CLIENTS
POUR NOUS ÉCRIRE:
Pour les problèmes qui relèvent du service technique,
infos sur la garantie, articles qui manquent et autre soutien:
Sharp Électronique du Canada Ltée
Service à la clientèle
335 Britannia Road East
Mississauga, Ontario L4Z 1W9
Prière de fournir les infos suivantes quand vous écrivez ou téléphones: numéro de modèle,
numéro de série, date de l'achat, votre adresse postale complète (incluant le code postal),
votre numéro de téléphone le jour (incluant l'indicatif régional) et une description du problème.
POUR ACCÉDER À NOTRE SITE WEB:
NUMÉRO DE MODÈLE _________ NUMÉRO DE SÉRIE_______________
DATE DE L'ACHAT ____________________________________
DÉTAILLANT _______________ TÉLÉPHONE ________________
FOURNISSEUR DE SERVICE APRÈS-VENTE ______________ TÉLÉPHONE _____________
www.sharp.ca

F-26
T
O
B
E
T
H
E
B
E
S
T
T
H
R
O
U
G
H
C
U
S
T
O
M
E
R
S
A
T
I
S
F
A
C
T
I
O
N
SERVICE
GARANTIE LIMITÉE
Électronique grand public
Bravo! Vous venez de faire un excellent achat!
PÉRIODES DE GARANTIE: (calculées à partir de la date d’achat originale): Pièces et main-d’œuvre (exceptions relevées)
Produit audio 1 an
Produit Blu-Ray 1 an
TV ACL/DEL 1 an
Four à micro-ondes 1 an (magnétron – 4 ans supplémentaires)
Purificateur d’air 1 an
Lunettes 3D 1 an
Adaptateur de réseau local sans fil 1 an
Petit électroménager 1 an
• En écrivant à Sharp Électronique du Canada Ltée, 335 Britannia Road East,
Mississauga (Ontario) L4Z 1W9
• En appelant au 905 568-7140
• En visitant notre site Web : www.sharp.ca
Pour connaître le nom et l’adresse du détaillant autorisé au service ou du centre agréé de service Sharp le plus près, ou pour obtenir
davantage de renseignements sur la présente garantie limitée, sur les offres de garantie prolongée de Sharp ou sur les ventes de
produits ou d’accessoires Sharp, veuillez communiquer avec Sharp :
®
Sharp Électronique du Canada Ltée (« Sharp ») garantit à l'acheteur initial de ce produit de marque Sharp (le « produit ») que, s’il est emballé dans son contenant
original et s’il est vendu ou distribué au Canada par Sharp ou par un détaillant autorisé Sharp, et s’il n’a pas été vendu « tel quel » ou s’il ne s’agissait pas d’une «
vente ferme », le produit est exempt de défaut de fabrication et de vice de matériau pour la période de garantie stipulée et s'engage auprès de l’acheteur initial et durant
ladite période à réparer la défectuosité ou à remplacer le produit défectueux.
Conditions:
La présente garantie limitée ne s’applique pas :
(a) Aux dommages causés ou aux réparations requises sur les appareils qui ont fait l’objet d’un emploi abusif, de négligence, d’un accident, d’une installation
inadéquate ou d’une utilisation non appropriée, tel qu’il est mentionné dans le manuel du propriétaire ou dans toute autre documentation applicable sur le produit;
(b) Aux dommages causés ou aux réparations requises sur les produits Sharp trafiqués, modifiés, réglés ou réparés par une entité autre que Sharp, un centre agréé
de service Sharp ou un détaillant autorisé au service Sharp;
(c) Aux dommages causés ou aux réparations requises à la suite de l’utilisation du produit avec des articles non désignés ou approuvés par Sharp, y compris, mais
sans en être limité, des agents de nettoyage chimiques;
(d) Au remplacement des accessoires devenu nécessaire à la suite d’une utilisation normale du produit, y compris, mais sans en être limité, les écouteurs, les
télécommandes, les adaptateurs c.a., les piles, la sonde de température, les plateaux, les filtres, les courroies, les câbles et le papier;
(e) Aux défauts cosmétiques à la surface ou au boîtier extérieur du produit, et qui sont attribuables à la détérioration ou à l’usure résultant d’un usage normal;
(f) Aux défectuosités causées ou aux réparations requises à la suite de dommages causés par des conditions extérieures et relatives à l'environnement, y compris,
mais sans en être limité, une tension de la ligne électrique ou de transmission trop élevée, du liquide répandu ou une catastrophe naturelle;
(g) Si le numéro de série ou de modèle indiqué sur le produit a été enlevé, maquillé, modifié, altéré ou trafiqué;
(h) Si le produit a été utilisé ou est utilisé dans un environnement commercial ou à des fins d’application commerciale, car la présente garantie vise uniquement les
produits non commerciaux et utilisés à des fins d’application domestique par des consommateurs dans leur résidence;
(i) Aux coûts d’installation, de livraison, de configuration et (ou) de programmation.
(j) Au démontage et à la réinstallation d’un four à micro-ondes à hotte intégrée ou d’un tiroir à micro-ondes si l’appareil est installé dans un endroit inaccessible, si des
armoires, des poignées ou d’autres pièces décoratives doivent être enlevées ou si l’appareil n’est pas installé conformément aux directives d’installation du
produit.
Pour obtenir un service après-vente:
La réparation sous garantie est offerte à la condition que le produit Sharp soit livré avec la preuve d’achat (sur laquelle est
indiquée la date d’achat) et une copie de la présente garantie limitée à un centre agréé de service Sharp ou chez un détaillant autorisé au service Sharp. La réparation
sur place sous garantie sera effectuée aux endroits accessibles par véhicule routier et situés à moins de 50 km d’un centre agréé de service Sharp sur tout téléviseur
Sharp doté d’un écran de 42 po ou plus et sur tout four à micro-ondes à hotte intégrée ou tiroir à micro-ondes Sharp. Le technicien peut, au besoin, ramener l’appareil
à son atelier pour en faire la réparation. Aucune autre entité (y compris les détaillants et les centres de service Sharp) n'est autorisée à prolonger la durée de la
garantie, à fournir des garanties autres ou à transférer cette garantie au nom de Sharp. L’acheteur doit assumer tous les coûts de démontage, de réinstallation, de
transport et d’assurance de l’appareil, à l’exception de tout four à micro-ondes à hotte intégrée ou tiroir à micro-ondes pour lequel Sharp est responsable du démontage
et de la réinstallation.
Les garanties expresses de la présente garantie limitée remplacent et Sharp décline, sauf pour les consommateurs-acheteurs domiciliés au Québec et à l’exception
des cas où la loi en vigueur l’interdit, toutes les autres garanties et conditions, expresses ou implicites, découlant de la loi, d’un règlement, de la conduite habituelle ou
de l’usage du commerce, y compris, mais sans en être limité, les garanties ou les conditions implicites de qualité marchande et d’adaptabilité à une utilisation ou à une
fin particulière, et/ou d’absence de contrefaçon. Limites (non applicables aux consommateurs-acheteurs domiciliés au Québec, dans la mesure où la loi en vigueur au
Québec l’interdit) : a) Sharp ne sera en aucun cas responsable des dommages accessoires, spéciaux, consécutifs, économiques, exemplaires ou indirects de quelque
type ou nature que ce soit (y compris la perte de profits ou les dommages par suite de la perte de temps, d’utilisation ou de données) découlant de l’utilisation ou du
rendement d’un produit ou de la défectuosité d’un produit, même si Sharp est informé ou a été avisé de la possibilité de tels dommages; b) les recours mentionnés
dans la présente garantie limitée constituent l’exécution intégrale de toutes les obligations et responsabilités de Sharp envers l’acheteur à l’égard du produit et
constituera la satisfaction entière de toutes les réclamations, qu’elles soient en fonction d’un contrat, d’une négligence, d’une responsabilité stricte ou autrement. Dans
certaines provinces, il est interdit d’exclure ou de limiter l’application de certains dommages ou de certaines limites sur la durée ou l’annulation de certaines garanties
ou conditions implicite. Par conséquent, dans ces provinces, les exclusions et les limites indiquées aux présentes peuvent ne pas s’appliquer. La présente garantie
limitée est, sauf pour les consommateurs-acheteurs domiciliés au Québec, régie par les lois de la province canadienne dans laquelle l’acheteur a acquis le produit.
Pour les consommateurs-acheteurs domiciliés au Québec, la présente garantie limitée est régie par les lois du Québec.
CETTE GARANTIE LIMITÉE EST VALIDE UNIQUEMENT AU CANADA.
FRANÇAIS

重要な安全上のご注意
J-1
1.この取扱説明書のすべての内容をよくお読みく
ださい。
2.高温面に触れない。所定のハンドルやノブを使用
してください。
3.火災、感電、人への傷害を避けるために電源コード、
電源プラグ、製品を水や他の液体に浸けないでくだ
さい。
4.子供による使用、あるいは子供の近くで使用
する場合は十分注意してください。
5.使用していない時やお手入れの際は、コンセント
から抜いてください。部品を外したり付けるとき、
およびお手入れの際は冷えてからおこなってくだ
さい。
6.損傷した電源コードや電源プラグでの使用、製品
の故障後および何らかの破損がある製品は使用
しないでください。
シャープのサービス窓口までお問い合わせください。
7.メーカーにより奨励されていないアクセサリー
パーツとの使用は、火災、感電、人への傷害の
原因となります。
8.屋外で使用しないでください。
9.電源コードはテーブルやカウンターの角にかからな
いようにし、高温面に触れないようにしてください。
10.高温のガスコンロや電気コンロ、加熱された
オーブンの近くや上に置かないでください。
11.コンセントを抜く際には、STOPを押し
電源プラグをコンセントから抜いてくだ
さい。
12.取扱説明書に記載の用途以外にはこの製品を
使用しないでください。
13.製品を操作する前に、フタがしっかりと
閉まっていることを確認してください。
14.動作中にフタを開けるとやけどの原因となる
ことがあります。
15.お茶容器は、この製品専用に設計されて
います。コンロやレンジでの使用はでき
ません。
16.湿っていたり冷たい表面に熱いお茶容器を
置かないでください。
18.クレンザーやスチールウールパッド等の
研磨材料でお茶容器を洗わないでください。
17.ひび割れ、ハンドルの緩みや劣化した
お茶容器は使用しないでください。
19.使用する前に、お茶うすに異物がないかを
確認してください。
製品を使用する際は、火災、感電、人への傷害の危険性を減らすために、次の基本的な安全注意事項に常に
従う必要があります。
これらの注意事項を守ってください
家庭用製品です。業務用として使用しないでください。
警告
火災や感電の危険があります
開けないでください
警告:火災や感電の危険を減らすため、
カバー(または背面板)を取り外さないでください
自分で絶対に分解・修理・改造をしないでください
認定サービス担当者のみが修理をおこなってください

知っておいていただきたいこと
J-2
定格15アンペアAC120V60Hzの電源が
必要です。
この製品専用の独立した電源の確保をお勧め
します。
この製品は、有極プラグ(一方のブレードが
他よりも広い)を使用しています。感電の
危険性を減らすためのものです。電源プラグが
コンセントの差し込み口に合わない場合は、
電源プラグの向きを変えてください。それでも
合わない場合は、有資格電気技術者にご相談
ください。
電源プラグは一切改造しないでください。
お茶メーカーを使用する前に、この取扱説明書をお読みください。
この取扱説明書には、この製品がどのように動作するのかということや、この製品を正しく使用するための
知識が記載されています。
電源仕様
長いコードにつまずいたり、もつれる危険性を
低減するために短い電源コードを使用して
います。
延長コードを使用する際は、次のことにご注意
ください。
延長コードに表示されている定格が、この製品
の電気定格以上のものをご使用ください。
延長コードは子供が引っ張られたり、つまずい
たりしないようにカウンターやテーブルの上
からぶら下がらないように設置してください。
延長コード
1.濡れた手で電源プラグを抜き差ししないで
ください。
電源プラグを持ってコンセントにしっかりと
差し込んだり抜いたりしてください。
コンセントから抜く際にはコードを引っ張ら
ないでください。
2.水タンクに新しい冷たい水を入れてください。
取扱説明書で指示されている製品の清掃時
以外は、水タンクにお湯や牛乳のような
他の液体を入れないでください。硬水で
定期的にご使用いただいていると、硬水の
成分が製品内部の給水パイプを詰まらせる
ことがあります。クエン酸洗浄をおこなって
いただくことをおすすめします。
J-20ページをご覧ください。
3.製品の動作中は目を離さないでください。
4.動作中の製品の上に物を置かないでください。
5.熱い液体が入っているときには製品を移動
させないでください。移動させる前に製品が
完全に冷えていることを確認してください。
製品を移動させる前に、お茶うすとお茶容器
を取りはずしてください。
6.水タンクにひびや水漏れがある場合、製品を
使用しないでください。シャープのサービス窓口
までお問い合わせください。
7.ご自身での製品の調整や修理はしないでください。
8.湯沸かし中のやけどを防ぐために:
a.お茶容器に触れないでください。
b.手や顔を蒸気口に近づけないでください。
9.直射日光下で製品を使用しないでください。
10.製品に水がかかる可能性のある場所では使用
しないでください。
11.吸気口にものを入れないでください。
12.接触可能な部位(例:お茶容器、給湯口)は、
使用中に高温になります。
使用中または使用後しばらくはそれらの部位に
触れないでください。
責任当事者によって承認されていない製品の
変更や改造により、ユーザーの製品を使用する
権限が無効になることがあります。
注:この製品は、FCC(米国連邦通信委員会)の
規則15項に従い、クラスBデジタル装置の規制
に準拠しています。
これらの規制は、家庭での使用における、有害
な干渉を防止する適切な保護を提供するために
設けられています。
この製品は、無線周波数エネルギーの発生、
使用あるいは放射する可能性があり、取扱説明
書に従って設置および使用しなかった場合、
無線通信に有害な干渉を引き起こす可能性が
あります。
しかしながら、設置条件により干渉が発生しな
いという保証はありません。
この製品がラジオやテレビの受信に障害を与え、
製品をオン・オフすることで識別できる場合、
以下のいずれかの方法で干渉を修正することを
おすすめします:
・受信アンテナの向きや位置を変える。
・製品と受信機の距離を離す。
・受信機が接続されているコンセントと異なる
コンセントに製品を接続する。
・販売店または経験を有するラジオ/テレビ技師
に相談する。
給湯口
その他の安全上のご注意
日本語

電源コード
給茶レバー
給茶口
置き台
(置き台の下につゆ受けトレイがあります)
受け皿
操作部
本体
モードを選ぶときに
(Hot,Warm,Latte)
すべての動作を取り消す
ときに
運転をスタートするとき、
一時的に止めるときに
湯沸かしランプ
湯沸かし中に点滅します。
お茶容器
お茶うす
(J-5ページ参照)
水タンク
フィルター
(吸気口)
LOCK
UNLOCK
挽く茶葉の分量
を選ぶときに
モードランプ
選択したモードが点灯します
(Hot,Warm,Latte)
分量ランプ
茶葉を挽くときに
選択分量が
点灯します
各部のなまえと扱いかた
正面
お茶容器
取り出しボタン
給茶レバーロック
点滅して粉末茶を入れる
タイミングをお知らせします
点滅してSTARTを
押すタイミングを
お知らせします
フタ
背面
POWDERINランプ
スタートランプ
操作部
受け皿は
ここに置きます。
WATER ONLY
GRIND
MODE
STOP
START/PAUSE
J-3

持ち手
水位線
お茶容器取り出しボタンを
押しながら、ゆっくりと
手前に引き抜く。
取りはずし
フタ/フタカバー
フタカバー
粉末茶を入れるとき
水/牛乳に粉末茶を入れるとき
(冷茶/ラテ)
取り付け
回転はね
(磁石付き)
(J-18ページ参照)
フタ
フタカバー
(取りはずさない)
取っ手
本体背面に沿わせて
下まで確実に差し込む。
パッキン
(取りはずさない)
水
持ち手に指をかけ
もう片方の手で本体を
押さえながら、上方に
引き抜く。
各部のなまえと扱いかた
ご注意:
1.水位線の数字は、つくるお茶の杯数に応じた表示です。
2.最大水位4を超えて水を入れないでください。
3.新鮮な水以外の液体(牛乳など)を入れないでください。
4.湯沸かし途中で水を加えないでください。
(最大水量を超えると、お茶容器のお湯があふれ出します)
5.本体に水タンクをセットした状態で水を入れないでください。
6.水タンクに水を入れて本体にセットしたあとは、水タンクを取りはずさないでください。
7.使用後は水タンクを空にし、お手入れしてください。
内側に、"冷茶"と"ラテ"の
水位線があります。
MAX
ご注意:
やけどを防ぐために、湯沸かし中や停止後すぐは、
お茶容器を取り出さないでください。
奥まで確実に押し込む。
1.
お茶容器は本体に取り付けたまま
、
楕円の穴が見える
までフタカバーを
スライドさせる。
(右図参照)
2.楕円形の穴から粉末茶を
お茶容器に入れる。
1.お茶容器を
本体から
取りはずす
2.フタをはずし、
水/牛乳と粉末茶を
入れる
3.フタをもとの
位置にもどす。
ご注意:
1.数字は、つくるお茶の杯数に
応じた水/牛乳の量を示しています。
2.冷茶は4、ラテは3を超えて水/牛乳を
入れないでください。
3.氷は入れないでください。
4.お茶容器を本体にセットした状態で
水/牛乳を入れないでください。
取りはずし
取り付け
W
A
T
E
R
O
N
L
Y
WA
T
E
R
ON
L
Y
J-4
水タンク
お茶容器
日本語
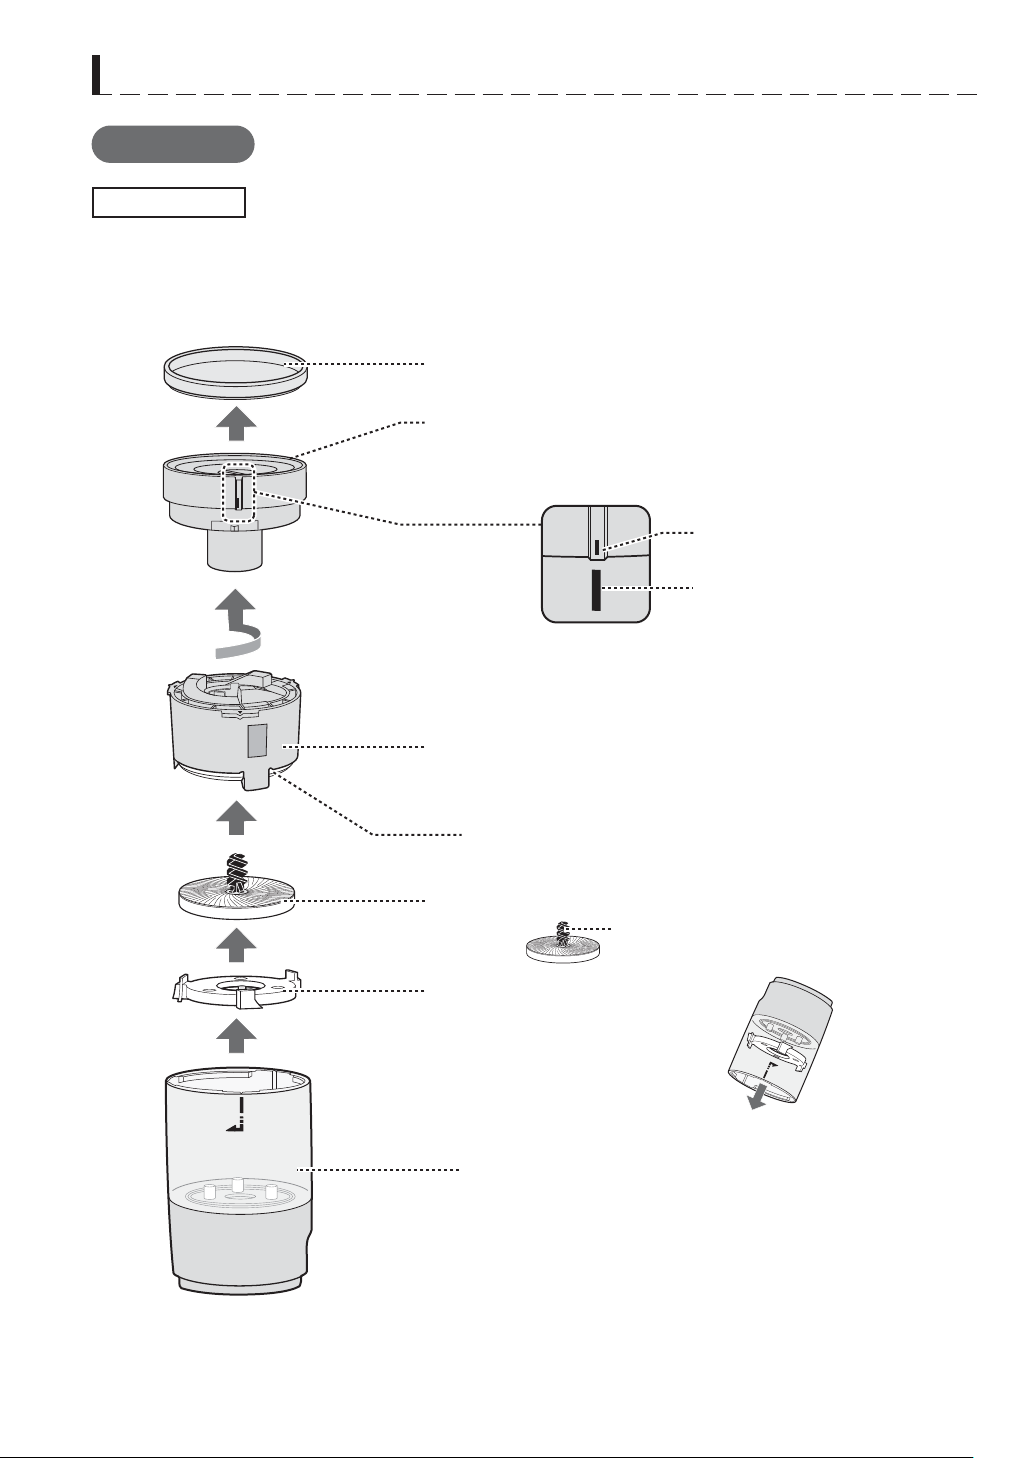
お茶ケース
挽きかた調節ダイヤル(ダイヤル*)
下うす
ヘラ
軸
(取りはずせません)
上うす
(取りはずせません)
上うすユニット
フタ
お茶ケースを逆さにする
とはずれます。
ダイヤルの突起
お茶ケースの白線
①
②
③
④
⑤
各部のなまえと扱いかた
お茶うす
分解するときは、番号順に取りはずします。
(組み立て方法はJ-21ページ参照)
取りはずし
「カチッ」と音がするまで反時計回りにまわす。
(ダイヤルの突起とお茶ケースの白線の位置を合わせる)
*この取扱説明書では、挽きかた調節ダイヤルを'ダイヤル'と
呼んでいます。
J-5

受け部にのせる。
(茶葉などの異物が付いているときは、
取り除いてからのせます)
受け部
持ち上げ、手前に引く。
茶葉を挽いたあとは、
まずフタをはずします。
フタを敷いてお茶うすに
残っている粉末を受けます。
→奥側へ
大(茶葉用)
小(粉末茶用)
(各1)
・清掃用ブラシ
(お茶うす専用)
・取扱説明書
(保証書付)
・メニュー集
・お茶スプーン
取り付け
取りはずし
フタ
終了音などを鳴らないように設定できます。
電源プラグを差し込んでください。
お知らせ音について
向き確認
音を鳴らないようにするときは、スタートを「ピピッ」と鳴るまで押す。
音を鳴らすときは、スタートを「ピッ」と鳴るまで押す。
ご注意:
1.電源プラグを抜いても設定された状態を保ちます。
2.音が鳴らない設定のときでもエラー音(ピピピピ…)は鳴ります。
各部のなまえと扱いかた
フタ
付属品
J-6
日本語

*
挽く
(お茶うす)
沸かす
(水タンク)
分量
*
目安時間
用意するもの
1〜4杯分
温かいお茶
飲み物
冷たいお茶
ラテ
牛乳は、成分無調整牛乳をお使いください。
加工乳や低脂肪乳は、泡立ちがよくありません。
・粉末茶**(0.02-0.085oz/0.6-2.4g)
・
・
茶葉**(0.035-0.1oz/1.0-2.8g)
・
1〜3杯分
・
・
1〜4杯分
・
・
混ぜる
(お茶容器)
水タンクは使いません。
お茶メーカーでできること
J-7
お湯を沸かします。
茶葉から粉末茶をつくります。
ダイヤルを調節すると、
2種類の粉末茶ができます。
FINE(細): 飲み物用
COARSE(粗):お料理用
お湯/冷水、温かい牛乳/
冷たい牛乳を粉末茶と混ぜて
お茶をつくります。
沸かして混ぜる:
3〜5分
水(水タンクにつくる杯数と
同じ水位まで入れる)
挽く、沸かして混ぜる:
3分30秒〜7分25秒
混ぜる:
約1分30秒
混ぜる:
約1分30秒
水(水タンクにつくる杯数と
同じ水位まで入れる)
粉末茶**(0.07-0.2oz/2-6g)
牛乳(お茶容器につくる杯数と
同じラテの水位まで入れる)
粉末茶**(0.02-0.085oz/0.6-2.4g)
冷たい水(お茶容器につくる杯数と
同じ冷茶の水位まで入れる)
水タンクは使いません。
1杯分(水位1):約5.1oz/150mL
3杯分(水位3):約14.2oz/420mL 4杯分 (水位4):約19oz/560mL
2杯分 (水位2):約9.6oz/285mL
茶葉を挽きながら、温かいお茶をつくることができます(J-13ページ参照)
その他、茶葉を挽きながらラテをつくることも、冷たいお茶をつくることもできます。
保温機能はありません。できあがった飲み物は、なるべくお早めにお飲みください。
メニュー集では、各種のお茶やラテメニュー、粉末茶を活用したお料理やお菓子メニューを
掲載していますので、お試しください。
・
・
・
**記載している粉末茶量は緑茶(日本茶)の場合。粉末茶量は茶葉の種類によって変わります。
ダイヤル設定
〜抹茶の場合〜
1杯分
沸かして混ぜる:
約3分
・粉末抹茶(0.1oz/3g)
・
水(水タンクの水位1)
〜抹茶の場合〜
1杯分
混ぜる:
約1分30秒
・粉末抹茶(0.1oz/3g)
・
冷水(お茶容器の冷茶の水位1)

●
直火にかけたり、電子レンジで加熱しないでください。お茶容器が溶けたり変形するおそれがあります。
●
●
●
●
●
●
お茶うす
●
日本茶、中国茶、紅茶などのお茶が適しています。次のようなお茶は故障の原因になることがあります。
・茶葉以外のお茶(麦茶・黒豆茶など)
・
お茶うすで挽けない大きな茶葉(小さくすると使えます)
・
粉に近い状態の細かい茶葉
●
●
湿った茶葉は使用しないでください。
お使いいただく前に
・
茶葉以外のものが含まれているお茶(玄米茶など)
詳しくはメニュー集をご覧ください。
あらかじめ茶筒に移すなどしてお使いください。金属製の茶筒をお使いいただくことをおすすめします。
飲み物をつくるときはフタ・フタカバーを必ず閉めてください。開いていると、
かき混ぜによる飛び散りの原因になります。
内側はフッ素コーティング加工をしています。長くお使いいただくために、
コート面を傷つけないでください。
回転はねは磁石付きです。磁気に弱いものに近付けないでください。
コンロのそばや、高温になる場所に置かないでください。水タンクが溶けたり変形するおそれがあります。
●
使用後は水タンクをカラにして、水タンクとフタを洗ってください。
うすはセラミック製です。落としたり、衝撃を与えると割れます。取り扱いにご注意ください。
水洗い後は水分をしっかりと拭き取り、よく乾燥させてください。
1.お茶メーカーを箱から取り出し、包装材を取りはずしてください。
2.お茶メーカーは丈夫で安定した水平な場所に置いてください。
3.お茶容器を洗い、本体に取り付けてください。
4.水タンクを洗い、水をMAXの水位まで入れる。MAXを超えて水を入れない。フタをして本体に
取り付けてください。
5.MODEを1度押し、STARTを押す。
6.お知らせ音(ピーピーピーピー)が鳴ったら、お手持ちのカップをお茶容器下方の置き台に置く。
給茶レバーロックを解除する。給茶レバーを下げて、お湯をカップに注ぐ。お湯は捨ててください。
7.給茶口からお湯が流れ出なくなるまで、お湯を注ぐ、捨てるを繰り返してください。
はじめてお使いいただくときは
知っておいていただきたいこと
お茶容器
水タンク
粉末にするお茶について
J-8
日本語
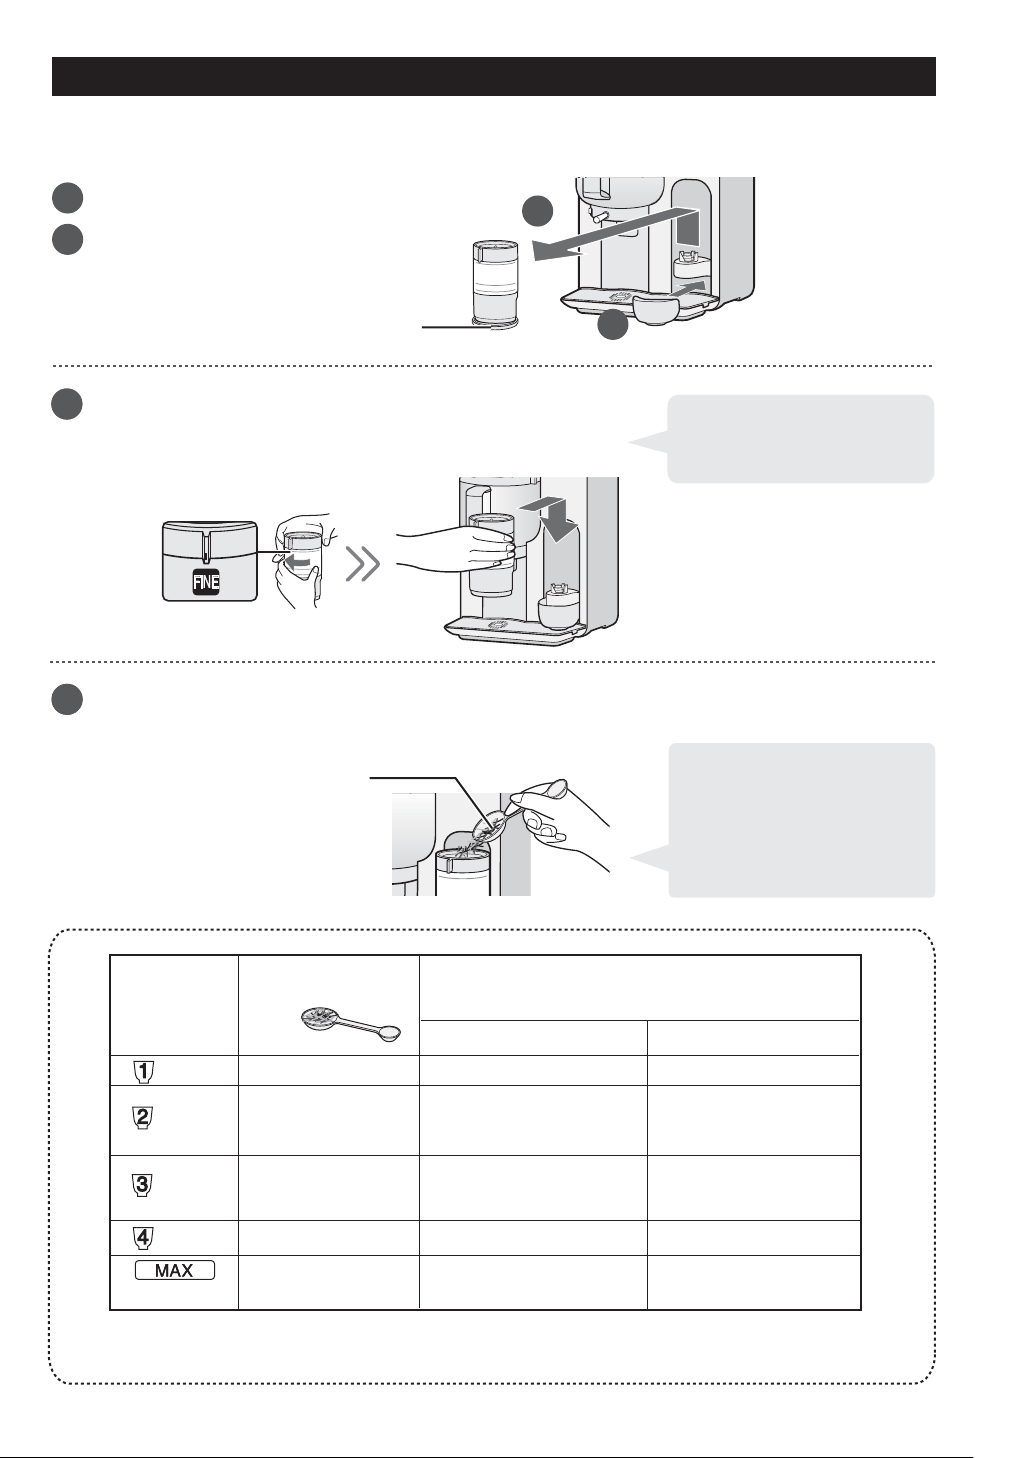
1
2
1
1
2
フタ
お茶スプーン大
茶葉を挽く
3
3
3
4
お茶スプーン大で茶葉をゆっくりお茶うすに入れる。
お茶うすにフタをのせる。
お料理用に使う場合は、
COARSE(粗)に合わせます
受け皿を置く。
お茶うすのフタをはずす。
お茶うすを本体から取り出し、
フタの上に置く。
(工場出荷時はCOARSE(粗)に設定されています)
*2杯分の茶葉を挽く
お茶うすのダイヤルをFINE(細)に合わせ、
本体にセットする。
分量
粉末茶*
時間
できあがりの目安
茶葉
(1杯分)
(2杯分)
(3杯分)
(4杯分)
約0.02oz/0.6g
1/2杯
1杯弱
1杯強
11/2杯
31/2杯
(まとめ挽)
約1分40秒
約0.04oz/1.2g
約3分15秒
約4分50秒
約6分25秒
約15分
約0.06oz/1.8g
約0.08oz/2.4g
約0.21oz/6.0g
*緑茶(日本茶)の場合。できあがりの粉末茶量は茶葉の種類によって変わります。
J-9
●
初めてお使いのときやお手
入れ後は、できあがり粉末
茶量が少なくなります。
1〜2杯分の茶葉を挽く
ときは、1杯分多い分量で
おこなってください。

●
●
お茶うすの底には粉末茶が
残っている場合があるので、
お茶うすのフタを数回軽く
トントンとたたいてください。
●
粉末茶をすぐに使わない
場合は、密閉容器に入れて
冷凍庫に保存し、お早めに
お使いください。
●
1→2→3→4→MAX→
off
:0
〜
1分39秒
:
1分40秒
〜
3分14秒
:
3分15秒
〜
4分49秒
:
4分50秒〜6分24秒
:6分25秒〜15分
ひ
ひ
茶葉を挽く
3
5
3
6
3
5
3
6
STARTを1度押します。
お茶うすが茶葉を挽きはじめます。
粉末茶は受け皿に溜まります。
電源プラグを差し込みます。GRINDを2度押して
2杯分を選びます。
×2
×1
GRINDを押すごとに分量ランプ
の点灯位置が移動します。
3
7
茶葉を挽き終わると、お知らせ音(ピーピーピーピー)が鳴り、
お茶うすは自動で止まります。
お茶うすのフタを軽くたたいてから、
受け皿を取り出します。
運転中にGRINDを押すと、
分量ランプが点滅して残り
時間をお知らせします。
茶葉がお茶うすに残っている場合は、GRINDを1度押し、
STARTを押してください。
GRINDを押して分量を選ぶときに、分量ランプが点滅しエラー音(ピピピピ…)が鳴ることがあります。
その際は製品のオーバーヒートを防ぐために休止時間をおいてください。
お茶うすの休止時間はJ-24ページを参照してください。
ご使用後は電源プラグを抜き、お手入れをしてください。
ご注意:
できあがった粉末茶を、再び投入口に入れて挽かないでください。
茶葉を続けて挽く場合
J-10
日本語

●
[入れる粉末茶量
*
]
1杯分・・お茶スプーン1杯
2杯分・・お茶スプーン2杯
3杯分・・お茶スプーン3杯
4杯分・・お茶スプーン4杯
1杯分・・お茶スプーン5杯
お茶スプーン小で
山盛りにしてはかります。
温かいお茶をつくる
お茶容器がカラであることを確認して、本体にセットする。
2種類の方法で温茶(HOT)、ぬるめのお茶(WARM)をつくることができます。
お茶容器に水気が残って
いるときは、拭き取って
ください。
*2杯分の温茶をつくる。
お茶容器に水位2まで水を入れ、本体にセットする。
お茶容器のフタカバーを開ける。
お茶スプーン小を使ってお茶容器の楕円形の穴から粉末茶を入れる。
フタカバーを閉める。
*分量は茶葉の種類によって
変わります。詳しくは付属の
メニュー集をご覧ください。
1.沸かして混ぜる: 挽いておいた粉末茶を使ってお茶をつくります
2.挽く、沸かして混ぜる:粉末茶をつくりながら、湯を沸かしてお茶をつくります
ぬるめのお茶は温茶より59-68°F(15-20℃)低めの温度に仕上がります
1.沸かして混ぜる:
WATER ONLY
WATER ONLY
J-11
1
2
3
4
●
粉末茶量は、お好みに
応じて調整してください。
緑茶の場合
抹茶の場合

●
●
水温によりできあがりまでの
時間は異なります。
HOT→WARM→LATTE→
OFF
●
お茶を注ぐ前に
給茶レバーロックを解除し、
注ぎ終わったら、
ロックしてください。
LOCK
UNLOCK
温かいお茶をつくる
電源プラグを差し込みます。MODEを1度押してHOT(温茶)を選びます。
STARTを1度押します。湯沸かしが始まります。
沸騰したお湯は自動的にお茶容器に注がれ、
粉末茶と混ぜ合わせられます。
x1 x1
MODEを押すごとに、
メニューランプ
の点灯位置が移動します。
●
ぬるめのお茶をつくるときはで
MODEを2度押してください。
お茶ができあがると、お知らせ音(ピーピーピーピー)が鳴り、
運転が自動で止まります。
お手持ちのカップをお茶容器下方の置き台に置き、
給茶レバーロックを解除します。
給茶レバーを下げて、お茶を注ぎます。
ご使用後は電源プラグを抜き、お手入れをしてください。
ご注意:
水タンクに入れた水はすべてお茶容器に入るので、お茶容器に液体を残さない。
お湯があふれ出します。
J-12
5
6
6
5
7
日本語
5

お茶スプーン大
●
●
初めてお使いのときやお手
入れ後は、できあがり粉末
茶量が少なくなります。
1〜2杯分の茶葉を挽く
ときは、1杯分多い分量で
おこなってください。
温かいお茶をつくる
*2杯分の茶葉を挽きながら、2杯分の温茶をつくる。
受け皿を置く。
お茶うすのフタをはずす。
お茶うすを本体から取り出し、フタの上に置く。
1
2
お茶容器がカラであることを確認して、
本体にセットする。
3
●
お茶容器に水気が残って
いるときは、拭き取って
ください。
お茶容器に水位2まで水を入れ、本体にセットする。
3
4
(工場出荷時はCOARSE(粗)
に設定されています)
お茶うすのダイヤルをFINE(細)に合わせ、
本体にセットする。
3
5
お茶スプーン大で茶葉をゆっくりお茶うすに入れる。
お茶うすにフタをのせる。
3
6
茶葉の量は、
J-9ページをご覧ください。
2.挽く、沸かして混ぜる:
WAT
ER
O
NL
Y
W
A
TE
R
O
NL
Y
1
1
2
3
フタ
J-13

お茶スプーン小
…約2分
…約3分20秒
…約5分
…約6分40秒
[挽く・沸かすの目安時間]
…約15分30秒
●
お茶容器周辺が熱くなって
いますので、
粉末茶を入れるときは、
やけどにご注意ください。
ひ
温かいお茶をつくる
3
7
電源プラグを差し込みます。
GRINDを2度押して2杯分を選びます。
MODEを1度押してHOT(温茶)を選びます。
3
8
STARTを1度押します。お茶うすが茶葉を挽きはじめ、
同時に湯沸かしが始まります。
3
9
3
7
3
8
9
x1 x1x2
茶葉を挽き終わると、
お知らせ音(ピーピーピーピー)
が鳴り、お茶うすは自動で止まります。
お茶うすのフタを軽くたたいてから、
受け皿を取り出します。
3
10
"POWDERIN"が点滅したら、
お茶容器のフタカバーを開けます。
お茶スプーン小を使ってお茶容器の
楕円形の穴から粉末茶を入れます。
フタカバーを閉めてSTARTを1度押します。
お湯と粉末茶が混ぜ合わせられます。
3
11
x1
お茶ができあがると、
お知らせ音(ピーピーピーピー)が鳴り、
運転が自動で止まります。お手持ちの
カップをお茶容器下方の置き台に置き、
給茶レバーロックを解除します。
給茶レバーを下げて、お茶を注ぎます。
3
12
●
お茶を注ぐ前に
給茶レバーロックを解除し、
注ぎ終わったら、ロックしてください。
LOCK
UNLOCK
ご使用後は電源プラグを抜き、お手入れをしてください。
"POWDERIN"が点滅してお茶容器に
粉末茶を入れるタイミングをお知らせします。
●
ご注意:
水タンクに入れた水はすべてお茶容器に入るので、お茶容器に液体を残さない。
お湯があふれ出します。
J-14
●
ぬるめのお茶をつくるときは
でMODEを2度押して
ください。
"POWDERIN"が点滅して
から30分以内にSTART
を押してください。
日本語
8
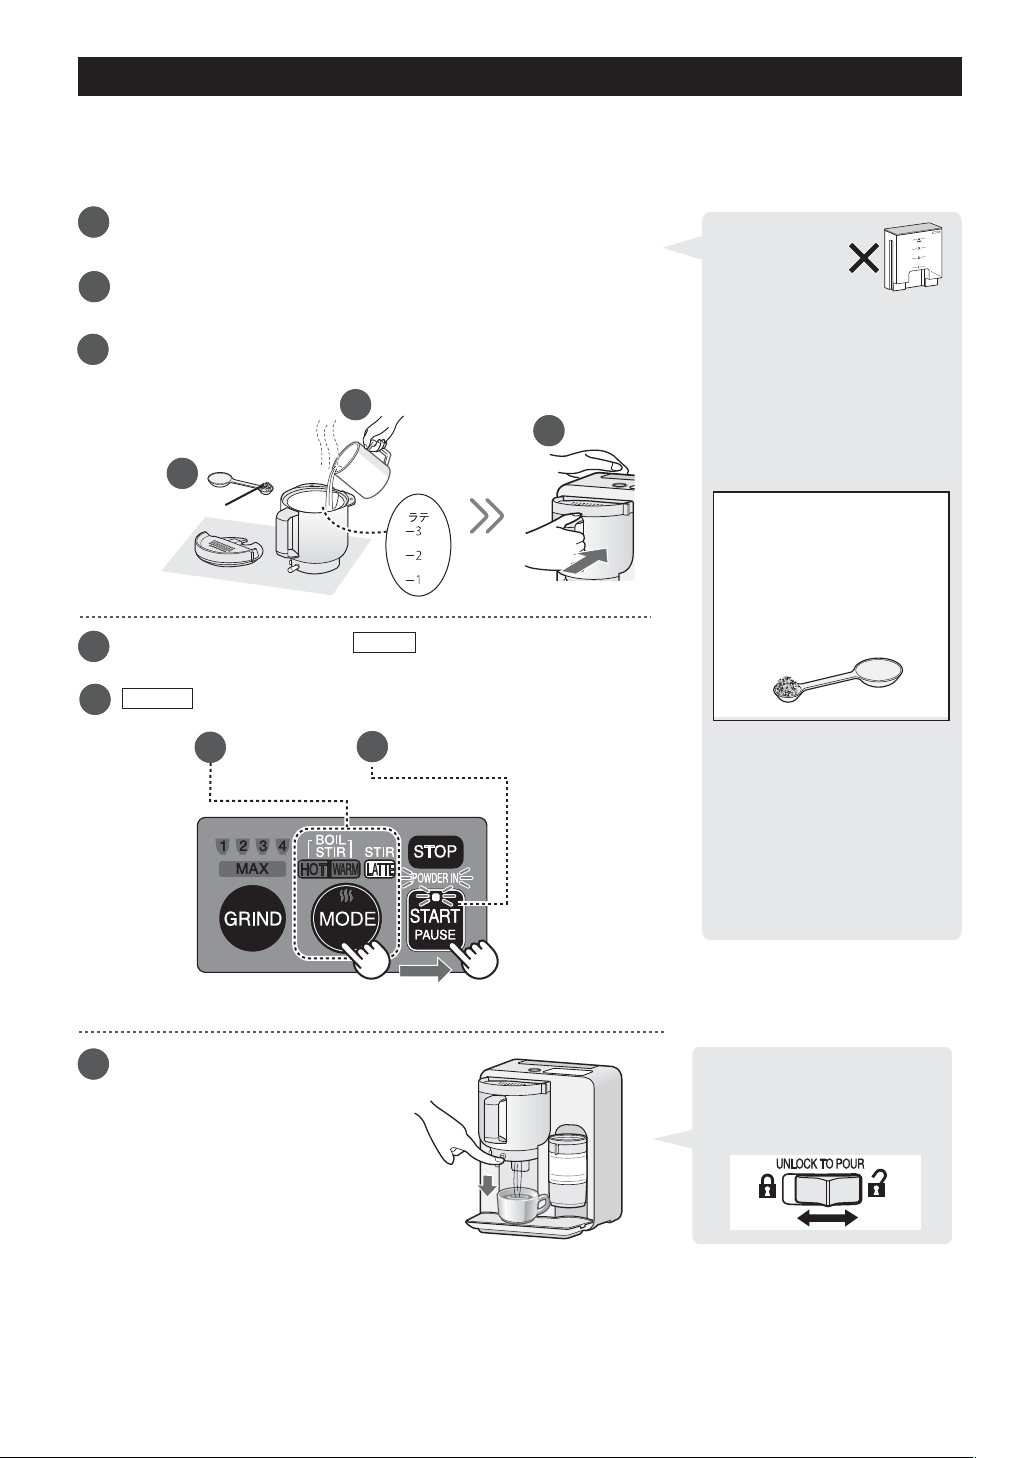
●
なめらかな口当たりの
ラテをつくるために、
牛乳を先に入れてください。
[入れる粉末茶量
*
]
●
水タンクは
使いません。
●
冷蔵保存の冷たい牛乳も
使えます。
●
あたためた牛乳を
入れるときは、やけどに
注意してください。
1杯分・・お茶スプーン3〜4杯
2杯分・・お茶スプーン6〜7杯
3杯分・・お茶スプーン10杯
●
ラテをつくる
3
1
牛乳とあらかじめ挽いておいた粉末茶をかき混ぜてラテをつくります。
*1杯分の緑茶ラテをつくる。
お茶容器のフタを開けます。あたためた牛乳を必要分量入れます。
(1杯分の場合、ラテの水位1まで)
3
2
お茶スプーン小を使って、粉末茶をお茶容器に入れます。
(1杯分の場合、山盛り3〜4杯)
3
1
お茶スプーン小
3
2
3
3
フタを閉め、お茶容器を本体にセットします。
3
3
3
5
3
6
x3 x1
3
4
3
5
3
4
ラテができあがると、お知らせ音
(ピーピーピーピー)が鳴り、
運転が自動で止まります。
お手持ちのカップを
お茶容器下方の置き台に置き、
給茶レバーロックを解除します。
給茶レバーを下げて、ラテを注ぎます。
お茶を注ぐ前に
給茶レバーロックを解除し、
注ぎ終わったら、ロック
してください。
ご使用後は電源プラグを抜き、お手入れをしてください。
お茶スプーン小で
山盛りにしてはかります。
*
分量は茶葉の種類によって
変わります。詳しくは付属の
メニュー集をご覧ください。
ご注意:
1.お好みでお茶容器に残った泡をスプーンなどですくってカップにのせるときは、
泡をすくうのに金属製のスプーンなどは使わないでください。
2.常温保存の牛乳は使わないでください。
3.泡の量は温度や茶葉、牛乳の種類によって変わります。
LOCK
UNLOCK
電源プラグを差し込みます。MODEを3度押してLATTE(ラテ)を
選びます。
STARTを1度押します。かき混ぜがはじまります。
J-15
●
粉末茶量は、お好みに
応じて調整してください。
緑茶の場合
WATER ONLY
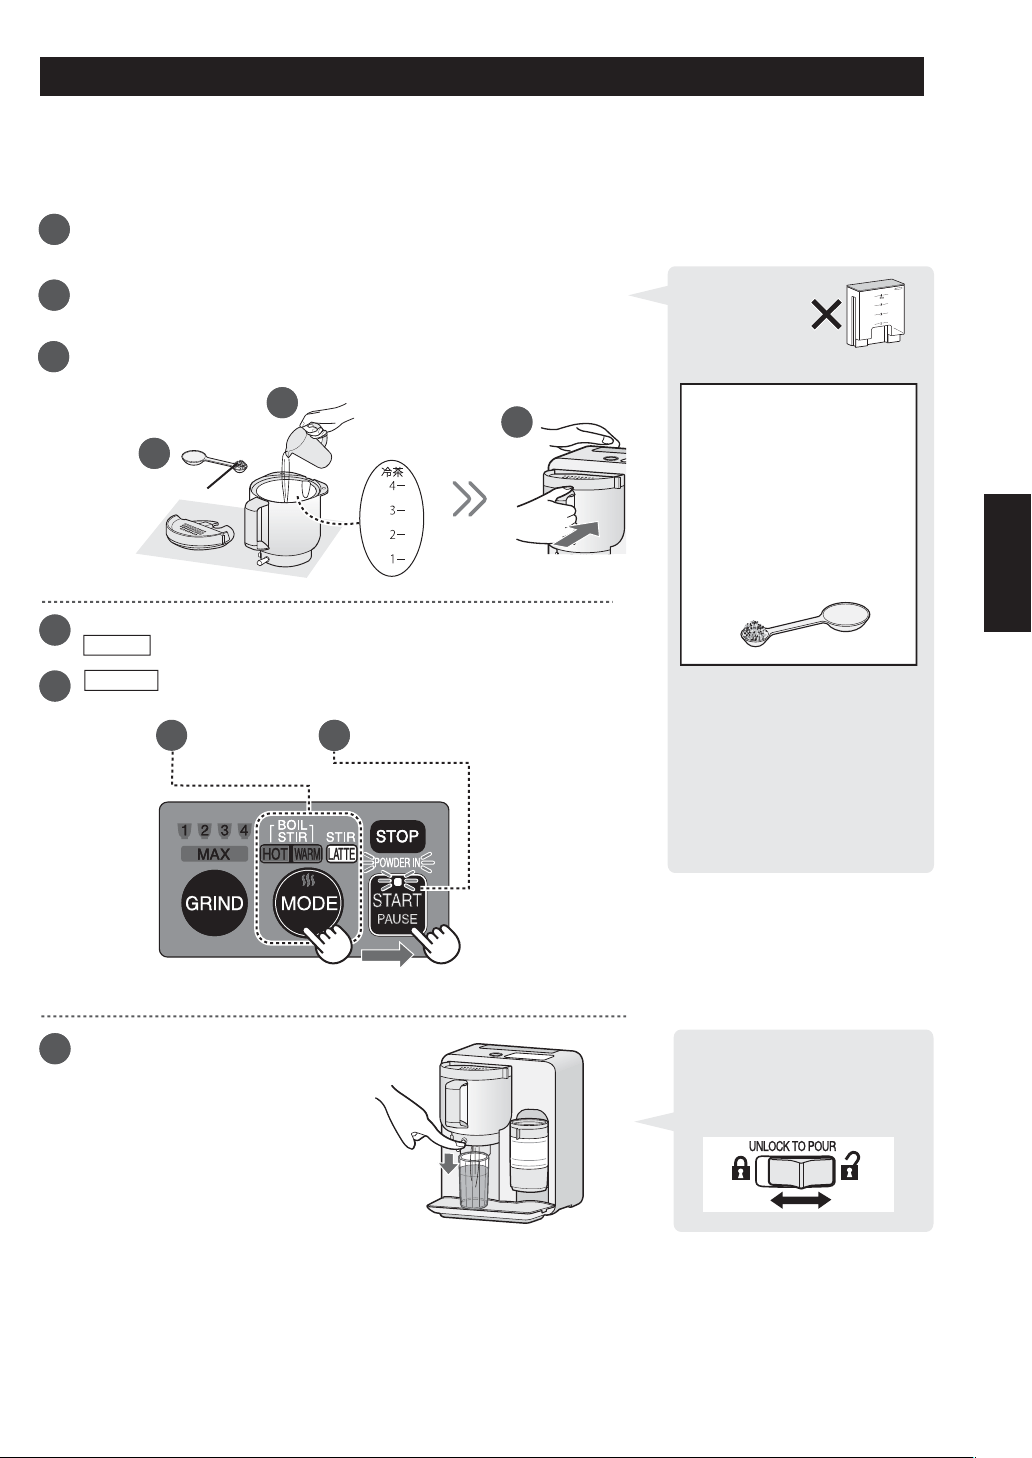
お茶スプーン小
●
冷たいお茶をつくる
3
1
冷たい水とあらかじめ挽いておいた粉末茶をかき混ぜて冷茶をつくります。
*1杯分の冷たい緑茶をつくる。
お茶容器のフタを開けます。冷水を必要分量入れます。
(1杯分の場合、冷茶の水位1まで)
3
2
お茶スプーン小を使って、粉末茶をお茶容器に入れます。
(1杯分の場合、山盛り1杯)
3
3
フタを閉め、お茶容器を本体にセットします。
水タンクは
使いません。
3
1
3
2
3
3
電源プラグを差し込みます。
MODEを3度押してLATTE(ラテ)を選びます。
3
5
3
6
x3 x1
STARTを1度押します。
かき混ぜがはじまります。
3
4
3
5
3
4
お茶ができあがると、
お知らせ音(ピーピーピーピー)が鳴り、
運転が自動で止まります。
お手持ちのカップを
お茶容器下方の置き台に置き、
給茶レバーロックを解除します。
給茶レバーを下げて、お茶を注ぎます。
●
LOCK
UNLOCK
お茶を注ぐ前に
給茶レバーロックを解除し、
注ぎ終わったら、
ロックしてください。
ご使用後は電源プラグを抜き、お手入れをしてください。
●
なめらかな口当たりの冷茶を
つくるために、冷水を先に
入れてください。
[入れる粉末茶量
*
]
1杯分・・お茶スプーン1杯
2杯分・・お茶スプーン2杯
3杯分・・お茶スプーン3杯
4杯分・・お茶スプーン4杯
お茶スプーン小で
山盛りにしてはかります。
緑茶の場合
*分量は茶葉の種類によって
変わります。詳しくは付属の
メニュー集をご覧ください。
W
A
T
E
R
O
N
L
Y
J-16
●
粉末茶量は、お好みに
応じて調整してください。
日本語
1杯分・・お茶スプーン5杯
抹茶の場合
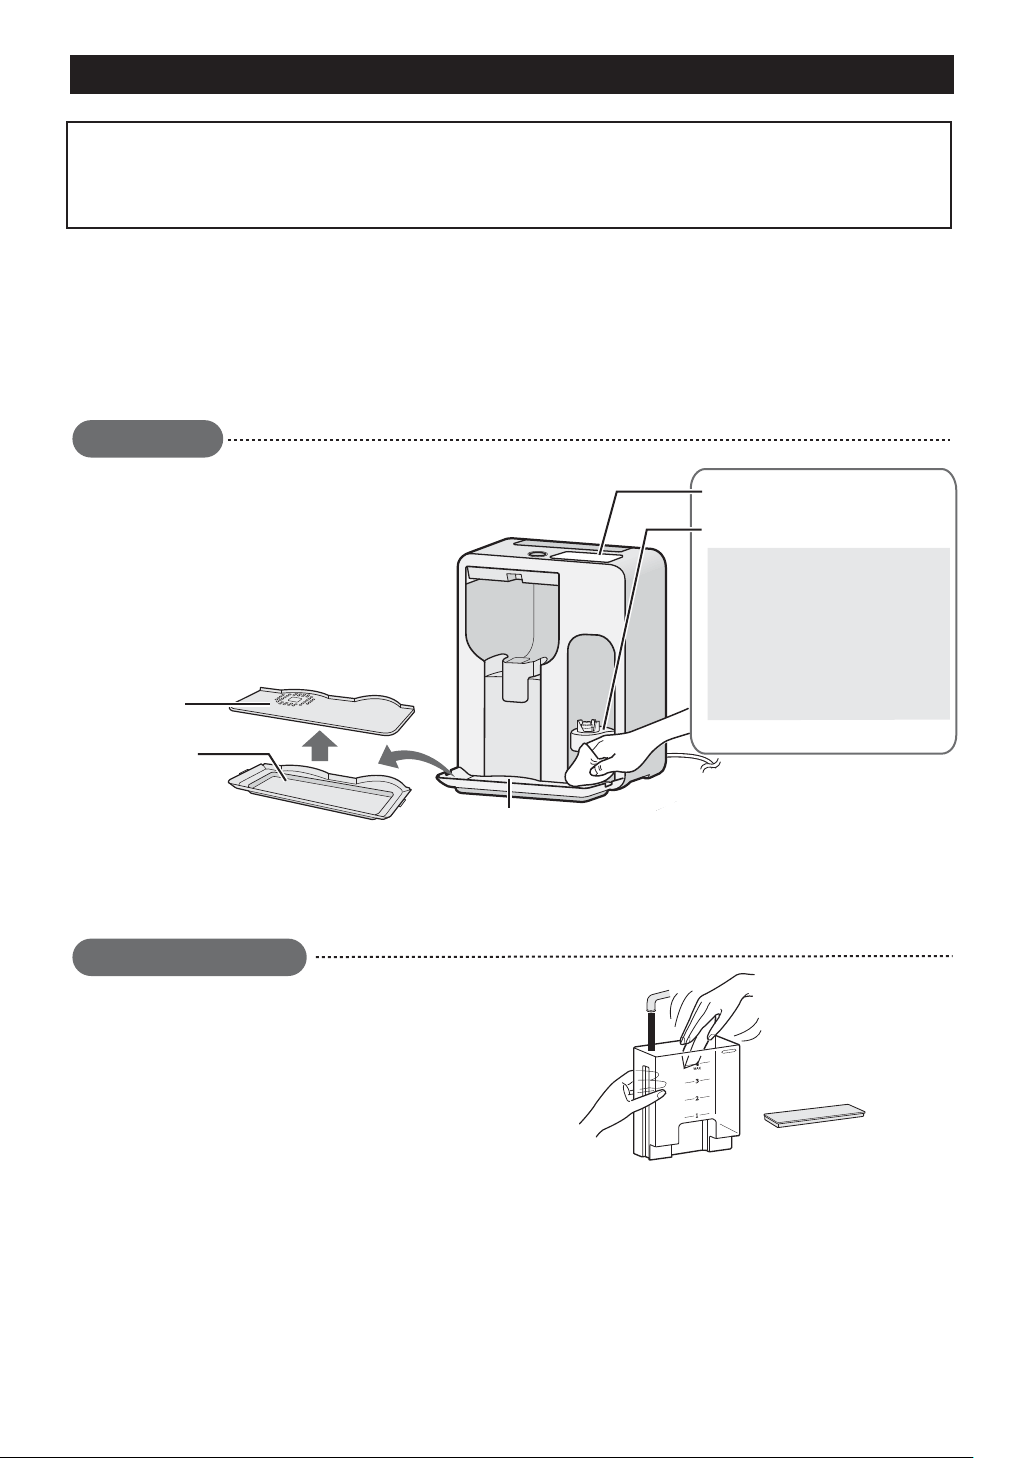
お茶うす受け部
操作部
固く絞ったふきんで水拭きする。
水分を多く含んだ布で拭かない。
洗剤や研磨剤は使用しない。
置き台・つゆ受けトレイを
取りはずし、つゆ受けも
お手入れします。
つゆ受け
トレイ
置き台
水タンク/フタ
つゆ受け
お手入れ
お手入れの前にはお茶メーカーの運転を止めてください。必ず電源プラグを抜き、冷めてから
お手入れしてください。
取扱説明書に記載以外のメンテナンスについては、シャープのサービス窓口にご相談ください。
ご注意:業務用のクリーナー、研磨剤入りの洗剤、水酸化ナトリウムを含む溶剤や研磨効果のある
スポンジなどは使用しない。
食器洗い乾燥機、食器乾燥器は使えません。
操作部とお茶うす受け部の
お手入れは特にご注意ください。
水で湿らせた布で、汚れを
拭き取ってください。
水分を多く含んだ布で
拭かない。洗剤や研磨剤は
使用しない。
ご使用後、柔らかい布またはスポンジと台所用
合成洗剤(中性)で洗う。
食器洗い乾燥機・食器乾燥器には入れない。
研磨剤入りの洗剤、金属製のスクレーパーや
固いブラシなどを使わない。
本体
WA
T
E
R
ON
LY
J-17
使うたびに
使うたびに

置き台受け皿
回転はね
パッキン
フタ
お茶容器
UNLOCK
つゆ受けトレイ
給茶レバー
お手入れ
柔らかいスポンジを使い、水洗いし、しっかり乾かしてください。
汚れが取れにくい場合は、台所用合成洗剤(中性)を使います。
柔らかいスポンジを使い、水洗いし、しっかり乾かしてください。
お茶容器の中の回転はねを取りはずします。
汚れが取れにくい場合は、台所用合成洗剤(中性)を使います。
茶しぶなどの汚れが気になるときは、酸素系漂白剤が使えます。
パッキン周辺の汚れは、給茶レバーを下げた状態にして
流水で洗い流します。
汚れが残っていると水漏れの原因になります。お手入れの前に、
給茶レバーロックを解除してください。
ご注意:
1.パッキンがはずれてしまった場合は、給茶レバーロックを解除してから、給茶レバーを下げた状態
にして、押し込みます。取り付け後、お茶容器に水を入れて、水漏れがないか確認してください。
2.お茶容器内側のパッキン、フタカバーは、無理にはずさないでください。
回転はね
取りはずし
注意して回転はねをすくうように持ち上げます。
(少しかために取り付けられています)
突起
取り付け
お茶容器底の突起(右図)に差し込みます。
ご注意:
紛失や誤飲を防ぐために、お手入れ後は放置せずに元の位置に正しく取り付けてください。
受け皿/置き台/つゆ受けトレイ
お茶容器
J-18
使うたびに
使うたびに
日本語

●
●
●
使うたびに
上うすユニットと下うすがくっついてしまった場合
ether.
無理にはずすと故障の原因になります。
必ずぬるま湯に浸して、無理なくはずせるようにな
るまでお待ちください。
(目安時間:2〜3分)
ご注意:
上うすユニットと下うすは、これ以上分解しないでください。
お茶うす
1カ月に1回程度
2〜3分
上うす
ユニット
下うす
●
●
お手入れ
分解します。(J-5ページ参照) 付属の清掃用ブラシで付着した粉末を取り除きます。
お手入れ後は組み立ててください。(J-21ページ参照)
分解します。(J-5ページ参照) 付属の清掃用ブラシで付着した粉末を払い落としてから、
やわらかいスポンジに台所用合成洗剤(中性)をつけて洗います。すすいだ後は、
しっかり乾燥させてください。
次のような場合は、1カ月未満でも水洗いしてください。
上うす、下うすが目詰まりして粉末茶が出にくくなった場合
●
前回使用した茶葉と違う種類の茶葉を使用する場合
運転中に、分量ランプがすべて点滅して、停止した場合
(上うすユニットと下うすがくっついている場合があります)
うすの回転中に異音がするとき
汚れがひどいとき
長期間使用しないとき
はずれた後は、付属の清掃用ブラシで粉末を取り除き、
水洗いしてからしっかり乾燥させてください。乾燥後は
組み立ててください。(J-21ページ参照)
大切:
乾燥は、乾いた布でしっかり水気を取ったあと、自然乾燥(8時間以上)
してください。水気が残っていると、うすの目に粉末茶が詰まり、
できあがり量が少なくなります。
お茶うすのお手入れ時のご注意:
食器乾燥器や電子レンジなどでの強制乾燥はしないでください。
変形や劣化の原因になります。
J-19

1.水タンクにMAXの水位まで水を入れる。
MAXを超えて水を入れない。
使っているうちに、水の中に含まれているミネラル分が
製品内部のパイプなどに付着します。
これは「湯あか」と言われているもので、付着すると、
湯沸かし時間が長くなったり、水タンクに
水が残ったりします。次の方法で、湯あかを取り除いてください。
フィルター
ツマミを右側に押す。
(湯沸かし目安時間:約5分)
ツマミ
取り付け取りはずし
本体の穴に2カ所のツメを差し込み、
「カチッ」と音がするまでツマミを押し込む。
本体の穴
ツメ
1カ月に1回程度
2.純粋クエン酸大さじ1を入れ、
かき混ぜて溶かし、フタをして本体にセットする。
3.カラのお茶容器を本体にセットし、
電源プラグを差し込む。
4.MODE を1度押し、STARTを押す。
5.お知らせ音(ピーピーピーピー)が鳴ったら、
お茶容器を取りはずしてお湯を捨てる。
6.水タンクにMAXの水位まで水を入れ、
フタをして、本体にセットする。
7.カラのお茶容器をセットする。
8.MODEを1度押し、STARTを押す。
9.お知らせ音(ピーピーピーピー)が鳴ったら、
お茶容器のお湯を捨てる。
10.6〜9を2〜3回繰り返す。ご使用後は電源プラグを抜く。
お手入れ
本体から取りはずし、水洗いする。水洗い後、しっかりと水気を拭き取って、
すぐに取り付けてください。
警告:
お湯を捨てるときは、やけどをしないように注意してください。
フタは鍋つかみなどを使ってはずしてください。
ご注意:
1.クエン酸洗浄をおこなう頻度は、水の硬度によって変わります。
硬水をご使用の場合は、定期的にクエン酸洗浄をおこなっていただくことをおすすめします。
2.純粋クエン酸は、ドラッグストアで購入できます。
クエン酸洗浄
WATER ONLY
WATER ONLY
J-20
日本語

合わせる
1
2
1
2
3
下うす
ヘラ
お茶ケース
上うすユニット
上うすユニットに"▼"は3カ所あります。どれか1つとお茶ケースの白線"I"を合わせます。
穴
突起
下うすの裏面
お手入れ
お茶うすの組み立て
ヘラの"オモテ"を上に向け、お茶ケースに入れる。
ヘラの穴をお茶ケースの突起に合わせてください。
下うすをお茶ケースに入れる。(-a)お茶ケースの突起に、
下うす裏面の穴を合わせます。下うすをゆっくり回して、
はまる場所をさがしてください。( -b)
2
-a
-b
上うすユニットを下うすの上にセットする。
上うすユニットの"▼"を、お茶ケースの白線"I"に合わせます。
ご注意:
"オモテ"を上に
向ける
J-21
突起
穴
2
2
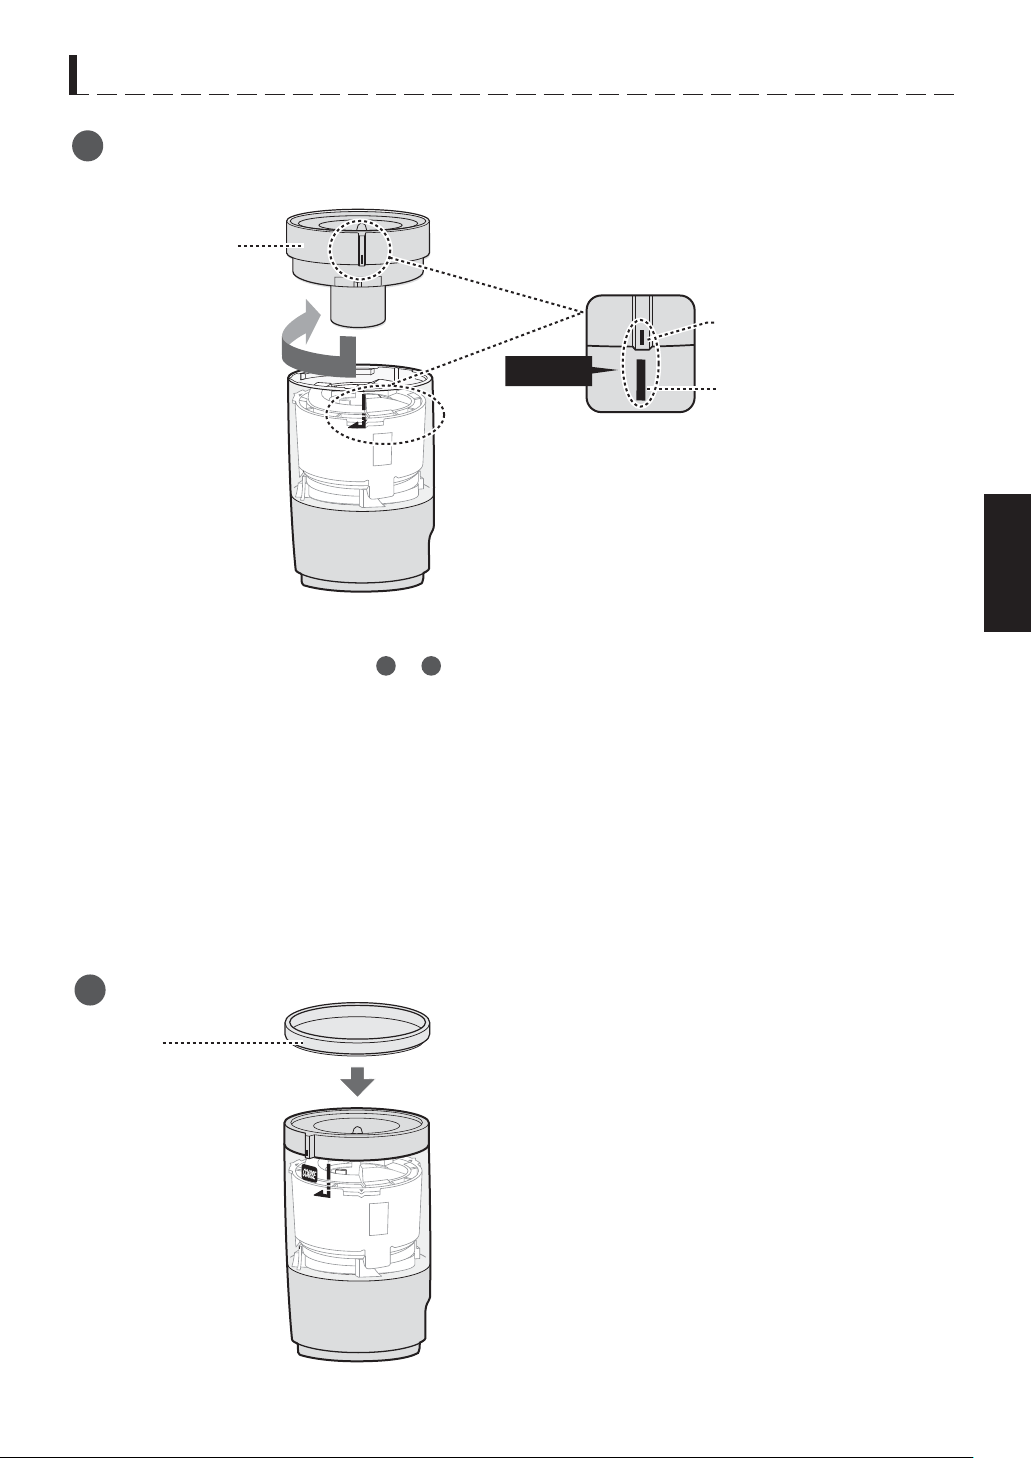
4
5
フタ
ダイヤル
●
●
●
合わせる
J-22
お手入れ
ダイヤルをセットする。ダイヤルの突起とお茶ケースの白線を合わせてダイヤルを押し込み、
時計回りに回します。
ダイヤルの突起
お茶ケースの白線
ご注意:
1.うまくセットできないときは、 〜 の組み立てがうまくできていません。
次のことを確認しながら、もう一度、最初からやり直してください。
2.お茶うすを保管するときは、ダイヤルを"COARSE(粗)"に合わせることをおすすめします。
(上うすと下うすのくっつきを軽減します)
ヘラ:"オモテ"を上に向けましたか?
下うす:裏面の穴をお茶容器の突起にはめましたか?
上うすユニット:位置を合わせましたか?
フタをのせる。
日本語
1 3

故障かな?
以下のような症状は異常や故障ではありません。
こんな場合
故障ではありません
キーキー音がする
初めて使うときやお手入れ後は、茶葉がうすに入るまで
音がしますが、異常ではありません。
使用中にうすの回転が
止まったり、いつもと違う
異常な音がする
適切な茶葉を使用していることを確認してください。
お茶うすを分解して付属の清掃用ブラシでお手入れしてください。
分解方法はJ-5ページを参照してください。
お手入れ後は、組み立ててください。J-21ページを参照してください。
お茶うすのお手入れの詳細はJ-19ページをご覧ください。
キーの受け付け音、
終了音が鳴らない
お知らせ音を消す設定になっています。お知らせ音を
鳴らす設定にするには、J-6ページをご覧ください。
クエン酸洗浄をしてください。J-20ページをご覧ください。
湯沸かし時間が長い
水タンクに水が残る
粉末茶が出ない
STARTを押してから約30秒後に粉末茶が出始めます。
お茶うすに残っている茶葉を取り除き、長い茶葉は
短くしてからお使いください。
ヘラがお茶うすに正しくセットされていることを確認してください。
仕様
電源:
消費電力:
本体
お茶うす
外形寸法(幅×高さ×奥行):
質量:
単相交流120V,60Hz
940W
910W
30W
91/4x113/4x87/8
233mmx296mmx225mm
約6.6lbs./3.0kg
●
●
●
●
●
●
●
粗い粉末茶が出る
ダイヤルの設定を確認してください。
●
ラテや冷茶に粉末がダマに
なって残る
必ず粉末茶より先に液体を入れてください。
●
できあがりの粉末茶量が、
いつもより少ない
それでも異常があるときは、電源プラグを抜いてシャープのサービス窓口にご連絡ください。
修理や部品購入のご相談については、E-25ページをご覧ください。製品の保証に関してはE-26,27ページを
ご覧ください。
初めて使うときやお手入れ後は、できあがりの粉末茶量が少ない
場合があります。
●
●
茶葉の種類によって、粉末状態(細かさ)が異なることがあります。
●
●
●
お茶うすを分解して付属の清掃用ブラシでお手入れしてください。
分解方法はJ-5ページを参照してください。
お手入れ後は、組み立ててください。J-21ページを参照してください。
お茶うすのお手入れの詳細はJ-19ページをご覧ください。
●
J-23
できあがりの粉末茶量は茶葉の種類によって変わります。
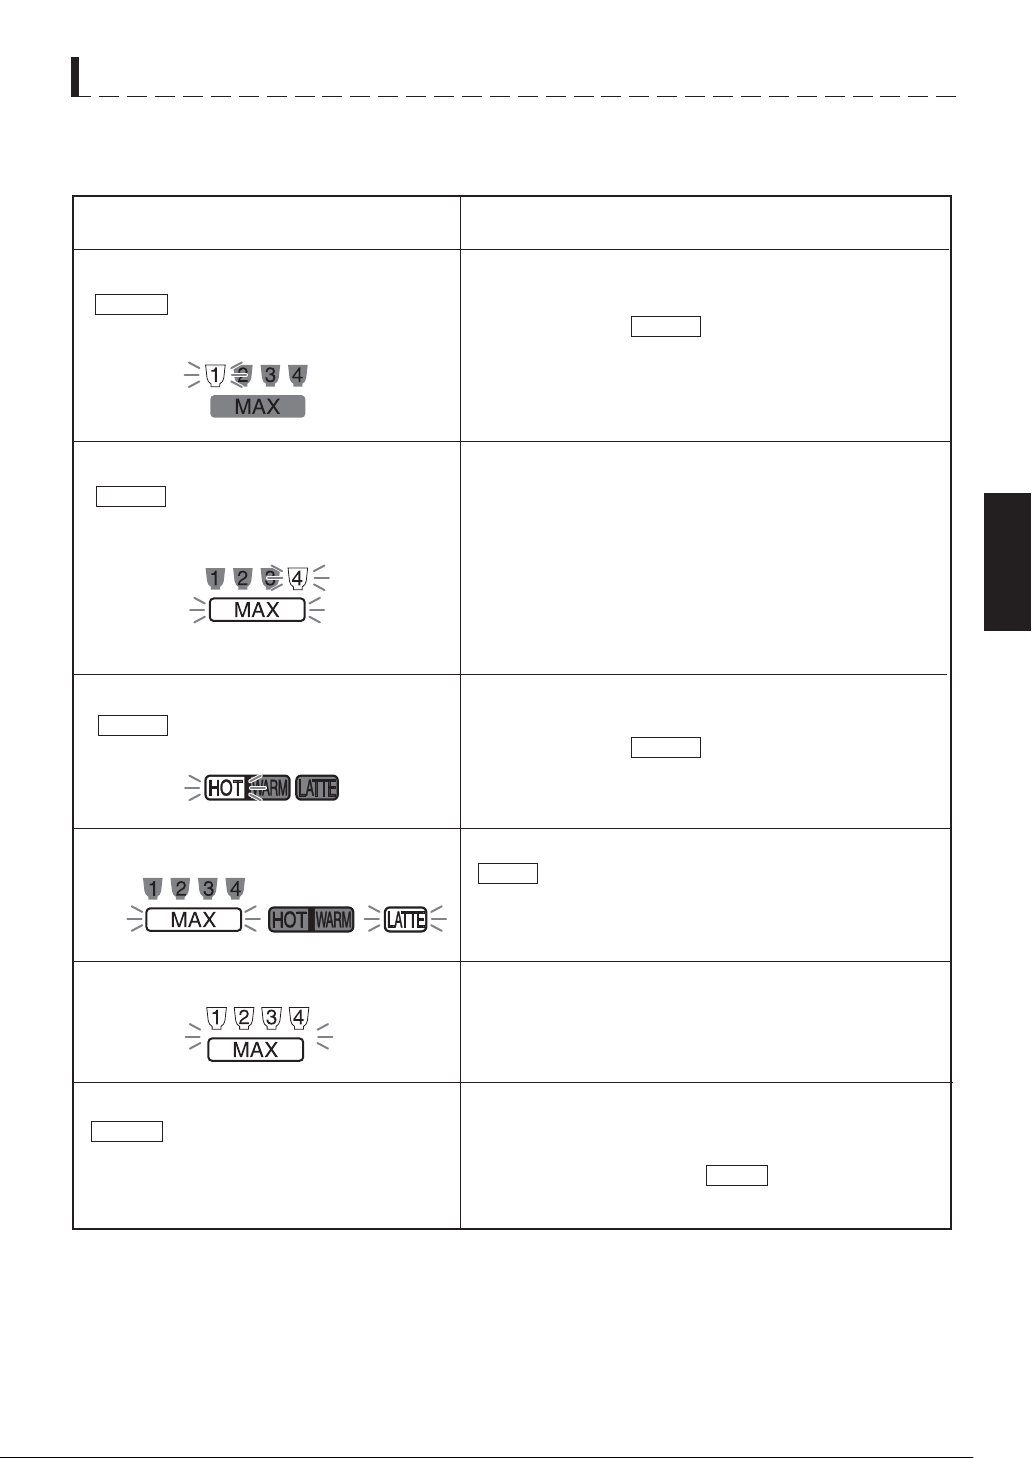
それでも異常があるときは、電源プラグを抜いてシャープのサービス窓口にご連絡ください。
修理や部品購入のご相談については、E-25 ページをご覧ください。製品の保証に関しては E-26,27 ページを
ご覧ください。
分量ランプがすべて点滅して、製品が停止した
"MAX" と "LATTE" のランプが点滅している
休止目安時間(最大)
1 杯分:3 分 20 秒、2 杯分:6 分 30 秒、
3 杯分:9 分 40 秒、4 杯分:12 分 50 秒、
MAX:30 分
うすの温度が高いので保護機能がはたらき、
挽くことができません。休止時間を
おいてからお使いください。休止時間は設定分量に
よって異なります。
例:HOT( 温茶 ) を選んでいたとき
上うすユニットと下うすユニットが
くっついている場合があります。
J-19 をご参照いただき、
お茶うすをお手入れしてください
デモモードになっています。
デモモードは、店頭での操作説明や、
お客様の操作練習のためのものです。
デモモードを解除するには、STOPを
「ピッ」と鳴るまで押し、さらに 4 回押します。
表示ランプの点灯位置が移動する。
STARTを押しても製品が動かない
水タンクに水が入っていません
STOPを押して、水タンクを取り出して水を入れ、
本体にセットして、再度メニューを選択してください。
お茶容器が正しくセットされていることを
確認してください。
正しく取り付けて、STARTを押してください。
選択したメニューランプが点滅している
(STARTを押したとき )
(4 杯分とまとめ挽が挽けません )
例:4杯分の茶葉を挽く設定をしたとき
例:1 杯分の茶葉を挽く設定をしたとき
普段と違うランプの点滅があり、製品が正しく動作していないとお感じの場合は、
シャープのサービス窓口へのご連絡の前に下のチャートをお調べください。
表示
故障かな?
表示の内容
分量ランプが点滅している
(GRINDを押したとき )
設定した分量ランプが点滅している
(STARTを押したとき )
お茶うすが正しくセットされていることを
確認してください。
正しく取り付けて、STARTを押してください。
J-24
日本語

SHARP ELECTRONICS OF CANADA LTD.
335 Britannia Road East Mississauga,
Ontario L4Z 1W9 Canada
SHARP ELECTRONICS CORPORATION
Sharp Plaza, Mahwah,
New Jersey 07495-1163 U.S.A.
Printed in China
Imprimé en Chine
TINSEA001WBRZ-D52