www.philips.com/welcome
55BDL4051T
V1.00
User Manual (English)

55BDL4051T
ii
Safety Instructions
Safety precautions and maintenance
WARNING: Use of controls, adjustments or procedures other than those specied in this documentation may result in exposure to
shock, electrical hazards and/or mechanical hazards.
Read and follow these instructions when connecting and using your display:
Operation:
• Keepthedisplayoutofdirectsunlightandawayfromstovesoranyotherheatsources.
• Removeanyobjectthatcouldfallintoventilationholesorpreventpropercoolingofthedisplay’selectronics.
• Donotblocktheventilationholesonthecabinet.
• Whenpositioningthedisplay,makesurethepowerplugandoutletareeasilyaccessible.
• Whenturningoffthedisplaybydetachingthepowercord,wait6secondsbeforere-attachingthepowercordfornormaloperation.
• EnsuretheuseofanapprovedpowercordprovidedbyPhilipsatalltimes.Ifyourpowercordismissing,pleasecontactyourlocalservicecenter.
• Donotsubjectthedisplaytoseverevibrationorhighimpactconditionsduringoperation.
• Donotknockordropthedisplayduringoperationortransportation.
Maintenance:
• Toprotectyourdisplayfrompossibledamage,donotputexcessivepressureontheLCDpanel.Whenmovingyourdisplay,grasptheframetolift;do
notliftthedisplaybyplacingyourhandorngersontheLCDpanel.
• Unplugthedisplayifyouarenotgoingtouseitforanextensiveperiodoftime.
• Unplugthedisplayifyouneedtocleanitwithaslightlydampcloth.Thescreenmaybewipedwithadryclothwhenthepowerisoff.However,never
useorganicsolvent,suchas,alcohol,orammonia-basedliquidstocleanyourdisplay.
• Toavoidtheriskofshockorpermanentdamagetotheset,donotexposethedisplaytodust,rain,wateroranexcessivelymoistenvironment.
• Ifyourdisplaybecomeswet,wipeitwithdryclothassoonaspossible.
• Ifaforeignsubstanceorwatergetsinyourdisplay,turnthepoweroffimmediatelyanddisconnectthepowercord.Thenremovetheforeignsubstance
orwater,andsendtheunittothemaintenancecenter.
• Donotstoreorusethedisplayinlocationsexposedtoheat,directsunlightorextremecold.
• Inordertomaintainthebestperformanceofyourdisplayandensurealongerlifetime,westronglyrecommendusingthedisplayinalocationthatfalls
withinthefollowingtemperatureandhumidityranges.
- Temperature:0-40°C32-104°F
- Humidity:20-80%RH
IMPORTANT:Alwaysactivateamovingscreensaverprogramwhenyouleaveyourdisplayunattended.Alwaysactivateaperiodicscreenrefresh
applicationiftheunitwilldisplayunchangingstaticcontent.Uninterrupteddisplayofstillorstaticimagesoveranextendedperiodmaycause“burnin”,
alsoknownas“after-imaging”or“ghostimaging”,onyourscreen.Thisisawell-knownphenomenoninLCDpaneltechnology.Inmostcases,the“burned
in”or“after-imaging”or“ghostimaging”willdisappeargraduallyoveraperiodoftimeafterthepowerhasbeenswitchedoff.
WARNING:Severe“burn-in”or“after-image”or“ghostimage”symptomswillnotdisappearandcannotberepaired.Thisisalsonotcoveredunderthe
termsofyourwarranty.
Service:
• Thecasingcovershouldbeopenedonlybyqualiedservicepersonnel.
• Ifthereisanyneedforrepairorintegration,pleasecontactyourlocalservicecenter.
• Donotleaveyourdisplayunderdirectsunlight.
Ifyourdisplaydoesnotoperatenormally,havingfollowedtheinstructionssetoutinthisdocument,pleasecontactatechnicianoryour
localservicecenter.
55BDL4051T
iii
Read and follow these instructions when connecting and using your display:
• Unplugthedisplayifyouarenotgoingtouseitforanextensiveperiodoftime.
• Unplugthedisplayifyouneedtocleanitwithaslightlydampcloth.Thescreenmanybewipedwithadryclothwhenthepoweris
off.However,neverusealcohol,solventsorammonia-basedliquids.
• Consultaservicetechnicianifthedisplaydoesnotoperatenormallywhenyouhavefollowedtheinstructionsinthismanual.
• Thecasingcovershouldbeopenedonlybyqualiedservicepersonnel.
• Keepthedisplayoutofdirectsunlightandawayfromstovesoranyotherheatsources.
• Removeanyobjectthatcouldfallintotheventsorpreventpropercoolingofthedisplay’selectronics.
• Donotblocktheventilationholesonthecabinet.
• Keepthedisplaydry.Toavoidelectricshock,donotexposeittorainorexcessivemoisture.
• WhenturningoffthedisplaybydetachingthepowercableorDCpowercord,waitfor6secondsbeforere-attachingthepower
cableorDCpowercordfornormaloperation.
• Toavoidtheriskofshockorpermanentdamagetothesetdonotexposethedisplaytorainorexcessivemoisture.
• Whenpositioningthedisplay,makesurethepowerplugandoutletareeasilyaccessible.
• IMPORTANT:Alwaysactivateascreensaverprogramduringyourapplication.Ifastillimageinhighcontrastremainsonthe
screenforanextendedperiodoftime,itmayleavean‘after-image’or‘ghostimage’onthefrontofthescreen.Thisisawell-known
phenomenonthatiscausedbytheshortcomingsinherentinLCDtechnology.Inmostcasestheafterimagewilldisappeargradually
overaperiodoftimeafterthepowerhasbeenswitchedoff.Beawarethattheafter-imagesymptomcannotberepairedandisnot
coveredunderwarranty.
CE Declaration of Conformity
ThisdevicecomplieswiththerequirementssetoutintheCouncilDirectiveontheApproximationoftheLawsoftheMemberStatesrelatingto
ElectromagneticCompatibility(2014/30/EU),Low-voltageDirective(2014/35/EU),RoHSdirective(2011/65/EU)andRadioEquipmentDirective(2014/53/
EU).
ThisproducthasbeentestedandfoundtocomplywiththeharmonizedstandardsforInformationTechnologyEquipment,theseharmonizedstandards
publishedunderDirectivesofOfcialJournaloftheEuropeanUnion.
Warning:
ThisequipmentiscompliantwithClassAofEN55032/CISPR32.Inaresidentialenvironmentthisequipmentmaycauseradiointerference.
ESD Warnings
Whenuserclosetothemonitormaycausetheequipmentdischargeandreboottothedisplayofmainmenu.
Federal Communications Commission (FCC) Notice (U.S. Only)
NOTE:ThisequipmenthasbeentestedandfoundtocomplywiththelimitsforaClassAdigitaldevice,pursuanttopart15ofthe
FCCRules.Theselimitsaredesignedtoprovidereasonableprotectionagainstharmfulinterferencewhentheequipmentisoperated
inacommercialenvironment.Thisequipmentgenerates,uses,andcanradiateradiofrequencyenergyand,ifnotinstalledandusedin
accordancewiththeinstructionmanual,maycauseharmfulinterferencetoradiocommunications.Operationofthisequipmentina
residentialareaislikelytocauseharmfulinterferenceinwhichcasetheuserwillberequiredtocorrecttheinterferenceathisown
expense.
Changesormodicationsnotexpresslyapprovedbythepartyresponsibleforcompliancecouldvoidtheuser’sauthoritytooperatethe
equipment.
UseonlyanRFshieldedcablethatwassuppliedwiththedisplaywhenconnectingthisdisplaytoacomputerdevice.
Topreventdamagewhichmayresultinreorshockhazard,donotexposethisappliancetorainorexcessivemoisture.
55BDL4051T
iv
Europe – EU Declaration of Conformity
ThisdevicecomplieswiththeessentialrequirementsoftheRadioEquipmentDirective(2014/53/EU).Thefollowingtestmethodshavebeenappliedin
ordertoprovepresumptionofconformitywiththeessentialrequirementsoftheRadioEquipmentDirective(2014/53/EU):
-EN60950-1
SafetyofInformationTechnologyEquipment
-EN62311
Assessmentofelectronicandelectricalequipmentrelatedtohumanexposurerestrictionsforelectromagneticelds(0Hz-300GHz)
-EN300328(For802.11b/g/n)
ElectromagneticcompatibilityandRadiospectrumMatters(ERM);WidebandTransmissionsystems;Datatransmissionequipmentoperatinginthe2,4GHz
ISMbandandusingspreadspectrummodulationtechniques;HarmonizedENcoveringessentialrequirementsunderarticle3.2oftheR&TTEDirective
-EN301489-17
ElectromagneticcompatibilityandRadiospectrumMatters(ERM);ElectroMagneticCompatibility(EMC)standardforradioequipmentandservices;Part
17:Specicconditionsfor2,4GHzwidebandtransmissionsystemsand5GHzhighperformanceRLANequipment
-EN301489-1
ElectromagneticcompatibilityandRadioSpectrumMatters(ERM);ElectroMagneticCompatibility(EMC)standardforradioequipmentandservices;Part1:
Commontechnicalrequirements
Taiwan:
低功率電波輻射性電機管理辦法
第十二條
經型式認證合格之低功率射頻電機,非經許可,公司、商號或使用者均不得擅自變更頻率、加
大功率或變更原設計之特性及功能。
第十四條
低功率射頻電機之使用不得影響飛航安全及干擾合法通信;經發現有干擾現象時,應立即停用,
並改善至無干擾時方得繼續使用。
前項合法通信,指依電信法規定作業之無線電通信。
低功率射頻電機須忍受合法通信或工業、科學及醫療用電波輻射性電機設備之干擾。
USA:
FederalCommunicationCommissionInterferenceStatement
ThisdevicecomplieswithPart15oftheFCCRules.Operationissubjecttothefollowingtwoconditions:(1)Thisdevicemaynotcauseharmful
interference,and(2)thisdevicemustacceptanyinterferencereceived,includinginterferencethatmaycauseundesiredoperation.
ThisequipmenthasbeentestedandfoundtocomplywiththelimitsforaClassBdigitaldevice,pursuanttoPart15oftheFCCRules.Theselimitsare
designedtoprovidereasonableprotectionagainstharmfulinterferenceinaresidentialinstallation.Thisequipmentgenerates,usesandcanradiateradio
frequencyenergyand,ifnotinstalledandusedinaccordancewiththeinstructions,maycauseharmfulinterferencetoradiocommunications.However,
thereisnoguaranteethatinterferencewillnotoccurinaparticularinstallation.Ifthisequipmentdoescauseharmfulinterferencetoradioortelevision
reception,whichcanbedeterminedbyturningtheequipmentoffandon,theuserisencouragedtotrytocorrecttheinterferencebyoneofthe
followingmeasures:
-Reorientorrelocatethereceivingantenna.
-Increasetheseparationbetweentheequipmentandreceiver.
-Connecttheequipmentintoanoutletonacircuitdifferentfromthattowhichthereceiverisconnected.
-Consultthedealeroranexperiencedradio/TVtechnicianforhelp.
FCCCaution:Anychangesormodicationsnotexpresslyapprovedbythepartyresponsibleforcompliancecouldvoidtheuser’sauthoritytooperate
thisequipment.
Thistransmittermustnotbeco-locatedoroperatinginconjunctionwithanyotherantennaortransmitter.

55BDL4051T
v
Canada:
IndustryCanadastatement:
ThisdevicecomplieswithRSS-247oftheIndustryCanadaRules.Operationissubjecttothefollowingtwoconditions:(1)Thisdevicemaynotcause
harmfulinterference,and(2)thisdevicemustacceptanyinterferencereceived,includinginterferencethatmaycauseundesiredoperation.
CedispositifestconformeàlanormeCNR-247d’IndustrieCanadaapplicableauxappareilsradioexemptsdelicence.Sonfonctionnementestsujetaux
deuxconditionssuivantes:(1)ledispositifnedoitpasproduiredebrouillagepréjudiciable,et(2)cedispositifdoitacceptertoutbrouillagereçu,ycompris
unbrouillagesusceptibledeprovoquerunfonctionnementin
Brazil:
ANATELRFSTATEMENT
PerArticle6ofResolution506,equipmentofrestrictedradiationmustcarrythefollowingstatementinavisiblelocation
“Esteequipamentooperaemcarátersecundário,istoé,nãotemdireitoaproteçãocontrainterferênciaprejudicial,mesmodeestaçõesdomesmotipo,e
nãopodecausarinterferênciaasistemasoperandoemcaráterprimário.”
ANATELBODYSARSTATEMENT
“Esteprodutoatendeaosrequisitostécnicosaplicados,incluindooslimitesdeexposiçãodaTaxadeAbsorçãoEspecícareferenteacamposelétricos,
magnéticoseeletromagnéticosderadiofrequência,deacordocomasresoluçõesn°303/2002e533/2009.Esteprodutoatendeàsdiretrizesdeexposição
àRFnaposiçãonormaldeusoapelomenosXcentímetroslongedocorpo,tendosidoosensaiosdeSARparacorporealizadoaXcmdeacordocom
oinformativoderecomendaçãoapresentadonomanualdofabricante.”
Polish Center for Testing and Certication Notice
Theequipmentshoulddrawpowerfromasocketwithanattachedprotectioncircuit(athree-prongsocket).Allequipmentthatworkstogether(computer,
display,printer,andsoon)shouldhavethesamepowersupplysource.
Thephasingconductoroftheroom’selectricalinstallationshouldhaveareserveshort-circuitprotectiondeviceintheformofafusewithanominalvalue
nolargerthan16amperes(A).
Tocompletelyswitchofftheequipment,thepowersupplycablemustberemovedfromthepowersupplysocket,whichshouldbelocatednearthe
equipmentandeasilyaccessible.
Aprotectionmark“B”conrmsthattheequipmentisincompliancewiththeprotectionusagerequirementsofstandardsPN-93/T-42107andPN-89/
E-06251.

55BDL4051T
vi
Electric, Magnetic and Electromagnetic Fields (“EMF”)
1. Wemanufactureandsellmanyproductstargetedatconsumers,which,likeanyelectronicapparatus,ingeneralhavetheabilitytoemitandreceive
electromagneticsignals.
2. OneofourleadingBusinessPrinciplesistotakeallnecessaryhealthandsafetymeasuresforourproducts,tocomplywithallapplicablelegal
requirementsandtostaywellwithintheEMFstandardsapplicableatthetimeofproducingtheproducts.
3. Wearecommittedtodevelop,produceandmarketproductsthatcausenoadversehealtheffects.
4. Weconrmthatifitsproductsarehandledproperlyfortheirintendeduse,theyaresafetouseaccordingtoscienticevidenceavailabletoday.
5. WeplayanactiveroleinthedevelopmentofinternationalEMFandsafetystandards,enablingustoanticipatefurtherdevelopmentsinstandardization
forearlyintegrationinitsproducts.
Information for U.K. only
(A)
(B)
WARNING - THIS APPLIANCE MUST BE EARTHED.
Important:
Thisapparatusissuppliedwithanapprovedmoulded13Aplug.Tochangeafuseinthistypeofplug
proceedasfollows:+
1. Removefusecoverandfuse.
2. FitnewfusewhichshouldbeaBS13625A,A.S.T.A.orBSIapprovedtype.
3. Retthefusecover.
Ifthettedplugisnotsuitableforyoursocketoutlets,itshouldbecutoffandanappropriate3-pin
plugttedinitsplace.
Ifthemainsplugcontainsafuse,thisshouldhaveavalueof5A.Ifaplugwithoutafuseisused,thefuse
atthedistributionboardshouldnotbegreaterthan5A.
NOTE: Theseveredplugmustbedestroyedtoavoidapossibleshockhazardshoulditbeinserted
intoa13Asocketelsewhere.

55BDL4051T
viii
China RoHS
电子电气产品有害物质限制使用标识要求 (中国RoHS法规标识要求) 产品中有害物质的名称及含量。
零部件名称
有害物质
铅
(Pb)
汞
(Hg)
镉
(Cd)
六价铬
(Cr (VI))
多溴联苯
(PBB)
多溴二苯醚
(PBDE)
塑料外框 O O O O O O
后壳 O O O O O O
LCD
panel
CCFL X X O O O O
LED X O O O O O
电路板组件* X O O O O O
底座 O O O O O O
电源线 X O O O O O
其他线材 X O O O O O
遥控器 X O O O O O
*:电路板组件包括印刷电路板及其构成的零部件,如电阻、电容、集成电路、连接器等。
本表格依据SJ/T 11364的规定编制。
O: 表示该有害物质在该部件所有均质材料中的含量均在 GB/T 26572 标准规定的限量要求以下.
X: 表示该有害物质至少在该部件的某一均质材料中的含量超出 GB/T 26572 标准规定的限量要求.
上 表 中 打“ X”的部件中,应功能需要,部分有害物质含量超出GB/T 26572规定的限量要求,但是符合欧盟
RoHS法规要求(属于豁免部分)。
备注:上表仅做为范例,实际标示时应依照各产品的实际部件及所含有害物质进行标示。
10
環保使用期限
此標識指期限(十年),電子电气產品中含有的有害物質在正常使用的條件下不會發生外泄或突變,
電子电气產品用戶使用該電子电气產品不會對環境造成嚴重污染或對其人身、財產造成嚴重損害的期限。

55BDL4051T
ix
中国能源效率标识
根据中国大陆《能源效率标识管理办法》,本显示器符合以下要求
能源效率(cd/W) >1.05
能效等级 1 级
能效标准 GB 21520-2008
详细有关信息请查阅中国能效标识网: http://www.energylabel.gov.cn/
《废弃电器电子产品回收处理管理条例》提示性说明
为了更好地关爱及保护地球,当用户不再需要此产品或产品寿命终止时,请遵守国家废弃电器电子产品
回收处理相关法律法规,将其交给当地具有国家认可的回收处理资质的厂商进行回收处理。
娤⌈
㨢᳸$䵥ᵥ⍿Ʋ◦䏝㯹䉭❁ᳫ濕媣ᵥ⍿⊭侻廞ノ㒞䵽䏳ⴰㄮƲ◦店䢋⾃濕⊭侻斾堿䏦ヵ
⪷ⴰㄮ悅⊔⩜⊭圊䕂㉨㑻Ʋ
設備名稱: 液晶彩色顯示器,型號(型式):55BDL4051T
單元
限用物質及其化學符號
鉛
(Pb)
汞
(Hg)
鎘
(Cd)
六價鉻
(Cr
+6
)
多溴聯苯
(PBB)
多溴二苯醚
(PBDE)
塑料外框 ○ ○ ○ ○ ○ ○
後殼 ○ ○ ○ ○ ○ ○
LCD panel - ○ ○ ○ ○ ○
電路板組件 - ○ ○ ○ ○ ○
底座 ○ ○ ○ ○ ○ ○
電源線 - ○ ○ ○ ○ ○
其他線材 - ○ ○ ○ ○ ○
遙控器 - ○ ○ ○ ○ ○
備考1.〝○〞係指該項限用物質之百分比含量未超出百分比含量基準值。
備考2.〝-〞係指該項限用物質為排除項目。
警語 : 使用過度恐傷害視力。
注意事項 :
(1) 使用30分鐘請休息10分鐘。
(2) 未滿2歲幼兒不看螢幕,2歲以上每天看螢幕不要超過1小時。

55BDL4051T
xiii
7. USB device compatibility ....................................................... 50
8. Input Mode ............................................................................... 52
9. Pixel Defect Policy .................................................................. 53
9.1. PixelsandSub-Pixels...............................................................53
9.2. TypesofPixelDefects+DotDenition....................53
9.3. BrightDotDefects...................................................................53
9.4. DarkDotDefects.....................................................................54
9.5. ProximityofPixelDefects...................................................54
9.6. PixelDefectTolerances.........................................................54
9.7. MURA.............................................................................................54
10. Cleaning and Troubleshooting .............................................. 55
10.1. Cleaning..........................................................................................55
10.2. Troubleshooting.........................................................................56
11. Technical Specications ......................................................... 57

55BDL4051T
1
1. Unpacking and Installation
1.1. Unpacking
• Thisproductispackedinacarton,togetherwiththestandardaccessories.
• Anyotheroptionalaccessorieswillbepackedseparately.
• Duetothesizeandweightofthisdisplayitisrecommendedfortwopeopletomoveit.
• Afteropeningthecarton,ensurethatthecontentsarecompleteandingoodcondition.
1.2. Package Contents
Pleaseverifythatyoureceivedthefollowingitemswithyourpackagecontent:
• LCDdisplay
• RemotecontrolwithAAAbatteries
• Powercord(1.8m)
• RS232cable(1.8m)
• RS232daisy-chaincable(1.8m)
• Quickstartguide
• Logoguider&logo
• USBcable(1.8m)
• IRsensorcable(1.8m)
* The supplied power cord varies depending on destination.
Power Cord
Logo guider
Quick start guide
Remote Control
and AAA Batteries
RS232 Cable
RS232 daisy-chain cable
USB Cable
IR Sensor Cable
*Differencesaccordingtoregions.
Displaydesignandaccessoriesmaydifferfromthoseillustratedabove.
NOTES:
• Forallotherregions,applyapowercordthatconformstotheACvoltageofthepowersocketandhasbeenapprovedbyandcomplieswiththe
safetyregulationsoftheparticularcountry(TypeH05VV-F,2Gor3G,0.75or1mm
2
shouldbeused).
• Youmightliketosavethepackageboxandpackingmaterialforshippingthedisplay.
1.3. Installation Notes
• Duetothehighpowerconsumption,alwaysusetheplugexclusivelydesignedforthisproduct.Ifanextendedlineisrequired,pleaseconsultyour
serviceagent.
• Theproductshouldbeinstalledonaatsurfacetoavoidtipping.Thedistancebetweenthebackoftheproductandthewallshouldbemaintained
forproperventilation.Avoidinstallingtheproductinthekitchen,bathroomoranyotherplaceswithhighhumiditysoasnottoshortentheservicelife
oftheelectroniccomponents.
• Theproductcannormallyoperateonlyunder3000minaltitude.Ininstallationsataltitudesabove3000m,someabnormalitiesmaybeexperienced.

55BDL4051T
2
1.4. Installing and Removing Table Stands (optional)
Step 1- Put on the table
Layaprotectivesheetonthetable,whickwaswrappedarroundthedisplaywhenitwaspackaged,beneachthescreensurfacesoasnottoscratch
thescreenface.
Step 2- Fix the tube to the display (by using M6xL41 screws)
Pleaserefertothefollowingdrawingtoknowthepositionofscrews.
Step 3- Set up the stand (by using thumb)
Table stand
Longer portions face the front
M6xL41 screws
Thumb screws
To remove table stands:
1. Poweroffthedisplay.
2. Spreadaprotectivesheetonaatsurface.
3. Placethedisplayface-downontheprotectivesheet.
4. Removescrewsusingascrewdriverandplacetheminasafeplaceforreuse.
55BDL4051T
3
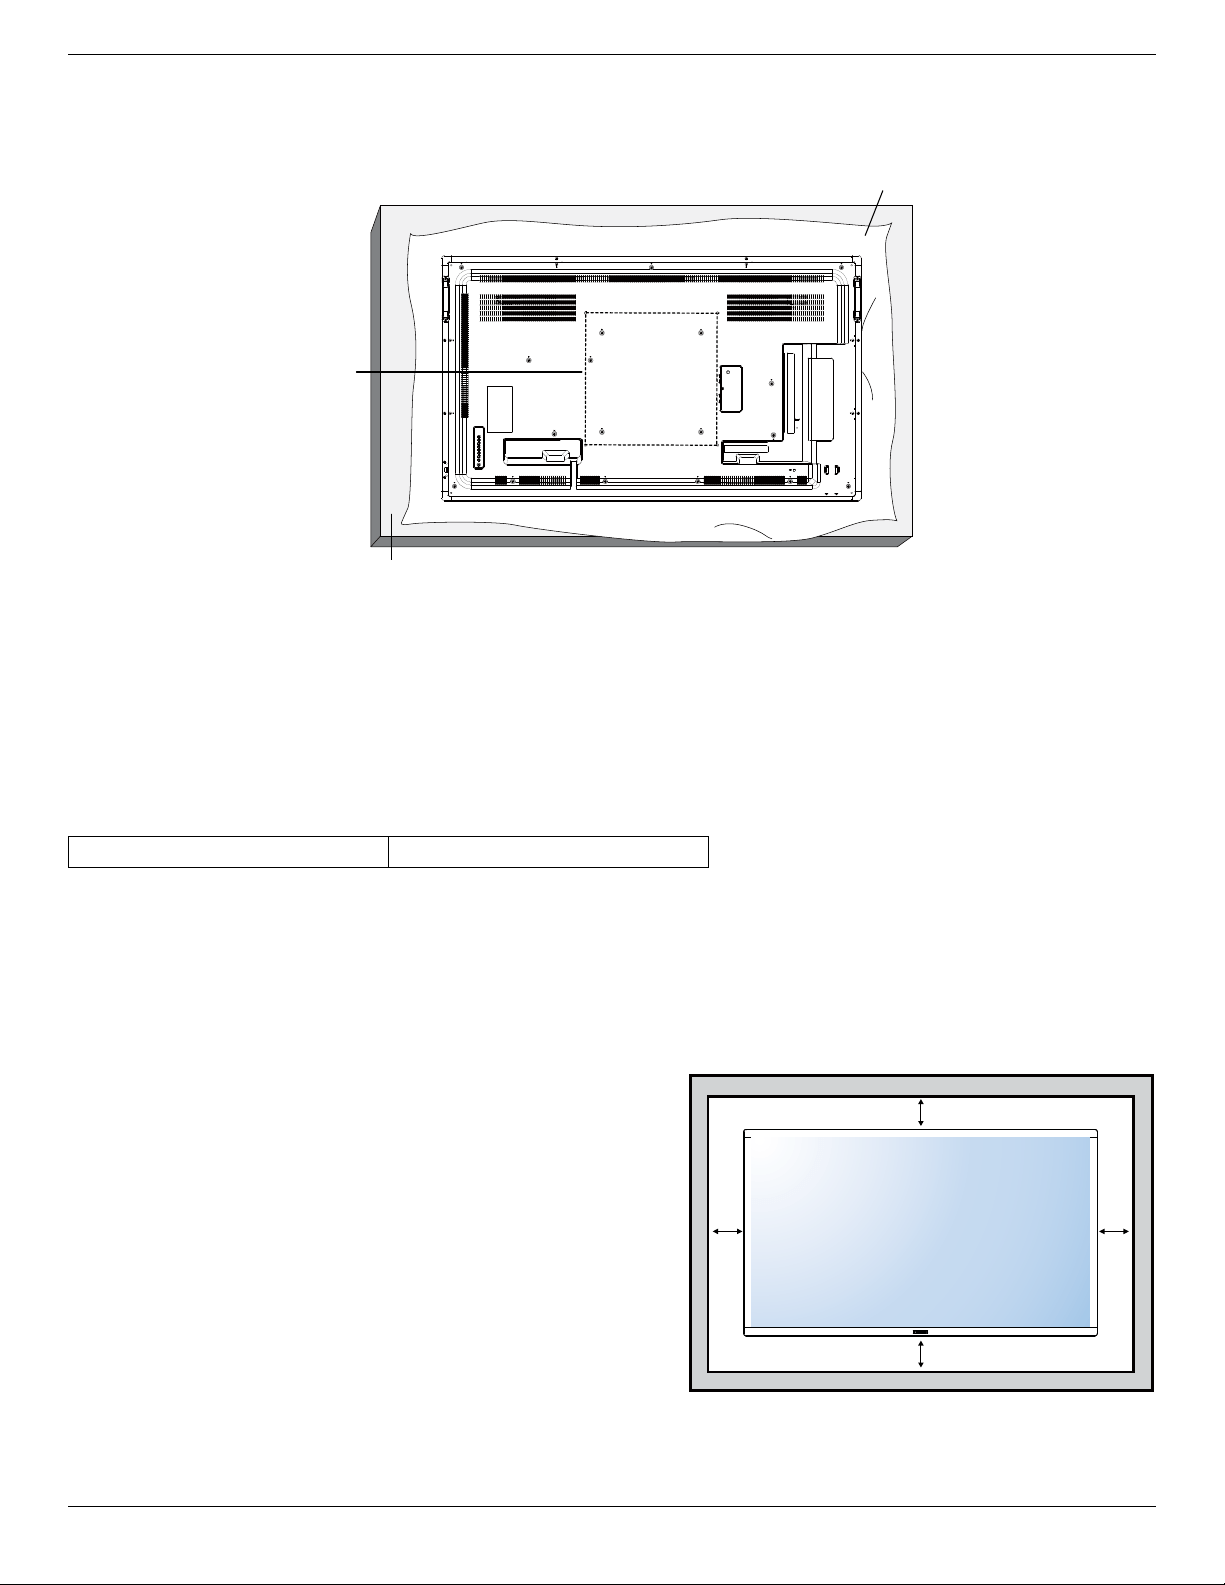
1.5. Mounting on a Wall
Tomountthisdisplaytoawall,youwillhavetoobtainastandardwall-mountingkit(commerciallyavailable).Werecommendusingamountinginterface
thatcomplieswithTUV-GSand/orUL1678standard.
Protective Sheet
Table
VESA Grid
1. Layaprotectivesheetonatable,whichwaswrappedaroundthedisplaywhenitwaspackaged,beneaththescreensurfacesoasnottoscratchthe
screenface.
2. Ensureyouhaveallaccessoriesformountingthisdisplay(wallmount,ceilingmount,tablestand,etc).
3. Followtheinstructionsthatcomewiththebasemountingkit.Failuretofollowcorrectmountingprocedurescouldresultindamagetotheequipment
orinjurytotheuserorinstaller.Productwarrantydoesnotcoverdamagecausedbyimproperinstallation.
4. Forthewall-mountingkit,useM6mountingscrews(havingalength10mmlongerthanthethicknessofthemountingbracket)andtightenthem
securely.
1.5.1. VESA Grid
55BDL4051T
400(H)x400(V)mm
Caution:
Topreventthedisplayfromfalling:
• Forwallorceilinginstallation,werecommendinstallingthedisplaywithmetalbracketswhicharecommerciallyavailable.Fordetailedinstallation
instructions,refertotheguidereceivedwiththerespectivebracket.
• Tolessentheprobabilityofinjuryanddamageresultingfromfallofthedisplayincaseofearthquakeorothernaturaldisaster,besuretoconsultthe
bracketmanufacturerforinstallationlocation.
Ventilation Requirements for enclosure locating
Toallowheattodisperse,leavespacebetweensurroundingobjectsasshowninthe
diagrambelow.
100 mm 100 mm
100 mm
100 mm
55BDL4051T
4
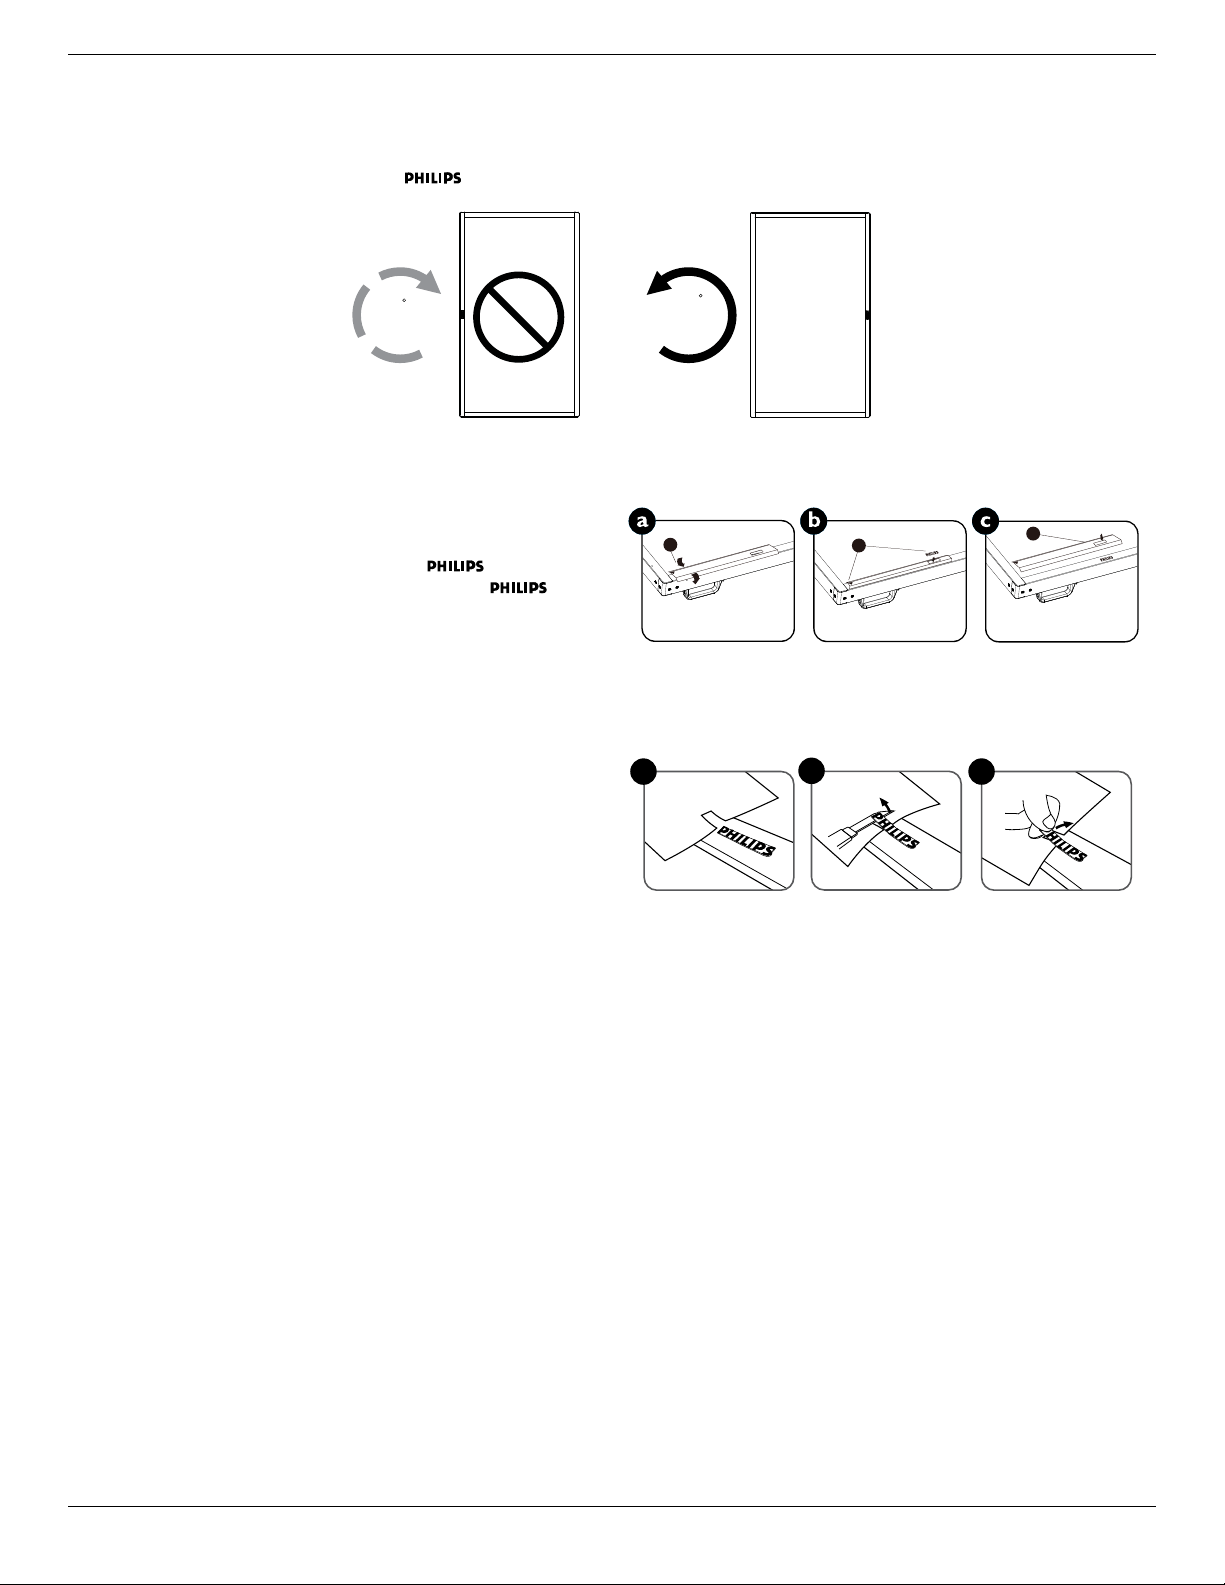
1.6. Mounting in Portrait Position
Thisdisplaycanbeinstalledinportraitposition.
1. Removethetablestand,ifattached.
2. Rotate90degreescounter-clockwise.The“
”logoshouldbeontheRIGHTsidewhenfacingthedisplay.
90
90
1.6.1. How to use the logo guider for portrait position
1. Puttheguideronthelower-leftcornerofthefrontbezelofthedisplay.
Folddownbothofitsedges.
2. Peelofftheprotectivelmatthebackofthe“
”logosticker.
Holdandpresstheguiderwithyourlefthand.Putthe“
”logo
stickerwithitsadhesivesidedownintothelogoholewithyourright
hand,andpresstomakeitsticktightlyontothefrontbezel.
3. Removetheguider.
1
2
3
1.6.2. How to remove the logo
1. Prepareapieceofpaperwithacuttingareaoflogoasaprotectorto
preventthefrontbezelfromscratching.
2. Usingaknife,carefullyremovethelogostickerwiththepaperplacing
beneath.
3. Tearoffthelogosticker.
1
2
3
NOTE: Wheninstallingthedisplayonawall,pleaseconsultaprofessionaltechnicianforproperinstallation.Weacceptnoliabilityforinstallationsnot
performedbyaprofessionaltechnician.

55BDL4051T
5
2. Parts and Functions
2.1. Control Panel
1
2
3
4
5
6
7
8
MUTE INPUT
MENU
9
1
[ ] button
Usethisbuttontoturnthedisplayonorputthedisplaytostandby.
2
[MUTE] button
SwitchtheaudiomuteON/OFF.
3
[INPUT] button
Choosetheinputsource.
• Usedas[
]buttonintheOn-Screen-Displaymenu.
4
[ ] button
IncreasetheadjustmentwhileOSDmenuison,orincreasethe
audiooutputlevelwhileOSDmenuisoff.
5
[ ] button
DecreasetheadjustmentwhileOSDmenuison,ordecreasethe
audiooutputlevelwhileOSDmenuisoff.
6
[ ] button
MovethehighlightbaruptoadjusttheselecteditemwhileOSD
menuison.
7
[ ] button
MovethehighlightbardowntoadjusttheselecteditemwhileOSD
menuison.
8
[MENU] button
ReturntopreviousmenuwhileOSDmenuison,ortoactivatethe
OSDmenuwhenOSDmenuisoff.
9
Remote control sensor and power status indicator
• Receivescommandsignalsfromtheremotecontrol.
• IndicatestheoperatingstatusofthedisplaywithoutOPS:
- Lightsgreenwhenthedisplayisturnedon
- Lightsredwhenthedisplayisinstandbymode
- LightsamberwhenthedisplayentersAPMmode
- When{SCHEDULE}isenabled,thelightblinksgreenandred
- Ifthelightblinksred,itindicatesthatafailurehasbeen
detected
- Lightsoffwhenthemainpowerofthedisplayisturnedoff
• Pullleftthelenstohavebetterremotecontrolperformance
andeasytoobservethelightinformationofpowerstatus.
• Pushrightthelensbeforemountingthedisplayforvideowall
application.
• Pull/Pushthelensuntilhearingtheclicksound.
55BDL4051T
6
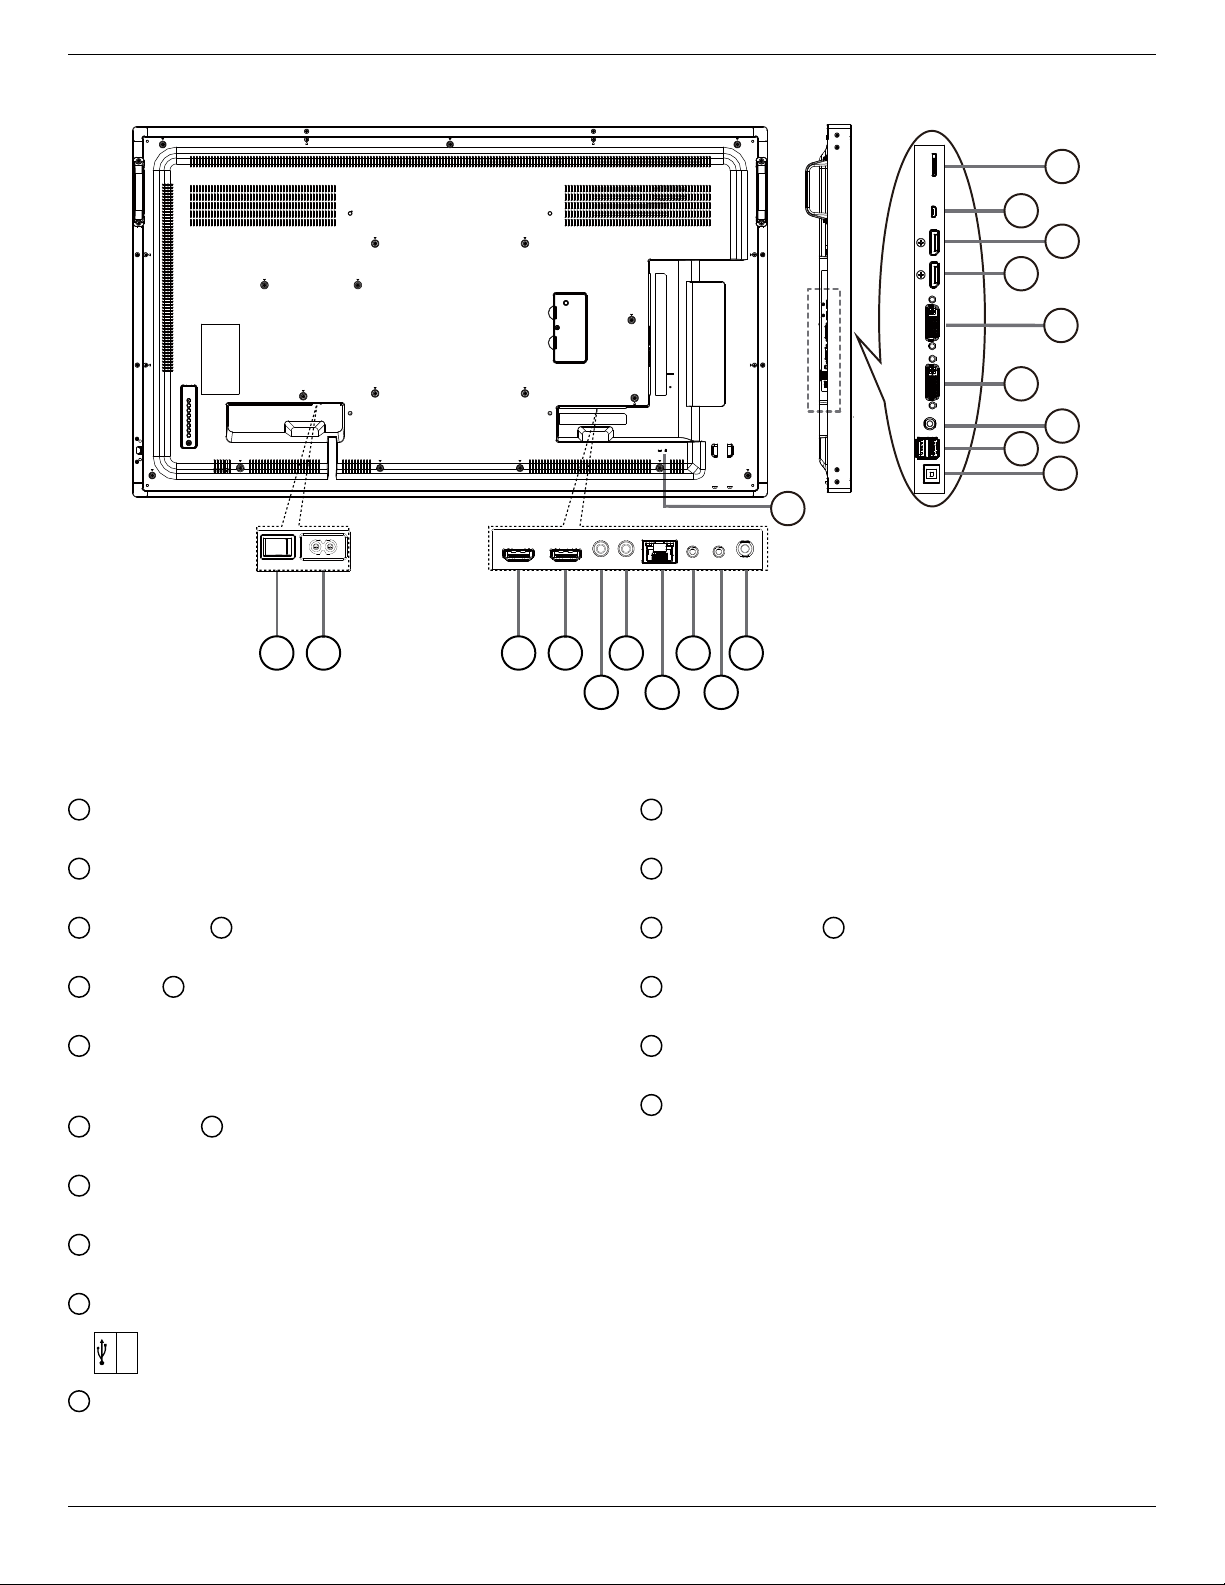
2.2. Input/Output Terminals
11
12
13
16
18
17
19
15
20
21 43 6
5
8
7
10
9
14
1
AC SWITCH
Switchthemainpoweron/off.
2
AC IN
ACpowerinputfromthewalloutlet.
3
HDMI1 IN /
4
HDMI2 IN
HDMIvideo/audioinput.
5
IR IN /
6
IR OUT
IRsignalinput/outputfortheloop-throughfunction.
7
RJ-45
LANcontrolfunctionfortheuseofremotecontrolsignalfrom
controlcenter.
8
RS232 IN /
9
RS232 OUT
RS232networkinput/outputfortheloop-throughfunction.
10
Audio OUT
AudiooutputtoexternalAVdevice.
11
USB PORT B
TouchconnectortoPC.
12
USB PORT A
USB
5V/2A
13
PC LINE IN
AudioinputforVGAsource(3.5mmstereophone).
14
DVI IN
DVI-Ivideoinput.
15
DVI OUT
DVIorVGAvideooutput.
16
DisplayPort IN /
17
DisplayPort OUT
DisplayPortvideoinput/output.
18
MICRO USB
ConnectyourUSBstoragedevice.
19
MICRO SD CARD
ConnectyourMICROSDCARD.
20
SECURITY LOCK
Usedforsecurityandtheftprevention.
55BDL4051T
7
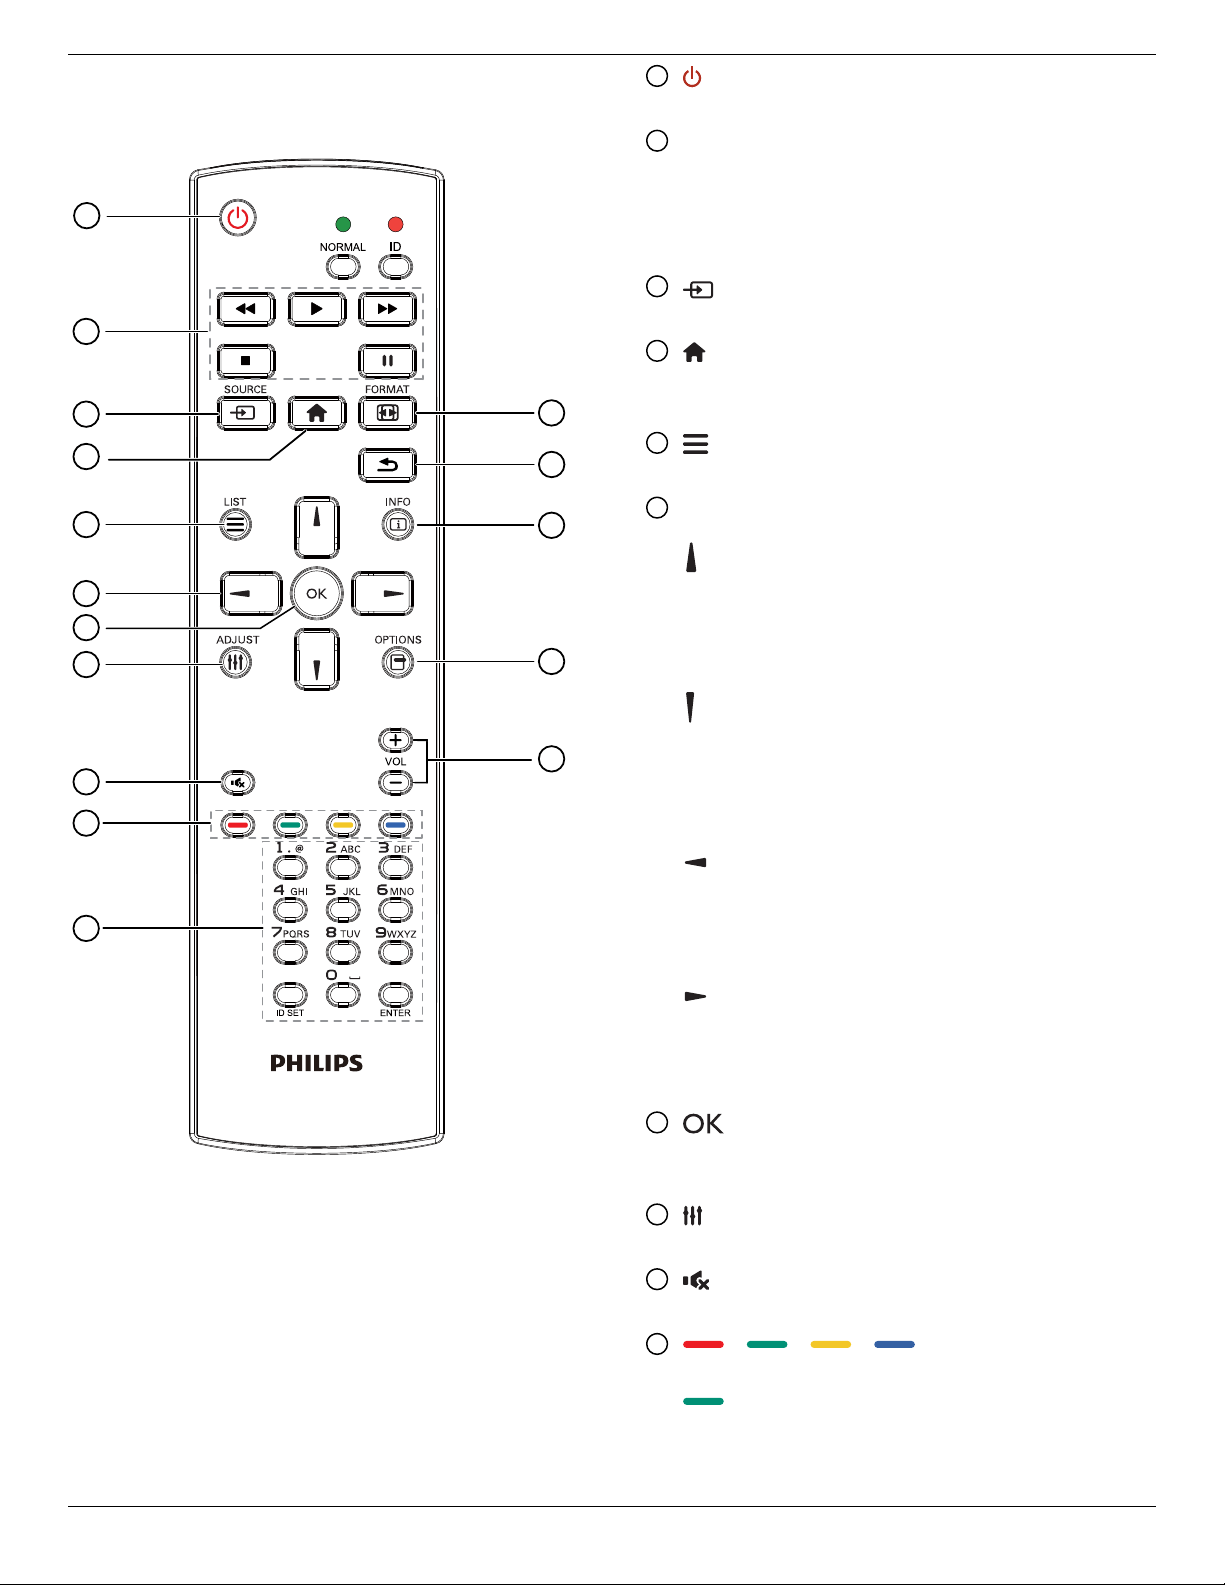
2.3. Remote Control
2.3.1. General functions
1
2
3
4
5
6
7
8
10
9
12
14
15
11
13
16
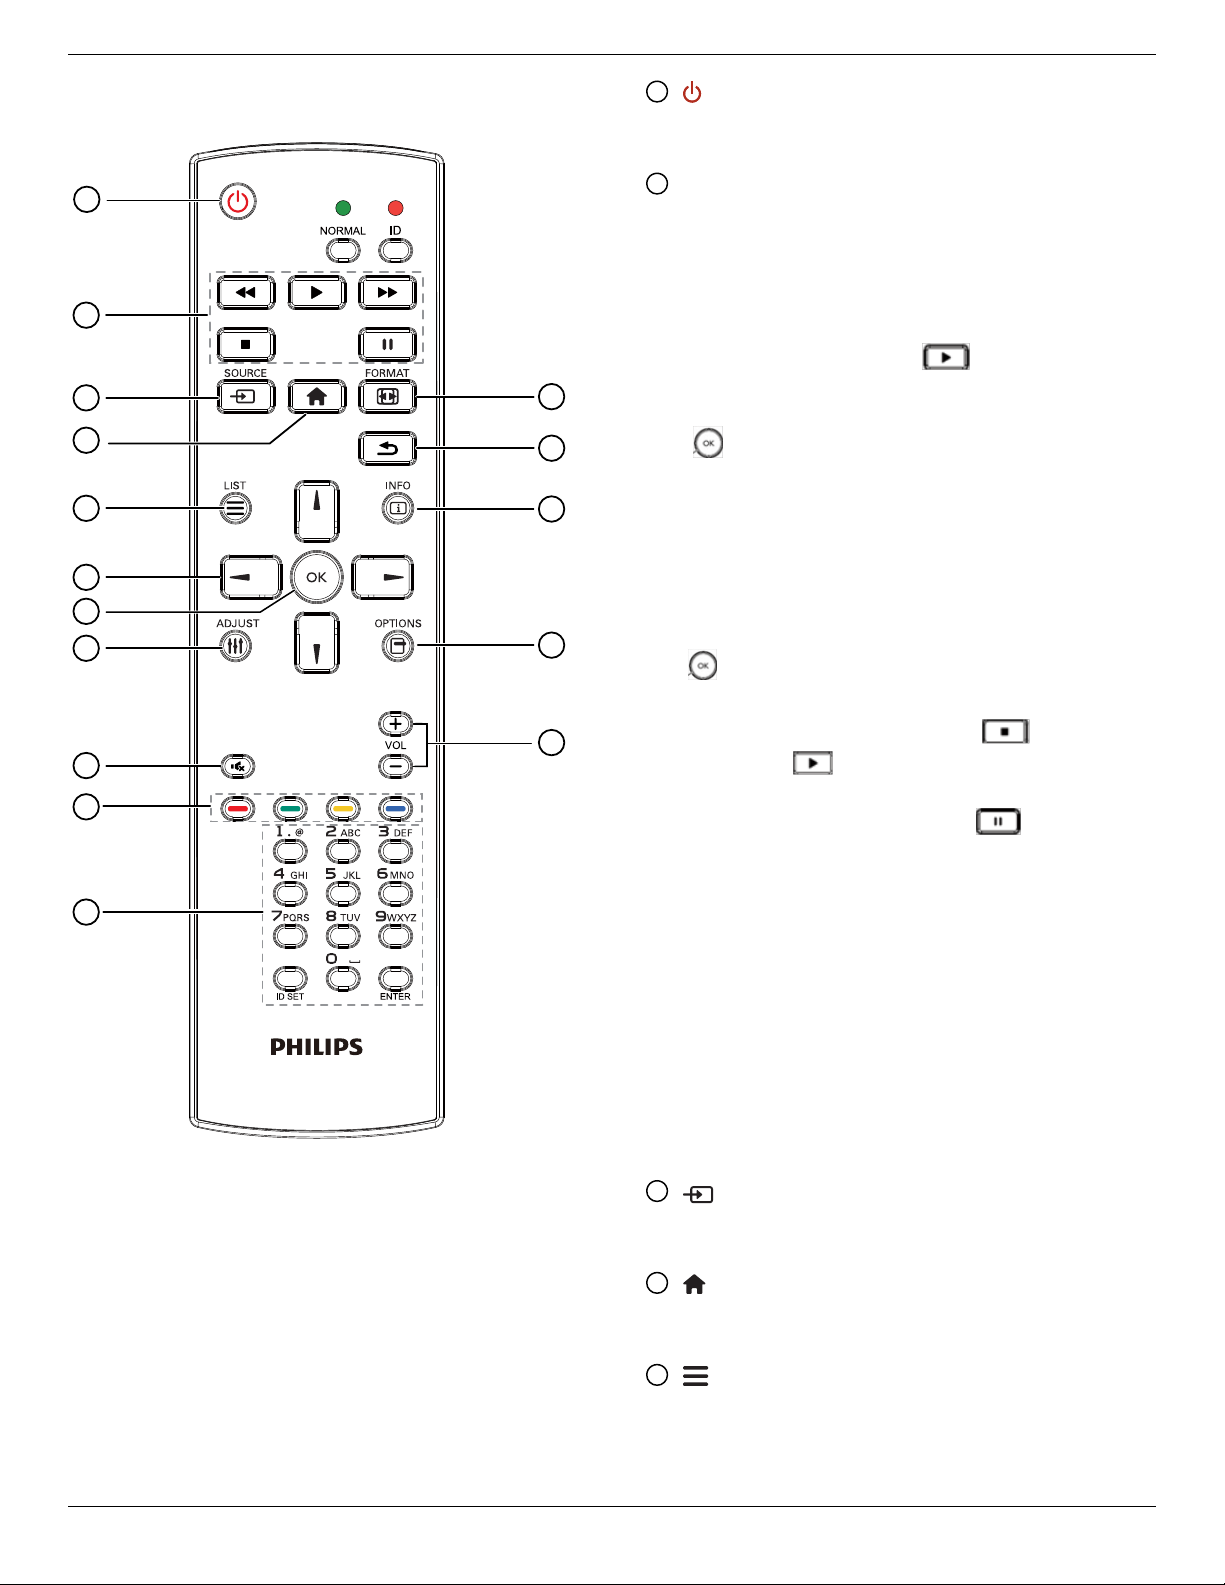
1
[ ] POWER button
PowerON/OFF.
2
[PLAY] buttons
Controlplaybackofmediales.(forMediaInputonly)
Freeze feature
Pasue:Freezehotkeyforallinputscontent.
Play:Unfreezehotkeyforallinputcontent.
3
[ ] SOURCE button
Root Menu:GotoVideosourceOSD.
4
[ ] HOME button
Root Menu:GotoMainMenuOSD.
Others:ExitOSD.
5
[ ] LIST button
Nofunction.
6
NAVIGATION buttons
[
]
Root Menu:GotoSmartpictureOSD.
Main Menu:Movethehighlightbaruptoadjusttheselecteditem.
IR Daisy Chain Menu:IncreasecontrolledGroupIDnumber.
[ ]
Root Menu:GotoAudiosourceOSD.
Main Menu:Movethehighlightbardowntoadjusttheselected
item.
IR Daisy Chain Menu:DecreasecontrolledGroupIDnumber.
[ ]
Main Menu:gotopreviouslevelmenu.
Source Menu:Exitsourcemenu.
Volume Menu:DecreaseAudioVolume.
[ ]
Main Menu:gotonextlevelmenuorsetselectedoption.
Source Menu:Gotoselectedsource.
Volume Menu:IncreaseAudioVolume.
7
[ ] button
Root Menu:GotoIRdaisychainOSDinPrimary/Secondarymode.
Main Menu:Conrmanentryorselection.
8
[ ] ADJUST button
GotoAutoAdjustOSDforVGAonly.
9
[ ] MUTE button
ToggleAudioMute/Unmute.
10
[ ] [ ] [ ] [ ] COLOR buttons
Choosetasksoroptions.(forMediaInputonly)
[ ]
HotkeyforWindowselectionfunction.
55BDL4051T
10
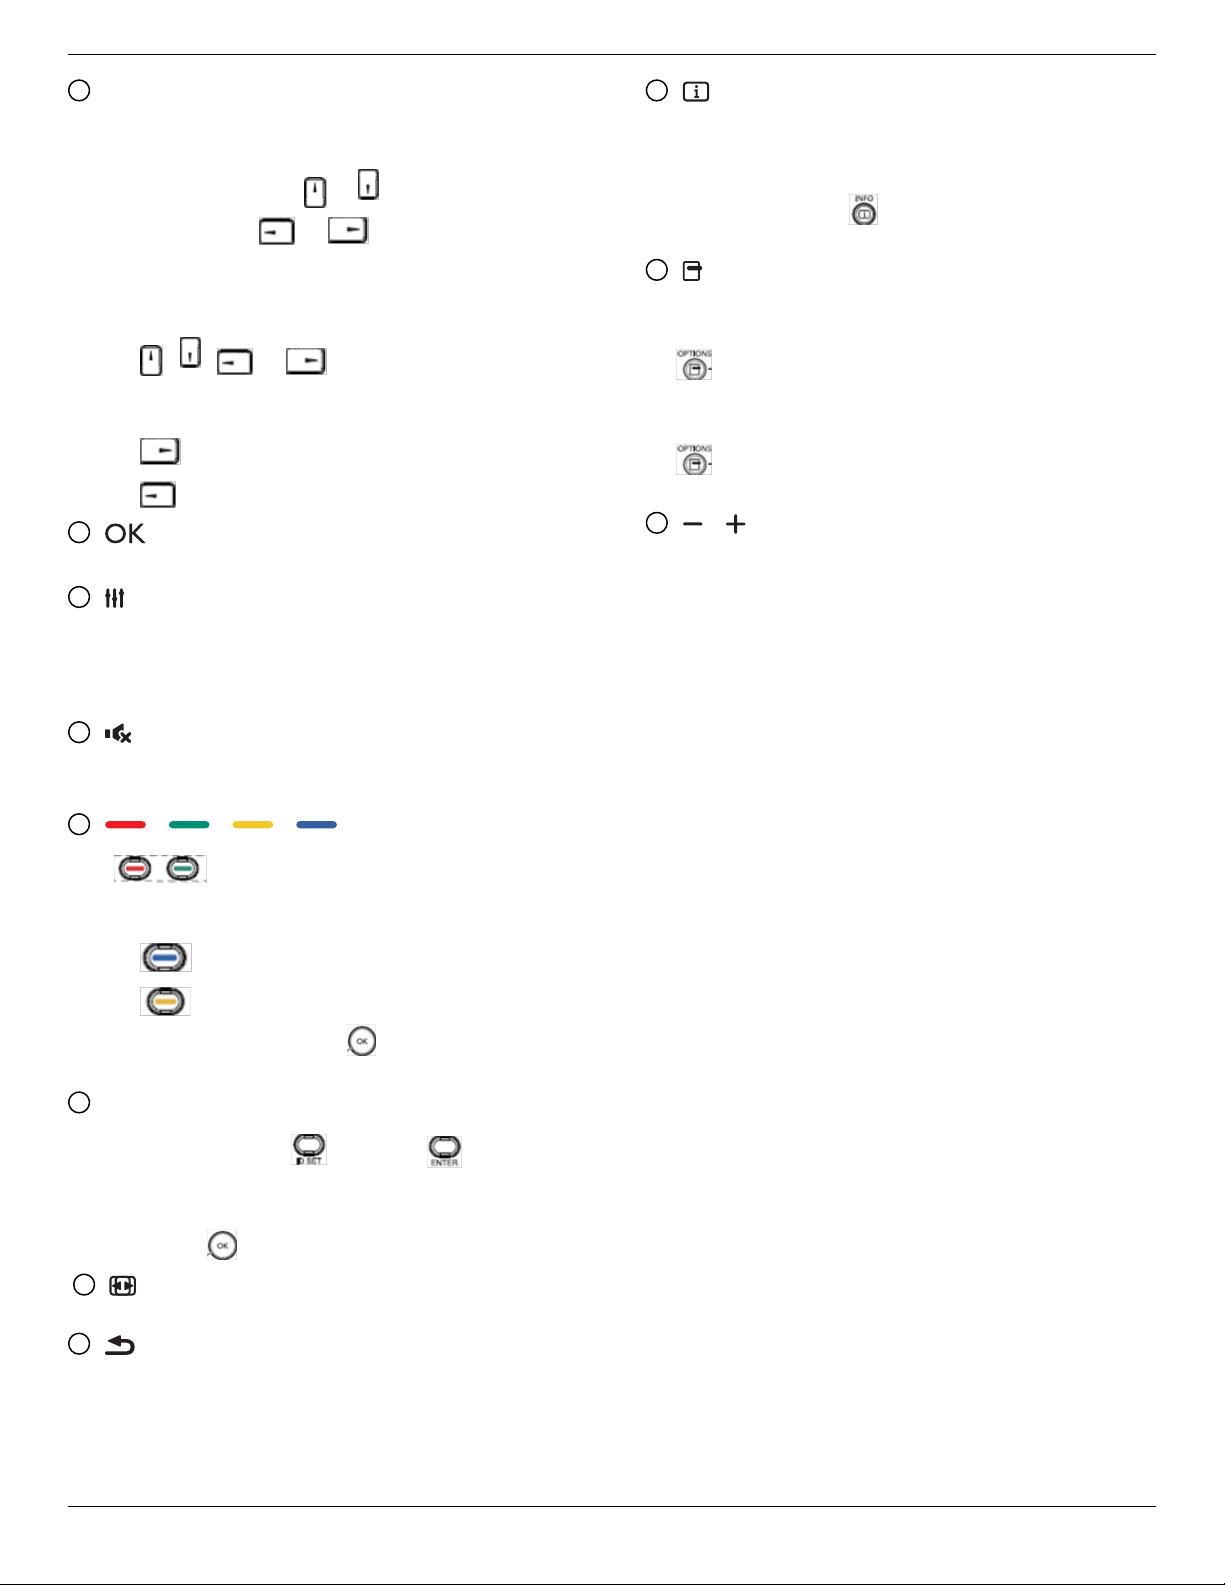
2.3.3. Remote Control buttons on Android
source
1
2
3
4
5
6
7
8
10
9
12
14
15
11
13
16
1
[ ] POWER button
Turnthedisplayonorputthedisplaytostandby.
ThebuttonisonlycontrolledbyScalar.
2
[PLAY] buttons
1.Controlplaybackofmedia(video/audio/picture)les.
Thereare4waystoplaymediales.
1)FileManager
FindthemedialefromtheFileManagerandselectittoplay.
2)MediaPlayer->Compose->editornewaddplaylist->
chooseanymediales->press
toplaythemediale
directly.
3)MediaPlayer->Play->choosenon-emptyplaylist->press
toplayallthemedialesintheplaylist.
4)SetmediaplaylistinBootonSourceorSchedulebyOSD
menu.
2.PlayPDFle
Thereare3waystoplaymediales.
1)FileManager
FindthepdflefromtheFileManagerandselectittoplay.
2)PDFPlayer->Play->choosenon-emptyplaylist->press
toplayallthePDFlesintheplaylist.
3)SetpdfplaylistinBootonSourceorSchedulebyOSDmenu.
3.WhenplayingPDF,videoormusic,press
tostopplaying.
Thenifpressing
again,playingwillbestartedfromthe
beginningofthele.
4.WhenplayingPDF,videoormusic,press
buttontopause
playing.
5.Allmeidaorpdflesshouldbeputatthefolder,whichisnamed
“philips”withsub-folder,undertherootdirectoryofthespecied
storage(internal/USB/SDCard).Allsub-folders(video/photo/music/
pdf)arenamedbymediatypesandshouldn’tbechanged.
videos:{rootdirofstorage}/philips/video/
photos:{rootdirofstorage}/philips/photo/
music:{rootdirofstorage}/philips/music/
pdfs:{rootdirofstorage}/philips/pdf/
Notethattherootdirectoriesofthreestoragesare
Internalstorage:/sdcard
USBstorage:/mnt/usb_storage
SDcard:/mnt/external_sd
3
[ ] SOURCE button
Chooseinputsource.
ThebuttonisonlycontrolledbyScalar.
4
[ ] HOME button
AccessOSDmenu.
ThebuttonisonlycontrolledbyScalar.
5
[ ] LIST button
1.Inthecontentofthewebpage,movethefocusuptothenext
clickableitems.
2.Movethefocusuptothenextcontrolorwidgetsuchasbuttons.
55BDL4051T
11
6
NAVIGATION buttons
1.Navigatethroughmenusandchooseitems.
2.Inthecontentofthewebpage,thesebuttonsaretocontrolthe
scrollbarofthescreen.Press
or isformovingverticalscroll
barupordown.Press
or isformovinghorizontal
scrollbarleftorright.
3.ForPDFles,
»
whenzoomin/outhasbeenperformed,
Press
, , or toadjustthepositionofthe
screen.
»
whenzoomin/outhasbeennotperformed,
Press
togotothenextpage.
Press
togotothepreviouspage.
7
[ ] button
Conrmanentryorselection.
8
[ ] ADJUST button
1.Inthecontentofthewebpage,movethefocusdowntothenext
clickableitems.
2.Movethefocusdowntothenextcontrolorwidgetsuchas
buttons.
9
[ ] MUTE button
Presstoturnthemutefunctionon/off.
ThebuttonisonlycontrolledbyScalar.
10
[ ] [ ] [ ] [ ] COLOR buttons
1. :NofunctiononAndroidsource.Thesetwobuttons
areonlycontrolledbyScalar.
2.ForPDFles,
press
buttontoperformzoom-in;
press
buttontoperformzoom-out.
Afterzoom-inorzoom-out,press
buttontorevertthepdf
letotheoriginalsize.
11
[Number/ ID SET/ ENTER] button
1.NofunctionsforIDSET andENTER onAndroid
source.ThesebuttonsareonlycontrolledbyScalar.
2.ForPDFle,enterthepagenumberbypressingnumberbuttons
andthenpress
buttontojumptothespecicpage.
12
[ ] FORMAT button
Changepictureformat.ThebuttonisonlycontrolledbyScalar.
13
[ ] BACK button
Returntothepreviouspageorexitfromthepreviousfunction.
14
[ ] INFO button
1.Displayinformationaboutcurrentinputsignal.Itisshownby
Scalar.
2.MediaPlayer->Compose->editornewaddplaylist->choose
anymediales->press
toshowtheinformationofthe
chosenmediale.
15
[ ] OPTIONS button
OpentoolboxinMediaPlayerorPDFPlayer.
1.MediaPlayer->Compose->Editornewaddplaylist->press
toopentoolbox.Toolboxwillbeslidefromtheleftsideof
thescreen.
2.PDFPlayer->Compose->Editornewaddplaylist->press
toopentoolbox.Toolboxwillbeslidefromtheleftsideof
thescreen.
16
[ ] [ ] VOLUME button
Adjustvolume.ThebuttonsareonlycontrolledbyScalar.
55BDL4051T
12
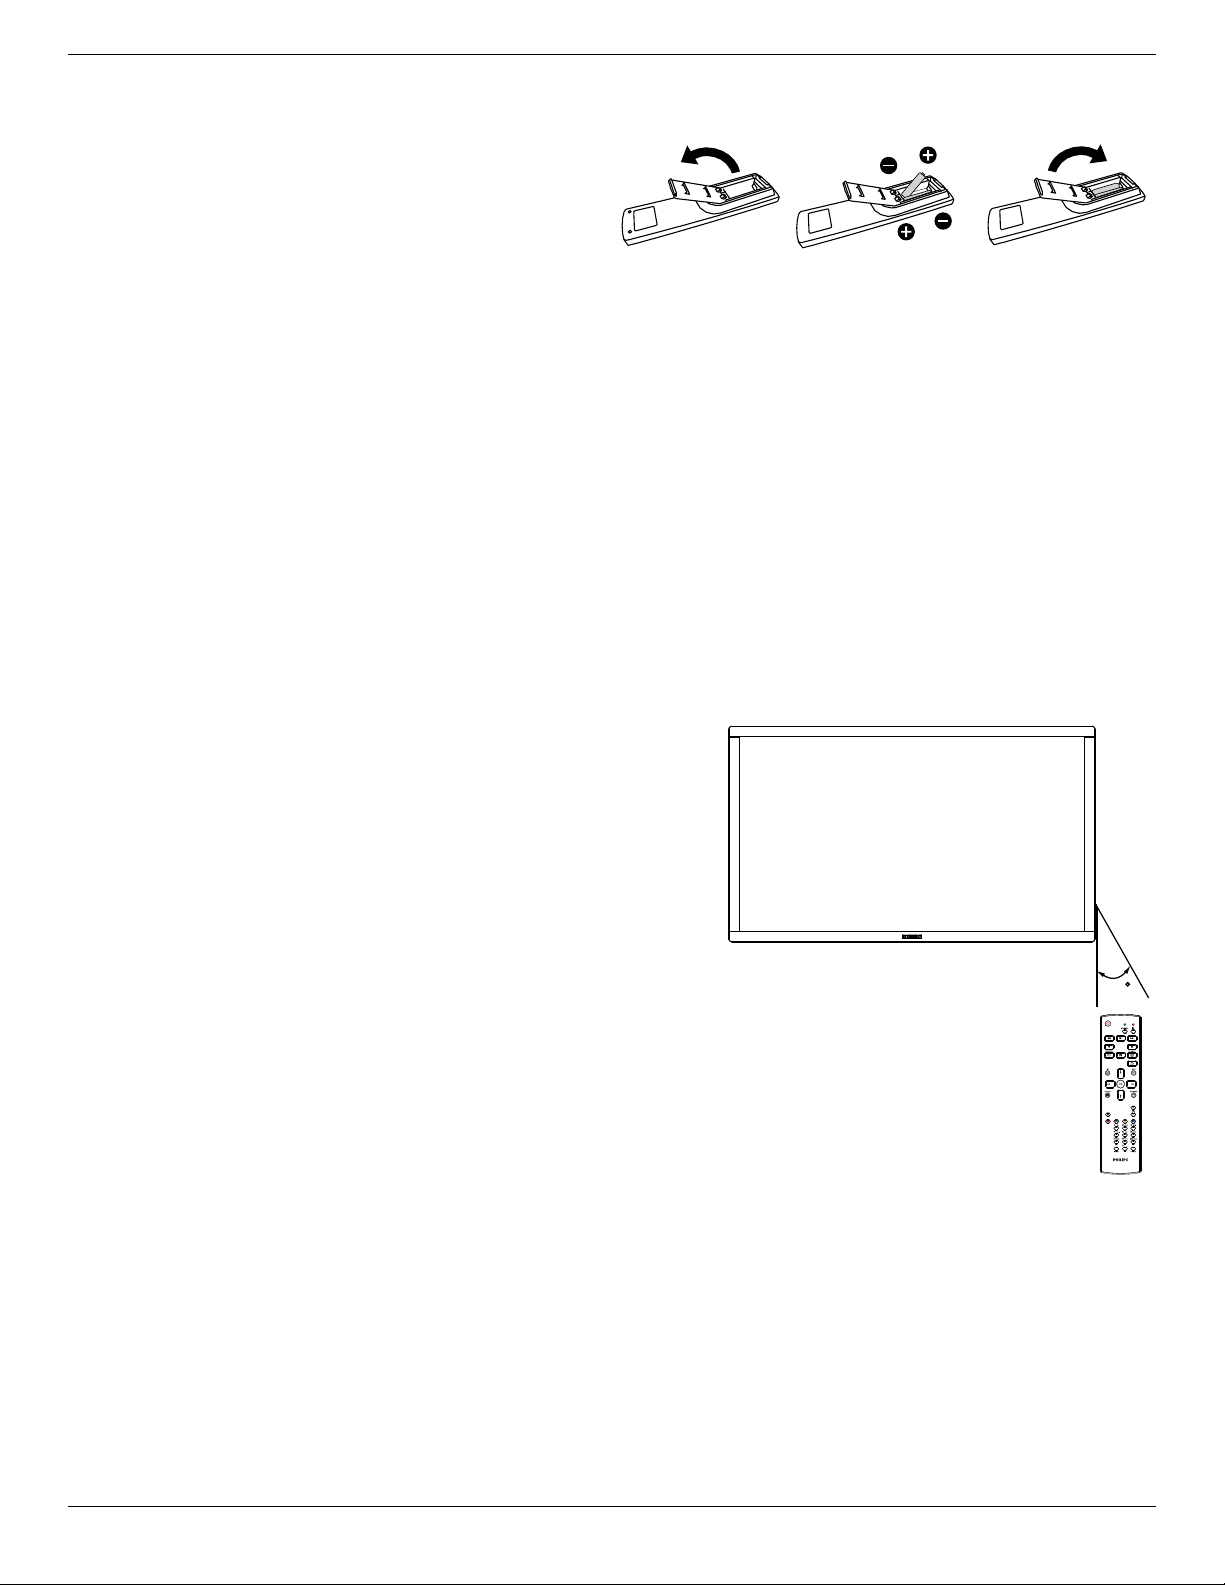
2.3.4. Inserting the batteries in the remote control
Theremotecontrolispoweredbytwo1.5VAAAbatteries.
Toinstallorreplacebatteries:
1. Pressandthenslidethecovertoopenit.
2. Alignthebatteriesaccordingtothe(+)and(–)indicationsinsidethe
batterycompartment.
3. Replacethecover.
Caution:
Theincorrectuseofbatteriescanresultinleaksorbursting.Besuretofollowtheseinstructions:
• Place“AAA”batteriesmatchingthe(+)and(–)signsoneachbatterytothe(+)and(–)signsofthebatterycompartment.
• Donotmixbatterytypes.
• Donotcombinenewbatterieswithusedones.Itcausesshorterlifeorleakageofbatteries.
• Removethedeadbatteriesimmediatelytopreventthemfromliquidleakinginthebatterycompartment.Don’ttouchexposedbatteryacid,asitcan
damageyourskin.
NOTE: Ifyoudonotintendtousetheremotecontrolforalongperiod,removethebatteries.
2.3.5. Handling the remote control
• Donotsubjecttostrongshock.
• Donotallowwaterorotherliquidtosplashtheremotecontrol.Iftheremotecontrolgetswet,wipeitdryimmediately.
• Avoidexposuretoheatandsteam.
• Otherthantoinstallthebatteries,donotopentheremotecontrol.
2.3.6. Operating range of the remote control
Pointthetopoftheremotecontroltowardthedisplay’sremotecontrolsensorwhen
pressingabutton.
Usetheremotecontrolwithinadistanceoflessthan5m/16ftfromthedisplay’ssensor,
andahorizontalandverticalangleoflessthan30degrees.
NOTE: Theremotecontrolmaynotfunctionproperlywhentheremotecontrol
sensoronthedisplayisunderdirectsunlightorstrongillumination,orwhen
thereisanobstacleinthepathofsignaltransmission.
30

55BDL4051T
15
3.4. Connecting Multiple Displays in a Daisy-chain Configuration
Youcaninterconnectmultipledisplaystocreateadaisy-chaincongurationforapplicationssuchasavideowall.
NOTE: Maximum25displays(5x5)canbeusedinaDVIdaisy-chainconguration.ForVGAdaisy-chain,Maximum9displayscanbeused.
3.4.1. Display control connection
Connectthe[RS232OUT]connectorofDISPLAY1tothe[RS232IN]connectorofDISPLAY2.
DISPLAY 1 DISPLAY 2
PC
[RS-232C IN]
[RS-232C]
[RS-232C OUT] [RS-232C IN]
3.4.2. Digital video connection
Connectthe[DVIOUT/DVI-IOUT]connectorofDISPLAY1tothe[DVIIN]connectorofDISPLAY2.
PC
[DVI IN]
[DVI]
[DVI/DVI-I OUT] [DVI IN]
DISPLAY 1 DISPLAY 2
Connectthe[DPOUT]connectorofDISPLAY1tothe[DPIN]connectorofDISPLAY2.
PC
[DP IN]
[DP]
[DP OUT] [DP IN]
DISPLAY 1 DISPLAY 2
Connectthe[DVIOUT]connectorofDISPLAY1tothe[DVIIN]connectorofDISPLAY2.
[DVI IN]
[HDMI]
[DVI OUT] [DVI IN]
DVD / VCR / VCD
DISPLAY 1 DISPLAY 2
55BDL4051T
17
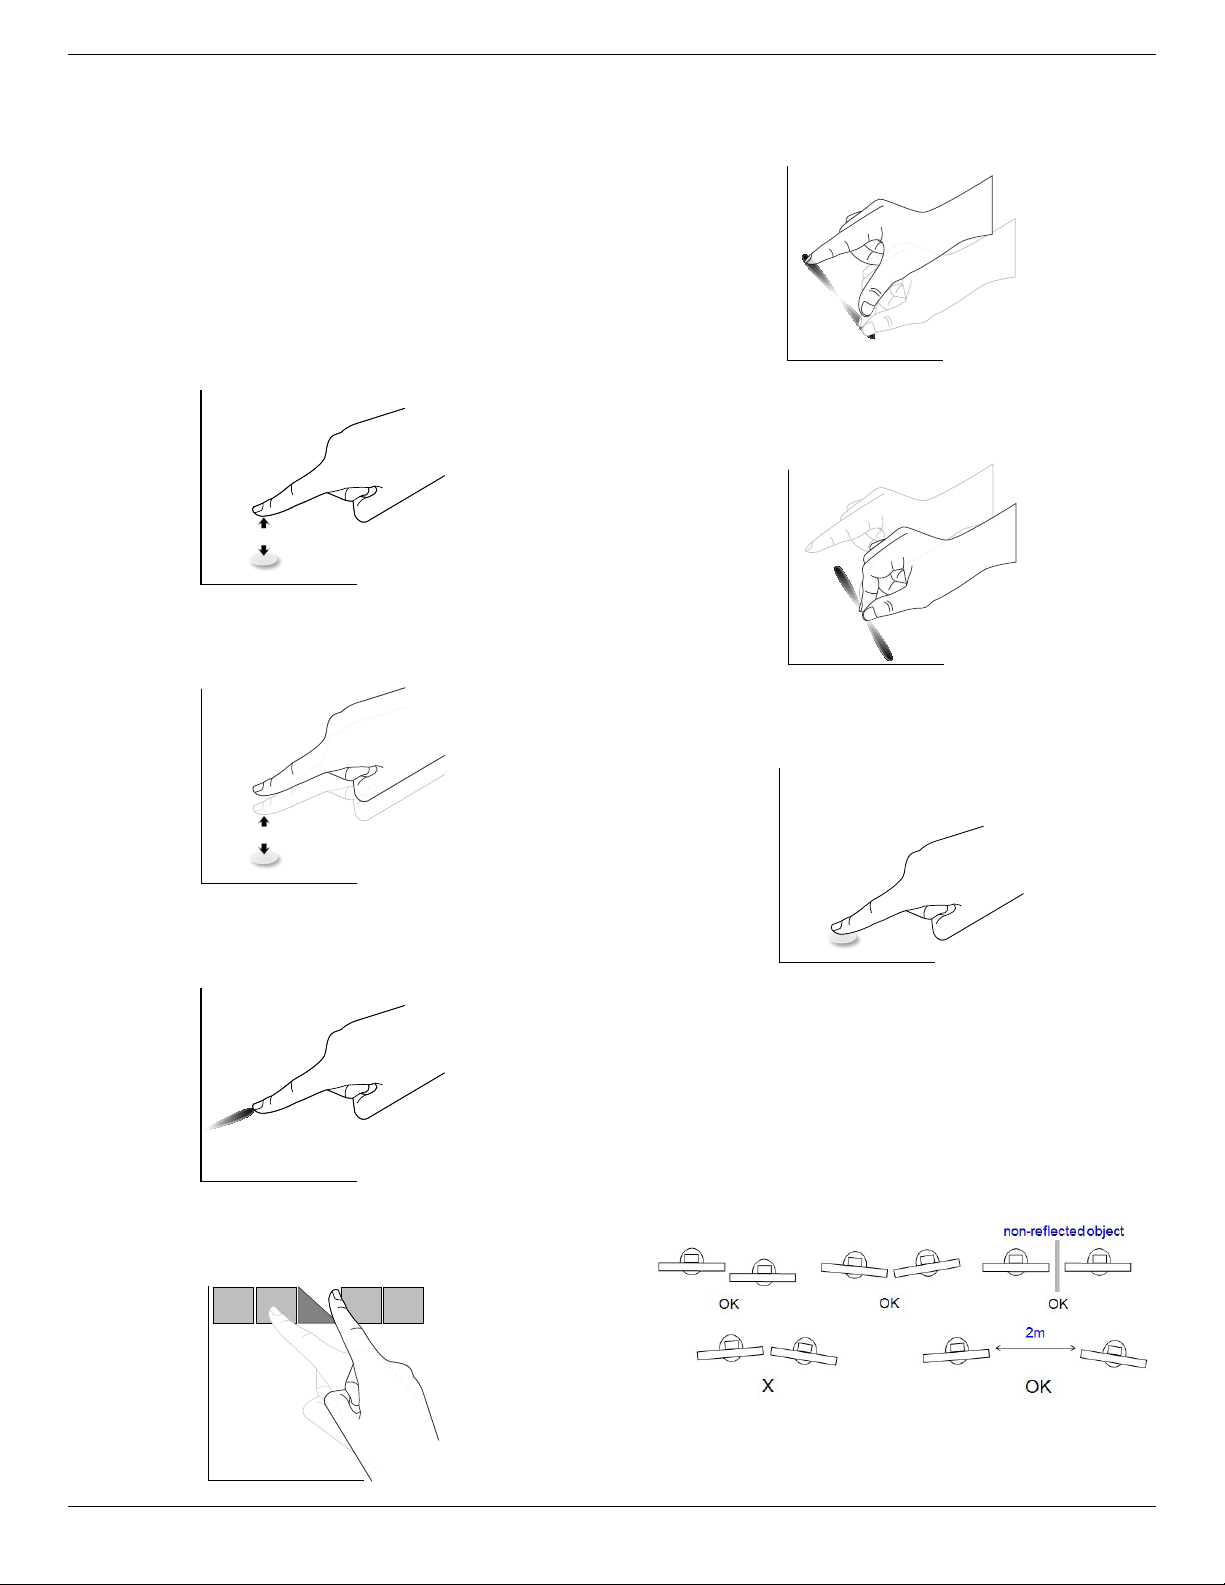
3.7. Touch Operation
Thisdisplayisequippedwithatouch-sensitivescreenandsupports
theWindows Touchfeatureseitherbysingletouchormultitouch
operation.Youcantouchthepicturesorwordsonthedisplaygently
withyourngers,andyourcomputerwillreact.
Thefollowingdescriptionillustratesometypicaltouchoperation
behavior.Forfurtherdetailonhowtorunthetouchoperation,please
refertotheWindowsoperationinstruction.
Single Tap
Touchthetargetonthescreenwithonengertipforonequicktap,
thenrelease.
Double Tap
Touchthetargetonthescreenwithonengertipfortwoquicktaps,
thenrelease.
Pan
Touchthetargetonthescreenwithonengertipandmoveacrossthe
targetwithoutlosingdirectcontact,thenrelease.
Flick
Touchthetargetonthescreenwithonengertipandbrushthesurface
quickly.
Zoom in
Touchthetargetonthescreenwithtwongertipsholdedtogetherand
movethemaparttozoomin(magnify)thescreenimage.
Zoom out
Touchthetargetonthescreenwithtwongertipsstretchedapartand
movethemclosertozoomout(shrink)thescreenimage.
Touch and Hold
Touchandholdthetargetonthescreenwithonengertipforawhile
todisplayacontextmenuoroptionspageforanitem.
Avoid
• Avoidscratchingwithsharpobjectonthescreen.Onlyyour
ngertipsareallowedtodothetouchcontrol.
• Avoidintensivelight,spotlight,orwide-spreadlightfromdirect
beamingonthescreen.
• Avoidinstallationlocationclosetothewindowsorglass-doorsas
thedirectsunlightmayaffectthetouch-controlperformance.
• Toavoidscreensinterferewihteachother,donotmake2touch
screenssidebysideasthefollowingpicture.
Fig.Touchscreensinterfering
55BDL4051T
19
4. Operation
NOTE: Thecontrolbuttondescribedinthissectionismainlyonthe
remotecontrolunlessspeciedotherwise.
4.1. Watch the Connected Video Source
Seepage14forexternalequipmentsconnection.
1. Press
[ ] SOURCEbutton.
2. Press[
]
or[ ]buttontochooseadevice,thenpress[ ]
button.
4.2. Change Picture Format
Youcanchangethepictureformattosuitthevideosource.Eachvideo
sourcehasitsavailablepictureformats.
Theavailablepictureformatsdependonthevideosource:
1. Press[
] FORMATbutton.
2. Press[
]
or[ ]buttontochooseapictureformat,thenpress
[
]button.
• PCmode:{Full}/{4:3}/{1:1}/{16:9}/{21:9}/{Custom}.
• Videomode:{Full}/{4:3}/{1:1}/{16:9}/{21:9}/{Custom}.
4.3. Android Launcher
1. AndroidPDlauncher:
• Android PD launcher is black page, as below:
• Every app leaves by pressing the back key. The screen will go
to Android PD launcher.
• When you return to android PD launcher, the screen will
show hint image, The hint image only shows 5 seconds as
below:
• The hint image will notify you can press source key to change
source.
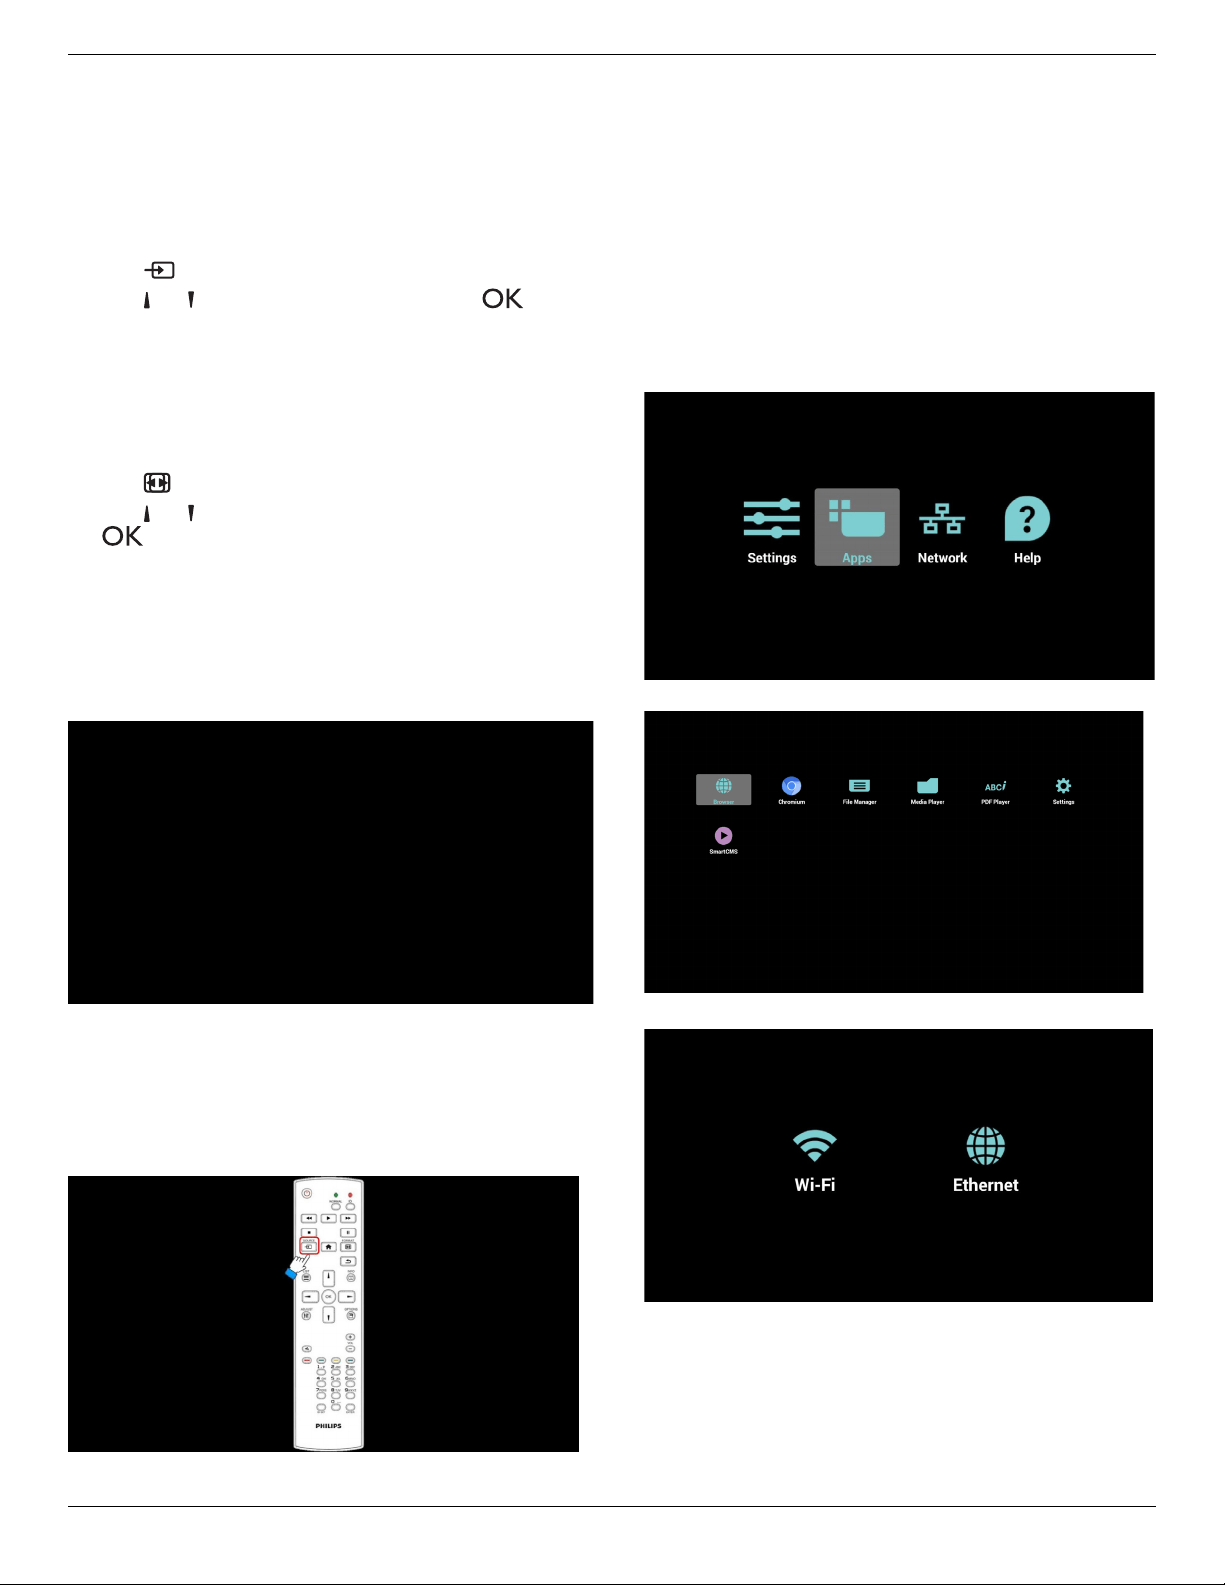
2. Adminmode:
• You can press “Home + 1888” to startup admin mode.
• Admin mode will show four icons: “Settings”, “Apps”,
“Network” and “Help”.
• When you leave admin mode, system will return to last
source.
1)Homepageofadminmode,thispagehasfouritems:“Settings”,
“Apps”,“Network”and“Help”.
Settings:gotosettingsapp.
Applications:showallapps.
Network:setwiorethernet.
Help:displayQRcode.
2.)Applicationpage:
3
)
Networkpage
4)Wi-Fipage:
55BDL4051T
22
12. MediaHotkey
Play:Playbackle.
Pause:Pausele.
Fastforward:forward10second.
Rewind:back10second.
Stop:Stopleandreturntostart.Ifthegifle,itlikethepause.
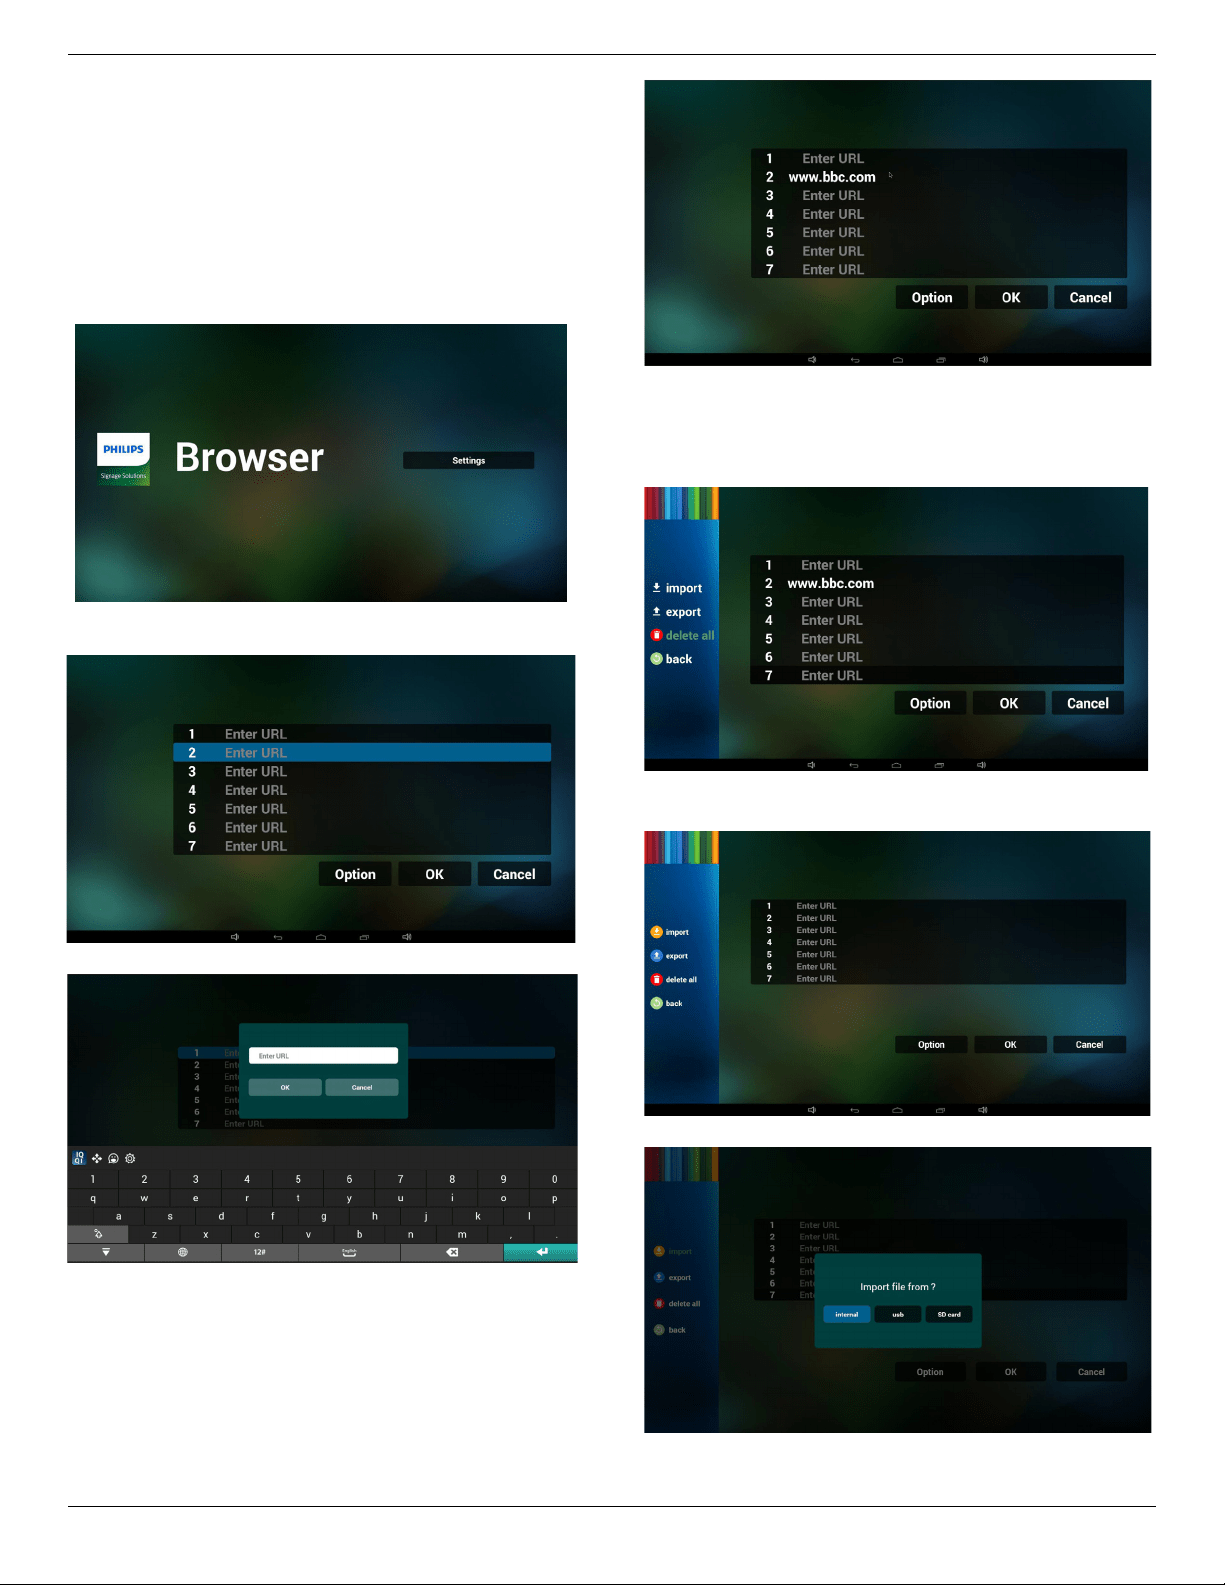
4.5. Browser manual
1. HomepageofBrowserapp,thispagehasoneitem:“Settings”.
PressSettingsthenenternextpage.
2. Userscanchoose1~7.
Pressanyonewillshowadialog.
3. EnterurlandpressOKthendatawillsaveonList
4. Press“Option”thenleftsidewillpopupalist
Import:Importurllistle
Export:Exporturllistle
Deleteall:Deleteallurlrecordonrightside
Back:leftsidelistwillbeclosed.
4.1Import
• Clickimport
• Choosestorage
• Chooselecontainsurls

55BDL4051T
23
• Importleandurlwillshowonlist
• Fileformatforimport
Formatshouldbelikebelowwithleextension“txt”
4.2Export:
• Clickexport
• Choosestorage
• Dialogshowspathlewillbesavedandle’sname.
Press“save”buttonthenurlsonlistwillbesaved.
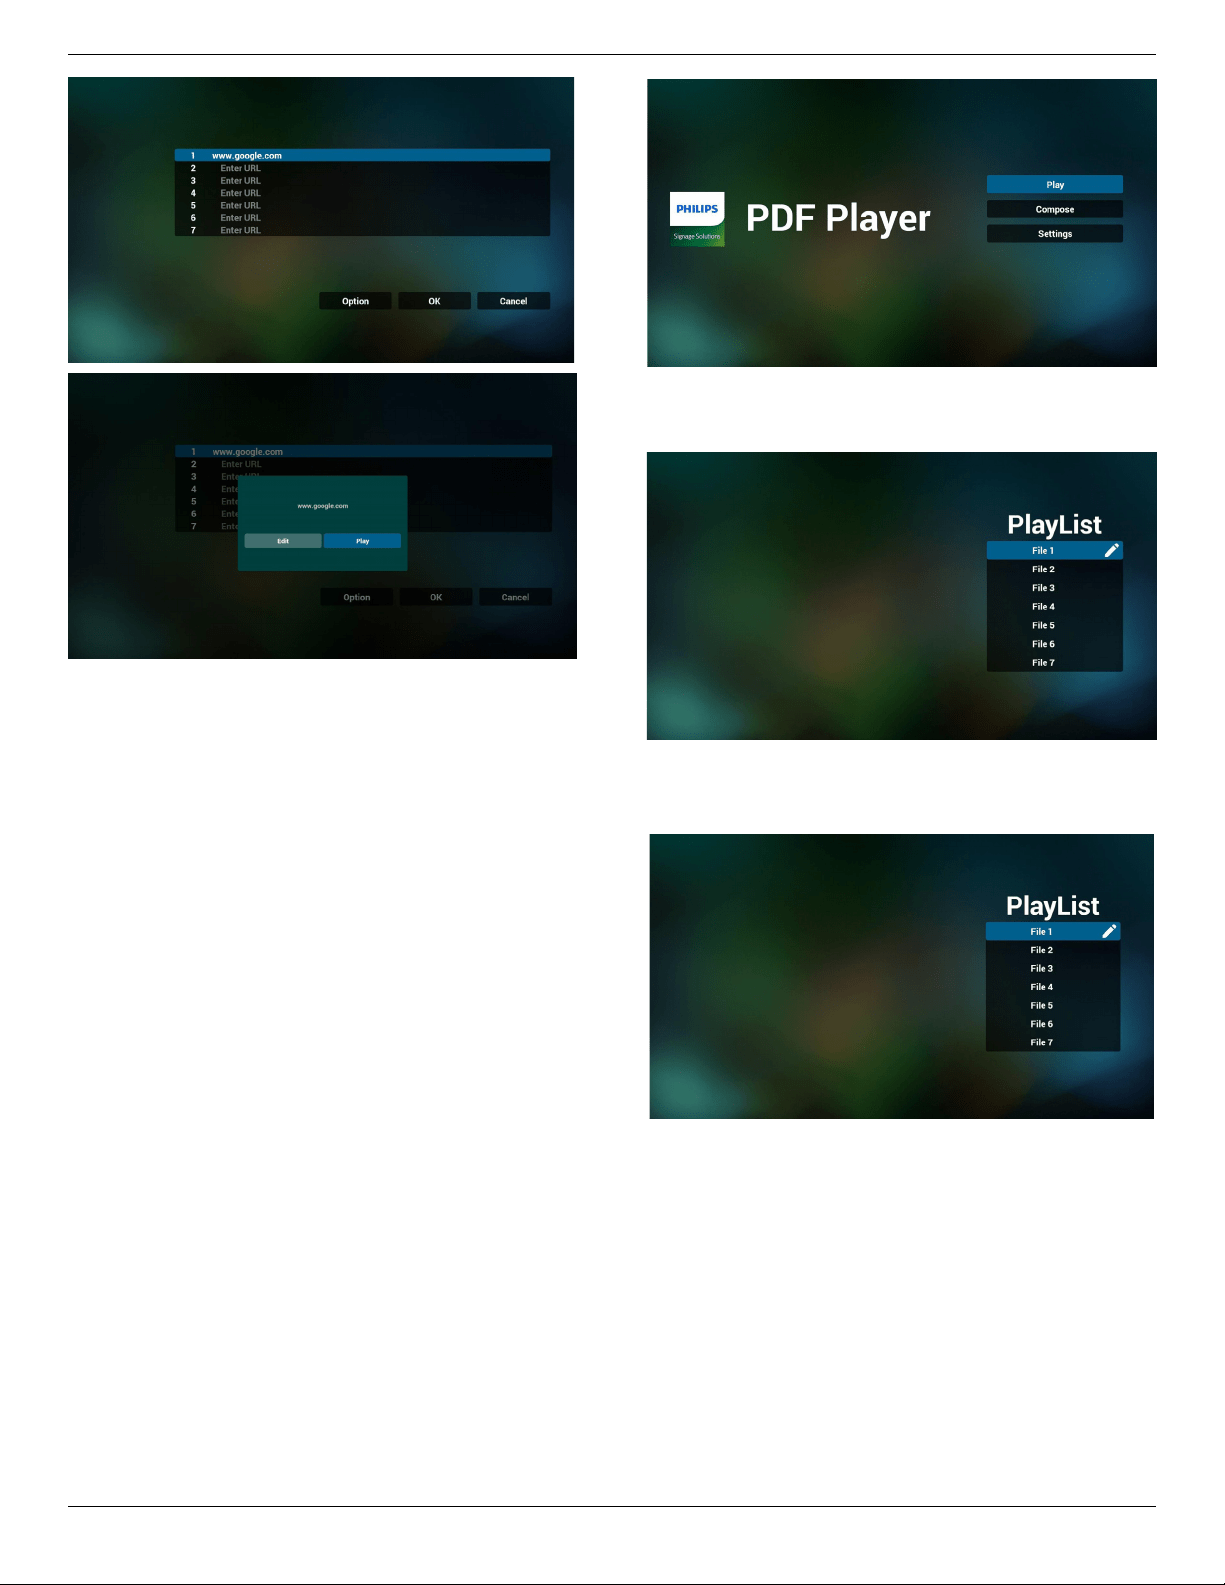
5. PressOKthenurlrecordswillbesaved
.
6. Onurllistpage,ifyouselectnon-emptyitem,itwillshowadialog
toaskeditorplayurl.Ifpress“Edit”,itwillshowediturldialog,if
press“Play”,itwillshowwebpageofitem’surl.
55BDL4051T
24
7. OSDmenuinteractionwithBrowser
7.1Bootonsource
• SetOSDmenu=>Conuration1=>Bootonsource=>Input
beBROWERPlayListbe0.
ThenPDwillshowBrowserafterreboot.
• SetOSDmenu=>Conuration1=>Bootonsource=>Inputbe
BROWERPlayListbe1.
ThenPDwillshowwebpagewith1stUrlinBrowserapp.
7.2Schedule
SetOSDmenu=>Advancedoption=>Schedule=>
Ontime1,Offtime2,InputbeBROWSER,anydayyouwantofweek,
andPlayList.
Finallychecktherightbox.
ThenPDwillshowwebpagewithUrlinBrowserappattime1and
nishattime2.
4.6. PDF reader play
1. HomepageofPDFPlayer,thispagehasthreeitems:“Play”,
“Compose”and“Settings”.
Play:selectplaylisttoplay.
Compose:editplaylist.
Settings:settingplayproperties.
2. Select“Play”onhomepage,rstyoushouldchooseoneplaylistto
playbetweenFILE1andFILE7.
Thepenciliconmeanstheplaylistisnon-empty.
3. Select“Compose”onhomepage,rstyoushouldchooseone
playlisttoeditbetweenFILE1andFILE7.
Thepenciliconmeanstheplaylistisnon-empty.
4. Ifanemptyplaylistischosen,theappwillguideyoutoselectthe
mediasource.
All media les should be placed in /philips/ of root directory. For
example,
- pdfs in /root/philips/pdf/
55BDL4051T
26
-PressOKkey,thebottomofthepagewillshowthepagenumber,
ifpagenumberovertotalpagenumber,itwillnotchangepageand
showcurrentpagenumberatthebottomofthepage.
55BDL4051T
27
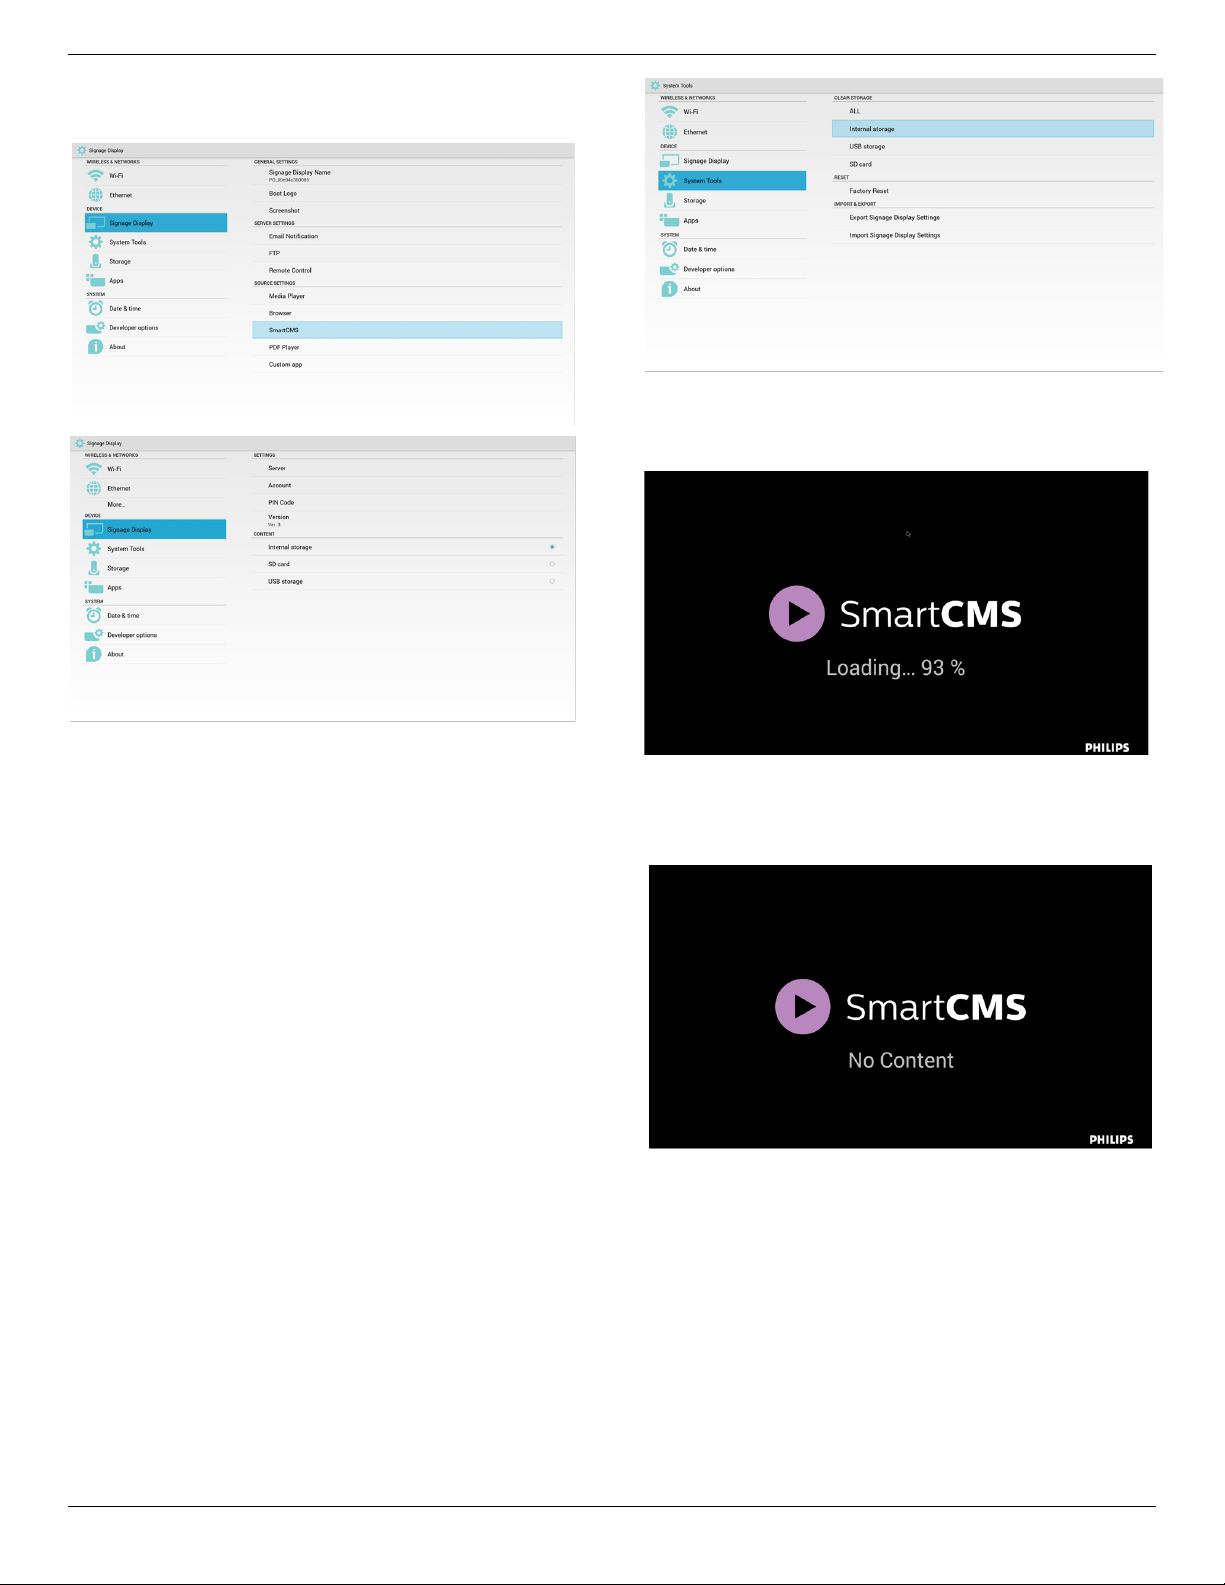
4.7. SmartCMS
1. Settings
1)ServerIP:Your_SmartCMS_server_address
2)Account:admin
3)PINCode:0281(Default,whichcanbegeneratebyservertool)
4)Version:Ver.3(defaultvalue)
YoucanselectVer.2orVer.3.AndSmartCMSwoulddownloadcms
contentsfromaVer.2serveroraVer.3server.
a. Ver.3:Youneedtosetserverinformation(ip,account,PIN
Code)inthesettings.
b. Ver.2:Youneedtoinstallcmsdatafromlocalstorageforthe
rsttime.Andserverinformationwouldbeaccessedfromthelocal
cmscontent.Theoptionsinthesettings,includingIP,account,andPIN
Code,wouldbedisabled.
5)Content:cmscontentcanbestoredintheinternalstorage,SD
card,andUSBstorage.Bydefault,thetargetisinternal.
a. Ifserverisconnected,cmsdatawouldbedownloadedfrom
SmartCMSserver.
b. Ifserverisdisconnected,cmsdatawouldbeaccessedfrom
localstorage.
6)Localcmscontent(*.cmsle)
a. If content is set to be internal storage, *.cms should be
stored in the FTP root folder(high priority) or /sdcard/philips(low
priority).
b. IfcontentissettobeUSBstorageorSDcard,*.cmsshould
bestoredintherootfolderofexternalstorage.
7)YoucandeletecmsdataviaSystemTools.
2. SetsourcetoSmartCMS,cmsdatawillbedownloaded
automatically
1)Ifthereisnocmsdataintheserverorthenetworkisdisconnect.
“NoContent”willbeshown.
2)Ifyouselect“SDcard”or“USBstorage”,“NoContent”willbe
shownwhenyouremovetheSDcard/USBstorage.

55BDL4051T
29
5. signage display
5.1. Setting
Settingmainitems:
(1)Wi-Fi
(2)Ethernet
(3)SignageDisplay
(4)SystemTools
(5)Storage
(6)Apps
(7)Date&time
(8)Developeroptions
(9)About
5.2. Wi-Fi
ViaEnable/DisabletocontrolWi-FiOn/OFF.AfterEnable,thescreen
willlistallavailableWiFiAP.
Note:
EthernetwillbedisableautomaticallyifWiturnonandconnectto
network
.
5.3. Ethernet
ViaEnable/DisabletocontrolEthernetOn/Off.AfterenableEthernet,it
willdisplay:
(1)ConnectType(availabletypeisDHCP/StaticIP)
A.DHCP
B.StaticIP
C.IPAddress
D.Netmask
E.DNSAddress
F.GatewayAddress
(2)MacAddress
Note:
WiFiwillbedisableautomaticallyifEthernetturnonandconnectto
network.
5.3.1. DHCP
DHCPmode:
(1)CannotmodifyIPAddress,Netmask,DNSAddressandGateway.
(2)(Ifconnectsuccessfully,itwilldisplaycurrentnetwork
conguration.
5.3.2. Static IP
UnderStaticIP,UsercanmanuallyinputIPAddress,Netmask,DNS
AddressandGateway.
Note:
IPaddress,netmask,DNSaddressandgatewayaddressinputlimitation
(1)Format:
I. number0-9
II. decimalpoint“.”

55BDL4051T
30
5.4. Signage Display
Divideinto3groups:GeneralSettings/ServerSettings/Source
Settings
(1)GeneralSettings
A. SignageDisplayName
B. BootLogo
C. Screenshot
(2)ServerSettings
A. EmailNotication
B. FTP
C. RemoteControl
(3)SourceSettings
A. MediaPlayer
B. Browser
C. SmartCMS
D. PDFPlayer
E. Customapp
5.4.1. General Settings
1. SignageDisplayName
SetupPDname“PD_”+EthernetMacAddress.
Note:
Inputlimitation:
(1)length:Max36characters
(2)format:nolimit
2. BootLogo
1)ScalarOSDmenutocontrolAndroidbootlogoenable/disable.
ScalarOSDMenuoperation:
RCU:Home->Conguration2->Logo->On/Off/User
InUsermode,usercanchoosetheirownbootlogoanimationle.
Note:
(1)Bootanimationlenamemustbe:bootanimation.zip
(2)Willpop-upawindowforusertoselectUSBandSDcard.No
priorityissue.
2)Whenbootlogoselection,PDwillcheckifthereisbootanimation.
zipunderUSBandSDcard.
Functionintroduction:
a. Optiondescription
/data/local
UsecustomizedbootanimationlewhichiscopiedfromSDcardor
USB
/mnt/external_sd
UsebootanimationleunderSDcard
/mnt/usb_storage
UsebootanimationleunderUSB
b. Save
PressSavekeytosaveSDcardorUSBbootanimation.zipto/data/
localandsetitasbootlogo.
c. Forget
PressForgetkeytodelete/data/localbootanimation.zipandnot
showbootlogo.
d. Cancel
Closedialoguew/ochanges.
Scenariointroduction:
Case1
Theusersdonotsettlecustomizedbootlogo.PDdoesnotndany
bootanimation.zipleunderSDandUSB.TheListwillbeblank.Save
andForgetbuttonwillbegrayanduseless.
55BDL4051T
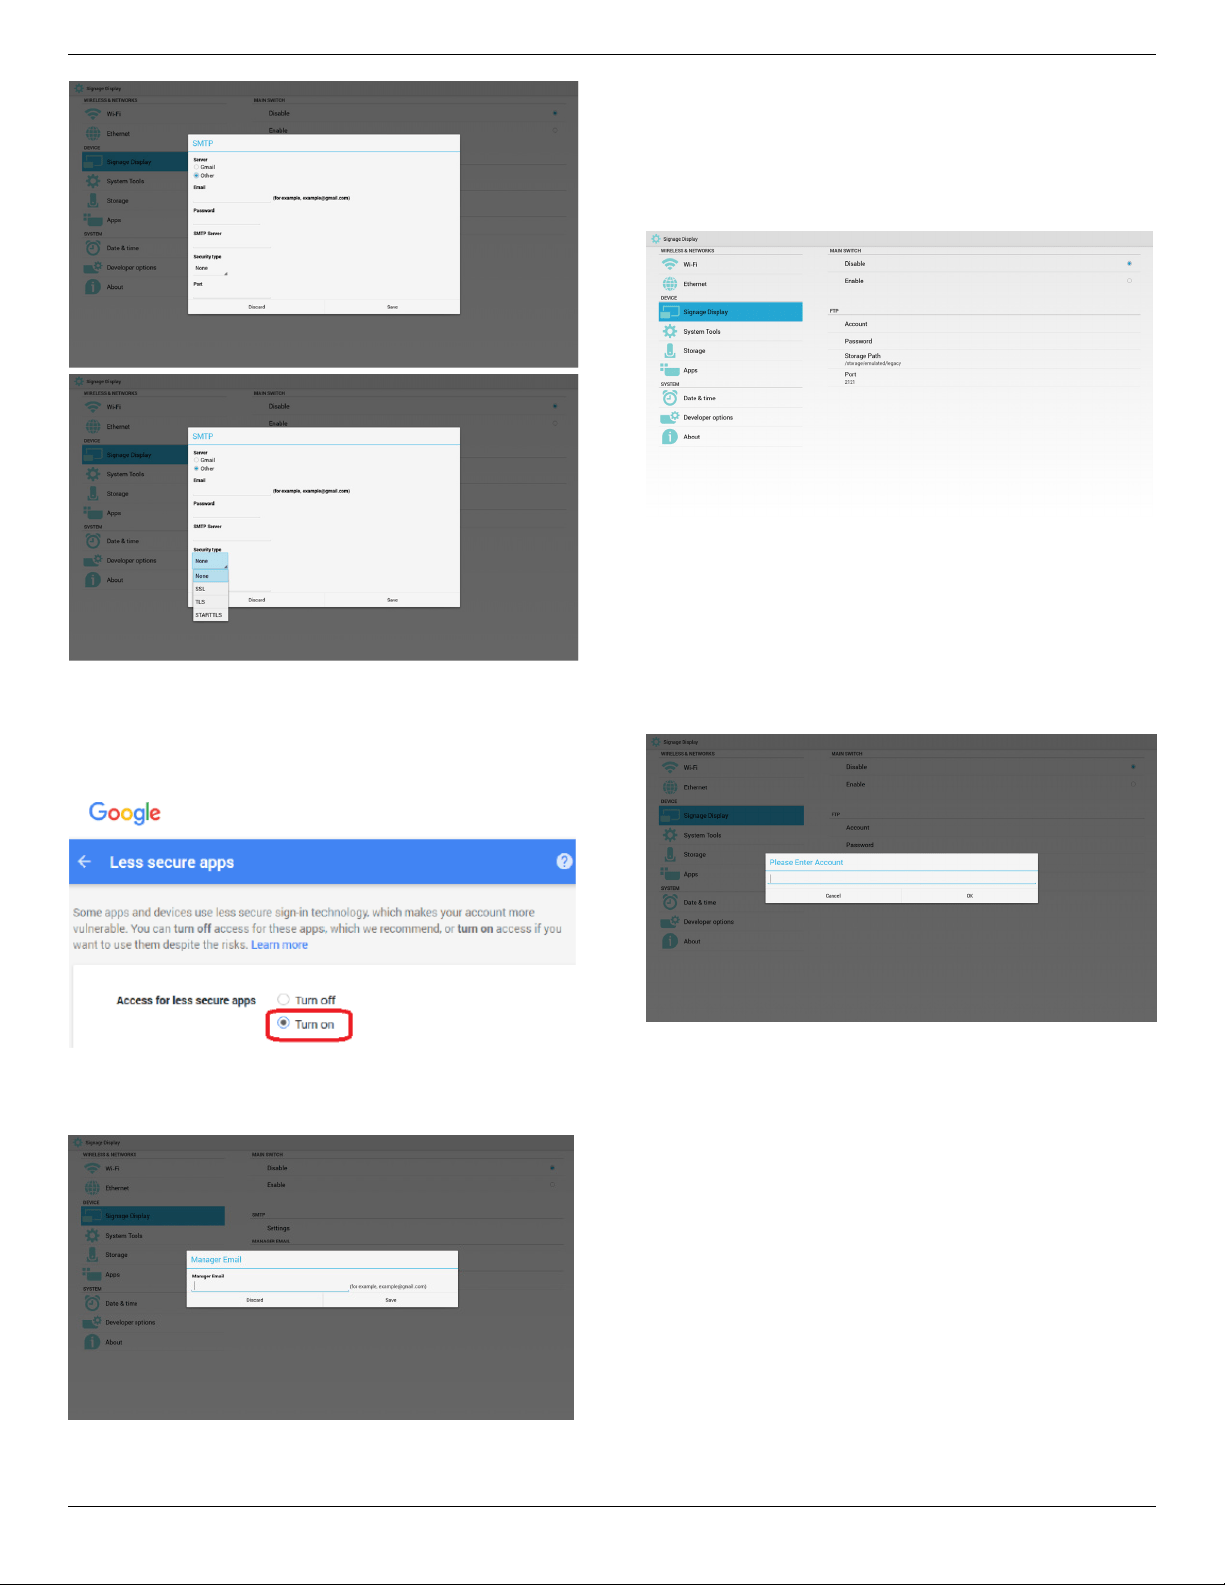
33
Gmailsafetysetting
IfitcannotsendmanageraftersettingGmail,pleaseloginyourGmail
testaccount,thenaccesstowebsite:
https://www.google.com/settings/security/lesssecureapps.
Conrmthe“Accessforlesssecureapps”,pleasesettoTurnon
2)ManagerEmail
Email
SetupReceivermailaccount
3)Test
SendTestMail
TotestGmailaccountreceive/sendfunction.
2. FTP
ViaEnable/DisabletocontrolFTPOn/Off.Aftersetup,PDcanshare
FTPles.
1)Account
SetupFTPaccount
Note:
Inputlimitation
(1)Length:4-20characters
(2)Format:
I. Englisha-zandA-Z
II. Number0-9
2)Password
SetupFTPpassword.
Note:
Inputlimitation
(1)Length:6-20characters
(2)Format:
I. Englisha-zandA-Z
II. Number0-9
FTPpassworddisplay
(1)Willshow“*”symboltoinsteadpasswordifsetuppassworkvia
remotecontrol.
(2)Aftersetup,thepasswordtextwillshowas“*”symbol.Before
passwordinput:

55BDL4051T
34
Afterpasswordinput:
Setupcompletedscreen:
3)StoragePath
SetupFTPsharepath.:/storage/emulated/legacy
Note:
Inputlimitation
(1)Cannotsaveifthepathisinvalid
4)Port
SetupFTPportnumber.Default:2121
Note:
Inputlimitation
(1)Length:Max5characters
(2)Range:1-65535
(3)Format:
I. Number0-9
(4)Donotusetheport:5000
3.RemoteControl
ViaEnable/DisabletoControlRemoteControlOn/Off
UsercaninputServeraddress.Ifserverdoesnotregistered,itwillask
userforPINcode.
Bindstatus:
(1)Willshownetworkisdisconnectedifnotyetconnectstonetwork.
Bindstatus:
(2)WillshowServerisdisconnectedifnetworkconnectedbut
remotecontrolserverdisconnected.

55BDL4051T
35
Bindstatus:
(3)WillshowServerisunbindedifRemotecontrolserverfeedback
unbindedstatus.
Bindstatus:
(4)WillshowserverisbindedifSeverbindedsuccessfully.
Bindstatus:
(5)WillshowErrorPINcodeifinputincorrectPINcode.
5.4.3. Source Settings
1. MediaPlayer
CanEditMediaPlayerplaylistandeffectsettings.
(1)OpenMediaPlayerPlayerListeditpage.
(2)OpenMediaPlayerslideshoweffecteditpage.
2. Browser
CaneditBookmarkconguration.
(1)OpenBrowsersettingpage.
55BDL4051T
37
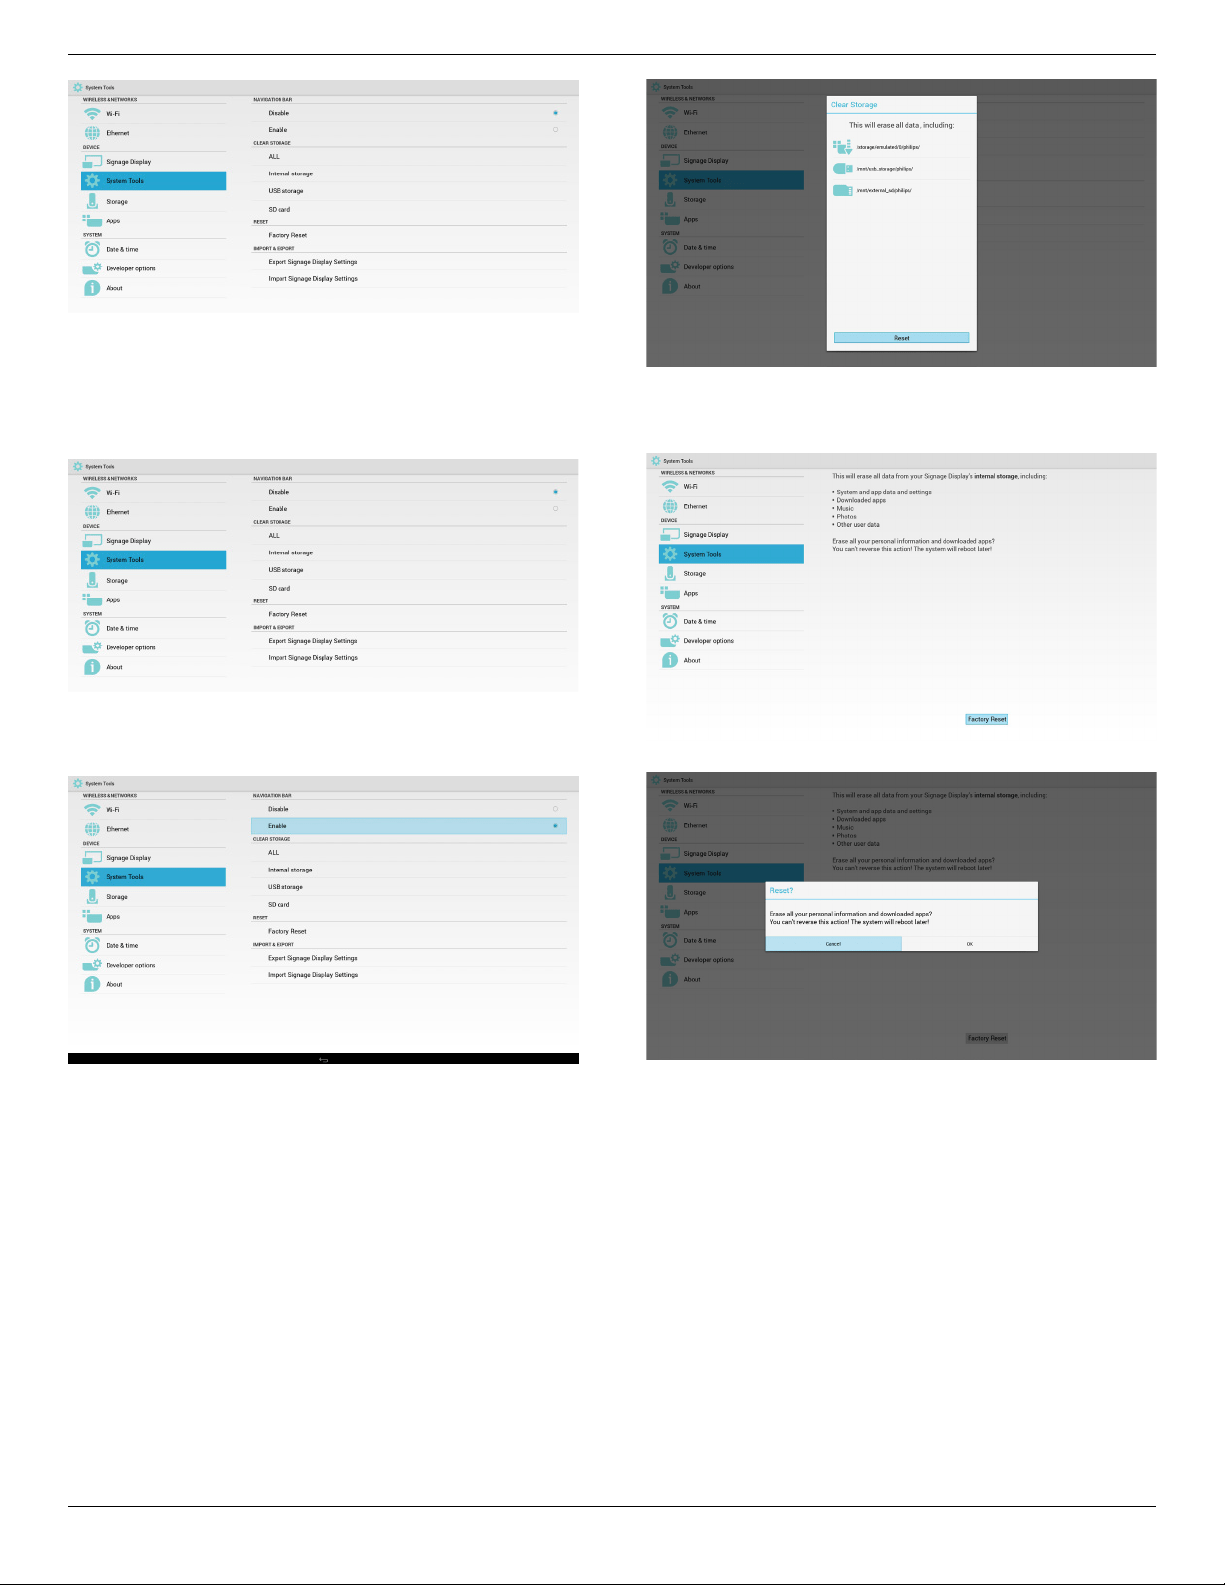
5.5.1. Navigation Bar
Toenable/disableNavigationBar.(Touchmodelonly)
• Disable:
Hidenavigationbar.
• Enable:
Shownavigationbar.TheBackkeywillshowonbottomof
screen.
5.5.2. Clear Storage
ThepurposeistoclearalldatainPhilipsfolders.
Dividedinto4mode:
(1)ClearallPhilipsfolde
(2)OnlyclearPhilipsfolderunderInternalstorage.
(3)OnlyclearPhilipsfolderunderUSBstorage.
(4)OnlyclearPhilipsfolderunderSDcard.
Pop-upthewindowtodisplayallfolderswhichcanbeclear.
5.5.3. Factory Reset
FactoryResetcanrecovertoFactorydefaultsettings.
PressOKtoexecuteResetfunctionautomatically
.
5.5.4. Import & Export
ThefunctionofImport&ExportPDsettins.
Note:
(1)Savedlename:settings.db
(2)WillsavetoPhilipsfolderinstorage.
1. Export
Willexportsettings.dbtoPhilipsfolderunderUSBorSDcard.
Note:
IfnoPhilipsfolderexistsinUSBorSDcard,itwillbecreated
automatically.
55BDL4051T
39
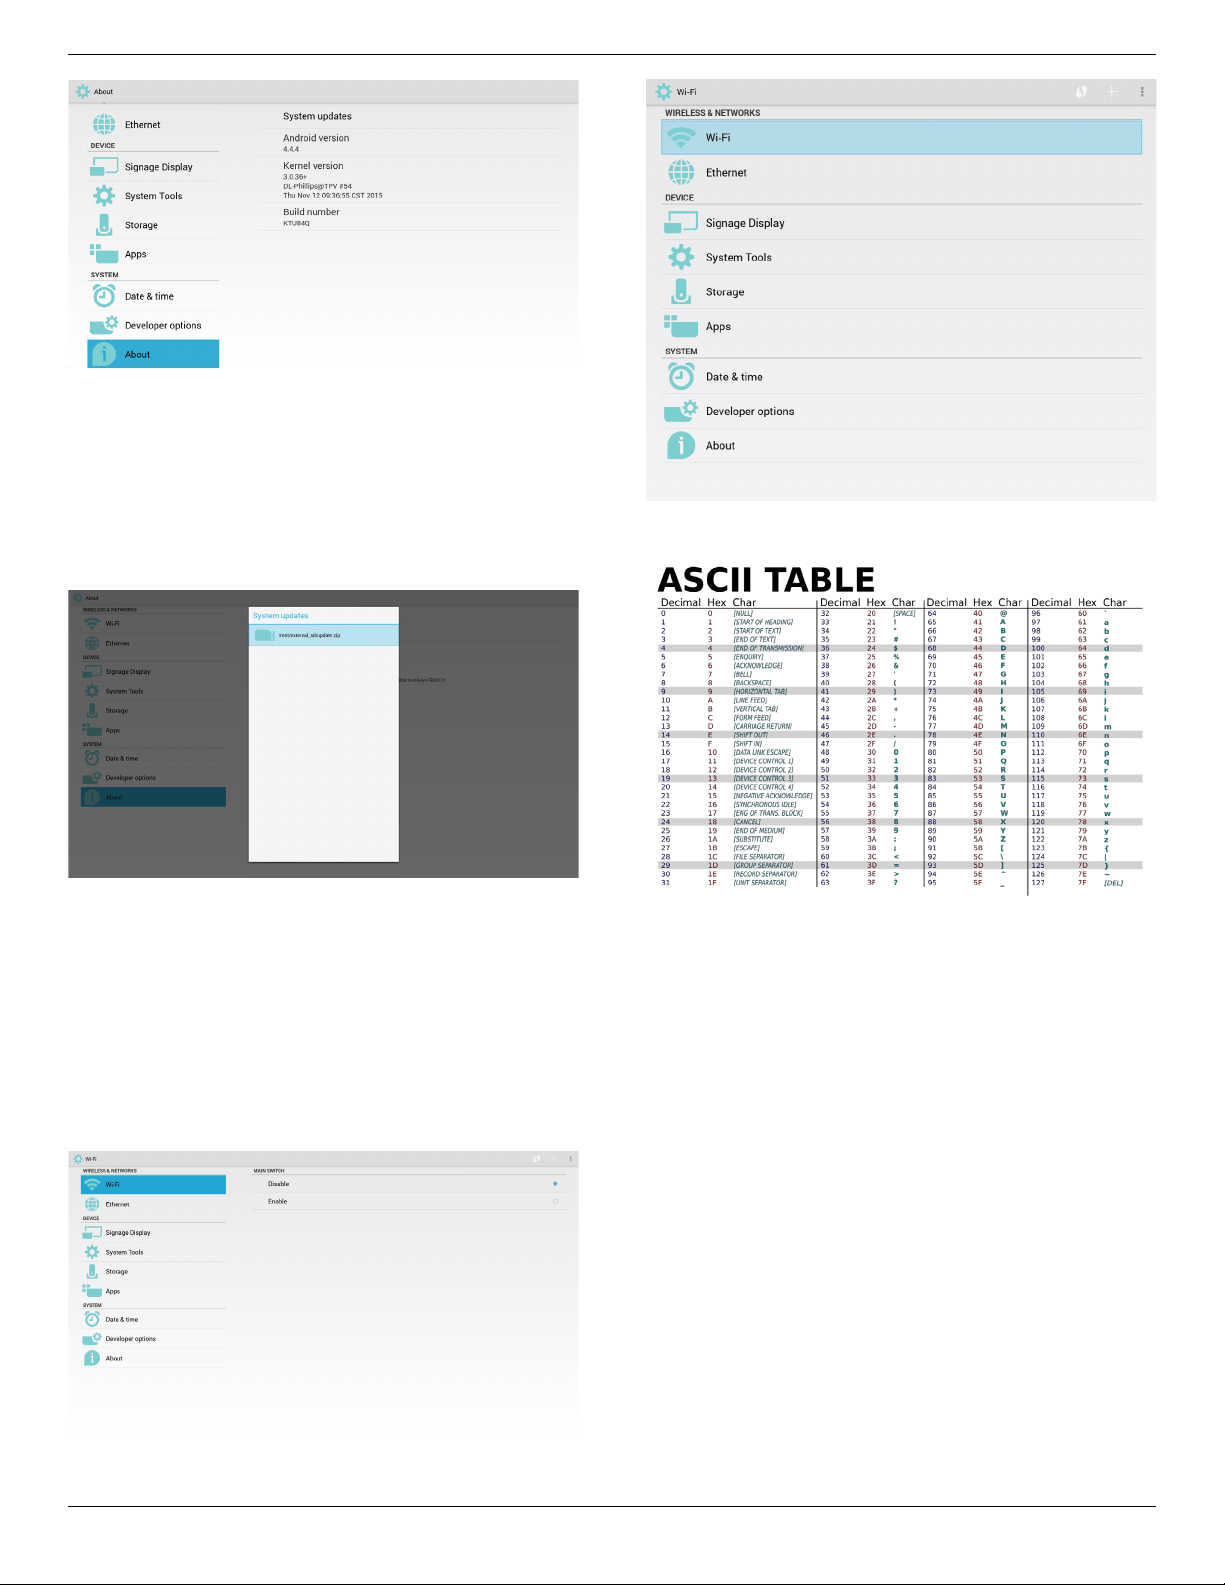
5.10.1. System updates
Willautomaticallysearchupdate.zipinUSBorSDcard.
Willbeshowninlistforuserselectioniffound
Note:
(1)OnlysupportAndroidFullimage.
(2)lenameshouldbeupdate.zip.
(3)theleshouldbelocatedinrootofstorage.
Afterselectupdate.ziple,PDwillrestartandstarttoupdate.
5.11. Supplementary
5.11.1. Rotation
ViaScalarOSDmenutooperateRotation:
Home->Conguration2->Rotation->OSDrotation
1. Landscape
AftersetupLandscapemode,thesettingscreenwilldivideinto2part.
SelectLeftitem,rightsidewilldisplaythesubmenu.
2. Portrait
AftersetupPortraitmode,thesettingscreenonlydisplayonelayer.
5.11.2. ASCII Table

55BDL4051T
41
CCT
10000ºK 9300ºK 7500ºK 6500ºK 5000ºK 4000ºK 3000ºK
X
0.279±
0.030
0.283±
0.030
0.299±
0.030
0.313±
0.030
0.346±
0.030
0.382±
0.030
0.440±
0.030
Y
0.292±
0.030
0.298±
0.030
0.315±
0.030
0.329±
0.030
0.359±
0.030
0.384±
0.030
0.403±
0.030
Color control
Thecolorlevelsofred,green,andblueareadjustedbythecolorbars.
R:Redgain,G:Greengain,B:Bluegain.
Smart picture
PQsetting
PCmode:{Standard}/{Highbright}/{sRGB}.
Videomode:{Standard}/{Highbright}/{Cinema}.
Smart Contrast
Autodetectblackdataandwhitedataoncontentandsetsuitable
backlight.
Surface Ratio Backlight Setting
5%-90% (MaxBacklight-MinBacklight)*SurfaceRatio/100
<5% MinBacklight
>90% MaxBacklight
Smart power
SmartPowercontrolisnotrelativetobrightnesscontrol:
1. InitialsettingBrigthness
70(intherangefrom0-100)
Powerconsumption70%ofmaximumpowerconsumption
2. SmartPower
OFF:noadaptation
MEDIUM:80%ofpowerconsumptionrelativetocurrentsettings
HIGH:65%ofpowerconsumptionrelativetocurrentsettings
3. Panelsaving/BrightnessON:40%ofmaximumpowerconsumption
Thecontrolssettingsshouldonlybevisibleonitsowncontrols.It
shouldnothavesecondaryeffectsonothercontrols
(eabrightnesssettingchangeswhensmartpowersettinghas
changed).
Overscan
Changethedisplayareaoftheimage.
ON:Settodisplayareaabout95%.
OFF:Settodisplayareaabout100%.
Picture reset
ResetallsettingsinthePicturemenu.
Select“Yes”andpress“SET”buttontorestoretofactorypresetdata.
Press“EXIT”buttontocancelandthenreturntothepreviousmenu.
6.2.2. Screen menu
P
Audio
PIP
Screen
Picture
Conguration 1
V position
Clock
Zoom mode
Custom zoom
H position
Clock phase
Auto adjust
Screen reset
50
50
50
50
Action
Action
Zoom
Full
H position
ControlHorizontalImagepositionwithinthedisplayareaoftheLCD.
Press+buttontomovescreentoright.
Press-buttontomovescreentoleft.
V position
ControlVerticalImagepositionwithinthedisplayareaoftheLCD.
Press+buttontomovescreentoup.
Press-buttontomovescreentodown.
Clock
Press+buttontoexpandthewidthoftheimageonthescreenthe
right.
Press-buttontonarrowthewidthoftheimageonthescreentheleft.
NOTE:VGAinputonly.
Clock phase
Improvesfocus,clarityandimagestabilitybyincreasingordecreasingthis
setting.
NOTE:VGAinputonly
Zoom mode
PCmode:{Full}/{4:3}/{1:1}/{16:9}/{21:9}/{Custom}.
Videomode:{Full}/{4:3}/{1:1}/{16:9}/{21:9}/{Custom}.
*Zoom mode setting is by input. If input in multi-windows, the setting
will apply for windows with the same input.
And the INFO OSD will show the latest setting.
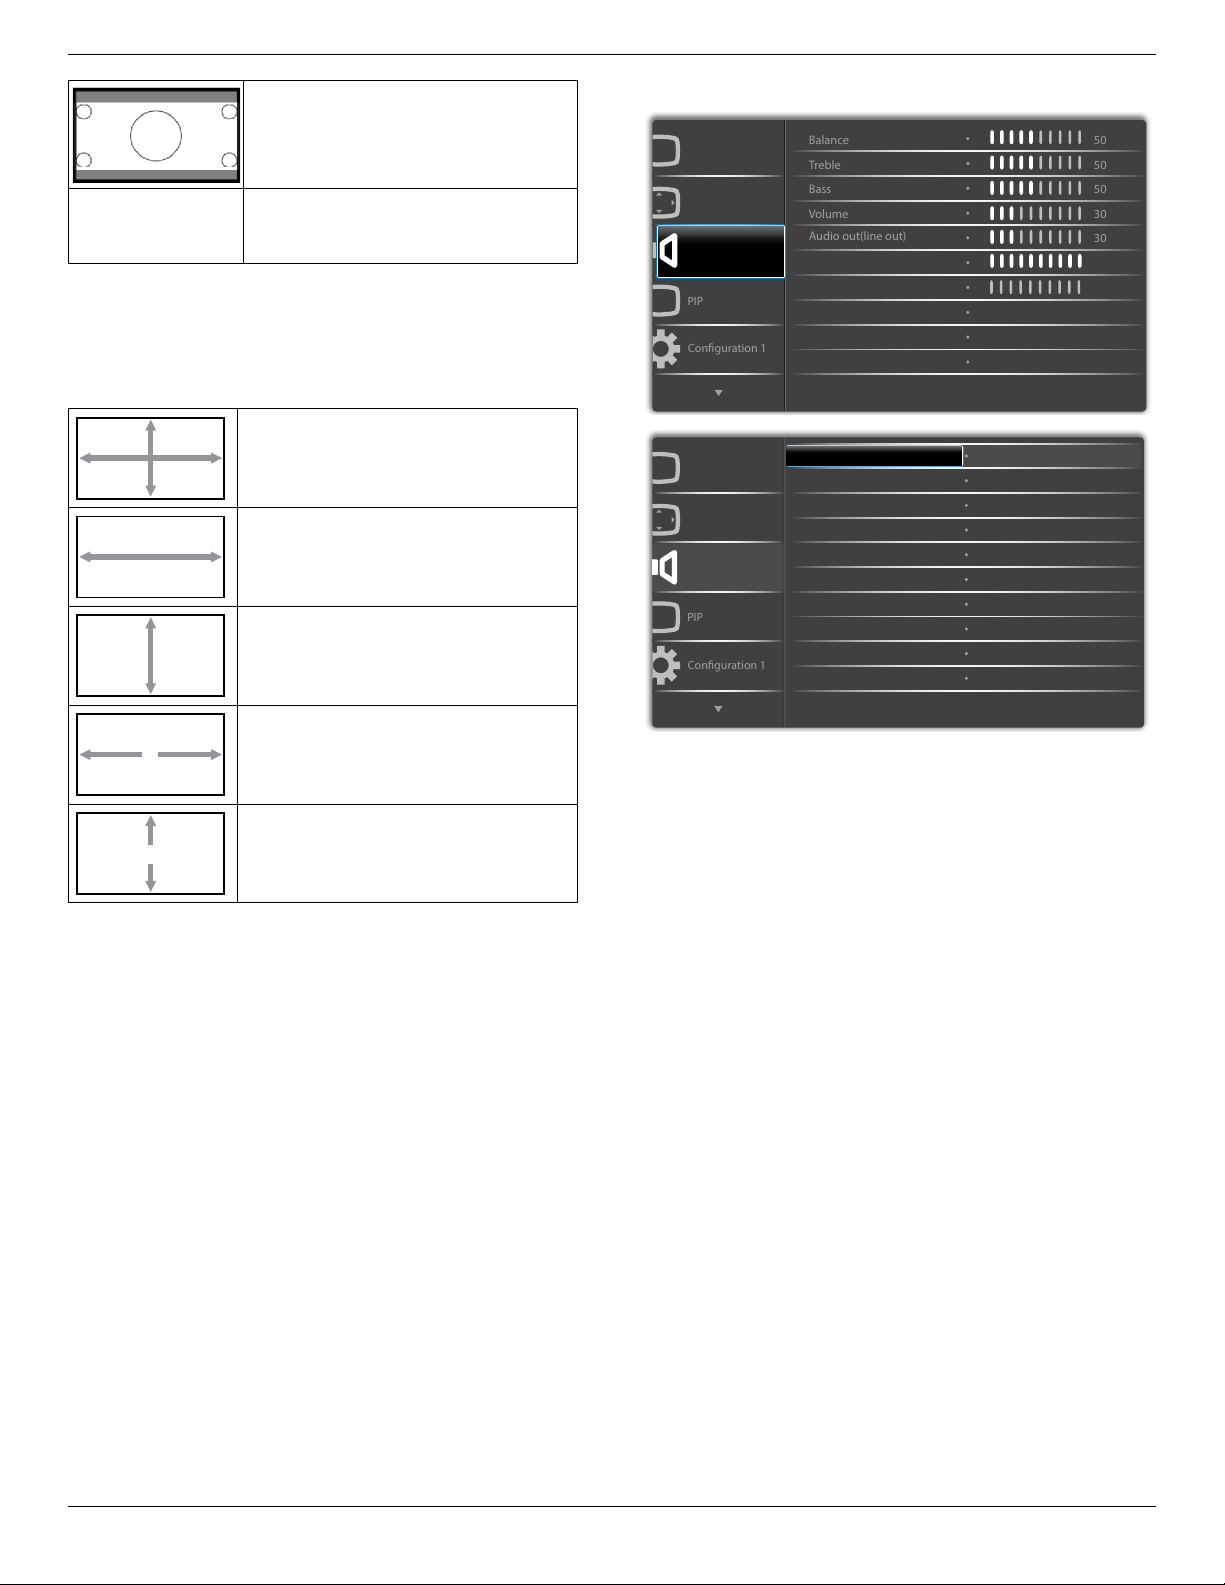
Full
Thismoderestoresthecorrectproportions
ofpicturestransmittedin16:9usingthefull
screendisplay.
4:3
Thepictureisreproducedin4:3formatand
ablackbandisdisplayedoneithersideofthe
picture.
1:1
Thismodedisplaystheimagepixel-by-pixel
onscreenwithoutscalingtheoriginalimage
size.
16:9
Thepictureisreproducedin16:9formatand
ablackbandatthetopandbottom.
55BDL4051T
42
21:9
Thepictureisreproducedin21:9formatand
ablackbandatthetopandbottom.
Custom
Choosetoapplythecustomzoomsettingsin
theCustomZoomsubmenu.
Custom zoom
Youcanusethisfunctiontofurthercustomizethezoomsettingstosuit
theimageyouwanttodisplay.
NOTE: Thisitemisfunctionalonlywhenthe{Zoom mode}issetto
{Custom}.
Zoom
Expandsthehorizontalandverticalsizesofthe
imagesimultaneously.
H zoom
Expandsthehorizontalsizeoftheimageonly.
V zoom
Expandstheverticalsizeoftheimageonly.
H position
Movesthehorizontalpositionoftheimageleft
orright.
V position
Movestheverticalpositionoftheimageupor
down.
Auto adjust
Press“Set”todetectandadjustHposition,Vposition,Clock,Phase
automatically.
Screen reset
ResetallsettingsintheScreenmenutofactorypresetvalues.
Select“Yes”andpress“SET”buttontorestorethefactorypresetdata.
Press“EXIT”buttontocancelandthenreturntothepreviousmenu.
6.2.3. Audio menu
P
Audio
PIP
Screen
Picture
Conguration 1
Treble
Bass
Maximum volume
Minimum volume
Balance
Volume
Audio out(line out)
Mute
50
50
50
30
O
O
30
0
100
Audio source
Sync.Volume
Analog
P
Audio
PIP
Screen
Picture
Conguration 1
Audio reset Action
Balance
Adjusttoemphasizeleftorrightaudiooutputbalance.
Treble
Adjusttoincreaseordecreasehigher-pitchedsounds.
Bass
Adjusttoincreaseordecreaselower-pitchedsounds.
Volume
Adjusttoincreaseordecreasetheaudiooutputlevel.
Audio out (line out)
Adjusttoincreaseordecreaselineoutoutputlevel.
Maximum volume
Adjustyourownlimitationforthemaximumvolumesetting.Thisstops
thevolumefrombeingplayedtooloudly.
Minimum volume
Adjustyourownlimitationfortheminimumvolumesetting.
Mute
Turnthemutefunctionon/off.
Audio source
Selecttheaudioinputsource.
Analog:audiofromaudioinput
Digital:audiofromHDMI/DVIaudio.
Displyport:audiofromDP.
Sync. Volume
Enable/disableaudioout(lineout)volumeadjustabilitytosyncwith
internalspeakers.

55BDL4051T
44
RS232 routing
Selectthenetworkcontrolport.
Choosefrom:{RS232}/{LAN ->RS232}.
Boot on source
Choosetoselectsourcewhenbootup.
Input:selectinputsourcewhenbootup.
Playlist:selectplaylistindexforMediaplayer,Browser,PDFplayer.
0:noplaylist.SameasswitchsourcefromOSD.1~7:playlist
number.
WOL
ChoosetoturnonoroffthewakeonLANfunction.
Choosefrom:{Off}/{On}
DDC/CI
ChoosetoturnonorofftheDDC/CIcommunicationfunction.
Select{On}fornormaluse.
Light sensor(require Philips accessory CRD41 External
Sensor Box)
Choosetoturnonoroffbacklightadjustmentaccordingto
environmentbrightness.
Choosefrom:{Off}/{On}
Human sensor(require Philips accessory CRD41 External
Sensor Box)
TheHumansensorcandetectifpeopleapproachthedisplayornot.
Thedisplaywillturnoffbacklightifdetectnothinginsettingtime.
Thedisplaywillbacktobacklightonwhenpeopleapproachit.
Theoptionsare:
•{Off}(Default),{10Min.},{20Min.},{30Min.},{40Min.},{50Min.},
{60Min.}
Power LED light
ChoosetosetpowerindicateLEDonoroff.
Choose{On}fornormaluse.
Conguration1 reset
ResetallsettingsinConguration1menutothefactorypresetvalues.
Factory reset
ResetallsettingsintheOSDmenusof{Picture},{Screen},{Audio},{PIP},
{Conguration1},{Conguration2},and{Advanced option}tothe
factorypresetvalues.
Androidsettingswillalsoresetwhenfactoryreset.
Press[
]
or[ ]buttontoselect{Reset},andpress[OK]buttonto
dothereset.
Factory reset
Cancel
Reset
6.2.6. Configuration2 menu
Advanced option
Conguration 2
OSD H-position
OSD V-position
Information OSD
Logo
OSD turn o
OSD transparency
Monitor ID
Monitor information
DP version
Heat status
50
50
45
o
Action
Action
Action
10 Sec.
On
DP 1.1
Advanced option
Conguration 2
Rotation
Language
Windows selection
Action
English
Main
Action
Conguration2 reset
OSD turn off
SettheperiodoftimetheOSD(on-screendisplay)menustaysonthe
screen.
Theoptionsare:{0 ~ 120}seconds.
*{0}doesnotdisappearautomatically.
OSD H-position
AdjustthehorizontalpositionoftheOSDmenu.
OSD V-position
AdjusttheverticalpositionoftheOSDmenu.
OSD Transparency
AdjustOSDtransparency.
• {Off}-Transparencyoff.
• {1-100}-Transparencylevel1-100.
Information OSD
SettheperiodoftimetheinformationOSDisdisplayedontheupper
rightcornerofthescreen.TheinformationOSDwilldisplaywheninput
signalischanged.
TheinformationOSDwillremainonthescreenwith{Off}selection.
Theoptionsare:{1 ~ 60}seconds.
Logo
ChoosetoenableordisablethepictureofLogowhenturnonyour
display.
Theoptionsare:
• {Off}(Default)
• {On}*
• {User}**
55BDL4051T
45
**IfLogosettoUSER.
UserlogodoesNOTsupportrotationfunction.
Monitor ID
SettheIDnumberforcontrollingthedisplayviatheRS232C
connection.EachdisplaymusthaveauniqueIDnumberwhenmultiple
setsofthisdisplayareconnected.MonitorIDnumberrangeisbetween
1to255.
Theoptionare:{Monitor group}/{Tiling matrix}/{Auto ID}
Monitor Id
Monitor Id
Monitor group
Tiling matrix
Auto ID
1
1
1
End
• {Monitor group}
Theoptionsare:{Off}/{1-254}
• {Off}–{Monitorgroup}arenotsupported.
• {1-254}–{Monitorgroup}aresupported.Thedefaultsettingis
1.
• {Tiling matrix}
Tilingmatrixnumberrangeisbetween1to15.1isdefaultsetting.
The{Auto ID}setupfunctionenablessettingup{Monitor ID}of
connectedmachineaccordingto{Tiling matrix}settings.
Example:Tilingmatrixsetsas4
1 2
5 6
3 4
7 8
9 10 11 12
13
14 15
16
• {Auto ID}
Theoptionare:{Start}/{End}.Thedefaultis{End}.
• SwitchtoStartoptiontosetupIDsofmachinesbackward
fromcurrentone.
• Oncethesetupiscompleted,theoptionexitstoEnd
automatically.
• Tousethisfunction,serialconnectallmachineswithRS-232
cableandsettheirControlportstoRS-232too.
Heat status
Thisfunctionallowsyoutocheckthethermalstatusatanytime.
• Atemperature-warningmessagewillbeshownonthescreen
ifthetemperaturereaches97°C(207°F).Allkeyfunctions
except
[ ]
keywillthenbedisabled.
• Oncethetemperaturereaches98°C(208°F),thedisplay
powerwillbeshutdownautomatically.
Monitor information
Showsinformationaboutyourdisplay,includingmodelnumber,serial
number,operatinghoursandsoftwareversion.
Monitor information
Model name
Serial no
Operation hours
SW Version
55BDL4051T
CNCA123456789
46H45M
V0.300
DP version
DisplayPortsupportmode.
Theoptionsare:
• {DP 1.1}(Default):DP1.1singlestream(clonemode)
• {DP 1.2 SST}:DP1.2Singlestream(clonemode)
• {DP 1.2 MST}:DP1.2Multi-Stream
*NOTE:
TheDPversionmustbesetthesameforalldaisychaindisplays.
Window selection
Selectthewindowforadjustingsetting.Theselectedwindowwillbe
highlightgreenborder.
WindowselectionwillsettoMainafterpoweron.
Theoptionsare:
• {Main}(Default),{PIP}
• [ ]
HotkeyforWindowselectionfunction.
Rotation
SettherotationofMain/Sub/OSD
AutoRotate: Off/On Default: Off
OSDRotate: Landscape/Portrait Default: Landscape
ImageRotate:
All: Off/On Default: Off
Main: Off/On Default: Off
Sub: Off/On Default: Off
AutoRotate:{Off},{On}whenvalueisOn,automaticallydetectwhether
thePDrotation,OffissetbyOSD.
OSDRotate:{Off},{On}whenvalueison,OSDrotate90°,Offis
restored.
All:{Off},{On}whenvalueison,allWindowscreenrotate90°,Offthe
referencesetindividualwindow.
Main:{Off},{On}whenvalueisonn,Mainwindowscreenrotate90°,
Offisrestored.
Sub:{Off},{On}whenvalueison,Sub1Windowscreenrotate90°,Off
isrestored.
*WhentheMain/Subsourceisthesame,rotationisgivenpriorityto
withSub.
*NotsuuporedDe-Interlacingfunctioninrotationmode.
Language
SelectthelanguageusedintheOSDmenu.
Theoptionsare:English/Deutsch/
简体中文
/Français/Italiano/Español/
Pyccкий/Polski/Türkçe/
繁體中文
/
日本語
/Português/
/Danish/
Svenska/Suomi/Norsk/Nederlands.
Conguration2 reset
ResetallsettingsinConguration2menutothefactorypresetvalues.

55BDL4051T
46
6.2.7. Advanced option menu
Advanced option
Conguration 2
IR control
Keyboard control
O timer
Date and time
Input resolution
Tiling
Schedule
Auto signal detection
Power Save
HDMI with One Wire
Action
Action
Auto
Action
Action
Action
O
O
Action
Mode 4
Input resolution
SettheresolutionoftheVGAinput.Thisisonlyrequiredwhenthe
displayisunabletodetecttheVGAinputresolutioncorrectly.
NOTE: ThisitemisfunctionalforVGAinputonly.
Theoptionsare:
• {1024x768/1280x768/1360x768 / 1366x768}
• {1400x1050/1680x1050}
• {1600x1200/1920x1200}
• {Auto}:Determinestheresolutionautomatically.
Theselectedsettingswillbecomeeffectiveafterturningoffthepower
andturningitonagain.
IR control
Selecttheoperationmodeoftheremotecontrolwhenmultipledisplays
areconnectedviaanRS232Cconnection.
• {Normal} -Alldisplayscanbeoperatednormallybytheremote
controlunit.
• {Primary}-Designatethisdisplayastheprimarydisplayforremote
controloperation.Onlythisdisplaycanbeoperatedbytheremote
control.(Inprimarymode,IRkeywillalwaysbeprocessedregardless
themonitorid/groupsettings).
• {Secondary}-Designatethisdisplayasthesecondarydisplay.This
displaycannotbeoperatedbytheremotecontrol,andwillonly
receivethecontrolsignalfromtheprimarydisplayviatheRS232C
connection.
• {Lock All}/{Lock all but Volume}/{Lock all but Power}/{Lock
all except PWR & VOL}-Locktheremotecontrolfunctionofthis
display.Tounlock,pressandholdthe[
]INFObuttononthe
remotecontrolfor6(six)seconds.
Keyboard control
Choosetoenableordisablethedisplaykeyboard(controlbuttons)
function.
• {Unlock}-Enablethekeyboardfunction.
• {Lock All}/{Lock all but Volume}/{Lock all but Power}/{Lock all
except PWR & VOL}-Disablethekeyboardfunction.
NOTE: “KeyboardControlLockMode”Thisfunctioncompletely
disablestheaccesstoallKeyboardControlfunctions.Toenable
ordisablethekeyboardcontrollock,pressboth[
]and[ ]
buttonsandholddowncontinuouslyformorethan3seconds.
Tiling
Withthisfunctionyoucancreateasinglelarge-screenmatrix(video
wall)thatconsistsofupto225setsofthisdisplay(up to 15-sets on
the vertical and 15-sets on the horizontal sides).Thisfunctionrequiresa
daisy-chainconnection.
Note:Touchfunctionisonlyforsinglefullscreen.Multiplescreentouch
eventwillbeincorrectcorresponding.
Tiling
H monitors
V monitors
Position
Frame comp.
Enable
Switch on delay
1
1
1
No
No
Off
Example: 2 x 2 screen matrix (4 displays)
Hmonitors=2displays
Vmonitors=2displays
1 2
3 4
H monitors
V monitors
Position
Example: 5 x 5 screen matrix (25 displays)
Hmonitors=5displays
Vmonitors=5displays
1 2
6 7
3 4
8 9
5
10
11 12 13 14 15
16 17 18 19 20
21 22 23 24 25
H monitors
V monitors
Position
• {H monitors}-Selectthenumberofdisplaysonthehorizontalside.
• {V monitors}-Selectthenumberofdisplaysontheverticalside.
• {Position}-Selectthepositionofthisdisplayinthescreenmatrix.
• {Frame comp.}-Choosetoturntheframecompensationfunctionon
oroff.Ifselected{Ye s },thedisplaywilladjusttheimagetocompensate
forthewidthofthedisplaybezelsinordertoaccuratelydisplaythe
imag
55BDL4051T
48
NOTE: Werecommendyoutosetupcurrentdateandtimeinthe
{Date and time}menubeforeusingthisfunction.
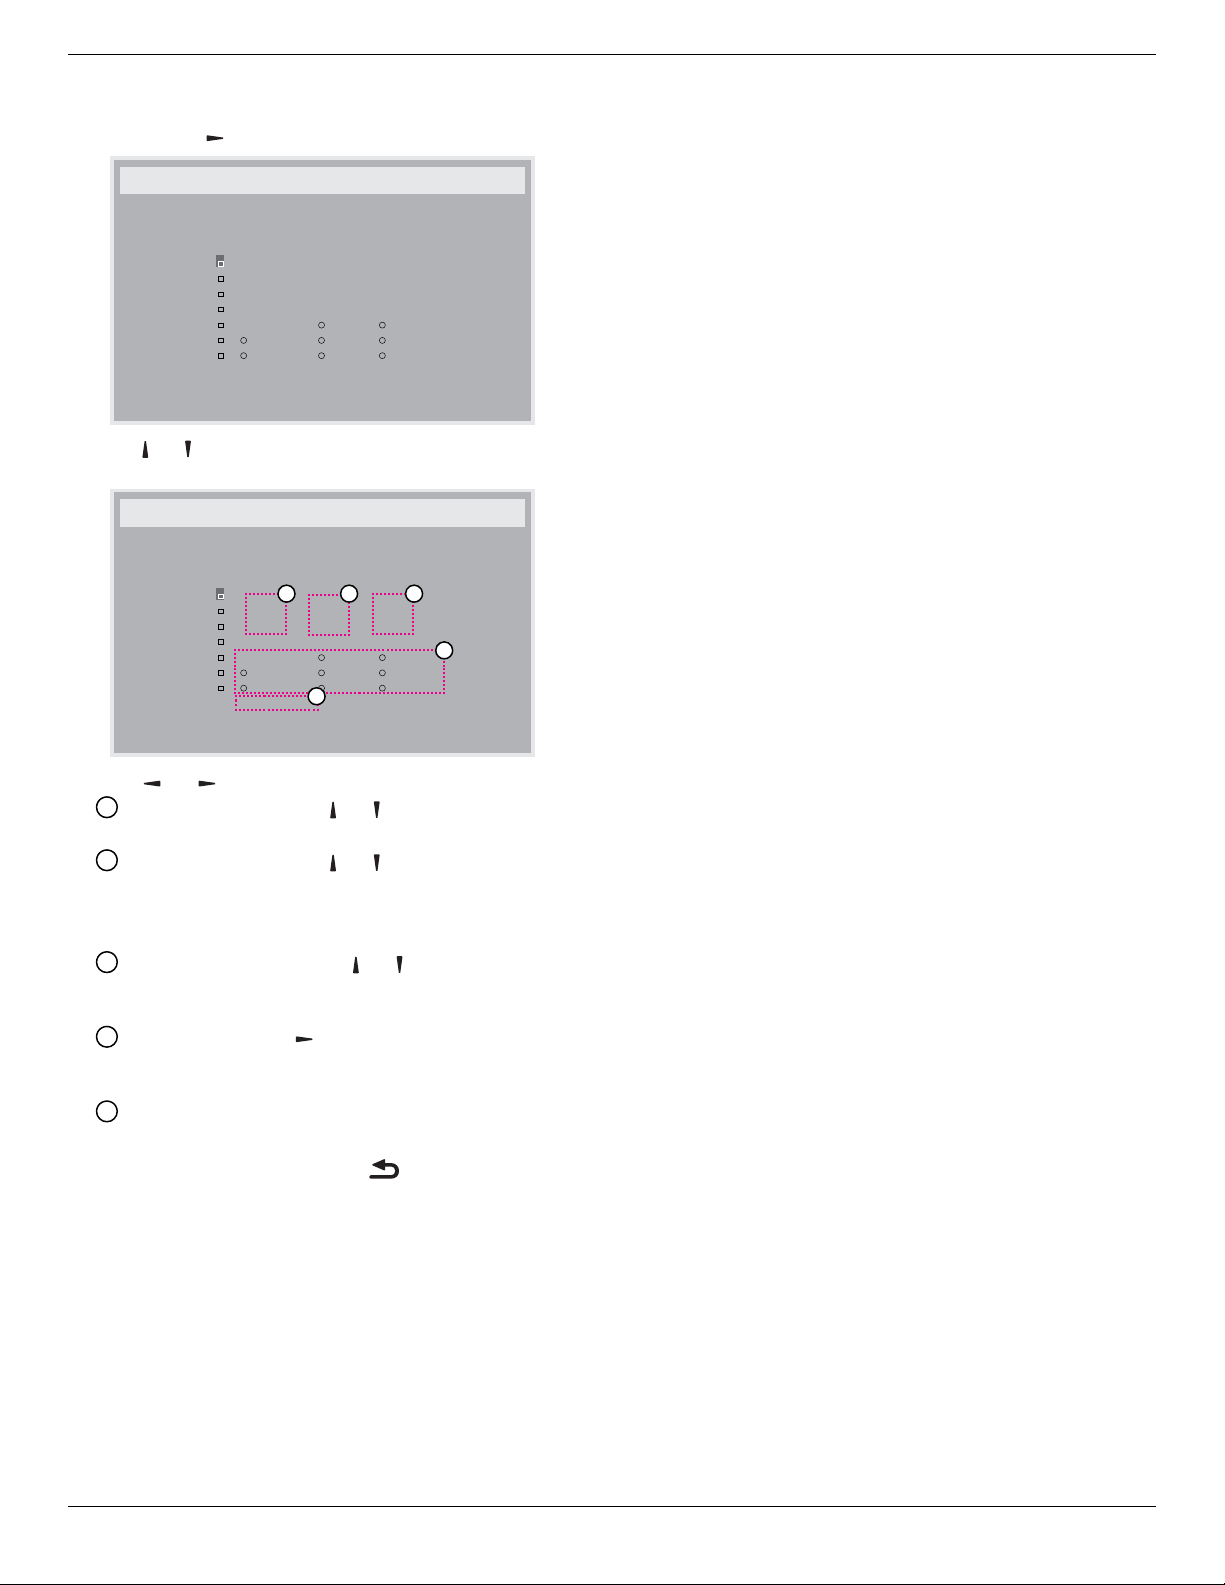
1. Press[OK]or[
]buttontoenterthesubmenu.
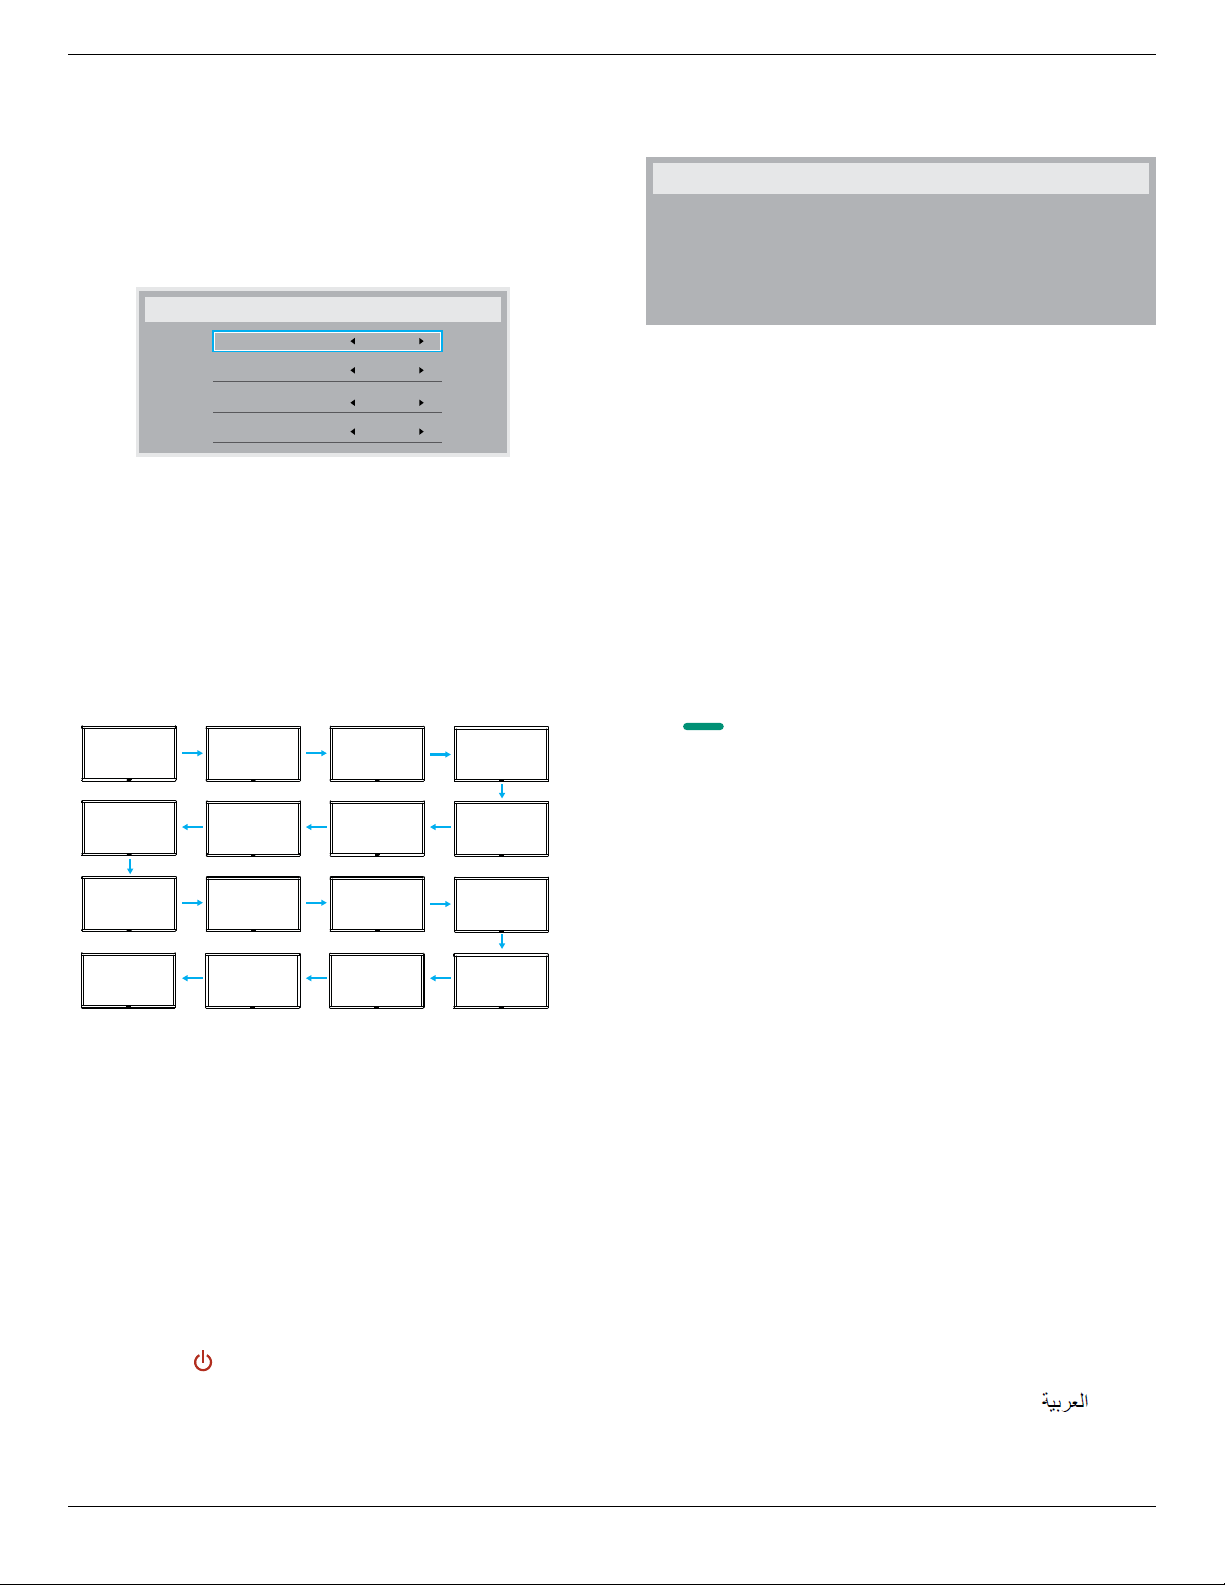
Schedule
Today
1
2
3
4
5
7
6
2015 . 01 . 04 SUN 04 : 14 : 01
On
:
_
:
_ _ _ _
O
Input
WED
SAT
MON
THU
SUN
TUE
FRI
Every week
Clear all
playlist 0
2. Press[ ] or[ ] buttontoselectascheduleitem(itemnumber1~7),
andthenpress[OK]buttontomarkittheitemnumber.
Schedule
Today
1
2
3
4
5
7
6
2015 . 01 . 04 SUN 04 : 14 : 01
On
:
_
:
_ _ _ _
O
Input
WED
SAT
MON
THU
SUN
TUE
FRI
Every week
Clear all
playlist 0
4
1 32
5
3. Press[ ]
or[ ]buttontoselecttheschedule:
1
Power-onschedule:Press[ ] or[ ]buttontosetthehour
andminuteforthedisplaytoturnon.
2
Power-offschedule:Press[ ] or[ ] buttontosetthehour
andminuteforthedisplaytoturnoff.
Selectorleaveanempty“__”forboththehourandminuteslotif
youdonotwanttousethispower-onorpower-offschedule.
3
Input-sourceselection:Press[ ] or[ ] buttontoselectan
inputsource.Ifnoinputsourceisselected,theinputsource
willremainthesameaslastselected.
4
Dateschedule:Press[ ]buttontoselectwhichdayina
weekthisscheduleitemwillbetakeeffect,andthenpressthe
[OK]button.
5
WhenInput-sourceselecttoUSB,enabletoaccessplaylist
setting:
4.
Foradditionalschedulesettings,press[
],thenrepeatthesteps
above.Acheckmarkintheboxnexttothenumberoftheschedule
itemindicatesthattheselectedscheduleisineffect.
NOTES:
• Iftheschedulesoverlap,thescheduledpower-ontimetakespriority
overscheduledpower-offtime.
• Iftherearetwoscheduleitemsprogrammedforthesametime,the
highestnumberedscheduletakespriority.Forexample,ifschedule
items#1and#2bothsetthedisplaytopoweronat7:00AMand
offat5:00PM,thenonlyscheduleitem#2willtakeeffect.
HDMI with One Wire
CECcontrol.
• {Off} -DisableCEC.(Default)
• {On}-EnableCEC.
Auto signal detection
Choosetoletthedisplaydetectanddisplayavailablesignalsources
automatically.
• {Off}-Onceasignalisconnected,itcanonlybeselectedmanually.
Iftheselectedinputisnosignal,setthedisplaytodisplaytheimage
automaticallyaccordingtothesearchorderofeachoption.
Theoptionsare:{All} / {Failover}
• {All}:DP -> HDMI1 -> HDMI2 -> DVI -> VGA->MediaPlayer->
Browser->SmartCMS->PDFReader->Custom.
• {Failover}
- Failover1:User-denedsetting.Default:HDMI1.
- Failover2:User-denedsetting.Default:HDMI1.
- Failover3:User-denedsetting.Default:HDMI1.
- Failover4:User-denedsetting.Default:HDMI1.
- Failover5:User-denedsetting.Default:HDMI1.
- Failover6:User-denedsetting.Default:HDMI1.
- Failover7:User-denedsetting.Default:HDMI1.
- Failover8:User-denedsetting.Default:HDMI1.
- Failover9:User-denedsetting.Default:HDMI1.
- Failover10:User-denedsetting.Default:HDMI1.
Power Save
Powersavemodes
Mode1:DCoff->Poweroff.LED:Red.
PowerSave->Poweroff,LED:Red
Mode2:DCoff->Poweroff,LED:Red.
PowerSave->PowerSaving.LED:Orange.Canbewakeup.
Mode3:DCoff->Backlightoff,LED:Red
PowerSave->Backlightoff,LED:Orange.Canbewakeup.
Mode4:DCoff->Backlightoff,LED:Red
PowerSave->Willnotenterpowersavemode.show“nosignal”only.
*Note:WhenAutoFWupdateisnotOFF,displaywillworkunder
Mode3forFWupdate,butOSDitemwillnotchange.

55BDL4051T
50
7. USB device compatibility
USB Multimedia Codec Formats
Video Decode
Type VideoCodec Container Decode Encode Channel
Remark
MPEG1/2 MPEG1/2 FileFormat:DAT,MPG,VOB,TS V
SupportedImageSize:48x48pixelsto1920x1088pixels
MaximumFrameRate:30fps
MaximumBitRate:80Mbps
AudioCodec:MP2,MP3
MPEG-4 MPEG4
FileFormat:AVI,MKV,MP4,MOV,
3GP
V
SupportedImageSize:48x48pixelsto1920x1088pixels
MaximumFrameRate:30fps
MaximumBitRate:38.4Mbps
AudioCodec:MP2,MP3,AAC,PCM,
(1)NotsupportMSMPEG4v1/v2/v3
(2)NotsupportGMC(globalmotioncompensation)
H.263 H.263 FileFormat:3GP,MOV,MP4 V
SupportedImageSize:SQCIF(128x96),
QCIF(176x144),
CIF(352x288),4CIF(704x576)
MaximumFrameRate:30fps
MaximumBitRate:38.4Mbps
AudioCodec:MP3
(1)NotsupportH.263+
H.264 H.264
FileFormat:AVI,MKV,MP4,MOV,
3GP,TS,FLV
V
SupportedImageSize:48x48pixelsto1920x1088pixels
MaximumFrameRate:30fps
MaximumBitRate:57.2Mbps
AudioCodec:MP2,MP3,AAC,PCM
(1)NotsupportMBAFF
GOOGLE
VP8
VP8 FileFormat:WEBM V
SupportedImageSize:48x48pixelsto1920x1088pixels
MaximumFrameRate:30fps
MaximumBitRate:38.4Mbps
AudioCodec:OggVorbis
MotionJPEG MJPEG FileFormat:AVI,MOV V
SupportedImageSize:48x48pixelsto1920x1088pixels
MaximumFrameRate:30fps
MaximumBitRate:38.4Mbps
AudioCodec:MP2,MP3,AAC,PCM
Audio Decode
Type AudioCodec Container Decode Encode Channel Remark
MPEGAudio
MPEG1/2/2.5Audio
Layer1/2/3
Decode:MP1,MP2,MP3 V 2
BitRate:8kbps~320Kbps,CBRandVBR
SamplingRate:8KHZ~48KHz
Windows
MediaAudio
WMAVersion4,4.1,
7,8,9,wmapro
Decode:WMA V 2
BitRate:8kbps~320Kbps
SamplingRate:8KHZ~48KHz
Non-supportWMAPro,losslessandMBR
AACAudio
MAIN,ADIF,ATDS
HeaderAAC-LC
andAAC-HE
FileFormat:AAC,M4A V 5.1
BitRate:N/A
SamplingRate:8KHZ~48KHz

55BDL4051T
52
8. Input Mode
VGA Resolution:
Standard
Resolution
ActiveResolution
RefreshRate PixelRate AspectRatio StandforMode
HPixels VLines
VGA 640 480
60Hz 25.175MHz
4:3 VideoGraphicArray72Hz 31.5MHz
75Hz 31.5MHz
WVGA 720 400 70Hz 33.75MHz 16:9 WideVideoGraphicArray
SVGA 800 600
60Hz 40MHz
4:3 SuperVGA
75Hz 49.5MHz
XGA 1024 768
60Hz 65MHz
4:3 ExtendedGraphicArray
75Hz 78.75MHz
WXGA 1280 768 60Hz 79.5MHz 5:3 WideXGA
WXGA 1280 800 60Hz 79.5MHz 16:10 WideXGA
SXGA 1280 1024 60Hz 108MHz 5:4 SuperXGA
WXGA 1360 768 60Hz 85.5MHz 16:9 WideXGA
UXGA 1600 1200 60Hz 162MHz 4:3 UltraXGA
HD1080 1920 1080 60Hz 148.5MHz 16:9 HD1080
SDTV Resolution:
Standard
Resolution
ActiveResolution
RefreshRate PixelRate AspectRatio StandforMode
HPixels VLines
480i
720 480 59.94Hz 27MHz 4:3 ModiedNTSCStandard
480p
576i
720 576 50Hz 27MHz 4:3 ModiedPALStandard
576p
HDTV Resolution:
Standard
Resolution
ActiveResolution
RefreshRate PixelRate AspectRatio StandforMode
HPixels VLines
720p 1280 720
50Hz
74.25MHz 16:9 NormallyDVBMode
60Hz
1080i 1920 1080
50Hz 74.25MHz
16:9 NormallyATSCMode
60Hz 74.176MHz
1080p 1920 1080
50Hz 148.5MHz
16:9 NormallyATSCMode
60Hz 148.325MHz
• ThePCtextqualityisoptimuminHD1080mode(1920x1080,60Hz).
• YourPCdisplayscreenmightappeardifferentdependingonthemanufacturer(andyourparticularversionofWindows).
• CheckyourPCinstructionbookforinformationaboutconnectingyourPCtoadisplay.
• Ifaverticalandhorizontalfrequency-selectmodeexists,select60Hz(vertical)and31.5KHz(horizontal).Insomecases,abnormalsignals(suchas
stripes)mightappearonthescreenwhenthePCpoweristurnedoff(orifthePCisdisconnected).Ifso,pressthe[INPUT]buttontoenterthe
videomode.Also,makesurethatthePCisconnected.
• WhenhorizontalsynchronoussignalsseemirregularinRGBmode,checkPCpowersavingmodeorcableconnections.
• ThedisplaysettingstablecompliestotheIBM/VESAstandards,andbasedontheanaloginput.
• TheDVIsupportmodeisregardedassametothePCsupportmode.
• Thebesttimingfortheverticalfrequencytoeachmodeis60Hz.

55BDL4051T
55
10. Cleaning and Troubleshooting
10.1. Cleaning
Caution When Using the Display
• Donotbringyourhands,faceorobjectsclosetotheventilationholesofthedisplay.Thetopofthedisplayisusuallyveryhotduetothehigh
temperatureofexhaustairbeingreleasedthroughtheventilationholes.Burnsorpersonalinjuriesmayoccurifanybodypartsarebroughttoo
close.Placinganyobjectnearthetopofthedisplaycouldalsoresultinheatrelateddamagetotheobjectaswellasthedisplayitself.
• Besuretodisconnectallcablesbeforemovingthedisplay.Movingthedisplaywithitscablesattachedmaydamagethecablesandthuscausere
orelectricshock.
• Disconnectthepowerplugfromthewalloutletasasafetyprecautionbeforecarryingoutanytypeofcleaningormaintenanceprocedure.
Front Panel Cleaning Instructions
• Thefrontofthedisplayhasbeenspeciallytreated.Wipethesurfacegentlyusingonlyacleaningclothorasoft,lint-freecloth.
• Ifthesurfacebecomesdirty,soakasoft,lint-freeclothinamilddetergentsolution.Wringtheclothtoremoveexcessliquid.Wipethesurfaceof
thedisplaytoremovedirt.Thenuseadryclothofthesametypetodry.
• Donotscratchorhitthesurfaceofthepanelwithngersorhardobjectsofanykind.
• Donotusevolatilesubstancessuchasinsertsprays,solventsandthinners.
Cabinet Cleaning Instructions
• Ifthecabinetbecomesdirty,wipethecabinetwithasoft,drycloth.
• Ifthecabinetisextremelydirty,soakalint-freeclothinamilddetergentsolution.Wringtheclothtoremoveasmuchmoistureaspossible.Wipe
thecabinet.Useanotherdryclothtowipeoveruntilthesurfaceisdry.
• Donotallowanywaterordetergenttocomeintocontactwiththesurfaceofthedisplay.Ifwaterormoisturegetsinsidetheunit,operating
problems,electricalandshockhazardsmayresult.
• Donotscratchorhitthecabinetwithngersorhardobjectsofanykind.
• Donotusevolatilesubstancessuchasinsertsprays,solventsandthinnersonthecabinet.
• DonotplaceanythingmadefromrubberorPVCnearthecabinetforanyextendedperiodsoftime.

55BDL4051T
56
10.2. Troubleshooting
Symptom Possible Cause Remedy
No picture is displayed 1. Thepowercordisdisconnected.
2. Themainpowerswitchonthebackofthe
displayisnotswitchedon.
3. Theselectedinputhasnoconnection.
4. Thedisplayisinstandbymode.
1. Pluginthepowercord.
2. Makesurethepowerswitchisswitchedon.
3. Connectasignalconnectiontothedisplay.
Interference displayed on the display or audible
noise is heard
Causedbysurroundingelectricalappliancesor
uorescentlights.
Movethedisplaytoanotherlocationtoseeisthe
interferenceisreduced.
Color is abnormal Thesignalcableisnotconnectedproperly. Makesurethatthesignalcableisattachedrmly
tothebackofthedisplay.
Picture is distorted with abnormal patterns 1. Thesignalcableisnotconnectedproperly.
2. Theinputsignalisbeyondthecapabilitiesof
thedisplay.
1. Makesurethatthesignalcableisattached
rmly.
2. Checkthevideosignalsourcetoseeifit
isbeyondtherangeofthedisplay.Please
verifyitsspecicationswiththisdisplay’s
specicationsection.
Display image doesn’t ll up the full size of the
screen
1. Thezoommodeisnotsetcorrectly.
2. ScanModemaybesetincorrectlyto
underscan.
3. Iftheimageexceedsthescreensize,Scan
ModemayneedtobesettoUnderscan.
UsetheZoommodeorCustomzoomfunction
intheScreenmenutonetunedisplaygeometry
andtimefrequencyparameter.
Can hear sound, but no picture Improperlyconnectedsourcesignalcable. Makesurethatbothvideoinputsandsound
inputsarecorrectlyconnected.
Can see picture but no sound is heard 1. Improperlyconnectedsourcesignalcable.
2. Volumeisturnedallthewaydown.
3. {Mute}isturnedon.
4. Noexternalspeakerconnected.
1. Makesurethatbothvideoinputsandsound
inputsarecorrectlyconnected.
2. Press[
]or[ ]buttontohearsound.
3. SwitchMUTEoffbyusingthe[
]button.
4. Connectexternalspeakersandadjustthe
volumetoasuitablelevel.
Some picture elements do not light up Somepixelsofthedisplaymaynotturnon. Thisdisplayismanufacturedusinganextremely
highlevelofprecisiontechnology:however,
sometimessomepixelsofthedisplaymaynot
display.Thisisnotamalfunction.
After-Images can still be seen on the display
after the display is powered off. (Examples
of still pictures include logos, video games,
computer images, and images displayed in 4:3
normal mode)
Astillpictureisdisplayedforanoverextended
periodoftime
Donotallowastillimagetobedisplayedfor
anextendedperiodoftimeasthiscancausea
permanentafter-imagetoremainonthedisplay.

2016 © Koninklijke Philips N.V. All rights reserved.
Philips and the Philips Shield Emblem are registered trademarks of
Koninklijke Philips N.V. and are used under license from
Koninklijke Philips N.V.
Specications are subject to change without notice.