© 2005 Sony Corporation
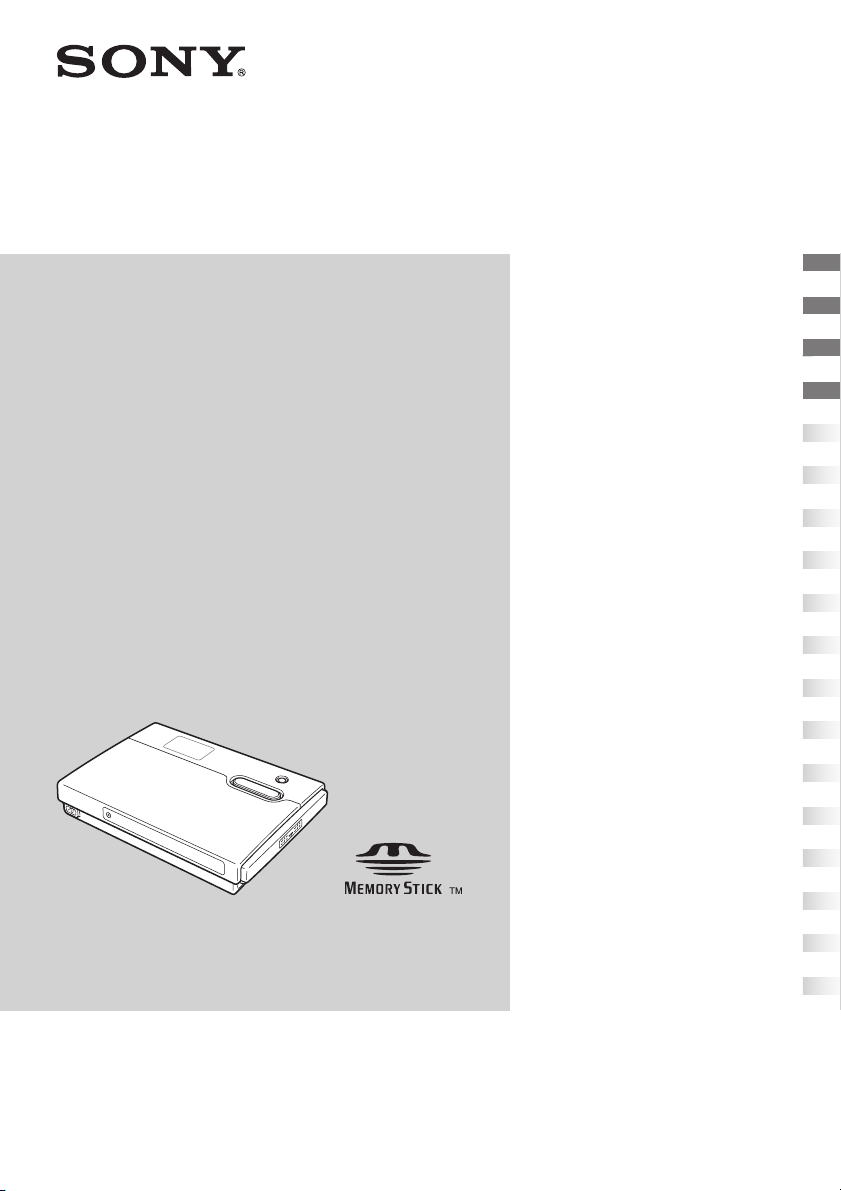
HDPS-M10
HDD
Photo Storage
Operating Instructions
Before operating the unit, please read this document
thoroughly, and retain it for future reference.
OPEN
Preparations _______________
Copying data to the unit _____
Connecting to a computer ____
Additional information _______
2-639-395-13(1)
2
Safety regulations
WARNING
Keep away from children. If any part of the unit is swallowed, promptly see a
doctor.
To reduce the risk of fire or electric shock, do not expose this apparatus to rain
or moisture.
To avoid electrical shock, do not open the cabinet. Refer servicing to qualified
personnel only.
For use only with power supply SONY, Model HDAC-M1.
Disclaimer
Sony corporation assumes no responsibility for the loss of information stored on the hard
disk of this unit, or information transferred to a “Memory Stick” and/or CompactFlash
card with your computer.
• “Memory Stick”, , and “MagicGate Memory Stick” are trademarks or registered
trademarks of Sony.
• “Memory Stick Duo” and “ ” are trademarks or registered trademarks of Sony.
• “MagicGate Memory Stick Duo” is a trademark or a registered trademark of Sony.
• “Memory Stick PRO” and “ ” are trademarks or registered trademarks of Sony.
• “Memory Stick PRO Duo” and “ ” are trademarks or registered trademarks
of Sony.
• “MagicGate” and “ ” are trademarks or registered trademarks of Sony.
• Microsoft and Windows are registered trademarks of Microsoft Corporation in the United States
and/or other countries.
• Mac and Macintosh are trademarks of Apple Computer Inc., registered in the U.S. and/or other
countries.
• CompactFlash is a trademark of SanDisk Corporation and is licensed to the CompactFlash
Association.
• Microdrive is a registered trademark of Hitachi Global Storage Technologies.
• Other system and product names used herein are registered trademarks or trademarks of their
respective manufacturers, although the ™ and ® marks are not used in the text.
In this manual, Microsoft
®
Windows
®
XP Professional and Microsoft
®
Windows
®
XP Home
Edition are referred to as Windows XP.
In this manual, Microsoft
®
Windows
®
2000 Professional is referred to as Windows 2000.
In this manual, Microsoft
®
Windows
®
Millennium Edition is referred to as Windows Me.

3
Table of contents
Safety regulations ...........................2
What you can do with the HDD Photo
Storage ............................................4
Media types that can be used with the
HDD Photo Storage ........................6
About the “Memory Stick”
media ............................................7
Recommended computer
environment ....................................8
Unpacking .......................................9
Identifying parts and controls ....... 10
Preparations
Powering the unit ..........................14
Charging the battery ...................14
Using the unit with the AC power
adapter ........................................16
Power save function ...................16
Using the unit abroad .................16
Copying data to the unit
Inserting and removing the
“Memory Stick” media .................17
Inserting and removing the
CompactFlash card .......................19
Copying data to the HDD Photo
Storage ..........................................21
Connecting to a computer
Preparing the HDD Photo Storage
and computer ................................ 24
Copying data to a computer ......... 26
With Windows 2000 or Windows
Me .............................................. 26
With Windows XP ..................... 33
With a Macintosh computer ....... 37
Data storage locations and folder
names ............................................ 39
Using the unit as an external hard disk
drive or reader/writer .................... 41
Additional information
Troubleshooting ........................... 42
Precautions ................................... 44
Maintenance ................................. 45
Disposing of the unit .................... 46
Specifications ............................... 47
Error Messages .......................... 48
4
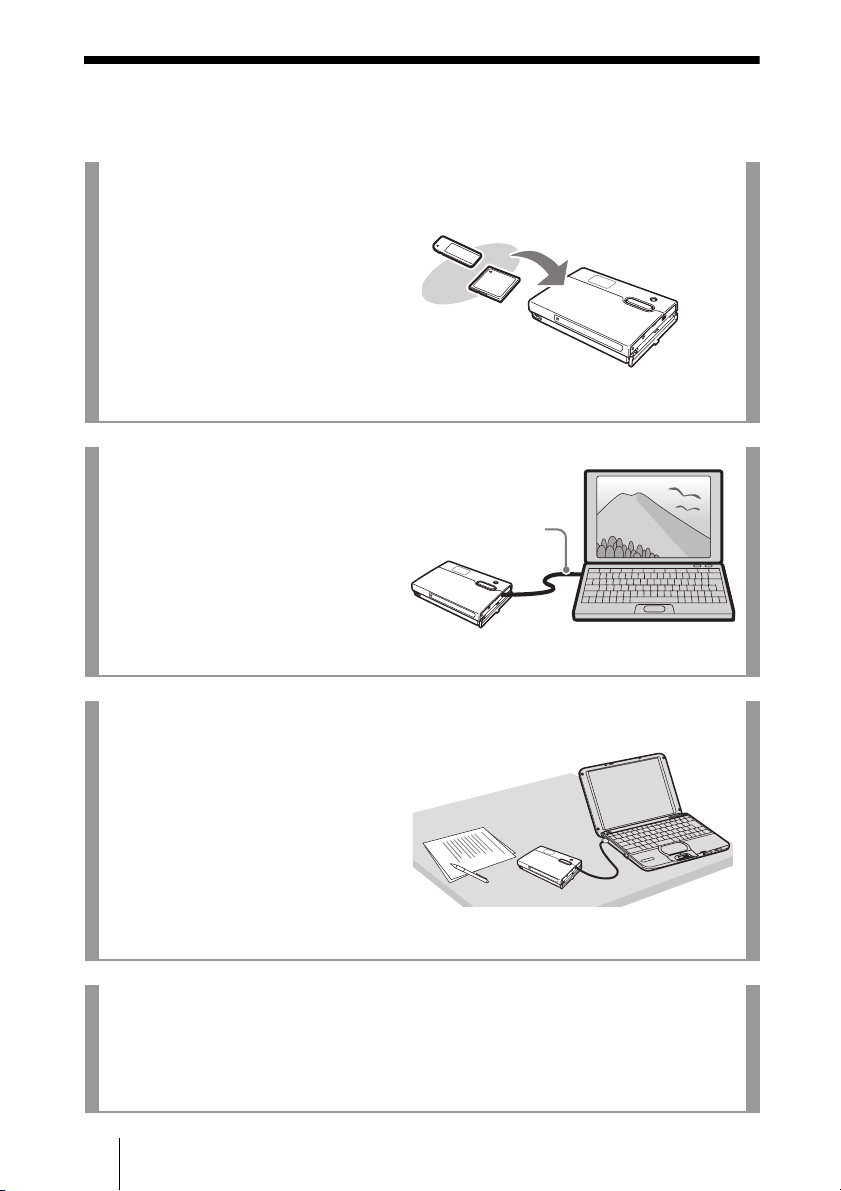
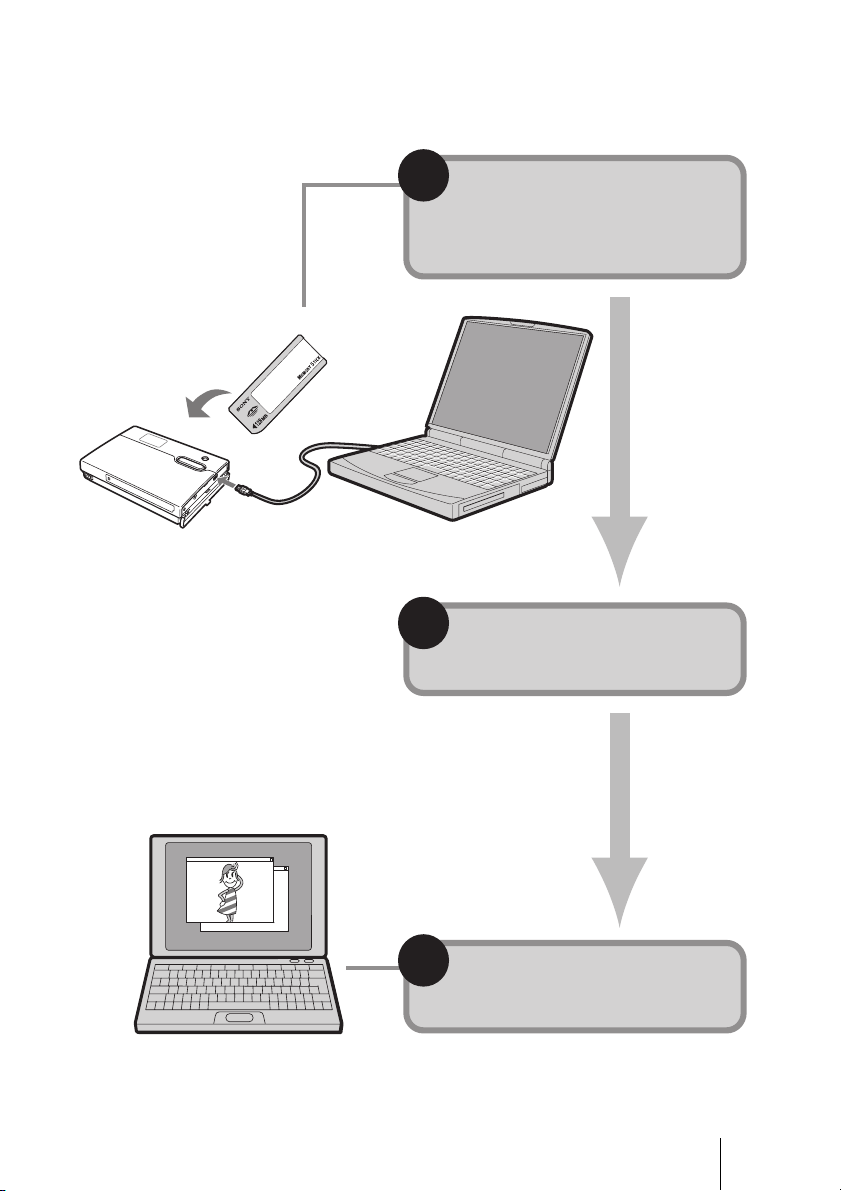
What you can do with the HDD Photo Storage
Store lots of images from a digital camera!
Simply take pictures, and then insert
the media into the HDD Photo
Storage to copy the image data to the
internal hard disk. After copying, you
can reuse the media immediately. The
40 GB hard disk of the HDD Photo
Storage can store the equivalent of
about 620 units of 64 MB media.
Copy!
HDD Photo Storage
Connect to a computer!
Using the supplied USB cable, you
can easily transfer data from an
inserted media or from the hard disk
of the HDD Photo Storage to a
computer. There is no need to install
any special software or perform a
setup procedure.
USB cable
See the next page for a
step-by-step guide.
Use as an external hard disk!
The HDD Photo Storage can function
as a USB 2.0-compatible external
hard disk, to provide data storage
capacity to a computer. There is no
need to install a dedicated driver,
which is great for quick copying of
data in a temporary setup.
THE HDD Photo Storage can also be used as a
card reader/writer.
Take it anywhere!
Thanks to its extremely compact dimensions and 300 g (10.6 oz.), the HDD Photo
Storage is very portable, making it the ideal companion on any trip, long or short.
6
Media types that can be used with the
HDD Photo Storage
The following storage media can be used with the HDD Photo Storage.
“Memory Stick” media
*1
Read/write of data that requires the MagicGate function is not possible.
CompactFlash cards (CF cards)
• Type I, II
• Microdrive
Others
• SD Card
*1
• MultiMediaCard (MMC)
*1
*1
This media is supported through the usage of a CF to SD/MMC adapter. However, there
is no guarantee that the unit can use all SD Cards or MultiMediaCards.
Notes
• There is no guarantee that the unit can use all “Memory Stick”, CompactFlash cards,
Microdrives, SD cards, or MultiMediaCards.
• The unit supports “Memory Stick”, CompactFlash and Microdrives of up to 4 GB.
Operation with “Memory Stick PRO”, CompactFlash or Microdrives of higher capacities
is not guaranteed.
• Do not insert any media or devices other than those outlined above into the unit.
“Memory Stick” types
Read/write on HDD
Photo Storage
“Memory Stick”
“Memory Stick” (with the Memory Select function)
“Memory Stick Duo”
Yes
“Memory Stick”
(MagicGate/High-speed transfer compatible)
“Memory Stick Duo”
(MagicGate/High-speed transfer compatible)
Yes
*1
“MagicGate Memory Stick”
“MagicGate Memory Stick Duo”
Yes
*1
“Memory Stick PRO”
“Memory Stick PRO Duo”
Yes
*1

7
The “Memory Stick” is a small, lightweight IC type storage media that can
hold considerably more data than a conventional floppy disk. It can serve not
only to exchange data between two devices with “Memory Stick” slots, but it
is also convenient as a removable external media for data storage.
The “Memory Stick” comes in two formats: the standard size “Memory Stick”
and the smaller “Memory Stick Duo”. The unit is compatible with both formats.
“Memory Stick” types
There are six different types of “Memory Stick” designed for various applications.
“Memory Stick PRO”
This “Memory Stick” can only be used in equipment compatible with “Memory
Stick PRO”. It incorporates a copy protection technology called MagicGate.
“Memory Stick”
This is the regular “Memory Stick”. It can store all kinds of data, except data
that requires MagicGate copy protection.
“Memory Stick” (MagicGate/High-speed transfer compatible)
This type of “Memory Stick” incorporates the MagicGate copy protection and
supports high-speed transfers. It can be used in all devices that support the
“Memory Stick”.
“MagicGate Memory Stick”
This type of “Memory Stick” incorporates the MagicGate copy protection.
“Memory Stick-ROM”
This is a read-only type of “Memory Stick” that contains prerecorded data that
cannot be deleted or overwritten.
“Memory Stick” (with the Memory Select function)
This “Memory Stick” has a number of separately addressable internal memory
blocks (128 MB). The Memory Select switch at the rear of this type of
“Memory Stick” lets you select the desired memory. It is not possible to use
multiple blocks simultaneously or continuously.
What is MagicGate?
MagicGate is a copyright protection technology that must be present in the “Memory Stick”
and on the device where it is to be used. MagicGate incorporates two security features:
encryption of copy-protected data, and mutual verification of the “Memory Stick” and reader
device. This serves to prevent the unauthorized copy and playback of copyrighted material.
Because the HDD Photo Storage does not come with MagicGate, it cannot use data encrypted
with MagicGate.
When you attempt to copy music files from a MagicGate device to a “Memory Stick”, the
device and “Memory Stick” verify whether the other is MagicGate-compliant. Music files are
only encrypted and copied if the verification is successful. Similarly, when attempting to play
back encrypted files from the “Memory Stick”, playback only starts if the verification
between the device and “Memory Stick” is successful.
About the “Memory Stick” media

8
Recommended computer environment
The unit can be used with computers that run the following preinstalled
operation systems and come with USB ports.
Windows
• Windows XP Professional
• Windows XP Home Edition
• Windows 2000 Professional (Service Pack 4 or later)
• Windows Me
Notes
• Even if the operating system is one of the above, operation is not guaranteed in a multiboot
environment or if the operating system is an upgraded version.
• Operation is not guaranteed when you use USB interface cards or USB CardBus cards
added afterwards.
Macintosh
• Mac OS X (10.3 or later)
9
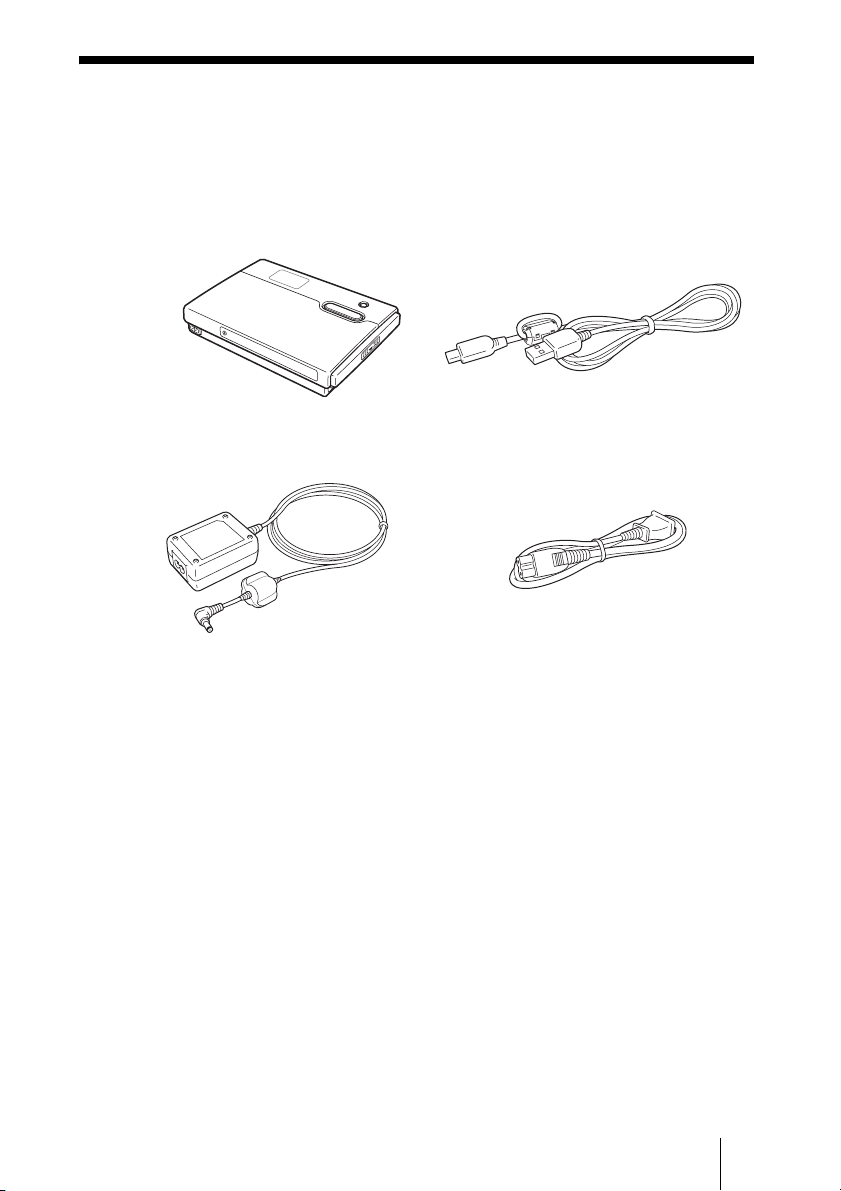
Unpacking
When you unpack the unit, make sure that all the items listed below are
present. If anything is missing, contact your dealer or an authorized service
center in your area.
• HDD Photo Storage unit (1) • USB cable (1)
•
AC power adapter (1)
(SONY, Model HDAC-M1)
• Power cord (1)
• Carrying case (1)
• Hand strap (1)
• Operating Instructions (this document)
• PhotoDiary software (on the hard disk)
• Read Me First (1)
• Warranty card (1)
OPEN
10
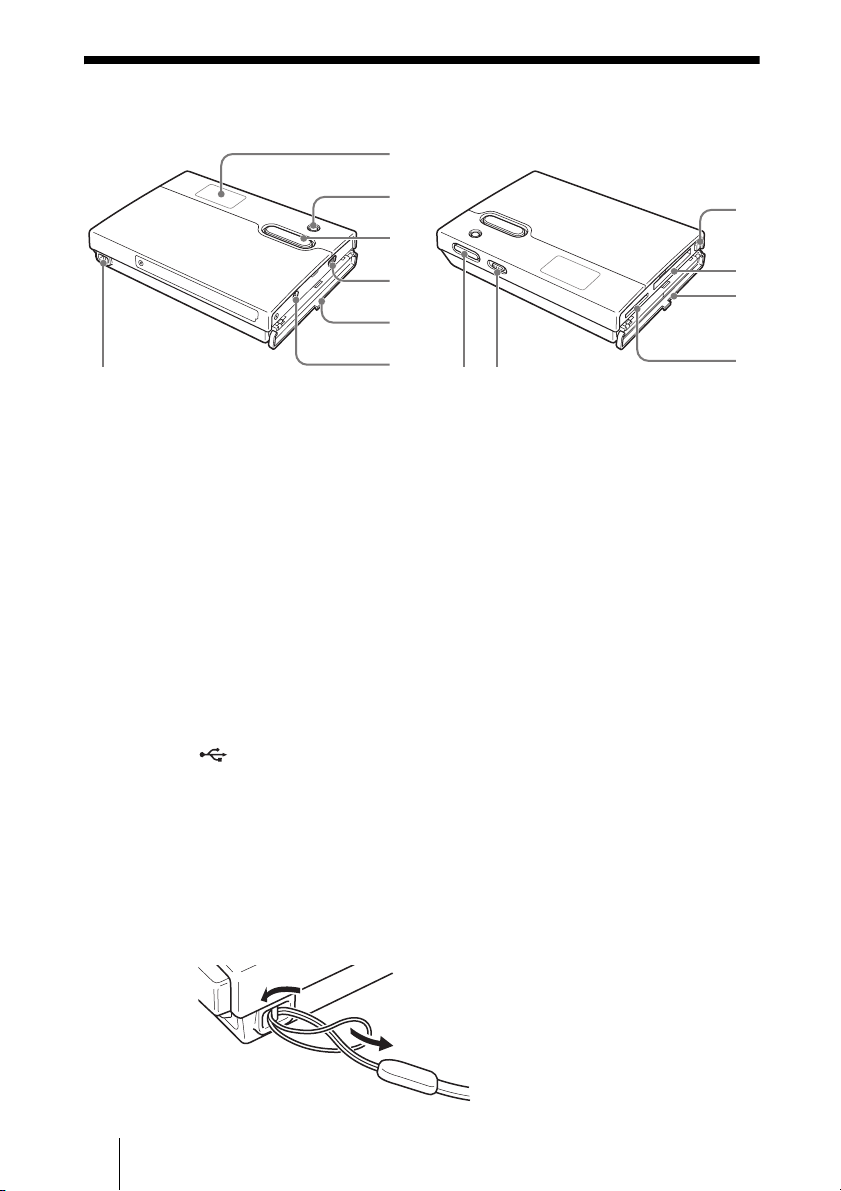
Identifying parts and controls
A LCD display (page 11)
Displays information such as battery indicator, the AC power adapter
indicator, the CompactFlash/Microdrive indicator, the “Memory stick”
indicator, the HDD capacity indicator, and the character information
display.
B CANCEL button (page 22)
Cancels copying process and verifies the remaining internal hard disk
space.
C COPY button (page 21)
Copies data from a “Memory stick” or “CompactFlash card to the internal
hard disk.
When the unit is ready to copy, a “READY” appears on the display.
D (USB) Port (page 24)
Connects to the supplied USB cable.
E Port cover (page 12)
F
! (DC In) connector (page 14)
Connects to the supplied AC power adapter.
G Hand strap hole
Allows a hand strap to be attached.
6
1
2
3
4
8
7
9
5
0
qa
qs
qd
11
H Eject button (page 19)
Ejects the CompactFlash card.
I CompactFlash slot (page 19)
Accepts a CompactFlash card.
J Slot cover (page 12)
K “Memory Stick” Slot (page 17)
Accepts a “Memory stick”.
L HOLD Switch (page 12)
Lock the controls to prevent accidental button presses while carrying the
unit.
M ! (POWER) button (page 21)
Turns the unit on and off.
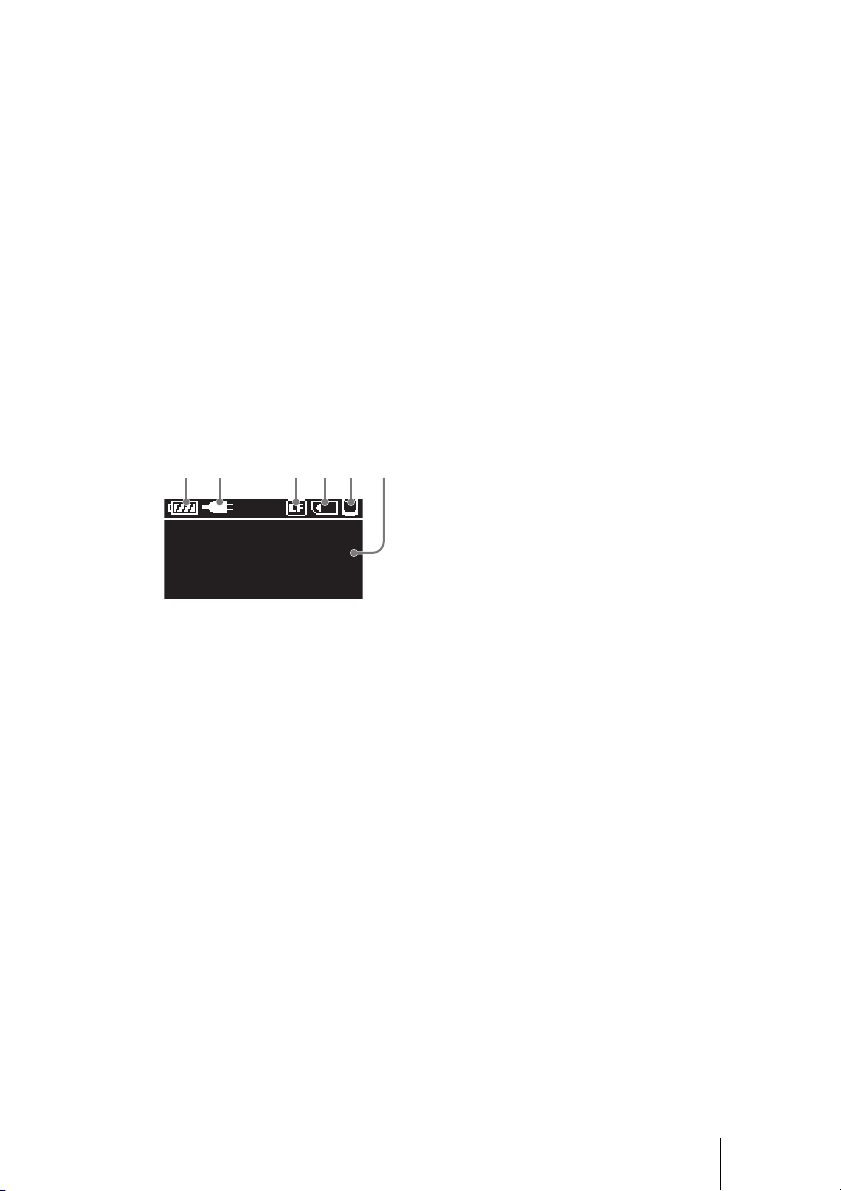
LCD
A Battery indicator (page 14)
B AC power adapter indicator (page 16)
C CompactFlash/Microdrive indicator (page 19)
D “Memory Stick” indicator (page 17)
E HDD capacity indicator (page 23)
F Character information display
654321
12
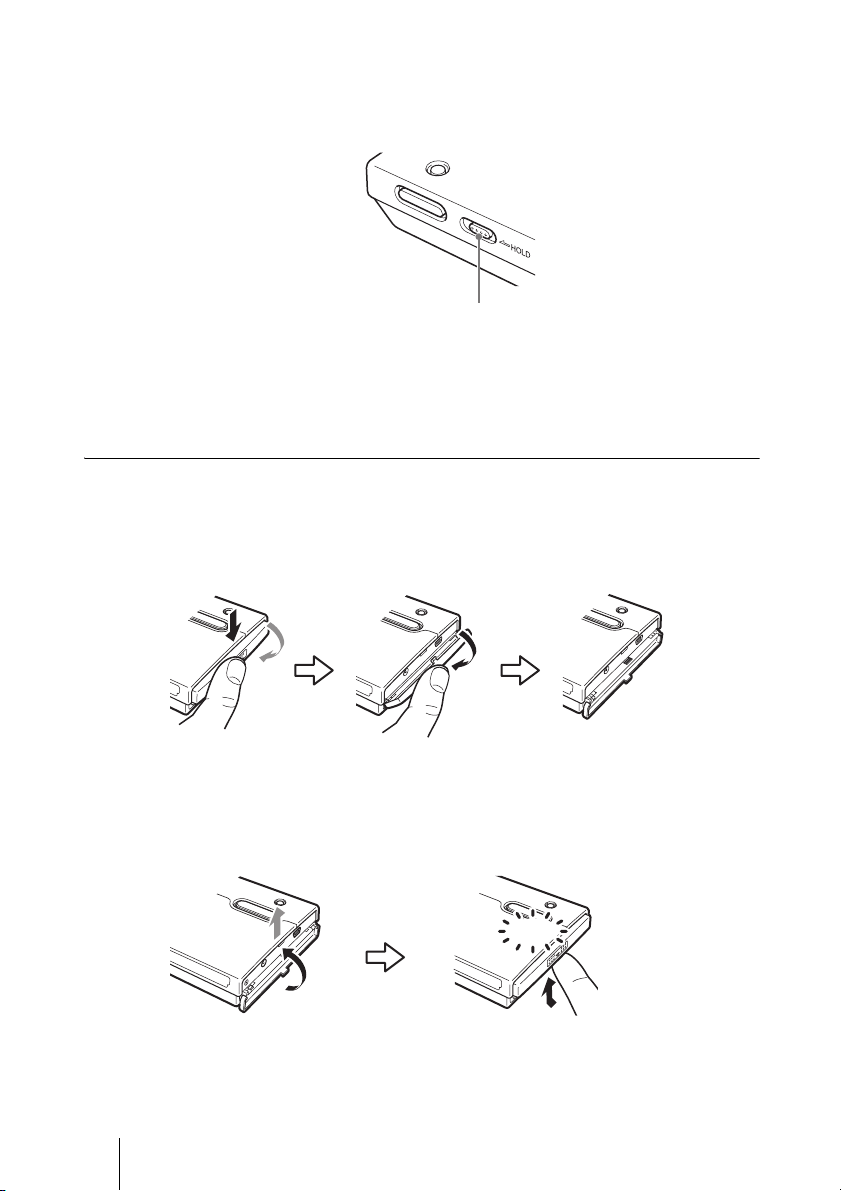
Locking the Controls (HOLD)
You can lock the controls to prevent accidental button presses while carrying
the device.
Slide the HOLD switch in the direction of the arrow to lock the controls.
To unlock the controls
Slide the HOLD switch in the direction opposite to that of the arrow.
Opening/closing the covers
You can open/close the port and slot covers the same way.
To open the covers
Lightly push down the top part of the cover to open it, as illustrated.
To close the covers
Push the cover up from its fully open position, until the tab of the cover fits
into the notch of the body. Then, lightly push up the cover until you feel it click
into place. When it does, the cover is securely closed.
!
Slide the HOLD switch in
the direction of the arrow.
Click
13
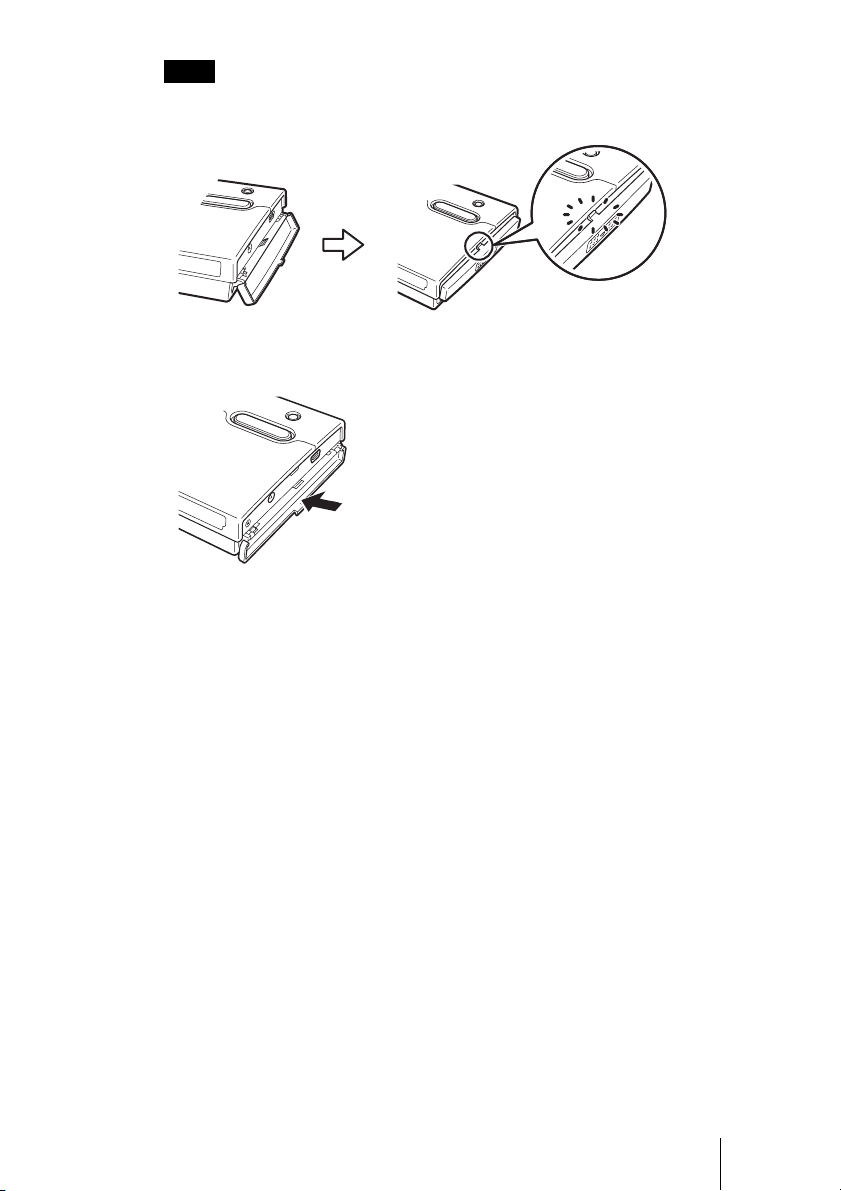
Notes
• Close the covers when the unit is not in use.
• If the cover only opens as far as illustrated, you cannot close the cover.
To solve this problem, press the center of the cover as illustrated until it is in its fully open
position, and then try closing it again.
14
B
Preparations
Powering the unit
You can use the internal battery or the AC power adapter to power the unit.
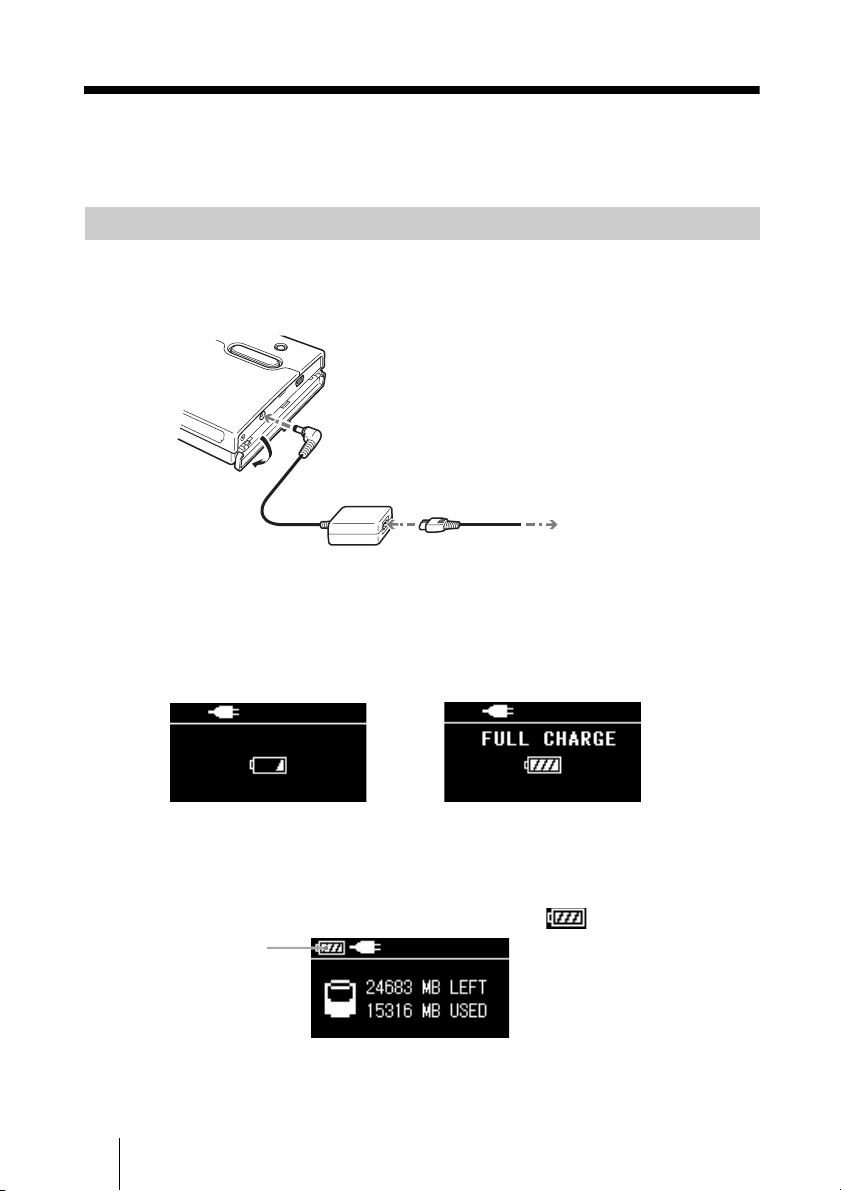
If you want to use the unit without the AC power adapter, you must first charge
the internal battery of the unit. To do this, connect the supplied AC power
adapter as illustrated.
When the AC power adapter is connected to the unit, the internal battery starts
charging. A battery charge indicator appears on the display during charging.
When the battery is fully charged, the LCD display shows “FULL CHARGE”
before it turns off. The charging process takes about 4 hours at ambient
temperature.
Confirming full battery charge
After the charging process is complete, turn on the unit while the AC power
adaptor is still connected, and make sure that the icon appears.
Charging the battery
To the AC outlet
To the ! (DC In) connector
Battery charging in progress Battery is fully charged
Battery icon
15
Preparations
Hints
• The internal battery charges even when the unit is in use, as long as the AC power adapter
is connected. However, the charge time is considerably longer than when the internal
battery is charged as outlined above.
• If the unit has not been charged for some time, the internal battery level may be depleted.
When the unit is turned on, the low battery level may cause the battery icon at the top left
corner of the LCD display not to appear.
To recover, fully charge the battery using the supplied AC power adapter. Do not remove
the adapter while charging is in progress.
Notes
• Only use the supplied AC power adapter. Other power adapters do not work.
• If you use the unit under battery power at temperatures of 10 °C (50 °F) or less, you cannot
use the unit as long as normal. Normal operation of the unit under battery power is not
guaranteed at low temperatures; therefore, make sure that you connect the AC power
adapter.
• To maintain battery performance, make sure that you fully charge it periodically by
connecting the AC power adapter.
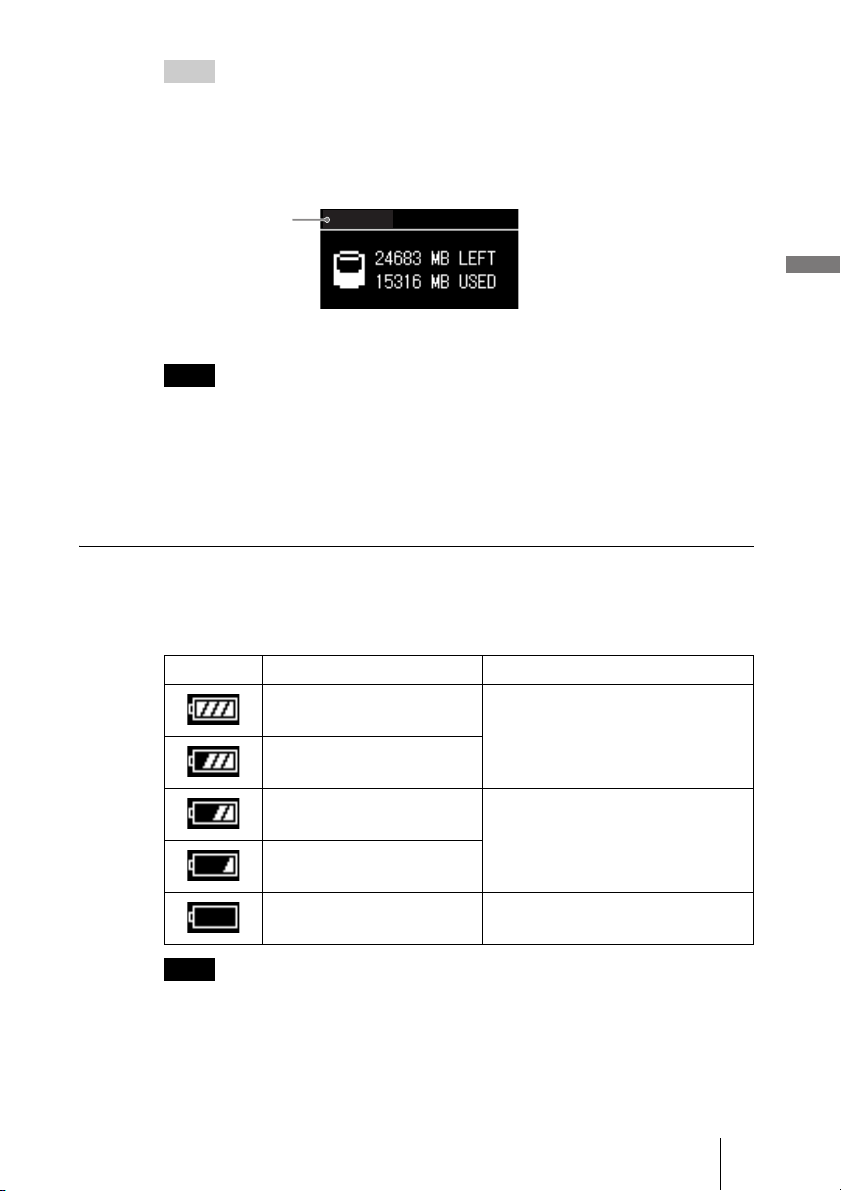
Checking the remaining battery charge
The remaining battery charge is indicated on the display. As the number of
indicator bars decreases, less charge remains.
Note
The remaining of charge figures above are approximative. Actual results vary depending on
the operating environment, number of times the battery is charged, etc.
No battery icon
Indicator Remaining battery charge Description
75% ~ 100%
There is enough remaining battery
charge to use the unit without
connecting it to the AC power adapter.
50% ~ 75%
25% ~ 50%
The remaining battery charge is
getting low, but is still sufficient to
copy several more media.
10% ~ 25%
0% ~ 10%
Connect the AC power adapter to
charge the internal battery.

16
You can use the unit without worrying about the remaining charge of the
internal battery simply by connecting the AC power adapter. Connect the AC
power adapter to the unit as outlined in “Charging the battery”(page 14).
When the unit is used stand-alone, it turns off automatically after remaining
idle for 5 minutes, whether operating on internal power or through the AC
power adapter. Simply restart the unit to resume operation.
Power sources
You can use the unit in any country or area with the supplied AC adapter
within 100 V to 240 V AC, 50/60 Hz. Use a commercially available AC plug
adapter [a], if necessary, depending on the design of the wall outlet (wall
socket) [b].
• Do not use an electronic transformer (travel converter), as this may cause a
malfunction.
Using the unit with the AC power adapter
Power save function
Using the unit abroad
HDAC-M1
[a] [b]
17
Copying data to the unit
B
Copying data to the unit
Inserting and removing the “Memory
Stick” media
The “Memory Stick” slot of the unit can accept either a standard size “Memory
Stick” or a “Memory Stick Duo”. The unit automatically detects what size of
“Memory Stick” is inserted. There is no need to use an adapter when using a
“Memory Stick Duo”.
Hint
For information on how to open and close the slot cover, see “Opening/closing the covers”
(page 12).
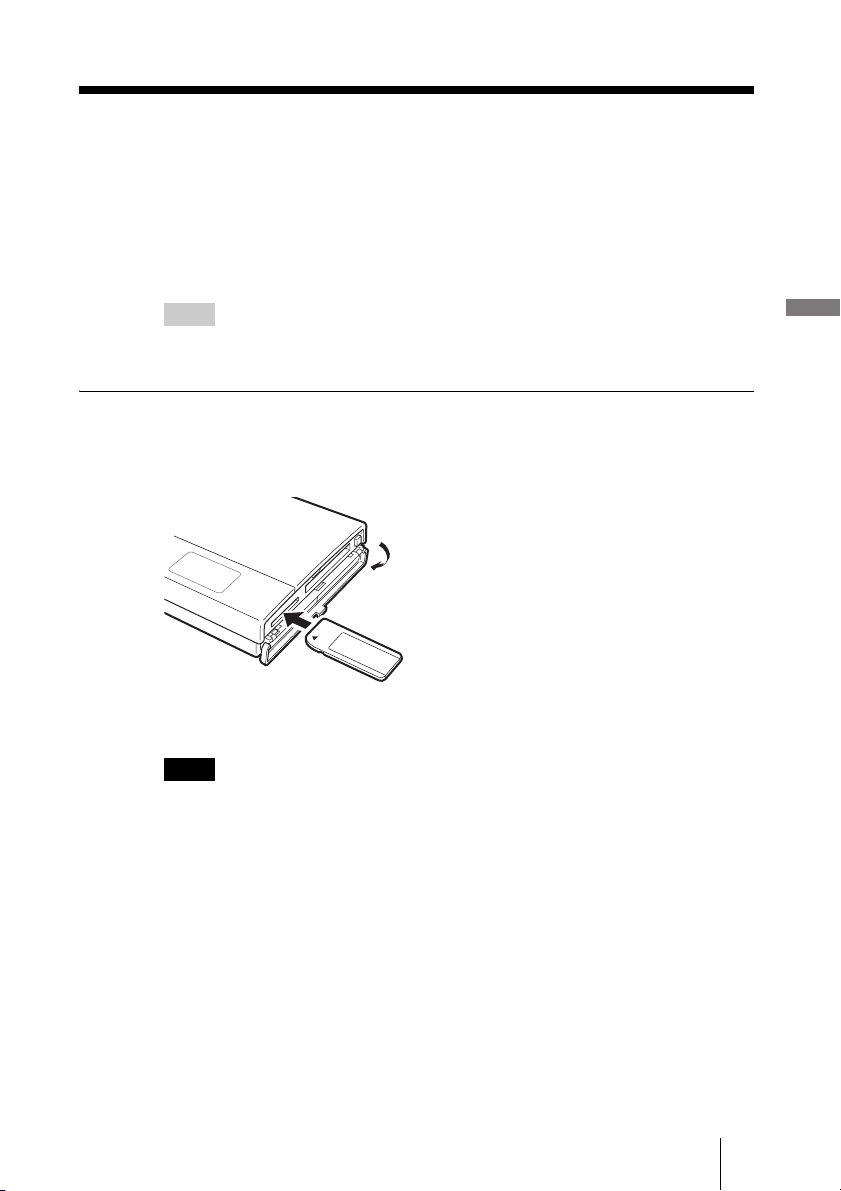
Inserting the “Memory Stick”
Insert the “Memory Stick” as illustrated, until you hear it click into
place.
If the unit is on, the “Memory Stick” indicator appears on the LCD display
when the “Memory Stick” is detected.
Notes
• Do not attempt to insert multiple “Memory Stick”. Otherwise, the equipment may be
damaged.
• Before use, double-check that the “Memory Stick” is inserted correctly. Otherwise, the
equipment may be damaged.
The label should face up. Insert it in the v
direction until you hear a click.
18
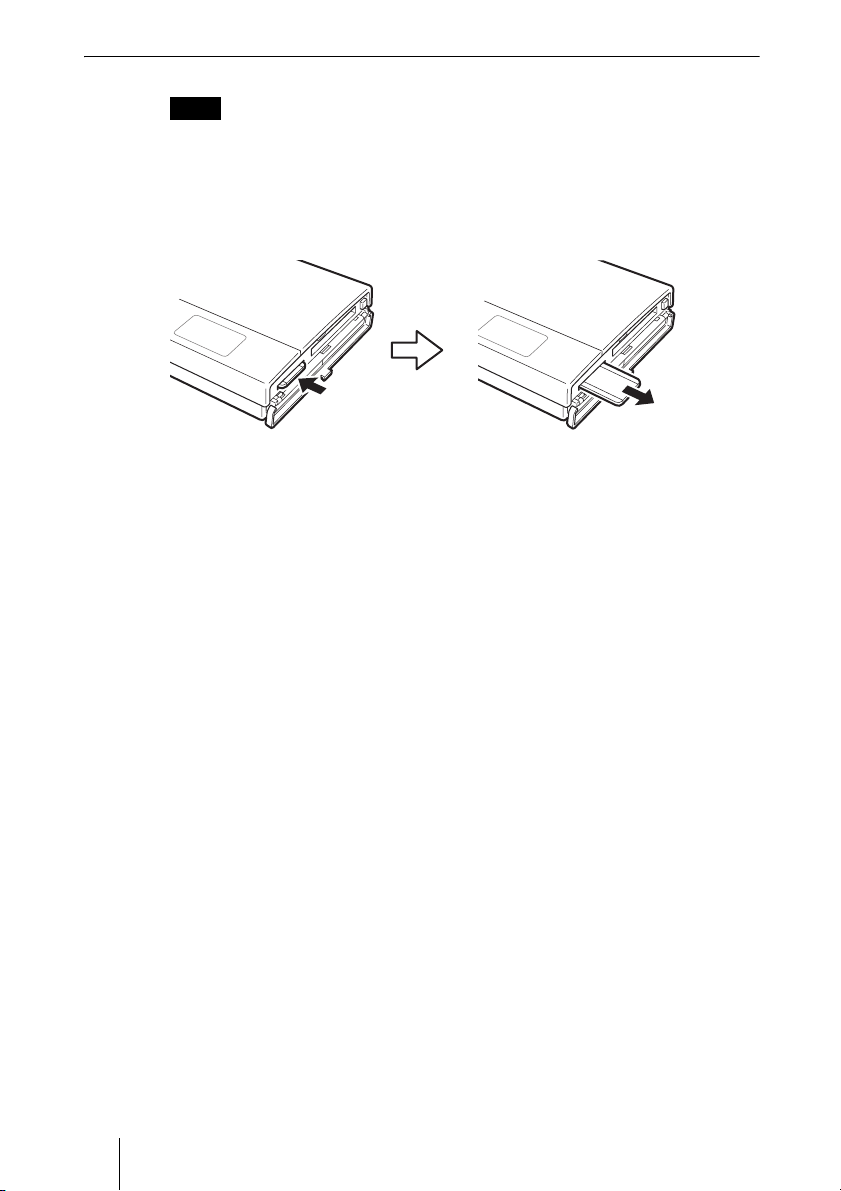
Removing the “Memory Stick” media
Note
Never remove the “Memory Stick” during copy. Otherwise, data may be corrupted.
Push the “Memory Stick” all the way in, briefly release it, and then
pull it out.
When you push the “Memory Stick” all the way in, it slightly sticks out.
Push in
Release briefly and pull out
19
Copying data to the unit
Inserting and removing the
CompactFlash card
Hint
For information on how to open and close the slot cover, see “Opening/closing the covers”
(page 12).
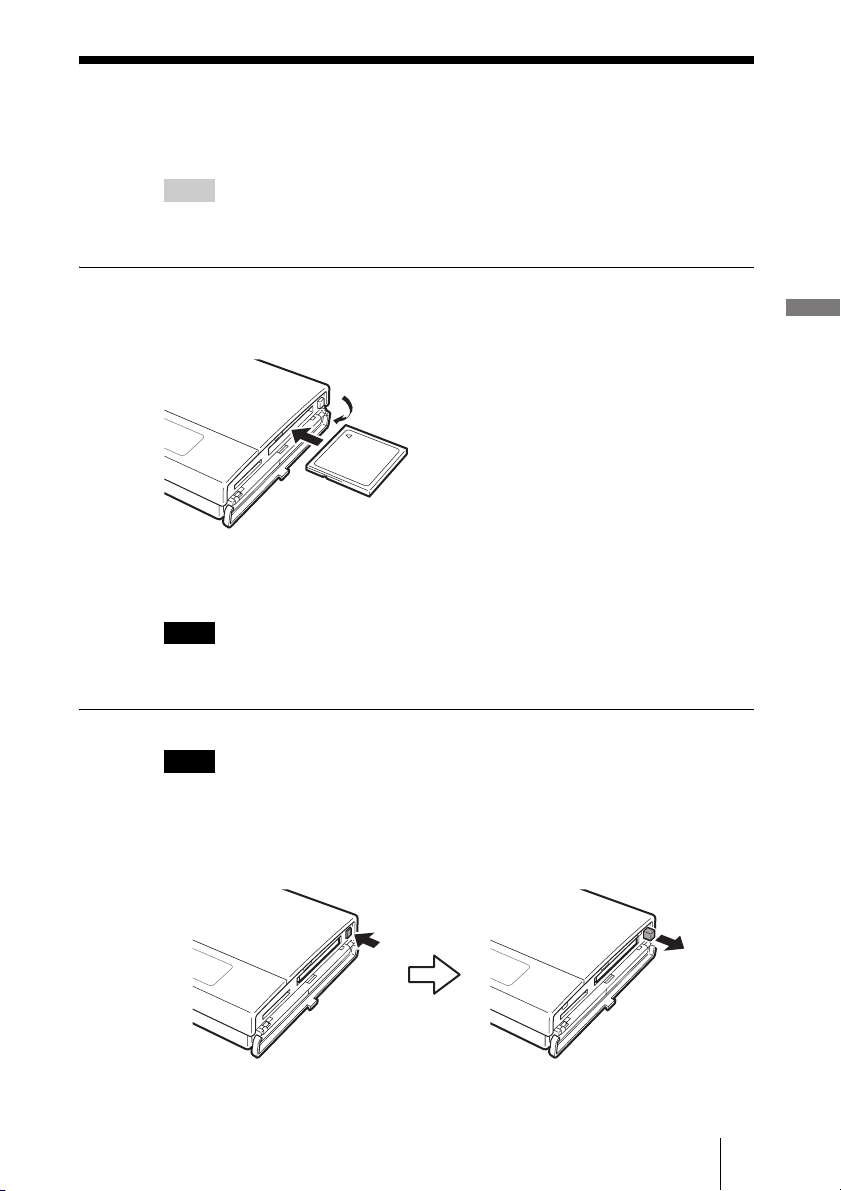
Inserting the CompactFlash card
Insert the CompactFlash card all the way into the slot, as illustrated.
If the unit is on, the CompactFlash/Microdrive indicator appears on the LCD
display when the CompactFlash card is detected.
Note
Before use, double-check that the CompactFlash card is inserted correctly. Otherwise, the
equipment may be damaged.
Removing the CompactFlash card
Note
Never remove the CompactFlash card during copy. Otherwise, data may be corrupted.
1 Push the eject button.
The eject button sticks out.
The label should face up. Insert it in the v
direction all the way into the slot.
Push
Sticks out
20
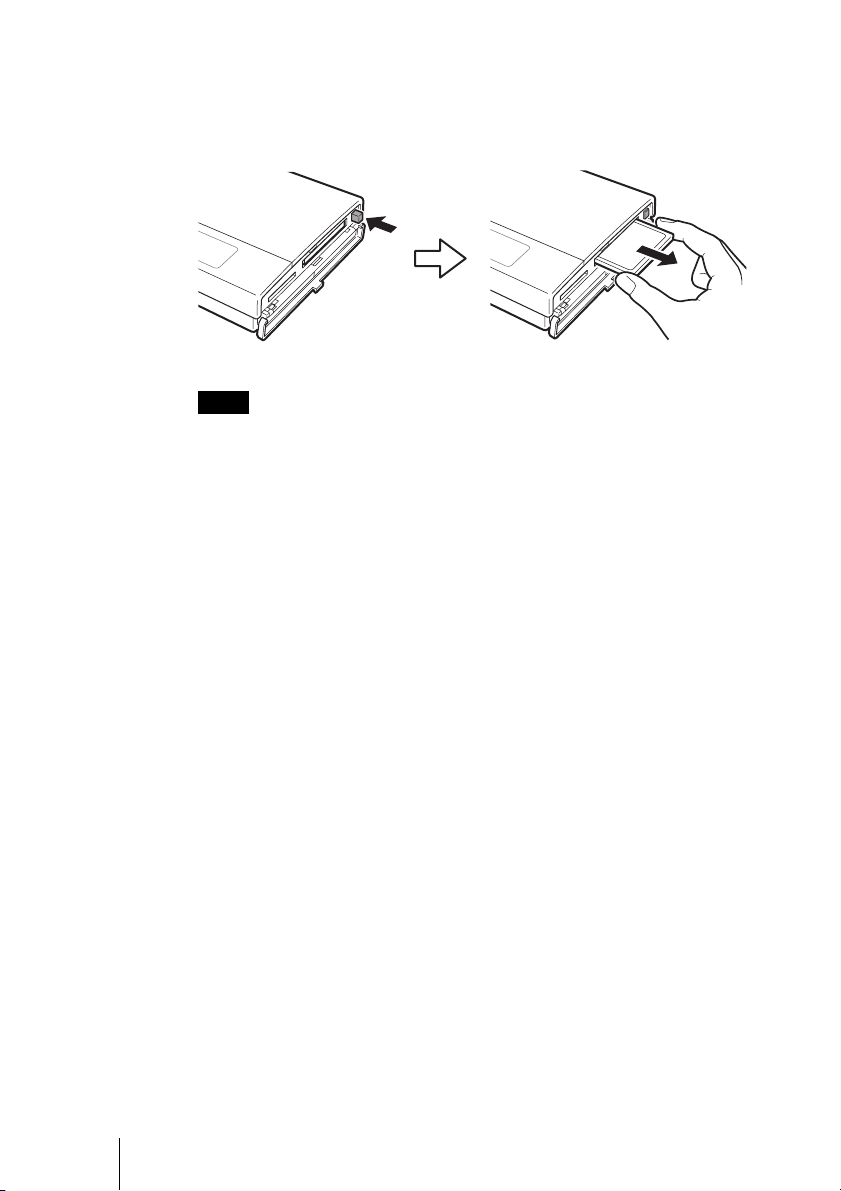
2 Push the eject button all the way in, release it, and then pull the
CompactFlash card out.
When you push the eject button in, the CompactFlash card slightly sticks
out.
Note
Do not close the slot cover when the eject button is out.
Push in fully Pull out
21
Copying data to the unit
Copying data to the HDD Photo Storage
This section explains how to use the COPY button on the unit to copy data
from a “Memory Stick” or CompactFlash card to the internal hard disk of the
unit.
Hint
For information on how to connect the unit to a computer to copy, see “Connecting to a
computer” (page 24).
Notes
• The data read/write speed depends on the combination of “Memory Stick” and equipment.
• Data from a “Memory Stick” that has the access control attribute set on another device
cannot be read or copied on the unit. To enable reading and copying of such data, you must
first disable the access control on the other device.
• MagicGate-compatible data can be copied but not played back with the unit. Once
MagicGate-compatible data is copied to the unit, it cannot be copied back to the “Memory
Stick”, either.
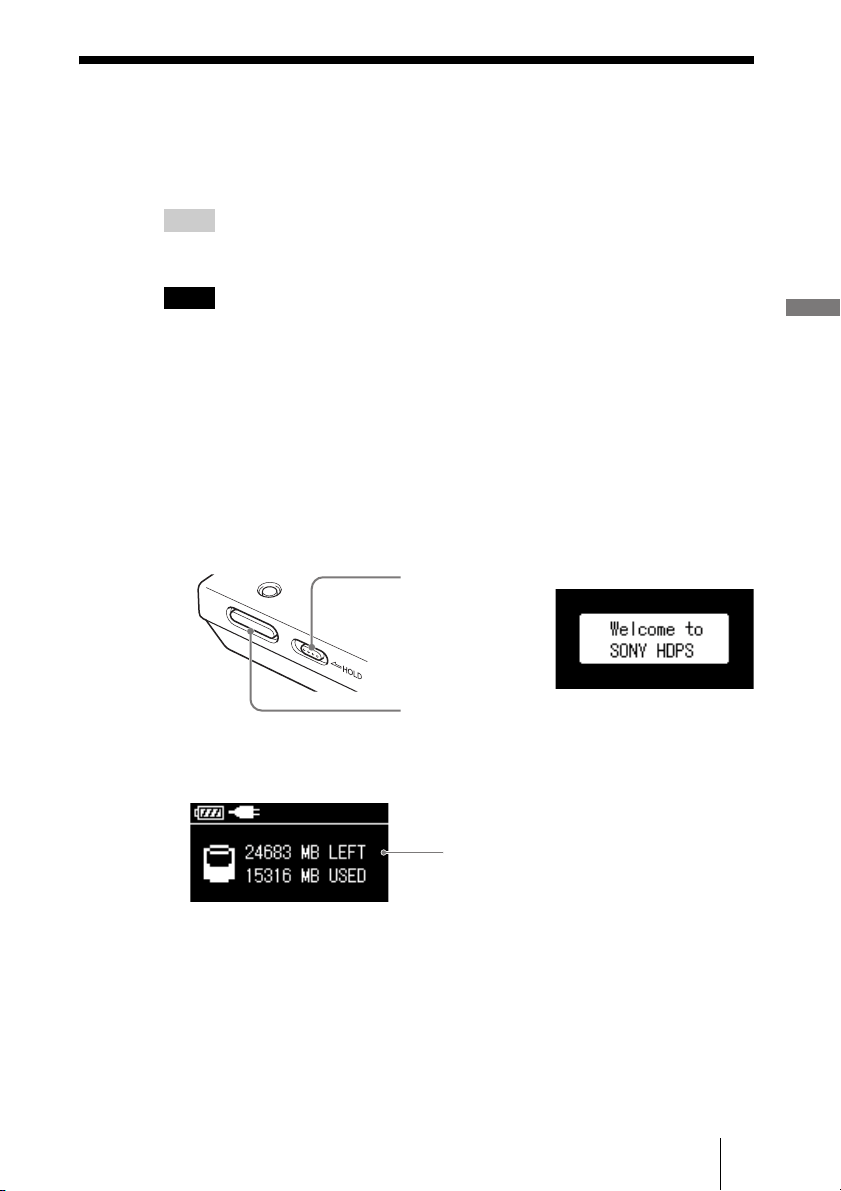
1 Turn on the unit.
Press the ! (power) button.
The “Welcome to SONY HDPS” appears on the unit display.
Remaining internal hard disk capacity appears on the display when no
media is inserted in the drives of the unit.
!
Slide the HOLD
switch in the
direction opposite to
that of the arrow.
! (power) button
Remaining internal
hard disk capacity

22
2 Insert the “Memory Stick” or CompactFlash card into the unit.
The “READY” (ready to copy) appears on the unit display.
Note
An error message appears on the display when an error has occurred. For details, see
“Error Messages” (page 48).
3 Press COPY.
A folder is automatically created on the internal hard disk and the data is
copied to the folder. While copying is in progress, the copy progress bar
shows the copying status. When copying is done, the “COMPLETED”
(copy completed) appears on the unit display.
Note
If the error message “HDD Disk Full” appears, the remaining space on the internal hard
disk is insufficient to finish copying. Connect the unit to a computer and use the
computer to delete unnecessary data on the internal hard disk of the unit. For details, see
“Deleting unnecessary files and folders” (page 39).
Hint
If you want to cancel copying midway, press the CANCEL button. The message
“Paused” appears on the display. To cancel copying, press the CANCEL button once
more. To continue the copying, press the COPY button. Even if you cancel copying, the
unit's internal hard disk capacity decreases slightly because folders are created on the
internal hard disk of the unit when copying is initiated.
CANCEL
Copy progress bar
Number of
folders copied
Number of folders
to be copied
Number of
files copied
Number of files
to be copied
23
Copying data to the unit
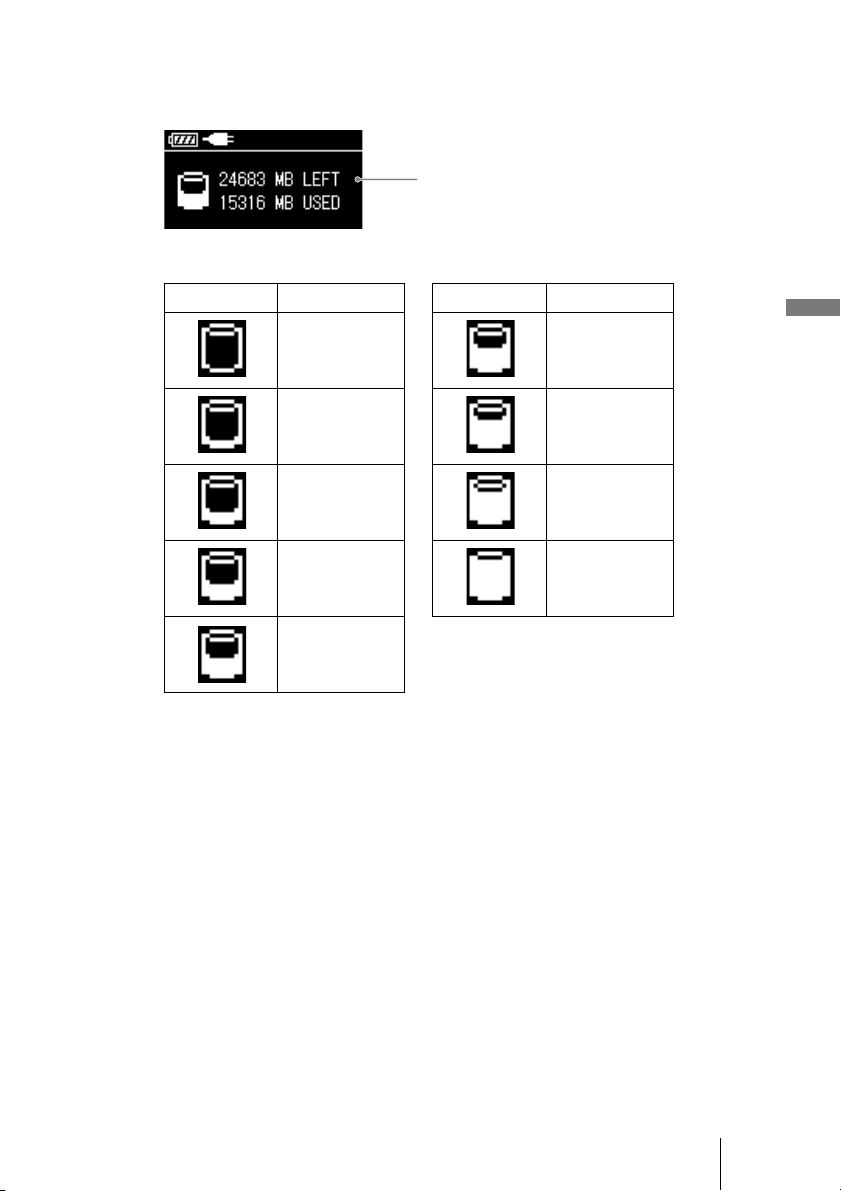
To verify the remaining capacity of the internal hard disk
Remaining internal hard disk capacity appears on the display when no media
is inserted in the drives of the unit.
The used capacity of the internal hard disk is displayed as follows:
To turn off the unit.
Press the POWER button. The LCD display turns off when the unit does. The
battery charging screen appears when the unit is recharging via the AC power
adapter.
Indicator Used capacity Indicator Used capacity
0 21-25 GB
1-5 GB 26-30 GB
6-10 GB 31-35 GB
11-15 GB 36-40 GB
16-20 GB
Remaining internal
hard disk capacity
24
B
Connecting to a computer
Preparing the HDD Photo Storage and
computer
This section describes how to connect the unit to a computer using the USB
cable to transfer data between the two devices.
Hints
• When the unit is connected to a computer, you can insert a “Memory Stick” and a
CompactFlash card at the same time and access data from both.
• When the unit is connected to a computer for the first time, the necessary programs are
installed automatically.
1 Turn on the computer.
2 Turn on the unit.
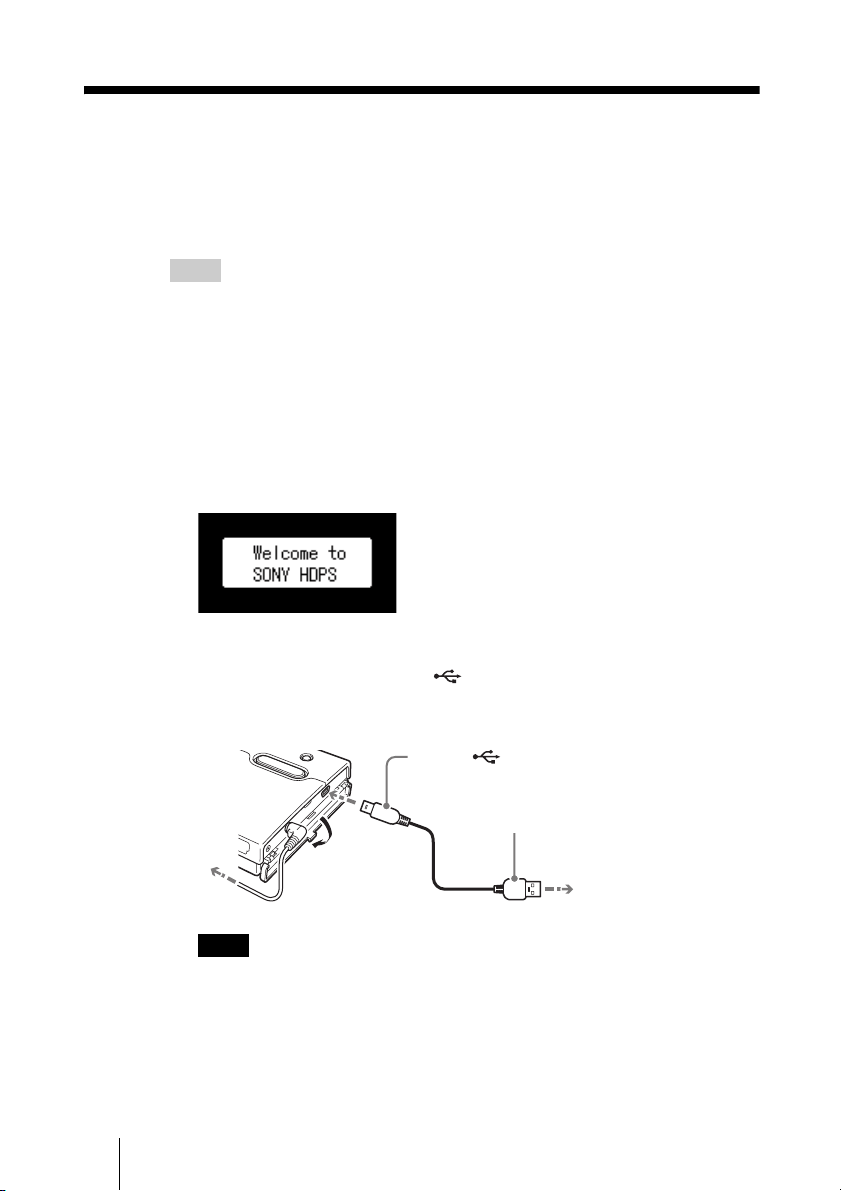
Press the ! (power) button
The “Welcome to SONY HDPS” appears on the unit display.
3 Open the port cover on the right side of the unit and connect the
supplied USB cable to the (USB) port. Connect the other
end of the cable to the USB port of your computer.
Note
Correct operation is not guaranteed when the unit is connected to a USB hub. Establish
a direct USB connection.
1
2
To the AC outlet
To the (USB) port
To the USB port of your computer

25
Connecting to a computer
Once the unit is connected to the computer, the following display appears:
4 Insert a “Memory Stick” or CompactFlash card into the unit as
necessary.
Hint
To maintain battery performance, make sure that you fully charge the unit periodically
by connecting the AC power adapter.
26
Copying data to a computer
When the unit is connected to a computer using the USB cable, data on the
internal hard disk of the unit, as well as the one on an inserted “Memory Stick”
or CompactFlash card, can be managed by the computer.
To illustrate, this section explains how to copy data from the unit to the “My
Documents” folder of a computer running Windows. Copying data from the
computer to the unit also uses a similar procedure.
Note
When the unit is connected to a computer with the USB cable, the COPY and CANCEL
buttons on the unit are disabled.
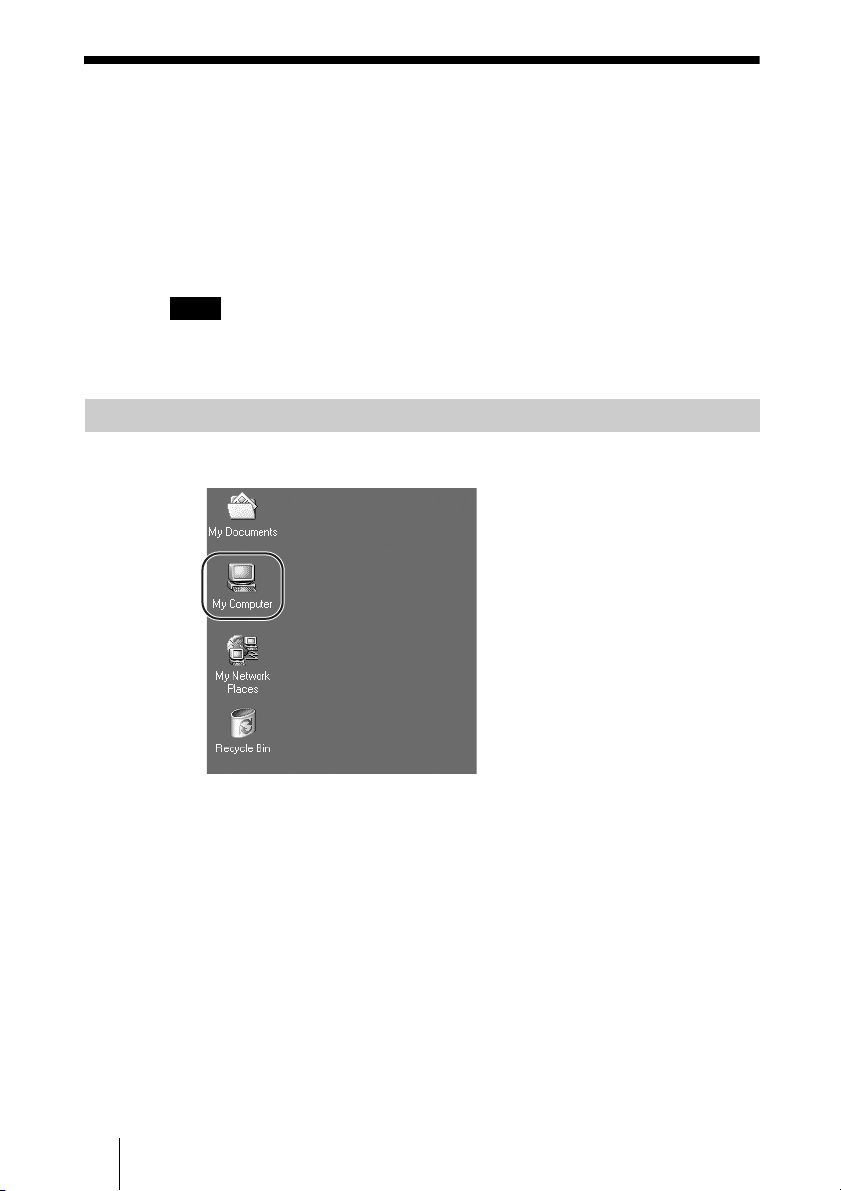
1 Double-click [My Computer].
The “My Computer” window opens.
With Windows 2000 or Windows Me
27
Connecting to a computer
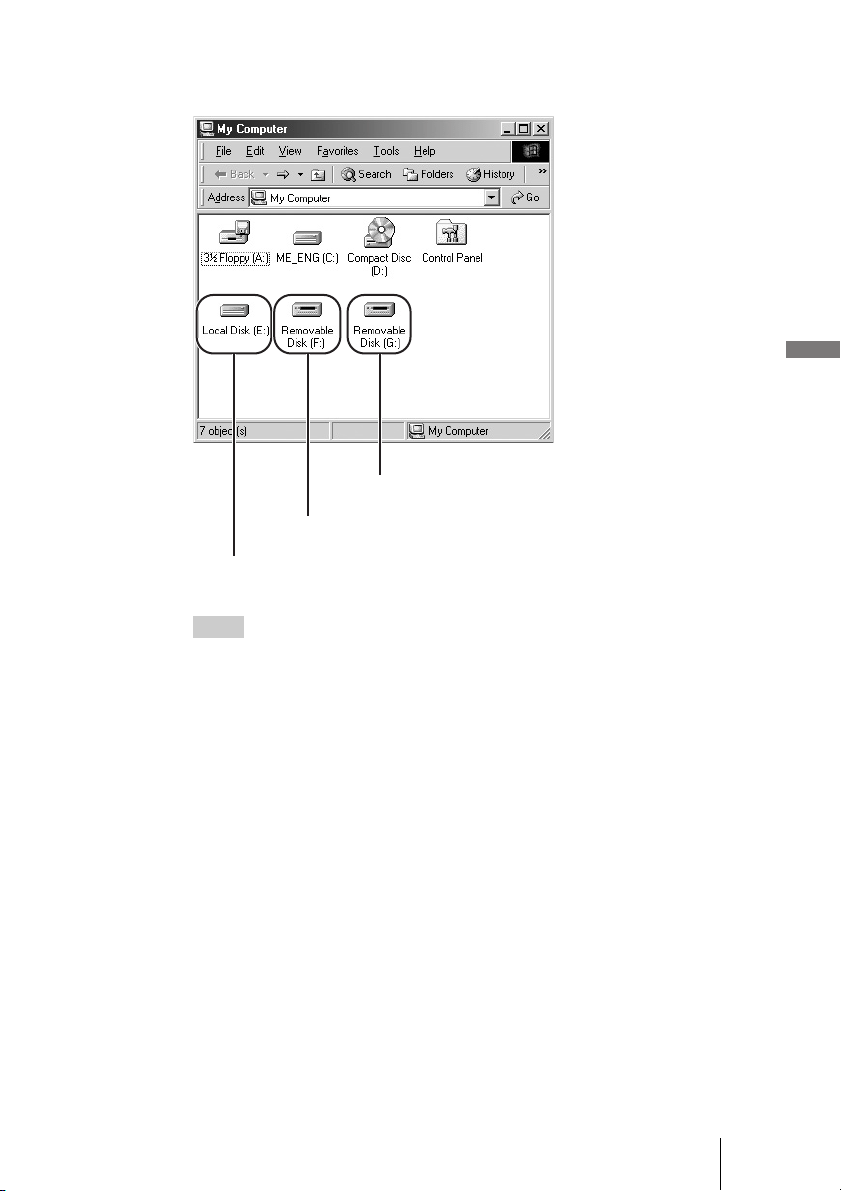
In the “My Computer” window, the “Memory Stick”, CompactFlash card,
and internal hard disk of the unit appear as follows.
Hints
• The “Memory Stick” and CompactFlash drives of the unit appear as removable disks,
while the internal hard disk of the unit appears as a local disk. The drive letters (e.g.,
“E:”) differ depending on the computer system.
• If no removable disks or the internal hard disk of the unit appear, refer to “When the
drives of the HDD Photo Storage do not appear on the computer” (page 30).
2 Double-click [Local Disk (E:)].
The contents of the internal hard disk of the unit are shown.
CompactFlash card
“Memory Stick”
Internal hard disk of the unit
28
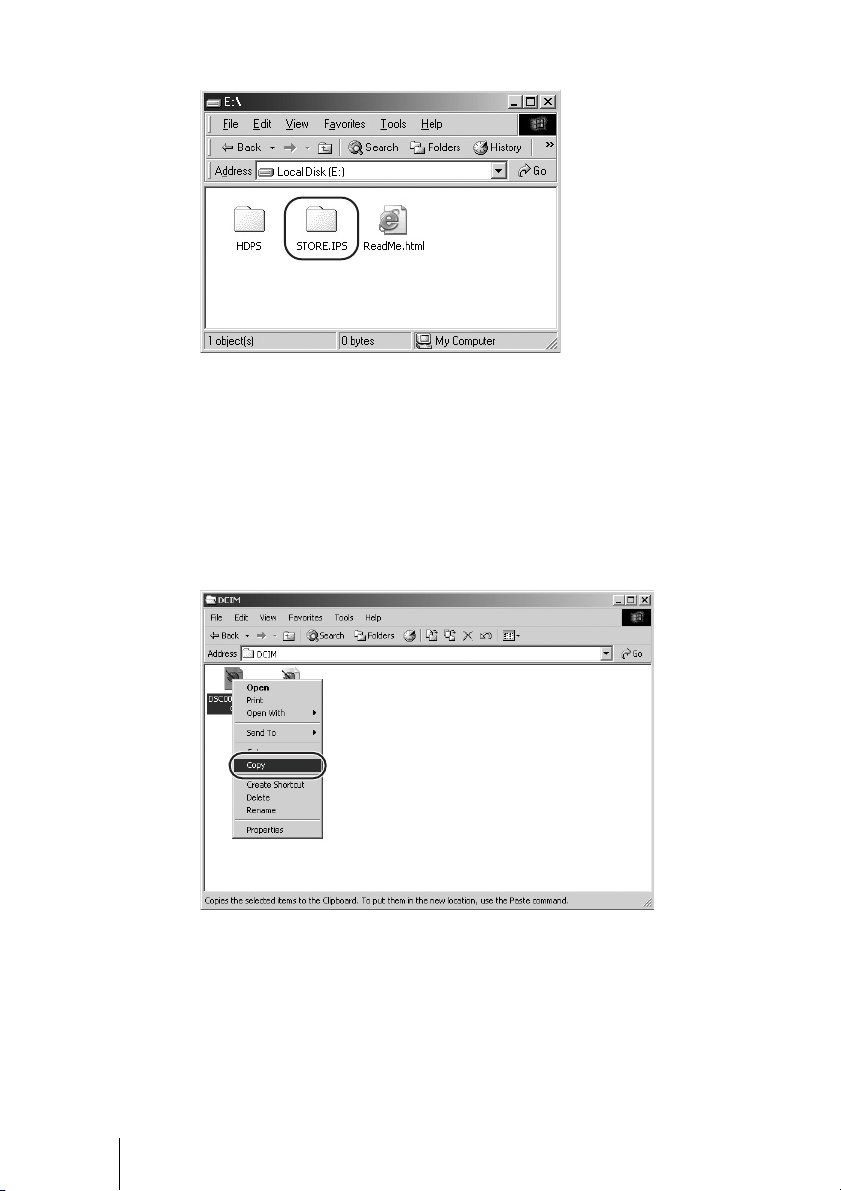
3 Double-click [STORE.IPS].
Files and folders on the internal hard disk of the unit appear. For details
about folder names, see “Data storage locations and folder names”
(page 39).
4 Double-click the folder that contains the files you want to copy to
the computer.
5 Right-click the file that you want to copy and click [Copy] on the
shortcut menu that appears.
6 Double-click [My Documents] on your desktop.
29
Connecting to a computer
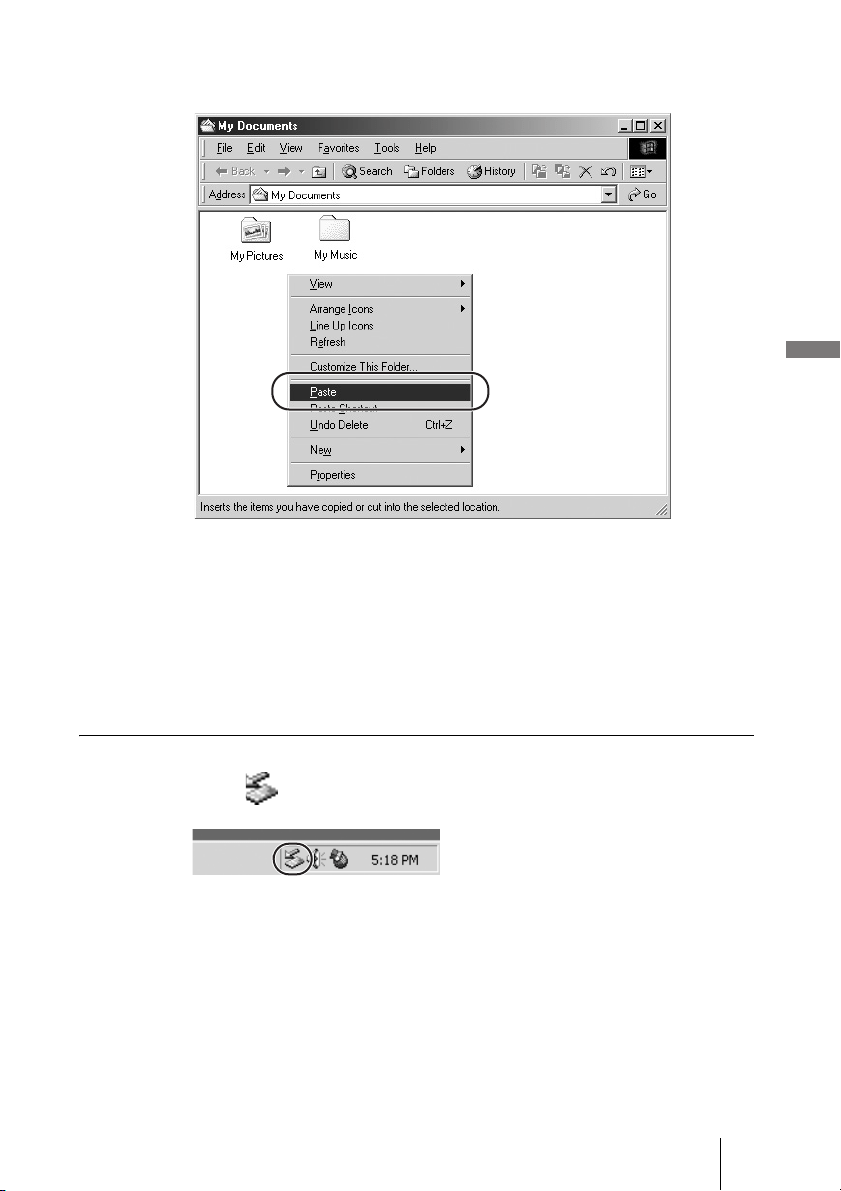
7 Right-click anywhere in the “My Documents” window and click
[Paste] on the shortcut menu that appears.
The selected file is copied to “My Documents”.
If a file with the same name already exists in the destination
folder
A message prompting you to confirm whether you want to overwrite the
existing file appears. If you overwrite the existing file, it is irrevocably lost,
as it is replaced by the new file. To copy the new file without overwriting the
existing file with the same name, save the new file under a different name.
Disconnecting the USB cable from the computer or removing media
1 Click on the Windows taskbar.
2 Click [Stop USB mass storage device - drive (X:)].
3 Make sure that the drive letter is correct and click [OK].
4 Click [OK].
5 Disconnect the USB cable.
Remove the “Memory Stick” or CompactFlash card.
30
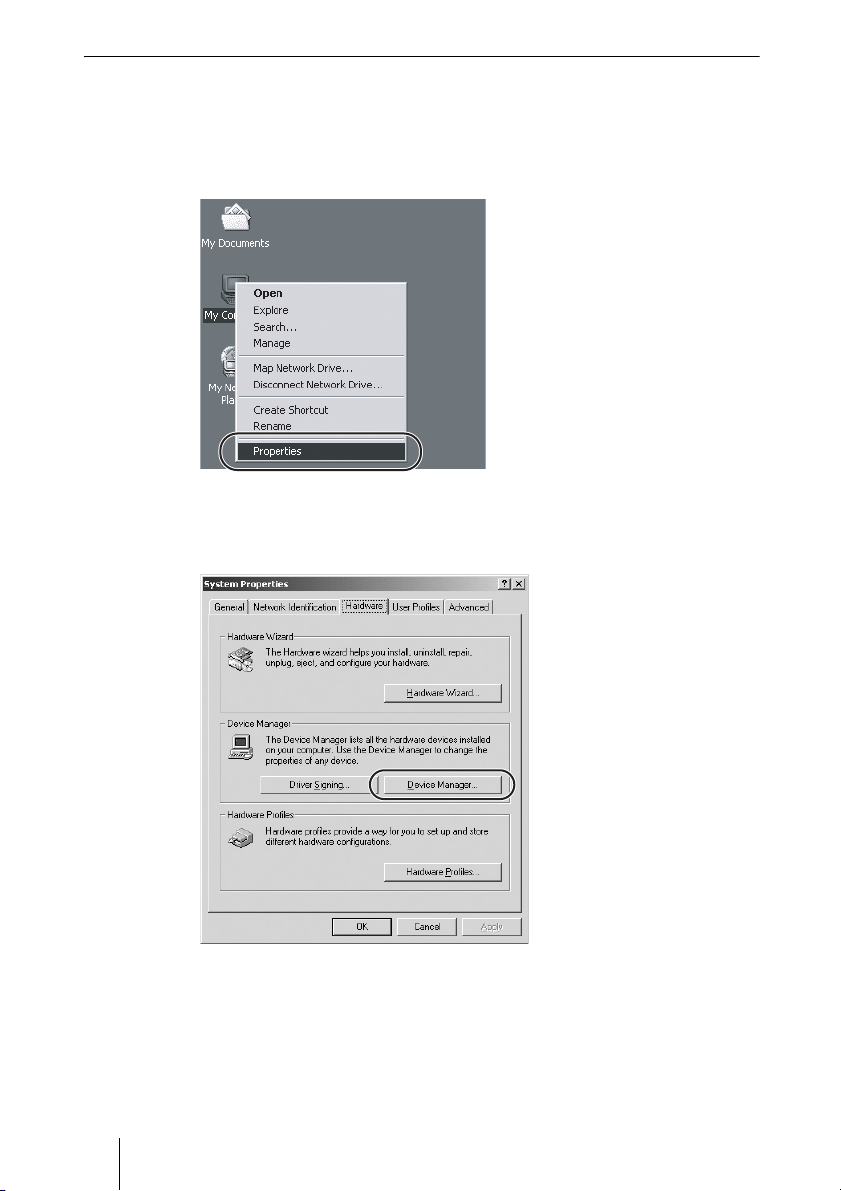
When the drives of the HDD Photo Storage do not appear on the computer
With Windows 2000
1 Right-click [My Computer] and click [Properties] on the shortcut
menu that appears.
The “System Properties” dialog box appears.
2 On the [Hardware] tab, click [Device Manager].
31
Connecting to a computer
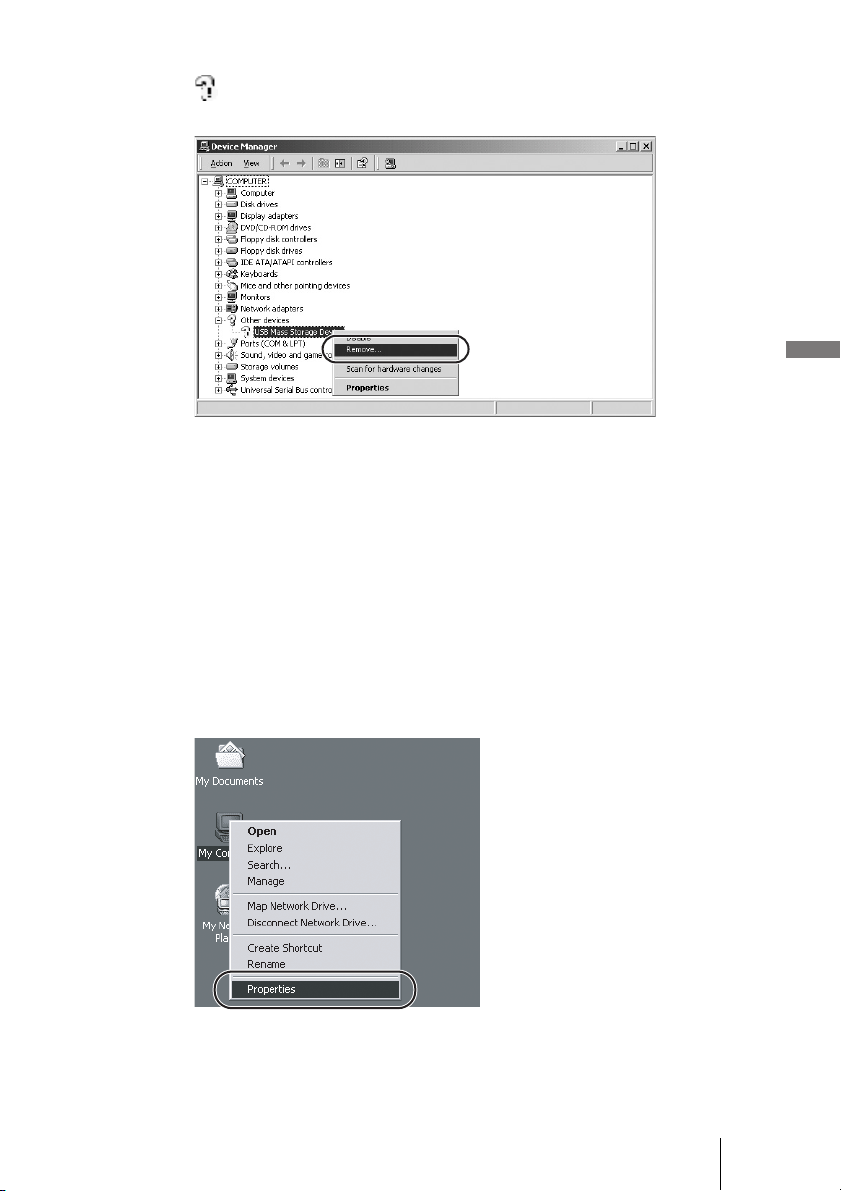
3 Make sure that “USB Mass Storage Device” is displayed as a
. If it is, right-click it and click [Remove] on the shortcut menu
that appears.
The “Confirm Device Removal” dialog box appears.
4 Click [OK].
The device is removed.
After the device is removed, disconnect the USB cable, and then reconnect
it.
With Windows Me
1 Right-click [My Computer] and click [Properties] on the shortcut
menu that appears.
The “System Properties” dialog box appears.
32
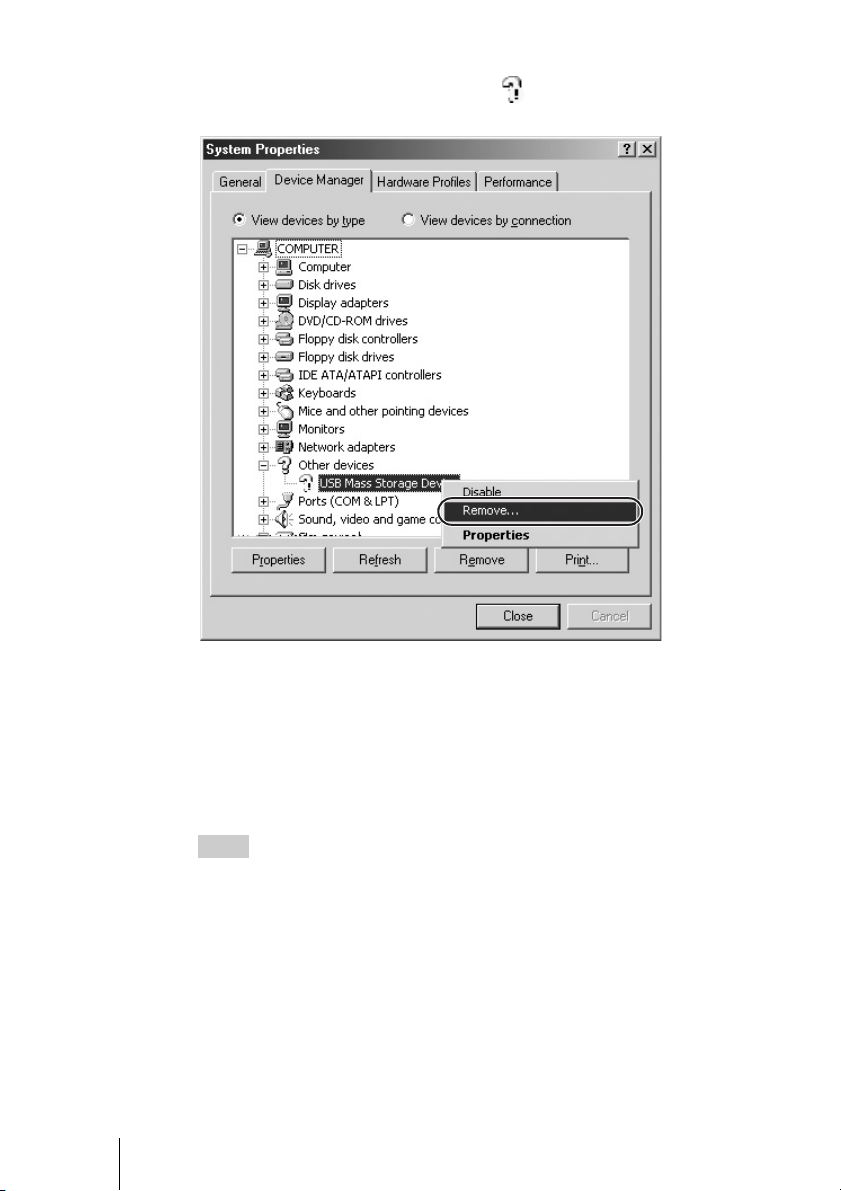
2 On the [Device Manager] tab, make sure that “USB Mass
Storage Device” is displayed as a . If it is, right-click it and
click [Remove] on the shortcut menu that appears.
The “Confirm Device Removal” dialog box appears.
3 Click [OK].
The device is removed.
After the device is removed, disconnect the USB cable, and then reconnect
it.
Hint
If the unit still cannot be detected by computer, restart the computer and try
again.
33
Connecting to a computer
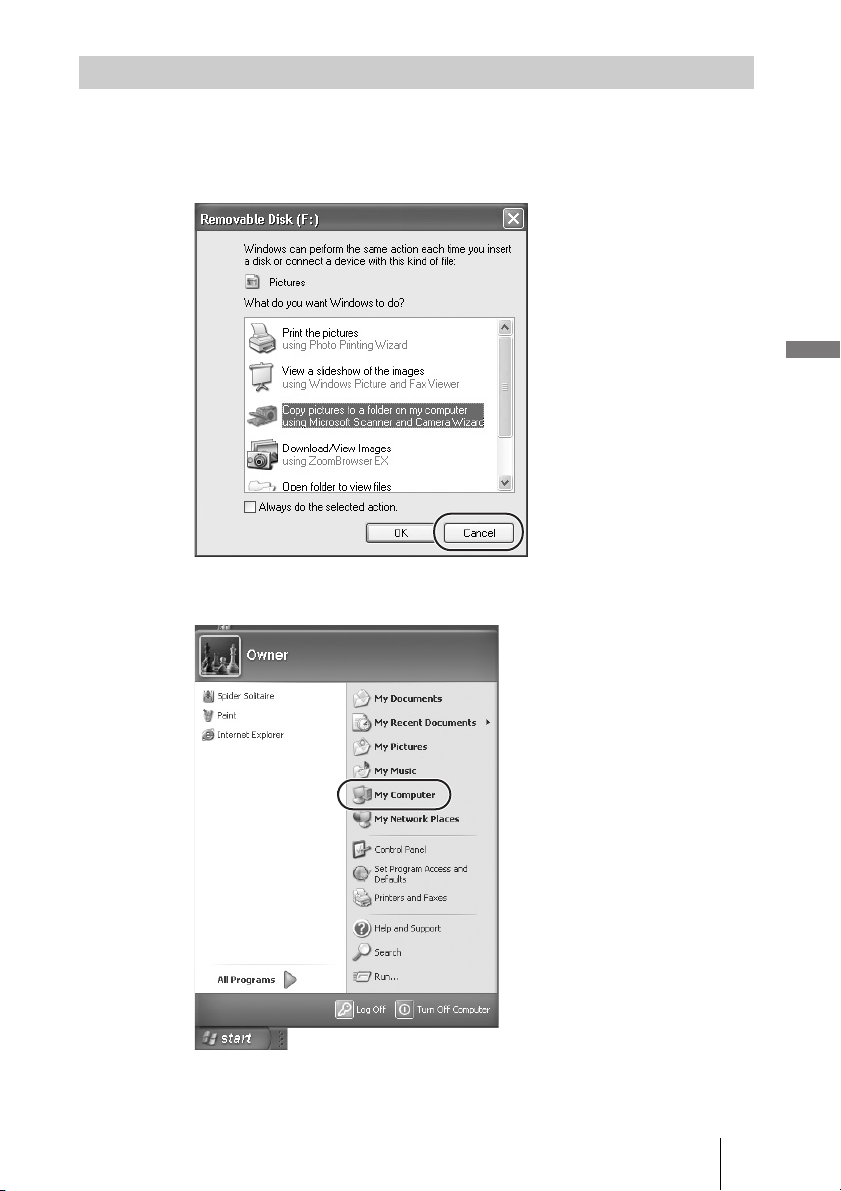
When connecting the unit with the USB cable to a computer running Windows
XP, the AutoPlay wizard appears.
1 Click [Cancel].
2 On the [Start] menu, click [My Computer].
The “My Computer” window appears.
With Windows XP
34
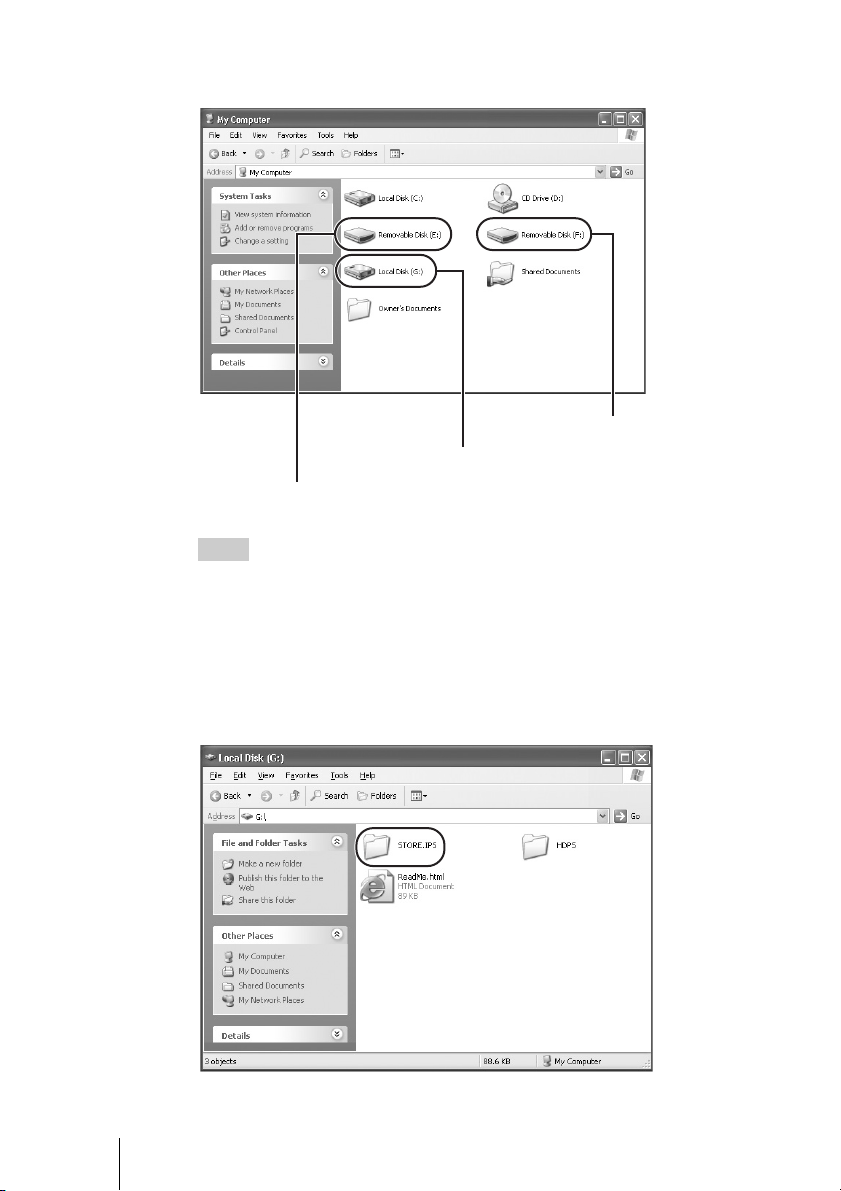
In the “My Computer” window, the “Memory Stick”, CompactFlash card,
and internal hard disk of the unit appear as follows.
Hint
The “Memory Stick” and CompactFlash drives of the unit appear as removable disks,
while the internal hard disk of the unit appears as a local disk. The drive letters (e.g.,
“G:”) differ depending on the computer system.
3 Double-click [Local Disk (G:)].
The contents of the internal hard disk of the unit are shown.
4 Double-click [STORE.IPS].
Internal hard disk of the unit
CompactFlash card
“Memory Stick”
35
Connecting to a computer
Files and folders on the internal hard disk of the unit appear. For details
about folder names, see “Data storage locations and folder names”
(page 39).
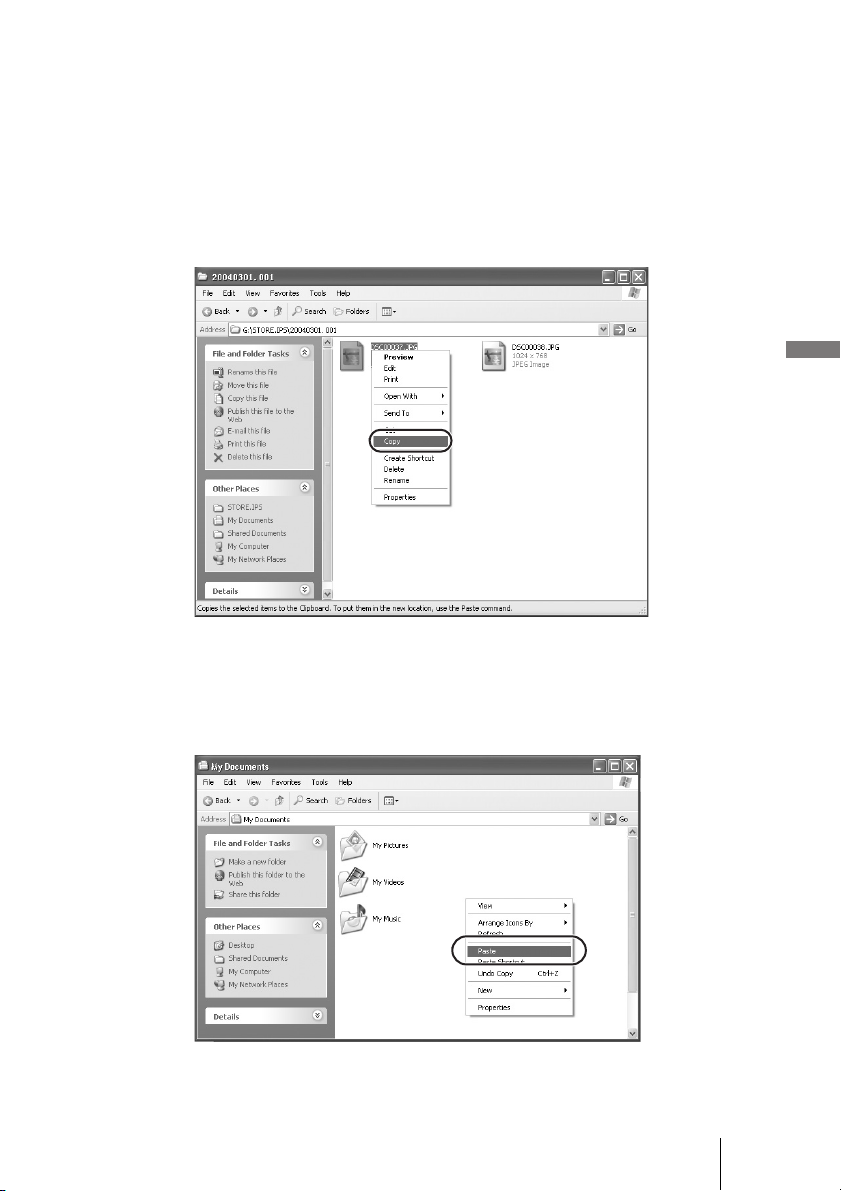
5 Double-click the folder that contains the files you want to copy to
the computer.
6 Right-click the file that you want to copy and click [Copy], on the
shortcut menu that appears.
7 On the [Start] menu, click [My Documents].
8 Right-click anywhere in the “My Documents” window and click
[Paste] on the shortcut menu that appears.
The selected file is copied to “My Documents”.

36
If a file with the same name already exists in the destination
folder
A message prompting you to confirm whether you want to overwrite the
existing file appears. If you overwrite the existing file, it is irrevocably lost,
as it is replaced by the new file. To copy the new file without overwriting the
existing file with the same name, save the new file under a different name.
Disconnecting the USB cable from computer or removing media
1 Click on the Windows taskbar.
2 Click [Safely remove USB mass storage device - drive (X:)].
3 Make sure that the drive letter is correct and click [OK].
4 Disconnect the USB cable.
Remove the “Memory Stick” or CompactFlash card.
When the drives of the HDD Photo Storage do not appear on the computer
When the drives of the unit do not appear on the computer, see “With Windows
2000” (page 30).

37
Connecting to a computer
When the unit is connected to a Macintosh computer with the USB cable, icons
for the internal hard disk of the unit and the media appear on the desktop. The
icons for the media appear when you insert a “Memory Stick” or a
CompactFlash card into the unit.
1 Double-click one of the newly added icons on the desktop.
The contents of the selected drive appear.
2 Double-click [STORE.IPS].
Files and folders on the internal hard disk of the unit appear. For details
about folder names, see “Data storage locations and folder names”
(page 39).
With a Macintosh computer
Internal hard disk of the unit
CompactFlash card
“Memory Stick”

38
3 Double-click the folder that contains the files you want to copy to
the computer.
4 Drag the file to the hard disk icon.
The file is copied to the hard disk.
Removing media
Drag the “Memory Stick” or CompactFlash card icon to the trash.
Disconnecting the USB cable
1 Drag all the media icons and the internal hard disk drive icon to
the trash.
2 Disconnect the USB cable from your computer.
39
Connecting to a computer
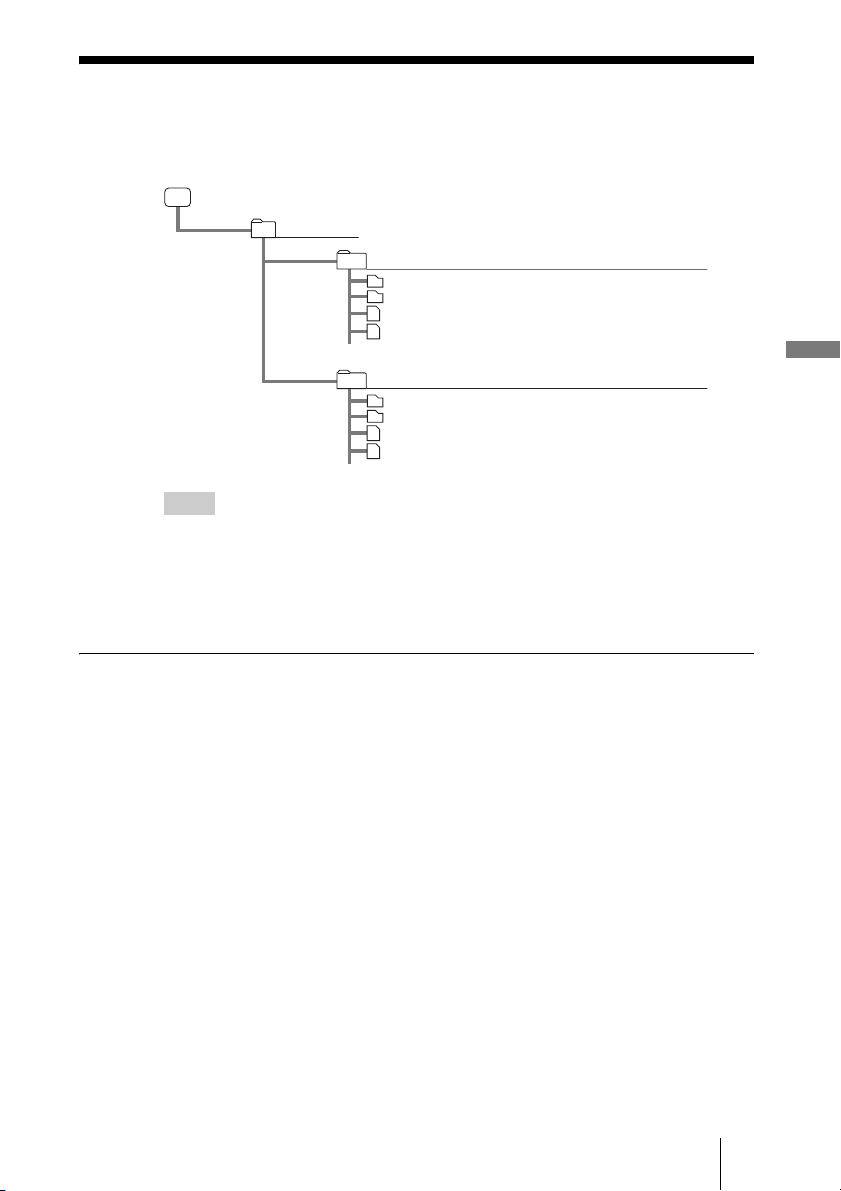
Data storage locations and folder names
Data copied to the internal hard disk of the unit is stored according to the
following rules.
Hints
• Each time data is copied, a new folder is created. The name of the folder is always the
creation date of the newest file copied from the media. For example, if the newest file
copied from the media was created 2005/03/01, the folder name becomes “20050301.001”.
If you copy other data with the same name as on the internal hard disk drive, the folder
name extension augments incrementally: “.002”, “.003”, etc.
• If a file has no date, it is saved in a folder named “19800000.001”.
Deleting unnecessary files and folders
With Windows
Right-click the file or folder that you want to delete, and then click [Delete] on
the shortcut menu that appears. Alternately, you can drag the file to the recycle
bin.
To free up space on the internal hard disk of the unit, right click on the Recycle
Bin, and click [Empty Recycle Bin] on the shortcut menu that appears.
If you wish to turn off the device or disconnect the unit from the computer,
ensure that the steps in “Disconnecting the USB cable from computer or
removing media” (page 29). This will ensure that unit is not disconnected
before the deletion process is complete.
With a Macintosh computer
Drag the file or folder that you want to delete to the trash.
To free up space on the internal hard disk of the unit, empty the trash.
If you wish to turn off the device or disconnect the unit from the computer,
ensure that the steps in “Disconnecting the USB cable” (page 38) and
“Removing media” (page 38). This will ensure that unit is not disconnected
before the deletion process is complete.
Data and folders
Internal hard disk
STORE.IPS
The folder name is the date of the newest file copied
Data and folders
The folder name is the date of the newest file copied
40
Hints
If the above procedures are not followed, the hard disk remaining capacity
displayed on the unit's LCD display may not be as expected.
• If the Recycle Bin or trash is not emptied, the file or folder will still exist
inside the hard disk. Therefore, the remaining hard disk capacity shown on
the unit's LCD display will be the same as shown before deletion.
• If the unit is disconnected from the computer before the deletion process is
completed, the remaining hard disk capacity shown on the unit's LCD
display may be wrong.
To recover from this condition, connect the unit to a computer running
Windows XP and perform Check Disk.
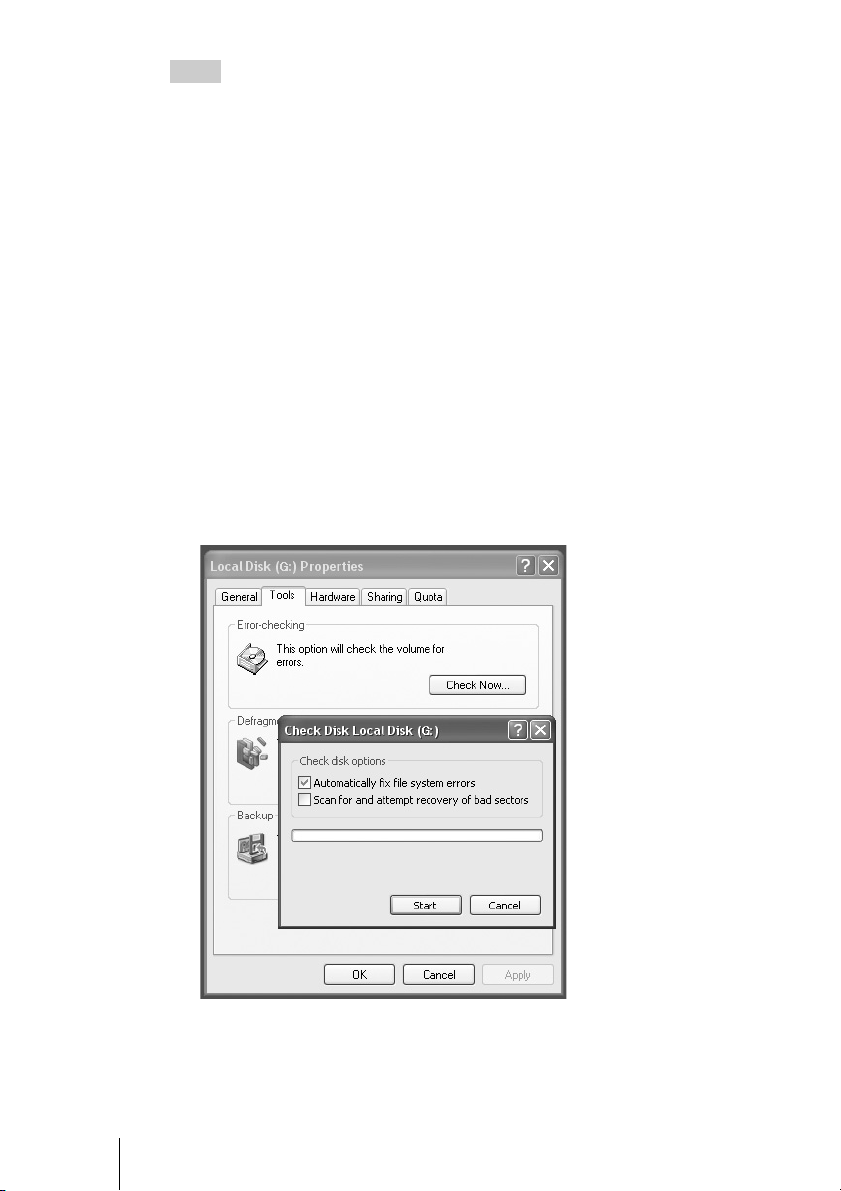
Check Disk procedures for Windows XP
1 On the [Start] menu, click [My Computer]. Right-click on the
internal hard disk and select [Properties].
2 Click on the [Tools] tab.
3 Click the [Check Now] button under “Error-checking”, select
[Automatically fix file system errors] and click [Start].
4 Copy any file into the internal hard disk using the computer.
This will correct any file system errors created when the device was
improperly disconnected.

41
Connecting to a computer
Using the unit as an external hard disk
drive or reader/writer
The unit can be used as a USB-compatible external hard disk, functioning as a
portable medium for data storage. The unit can also be used as a reader/writer
of the “Memory Stick” or CompactFlash cards.
Notes
• When you use the unit as an external hard disk, the space available to copy data from a
“Memory Stick” or CompactFlash card decreases according to the amount of data written
to the disk. If there is not enough space to copy files, delete unnecessary data.
• Do not format the internal hard disk of the unit with Windows or your Macintosh computer.
In particular, if formatted with Windows NTFS, you will no longer be able to use the unit.
If you partition the internal hard disk of the unit, make sure that the file system of the first
partition is FAT32.
• If the hard disk has been formatted using your computer or NTFS format, Error Code F20
will be shown on the LCD display when it is turned on while not connected to a computer.
Reformat the internal hard disk. For details, see “If an HDD Format Error (error code: F20)
appears” (page 51).
• If you retouch images, change their names or change folder names of data on a “Memory
Stick” or CompactFlash card with your computer, you may no longer be able to view them
on a digital still camera.
Hint
When the unit is connected to a computer, the unit is used to exchange data with the computer,
as well as between the “Memory Stick” and CompactFlash card.
Note on formatting a “Memory Stick”
If you want to format a “Memory Stick” with Windows, download the
Memory Stick Formatter from the following address:
http://www.sony.net/Products/mssupport/
42
B
Additional information
Troubleshooting
This section provides information related to the most common problems
encountered by users of this product and their solutions. Check the points listed
here before contacting your dealer or an authorized service center. Also refer
to the documentation of your computer.
Hint
If the battery needs charging or if an error occurs while using the unit, the current condition
of the unit appears in the message display. For details on error messages, see “Error
Messages” (page 48).
Battery/power supply
Symptom Cause/remedy
The unit does not start. c The internal battery may be depleted. Connect
the AC power adapter and charge the battery
(page 14).
The unit turns on briefly, but
then turns off again.
c Even when the internal battery is fully charged,
it gradually loses charge if the unit is not used
for an extended period of time, which can lead
to reduced operating time. If you do not use the
unit for a while, fully charge it before using the
unit (page 14).
c When the unit is shipped, the internal battery is
not fully charged. It may therefore be empty by
the time you receive it.
c When using the unit on internal power at low
temperatures, usage time may be radically
reduced (page 14).
c The performance of the internal battery
gradually deteriorates, depending on the number
of times it is charged, usage time, and storage
period. Therefore, operating time may be
reduced even if the battery is fully charged. This
may mean that the battery needs to be replaced.
Contact your dealer or an authorized service
center regarding battery replacement.
The unit turns off unexpectedly. c When the unit is used stand-alone, it turns off
automatically after remaining idle for five minutes,
whether operating on internal power or through
the AC power adapter. Restart the unit (page 21).
When the unit is turned on,
there is no battery icon at the top
left corner of the LCD display.
c Connect the AC power adapter and fully charge
the battery (page 14).
43
Additional information
Copying data to the HDD Photo Storage
Using the HDD Photo Storage with a computer
The unit does not respond in
hang up state.
c Wait for a few moments. If the drive status does
not change, press the ! (POWER) button while
holding down the COPY and CANCEL button.
This will reset the drive. If RESET was
performed during data copying, the data may
not be valid. Please recopy the data.
Symptom Cause/remedy
Symptom Cause/remedy
Cannot copy. c Verify that the “Memory Stick” or
CompactFlash card is inserted correctly and
detected by the unit. When detected correctly,
the “Ready” copy status appears in the unit
display.
c Verify that a “Memory Stick” and
CompactFlash card are not inserted in the unit
simultaneously. If so, remove one.
c Verify whether there is enough free space on the
internal hard disk. If necessary, delete
unnecessary data (page 39).
c Verify that the internal battery has an adequate
remaining charge (page 15).
c Verify whether the buttons are locked. Slide the
Hold switch to the unlock position (page 12).
HDD Format Error (error code:
F20) is shown on the LCD
display.
c Reformat the internal hard disk (page 51).
Symptom Cause/remedy
Cannot copy. c Verify that the unit is properly connected to the
computer with the USB cable. If so, the drive of
the unit is displayed on the computer screen
(page 24).
Cannot use the COPY button. c When the unit is connected to a computer, the
COPY button is disabled.
Cannot copy computer data to a
“Memory Stick” or
CompactFlash card.
c Verify whether the “Memory Stick” is write-
protected.
c Verify whether there is enough free space on the
“Memory Stick” or CompactFlash card, or if
they are formatted.
44
Precautions
Usage and storage
• Only use the specified AC power
adapter.
• Never short-circuit any of the
connectors using a metallic object such
as a keyholder.
• Do not leave the unit in locations where
the temperature may rise above 60 °C
(140 °F), such as in a closed car or in
direct sunlight.
• Protect the unit from water and
moisture.
• Use the unit on a flat level surface.
• Turn off the unit before carrying it.
Overheating
If the unit has become hotter than normal
during operation, turn off the unit,
disconnect the AC power adapter, and
then contact an authorized service center.
Condensation
If the unit is brought from a cold to a warm
location, or if the ambient temperature
suddenly rises, moisture may form on the
outer surface and in the interior of the unit.
Do not use the unit in such a condition, as
this can cause damage. If condensation
has occurred, leave the unit for about an
hour without turning it on.
Hard disk
• Never disconnect a cable or turn off the
computer or unit while data is being
written to or read from the hard disk.
Otherwise, data may be corrupted or
lost. Sony Corporation does not accept
any liability for damage caused by data
loss.
• Hard disks can hold a vast amount of
data, but damage or malfunction can
lead to sudden and irreplaceable data
loss. It is highly recommended to
regularly back up the contents of the
hard disk. Sony Corporation does not
accept any liability for damage caused
by data loss.
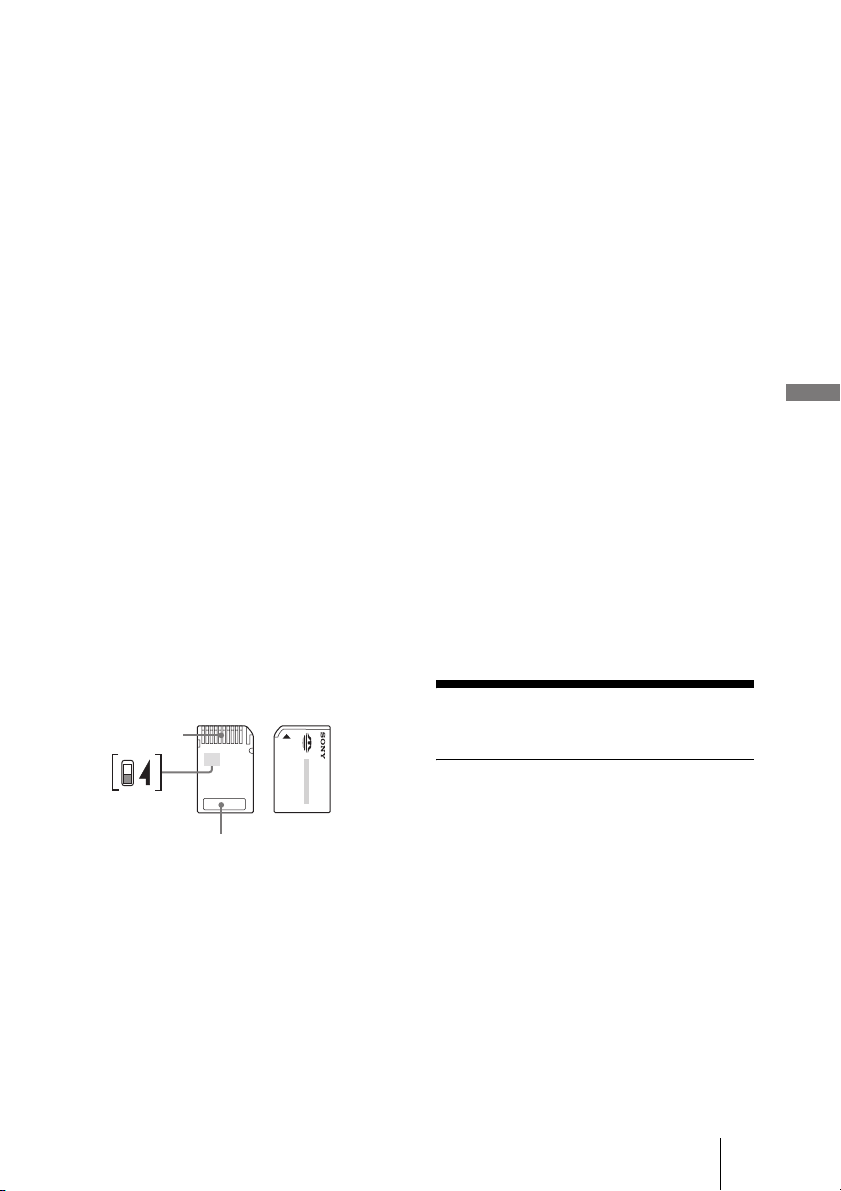
“Memory Stick” media
Notes on using “Memory Stick”
media
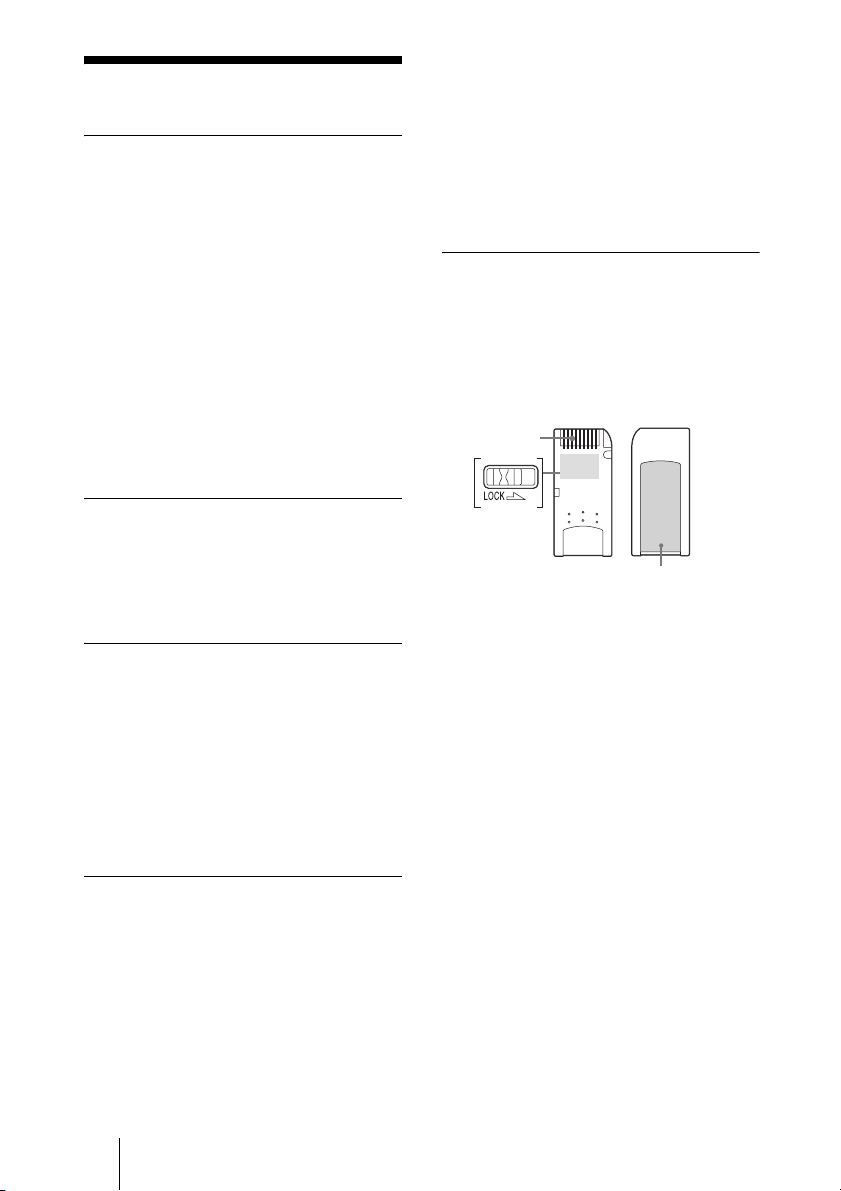
• When you set the “Memory Stick”
write-protect switch to “LOCK”, data
cannot be written, edited, or deleted.
The position and shape of the write-
protect switch may differ between the
various types of “Memory Stick”.
• Do not remove the “Memory Stick”
while it is reading or writing data.
• Data may be damaged if:
– The “Memory Stick” is removed or
the unit is turned off while reading or
writing.
– You use the “Memory Stick” in a
location subject to the effects of static
electricity or electric noise.
• We recommend that you back up
important data recorded on the
“Memory Stick”.
• Do not affix anything other than the
supplied label to the “Memory Stick”
label area.
Terminal
Write-protect
switch
Label area
45
Additional information
• Affix the label so that it does not stick
out beyond the label area.
• When storing or carrying a “Memory
Stick”, keep it in a protective case.
• Do not touch the terminal of the
“Memory Stick” with anything,
including your fingers or metallic
objects.
• Do not strike, bend, or drop the
“Memory Stick”.
• Do not disassemble or modify the
“Memory Stick”.
• Do not allow the “Memory Stick” to get
wet.
• Do not use or store the “Memory Stick”
in locations subject to:
– Extreme heat, such as in a closed car
parked in the sun.
– Direct sunlight.
– Humidity or corrosive substances.
Notes on using “Memory Stick
Duo”
• Use a pointed object, such as a ballpoint
pen, to move the “Memory Stick Duo”
write-protect switch.
• Do not write forcefully on the “Memory
Stick Duo” memo area.
Notes on using the Memory Select
function
• You cannot use multiple memory blocks
simultaneously or continuously.
• Never operate with the Memory Select
switch when the “Memory Stick” is
inserted in the slot of the unit as it may
cause damage. Sony Corporation does
not guarantee such failure resulted from
the above operation.
• Make sure that the Memory Select
switch is properly positioned to the side.
When the switch is not positioned
properly, the unit may be damaged or
malfunction.
• Before inserting the “Memory Stick” in
the slot of the unit, make sure that the
memory you want to use is already
selected.
• A “Memory Stick” with the Memory
Select function allows the user to select
the internal memory of the “Memory
Stick” with the selector switch. Care
must be taken in the following cases as
the supported devices only detect the
selected memory:
– Formatting is only processed for the
selected memory.
– The remaining memory is only
indicated for the selected memory.
– The error display is only served for the
selected memory. It is detected
separately from the unselected
memory.
Maintenance
Cleaning the cabinet
Wipe the outside of the unit with a soft,
dry cloth. To remove stubborn stains,
moisten the cloth with a mild, neutral
detergent. Do not use solvents, cleaning
alcohol, benzene, or other substances that
may damage the finish.
Terminal
Write-protect
switch
Memo area

46
Disposing of the
unit
Before disposing of the unit, the internal
battery must be removed as described
below.
If you want the internal battery replaced,
contact your dealer or an authorized
service center. In this case, you do not
need to remove the internal battery
beforehand.
To prevent the risk of damage and/or
injury, never use any other battery except
the one integrated in the unit.
Do not remove the side panel or the
internal battery of the unit unless you are
about to permanently dispose of the unit.
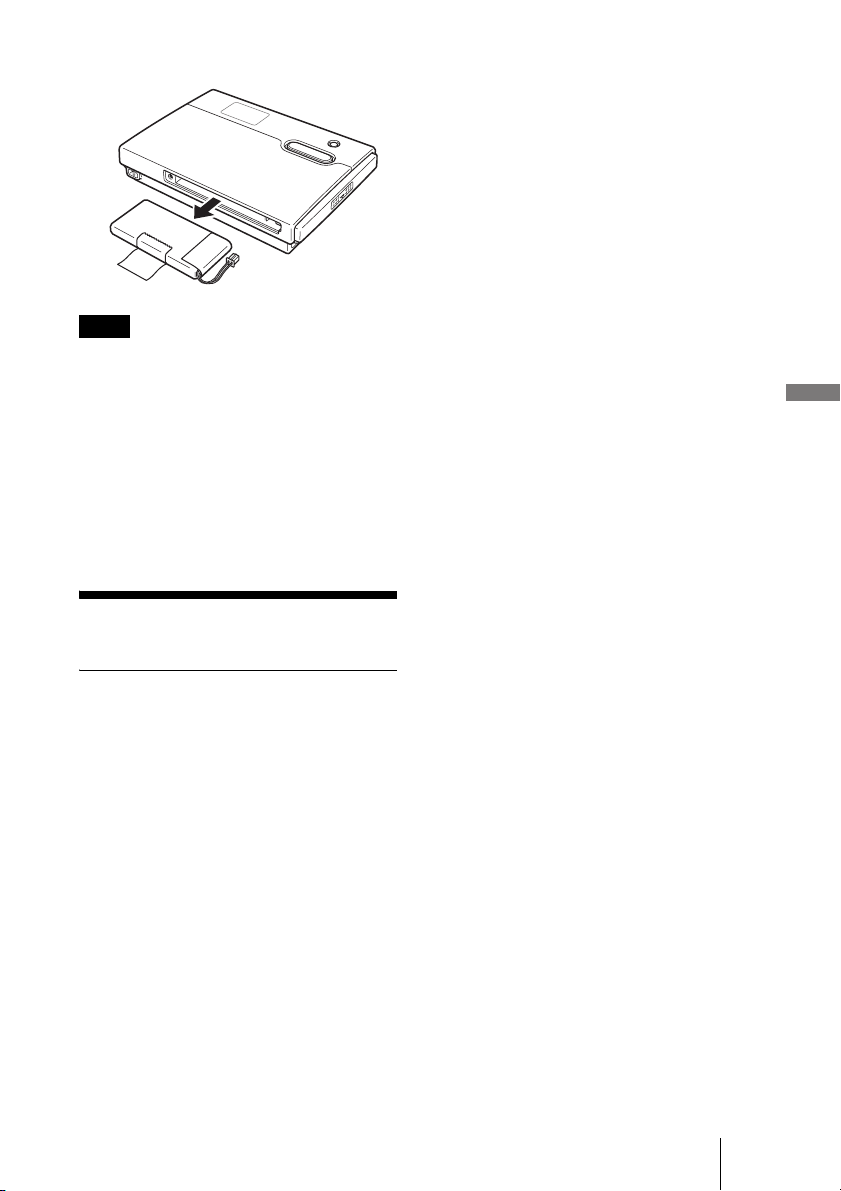
Removing the internal battery
1 Disconnect the AC power
adapter and USB cable from the
unit.
2 Use a Phillips screwdriver to
remove the screw on the side of
the unit.
You can see a tape on the side of the
battery.
3 Extract the tape from the inside
of the unit with an elongated
object, as illustrated.
4 Grab the extracted tape and
partially pull the battery out of the
unit.
5 Disconnect the battery cable.
O
P
E
N
47
Additional information
6 Remove the internal battery.
Notes
• The interior of the unit may become hot during
operation. Before removing the internal battery,
make sure that the unit has cooled down.
• Take care that no foreign object enters the unit
while the internal battery is removed.
• Do not reinstall the internal battery into the unit
once removed.
• When disposing of the internal battery, make
sure that you conform to your local regulations.
Specifications
HDPS-M10
Storage capacity
40 GB
(Formatted with FAT32. 1 GB amounts to
1,000,000,000 bytes.)
Media slots
“Memory Stick” slot × 1
CompactFlash slot × 1
Supported media
See page 6.
Interface
USB 2.0 (Hi-Speed/Full-Speed)*
* If the connected computer does not support
USB 2.0, transfer speed will be according to
Full-speed USB (12 Mbps).
Connector
USB (mini-B) × 1
Power supply
Lithium-ion rechargeable battery
(internal)
100 - 240 V AC, 50/60 Hz
Power consumption
7.5 W maximum
Ambient conditions
Operating temperature: 5 °C to 40 °C
(40 °F to 104 °F) (temperature gradient
less than 10 °C/hour (50 °F/hour))
Operating humidity: 20% to 80%
(non-condensing)
Dimensions
Approx. 135 × 30 × 92 mm
(5
3
/
8
× 1
3
/
16
× 3
5
/
8
in.)
(W × H × D)
Mass
Approx. 300 g (10.6 oz.)
Supplied accessories
AC power adapter
(SONY, Model HDAC-M1) (1)
Carrying case (1)
Hand strap (1)
Operating Instructions (this document)
PhotoDiary software (on the hard disk)
Power cord (1)
Read Me First (1)
USB cable (1)
Warranty card (1)
Design and specifications are subject to
change without notice.
O
P
E
N
48
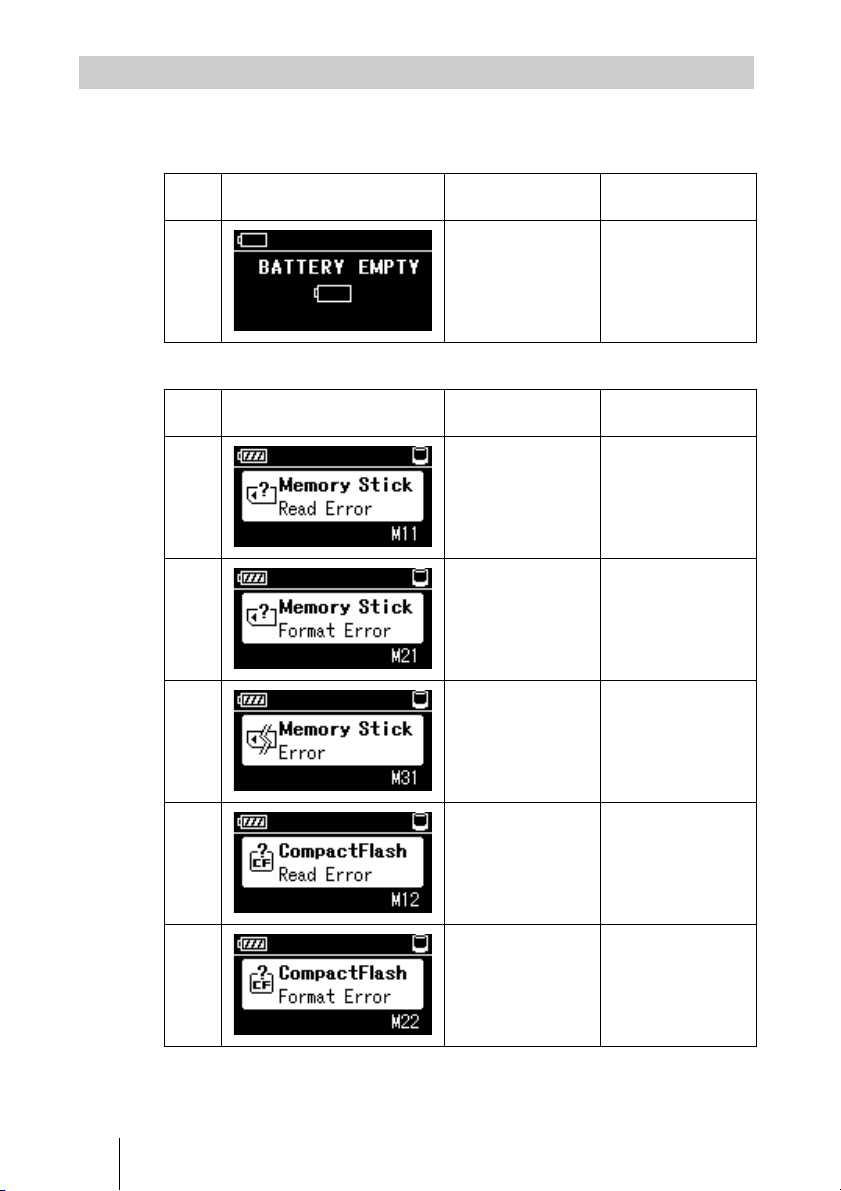
Follow the instructions below if an error message appears on the display.
Battery error
Media error
Error Messages
Error
code
Message Meaning Corrective action
—
The battery level is
almost completely
depleted.
Connect the AC
power adapter and
fully charge.
For details, see
“Charging the
battery”(page 14).
Error
code
Message Meaning Corrective action
M11
The “Memory Stick”
cannot be accessed
during copying.
Press the COPY
button again to
restart copying.
M21
“Memory Stick”
format error
Format the “Memory
Stick”.
M31
“Memory Stick”
error
The “Memory Stick”
may be damaged.
Use a different
“Memory Stick”.
M12
The CompactFlash
card cannot be
accessed during
copying.
Press the COPY
button again to
restart copying.
M22
CompactFlash card
format error
Format the
CompactFlash card.

49
Additional information
Warning
M32
CompactFlash card
error
The CompactFlash
card may be
damaged. Use a
different card.
Error
code
Message Meaning Corrective action
Error
code
Message Meaning Corrective action
W10
Internal hard disk
full error
There is not enough
free space on the
internal hard disk.
Delete any
unnecessary data to
free space.
W11
The number of
folders with the
same name has
reached its
maximum (999).
Delete some folders
with the same name.
W01
Battery power alone
is insufficient to
perform copying.
Connect the AC
power adapter.
W02
“Memory Stick” and
CompactFlash card
double load error
Eject either the
“Memory Stick” or
CompactFlash card.
50
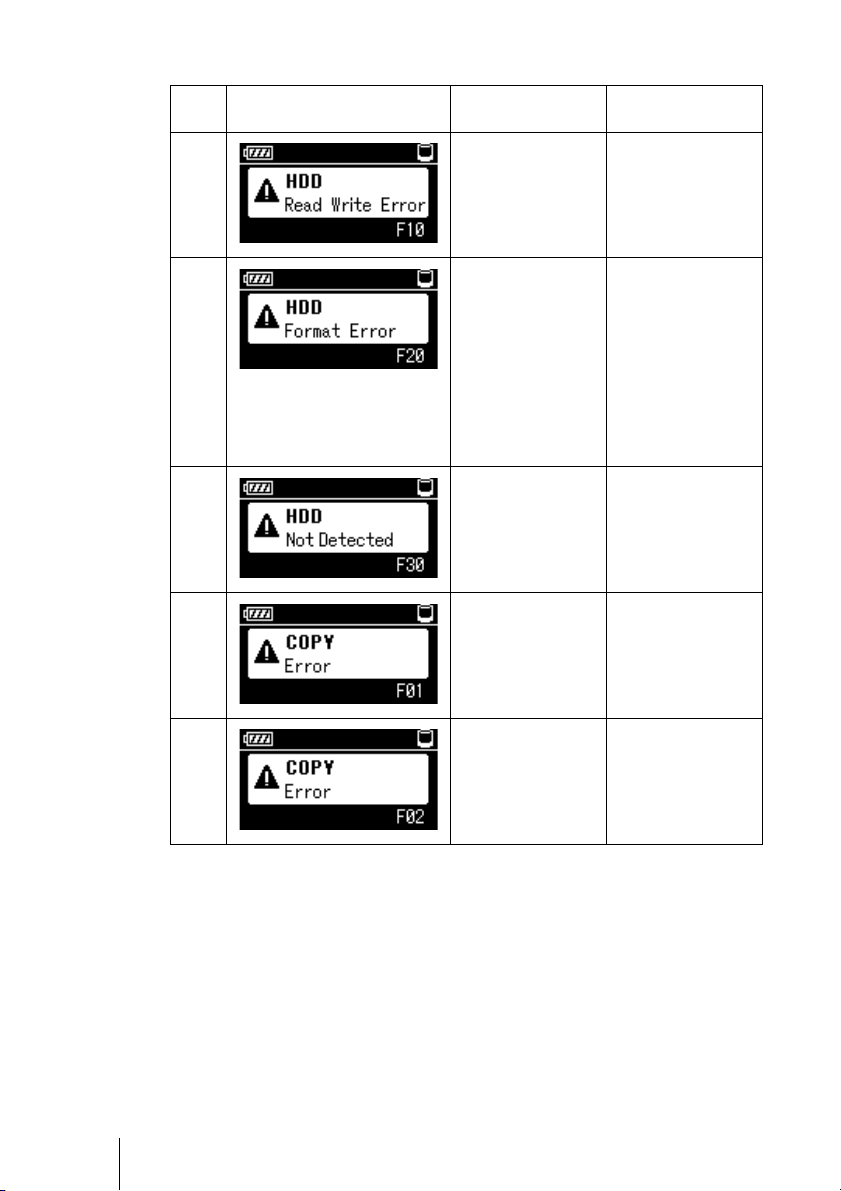
Fatal error
Error
code
Message Meaning Corrective action
F10
The internal hard
disk on the unit
cannot be accessed.
Contact your dealer
or an authorized
service center.
F20
Internal hard disk
format error
Reformat the internal
hard disk. For
details, see “If an
HDD Format Error
(error code: F20)
appears”(page 51). If
the unit still does not
operate properly,
contact your dealer
or an authorized
service center.
F30
The internal hard
disk cannot be
detected.
Contact your dealer
or an authorized
service center.
F01
“Memory Stick”
copy error
Reinsert the
“Memory Stick”. If
the error persists, use
a different “Memory
Stick”.
F02
CompactFlash card
copy error
Reinsert the
CompactFlash card.
If the error persists,
use a different
CompactFlash card.
51
Additional information
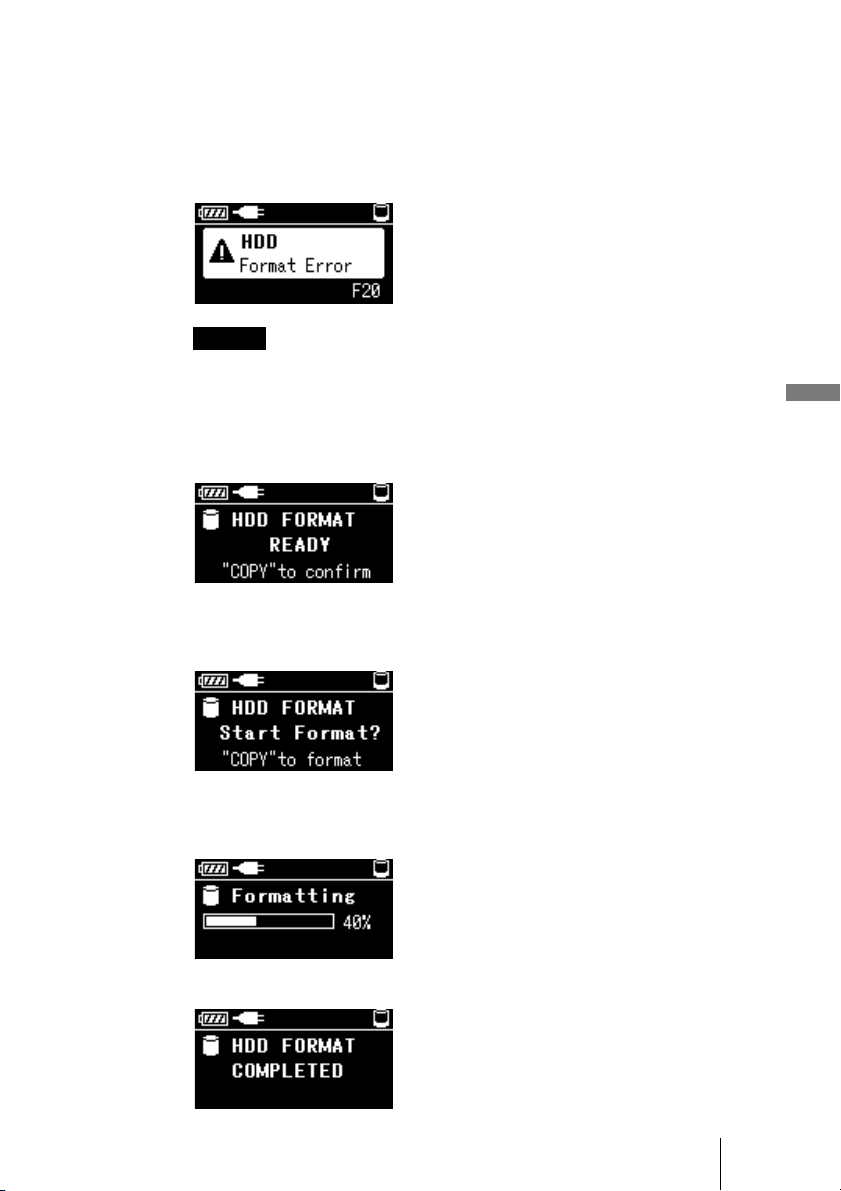
If an HDD Format Error (error code: F20) appears
Perform the following steps to format the unit’s internal hard disk.
1 At first, connect the unit to a computer and backup your data.
Then safely disconnect the drive.
Error code F20 will be shown on the LCD display.
Warning
The following steps will erase all data on your hard disk.
2 Press the CANCEL button 5 times while holding the COPY
button.
The screen below will be displayed.
3 Press COPY button.
The screen below will be displayed.
4 Press COPY button again to start the format.
The screen below will be displayed. The hard disk data will be erased.
The screen below will be displayed upon format completion.

52
5 Press COPY for the final time.
Contact an authorized service center to restore all the applications originally
supplied in the hard disk of the unit.