If at some time you wish to remove the oven door follow these procedures. Do not force the door on or off the cooker as you may damage the hinges. Call Glem Gas Australasia on 1300 307 917 should you require assistance.
1. Open the door fully.
2. Rotate the hinge locking tab using a finger or small screwdriver.
3. Tab locked in position, repeat the procedure on each hinge.
4. Crouch in front of the door. With the door partly open (150mm at the top) pull in the direction of the arrows and away from the cooker at the bottom of the door. Then lift the door away from the cooker.
REFITTING THE OVEN DOOR
It is important to hold the door at an angle so there is a 150mm gap at the top of the door.
Hook the hinges in first with the groove in the bottom of the hinge sitting on the edge of the slots. The door should feel stable. Fully open the door to allow the unlocking of the hinges. You will then be able to close the door. If the door doesn’t close correctly, fully open the door and relock the hinges so you can try again. DO NOT FORCE THE DOOR AT ANY TIME.
IDENTIFYING THE SYMBOLS ON THE CONTROL PANEL
Symbols printed on the control panel identify the functions controlled by each knob and switch. The table shows the meaning of each symbol. There may be slight differences in designs
SYMBOL
MEANING
Burner / front left area
Burner / rear left area
Central burner
Burner / front right area
Burner / rear right area
Burner / left area
Oven temperature control (°C)
Timer / minute minder
Multi-function electric oven features
Oven thermostat
Gas oven burner
Grill
Light button
Fan-assisted gas oven
Ventilated gas button (MultiChef)
These two pilot lights indicate that the electric oven is on and/or that the oven is heating up
BEFORE USING FOR THE FIRST TIME
Remove all packing material, plastic film and literature from the oven before connecting the gas and electricity supplies.
Make sure all plastic has been removed before use. Some models have trays with a protective coating; make sure that plastic coating has also been removed. Clean the interior of the oven and all accessories with soap and water and dry them carefully.
Switch on the empty oven on maximum to eliminate grease residues from manufacturing. There may be a slight odour at this time. Run the oven on maximum for a period of 1 hour and open the kitchen windows to ventilate. If this odour lingers use the oven and the odour will dissipate.
The oven is fitted with 3 or 4 guides for positioning trays and racks at different heights. On some models a telescopic runner is fitted to the middle level.
Included with all cookers are two oven shelves, a grill tray and a rack insert for the grill tray
Some models include an Air Fryer basket feature. It can be purchased as an option for other models. See Page 15 for instructions on use.
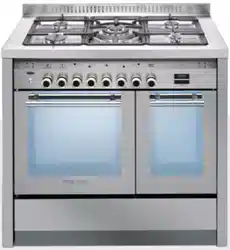
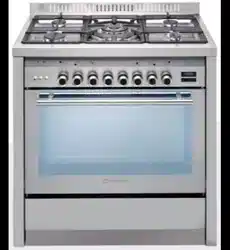
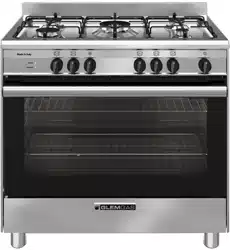
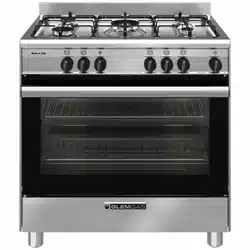
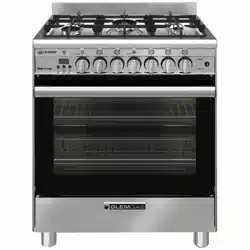
OPERATION OF THE GAS COOKTOP
Gas Burners
The combination of large burners, wok burners and smaller burners provides the flexibility for different cooking tasks. All burners are fitted with flame failure safety devices. This means that if the flame goes out for any reason the gas stops flowing.
To ignite any burners simply depress the corresponding control knob and rotate anti-clockwise to the high flame position. As the knob is rotated the gas begins to flow and the electrode begins sparking. Once the flame is lit hold the knob for a couple more seconds to activate the flame failure safety valve.
In case of ignition malfunction or electricity failure, a match can be used to ignite the burners. Strike a match and place it close to the selected burner. Depress the corresponding control knob and turn it anti-clockwise to maximum flame.
General Points
If you have problems lighting the burners check that the round cap on the top of the burner is correctly aligned.
If the burner is wet the ignition may not operate correctly. In that case, light the burner using a match.
Take care as the electronic sparker is ceramic and can be easily damaged when reassembling the burner after cleaning.
Gas Burner assembly
Sometimes when the burner is difficult to light it is simply due to the burner not being correctly assembled. All parts must be correctly aligned.
OPERATING THE GAS OVEN
The gas oven is equipped with a gas thermostat. Its purpose is to keep the temperature at a constant heat. The oven is fitted with electronic spark ignition and a safety shut-off device.
Lighting the Oven
First, open the oven door and remove the grill tray. Leave the grill tray out when operating the oven as it can affect oven performance unless there is a special requirement to have the tray under the cooking.
Press the oven control knob and rotate anti-clockwise to the maximum heating position. The electronic ignition is activated automatically when the knob is depressed.
Keep the knob depressed for about 15 seconds after the flame has lit. Always view the burner during lighting the procedure for safety. There is a hole in the bottom panel of the oven to allow the viewing the burner.
Ignition Malfunction
In case of ignition malfunction or electricity failure depress and turn the oven knob in an anticlockwise direction to reach the maximum heating positioning.
Light a match and place it near the hole in the base panel, keep the knob depressed. Once the burner is lit keep the knob depressed for 10 to 15 sec.
New Oven Smell
There are likely to be some odors when using an oven for the first few times. Once the oven has been used the odors will disappear.
PREHEATING THE GAS OVEN
After the oven has been switched on, keep the door open for a minute then close the door gently so there is no risk of extinguishing the flame. Set the oven knob to the required temperature and wait for about 20 minutes before introducing the food. Comply with the cooking indication chart in these instructions to get the best out of the oven and choose the right shelf position.
Gas ovens heat up very rapidly and will reach temperature within 20 minutes. Please note: Gas oven models do not have an indicator light for oven mode.
Removing and installing the oven shelves
Slide the oven shelves towards you until they reach the front stop. Tilt them up at the front to clear the side supports and lift them clear. To install the shelves reverse the operation. Ensure that the shelf is correctly installed so that the stops prevent the shelf sliding out in one action.
ELECTRIC GRILLING ELEMENT
All Emilia and Glem cookers have an electric grill within the oven compartment. Gas grills have been found to be unsuitable for Australian cooking styles where we like to grill lamb chops.
The oven door must be closed during grill operation. If the oven has been on, always wait a few minutes before switching on the grill. The grill element is an infrared type, which provides an even controlled heat. When the grill is on an indicator light will come on.
Using a standard shelf with a drip tray below filled with some water will avoid smoke build-up coming from burnt fat and at the same time assist in keep the food moist.
Cookers with gas ovens
On cookers with a gas oven the electric grill may be controlled by a separate button. The grill operates at a fixed temperature. Change the height of the grill tray to vary intensity.
Cookers with electric ovens
On cookers with electric ovens, the grill function is selected on the oven function selector knob or by a separate button that can be pressed to switch on the grill.
Selected the temperature of the grill using the temperature selection control knob. Preheat the grill for 3 minutes prior to introducing the food.
Never leave the kitchen when grilling as the cooking is fast and needs to be monitored. There is an overide sensor that shuts the grill off in the event of a flare up during cooking.
Selecting the right baking dish
Black baking dishes transfer heat differently to silver baking dishes. If you are burning the underside of cakes and biscuits try changing the color of baking tray to silver.
ELECTRIC OVEN FUNCTIONS
Multifunction Electric Oven
1. Remove the grill tray.
2. Choose a function using the selector knob for oven functions. Turn the knob to the symbol of the cooking function you wish to use. On some models, the ovens only operate as fan forced and the function is automatically selected when selecting the temperature.
3. Rotate the thermostat knob to the desired temperature.
4. Wait until the thermostat indicator light goes off – this indicates that the oven has reached temperature and introduces the food to be cooked.
Selecting the best oven function
All ovens operate differently and trial and error is part of gaining full familiarity with any new oven. Fan forced is great heat up function and very good when cooking on multiple shelves. The classic bake which applies heat from the top and bottom of the oven works well when cooking on a single level.
Oven Light : The oven light illuminates the oven cavity enabling the user to visually monitor the cooking process.
Fan Forced : A circular element around the fan. The air is forced through the element for rapid heat distribution. In some cooking tasks the food may need to be rotated.
Classic Baking : The heat comes from two elements. An element is above an element is under the floor of the oven. A good function for pizza and cooking on single shelves.
Bottom Heat : Heat from the bottom element and distributed by a fan. Too slow for initial heat up but a great function for browning the bases of pizzas, pies and pastries.
Double grill with fan - some models : The grill element produces radiant heat to the top of the food and the fan distributes the heat. Ideal for thicker cuts of meat. Preheat for 3 minutes.
Double grill : Traditional grilling of sausages, chops, cheese toasties. All grilling is done with the door closed for maximum efficiency and to keep cooking odors out of the kitchen.
Grill : The single grill element produces radiant heat over a smaller area so that smaller amounts of food can be prepared without wasting energy.
Defrost : The oven fan operates moving the air in the oven cavity. This reduces the amount of time it takes to defrost food compared to leaving the food at room temperature.
Thermostat Indicator light
The thermostat pilot light switches on and off during cooking to show that the heating cycles are taking place properly. For Static and fan-forced modes, the oven must always be preheated.
Try to open the oven door as little as possible as opening the door lowers the temperature and affects the thermostat cycles. When cooking on different shelves simultaneously, put all containers in the center of the shelves.
USE OF TIMERS
Type 1 Electronic timer
Setting the clock
When the oven is first connected, or after a power failure, ‘0.00’ will flash on the display. To set the clock, push thebutton, then the (+) or (–) buttons. The time of day will be set after 10 seconds.
Changing the volume of the beep
The (–) button can also be used to change the volume of the beep. Set the timer for one minute. When the beep sounds use the (–) button to adjust the volume.
Using the timer
The timer can be set for a maximum period of 99 minutes and a minimum of 10 seconds. To set the timer, push the (+) or (-) button until you have set the required time. When the timer is operating the symbol will show. When the set time has elapsed, the timer will beep. It doesn’t switch off the oven. Push the button to switch off.
Type 2 Electronic Timer
Setting the clock
When the oven is first connected, or after a power failure, ‘0.00’ will flash on the display. To set the clock, push the set button, then the (+) or (–) buttons. The time of day will be set after 10 seconds.
Changing the volume of the beep
The (–) button can also be used to change the volume of the beep. Set the timer for one minute. When the beep sounds use the (–) button to adjust the volume.
Using the timer
The timer can be set for a maximum period of 99 minutes and a minimum of 10 seconds. To set the timer, push the (+) or (-) button until you have set the required time. When the timer is operating the symbol will show. When the set time has elapsed, the timer will beep. It doesn’t switch off the oven. Push the SET button to switch off.
Mechanical Timer - minute minder
Some models have a mechanical timer. Rotate the dial right to the end to load the machine and then back to the time in minutes you want to set. A bell will ring at the end of the time period. It does not switch off the oven.
AIR FRYER BASKET
A standard inclusion with some models is a stainless steel air fryer basket. The basket uses the movement of hot air in the oven to distribute even heat around the food being cooked. Select fan forced function on the electric oven and use the oven fan on gas ovens.
The air fryer basket cooks any frozen food such as oven fries or fish fillets really well. Cook following the normal directions on the packet. Rather than turning the food while cooking just give the basket a shake. Tip the chips into a bowl for salting.
Use the middle shelf and place the grill tray on the shelf below to catch crumbs
OVEN OPERATION NOTES.
The cooking information provided is intended purely as a guideline. Modify them to suit you experience, eating habits and personal taste.
The times indicated in the table do not include preheating of the oven, which is always recommended. The times and temperature indicated refer to average quantities of food - meats = 1/1.5kg; dough for confectionary, pizza, bread = 0.5/0.8kg.
Information in brackets with regards to shelves indicates the shelf to use when cooking several dishes together. All ovens are different and experimentation and use of the various cooking functions will determine the most effective way to use the oven to suit your cooking style. When cooking on different shelves simultaneously put all containers in the center of the shelves.
Baking troubleshooting
Problem
Cause
Solution
Cooking Unevenly
Wrong location in oven
Wrong size tray
Heat variations in oven
Place food in the center of the oven.
Try alternatives
Rotate food during cooking
Burning on Top
Oven not preheated
Oversized baking tins
Food too close to the top of the oven
Wait for oven to reach temperature first
Use correct-sized tins
Place in the center of the oven
Burning on Bottom
Temperature is set too high
Baking tins to large or dark in color
Food too low in the oven
Oven door being opened too often
If there is also smoke/soot present then the wrong injectors may be fitted
Reduce the temperature setting
Use correct sized silver color tins
correct-sizedOn a gas oven try cooking with the grill tray (minus the rack) upside down on the oven floor.
Meat and potatoes not browning
Poor heat distribution on the food
Place the food onto a wire rack in the pan to allow for heat to surround the food
Cakes have a hard split crust and seem over cooked
Temperature set too high
Food positioned too high in the oven
Cake tin is too deep
Cake tin is dark in color
Reduce the cooking temperature
Cook on a lower shelf height
Change to a correct size tin
Change to a silver colour tin
Cakes sunk in middle and seem under cooked
Temperature set too low
Baking time too short
Door was opened too early
Increase the temperature
Increase the cooking time
Do not open the door until late in the cycle
DOPPIO OVENS
Doppio Ovens are an Australian innovation where the oven can operate using electricity or gas. It allows the best of both worlds in oven cooking allowing the selection of the best energy source to match the cooking task. Doppio ovens are operated exactly the same way as a normal gas oven or electric oven, with oven controls for gas and for electricity.
Gas is typically a moist heat which is perfect for roasting as it reduces shrinkage and retains moisture in the meat. Electricity, being a drier heat, takes moisture out of the mix and works very well for pastries. Both energy sources do a great job but have different characteristics.
Experimenting by cooking the same dish on time using gas and then repeating using electricity is the best way to learn how to get the most out of a Doppio oven. You will see a difference.
CLEANING AND MAINTENANCE
Do not use strong detergents to clean your cooker. Many detergents or cleaning products will mark stainless steel. Oven cleaners are intended for cleaning the internal liner of the oven only and will possibly damage the inside of the door. Avoid ignitors becoming wet as they are an electrical part. Avoid water falling into the burners and always dry everything carefully before use.
The oven and hob must be kept clean, as a build-up of fat constitutes of a fire risk. A really great idea is to wipe the oven down with something like a baby wipe each time you cook and the oven will rarely need a major cleaning.
1.Cleaning of Stainless Steel:
In order that your cooker retains its new appearance, care should be taken to protect the stainless steel finish. Never use gritty or abrasive sponges. We highly recommend stainless steel cleaners and protectors. Stubborn stains can be removed by soaking in hot water and stains can be prevented by using a clean cloth soaked in warm water before a spillage becomes cold or dries up. Acid materials like milks, vinegar, citrus juice can damage the most resistant surfaces. If a spill occurs wipe it up immediately.
2. Oven Cleaning:
Oven spills should be cleaned straight away. Leaving spills can also cause permanent damage to the enamel and make it extremely hard to remove later. A non-caustic oven cleaner is recommended such as non caustic “Mr. Muscle” to clean the the oven only. Do not use abrasive scourers, sponges or cleaning products. Wipe the oven out regularly while the oven is still warm using hot soapy water and a soft cloth or even a baby wipe. The removal of side shelves supports makes cleaning easier.
3. Gas Burners - All models:
The burners can be removed from the cooker and cleaned in hot soapy water. The burner covers are made of cast iron so as soon as they are cleaned dry burner covers immediately to prevent rusting. Enamelled trivets are also recommended to be cleaned in hot soapy water. Make sure all pieces are completely dry before placing them back onto the cooker.
4. Knobs and Control Panel:
All knobs are removable. Clean behind the knobs and the control panel to prevent grrease and grime build up that can cause jamming of the knobs/gas taps etc. The stainless steel panel should be cleaned with a damp cloth, do not use anything abrasive.
5. Cleaning of Oven Door:
The outer glass should be cleaned with a specific glass and mirror cleaner. Soapy water will work to remove stains and but may leave streaks. Do not use abrasive or aggressive cleaners on aluminium door frame components, if in doubt contact Glem Gas for advice.
6. Removal of Side Shelf Supports - All models:
The sides racks are removed by simply flexing the bottom rail off the support and unhooking at the top. To replace just reverse the procedure.
7.Grill Element/Top Element -
This element must never be sprayed with any detergents. A damp cloth and a bottle brush can be used to clean the roof of the oven and the element itself. Never soak the element and always dry it after cleaning as not doing so can lead to deterioration. It is important to clean this area regularly as fats spit up and stick to the ceiling and element while grilling and they may burn, smoke and give out unpleasant odours.
VENTILATION REQUIREMENTS
A cooker should not be installed in any room which has a volume less than 5.6 cubic metres.
If the room is between 5.6 cubic metres and 11.2 cubic metres in volume, provision must be made for permanent ventilation.
Above 11.2 cubic metres volume, no special provision needs to be made unless other gas burning appliances are installed in the same room. Ventilation must always be provided if a cooker is installed in a cellar or a basement. The manufacturer does not accept damage caused directly or indirectly by failure to comply with the above.
DIMENSION DETAILS
1. Location of gas inlet
Bottom rear of upright cooker:
60 mm from right-hand side
400 mm from the bottom of the cooker plus the height of the legs.
2. Electrical connection
Connection is by means of flexible cord and plug. Check the data plate - models with electrical consumption greater than 2400W will require a 15 amp connection.
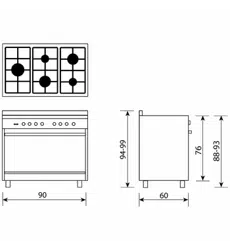
3. Overall dimensions of cooker
Depth over cabinet 600 mm - all models
Height over cooktop is either 760 mm or 750 mm (check model)
Height over splashback is either 810 mm or 820 mm (check model)
4. Width of cooker models:
534 series width 530 mm
664 series width 598 mm
765 series width 698 mm
865 series width 798 mm
965 series width 898 mm
Height of legs must be added to overall cooker dimensions
Height adjustable legs add up to 160 mm on 60, 70, 80 and 90 cm cookers.
Height adjustable legs add up to 150 mm on 53 cm cookers.
The adjustable legs are screwed into the base of the cabinet and the height adjustment is achieved by rotating the lower portion of the legs clockwise or anti-clockwise as appropriate.
REFER TO RELEVANT PAGE IN THIS MANUAL FOR INSTALLATION OF ANTI-TILT BRACKETS
CONVERSION TO OPERATE ON ULPG (LPG)
This must be done by a licensed Gas Fitter. COMPULSORY REQUIREMENT
Included with the cooker is a conversion kit for converting the cooker to operate on ULPG (LPG in Aust.). The kit consists of replacement injectors for all burners, including oven burners for gas models. The kit also includes a test point for checking gas pressure and a replacement label identifying the type of gas the cooker is connected to.
There is no gas regulator requirement for ULPG installations as the gas pressure of 2.75 Kpa is regulated at the bottle.
A 7 mm socket is needed to remove and replace the injectors. The data plate in this instruction manual identifies the injector size for each burner.
Each burner must be run on the minimum flame setting and adjusted accordingly to ensure that the minimum flame is not extinguished by air drafts.
REMEMBER TO CHANGE THE OVEN INJECTOR ON GAS OVEN COOKERS.
If the flame is yellow and leaves black marks on pots and in the oven then the conversion has not been done correctly. THIS WILL VOID THE WARRANTY.
ALL CONVERSIONS TO ULPG MUST BE CARRIED OUT BY A LICENSED GAS FITTER. GLEM GAS WARRANTY SERVICE WILL NOT BE MADE ON INCORRECTLY CONVERTED APPLIANCES.
GAS CHECKS AND ADJUSTMENTS - LOW FLAME SETTING
Check the low flame setting for each hob burner and the oven burner with the control engaged in the minimum position.
Cooktop Burner -
Turn the control until it engages in the minimum position and remove the control knob. Insert a screwdriver in the adjusting screw (located to the side of the gascock shaft). To increase the flame, turn the adjusting screw anticlockwise. To decrease the flame, turn the adjusting screw clockwise. Adjust for a minimum, stable and clear flame. ENSURE THE MINIMUM FLAME WILL NOT BE EXTINGUISHED BY AIR DRAUGHTS
Oven Burner -
Light the oven burner and operate at maximum for 15 minutes. Turn the control until it engages in the minimum position and remove the control knob. Insert a screwdriver in the adjusting screw (located to the left side of the thermostat shaft). To increase the flame, turn the adjusting screw anticlockwise. To decrease the flame, turn the adjusting screw clockwise. Adjust for a minimum, stable and clear flame.
Ensure the minimum flame will not be extinguished when the oven door is closed
GAS INJECTOR SELECTION TABLE
FINAL CHECK
Operate all cooker burners on high and low flames and check that each burner ignites properly and has a stable flame. The following may be considered to be abnormal:
• If the burners have yellow tipping.
• If the pots are sooting up underneath.
• If the burners are extinguished by opening and closing the oven door.
• If the burners fail to ignite properly.
• If the burners fail to remain alight.
• If the electrodes constantly click when burners are alight.
When satisfied with the operation of the cooker, please explain to the user the correct method of operation. If the cooker fails to operate correctly, contact your local service agent.
Gas checks and adjustments -igniter operation
Check that the igniter for each burner successfully ignites the gas and that the burner remains alight. If an igniter fails to work or a burner fails to remain alight, first remove the plug from the electrical power outlet, and then check that all the electrical connections are in place. If the cooker fails to operate correctly, call Glem Gas or their appointed agent for service. Do not attempt repairs yourself.
Gas checks and adjustments -pressure adjustment
First shut off the gas to the appliance. Remove the sealing screw from the regulator test point at the rear of the cooker and attach the hose from the manometer to the point. Turn the gas back and light the largest burner and smallest burner at the maximum setting. Check the pressure and adjust at the regulator if necessary to the settings in the table or on the data plate. For propane gas adjust at the regulator at the cylinder. Turn regulator adjusting screw clockwise to increase pressure and anti clockwise to reduce pressure. Refit the test point sealing screw when finished.
QUICK REFERENCE FAULT FINDING CHART
GAS COOKTOP
Burner does not stay alight after several attempts
1. Check that the burner is correctly assembled. Sometimes the parts get misaligned and that interrupts correct gas flow.
2. Make sure the gas supply is turned on.
3. Make sure that the burner is dry and clean.
4. Ensure there is nothing blocking the gas inlet on the burner or the slots in the flame spreader.
5. Try to light the burner using a match, this will identify if it is an ignition fault.
Burner will not stay alight
1. Check that the burner is correctly assembled.
2. There is a thermocouple valve on each burner. It is a tapered copper point. If the thermocouple is faulty the flame will not stay alight once you release the control knob. Hold the knob in for a few seconds to make sure that the thermocouple reaches temperature.
The ignitor does not spark
1. While it is not always possible to see the spark there is a clicking sound when the ignitor is operating.
2. Make sure the ignitor is clean and dry (this is the cylindrical white point at the edge of the burner)
3. Make sure that the burner is correctly assembled.
4. Make sure that the electricity is turned on.
5. The flame suddenly looks different
6. This usually means that the burner is not assembled correctly.
Flames are huge, difficult to light and sooty
Cooktop injectors are incorrect and have to be changed to suit the gas type.
GAS OVEN
Oven won’t light
1. Make sure the gas supply is turned on and the knob turned to maximum temperature
2. Make sure the oven door is open
3. Make sure that the electricity is connected and turned on
4. Get the electronic ignition sparking before turning on the gas, this is the best way to encourage the burner to light.
5. Try to light the oven manually to check if the problem is electronic ignition related
Oven won’t stay alight
Once the oven is lit hold the control knob in for 20 seconds to heat the thermocouple which will maintain the flame.
Oven fills with black soot after lighting
The oven injector is incorrect and has not been changed to ULPG specification.
ALL OVENS
Cooling fan operating after cooking
The cooling fan continues to operate even after the cooking cycle has finished. It will stop automatically once the cooker has cooled.


 Oven Light : The oven light illuminates the oven cavity enabling the user to visually monitor the cooking process.
 Fan Forced : A circular element around the fan. The air is forced through the element for rapid heat distribution. In some cooking tasks the food may need to be rotated.
 Classic Baking : The heat comes from two elements. An element is above an element is under the floor of the oven. A good function for pizza and cooking on single shelves.
 Bottom Heat : Heat from the bottom element and distributed by a fan. Too slow for initial heat up but a great function for browning the bases of pizzas, pies and pastries.
 Double grill with fan - some models : The grill element produces radiant heat to the top of the food and the fan distributes the heat. Ideal for thicker cuts of meat. Preheat for 3 minutes.
 Double grill : Traditional grilling of sausages, chops, cheese toasties. All grilling is done with the door closed for maximum efficiency and to keep cooking odors out of the kitchen.
 Grill : The single grill element produces radiant heat over a smaller area so that smaller amounts of food can be prepared without wasting energy.
 Defrost : The oven fan operates moving the air in the oven cavity. This reduces the amount of time it takes to defrost food compared to leaving the food at room temperature.
 button, then the (+) or (–) buttons. The time of day will be set after 10 seconds.