Loading ...
Loading ...
Loading ...
Fiskars Help Line: 1-877-201-3260 videos & more at: skars.com/reelmowers Fiskars Help Line: 1-877-201-3260 videos & more at: skars.com/reelmowers
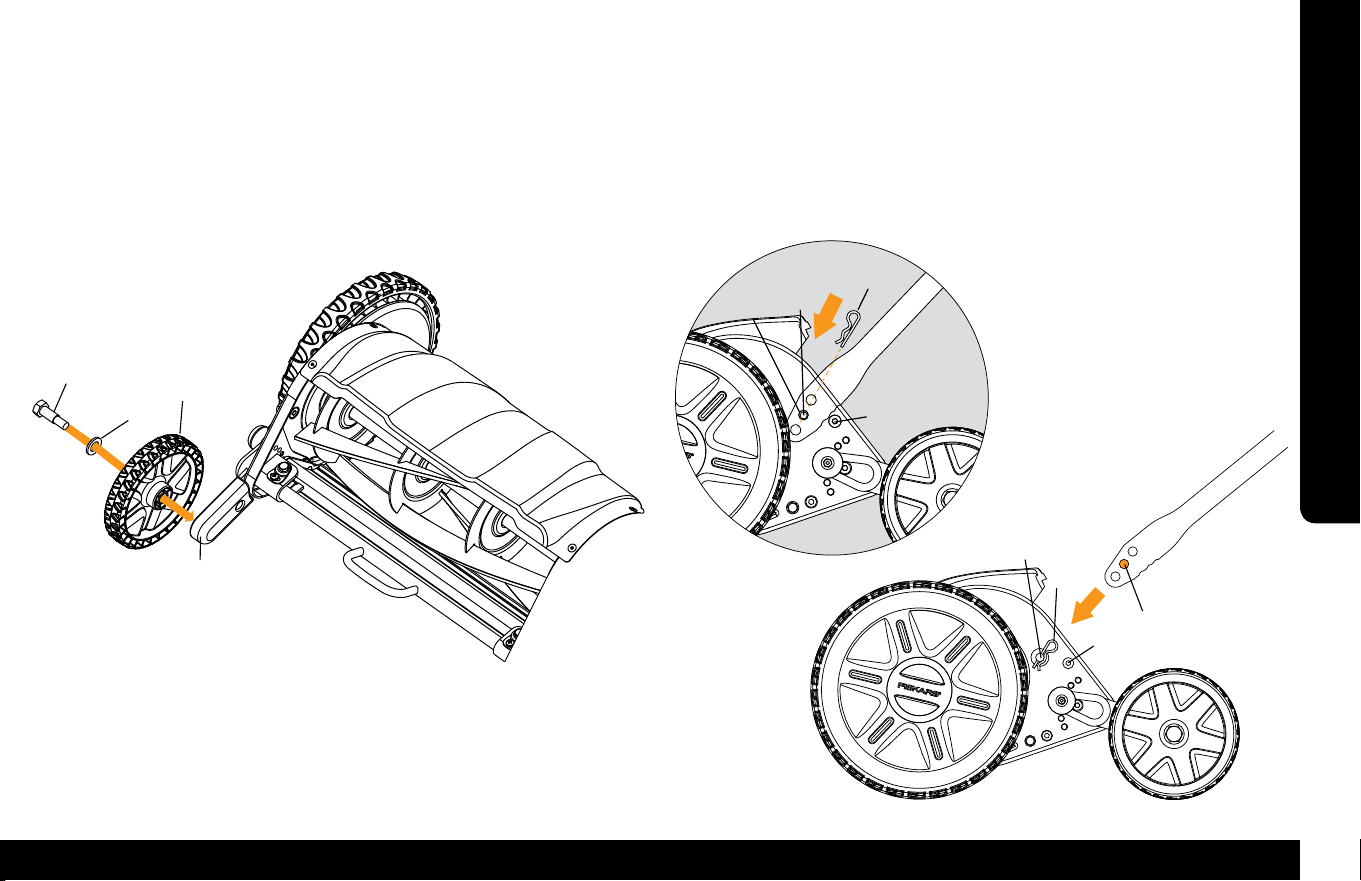
Rear Wheel Assembly
1. Assemble the rear wheel bolt (A) through the rear wheel washer
(B) and insert through the rear wheel (C).
2. Screw the bolt assembly into the swing arm (D) and tighten firmly
using the 18 mm wrench or socket.
3. Repeat for the other rear wheel.
Attaching the Handle
1. Remove the two cotter pins (A) from the handle mount pegs (B).
2. Slide hole number 2 (C) of the handle onto the handle mount pegs (B).
Some force may be needed to separate the handle legs so they fit over
the pegs. Release the handle until it rests on the handle stop peg (D).
3. Insert the cotter pins (A) to secure the handle.
Assembly
Assembly
A
B
C
D
A
B
C
D
6 7
4. Slide handle shroud (E) into place from below with the Fiskars logo facing
down and toward the upper handle section (B).
5. Align holes in handle sections and shroud (E). Slide a handle bolt (F) through
from the inside, so that the end comes through the hole of the handle shroud.
Repeat for the remaining three handle bolts.
6. Align the hex-shaped bolt head with the hex-shaped cutout in the center
handle section (A), then hand-tighten a handle nut (G) onto the bolt.
Repeat for the remaining three handle nuts.
7. Using an 11 mm wrench or socket, tighten the four handle nuts (G) until
they are snug.
Handle Assembly
1. Lay out the handle parts upside down as shown above for easier
assembly. Note the center handle section (A) is symmetrical, so it can
be laid down on either side.
2. Make sure the arch of the upper handle section (B) is facing down.
Then insert the free ends of the upper handle section (B) into the center
handle section (A). Roughly align the holes.
3. Make sure the lower handle sections, (C) and (D), are laid out with the
notches up. Then insert the left lower handle section (marked with “L”) (C)
and the right lower handle section (marked with “R”) (D) into the center
handle section (A) as shown. Roughly align the holes.
The following parts are included in the hardware bag (bagged separately):
Handle Assembly
Handle nuts (4)
Handle bolts (4)
B
A
C
D
1
2
3
Rear Wheel Assembly (next page)
Rear wheels (2)
Rear wheel bolts (2)
Rear wheel washers (2)
Tools required for assembly:
The only tools required for assembly are
11 mm and 18 mm wrenches or sockets.
L
R
A
B
C
D
E
(left)
(right)
F
G
Handle Arch
(pointed down)
Loading ...
Loading ...
Loading ...