9.801-642.0 08/18
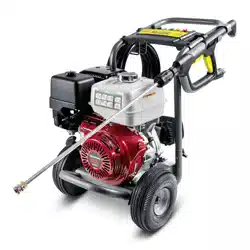
G 4000 OH
Manual Not For Use
in USA and Canada!
Register and win!
www.kaercher.
com

2 English
Model Overview 4
Important Safety Instructions 5
Assembly Instructions 6
Operating Instructions 8
Using the Accessories 9
Working With Detergents 10
Taking a Break 10
Shutting Down & Clean-Up 11
Long Term Storage 11
Maintenance Instructions 11
Cleaning Tips 12
Troubleshooting 13
Specications
HIGH PRESSURE WASHER OPERATOR MANUAL
G 4000 OH Servo Press
Operating Pressure 4000 PSI
Water Volume 13.6 LPM
Detergent Suction 0.5 - 0.75 LPM
Engine Honda GX 390
Part No. 1.194-801.0
Serial No.
Dear Customer,
Please read and comply with these
original instructions prior to the initial opera-
tion of yout appliance and store them for later
use of subsequent owners.
Proper Use
This high-pressure cleaner is designed for
domestic use only:
- To clean machines, vehicles. buildings, tools,
facades, terraces, garden equipment etc. us-
ing a high-pressure water jet (and detergents
if required).
- Whit accessories, replacemente parts and
detergents approved by KÄRCHER. Observe
the instructions provided with these deter-
gents.
Environmental Protection
The packing material can be recycled.
Please do not place the packaging into
the ordinary refuse for disponsal, but arrange
for the proper recycling.
Old appliances contain valuable materi-
als than can be recycled. please arrange
for the proper recycling of old appli-
ances. Please dispose your old appliances
using appropriate collection systems.
Notes About the ingredients (REACH)
You will find current information about the
ingredientents at:
http://www.karcher.de/de/unternehmen/
umweltschutz/REACH.htm
English 3
Call: 1 800 675 714 for help or visit our
website:
www.karcher.com.au
Please take a moment to register your pres-
sure washer online at:
www.karcher.com.au
Call: 0800 5272437 for help or visit our
website: www.karcher.co.nz
Kärcher Customer Support Australia
Kärcher Customer Support
New Zealanda
HIGH PRESSURE WASHER OPERATOR MANUAL
DANGER
Indicates an imminently hazardous situation
which, if not avoided, will result in death or
serious injury.
WARNING
Indicates a potentially hazardous situation
which, if not avoided, could result in death
or injury.
CAUTION
Indicates a potentially hazardous situation
which, if not avoided, may result in minor
or moderate injury or in property damage
incidents.
The owner and/or user must have an un-
derstanding of the manufacturer’s operat-
ing instructions and warnings before using
this pressure washer. Warning information
should be emphasized and understood. If the
operator is not fluent in English, the manu-
facturer’s instructions and warnings shall be
read to and discussed with the operator in
the operator’s native language by the pur-
chaser/owner, making sure that the opera-
tor comprehends its contents. Owner and/
or user must study and maintain for future
reference the manufacturer’s instructions.
Owner/User Responsibility
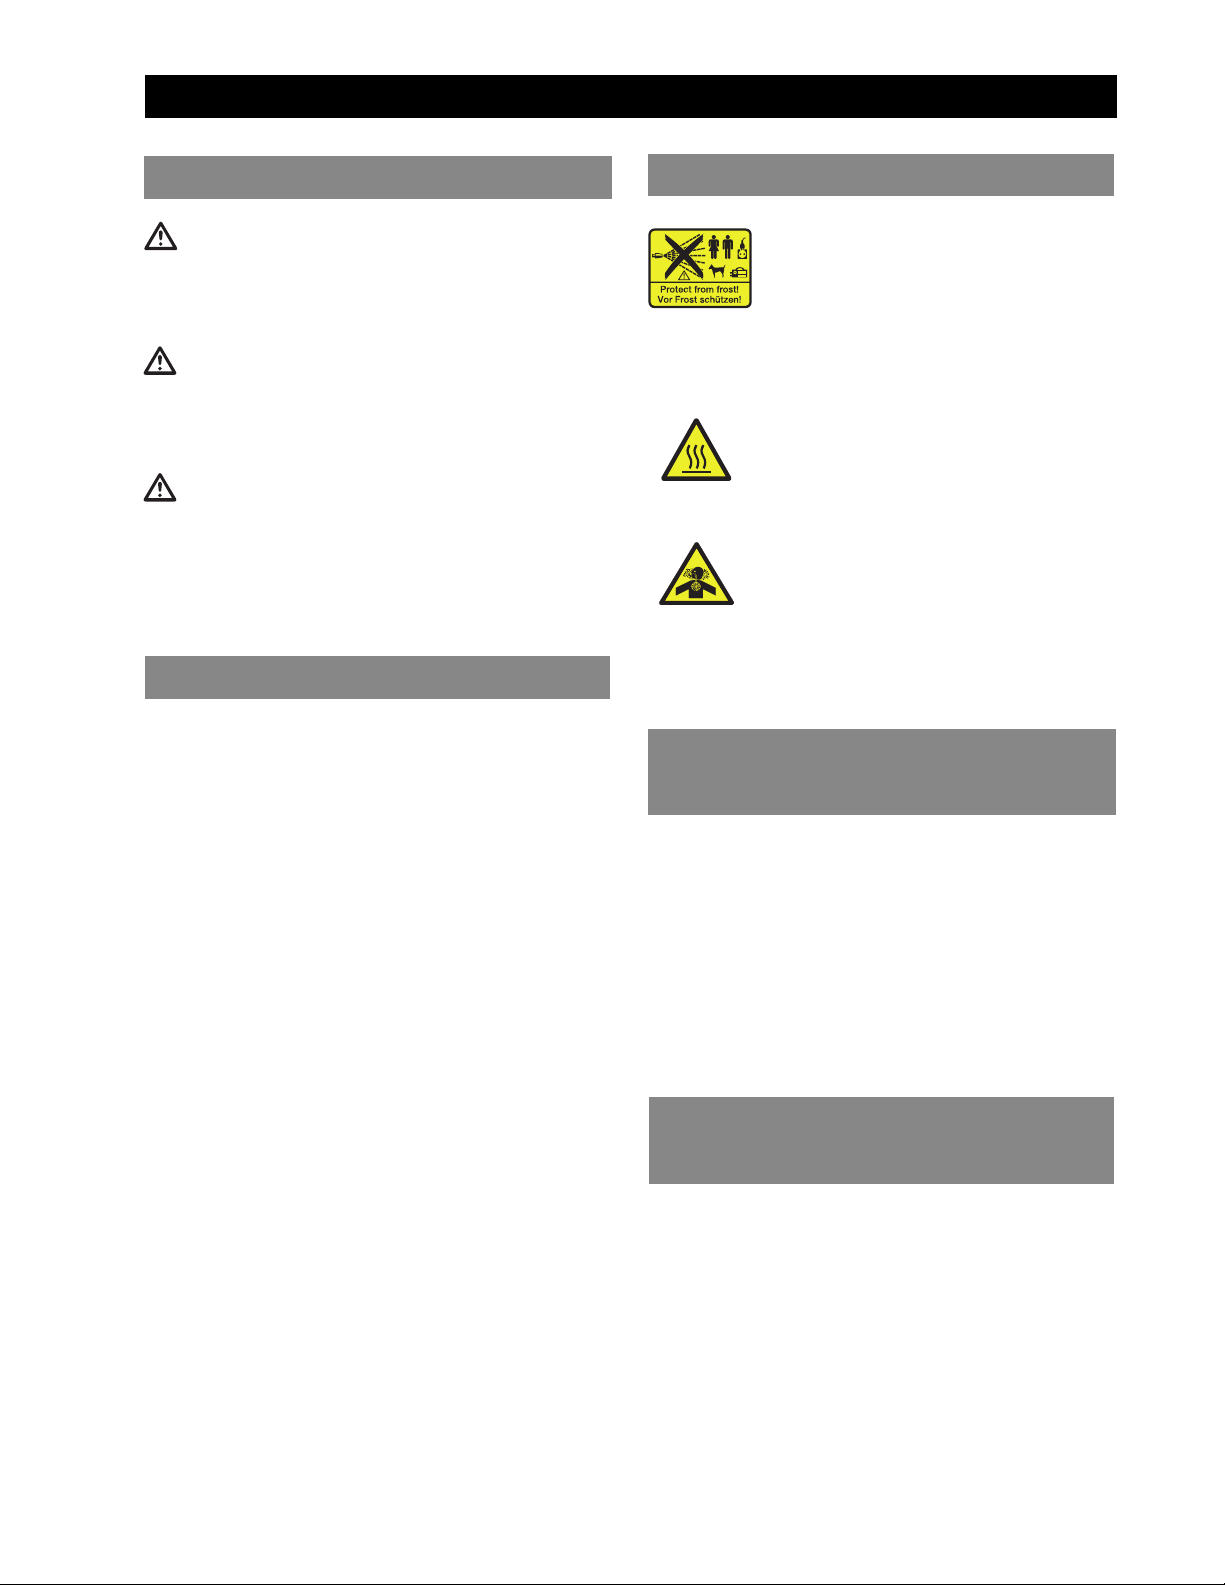
Safety Alert Symbols
The high pressure jet may not
be directed at persons, animals,
live electrical equipment or at the
appliance against frost.
Risk of Burns on Account of hot
surfaces!
Risk of Poisoning! Do not Breathe
in the exhaust fumes.
Symbols on the machine
4 English
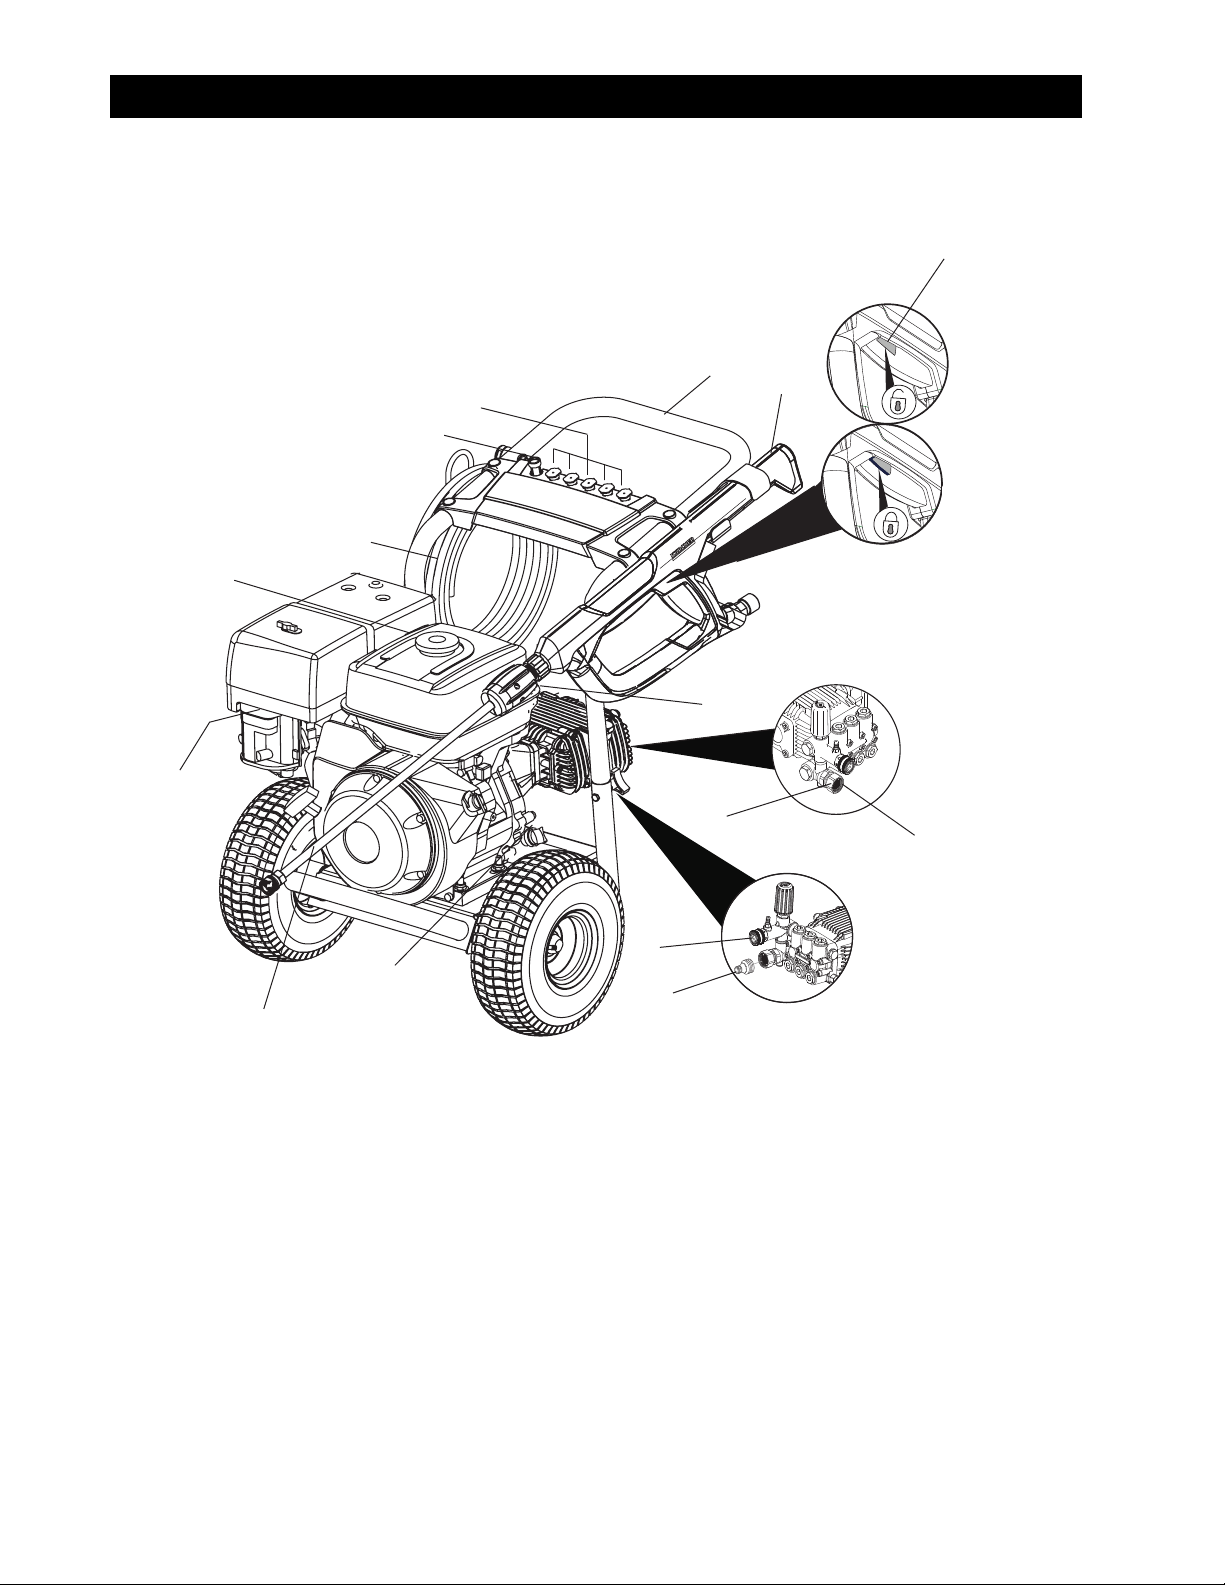
1 Handle
2 Trigger gun
3 Trigger gun safety lock
4 High pressure hose
5 Gas tank
6 Spray wand
7 Dipstick
8 Water inlet with garden hose connector
MODEL OVERVIEW
5
4
10
11
9
15
7
8
13
14
2
1
3
12
6
9 High pressure outlet
10 Detergent suction tube with filter
11 Quick connect nozzles
12 Spark plug
13 Water inlet filter
14 Remote Pressure Control
15 Tap Adaptor
For engine details see engine manual.
English 5
n Read the operating instructions of the
engine manufacturer before start-up and
follow the safety instructions carefully.
WARNING
When using this product, basic precau-
tions should always be followed, includ-
ing the following:
nRead all instructions before using product.
n To reduce the risk of injury, close supervi-
sion is necessary when a product is used
near children.
n Know how to stop the product and bleed
pressures quickly. Be thoroughly familiar
with the controls.
n Stay alert – watch what you are doing.
n Do not operate when fatigued or under the
influence of alcohol or drugs.
n Keep operating area clear of all persons.
n Do not overreach or stand on unstable
support. Keep good footing and balance
at all times.
n Wear safety goggles and ear protection.
n Follow the maintenance instructions speci-
fied in the manual.
n To avoid risks, all repairs and replacement
of spare parts should only be carried out
by trained personnel.
n When inflating tires, set your air compres-
sor’s max setting to 25 psi to avoid over
inflation.
n Tire pressure should not exceed max. 25
psi.
WARNING
Risk of Injection or Injury – Do Not Direct
Discharge Stream At Persons.
n High pressure jets can be
dangerous if misused. The jet
must not be directed at persons, animals,
electrical devices, or the unit itself.
DANGER
Do not spray electrical connections, elec-
trical outlets or fixtures.
WARNING
Risk Of Explosion –Do not spray flam-
mable liquids. Operate only where open
flame or torch is permitted.
n Do not use acids, solvents, or any alka-
line or flammable material in this product.
These products can cause physical inju-
ries to the operator and irreversible dam-
age to the machine.
WARNING
Gun Kicks Back – Hold with both hands.
nThe Trigger Gun Safety Lock prevents the
trigger from accidentally being engaged.
This safety feature must be engaged when
replacing nozzles or not in use.
WARNING
The engine exhaust from this product
contains chemicals known to the State of
California to cause cancer, birth defects
or other reproductive harm. Operation of
this equipment may create sparks that
can start fires around dry vegetation. A
spark arrestor may be required. Operator
should contact local fire agencies for laws
or regulations.
CAUTION
Risk of Asphyxiation – Use this product
only in a well ventilated area.
n Operate and fuel machine in a well ven-
tilated area, free of devices featuring an
open pilot or flame such as boilers, water
heaters, etc.
CAUTION
Risk of Fire – Do not add fuel when the
product is operating or still hot.
CAUTION
Risk of fire - Do not put container with flam-
mables products into the nozzle holder.
n Do not operate if fuel has been spilled. In-
stead, move machine to different location
and avoid creating sparks.
n This machine has hot surfaces which can
cause burns. Operate in a safe environ-
ment and away from children.
n Do not touch hot surfaces or allow acces-
sories to contact hot surfaces.
IMPORTANT SAFETY INSTRUCTIONS
6 English
CAUTION
When connecting to water sup-
ply mains, local regulations of
your municipal water company
must be observed. In some areas connect-
ing directly to public drinking water supply
may require a backflow prevention device.
This is to ensure that there is no feedback
of chemicals into the water supply. Use a
suitable system separator manufactured
by KÄRCHER; or, as an alternative, a sys-
tem separator as per EN 12729 Type BA,
Water flowing throught a system separator
is considered non-drinkable.
n Garden hose must be at least 16mm
diameter.
nFlow rate of water supply must not fall
below 15 L/Min. (Liters per minute)
n Flow rate can be determined by running
the water for one minute into an empty 19
L container.
nThe water supply temperature must not
exceed 104°F/40°C.
n Never use the pressure washer to draw
in water contaminated with solvents, e.g.
paint thinners, gasoline, oil, etc.
n Always prevent debris from being drawn
into the unit by using a clean water source.
Use additional water filter.
n Do not operate pressure washer without
the water turned on.
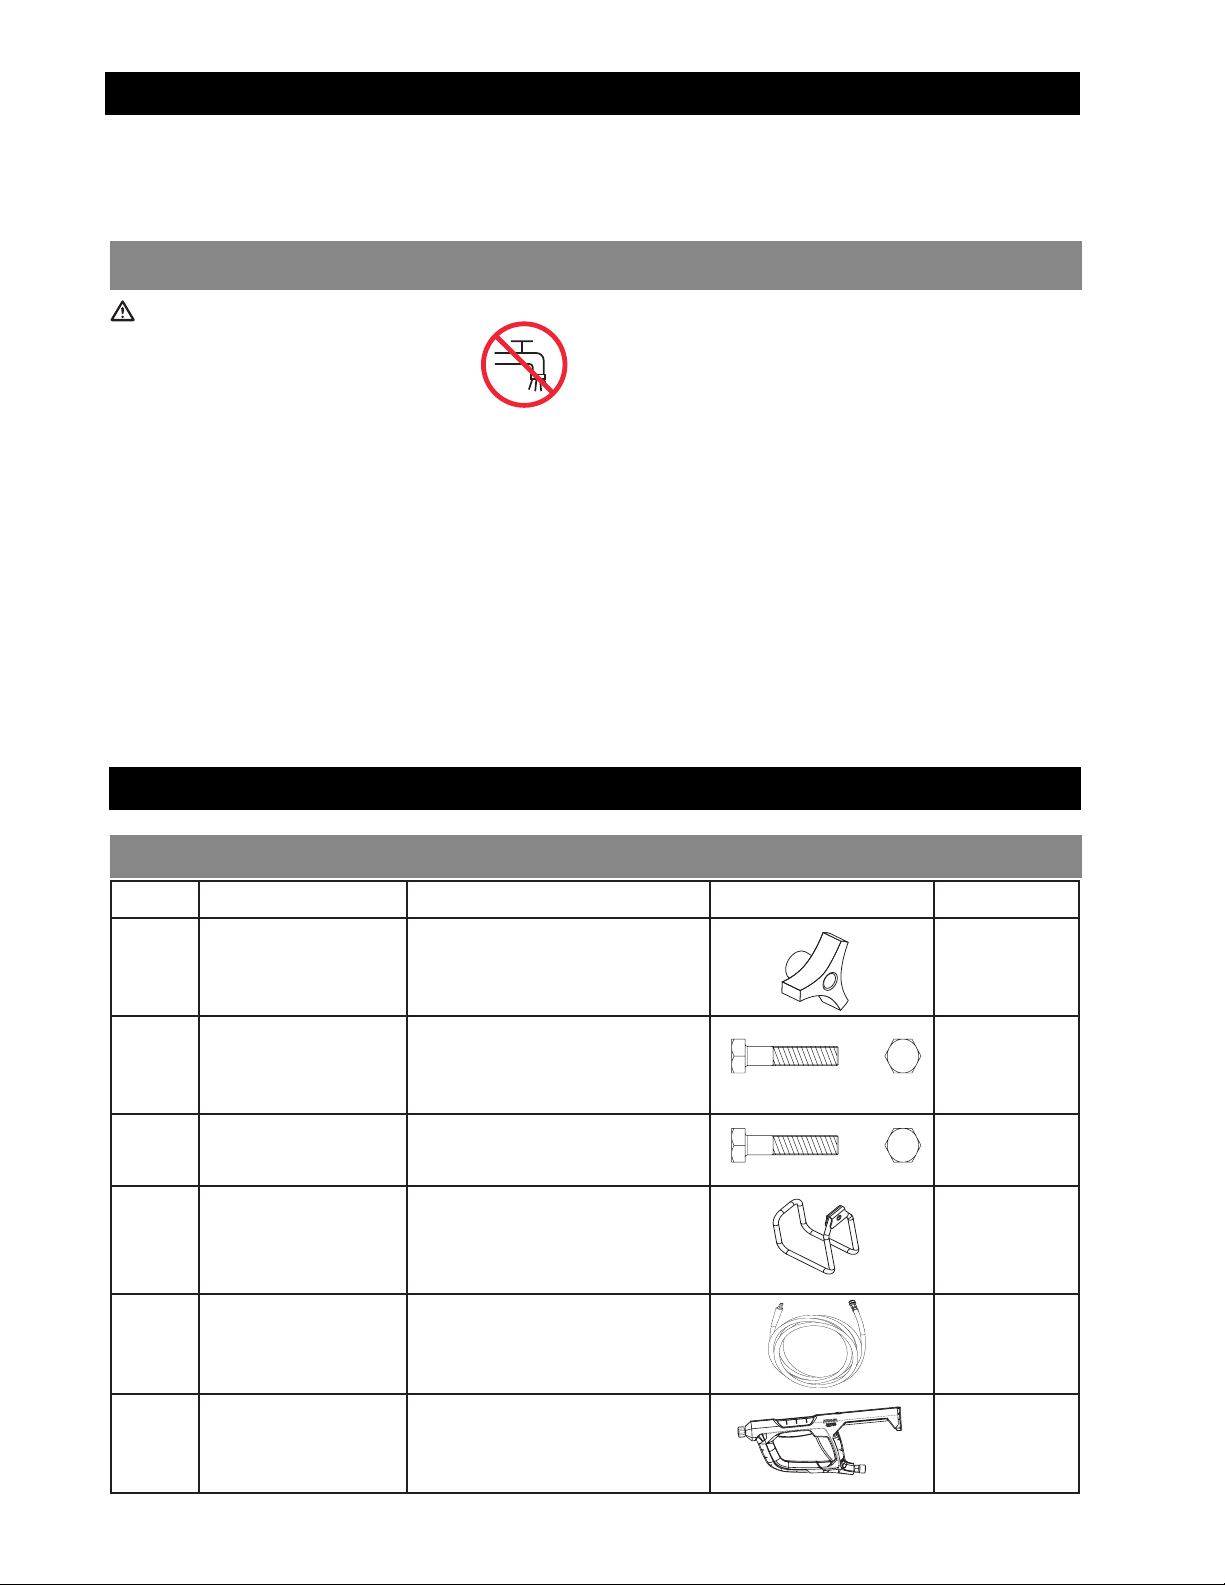
Hardware (included)
ASSEMBLY INSTRUCTIONS
WATER SUPPLY (Cold Water Only)
IMPORTANT SAFETY INSTRUCTIONS
n Do not leave machine running unattended.
n Avoid tipping machine on its side.
SAVE THESE INSTRUCTIONS
Description Purpose Illustration Qty
A
Knob Joint Assembly 2
B
5/16" X 1 3/4
Bolt
Joint Assembly 2
C
5/16" X 2" Bolt Hose Holder Assembly 1
D
Hose Holder Hose Holder Assembly 1
E
High Pressure
Hose
Spray Gun Assembly 1
F
Spray Gun Spray Gun Assembly 1
English 7
STEP 2:
Place the quick connect nozzles in the
nozzle holder.
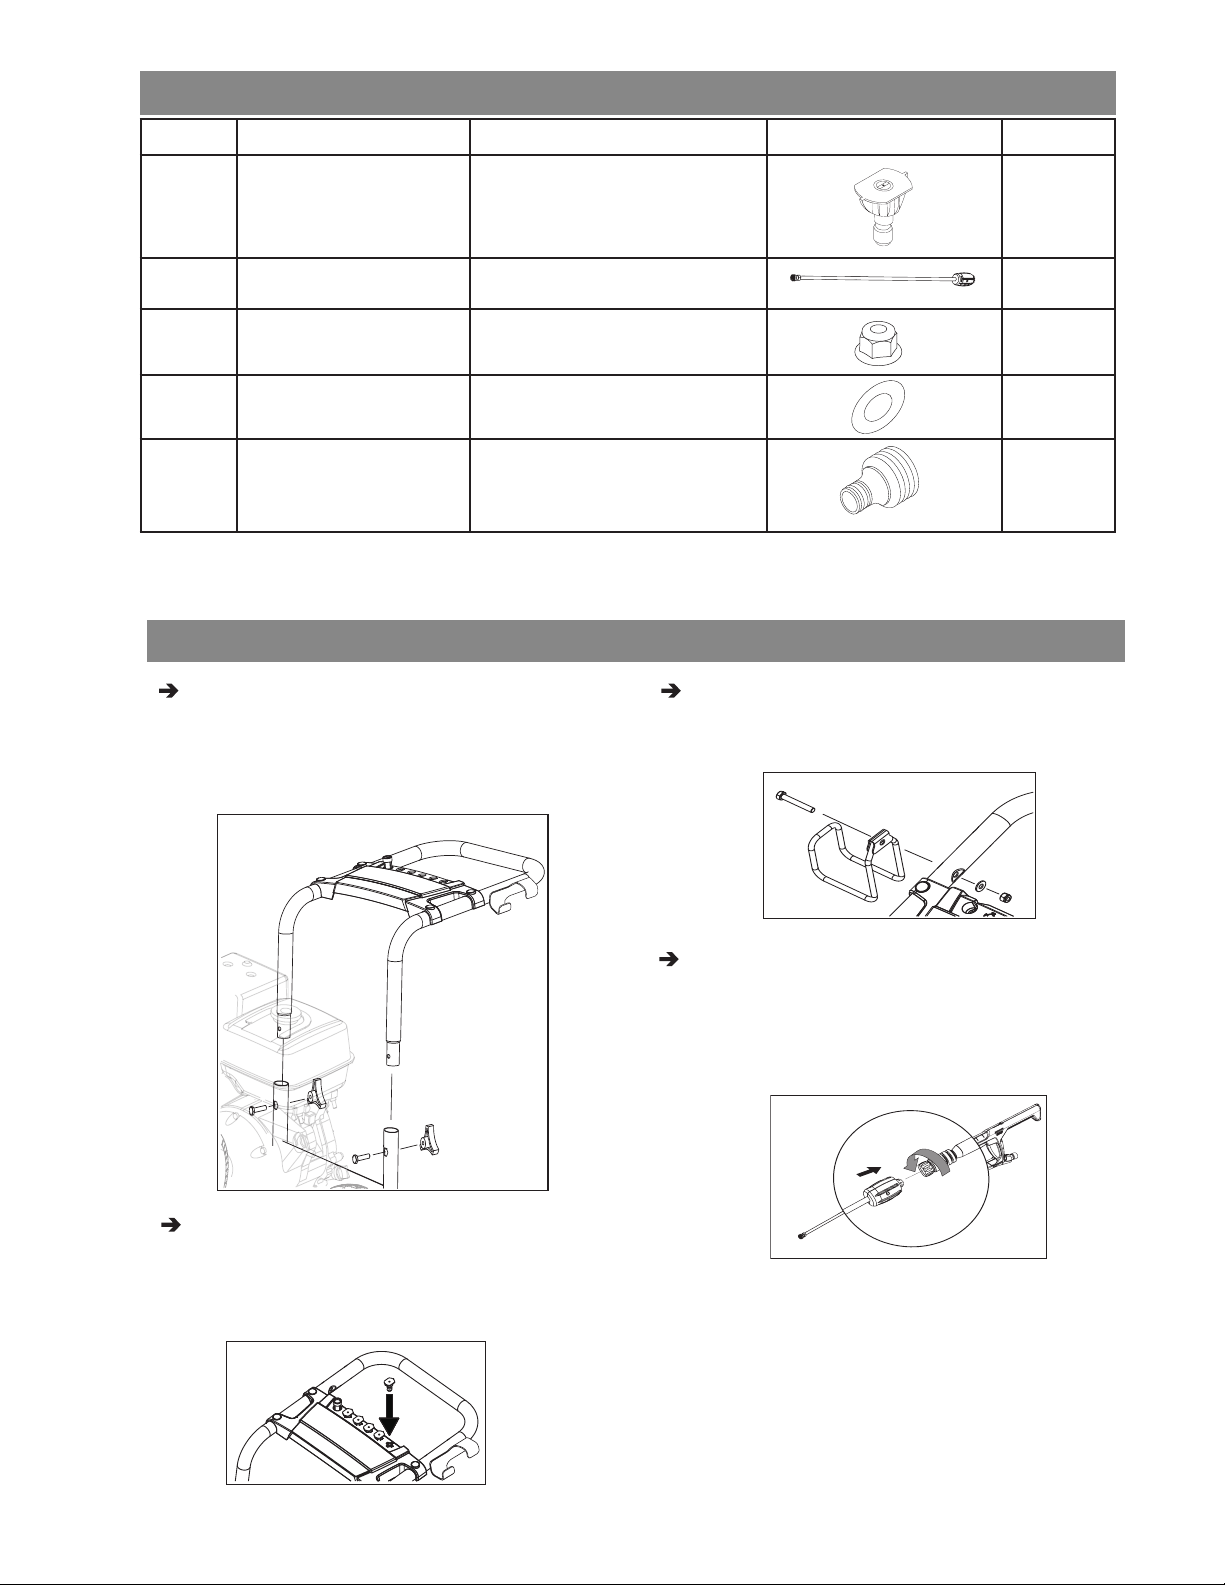
Hardware (included)
Assembling
STEP 1:
Attach the handle to the frame of the
pressure washer. Align holes, insert
bolts, and tighten with knobs.
STEP 3:
Mount the hose holder to the handle and
tighten with nut and washer.
STEP 4:
Attach the wand to the spray gun.
Push the wand into the trigger gun and
then thread the connection.
Description Purpose Illustration Qty
E
Quick Connect
Nozzle Kit
Nozzles Kit
Assembly
1
H
Wand Wand Assembly 1
I
Nut Hose Holder Assembly 1
J
Washer Hose Holder Assembly 1
K
Tap Adaptor Quick Connection 1
8 English
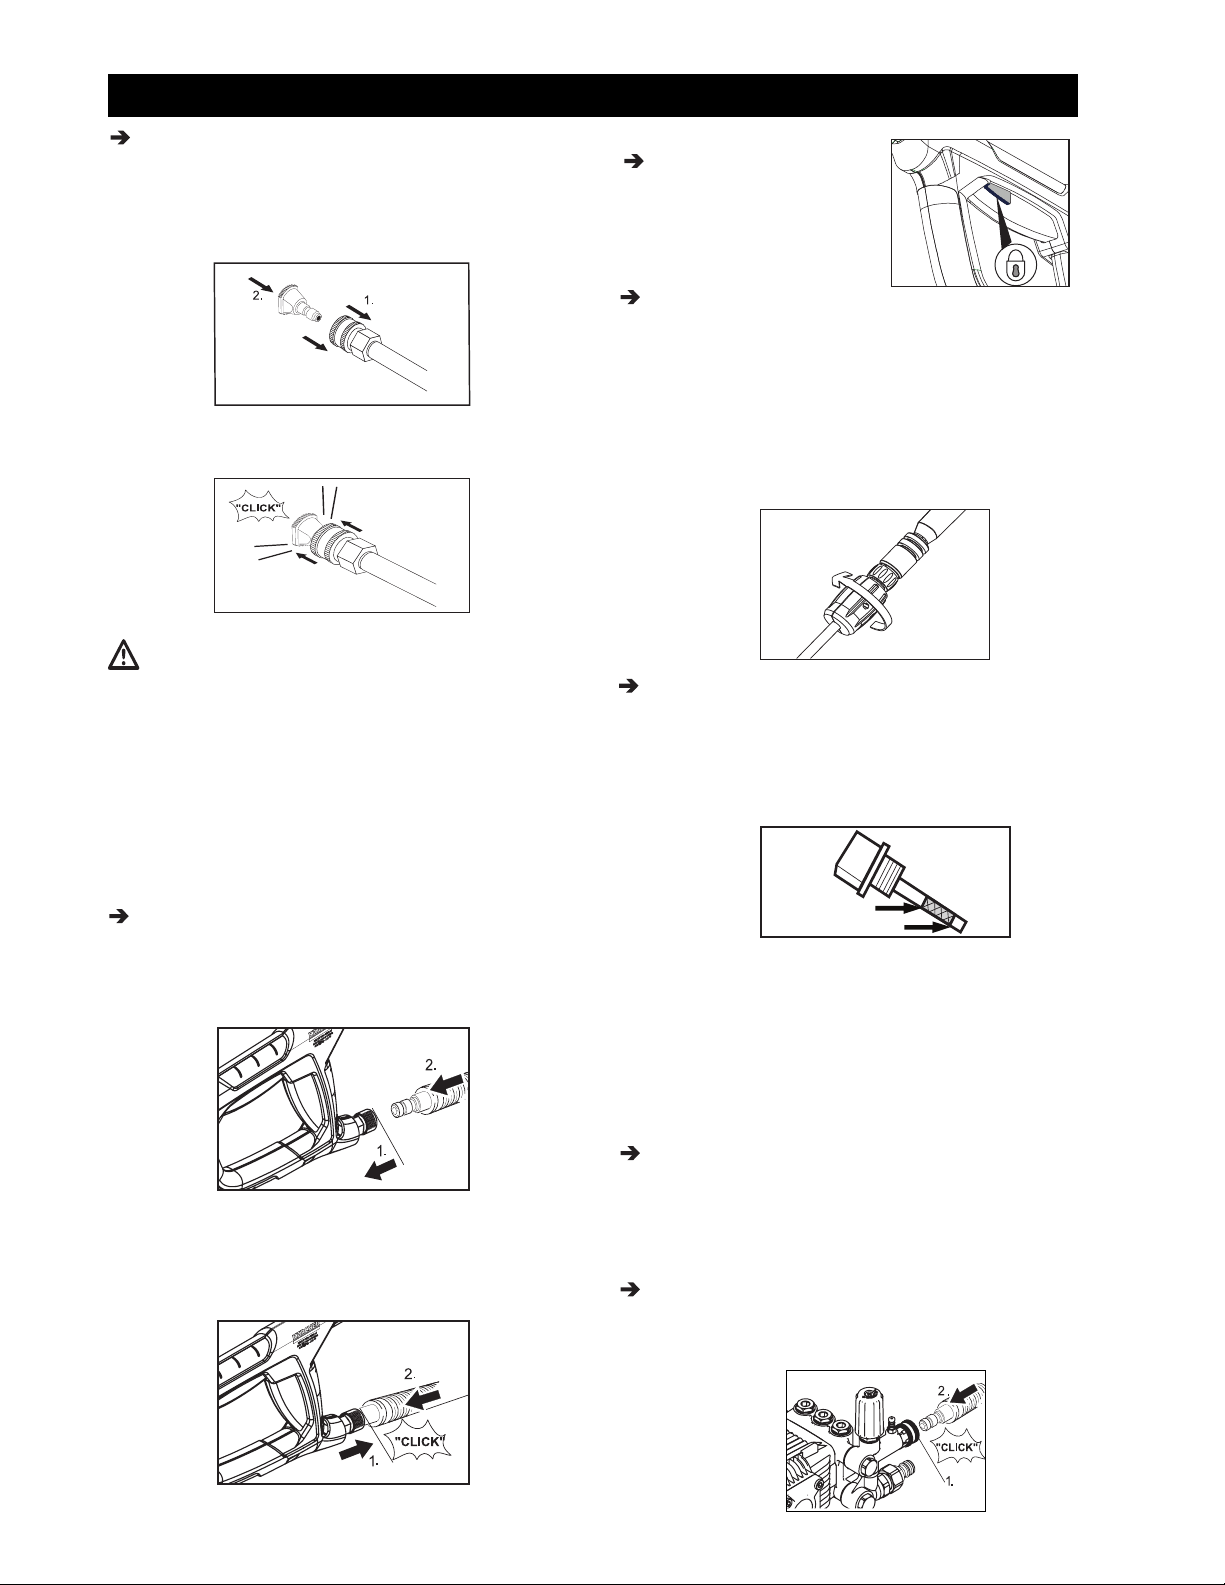
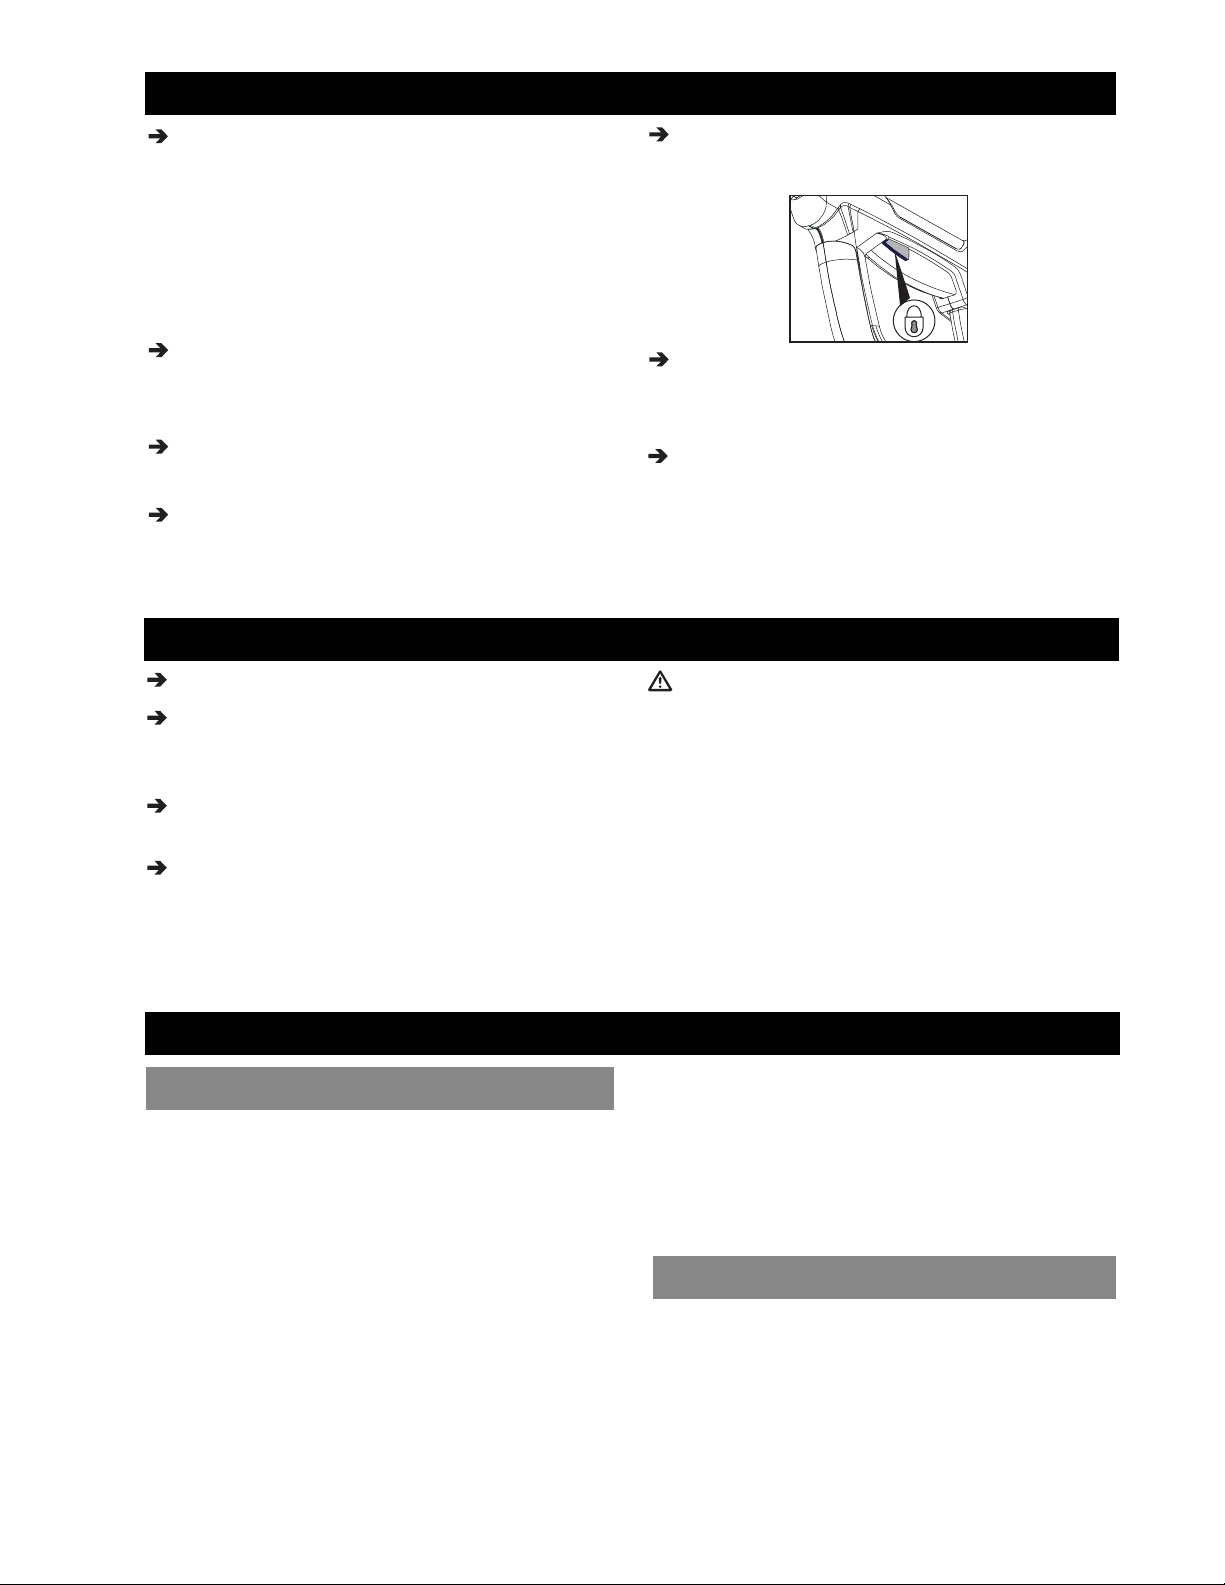
STEP 3:
Lock the safety lock.
STEP 4:
Adjust working pressure and water vol-
ume by turning the Remote Pressure
Control either direction.
Always return the control to the high-
est setting before shutting the pressure
washer off.
STEP 5:
Check oil level. Oil level should always be
between the "FULL" and "ADD" or "MAX"
and "MIN" marks on the dipstick as shown
in the picture below.
Be sure the machine is level when check-
ing the oil level. (Refer to the engines
operating manual for seasonal grades).
We recommend that the oil be changed
after the first 5 hours of use, then once
every 50 hours.
STEP 6:
Fill gas tank with unleaded gasoline.
Do not use leaded gasoline.
Do not add oil to the gasoline.
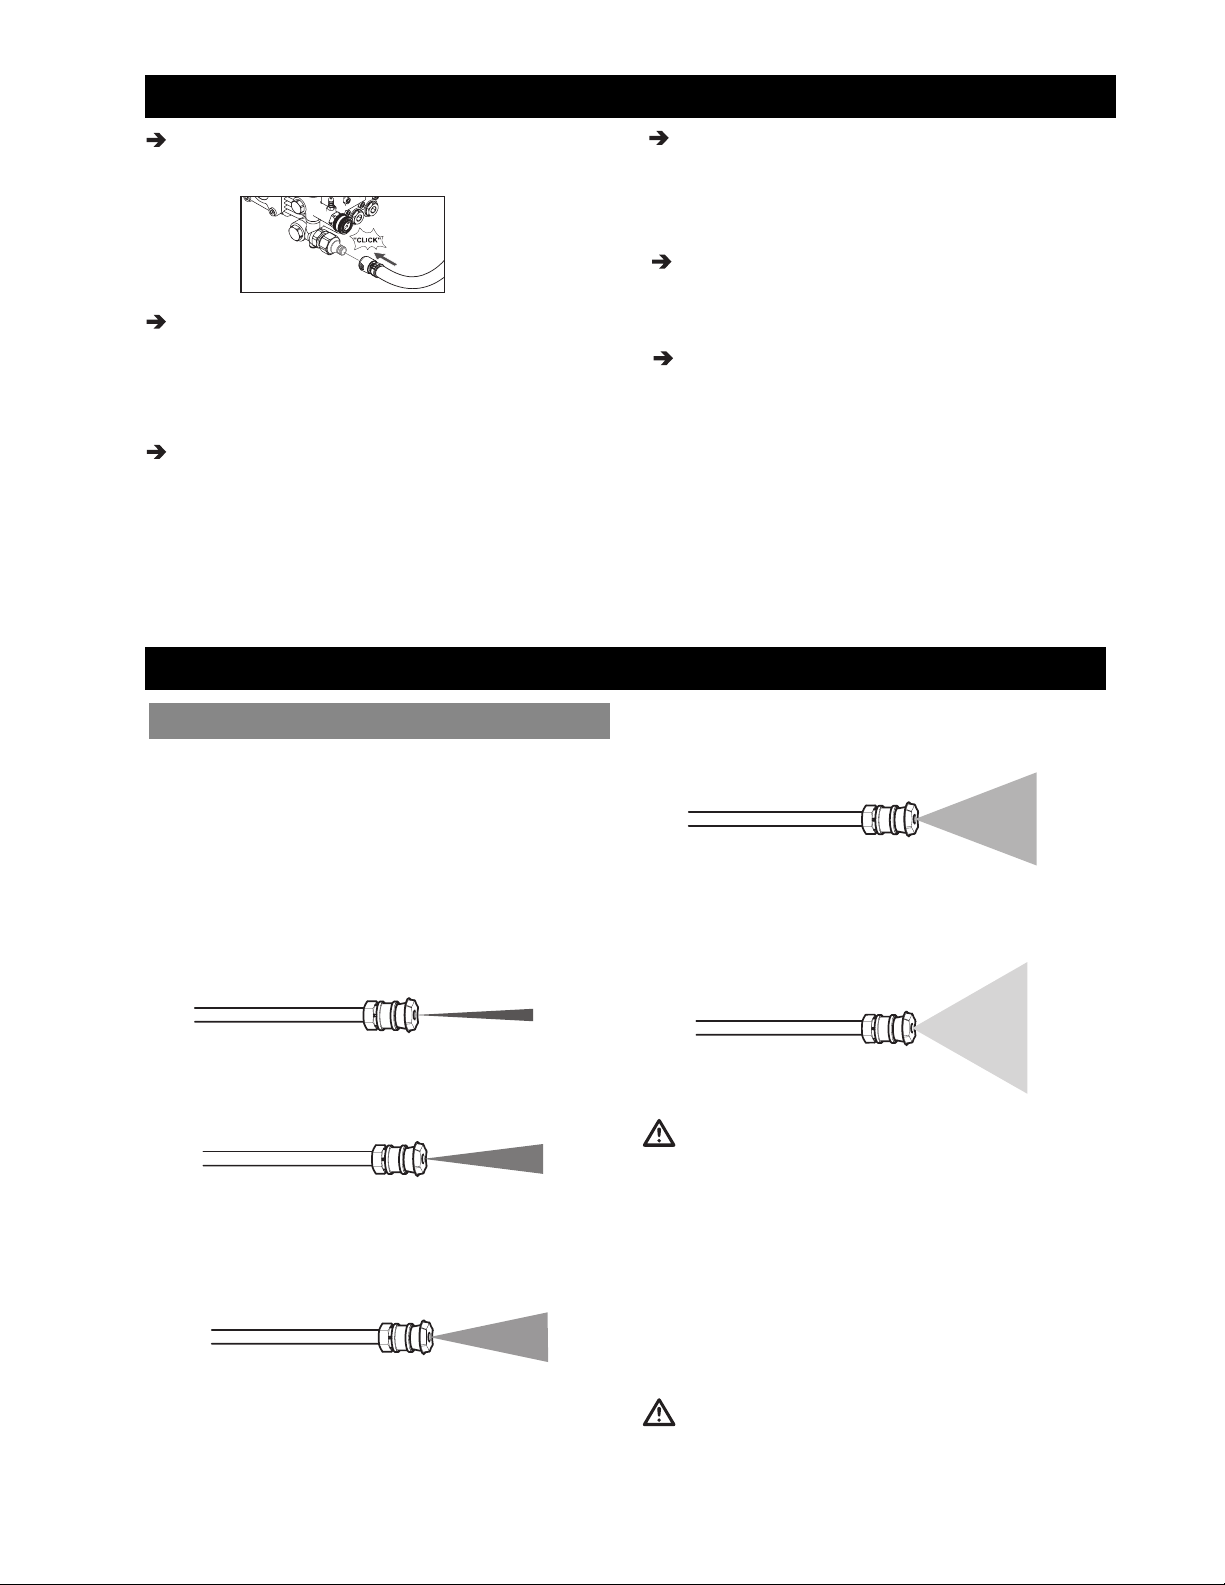
STEP 7:
Connect the high pressure hose to the
high pressure outlet on the pump.
FULL / MAX
ADD / MIN
OPERATING INSTRUCTIONS
STEP 1:
Pull the spring-loaded collar of the wand
back to insert your choice of quick connect
nozzle.
Release the collar and push the nozzle
until the collar clicks.
CAUTION
High pressure in nozzle area.
Risk of injury caused by improperly locked
nozzle.
n Make sure you hear a "click" when insert-
ing the nozzle tip in to the wand.
n Pull the nozzle to make sure it is seated
properly before operating your unit.
STEP 2:
Pull back the spring loaded collar at the
spray gun and insert the high pressure
hose.
Release the collar and push the nozzle
until the collar clicks.
English 9
STEP 8:
Connect garden hose to unit`s water inlet.
STEP 9:
Connect garden hose to the cold water
source and turn water completely on.
Do not use hot water.
STEP 10:
Unlock the trigger gun safety lock. Trigger
the gun to eliminate trapped air, wait for a
steady flow of water to emerge from the
spray nozzle.
OPERATING INSTRUCTIONS
USING THE ACCESSORIES
CAUTION
High pressure in nozzle area. Risk of injury
caused by improperly locked nozzle.
n Make sure you hear the "click" when in-
serting the nozzle tip into the quick con-
nection.
n Pull the nozzle to make sure it is seated
properly before operating your unit. (See
OPERATING INSTRUCTIONS: Step 1)
WARNING
To avoid serious injury never point spray
nozzle at yourself, other persons or ani-
mals.
The color-coded quick connect nozzles pro-
vide a wide array of spray widths from 0° to
65° and are easily accessible when placed
in the convenient nozzle holder.
0° spray angle = Red nozzle
For particularly stubborn accumulation of
grime. Not recommended for soft materials
like sidings, decks, painted surfaces, cars.
25° spray angle = Green nozzle
For dirt accumulation over a large surface.
15° spray angle = Yellow nozzle
For dirt accumulation over a surface.
65° spray angle = Black nozzle
For operating with detergents or cleaning
with low pressure.
40° spray angle = White nozzle
For moderate dirt accumulation over a large
surface.
Quick connect nozzles
STEP 11:
Open fuel valve. Pull the choke rod to the
ON position (on a warm engine, leave the
choke rod in the OFF position).
STEP 12:
Move the engine stop switch to the ON
position.
STEP 13:
Pull the starter handle. If the engine fails
to start after 3 pulls, squeeze the trigger
gun to release pressure, and repeat step.
After the engine warms up enough to run
smoothly move choke rod to OFF position.
For engine details see engine manual.
10 English
Detergents can only be applied with the
black detergent nozzle.
STEP 1:
Install the black detergent nozzle for de-
tergent application at low pressure.
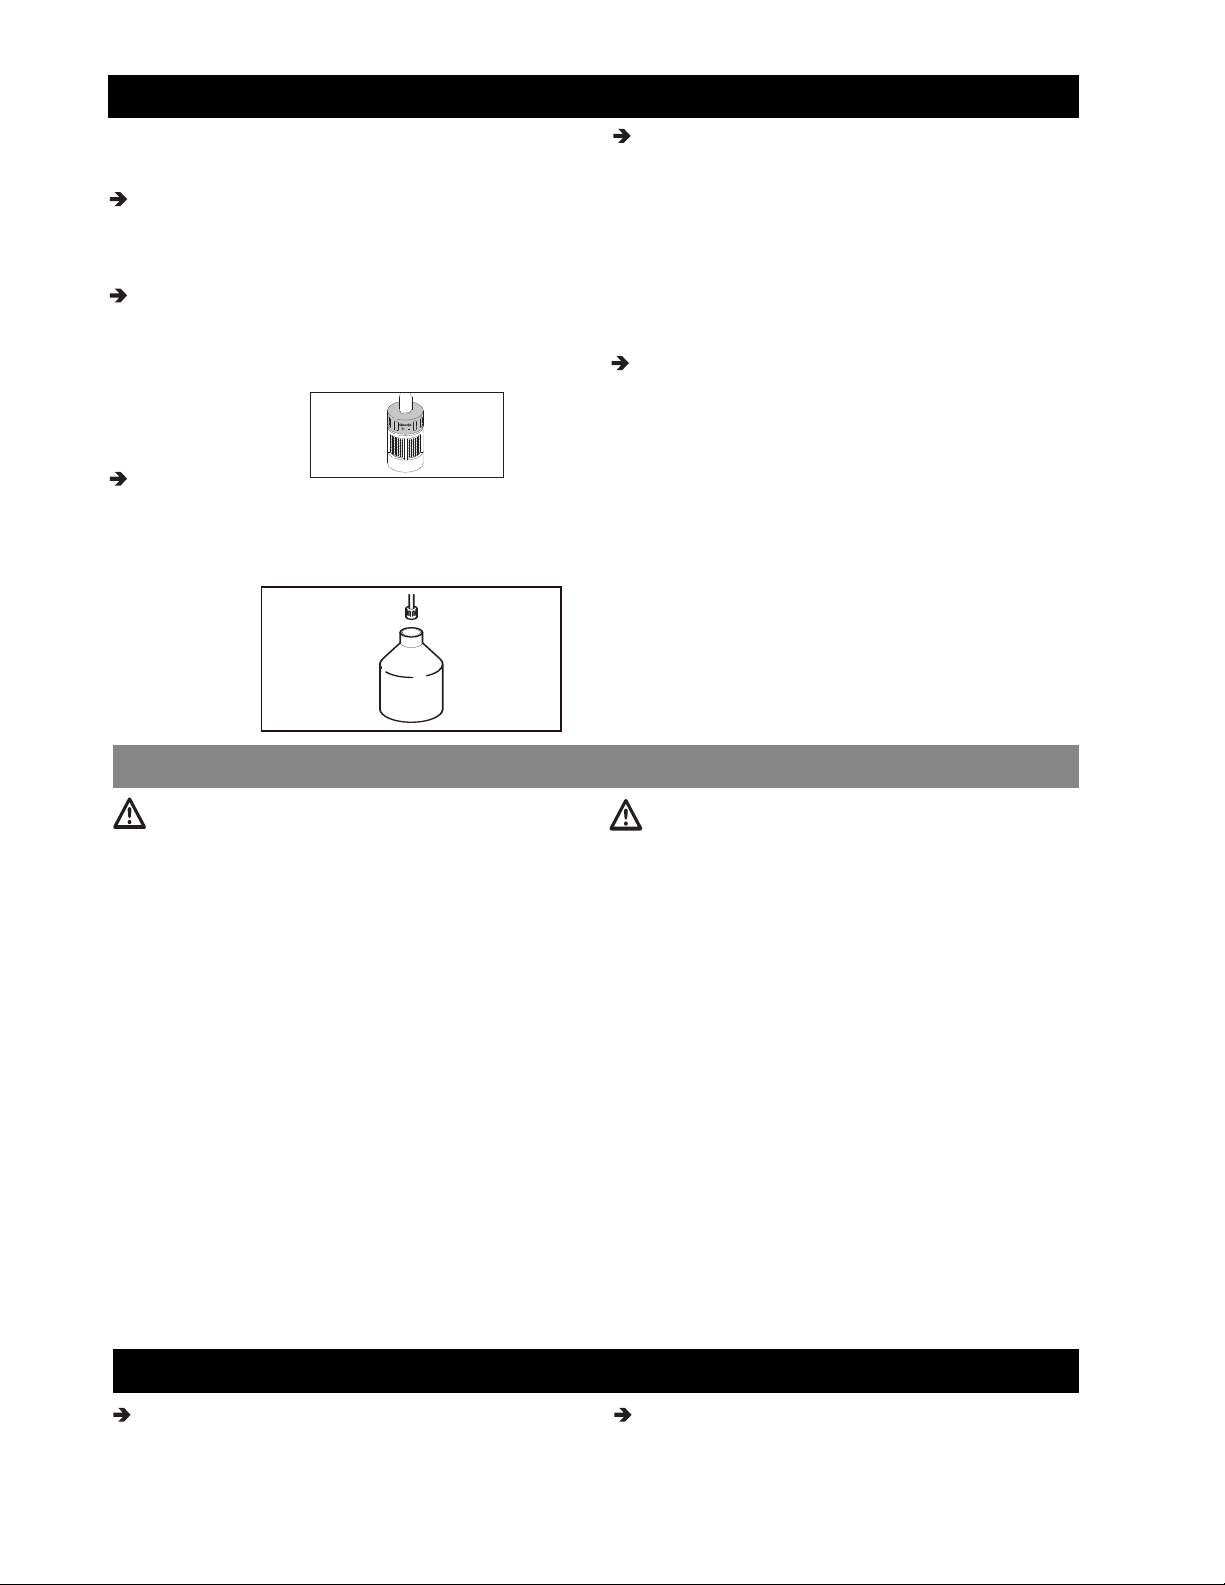
STEP 2:
Adjust the filter end of the detergent
tube for light (- / 0.5 lpm), or maximum
(+ / 0.75 lpm)
STEP 3:
Fill a container with Kärcher detergent.
Place the filter end of detergent suction
tube into the container.
STEP 1:
Move the engine stop switch to the OFF
position.
STEP 2:
Release trigger and engage safety lock.
For engine details see engine manual.
Detergents
TAKING A BREAK ...five minutes or more
WORKING WITH DETERGENTS
CAUTION
This unit has been designed for use with
cleaning detergents recommended by the
manufacturer.
The use of other cleaning detergent may af-
fect the operation of the machine and void
the warranty.
Always Use Kärcher Detergent for Best
Results
Kärcher biodegradable detergents are spe-
cially formulated to protect the environment
and your pressure washer. The special for-
mula won`t clog the suction tube filter and
will protect the internal parts of the pressure
washer for a longer life. For Kärcher Deter-
gents, check your retailer or visit our website:
www.karcher.com.au
www.karcher.co.nz
CAUTION
Never use:
– Bleach, chlorine products or other cor-
rosive chemicals
– Liquids containing solvents (i.e., paint
thinners, gasoline, oils.)
– Tri-sodium phosphate products
– Ammonia products
– Acid-based products
These chemicals will harm the unit and will
damage the surface being cleaned.
Use of these items will void the warranty.
STEP 4
With the engine running, pull trigger to
operate unit.
Liquid detergent is drawn into the unit and
mixed with water.
Apply detergent to work area.
Do not allow detergent to dry on surface.
STEP 5:
Always draw fresh water through the
detergent suction tube when the cleaning
job is done, to rinse/flush any remaining
detergents from the injection system.
For best results see Cleaning Tips for
specic information on how to clean dif-
ferent surfaces.
English 11
STEP 6:
Disconnect the garden hose from the water
inlet on the unit.
STEP 7:
Disconnect the high pressure hose from
the high pressure outlet. Store the high
pressure hose in the hose holder assem-
bly.
STEP 1:
If detergents have been used, remove
detergent suction tube from container and
insert into 3.78 liters of fresh water.
Siphon water at low pressure for one
minute to clear the line of residual deter-
gent.
STEP 2:
Move the engine stop switch to the OFF
position. Close the fuel valve.
STEP 3:
Turn off the water source.
STEP 4:
Press trigger to release water pressure.
STEP 5:
Release trigger and engage gun safety
lock.
SHUTTING DOWN & CLEAN-UP
Initial Use
All Kärcher pumps ship with oil already inside
direct from the factory. There is no need to
add oil.
Pump Inspection
You should routinely make a visual inspec-
tion of the pressure washer’s pump. If you
notice oil leaking around the pump seals, you
should take the pressure washer to a Kärcher-
Authorized Service Center for repair. (You can
locate a service center in your area online at:
www.karcher.com.au &
www.karcher.co.nz).
Pump Maintenance
The pump on your Kärcher pressure washer
does not require maintenance. Any attempts
to service or alter the pump may damage
your pressure washer and void your product
warranty.
Carry out maintenance tasks for the engine
according to the specifications provided in
the operating instructions provided by engine
manufacturer.
Kärcher pump
Engine
MAINTENANCE INSTRUCTIONS
1: Disconnect all water connections.
2: Turn on the machine for a few seconds,
until the water which had remained in the
pump exits, turn off immediately.
3: Do not allow high pressure hose to
become kinked.
4: Store the machine and accessories
in a room which does not reach freezing
temperatures. DO NOT store near furnace
or other sources of heat as it may dry the
pump seals.
CAUTION
Failure to follow the above directions will
result in damage to the pump assembly
and accessories and will void the warranty.
It is highly recommended to use Kärcher's
Pump Guard (part number 9.558-998.0)
before winter storage and during the
cleaning season to protect the pump from
freezing and premature wear.
LONG TERM STORAGE

12 English
CLEANING TIPS
(with or without detergent). Pre-rinse deck
and surrounding area with fresh water. If us-
ing Kärcher Deck Wash, apply to surface at
low pressure. For best results, limit your work
area to smaller sections of approximately
2.35 square meters. Allow Deck Wash to
remain on surface 1-3 minutes. Do not allow
detergent to dry on surface. Rinse at high
pressure in a long sweeping motion keeping
the spray nozzle approximately 8 - 15 cm from
the cleaning surface. Always clean from top
to bottom and from left to right. When moving
on to a new section of the cleaning surface,
be sure to overlap the previous section to
eliminate stop marks and ensure a more even
cleaning result.
Deck Cleaning
Barbecue Grills, Outdoor Power Equip-
ment & Gardening Tools
(with or without detergent). Pre-rinse
cleaning surface with fresh water. If using
Kärcher Pressure Wash or Degreaser, apply
to surface at low pressure. For best results,
limit your work area to smaller sections of
approximately 2.35 square meters. Allow
Pressure Wash or Degreaser to remain on
surface 1-3 minutes. Do not allow detergent
to dry on surface. Rinse at high pressure in
a sweeping motion keeping the spray nozzle
approximately 8 - 15 cm from the cleaning
surface. Always clean from top to bottom
and from left to right. For removing extremely
stubborn stains, use a DirtBlaster® Spray
Nozzle (sold separately).
(with or without detergent). Pre-rinse ve-
hicle with fresh water. If using Kärcher Touch-
less Vehicle Wash, apply to surface at low
pressure. For best results, clean one side of
vehicle at a time and always apply detergent
from bottom to top, do not allow detergent to
dry on surface. If needed, use special wash
brush attachment (not included) to remove
stubborn dirt. Rinse at high pressure in a
sweeping motion keeping the spray nozzle
approximately 15 - 20 cm from the cleaning
surface (distance should increase when rins-
ing pin-striping or other sensitive surfaces).
Always clean from top to bottom and from left
to right. For best results, wipe surface dry with
a chamois or soft dry cloth.
(with or without detergent). Pre-rinse
cleaning surface with fresh water. If using
Kärcher Pressure Wash or Degreaser, apply
detergent at low pressure. Allow Pressure
Wash to remain on surface 1-3 minutes. Do
not allow detergent to dry on surface. Rinse
at high pressure keeping the spray nozzle
approximately 8 - 15 cm from the cleaning
surface. For removing extremely stubborn
dirt, it may be necessary to move the spray
nozzle even closer to the surface for greater
dirt cutting action.
Cement Patios, Brick and Stone
Cars, Boats & Motorcycles
(with or without detergent). Pre-rinse furni-
ture and surrounding area with fresh water. If
using Pressure Wash, apply to surface at low
pressure. Allow Pressure Wash to remain on
surface 1-3 minutes. Do not allow detergent
to dry on surface. If needed use special Wash
Brush Attachment (not included) to remove
stubborn dirt. Rinse at high pressure in a
sweeping motion keeping the spray nozzle
approximately 8 - 15 cm from the cleaning
surface. For best results, clean from top to
bottom and from left to right.
Patio & Lawn Furniture
(with or without detergent). Pre-rinse clean-
ing surface with fresh water. If using Kärcher
Pressure Wash, apply to surface at low pres-
sure (for best results, limit your work area to
sections of approximately 15 cm and always
apply detergent from bottom to top). Allow
detergent to remain on surface 1-3 minutes.
Do not allow detergent to dry on surface, if
surface appears to be drying, simply wet down
surface with fresh water. If needed, use spe-
cial wash brush attachment (not included) to
remove stubborn dirt. Rinse at high pressure
from top to bottom in an even sweeping mo-
tion keeping the spray nozzle approximately
15 cm from the cleaning surface.
House Siding
English 13
n Before cleaning any surface an incon-
spicuous area should be cleaned to test
spray pattern and distance for maximum
cleaning results.
n If painted surfaces are peeling or
chipping,use extreme caution as pres-
sure washer may remove the loose paint
from the surface.
n When using on surfaces which might
come in contact with food, flush surfaces
with plenty of drinking water.
n For additional cleaning tips, visit our
website at:
www.karcher.com.au
www.karcher.co.nz
Recommendations
CLEANING TIPS
Optional accessories are available to further
enhance your cleaning capabilities. These
accessories are accurate as of the printing
date of this manual. Please check our website:
www.karcher.com.au
www.karcher.co.nz
for up-to-date information.
– Extension Hose
– DirtBlaster® Spray
– Universal Wash Brush Kit
Optional Accessories
CAUTION
Remove the spark plug cable to prevent accidental ignition of the engine before making any
repair.
TROUBLESHOOTING
Symptom Cause Solution
ENGINE
WILL NOT
START
No gasoline Fill gas tank
Choke is not in the correct
position
Slide choke lever out to closed position
Water pressure built up in
the machine
Squeeze the trigger to release the pressure
For additional engine problems refer to the engine manual.
UNIT DOES
NOT REACH
HIGH PRES-
SURE
Diameter of garden hose is
too small
Replace with a 16 mm or larger garden
hose
Water supply is restricted Check garden hose for kinks, leaks and
blockage
Not enough inlet water sup-
ply
Turn water on full force. Check garden hose
for kinks, leaks or blockage.
Water inlet filter is clogged Remove filter and rinse out in warm water
Black detergent nozzle is
attached
Remove black detergent nozzle and attach
high pressure nozzle
OUTPUT
PRESSURE
VARIES
HIGH AND
LOW
Not enough inlet water sup-
ply.
Turn water on full force. Check garden hose
for kinks, leaks or blockage
Pump is sucking air Check that hoses and fittings are air tight.
Turn off machine and purge pump by
squeezing trigger gun until a steady flow of
water emerges through the nozzle
Water inlet filter is clogged Remove filter and rinse out in warm water

14 English
Symptom
Cause Solution
OUTPUT PRES-
SURE
VARIES HIGH
AND LOW
Spray nozzle is obstructed Blow out or remove debris with a fine
needle
Calcified gun, hose or spray
wand
Run distilled vinegar through detergent
suction tube.
NO DETER-
GENT
Detergent suction tube not
properly connected to the
machine
Check connection
Detergent is too thick Dilute detergent, for best results use
Kärcher detergent
Filter on detergent suction
tube is clogged
Run warm water through filter to remove
debris
Damaged or clogged deter-
gent suction tube
Remove obstruction or replace deter-
gent suction tube
A high pressure nozzle is
attached
Replace with black detergent nozzle
Spray nozzle is obstructed Blow out or remove debris with fine
needle
GARDEN HOSE
CONNECTION
LEAKS
Loose fittings Tighten fittings
Missing/worn rubber washer Insert new washer
SPRAY WAND
LEAKS
Spray wand not properly
attached
Turn the swivel nut of the gun clockwise
until connection is tight
Broken o-ring or plastic
insert
Visit www.karcher-help.com or locate a
service center at: www.karcher.com.au
or www.karcher.co.nz
PUMP IS NOISY
Not enough gas or engine
oil
Check that hoses and fittings are air
tight.
Turn off machine and purge pump by
squeezing trigger gun until a steady flow
of water emerges through the nozzle
WATER LEAKS
FROM PUMP
(UP TO 10
DROPS PER
MINUTE IS PER-
MISSIBLE)
Loose fittings Check fittings
Water seals are damaged
or worn.
Visit www.karcher-help.com or locate a
service center at www.karcher.com.au
or www.karcher.co.nz
Thermal protection device
is activated.
Thermal protection device will auto
reset. Do not run pump for more than 5
minutes without spraying.
OIL DRIP
Oil seals are damaged or
worn
Visit www.karcher-help.com or locate a
service center at :www.karcher.com.au
or www.karcher.co.nz
TROUBLESHOOTING
If the symptom you are experiencing is not listed above, or if the provided solutions do not
solve your issue, please visit our extensive online troubleshooting database at:
www.karcher.com.au or www.karcher.co.nz

English 15
High Pressure Washers
Limited warranty
Cold water gasoline pressure washers
This Kärcher product is warranted by Kärcher to be free of defects in
workmanship and materials under normal use.
Specific warranty applies to:
• Kärcher KPS and KXS series engines are warranted for three (3) years on parts and labor.
• Honda GC series engines are warranted for two (2) years on parts and labor.
• Honda GX series engines are warranted for three (3) years on parts and labor.
• Please reference the Honda Engine Manual for specific warranty instructions.
• Pumps are warranted for two (2) years on parts and labor.
• Frames, handles and detergent tanks, as well as other structural components, carry a
one (1) year parts and labor warranty.
• Standard accessories and attachments are warranted for a ninety (90) day period.
• Any commercial, industrial or rental use of this equipment will reduce the warranty to
ninety (90) days.
The warranty period is calculated from the date of purchase by the end user and covers cost
for replacement parts / equipment and warranty labor performed. In order to verify a warranty
situation, the machine must be evaluated by an Authorized Kärcher Service Center. A copy
of the original purchase receipt or gift receipt from the original retailer must also accompany
the warranty claim. To locate the nearest authorized Kärcher service center, please visit our
website at www.karcher-service.com.
Kärcher's obligation under this warranty shall strictly be limited, at Kärcher's option, either to
replace or repair, through Kärcher direct or through an Authorized Kärcher Service Dealer
without charge during the warranty period any part, which in the opinion of the manufacturer,
shows defect in workmanship or material. Service will be scheduled according to the normal
work flow and business hours at the service center, and availability of replacement parts. All
decisions of Kärcher with regard to this limited warranty shall be final.
This warranty does not cover:
• Merchandise sold as reconditioned, used, demonstration or floor models.
• Merchandise purchased on eBay and other online auction web sites.
• Damage caused by misuse, neglect, accident, abuse, improper handling,freezing, normal
wear and tear or non-compliance with operator's manual.
• Damage caused by water sediment, contaminated water supply or use of chemicals and
detergents not approved by or recommended by Kärcher.
• Damage caused by acts of nature such as floods, fires, earthquakes, lightning strikes, etc.
• Devices or accessories not distributed or approved by Kärcher. Any use of such said
devices or accessories will void implied warranty.
• Repairs made by the end user or any service center not authorized by
• Kärcher. Any such tampering with Kärcher equipment or accessories will void the implied
warranty.
WARRANTY INFORMATION

16 English
INFORMATIONS DE GARANTIE
• Mécanismes ou accessoires non distribués ou approuvés par Kärcher.
• L'utilisation de ces mécanismes ou accessoires annulera la garantie.
• Les réparations effectuées par l'utilisateur ou tout autre centre de service non autorisé
par Kärcher. De plus, toute tentative pour fixer l'équipement ou les accessoires Kärcher,
annulera la garantie en question.
• Tout coût d'expédition par le client au centre de service autorisé de la pièce ou de
l'équipement prétendus défectueux.
Cette garantie s'applique seulement aux pièces et équipement manufacturés par Kärcher.
L'équipement fourni mais non manufacturé par Kärcher (tel que moteurs essences) sont
sujets à des garanties et à un service par les centres de services de ces manufacturiers
selon les termes et les conditions offerts par le fabricant respectif de l'équipement. Kärcher
n'est pas autorisé et n'a aucune responsabilité pour offrir une garantie de service pour de
tels équipements. Cette garantie est non-transférable et s'applique aux produits Kärcher
achetés chez un distributeur autorisé aux États-Unis ou au Canada. Cette garantie vous
donne des droits légaux spécifiques. Vous pouvez avoir d'autres droits qui varient selon le
pays, l'état ou la province.
Veuillez vous enregistrer en ligne à: www.karcher-register.com.
L'enregistrement en ligne est rapide et vous confirme la réception de
ces données par courriel.
Si vous n'avez pas accès à l'internet, s'il vous plaît retourner la carte de garantie incluse
dans le sachet d'accessoires. N'oubliez pas d'apposer le timbreposte première classe. Le
service postal ne peut pas livrer sans le timbreposte.
A
Alfred Kärcher Ges.m.b.H.
Lichtblaustraße 7
1220 Wien
(01) 250 600
FIN
Kärcher OY
Yrittäjäntie 17
01800 Klaukkala
0207 413 600
N
Kärcher AS
Stanseveien 31
0976 Oslo
24 17 77 00
SGP
Karcher Asia Pacific Pte. Ltd.
5 Toh Guan Road East
#01-00 Freight Links
Express Distripark
Singapore 608831
6897-1811
SK
Kärcher Slovakia, s.r.o.
Beniakova 2
94901 Nitra
037 6555 798
TR
Kärcher Servis Ticaret A.S.
9 Eylül Mahallesi
307 Sokak No. 6
Gaziemir / Izmir
(0232) 252-0708
TWN
Karcher Limited
5F/6. No.7
Wu-Chuan 1st Rd
Wu-Ku Industrial Zone
Taipei County
(02) 2299-9626
UA
Kärcher Ukraine
Kilzeva doroga, 9
03191, Kyiv
(044) 594 75 75
UAE
Karcher FZE
Jebel Ali Free Zone
RA 8, XB 1, Jebel Ali, Dubai
(04) 8836-776
USA
Kärcher North America
750 W Hampden Ave.
Suite 400
Englewood, CO 80110
877-527-2437
ZA
Kärcher (Pty.) Limited
144 Kuschke Street
Meadowdale
Edenvale 1614
(011) 574-5360
NL
Kärcher BV
Postbus 474
4870 AL Etten-Leur
0900-33 444 33
NZ
Karcher Limited
12 Ron Driver Place
East Tamaki, Auckland
(09) 274-4603
P
Neoparts - Com. e
Ind. Automóvel, S.A.
Av. Infante D. Henrique, Lote 35
1800-218 Lisboa
21 8558300
PL
Kärcher Sp. z o.o.
Ul. Stawowa 140
31-346 Kraków
(012) 6397-222
PRC
Kärcher Cleaning Systems
Co., Ltd.
Part B, Building 30,
No. 390 Ai Du Road
Shanghai Waigaoquiao 200131
(021) 5046-3579
RO
Karcher Romania s.r.l.
Sos. Odaii Nr. 439
013606 Bucureşti
0372 709 001
RUS
+7 495 228 39 45
S
Kärcher AB
Tagenevägen 31
42502 Hisings-Kärra
(031) 577-300
GB
Kärcher(UK) Limited
Kärcher House
Beaumont Road
Banbury
Oxon, OX16 1TB
01295 752 200
GR
Kärcher Cleaning Systems A.E.
31-33, Nikitara str. &
Konstantinoupoleos str.
13671 Acharnes
210 - 2316 153
H
Kärcher Hungária Kft
Tormásrét ut 2.
2051 Biatorbágy
(023) 530 640
HK
Kärcher Limited
Unit 10, 17/F.
APEC Plaza
49 Hoi Yuen Road
Kwun Tong, Kowloon
(02) 357-5863
I
Kärcher S.p.A.
Via A.Vespucci 19
21013 Gallarate (VA)
848 - 99 88 77
IRL
Karcher Limited
12 Willow Business Park
Nangor Road
Clondalkin Dublin 12
(01) 409 77 77
KOR
Karcher Co. Ltd. (South Korea)
Youngjae B/D, 50-1, 51-1
Sansoo-dong, Mapo-ku
Seoul 121-060
032-465-8000
MAL
Karcher Cleaning
Systems Sdn. Bhd.
No. 8, Jalan Serindit 2
Bandar Puchong Jaya
47100 Puchong, Selangor
(03) 5882 1148
MEX
Karcher México, SA de CV
Av. Gustavo Baz No. 29-C
Col. Naucalpan Centro
Naucalpan, Edo. de México
C.P. 53000 México
01 800 024 13 13
AUS
Kärcher Pty. Ltd.
40 Koornang Road
Scoresby VIC 3179
(03) 9765 - 2300
B / LUX
Kärcher N.V.
Industrieweg 12
2320 Hoogstraten
B: 0900 10027
LUX: 0032 900 10027
BR
Kärcher Indústria e Comércio Ltda.
Av. Prof. Benedicto Montenegro 419
CEP 13.140-000 - Paulínia - SP
0800 176 111
CDN
Kärcher Canada Inc.
6975 Creditview Road Unit #2
Mississauga, Ontario L5N 8E9
1-800-465-4980
CH
Kärcher AG
Industriestraße 16
8108 Dällikon
0844 850 863
CZ
Kärcher spol s r.o.
Modletice ş.p. 141
251 01 şíşany u Prahy
0323 606 014
DK
Kärcher Rengøringssystemer A/S
Gejlhavegård 5
6000 Kolding
70 206 667
F
Kärcher S.A.S.
5 Avenue des Coquelicots
Z.A. des Petits Carreaux
94865 Bonneuil-sur-Marne
(01) 43 996 770
E
Kärcher S.A.
Pol. Industrial Font del Radium
Calle Doctor Trueta 6-7
08400 Granollers (Barcelona)
902 170 068
D
Alfred Kärcher GmbH & Co. KG
Service-Center Gissigheim
Im Gewerbegebiet 2
97953 Königheim-Gissigheim
(07195) 903 2065