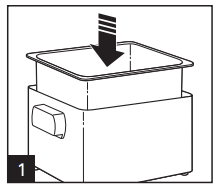
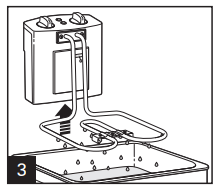
Place base on a stable, flat surface. Insert oil pot into base
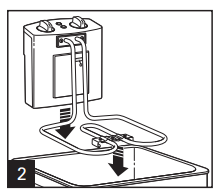
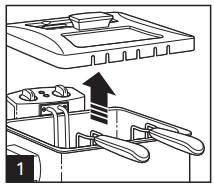
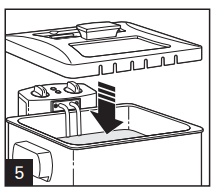
Align grooves of heating element assembly with grooves on base. Push down on heating element assembly to connect it to the base. NOTE: Heater cannot be turned on unless correctly installed on base.
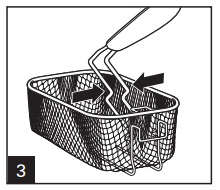
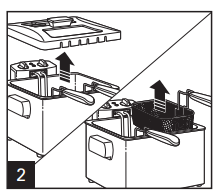
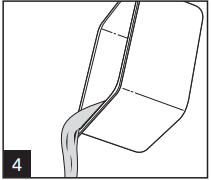
To assemble handle, squeeze tines of handle together. Align tines with round holes on metal bracket inside basket(s).
Release tines to allow them to spread and then pull handle back to lock into metal bracket.
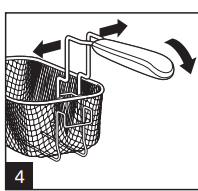
For storage: Rotate handle into basket(s).
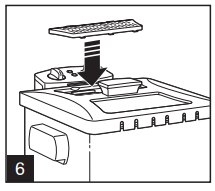
Align vent cover and vent of lid toward heating element assembly. Lid snaps into place
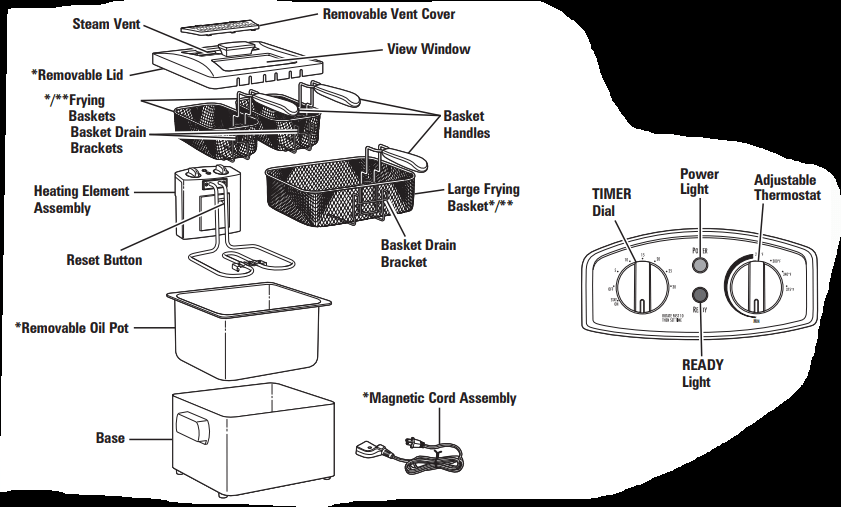
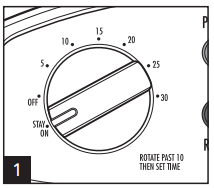
How the Timer Works
The timer counts down. It can be set for any time between 1 and 30 minutes.
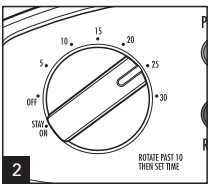
To set timer, rotate past 10 minutes and then to desired frying time or rotate timer to STAY ON.
Timer will start counting down selected time shortly after you stop turning the TIMER knob.
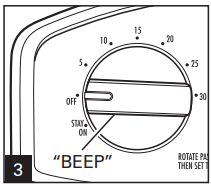
Timer will beep when it reaches OFF and fryer turns off automatically.
NOTE: Do not use STAY ON for more than 60 minutes in a 2-hour period.
Frying
BEFORE FIRST USE: Thoroughly clean and dry fryer. See “Cleaning Your Fryer” section.
NOTE: Never operate unit without oil in tank or unit will exceed temperature limit and will require resetting. See “How to Reset” section for details.
Place assembled fryer on a stable, level, heat-resistant surface out of reach of children. Lift lid to open.
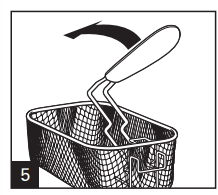
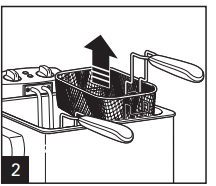
Remove basket(s) from fryer.
Fill fryer with about 15 cups (3.5 L) but no more than about 19 cups (4.5 L) of oil to top indicator mark on removable oil pot.
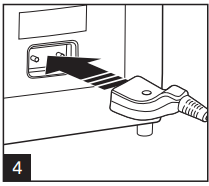
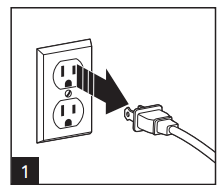
Make sure fryer is turned to MIN. Attach magnetic end of cord assembly to fryer socket. Magnetic end of cord will only go in one way. Be careful not to disturb magnetic connection when plugging cord into electrical outlet.
NOTE: The low magnetic force allows the cord to “break away” which prevents unit from accidentally being pulled off a countertop
Replace lid. Plug in unit. Set thermostat to desired setting. Preheat fryer until READY light comes on (10 to 15 minutes). For more information on temperature selection, check food package or Frying Chart. READY light will come on when oil has reached preset temperature. Remove lid before frying
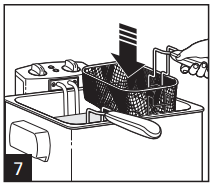
To fry food, place food in basket(s).
TO FRY UNBATTERED FOOD: Place food in basket and proceed with Step 7.
TO FRY BATTERED FOOD (such as tempura batter): Lower basket into oil; then carefully place food directly into oil.
NOTE: Do not exceed maximum amount of food to be fried in one batch. See Frying Chart for more information
Carefully place basket(s) in fryer. Replace lid.
NOTE: Never operate unit without oil in pot or unit will exceed temperature limit and will require resetting.
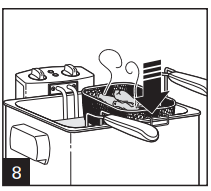
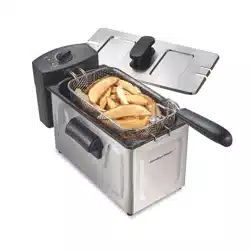
When frying is done, remove lid, raise basket(s), and hook over removable oil pot to drain.
NOTE: Do not allow condensation to drain into oil pot while removing lid or while unit is off.
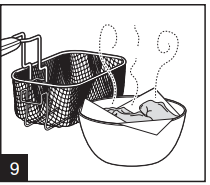
Carefully empty food from basket(s) and place in a bowl, colander, or tray lined with paper towel. Fill basket(s) and repeat as needed to complete frying. Set thermostat to MIN and unplug appliance after use.
Cleaning Your Fryer
Unplug from wall outlet. Wait until oil has cooled. This can take several hours.
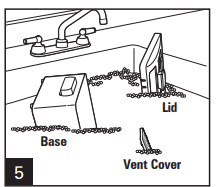
Remove lid and remove basket(s) from fryer.
Lift heating element assembly from base and allow oil to drain into oil pot
Lift oil pot from base and pour out oil. Wipe all excess oil or oil film from oil pot.
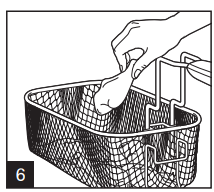
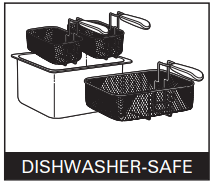
Clean base, lid, and vent cover with hot, soapy water. Dry thoroughly. Position lid vertically to drain and allow to dry thoroughly.
DO NOT use the “SANI” setting when washing in the dishwasher. “SANI” cycle temperatures could damage your product.
Do not immerse heating element assembly in water.
NOTE: To avoid damaging fryer, use care when cleaning heating element assembly. Gently wipe with soft cloth dampened with hot, soapy water.
Frying Tips
SELECTING AND CHANGING THE FRYING OIL:
Use a good quality vegetable or peanut oil.
Frying foods in butter, margarine, olive oil, or animal fat is NOT recommended because of low temperature smoke point.
DO NOT mix two types of oil.
Change oil regularly to maintain optimum frying and flavor quality.
Oil used for french fries can be used 10 to 12 times before changing if oil is filtered after each use. Oil used for food that is high in protein (such as meat or fish) should be changed more frequently.
To filter oil, allow oil to cool completely. Cheesecloth or paper towel may be used as a filter to strain oil.
Always follow food package directions.
DO NOT add fresh oil to used oil.
Always change the oil when it has a strong smell or taste, or when it turns dark and/or syrupy.
BEFORE FRYING:
Remove any excess water from fresh food by blotting with a paper towel. Excess water or ice particles can cause hot oil to splatter or foam.
GENERAL TIPS:
DO NOT use plastic utensils in hot oil.
Season food AFTER frying.
If food is not as crisp as desired, reduce batch size.
DISPOSING OF OIL:
Pour cool oil into its original (resealable) empty plastic bottle.
BASKET USAGE WITH FRESHLY BATTERED FOODS:
Freshly battered foods should be carefully placed directly into oil. First, lower basket completely and then carefully place each piece of battered food into hot oil. Use basket to remove fried battered foods.
STORAGE:
Basket handle can be disengaged and rotated into basket. Place oil pot in base and then place basket and power cord in oil pot.
It is best to store all oils in the refrigerator or a cool, dark, dry place for up to six months.
COOKING:
Length of cooking time and temperature may vary based on batch size and weight.
For best results, fry a single layer of food for each batch.
Frozen, uncooked chicken should be thawed, excess water removed, and patted dry with paper towel prior to cooking.
Always follow package directions.
When cooking meat, poultry, or fish, use cooking thermometer to determine internal temperatures.
Troubleshooting
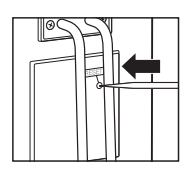
HOW TO RESET: If your unit is not heating or will not turn on, your unit may need to be reset. 1. Make sure fryer and oil are cold. 2. Turn temperature control to MIN. 3. Unplug magnetic cord from the wall outlet. 4. Remove removable control panel and heater element. 5. Use a thin pointed object such as a wooden skewer or thin screwdriver to push in RESET button.
PROBLEM
PROBABLE CAUSE/SOLUTION
Fried food does not have a golden-brown color and/or is not crispy.
Selected temperature is too low or food has not been fried long enough. Check food package or Frying Chart for correct temperature or preparation time.
There is too much food in basket(s). Never fry too much food at one time. See food package, Frying Chart, or recipe for correct frying amount. Food pieces may be too thick to fry adequately.
Volume of oil is too low.
Fryer gives off a strong, unpleasant odor.
Oil isn’t fresh. Change oil. Filter oil regularly to keep it fresh longer.
When frying food with a high moisture content (such as chicken or fries), change oil frequently.
Type of oil is not suitable for deep-frying food. Use good quality frying oil. Do not mix two different types of oil or fat.
Unit does not heat.
Ensure magnetic cord assembly is properly attached to fryer socket.
Ensure electrical cord assembly is plugged into electrical outlet.
Heating element assembly not correctly assembled. Make sure heating element assembly is properly installed on base. See “How to Assemble the Fryer” section.
Press RESET button on heating element assembly by inserting a small pointed item (such as a wooden skewer) into the opening labeled RESET. Make sure fryer has recommended amount of oil in oil pot
During frying, the oil spills over the edge of the fryer.
There is too much oil in fryer. Make sure that oil does not exceed maximum level mark.
Basket(s)/food immersed too quickly. Carefully raise basket(s) out of oil.
Food contains too much liquid. Dry food thoroughly before placing it in fryer. Follow instructions in “Frying” section.
When frying food with a high moisture content (such as chicken or fries), change oil frequently.
There is too much food in frying basket(s). Do not fry more food at one time than quantities indicated on food package or Frying Chart
Condensation forms on viewing window.
Water vapor from food collects on window. When unit is cold, wipe a small amount of oil on inside of viewing window to prevent condensation buildup.
Oil film buildup on oil pot.
Use plastic scouring pad to clean.
To clean oil residue from oil pot, use a household degreaser.
Oil foams too much during frying.
Food contains too much liquid. Dry food thoroughly before placing it in fryer.
When frying food with a high moisture content (such as chicken or fries), change oil frequently.
Type of oil is not suitable for deep-frying food. Use good quality frying oil. Do not mix two different types of oil or fat.
Basket(s)/food immersed too quickly. Carefully raise basket(s) out of the oil.
The use of refrigerated oil may cause excessive splattering. Use room-temperature oil.
Oil pot has not been cleaned properly. See instructions in the “Cleaning Your Fryer” section.
Limited Warranty
This warranty applies to products purchased and used in the U.S. and Canada. This is the only express warranty for this product and is in lieu of any other warranty or condition.
This product is warranted to be free from defects in material and workmanship for a period of five (5) years from the date of original purchase in Canada and one (1) year from the date of original purchase in the U.S. During this period, your exclusive remedy is repair or replacement of this product or any component found to be defective, at our option; however, you are responsible for all costs associated with returning the product to us and our returning a product or component under this warranty to you. If the product or component is no longer available, we will replace with a similar one of equal or greater value.
This warranty does not cover glass, filters, wear from normal use, use not in conformity with the printed directions, or damage to the product resulting from accident, alteration, abuse, or misuse. This warranty extends only to the original consumer purchaser or gift recipient. Keep the original sales receipt, as proof of purchase is required to make a warranty claim. This warranty is void if the product is used for other than single-family household use or subjected to any voltage and waveform other than as specified on the rating label (e.g., 120 V ~ 60 Hz).
We exclude all claims for special, incidental, and consequential damages caused by breach of express or implied warranty. All liability is limited to the amount of the purchase price. Every implied warranty, including any statutory warranty or condition of merchantability or fitness for a particular purpose, is disclaimed except to the extent prohibited by law, in which case such warranty or condition is limited to the duration of this written warranty. This warranty gives you specific legal rights. You may have other legal rights that vary depending on where you live. Some states or provinces do not allow limitations on implied warranties or special, incidental, or consequential damages, so the foregoing limitations may not apply to you.
To make a warranty claim, do not return this appliance to the store. Please call 1.800.851.8900 in the U.S. or 1.800.267.2826 in Canada or visit hamiltonbeach.com in the U.S. or hamiltonbeach.ca in Canada. For faster service, locate the model, type, and series numbers on your appliance.