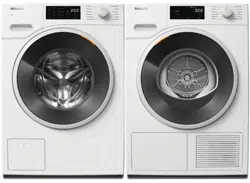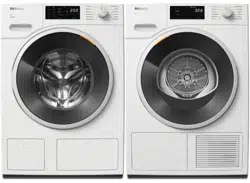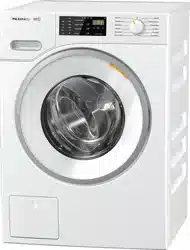
Operating and Installation Instructions
Washer
To prevent accidents and appliance damage, read these instructions
before installation or use.
en-US M.-Nr. 10 980 030
Caring for the environment
2
Disposal of the packing mate-
rial
The cardboard box and packing materi-
als protect the appliance during ship-
ping. They have been designed to be
biodegradable and recyclable.
Ensure that any plastic wrappings,
bags, etc. are disposed of safely and
kept out of the reach of children. Dan-
ger of suffocation!
Disposal of your old appliance
Electrical and electronic appliances
contain valuable materials. They also
contain certain substances, compounds
and components which were essential
for the proper functioning and safe use
of the equipment. Handling these mate-
rials improperly by disposing of them in
your household waste can be harmful to
your health and the environment. There-
fore, please do not dispose of your old
appliance with regular household waste
and follow local regulations on proper
disposal.
Consult with local authorities, dealers or
Miele in order to dispose of and recycle
electrical and electronic appliances.
Miele assumes no responsibility for
deleting any personal data left on the
appliance being disposed. Please en-
sure that your old appliance is kept
away from children until removal. Ob-
serve safety requirements for appli-
ances that may tip over or pose an en-
trapment hazard.

Contents
3
Caring for the environment .................................................................................. 2
IMPORTANT SAFETY INSTRUCTIONS ................................................................ 6
Guide to the washer ............................................................................................ 11
Control panel......................................................................................................... 11
How the control field works................................................................................... 12
Before using for the first time ............................................................................ 14
Removing the protective film and stickers ........................................................... 14
Environmentally friendly washing ...................................................................... 16
1. Prepare the laundry......................................................................................... 17
2. Load the laundry.............................................................................................. 18
3. Select a program ............................................................................................. 19
4. Adding detergent............................................................................................. 21
Detergent dispenser drawer .................................................................................. 21
Dispensing aids ................................................................................................ 21
Using chlorine bleach....................................................................................... 22
Using powder detergent................................................................................... 22
Using detergent tablets or pods....................................................................... 22
Using fabric softener and liquid starch ............................................................ 23
CapDosing............................................................................................................. 23
5. Starting a program .......................................................................................... 26
6. Program end – removing the laundry ............................................................ 27
Spin cycle ............................................................................................................. 28
Delay Start............................................................................................................ 30
Program guide ..................................................................................................... 31
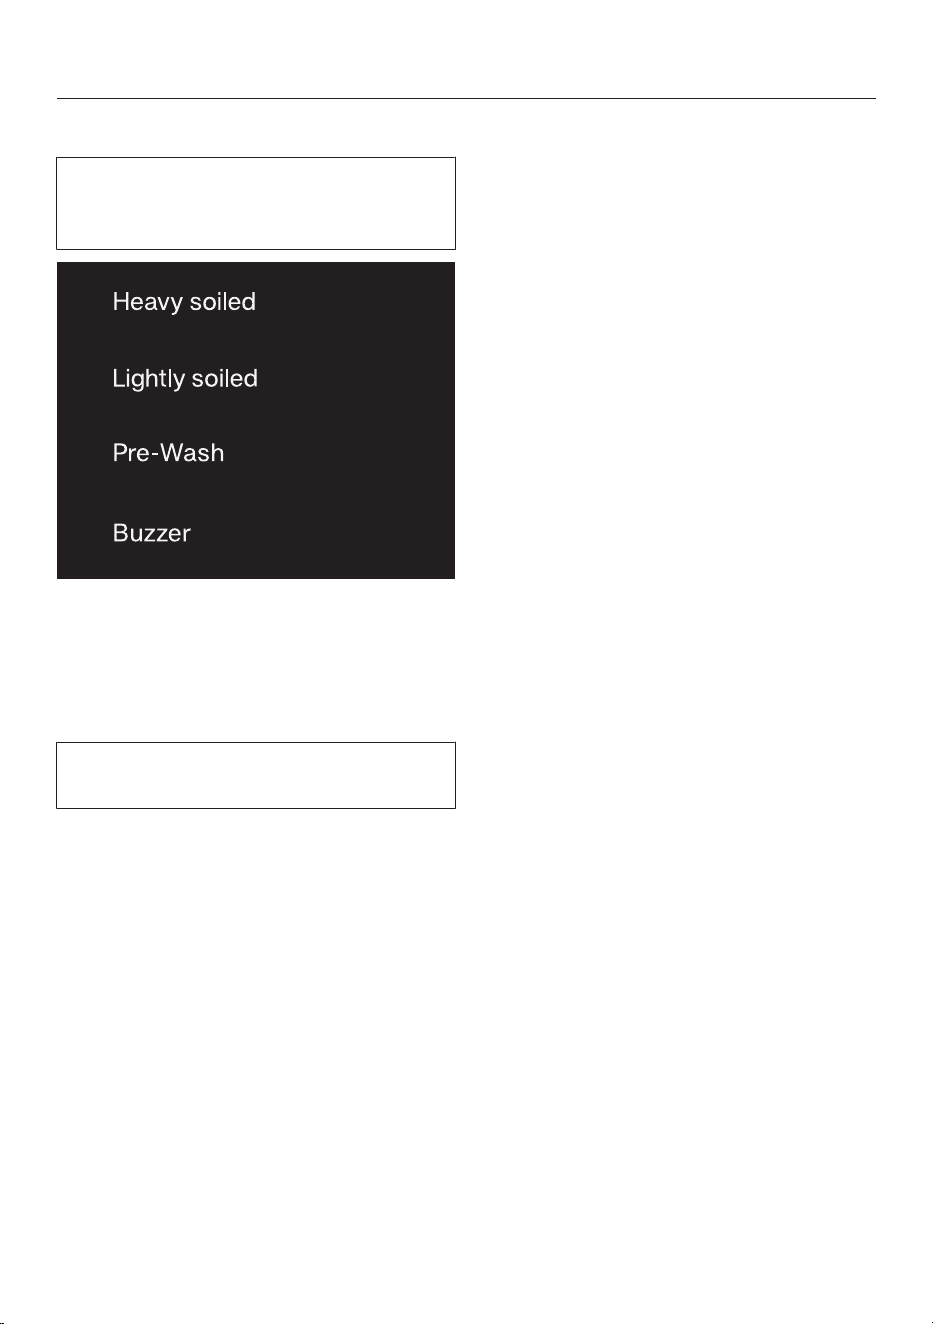
Extra options........................................................................................................ 34
Heavy soiled.......................................................................................................... 34
Light soiled ............................................................................................................ 34
Pre-wash ............................................................................................................... 34
Buzzer.................................................................................................................... 34
The following extra options can be selected in addition to the programs ............ 35
Changing the program sequence ...................................................................... 36
Changing the program .......................................................................................... 36
Canceling a program ............................................................................................. 36
Interrupting a program........................................................................................... 36
Adding or removing laundry .................................................................................. 37

Contents
4
Detergent ............................................................................................................. 38
Miele-recommended detergents ........................................................................... 38
General detergent recommendations.................................................................... 39
Cleaning and care ............................................................................................... 40
Cleaning the drum (hygiene info)........................................................................... 40
Cleaning the housing and control panel................................................................ 40
Cleaning the detergent dispensing drawer ........................................................... 40
Cleaning the water inlet filter................................................................................. 43
Frequently asked questions ............................................................................... 44
Problem solving guide........................................................................................... 44
A wash program cannot be started....................................................................... 44
The program is canceled and a fault indicator light lights up on
the control field...................................................................................................... 45
During the program, a symbol appears on the time display ................................. 46
At the end of the program, an indicator light lights up on the control field........... 46
General problems with the washer........................................................................ 47
Poor wash results.................................................................................................. 49
The drum door cannot be opened ........................................................................ 50
Opening the door in the event of a blocked drain outlet and/or power outage .... 51
Technical Service................................................................................................. 53
Contact in case of fault ......................................................................................... 53
Optional accessories............................................................................................. 53
Warranty ................................................................................................................ 53
Installation............................................................................................................ 56
Front view .............................................................................................................. 56
Rear view............................................................................................................... 57
Installation surface ................................................................................................ 57
Transporting the washing machine to its installation site...................................... 58
Removing the shipping struts ............................................................................... 58
Refitting the shipping struts .................................................................................. 60
Leveling the machine............................................................................................. 61
Unscrewing and adjusting the feet................................................................... 61
Additional installation requirements ...................................................................... 62
Installing under a countertop............................................................................62
Setting up the cabinet ...................................................................................... 62
For closets at room height................................................................................ 63
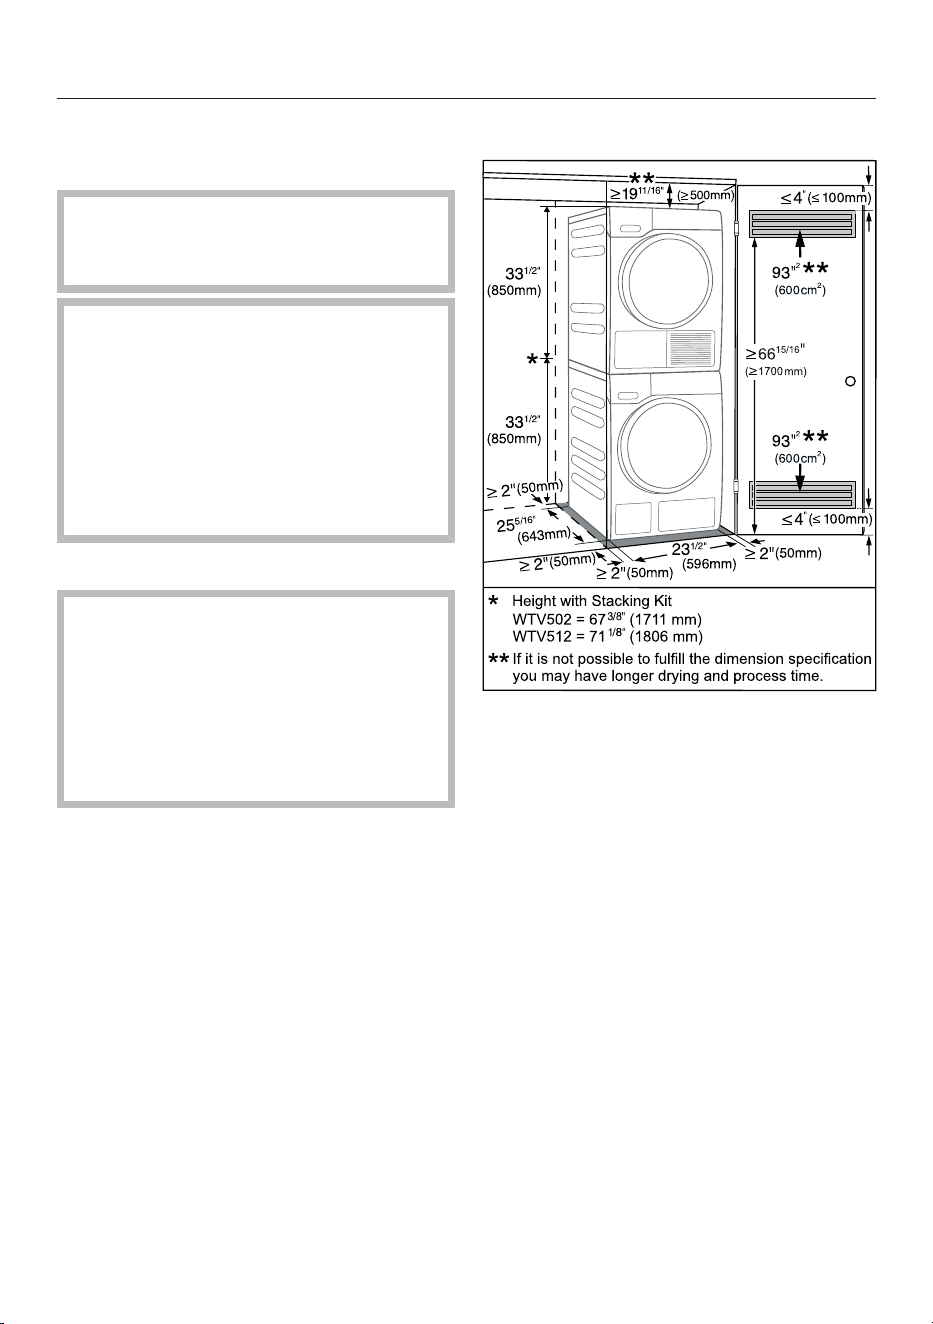
Product Dimensions .............................................................................................. 63
Dimensions....................................................................................................... 63
Installation on a plinth ...................................................................................... 64
Washer-dryer stack .......................................................................................... 64

Contents
5
The water protection system................................................................................. 65
Water intake .......................................................................................................... 66
Water drainage ...................................................................................................... 67
Electrical connection ............................................................................................. 68
Technical data...................................................................................................... 69
Programmable functions .................................................................................... 70
Choosing and selecting programmable functions ................................................ 70
Editing and saving the programmable function .................................................... 71
Exiting the programming level............................................................................... 71
Buzzer.............................................................................................................. 71
Keypad tone..................................................................................................... 71
PIN code.......................................................................................................... 72
Control field switch-off status ........................................................................ 72
Memory .......................................................................................................... 73
Water intake ................................................................................................... 73
Additional long pre-wash – Normal................................................................ 74
Gentle action .................................................................................................. 74
Reducing the temperature.............................................................................. 74
Maximum rinse level....................................................................................... 75
Suds cooling ................................................................................................... 75
Anti-crease ..................................................................................................... 75
Low water pressure........................................................................................ 75
Chlorine bleach .............................................................................................. 76
Display brightness dimmed............................................................................ 76
Welcome tone................................................................................................. 76
Optional accessories .......................................................................................... 77
Detergent............................................................................................................... 77
Speciality detergents............................................................................................. 77
Fabric care............................................................................................................. 78
Additive ................................................................................................................. 78
Machine care......................................................................................................... 78

IMPORTANT SAFETY INSTRUCTIONS
6
WARNING
To reduce the risk of fire, electric shock or injury to persons while
using your appliance follow basic safety precautions, including the
following:
Read all instructions before using the appliance.
GROUNDING INSTRUCTIONS
This appliance must be grounded. In the event of a malfunction or
breakdown, grounding will reduce the risk of electric shock by pro-
viding a path of least resistance for electric current. This appliance is
equipped with a cord having an equipmentgrounding conductor and
a grounding plug. The plug must be plugged into an appropriate out-
let that is properly installed and grounded in accordance with all lo-
cal codes and ordinances.
WARNING - Improper connection of the equipment-grounding
conductor may result in a risk of electric shock. Check with a quali-
fied electrician if you are in doubt as to whether the appliance is
properly grounded.
Do not modify the plug provided with the appliance - if it will not
fit the outlet, have a proper outlet installed by a qualified electrician.
Do not install or use a washer with visible damage.
Do not install or store this appliance where it will be exposed to
the weather.
Do not install your washing machine where temperatures below
freezing may occur. Frozen hoses may burst under pressure. The reli-
ability of the electronic control unit may be impaired at temperatures
below freezing.

IMPORTANT SAFETY INSTRUCTIONS
7
Before connecting the machine, ensure that the connection data
on the data plate (fusing, voltage and frequency) match the mains
electrical supply. If in doubt contact an electrician.
Do not use an extension cord to connect this appliance to the
power supply. Extension cords do not guarantee the required safety
of the appliance (e.g. danger of overheating).
This appliance is not designed for maritime use or for use in mo-
bile installations such as recreational vehicles or aircraft. However,
under certain conditions it may be possible for an installation in
these applications. Please contact the Miele Technical Service Dept.
with specific requirements.
Do not repair or replace any part of the appliance or attempt any
servicing unless specifically recommended in these operating in-
structions.
If the power cord is damaged it must only be replaced by a Miele
Service technician with a genuine Miele power cord.
Under certain conditions, hydrogen gas may be produced in a hot
water system that has not been used for 2 weeks or more. HYDRO-
GEN GAS IS EXPLOSIVE. If the hot water system has not been used
for such a period, turn on all hot water faucets and let the water flow
from each for several minutes before using the washing machine.
This will release any built-up hydrogen gas. Do not smoke or use an
open flame during this time, the gas is flammable.
Before the appliance is removed for service or discarded, remove
the door.

IMPORTANT SAFETY INSTRUCTIONS
8
Use
Do not allow children to play on or in the appliance. Close super-
vision is necessary when the appliance is used near children.
The drum door glass will be hot when washing at very high tem-
peratures. Do not touch the glass. Danger of burns! Keep children
away from the washer when in use.
Only use the washing machine to wash items which are specified
by the manufacturer to be machine washable on the fabric care la-
bel. Any other applications may be dangerous.
Do not wash articles that have been previously cleaned, washed,
soaked or spotted with gasoline, dry-cleaning solvents or other
flammable substances. These articles give off vapors that could ig-
nite or explode. Do not add these items to the wash load.
Do not add gasoline, dry-cleaning solvents, or other flammable or
explosive substances to the wash water. These substances give off
vapors which could ignite or explode.
Do not use cleaning solvents on or near the machine or the con-
trols. Contact with cleaning solvents will damage the surface..
Do not reach into the appliance if the drum is moving.
Do not tamper with the controls.
SAVE THESE INSTRUCTIONS

IMPORTANT SAFETY INSTRUCTIONS
9
Miele tumble dryers and Miele washing machines can be installed
as a washer-dryer stack. A Miele washer-dryer connection kit is re-
quired as an optional accessory for this. Please ensure that the
washer-dryer connection kit is suitable for the Miele tumble dryer
and the Miele washing machine.
If installing the machine on a Miele plinth (available as an optional
accessory), please make sure you order the correct one for this
washing machine.
Should detergent enter the eyes, rinse out immediately with plenty
of lukewarm water. If accidentally ingested, seek medical advice im-
mediately. People who have sustained damage to the skin or who
have sensitive skin should avoid contact with the detergent.
The maximum dry laundry weight is 17.6 lb (8 kg). See the “Pro-
gram guide” for the maximum recommended loads for individual
programs.
This product may contain chemicals know to the state of Califor-
nia to cause cancer or birth defects or other reproductive harm.

IMPORTANT SAFETY INSTRUCTIONS
10
FCC Declaration of Conformity
These devices comply with FCC Rules Part15. This equipment
has been tested and found to be in compliance with the limits for a
ClassB digital device, pursuant to Part15 of the FCC Rules of Oper-
ation and is subject to the following conditions:
These devices may not cause harmful interference.
These devices must accept any interference received, including in-
terference that may cause undesired operation.
FCC Radiation Exposure Statement
This equipment complies with FCC radiation exposure limits set
forth for an uncontrolled environment. This equipment should be in-
stalled and operated with minimum distance 8“ (20cm) between the
radiator and your body.
Industry Canada Statement
This digital apparatus does not exceed the ClassB limits for Ra-
dio Noise Emissions from digital apparatus set out in the Radio Inter-
ference Regulations of the Canadian Department of Communica-
tions.
Complies with Canadian ICES-003 ClassB specifications.
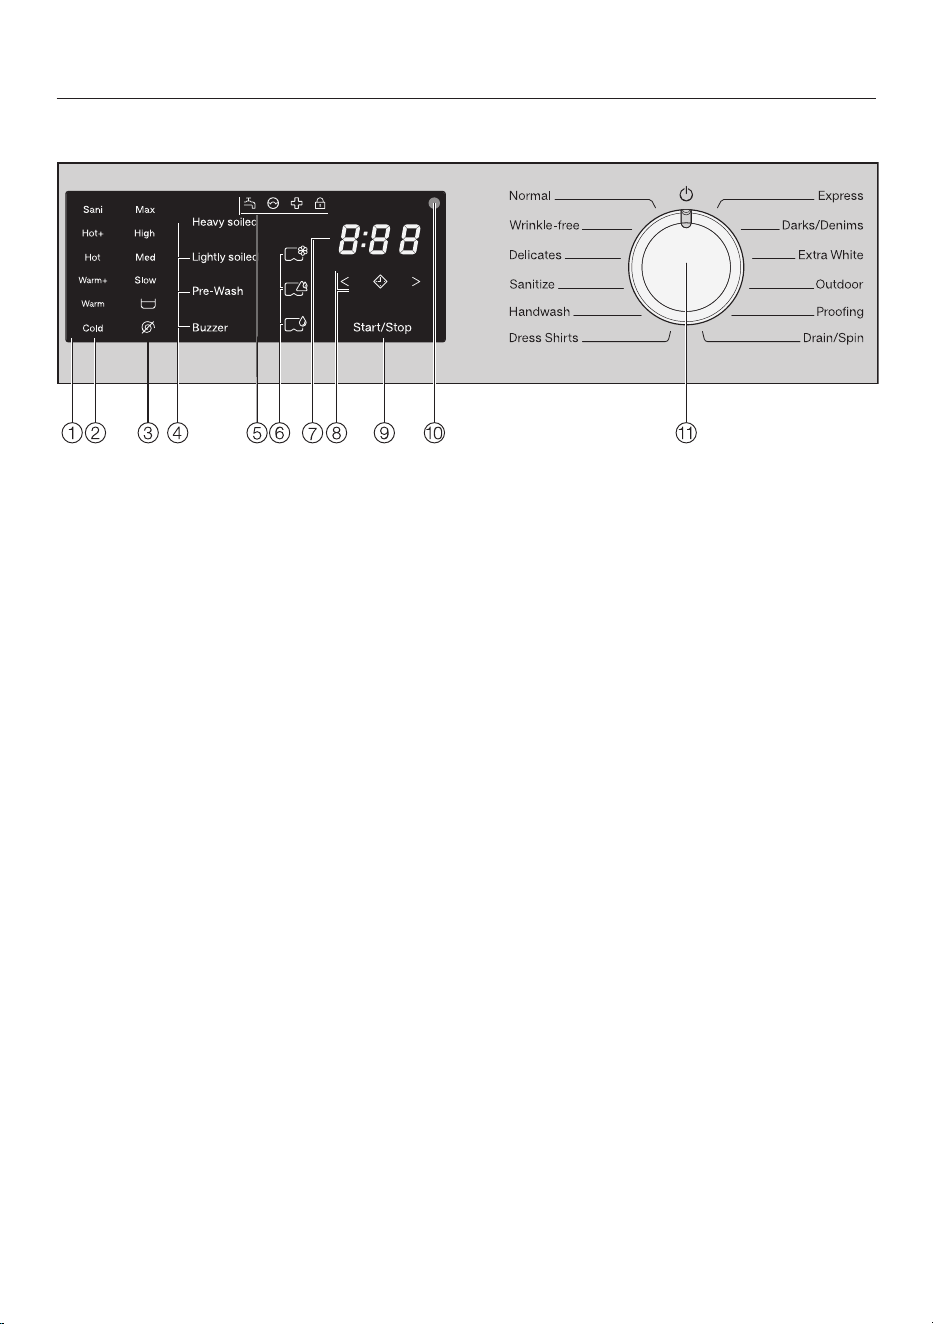
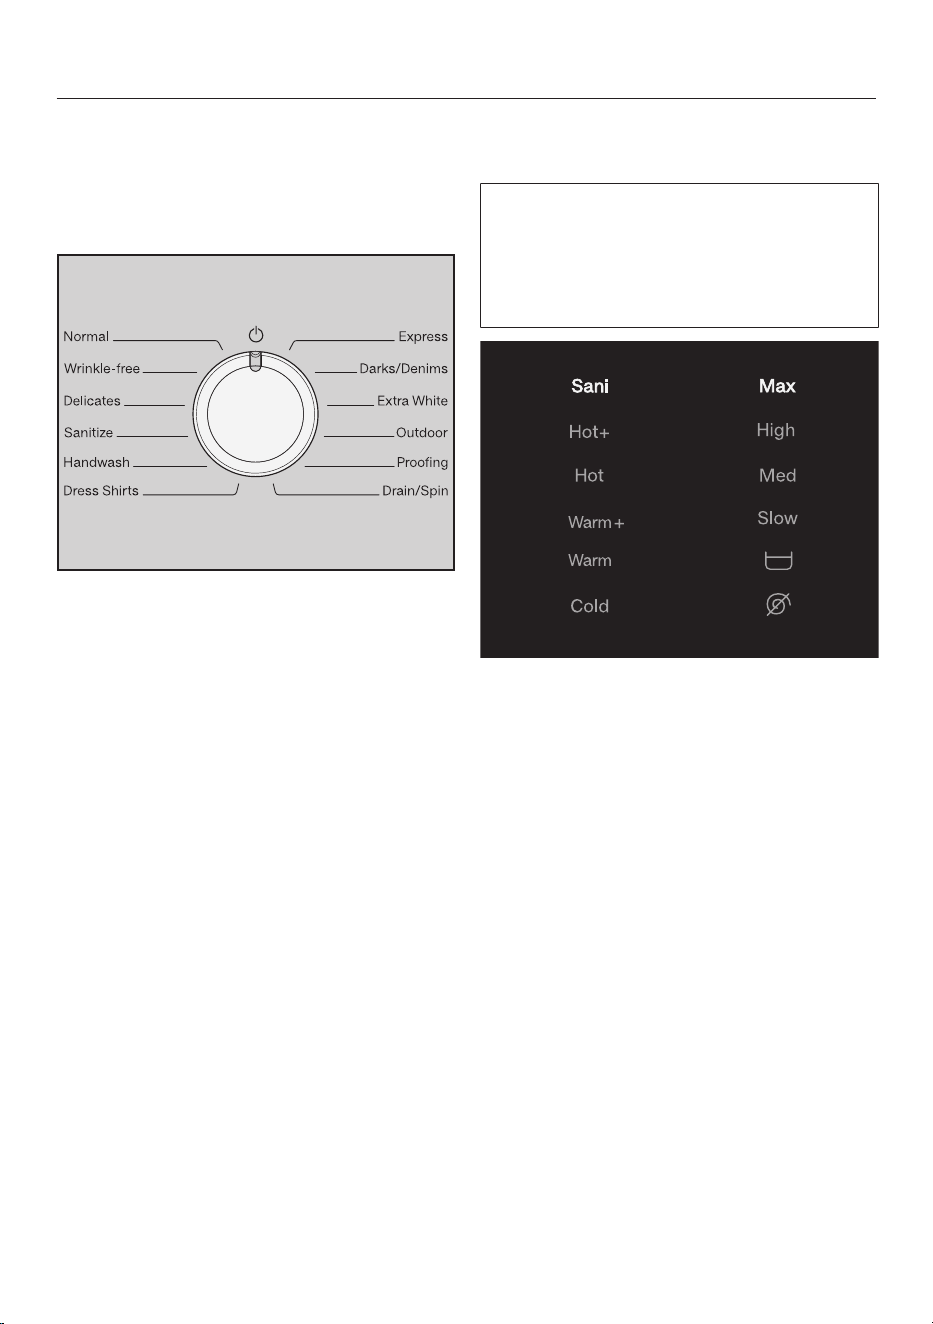
Guide to the washer
11
Control panel
a
Control field
b
Temperature sensor buttons
for selecting the temperature.
c
Spin Speed sensor buttons
for selecting the spin speed.
d
Extra Options sensor buttons
for the various extra options that can
be added to the wash programs.
e
Indicator lights
light up when necessary
f
CapDosing sensor buttons
g
Time display
for the program duration
h
Sensor buttons
for the Delay Start function
i
Start/Stop sensor button
for program start/cancellation
j
Optical interface
for service technicians
k
Program selector
for selecting programs and for
switching off. The washing machine
is switched on when you select a
program, and switched off by turning
the program selector to the posi-
tion.
Guide to the washer
12
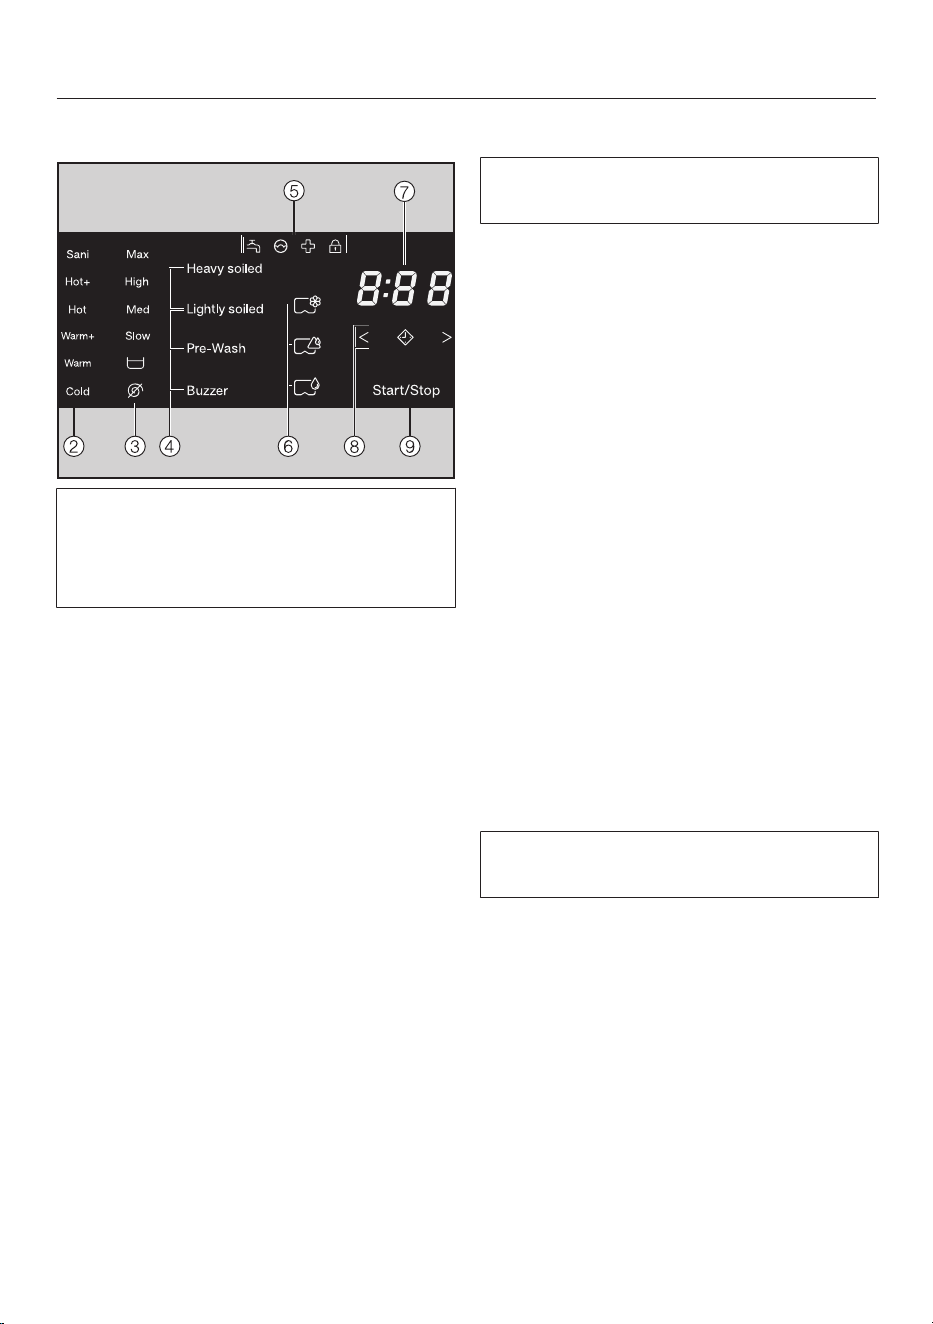
How the control field works
The , , , , , and sensor
buttons react to fingertip contact. Se-
lection is possible as long as the re-
spective sensor button is lit.
If a sensor button is brightly lit, this
means it is currently selected
If a sensor button is dimly lit, this
means it can be selected
and sensor buttons for temper-
ature and spin speed
After a wash program has been se-
lected with the program selector, the
recommended temperature (in °F) and
spin speed (in rpm) light up brightly.
Selectable temperatures and spin
speeds light up dimly.
Sensor buttons for extra options
You can supplement the wash pro-
grams with extra options.
If a wash program has been selected,
the sensor buttons for the available ex-
tra options light up dimly.
Indicator lights
–
lights up if there are faults affecting
the water intake and drainage
–
lights up if excess detergent was
used
–
lights up as a reminder about hygiene
information
–
flashes for as long as it is possible to
add laundry
lights up when the door of the wash-
ing machine is locked
CapDosing
The CapDosing sensor buttons are
used for activating cap dosing.
–
Fabric care (e.g., fabric softener,
proofing agent)
–
Additives (e.g., detergent enhancers)
–
Detergent (for the main wash only)

Guide to the washer
13
Time display
After the program has started, the pro-
gram duration will appear on the display
in hours and minutes.
When Delay Start is being used, the
program duration will appear after the
Delay Start time has elapsed.
Sensor buttons
–
After touching the sensor button,
a later start time for the program (De-
lay Start) can be selected. Once se-
lected, lights up brightly.
–
The duration of the Delay Start period
is selected by touching the or
sensor button.
The Delay Start time selected will ap-
pear on the time display.
After the program has started, the Delay
Start time will begin to count down.
Once the Delay Start time has elapsed,
the program begins and the estimated
program duration appears on the time
display.
Start/Stop sensor button
Touching the Start/Stop sensor button
starts the selected program or cancels
a program that has already been
started. The sensor button flashes
slowly as soon as it is possible for a
program to be started and then lights
up constantly after the program has
started.
Before using for the first time
14
Damage from incorrect installa-
tion and connection.
Installing and connecting the wash-
ing machine incorrectly will cause
serious damage to property.
See “Installation”.
Removing the protective film
and stickers
Remove:
– The protective film from the door
– Any stickers (if present) from the front
and the lid
Please do not remove any labels
(e.g., the data plate) which are visible
when you open the door.
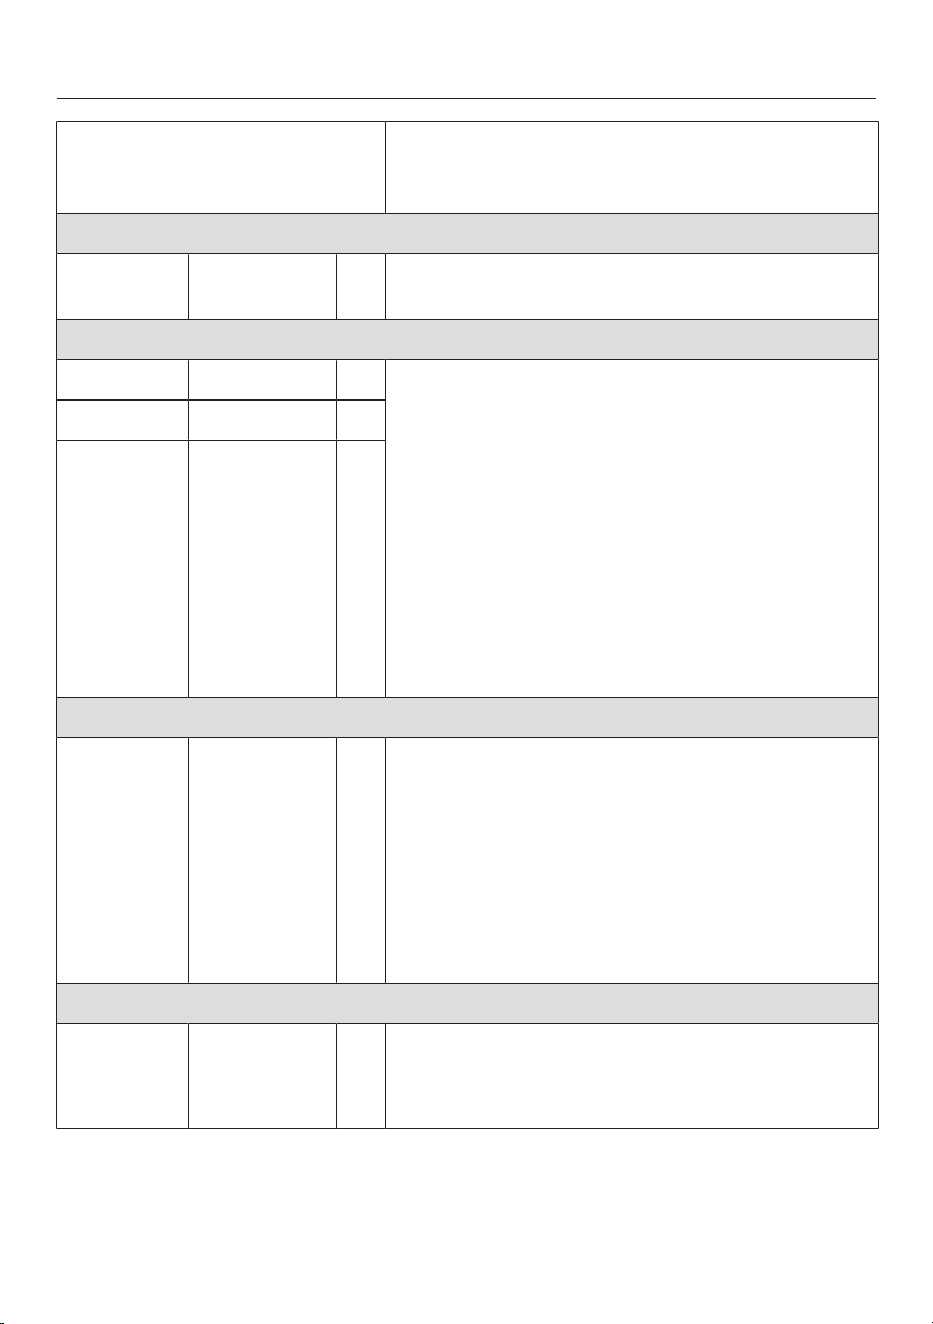
Remove the drain hose elbow
from the drum
An elbow piece for the drain hose is
stored in the drum.
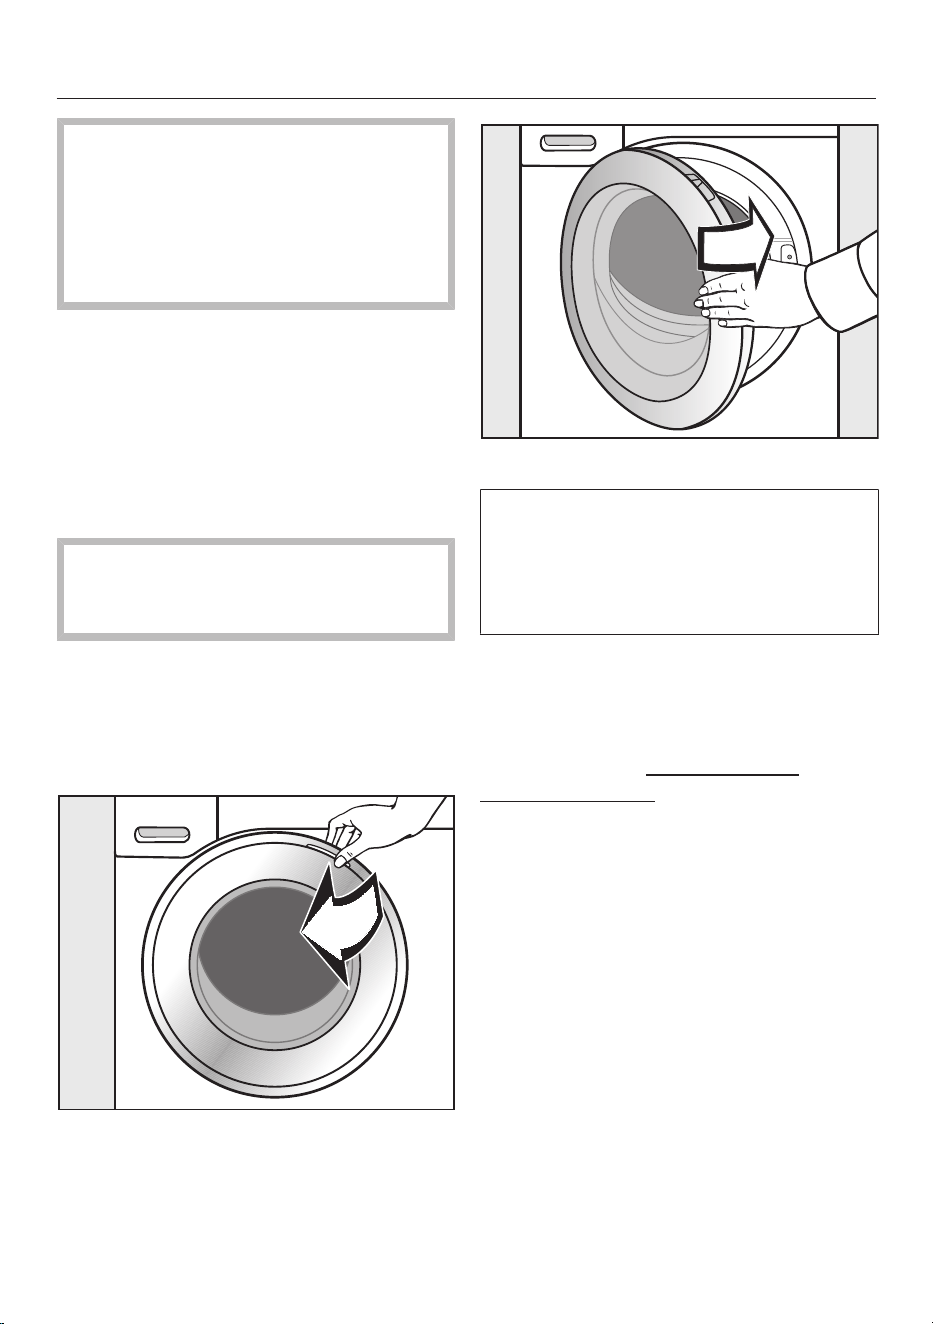
Pull open the door.
Remove the elbow piece.
Shut the door.
This washing machine has undergone
a complete functional test at the fac-
tory and some residual water will
therefore remain in the drum from this
process.
For safety reasons, spinning is not pos-
sible until the machine has been pre-
pared for use for the first time. To acti-
vate the spinning function, you must run
a wash program without laundry and
without detergent.
Using detergent could result in an ex-
cessive build-up of foam!
The ball valve is activated at the same
time. The ball valve prevents detergent
escaping from the suds container into
the sump during a wash program, thus
making maximum use of the detergent.
Before using for the first time
15
Running the first program
Turn on the water supply.
Turn the program selector to Normal.
The washing machine is now switched
on and the temperature hot+ lights up
on the control field.
Touch the Start/Stop sensor button.
The program starts and the symbol
lights up on the control field.
After 10minutes, the indicators dim
and the Start/Stop sensor button
starts flashing.
At the end of the program
At the end of the program, the Anti-
crease function is switched on. The
symbol lights up on the control field,
:appears on the time display, and
the drum occasionally rotates.
Touch the Start/Stop sensor button.
The door will be unlocked.
Reach under the recessed grip and
pull the door open.
Tip: Leave the door slightly open to al-
low the drum to dry.
When the program has ended, turn
the program selector to.
The washing machine is switched off
again and is now ready for use.
Energy savings
– 10minutes after the beginning of the
Anti-crease phase, the indicators dim
and the Start/Stop sensor button
starts flashing.
– 15minutes after completion of the
Anti-crease phase, the washing ma-
chine switches off completely and
the door lock is released.

Environmentally friendly washing
16
Energy and water consumption
– Make use of the maximum load that
the wash program can accommo-
date.
This will keep the energy and water
consumption to a minimum in relation
to the size of the load.
– When smaller amounts of laundry are
washed, the washing machine’s au-
tomatic load control system will re-
duce the amount of water and energy
used.
– Use the Express program for small,
lightly soiled loads.
– Modern detergents make it possible
to wash at lower temperatures (e.g.,
70°F/20°C). Using the corresponding
temperature settings will save energy.
– To maintain the hygiene of the ma-
chine, carry out a hot wash (above
60°C) at regular intervals. The indi-
cator will come on to remind you to
carry out a hot wash.
Detergent consumption
– Do not exceed the amounts of deter-
gent recommended on the packag-
ing.
– Adjust the dosage to the level of soil-
ing of the laundry.
– Reduce the amount of detergent with
smaller loads (approx. ⅓ less than
the amount recommended can be
used when washing a half load).
When drying with a tumble dryer
Select the highest possible spin speed
for the wash program to save energy in
the subsequent tumble dryer cycle.
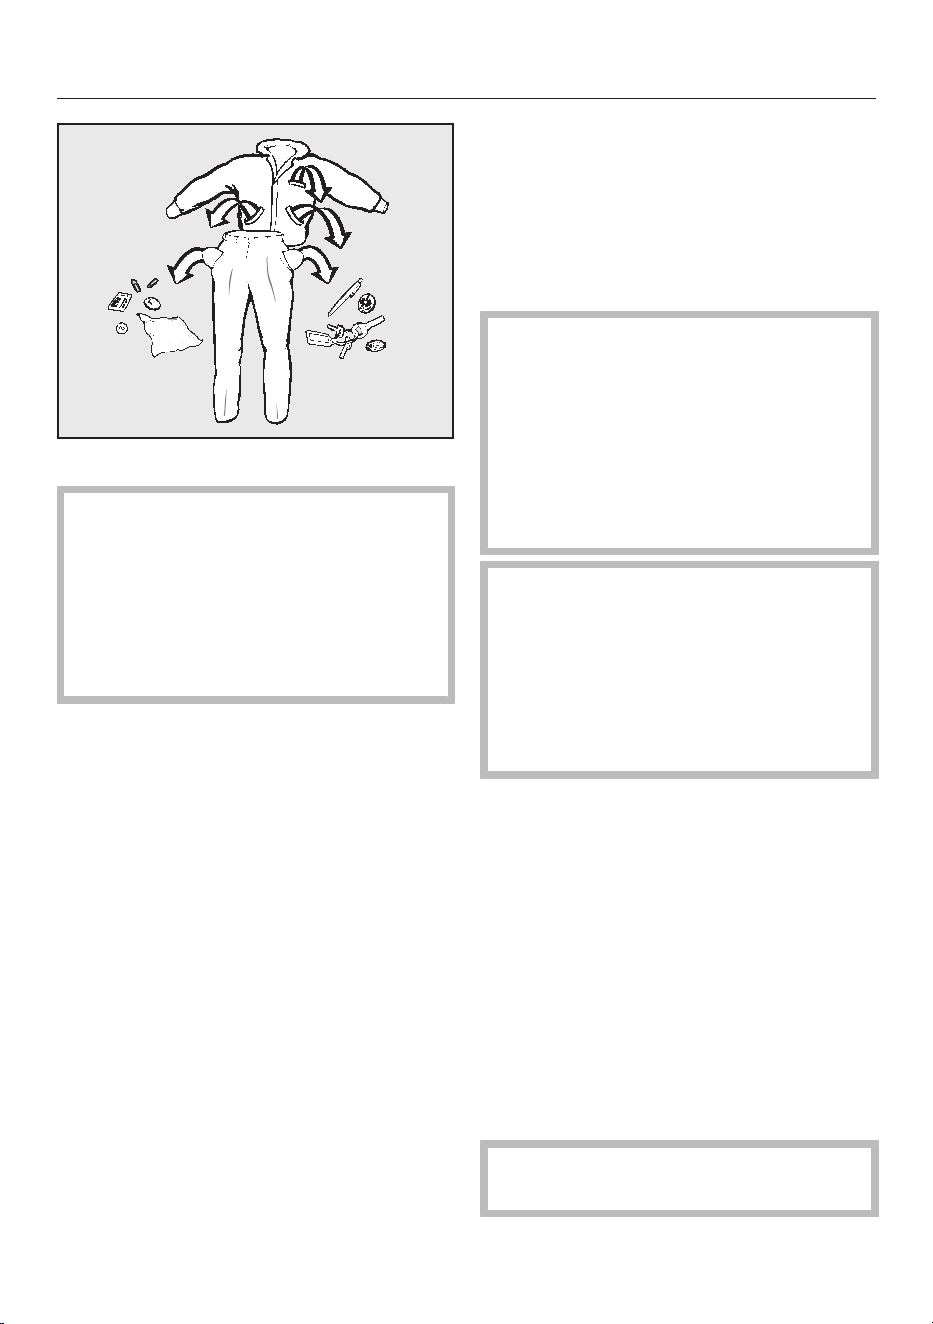
1. Prepare the laundry
17
Empty all pockets.
Damage due to foreign objects.
Nails, coins, paper clips, and so on
can cause damage to garments and
components in the machine.
Check the laundry before washing
and remove any such foreign ob-
jects.
Sort the laundry
Only wash items that are labeled ma-
chine washable by the manufacturer.
Most garments have a fabric care label
in the collar or side seam.
Sort the laundry by care label and
color.
Tip: Dark fabrics often bleed the first
few times they are washed. They should
be washed separately several times be-
fore being included in a mixed load.
Pre-treating stains
Badly soiled areas and stains should
be cleaned as soon as possible,
preferably while still fresh. Stains
should be carefully dabbed off using
a soft, colorfast cloth. Do not rub!
Tip: Stains (such as blood, egg, coffee,
and tea) can be pre-treated using some
handy tricks which can be found in the
Miele guide to laundry care. Please
contact Miele directly or submit a re-
quest via Internet page to obtain or
view a copy of this manual.
Damage due to solvent-based
cleaning agents
Cleaning agents containing benzine,
stain remover, etc., can damage
plastic parts.
When pre-treating a stain, make sure
that plastic parts do not come into
contact with cleaning agents.
Risk of explosion due to solvent-
based cleaning agents.
When using solvent-based cleaning
agents, an explosive mixture may
develop.
Never use solvent-based cleaning
agents in the washing machine.
General tips
– Curtains: Remove any lead weights
or strips before washing.
– Loose bra underwires should be re-
moved or sewn in place before wash-
ing.
– Close zippers, hooks and eyelets be-
fore washing.
– Comforter covers and pillowcases
should be fastened to prevent small
items from rolling inside of them.
Do not wash items with the sym-
bol on the fabric care label.
2. Load the laundry
18
Opening the door
Take hold of the door and pull it
open.
Check the drum for pets or foreign
objects before loading it with laun-
dry.
The most efficient use of energy and
water is achieved when a full load is
washed. However, do not overload as
this reduces cleaning efficiency and
causes creasing.
Unfold the laundry and load loosely in
the drum.
Mixing both large and small items
gives better wash results and also
helps distribute the load evenly during
spinning.
Tip: Please note the maximum load for
different wash programs.
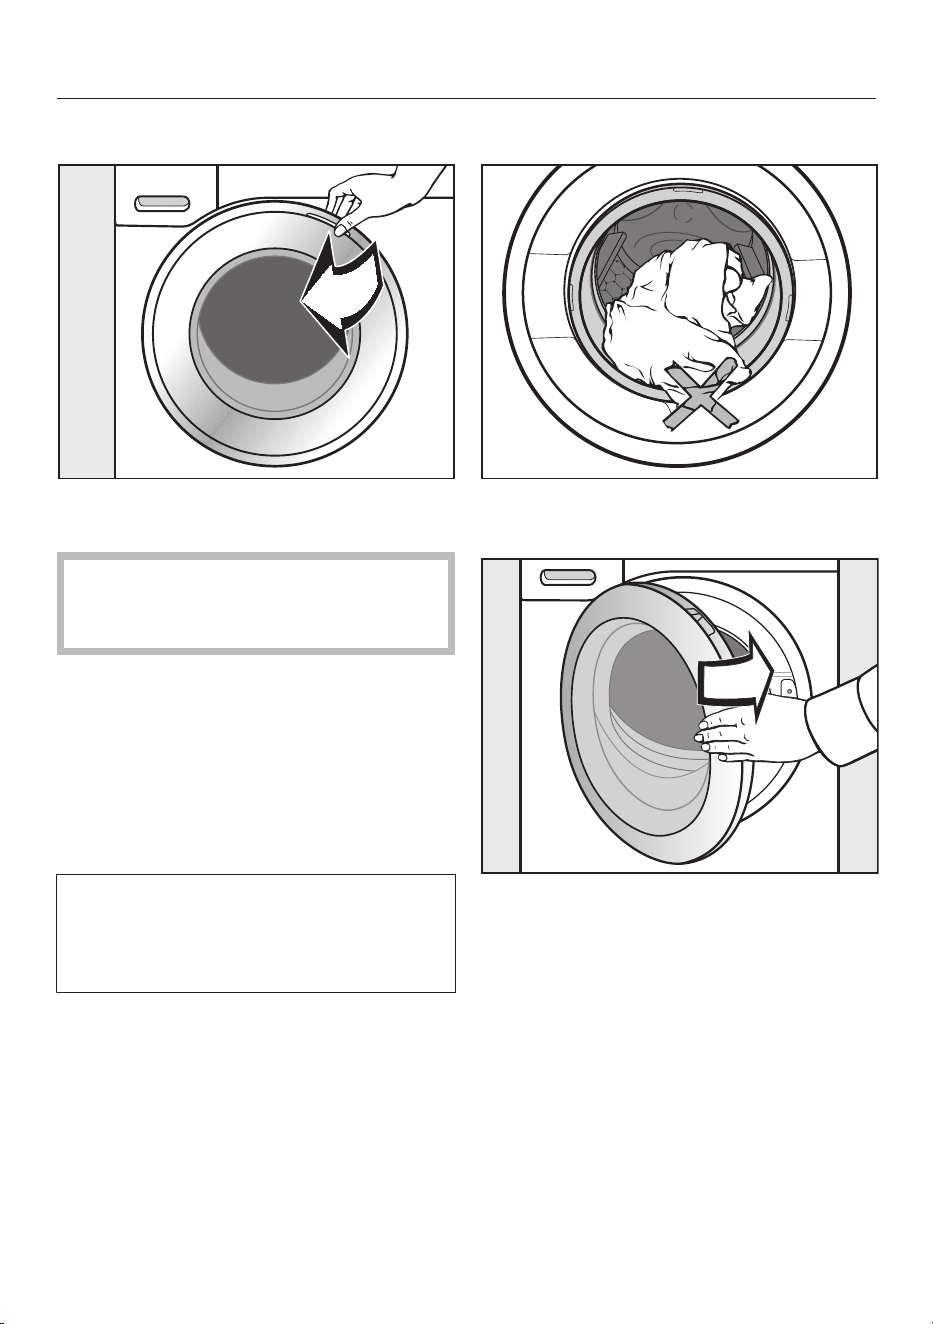
Closing the door
Make sure that no items are caught
between the door and the seal.
Shut the door with a gentle swing.
3. Select a program
19
Program selection
The washing machine is switched on by
turning the program selector to a wash
program.
Turn the program selector to the re-
quired program.
The estimated wash time is shown on
the time display and the pre-set tem-
perature and spin speed light up in the
control field.
Selecting a temperature and spin
speed
The wash program’s pre-set tempera-
ture and spin speed light up brightly.
The choice of temperatures and spin
speeds selectable for the wash pro-
gram light up dimly.
Touch the sensor button for the tem-
perature desired. It will then light up
brightly.
Touch the sensor button for the spin
speed desired. It will then light up
brightly.
3. Select a program
20
Selecting extra options
The selection of extra options avail-
able for the wash program lights up
dimly.
Touch the sensor button for the re-
quired extra option. It will then light
up brightly.
Tip: You can select multiple extra op-
tions for a wash program.
Please refer to “Extra options” for
more information.
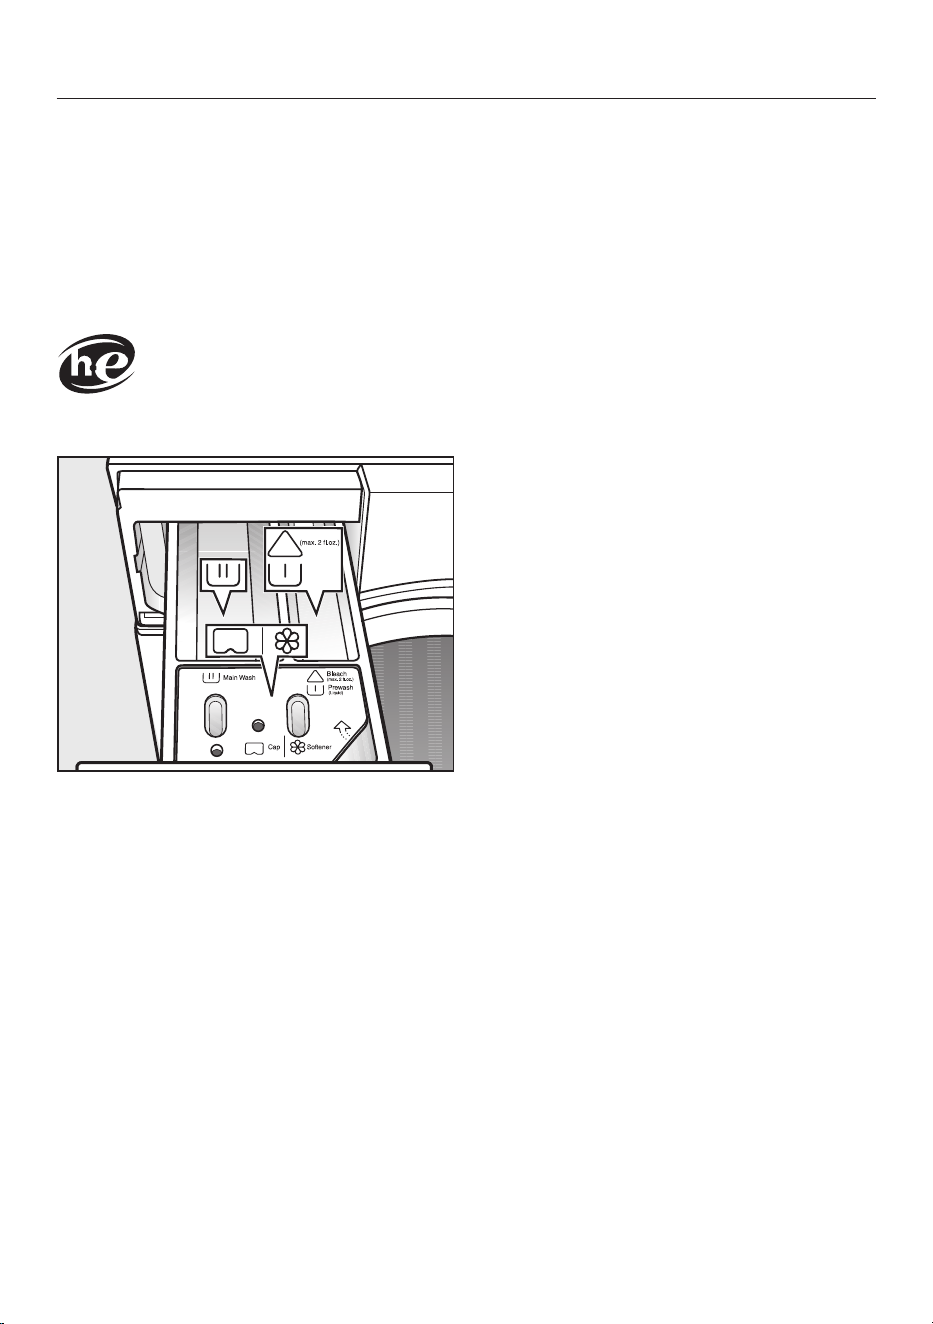
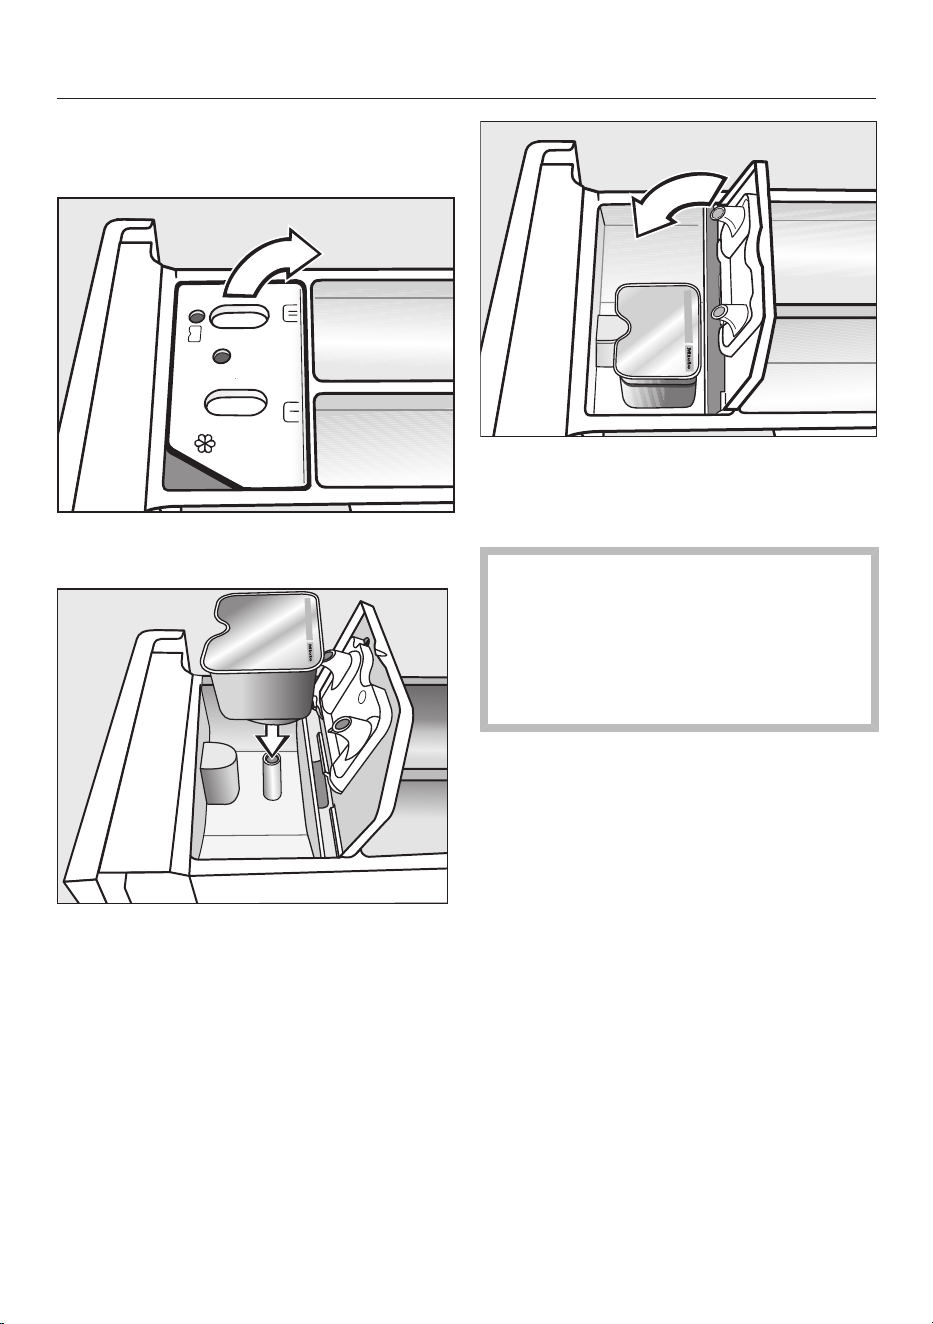
4. Adding detergent
21
Detergent dispenser drawer
This washing machine requires high ef-
ficiency detergent. Adhere strictly to the
dispensing amounts supplied by the
detergent manufacturer. The detergents
must be marked with the following la-
bel:
Filling with detergent
Pull out the detergent drawer and add
detergents to the compartments.
Chlorine bleach for removing
stains or liquid detergent for the
pre-wash
Detergent for the main wash and
soaking
Fabric softener, liquid starch, or
capsules
Tips for dispensing
Adjust the detergent dosage to the level
of soiling of the laundry and the maxi-
mum load. Reduce the amount of de-
tergent with smaller loads (e.g., reduce
the amount of detergent by ⅓ when
washing a half load).
Too little detergent:
– The laundry is not cleaned properly
and may become gray and hard to
the touch over time.
– Can lead to a build-up of mould in
the washing machine.
– Grease is not completely removed
from the laundry.
– Can lead to limescale deposits on the
heater elements.
Too much detergent
– Poor wash, rinse, and spin results.
– Causes higher water consumption as
an extra rinse cycle is automatically
activated.
– A greater burden on the environment.
Dispensing aids
Use dispensing aids (e.g., balls) if these
are supplied with the detergent, particu-
larly when using liquid detergent.

4. Adding detergent
22
Using chlorine bleach
Damage due to chlorine bleach.
Textiles may be discolored or their
fibers damaged.
Only use chlorine bleach on suitable
textiles.
Chlorination must be activated in the
programmable functions before chlo-
rine bleach is first used.
Chlorine bleach may be used in the
following programs:
– Normal
– Wrinkle-free
– Sanitize
– Dress Shirts
– Extra White
Dispensing chlorine bleach
Follow the manufacturer's instruc-
tions on the packaging.
The extra option pre-wash must not
be selected.
Pour max. ¼ cup (60ml) of chlorine
bleach into the chamber.
The chlorine bleach is added automati-
cally 10minutes before the end of the
main wash.
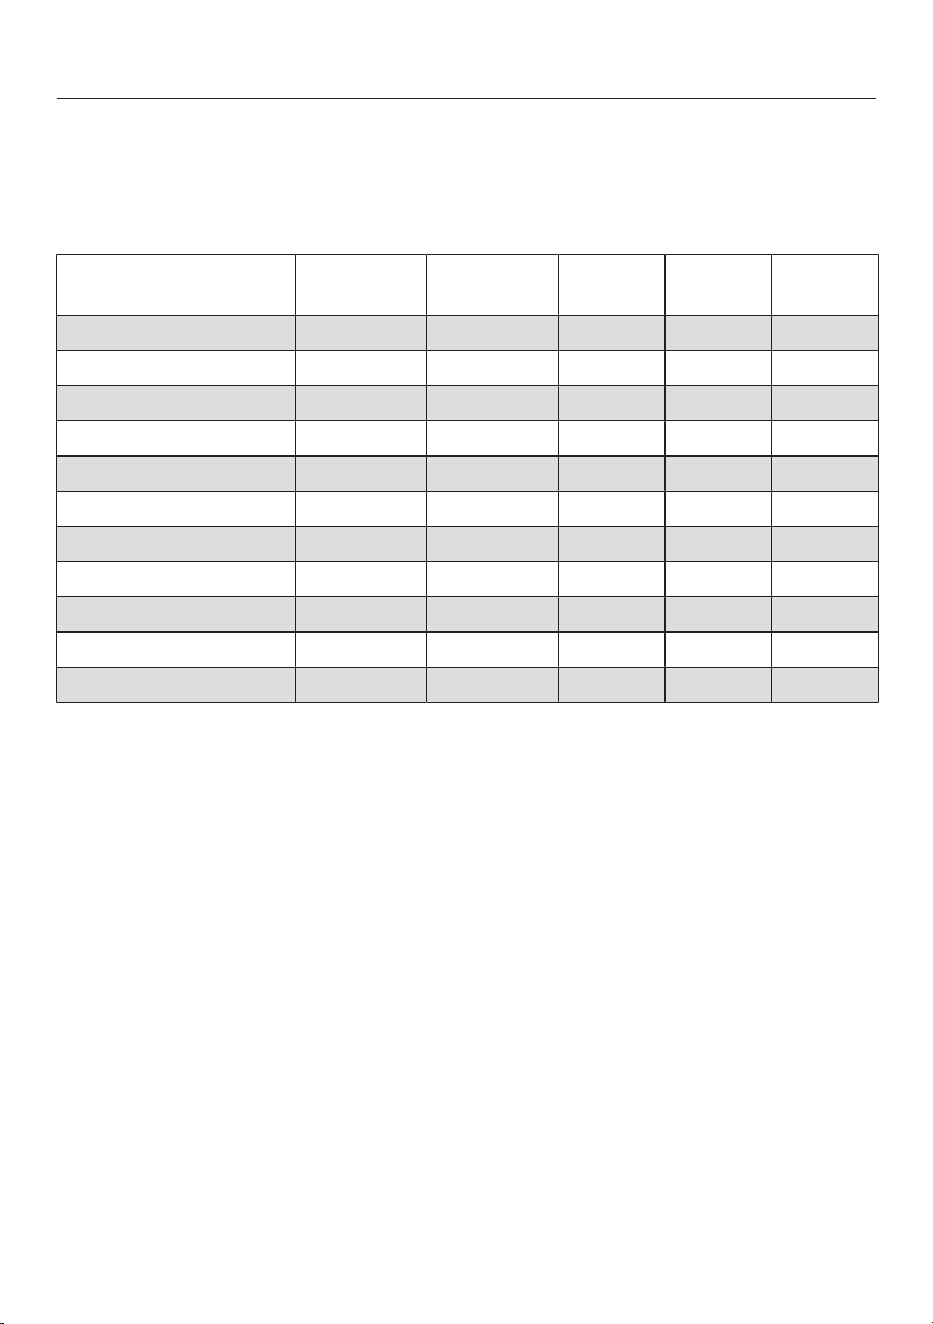
Using powder detergent
The detergent dispenser drawer con-
tains an insert for liquid detergent in the
compartment. This insert must be
removed to use powder detergent.
It is not possible to use powder de-
tergent in the compartment.
A pre-wash cannot be carried out
when using powder detergent.
Remove the detergent dispenser
drawer.
Remove the insert for liquid deter-
gents from the compartment.
Tip: Reinsert the insert into the deter-
gent dispenser drawer before next us-
ing liquid detergent.
Using detergent tablets or pods
Always put detergent tablets or pods
directly in the drum with the laundry.
They cannot be added via the detergent
dispenser drawer.
4. Adding detergent
23
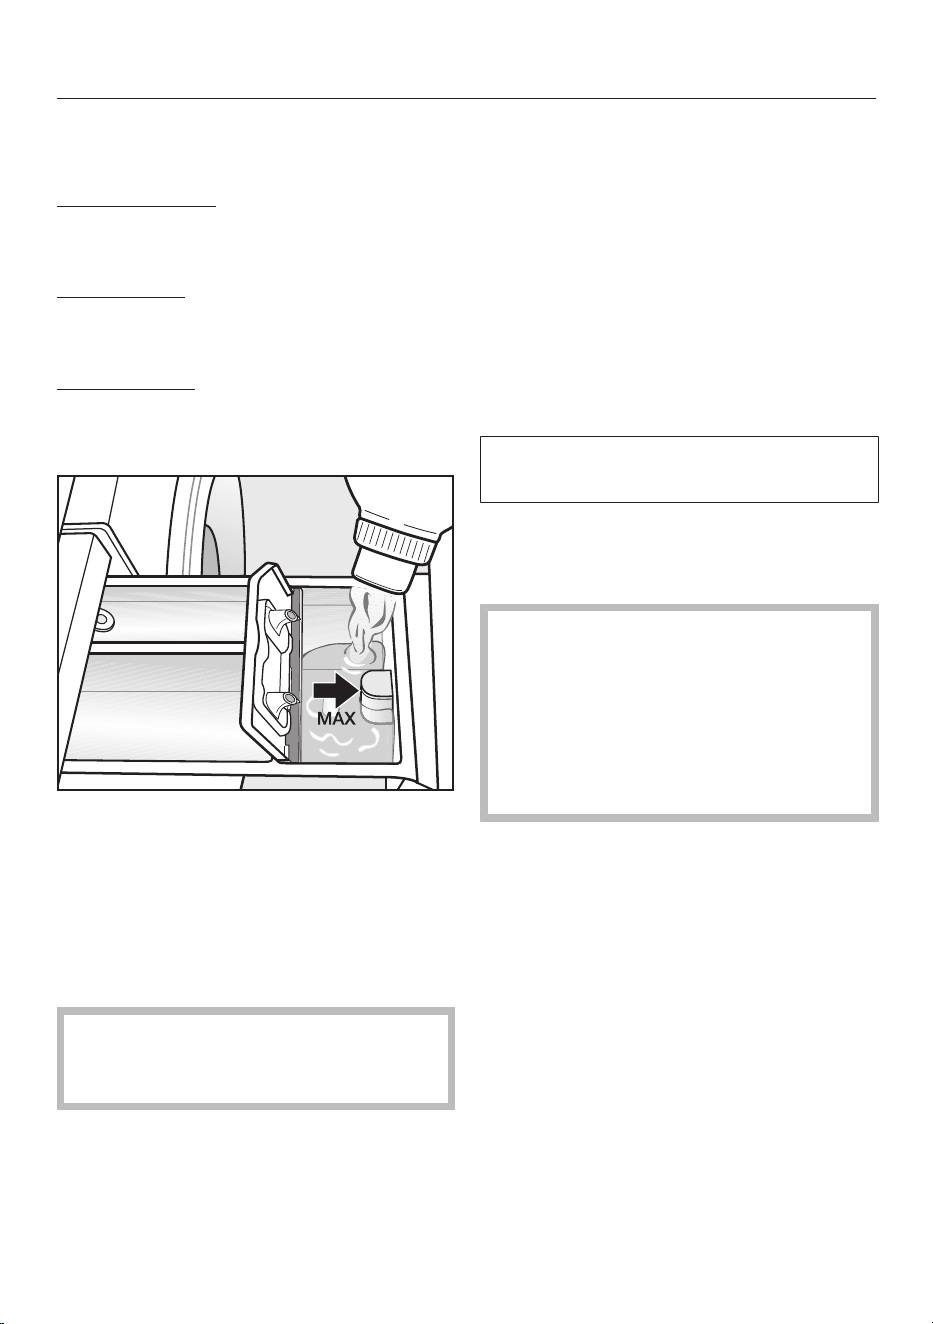
Using fabric softener and liquid
starch
Fabric softeners
make garments soft to handle and help
prevent static cling when tumble drying.
Liquid starch
is synthetic and provides good stiffness
to fabric.
Natural starch
stiffens and gives body to fabric.
Adding fabric softener
Add the fabric softener or the liquid
starch to the compartment. Do not
exceed the maximum level mark.
It will be automatically dispensed in the
final rinse cycle. At the end of the pro-
gram, a small amount of water remains
in the compartment.
If starching frequently, clean the dis-
penser compartment, especially the
siphon, regularly.
CapDosing
Three different types of capsule are
available:
= Fabric care (e.g., fabric soft-
ener, proofing agent)
= Additives (e.g., detergent en-
hancers)
= Detergent (for the main wash
only)
Each capsule contains the correct
amount for one wash cycle.
Capsules are available to order from
Miele’s online store, Miele customer
service, or your Miele dealer.
Capsules pose a health risk.
The ingredients of capsules can be
hazardous to health if they are swal-
lowed or come into contact with
skin.
Keep capsules out of the reach of
children.
Switching on CapDosing
Touch the sensor button for the cap-
sule you want to use.
Sensor button Capsule
for
for
for
4. Adding detergent
24
Inserting a capsule
Open the detergent dispenser drawer.
Open the lid of the / compart-
ment.
Press the capsule in firmly.
Close the lid and press it firmly shut.
Close the detergent dispenser
drawer.
The capsule is opened by the act of
inserting it in the detergent dispenser
drawer. The contents can run out of
the capsule if you then remove it
from the drawer before it is used.
Dispose of opened capsules.

4. Adding detergent
25
The contents of the capsule will be
added to the wash program at the cor-
rect time.
During CapDosing, water intake to
the compartment takes place
solely via the capsule.
Do not add any additional fabric soft-
ener to the compartment.
Remove the empty capsule at the
end of the wash program.
For technical reasons, a small amount
of water will remain in the capsule.
Switching off/Changing CapDosing
In order to switch off CapDosing,
touch the brightly lit sensor button.
In order to change CapDosing, touch
one of the other capsule sensor but-
tons.
Color run and dye removers
Damage due to color run/dye re-
movers.
Color run and dye removers can
cause corrosion in the washing ma-
chine.
Do not use color run or dye removers
in the washing machine.
Dyes suitable for use in domestic wash-
ing machines can be used. However,
please note that the salt used in the
dyeing process can cause corrosion to
stainless steel components in the ma-
chine if you use dye frequently. Always
observe the dye manufacturer’s instruc-
tions carefully.

5. Starting a program
26
Starting a program
Touch the flashing Start/Stop sensor
button.
The door will lock and the program will
start.
– As long as the symbol is flashing
on the control field, you can add
laundry.
– When the symbol lights up con-
stantly, the door is locked until the
end of the program.
If a Delay Start time has been selected,
this will count down on the time display.
At the end of the Delay Start time or im-
mediately after the program has started
(if no Delay Start time has been se-
lected), the program duration will ap-
pear on the time display.
Energy savings
After 10minutes, the indicators dim.
The Start/Stop sensor button will flash
slowly.
You can reactivate the indicators:
Touch the Start/Stop sensor button
(this does not have any effect on a
running program).
6. Program end – removing the laundry
27
Program end
The time display shows 0:00. The
symbol will remain lit up on the control
field. The door is locked in the Anti-
crease phase.
Touch the Start/Stop sensor button.
The door unlocks and the symbol on
the control field goes out.
Pull open the door.
Remove the laundry.
Energy savings
– 10minutes after the beginning of the
Anti-crease phase, the indicators dim
and the Start/Stop sensor button
starts flashing.
– 15minutes after completion of the
Anti-crease phase, the washing ma-
chine switches off completely and
the door lock is released.
Items left in the drum could discolor
other items in the next wash or be-
come discolored themselves.
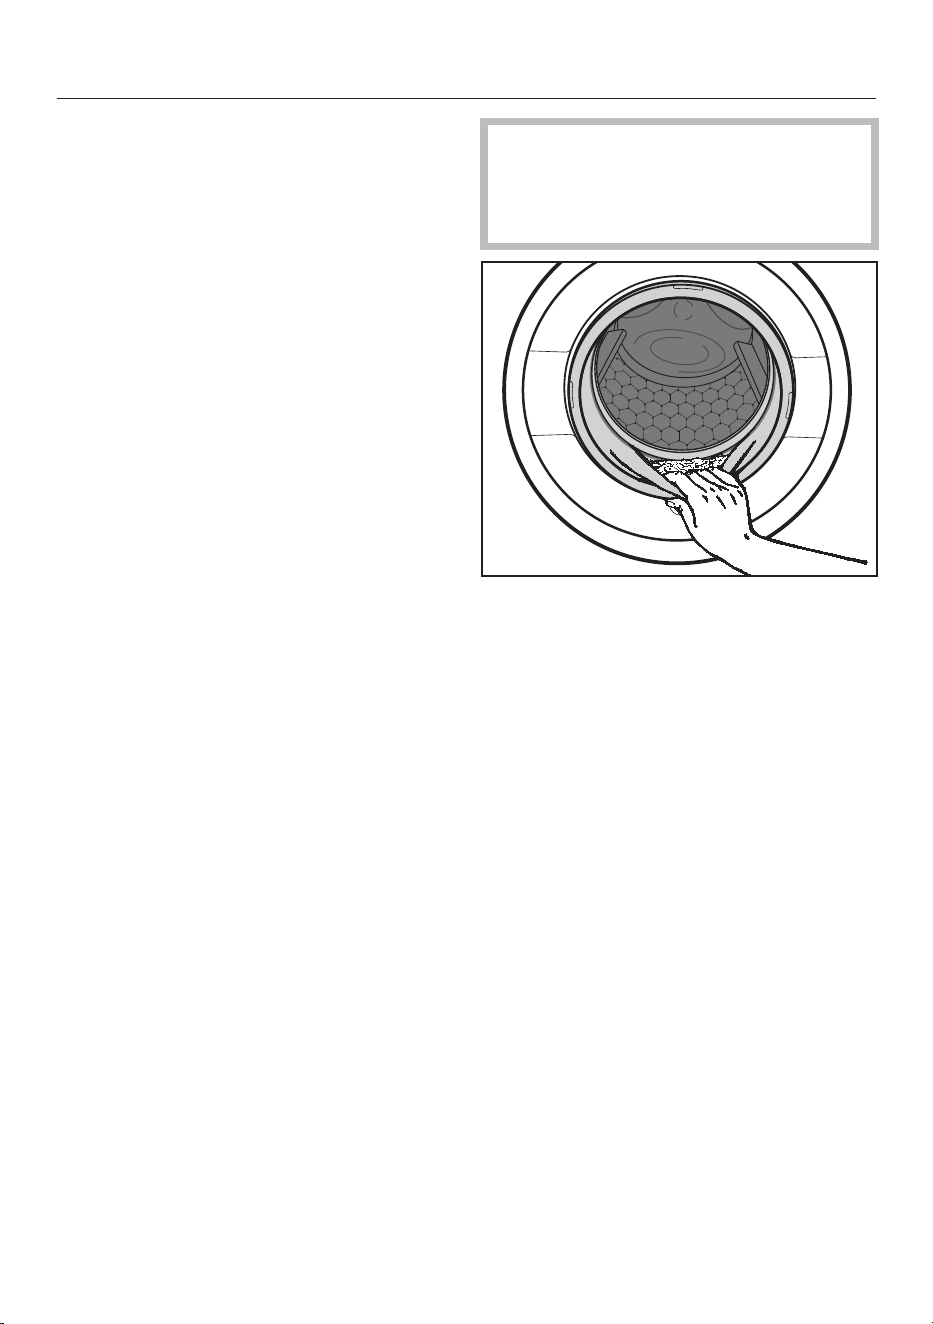
Remove all items from the drum.
Check the folds in the door seal for
any foreign objects.
Tip: Leave the door slightly open to al-
low the drum to dry.
Turn the program selector to the
position. This switches the washing
machine off.
If applicable, remove the used cap-
sule from the detergent dispenser
drawer.
Tip: Leave the detergent dispenser
drawer slightly open to allow it to dry.

Spin cycle
28
Final spin speeds
Program Selectable spin speeds in words and numbers
Max.
1,400rpm
High
1,200rpm
Med
800rpm
Slow
600rpm
Normal – – – X X
Wrinkle-free – X X X X
Delicates – – X X X
Sanitize X – – X X
Handwash – X X X X
Dress Shirts – – X X X
Express – X X X X
Darks/Denims – X X X X
Extra White X – – X X
Outdoor – – X X X
Proofing – X X X X
Drain/Spin X X X – X
= optimum spin speed for program is pre-set
X = can be selected – = cannot be selected

Spin cycle
29
Final spin speed in the wash
program
When a program is selected, the sensor
button for the optimum spin speed for
that program will be brightly lit up on
the control field.
A faster spin speed can be selected for
certain wash programs.
The highest selectable spin speed is in-
dicated in the table.
Omitting the final spin (Rinse hold)
Touch the sensor button (Rinse
hold).
The laundry is not spun after the final
rinse and remains in the rinse water.
This helps prevent creasing if the laun-
dry is not going to be removed from the
drum immediately after the end of the
program.
After the end of a program
The sensor button for the optimum
spin speed lights up on the control
field. You can change the spin speed.
The Start/Stop sensor button will flash
slowly.
To start the final spin:
Touch the flashing Start/Stop sensor
button once.
The final spin is carried out.
To end the program:
Touch the flashing Start/Stopsensor
button twice.
The water will be pumped away.
Deselecting the rinse-spin and final
spin
Touch the sensor button.
After the last rinse cycle, the water will
be pumped away and the Anti-crease
phase will switch on.
An Extra Rinse cycle is carried out with
this setting for certain wash programs.
Rinse-spin
There is a spin cycle after the main
wash and between the rinse cycles. A
reduction in the final spin speed will
also reduce the interim spin speed as
appropriate. If a spin speed of less than
700rpm is selected for the Normal pro-
gram, an Extra Rinse phase is carried
out.

Delay Start
30
With Delay Start, you can delay the
start of a program from 30minutes up
to a maximum of 24hours. This allows
you to make use of night-time economy
electricity rates, for example.
Selecting Delay Start
Delay Start cannot be selected in the
Drain / Spin or Proofing programs.
Select the program required.
Touch the sensor button.
The sensor button lights up brightly.
Touch the or sensor button re-
peatedly until the required Delay Start
time appears on the time display.
– In the case of settings below
10hours, the Delay Start time
changes in increments of 30minutes
– In the case of settings above
10hours, the Delay Start time
changes in increments of 1hour
Starting Delay Start
Touch the flashing Start/Stop sensor
button.
The Delay Start process starts and
counts down on the time display.
Altering Delay Start
Touch the Start/Stop sensor button.
The Delay Start process stops and the
symbol on the control field goes out.
Touch the or sensor button re-
peatedly until the required Delay Start
time appears on the time display.
Touch the flashing Start/Stop sensor
button.
Canceling Delay Start
Touch the Start/Stop sensor button.
The Delay Start process stops and the
symbol on the control field goes out.
Touch the brightly lit sensor but-
ton.
Delay Start is canceled and the sen-
sor button goes out. The program dura-
tion appears on the time display.
Touch the flashing Start/Stop sensor
button in order to start the wash pro-
gram.
Program guide
31
Temperature
with garment care label sym-
bols
Item/Tip
Normal Full load (17.6lb/8kg)
Hot+ 140°F/60°C Cotton, linen, and mixed fiber textiles made of
both cotton and linen.
Hot 120°F/50°C
Warm+ 105°F/40°C
Warm 85°F/30°C
Cold Cold
USA test program in accordance with: DOE Federal Register 10 CFR Part 430
Appendix J2 to subpart B
Canada test program in accordance with: CAN/CSA-C360-13
Wrinkle-free Half load (8.8lb/4kg)
Hot+ 140°F/60°C Synthetic or mixed fiber fabric, or wrinkle-free
cotton.
Hot 120°F/50°C
Warm+ 105°F/40°C
Warm 85°F/30°C
Cold Cold
Delicates Small load (6.6lb/3kg)
Hot+ 140°F/60°C For fine textiles made from synthetic fibers.
Hot 120°F/50°C
Warm+ 105°F/40°C
Warm 85°F/30°C
Cold Cold
Sanitize Full load (17.6lb/8kg)
Sani 170°F/75°C Cotton or linen fabrics with direct skin contact
or for which special hygiene requirements ap-
ply.
Program guide
32
Temperature
with garment care label sym-
bols
Item/Tip
Handwash Small load (4.4lb/2kg)
Warm+ 105°F/40°C For fine textiles which are only suitable for hand
washing.
Warm 85°F/30°C
Cold Cold
Dress Shirts Small load (4.4lb/2kg)
Hot+ 140°F/60°C Pre-treat collars and cuffs depending on the
level of soiling.
Wash dress shirts and silk blouses in the Deli-
cates program.
Hot 120°F/50°C
Warm+ 105°F/40°C
Warm 85°F/30°C
Cold Cold
Express Half load (7.7lb/3.5kg)
Warm+ 105°F/40°C Cotton textiles that have hardly been worn or
are only very lightly soiled.
Selecting the Lightly soiled extra option will re-
duce the washing time by 10minutes.
Warm 85°F/30°C
Cold Cold
Darks/Denims Small load (4.4lb/2kg)
Warm+ 105°F/40°C Black and dark garments made from cotton,
mixed fibers, and denim.
– Wash inside out.
– Denim often contains excess dye and may
run during the first few washes. Therefore,
wash light and colored items separately.
Warm 85°F/30°C
Cold Cold
Program guide
33
Temperature
with garment care label sym-
bols
Item/Tip
Extra White Full load (17.6lb/8kg)
Hot+ 140°F/60°C For white textiles made of cotton or linen with-
out special hygiene requirements.
Outdoor Small load (5.5lb/2.5kg)
Warm+ 105°F/40°C Performance outerwear (e.g., jackets and
trousers) made from membrane fabric such as
Gore-Tex®, SYMPATEX®, WINDSTOPPER®,
etc.
– Zip up or close any jackets with Velcro before
washing.
– Do not use fabric softener.
– If required, these garments can also be re-
proofed using the Proofing program. Reproof-
ing after each wash cycle is not recom-
mended.
Warm 85°F/30°C
Cold Cold
Proofing Small load (5.5lb/2.5kg)
Warm+ 105°F/40°C Treating microfiber fabric, ski wear, or table
linens made from mainly synthetic fibers to pro-
vide a finish which is resistant to water and dirt.
– The items should be freshly laundered and
spun or dried before proofing.
– For best results, the items should be heat-
treated afterwards either in a tumble dryer or
by ironing.
Drain / Spin Full load (17.6lb/8kg)
Cold – Drain only: Set spin speed to .
– Make sure you select the appropriate spin
speed.

Extra options
34
You can supplement the wash pro-
grams with extra options.
Extra options are selected and dese-
lected using the relevant sensor buttons
on the control field.
Touch the sensor button for the extra
option you require.
The relevant button will light up brightly.
Not all the extra options can be used
with every program.
An extra option that is not permitted for
the wash program is not lit dimly and
cannot be activated by touch.
Heavy soiled
For laundry that is very heavily soiled.
The extended wash duration enhances
the stain-removing effect.
Light soiled
For slightly soiled textiles that are not
stained. The wash duration is reduced.
Pre-wash
For laundry with large amounts of dirt,
e.g., dust and sand.
Buzzer
A buzzer sounds at the end of the pro-
gram. The buzzer sounds until the
washing machine is switched off. The
volume of the buzzer can be changed,
see “Settings – Buzzer”.

Extra options
35
The following extra options can be selected in addition to the
programs
Heavy soiled Light soiled Pre-Wash Buzzer
Normal X X X X
Wrinkle-free X X X X
Delicates X X X X
Sanitize X X X X
Handwash – X – X
Dress Shirts X X X X
Express – X – X
Darks/Denims X X X X
Extra White X X X X
Outdoor X X X X
Proofing – – – X
Drain / Spin – – – X
X = can be selected
– = cannot be selected

Changing the program sequence
36
Changing the program
After a program has started, it is no
longer possible to select a different pro-
gram.
If you would like to change the pro-
gram, you have to cancel the program.
Canceling a program
You can cancel a wash program at any
time after it has started.
Touch and hold the Start/Stop sensor
button until the time display switches
to :.
The water will be pumped away. As
soon as the symbol on the control
field goes out, the program has been
canceled.
Open the door.
Selecting a different program after
canceling the program
Close the door.
Check that there is still detergent in
the dispenser drawer. Add more de-
tergent if necessary.
Turn the program selector to the pro-
gram you want and start it by touch-
ing the Start/Stop sensor button.
Removing laundry after canceling the
program
If you want to remove the laundry when
it is dripping wet:
Open the door.
Remove the laundry.
If you want to remove the laundry after
it has been spun (damp):
Open the door.
Close the door.
Turn the program selector to Drain/
Spin.
Tip: Select an appropriate spin speed.
Interrupting a program
Turn the program selector to the
position.
The washing machine switches off.
To continue, turn the program selec-
tor to the position of the wash pro-
gram that was started.
Tip: If appears on the time display,
the program selector is in the incorrect
position.

Changing the program sequence
37
Adding or removing laundry
You can add or remove laundry at the
start of a wash program as long as the
symbol is flashing on the control
field.
Briefly touch the Start/Stop button.
The program will stop and the door will
unlock.
Pull open the door.
Add or remove items.
Close the door.
Touch the Start/Stop sensor button.
The wash program will continue.
Detergent
38
Miele-recommended detergents
The Miele detergents have been developed by Miele especially for the Miele wash-
ing machine. You can order the Miele detergents from Miele's online store or you
can purchase them from Miele's customer service, or your Miele dealer.
Miele
UltraWhite
Miele
UltraColor
Miele
Cap
Miele
Cap
Miele
Cap
Normal –
Wrinkle-free – –
Delicates – , , –
Sanitize – –
Handwash – – , , –
Dress Shirts –
Express – – –
Darks/Denims – – –
Extra White –
Outdoor – – – –
Proofing – – – –
Recommended Sport SilkCare
– Not recommended Downs Fabric softener
Outdoor Proofing
WoolCare Booster

Detergent
39
General detergent recommendations
The wash programs that are not listed do not have a detergent recommendation.
Universal
detergent
Color
detergent
Detergent for
Woolens and
delicates
Bleach
Normal –
Wrinkle-free –
Delicates – –
Sanitize –
Handwash – – –
Dress Shirts –
Express –
1)
– –
Darks/Denims – –
Extra White – –
Outdoor – – –
Recommended
1)
Liquid detergent
– Not recommended
Cleaning and care
40
Cleaning the drum
(hygiene info)
Washing at low temperatures and/or us-
ing liquid detergent can cause bacteria
and unpleasant odors to build up in the
washing machine. Use the Sanitize pro-
gram to clean the machine. This should
be done at the latest when the indicator
light comes on.
Cleaning the housing and con-
trol panel
Risk of electric shock.
Mains voltage is present when the
washing machine is switched off
Disconnect the machine from the
electricity supply before cleaning or
maintenance.
Risk of damage due to ingress of
water.
The pressure of a water jet can
cause water to get into the washing
machine, resulting in damage to
components.
Do not spray the washing machine
with a water jet when hosing down.
Clean the housing and control panel
with a mild cleaning agent or soap
and water and dry both with a soft
cloth.
The drum can be cleaned using a
suitable stainless steel cleaning agent
following the manufacturer’s instruc-
tions on the packaging.
Damage due to cleaning agents.
Do not use solvents, abrasive clean-
ers, glass cleaners or all-purpose
cleaning agents. These might dam-
age plastic surfaces and other com-
ponents because of the chemicals
they contain.
Do not use any of these cleaning
agents.
Cleaning the detergent dis-
pensing drawer
Washing at low temperatures and the
use of liquid detergent can lead to a
build-up of bacteria in the detergent
dispenser drawer.
For hygiene reasons, clean the entire
drawer at regular intervals.
Removing the detergent dispenser
drawer
Pull out the detergent dispenser
drawer until a resistance is felt. Press
down the release button and at the
same time pull the drawer right out of
the machine.
Cleaning and care
41
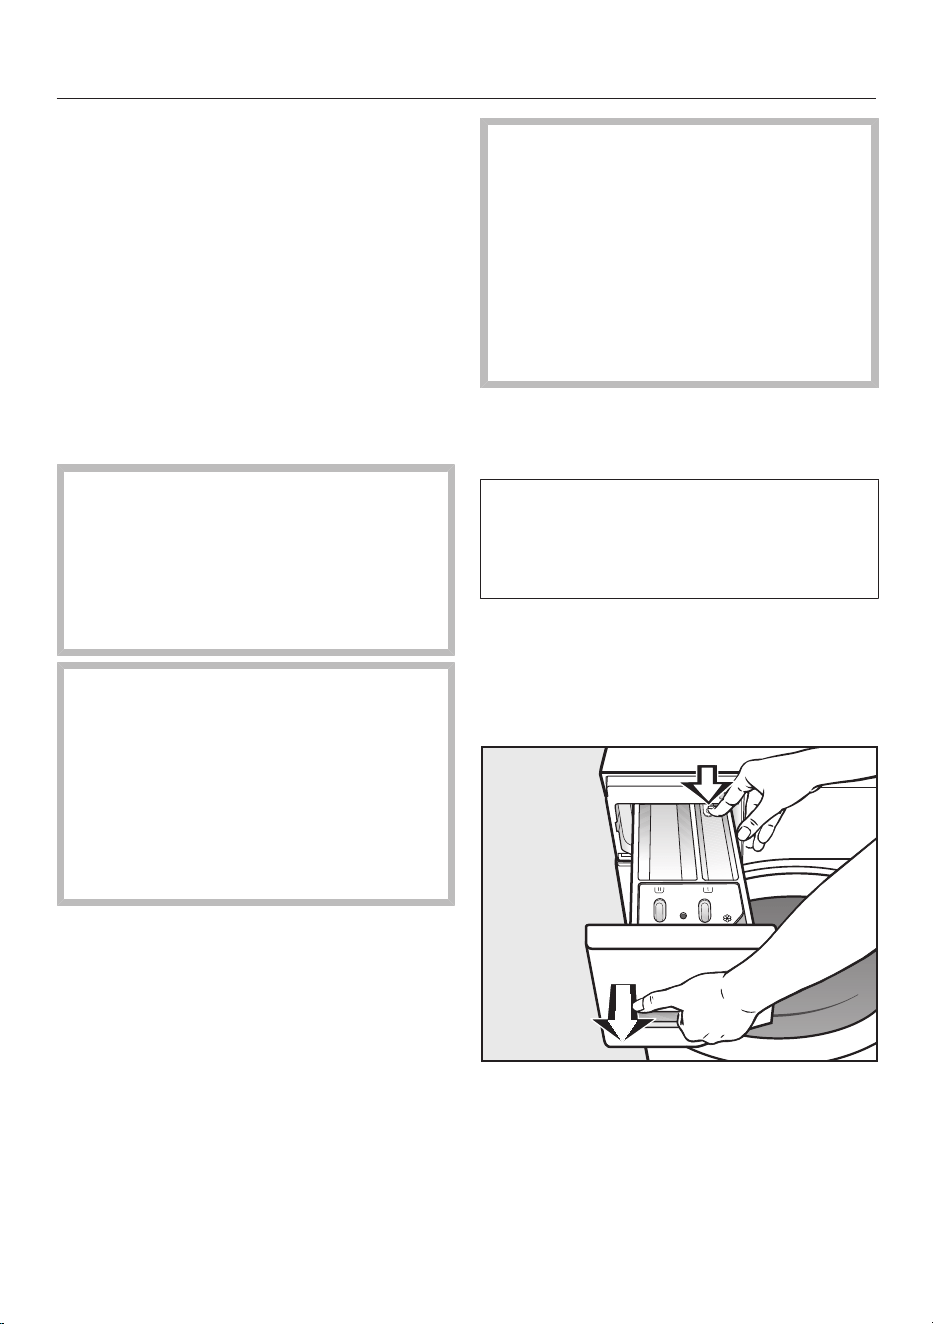
Removing and cleaning the insert for
liquid detergents
An insert for liquid detergents is located
in the compartment of the detergent
dispenser drawer.
Remove the insert. Clean the insert
thoroughly with warm water.
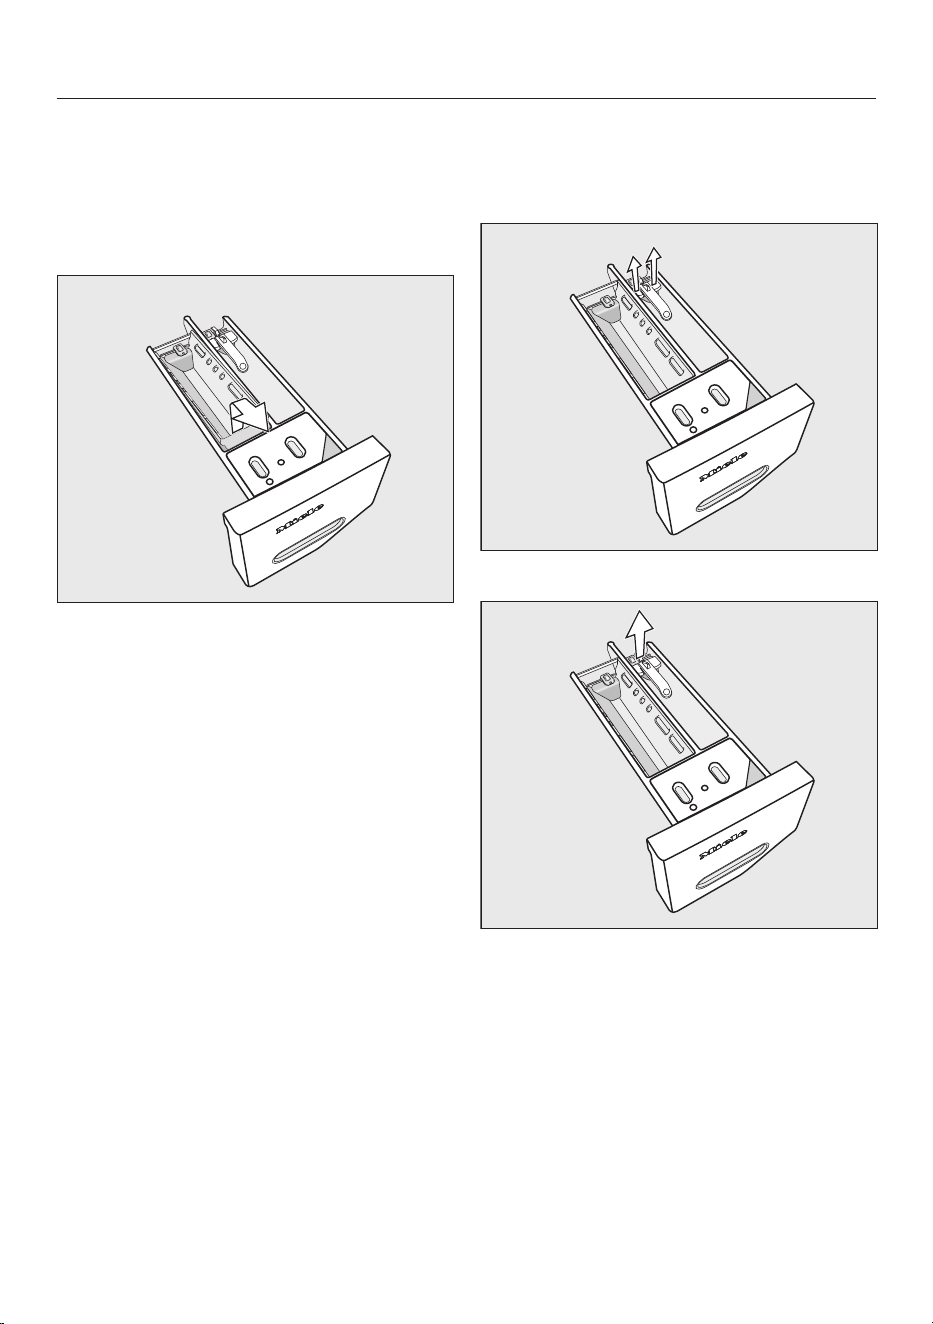
Cleaning the compartment
Compartment 1 has a siphon for better
dispensing of the chlorine bleach.
Remove the release catch.
Remove and clean the siphon.
Clean the and compart-
ments with warm water.
Cleaning and care
42
Cleaning the siphon and the /
compartment channel
Liquid starch results in clogging. The
siphon in the / compartment no
longer works and the compartment
can overflow.
Clean the siphon particularly thor-
oughly after using liquid starch a few
times.
1. Remove the siphon from the com-
partment and clean under warm run-
ning water. Clean the siphon tube in
the same way.
2. Refit the siphon.
Clean the fabric softener channel with
a brush and warm water.
Cleaning the detergent dispenser
drawer housing
Use a bottle brush to remove deter-
gent residues and limescale from the
jets inside the detergent dispenser
drawer housing.
Cleaning and care
43
Cleaning the water inlet filter
The washing machine has two filters to
protect the inlet valve. You should in-
spect the filters approximately every six
months, or more often if there are fre-
quent interruptions to the external water
supply.
Cleaning the filter in the inlet hose
First turn off the faucet.
Unscrew the inlet hose from the
faucet.
Remove the rubber seal 1 from the
connector.
Using needle nose pliers, take hold of
the plastic filter bar 2 and remove it.
Clean the filter.
Reassemble the appliance in reverse
order.
Cleaning the filter in the inlet valve
Using pliers, carefully loosen the
ribbed plastic nut on the inlet valve
and unscrew.
Use needle nose pliers to withdraw
the filter by the bar.
Clean the filter.
Reassemble the appliance in reverse
order.
After cleaning, turn the faucet slowly
and make sure the screw connec-
tions are watertight. If water leaks,
tighten the screw connections.
The filters must be put back in place
after cleaning.

Frequently asked questions
44
Problem solving guide
With the help of the following guide, minor faults in the performance of the appli-
ance, some of which may result from incorrect operation, can be put right without
contacting Miele Service. This will save time and money.
The following guide may help you to find the reason for a fault, and to correct it.
You should, however, note the following:
Repairs and other work by unqualified persons could be dangerous. The
manufacturer cannot be held responsible for unauthorized work.
Repair work to electrical appliances must only be carried out by a suitably qual-
ified and competent person in strict accordance with current local and national
safety codes.
A wash program cannot be started
Problem Possible cause and solution
The control field re-
mains dark.
There is no power to the machine.
Check whether the plug is plugged in.
Check whether the fuse has tripped.
The washing machine has switched off automatically
to save energy.
Switch the washing machine on again by turning
the program selector.
and appear alter-
nately on the time dis-
play.
The door is not closed properly. The door lock could
not engage.
Close the door again.
Start the program again.
If the fault message appears again, contact Tech-
nical Service.

Frequently asked questions
45
The program is canceled and a fault indicator light lights up on
the control field
Problem Possible cause and solution
The fault indicator light
lights up, and ap-
pear alternately on the
time display, and the
buzzer sounds.
The water intake is blocked or restricted.
Check whether the water supply is turned on prop-
erly.
Check whether the intake hose is kinked.
Check whether there is sufficient water pressure.
The filter in the water intake is blocked.
Clean the filter.
The fault indicator light
lights up, and ap-
pear alternately on the
time display, and the
buzzer sounds.
The drain is blocked or restricted.
The drain hose has been fixed too high.
Clean the filter and the pump.
The maximum drain height is 1m.
The fault indicator light
lights up, and
appear alternately on
the time display, and
the buzzer sounds.
The water protection system has reacted.
Close the water supply.
Contact Technical Service.
and appear alter-
nately on the time dis-
play and the buzzer
sounds.
There is a fault.
Disconnect the washing machine from the power
supply, either by unplugging the machine or by
disconnecting it at the fuse.
Wait at least 2minutes before reconnecting the
washing machine to the electricity supply.
Then switch the washing machine on again.
Restart the program.
If the fault message appears again, contact Tech-
nical Service.

Frequently asked questions
46
During the program, a symbol appears on the time display
Message Possible cause and solution
lights up. The program selector was moved to a different posi-
tion after the program had started.
Turn the program selector back to the original po-
sition.
The program has been interrupted.
Open the door.
Close the door.
At the end of the program, an indicator light lights up on the
control field
Problem Possible cause and solution
The indicator light
lights up.
Excessive foam has built up during washing.
Use less detergent next time and follow the manu-
facturer’s instructions on dosage given on the
packaging.
The indicator light
lights up.
A wash program using a temperature above 140°F
(60°C) has not been run for a long period of time.
In order to prevent bacteria and unpleasant odors
building up in the machine, run the Sanitize pro-
gram using Miele washing machine cleaner or uni-
versal powder detergent.

Frequently asked questions
47
General problems with the washer
Problem Possible cause and solution
The washing machine is
emitting an odor.
The indicator light was ignored. A wash program
using a temperature above 140°F (60°C) has not been
run for a long period of time.
In order to prevent bacteria and unpleasant odors
building up in the machine, run the Sanitize pro-
gram using Miele washing machine cleaner or uni-
versal powder detergent.
The door and detergent dispenser drawer were
closed after washing.
Leave the door and the detergent dispenser
drawer slightly open to allow them to dry.
The washer shakes dur-
ing the spin cycle.
The four feet are not resting evenly on the floor.
Level the machine (see “Leveling the washer”).
The laundry has not
been spun properly and
the laundry is still wet.
The machine detected an imbalance during the final
spin and reduced the spin speed automatically.
Wash large and small items together in order to
achieve a more even load distribution.
There are unusual
sounds coming from
the drain pump.
There is no fault!
Lapping sounds at the beginning and end of the
drain process are normal.
Large amounts of deter-
gent residue remain in
the detergent dispens-
ing drawer.
The water pressure is too low.
Clean the filter in the water intake.
Please note that the water pressure must be at
least 14.5psi (100kPa).
Powder detergent used in conjunction with water
softeners tends to become sticky.
Clean the detergent dispenser drawer and in fu-
ture, add detergent first and then the water soft-
ener.

Frequently asked questions
48
General problems with the washing machine
Problem Possible cause and solution
The fabric softener is
not completely dis-
pensed or too much
water remains in the
compartment.
The siphon tube is either positioned incorrectly or
clogged.
Clean the siphon tube, see “Cleaning and care -
Cleaning the detergent drawer”.
At the end of the pro-
gram there is still liquid
in the capsule.
The small pipe in the detergent dispenser drawer onto
which the capsule is placed is blocked.
Clean the small pipe.
Not a fault.
For technical reasons, a small amount of water will
remain in the capsule.
There is water next to
the capsule in the fabric
softener compartment.
The Cap sensor button was not activated or an
empty capsule was not removed at the end of the last
wash cycle.
Make sure that you remember to activate the Cap
sensor button the next time you insert a cap-
sule.
Remove and then dispose of the empty capsule at
the end of each wash cycle.
The small pipe in the detergent dispenser drawer onto
which the capsule is placed is blocked.
Clean the small pipe.

Frequently asked questions
49
Poor wash results
Problem Possible cause and solution
Liquid detergent is not
achieving the required
results.
Liquid detergents do not usually contain bleaching
agents. Consequently, fruit, coffee, and tea stains
cannot always be removed.
Use powder detergent containing a bleaching
agent.
Use the appropriate capsule or add stain removers
to the compartment.
Never put stain removers and liquid detergent to-
gether in the detergent dispenser drawer.
Gray, greasy particles
cling to washed laundry.
Insufficient amounts of detergent were used. The
laundry was heavily soiled with grease (oils, oint-
ments).
Use more detergent or use liquid detergent with
this type of soiled laundry.
Before washing the next load, run a Normal 60°C
program with liquid detergent but without a load.
White residues which
look like powder deter-
gent are seen on dark
textiles after washing.
The detergent contained compounds (zeolites) to aid
water softening which are not soluble in water. These
have ended up on the laundry.
Try and brush off the residues with a soft brush
once the laundry is dry.
In the future, wash dark textiles using a detergent
which contains no zeolites. Liquid detergents do
not usually contain zeolites.
Use the Darks/Denim program to wash the textiles.

Frequently asked questions
50
The drum door cannot be opened
Problem Possible cause and solution
The door cannot be
pulled open during a
program.
The drum is locked during a program.
Touch the Start/Stop sensor button to cancel the
program.
The program is canceled, the door will unlock, and
you will be able to pull it open.
There is still water in the drum and the machine is un-
able to drain.
Clean the drain filter and the drain pump as de-
scribed in “Opening the door in the event of a
blocked drain outlet and/or power outage”.
After the program is
canceled, flashing bars
......... appear
on the time display.
To protect the user against scalding, the door cannot
be opened if the suds temperature is higher than
130°F (55°C).
Wait until the temperature in the drum has de-
creased and the bars have stopped flashing on the
time display.
and appear alter-
nately on the time dis-
play.
The door lock has jammed.
Contact Technical Service.
Frequently asked questions
51
Opening the door in the event
of a blocked drain outlet and/
or power outage
Turn off the washing machine.
Open the drain pump flap.
Blocked drain outlet
If the drain outlet is blocked, a larger
quantity of water can remain in the
washing machine.
Risk of scalding due to hot suds.
Escaping suds will be hot if laundry
has been washed at high tempera-
tures.
Carefully allow all suds to drain off.
Draining the washing machine
Remove the drain filter, though not
completely.
Place a suitable container under the
flap, e.g., a bowl or dish.
Slowly unscrew the drain filter to let
the water out.
Tighten the drain filter back up again
if you need to interrupt the flow of
water.
Once the flow of water stops:
Remove the drain filter completely.
Frequently asked questions
52
Clean the drain filter thoroughly.
Remove any foreign objects (e.g.,
buttons, coins, etc.) and clean the in-
terior. Turn the impellers by hand to
check that they rotate freely.
Replace the drain filter correctly and
tighten it securely.
Close the drain pump flap.
Risk of water damage
Make sure the drain filter is securely
tightened. Otherwise there is a risk of
water leakage during use.
Replace the drain filter correctly and
tighten it securely.
Opening the door
Danger of injury due to rotating
drum.
Reaching into a rotating drum is ex-
tremely dangerous and may result in
injury.
Always make sure that the drum is
stationary before reaching in to re-
move laundry.
Use a screwdriver to unlock the door.
Pull open the door.
Technical Service
53
Contact in case of fault
In the event of a fault which you cannot
remedy yourself, please contact your
Miele dealer or Miele Technical Service.
Contact information for Miele Techni-
cal Service can be found at the end of
this document.
Please quote the model and serial num-
ber of your appliance when contacting
Miele. Both pieces of information can
be found on the data plate.
The data plate is found above the port-
hole glass when the door is opened.
Optional accessories
Optional accessories are available
through your Miele dealer or Miele.
Warranty
For further information, please refer to
your warranty booklet.

54
55
Installation instructions
Alteration rights reserved.
Visit our website for all the current product specifications, technical appliance
information, and warranty information.
To avoid accidents or damage to the appliance, please read these instructions
before installing and/or using it.
Installation
56
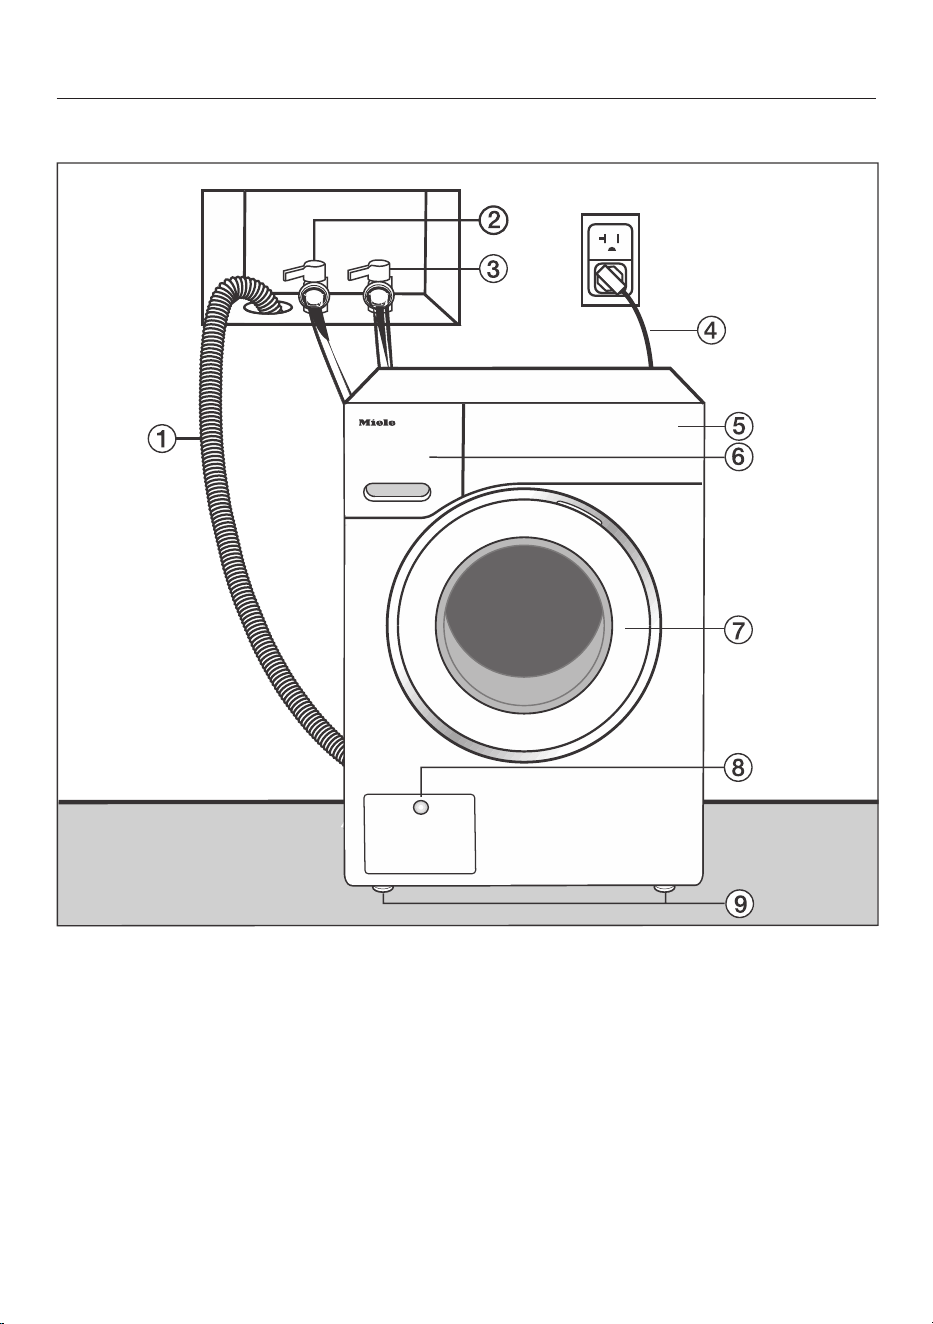
Front view
a
Drain hose
b
Hot-water inlet hose (pressure-proof
to 1,015 psi/7,000kPa)
c
Cold-water inlet hose (pressure-
proof to 1,015 psi/7,000kPa)
d
Electrical connection
e
Control panel
f
Detergent dispenser drawer
g
Door
h
Flap for drain filters, drain pump, and
emergency release
i
Four height-adjustable feet
Installation
57
Rear view
8
8
a
Drain hose
b
Transport clips for inlet and drain
hoses and power cord
c
Electrical connection
d
Protruding lid for holding when mov-
ing the machine
e
Cold-water inlet hose (pressure-
proof to 1,015 psi/7,000kPa)
f
Hot-water inlet hose (pressure-proof
to 1,015 psi/7,000kPa)
g
Safety caps for shipping struts
h
Transport clips for inlet and drain
hoses and for storing shipping struts
when not in use
Installation surface
A concrete floor is the most suitable in-
stallation surface for this machine. It is
far less prone to vibration during the
spin cycle than wooden floorboards or
a carpeted surface.
Installation
58
Please note:
The machine must be level and se-
curely positioned.
To avoid vibrations during spinning,
the machine should not be installed
on soft floor coverings.
If installing on a wooden joist floor:
Install the unit on a 2 ft. x 2 ft. x
1
3
/
16
“ (61 x 61 x 3 cm) plywood base.
Ideally the base should be large
enough to span several joists and
should be anchored to the joists and
not just the floor boards.
Tip: If possible, install the machine in a
corner. This is usually the most stable
part of the floor.
Injury can occur if the washing
machine has not been adequately
secured.
During installation, the washing ma-
chine must be secured on a raised
plinth to be made available on site
(concrete or brick), in order to ensure
it cannot fall or slip.
Secure the washing machine using a
clamp/fastening bracket (MTS floor
mounting kit – available from your
Miele dealer or Miele Technical Ser-
vice).
Transporting the washing ma-
chine to its installation site
Danger of injury due to unsecure
lid.
The fixings at the back of the lid may
become brittle due to external cir-
cumstances. There is a danger of the
lid being pulled off when carrying the
appliance.
Before carrying the appliance, check
that the lid is secure where it pro-
trudes at the back of the appliance.
Carry the washing machine by the
front feet and by the lid where it pro-
trudes at the back of the appliance.
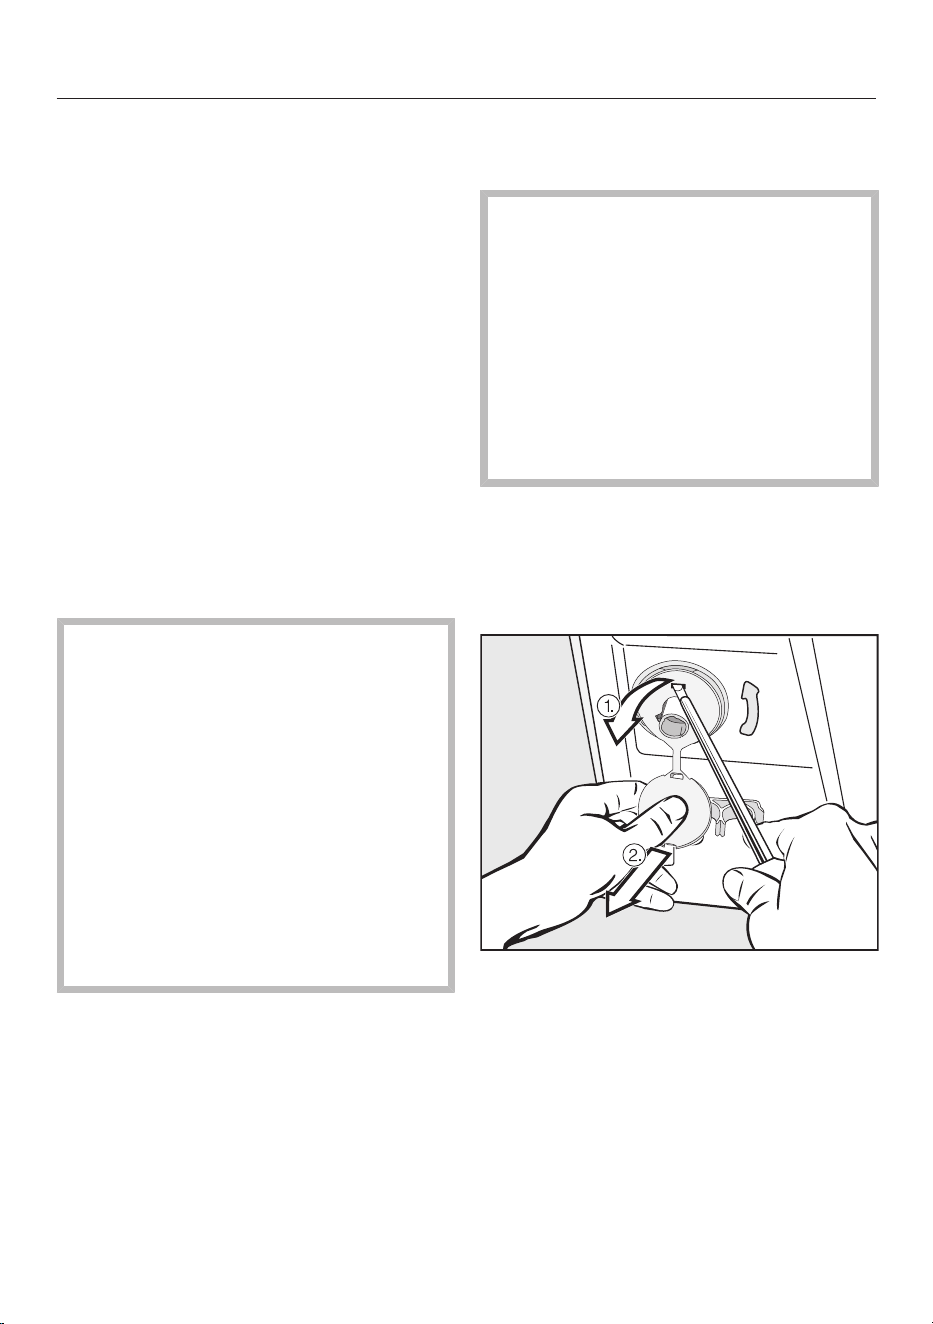
Removing the shipping struts
Remove the left and right covers.
1. Pull off the shipping strut covers and
2. then use a screwdriver to release the
catches at the top and bottom.
Installation
59
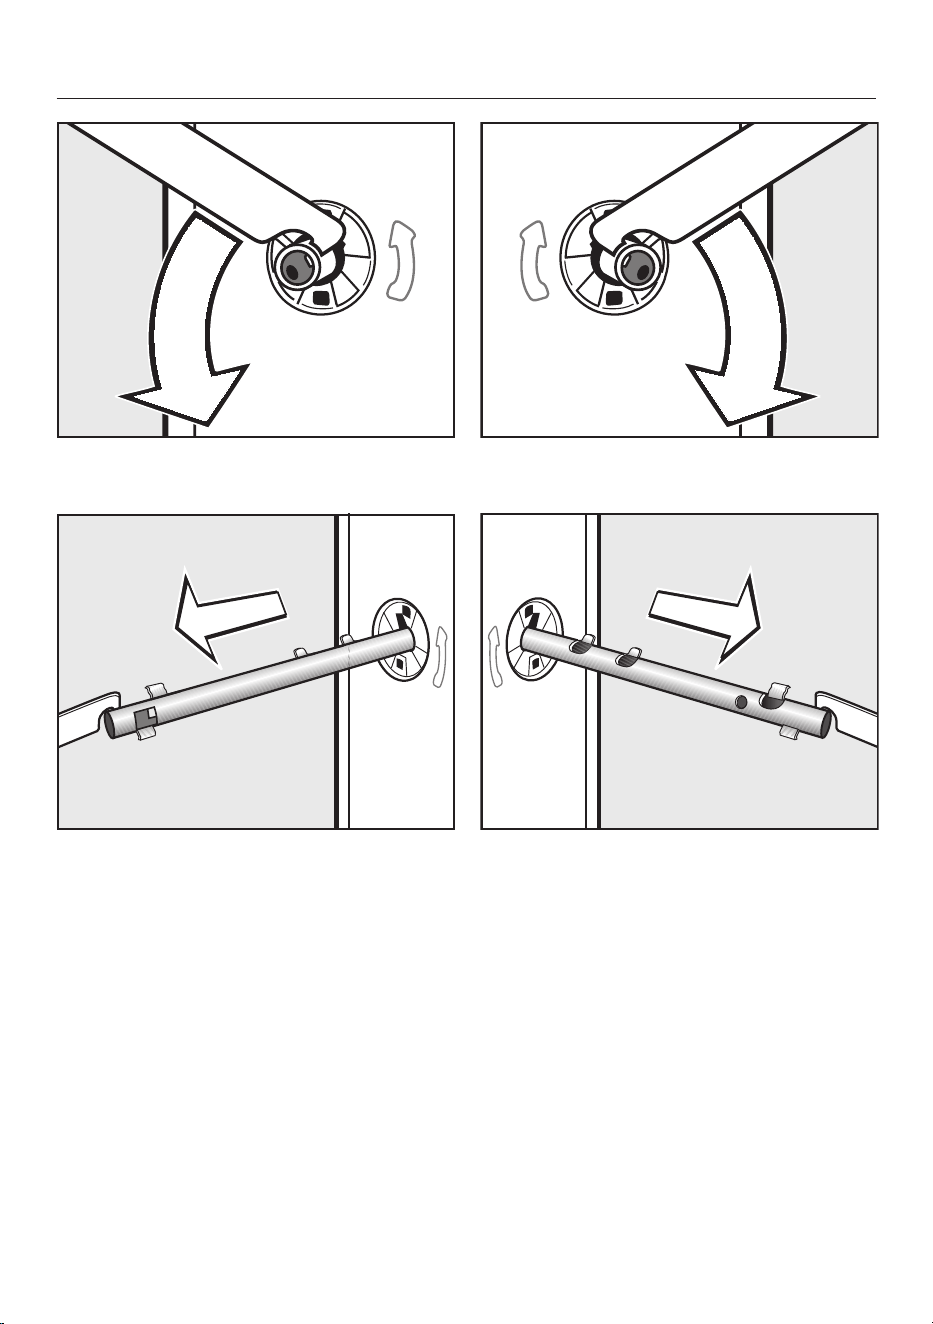
Using the wrench supplied, turn the
left-hand shipping strut 90°, then
withdraw the shipping strut.
Turn the right-hand shipping strut
90°, then
withdraw the shipping strut.
Installation
60
Risk of injury from sharp edges.
There is a risk of injury from reaching
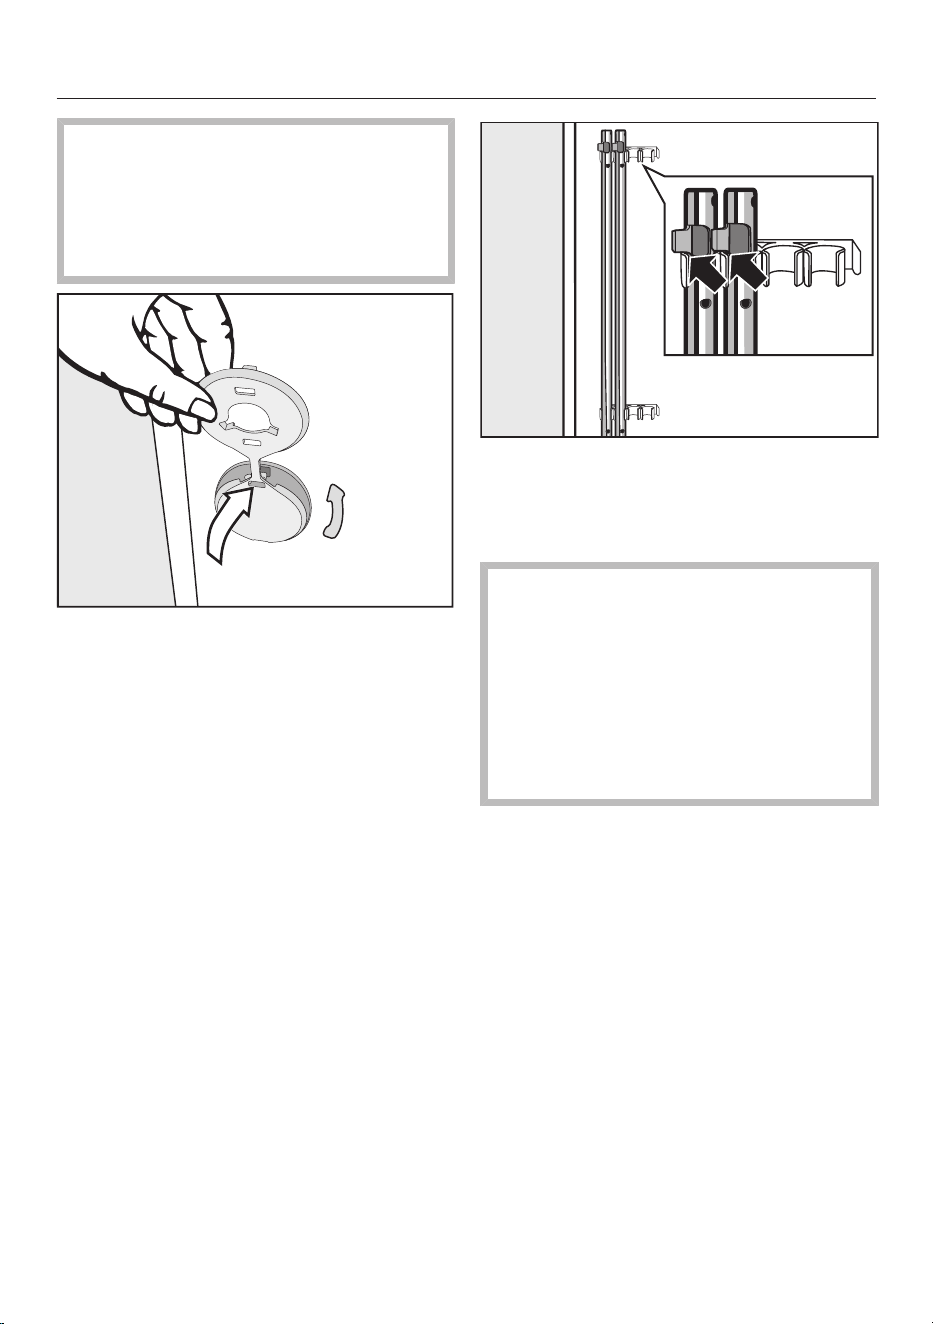
into holes that are not covered.
Cover the holes for the shipping
struts after they have been removed.
Fit the covers onto the holes.
Secure the shipping struts to the
back of the washing machine. Make
sure that the top catch is located
above the holder.
Risk of damage from incorrect
transport.
The washing machine may become
damaged if moved without the ship-
ping struts in place.
Keep the struts in a safe place. Fit
them again if the machine is to be
moved (e.g., when moving house).
Refitting the shipping struts
Refitting is carried out by reversing the
procedure.
Installation
61
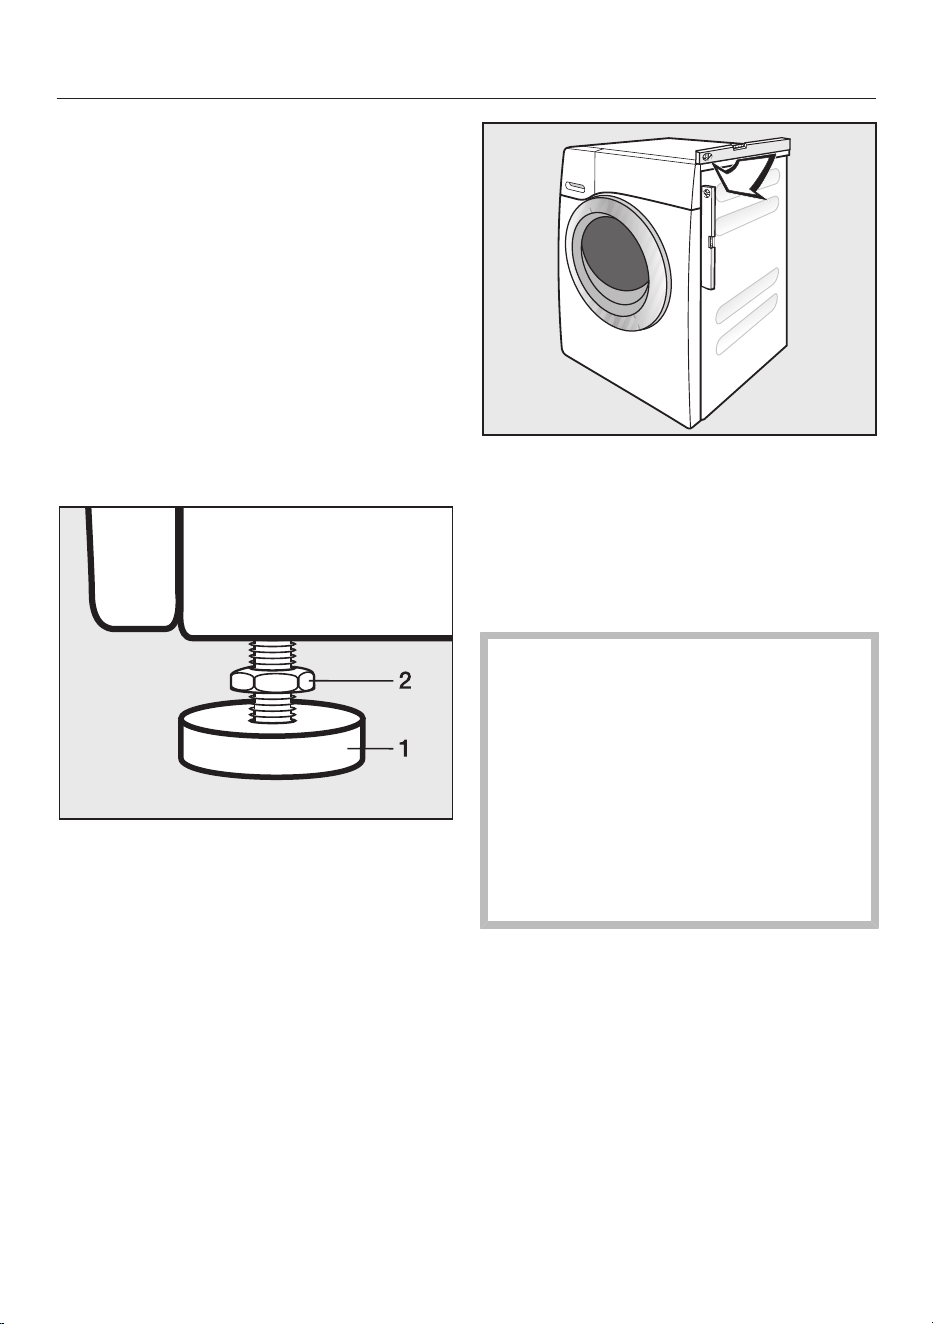
Leveling the machine
The washing machine must stand per-
fectly level on all four feet to ensure
safe and proper operation.
Incorrect installation may increase elec-
tric and water consumption and may
cause the machine to move about.
Unscrewing and adjusting the feet
The four adjustable screw feet are used
to level the washing machine. All four
feet are screwed in when the machine is
delivered.
Using the wrench supplied, turn
counter nut 2 in a clockwise direction.
Then turn counter nut 2 together with
foot 1 to unscrew.
Use a spirit level to check that the
washing machine is standing level.
Hold foot 1 securely with a pipe
wrench. Turn counter nut 2 again us-
ing the wrench supplied until it sits
firmly up against the housing.
Risk of damage due to incor-
rectly aligned washing machine.
There is a danger of the washing ma-
chine moving about if the feet are not
secured.
Turn all four counter nuts for the feet
until they sit firmly up against the
housing. Please also check this for
the feet which did not need adjust-
ment.
Installation
62
Additional installation require-
ments
The washing machine must be in-
stalled in accordance with the rele-
vant local regulations.
Risk of damage due to failure to
remove the shipping struts.
Failure to remove the shipping struts
can result in damage to the washing
machine and to adjacent cabinetry or
appliances.
Remove the shipping struts as de-
scribed in “Installation”.
Installing under a countertop
Risk of electric shock due to ex-
posed cables
There is a risk of coming into contact
with live parts while the lid is re-
moved.
Do not remove the washing machine
lid.
This washing machine (with lid intact)
can be pushed under a worktop if there
is space to do so.
Setting up the cabinet
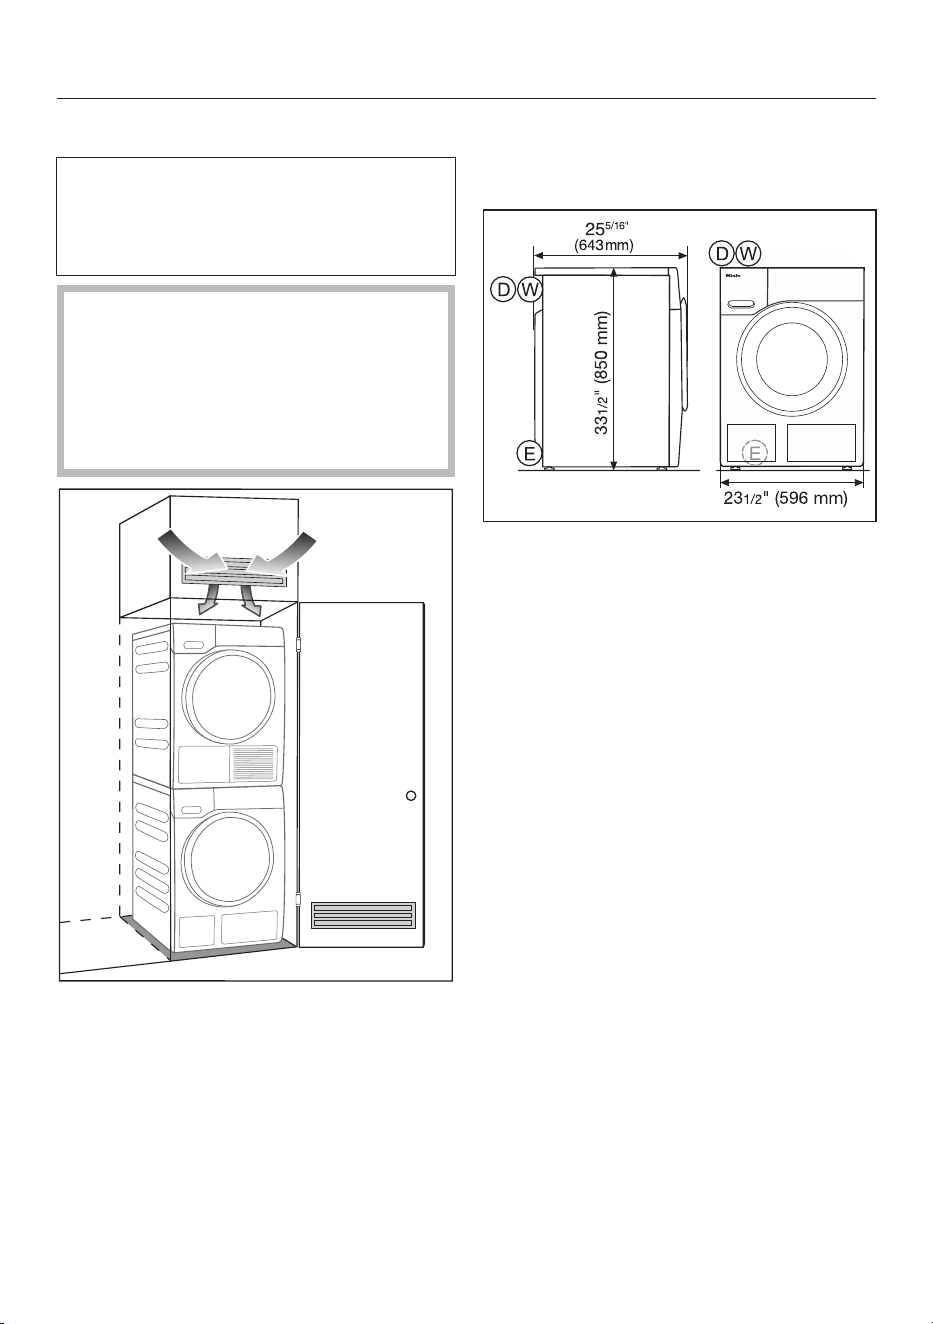
Installation
63
For closets at room height
You can also insert a ventilation open-
ing at the top of the closet. In addition,
you must provide an opening on the
bottom side of the door.
Risk of damage due to overheat-
ing of the washing machine.
The air supply must not be hindered
by an additional closet or shelf.
Please ensure that air is able to cir-
culate freely at the top of the closet.
Product Dimensions
Dimensions
= 4.9 ft (1.50m) drain hose with
connection to the top left on the
rear
= 6.5 ft (2.00m) electrical cord
with plug for 120V, 15A (NEMA
5-15 configuration) to the top
left on the rear
= 5.2 ft (1.60m) warm and cold-
water intake hoses to the top
left on the rear
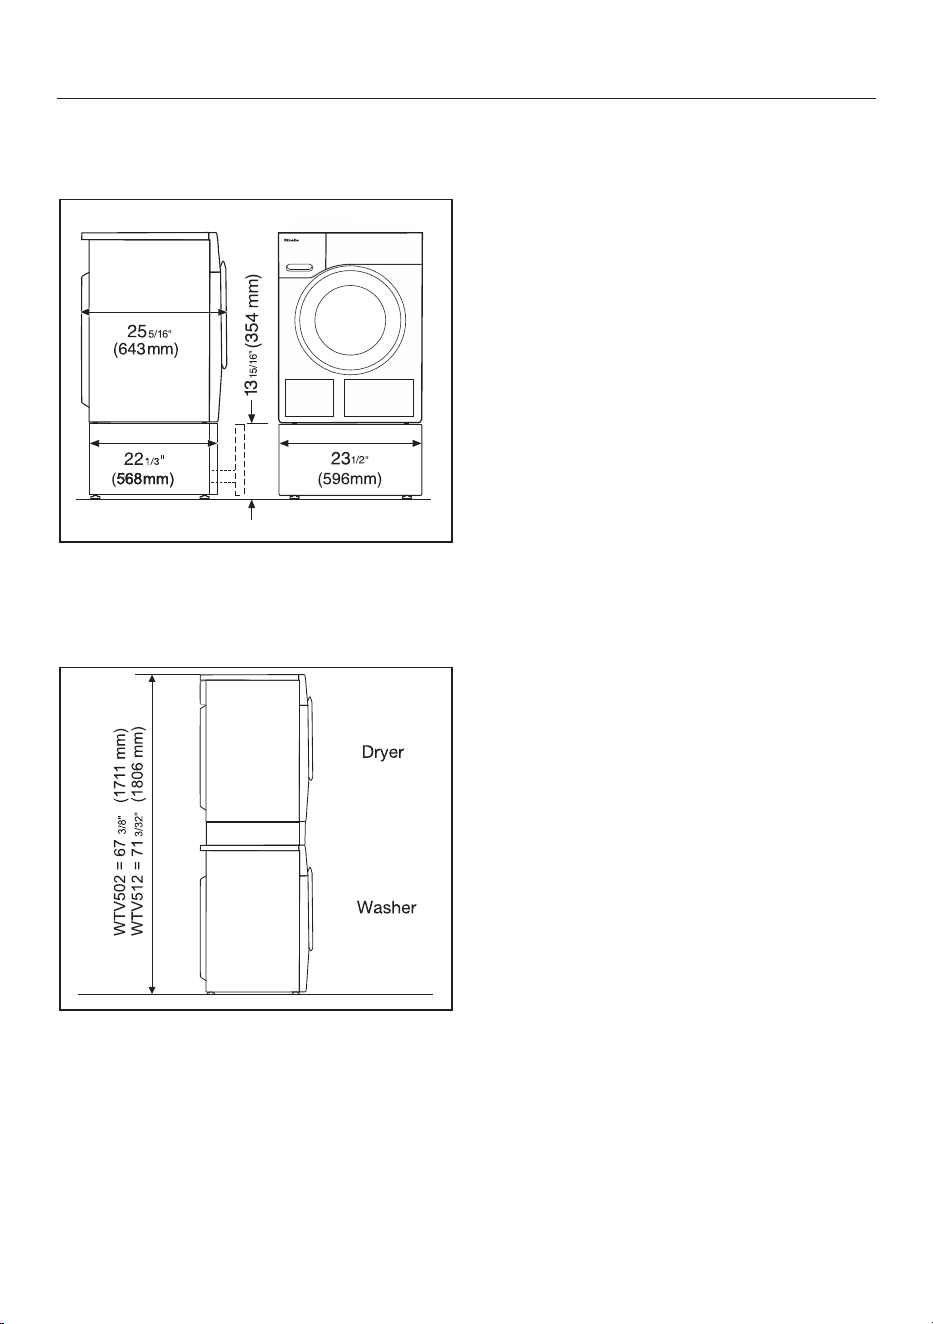
Installation
64
Installation on a plinth
– WTS 510 (only available in white)
Washer-dryer stack
– WTV 512 and WTV 502 washer-dryer
stacking kit

Installation
65
The water protection system
The Miele water protection system pro-
tects all parts of the washing machine
and its surroundings from water dam-
age.
The system consists of the following
main components:
– the inlet hose
– the electronic module and drainage
and overflow protection
– the drain hose
Inlet hoses
– Protection against the hoses bursting
The inlet hose can withstand pres-
sure of more than 1,015psi
(7,000kPa).
Electronic module and washing ma-
chine housing
– Sump: Any leaking water is collected
in a sump in the base of the machine.
A float switches off the water inlet
valves, preventing any more water
from flowing into the machine and
water in the suds container is
pumped away.
– Overflow protection: This prevents
the washing machine taking in too
much water. If the water level ex-
ceeds a certain level, the drain pump
switches on and pumps the excess
water away in a controlled way.
Drain hose
The drain hose is protected by a ventila-
tion system which prevents the washing
machine from being emptied com-
pletely.

Installation
66
Water intake
The washing machine can be con-
nected to a portable water supply. A
non-return valve is not needed unless
required by building code.
The washing machine has ½“ (13 mm)
pressure hoses with ¾” (19 mm) female
hose thread connections. If there is no
water hookup, contact a plumber to in-
stall a connection. Make sure that the
sealing ring is seated properly on the
hose connector.
Replace the hose only with a genuine
Miele hose, or with a hose able to with-
stand up to 145 psi (10.000 kPa) pres-
sure. The water valve connector must
also be able to withstand 145 psi
(10.000 kPa).
The bolted connection is under
water pressure. Open the water sup-
ply slowly to check for leaks. Adjust
the rubber seal and the bolted con-
nection if necessary.
To protect the inlet valve, the two fil-
ters (one at the pressure hose / valve
connection and one at the inlet con-
nection to the solenoid valve) must
not be removed.
Maintenance
Only use a genuine Miele hose that has
been tested to withstand pressure of at
least 1,015psi (7,000kPa) should you
ever need a replacement.
A filter is located in the open end of
the inlet hose and another in the in-
take point to protect the inlet valve.
Neither filter may be removed.

Installation
67
Water drainage
The suds are drained through a drain
pump with a 3.2ft (1m) delivery head.
For the water to drain freely, the hose
must be installed free of kinks.
If required, the hose can be extended to
a length of up to 16.4ft (5m). Acces-
sories are available from your Miele
dealer or the Miele Technical Service.
Drainage options:
1. Direct into a sink or basin:
Please note:
– Hook the hose over the edge and
secure!
– If the water is pumped into a sink,
be sure that it can drain away
quickly enough. Otherwise there is
a risk of water overflowing or of
some of the drained water being
sucked back into the machine.
2. Connected securely to a plastic drain
pipe with a rubber nipple (there is no
need to use a non-return valve).
3. Connected securely to a floor drain.
4. Connected securely to a sink with a
plastic nipple.

Installation
68
Electrical connection
GROUNDING INSTRUCTIONS
This appliance must be grounded. In
the event of a malfunction or break-
down, grounding will reduce the risk
of electric shock by providing a path
of least resistance for electric cur-
rent. This appliance is equipped with
a cord having an equipment-ground-
ing conductor and a grounding plug.
The plug must be plugged into an
appropriate outlet that is properly in-
stalled and grounded in accordance
with all local codes and ordinances.
WARNING – Improper connection of
the equipment-grounding conductor
can result in a risk of electric shock.
Check with a qualified electrician or
service representative if you are in
doubt as to whether the appliance is
properly grounded.
Do not modify the plug provided with
the appliance; if it will not fit the out-
let, have a proper outlet installed by
a qualified electrician.
ELECTRICAL INSTRUCTIONS
This installation should be performed by
an experienced and qualified techni-
cian, in accordance with local codes
and regulations.
The washing machine is supplied with a
5’3“ (1.6m) long, 3 wire cord, ending in
a NEMA 5-15P plug, ready for connec-
tion to a 120V, 15A, 60Hz, AC power
supply.
The proper outlet can be purchased
from an electrical supply dealer.

Technical data
69
Height 33 7/16" (850 mm)
Width 23 7/16" (596 mm)
Depth 25 1/16" (636 mm)
Depth with door open 41 1/2" (1054 mm)
Height for building under 32 5/16" (+5/16"/-1/16") (820 mm)
Width for building under 23 5/8" (600 mm)
Weight Approx. 220.5 lb (100 kg)
Capacity 17.6 lb (8 kg) dry laundry
Connection voltage See data plate
Power rating See data plate
Fuse See data plate
Consumption data See “Consumption data”
Minimum flow pressure 14.5psi (100kPa)
Maximum flow pressure 145psi (1,000kPa)
Water inlet hose length 5.2ft (1.60m)
Drain hose length 4.9ft (1.50m)
Power cord length 6.5ft (2.00m)
Maximum drain pump head height 3.2ft (1.00m)
Maximum drain hose length 16.4ft (5.00m)
LEDs Class 1
Test certificates awarded See data plate
Power consumption when switched off 0.3 W
Power consumption when not switched
off
0.3 W

Programmable functions
70
The programmable functions are used
to alter the machine’s electronics to
suit changing requirements. Program-
mable functions can be altered at any
time.
Programming is carried out in 8 steps
(, , ... ) using the sensor but-
tons.
Accessing the programming level
Before you begin, ensure the following:
– The washing machine is switched on
(the program selector is pointing to a
wash program).
– The washing machine door is open.
Touch the Start/Stop sensor button
and hold it down during steps –.
Close the washing machine door.
Wait until the Start/Stop sensor button
lights up constantly...
...and then release the Start/Stop
sensor button.
After approximately4seconds, will
light up on the time display.
Choosing and selecting pro-
grammable functions
The number of the programmable
function will appear on the time dis-
play as and a number: e.g., .
Touch the or sensor button to
scroll to the next or previous pro-
grammable function:
Programmable functions
Buzzer
Keypad tone
PIN code
Control field switch-off status
Memory
Water intake
Additional long pre-wash – Nor-
mal
Soak duration
Gentle action
Reduce temperature
Maximum rinse level
Suds cooling
Anti-crease
Low water pressure
Chlorine bleach
Display brightness dimmed
Welcome tone volume
Confirm the selected programmable
function by touching the Start/Stop
sensor button.
Programmable functions
71
Editing and saving the pro-
grammable function
You can either switch a programmable
function on/off or select different op-
tions.
Touch the or sensor button to
switch the programmable function
on/off or to select an option:
Programmable function
Available options
–
X X
O
X O
X
O X
X O
O X
X O
O X X X
O X X X
O X
O X
O X
O X
X O
O X
O X
X X O X X
X O X
X = can be selected
O = Factory setting
Confirm the chosen selection with
the Start/Stop sensor button.
The number of the programmable func-
tion, e.g., , will then light up again.
Exiting the programming level
Turn the program selector to .
The setting you have selected are now
stored in the memory. You can alter the
settings again at any time.
Buzzer
The buzzer sounds to let you know the
program has finished.
Options
= Buzzer is switched off
= Normal buzzer volume
= Loud buzzer volume
(factory setting)
Keypad tone
Each touch of a sensor button is con-
firmed with an audible tone.
Options
= Keypad tone is switched off
= Keypad tone is switched on
(factory setting)

Programmable functions
72
PIN code
The PIN code prevents the washing
machine being used without your
knowledge.
When the PIN code has been activated,
you have to enter it after switching the
washing machine on. Otherwise, the
washing machine cannot be operated.
Options
= PIN code is switched off (fac-
tory setting)
= PIN code is switched on
Using the washing machine with a
PIN code
The code is 125 and cannot be altered.
Switch on the washing machine.
appears on the time display and
the and sensor buttons light up.
Touch the sensor button.
appears on the time display.
Confirm the number with the Start/
Stop sensor button.
The first number has been saved and
you can now enter the second number
using the and sensor buttons.
Enter the second and third numbers
and confirm the numbers with the
Start/Stop sensor button.
The lock is released and a wash pro-
gram can now be selected and started.
Control field switch-off
status
To save energy, the time display and
sensor buttons will go out after
10minutes, and only the Start/Stop
sensor button will flash.
Options
= Off
The time display and sensor
buttons will remain lit up while
the washing machine is
switched on
= On (factory setting)
The time display and sensor
buttons will switch off after
10minutes if
– no further selection is made
after switching the machine
on
– the program is started
However, the time display and
sensor buttons will remain lit
up for 10minutes after a Delay
Start time has elapsed, after
the end of a program, or at the
end of the Anti-crease phase.

Programmable functions
73
Memory
The washing machine will save the
last settings (temperature, spin speed,
and some of the extra options) se-
lected for a wash program after the
program has started.
When the program is chosen again, the
saved settings will appear on the dis-
play.
Options
= Memory is switched off (fac-
tory setting)
= Memory is switched on
Water intake
You can program 2 options for the wa-
ter intake. The water intake is con-
trolled by the two intake hoses.
Options
= Cold water
The washing machine will be
operated with cold water only.
= Hot water (factory setting)
Hot water is used in the main
wash.
Risk of damage from incorrect
water connection.
Connection to a hot water supply
only is not permitted. When being
operated with hot water, the washing
machine always requires a cold wa-
ter connection as well in order to
control the temperature of the water
used for washing the laundry.
The washing machine must always
be connected to cold water.

Programmable functions
74
Additional long pre-wash –
Normal
If you require a longer pre-wash, you
can extend the pre-wash time.
Options
= No increase in the pre-wash
time (factory setting)
= + 6minutes increase in the
pre-wash time
= + 9minutes increase in the
pre-wash time
= + 12minutes increase in the
pre-wash time
Gentle action
When Gentle action is activated, drum
rotation is reduced. In this way, lightly
soiled items can be washed more gen-
tly.
Gentle action can be activated for the
Normal and Wrinkle-free programs.
Options
= Gentle action is switched off
(factory setting)
= Gentle action is switched on
Reducing the temperature
At high altitudes, water has a lower
boiling point. Miele recommends
switching on the reduce temperature
setting at altitudes of 6,560ft
(2,000m) or above to prevent water
from boiling. The maximum tempera-
ture is reduced to 176°F (80°C), even if
a higher temperature has been se-
lected.
Options
= The reduce temperature setting
is switched off (factory set-
ting)
= The reduce temperature setting
is switched on

Programmable functions
75
Maximum rinse level
The water level in the rinse can be
permanently set to the highest value.
This function is important for allergy
sufferers as it achieves excellent wash
results. The water consumption will be
increased.
Options
= Maximum rinse level is
switched off (factory setting)
= Maximum rinse level is
switched on
Suds cooling
Additional water flows into the drum at
the end of the main wash to cool the
suds down.
Suds cooling takes place when a Nor-
mal program with a temperature of
158°F (70°C) or higher is selected.
Suds cooling should be activated:
– To prevent the danger of scalding if
the drain hose is hooked over the
edge of a sink or basin.
– Where the drainage pipes do not
comply with DIN 1986.
Options
= Suds cooling is switched off
(factory setting)
= Suds cooling is switched on
Anti-crease
The Anti-crease function helps prevent
creasing after the end of the program.
At the end of the program, the drum
continues to turn for up to 30minutes.
The door can be opened at any time
during the Anti-crease phase.
Options
= The Anti-crease function is
switched off
= The Anti-crease function is
switched on (factory setting)
Low water pressure
If the water pressure is below 100kPa
(1bar), the program will be canceled
and the fault message will appear.
If the water pressure cannot be in-
creased, activating this function will
prevent the program from being can-
celed.
Options
= Low water pressure is
switched off (factory setting)
= Low water pressure is
switched on
Programmable functions
76
Chlorine bleach
You can activate the automatic addi-
tion of chlorine bleach at the end of
the main wash.
Chlorine bleach may only be used in
some programs. See “5. Adding deter-
gent – Using chlorine bleach” for more
detailed information.
Activating chlorine bleach extends the
program duration by approximately
10minutes.
Options
= Chlorine bleach is switched off
(factory setting)
= Chlorine bleach is switched on
Display brightness dimmed
The brightness of the dimmed sensor
buttons on the control field can be set
to one of seven different levels.
The brightness will change as soon as a
different setting is chosen.
Options
= Darkest level
= Brightest level
= (factory setting)
Welcome tone
The welcome tone sounds whenever
the washing machine is switched on.
You can switch the welcome tone on or
off.
Options
= Welcome tone is switched off
= Welcome tone is switched on
at normal volume (factory set-
ting)
= Welcome tone is switched on
at loud volume

Optional accessories
77
Detergent, fabric care products, addi-
tives, and machine care products are
available for this washing machine. All
the products have been designed for
Miele washing machines.
These and many other useful products
can be ordered via the Miele online
shop, from your Miele dealer, or from
Miele directly (see end of this manual
for contact details).
Detergent
UltraWhite
– Multi-purpose powder detergent
– For white and light-colored laundry
as well as heavily soiled cotton items
– Effective stain removal even at low
temperatures
UltraColor
– Liquid detergent for colored items
– For colored and dark textiles
– Protects bright colors from fading
– Effective stain removal even at low
temperatures
Wool and delicates detergent
– Liquid detergent for delicates
– Particularly suitable for woollen and
silk textiles
– Cleans at temperatures as low as
70°F (20°C), helps retain the shape of
delicate items and protect colors
Speciality detergents
Speciality detergents are available as
capsules in convenient single dose
amounts or in a handy bottle.
Outdoor
– Liquid detergent for outdoor and per-
formance clothing
– Cleans with care and is gentle on col-
ors
– With lanolin to care for and condition
membrane fabric
Sport
– Liquid detergent for sportswear and
fleece garments
– Neutralizes unpleasant odors
– Retains the shape of the textiles
Downs
– Liquid detergent suitable for pillows,
sleeping bags, and Down Filled Items
– Retains the elasticity of down and
feather-filled items
– Retains the breathability of Down
Filled Items
– Prevents down filling clumping to-
gether

Optional accessories
78
WoolCare
– Liquid detergent for Woolens and
delicates
– Includes a special wheat protein con-
ditioning formula
– Helps prevent pilling
– Gentle on colors
– Only available as capsules
SilkCare
– Liquid detergent for silks
– Contains a special silk protein condi-
tioning formula
– Gentle on colors
– Only available as capsules
Fabric care
Fabric care agents are available as cap-
sules in convenient single dose
amounts or in a handy bottle.
Proofing agent
– For reproofing microfiber textiles,
e.g., rain coats
– Retains the breathability of textiles
Fabric softener
– Fresh, natural fragrance
– Makes laundry soft to handle
Additive
Booster
– For removing stains
– For white and colored laundry
– Available as capsules in conve-
nient single dose amounts
Machine care
Detergent
– For cleaning the washing machine
thoroughly and effectively
– Removes grease, bacteria, and asso-
ciated unpleasant odors
– Use 1–3 times per year
Descaling agent
– Removes heavy lime scale deposits
– Mild and gentle with natural citric
acid
Water softener tablets
– Reduces quantities of detergent for
hard water
– Less detergent residue in textiles
– Less chemicals in waste water due to
reduced amount of detergent

9 Independence Way
Princeton, NJ 08540
Phone:
Fax:
www.mieleusa.com
U.S.A.
Miele, Inc.
National Headquarters
Please have the model and serial number
of your appliance available when
contacting Technical Service.
Canada
Importer
Miele Limited
Headquarters and Miele Centre
800-843-7231
609-419-4298
Technical Service & Support
Phone:
Fax:
161 Four Valley Drive
Vaughan, ON L4K 4V8
www.miele.ca
800-999-1360
888-586-8056
Customer Care Centre
Phone:
800-565-6435
905-532-2272
International Headquarters
Miele & Cie. KG
Carl-Miele-Straße 29
33332 Gütersloh
Germany

M.-Nr. 10 980 030 / 00en-US
WWB 020