Loading ...
Loading ...
Loading ...
06 GB - IE
2.3. ADAPTING THE HOB TO DIFFERENT
TYPES OF GAS
To adapt the Hob for use with different types of gas, carry out the
following instructions:
•remove the grids and burners
•insert on hexagonal spanner (7 mm) into the burner support (Figure
6)
•Unscrew the injector and replace it with one suitable for the gas to be
used (see gas type table)
•Screw the injector tightly.
•Replace the burners and the grids.
2.4. REGULATING THE MINIMUM FLAME
After lighting the burners, turn the control knob to the minimum setting
and then remove the knob (this can easily be removed by applying
gentle pressure).
Using a small «Terminal» type screwdriver the regulating screw can
be adjusted as in Figure 9. Turning the screw clockwise reduces the
gas flow, whilst turning it anticlockwise increases the flow – Use this
adjustment to obtain a flame of approximately 3 to 4 mm in length and
then replace the control knob.
When the gas supply available is LPG - the screw to set the idle flame
must be turned (clockwise) to the end stop.
When you have carried out the new gas regulation, replace the old gas
rating plate on your appliance with one (supplied with hob) suitable for
the type of gas for which it has been regulated.
3. USE OF HOB - USER INSTRUCTIONS
This appliance must only be used for the purpose for which it is
intended, domestic cooking, and any other use will be considered
improper and could therefore be dangerous. The Manufacturer will
not be responsible for any damage or loss resulting from improper
use.
3.1. USING THE GAS BURNER
To ignite the burners, place a lighted taper close to the burner, press in
and turn the control knob anti-clockwise.
If the burners have not been used for a couple of days, wait for a few
seconds before lighting the burner, this will allow any air present in the
pipes to escape.
For appliances fitted with electronic ignition carry out the following:
• push in and turn the knob anticlockwise to the ignition symbol.
• ignite the burner by pressing the sparker button.
For hobs fitted with automatic ignition simply push in and turn the knob
to the ignition symbol.
The ignition system will continue to generate sparks as long as the
control knob is being pressed.
If the burner has not ignited within 5 seconds, turn the knob to the 0
position and repeat the operation.
For models fitted with a safety tap (which cuts-off the flow of gas if the
flame is accidentally extinguished) the burners are ignited and
described above, but care must be taken.
Prior to switching on the gas hob ensure that the burners and burner
caps are correctly placed within their position.
For smaller containers the gas burner should be regulated so that the
flame does not overlap the base of the pan. Vessels with a concave or
convex base should not be used.
WARNING: If a flame is accidentally extinguished, turn the knob
to the off position and do not attempt to re-ignite if for at least 1
minute.
If over the years the gas taps become stiff to turn it is necessary to
lubricate them.
Such operation must be carried out only by qualified Service
Engineers.
GENERAL ADVISE
For best results, use cooking vessels with a flat surface. The size of
the surface should match the gas burner side as follows. Table A.
NEVER USE RECIPIENTS that comes out from the edges of the hob.
4. MAINTENANCE AND CLEANING
Before cleaning the hob, ensure the appliance has cooled down.
Remove the plug from the socket or (if connected directly) switch off
the electricity supply.
Cleaning and user maintenance shall not be made by children without
supervision.
Never use abrasives, corrosive detergents, bleaching agents or
acids. Avoid any acid or alkaline substances (lemon, juice, vinegar
etc.) on the enamelled, varnished or stainless steel sections.
When cleaning the enamelled, varnished or chrome sections, use
warm soapy water or a non caustic detergent. For stainless steel use
an appropriate cleaning solution.
The burners can be cleaned with soapy water. To restore their original
shine, use a household stainless steel cleaner. After cleaning, dry the
burners and replace.
It is important the Burners are replaced correctly.
GLASS HOB.
• Avoid spillages, as anything which falls on to the hob surface will
quickly burn and will make cleaning more difficult.
• It is advisable to keep away from the hob all substances which are
liable to melt, such as plastic items, sugar, or sugar-based
products.
MAINTENANCE:
. Place a few drops of the specialised cleaning products on the hob
surface.
. Rub any stubborn stains with a soft cloth or with slightly damp kitchen
paper.
. Wipe with a soft cloth or dry kitchen paper until the surface is clean.
If there are still some stubborn stains :
. Place a few more drops of specialised cleaning fluid on the surface,
. Scrape with a scraper, holding it at an angle of 30° to the hob, until the
stains disappear.
.Wipe with a soft cloth or dry kitchen paper until the surface is clean.
.Repeat the operation if necessary.
A scraper with a razor blade will not damage the surface, as long as it
is kept at an angle of 30°. Never leave a scraper with a razor blade
within the reach of children. (Figure 10)
A FEW HINTS :
Frequent cleaning leaves a protective layer which is essential to
prevent scratches and wear.
Make sure that the surface is clean before using the hob again.
To remove marks left by water, use a few drops of white vinegar or
lemon juice. Then wipe with absorbent paper and a few drops of
specialised cleaning fluid.The glass ceramic surface will withstand
scraping from flat bottomed cooking vessels, however, it is always
better to lift them when moving them from one zone to another.
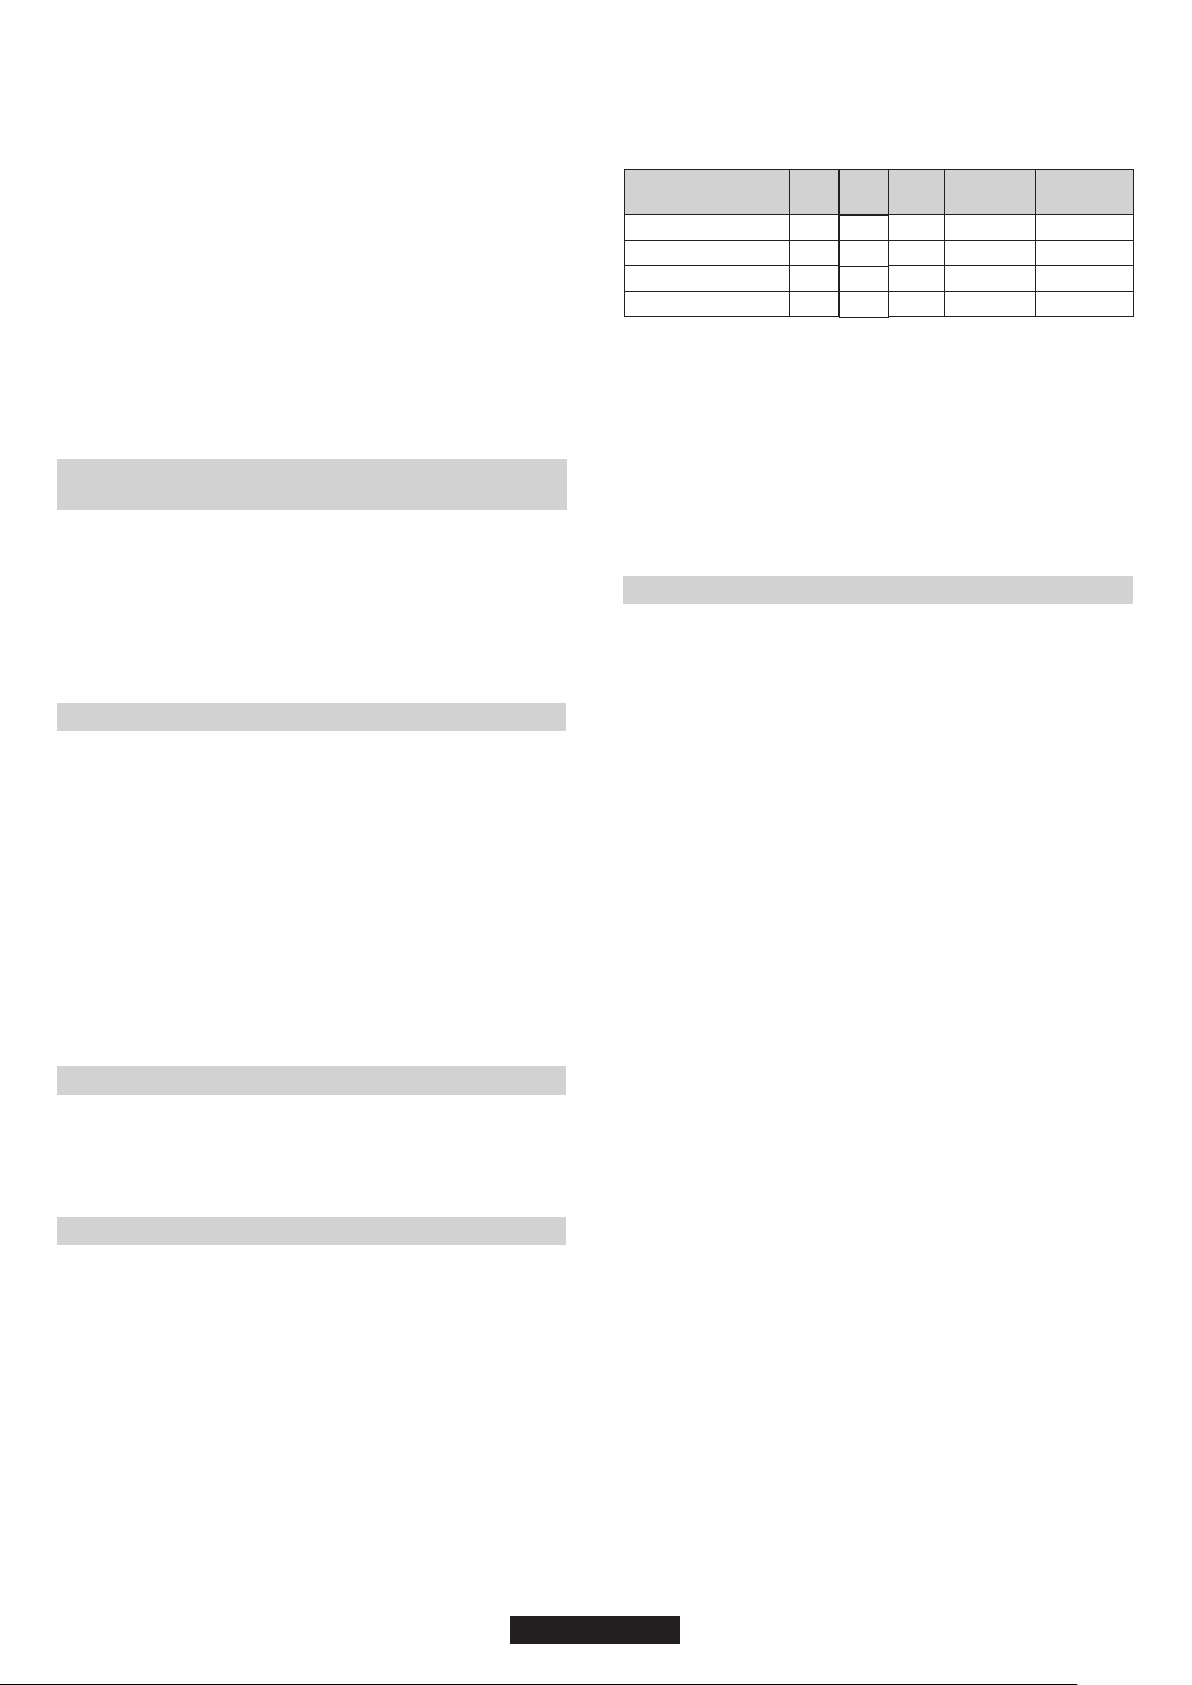
Auxiliary Burner
Semi Rapid Burner
Rapid Burner
Burner Type
Ø pan /
pot
Min(cm)
A
SR
R
≥10
≥12
≥16-18
Table A
Power
(kW)
G20/20 mbar
(Methane)
G30/28-30 mbar
(LPG)
1
1,75
2,5
95 I/h
162 I/h
257 I/h
73 g/h
124 g/h
196 g/h
Rapid Burner
UR
≥18
3.5
333 I/h 254 g/h
Ø pan /
pot
Max(cm)
≤18
≤24
≤26
≤26
1)As illustrated, assemble parts in sequence:
A: 1/2 Male Adaptor Cylindirical
B: 1/2 Seal
C: 1/2 Female Gas Adaptor Conical-Cylindirical or
Cylindirical-Cylindirical
2)Tighten the joints with the spanner, remembering to twist the
pipes into position.
3)Attach fitting C to mains gas supply using rigid copper pipe or
flexible steel pipe.
IMPORTANT: carry out a final check for leaks on the pipe
connections using a soapy solution. NEVER USE A FLAME. Also,
make sure that the flexible pipe cannot come into contact with a
moving part of the cabinet (eg.adrawer) and that it is not situated
where it could be damaged.
Warning: If gas can be smelt in the vicinity of this appliance turn off the gas
supply to the appliance and call the engineer directly. Do not search for a
leak with a naked flame.
Loading ...
Loading ...
Loading ...