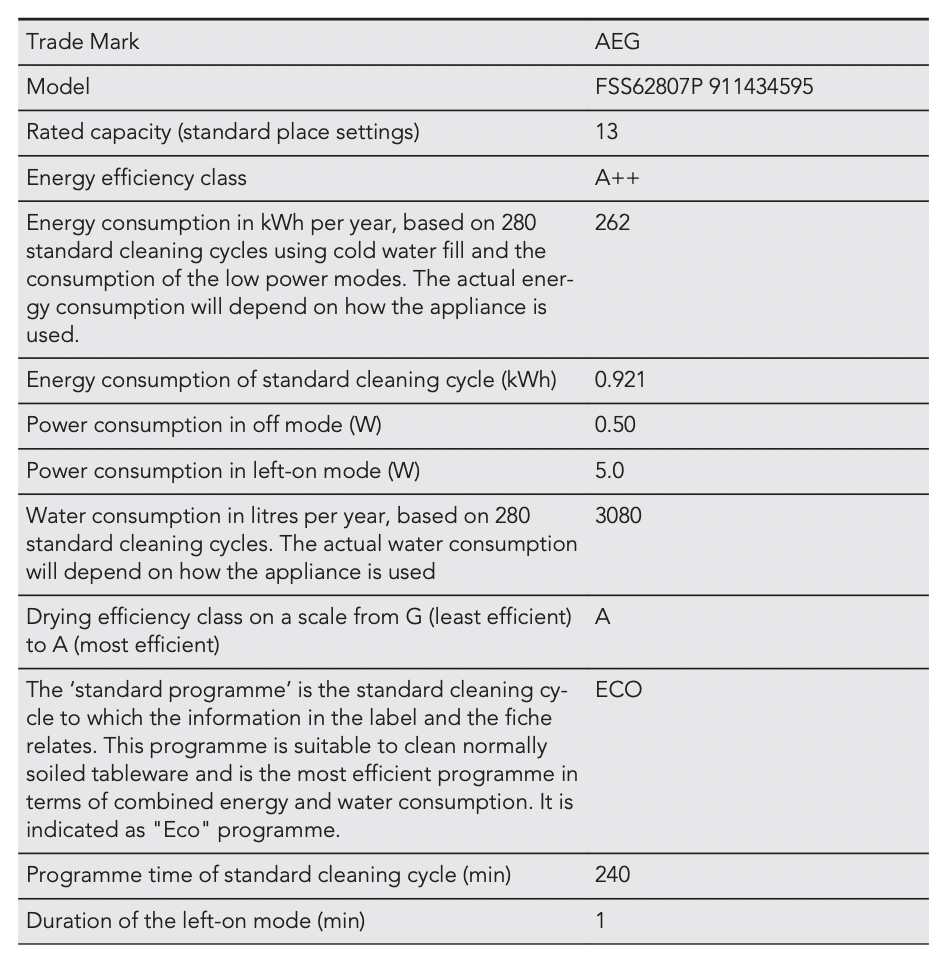
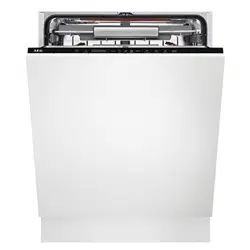
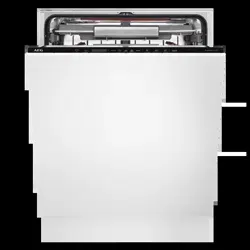
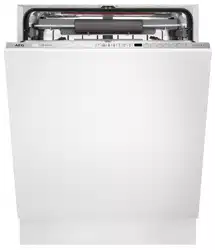
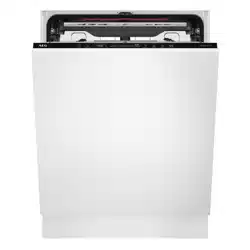
USER MANUAL
PRODUCT DESCRIPTION
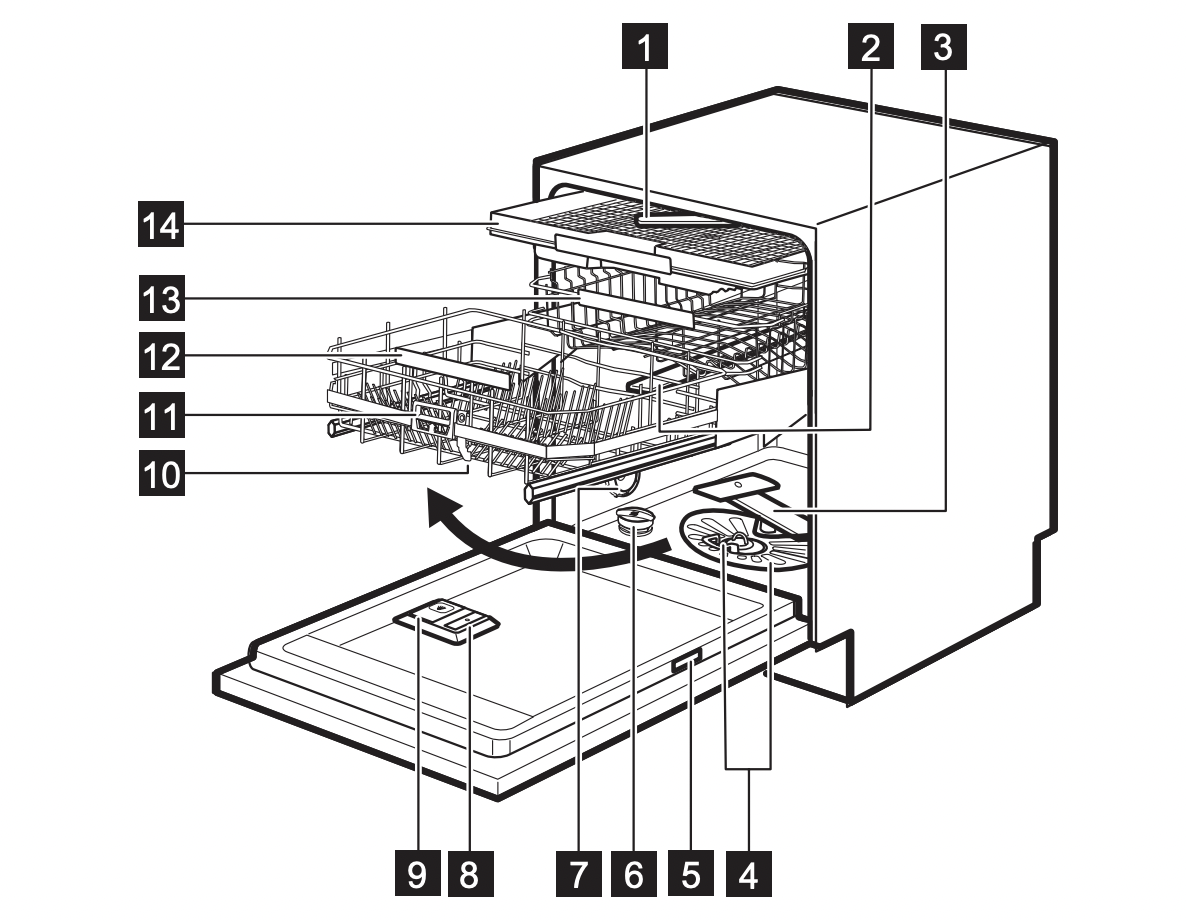
- Ceiling spray arm
- Upper spray arm
- Lower spray arm
- Filters
- Rating plate
- Salt container
- Air vent
- Rinse aid dispenser
|
- Detergent dispenser
- ComfortLift basket
- Trigger handle
- Lower basket handle
- Upper basket
- Cutlery drawer
|
Beam-on-Floor
The Beam-on-Floor is a light that is displayed on the floor below the appliance door.
- A red light comes on when a programme starts. It remains on for the duration of the programme.
- A green light comes on when the programme is complete.
- The red light flashes when the appliance has a malfunction.
 The Beam-on-Floor is off when the appliance is deactivated.
CONTROL PANEL

- On/Off button
- Delay Start button
- Display
- MY TIME selection bar
|
- EXTRAS buttons
- AUTO Sense button
|
Display
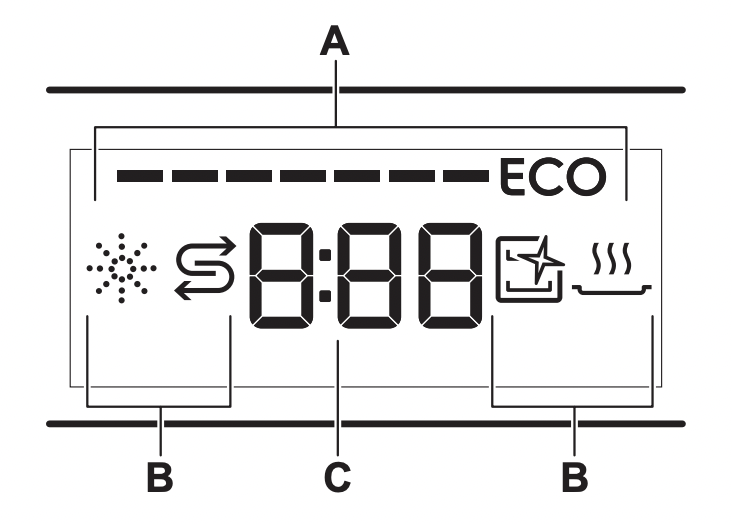
A. ECOMETER
B. Indicators
C. Time indicator
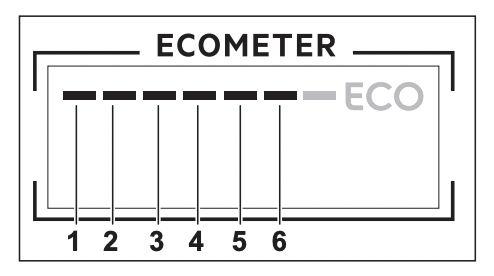
ECOMETER

The ECOMETER indicates how the programme selection impacts energy and water consumption. The more bars are on, the lower the consumption is.  indicates the most environmentally friendly programme selection for a normally soiled load.
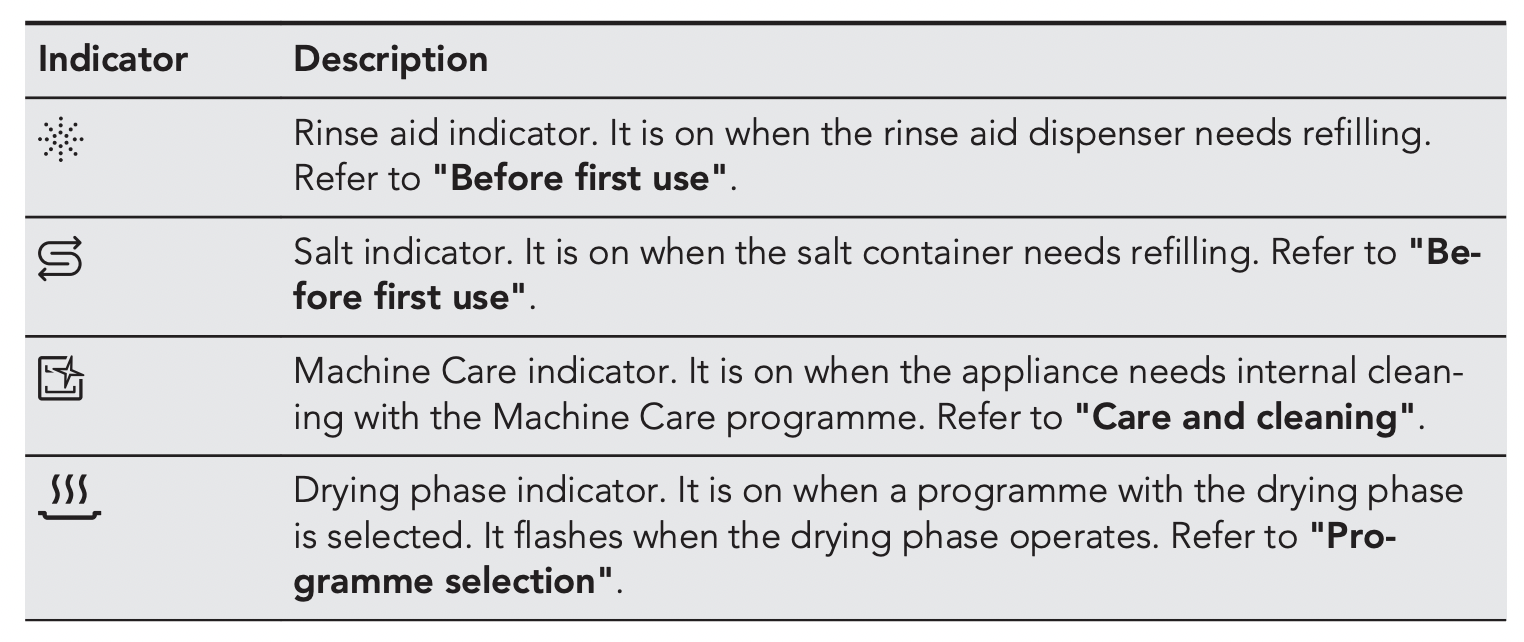
Indicators
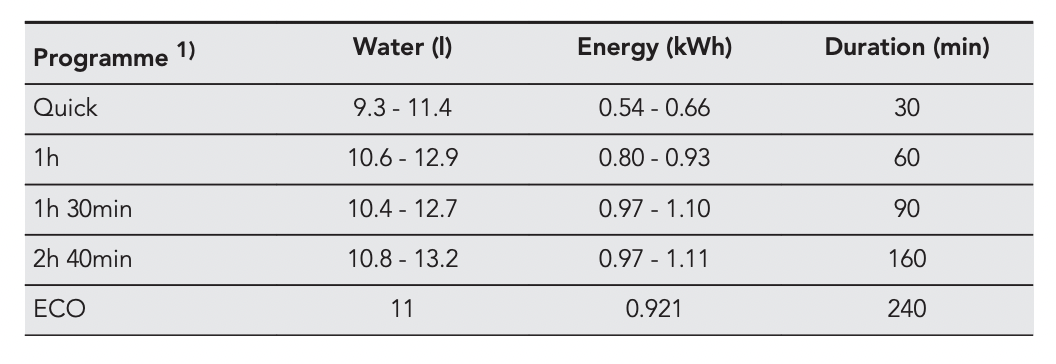
PROGRAMME SELECTION
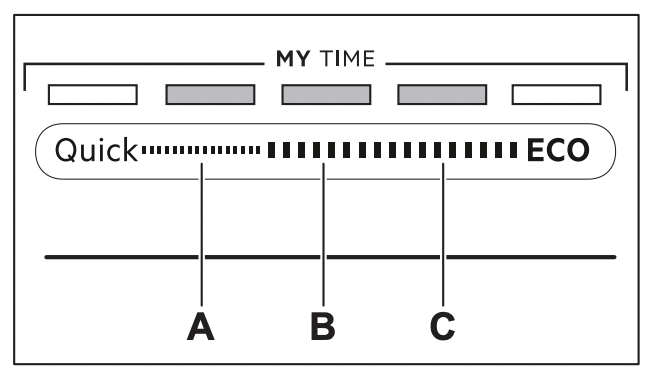
MY TIME
Using MY TIME selection bar, you can select a suitable wash cycle based on programme duration, ranging from 30 minutes to four hours.
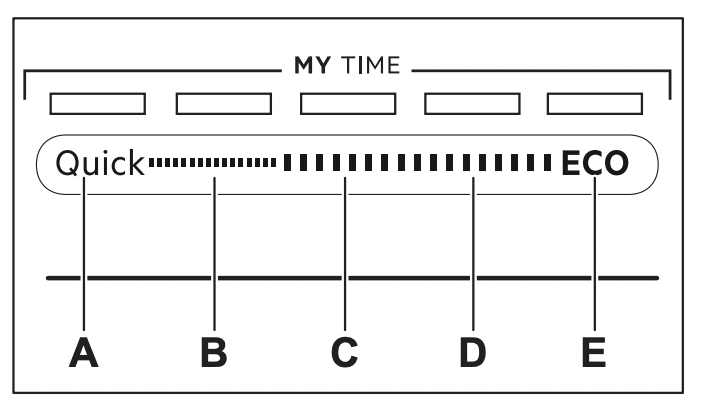
A. Quick is the shortest programme (30min) suitable for washing a load with fresh and light soil.
B. 1h is a programme suitable for washing a load with fresh and lightly dried-on soil.
C. 1h 30min is a programme suitable for washing and drying normally soiled items.
D. 2h 40min is a programme suitable for washing and drying heavily soiled items.
E. ECO is the longest programme (4h) offering the most efficient use of energy and water consumption for crockery and cutlery with normal soil. This is the standard programme for test institutes.
EXTRAS
You can adjust the programme selection to your needs by activating EXTRAS.
ExtraSilent
 ExtraSilent allows to reduce the noise generated by the appliance. When the option is activated, the wash pump works quietly at a lower speed. Due to the low speed, the programme duration is longer.
ExtraPower
 ExtraPower improves the washing results of the selected programme. The option increases the wash temperature and duration.
GlassCare
 GlassCare provides special care for a delicate load. The option prevents rapid changes in the wash temperature of the selected programme and reduces it to 45 °C. This protects glassware in particular from damaging.
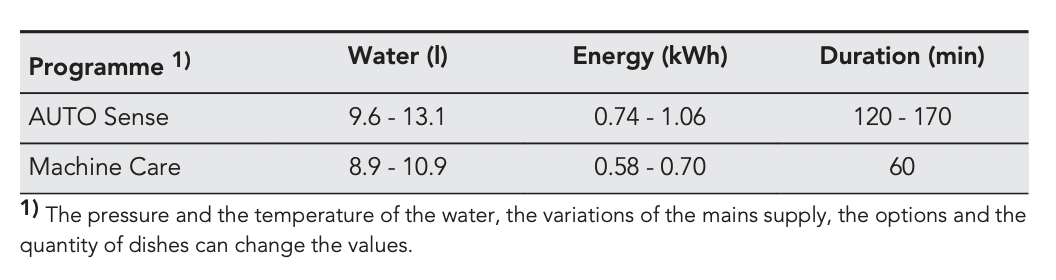
AUTO Sense
The AUTO Sense program automatically adjusts the wash cycle to the type of load.
The appliance senses the degree of soil and the amount of dishes in the baskets. It adjusts the temperature and quantity of water as well as the wash duration.
Programmes overview


Consumption values
Information for test institutes
To receive the necessary information for conducting performance tests (e.g. according to EN60436), send an email to: [email protected]. In your request please include the product number code (PNC) found on the rating plate.
For any other questions regarding your dishwasher please refer to the service book provided with your appliance.
BASIC SETTINGS
You can configure the appliance by changing basic settings according to your needs.
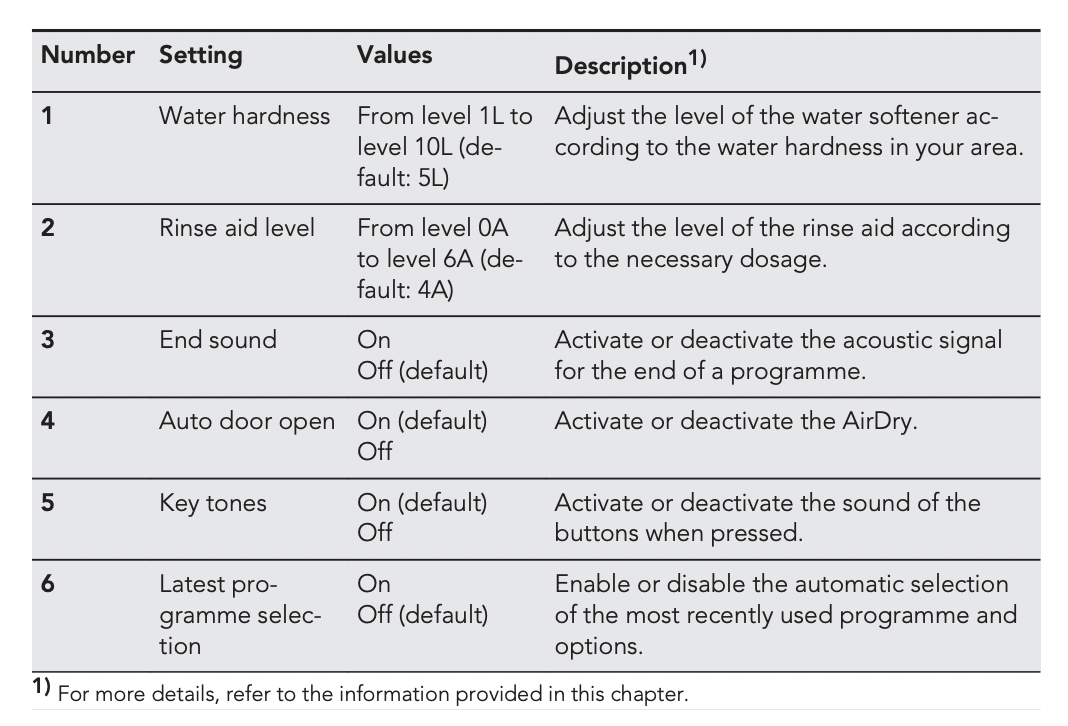
You can change the basic settings in setting mode.
When the appliance is in setting mode, the bars of the ECOMETER represent available settings. For each setting, a dedicated bar of the ECOMETER flashes.
The order of the basic settings presented in the table is also the order of the settings on the ECOMETER:
The water softener
The water softener removes minerals from the water supply, which would have a negative effect on the washing results and on the appliance.
The higher the content of these minerals, the harder your water is. Water hardness is measured in equivalent scales.
The water softener should be adjusted according to the hardness of the water in your area. Your local water authority can advise you on the hardness of the water in your area. It is important to set the right level of the water softener to assure good washing results.
 Softening hard water increases the consumption of water and energy as well as the programme duration. The higher the level of water softener, the higher the consumption and the longer the duration.

Regardless of the type of detergent used, set the proper water hardness level to keep the salt refill indicator active.
 Multi-tabs containing salt are not effective enough to soften hard water.
The rinse aid level
The rinse aid helps to dry the dishes without streaks and stains. It is automatically released during the hot rinse phase. It is possible to set the released quantity of rinse aid.
When rinse aid chamber is empty, the rinse aid indicator is on notifying to refill rinse aid. If the drying results are satisfactory while using multi-tablets only, it is possible to deactivate the dispenser and the indicator. However, for best drying performance, always use rinse aid and keep the rinse aid indicator active.
To deactivate the rinse aid dispenser and indicator, set the level of rinse aid to 0A.
End sound
You can activate an acoustic signal that sounds when the programme is completed.
 Acoustic signals sound also when a malfunction of the appliance occurs. It is not possible to deactivate these signals.
AirDry
AirDry improves the drying results. The appliance door opens automatically during the drying phase and remains ajar.
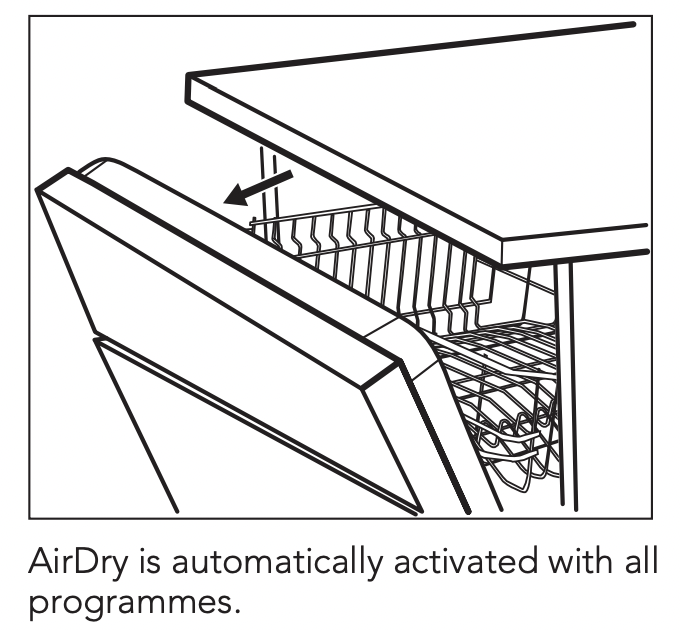
CAUTION! Do not try to close the appliance door within 2 minutes after automatic opening. This can cause damage to the appliance.
CAUTION! If children have access to the appliance, we advise to deactivate AirDry. The automatic opening of the door may pose a danger.
 When AirDry opens the door, Beam-on-Floor might not be completely visible. To see if the programme is complete, look at the control panel.
Key tones
The buttons on the control panel make a click sound when you press them. You can deactivate this sound.
Latest programme selection
You can set the automatic selection of the most recently used programme and options.
The latest programme that was completed before the appliance deactivation is saved. It is then selected automatically after you activate the appliance.
When the latest programme selection is disabled, the default programme is ECO.
Setting mode
How to navigate in setting mode
You can navigate in setting mode using MY TIME selection bar.
A. Previous button
B. OK button
C. Next button
Use Previous and Next to switch between the basic settings and to change their value.
Use OK to enter the selected setting and to confirm changing its value.
How to enter setting mode
You can enter setting mode before starting a programme. You cannot enter setting mode while the programme is running.
To enter setting mode, press and hold simultaneously  and
and  for about 3 seconds. The lights related to the Previous, OK and Next are on.
How to change a setting
Make sure the appliance is in setting mode.
1. Use Previous or Next to select the bar of the ECOMETER dedicated to the desired setting.
- The bar of the ECOMETER dedicated to the chosen setting flashes.
- The display shows the current setting value.
2. Press OK to enter the setting.
- The bar of the ECOMETER dedicated to the chosen setting is on. The other bars are off.
- The current setting value flashes.
3. Press Previous or Next to change the value.
4. Press OK to confirm the setting.
- The new setting is saved.
- The appliance returns to the basic settings list.
5. Press and hold simultaneously  and
and  for about 3 seconds to exit setting mode.
The appliance returns to the programme selection.
The saved settings remain valid until you change them again.
BEFORE FIRST USE
1. Make sure that the current level of the water softener agrees with the hardness of the water supply. If not, adjust the level of the water softener.
2. Fill the salt container.
3. Fill the rinse aid dispenser.
4. Open the water tap.
5. Start the programme Quick to remove any residuals from the manufacturing process. Do not use detergent and do not put dishes in the baskets.
After starting the programme, the appliance recharges the resin in the water softener for up to 5 minutes. The washing phase starts only after this procedure is complete. The procedure is repeated periodically.
The salt container
CAUTION! Use rough salt designed for dishwashers only. Fine salt increases the risk of corrosion.
The salt is used to recharge the resin in the water softener and to assure good washing results in daily use.
How to fill the salt container
 Make sure that the ComfortLift basket is empty and locked in the raised position.
1. Turn the cap of the salt container counterclockwise and remove it.
2. Put 1 litre of water in the salt container (only for the first time).
3. Fill the salt container with dishwasher salt (until it is full).
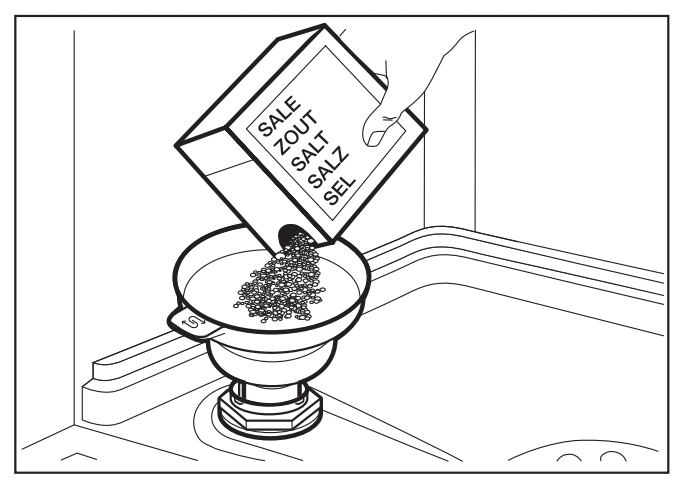
4. Carefully shake the funnel by its handle to get the last granules inside.
5. Remove the salt around the opening of the salt container.
6. Turn the cap of the salt container clockwise to close the salt container.
CAUTION! Water and salt can come out of the salt container when you fill it. After you fill the salt container, immediately start the shortest programme to prevent corrosion. Do not put dishes in the baskets.
How to fill the rinse aid dispenser
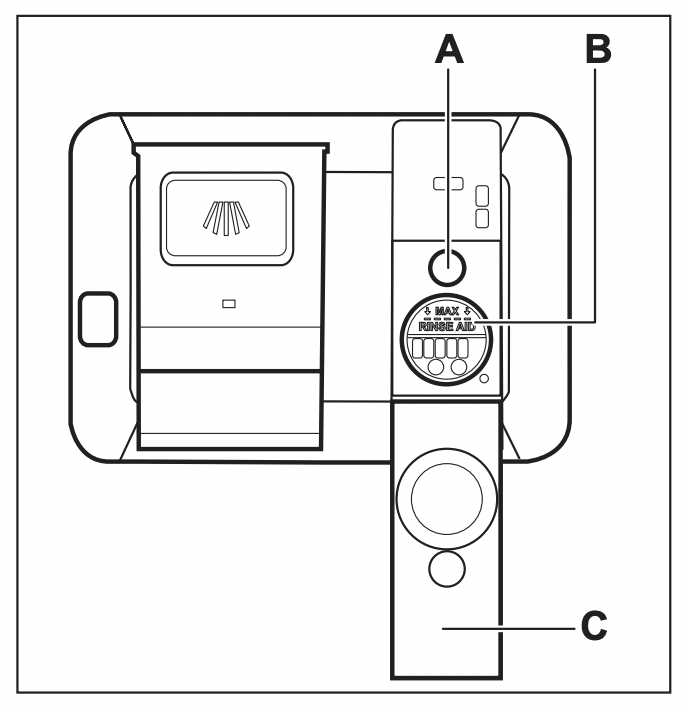
CAUTION! Only use rinse aid designed specifically for dishwashers.
1. Open the lid (C).
2. Fill the dispenser (B) until the rinse aid reaches the marking ''MAX''.
3. Remove the spilled rinse aid with an absorbent cloth to prevent excessive foam formation.
4. Close the lid. Make sure that the lid locks into position.
 Fill the rinse aid dispenser when the indicator (A) is clear.
DAILY USE
1. Open the water tap.
2. Press and hold  until the appliance is activated.
3. Fill the salt container if it is empty.
4. Fill the rinse aid dispenser if it is empty.
5. Load the baskets.
6. Add the detergent.
7. Select and start a programme.
8. Close the water tap when the programme is complete.
ComfortLift
CAUTION! Do not sit on the rack or put excessive pressure on the locked basket.
CAUTION! Do not exceed the max load capacity of 18 kg.
CAUTION! Make sure that items do not stick out of the basket frame as it can cause damage to the items and the ComfortLift mechanism.
The ComfortLift mechanism allows to lift the lower rack up (to the second rack level) and put it down to load and unload dishes easily.
To load or unload the lower basket:
1. Lift the basket by pulling the rack out of the dishwasher by the basket handle. The trigger handle should not be used.
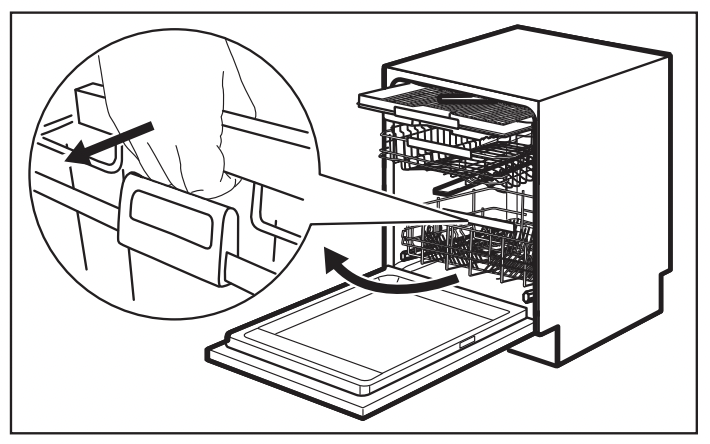
The basket is automatically locked on the upper level.
2. Carefully place items in the basket or remove them (refer to Basket loading leaflet).
3. Lower the basket by connecting the trigger handle with the basket frame as shown below. Lift the trigger handle completely and the basket handle slightly until the basket is disengaged on both sides.
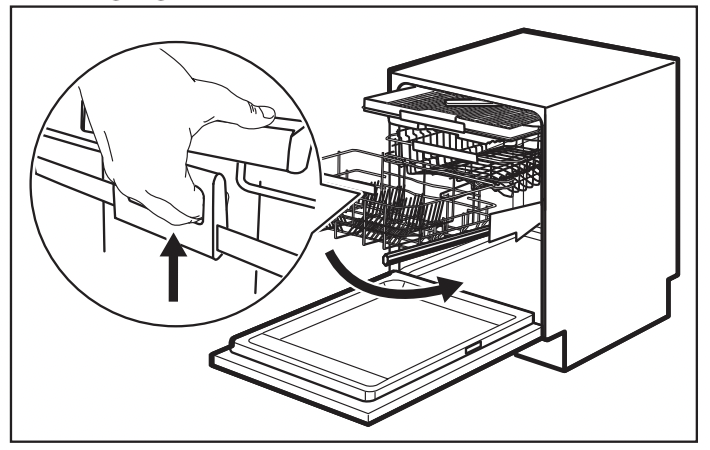
Once the basket is unlocked, push the rack down. The mechanism returns to its default position on the lower level.
There are two ways of lowering the basket depending on the loading:
- If there is a full load of plates, slightly push the basket down.
- If the basket is empty or halfloaded, press the basket down.
Using the detergent
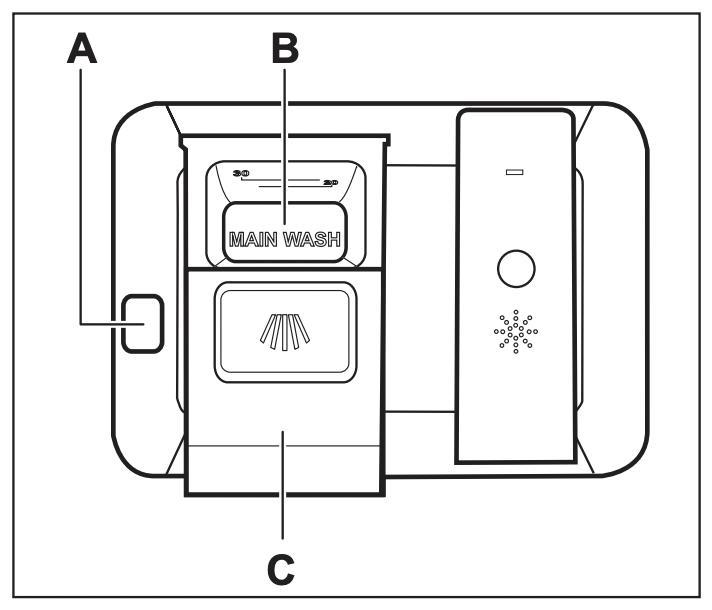
CAUTION! Only use detergent specifically designed for dishwashers.
1. Press the release button (A) to open the lid (C).
2. Put the detergent, in powder or tablets, in the compartment (B).
3. If the programme has a prewash phase, put a small quantity of detergent on the inner part of the appliance door.
4. Close the lid. Make sure that the lid locks into position.
How to select and start a programme using MY TIME selection bar
1. Slide your finger across MY TIME selection bar to choose a suitable programme.
- The light related to the selected programme is on.
- The ECOMETER indicates the level of energy and water consumption.
- The display shows the programme duration.
2. Activate applicable EXTRAS if desired.
3. Close the appliance door to start the programme.
How to activate EXTRAS
1. Select a programme using MY TIME selection bar.
2. Press the button dedicated to the option you want to activate.
- The light related to the button is on.
- The display shows the updated programme duration.
- The ECOMETER indicates the updated level of energy and water consumption.
 By default, options must be activated every time before you start a programme. If the latest programme selection is enabled, the saved options are activated automatically along with the programme.
 It is not possible to activate or deactivate options while a programme is running.
 Not all options are compatible with each other.
 Activating options often increases the water and energy consumption as well as the programme duration.
How to start the AUTO Sense program
1. Press  .
.
- The light related to the button is on.
- The display shows the longest possible program duration.
 MY TIME and EXTRAS are not applicable to this program.
2. Close the appliance door to start the program.
The appliance senses the type of load and adjusts a suitable wash cycle. During the cycle, the sensors operate several times and the initial program duration can decrease.
How to delay the start of a programme
1. Select a programme.
2. Press  repeatedly until the display shows the desired delay time (from 1 to 24 hours). The light related to the button is on.
3. Close the appliance door to start the countdown.
During the countdown, it is not possible to change the delay time and the programme selection.
When the countdown is complete, the programme starts.
How to cancel the delay start while the countdown operates
Press and hold  for about 3 seconds. The appliance returns to the programme selection.
 If you cancel the delay start, you have to select the programme again.
How to cancel a running programme
Press and hold  for about 3 seconds. The appliance returns to the programme selection.
 Make sure that there is detergent in the detergent dispenser before you start a new programme.
Opening the door while the appliance operates
Opening the door while a programme is running stops the appliance. It may affect the energy consumption and the programme duration. After closing the door, the appliance continues from the point of interruption.
 If the door is opened for more than 30 seconds during the drying phase, the running programme ends. It does not happen if the door is opened by AirDry function.
The Auto Off function
This function saves energy by switching the appliance off when it is not operating.
The function comes into operation automatically:
- When the programme is completed.
- After 5 minutes if a programme was not started.
End of the programme
When the programme is complete, the display shows 0:00.
The Auto Off function switches the appliance off automatically.
All buttons are inactive except for the on/off button.
HINTS AND TIPS
General
Follow the hints below to ensure optimal cleaning and drying results in daily use and to help you protect the environment.
- Remove larger residues of food from the dishes into the waste bin.
- Do not pre-rinse dishes by hand. When needed, select a programme with a prewash phase.
- Always use the whole space of the baskets.
- Make sure that items in the baskets do not touch or cover each other. Only then can the water completely reach and wash the dishes.
- You can use dishwasher detergent, rinse aid and salt separately or you can use the multi-tablets (e.g. ''All in 1''). Follow the instructions on the packaging.
- Select a programme according to the type of load and the degree of soil. ECO offers the most efficient use of water and energy consumption.
Using salt, rinse aid and detergent
- Only use salt, rinse aid and detergent designed for dishwasher. Other products can cause damage to the appliance.
- In areas with hard and very hard water, we recommend to use basic dishwasher detergent (powder, gel, tablets containing no additional agents), rinse aid and salt separately for optimal cleaning and drying results.
- Detergent tablets do not fully dissolve with short programmes. To prevent detergent residues on the tableware, we recommend that you use tablets with long programmes.
- Do not use more than the correct quantity of detergent. Refer to the instructions on the detergent packaging.
What to do if you want to stop using multi-tablets
Before you start using separately detergent, salt and rinse aid, complete the following steps:
1. Set the highest level of the water softener.
2. Make sure that the salt and rinse aid containers are full.
3. Start the Quick programme. Do not add detergent and do not put dishes in the baskets.
4. When the programme is completed, adjust the water softener according to the water hardness in your area.
5. Adjust the released quantity of rinse aid.
Before starting a programme
Before you start the selected programme, make sure that:
- The filters are clean and correctly installed.
- The cap of the salt container is tight.
- The spray arms are not clogged.
- There is enough salt and rinse aid (unless you use multi-tablets).
- The arrangement of the items in the baskets is correct.
- The programme is suitable to the type of load and the degree of soil.
- The correct quantity of detergent is used.
Loading the baskets
- Use the appliance to wash dishwasher-safe items only.
- Do not wash in the appliance items made of wood, horn, aluminium, pewter and copper.
- Do not wash in the appliance items that can absorb water (sponges, household cloths).
- Remove large food residues from dishes.
- Soak cookware with burnt-on food before washing it in the appliance.
- Put hollow items (cups, glasses and pans) with the opening facing downwards.
- Make sure that glasses do not touch each other.
- Put light items in the upper basket. Make sure that the items do not move freely.
- Put cutlery and small items in the cutlery drawer.
- Move the upper basket upwards to accommodate large items in the lower basket.
- Make sure that the spray arms can move freely before you start a programme.
Unloading the baskets
1. Let the tableware cool down before you remove it from the appliance. Hot items can be easily damaged.
2. First remove items from the lower basket, then from the upper basket.
 After the programme is completed, water can still remain on the inside surfaces of the appliance.
CARE AND CLEANING
WARNING! Before any maintenance other than running the programme Machine Care, deactivate the appliance and disconnect the mains plug from the main socket.
 Make sure that the ComfortLift basket is empty and locked in the raised position.
 Dirty filters and clogged spray arms negatively affect the washing results. Check these elements regularly and, if necessary, clean them.
Machine Care
Machine Care is a programme designed to clean the appliance interior with optimal results. It removes limescale and grease buildup.
When the appliance senses the need for cleaning, the indicator  is on. Start the Machine Care programme to clean the appliance interior.
How to start the Machine Care programme
 Before starting the Machine Care programme, clean the filters and spray arms.
1. Use a descaler or a cleaning product designed specifically for dishwashers. Follow the instructions on the packaging. Do not put dishes in the baskets.
2. Press and hold simultaneously  and
and  for about 3 seconds. The indicators
  and
and  flash. The display shows the programme duration.
3. Close the appliance door to start the programme. When the programme is complete, the indicator  is off.
Internal cleaning
- Carefully clean the appliance, including the rubber gasket of the door, with a soft damp cloth.
- Do not use abrasive products, abrasive cleaning pads, sharp tools, strong chemicals, scourer or solvents.
- To maintain the performance of your appliance, use a cleaning product designed specifically for dishwashers at least once every two months. Carefully follow the instructions on the packaging of the product.
- For optimal cleaning results, start the Machine Care programme.
External cleaning
- Clean the appliance with a moist soft cloth.
- Only use neutral detergents.
- Do not use abrasive products, abrasive cleaning pads or solvents.
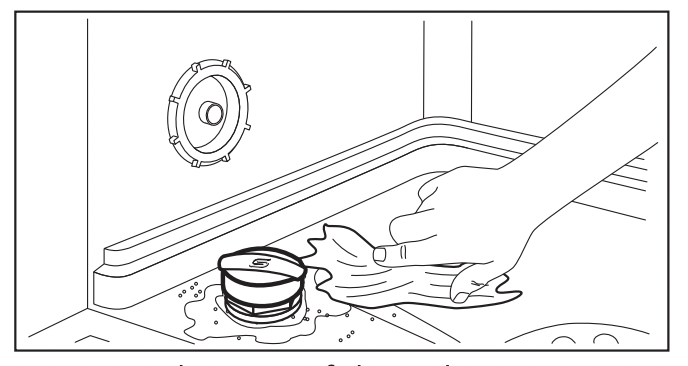
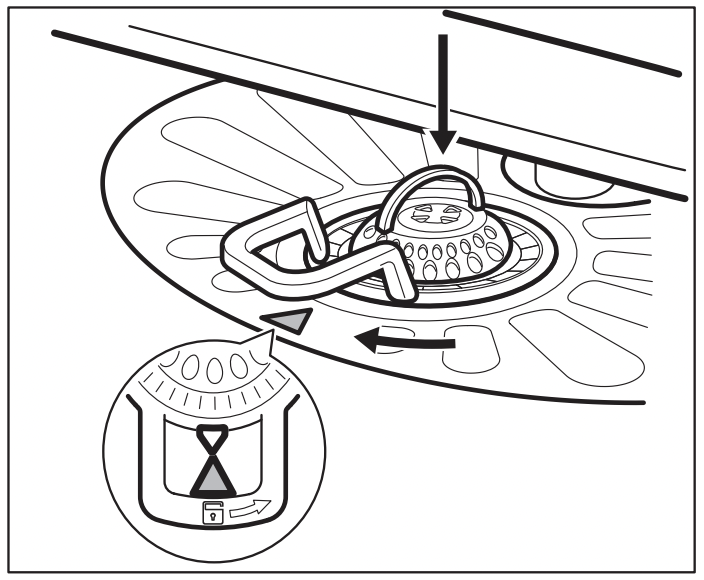
Cleaning the filters
The filter system is made of 3 parts

1. Turn the filter (B) counterclockwise and remove it.
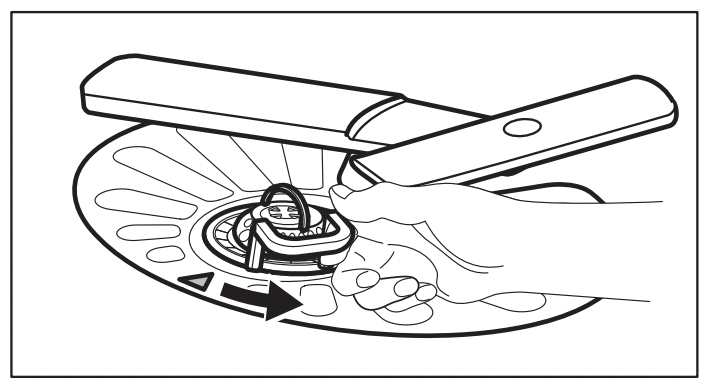
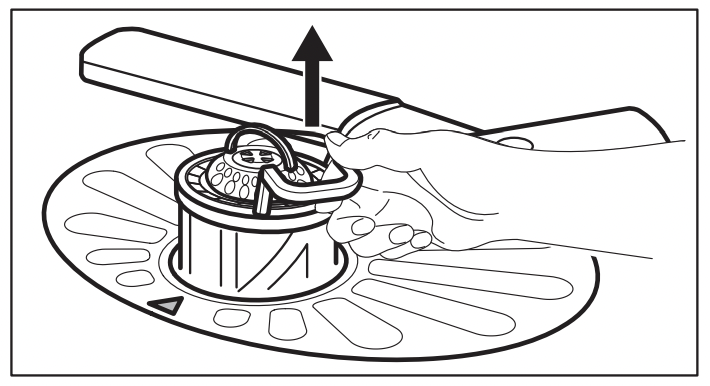
2. Remove the filter (C) out of filter (B).
3. Remove the flat filter (A).
4. Wash the filters.
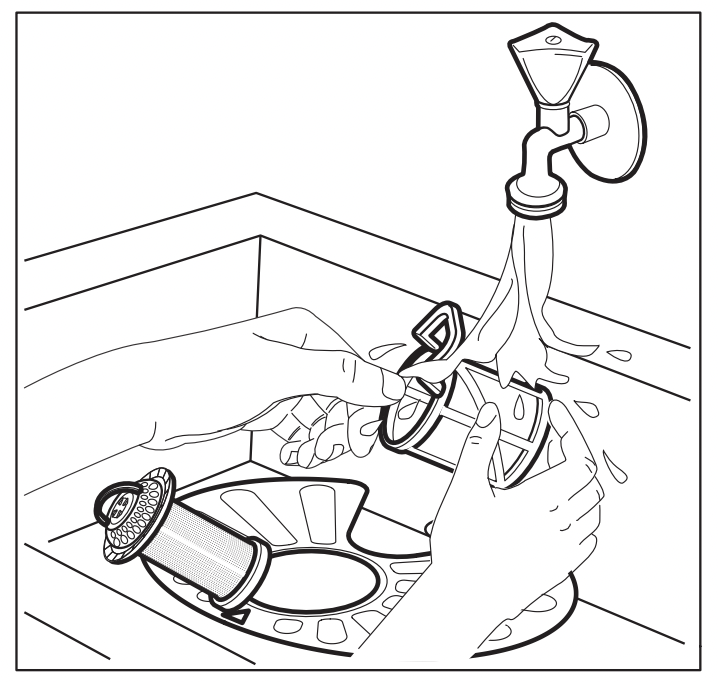
5. Make sure that there are no residues of food or soil in or around the edge of the sump.
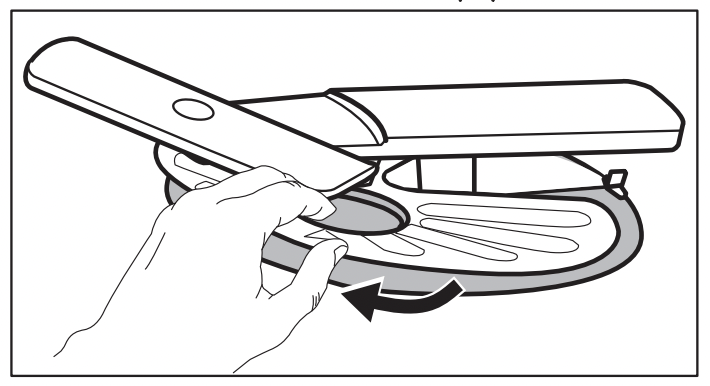
6. Put back in place the flat filter (A). Make sure that it is correctly positioned under the 2 guides.
7. Reassemble the filters (B) and (C).
8. Put back the filter (B) in the flat filter (A). Turn it clockwise until it locks.
CAUTION! An incorrect position of the filters can cause bad washing results and damage to the appliance.
Cleaning the lower spray arm
We recommend to clean the lower spray arm regularly to prevent soil from clogging the holes.
Clogged holes can cause unsatisfactory washing results.
1. To remove the lower spray arm, pull it upwards.
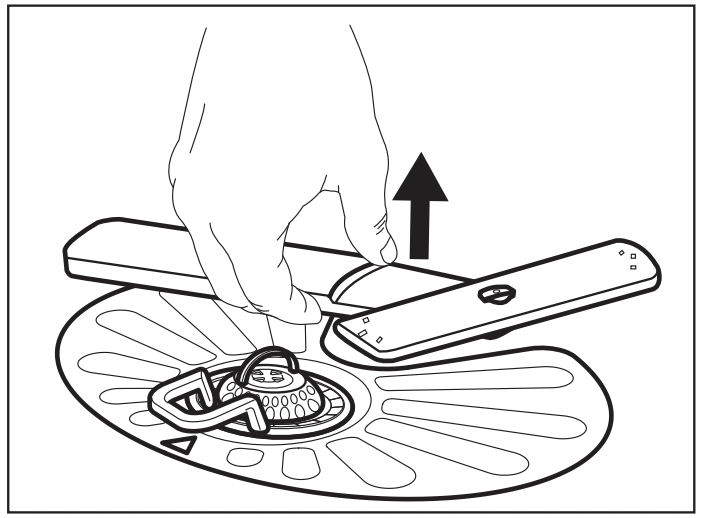
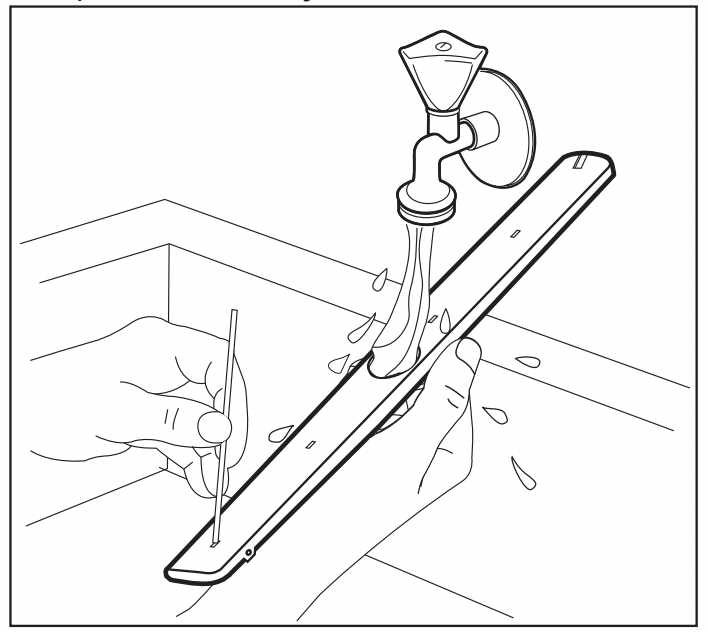
2. Wash the spray arm under running water. Use a thin pointed tool, e.g. a toothpick, to remove particles of soil from the holes.
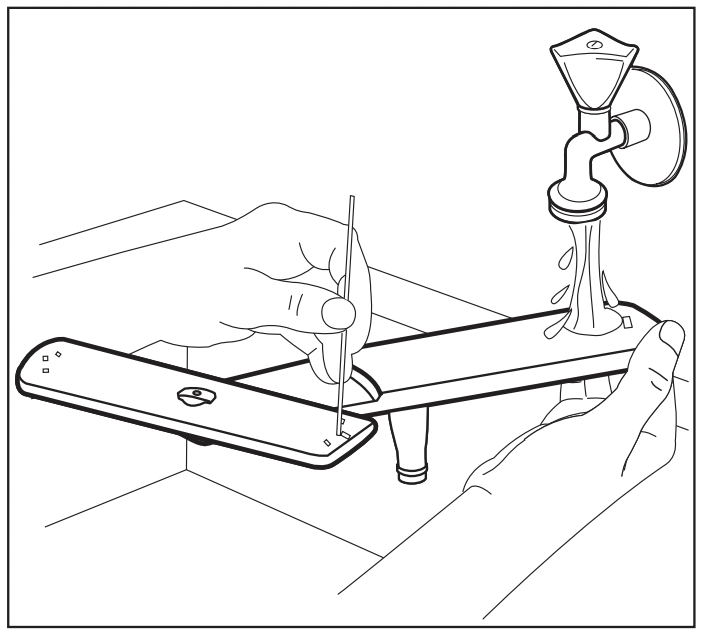
3. To install the spray arm back, press it downwards.
Cleaning the upper spray arm
We recommend to clean the upper spray arm regularly to prevent soil from clogging the holes.
Clogged holes can cause unsatisfactory washing results.
1. Pull out the upper basket.
2. To detach the spray arm from the basket, press the spray arm upwards and simultaneously turn it clockwise.
3. Wash the spray arm under running water. Use a thin pointed tool, e.g. a toothpick, to remove particles of soil from the holes.
4. To install the spray arm back, press the spray arm upwards and simultaneously turn it counterclockwise until it locks into place.
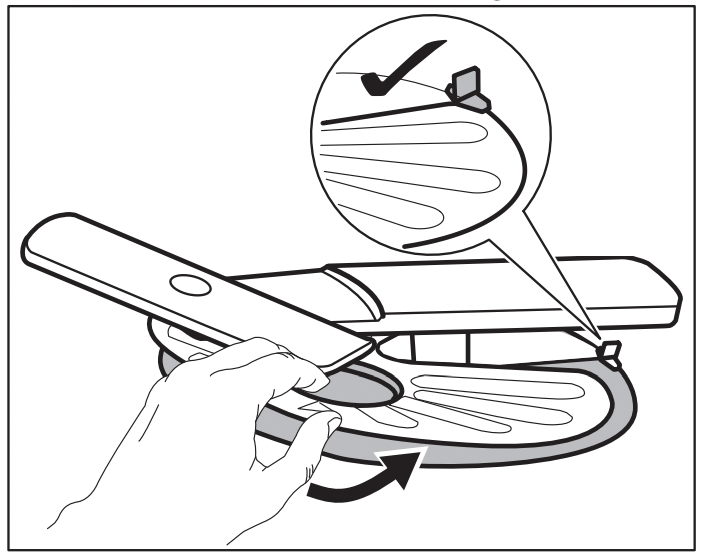
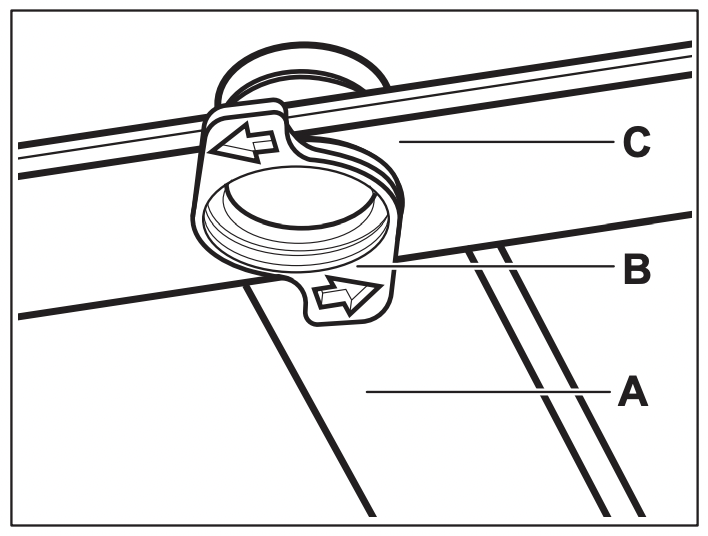
Cleaning the ceiling spray arm
We recommend to clean the ceiling spray arm regularly to prevent soil from clogging the holes. Clogged holes can cause unsatisfactory washing results.
The ceiling spray arm is placed on the ceiling of the appliance. The spray arm (C) is installed in the delivery tube (A) with the mounting element (B).
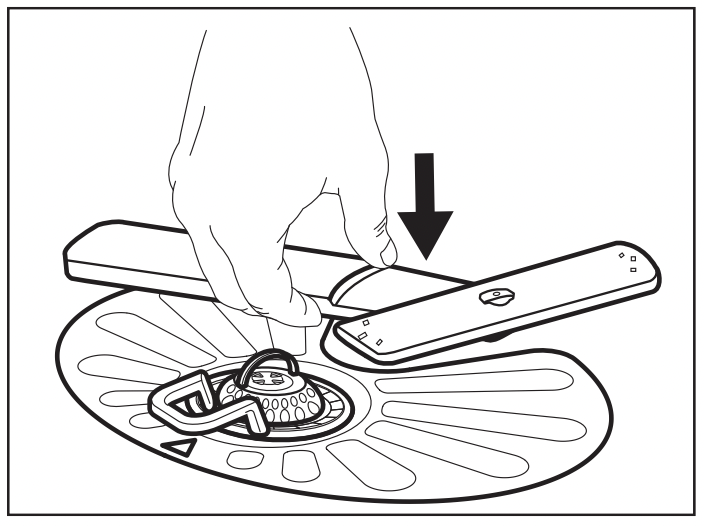
1. Remove the stoppers from the sliding rails of the cutlery drawer and pull the drawer out.
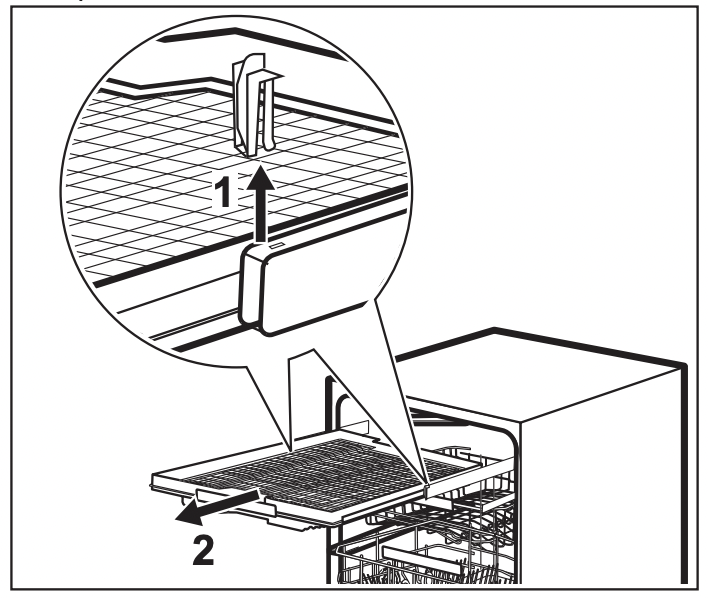
2. Move the upper basket to the lowest level to reach the spray arm more easily.
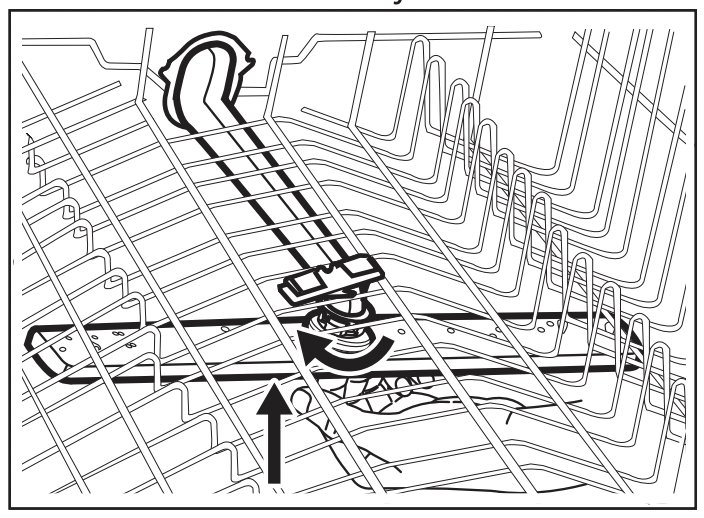
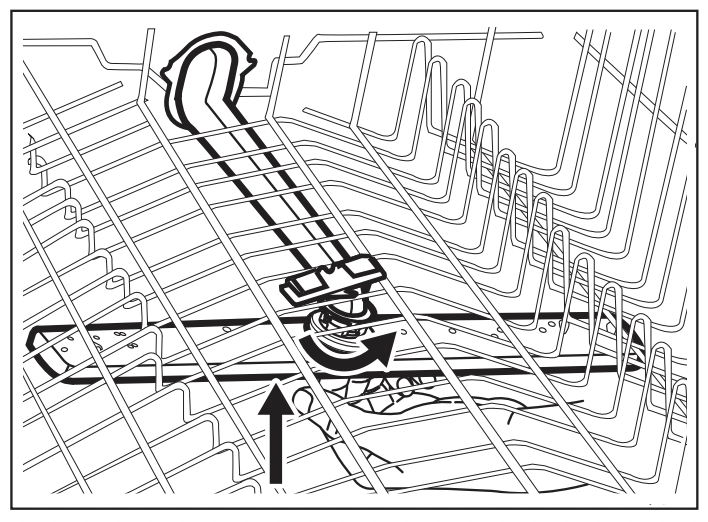
3. To detach the spray arm (C) from the delivery tube (A), turn the mounting element (B) counterclockwise and pull the spray arm downwards.
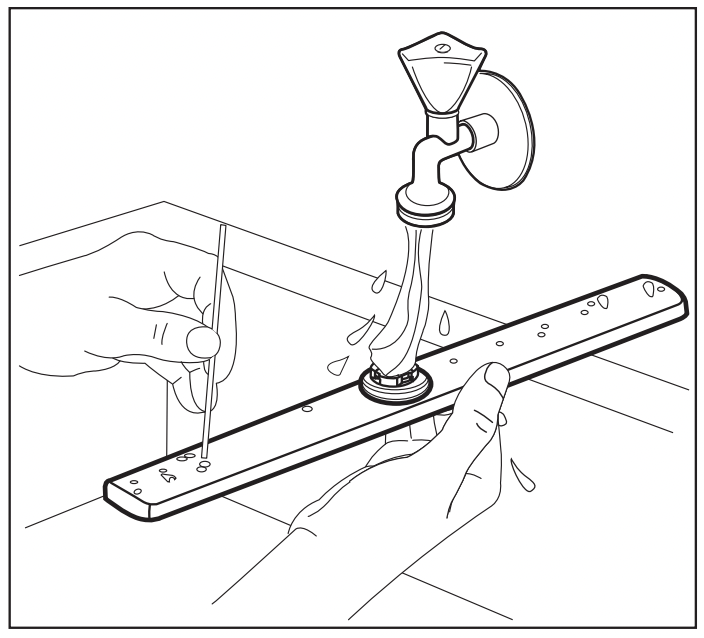
4. Wash the spray arm under running water. Use a thin pointed tool, e.g. a toothpick, to remove particles of soil from the holes. Run the water through the holes to wash soil particles away from the inside.
5. To install the spray arm (C) back, insert the mounting element (B) in the spray arm and fix it in the delivery tube (A) by turning it clockwise. Make sure that the mounting element locks into place.
6. Install the cutlery drawer on the sliding rails and insert the stoppers.
TROUBLESHOOTING
WARNING! Improper repair of the appliance may pose a danger to the safety of the user. Any repairs must be performed by qualified personnel.
The majority of problems that may occur can be solved without the need to contact an Authorised Service Centre.
Refer to the below table for information on possible problems.
With some problems, the display shows an alarm code.
| Problem and alarm code |
Possible cause and solution |
| You cannot activate the appliance. |
- Make sure that the mains plug is connected to the mains socket.
- Make sure that there is no damaged fuse in the fuse box.
|
| The programme does not start. |
- Make sure that the appliance door is closed.
- If the delay start is set, cancel the setting or wait for the end of the countdown.
- The appliance recharges the resin inside the water softener. The duration of the procedure is approximately 5 minutes.
|
The appliance does not fill with water. The display shows  or or  . . |
- Make sure that the water tap is open.
- Make sure that the pressure of the water supply is not too low. For this information, contact your local water authority.
- Make sure that the water tap is not clogged.
- Make sure that the filter in the inlet hose is not clogged.
- Make sure that the inlet hose has no kinks or bends.
|
The appliance does not drain the water. The display shows  . . |
- Make sure that the sink spigot is not clogged.
- Make sure that the filter in the outlet hose is not clogged.
- Make sure that the interior filter system is not clogged.
- Make sure that the drain hose has no kinks or bends.
|
The anti-flood device is on. The display shows  . . |
- Close the water tap and contact an Authorised Service Centre.
|
| The appliance stops and starts more times during operation. |
- It is normal. It provides optimal cleaning results and energy savings.
|
| The programme lasts too long. |
- If the delay start option is set, cancel the delay setting or wait for the end of the countdown.
- Activating options can increase the programme duration.
|
| The remaining time in the display increases and skips nearly to the end of the programme duration. |
- This is not a defect. The appliance is working correctly.
|
| Small leak from the appliance door. |
- The appliance is not levelled. Loosen or tighten the adjustable feet (if applicable).
- The appliance door is not centred on the tub. Adjust the rear foot (if applicable).
|
| The appliance door is difficult to close. |
- The appliance is not levelled. Loosen or tighten the adjustable feet (if applicable).
- Parts of the tableware are protruding from the baskets.
|
| Rattling or knocking sounds from the inside of the appliance. |
- The tableware is not properly arranged in the baskets. Refer to basket loading leaflet.
- Make sure that the spray arms can rotate freely.
|
| The appliance trips the circuit-beaker. |
- The amperage is insufficient to supply simultaneously all the appliances in use. Check the socket amperage and the capacity of the meter or turn off one of the appliances in use.
- Internal electrical fault of the appliance. Contact an Authorised Service Centre.
|
Once you have checked the appliance, deactivate and activate the appliance. If the problem occurs again, contact an Authorised Service Centre.
For alarm codes not described in the table, contact an Authorised Service Centre.
The product number code (PNC)
If you contact an Authorised Service Centre, you need to provide the product number code of your appliance.
The PNC can be found on the rating plate on the appliance door. You can also check the PNC on the control panel.
Before checking the PNC, make sure the appliance is in the programme selection.
1. Press and hold simultaneously  and
and  for about 3 seconds. The display shows the PNC of your appliance.
2. To exit the PNC presentation, press and hold simultaneously  and
and  for about 3 seconds.
The appliance returns to the programme selection.
The washing and drying results are not satisfactory
| Problem |
Possible cause and solution |
| Poor washing results. |
- Refer to "Daily use", "Hints and tips" and the basket loading leaflet. • Use more intensive washing programme.
- Activate the ExtraPower option to improve the washing results of a selected programme.
- Clean spray arm jets and filter. Refer to "Care and Cleaning".
|
| Poor drying results. |
- Tableware was left for too long inside the closed appliance. Activate AirDry to set the automatic opening of the door and to improve the drying performance.
- There is no rinse aid or the dosage of rinse aid is not sufficient. Fill the rinse aid dispenser or set the level of rinse aid to a higher level.
- The quality of the rinse aid can be the cause.
- We recommend to use rinse aid always, even in combination with multi-tablets.
- Plastic items may need to be towel dried.
- The programme does not have the drying phase. Refer to "Programmes overview".
|
| There are whitish streaks or bluish layers on glasses and dishes. |
- The released quantity of rinse aid is too high. Adjust the rinse aid level to a lower level.
- The quantity of detergent is too high.
|
| There are stains and dry water drops on glasses and dishes. |
- The released quantity of rinse aid is not sufficient. Adjust the rinse aid level to a higher level.
- The quality of the rinse aid can be the cause.
|
| The interior of the appliance is wet. |
- This is not a defect of the appliance. Humid air condensates on the appliance walls.
|
| Unusual foam during washing. |
- Use the detergent designed specifically for dishwashers.
- There is a leak in the rinse aid dispenser. Contact an Authorised Service Centre.
|
| Traces of rust on cutlery. |
- There is too much salt in the water used for washing. Refer to "The water softener".
- Silver and stainless steel cutlery were placed together. Do not put silver and stainless steel items close together.
|
| There are residues of detergent in the dispenser at the end of the programme. |
- The detergent tablet was stuck in the dispenser and therefore was not completely washed away by water.
- Water cannot wash away the detergent from the dispenser. Make sure that the spray arms are not blocked or clogged.
- Make sure that items in the baskets do not impede the lid of the detergent dispenser from opening.
|
| Odours inside the appliance. |
- Refer to "Internal cleaning".
- Start the Machine Care programme with a descaler or a cleaning product designed for dishwashers.
|
| Limescale deposits on the tableware, on the tub and on the inside of the door. |
- The level of salt is low, check the refill indicator.
- The cap of the salt container is loose. • Your tap water is hard. Refer to "The water softener".
- Use salt and set regeneration of the water softener even when multi-functional tablets are used. Refer to "The water softener".
- Start the Machine Care programme with a descaler designed for dishwashers.
- If limescale deposits still remain, clean the appliance with appliance cleaners which are particularly suitable for this purpose.
- Try a different detergent.
- Contact the detergent manufacturer.
|
| Dull, discoloured or chipped tableware. |
- Make sure that only dishwasher-safe items are washed in the appliance.
- Load and unload the basket carefully. Refer to the basket loading leaflet.
- Place delicate items in the upper basket.
- Activate the GlassCare option to ensure special care for glassware and delicate items.
|
 Refer to "Before first use", "Daily use", or "Hints and tips" for other possible causes.