Use & Care Manual
Induction Range
EN 2
Guide d’utilisation et d’entretien
Cuisinière à induction
Manual de uso y cuidado
Estufa de inducción
FR 52
SP 102

2
THANK YOU FOR CHOOSING OUR APPLIANCE!
For Customer Care support and webshop visit or download an extended version of this manual, visit:
www.ElectroluxAppliances.com
This manual is your resource for the use and care of your product. Please read it before using your appliance.
Keep it handy for quick reference. If something doesn't seem right, the troubleshooting section will help you with
common issues.
FAQs, helpful tips and videos, cleaning products, and kitchen and home accessories are available at
www.ElectroluxAppliances.com.
We are here for you! Visit our website, chat with an agent, or call us if you need help. We may be able to help you
avoid a service visit. If you need service, we can get that started for you.
Let's make it official! Be sure to register your product.
Keep your product info here so it's easy to find.
Model Number:
Serial Number:
Purchase Date:
WELCOME TO ELECTROLUX!............................................... 2
IMPORTANT SAFETY INSTRUCTIONS..............................3
FEATURES ......................................................................................9
BEFORE USING THE APPLIANCE...................................... 13
USING THE COOKTOP...........................................................16
USING THE OVEN..................................................................... 21
CARE AND CLEANING..........................................................40
BEFORE YOU CALL.................................................................48
WELCOME TO ELECTROLUX!
3
Read all instructions before using this appli-
ance.
This manual contains important safety symbols
and instructions. Please pay attention to these
symbols and follow all instructions given.
Do not attempt to install or operate your
appliance until you have read the safety pre-
cautions in this manual. Safety items through-
out this manual are labeled with a WARNING
or CAUTION statement based on the risk type.
Warnings and important instructions appear-
ing in this guide are not meant to cover all
possible conditions and situations that may
occur. Common sense, caution, and care must
be exercised with installing, maintaining, or
operating your appliance.
DEFINITIONS
This is the safety alert symbol. It is used to
alert you to potential personal injury haz-
ards. Follow all the safety messages that fol-
low this symbol to avoid possible injury or
death.
IMPORTANT INSTRUCTIONS FOR UNPACK-
ING AND INSTALLATION
Remove all tape and packaging before using
the appliance. Dispose of the carton and plas-
tic bags after unpacking the appliance. Never
allow children to play with packaging mate-
rial. Do not remove the wiring label and other
information attached to the appliance. Do not
remove model/serial number plate.
Cold temperatures can damage the electronic
control. If this appliance has not been used for
a long time, make sure that it has been stored
at temperatures above 32ºF (0ºC) for at least
3 hours before turning on power to the appli-
ance.
Never modify or alter the construction of the
appliance by removing the leveling legs, pan-
els, wire covers, anti-tip brackets/screws, or
any other part of the appliance. Be sure to
have an appropriate foam-type fire extin-
guisher available, clearly visible and easily
accessible located near the appliance.
All materials used in construction of cabinets,
enclosures, and supports surrounding the
product must have a temperature rating
above 200°F (94°C).
WARNING
Indicates a potentially hazardous situation
which, if not avoided, may result in death or
serious injury.
CAUTION
Indicates a potentially hazardous situation
which, if not avoided, may result in minor or
moderate injury.
IMPORTANT
Indicates installation, operation, mainte-
nance, or valuable information that is not
hazard related.
NOTE
Indicates a short, informal reference –
something written down to assist the mem-
ory or for future reference.
IMPORTANT
Read and follow the instructions and pre-
cautions below for unpacking, installing,
and servicing your appliance.
IMPORTANT SAFETY INSTRUCTIONS

4
GROUNDING INSTRUCTIONS
Proper Installation—Be sure your appliance is
properly installed and grounded by a quali-
fied technician. In the United States, install in
accordance with the National Fuel Gas Code
ANSI Z223.1/NPFA No. 54, latest edition and
National Electrical Code NFPA No. 70 latest
edition, and local electrical code require-
ments. In Canada, install in accordance with
CAN/CGA B149.1 and CAN/CGA B149.2 and
CSA Standard C22.1, Canadian Electrical
code, Part 1-latest editions and local electrical
code requirements. Install only as per the
installation instructions provided in the docu-
mentation received with this appliance.
For personal safety, this appliance must be
properly grounded. For maximum safety, the
power cord must be securely connected to an
electrical outlet or junction box that is the cor-
rect voltage, is correctly polarized and prop-
erly grounded, and protected by a circuit
breaker in accordance with local codes.
It is the personal responsibility of the consumer
to have the appropriate outlet or junction box
with the correct, properly grounded wall
receptacle installed by a qualified electrician.
It is the responsibility and obligation of the
consumer to contact a qualified installer to
ensure that the electrical installation is suitable
and in conformance with all local codes and
ordinances.
See the installation instructions provided with
this appliance for complete installation and
grounding instructions.
IMPORTANT INSTRUCTIONS FOR USING
THE APPLIANCE
WARNING
• Avoid fire hazard or electrical shock.
Failure to follow this warning may
cause fire, serious injury, or death.
• Avoid fire hazard or electrical shock.
Do not use an adapter plug, an exten-
sion cord, or remove the grounding
prong from the power plug. Failure to
follow this warning may cause fire,
serious injury, or death.
CAUTION
Persons with a pacemaker or similar medi-
cal device should exercise caution using or
standing near an induction unit while it is in
operation as the electromagnetic field may
affect the working of the pacemaker or sim-
ilar medical device. It would be advisable
to consult your doctor or the pacemaker or
similar medical device manufacturer about
your particular situation.
Do not touch surface burners or elements,
areas near these burners or elements, inte-
rior surfaces of the oven, or the warmer
drawer (if provided). Surface burners and
elements may be hot even though they
appear to be cool. Areas near surface
burners and elements may become hot
enough to cause burns. During and after
use, do not touch, or let clothing or other
flammable materials come into contact with
these areas until they are cool. These areas
may include the cooktop, surfaces facing
the cooktop, oven vent areas and the oven
door and oven window.
WARNING
• Storage In or On the Appliance - Flam-
mable materials should not be stored
in the oven, near surface burners or
elements, or in the storage or warmer
drawer (if provided). This includes
paper, plastic, and cloth items, such as
cookbooks, plasticware and towels, as
well as flammable liquids. Do not store
explosives, such as aerosol cans, on or
near the appliance.
IMPORTANT SAFETY INSTRUCTIONS

5
IMPORTANT INSTRUCTIONS FOR USING
YOUR INDUCTION COOKTOP
Know which knob or key controls each sur-
face heating area. Place the cookware con-
taining food on the cooking area before
turning it on. Turn the cooking area off before
removing the cookware.
Cookware handles should be turned inward
and not extend over adjacent surface ele-
ments. — To reduce the risk of burns, ignition of
flammable materials and spillage due to unin-
tentional contact with the utensil, the handle of
the cookware should be positioned so that it is
turned inward and does not extend over other
cooking areas.
• Do not leave children alone - Children
should not be left alone or unattended
in the area where appliance is in use.
They should never be allowed to sit or
stand on any part of the appliance,
including the storage drawer, lower
broiler drawer, warmer drawer, or
lower double oven.
• Do not store items of interest to chil-
dren in the cabinets above the appli-
ance or on the backguards of ranges.
Children climbing on or near the appli-
ance to reach items could be seriously
injured.
• Do not allow children to climb or play
around the appliance. The weight of a
child on an open oven door may
cause the appliance to tip, resulting in
serious burns or other injury. An open
drawer when hot may cause burns.
• Stepping, leaning, or sitting on the
door or drawers of this appliance can
result in serious injuries and also cause
damage to the appliance.
• Never cover any slots, holes or pas-
sages in the oven bottom or cover and
entire rack with materials such as alu-
minum foil. Aluminum foil linings may
also trap heat, causing a fire hazard.
CAUTION
• When heating fat or grease, watch it
closely. Grease may catch fire if it
becomes too hot.
• Do not use water or flour on grease
fires.
• Smother fire or flame or use dry chemi-
cal or foam-type extinguisher. Cover
the fire with a pan lid or use baking
soda.
WARNING
• Only use dry potholders. Moist or
damp potholders on hot surfaces may
result in burns from steam. Do not let
potholders touch hot heating elements
or hot cooking areas. Do not use tow-
els or other bulky cloths.
• Do not heat unopened food containers
- Build-up of pressure may cause the
container to burst and result in injury.
• Wear proper apparel - Loose-fitting or
hanging garments should never be
worn while using the appliance. Do not
let clothing or other flammable materi-
als come into contact with hot sur-
faces.
• Do not attempt to operate the appli-
ance during a power failure. If the
power fails, always turn off the appli-
ance. If the appliance is not turned off,
electric surface elements may resume
operation when power is restored.
Once the power is restored, reset the
clock and the oven function.
CAUTION
IMPORTANT SAFETY INSTRUCTIONS

6
Use proper pan size — This appliance is
equipped with one or more surface units of
different sizes. Select cookware with flat bot-
toms that match the surface unit size. Using
the proper cookware on the cooking area will
improve efficiency.
Glazed cooking utensils — Only certain types
of cookware are suitable for cooktop service
and must be magnetic in order to work prop-
erly on the induction zones. Check the manu-
facturer’s recommendations for cooktop use
to ensure that the cookware is compatible
with induction cooking.
Improper cookware may break due to sudden
changes in temperature. Check the cookware
manufacturer’s recommendations for cooktop
use.
Do not place metallic objects such as knives,
forks, spoons and lids on the cooktop surface
since they can become hot.
Never leave surface elements unattended.
Boil-overs may cause smoking and greasy
spills that may ignite. A pan that has boiled
dry could be damaged and may damage the
cooktop
When you are flaming foods under a ventilat-
ing hood, turn on the fan.
IMPORTANT INSTRUCTIONS FOR GLASS
AND CERAMIC COOKTOPS
Clean cooktop glass with caution. If a wet
sponge or cloth is used to wipe spills on a hot
cooking area, be careful to avoid steam
burns. Some cleaners can produce harmful
fumes if applied to a hot surface. Avoid
scratching the cooktop glass with sharp
objects.
IMPORTANT INSTRUCTIONS FOR USING
YOUR OVEN
Protective liners—Do not use aluminum foil,
aftermarket oven liners, or any other materials
or devices to line oven bottom, oven racks, or
any other part of the appliance. Only use alu-
minum as recommended for baking, such as
lining cookware or as a cover placed on food.
Any other use of protective liners or aluminum
foil may result in a risk of electric shock, fire or
a short circuit.
Take care when opening oven door, lower
oven door, or warmer drawer (some models).
Stand to the side of the appliance when open-
ing the door of a hot oven. Let hot air or
steam escape before you remove food or
place it back in the oven.
Keep oven vent ducts unobstructed. Touching
surfaces in this area when the oven is on may
cause severe burns. Do not place plastic or
heat-sensitive items on or near the oven vent.
These items can melt or ignite.
WARNING
Do Not Clean or Operate a Broken Cook-
top. If cooktop should break, cleaning
solutions and spillovers may penetrate
the broken cooktop and create a risk of
electric shock. Contact a qualified techni-
cian immediately.
IMPORTANT SAFETY INSTRUCTIONS

7
Placement of oven racks - Always place oven
racks in required position while the oven is
cool. If a rack has to be moved while the oven
is hot, do not let the potholder come into con-
tact with a hot burner or element in oven. Use
potholders and grasp the rack with both
hands when repositioning it. Remove all cook-
ware and utensils before moving the rack.
Do not use a broiler pan without its insert.
Broiler pans and inserts allow dripping fat to
drain away from the high heat of the broiler.
Do not cover the broiler insert with aluminum
foil; exposed fat and grease could ignite.
Do not cook food on the oven bottom.
Always cook in proper cookware and always
use the oven racks.
IMPORTANT INSTRUCTIONS FOR CLEANING
YOUR APPLIANCE
Clean the appliance regularly to keep all parts
free of grease that could catch fire. Do not
allow grease to accumulate. Greasy deposits
in the fan could catch fire.
Always follow the manufacturer’s recom-
mended directions when using kitchen clean-
ers and aerosols. Be aware that excess
residue from cleaners and aerosols may ignite
causing damage and injury.
Clean ventilating hoods frequently, grease
should not be allowed to accumulate on hood
or filter. Follow the manufacturer’s instructions
for cleaning ventilating hoods.
IMPORTANT INSTRUCTIONS FOR SERVICE
AND MAINTENANCE
Do not repair or replace any part of the appli-
ance unless specifically recommended in the
manuals. All other servicing should be done
only by a qualified technician. This reduces the
risk of personal injury and damage to the
appliance.
Always contact your dealer, distributor, ser-
vice agent, or manufacturer about problems
or conditions you do not understand.
Ask your dealer to recommend a qualified
technician and an authorized repair service.
Know how to disconnect the power to the
appliance at the circuit breaker or fuse box in
case of an emergency.
Remove the oven door from any unused oven
if it is to be stored or discarded.
Do not touch a hot oven light bulb with a
damp cloth. Doing so could cause the bulb to
break. Handle halogen lights (if provided) with
paper towels or soft gloves.
Disconnect the appliance or shut off the
power to the appliance before removing and
replacing the bulb.
CAUTION
Make sure all controls are turned off and
that the appliance is cool before manually
cleaning any part of the appliance. Clean-
ing a hot appliance can cause burns.
WARNING
California Residents: for cancer and
reproductive harm information, visit
www.P65Warnings.ca.gov
IMPORTANT SAFETY INSTRUCTIONS

8
Important: This appliance has been tested and
found to comply with the limits for a class B
digital device, pursuant to Part 18 of the FCC
rules (United States) and ICES-001 (Canada).
These limits are designed to provide reason-
able protection against harmful interference in
a residential installation. This unit uses and can
radiate radio frequency energy that may inter-
fere with radio communications if not installed
and used in accordance with the instructions
manual. However, there is no guarantee that
interference will not occur in a particular
installation. If this unit does cause interference
to radio or television reception, which can be
determined by turning the unit off and on, the
user is encouraged to try to correct the inter-
ference by one or more of the following mea-
sures:
• Reorient or relocate the receiving anten-
nae.
• Increase distance between unit and
receiver.
• Connect the unit into an outlet or a cir-
cuit different from the one to which the
receiver is connected.
IMPORTANT SAFETY INSTRUCTIONS
9
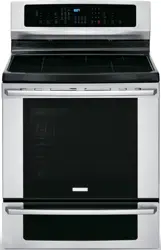
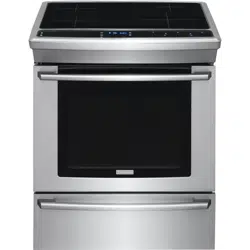
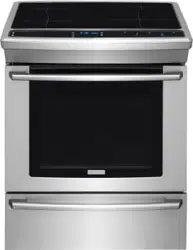
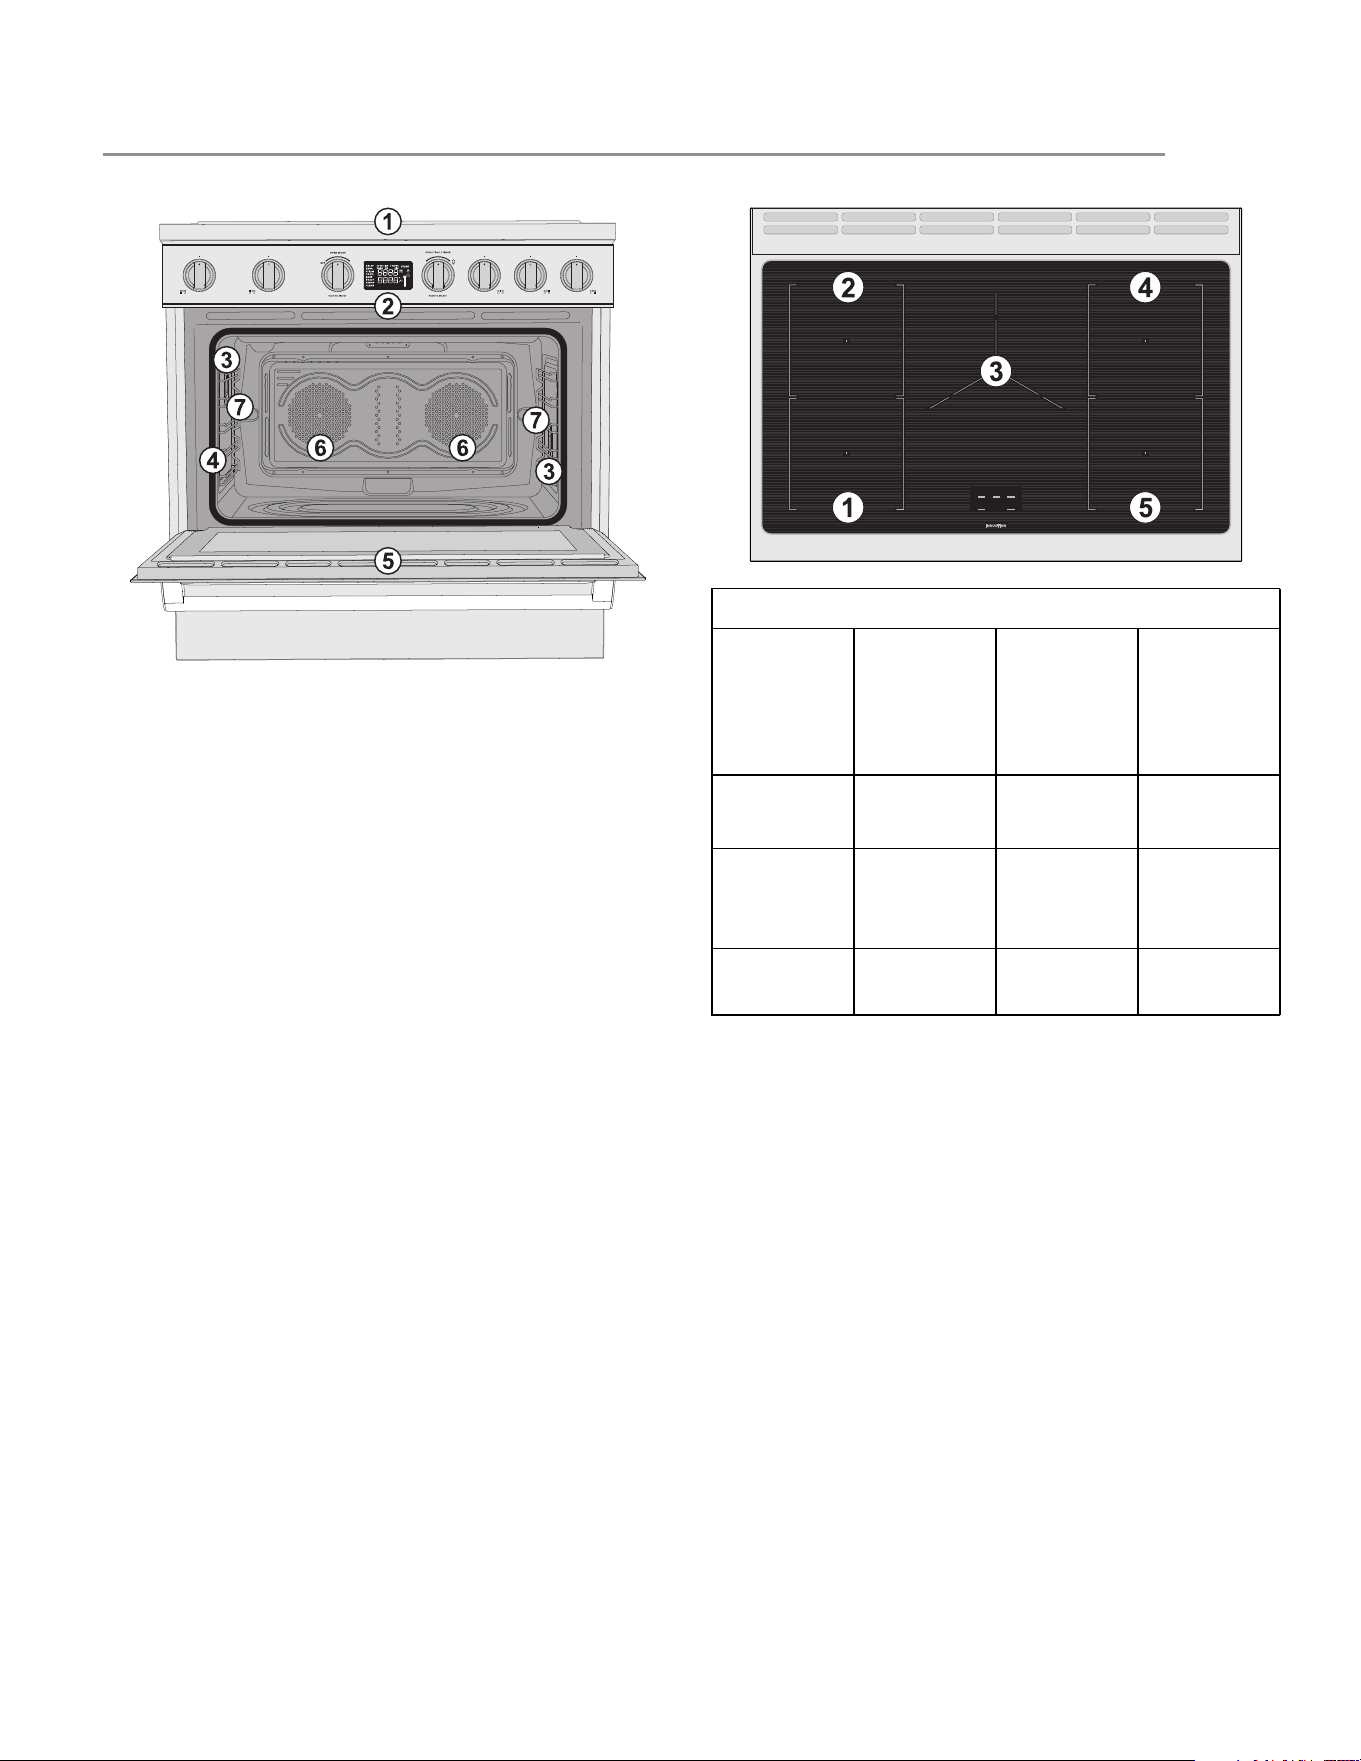
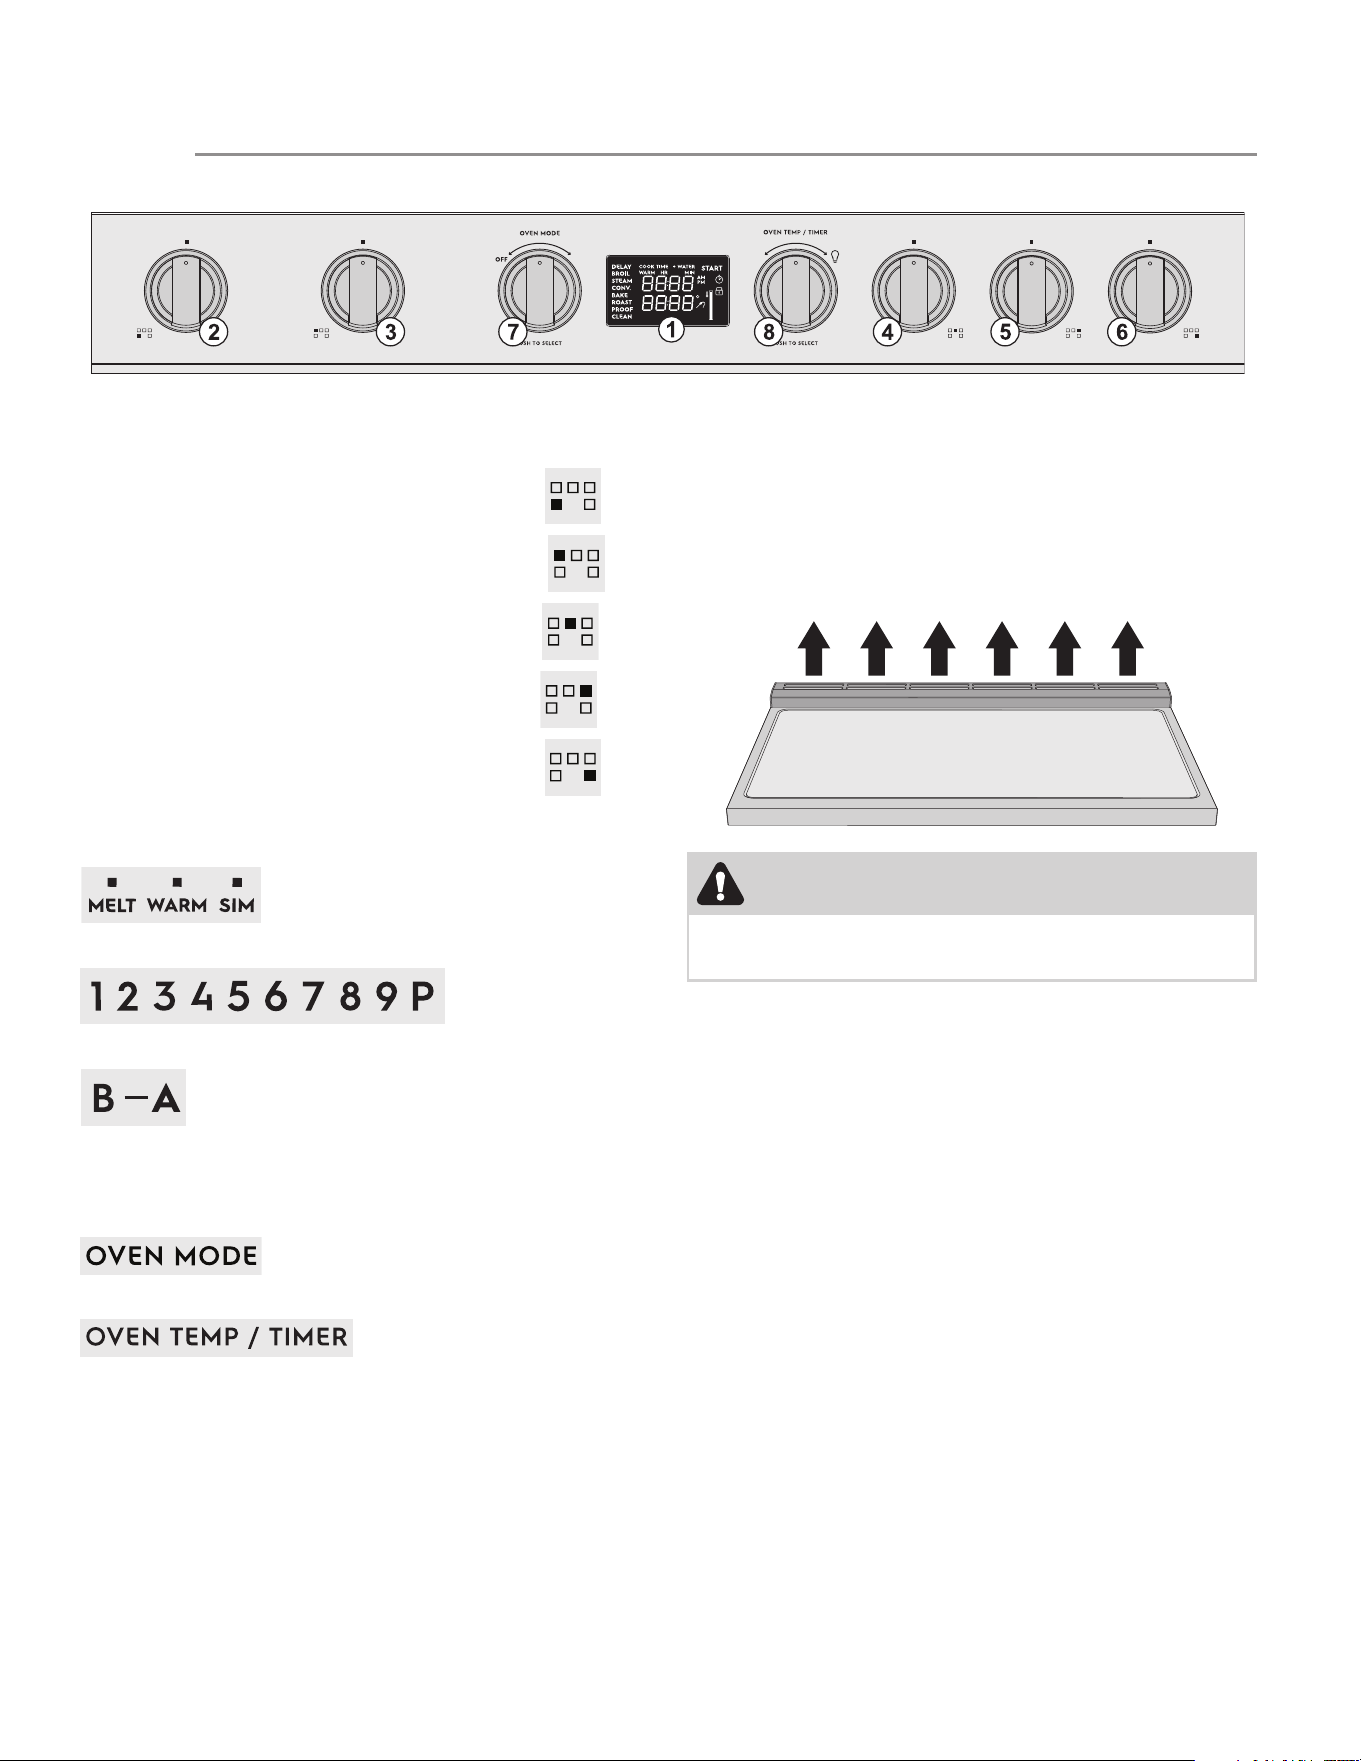
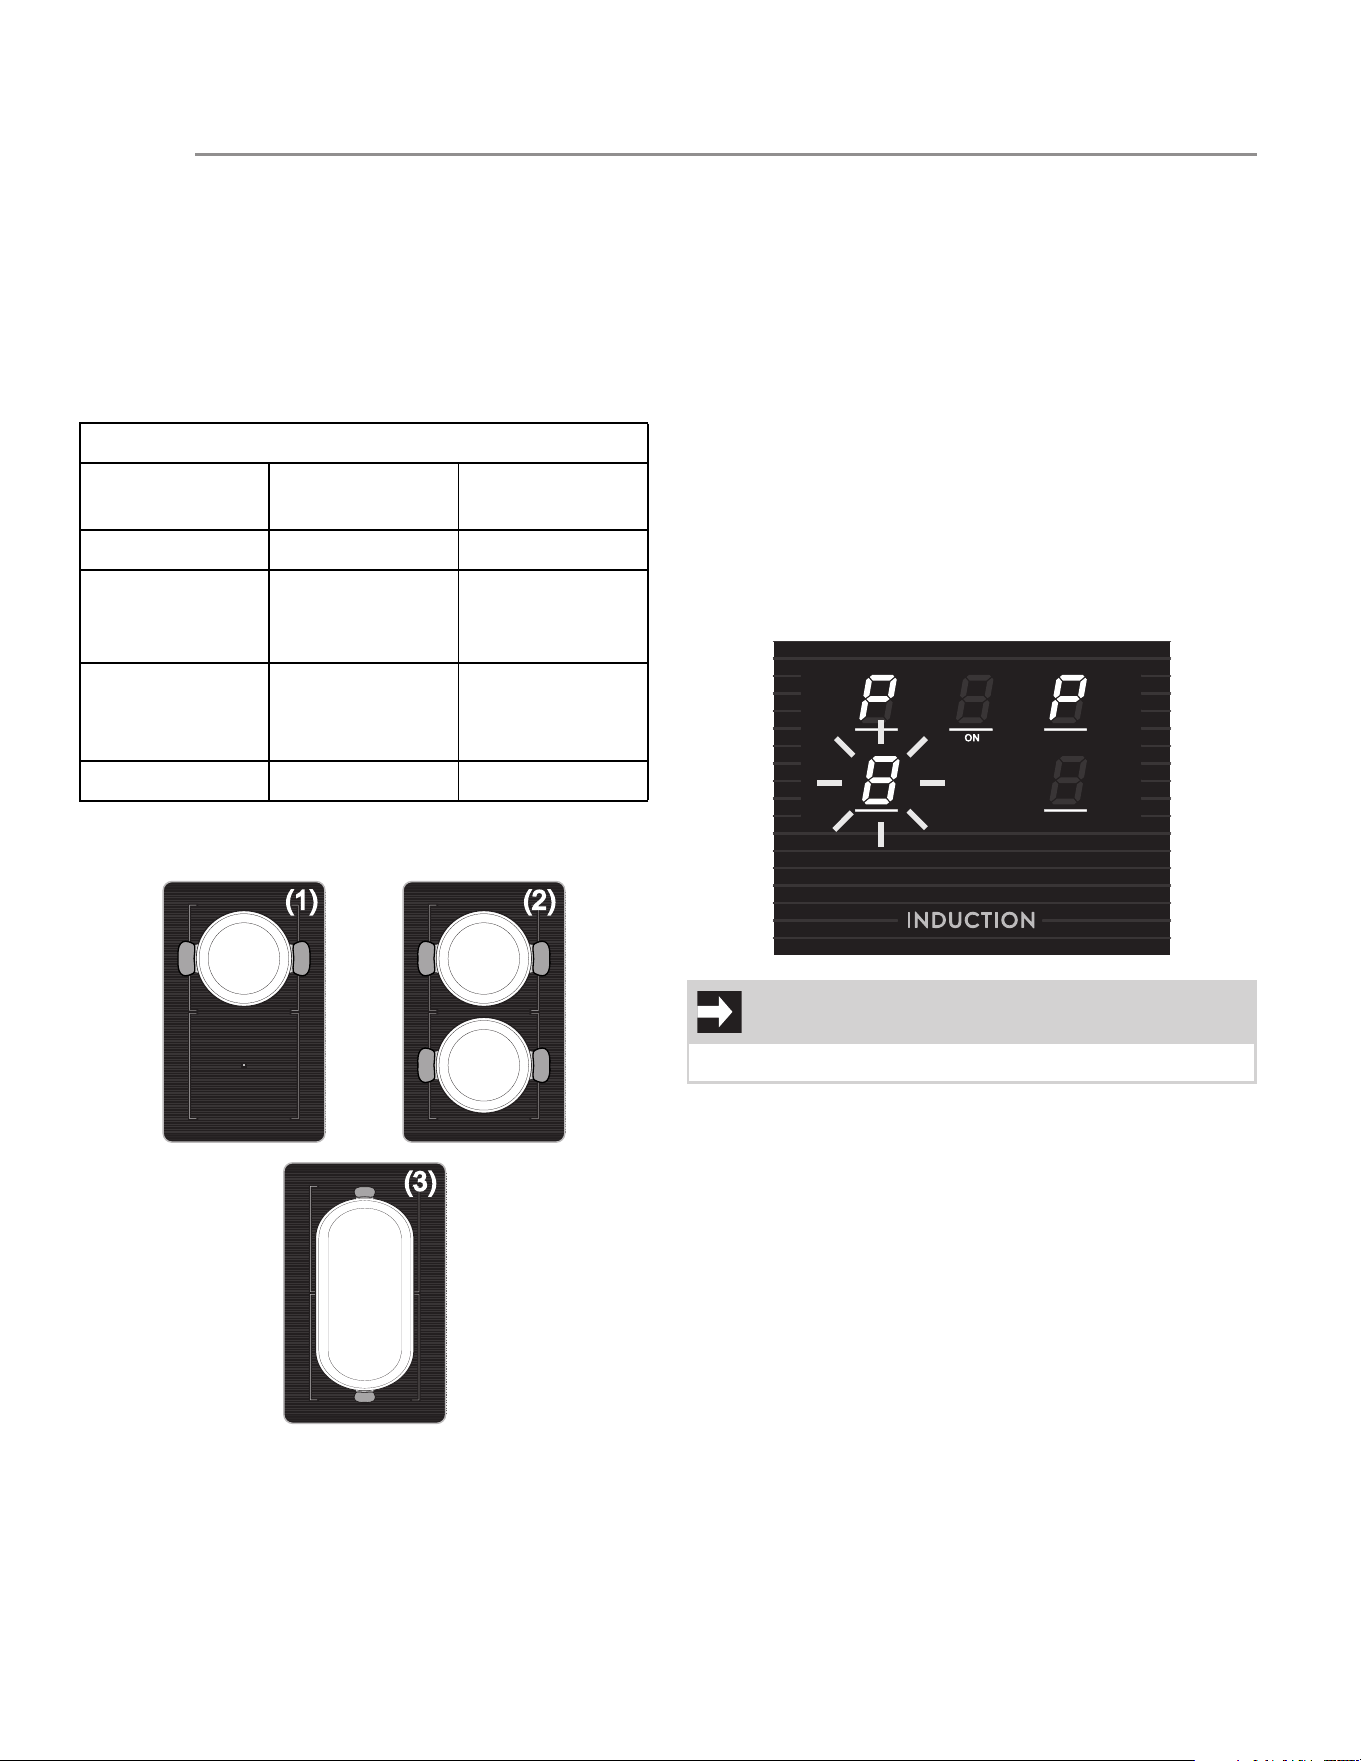
General description
1. Cooktop
2. Control panel
3. Inside lights
4. Seal
5. Oven door
6. Fan
7. Rack/tray support frame shelf
Cooktop
Cooking zones characteristics table
Zone Dimensions Max.
absorbed
power (W)
Max.
absorbed
power in
Boost
mode (W)
1-2-4-5
Single zone
180 mm - 7
1/16”
1850 3000
1-2-4-5
Bridge
mode
180 mm - 7
1/16”
3700 -
3 260 mm - 10
1/4”
2600 3700
FEATURES
10
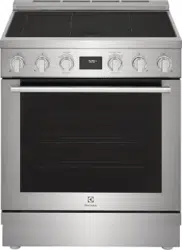
Control panel
1. Oven display
Cooktop knobs:
2. Cooktop cooking zone knob (front left)
3. Cooktop cooking zone knob (rear left)
4. Cooktop cooking zone knob (central)
5. Cooktop cooking zone knob (rear right)
6. Cooktop cooking zone knob (front right)
The following wording appears on each cooktop
knob:
For the Melt, Keep Warm and Simmer functions.
For the cooktop power levels.
For the Bridge and Heating Accelerator functions.
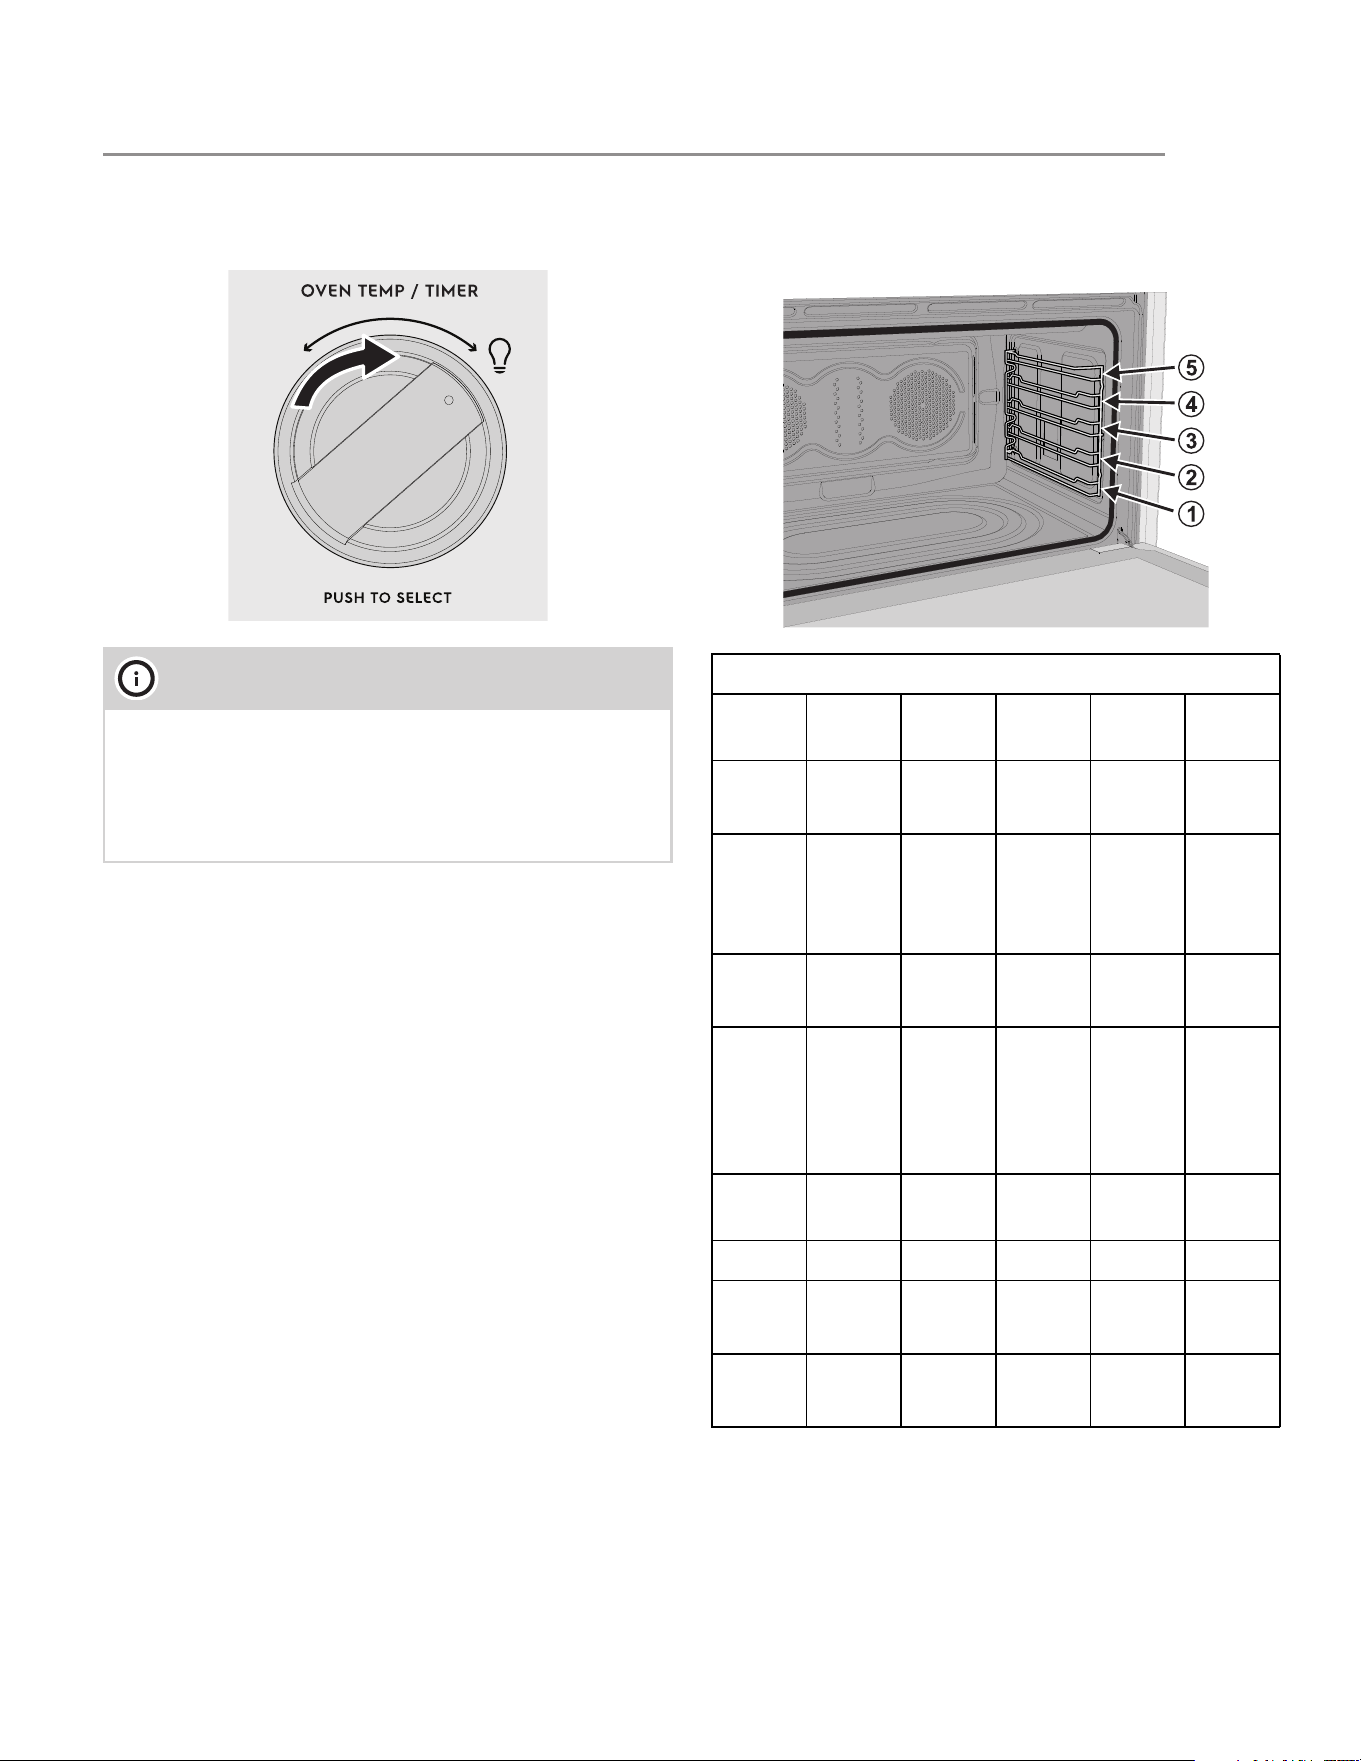
Oven knobs:
7. Oven mode knob
8. Oven temperature knob
Cooling fan
The fan cools the oven and comes into operation
during cooking.
The fan causes a steady outflow of air that exits from
the rear of the appliance, which may continue for a
brief period of time even after the appliance has been
turned off.
CAUTION
Do not obstruct ventilation openings and heat dis-
persal slots.
FEATURES
11
Inside lights
The inside lights can be toggled ON and OFF by turn-
ing the oven temperature knob to he bulb icon:
Oven shelf positions
The appliance is fitted with shelf supports to position
trays and racks at different heights. The insertion
heights are indicated from the bottom upwards.
NOTE
• When the oven display is in standby mode or
during cooking, the lights are normally off and
can be toggled on in any moment.
• The lights cannot be turned on during the Sab-
bath function.
Cooking Functions table
Func-
tion
Min T° Max T° Meat
Probe
Cook
time
Delay
Bake 170°F
75°C
550°F
280°C
Yes Yes Yes
Con-
vec-
tion
bake
170°F
75°C
550°F
280°C
Yes Yes Yes
Broil 400°F
200°C
550°F
280°C
No No No
Con-
vec-
tion
roast
170°F
75°C
550°F
280°C
Yes Yes
(with-
out
meat
probe)
Yes
(with-
out
meat
probe)
Steam
clean
- - No No Yes
Proof - - No Yes No
Warm 160°F
70°C
200°F
90°C
No No No
Sab-
bath
170°F
75°C
550°F
280°C
No Yes No
FEATURES
12
Available accessories
Regular rack
Useful for supporting containers with food during
cooking.
Telescopic guide set
Useful for easily removing the racks from the oven
cavity.
Temperature probe
With the temperature probe, you can cook according
to the temperature measured at the center of the food.
Protective cover
Used to cover and protect the temperature probe
socket when the temperature probe is not in use.
Special accessories (not included)
Low backguard
This accessory is an extension of the backguard. It is
intended to be mounted over the included backguard
as an extended duct for the heat dispersal openings
located on the wall-wards side of the range cooktop.
Side fillers
These are aesthetic panels intended to cover the lat-
eral spaces below the rear protruding part of the
cooktop.
NOTE
• Some models are not provided with all acces-
sories.
• The accessories intended to come into contact
with food are made of materials that comply
with the provisions of current legislation.
• Supplied and optional can be requested from
Authorized Assistance Centers. Use only origi-
nal accessories supplied by the manufacturer.
FEATURES

13
First power on
Preliminary setup
When setting the clock or a timer, depending on how
you turn the knob, you can set a different increase /
decrease speed for the settable minutes.
• Turn and release: minutes increase / decrease
one by one.
Example: 00:00 > 00:01 > 00:02 > 00:03 > etc.
• Hold turn: minutes increase / decrease one by
one for the first 3 minutes, then the timer switches
directly to the nearest multiple of 15, increasing or
decreasing in 15 minute steps.
Example: 00:00 > 00:01 > 00:02 > 00:03 > 00:15 > 00:30 >
00:45 > 01:00 > 01:15 > etc.
When setting the minutes you will only see the
icon. Once 60 minutes have been exceeded the icon
will also appear.
Blackout management
After a blackout, there can be two scenarios depend-
ing on how long the appliance has been without
power.
1. A few seconds to a few minutes: the appliance
restores the settings and features set before the
power loss event.
2. A few minutes to hours: The appliance does not
save the previous settings and will have to be
reprogrammed.
First power on
When the range is first plugged in, or when the power
supply has been interrupted “12:00 PM” will flash on
the timer display.
It will stop flashing once the current time is set up as
below.
Setting the display clock
1. Press the oven temperature knob to enable the
time selection.
2. The hours can be set by turning the temperature
knob towards the right or left. Press the knob to
confirm the selection.
3. Repeat the same process for setting the
minutes. Press the knob to confirm the selection.
Once the time has been set, the display switches to
standby mode where only the current time is shown.
To adjust the display clock after the initial set up, in the
stand-by mode, just hold turn the temperature knob
left or right for at least 3 seconds, until you see the
hour digits flashing.
The instructions to adjust the clock in detail are the
same as for setting the clock in the case of the first
power on (see “Setting the display clock”) starting
from point no. 2.
BEFORE USING THE APPLIANCE
14
Cooking with the induction cooktop
Preliminary information
• Each zone of the induction cooktop has its own
dedicated display, where the power level and
the function symbols are indicated.
• Each zone of the cooktop can be activated by
pressing and then turning the relative cooktop
knobs.
• Cooktop knobs can only be pressed when they
are in the OFF position (zone deactivated).
• Once a zone has been activated (knob not in the
OFF position), simply turn the relative knob to
change the power level or to deactivate the
zone.
What is Electromagnetic induction?
Induction cooking uses electromagnets to create heat
in compatible cookware.
Below each cooking zone on an induction cooktop,
there is a copper coil. When the cooking zone is
turned on, the electricity turns the coil into a type of
magnet that heats metal cookware in the cooking
zone.
Induction features
Because heat starts in the cookware instead of the
cooktop, induction offers several advantages.
Fast Heating: Cookware will heat up faster than on a
conventional electric cooktop. Pay close attention to
avoid scorching food when starting to cook. You may
need to use a lower setting for cooking food than you
are used to.
Precise Control: The heat going into the cookware will
change immediately when you change the setting of
the cooking zone.
Even Heating: Cookware will typically heat more
evenly on an induction cooktop, so you are less likely
to have hot or cool spots in the cookware.
Cooler Cooktop: An induction cooktop will be cooler
when you remove the cookware than a conventional
electric cooktop would be. Because the cooktop
doesn’t get as hot, you are not as likely to get burned.
Spills are also less likely to cook onto the surface,
making clean-up easier.
Energy Efficiency: Induction cooking wastes less
energy than a conventional cooktop, so it uses less
electricity.
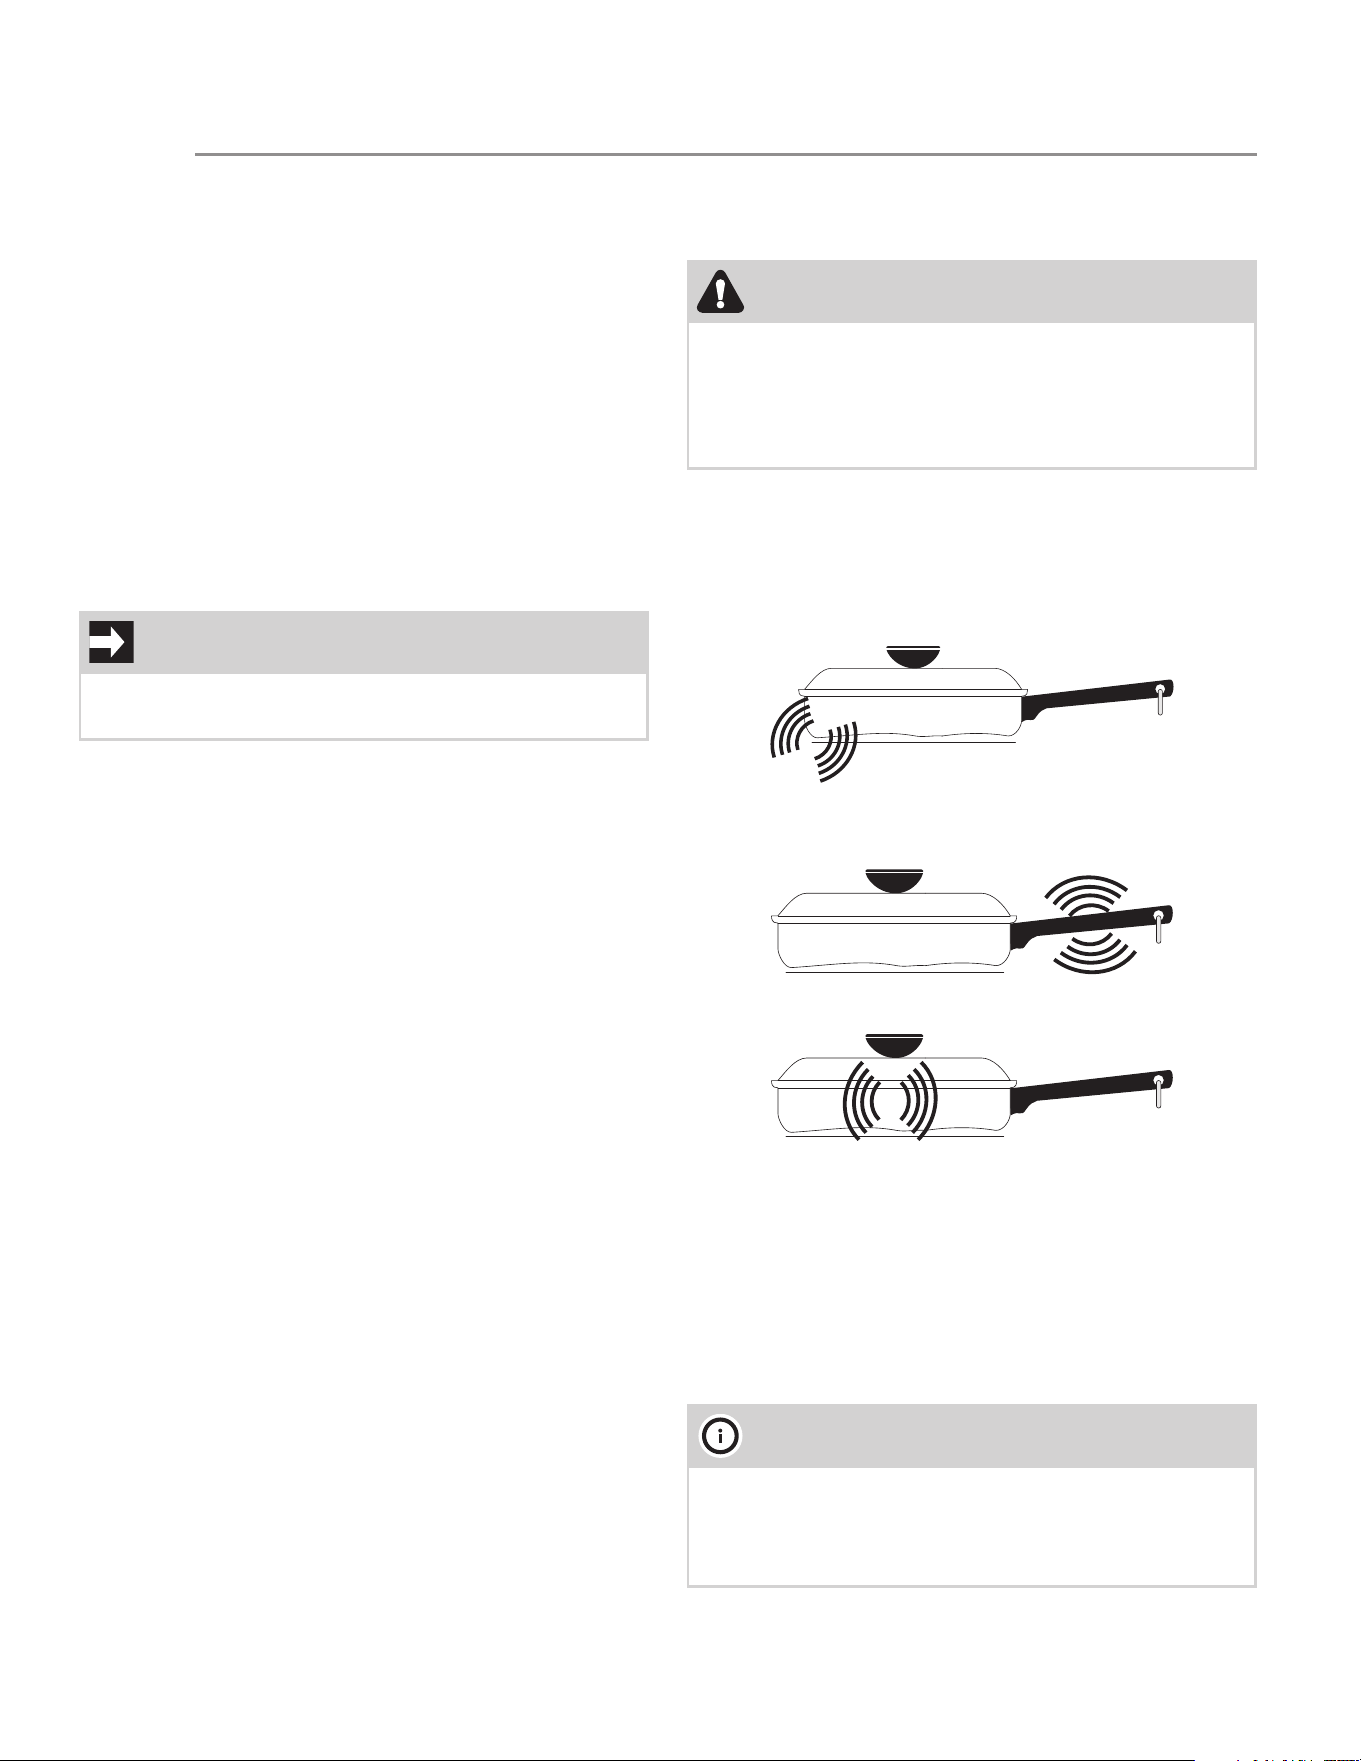
Sounds
The magnetic field over the induction cooking zone
may cause cookware to vibrate, creating a buzzing or
humming noise. These sounds are not unusual, espe-
cially at high settings.
Cookware that is not perfectly flat on the bottom may
vibrate slightly against the cooktop.
A loose handle may vibrate in its socket.
Multi-material cookware may allow small vibrations in
its structure.
Sounds are less likely to occur with heavier, higher
quality cookware.
An induction cooktop may also produce faint clicking
sounds from the electronic switches that maintain the
desired cooking temperature. You may also hear a fan
that cools the electronics inside the cooktop.
IMPORTANT
To avoid damaging the appliance, do not force the
knobs to turn if you have not pressed them first.
CAUTION
Although induction cooking zones do not produce
heat, they can become hot from contact with hot
cookware. Burns may occur if a cooking zone or the
surrounding area is touched before it has cooled to
a safe temperature.
NOTE
Be sure to read detailed instructions for induction
cooktop cleaning in the “Care and Cleaning” section
and “Before You Call” checklist section of this Use
and Care Guide.
BEFORE USING THE APPLIANCE
15
Use the correct cookware type
The magnetic cooking zone sensors located below the
cooktop surface require the use of cookware made
with magnetic material in order to start the heating
process on any of the cooking zones.
Use only cookware with a perfectly flat bottom suit-
able for induction cooking. The use of cookware with
an irregular bottom could affect the efficiency of the
heating system and even prevent the pan from being
detected on the cooking zone.
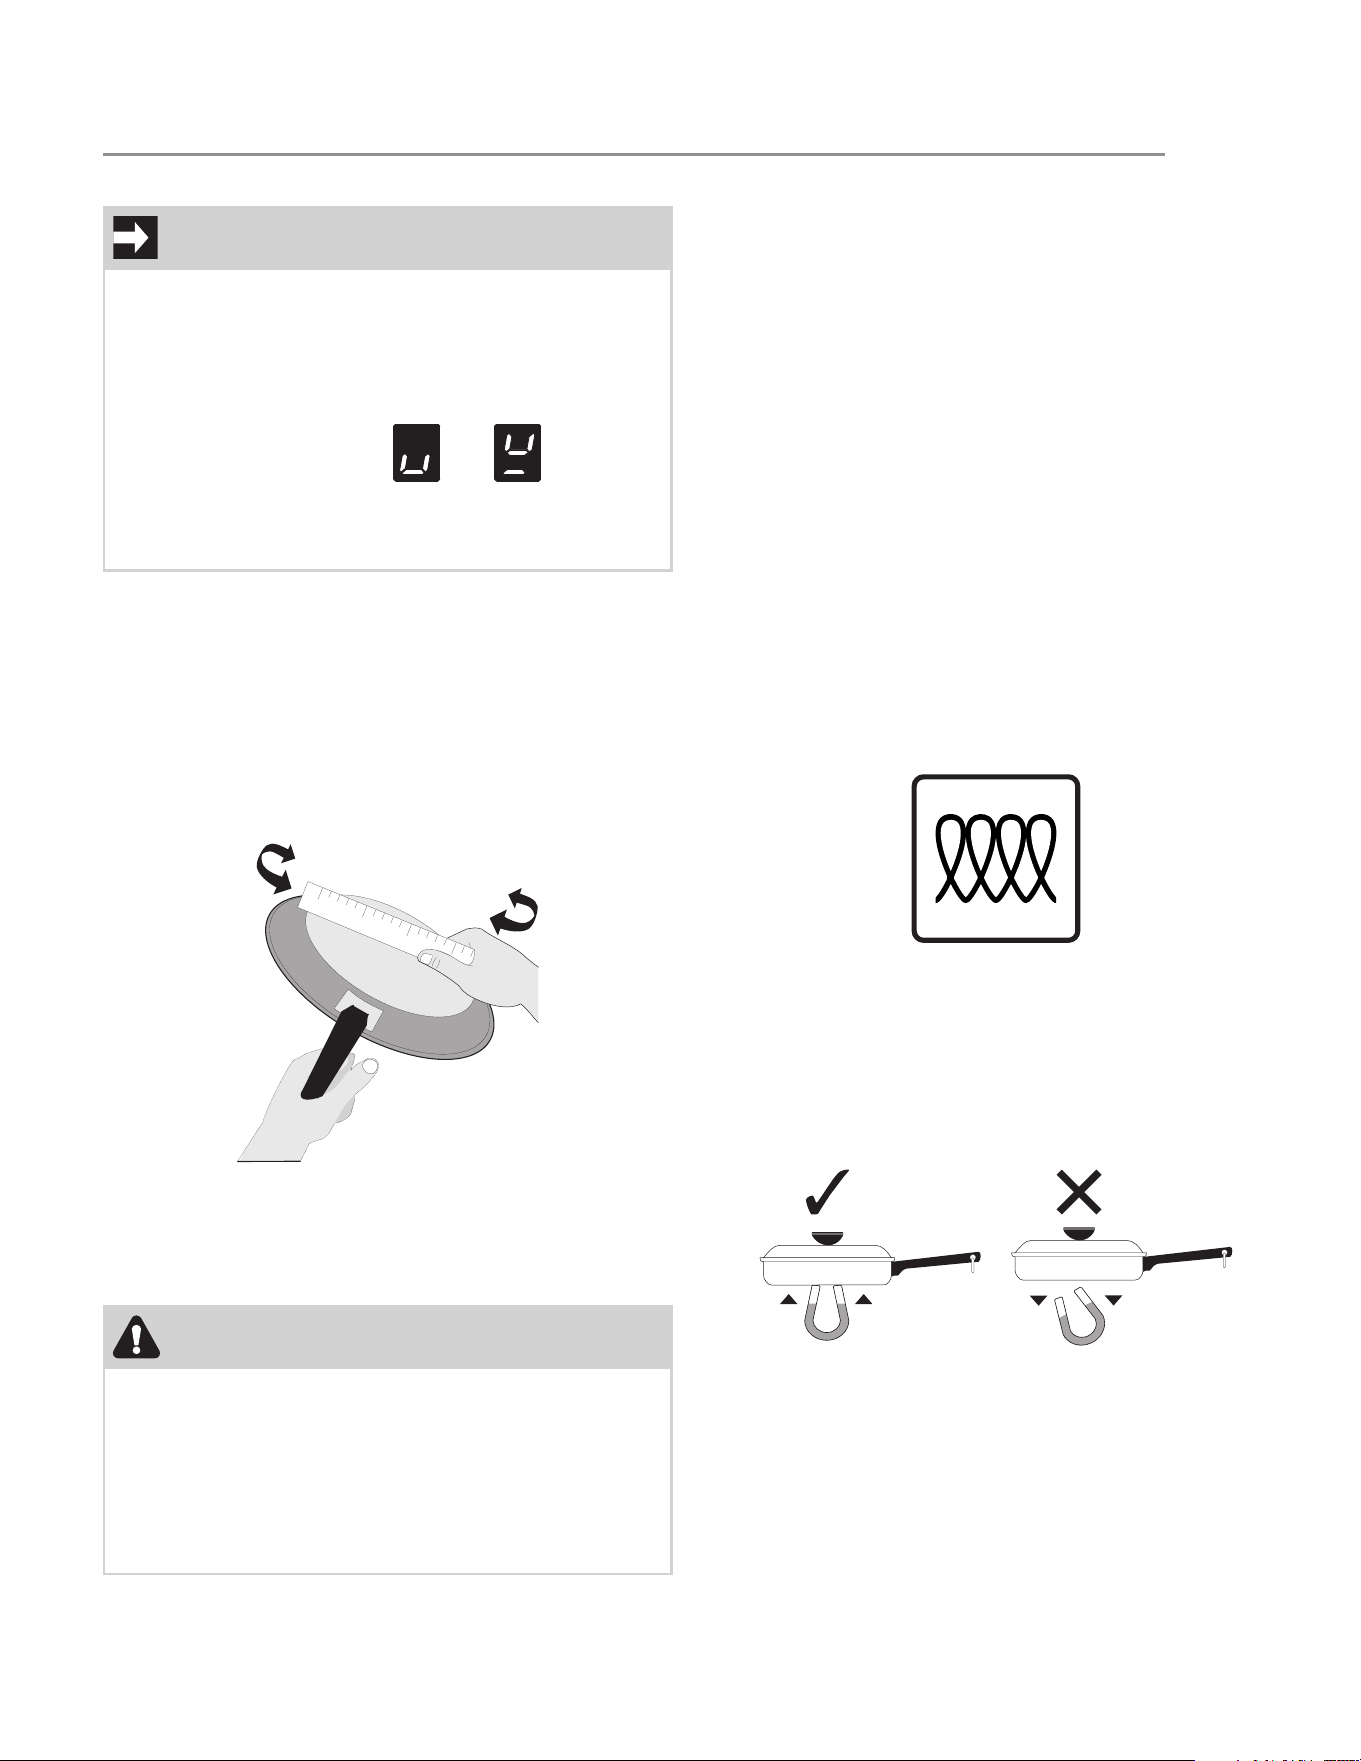
Check for flatness by rotating a ruler across the bottom
of the cookware. Cookware should have fl at bottoms
that make good contact with the entire surface of the
heating element.
Cookware material types
Cookware material is especially important when using
an induction cooktop. The cookware must contain
magnetic iron or steel to work on an induction cook-
top. Common materials for induction cookware
include the following:
• Stainless Steel - Slow heat conductor with
uneven cooking results. Durable, easy to clean,
and resists staining. Some types of stainless steel
will not work on an induction cooktop. Use the
magnet test to check stainless steel cookware.
• Cast Iron - A slow heat conductor that retains
heat very well. Cooks evenly once cooking tem-
perature is reached.
• Porcelain-enamel on metal - Heating character-
istics will vary depending on the base material.
Porcelain-enamel on a compatible metal will
work on an induction cooktop. Use the magnet
test to check porcelain-enamel cookware.
Cookware sold as induction-ready will often have a
symbol printed on the bottom by the manufacturer.
The magnet test
To see if a piece of cookware will work on your induc-
tion cooktop, try to stick a magnet to it. If the magnet
clings firmly to the bottom of the cookware, the cook-
ware will work on your induction cooktop. If the mag-
net clings weakly or not at all, the cookware will not
heat up on your induction cooktop.
IMPORTANT
• Each cooking zone is fitted with a magnetic
sensor that distinguishes between suitable and
unsuitable cookware.
• If unsuitable cookware is used, no heat is gen-
erated and no cooking will be performed.
• The alternating symbols and appear
when improper cookware is used, with missing
pan or when you remove the pan during cook-
ing.
CAUTION
Proper cookware on an operating induction cooking
zone will heat up very quickly. If an empty piece of
cookware is left on an operating induction cooking
zone, the rapid change in temperature may warp or
damage the cookware.
Do NOT place hot cookware on the control panel.
The heat may damage the electronic parts.
BEFORE USING THE APPLIANCE
16
Minimum pan size requirements
USE THE CORRECT SIZE COOKWARE - The
cooking zones available on the Induction cooktop
require a MINIMUM pan size to be used at each loca-
tion. We recommend using cookware with a diameter
that allows efficient cooking.
Below is a summary table showing the recommended
diameter of the cookware for each cooking zone.
Example of correct pan arrangement on cooking
zones 1 - 2 - 4 - 5:
* In the (3) case, the measurement refers to the length
of a an elongated pan. For the width of this pan keep
a maximum of 200 mm - 7” 7/8.
First power on
When the range is first plugged in, or when the power
supply has been interrupted, all the symbols on the
cooktop display light up for one second.
Cooktop power management
The cooktop is equipped with a power management
module which optimizes or limits energy consumption.
If the total power levels set exceed the maximum
allowed limit, the electronic board automatically man-
ages the power supplied to the cooking zones.
The levels set by the automatic management system
are shown on the display.
A flashing a power level icon indicates that it will be
automatically limited to a new value selected by the
power management module.
Cookware diameters table
Zone Cooking zone
mode
Recommended
diameter
1-2-4-5 Single zone (1) 145 mm - 5” 6/8
1-2-4-5 Single zone in
Bridge function
(2)
145 mm - 5” 6/8
1-2-4-5 Double zone in
Bridge function
(3) *
300 mm - 11” 6/8
3 Single zone 230 mm - 9” 1/8
IMPORTANT
Priority is given to the last set zone.
USING THE COOKTOP
17
Cooktop operation time limitation
The cooktop is equipped with an automatic device
that limits its duration of use.
If you do not change the cooking zone settings, the
maximum operating duration of each individual zone
depends on the power level selected.
When the device for limiting the operating time is acti-
vated, the cooking zone switches off, a short signal is
emitted and if hot the symbol appears on the display.
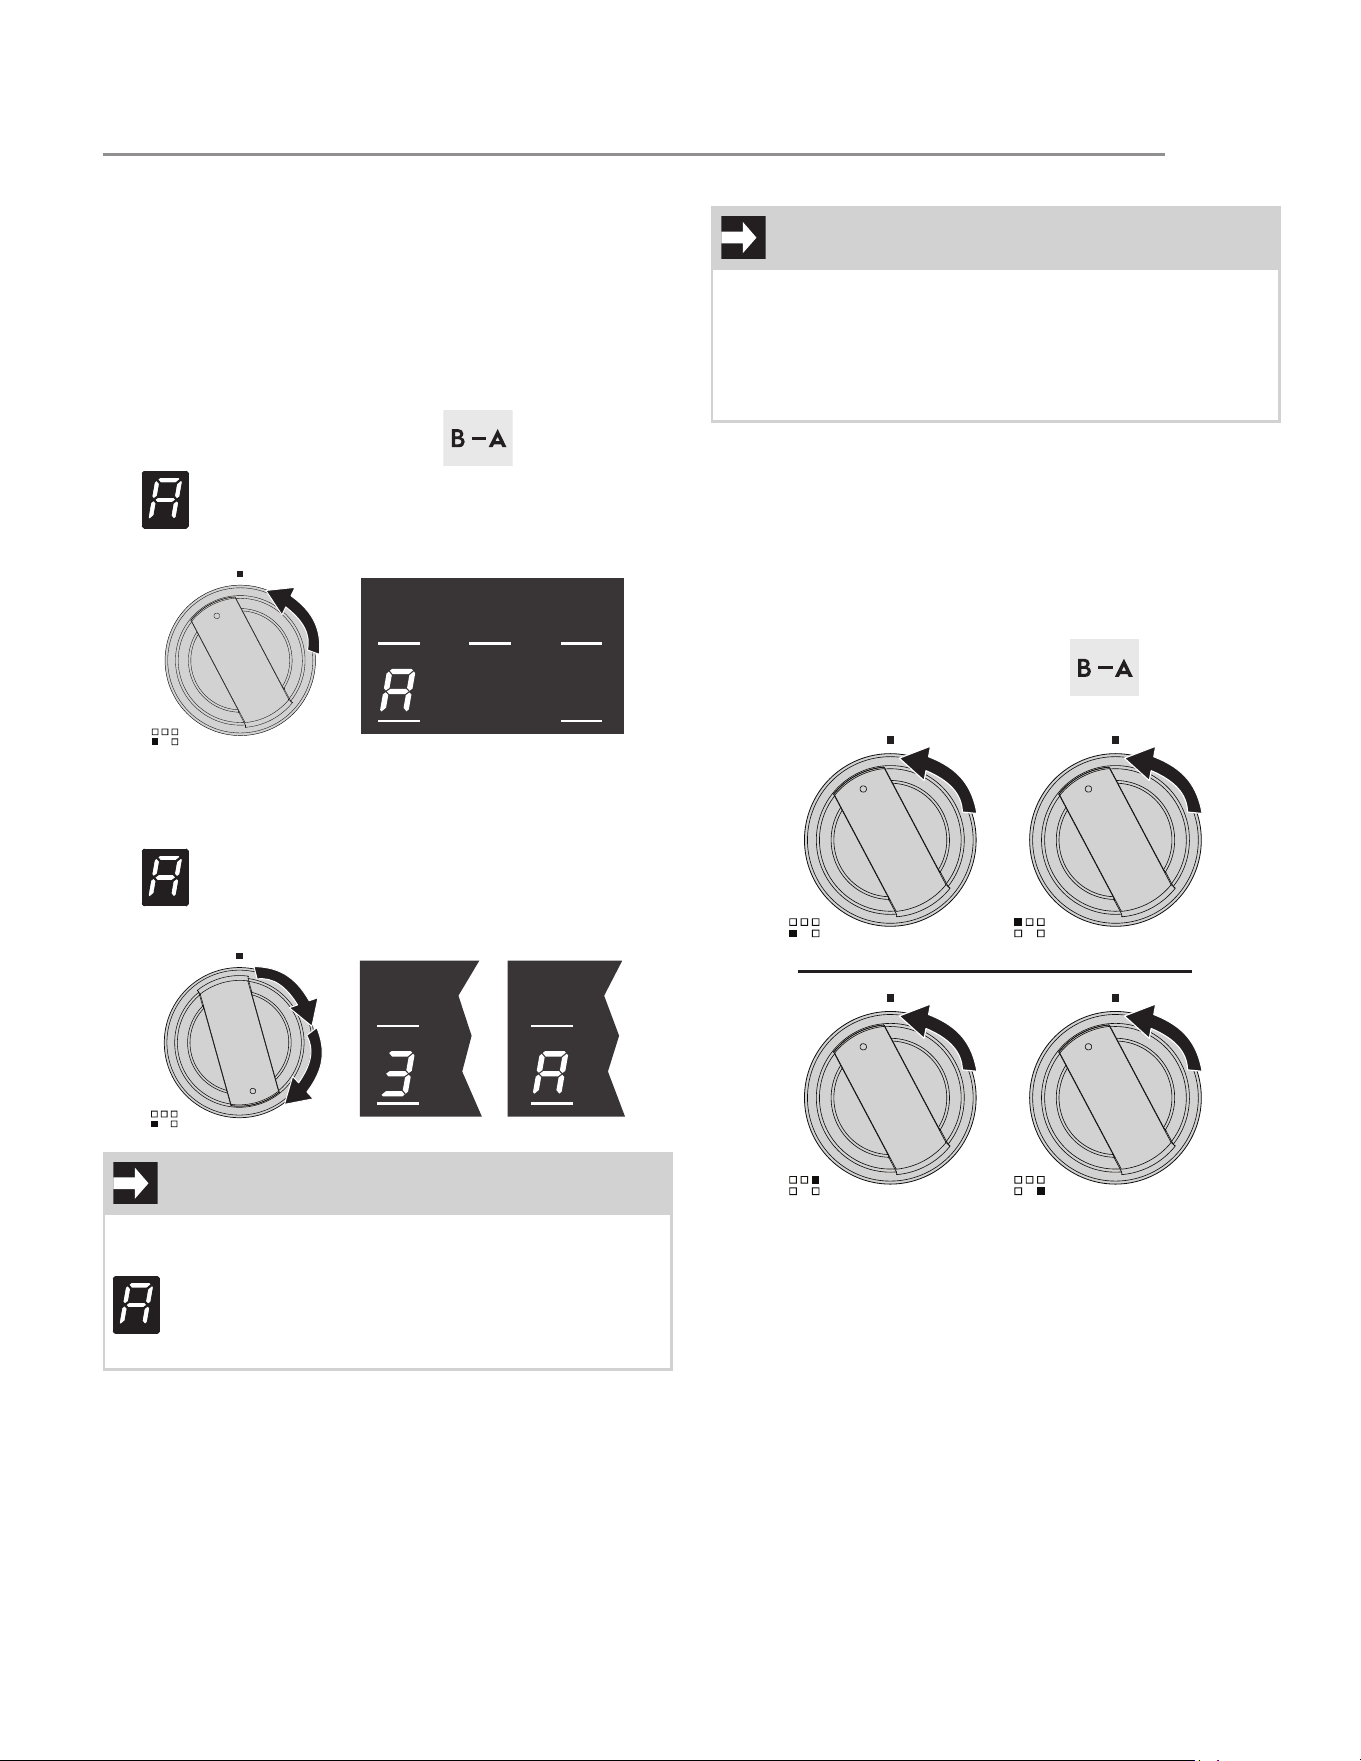
Switching on the cooking zones
To switch on a cooking zone, press and then turn the
corresponding knob clockwise. A short beep will be
emitted.
The corresponding display shows the selected power
level, “ON” appears below the central cooking zone
display and all the other cooking zone displays briefly
display “0” and then go off. (the example shows the
front left cooking zone at level 3).
Turning off the cooking zones
To switch off a cooking zone, simply turn the corre-
sponding knob to “OFF”. All the cooking zone displays
show flashing red dots at their lower right corner and
the word “ON” below the central cooking zone display
for 10 seconds.
Induction cooktop residual heat
After the cooking zones have been switching off, if
they are still hot the corresponding displays shows the
flashing symbol . When the temperature drops
below the safety threshold, the symbol disappears.
Maximum cooking duration table
Power level selected Maximum duration of
use in hours/minutes
1 8 hours
2 6 hours
3 - 4 5 hours
5 4 hours
6 - 7 1 ½ hours
8 - 9 1 ½ hours
P 10 minutes
CAUTION
Protection from overheating
• If the cooktop is used at full power for a long
period of time, the internal electronics may
have difficulty cooling if the room temperature
is high.
• To prevent excessively high temperatures from
forming inside the cooktop, the power of the
cooking zone is automatically lowered.
USING THE COOKTOP
18
Power levels
The power of the cooking zone can be adjusted to
various levels. Information on the different types of
cooking can be found in the table. All power levels are
available for all cooking zones.
* See boost mode
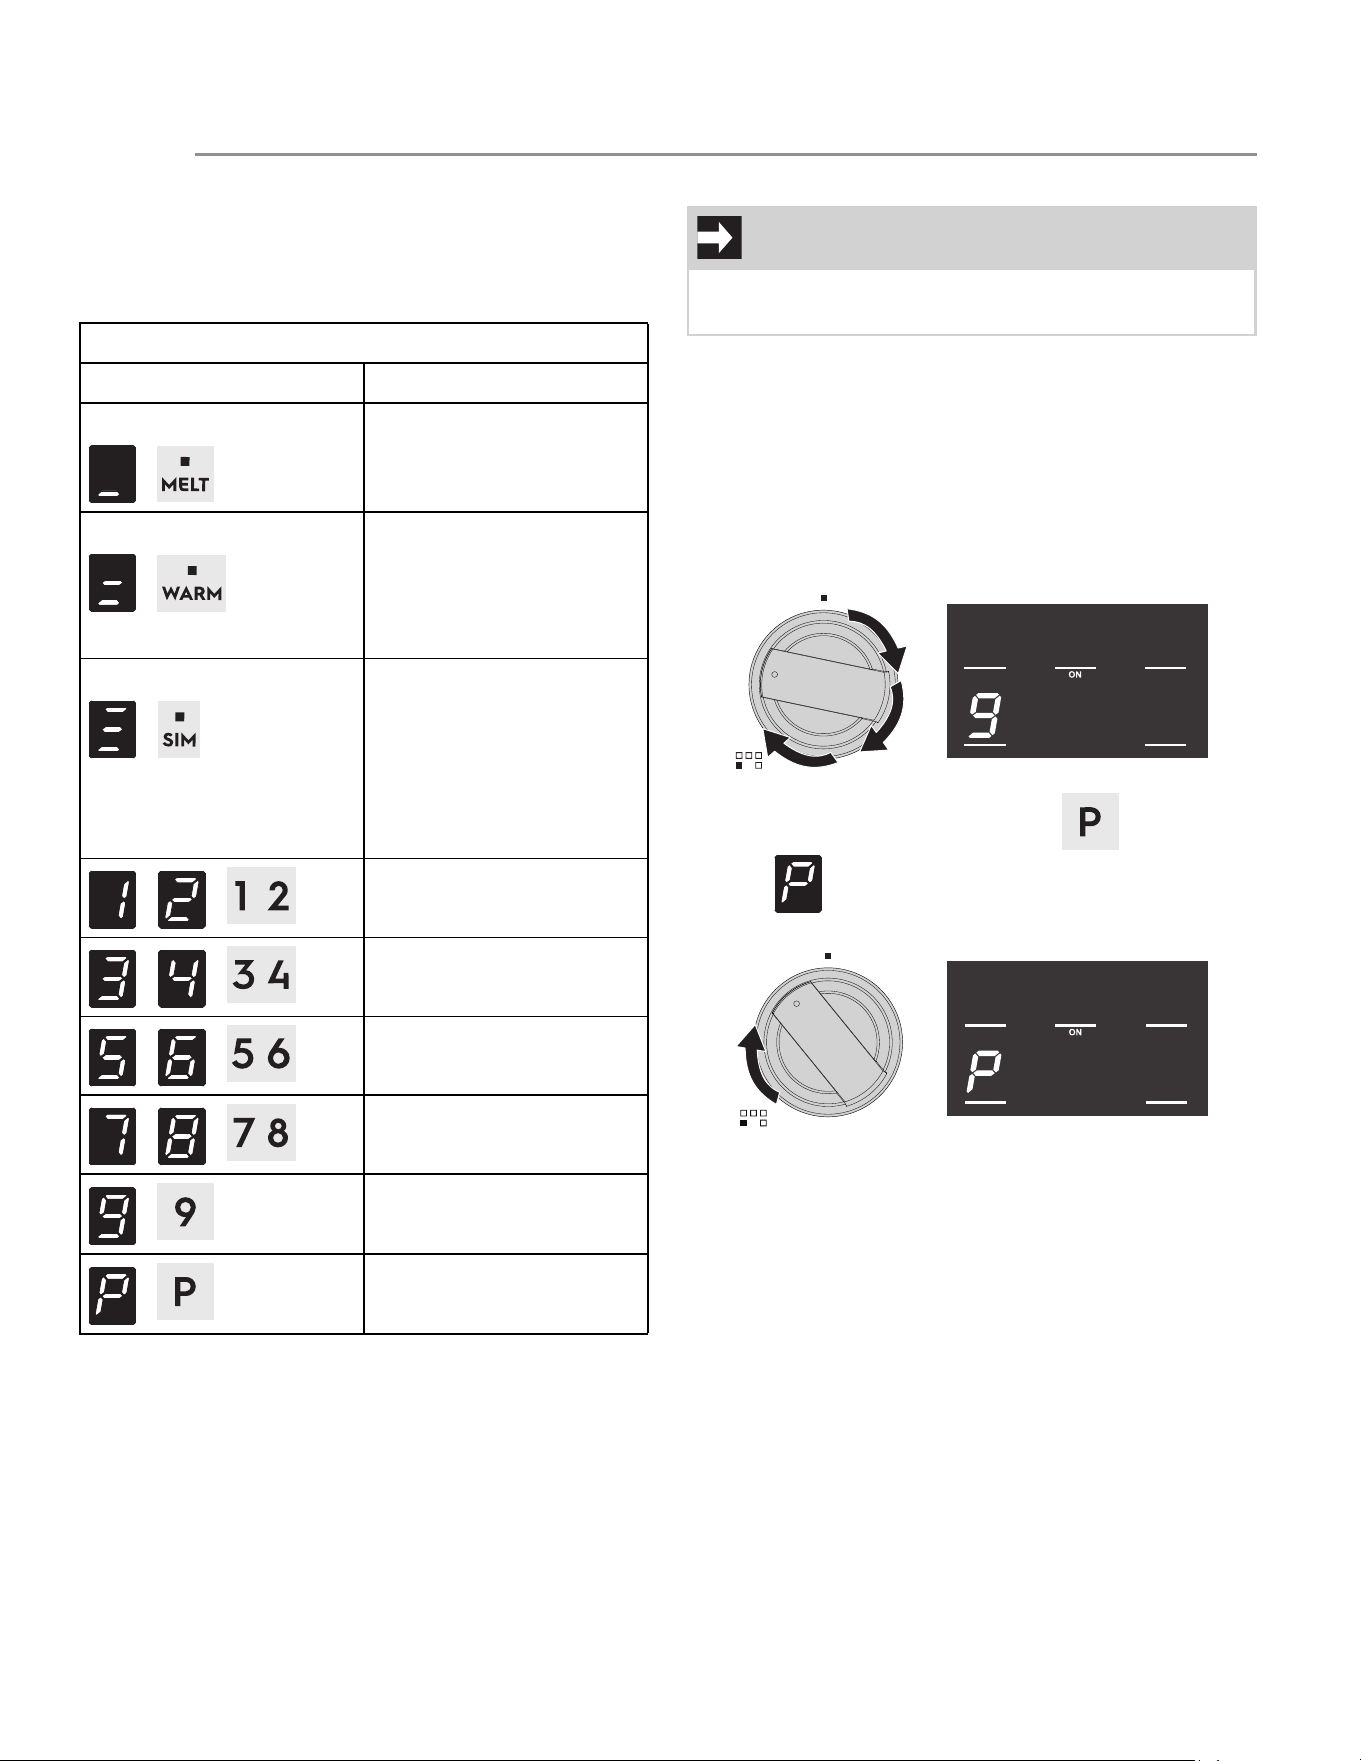
Boost mode
A Booster function allows you to activate the cooking
zone on the maximum power for up to 10 minutes. Use-
ful for bringing a large quantity of water quickly to the
boil or cooking meat over high heat.
To activate Boost mode (the example shows the front
left cooking zone):
1. Press a cooktop knob.
2. Turn the knob all the way clockwise to level 9.
3. Turn clockwise again to position and hold
until is shown on the corresponding
cooking zone display (a beep will be emitted).
4. Release the knob.
To deactivate Boost mode, simply bring the knob to
the OFF position or select another power level.
Cooking zone power levels table
Power level selected Suitable for...
Melt function
/
Melting butter, chocolate
or similar.
Keep Warm function
/
Warming dishes and
keeping small amounts of
water boiling, whisking
egg yolk or butter
sauces.
Simmer function
/
Heating solid or liquid
foods, keeping water
boiling, thawing frozen
foods, making 2- or 3-
egg omelets, fruit and
vegetable dishes, various
preparations.
- /
Cooking small amounts
of food (minimum power).
- /
Cooking large amounts
of food.
- /
Cooking large amounts
of food, roasting.
- /
Roasting.
/
Roasting larger pieces,
frying with flour.
/ *
Roasting, frying, cooking
(maximum power).
IMPORTANT
After 10 minutes of operation in Boost mode, the
cooktop automatically brings the power to level 9.
USING THE COOKTOP
19
Heating accelerator function
This function allows you to bring the cooking zone to
the selected power level more quickly than when
selecting the power level.
To activate the Heating accelerator function (the
example shows the front left cooking zone at level 3):
1. Press and hold a cooktop knob.
2. Keep the knob pressed and turn it
counterclockwise to position until the
symbol appears on the corresponding
cooking zone display (a beep will be emitted).
3. Keep the knob pressed and select the required
power level within 3 seconds. The
corresponding cooking zone display will show
and the selected power level number
alternating.
You can increase the power level at any time. The
“acceleration” time frame will be modified
automatically.
To deactivate the Heating acceleration function, sim-
ply bring the knob to the OFF position or select a
lower power level.
Bridge function
The bridge function allows you to control two cooking
zones simultaneously. This function is useful when
cooking with oblong cookware such as roasting pans
or fish kettles, or when cooking with two pans at the
same time.
To activate the Bridge function:
1. Press and hold turn the front / rear left or right
knobs counterclockwise to the positions
(a short beep will be emitted):
2. Release the knobs.
IMPORTANT
Once the selected power level is reached, the Heat-
ing accelerator function will be deactivated (the
symbol will disappear) and the power level will
remain the selected one.
IMPORTANT
• This function is only available for pairs of front
and rear zones (1 - 2 and 4 - 5). All the other
zone combinations are not allowed.
• With the bridge function activated, is it not pos-
sible to activate Boost mode.
USING THE COOKTOP
20
3. Press and turn the rear left or the front right
cooking zone knobs until you reach power level
9 (a long beep will be emitted).
Now both cooking zone displays shows level 0 and
flashing red dots appear on all displays. The Bridge
function is now activated.
4. You can control both the linked zones using the
front left or rear right cooking zone knobs.
To deactivate the Bridge function, bring both knobs to
the OFF position.
Control Lock
The control lock is a device that protects the appli-
ance from accidental or inappropriate use. Only the
cooktop knobs will be locked.
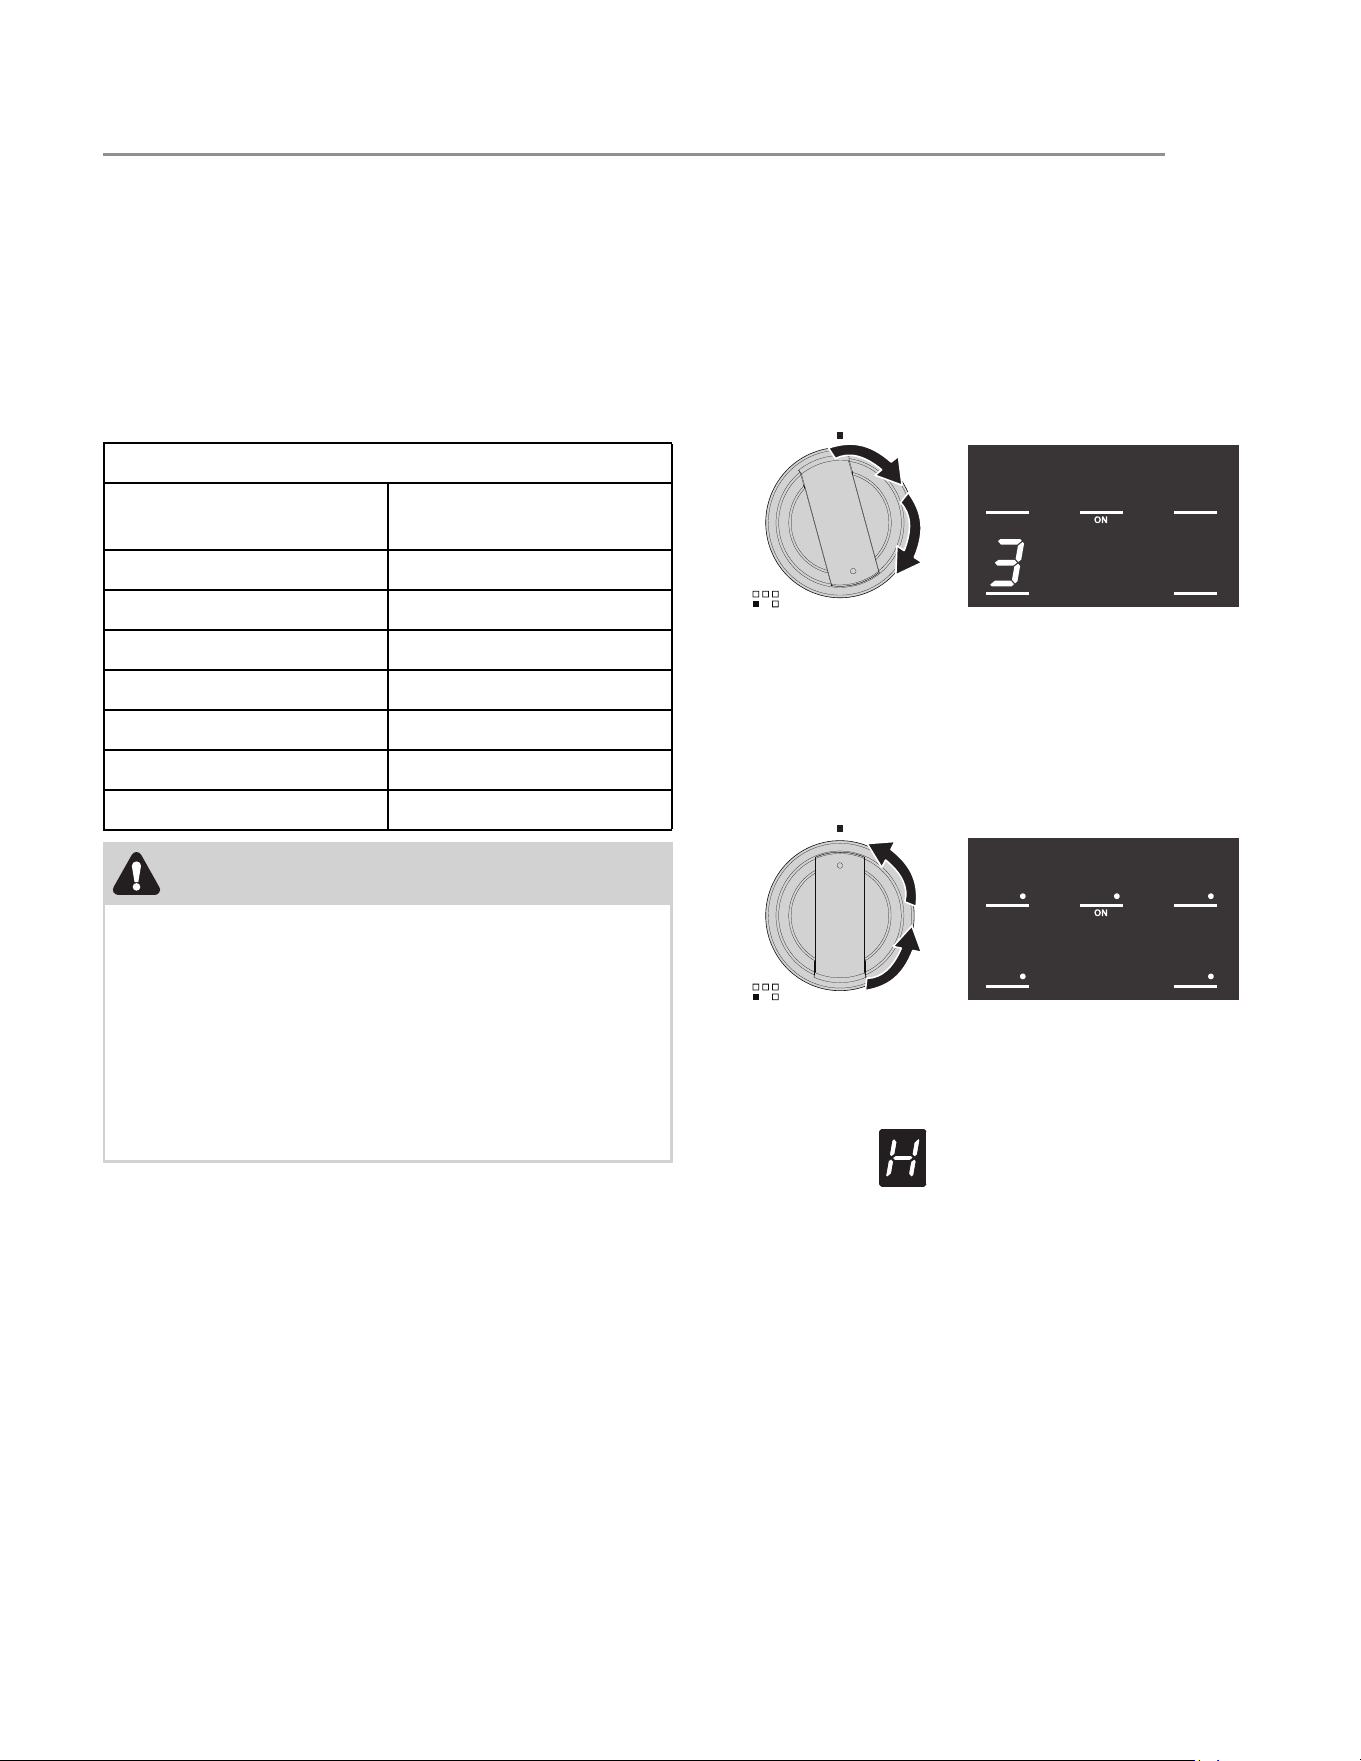
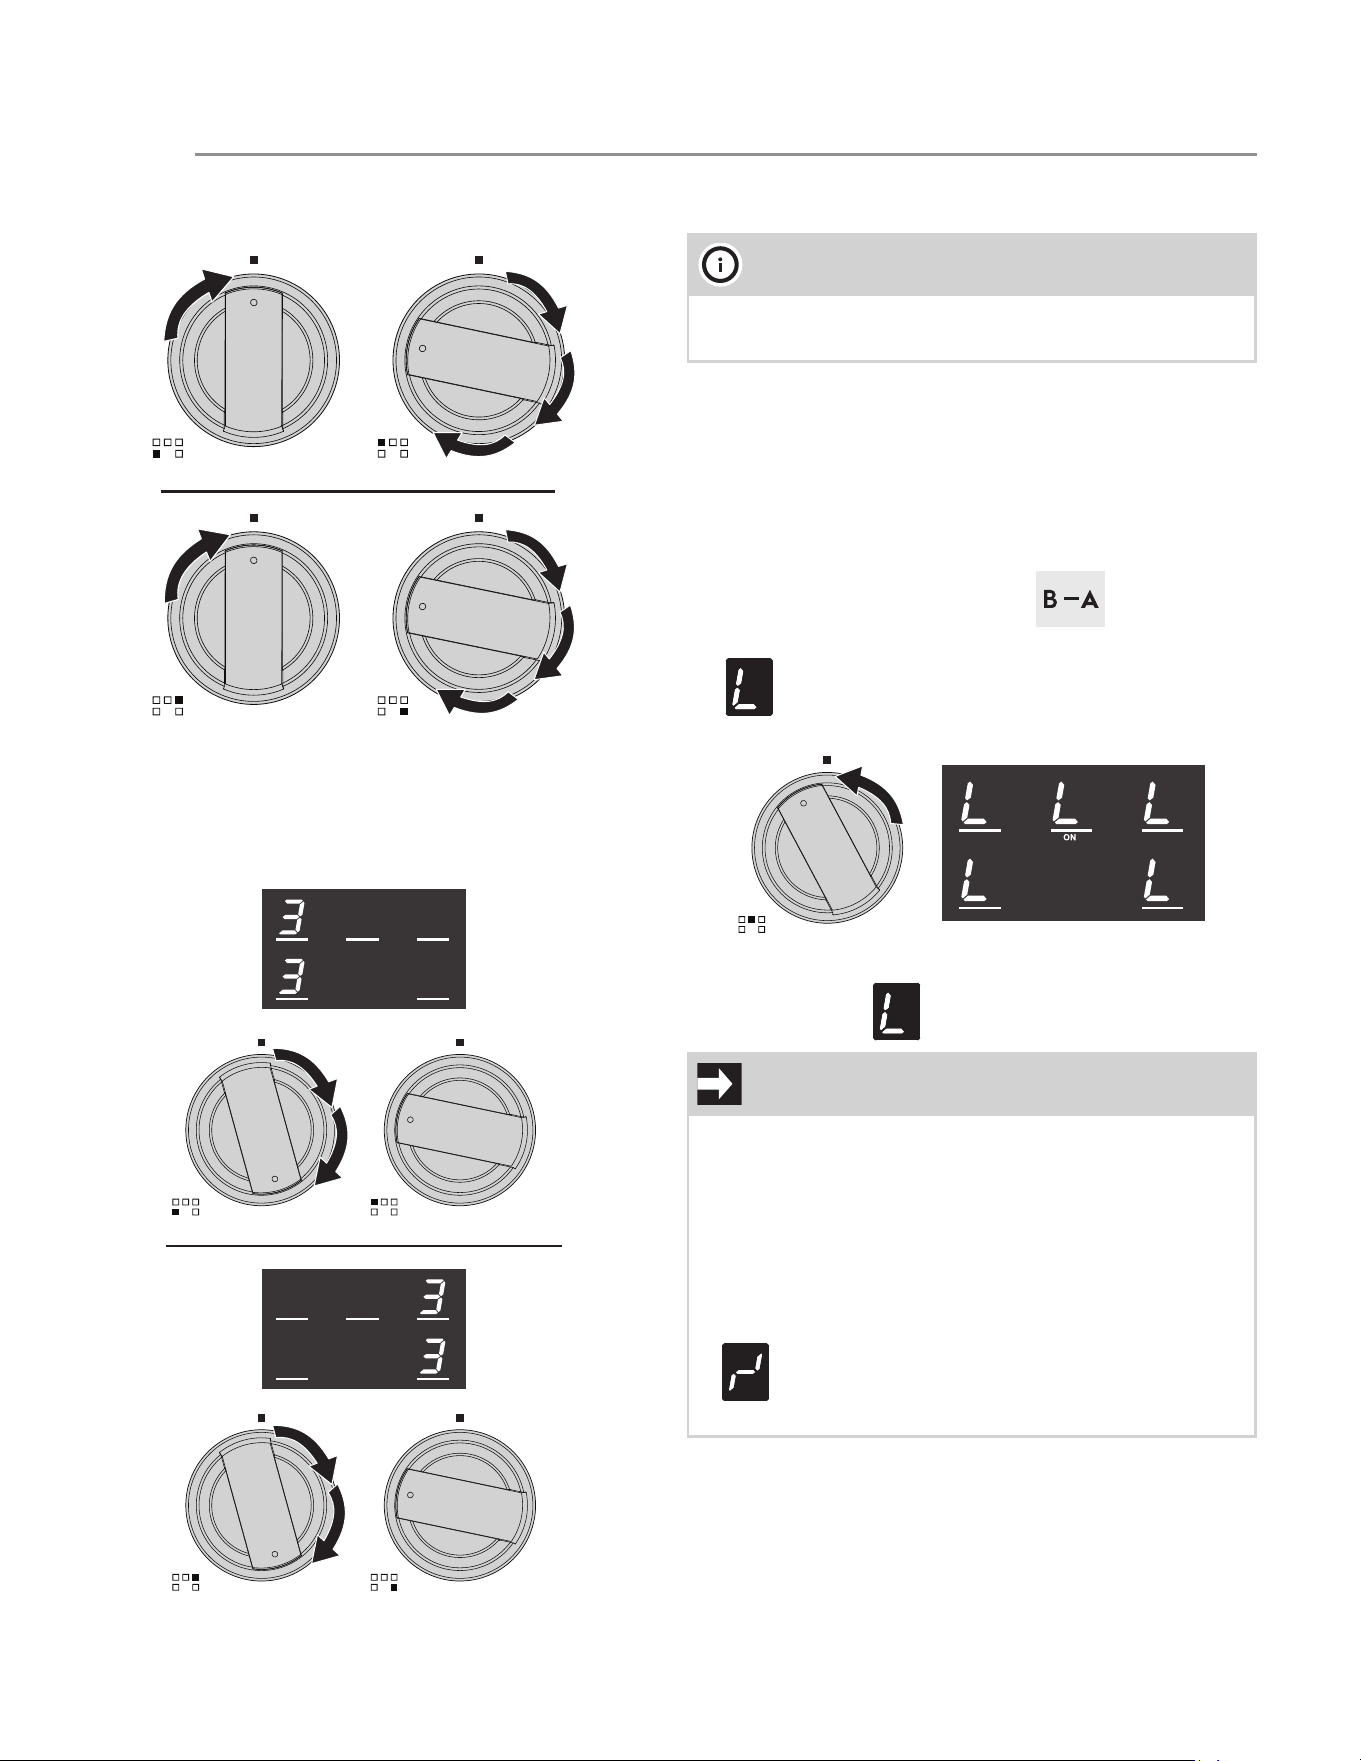
To activate the Control Lock:
1. Press and hold turn the central cooking zone
knob counterclockwise to the position
until all the cooking zone displays show the
symbols (two short beeps will be emitted in
the meantime):
To deactivate the Control Lock, follow the instructions
in point 1 until the symbol disappears.
NOTE
This function automatically distributes an equal
amount of power over both the zones involved.
IMPORTANT
• After about 10 seconds without interacting with
the cooktop knobs, the cooking zone displays
will be turned off. To check if the Control Lock
is active or not, simply try to turn on any cook-
ing zone.
• When you activate Control Lock, if you turn
and hold the central cooking zone knob for
more than 30 seconds, the flashing symbol
will appear as an error message. Release
the knob to remove it.
USING THE COOKTOP
21
Oven preparation
Prepare your range for first time use by setting Bake
function at 350°F (175°C) for about 30 minutes. (see
“Timed cooking”). This allows the inside of the oven to
remove eventual manufacturing residues. Some smoke
and noises during this time is normal.
Using the accessories
Regular rack
The rack is fitted with mechanical safety locks that pre-
vent it from being removed by accident:
To insert the rack:
1. Grip the rack firmly on both sides.
2. Keep the front of rack slightly tilted upwards
and rest the rear part in one of the spaces
indicated.
3. Gently slide in the rack until it comes to a
complete stop.
CAUTION
Remove all accessories, materials and literature from
the inside of the oven before performing this opera-
tion.
CAUTION
• Always use potholders or oven mitts when
removing food or adjusting the oven racks and
guides. Wait until the oven has cooled down
completely, if possible. Oven accessories may
be HOT and may cause burns.
• If the rack has to be moved while the oven is
still hot, do not let oven mitts come into contact
with heating elements.
• Be careful when removing oven racks from the
lowest rack position to avoid contact with the
hot oven door.
• To avoid possible injury or damage to the
appliance, ensure that racks are installed cor-
rectly and not backwards or upside down.
• To avoid damage to the enameled and
chromed surfaces, be very careful when insert-
ing and removing the telescopic guides.
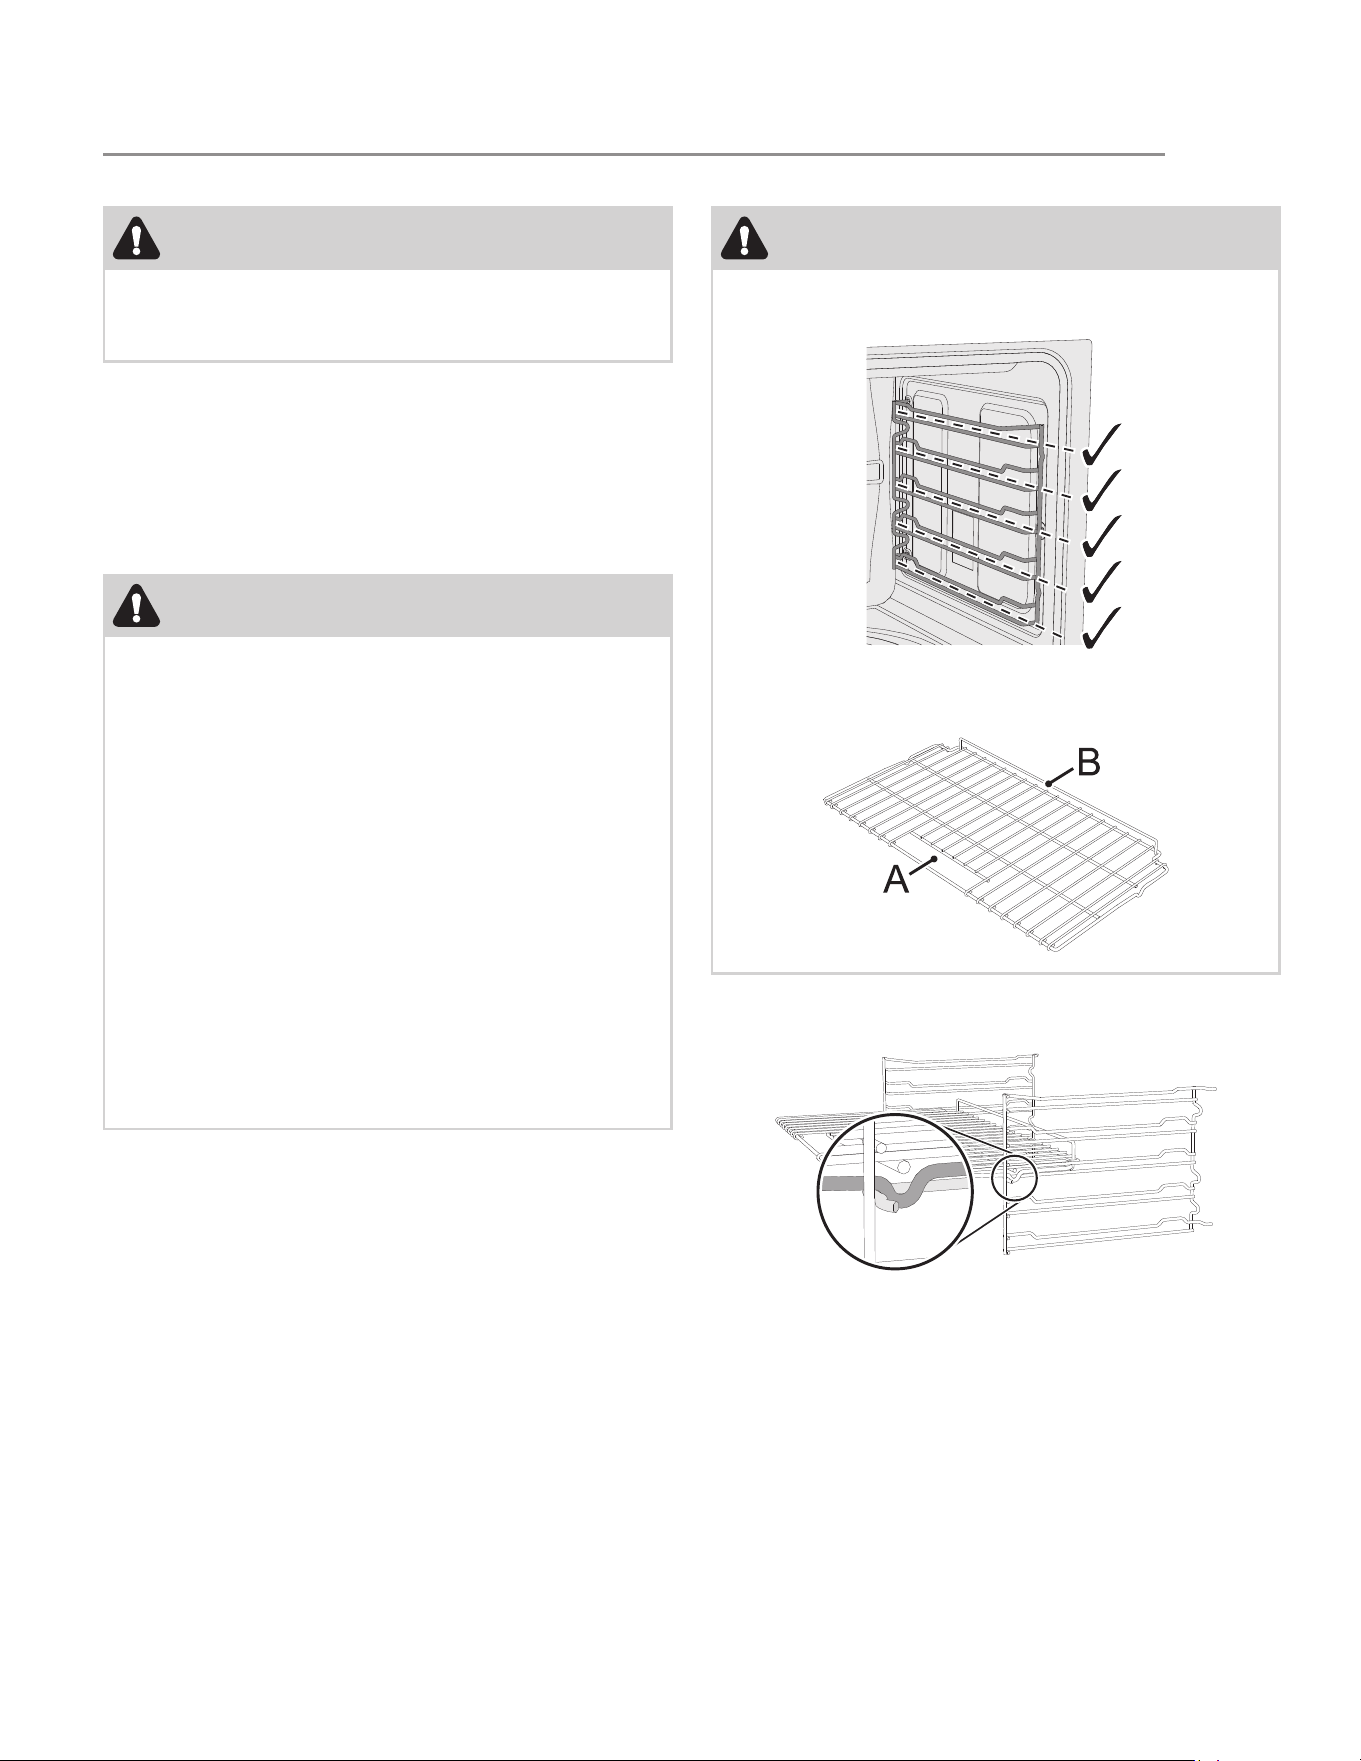
CAUTION
• Be careful to insert the rack in the correct
spaces indicated by the dashed lines:
• Part A of the rack must face towards the out-
side of the oven and part B must face upwards.
USING THE OVEN
22
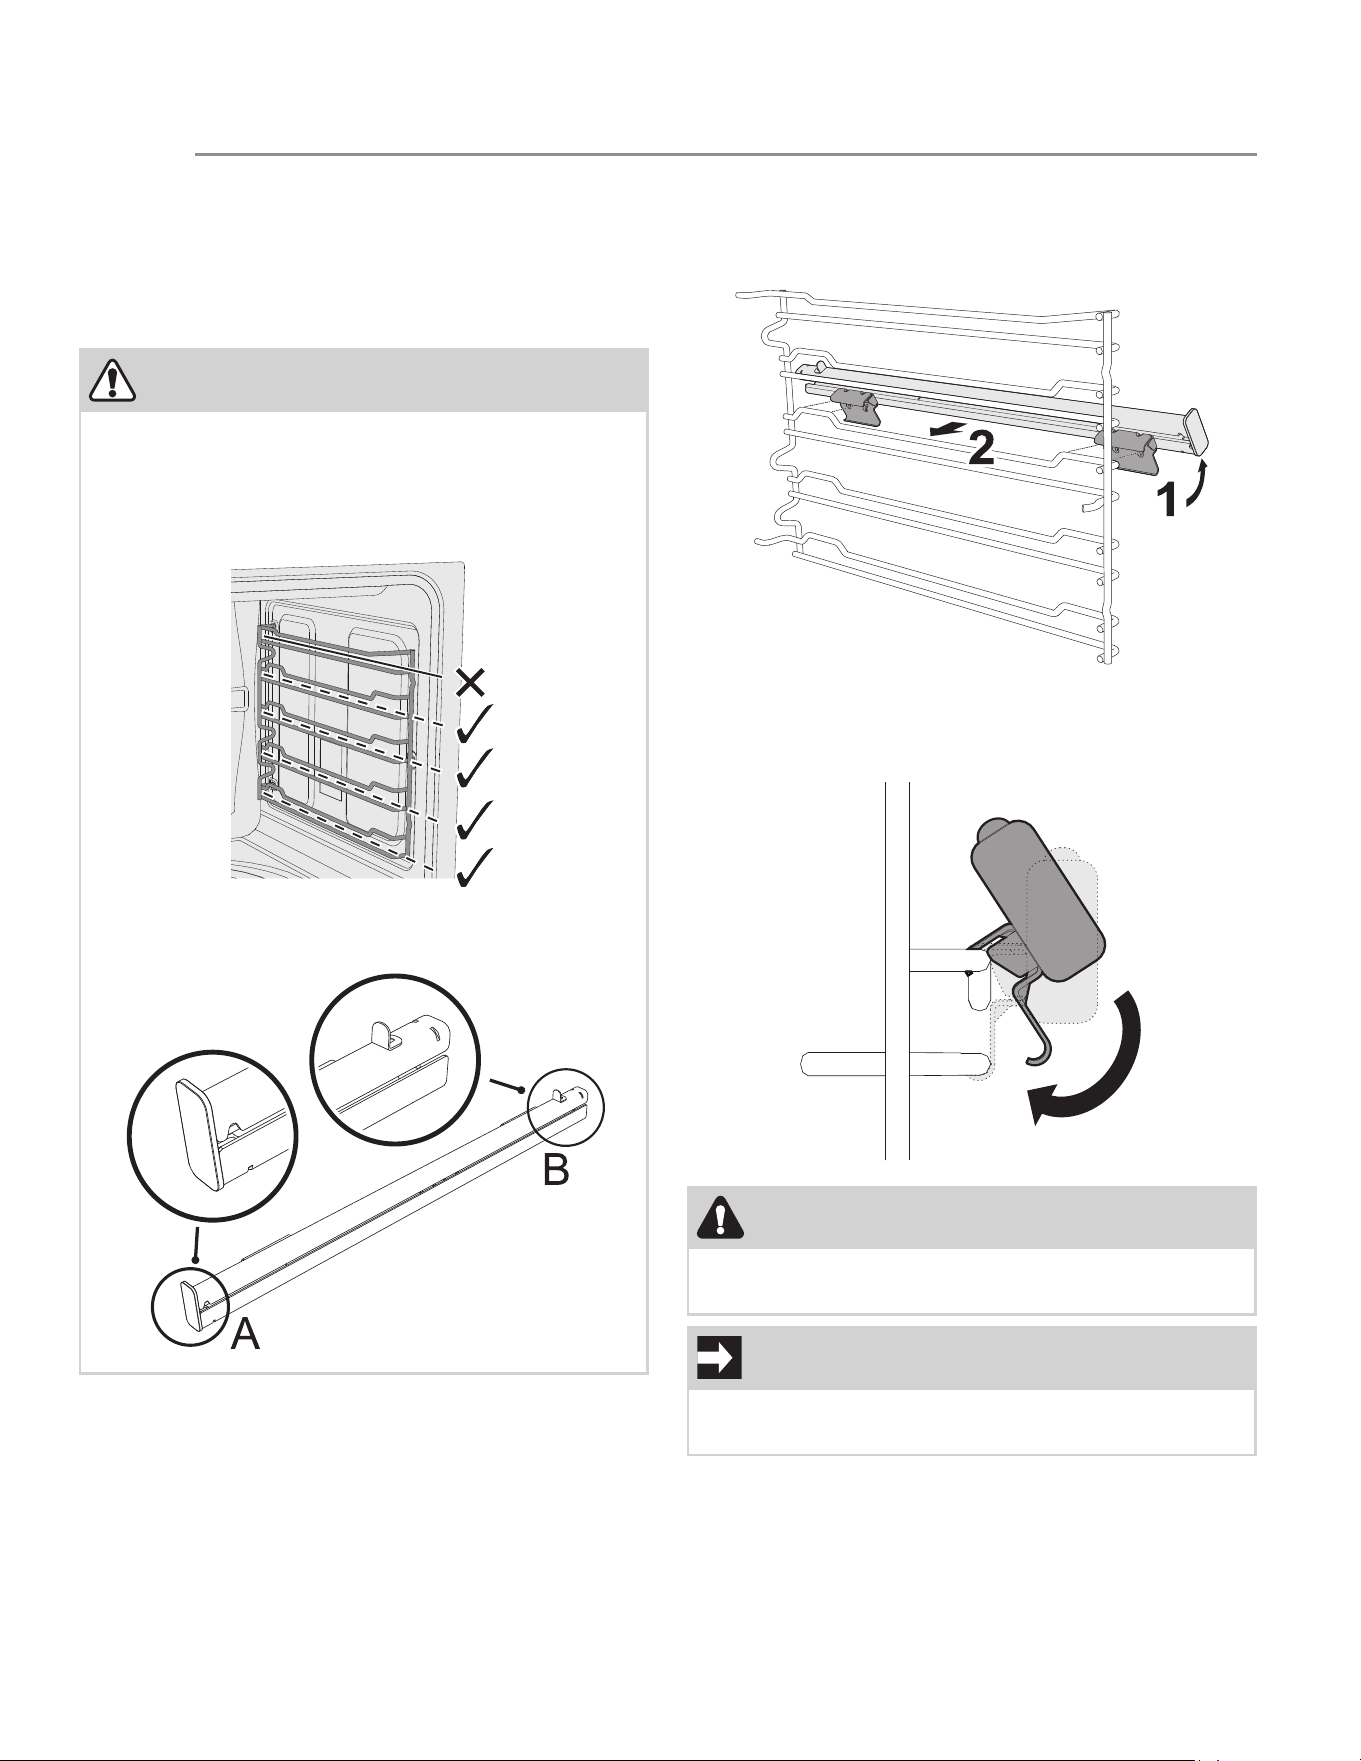
To remove the rack:
1. Slide out the rack until it stops due to the
mechanical safety locks.
2. Slightly lift it upwards and pull it all the way out.
Telescopic guides
To install the telescopic guides:
1. Slightly tilt the guides towards the inside wall of
the oven (1) and rest its hooks on the raised
parts of the oven shelf supports (2).
2. Turn the guides in order to lock the lower part of
the hook onto the lower part of the shelf
support.
CAUTION
• Be careful to hook the telescopic guides in the
correct spaces indicated by the dashed lines.
To avoid damaging the appliance the top shelf
position is not designed for the guides to be
inserted.
• Part A of the guides must face towards the out-
side of the oven and part B must face inwards.
CAUTION
Ensure that the telescopic guides have been installed
correctly and securely.
IMPORTANT
To avoid damaging the guides, pull them out and
push them in gently.
USING THE OVEN
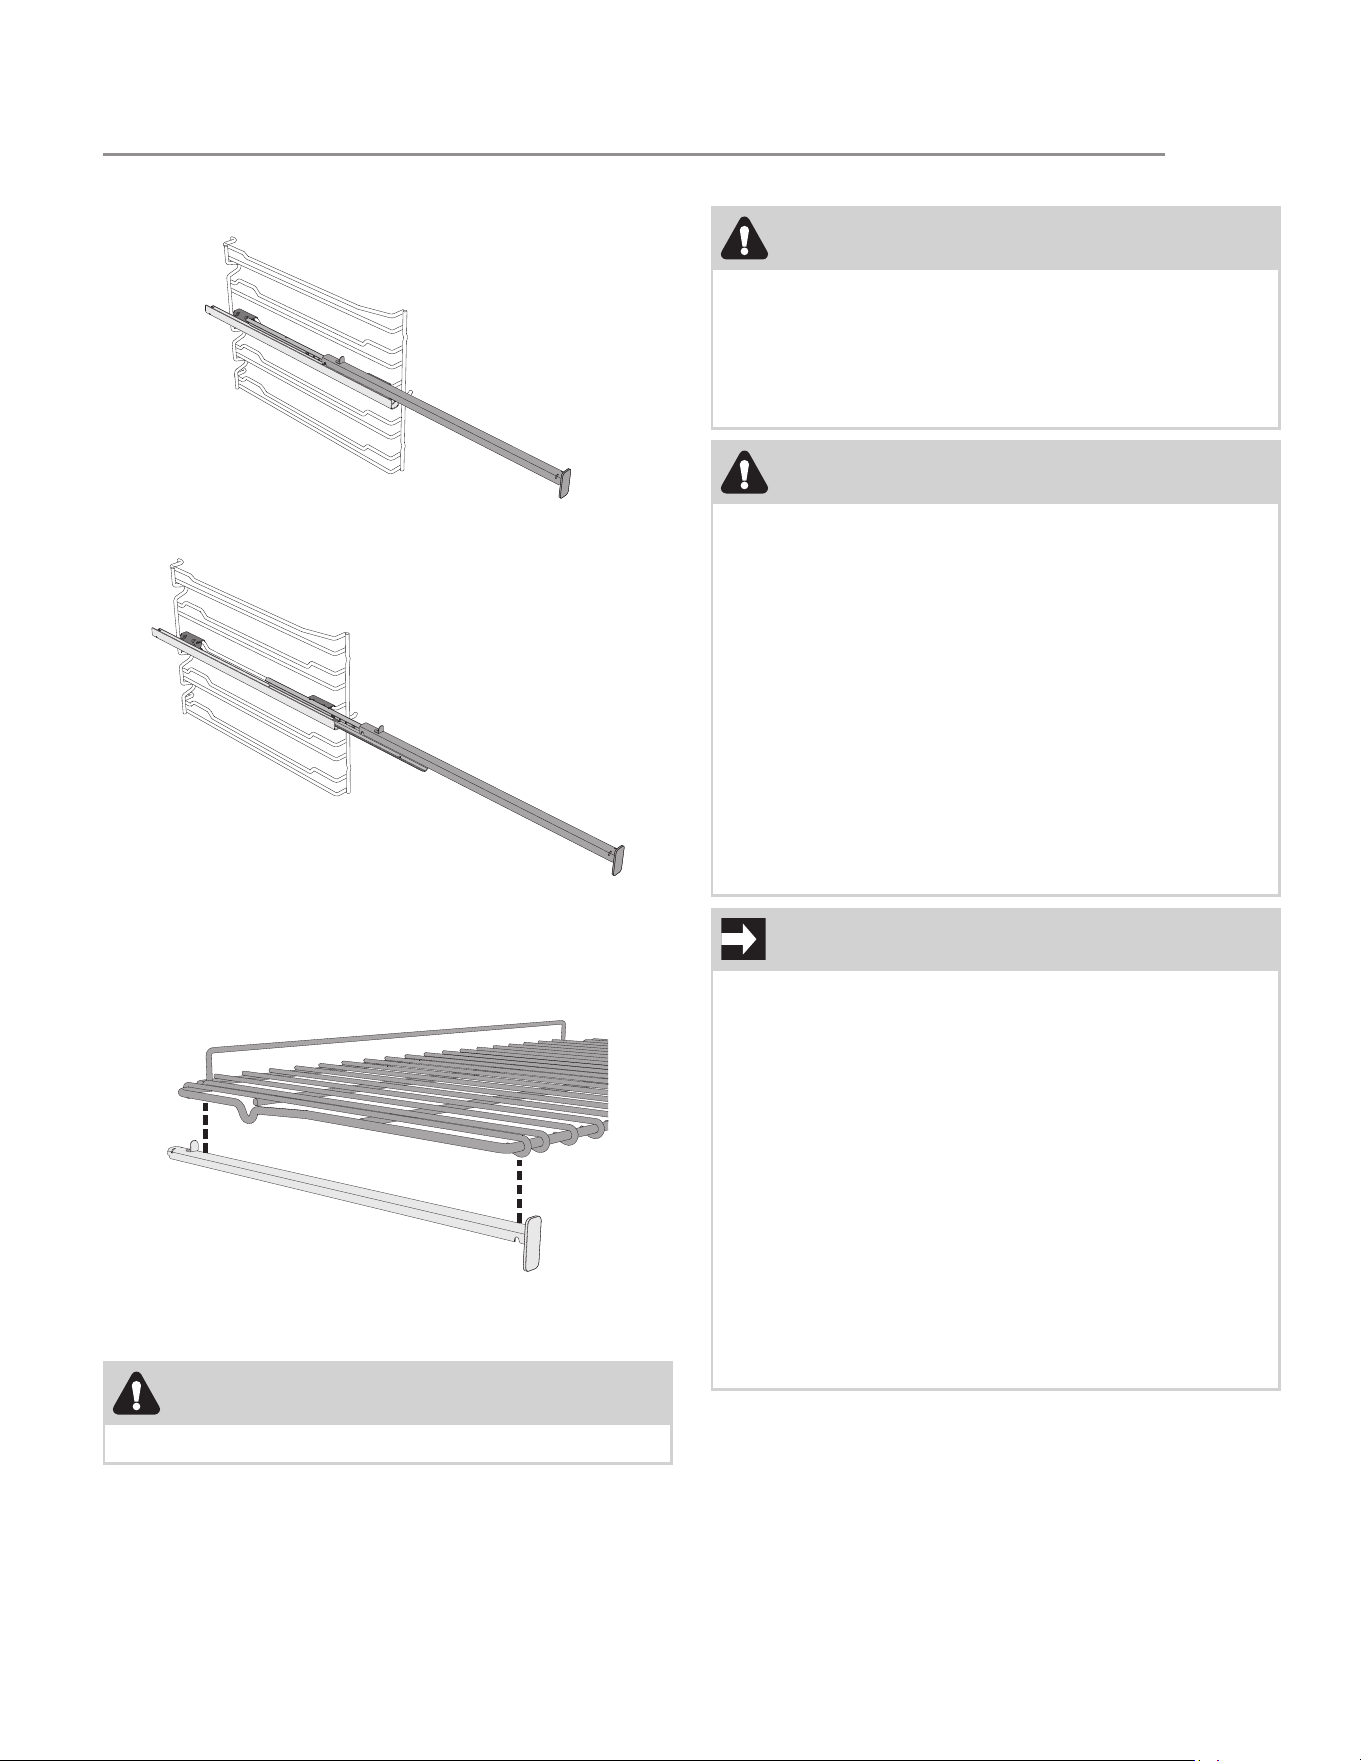
23
The telescopic guides allow a two stage extraction:
• Partial extraction:
• Total extraction:
When using the guides, extract the guides completely
and gently place the rack on them.
Take care to position the rack on the guides as shown
in the figure below.
To remove the telescopic guides, follow the installation
instructions in reverse.
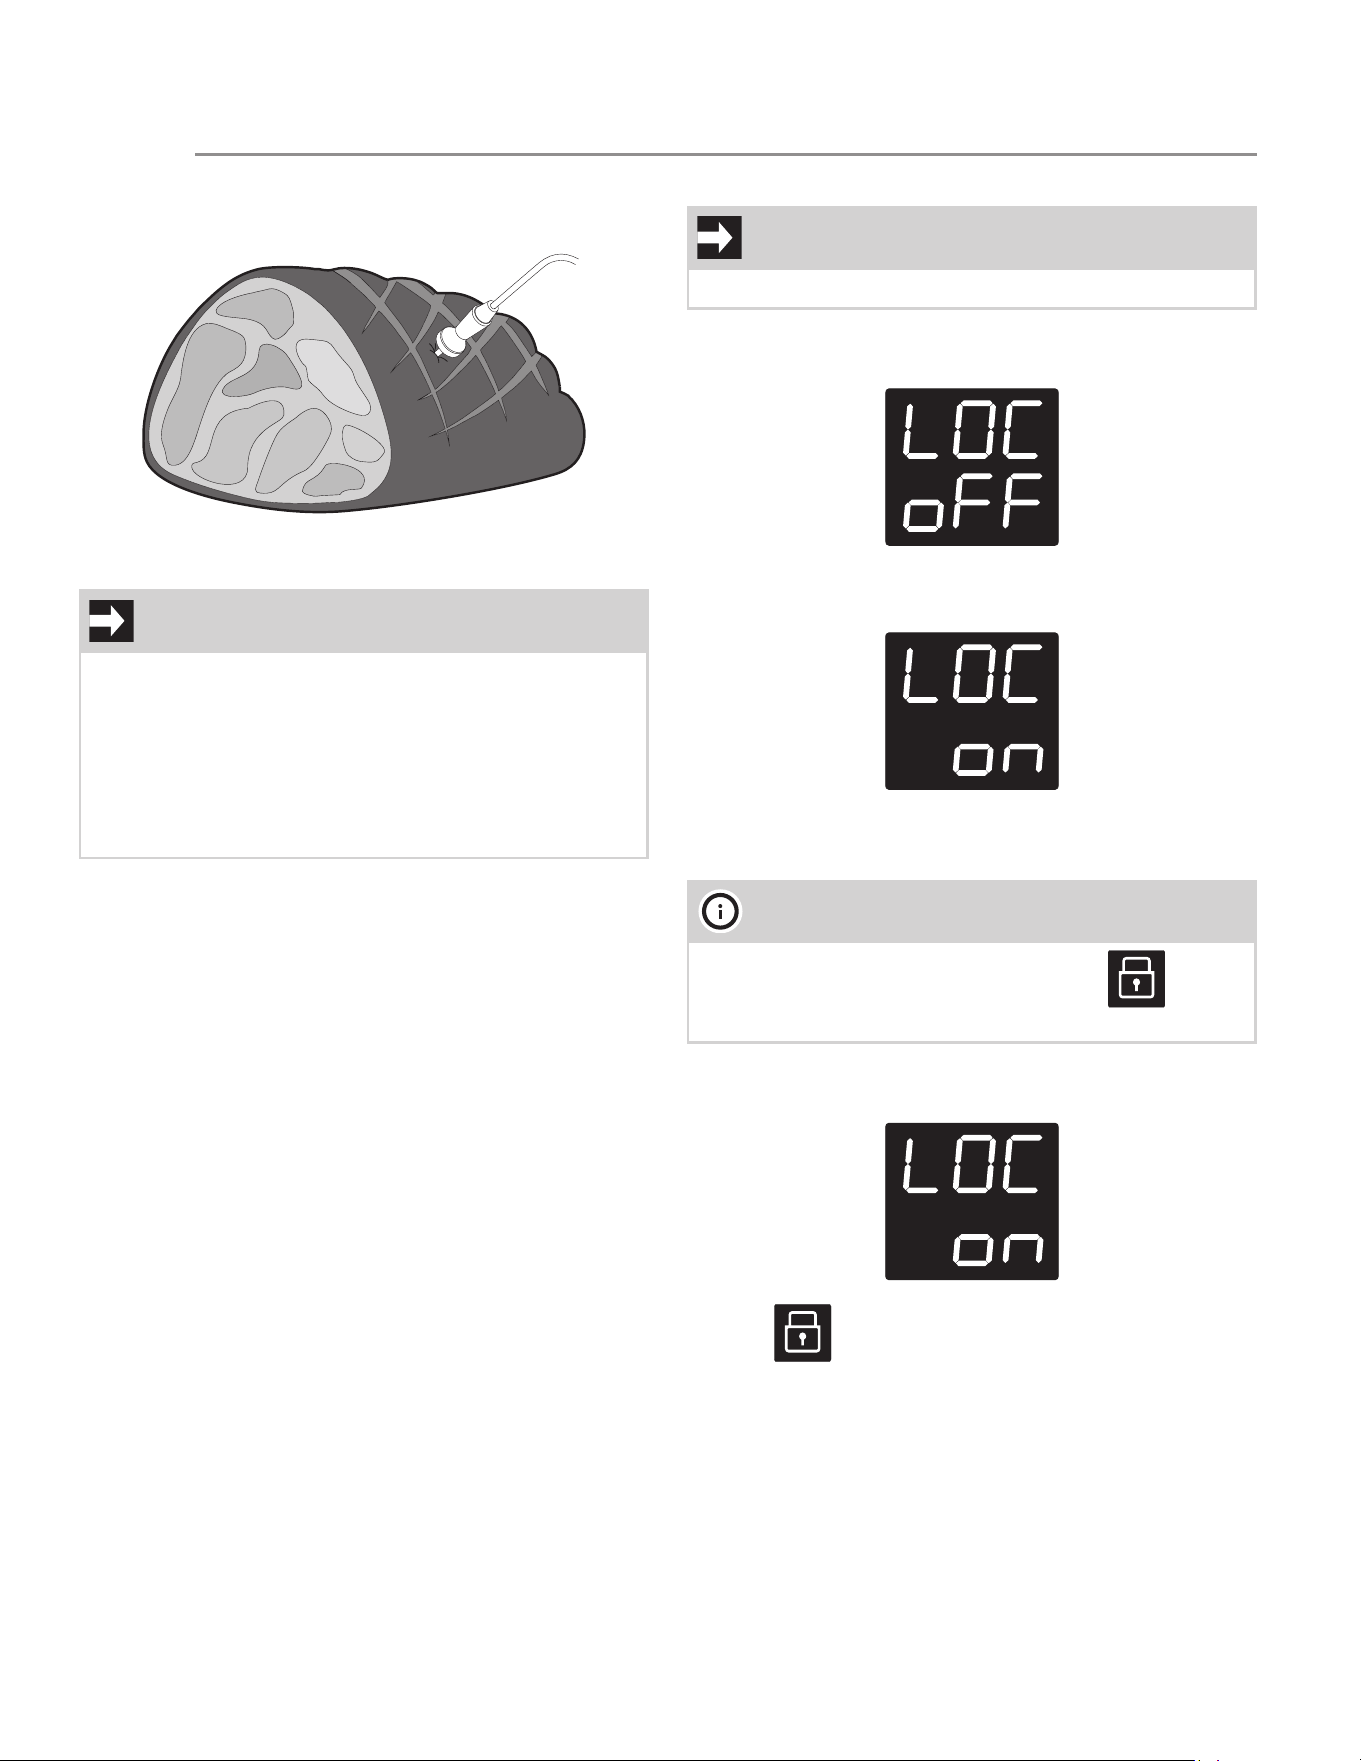
Temperature probe
With the temperature probe, roasts, pork loin and vari-
ous cuts and sizes of meat can be cooked to perfec-
tion.
The probe, in fact, allows foods to be cooked to per-
fection because it accurately monitors the core tem-
perature of the food.
The core temperature of the food is measured by a
sensor located in the tip of the probe.
CAUTION
Wear protective gloves when removing the guides.
WARNING
• Do not leave the temperature probe unat-
tended.
• Do not allow children to play with the probe.
• Take care not to hurt yourself on the sharp
parts of the probe.
CAUTION
• Do not touch the rod or the tip of the probe
after having used it.
• Wear oven mitts when handling the tempera-
ture probe.
• Take care not to scratch or damage enameled
or chrome-plated surfaces with the tip or the
plug of the temperature probe.
• Do not insert the probe into openings and slots
on the appliance.
• Only use the temperature probe provided or
recommended by the manufacturer.
• When the probe is not in use, make sure that
the protective cover is properly closed.
IMPORTANT
• Do not pull the cable to remove the probe from
the socket or from the food.
• Make sure that the probe or its cable do not
get caught in the door.
• No part of the probe should be allowed to
come into contact with the walls of the oven
cavity, the heating elements, the rack or the
guides when they are still hot.
• When not in use, the probe should not be kept
inside the appliance.
• Make sure the plug of the probe is fully inserted
into the socket.
• Do not use the probe to place food into or to
remove it from the oven cavity.
USING THE OVEN
24
For cooking with the temperature probe see “Meat
probe cooking”.
Cooking with the oven
With this range, you can bake many kinds of food in
several ways.
Four different cooking functions are available: different
heating elements, combinations of them and internal
fans will be activated, according to the type of dish
you intend to cook.
List of cooking functions
Manual cooking
Preliminary information
• The word “START” flashes in the upper right cor-
ner of the display to indicate that is possible to
start the selected function.
• Once a function is started or when setting the
temperature and timing functions the word
“START” disappears.
• When you select a function you can set the tem-
perature, the minute minder (see “Cooking
timer”), the cooking time (see “Timed cooking”)
and the delay time (see “Delayed cooking”)
exactly in this order.
• Every function can be paused at any time by sim-
ply opening the door. During the pause the inside
lights turns on, the heating elements are deacti-
vated as well as the oven fan (if the function pro-
vides for fan activation) and the flashing word
“START” appears. Close the door to resume the
function (the word “START” disappears).
Bake
This function is best used for your stan-
dard recipes. This function is suitable for
cooking one dish at a time. Perfect for
bread, biscuits, cookies and similar dishes.
Convection bake
This function allows different foods to be
cooked on several levels extremely
quickly and efficiently, without odors and
flavors mingling. Recommended for leav-
ened cakes and muffins.
Broil
This function gives perfect grilling results,
especially for thin and medium thickness
meat and gives the food an even brown-
ing at the end of cooking. Perfect for sau-
sages, spare ribs, bacon, fish and shrimps.
This function enables large quantities of
food to be grilled evenly.
Convection roast
The combination of the fan and heating
elements allows you to cook both on sin-
gle level and on several levels. Hot air cir-
culation ensures instant and even
distribution of heat. This function is sug-
gested for the simultaneous cooking of
different types of food, as long as they
need the same temperatures and same
type of cooking. Recommended for tender
cuts of beef, lamb, pork and poultry.
NOTE
Each cooking function has its own auto-suggest
(default) temperatures.
• Bake: 350°F / 175°C.
• Convection bake: 325°F / 165°C.
• Broil: 550°F / 280°C.
• Convection roast: 350°F / 175°C.
• Warm: 170°F / 75°C.
• Sabbath: 350°F / 175°C.
IMPORTANT
It is not possible to set the temperature and all the
timing for all functions.
USING THE OVEN
25
• When setting the temperature and the timing
functions, the relative symbol/word starts flash-
ing:
1. Temperature: .
2. Stand alone timer / cooking timer: .
3. Timed cooking: .
4. Delayed cooking: .
• Move through the temperature setting and the
timing functions by pressing the oven tempera-
ture knob. Change the relative values by turning
the oven temp. knob left or right.
• The temperature and the timing functions can be
set or reset during cooking.
• To cancel the timing functions, simply set the rel-
ative values in minutes / hours to zero.
• While setting a function or when a function is in
progress, it always possible to go in standby
mode by turning the oven mode knob to the left
and then releasing it. Doing so will cancel the
cooking settings or stop the cooking function.
To set a manual cooking cycle
1. Press the oven mode knob. The default screen
will show:
2. Turn the oven mode knob to select the cooking
function. If you keep turning the knob, you can
select the auxiliary functions and the special
functions (see “Auxiliary functions” and “Special
functions”).
3. Turn the oven temperature knob to the left or
right to select the temperature.
4. Once the cooking function and temperature
have been selected, press the oven mode knob
to start cooking (the word “START” disappears)
Manual cooking in progress
1. Manual cooking can be stopped at any time by
turning the oven mode knob to the left.
2. Open the door to pause cooking. Close the
door to resume cooking.
3. Turn the oven temperature knob to the right to
turn on and off the lights.
4. The temperature can be changed by pressing
and then rotating the temperature knob. The
timing functions can be selected by pressing the
temperature knob again (see “Timing
functions”).
You can change the temperature
and the timing functions by pressing and turning
the temperature knob even during the pause.
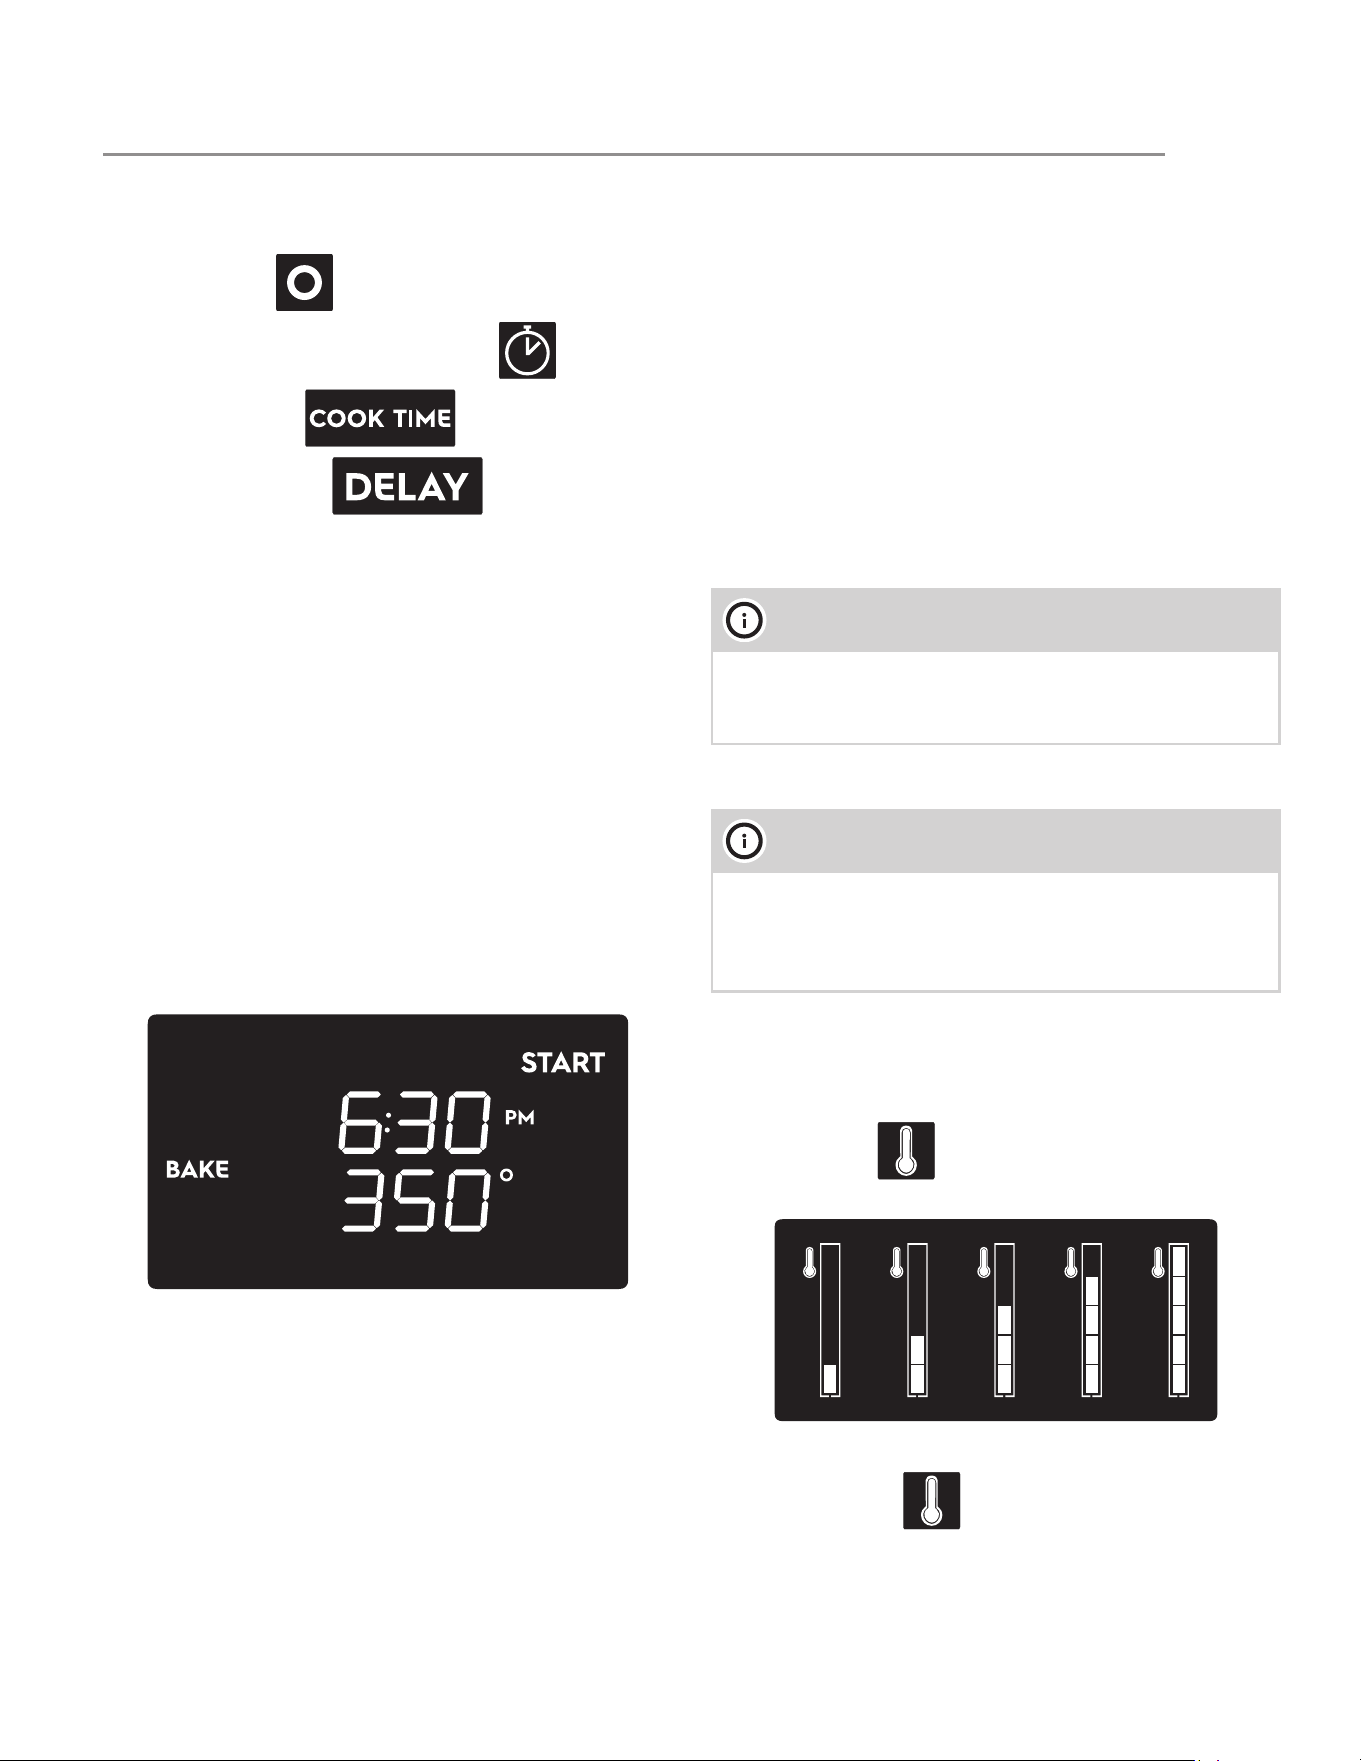
Preheating
The bake, convection bake and broil functions are
always preceded by preheating, during which the
oven is heated to the set cooking temperature.
The temperature bar is shown on the right hand side of
the display. The icon and the bar segments flash
to indicate that the oven temperature is increasing.
When preheating is complete, the temperature bar
segments and the icon become steady.
The duration of preheating varies according to the
temperature and the cooking function selected.
NOTE
At the end of any function, a buzzer is triggered and
sounds twice every 15 seconds (except for the Sab-
bath function).
NOTE
At the start of each cooking cycle, the oven will pre-
heat in order to reach the selected cooking tem-
perature (except for Convection roast and Sabbath
functions).
USING THE OVEN
26
A buzzer sounds to signal the end of preheating. Open
the oven door to stop the buzzer.
Oven residual heat
When the display is in standby mode and the oven
cavity is still hot, the decreasing temperature bar will
be shown at the right side of the screen.
The temperature bar will disappear when the oven
cavity temperature decreases to below 140°F (60°C).
Timing functions
Minute minder
The minute minder allows you to set a timer and a
buzzer will sound at the end of the set time.
Stand alone timer
The stand alone timer can be useful when cooking with
the induction cooktop.
With the display in standby mode:
1. Press the temperature knob. The screen will
show:
2. Turn the temperature knob left or right to set the
time.
3. Press the temperature knob to start the timer.
During the countdown, you can change the previously
set time by pushing and rotating the temperature
knob. Push the knob again to resume the timer count-
down.
When the timer expires, a buzzer sounds and the clock
icon starts to flash.
To stop the buzzer, simply interact with one of the
oven knobs or open the door, then the display
switches to standby mode.
IMPORTANT
There is no preheating for the convection roast func-
tion. When starting to cook using the convection
roast function the display immediately shows the full
temperature bar.
Minute minder
The function of this timer is only to warn the
user when the set time has expired. It does
not stop any function in progress. It can be
activated either as a stand alone timer or
when setting a function, but its operation is
the same.
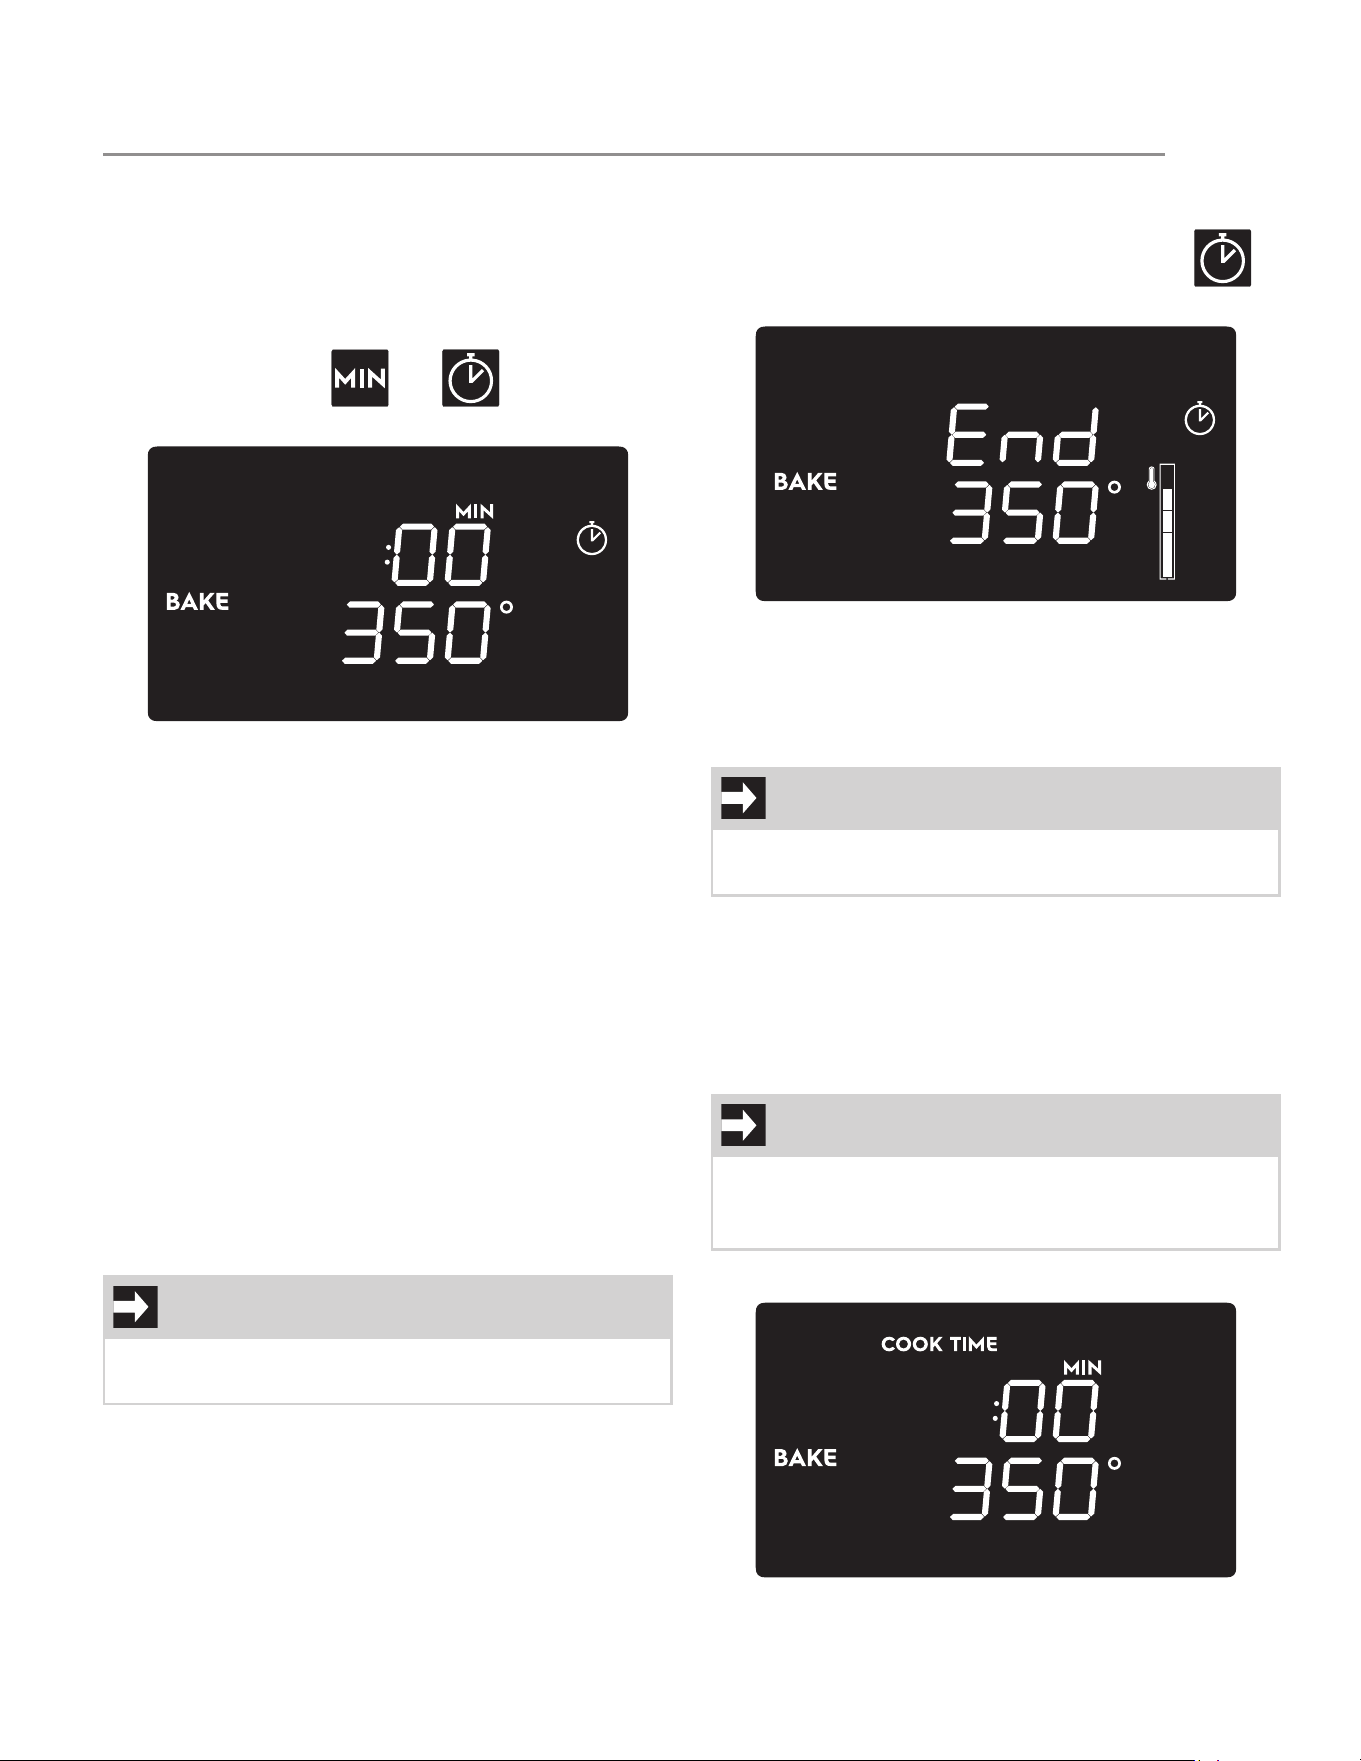
Timed cooking
This timer stops the function in progress
when the time has elapsed. It can only be
activated when setting a function.
Delayed cooking
This timer allows you to start a function
after the preset time. It can only be acti-
vated when setting a function and when
timed cooking has been set.
NOTE
• The minute minder can be set both during
cooking and as a stand alone timer.
• A minimum of 1 minute and a maximum of 12
hours can be set.
USING THE OVEN
27
Cooking timer
This timer mode acts as a stand alone timer during a
function in progress.
1. Set a manual cooking cycle (See “Manual cook-
ing”) (example is a 350°F Bake).
2. Press the oven temperature knob until the
display shows the and icons and
the number “:00”.
3. Set the time by turning the temperature knob.
4. Keep pressing the temperature knob until
“START” flashes on the display. The countdown
starts immediately.
5. Press the oven mode knob to start cooking.
Cooking timer in progress
During cooking you can change or deactivate the
cooking timer by pressing the oven temperature knob
until the display shows the number of minutes/hours
that were previously selected.
1. To reset the timer, keep the temperature knob
turned to the left until you reach “:00”.
2. To change the timer, turn the temperature knob
left or right to select another countdown.
3. Keep pressing the temperature knob until the
display shows the current time or the new
countdown in progress.
End of cooking timer
When the timer expires, a buzzer sounds and the fol-
lowing screen appears on the display with the
icon flashing.
To stop the buzzer, simply interact with one of the
oven knobs or open the door, then the display
switches to the cooking in progress screen.
Timed cooking
The timed cooking allows you to stop the cooking pro-
cess after a preset time.
1. Set a manual cooking cycle (See “Manual cook-
ing”) (Example is a 350°F Bake).
2. Press the oven temperature knob until “COOK
TIME” flashes on the display.
IMPORTANT
• If cooking is paused, the countdown anyway
continues.
IMPORTANT
The timed cooking is allowed for all functions except
Warm, Steam clean and Broil.
IMPORTANT
On this screen, if you do not interact with the knobs
for 5 seconds, the display switches to the cooking
settings screen.
USING THE OVEN
28
3. Turn the temperature knob left or right to set the
time.
4. Press the temperature knob until the display
shows the cooking settings screen with the
cooking time just set and the word “START”
flashing.
5. Press the oven mode knob to start the timed
cooking.
Timed cooking in progress
When the cooking is in progress, by pressing and turn-
ing the temperature knob, you can:
1. Change the temperature.
2. Set a minute minder timer.
3. Change or reset the timed cooking countdown.
If you reset the countdown, cooking switches to
manual mode.
Open the door to pause cooking.
You can change the temperature and the timing func-
tions by pressing and turning the temperature knob
even during the pause.
Close the door to resume cooking.
To stop cooking, turn and release the oven mode
knob to the left.
End of timed cooking
At the end of cooking, a buzzer sounds and “End” will
appear on the display together with the current time.
By turning and releasing the oven mode knob to the
left or after a few seconds of waiting, the display
switches to the standby screen (current time only) with
the decreasing temperature bar to indicate that the
oven cavity is still hot.
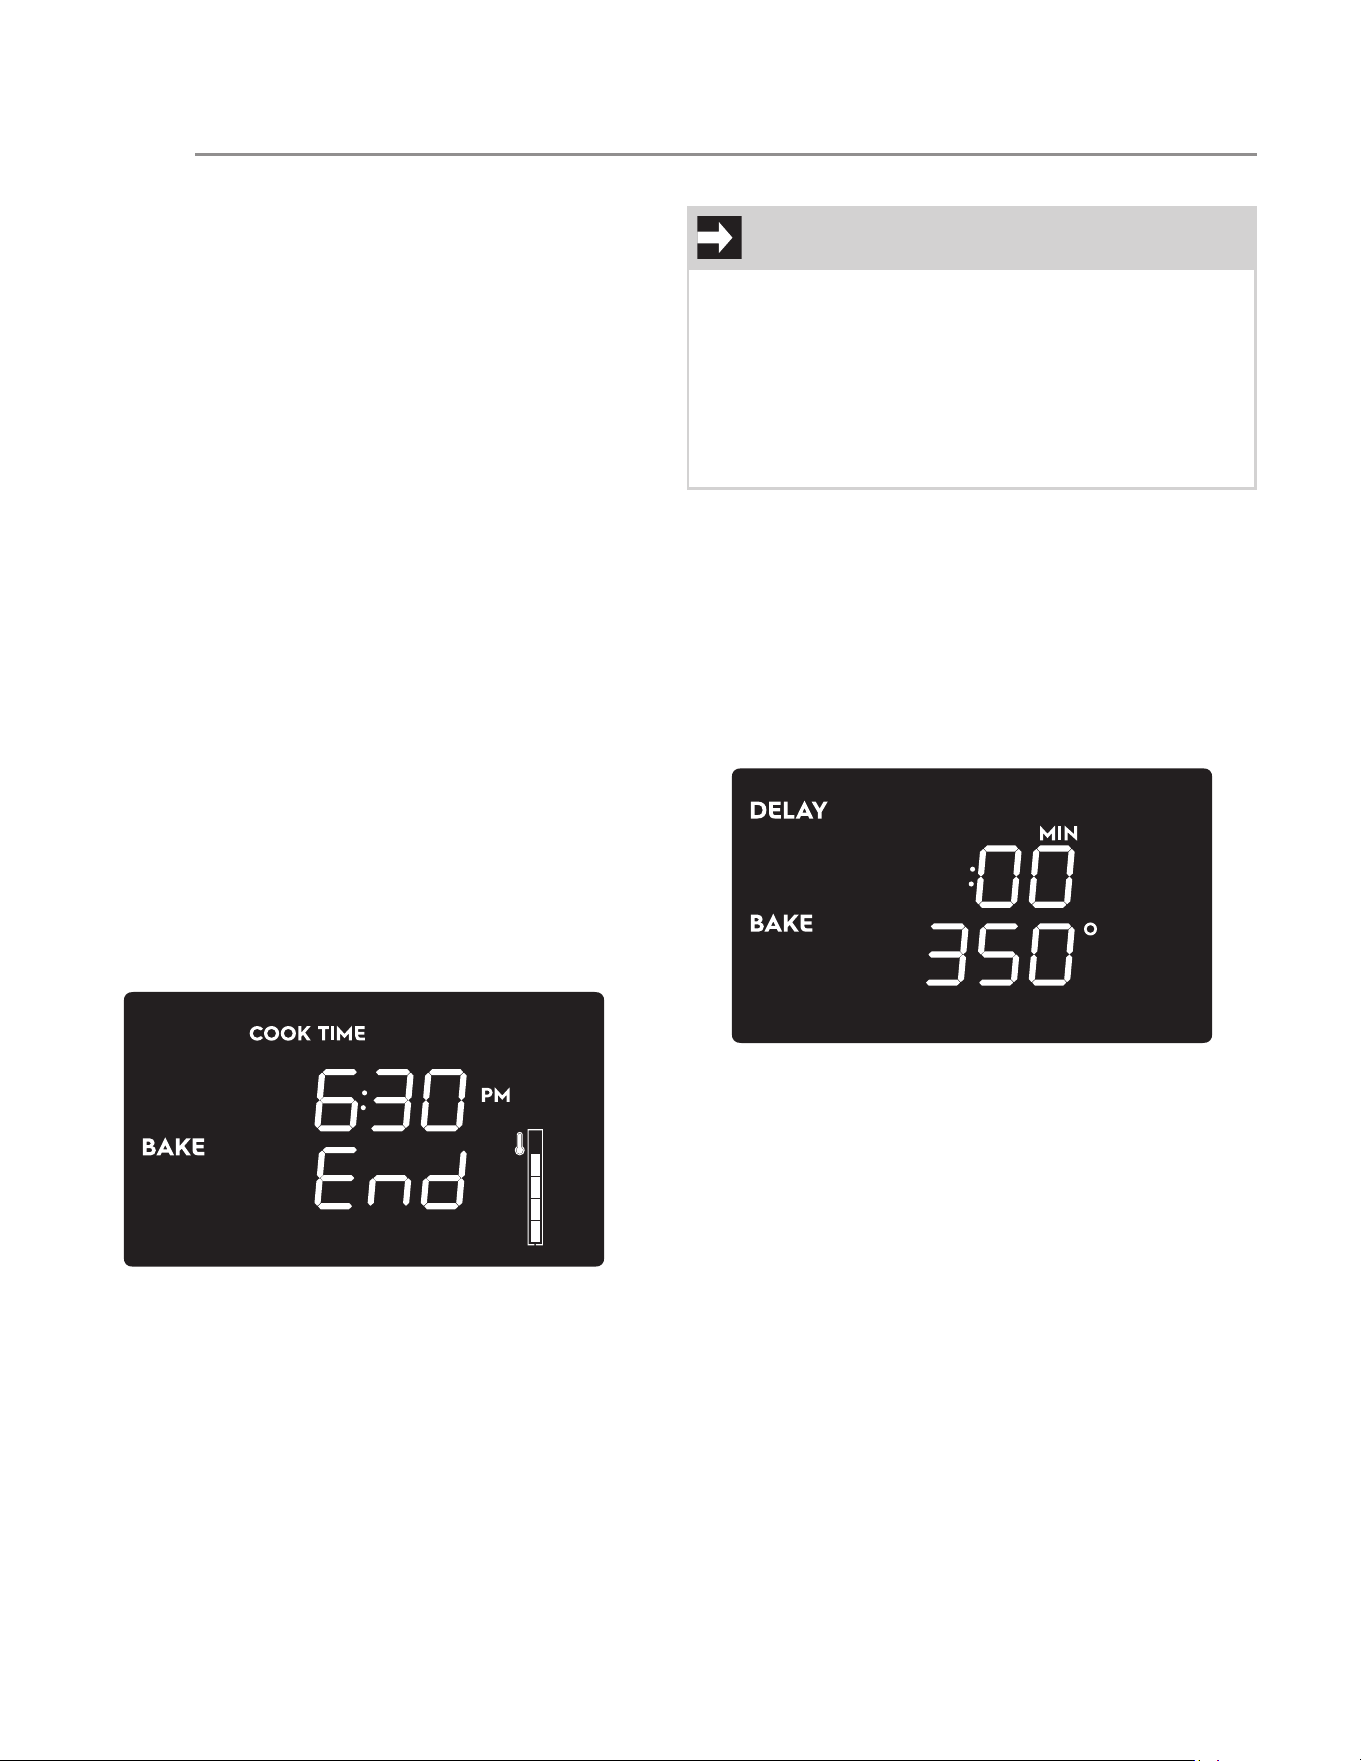
Delayed cooking
The delayed function allows you to start a timed cook-
ing automatically after a preset time.
To set a delayed function:
1. Set a timed cooking function (see “Timed cook-
ing”) (Example is 350°F Bake).
2. Once the cooking duration has been set, press
the temperature knob until the following screen
is displayed with the word “DELAY” flashing:
3. Turn the temperature knob left or right to select
a delay time.
4. Press the temperature knob to switch to the
cooking settings screen.
5. Press the oven mode knob to start the delay
countdown. During this phase, the display is less
bright.
6. Once delay countdown ends, the brightness of
the display returns normal and timed cooking
starts.
7. At the end of timed cooking follow the same
instructions described previously for timed
cooking (see “End of timed cooking”).
IMPORTANT
• Delayed cooking can only be selected if a
timed cooking has been set.
• Delayed cooking is allowed for all functions
except Warm, Proof and Broil.
• The minimum settable delay is 1 min.
• For the Warm function, the max. settable delay
is 12 hours; for all the other functions it is 1 hour.
USING THE OVEN
29
Auxiliary functions
Three auxiliary functions are available, selectable in
the same way as the cooking functions.
Steam Clean
For the details on setting and starting the Steam Clean
function see the dedicated chapter.
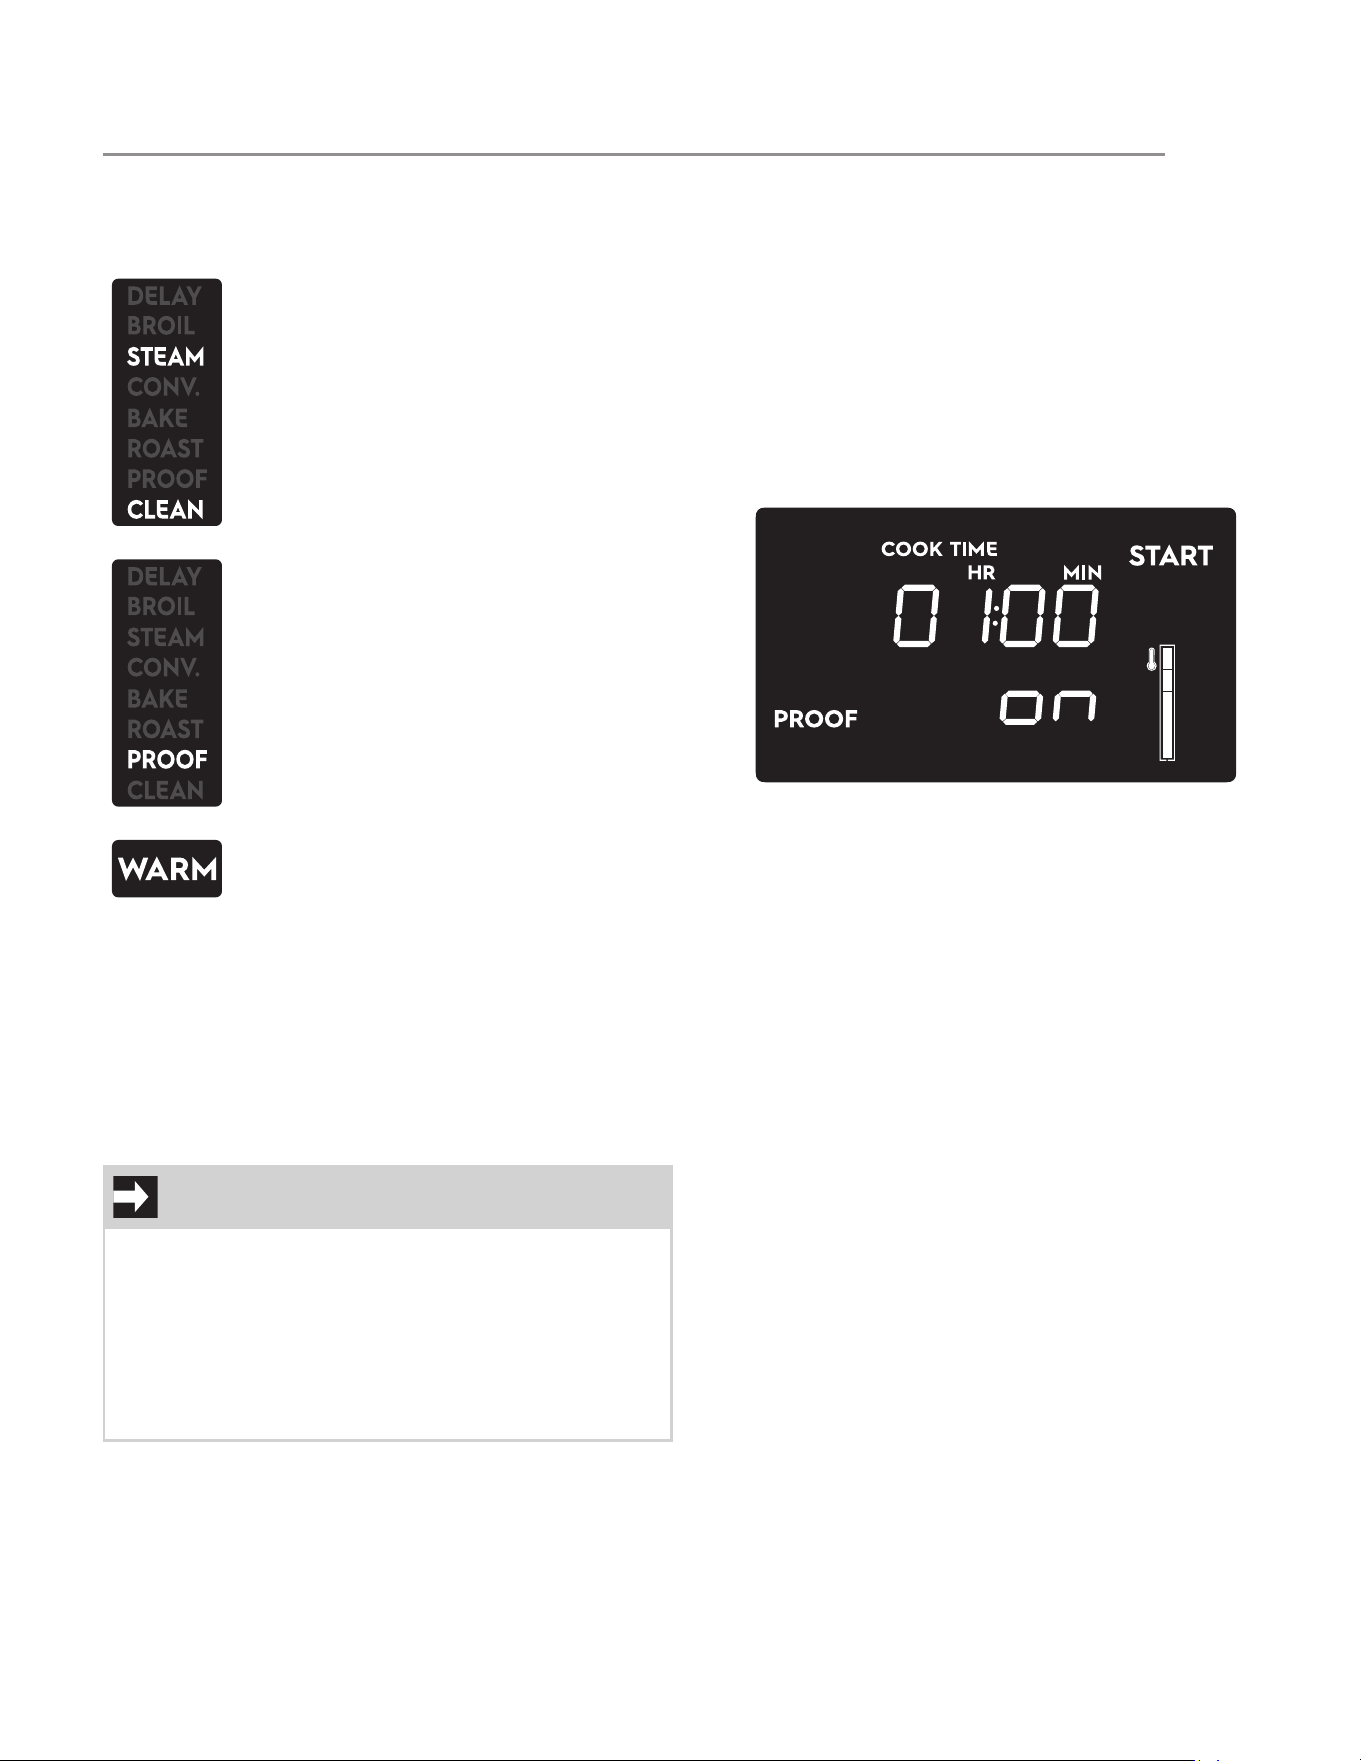
Proof
Preliminary operations:
1. Open the oven door.
2. Place the container containing the dough in the
oven.
3. Close the oven door.
To set the Proof function:
1. Press the oven mode knob.
2. Turn the oven mode knob until the Proof setting
screen appears on the display (the word
“START” flashes):
3. By pressing the oven temp. knob you can set a
minute minder timer or change the default
duration of the function (see “Cooking timer”
and “Timed cooking”).
4. Press the oven mode knob to start the Proof
function (the default/user countdown starts and
the word “on” disappears).
Proof function in progress
By pressing and turning the oven temp. knob, you can
modify the minute minder and the duration of the func-
tion (see “Cooking timer” and “Timed cooking”).
Open the door to pause function.
You can change the temperature and the timing func-
tions by pressing and turning the temperature knob
even during the pause.
Close the door to resume function.
Turn the oven mode knob to the left and then release it
to stop the function.
Steam clean
This function is an assisted cleaning pro-
cedure that facilitates dirt removal. This
function allows the inside of the oven can
be cleaned with great ease. Dirt residues
are softened by the steam produced by
heating a small amount of water on the
bottom of the oven cavity.
Proof
This function allows to create the perfect
environment to activate yeast when bak-
ing homemade breads or pizza using heat
coming only from the upper part of the
oven cavity.
Warm
This function allows you to maintain a
constant temperature inside the oven.
Useful to prevent freshly cooked food
from cooling down.
IMPORTANT
• When you select the Proof function the “COOK
TIME” appears on the display to indicate that
the default duration of this function is 1 hour.
• It is not possible to set a delayed start for this
function.
• For best results, a container of water should be
placed at the bottom of the oven cavity.
USING THE OVEN
30
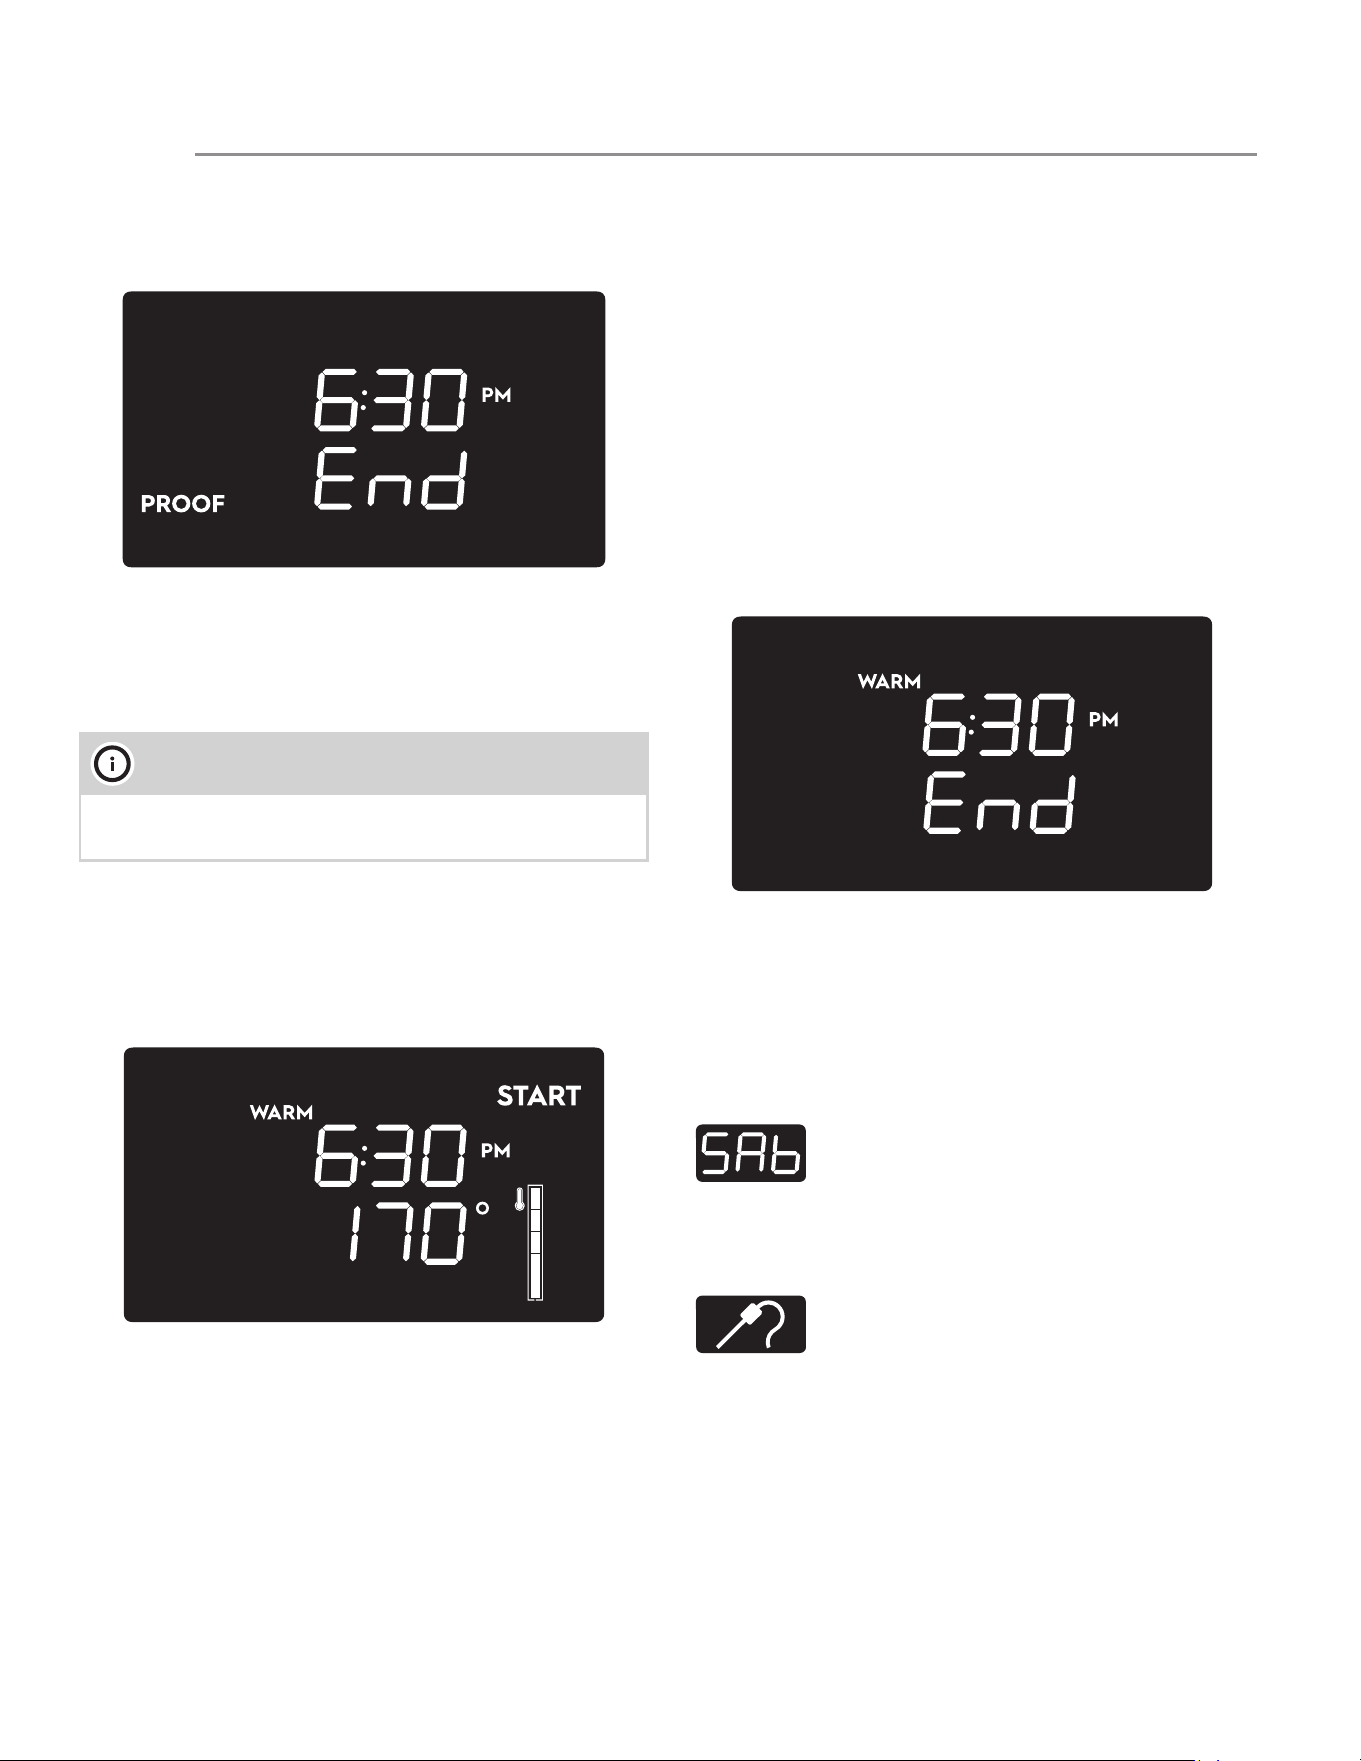
End of Proof function
At the end of the Proof function, a buzzer sounds and
“END” will appear on the display together with the cur-
rent time.
Turn and release the oven mode button to stop the
buzzer and the function. The display goes into standby
mode.
Warm
To set the Warm function
1. Press the oven mode knob.
2. Turn the oven mode knob until the Warm setting
screen appears on the display (the word
“START” flashes):
3. Press turn and release the oven temp. knob to
change the Function temperature.
4. Press turn and release the same knob again
and to set a function timer.
5. Press oven temp. knob again to confirm the
timer and to switch to the Warm setting screen.
6. Press the oven mode knob to start the Warm
function.
Warm function in progress
You can modify the temperature and duration of the
function by pressing and turning the oven temp. knob.
Open the door to pause function.
You can change the temperature and the timing func-
tions by pressing and turning the temperature knob
even during the pause.
Close the door to resume function.
Turn the oven mode knob to the left and then release it
to stop the function.
End of Warm function
At the end of the Warm function, a buzzer sounds and
“END” will appear on the display together with the cur-
rent time.
Turn and release the oven mode button to stop the
buzzer and the function. The display goes into standby
mode.
Special functions
Two special functions are available, selectable in the
same way as the cooking and auxiliary functions.
NOTE
The temperature range for this function is from 160°F
(70°C) to 200°F (90°C).
Sabbath
Function that allows you to cook food
whilst respecting the provisions of the Jew-
ish day of rest. This function has the same
characteristics as the Bake function.
Meat probe cooking
Useful function for cooking various types
of meat to perfection by measuring the
core temperature of the meat. This is not a
timed cooking function: the cooking pro-
cess ends when the probe sensor reaches
the set target temperature.
USING THE OVEN
31
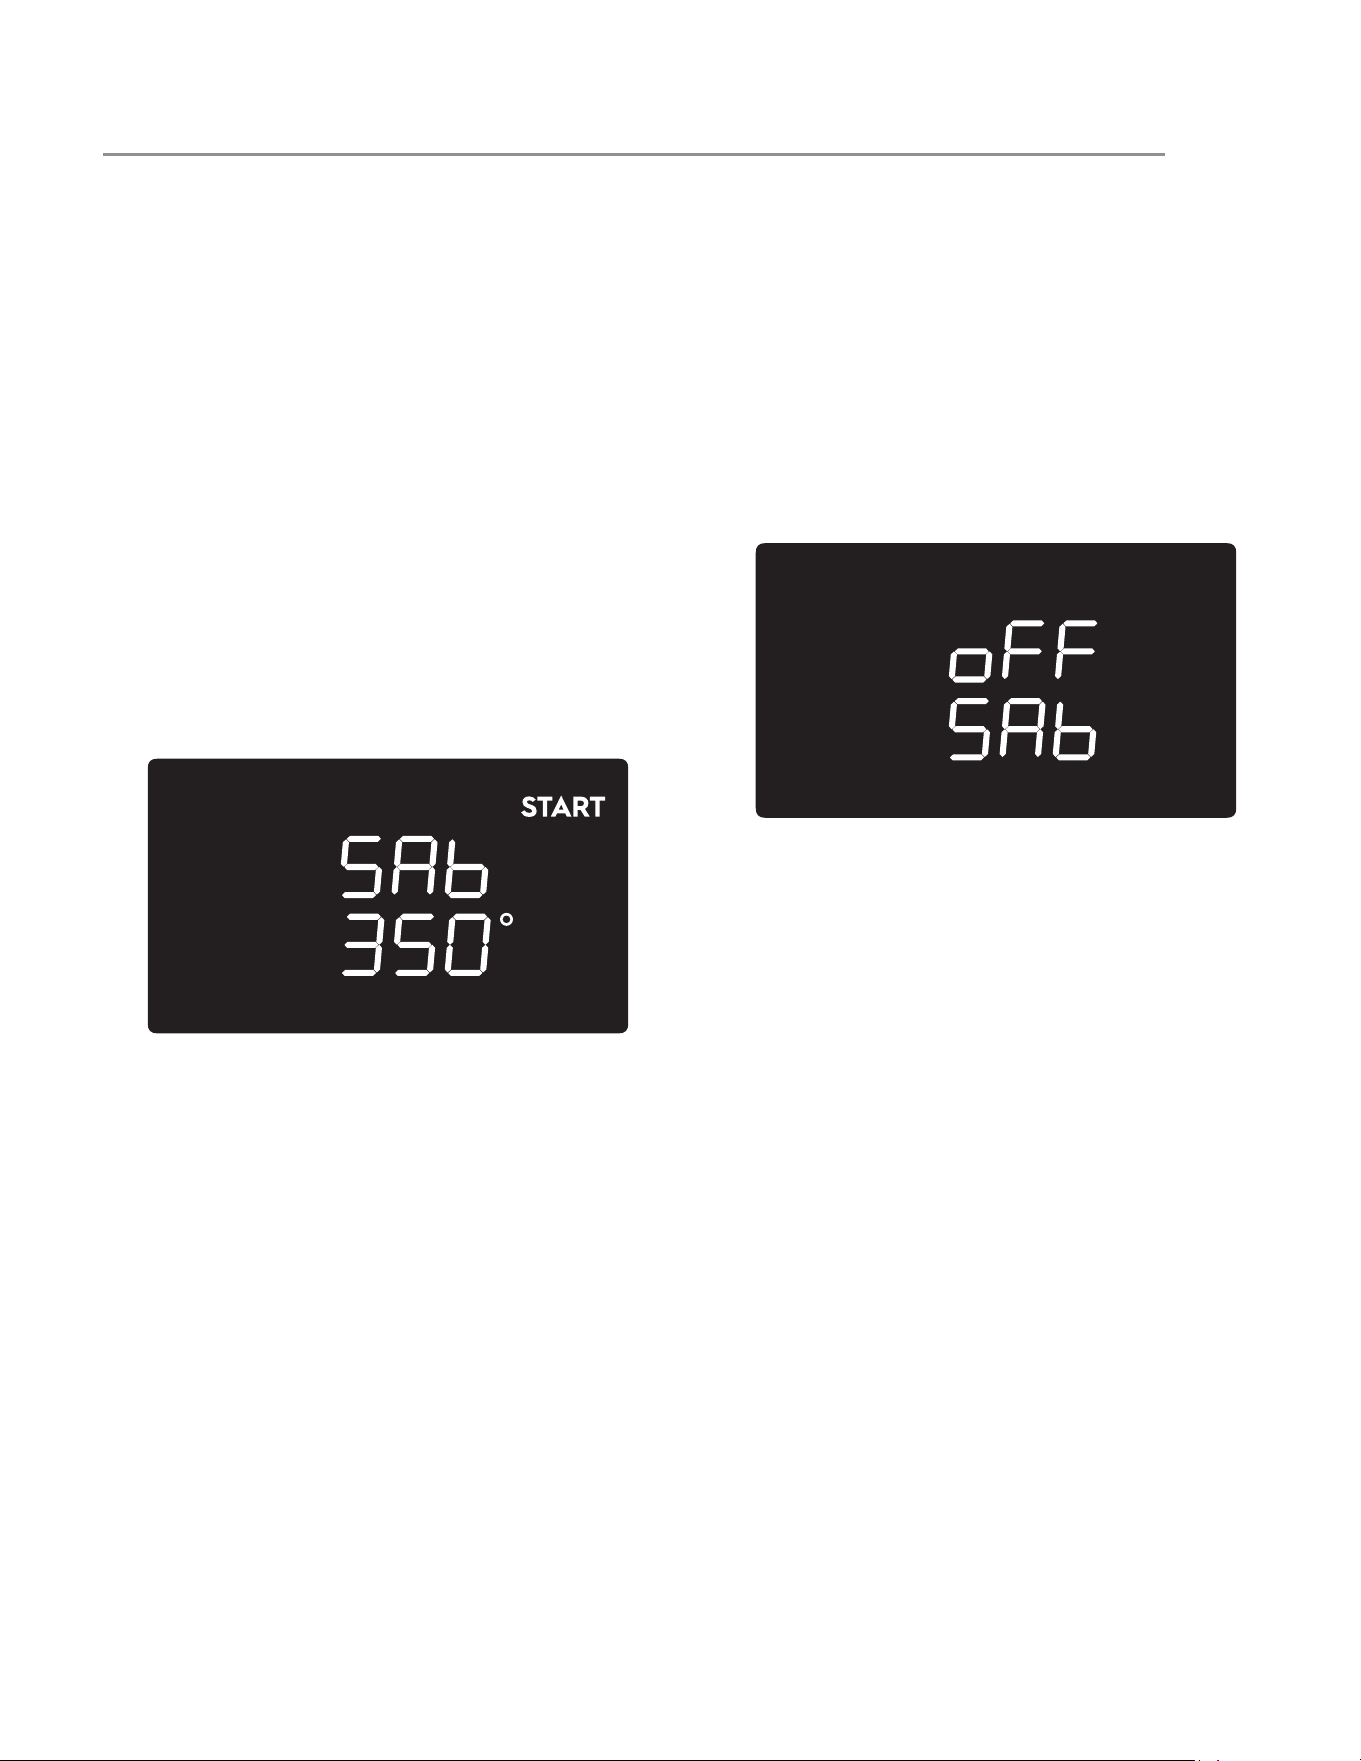
Sabbath function
The Sabbath function operates the appliance in a par-
ticular way:
• The maximum operating time is 74 hours.
• A timed cooking from 10 minutes to a maximum
of 74 hours can be set.
• No minute minder timer is allowed.
• No delayed cooking is allowed.
• No preheating will be performed.
• The internal fans remain off.
• The oven lights cannot be toggled on.
• No sound will be emitted.
To set the Sabbath function:
1. With the display is in standby mode, press the
oven mode knob to access the cooking settings
screen.
2. Turn it once to the left. The display below will
appear (“START” will flash):
3. Press and turn the oven temperature knob once
to change the temperature (the degrees symbol
starts flashing).
4. Press the temp. knob again to set a timed
cooking (the default duration is 1 hour).
5. Turn the temp. knob to change the timed
cooking duration.
6. Press the temp. knob again to confirm the
previous selections and to switch to the cooking
settings screen.
7. Press the oven mode knob to start the function.
Sabbath function in progress
When the Sabbath function is in progress, no action is
allowed except to stop cooking by rotating the oven
mode knob to the left. Only the word “SAb” is shown
on the display.
End of Sabbath function
You can end the Sabbath function in any moment by
turning and releasing the oven mode knob. The dis-
play goes into time of day mode.
When the timed Sabbath cooking function has ended
or the maximum 74 hours are reached, the display
shows:
In this state the oven doesn’t generate heat but the
Sabbath function is still active. This screen remains
indefinitely until you turn the oven mode knob. By turn-
ing the oven mode knob the display will show the time
of day screen.
After a power failure event the display shows the
above screen, the Sabbath function will be stopped
and an eventual timed function will be canceled.
In any case, when the display shows the above screen
it is not possible to toggle on the lights, neither by
opening the door nor by turning the temperature knob
to the right.
USING THE OVEN
32
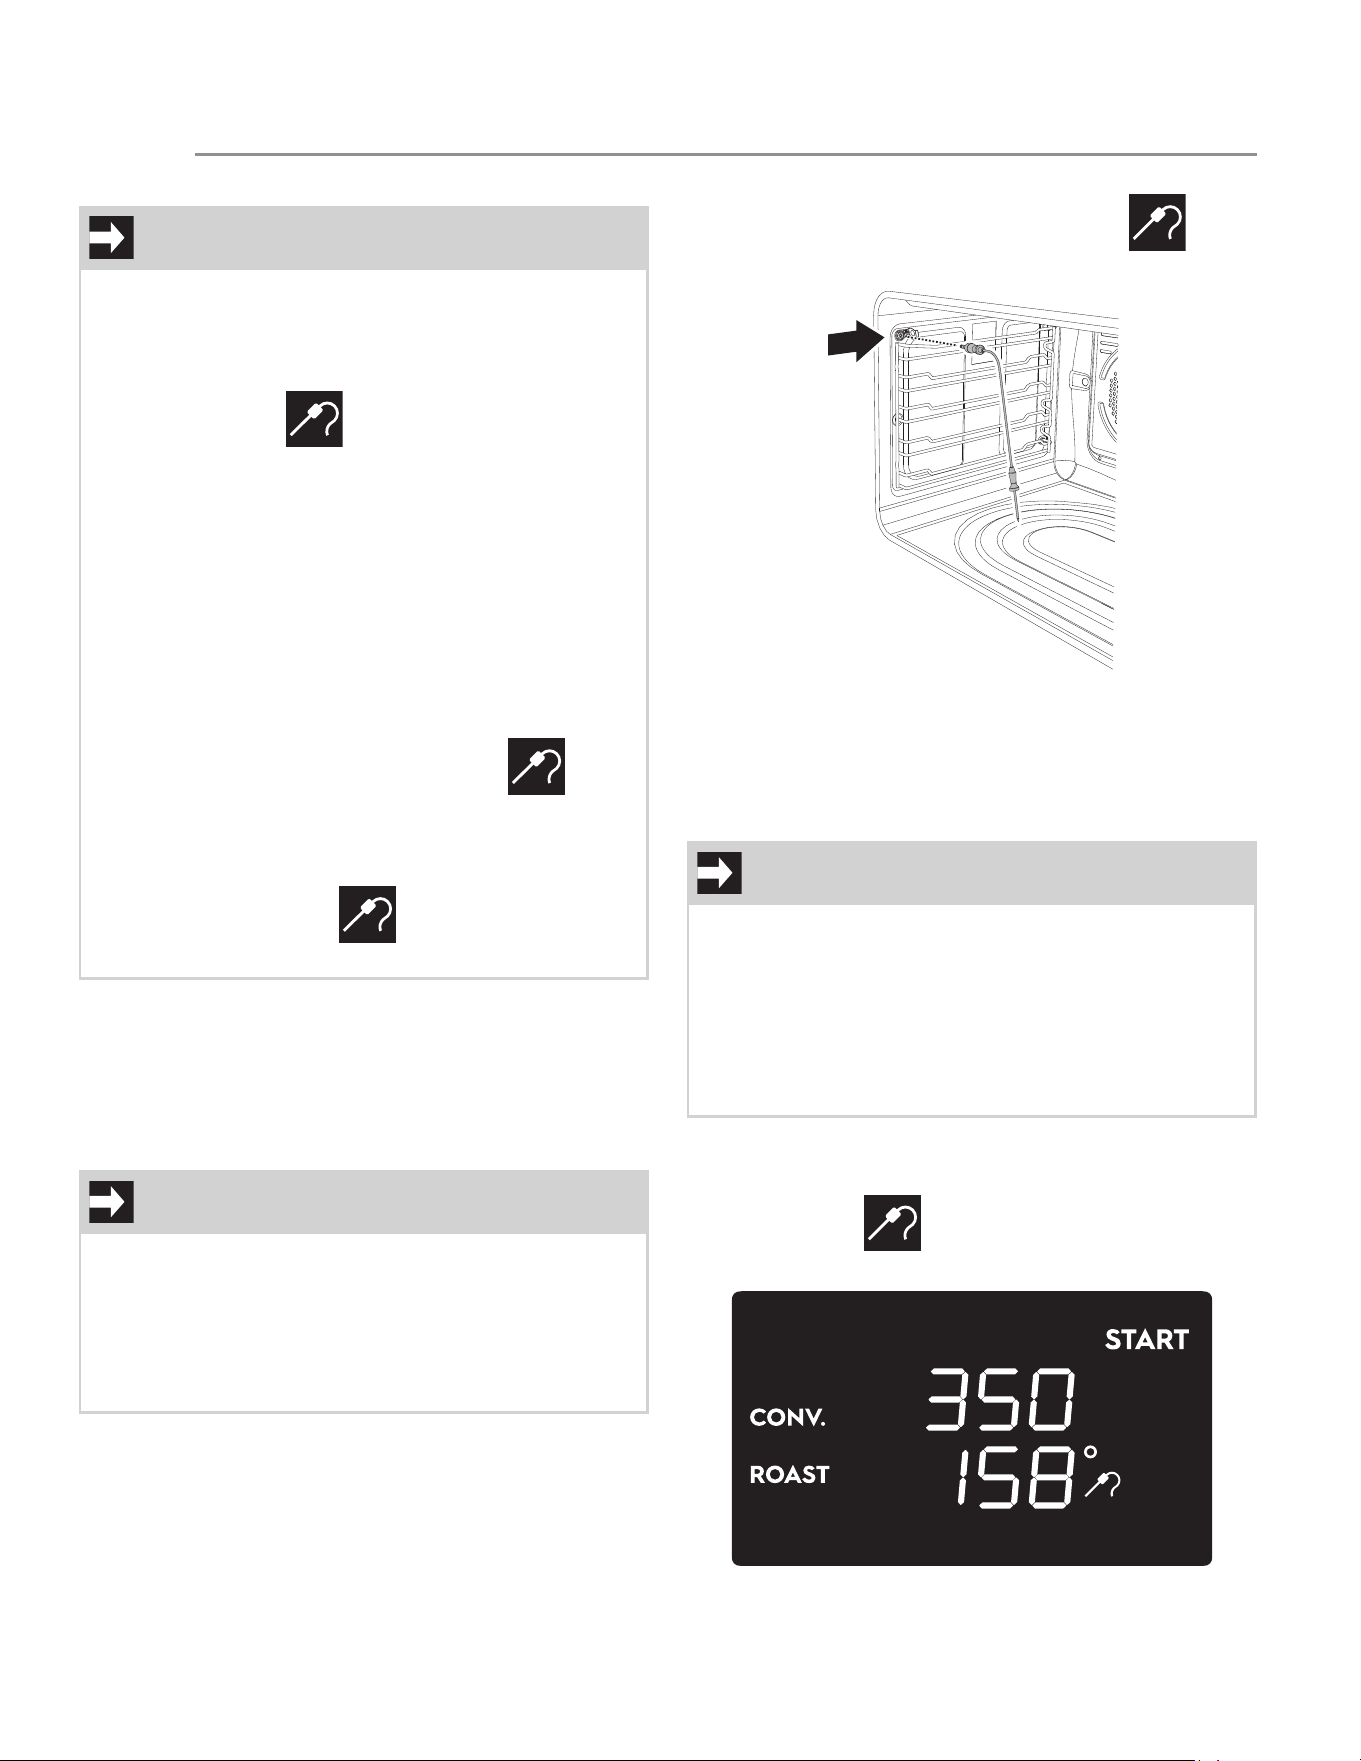
Meat probe cooking
Preliminary operations
1. Open the oven door.
2. Place the food on the rack.
3. Insert the tip of the probe into the food before
placing it in the oven.
4. Insert the plug of the probe into the socket on
the left the side of the oven cavity. The
icon starts flashing.
5. Place the rack with the food to be cooked in the
oven.
6. Close the oven door.
To set a meat probe cooking
1. Press the oven mode knob.
2. Select a function enabled for meat probe
cooking. The icon becomes steady and
the word “START” flashes.
IMPORTANT
• Meat probe cooking is allowed only with Bake,
Convection Bake and Convection Roast func-
tions.
• If you use the meat probe with any other cook-
ing function, the icon starts to flash
(except for the Sabbath function).
• With the meat probe inserted, it is not possible
to set a minute minder timer when setting a
cooking cycle or during a cooking.
• If you insert the meat probe when a timed
Bake, Conv. Bake or Conv. Roast is in progress,
the timer will be canceled and the function con-
tinues using the default temperature or the set
temperature of the meat probe.
• If you insert the meat probe when other timed
cooking functions are in progress, the
icon starts to flash and the cooking process will
go ahead ignoring the meat probe.
• If the meat probe is inserted when the display is
in standby mode, the icon starts to flash,
but it is still possible to set a stand alone timer.
IMPORTANT
• Always insert the probe so that the tip is in the
center of the thickest part of the meat. Do not
allow the probe to touch bone, fat, gristle or
the pan.
• Make sure that the tip of the probe does not
protrude from the food.
IMPORTANT
When setting a meat probe cooking cycle there two
temperature values have to be selected:
• Oven cavity temperature: Min. 170°F (75°C) -
Max. 550 °F (280°C) - Default: 350°F (175°C).
• Meat probe target temperature: Min. 100°F
(38°C) - Max. 200°F (90°C) - Default: 160°F
(70°C).
USING THE OVEN

33
3. Press the oven temp. knob to change the oven
cavity temperature. The display will show the
default cavity temperature at the bottom with
the flashing degree symbol. The word “START”
disappears.
4. Turn the oven temp. knob to change the cavity
temperature.
5. Press the oven temp. knob to confirm the
selection and to allow the probe target
temperature to be changed (shown at the
bottom).
6. Turn the oven temp. knob to change the probe
target temperature.
7. Press the oven temp. knob to confirm the
selection and switch to the probe cooking
settings screen. The word “START” begins to
flash again.
8. Press the oven mode knob to start the Meat
probe cooking process. The word “START”
disappears.
Meat probe cooking in progress
When meat probe cooking is in progress the display
will show the oven cavity temperature at the top, the
meat probe target temperature at the bottom and the
full temperature bar on the right.
1. Press the oven temp. knob to change the oven
cavity and the meat probe target temperature
as was done when setting the cooking cycle.
2. Open the door to pause cooking. Close the
door to resume cooking.
3. Turn the oven mode knob to the left and then
release it to stop the cooking cycle.
End of meat probe cooking
The meat probe cooking will end when the probe
reaches the set target temperature. A buzzer will
sound and the display will show:
Turn and release the oven mode button to stop the
buzzer and the function. The display goes into standby
mode.
USING THE OVEN
34
Oven cooking tips
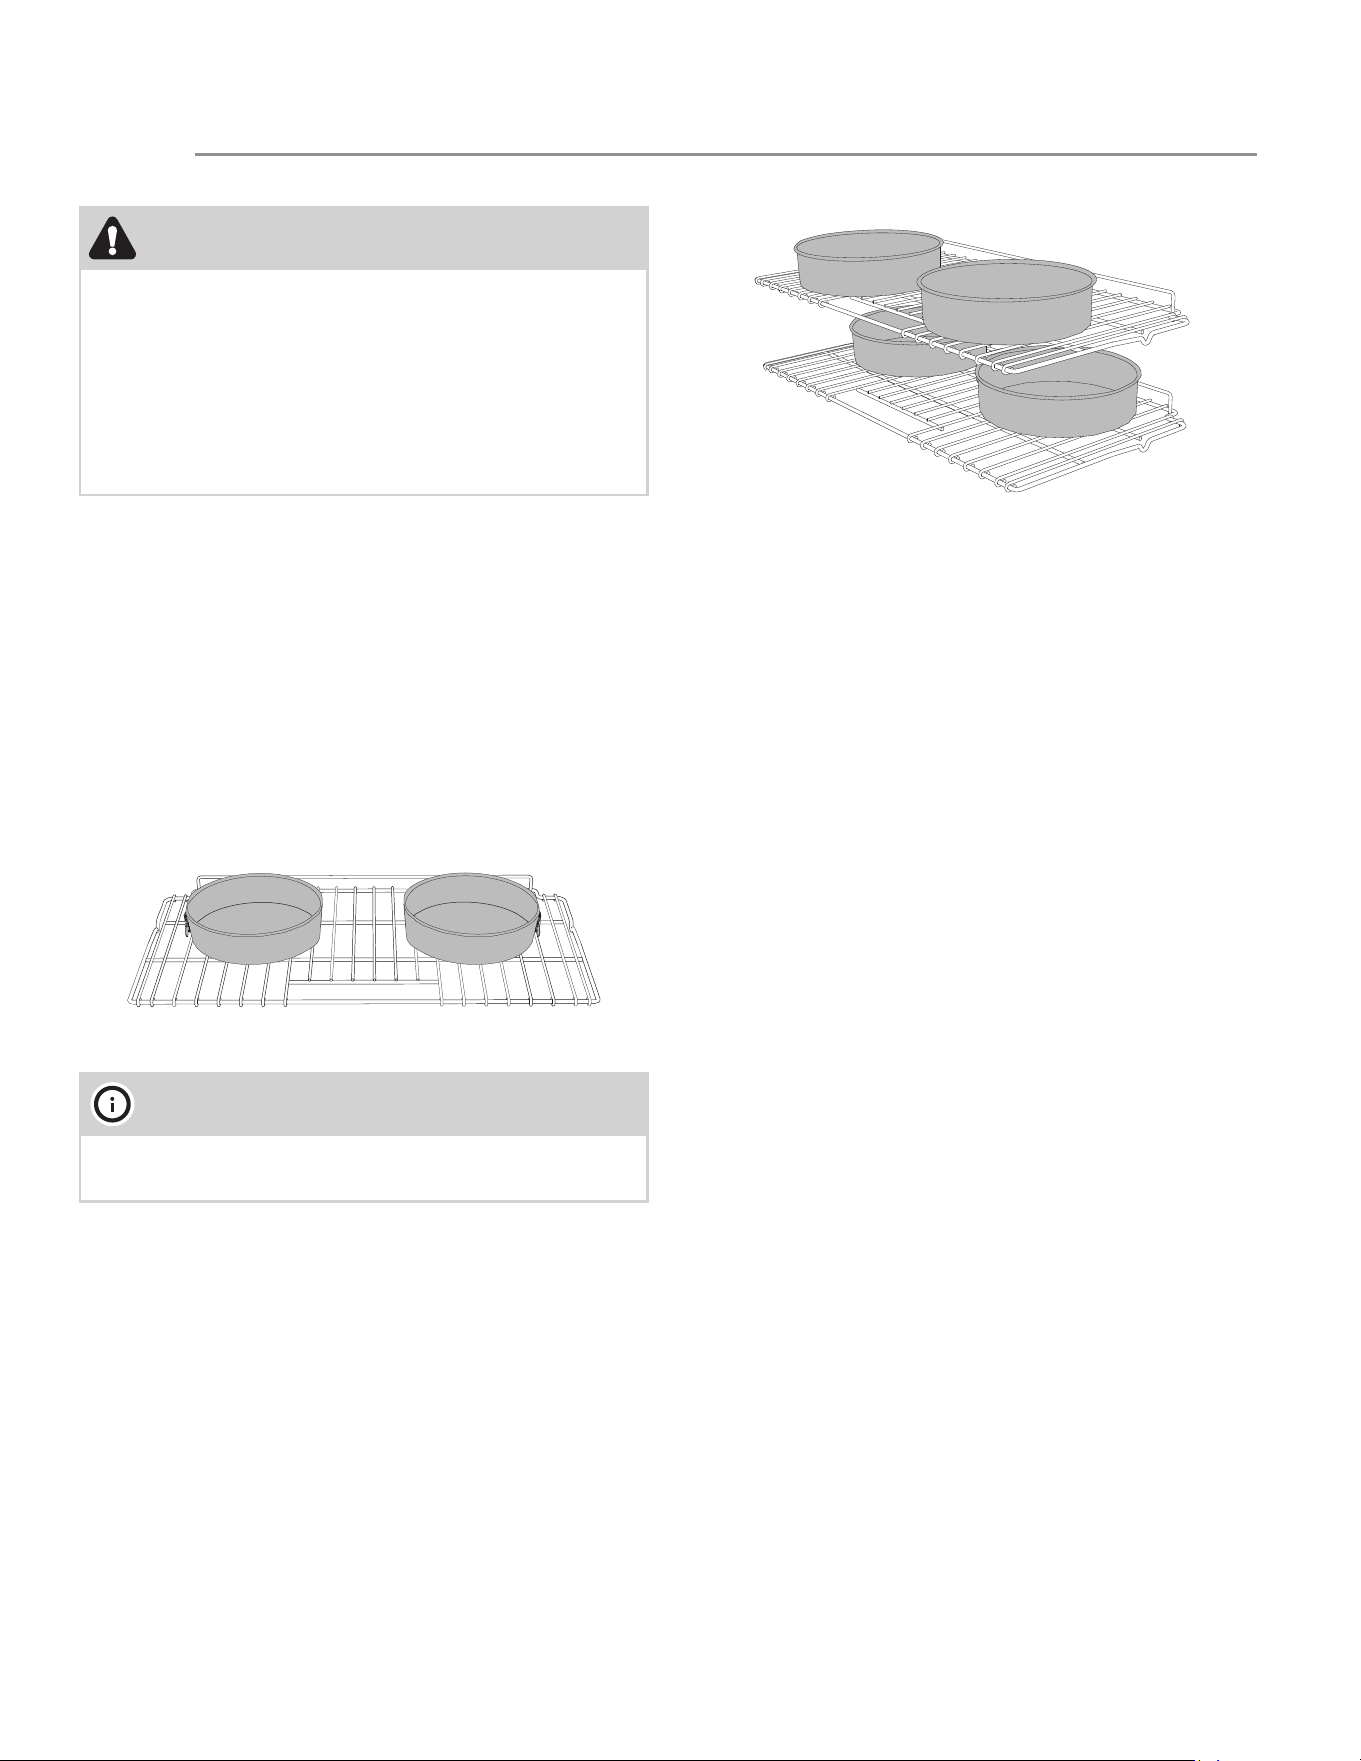
Air circulation in the oven
If using 1 rack, place it in center of oven. If using multi-
ple racks, stagger cookware as shown in the following
figures.
For optimum air circulation and best baking results,
allow at least 2” around the cookware for proper air
circulation and be sure pans and cookware are not
touching each other, the oven door, the sides or the
back of the oven cavity.
The hot air must circulate around the pans and cook-
ware in the oven for even heat to reach around the
food.
Pan position for one rack baking
When baking with two or more racks we recommend
arranging the pans on the upper rack closer to the
door and the pans on the lower rack closer to the fans
(see the figure below).
Make sure that pans don't touch the internal glass
pane of the door or the back wall of the oven.
Pan position for four rack baking
Bake function tips
• Use the bake function to cook most food items
that require normal cooking temperatures.
• As much as possible, use only one rack on posi-
tion 2 or 3 and center the pans. If using two
racks, place them in positions 1 and 4.
• Dark or dull pans absorb more heat than shiny
bakeware resulting in dark or overbrowning of
foods. It may be necessary to reduce the oven
temperature or cook time to prevent overbrown-
ing of some foods. Dark pans are recommended
for pies. Shiny pans are recommended for cakes,
cookies and muffins.
• Fully preheat the oven before baking items like
cookies, cakes, biscuits and breads.
• Do not open oven door often. Opening the door
will reduce the temperature in the oven and may
increase the cook time.
Convection Bake function tips
• The Convection Bake function is optimized for
multiple rack cooking.
• When baking cookies and biscuits on multiple
racks, use positions 1 and 4. When baking cakes
on multiple racks, use positions 1 and 3.
• Cookies and biscuits should be baked on pans
with no sides or very low side to allow heated air
to circulate around the food.
• Food baked on pans with a dark finish will cook
faster.
• When placing multiple food items in the oven,
allow at least 2” of space between them for
proper air circulation.
• Use tested recipes with times adjusted for Con-
vection Baking when using this mode. Check
food at the minimum cooking time.
WARNING
FOOD POISONING HAZARD. Do not let food sit for
more than one hour before or after cooking. Doing
so can result in food poisoning or sickness. Foods
that can easily spoil such as milk, eggs, fish, meat or
poultry, should be chilled in the refrigerator first. Even
when chilled, they should not stand in the oven for
more than 1 hour before cooking begins and should
be removed promptly once cooking has ended.
NOTE
Always use caution when removing food from the
oven.
USING THE OVEN
35
Broil function tips
• Use the Broil function to cook meats that require
direct exposure to radiant heat for optimum
browning results.
• Always allow the oven to preheat before placing
the food in it.
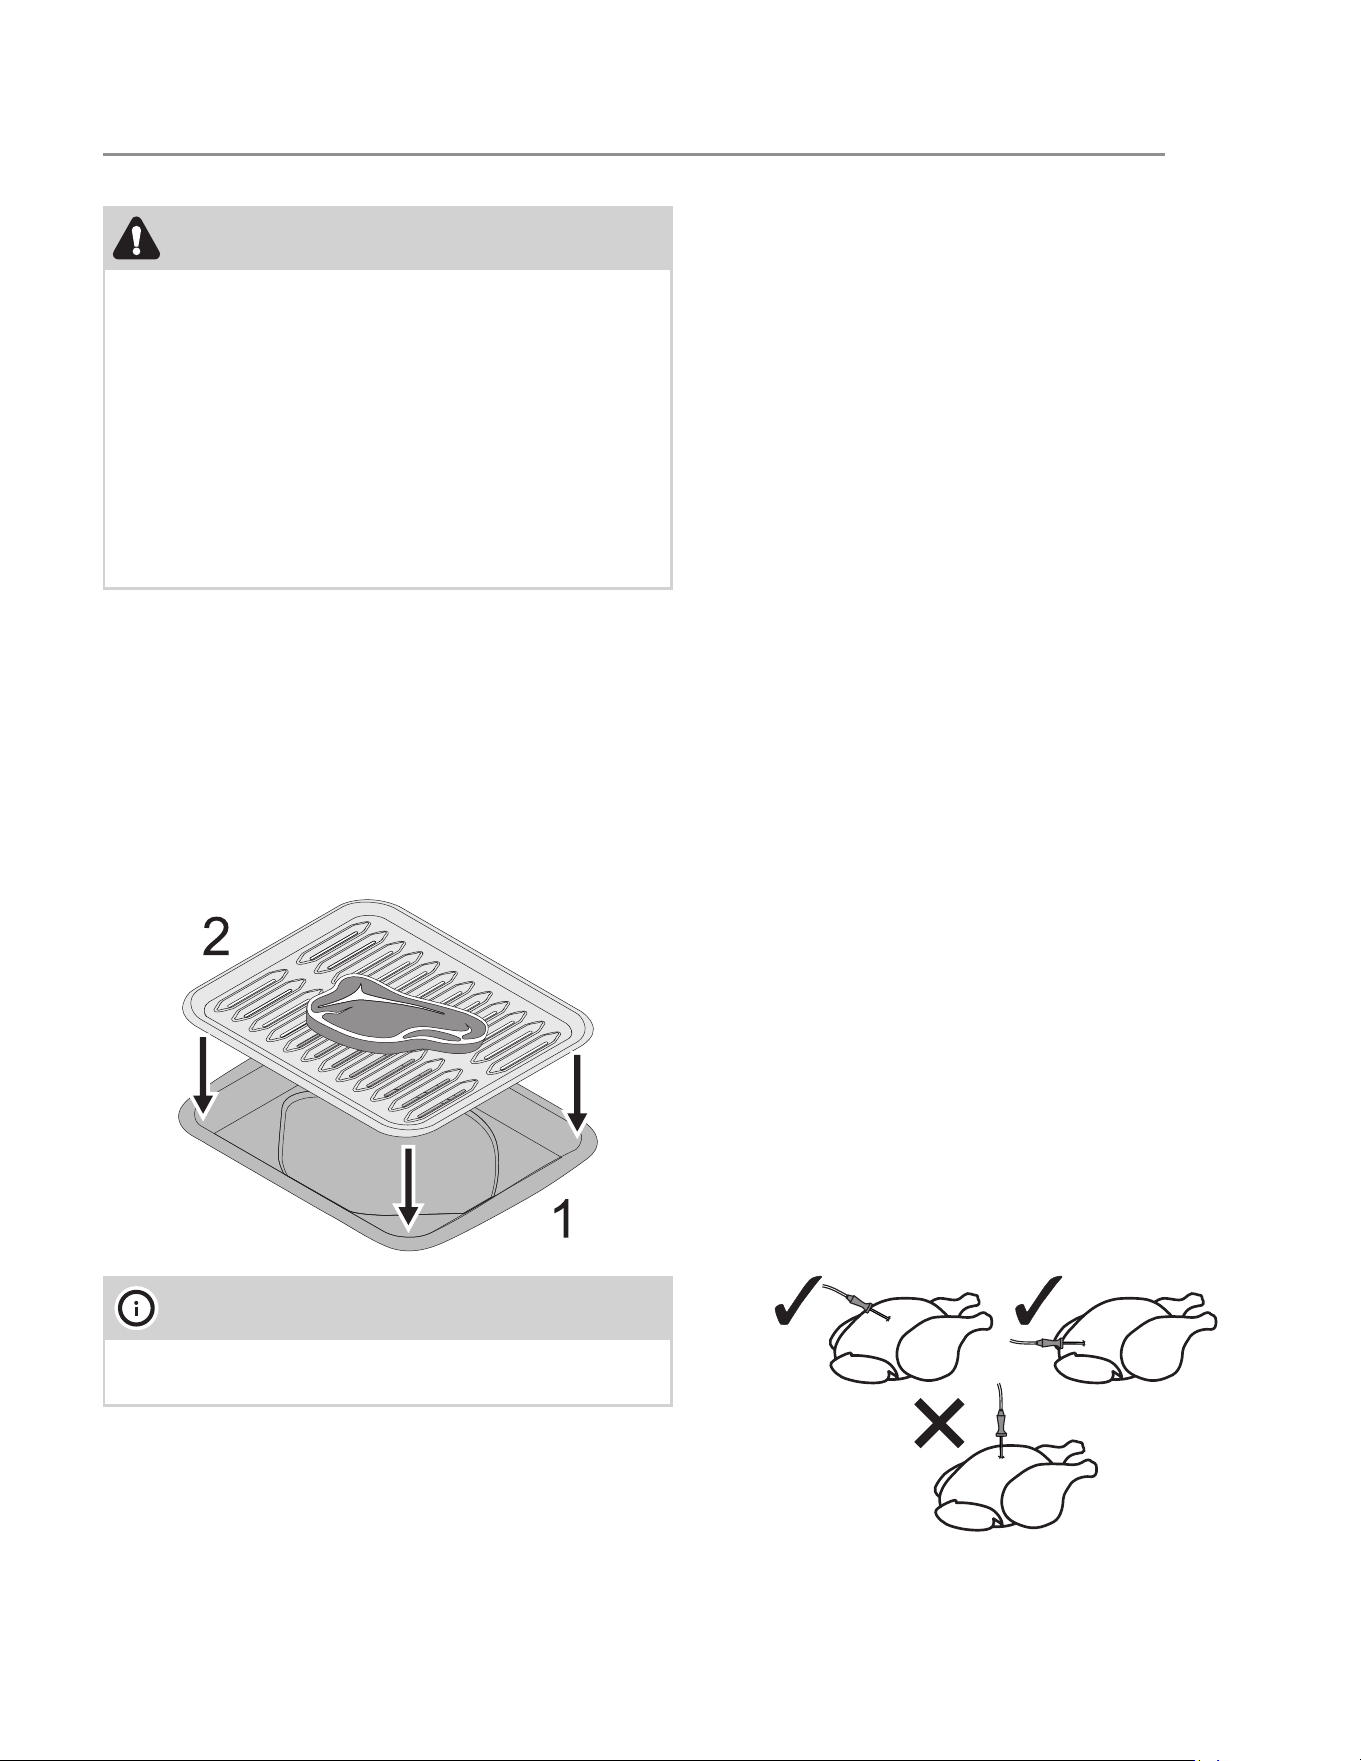
• For proper broiling, use the broiler pan (1) and its
insert (2) to place the meat on as shown in the
figure below. The broiler pan insert contains slots
that allow grease from the meat to drain into the
broil pan.
• Broiling is direct heat cooking and will produce
some smoke. If the smoke is excessive please
refer to the “Oven problems” table.
• Broil one side until the food is browned; turn and
cook the second side. Season and serve.
• Always pull the rack out to the “stop” position
before turning or removing food (see “Regular
rack”).
Convection Roast function tips
• Convection roast combines a cook cycle with the
convection fan and heating element to rapidly
roast meats and poultry. Heated air circulates
around the meat from all sides, sealing in juices
and flavors. Meats cooked with this function are
crispy brown on the outside while staying moist
on the inside. In addition, there is no need to
reduce the oven temperature when using con-
vection roast.
• The Convection Roast function is optimized for
multiple oven rack cooking.
• Place an oven rack in position 2 (next up from
bottom).
• Please refer to the “Convection Roast function
cooking table” for temperature and time instruc-
tions when cooking with this function.
• Do not cover foods when dry roasting - this will
prevent the meat from browning properly.
Meat probe cooking tips
• For some foods, especially poultry and roasts,
testing the internal temperature is the most effec-
tive way of insuring that your food has been
properly cooked.
• For bone-in ham or lamb, insert the probe into
the center of the lowest large muscle or joint. For
dishes such as meat loaf or casseroles, insert the
probe into the center of the food. When cooking
fish, insert the probe just above the gill.
• For whole poultry or turkey, insert the probe into
the thickest part of the inner thigh, below the leg.
• In general, place the temperature probe trans-
versely in the thickest part of the food and for
least 3/4 of its length.
WARNING
• Should an oven fire occur, close the oven door.
If the fire continues, throw baking soda on the
fire or use a fire extinguisher. Do not put water
or flour on the fire. Flour may be explosive and
water can cause a grease fire to spread and
cause personal injury.
• Use potholders or oven mitts when working
with a hot oven.
• Consuming raw or undercooked meats, poultry,
seafood or shellfish may increase your risk of
food borne illness.
NOTE
The broiler pan and the insert are not included with
the appliance.
USING THE OVEN
36
• For very thick pieces of meat, take care to insert
the entire length of the probe to ensure correct
temperature detection.
User settings menu
The user settings menu allows you to set the following
parameters (displayed in this order):
1. Child lock mode:
The child lock mode allows you to lock the oven con-
trols to prevent the appliance being activated uninten-
tionally.
2. Demo mode:
This mode deactivates all the heating elements of the
appliance, keeping the controls active. It is designed
to simulate the operation of the appliance and is
intended for exhibitors.
3. Temperature units:
This feature allows you to set the unit of measurement
of temperature, degrees Celsius (°C) or degrees Fahr-
enheit (°F).
4. Time format:
This feature gives you the option to display the time in
12h format with AM/PM indication or 24h format.
Child lock mode
After accessing the settings menu, the oven display will
show:
By turning the temperature knob to right the screen will
show
Press the knob to activate the child lock mode. The
display will return to the standby screen.
To deactivate the child lock mode, turn the tempera-
ture knob to the right. The display will show
and the icon starts to flash. Now press the tem-
perature knob for a few seconds to deactivate the
child lock mode. The display will return to the standby
screen.
IMPORTANT
• To access the settings menu, you must first
have to turn on the oven light and then press
and hold the oven temperature knob for a few
seconds.
• To exit from the settings menu, press and hold
the temperature knob until the display goes
into standby mode.
IMPORTANT
This setting will only lock the oven knobs.
NOTE
When the child lock mode is active, the icon
appears on the right side of the display.
USING THE OVEN
37
Demo mode
After accessing the settings menu, keep pressing the
temperature knob until the display shows:
By turning the temperature knob to right the screen will
show:
Now keep pressing the temperature knob to exit from
the settings menu.
The demo mode is now active and the range will oper-
ate normally with the difference that “5d” will always
be displayed and no heat will be produced.
To deactivate the demo mode you have to disconnect
and re-connect the appliance to the power supply
and access the settings menu, disabling the parameter
described above.
Temperature units
After accessing the settings menu keep pressing the
temperature knob until the display shows
Turning the temperature knob to right causes the dis-
play to switch between °C and °F.
Press the knob to confirm the selection and exit from
the user menu if you wish to do so.
Time format
After accessing the settings menu keep pressing the
temperature knob until the display shows
By turning the temperature knob to the right, the dis-
play switches between the 12h (with the AM/PM indi-
cation) and the 24h time format.
Press the knob to confirm the selection and to exit
from the settings menu.
IMPORTANT
This mode can be activated and deactivated only
for the first 5 minutes after the power to the appli-
ance has been turned on.
USING THE OVEN
38
Oven cooking tables
Bake function cooking table
Food Rack
position
Recommended pan
Cookies 2
Shiny pan with no sides/ very low sides placed on the rack
Biscuits 3
Shiny pan with no sides/ very low sides placed on the rack
Convection Bake function cooking table
Food Rack
position
Recommended pan
Cookies 1 - 4
Shiny pan with no sides/ very low sides placed on the rack
Biscuits 1 - 4
Shiny pan with no sides/ very low sides placed on the rack
White cake 1 - 3 8 inch diameter
Broil function cooking table
Food Rack position Oven T° Cooking time 1st
side (min)
Cooking time
2nd side (min)
Doneness
Steak
4 550°F - 280°C 6 6 Med-Rare
5 550°F - 280°C 6 4 Rare
Chicken Breast-
bone in
4 450°F - 230°C 20 20 Well Done
Chicken Breast
boneless
3 450°F - 230°C 30 10 Well Done
Fish Steak 4 500°F - 260°C 6 - Well Done
Shrimp 3 550°F - 280°C 5 - Well Done
Hamburger
5 550°F - 280°C 6 4 Med-Rare
5 550°F - 280°C 8 5 Well Done
USING THE OVEN
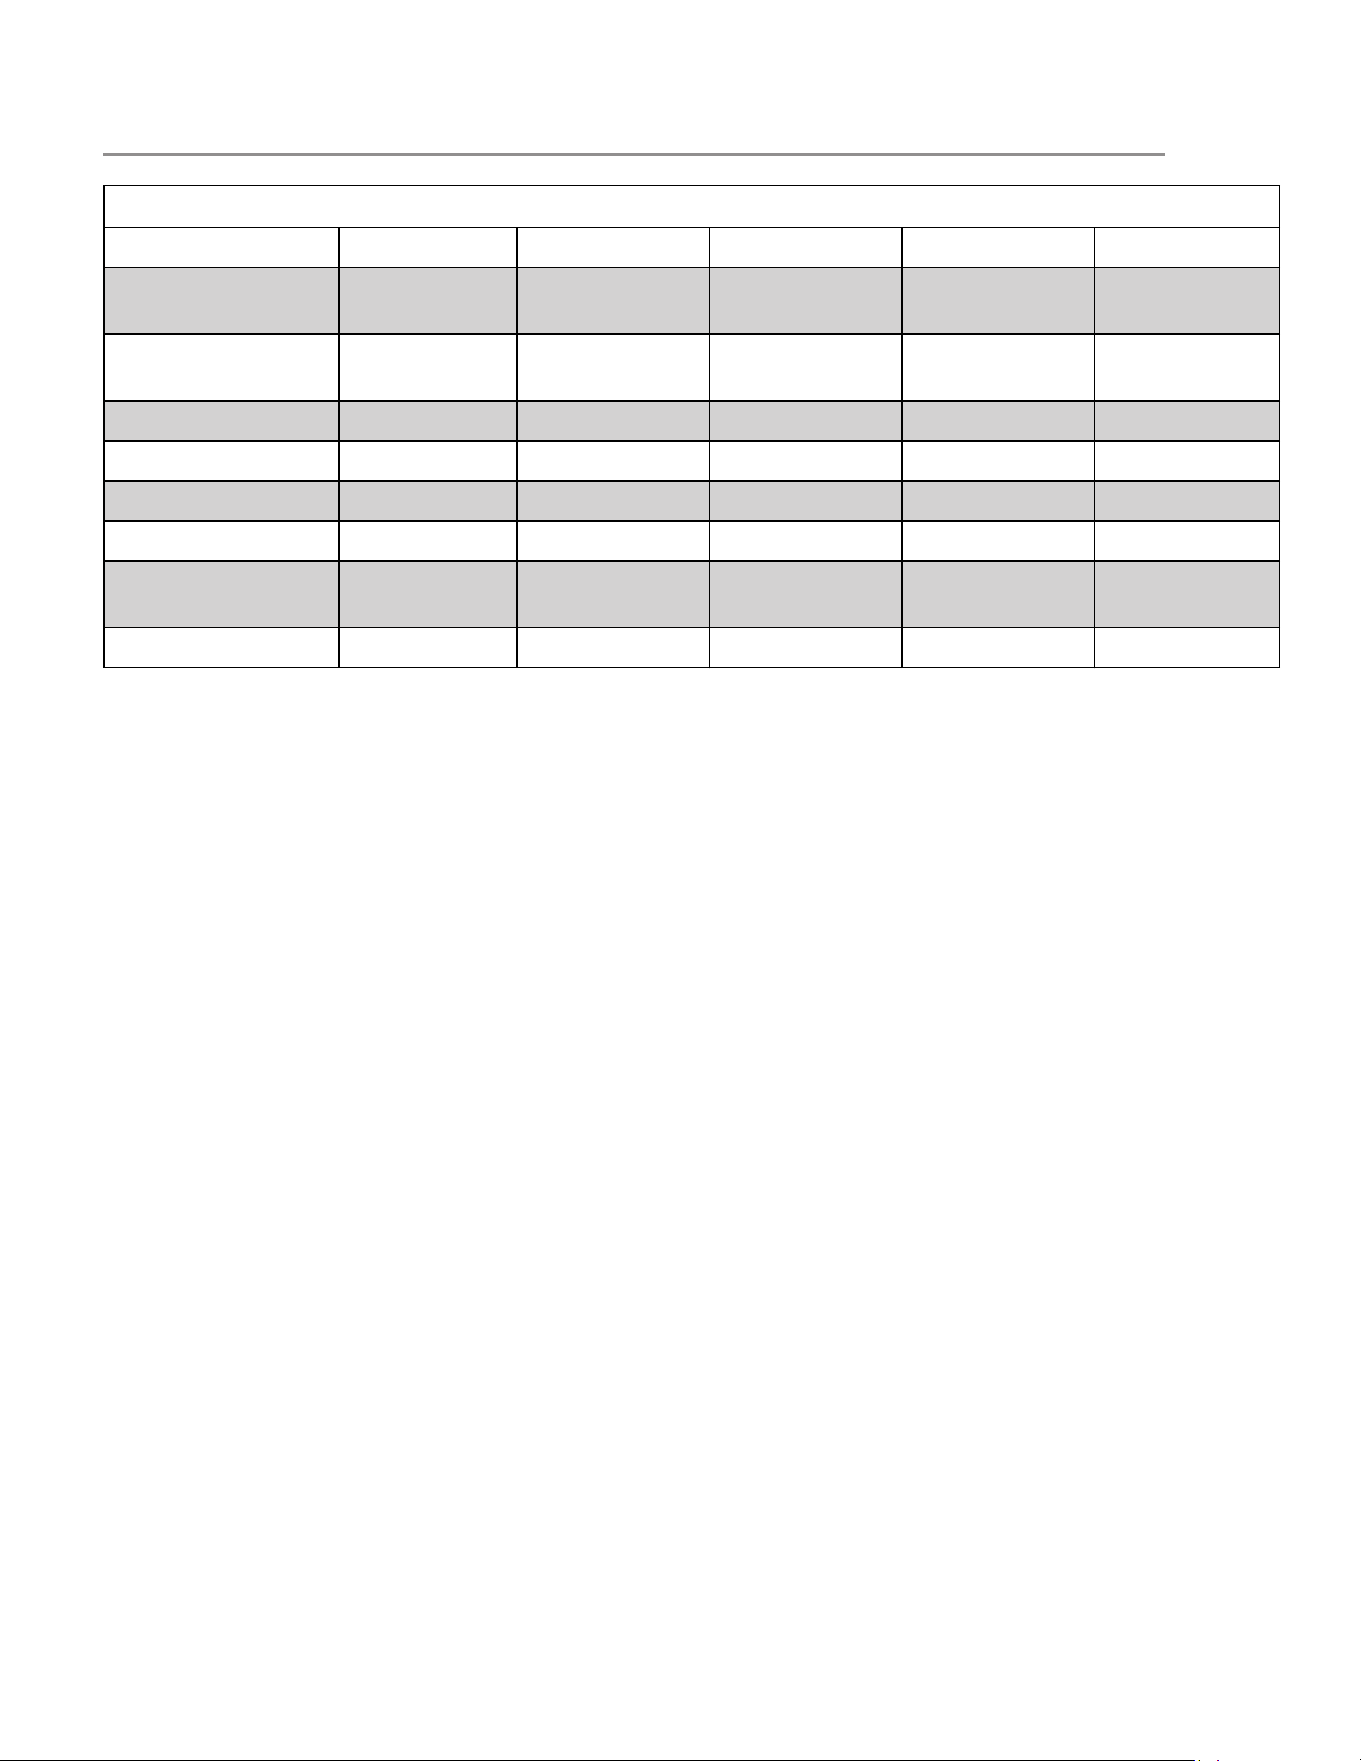
39
* In Convection Roast it is recommended to use the meat probe to reach the desired cooking level. Otherwise,
refer to the Time/lb column.
** For lower meat weight it is suggested to decrease the Probe T° setting by 5°F. The cooking duration will
decrease accordingly.
Convection Roast function cooking table
Meat type Weight (lb) Oven T° Probe T° Time/lb (min/lb) Rack position
Standing Rib Roast
(med-rare)
5 - 7 350°F - 175°C 145°F - 60°C 15 2
Standing Rib Roast
(well done)
5 - 7 350°F - 175°C 170°F - 75°C 24 2
Whole Ham, bone-in 10 - 15 325°F - 160°C - 24 2
Whole Turkey 10 - 15 325°F - 160°C - 12 2
Whole Turkey 15 - 20 325°F - 160°C - 10 2
Whole Chicken 4 - 6 375°F - 190°C 180°F - 80°C 19 2
Pork Shoulder/Butt
Roast
10 - 15 325°F - 160°C 180°F - 80°C 25 2
Pork Loin 4 - 6 350°F - 175°C 165°F - 70°C 25 2
USING THE OVEN
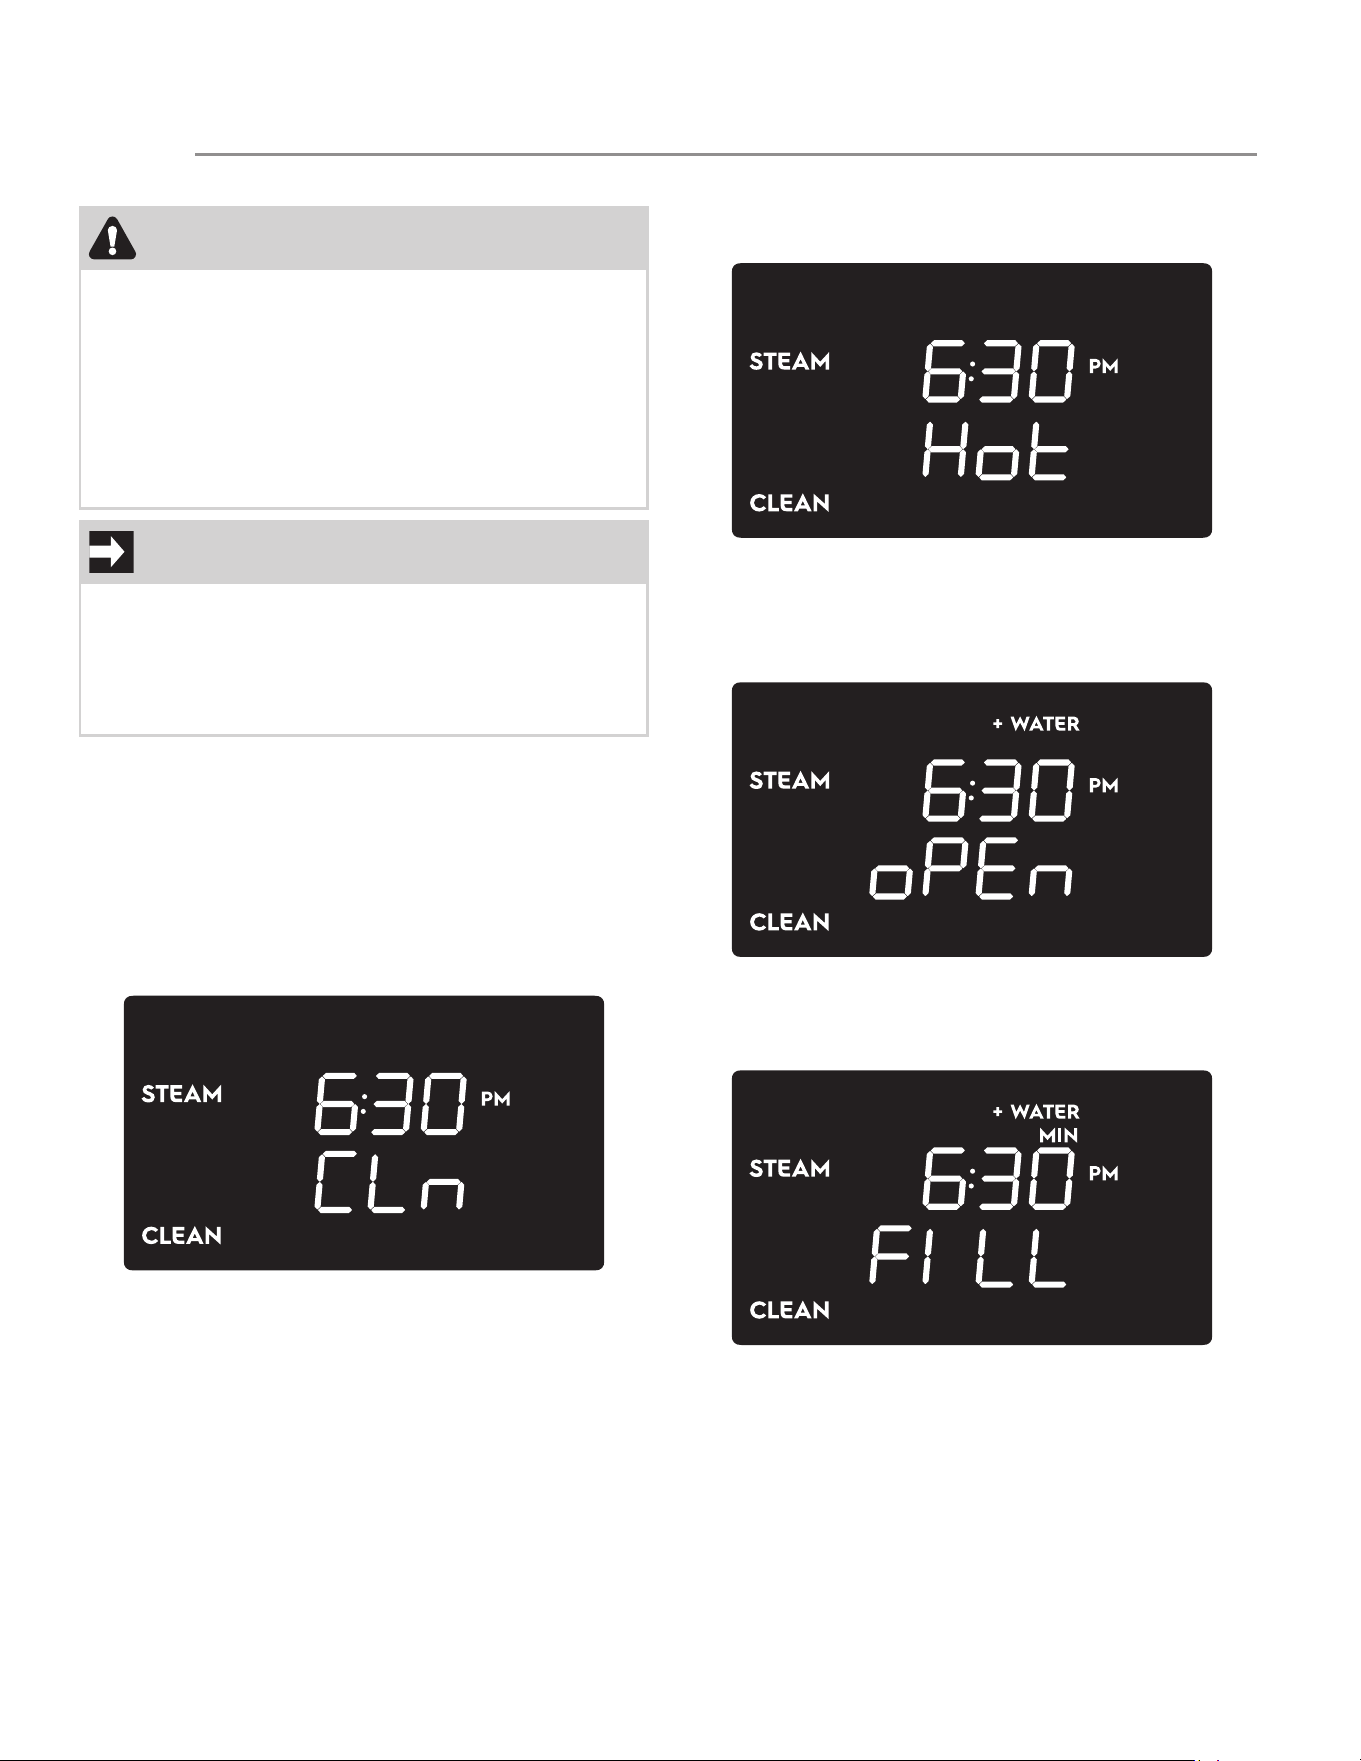
40
Steam clean function
Before setting and starting the Steam cleaning cycle,
completely remove all accessories from inside the
oven.
To set the Steam Clean function (display in standby
mode):
1. Press the oven mode knob.
2. Turn the oven mode knob until the Steam clean
screen appears on the display:
3. A delayed start can be set for this function by
pressing the oven temp. knob until “DELAY”
appears and then follow the instruction
described in the “Delayed cooking” chapter.
4. Press the oven mode knob.
• If the inside temperature is above 167°F (75°C)
the display shows:
In this case the function cannot be started. Wait until
the oven has cooled down.
• If the inside temperature is below 167°F (75°C)
the display shows the following screen:
5. Open the oven door. The word “FILL” appears
on the display to indicate that is possible to
pour water into the oven cavity.
6. Pour approximately 13.5 fl. oz. (400 cc - 1.7 cup)
of water onto the bottom of the oven. Make
CAUTION
• Remove any food residues or large spills from
previous cooking operations from the inside of
the oven.
• Only carry out this cleaning cycle when the
oven is cold.
• In order to prevent burnings caused by hot
steam it is strongly recommended to not open
the door during the steam clean function.
IMPORTANT
• The temperature and the duration of this func-
tion are fixed and cannot be changed.
• The steam cleaning cycle lasts for 1 hour and
can only be started when the inside tempera-
ture is below 167°F (75°C).
CARE AND CLEANING
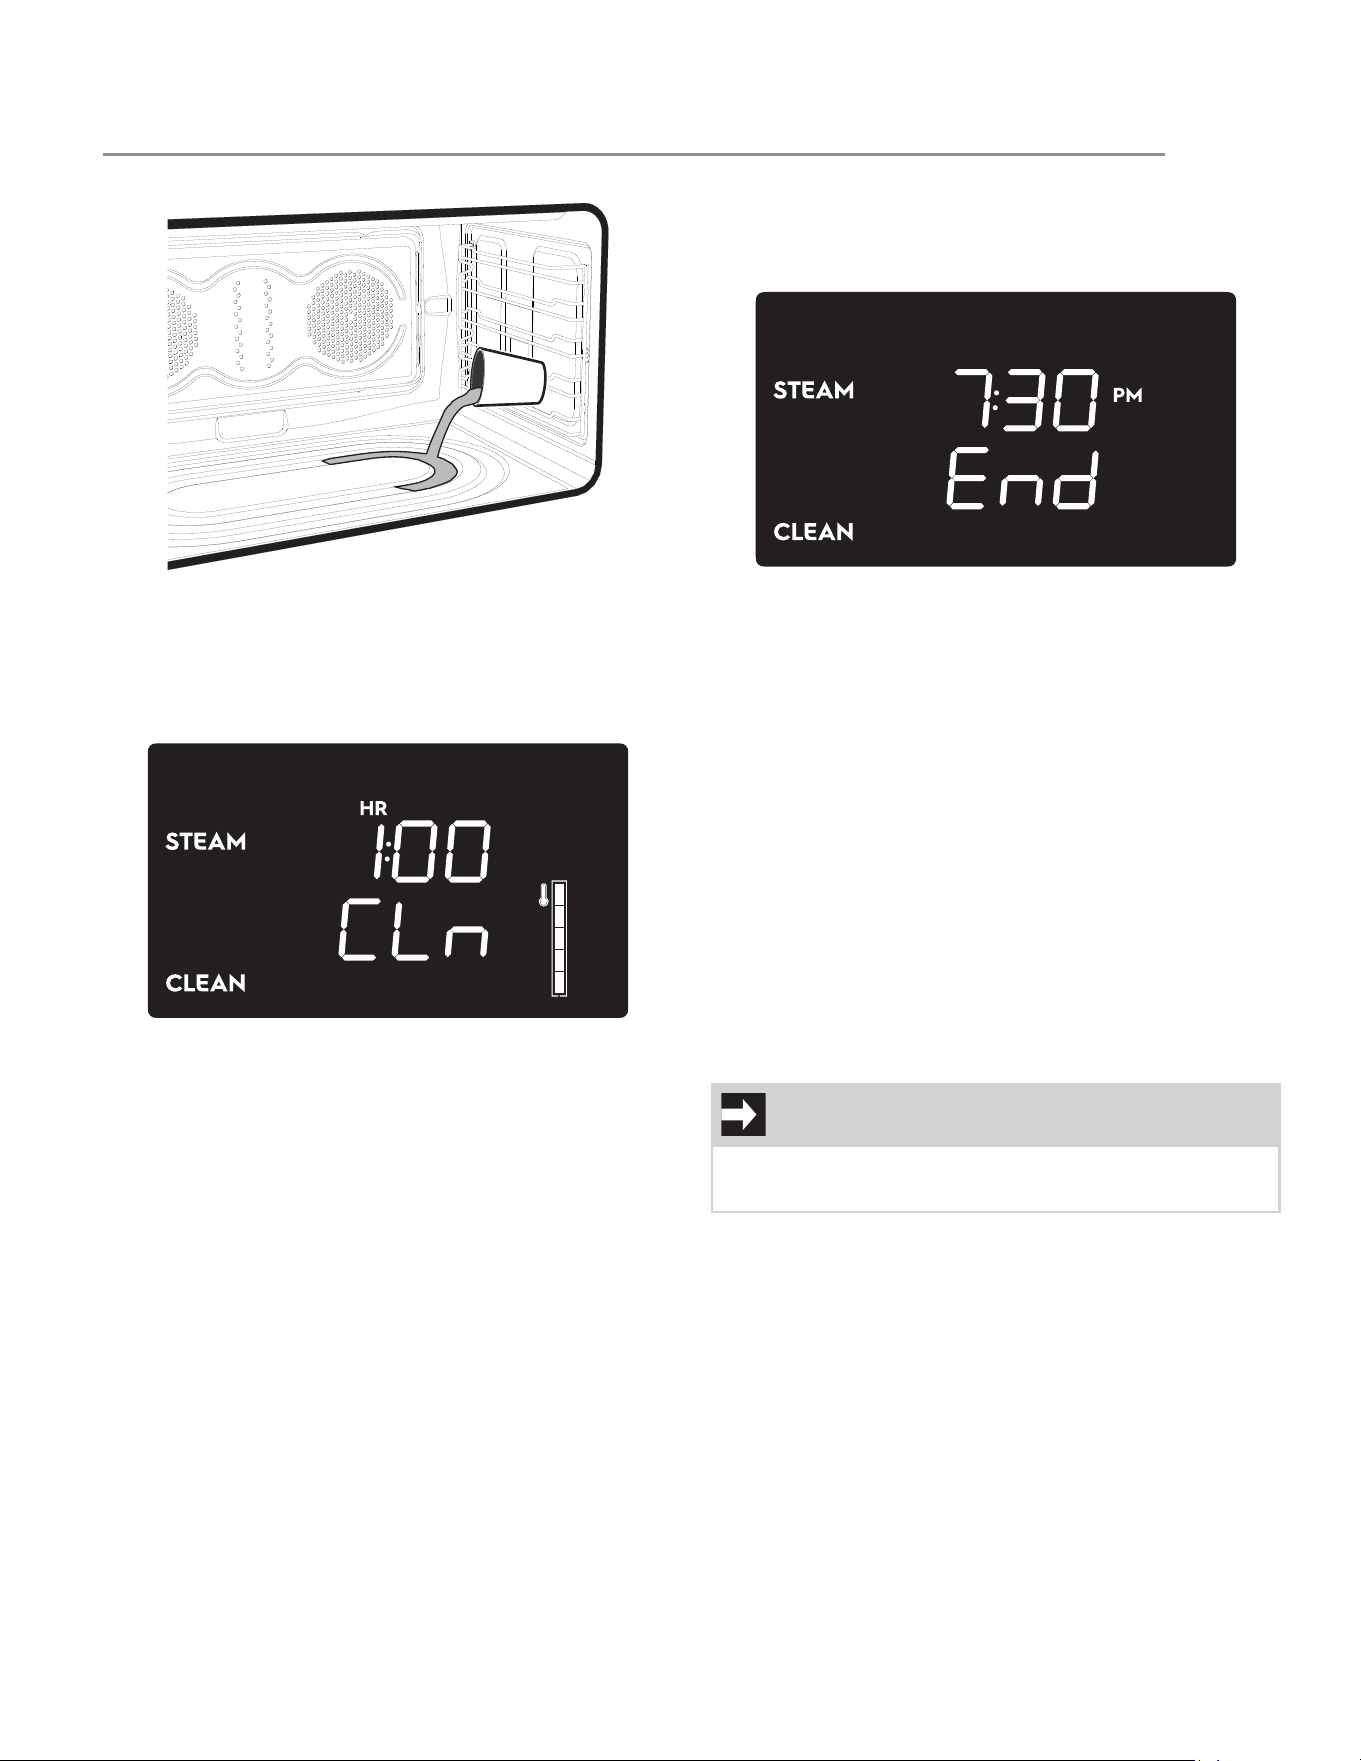
41
sure it does not overflow out of the cavity.
7. Close the oven door. The display now shows
only the current time and the flashing word
“START”.
8. Press the oven mode knob to start the Steam
Clean function.
End of Steam clean function
At the end of the cleaning cycle, a buzzer sounds and
“END” will appear on the display together with the cur-
rent time.
1. Turn and release the oven mode knob to the left
to stop the buzzer, the display switches to the
stand-by screen.
2. Open the door about 2” (5 cm) to let out most of
the hot steam. Be very careful to keep distance
while the hot steam comes out.
3. Open the door completely and wipe away the
less stubborn dirt with a microfiber cloth. Use an
anti-scratch sponge with brass filaments on
tougher encrustations. In case of grease
residues, use specific oven cleaning products.
4. Remove all the water left inside the oven nd dry
carefully.
For improved hygiene and to avoid food being
affected by any unpleasant smells, we recommend
that the oven is dried using the Convection Bake func-
tion at 320°F (160 °C) for approximately 10 minutes.
IMPORTANT
• We recommend wearing rubber gloves for
these operations.
CARE AND CLEANING

42
Surface type Cleaning recommendations
Aluminum & chrome surfaces
(rear backguard and handle
tips)
Use hot, soapy water and a cloth. Dry with a clean cloth.
Plastic & Zamak alloy (control
knobs)
For general cleaning, use hot soapy water and a cloth. For more difficult to
remove soil and built-up grease, apply a liquid detergent directly onto the
soil. Leave for 30 to 60 minutes. Rinse with a damp cloth and dry. Do not use
abrasive cleaners on any of these materials; they can scratch. To remove the
control knobs, turn them to the OFF position; grasp firmly and pull straight off
the shaft. To replace knobs after cleaning, line up the flat sides of both the
knob and the shaft; then push the knob into place.
Stainless steel (all external trim
pieces and control panel)
Clean stainless with warm soapy water using a clean sponge or cloth. Rinse
with clean water and dry with a soft clean cloth. Do not use harsh cleaners.
Only use kitchen cleaners that are especially made for cleaning Stainless
Steel. Always be sure to rinse the cleaners from the surface as bluish stains
may occur during heating that cannot be removed.
Porcelain enamel (oven cavity
inside walls)
Gentle scouring with a soapy scouring pad will remove most spots. Rinse with
a 1:1 solution of clear water and ammonia. If necessary, cover difficult spots
with an ammonia-soaked paper towel for 30 to 40 minutes. Rinse with clean
water and a damp cloth; then scrub with a soap-filled scouring pad. Rinse
and wipe dry with a clean cloth. Remove all cleaners as the porcelain may
become damaged when heated. Do not use spray oven cleaners on the
cooktop.
Glass (door glasses and
display glass)
Use soap & water to thoroughly clean the top, sides and front of the oven
door. Rinse well. You may use a glass cleaner on the outside glass of the
oven door. Do not immerse the door in water. Do not spray or allow water or
the glass cleaner to enter the door vents. Do not use oven cleaners, cleaning
powders or any harsh abrasive cleaning materials on the outside of the oven
door.
Ceramic glass (induction
cooktop surface)
See “Cleaning recommendations for the ceramic glass surface” for a detailed
description.
Oven racks & shelves Oven racks must be removed. Clean using a mild, abrasive cleaner following
the manufacturer’s instructions. Rinse with clean water and dry.
CARE AND CLEANING
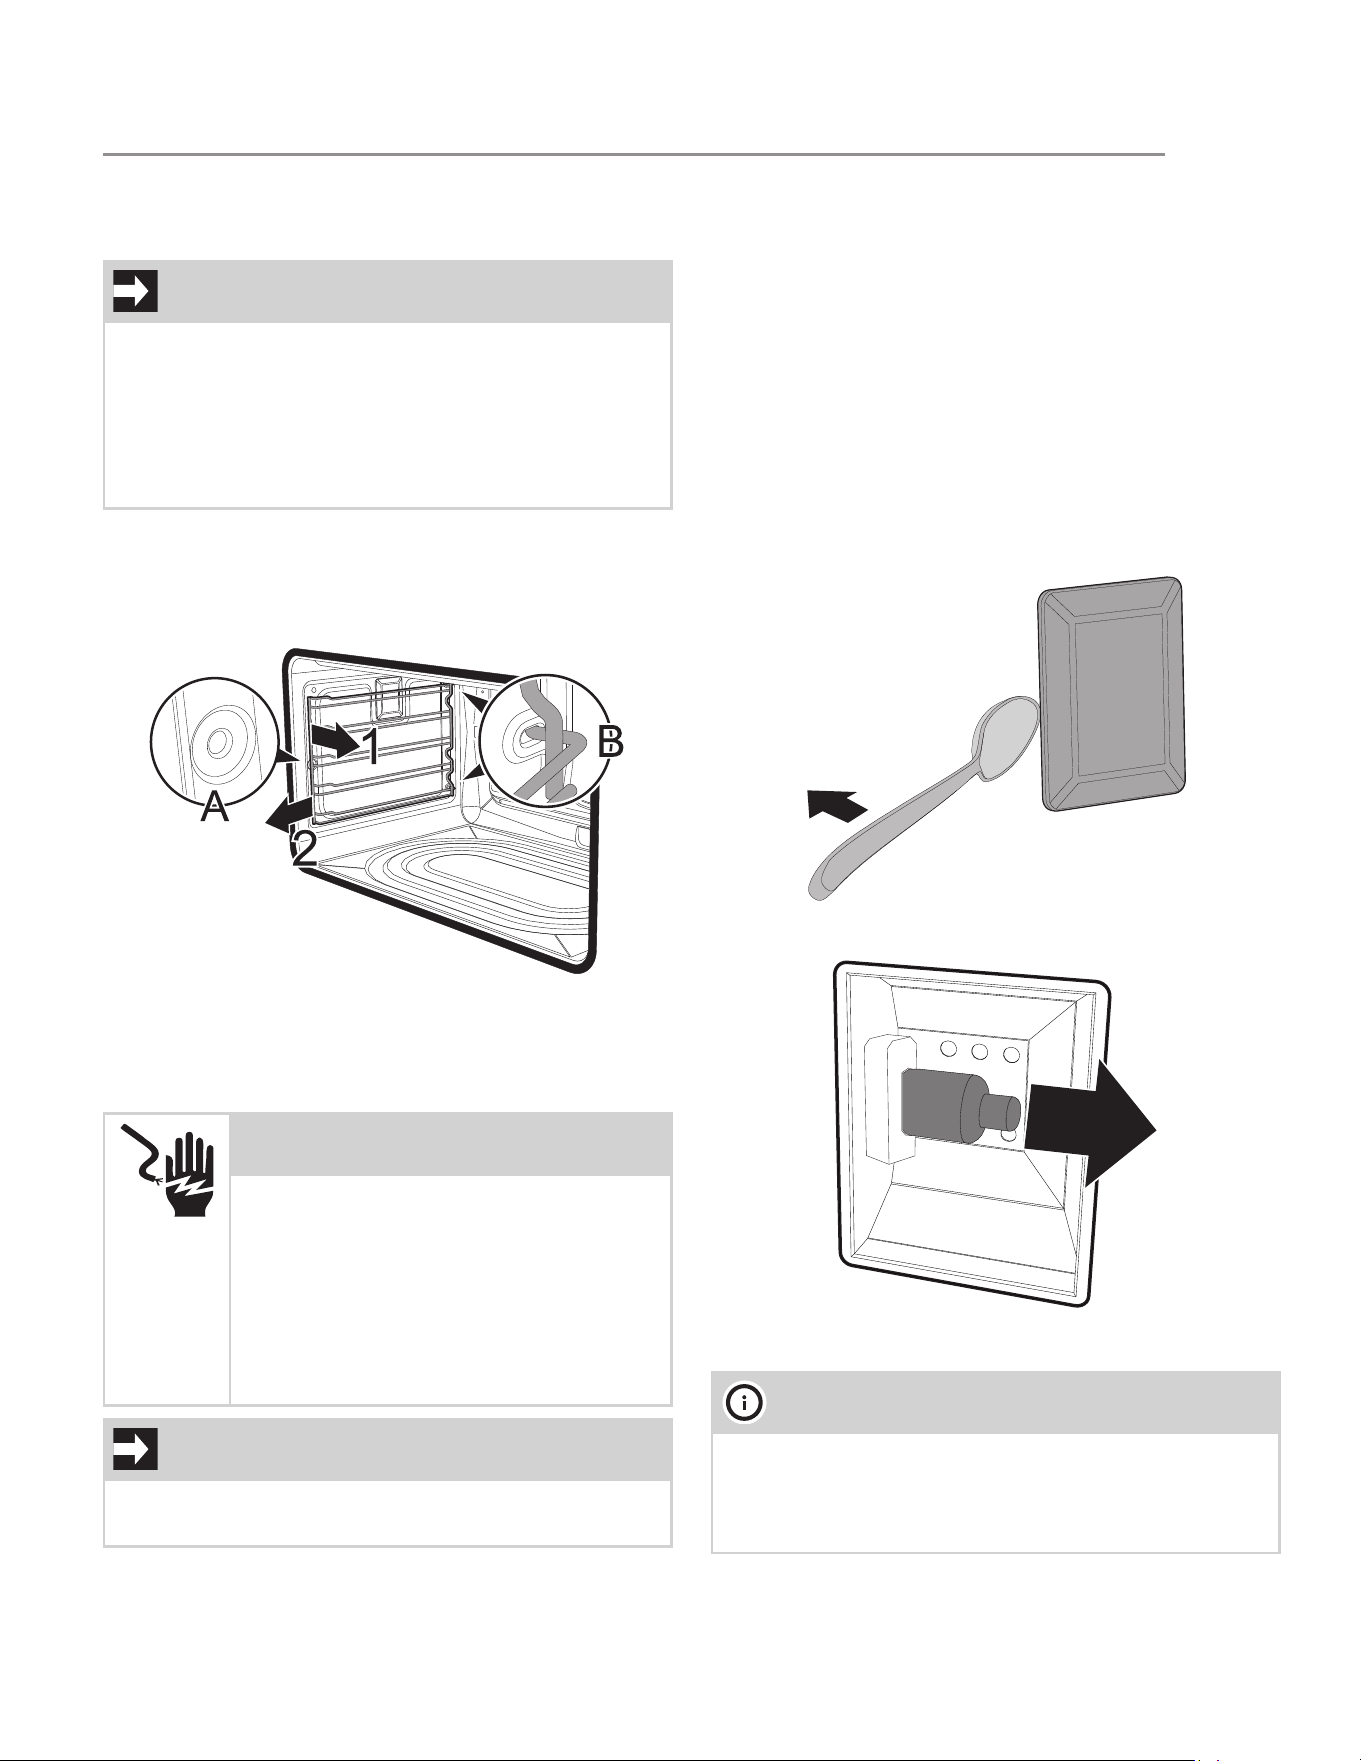
43
Oven maintenance
Removing the shelf supports
To remove the shelf supports:
1. Pull the frame towards the inside of the oven to
unhook it from its groove A, then slide it out of
the seats B at the back.
1. When cleaning is complete, repeat the above
procedures to put the self supports back in.
Replacing the oven light
The oven lights will automatically turn ON when the
oven door is opened. The oven lights may also be
manually operated by turning the oven temperature
knob to the bulb icon (see “Inside lights”).
The oven light bulb is covered by a glass shield. The
glass shield can be removed to be cleaned manually
or for replacing the oven light bulb. THIS GLASS
SHIELD MUST BE IN PLACE WHENEVER THE OVEN IS
IN USE.
To replace the oven lights:
1. Turn the power off at the main source or unplug
the appliance.
2. Remove the bulb cover using a tool that cannot
scratch the enamel surfaces (e.g. a spoon).
1. Slide out the light bulb and remove it.
2. Install the new light bulb.
3. Close the cover. Ensure that the molded part of
IMPORTANT
This has to be done in order to replace the oven
lights and enables you to clean the oven side walls.
• Grasp the shelf supports firmly by both ends to
prevent scratching the enamel of the oven cav-
ity when removing them.
• Wear protective gloves.
WARNING
ELECTRIC SHOCK HAZARD -
Make sure the range is unplugged
and that all parts are COOL
before replacing oven light. Wear
a leather-faced glove for protec-
tion against possible broken glass
or burns.
IMPORTANT
The oven is fitted with two 120V - 40W halogen light
bulbs.
NOTE
Do not allow your fingers to touch the new bulb
when installing it. This will shorten the life of the new
bulb. Use a paper towel to cover the new bulb when
installing it.
CARE AND CLEANING
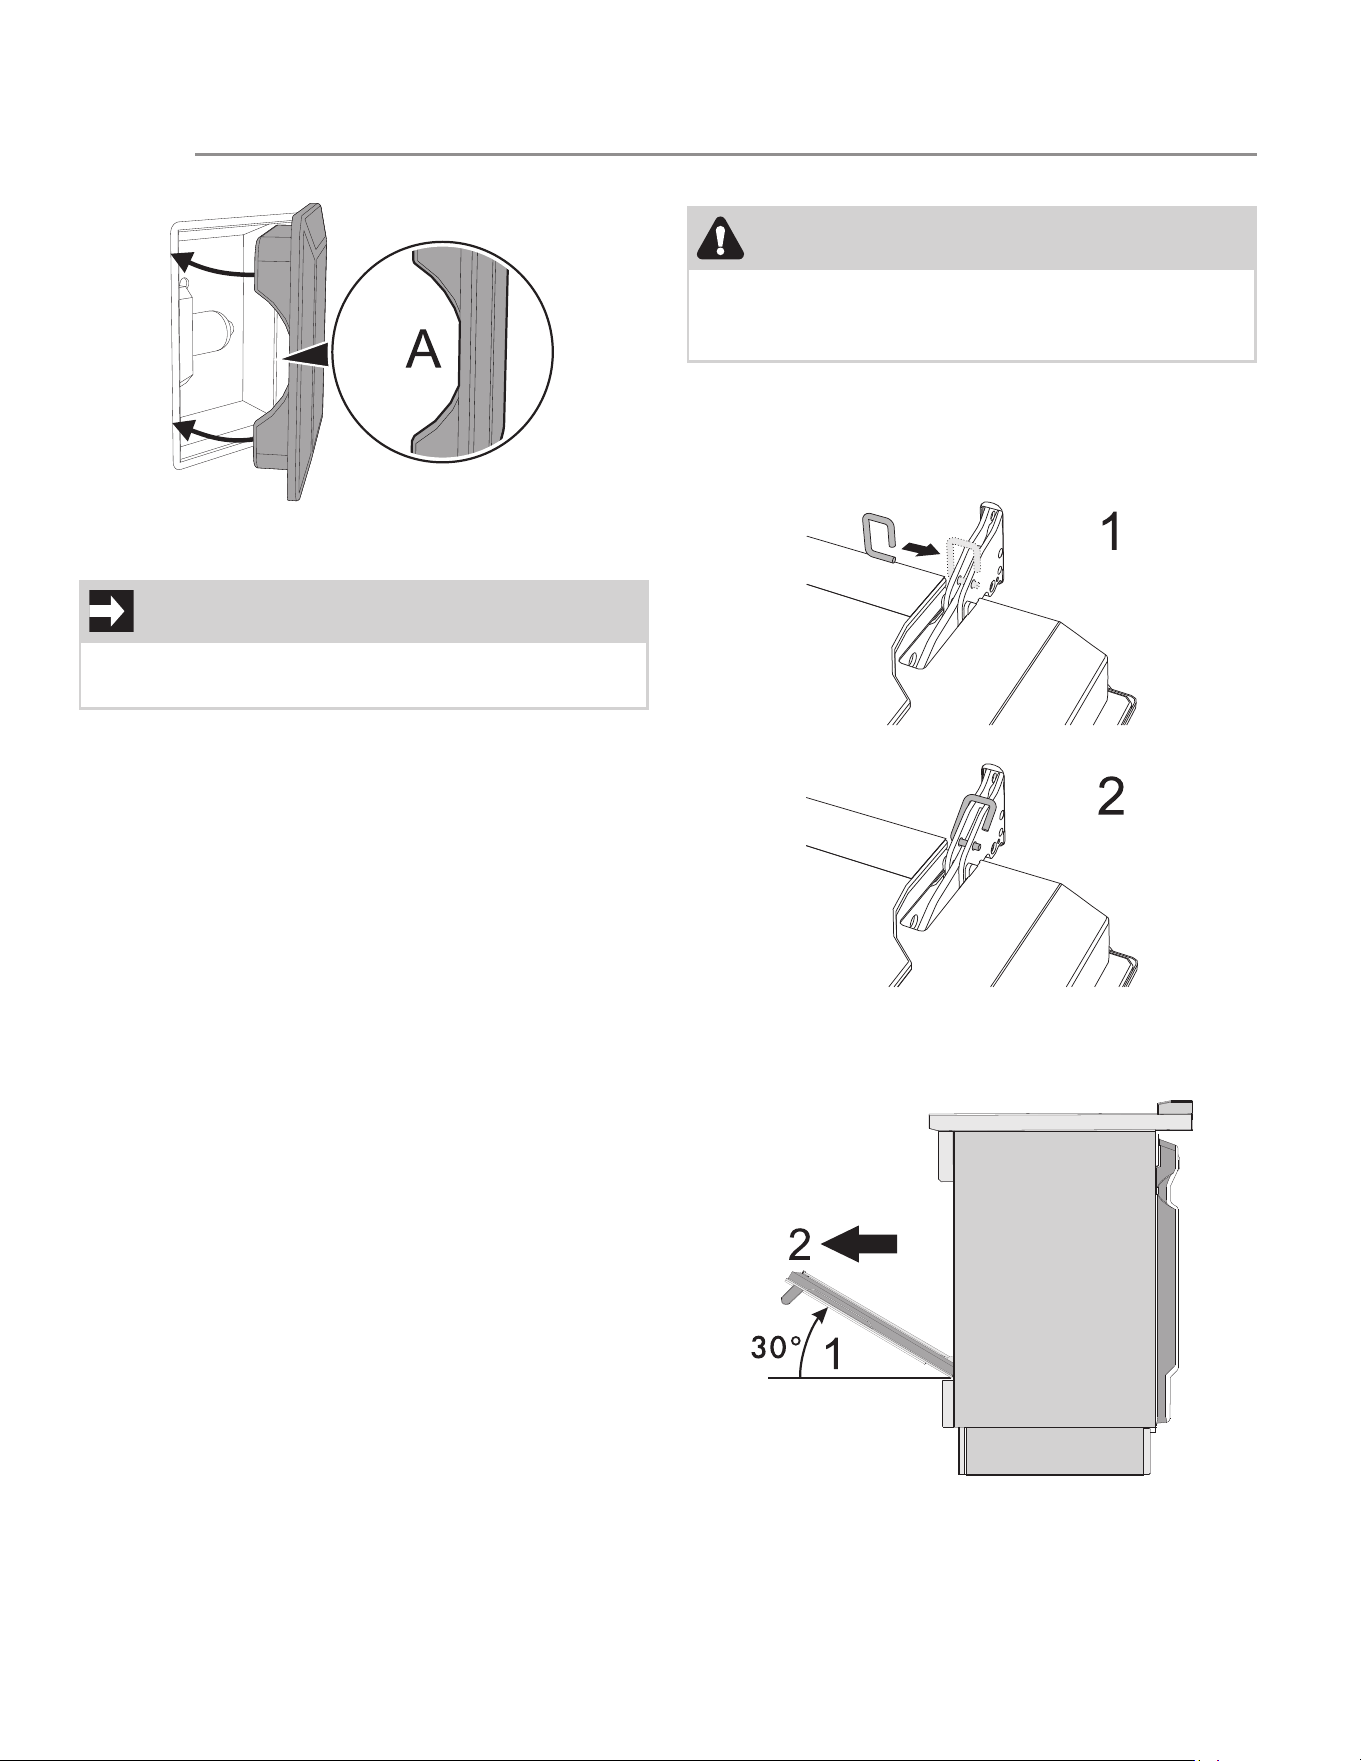
44
the glass (A) is facing the door.
Special door care instructions
• Do not close the oven door until all the interior
oven racks are fully inserted and retracted to the
back of the oven.
• Do not hit the glass with pots, pans, or any other
object. The oven door glass may break or even
break unexpectedly at a later time.
• Scratching, hitting, jarring or stressing the oven
door glass may weaken its structure causing an
increased risk of breakage at a later time.
• You may use a glass cleaner on the outside of
the oven door glass. Do not spray or allow water
or the cleaner to enter or drip down into the
oven door vents. First spray cleaner onto the
cloth and then wipe the oven door clean.
• Do not use strong oven cleaners, powders or
harsh abrasive cleaning materials on the outside
of the oven door or glass.
Removing the oven door
To remove the door proceed as follows:
1. Open the door completely and insert two pins
into the holes on the hinges indicated in the fig-
ure:
2. Grasp the door on both sides with both hands,
lift it forming an angle of around 30° (1) and
slide it out (2).
IMPORTANT
Most oven doors contain glass that can break. Read
the following recommendations:
CAUTION
The oven door is heavy. Be careful when removing
and lifting the door. Do not lift the oven door by the
handle.
CARE AND CLEANING
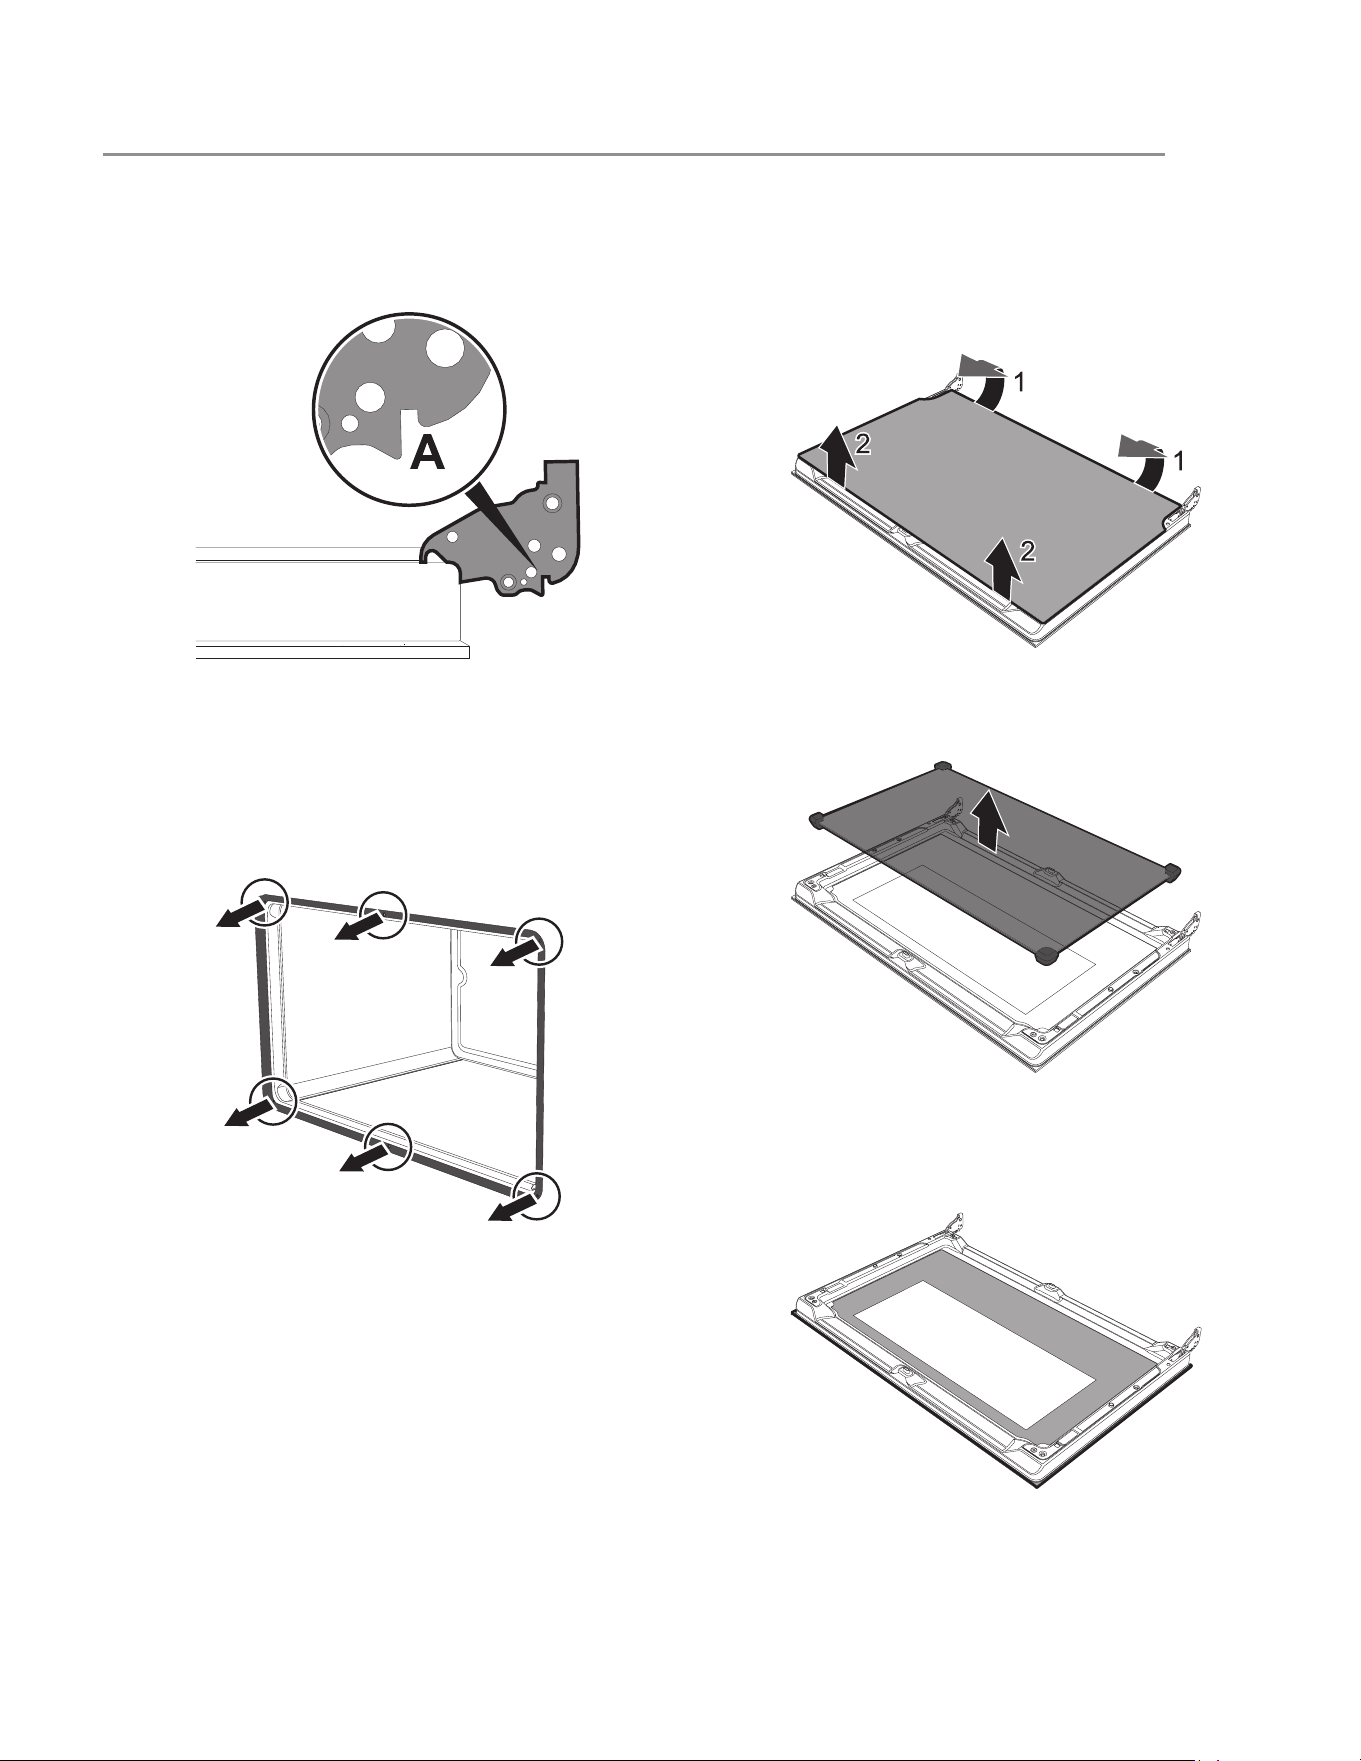
45
3. To reassemble the door, put the hinges in the
relevant slots in the oven, making sure that the
grooved sections A are resting completely in
the slots. Lower the door and once it is in place
remove the pins from the holes in the hinges.
Removing the oven seal
To permit thorough cleaning of the oven, the door seal
may be removed. There are fasteners on all 4 sides
and in the middle to attach it to the edge of the oven.
Pull the seal outwards at the indicated points in order
to remove it from the appliance.
The seal should be soft and elastic. To clean the seal,
use a non-abrasive sponge and wash with lukewarm
water.
Removing the internal glass panes
For easier cleaning, the internal glass panes of the
door can be disassembled:
1. Remove the internal glass pane by pulling the
rear part gently upwards, following the move-
ment indicated by the arrows (1).
2. Then pull the front part upwards (2). In this way,
the 4 pins attached to the glass detach from
their housings in the oven door.
3. Clean the external glass pane and the panes
that were previously removed. Use absorbent
kitchen roll. In case of stubborn dirt, wash with a
damp sponge and neutral detergent.
CARE AND CLEANING
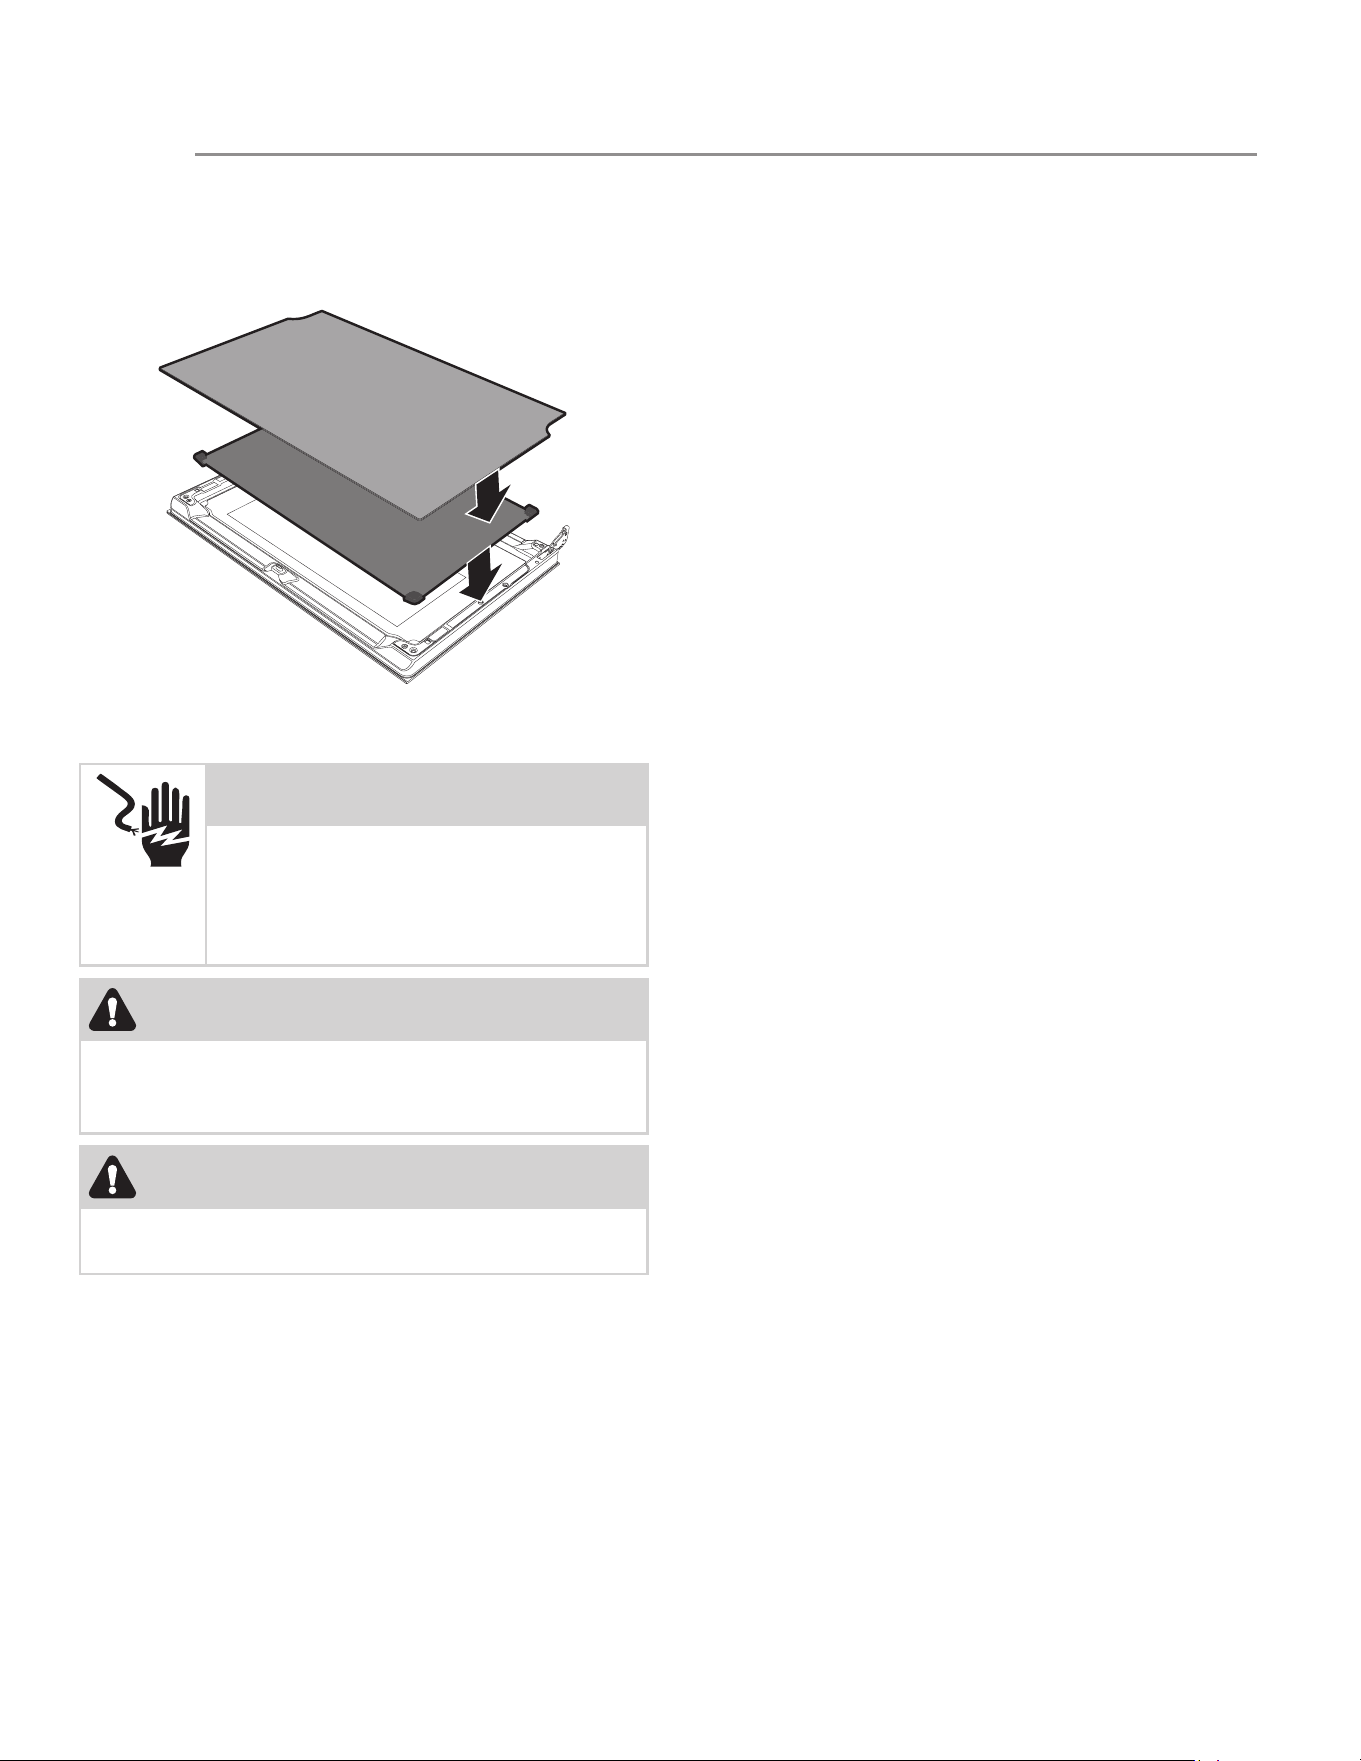
46
4. Refit the panes in the reverse order in which
they were removed. Reposition the internal
glass pane. Take care to center and insert the 4
pins into their housings in the oven door by
applying slight pressure.
Cooktop cleaning and maintenance
CONSISTENT AND PROPER CLEANING IS ESSENTIAL
TO MAINTAINING YOUR CERAMIC GLASS COOK-
TOP.
• Do not use steam jets to clean the appliance.
• Do not use cleaning products containing chlo-
rine, ammonia or bleach on steel parts or parts
with metallic finishes on the surface (e.g. anodiz-
ing, nickel- or chromium-plating).
• Do not use abrasive or corrosive detergents on
glass parts (e.g. powder products, stain removers
and metallic sponges).
• Do not use rough or abrasive materials or sharp
metal scrapers.
• Do not slide anything metal or glass across the
cooktop.
• Do not use your cooktop as a cutting board or
work surface in the kitchen.
• Do not cook foods directly on the cooktop sur-
face without a pan.
• Do not drop heavy or hard objects on the glass
cooktop, they may cause it to crack or break.
Cleaning recommendations for the ceramic
glass surface
To maintain the surfaces, clean them regularly after
each use once they have cooled down. Any marks left
by the use of pans with aluminum bases can be wiped
off with a damp cloth soaked in vinegar. If, after cook-
ing, burnt residues remain, remove them with water
and dry thoroughly with a clean cloth.
Grains of sand which may end up on the cooktop
while cleaning lettuce or potatoes can scratch the
cooktop when you move pans around.
Therefore, make sure that no grains of sand are left on
the cooktop.
Changes in color do not affect the function and stabil-
ity of the glass. It is not a question of changes to the
cooktop material, but simply due to residues which
were not removed and therefore charred.
Shiny spots can form due to the bases of pans rubbing
on the surface, especially if they are aluminum, and the
use of unsuitable cleaning agents. They are difficult to
remove using common cleaning products. You may
need to repeat the cleaning process several times.
Using aggressive detergents or sliding the base of
pans on the surface can, over time, wear away the
decorations of the cooktop and could cause spots to
form.
Regular daily cleaning
Always use only specific products that do not contain
abrasives or chlorine-based acids. Pour the product
onto a damp cloth and wipe the surface, rinse thor-
oughly and dry with a soft cloth or a microfiber cloth.
WARNING
ELECTRIC SHOCK HAZARD - Dis-
connect the appliance from the
power supply before carrying out
cleaning.
WARNING
DO NOT use a cooktop cleaner on a hot cooktop.
The fumes can be hazardous to your health and can
chemically damage the ceramic-glass surface.
CAUTION
Before cleaning the cooktop, make sure the controls
are turned to OFF and that the cooktop is COOL.
CARE AND CLEANING

47
Weekly routine cleaning
Clean and maintain the cooktop once a week using a
standard product for cleaning glass. Always follow the
manufacturer's instructions. The silicone in these prod-
ucts creates a protective water- and dirt-repellent film.
All the dirt remaining on the film and can be removed
easily. Just wipe the surface with a clean cloth. Make
sure that no detergent remains on the cooktop surface
because it will react aggressively when the cooktop is
heated and can alter its structure.
Food stains or residues
Do not use metallic sponges or sharp scrapers as they
will damage the surfaces. Use ordinary non-abrasive
products with the aid of wooden or plastic utensils if
necessary. Rinse thoroughly and dry with a soft cloth
or a microfiber cloth. Do not allow residues of sugary
foods (such as jam) to set inside the oven. If allowed to
set for too long, sugar residue could pit the enamel lin-
ing of the oven.
CARE AND CLEANING

48
Baking problems
For best results, pre-heat the oven when baking cookies, breads, cakes, pies or pastries etc. There is no need to
preheat the oven for roasting meats or baking casseroles. The cooking times and temperatures needed to bake a
product may vary slightly from your previous appliance.
Problem Causes Corrections
Cookies and biscuits burn on the
bottom
• Cookies and biscuits placed in
the oven before preheating
has finished.
• Oven rack overcrowded.
• Dark pan absorbs heat too
fast.
Allow the oven to preheat to the
selected temperature before plac-
ing food in it.
See the “Air circulation in the oven”
section.
Cakes too dark on top or bottom • Cakes put into the oven
before preheating has fin-
ished.
• Rack position too high or low.
• Oven too hot.
Allow the oven to preheat to the
selected temperature before plac-
ing food in it.
Use proper rack position for baking
needs.
Set oven temperature 25°F/12°C
lower than recommended.
Cakes not done in the center • Oven too hot.
• Incorrect pan size.
• Pan not centered in the oven.
Set oven temperature 25°F/12°C
lower than recommended.
Use pan size suggested in recipe.
See the “Air circulation in the oven”
section.
Cakes not level • Range not level.
• Pan too close to oven wall or
rack overcrowded.
• Pan warped.
Place a marked glass measuring
cup filled with water on the center
of the oven rack. If the water level is
uneven, refer to the installation
instructions for leveling the range.
Be sure to allow 2” to 4” (5.1cm to
10.2cm) of clearance on all sides of
each pan in the oven.
Do not use pans that are dented or
warped.
Food not done when cooking time
is up
• Oven too cool.
• Oven overcrowded.
• Oven door opened too fre-
quently.
Set oven temperature 25°F/12°C
higher than suggested and bake for
the recommended time.
Be sure to remove all pans from the
oven except the ones to be used
for baking.
Open oven door only after shortest
recommended baking time.
BEFORE YOU CALL

49
Let us help you troubleshoot your concern! This section will help you with common issues. If you need us, visit our
website, chat with an agent, or call us. We may be able to help you avoid a service visit. If you do need service,
we can get that started for you!
1-887-435-3287 (United States)
ElectroluxAppliances.com
1-800-265-8352 (Canada)
ElectroluxAppliances.ca
Oven problems
Problem Solution
Display shows an error code (“Err XX”)
A fault has been detected. Record the fault code and call techni-
cal support.
Installation
Place the rack in the center of the oven. Place a level on the oven
rack. Contact installing agent if rack and or cabinet are not level
Kitchen cabinet misalignment may make the range appear to be
not level. Be sure cabinets are square and level. Contact the cab-
inetmaker to correct the problem.
Entire range does not operate
Make sure the electrical cord is securely connected inside the
electrical junction box.
Cord/plug is not installed and/or connected. Cord is not supplied
with the range. Contact your dealer, installing agent or authorized
servicer.
Service wiring not complete. Contact your dealer, installing agent
or authorized servicer.
Power outage. Check the house lights to be sure. Call your local
electric company. Short in cord/plug. Replace cord/plug.
Controls are not set properly. See instructions to set the controls.
House fuse has blown or circuit breaker has tripped immediately
following installation.
House fuse may not be fully engaged. Check fuse and screw or
engage circuit breaker securely.
Oven lights do not work
Burned-out or loose bulb. Follow the instructions under Oven Light
to replace or tighten the bulb.
Poor cooking results
Many factors affect baking results. See “Oven cooking tips” for
hints, cause and corrections.
Adjust the recipe’s recommended power levels or cooking times.
Cookware is too lightweight or warped. Use heavier quality cook-
ware so foods being prepared may cook more evenly.
Fan noise when the appliance is off
This range is equipped with a cooling fan that runs during the
cooking process to cool internal electronic components. It is nor-
mal for this fan to continue to run for an extended period of time,
even when the oven is off.
Flames inside oven or smoking from
oven vents
Excessive spillovers in oven. For example, this will happen for pie
spillovers or large amounts of grease left on the oven bottom.
Wipe up excessive spillovers before switching on the oven. If
flames or excessive smoke are present see “Broil function tips” in
the Setting Oven cooking tips section.
BEFORE YOU CALL
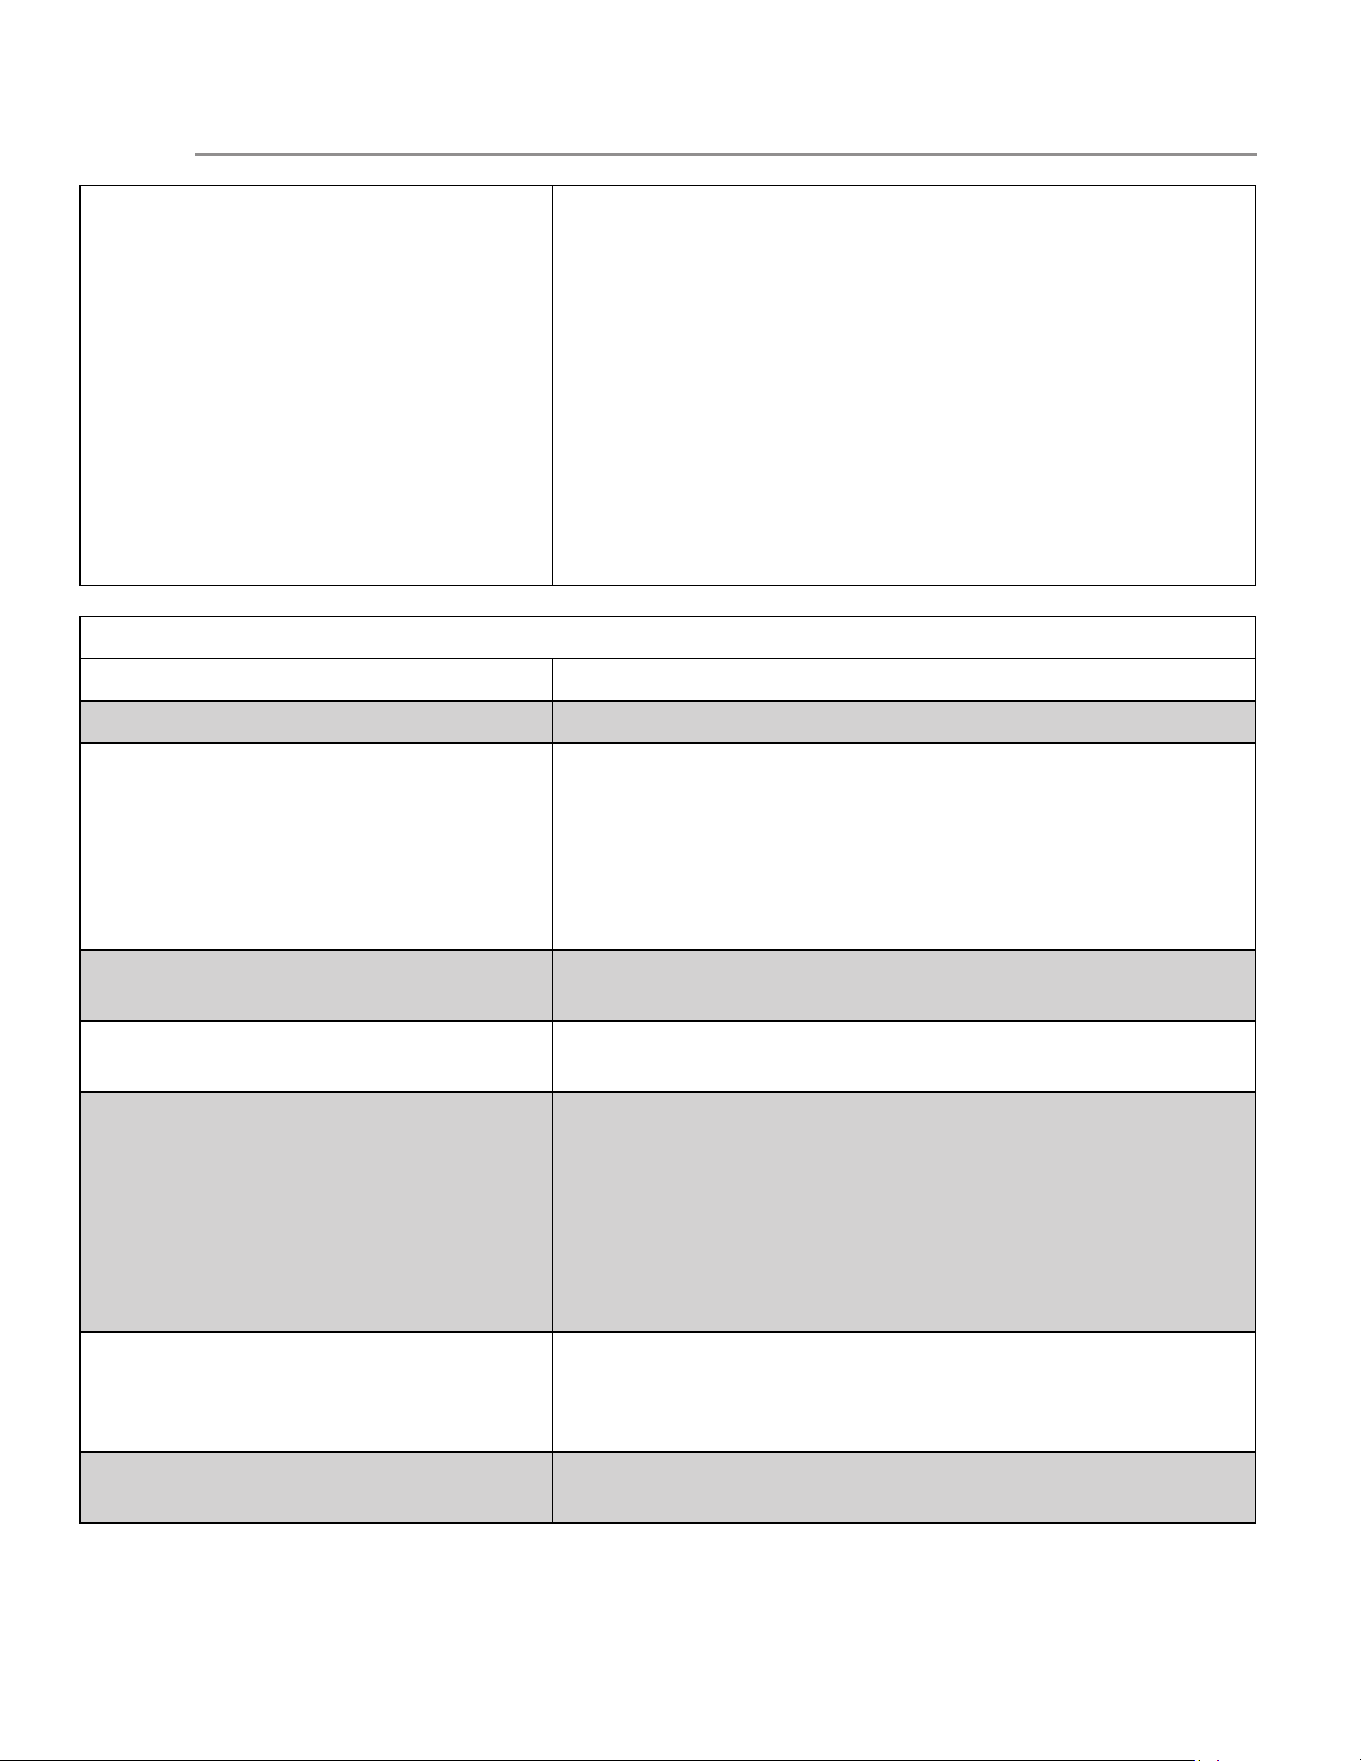
50
Excessive oven smoke during broiling
Meat too close to the broiler element. Reposition the rack to pro-
vide more clearance between the meat and the broiler. Pour a
small amount of water into the broiler pan before cooking to pre-
vent meat grease from producing smoke due to intense heating.
Do not let the water overflow from the pan. Meat not properly
prepared. Remove excess fat from meat. Cut any remaining fatty
edges to prevent curling but do not cut into the lean. Grid on
broiler pan wrong side-up. Grease does not drain into broiler pan.
Broiler pan used without grid or grid covered with aluminum foil.
DO NOT use the broiler pan without the grid or cover the grid with
aluminum foil.
Oven needs to be cleaned. Grease has built up on oven surfaces.
Regular cleaning is necessary when broiling frequently. Grease or
food spatters cause excessive smoking.
Cooktop problems
Problem Solution
Cookware is too hot or not hot enough
Incorrect surface control setting. Adjust power level setting.
Cookware does not heat or does not
heat evenly
Be sure the correct surface control knob is turned on for the cook-
ing zone needed.
Cookware is light weight or warped. Use only flat, evenly bal-
anced, medium or heavyweight cookware. Flat pans heat better
than warped pans. Cookware materials and weight of the mate-
rial affect heating. Heavy and medium weight pans heat evenly.
Because lightweight pans heat unevenly, foods may burn easily.
Control for power level setting not
responding
Wait 5-6 seconds without any pressing the control to allow it to
reset.
Areas of discoloration with metallic
sheen on cooktop surface
Mineral deposits from water and food. Remove them and buff
with a non-abrasive cloth or sponge.
Scratches or abrasions on cooktop
surface
Coarse particles such as salt or hardened soils between cooktop
and utensils can cause scratches. Be sure the cooktop surface
and bottoms of utensils are clean before use. Small scratches do
not affect cooking and will become less visible with time.
Cleaning materials not recommended for ceramic-glass cooktop
have been used.
Cookware with a rough bottom was used. Use smooth, flat-bot-
tomed cookware.
Metal marks on the cooktop
Sliding or scraping of metal utensils on cooktop surface. Do not
slide metal utensils on the cooktop surface. Buff with a non-abra-
sive cloth or sponge. For more information, see “Cooktop clean-
ing and maintenance”.
Brown streaks or specks on cooktop
surface
Boil overs are cooked onto the surface. For more information see
“Cooktop cleaning and maintenance”.
BEFORE YOU CALL

USA
1.877.435.3287
Electrolux
10200 David Taylor Drive
Charlotte, NC 28262
Canada
1.800.265.8352
Electrolux Canada Corp.
5855 Terry Fox Way
Mississauga, Ontario, Canada
L5V 3E4
WARRANTY
Your appliance is covered by a one year limited warranty. For one year from your original date of purchase, Elec-
trolux will pay all costs for repairing or replacing any parts of this appliance that prove to be defective in materials or
workmanship when such appliance is installed, used and maintained in accordance with the provided instructions.
Exclusions
This warranty does not cover the following:
Products with original serial numbers that have been removed, altered or cannot be readily determined.
Product that has been transferred from its original owner to another party or removed outside the USA or Canada.
Rust on the interior or exterior of the unit.
Products purchased “as-is” are not covered by this warranty.
Food loss due to any refrigerator or freezer failures.
Products used in a commercial setting.
Service calls which do not involve malfunction or defects in materials or workmanship, or for appliances not in ordi-
nary household use or used other than in accordance with the provided instructions.
Service calls to correct the installation of your appliance or to instruct you how to use your appliance.
Expenses for making the appliance accessible for servicing, such as removal of trim, cupboards, shelves, etc., which
are not a part of the appliance when it is shipped from the factory.
Service calls to repair or replace appliance light bulbs, air filters, water filters, other consumables, or knobs, handles,
or other cosmetic parts.
Surcharges including, but not limited to, any after hour, weekend, or holiday service calls, tolls, ferry trip charges, or
mileage expense for service calls to remote areas, including the state of Alaska.
Damages to the finish of appliance or home incurred during installation, including but not limited to floors, cabinets,
walls, etc.
Damages caused by: services performed by unauthorized service companies; use of parts other than genuine Elec-
trolux parts or parts obtained from persons other than authorized service companies; or external causes such as
abuse, misuse, inadequate power supply, accidents, fires, or acts of God.
DISCLAIMER OF IMPLIED WARRANTIES; LIMITATION OF REMEDIES
CUSTOMER’S SOLE AND EXCLUSIVE REMEDY UNDER THIS LIMITED WARRANTY SHALL BE PRODUCT REPAIR OR
REPLACE-MENT AS PROVIDED HEREIN. CLAIMS BASED ON IMPLIED WARRANTIES, INCLUDING WARRANTIES OF
MERCHANTABILITY OR FITNESS FOR A PARTICULAR PURPOSE, ARE LIMITED TO ONE YEAR OR THE SHORTEST
PERIOD ALLOWED BY LAW, BUT NOT LESS THAN ONE YEAR. ELECTROLUX SHALL NOT BE LIABLE FOR CONSE-
QUENTIAL OR INCIDENTAL DAMAGES SUCH AS PROPERTY DAMAGE AND INCIDENTAL EXPENSES RESULTING
FROM ANY BREACH OF THIS WRITTEN LIMITED WARRANTY OR ANY IMPLIED WARRANTY. SOME STATES AND
PROVINCES DO NOT ALLOW THE EXCLUSION OR LIMITATION OF INCIDENTAL OR CONSEQUENTIAL DAMAGES,
OR LIMITATIONS ON THE DURATION OF IMPLIED WARRANTIES, SO THESE LIMITATIONS OR EXCLUSIONS MAY
NOT APPLY TO YOU. THIS WRITTEN WARRANTY GIVES YOU SPECIFIC LEGAL RIGHTS. YOU MAY ALSO HAVE
OTHER RIGHTS THAT VARY FROM STATE TO STATE.
If You Need Service
Keep your receipt, delivery slip, or some other appropriate payment record to establish the warranty period should
service be required. If service is performed, it is in your best interest to obtain and keep all receipts. Service under this
warranty must be obtained by contacting Electrolux at the addresses or phone numbers below.
This warranty only applies in the USA and Canada. In the USA, your appliance is warranted by Electrolux Major
Appliances North America, a division of Electrolux Home Products, Inc. In Canada, your appliance is warranted by
Electrolux Canada Corp. Electrolux authorizes no person to change or add to any obligations under this warranty.
Obligations for service and parts under this warranty must be performed by Electrolux or an authorized service com-
pany. Product features or specifications as described or illustrated are subject to change without notice.

914779578-E-502021