Documents: Go to download!
User Manual
- User Manual - (English)
- service manual - (English)
- Operation Guide
- Maintenance
- Troubleshooting
- Information
- Specifications
Table of contents
Owner’s Manual
Operation Guide
Parts Location
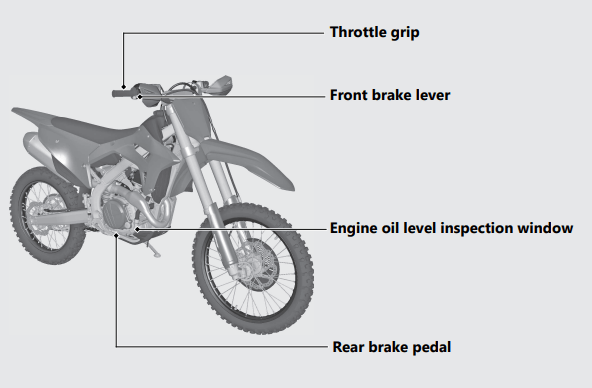
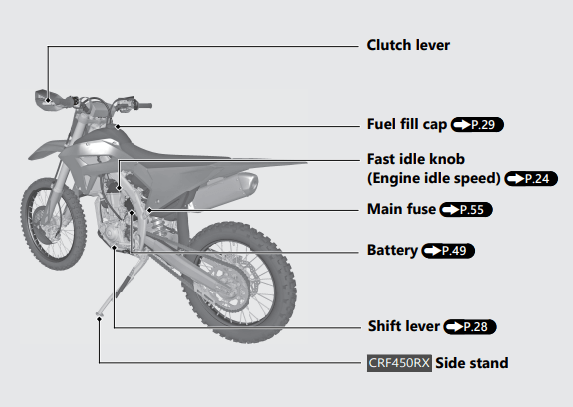
Indicators
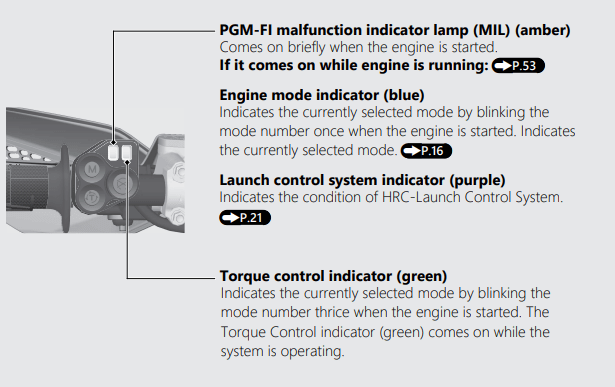
Switches
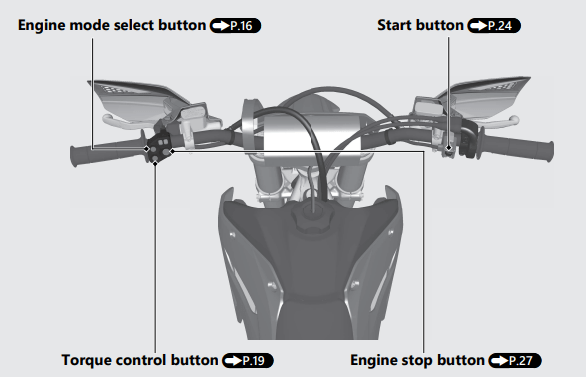
Engine Mode: You can change the engine output characteristic depending on track conditions by using the engine mode select button.
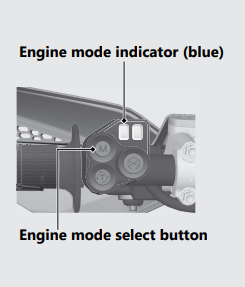
- PGM-FI mode 1: standard setting
- PGM-FI mode 2: smooth setting (reduce throttle response from the standard setting)
- PGM-FI mode 3: aggressive setting (increase throttle response from the standard setting)
Current Mode:
- Start the engine and push the engine mode select button with your vehicle stopped. The engine mode indicator over the engine mode select button indicates the selected mode by blinking the mode number in blue 3 times
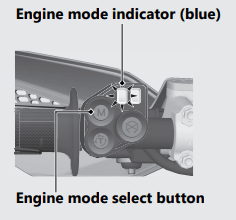
- The engine mode indicator also indicates the currently selected mode by blinking the mode number once when the engine is started.
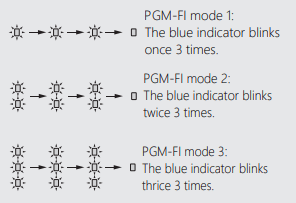
- If the engine mode indicator stays on or does not come on when it should, have your dealer check it for problems.
Mode Selection
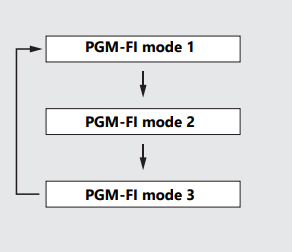
- Start the engine.
- With your vehicle stopped and the throttle closed, push and hold the engine mode select button for 1 or more second. Make sure that the fast idle knob is pushed in. (P.24) If the fast idle knob is pulled out, the engine mode will not change.
- Release the engine mode select button. The engine mode indicator will indicate a selected mode by the number of times the blue indicator blinks.
- Repeat steps 2 – 3 until the desired mode is indicated.
Starting the Engine
- Start your engine using the following procedure.
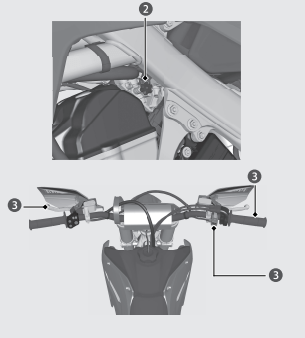
- To restart a warm engine, follow the procedure for “Warm Engine Starting”.
NOTICE
- If the engine does not start within 5 seconds, wait 10 seconds before trying to start the engine again to recover battery voltage.
- Extended fast idling and revving the engine can damage the engine and the exhaust system.
- Snapping the throttle or fast idling for more than about 5 minutes may cause exhaust pipe discoloration.
This vehicle does not have a start inhibitor. Pull the clutch lever all the way in when pressing the start button.
- The vehicle can move when pressing the start button if the transmission is in gear and the clutch lever is not pulled
Cold Engine Starting
- Shift the transmission to neutral.
- If the temperature is 50 °F (10 °C) or below, pull the fast idle knob fully out.
- With the throttle completely closed, pull the clutch lever all the way in and press the start button.
- About a minute after the engine starts, push the fast idle knob back all the way to fully off.
Warm Engine Starting
- Shift the transmission into neutral.
- With the throttle completely closed, pull the clutch lever all the way in and press the start button.
Starting the engine excessively charged with fuel by throttle blipping or other reasons
- Shift the transmission into neutral.
- With the throttle fully opened, pull the clutch lever and press the start button for 5 seconds to discharge excessive fuel from the engine.
- With the throttle completely closed, pull the clutch lever all the way in and press the start button.
If Engine Will Not Start
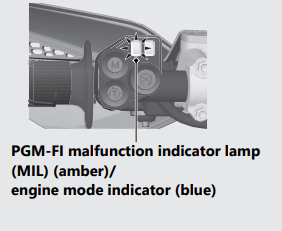
- When starting the engine, the PGM-FI malfunction indicator lamp (MIL) (amber) will stay on for 2 seconds, then go off. Then, the engine mode indicator (blue) indicates the current engine mode for 0.8 seconds, then goes off. If the PGM-FI malfunction indicator lamp (MIL)/engine mode indicator does not come on or go off when it should, have your dealer check it for problems.
When you stop the engine
Normal Engine Stop
- Shift the transmission into neutral.
- Push and hold the engine stop button until the engine stops completely
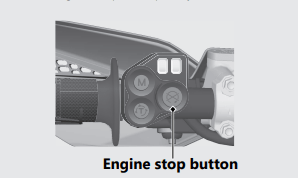
Emergency Engine Stop
- To stop the engine in an emergency, push and hold the engine stop button.
Shifting Gears
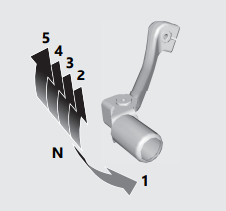
- Your vehicle transmission has 5 forward gears in a one-down, four-up shift pattern.
Refueling
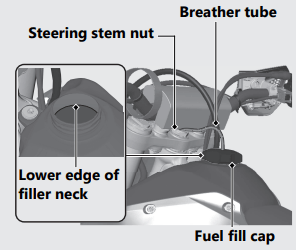
- Be careful not to damage the fuel pump while filling the fuel tank.
- Avoid overfilling the tank. There should be no fuel in the filler neck
- Fuel type: Unleaded gasoline only
- Recommended fuel octane number: Pump Octane Number (PON) 91 or higher. CRF450RX
- Tank capacity: 2.11 US gal (8.0 L) CRF450R/RWE
- Tank capacity: 1.66 US gal (6.3 L)
Refueling and Fuel Guidelines
Opening the Fuel Fill Cap
- Pull the breather tube out of the steering stem nut.
- Turn the fuel fill cap counterclockwise and remove it.
Closing the Fuel Fill Cap
- After refueling, close the fuel fill cap securely.
- Insert the breather tube into the steering stem nut.
Maintenance
Maintenance Schedule
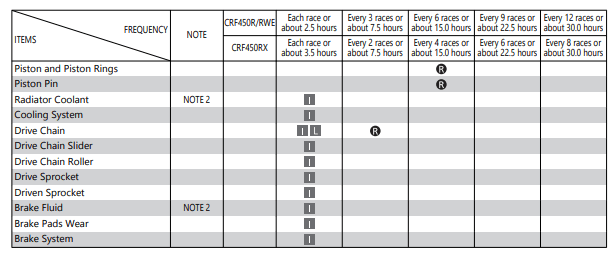
- To maintain the safety and reliability of your vehicle, regular inspection and service is required as shown in the Maintenance Schedule that follows. The Maintenance Schedule lists items that can be performed with basic mechanical skills and hand tools. Procedures for these items are provided in Competition Handbook.
- The Maintenance Schedule also includes items that involve more extensive procedures and may require special training, tools, and equipment. Therefore, we recommend that you have your dealer perform these tasks unless you have advanced mechanical skills and the required tools. Procedures for items in this schedule are provided in an official Honda Service Manual available for purchase from your deale
- CRF450RX: Service intervals in the maintenance schedule are expressed in terms of races and riding hours. To avoid overlooking required service, we urge you to develop a convenient way to record the number of races and/or hours you ride.
- CRF450R/RWE: Service intervals in the maintenance schedule are expressed in terms of motos and riding hours. To avoid overlooking required service, we urge you to develop a convenient way to record the number of motos and/or hours you ride.
- If you do not feel capable of performing a given task or need assistance, remember that your Honda dealer knows your vehicle best and is fully equipped to maintain and repair it. If you decide to do your own maintenance, use only Honda Genuine Parts or their equivalents for repair or replacement to ensure the best quality and reliability.
- Make sure whoever performs the scheduled maintenance completes the maintenance record. Retain all service documents. If you sell your vehicle, these service documents should be transferred with the vehicle to the new owner.
Perform the Pre-ride Inspection (2 P. 39) at each scheduled maintenance period.
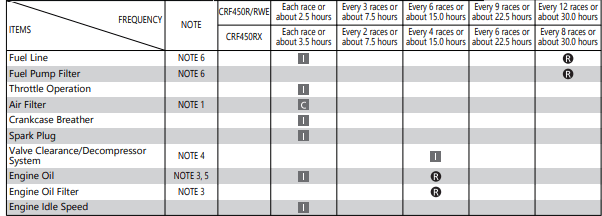
- WE RECOMMEND THESE ITEMS BE SERVICED BY REFERRING TO THE OFFICIAL HONDA SERVICE MANUAL.
- This maintenance schedule is based upon average riding condition. Machines subjected to severe use require more frequent servicing.
Maintenance Legend

Maintenance Fundamentals
Pre-ride Inspection
- To ensure safety, it is your responsibility to perform a pre-ride inspection and make sure that any problem you find is corrected. A preride inspection is a must, not only for safety, but because having a breakdown, or even a flat tire, can be a major inconvenience.
- Refer to the Competition Handbook for procedures.
- Competitive riding can be tough on a vehicle, so it’s important to inspect your vehicle and correct any problems you find before each ride.
- Check the following before each ride:
- Engine oil level.
- Fuel line for condition.
- Coolant for proper level.
- Cooling system and hoses for condition.
- Spark plug for proper heat range, carbon fouling and spark plug wire terminal for looseness.
- Air cleaner for condition and contamination.
- Clutch lever freeplay.
- Breather drain for cleaning.
- Steering head bearing and related parts for condition.
- Throttle operation.
- Tires for damage or improper inflation pressure.
- Spokes for looseness.
- Rim locks for looseness.
- Front and rear suspension for proper operation.
- Front and rear brakes, check operation.
- Drive chain for correct slack and adequate lubrication.
- Drive chain sliders and drive chain rollers for damage or wear.
- Exhaust pipe/Muffler for looseness.
- Every possible part for looseness (such as cylinder head bolts, engine mounting bolts/ nuts, axle nuts, handlebar holder bolts, fork bridge pinch bolts, drive chain adjuster, lock nuts, drive chain roller bolt/nut, wire harness connectors).
- PGM-FI malfunction indicator lamp (MIL) operation.
Between Races/Motos & Practice Maintenance
- CRF450RX: After practice or between races you have a chance to make additional checks and adjustments.
- CRF450R/RWE: After practice or between motos you have a chance to make additional checks and adjustments.
- Clean accumulated dirt from under the fenders and off the wheels, suspension components, handgrips, controls, and footpegs. A stiff, nylon parts cleaning brush works well.
- Check tire air pressure.
- Check spoke tension, and make sure the rim locks are secure.
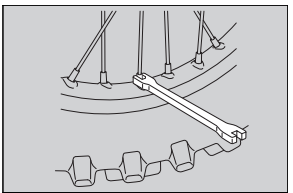
- Check to make sure the sprocket bolts and nuts are secure.
- Clean the sides of the drive chain with a stiff, nylon parts-cleaning brush. Lubricate and adjust the chain as necessary.
- Do not perform maintenance while engine is running. Injury to your fingers or hands may result.
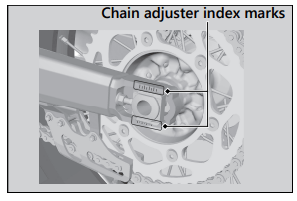
- After adjustment, check that the chain adjuster index marks are in the same position on each side. This will ensure that the rear wheel is in proper alignment and allow maximum performance from the rear disc brake.
- Maintaining proper wheel alignment will also extend brake pad lifespan.
- Suspend the front wheel above the ground and use the pressure release screws to release the built-up pressure in the forks. This pressure is caused by normal fork action while riding.
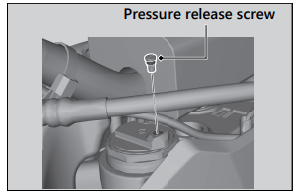
- Suspend the front wheel above the ground and use the pressure release screws to release the built-up pressure in the forks. This pressure is caused by normal fork action while riding.
- Tighten the pressure release screws to the specified torque: Torque: 1.0 lbf·ft (1.3 N·m, 0.1 kgf·m)
After Competition Maintenance
- It is important to the long term performance of your vehicle to practice a consistent maintenance program. Right after the event is a good time to begin your next maintenance cycle
- After Race Lubrication
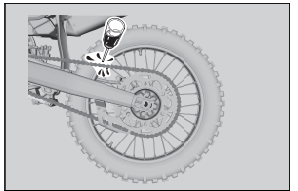
- Apply a light coating of rust-inhibiting oil to the drive sprocket and any steel portions of the chassis or engine where the paint has worn away.
- This will prevent rusting of the exposed metal. Apply rust-inhibiting oil more heavily if the event was particularly wet or muddy. Take care to avoid spraying any oil near the brake pads or the brake discs.
- Take care to prevent catching your fingers between the chain and sprocket.
- Remove the drive chain, clean and lubricate it. Be sure the chain is wiped clean and is dry before lubricating the chain.
- Routine Cleaning
- If your vehicle is only slightly dirty, it is best to clean it by hand with the aid of a stiff bristled nylon brush and some clean rags
- Take care to prevent catching your fingers between the chain and sprocket.
- A variety of reasonably priced cleaning brushes are available from variety, drug, food, and hardware stores. Some of these brushes are extremely useful in removing dirt from the many tight contours of the metal pieces of your vehicle.
- Avoid using stiff, abrasive brushes on the plastic or rubber parts.
- If your vehicle was exposed to sea air or salt water, rinse it as soon as possible after the event, dry it, and apply a spray lubricant to all metal parts.
- If you decide to wash your vehicle or use cleaners, refer to "Caring for Your Vehicle"
Replacing Parts
- Always use Honda Genuine Parts or their equivalents to ensure reliability and safety
Lithium-Ion (Li-Ion) Battery
- Your vehicle has a lithium-ion (li-ion) battery. Clean the battery terminals if they become dirty or corroded.
- NOTICE An improperly disposed of battery can be harmful to the environment and human health. Always confirm local regulations for proper battery disposal instruction
What to do in an emergency
- If any of the following occurs, immediately see your doctor.
- Electrolyte splashes into your eyes:
- Wash your eyes repeatedly with cool water for at 15 minutes. Using water under pressure can damage your eyes.
- Electrolyte splashes onto your skin:
- Remove affected clothing and wash your skin thoroughly using water.
- Electrolyte splashes into your mouth
- Rinse mouth thoroughly with water, and do not swallow.
- Electrolyte splashes into your eyes:
Cleaning the Battery Terminals
1. Remove the battery.
2. If the terminals are starting to corrode and are coated with a white substance, wash with warm water and wipe clean.
3. If the terminals are heavily corroded, clean and polish the terminals with a wire brush or sandpaper. Wear safety glasses.
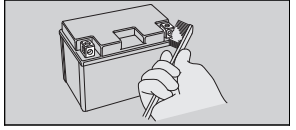
4. After cleaning, reinstall the battery. The battery has a limited life span. Consult your dealer about when you should replace the battery. Always replace the battery with another lithium-ion (li-ion) battery of the same type
Charging
- If you use electrical accessories that drain the battery or you do not ride frequently, we recommend that you charge the battery every 30 days using a charger recommended by your lithium-ion (li-ion) battery manufacturer. Contact your dealer before charging the battery.
- Make sure the battery terminals are disconnected before charging the battery.
- NOTICE Only use a charger recommended by your lithium-ion (li-ion) battery manufacturer. Using a battery charger that is not recommended can cause permanent damage to your battery.
- NOTICE Improper charging can damage the battery. If you can’t charge the battery or it appears unable to hold a charge, contact your dealer.
- NOTICE Do not jump-start, as this can damage your vehicle's electrical system and battery. Bump starting is not recommended.
- NOTICE Installing non-Honda electrical accessories can overload the electrical system, discharging the battery and possibly damaging the system.
Fuses
- Fuses protect the electrical circuits on your vehicle. If something electrical on your vehicle stops working, check for and replace any blown fuses.
- Inspecting and Replacing Fuses: Turn the engine off to remove and inspect the fuses. If a fuse is blown, replace with a fuse of the same rating. For fuse ratings, see “Specifications.”
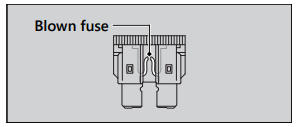
- NOTICE Replacing a fuse with one that has a higher rating greatly increases the chance of damage to the electrical system.
- If a fuse fails repeatedly, you likely have an electrical fault. Have your vehicle inspected by your dealer.
Tires (Inspecting/Replacing)
Checking the Air Pressure
- Visually inspect your tires and use an air pressure gauge to measure the air pressure before each ride.
- Always check air pressure when your tires are cold.
- If you decide to adjust the tire pressure for a particular riding condition, make changes a little at a time.
Inspecting for Damage
- Inspect the tires for cuts, slits, or cracks that exposes fabric or cords, or nails or other foreign objects embedded in the side of the tire or the tread. Also inspect for any unusual bumps or bulges in the side walls of the tires.
Inspecting for Abnormal Wear
- Inspect the tires for signs of abnormal wear on the contact surface.
Inspecting Rims and Valve Stems
- Inspect the rims for damage and loose spokes. Also inspect the valve stems for their positions. A tilted valve stem indicates the tube is slipping inside the tire or the tire is slipping on the rim. See your dealer
Have your tires replaced by your dealer. For recommended tires and air pressure, see “Specifications.” 2 P. 71 Follow these guidelines whenever you replace tires.
- Use the recommended tires or equivalents of the same size, construction, speed rating, and load range.
- Remember to replace the inner tube whenever you replace a tire. The old tube will probably be stretched, and it could fail if installed in a new tire.
- If a tube is punctured or damaged, you should replace it as soon as possible. A repaired tube may not have the same reliability as a new one, and it may fail while you are riding. Use a replacement tube equivalent to the original.
Removing & Installing Body Components
Battery
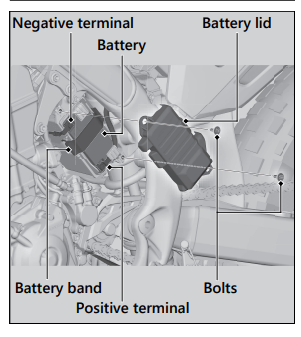
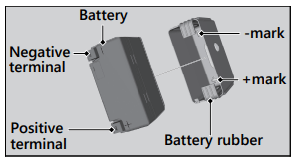
Removal
- Remove the battery lid by removing the bolts.
- Disconnect the negative - terminal from the battery.
- Disconnect the positive + terminal from the battery.
- Remove the battery band.
- Remove the battery assembly, taking care not to drop the terminal nuts.
- Separate the battery and battery rubber.
Installation
- Assemble the battery and battery rubber.
- Make sure the + and - marks on the bottom of the battery rubber align with the positive + and negative - of the battery terminals.
- Install the battery assembly.
- Install and tighten the battery terminal bolts. Always connect the positive + terminal first. Make sure that bolts and nuts are tight.
- Tighten the positive + terminal bolt and negative - terminal bolt to the specified torque: Torque: 1.5 lbf·ft (2 N·m, 0.2 kgf·m)
- Install the battery band.
- Install the battery lid and tighten the bolts to the specified torque: Torque: 3.8 lbf·ft (5.2 N·m, 0.5 kgf·m)
For proper handling of the battery, see “Maintenance Fundamentals.” “Battery Goes Dead.
Troubleshooting
Engine Will Not Start
1. Starter Motor Operates But Engine Does Not Start
Check the following items:
- Check the correct engine starting sequence.
- Check that there is gasoline in the fuel tank.
- Check if the PGM-FI malfunction indicator lamp (MIL) is on.
2. Starter Motor Does Not Operate
- Check the following items:
- Check the correct engine starting sequence.
- Check for a blown fuse.
- Check for a loose battery connection or battery terminal corrosion
- Check the condition of the battery.
- If the problem continues, have your vehicle inspected by your dealer as soon as possible or refer to an official Honda Service Manual available for purchase from your dealer.
Warning Indicators On or Flashing
1. PGM-FI (Programmed Fuel Injection) Malfunction Indicator Lamp (MIL)
- If the indicator comes on while riding, you may have a serious problem with the PGM-FI system.
- Reduce speed and have your vehicle inspected by your dealer as soon as possible or refer to an official Honda Service Manual available for purchase from your dealer.
Electrical Trouble
1. Battery Goes Dead
- Battery charging is needed.
- A battery charger recommended by your lithium-ion (li-ion) battery manufacturer is needed for battery charging.
- Contact your dealer before charging the battery.
- Remove the battery from the vehicle before charging.
- NOTICE Only use a charger recommended by your lithium-ion (li-ion) battery manufacturer. Using a battery charger that is not recommended can cause permanent damage to your battery.
- If the battery does not recover after recharging, contact your dealer.
- NOTICE Do not jump-start, as this can damage your vehicle's electrical system and battery. Bump starting is not recommended.
- Check the battery voltage using a digital multimeter with the cable connected. Below 1V: The battery has failed; replace the battery.
- Between 1V and 8V: The battery may have failed; charge the battery and then recheck. If you can’t charge the battery or it appears unable to hold a charge, see your dealer.
2. Blown Fuse
Before handling fuses, see “Inspecting and Replacing Fuses.”
1. Disconnect the negative - terminal.
2. Pull back the coupler cover.
3. Disconnect the connector from the starter magnetic switch.
4. Remove the starter magnetic switch stay bolt.
5. Remove the starter magnetic switch cover.
6. Pull the main fuse and check for a blown fuse. Always replace a blown fuse with a spare of the same rating
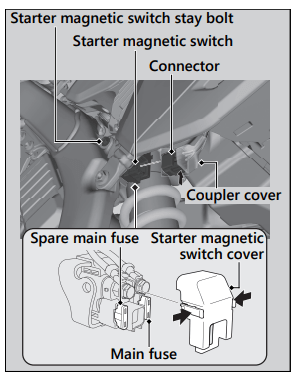
7. Install the starter magnetic switch cover.
8. Install and tighten the starter magnetic switch stay bolt.
9. Install the connector and coupler cover.
10.Connect the negative - terminal.
NOTICE If a fuse fails repeatedly, you likely have an electrical problem. Have your vehicle inspected by your dealer.
Information
Caring for Your Vehicle
- Frequent cleaning and polishing is important to ensure the life of your Honda. A clean vehicle makes it easier to spot potential problems. While you're cleaning, be sure to look for damage, wear, and gasoline or oil leaks.
Washing
Allow the engine, muffler, brakes, and other high-temperature parts to cool before washing.
- Rinse your vehicle thoroughly using a low pressure garden hose to remove loose dirt.
- If necessary, use a sponge or a soft towel with mild cleaner to remove road grime.
- Clean the plastic components with extra care to avoid scratching them. Avoid directing water into the air cleaner, muffler, and electrical parts.
- Do not use steel wool to clean the frame as it could damage or discolor the frame surface. Scotch Brite Hand Pad #7447- maroon is for removing stains on the non-coated aluminum frame only.
- Thoroughly rinse your vehicle with plenty of clean water and dry with a soft, clean cloth.
- After the vehicle dries, lubricate any moving parts. u Make sure that no lubricant spills onto the brakes or tires. Brake discs, pads, drum or shoes contaminated with oil will suffer greatly reduced braking effectiveness and can lead to a crash.
- Lubricate the drive chain immediately after washing and drying the vehicle.
- Apply a coat of wax to prevent corrosion.
- Avoid products that contain harsh detergents or chemical solvents. These can damage the metal, paint, and plastic on your vehicle. Keep the wax clear of the tires and brakes.
- If your vehicle has any matte painted parts, do not apply a coat of wax to the matte painted surface.
Washing Precautions: Follow these guidelines when washing:
- Do not use high-pressure washers:
- High-pressure water cleaners can damage moving parts and electrical parts, rendering them inoperable.
- Water in the air intake can be drawn into the throttle body and/or enter the air cleaner.
- If you use a high pressure washer, avoid spraying the following areas: brake master cylinders clutch master cylinder drive chain electrical circuit engine stop button muffler outlet steering head bearings suspension pivot points throttle body under fuel tank under seat
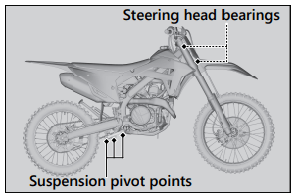
- Do not direct water at the muffler:
- Water in the muffler can prevent starting and causes rust in the muffler.
- Dry the brakes:
- Water adversely affects braking effectiveness. After washing, apply the brakes intermittently at low speed to help dry them.
- Do not direct water at the air cleaner:
- Water in the air cleaner can prevent the engine from starting
- Do not use wax or polishing compounds on matte painted surfaces:
- Use a soft cloth or sponge, plenty of water, and a mild detergent to clean matte painted surfaces. Dry with a soft clean cloth.
Aluminum Frame Maintenance
- Aluminum corrodes when it comes in contact with dust, mud and road salt.
- To remove stains, use Scotch Brite Hand Pad #7447 (maroon) or an equivalent. Wet the pad and polish the surface using strokes parallel to the length of the frame. Clean the frame using a wet sponge and a mild detergent, then rinse well with clean water. Dry the frame with a soft clean cloth, using strokes parallel to the length of the frame.
- NOTICE Do not use steel wool to clean the frame as it could damage or discolor the frame surface. Scotch Brite Hand Pad #7447-maroon is for removing stains on the non-coated aluminum frame only.
Titanium Fuel Tank Maintenance
- CRF450R/RWE: The fuel tank is made of titanium material. To remove mud or dust, use a sponge or soft cloth and a stainless steel kitchen detergent, then rinse well with clean water. After washing, rinse with plenty of water and dry with a clean cloth.
Exhaust Pipe and Muffler
- CRF450R/RX
- The exhaust pipe and muffler are stainless steel but may become stained by mud or dust.
- To remove mud or dust, use a wet sponge and a liquid kitchen abrasive, then rinse well with clean water. Dry with chamois or a soft towel.
- If necessary, remove heat stains by using a commercially available fine texture compound. Then, rinse by the same manner as removing mud or dust.
- NOTICE Even though the exhaust is made of stainless steel, it can become stained. Remove all marks and blemishes as soon as they are noticed.
- CRF450RWE
- The exhaust pipe and muffler are titanium and stainless steel but may become stained by mud or dust.
- To remove mud or dust, use a wet sponge and a liquid kitchen abrasive, then rinse well with clean water. Dry with chamois or a soft towel.
- If necessary, remove heat stains by using a commercially available fine texture compound. Then, rinse by the same manner as removing mud or dust.
- NOTICE Even though the exhaust is made of titanium and stainless steel, it can become stained. Remove all marks and blemishes as soon as they are noticed
Storing Your Vehicle
- If you won't be riding for an extended period, follow these guidelines:
- Wash your vehicle.
- Drain the coolant.
- Lubricate the drive chain.
- Place your vehicle on an optional workstand or equivalent to raise both tires off the ground.
- Relieve the fuel pressure and drain the fuel from the fuel tank into an approved gasoline container.
- Remove the battery to prevent discharge. Fully charge the battery and then place it in a shaded, well-ventilated area.
- If you leave the battery in place, disconnect the negative - terminal to prevent discharge.
- Stuff a rag into the muffler outlet. Then, tie a plastic bag over the end of the muffler to prevent moisture from entering.
- Store your vehicle in an unheated area, free of dampness, away from sunlight, with a minimum of daily temperature variation.
- Cover your vehicle with a porous material. Avoid using plastic or similar non-breathing, coated materials that restrict air flow and allow heat and moisture to accumulate.
- To remove your vehicle from storage, follow these guidelines:
- Uncover and clean your vehicle.
- Change the engine oil if more than 4 months have passed since the start of storage.
- Uncover the end of the muffler and remove the rag from the muffler outlet.
- Fill the fuel tank with the recommended fuel.
- Charge the battery as required. Install the battery.
- Pour a fresh recommended coolant mixture slowly into the radiator fill hole up to the filler neck.
- Increase the fuel pressure.
- Perform all maintenance checks
Transporting Your Vehicle
If your vehicle needs to be transported, it should be carried on a motorcycle trailer or a flatbed truck or trailer that has a loading ramp or lifting platform, and motorcycle tie-down straps. Never try to tow your vehicle with a wheel or wheels on the ground.
NOTICE Towing your vehicle with a wheel or wheels on the ground can cause serious damage to the transmission.
If you use a truck or motorcycle trailer to transport your vehicle, we recommend that you follow these guidelines:
- Use a loading ramp.
- Relieve the fuel pressure and drain the fuel from the fuel tank into an approved gasoline container.
- Secure the vehicle in an upright position, using motorcycle tie-down straps. Avoid using rope, which can loosen and allow the vehicle to fall over.
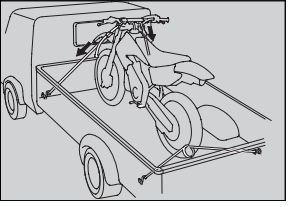
To secure your vehicle, brace the front wheel against the front of the truck bed or trailer rail. Attach the lower ends of two straps to the tiedown hooks on truck bed or trailer rail. Attach the upper ends of the straps to the handlebar (one on the right side, the other on the left), close to the fork.
Check that the tie-down straps do not contact any control cables or electrical wiring.
Tighten both straps until the front suspension is compressed about half-way. Too much pressure is unnecessary and could damage the fork seals.
Use another tie-down strap to keep the rear of the vehicle from moving.
We recommend that you do not transport your vehicle on its side. This can damage the vehicle, and leaking gasoline could be a hazard.
Oxygenated Fuels
- Some conventional fuels blended with alcohol or an ether compound are available in some locales to help reduce emissions to meet clean air standards. These gasolines are collectively referred to as oxygenated fuels. If you plan to use oxygenated fuel, check that it is unleaded and meets the minimum octane rating and blend requirement.
- The following fuel blends have been approved for use in your vehicle:
- Ethanol (ethyl alcohol) up to 10% by volume.
- Gasoline containing ethanol may be marketed under the name Gasohol.
- Do not use gasoline containing methanol (methyl alcohol).
- Ethanol (ethyl alcohol) up to 10% by volume.
- If you accidentally fill your fuel tank with an oxygenated fuel containing higher percentages, you may experience performance problems. To resolve the problem, have your dealer drain the fuel tank and replace with the correct fuel. Fuel system or performance problems resulting from the use of an oxygenated fuel containing higher percentages are not covered by your warranty.
- NOTICE Improper use of oxygenated fuels can damage metal, rubber, and plastic parts of your fuel system. Oxygenated fuel can also damage paint.
- If you notice any undesirable operating symptoms or performance problems, try a different brand of gasoline.
Specifications
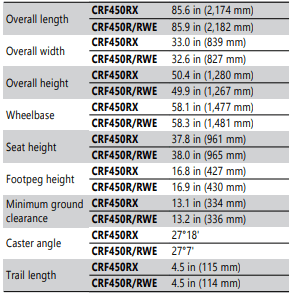
Dimension
Frame
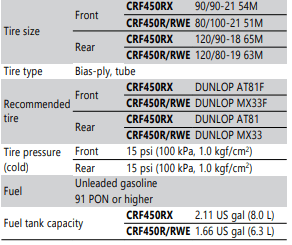
Engine
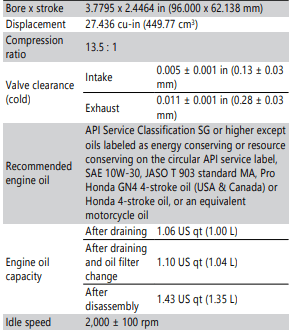
Cooling system

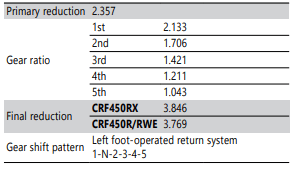
Drive train
Electrical

Fuses
- Main fuse: 10 A
Torque specifications

See other models: INSIGHT 2022 PCX150 2022 RUCKUS 2022 GROM 2021 NC750X
