Loading ...
Loading ...
Loading ...
34
INSTALLATION INSTRUCTIONS
FOR YOUR SAFETY
If you smell gas:
1. Open windows.
2. Don’t touch electrical switches.
3. Extinguish any open flame.
4. Immediately call your gas supplier.
CAUTION
Do not attempt to operate the oven
of this range during a power failure
(Electric Ignition models only).
IMPORTANT
Remove all packing material and
literature from oven before connecting
gas and electrical supply to range.
FOR YOUR SAFETY
Do not store or use combustible
materials, gasoline or other flammable
vapors and liquids in the vicinity of this
or any other appliance.
BEFORE YOU BEGIN
Read these instructions completely and
carefully.
IMPORTANT: Save these instructions
for the local electrical inspector’s use.
INSTALLER: Leave these instructions
with the appliance after installation is
completed.
CONSUMER:
Keep this Use and Care
Guide and the Installation Instructions
for future use.
This appliance must be properly grounded.
WARNING
• Improper installation, adjustment,
alteration, service or maintenance can
cause injury or property damage. Refer to
this guide. For assistance or additional
information, consult a qualified installer,
service agency, manufacturer (dealer) or
the gas supplier.
• Never reuse old flexible connectors.
The use of old flexible connectors can
cause gas leaks and personal injury.
Always use NEW flexible connectors
when installing a gas appliance.
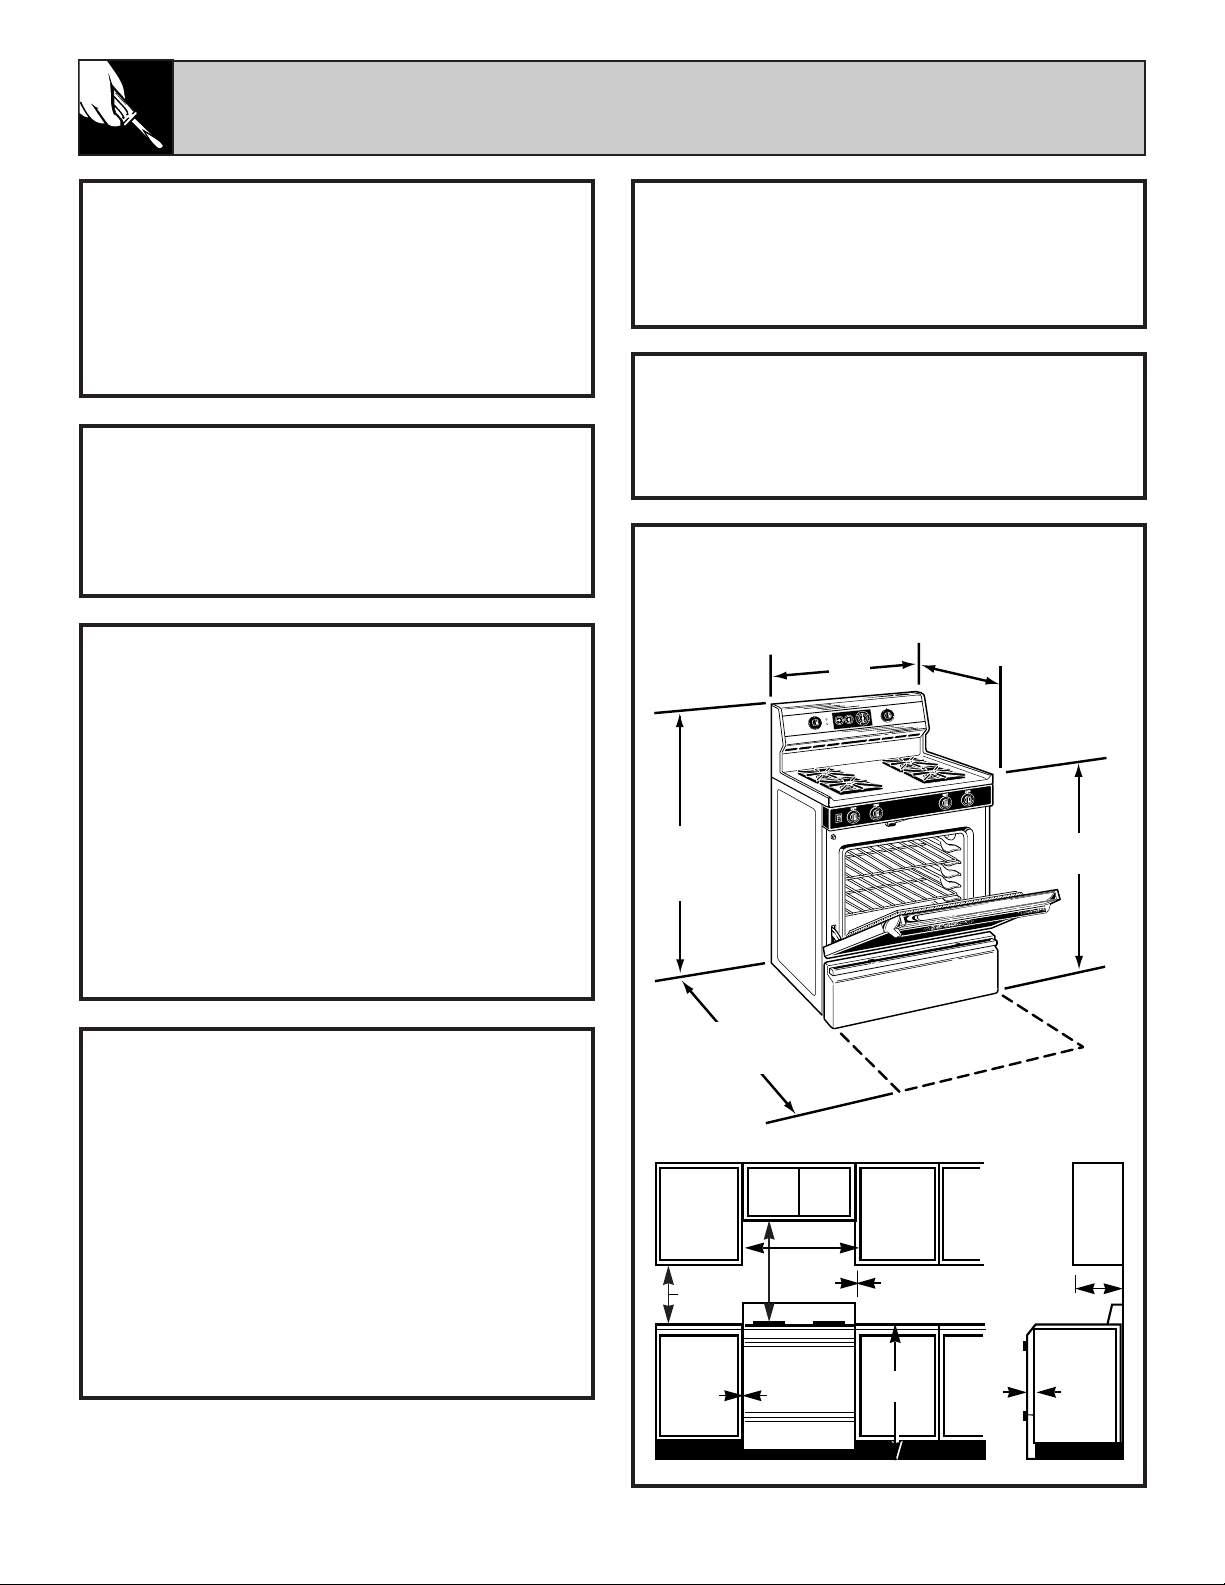
DIMENSIONS AND CLEARANCES
Provide adequate clearances between the range
and adjacent combustible surfaces.
MASK FOR SHELVES
O
F
F
˚
˚
˚
˚
˚
L
I
T
E
˚
˚
˚
H
I
˚
˚
˚
˚
˚
˚
˚
˚
˚
˚
˚
˚
˚
˚
˚
˚
˚
˚
˚
˚
˚
˚
˚
˚
˚
˚
˚
˚
˚
˚
˚
˚
˚
˚
˚
˚
˚
˚
˚
˚
˚
˚
˚
˚
˚
˚
˚
L
O
W
LEFT
REAR
O
F
F
˚
˚
˚
˚
˚
L
I
T
E
˚
˚
˚
H
I
˚
˚
˚
˚
˚
˚
˚
˚
˚
˚
˚
˚
˚
˚
˚
˚
˚
˚
˚
˚
˚
˚
˚
˚
˚
˚
˚
˚
˚
˚
˚
˚
˚
˚
˚
˚
˚
˚
˚
˚
˚
˚
˚
˚
˚
˚
˚
L
O
W
LEFT
FRONT
O
F
F
˚
˚
˚
˚
˚
L
I
T
E
˚
˚
˚
H
I
˚
˚
˚
˚
˚
˚
˚
˚
˚
˚
˚
˚
˚
˚
˚
˚
˚
˚
˚
˚
˚
˚
˚
˚
˚
˚
˚
˚
˚
˚
˚
˚
˚
˚
˚
˚
˚
˚
˚
˚
˚
˚
˚
˚
˚
˚
˚
L
O
W
RIGHT
REAR
O
F
F
˚
˚
˚
˚
˚
L
I
T
E
˚
˚
˚
H
I
˚
˚
˚
˚
˚
˚
˚
˚
˚
˚
˚
˚
˚
˚
˚
˚
˚
˚
˚
˚
˚
˚
˚
˚
˚
˚
˚
˚
˚
˚
˚
˚
˚
˚
˚
˚
˚
˚
˚
˚
˚
˚
˚
˚
˚
˚
˚
L
O
W
RIGHT
FRONT
PUSH TO TURN
12
3
9
6
STOP TIM
E
DELAY START
12
3
9
6
OFF
60
55
50
45
40
35
30
25
20
15
10
5
0
12
3
9
6
OVEN TEM
P
B
A
K
E
˚
˚
˚
˚
˚
˚
˚
˚
˚
˚
˚
˚
˚
˚
B
R
O
I
L
˚
˚
˚
˚
˚
˚
˚
˚
˚
˚
˚
˚
˚
˚
C
L
E
A
N
˚
˚
˚
˚
˚
˚
˚
˚
˚
T
I
M
E
B
A
K
E
OVEN TEM
P
C
L
E
A
N
O
F
F
˚
˚
W
A
R
M
2
0
0
˚
˚
˚
3
0
0
˚
˚
˚
4
0
0
˚
˚
˚
5
0
0
B
R
O
I
L
Depth with Door Closed
(Includes Door Handle):
28
1
⁄
4
″
30″
Height
46
1
⁄
2
″
36
1
⁄
4
″±
1/4
″
Depth with
Door Open:
46
3
⁄
8
″
To cabinets
below cook-top
and at the range
back
30″
13″
30″
Minimum
1″ To wall on
either side
Maximum depth
for cabinets above
countertops
Front edge
of the range
side panel
forward
from
cabinet
18″
0″
1/4″
Minimum
to cabinets
on either
side of the
range
36″
Loading ...
Loading ...
Loading ...