Loading ...
Loading ...
Loading ...
51
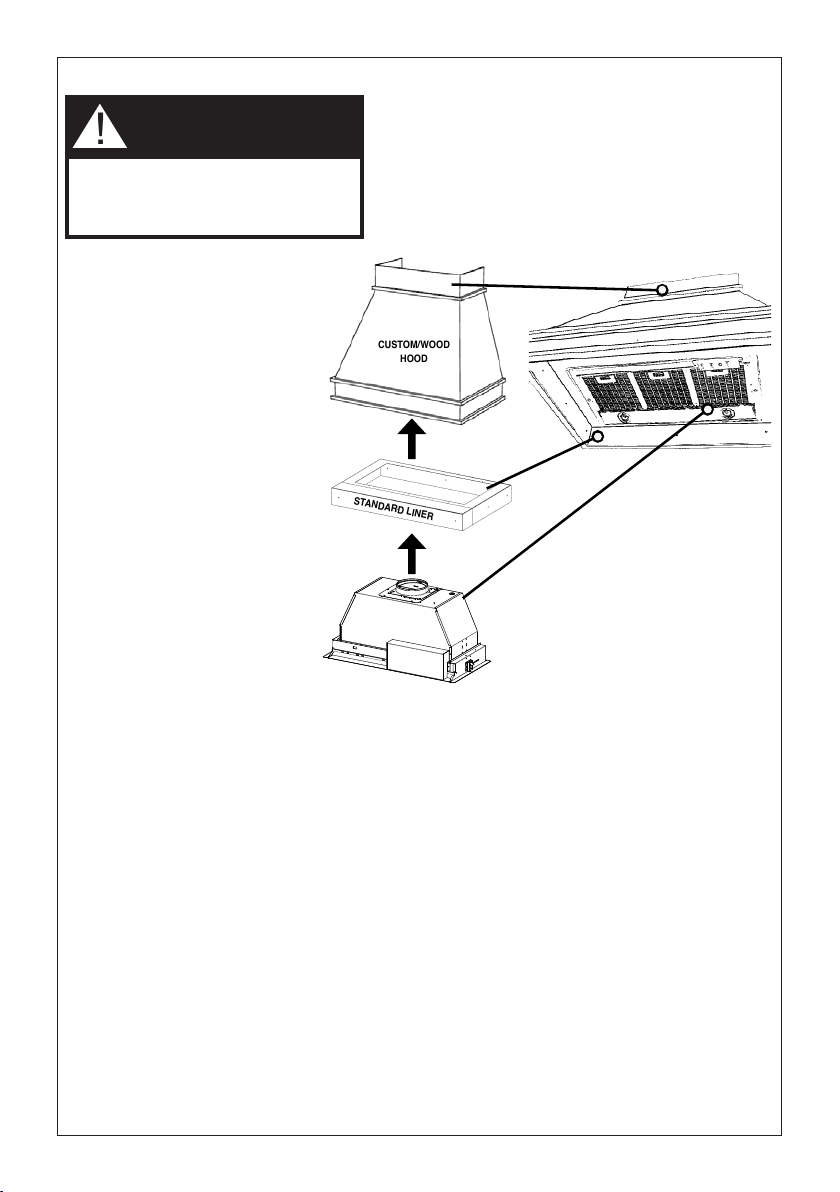
FOR INSTALLATIONS WITH LINERS
CUSTOM/WOOD
HOOD
STANDARD LINER
WARNING
!
When building a custom hood,
always follow all applicable
codes and standards.
1. The custom/wood hood must have a sturdy base (3/4" plywood recommended) to
accomodate the cut-out for the Inca HC SS. The base must be recessed to accomodate
the height of the Liner (see LINER DIMENSIONS on Page 4). The Liner attaches to the
bottom of the base using screws appropriate for the size and material of your custom/
wood hood. The Inca HC SS inserts into the cut-out in the Liner and base.
2. Position the rear section of the Liner so that it abuts the back edge of your custom/
wood hood. Using a pen, trace the outline of the pre-cut out. Remove the Liner and
proceed to MAKE YOUR CUT-OUTS on Page 7. Install both sections of the Liner and
proceed to INSTALL THE Range hood on Page 7.
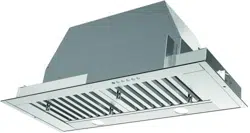
INCA HC SS
The Inca HC SS can be used with
custom cabinetry and hoods 30"
wide and up. Choose either a
custom liner or our Standard Liner
designed for 30" and 36" wide
installations.
Liners create a perfectly-sealed,
non-combustible finish for the
underside of your custom/wood
hood.
The Standard Liners are made up of
two sections: a larger, rear section
(pre-cut out for insertion of the
Inca Smart) and a front section for
a total adjustable depth between
16" and 17
7/8"
.
!!! IMPORTANT NOTE: YOU
MUST REMOVE THE ADDITIONAL
PERFORATED SECTION AROUND
THE PRE-CUT-OUT WHEN
INSTALLING THE STANDARD
LINER WITH THE INCA HC SS
MODEL.
Consider the shape, size, and
weight of the Inca HC SS and Liner
to determine the conguration
of the custom/wood hood. See
Range hood AND CUT-OUT
DIMENSIONS AND LINER
DIMENSIONS on Page 4.
PARA LA INSTALACIÓN CON FORROS
Al construir una campana
personalizada, siempre siga todos
los códigos y estándares aplicables.
ADVERTENCIA
!
El Inca SD se puede usar con
armarios y campanas a medida de
30" de ancho y superior. Elija un
forro personalizado o nuestro
forro estándar diseñado para
instalaciones de 30" y 36" de
ancho.
Los forros crean un acabado de
sellado perfecto e incombustible
para la parte inferior de su
campana de madera
personalizada.
Los forros estándar se componen
de dos secciones: una sección
trasera más grande (pre recortada
para la inserción del Inca Smart)
y una sección frontal para una
profundidad ajustable total entre
16" y 17 7/8".
!!! NOTA IMPORTANTE: SE
DEBE ELIMINAR LA SECCIÓN
PERFORADA ADICIONAL
ALREDEDOR DE LA PARTE
PRECORTADA AL INSTALAR LA
REJILLA ESTÁNDAR CON EL
MODELO INCA SD.
Considere la forma, el tamaño y
el peso del Inca SD y el forro
para determinar la conguración
de la campana de madera/
personalizada.
1. La campana de madera/personalizada debe tener
una base resistente (se recomienda madera contra-
chapada de 3/4") para alojar el recorte para Inca SD.
La base debe estar rebajada para alojar la altura del
forro (consulte DIMENSIONES DEL FORRO en la
Página 47). El forro se acopla a la
parte inferior de la base con tornillos adecuados para
el tamaño y el material de la campana de madera/
personalizada. El Inca SD se inserta en el recorte en el
forro y la base.
2. Coloque la sección posterior del forro de forma que
quede en el borde posterior de la campana persona-
lizada/de madera. Con un bolígrafo, trace el contorno
del pre recorte. Retire el forro y proceda a HACER
LOS RECORTES . Instale ambas secciones del forro y
proceda a INSTALAR LA CAMPANA EXTRACTORA.
Loading ...
Loading ...
Loading ...