Owner's Guide Washer & Dryer
USING THE DRYER
WARNING: To reduce the risk of fire, electric shock, or injury to persons, read the IMPORTANT SAFETY INFORMATION before operating this appliance.
WARNING - Fire Hazard
- Keep flammable materials and vapors, such as gasoline, away from dryer.
- DO NOT dry anything that has ever had anything flammable on it (even after washing).
- No washer can completely remove oil.
- DO NOT dry anything that has ever had any type of oil on it (including cooking oils).
- Items containing foam, rubber, or plastic must be dried on a clothesline.
- Failure to do so can result in death, explosion, or fire.
Using the dryer
Features and appearance will vary.
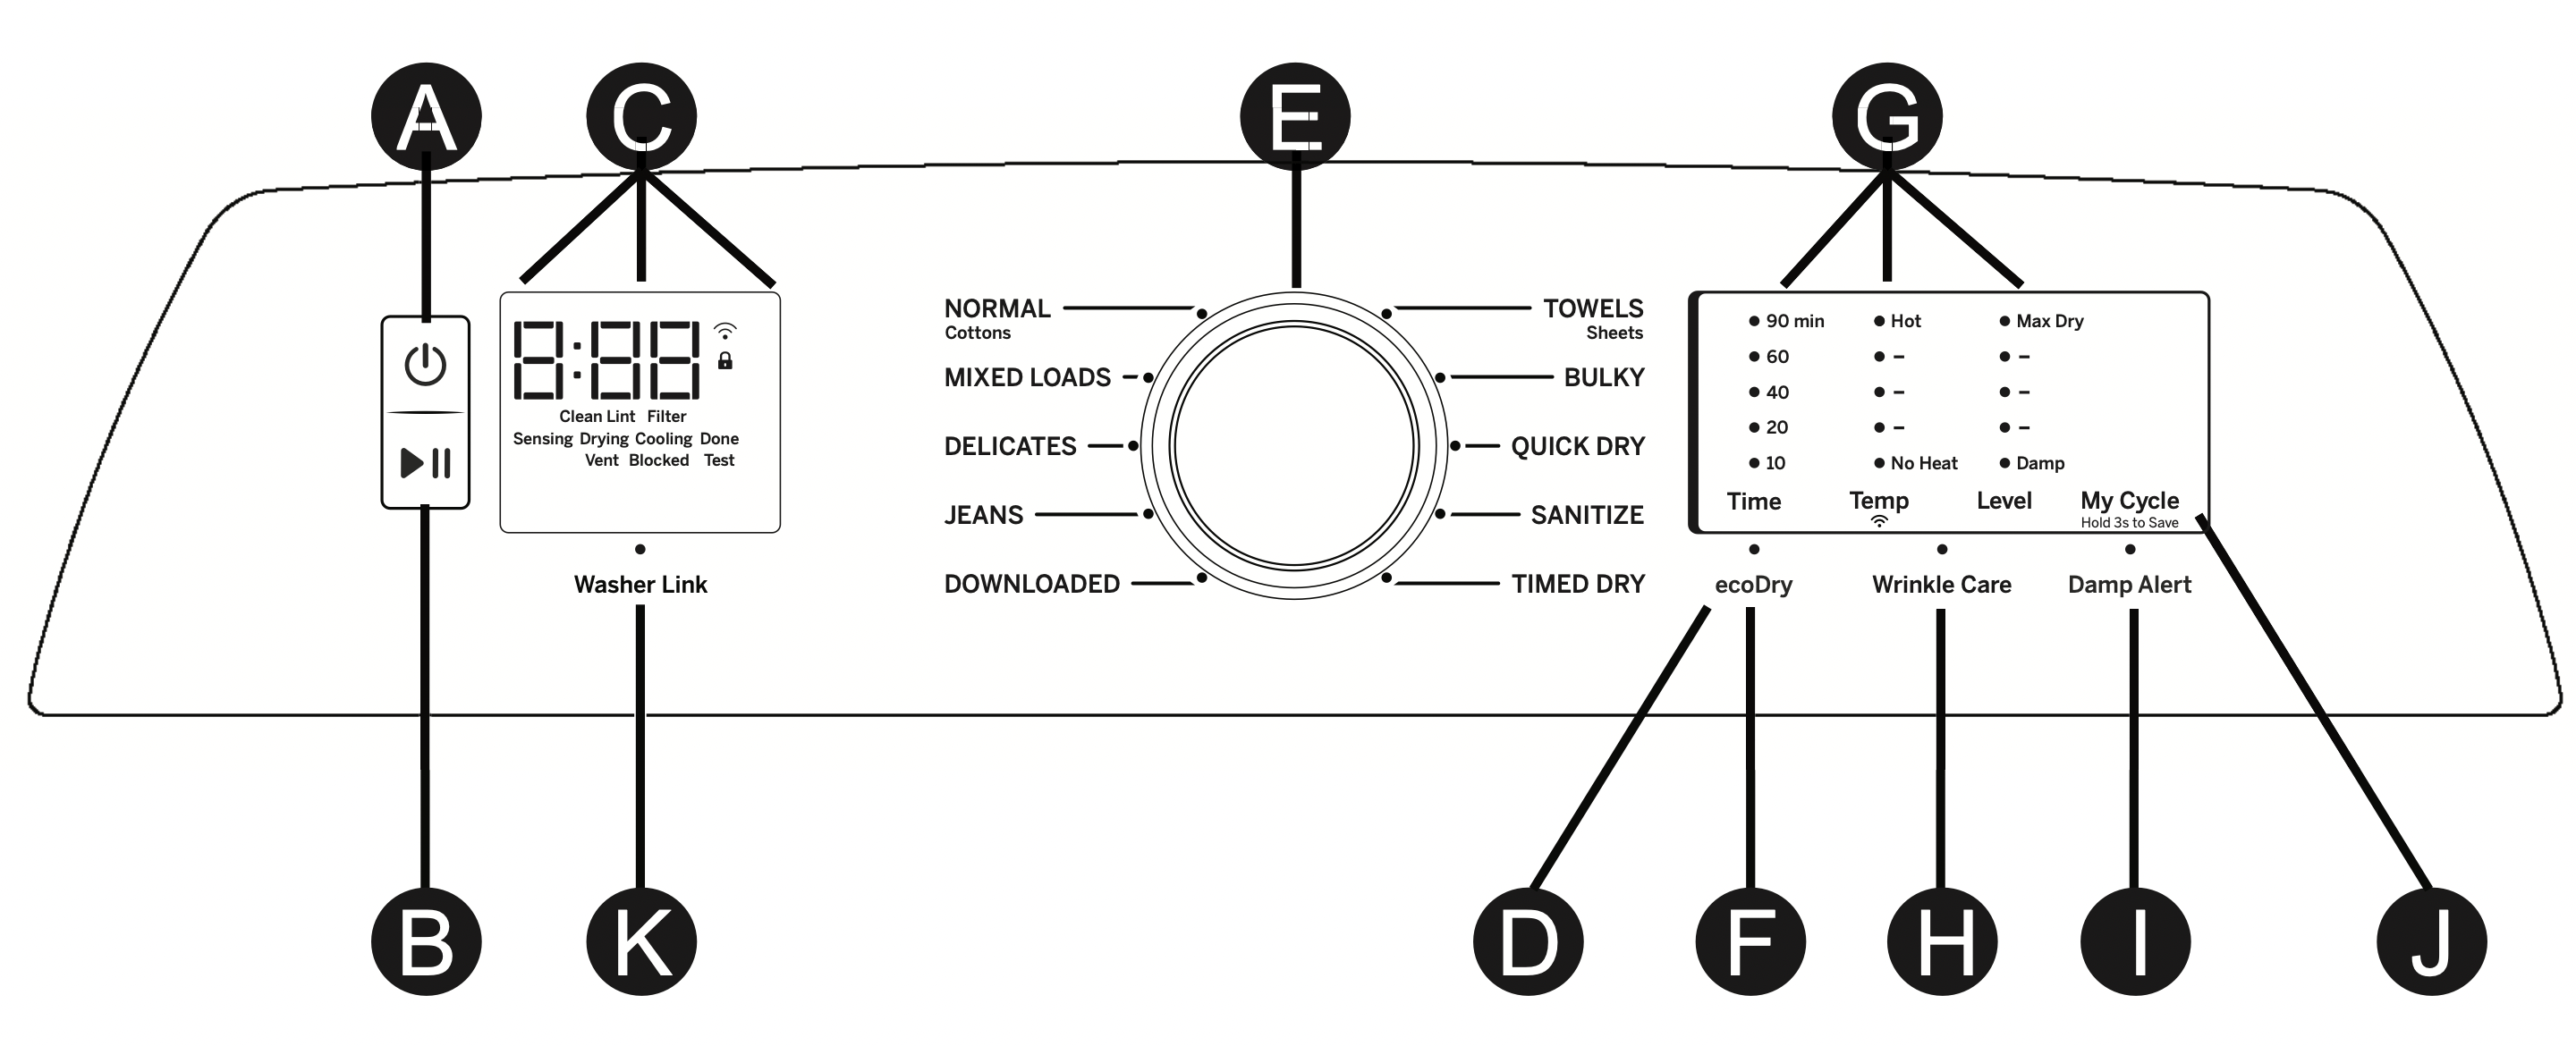
A. Power
Press to “wake up” the display. If the display is active, press to put the dryer into idle mode.
NOTE: Pressing Power does not disconnect the appliance from the power supply.
B. Start and Pause
Press Start to begin the cycle.
NOTE: The door must be closed for the dryer to start the cycle. Pressing Start again will pause the cycle, the Start light will blink and “Pause” will display. To continue the cycle, press Start again.
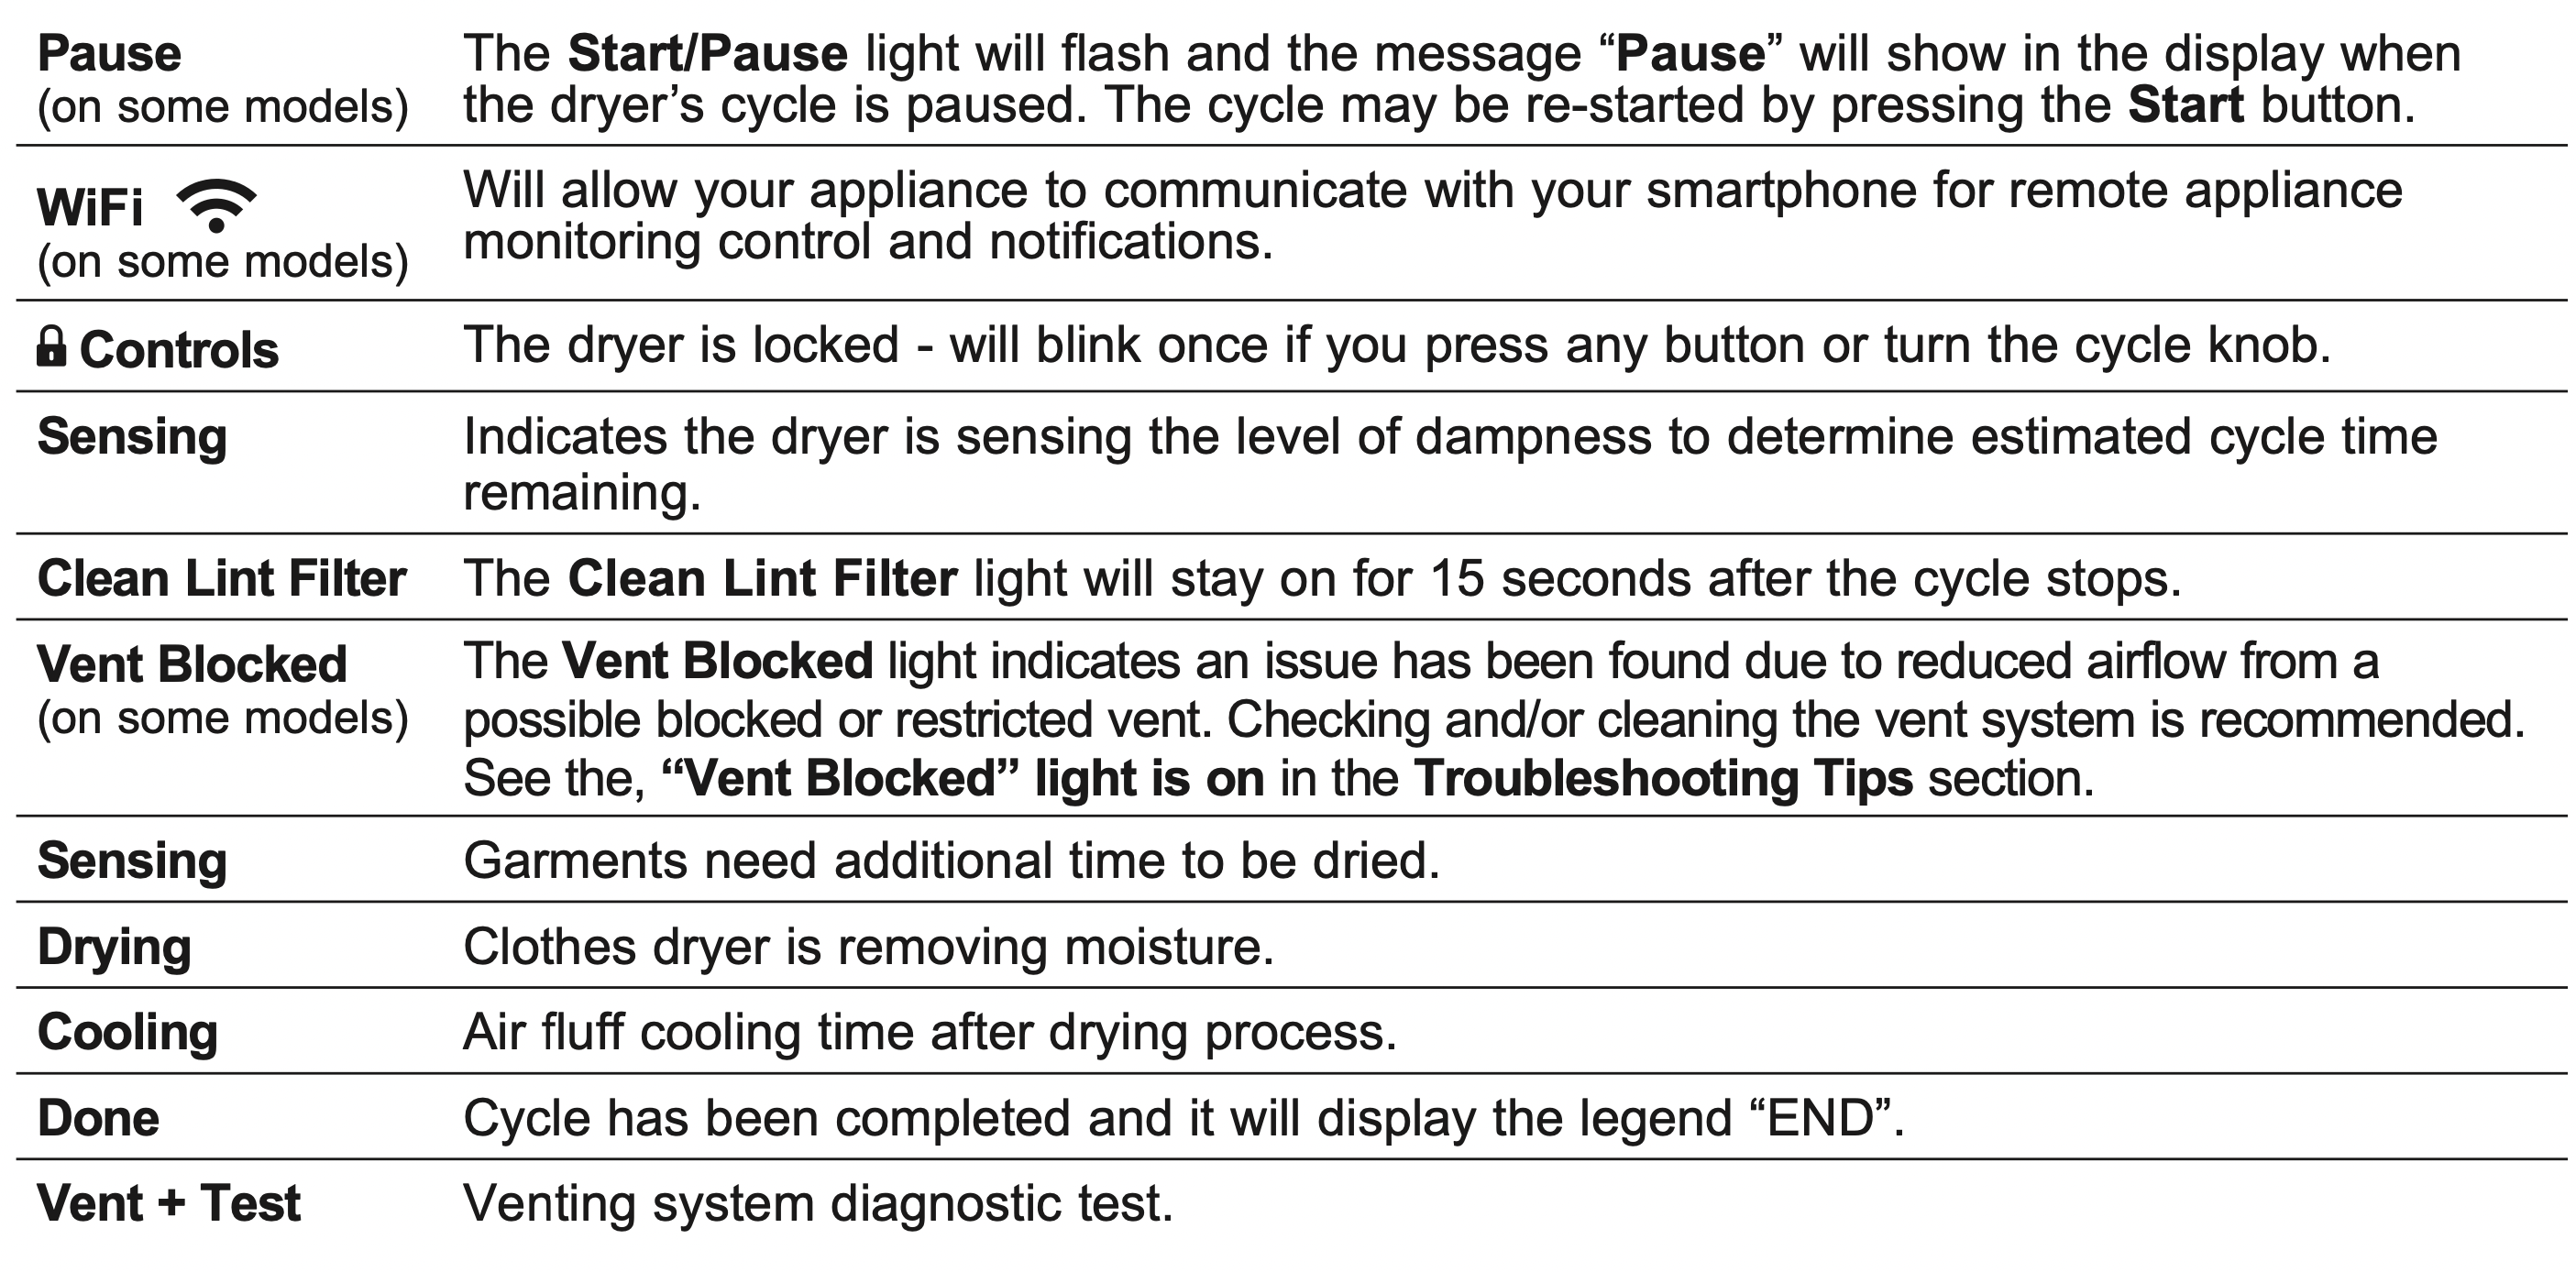
C. Display and Status Lights
The display shows the approximate time remaining until the end of the cycle.
In addition, this display will show the dryer status:
D. Control Lock 
You can lock the controls to prevent any selections from being made. Or you can lock the controls after you have started a cycle. Children cannot accidentally start the dryer by touching buttons with this option selected.
To lock/unlock the dryer controls, press and hold the ecoDry button for 3 seconds. The control lock icon will flash while locking/unlocking, stay on when locked, and turn off when unlocked.
NOTE: The Power button can still be used when the machine is locked.
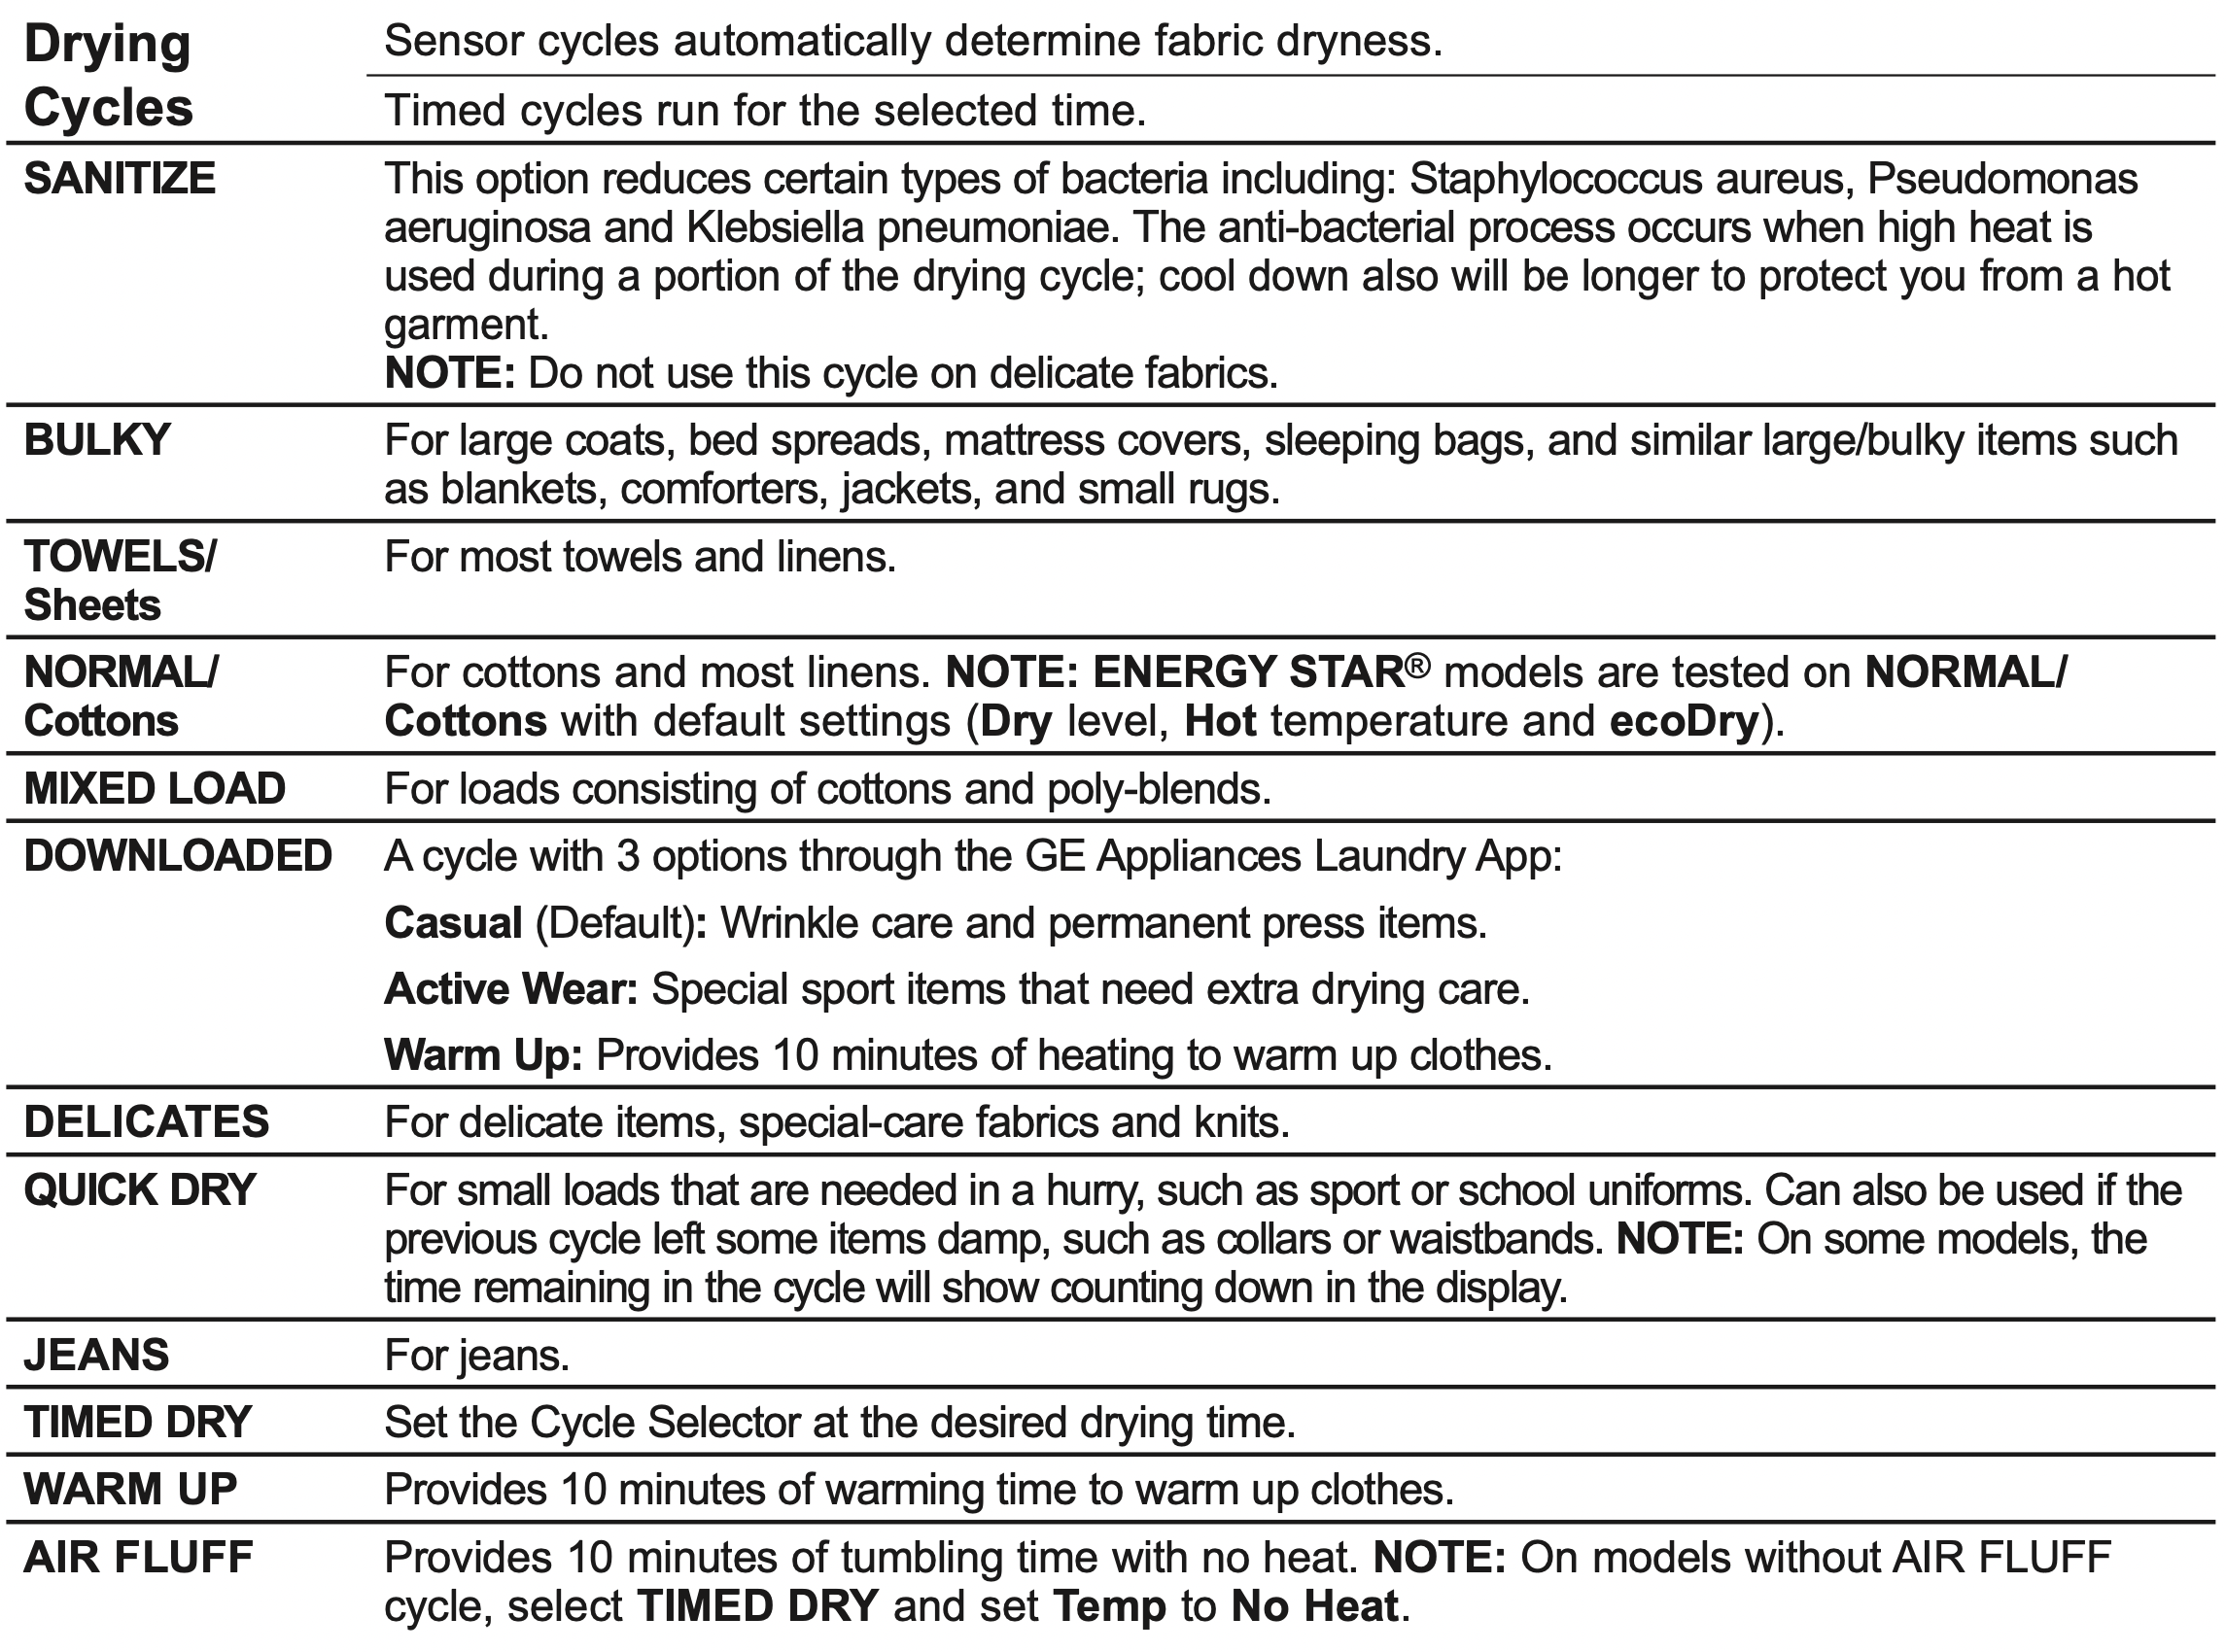
E. Drying Cycles
F. ecoDry
Available for BULKY, TOWELS/Sheets, NORMAL/Cottons, MIXED LOAD, JEANS, and DELICATES. When the ecoDry button is pressed, cycle settings change to reduce the total energy consumption of the selected sensor cycle.
NOTE: Cycle times will change when ecoDry is selected. The ecoDry option will default to on for NORMAL/Cottons. For optimal energy savings, turn ecoDry on. For optimal drying times, turn ecoDry off.
NOTE: Energy savings will vary across loads and cycles.
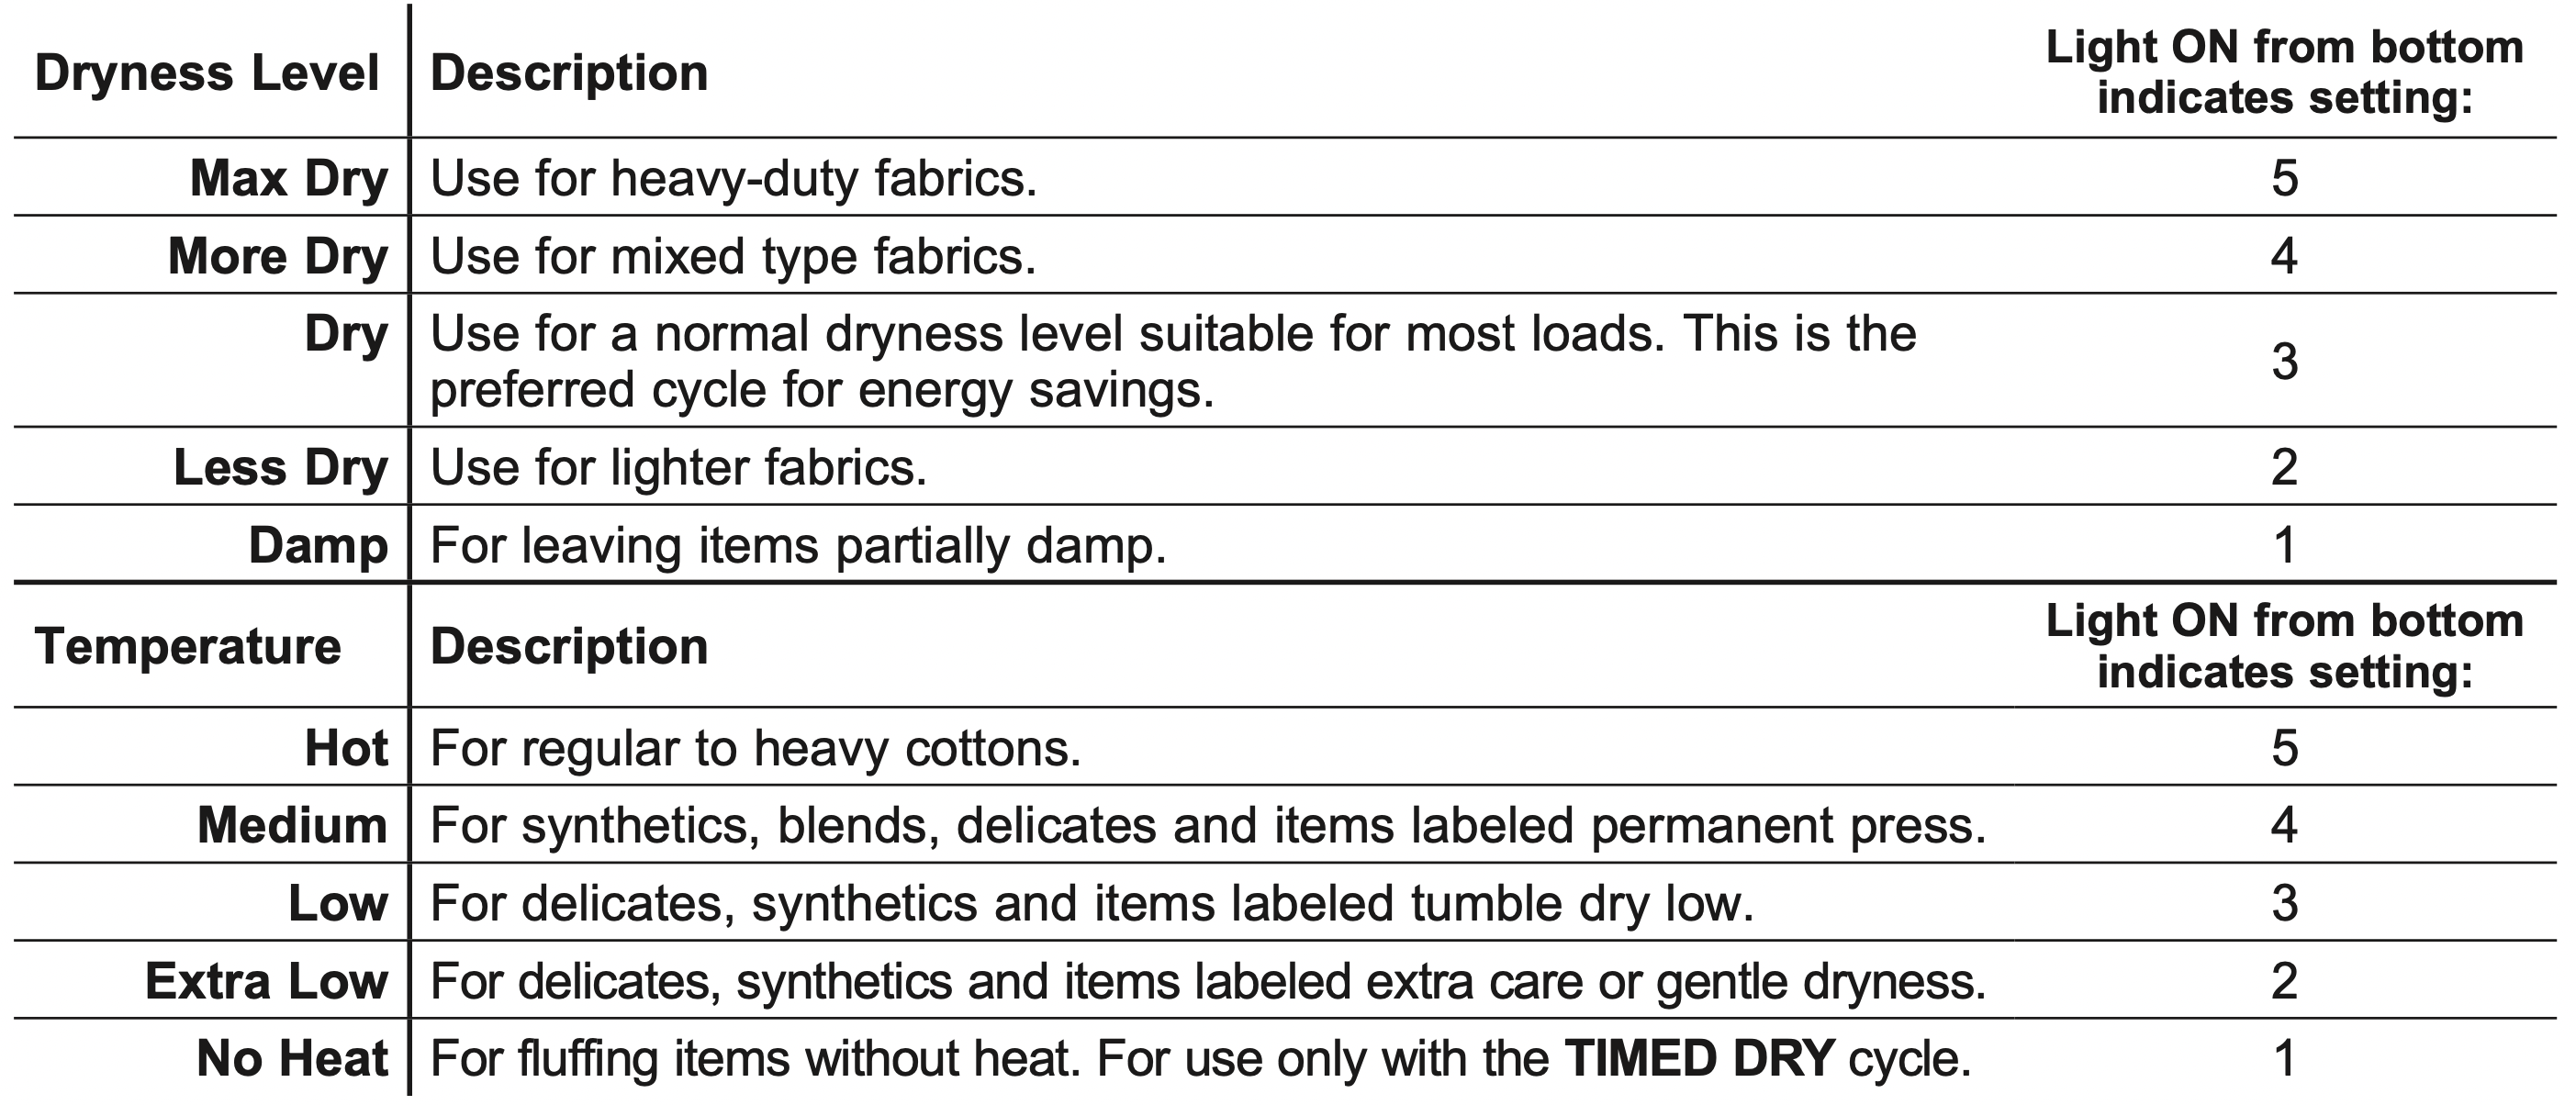
G. Settings
Individual settings for cycle minutes (Time), dryness level (Level) and temperature (Temp) can be set from the minimum (lowest in column) to maximum (highest in column). In general, the higher up the column, the more energy will be used.
H. Wrinkle Care
Use this option to minimize the wrinkles in clothes. It provides 1 hour of no-heat tumbling after the clothes are dry. If you have Sound option enabled and you select the Wrinkle Care option, a signal will sound at the end of the drying time and several times during the Wrinkle Care cycle. This will remind you that it is time to remove the clothes.
Sound
Press and hold the Wrinkle Care button for 3 seconds to toggle Sound option between enabled and disabled. “Sound on” will show on the display and a tone will play when enabled. “Sound off” will show on the display and no tone will play when disabled.
I. Damp Alert
This option causes the dryer to beep when clothes have dried to a damp level. Remove items that you wish to hang dry. The Damp Alert will only beep when this option is selected (but the dry cycle will keep running). Removing clothes and hanging them when they are damp, can reduce the need to iron some items. The light beside the button will be lit when Damp Alert is on.
Drum Light
The drum light will turn on if, the Damp Alert button is pressed for 3 seconds, or the door is opened. It will turn off when the door is shut, the Damp Alert button is pressed again for 3 seconds or after 5 minutes if the door is left open.
- Remove garments promptly at the sound of signal. Place clothes on hangers so wrinkles will not set in.
- Use the Damp Alert especially when drying fabrics like polyester, knits and permanent press. These fabrics should be removed so wrinkles will not set in.
J. My Cycle
As the cycle selector knob is turned, the Time (timed dry), Level (dryness level) and Temp (temperature) settings change to automatic pre-set default settings. If you desire a different setting, press the appropriate button(s). Then press and hold the My Cycle button for 3 seconds and the dryer will “remember” these settings for that Knob Selection. In the future, when you turn the selector knob to that cycle, your settings will be automatically recalled.
NOTE: Signal sound cannot be set for My Cycle.
K. Washer Link
This feature wirelessly links your washer to your dryer and uses the connection information to automatically adjust the settings of your dryer for the clothes just washed. If the dryer has a valid WiFi connection, and the Washer Link option is selected, either via the button or the App, the light above the button will be lit. If the option is not selected then the light will turn off. If the dryer does not have a valid WiFi connection, and this option is selected, either via the button or the App, the WiFi light and the Washer Link light will blink and an error tone will play.
LOADING
Always follow fabric manufacturer’s care label when laundering.
Sorting and Loading Hints
WARNING - Fire Hazard
- Keep flammable materials and vapors, such as gasoline, away from dryer.
- DO NOT dry anything that has ever had anything flammable on it (even after washing). ŷ No washer can completely remove oil.
- DO NOT dry anything that has ever had any type of oil on it (including cooking oils).
- Items containing foam, rubber, or plastic must be dried on a clothesline.
- Failure to do so can result in death, explosion, or fire.
As a general rule, if clothes are sorted properly for the washer, they are sorted properly for the dryer. Try also to sort items according to size. For example, do not dry a sheet with socks or other small items.
Do not add fabric softener sheets once the load has become warm. They may cause fabric softener stains. Bounce® Fabric Conditioner Dryer Sheets have been approved for use in this dryer when used in accordance with the manufacturer’s instructions.
Do not overload. This wastes energy and causes wrinkling.
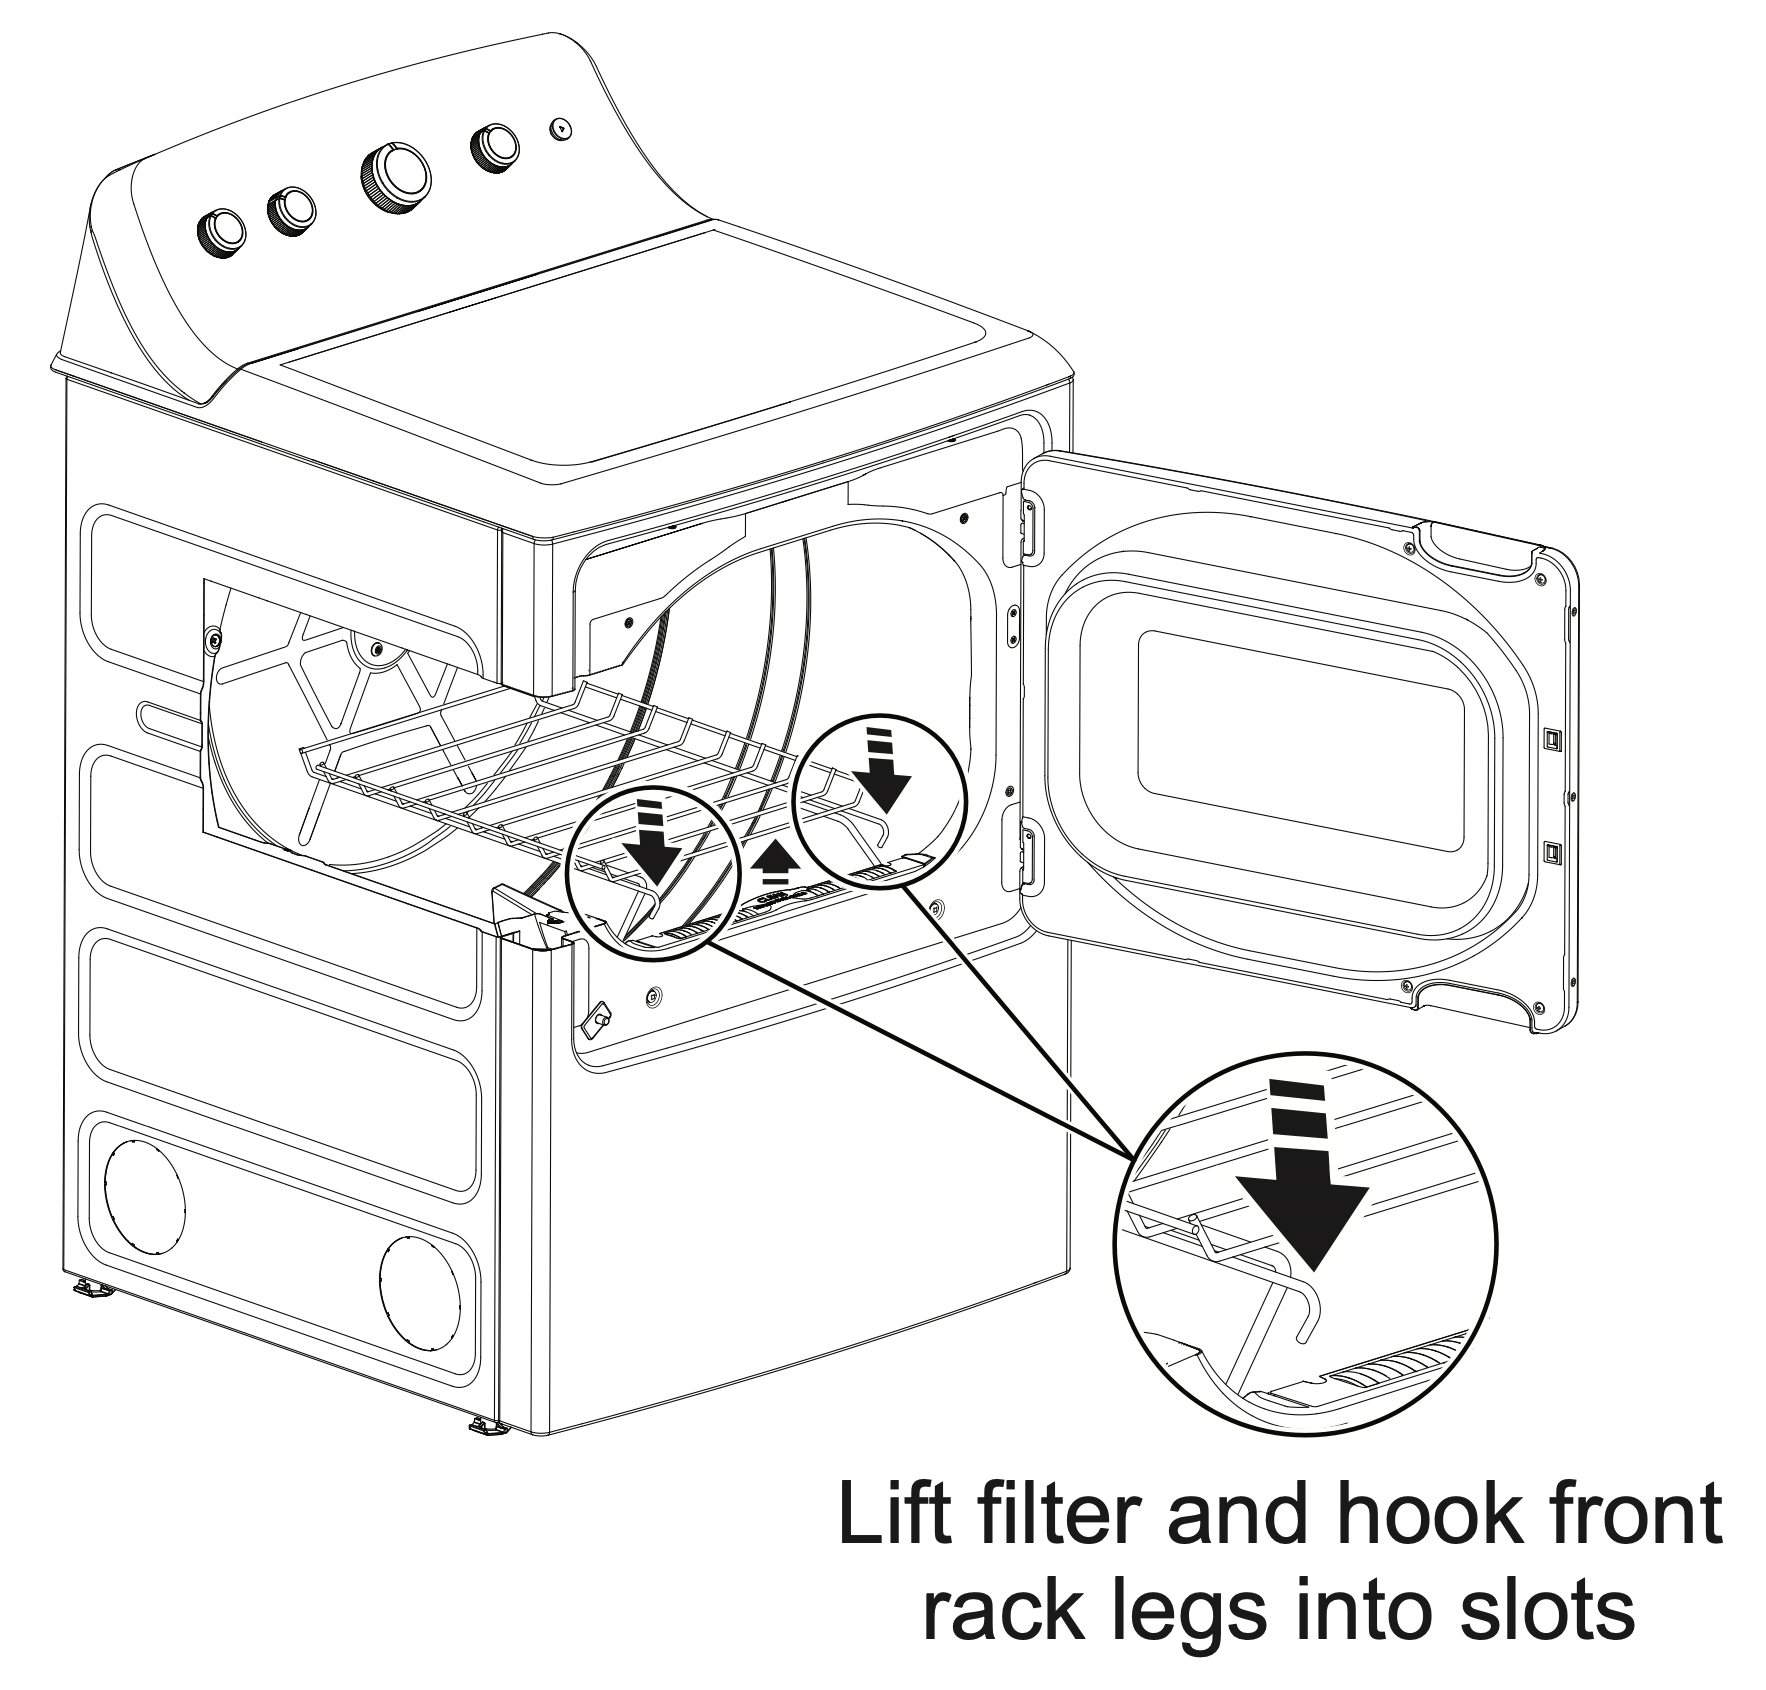
Drying Rack (on some models)
A handy drying rack may be used for drying delicate items such as washable sweaters.
To install the drying rack:
- Lift the lint filter slightly. (Do not remove the lint filter completely).
- Place the rack in the dryer and lower its front legs and hook them in the slots.
- Press the rack down flat and lower the lint filter back down into position.
NOTES:
- The drying rack must be used with the TIMED DRY cycle. Use with sensor cycles may result in damp items or extended cycle times.
- Do not use this drying rack when there are other clothes in the dryer.
VENTING
Venting the Dryer
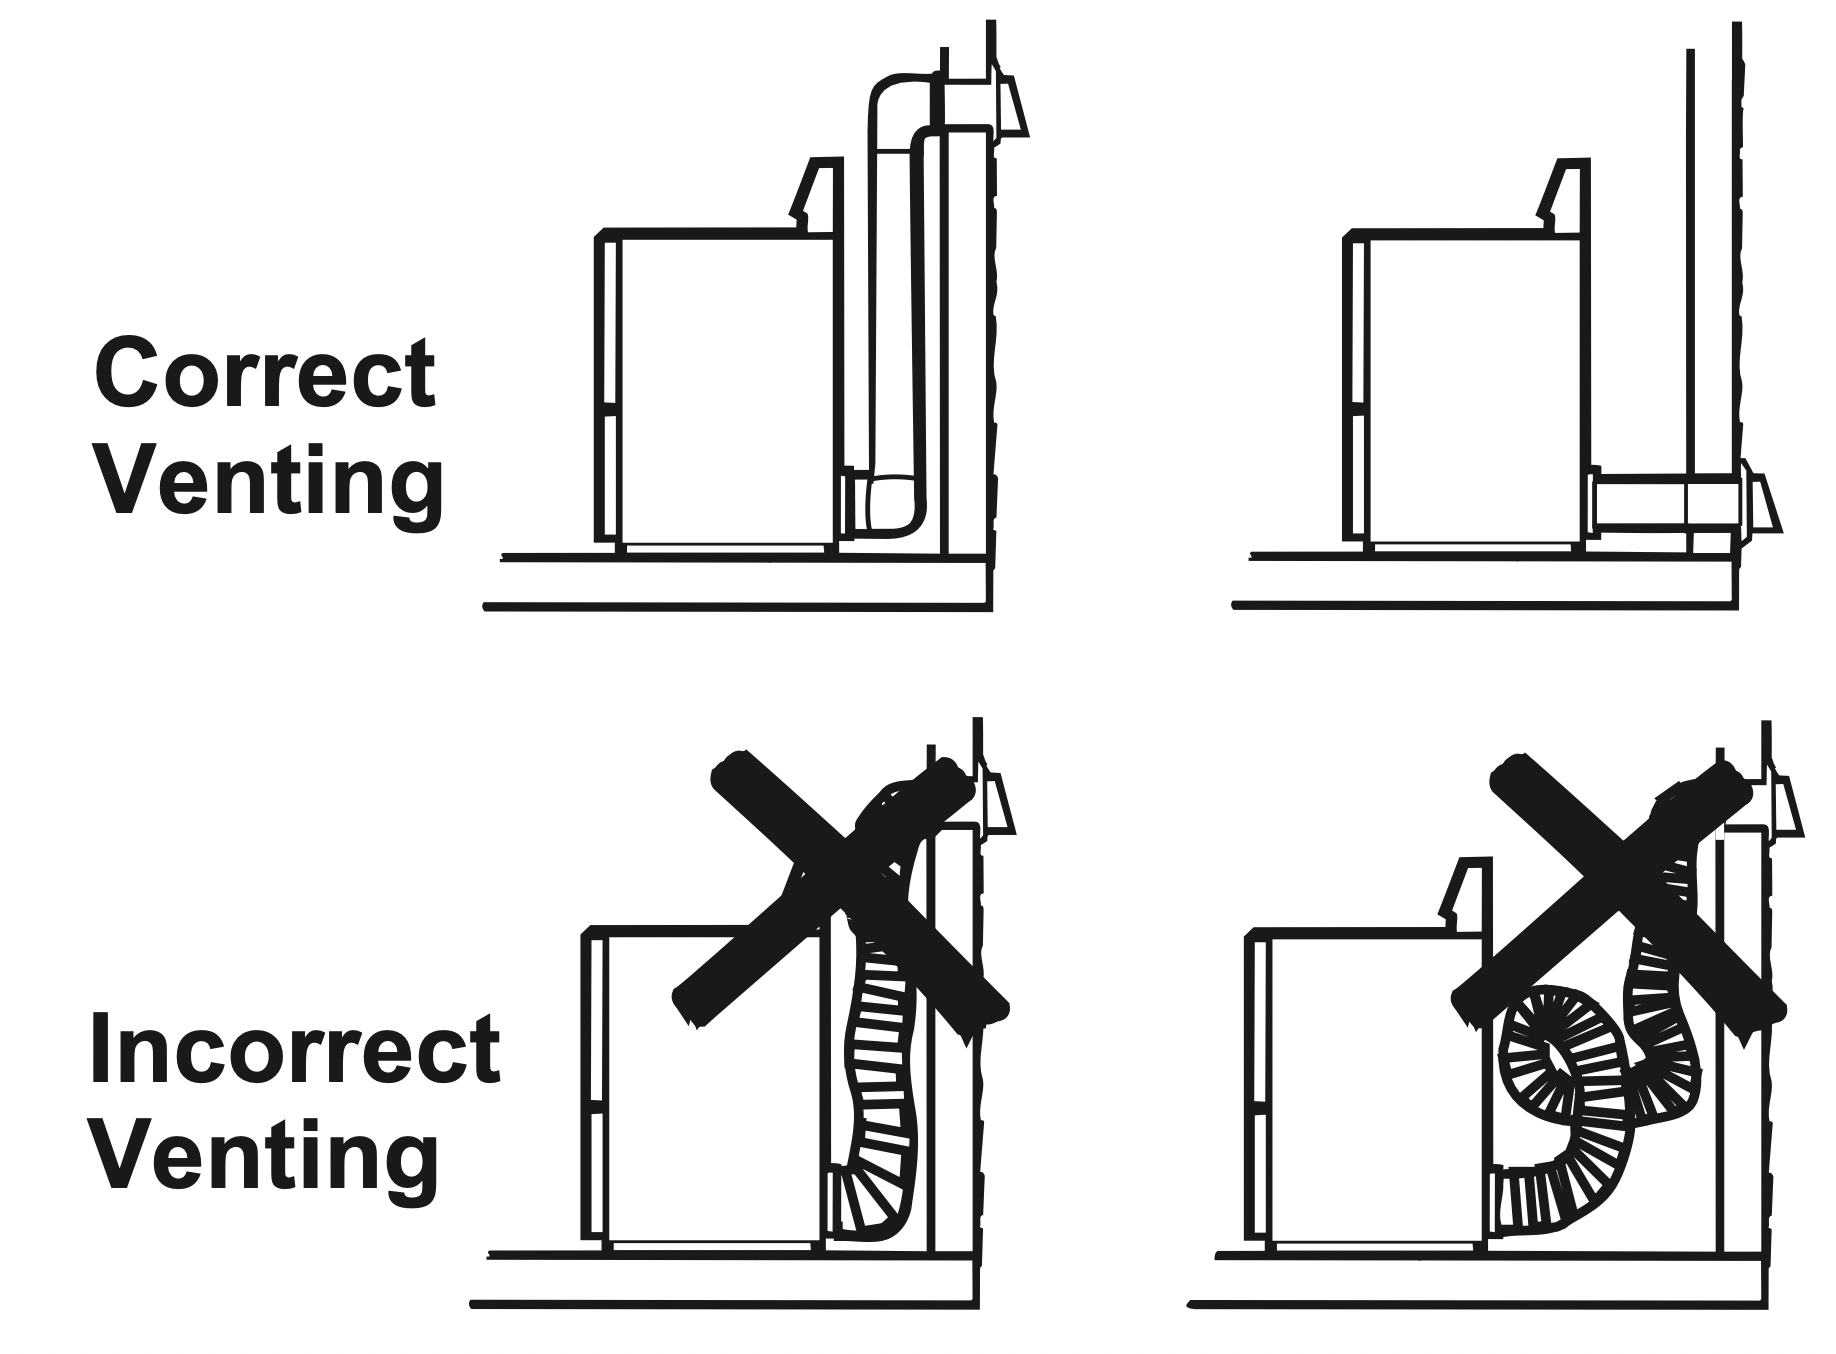
For the best drying performance, the dryer needs to be properly vented. The dryer will use more energy and run longer if it is not vented to the specifications below. Carefully follow the details on Exhausting in the Installation Instructions.
- Use only rigid metal 4” diameter ductwork inside the dryer cabinet. Use only rigid metal or UL listed flexible metal 4” diameter ductwork for exhausting to the outside.
- Do not use plastic or other combustible ductwork.
- Use the shortest length possible.
- Do not crush or collapse.
- Avoid resting the duct on sharp objects.
- Venting must conform to local building codes.
WARNING - Fire Hazard
- Use only 4” rigid metal ducting for the home exhaust duct.
- This dryer MUST be exhausted to the outdoors.
- Use only 4” rigid metal or UL-listed dryer transition duct to connect the dryer to the home exhaust.
- DO NOT use a plastic vent.
- DO NOT exhaust into a chimney, kitchen exhaust, gas vent, wall, ceiling, attic, crawl space, or concealed space of a building.
- DO NOT install a screen in or over the exhaust duct.
- DO NOT install a booster fan in the exhaust duct.
- DO NOT use duct longer than specified in the exhaust length table.
- Failure to follow these instructions can result in death or fire.
Vent Health
Is a diagnostic test to verify the status of the venting system.
NOTE: To run the test, ambient temperature must be below 85°F (if temperature is above 85°F the test will be invalid and the main display will show “00”).
To enter Vent Health test mode:
- Ensure the drum is empty.
- Ensure the lint filter is clean.
- Press and hold the Time and Level buttons for 3 seconds.
- Close the door and press Start.
After the test is run, the display will show a number. Use the table below to understand the result and the action needed.
| Main Display |
LED Display |
Result |
Action* |
|
01
|
OFF
|
Clean/Normal
|
Your house vent is in good condition and no action is required.
|
|
02
|
OFF
|
May need attention
|
Your house vent condition may affect your dryer’s performance. Check and clean or make adjustments to improve.
|
|
03
|
Vent Blocked
|
Blocked
|
Your house vent is highly restricted and is affecting your dryer’s performance. Clean and/or make needed adjustments to improve.
|
|
*Also see Interior and Duct in the Care and Cleaning section.
|
CARE AND CLEANING
Interior and Duct
The interior of the appliance and exhaust duct should be cleaned once a year by qualified service personnel.
The Exhaust Duct: Inspect and clean the exhaust ducting at least once a year to prevent clogging. A partially clogged exhaust can lengthen the drying time.
Follow these steps:
- Turn off electrical supply by disconnecting the plug from the wall socket.
- Disconnect the duct from the dryer.
- Vacuum the duct with the hose attachment and reconnect the duct.
The Exhaust Hood: Check with a mirror that the inside flaps of the hood move freely when operating. Make sure that there is no wildlife (birds, insects, etc.) nesting inside the duct or hood.
Exterior
Wipe or dust any spills or washing compounds with a damp cloth. Dryer control panel and finishes may be damaged by some laundry pretreatment soil and stain remover products. Apply these products away from the dryer. The fabric may then be washed and dried normally. Damage to your dryer caused by these products is not covered by your warranty.
Lint Filter
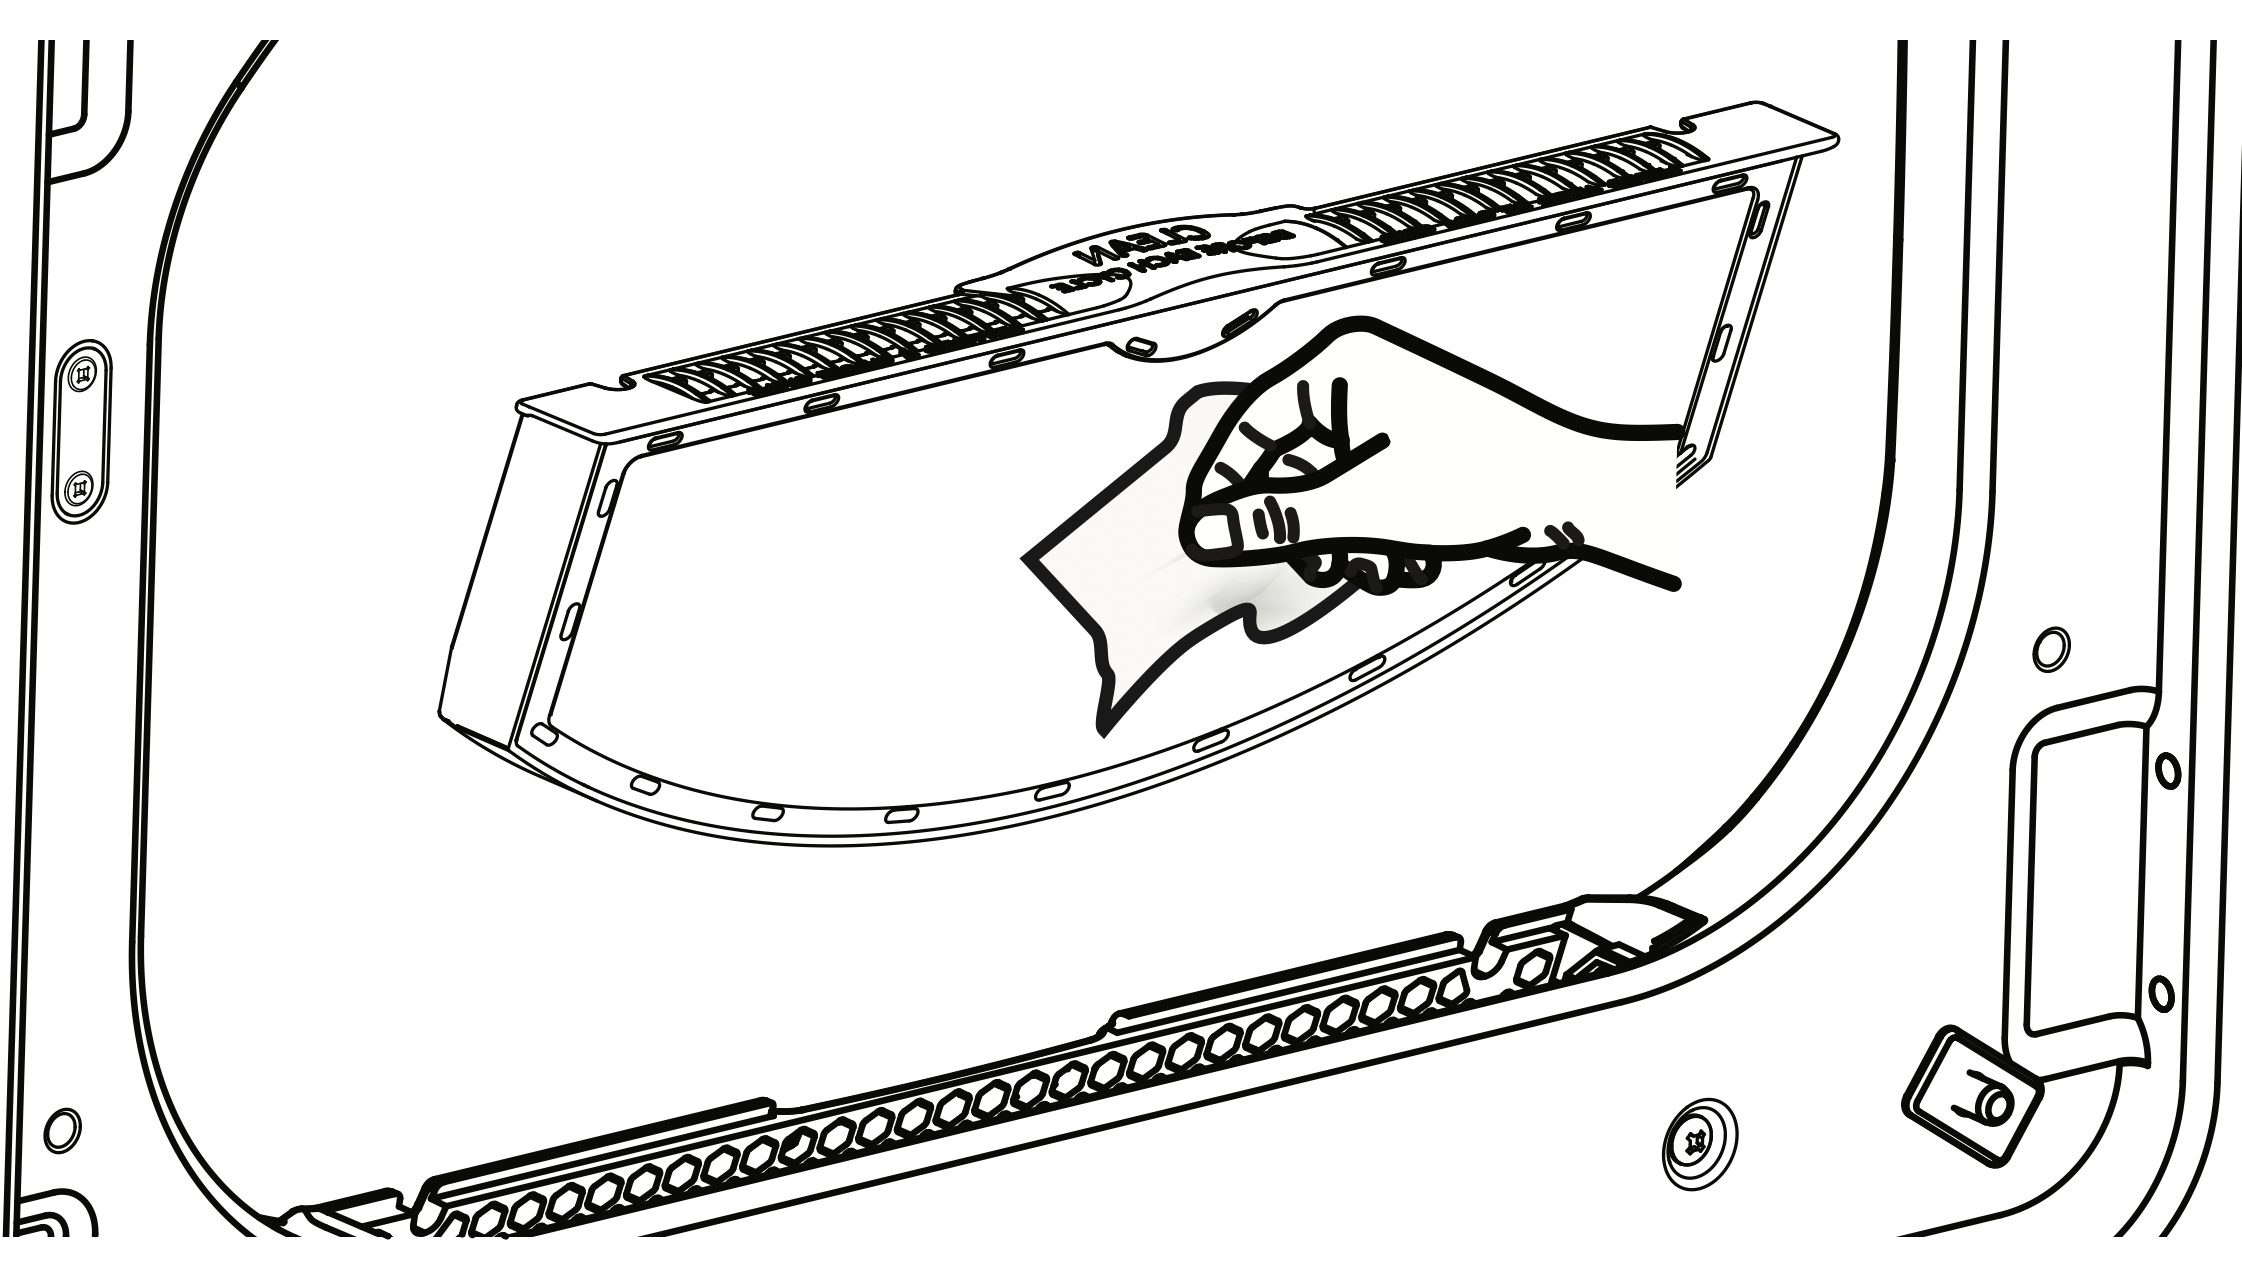
Clean the lint filter before each use.
Remove by pulling straight up. Run your fingers across the filter. A waxy buildup may form on the lint filter from using dryer added fabric softener sheets.
To remove this buildup, wash the lint screen in warm, soapy water. Dry thoroughly and replace.
Vacuum the lint from the dryer lint filter area if you notice a change in dryer performance.
NEVER OPERATE THE DRYER WITHOUT ITS FILTER IN PLACE.
Stainless Steel
To clean stainless steel surfaces use a damp cloth with a mild, non-abrasive cleaner suitable for stainless steel surfaces. Remove the cleaner residue and then dry with a clean cloth.
The stainless steel used to make the dryer drum provides the highest reliability available in a GE Appliances dryer. If the dryer drum should be scratched or dented during normal use, the drum will not rust or corrode. These surface blemishes will not affect the function or durability of the drum.
Drum Light
The drum light is an LED light. Replacement must be done by a qualified technician.
TROUBLESHOOTING
| Problem |
Possible Cause |
What To Do |
|
Dryer shakes or makes noise
|
Some shaking/ noise is normal. Dryer may be sitting unevenly.
|
Move dryer to an even floor space, or adjust leveling legs as necessary until even.
|
|
Clothes take too long to dry
|
Improper or obstructed ducting
|
Check the Installation Instructions to make sure the dryer venting is correct.
Make sure ducting is clean, free of kinks and unobstructed. Check to see if outside wall damper operates easily.
|
|
Improper sorting
|
Separate heavy items from light weight items (generally, a well-sorted washer load is a well-sorted dryer load).
|
|
Large loads of heavy fabrics (like beach towels)
|
Large, heavy fabrics contain more moisture and take longer to dry. Separate large, heavy fabrics into smaller loads to speed drying time.
|
|
Controls improperly set
|
Match control settings to the load you are drying.
|
|
Lint filter is full
|
Clean lint filter before every load.
|
|
Blown fuses or tripped circuit breaker
|
Replace fuses or reset circuit breakers.
NOTE: Some electric dryers use 2 fuses/breakers, make sure both are operating.
|
|
Overloading/ combining loads
|
Do not put more than one washer load in the dryer at a time.
|
|
Underloading
|
If you are drying only one or two items, add a few items to ensure proper tumbling.
|
|
ecoDry is enabled
|
The ecoDry feature is designed to operate your dryer in the most energy efficient mode, which is not always the fastest mode. In some instances, dry times may be extended to reduce overall energy usage for the cycle.
|
|
The Dry dryness level was chosen but load is still damp
|
Load consists of a mixture of heavy and light fabrics
|
When combining heavy and light fabrics in a load, choose Max Dry.
|
|
Exhaust system is blocked
|
Inspect and clean exhaust system.
|
|
Dryer doesn’t start
|
Control panel is “asleep”
|
This is normal. Press Power to activate the control panel.
|
|
Dryer is unplugged
|
Make sure the dryer plug is pushed completely into the outlet.
|
|
Fuse is blown/ circuit breaker is tripped
|
Check the building’s fuse/ circuit breaker box and replace fuse or reset breaker.
NOTE: Some electric dryers use two fuses/ breakers, make sure both are operating.
|
|
Dryer was accidentally paused when starting Delay Dry
|
If the light on the Start/Pause button is flashing, the dryer is paused. PressStart/Pause to restart the countdown.
|
|
No numbers displayed during cycle, only lights
|
Dryer is continuously monitoring the amount of moisture in the clothes
|
This is normal. When the dryer senses a low level of moisture in the load,the dryer will display the dry time remaining.
|
|
Time Remaining jumped to a lower number
|
The estimated time may change when a smaller load than usual is drying
|
This is normal.
|
|
Cannot make as election and the dryer beeps twice
|
The dryness Level, Temp or option that you are trying to select is in compatible with the chosen dry cycle
|
This is normal.
|
|
Dryer is running but 00 is displayed in Time Remaining
|
The Wrinkle Care option was chosen
|
This is normal. During extended tumbling, the time remaining is not displayed. The extended tumbling option lasts approximately 60 minutes.
|
|
“Vent Blocked” light is on
|
Lint filter is full
|
Clean lint filter, dry a load on an automatic cycle and verify that light turns off.
|
|
Improper or obstructed ducting
|
Check the Installation Instructions to make sure the dryer venting is correct.
Make sure ducting is clean, free of kinks and unobstructed. Check to see if outside wall damper operates easily.
Dry a load on an automatic cycle and verify that light turns off.
|
|
Exhaust system is blocked
|
Inspect and clean the exhaust system.
Dry a load on an automatic cycle and verify that light turns off.
|
|
Dryer doesn’t heat
|
Fuse is blown/ circuit breaker is tripped; the dryer may tumble but not heat
|
Check the building’s fuse/ circuit breaker box and replace both fuses or reset both breakers. Your dryer may tumble if only one fuse is blown or one breaker tripped.
NOTE: Some electric dryers use 2 fuses/ breakers, make sure both are operating.
|
|
Gas service is off (gas models only)
|
Make sure gas shut off at dryer and main shutoff are fully open.
|
|
LP gas supply tank is empty or there has been a utility interruption of natural gas (gas models only)
|
Refill or replace tank. Dryer should heat when utility service is restored.
|
|
No heat temperature selected
|
Select another heat setting
|
|
Inconsistent drying times
|
Type of heat
|
Drying time will vary according to the type of heat used. If you recently changed from an electric to a gas (natural or LP) dryer, or vice versa, the drying time could be different.
|
|
Type of load and drying conditions
|
The load size, types of fabric, wetness of clothes and the length and condition of the exhaust system will affect drying times.
|
|
Clothes are still wet and dryer shut off after ashort time
|
The door was opened mid-cycle. The load was then removed from the dryer and a new load put in without selecting a new cycle
|
A dry cycle must be reselected each time a new load is put in.
|
|
Small load
|
When drying 3 items or less, choose QUICK DRY or TIMED DRY.
|
|
Load was already dry except for collars and waist bands
|
Choose QUICK DRY or TIMED DRY to dry damp collars and waist bands. In the future, when drying a load with collars and waist bands, choose More Dry.
|
|
Dryer is not level
|
Move dryer to an even floor space or adjust leveling legs as necessary until even.
|
|
Clothes are wrinkled
|
Overdrying
|
Select a shorter drying time.
Remove items while they still hold a slight amount of moisture. Select a Less Dry or Damp setting.
|
|
Letting items sit in dryer after cycle ends
|
Remove items when cycle ends and fold or hang immediately, or use the Wrinkle Care option.
|
|
Overloading
|
Separate large loads into smaller ones.
|
|
Clothes shrink
|
Some fabrics will naturally shrink when washed. Others can be safely washed, but will shrink in the dryer.
|
To avoid shrinkage, follow garment care labels exactly. Some items maybe pressed back into shape after drying. If you are concerned about shrinkage in a particular item, do not machine wash or tumble dry it.
|
|
Greasy spots on clothes
|
Improper use of fabric softener
|
Follow directions on fabric softener package.
|
|
Drying dirty items with clean ones
|
Use your dryer to dry only clean items. Dirty items can stain clean items and the dryer.
|
|
Clothes were not completely clean
|
Sometimes stains which cannot be seen when the clothes are wet appear after drying. Use proper washing procedures before drying.
|
|
Lint on clothes
|
Lint filter is full
|
Clean lint screen before each load.
|
|
Improper sorting
|
Sort lint producers (like chenille) from lint collectors (like corduroy).
|
|
Static electricity can attract lint
|
See suggestions in this section under Static occurs.
|
|
Overloading
|
Separate large loads into smaller ones.
|
|
Paper, tissue, etc., left in pockets
|
Empty all pockets before laundering clothes.
|
|
Static occurs
|
No fabric softener was used
|
Try a fabric softener.
Bounce ®Fabric Conditioner Dryer Sheets have been approved for use in all GE Appliances dryers when used in accordance with the manufacturer’s instructions.
|
|
Overdrying
|
Try a fabric softener. Adjust setting to Damp.
|
|
Synthetics, permanent pressand blends can cause static
|
Try a fabric softener.
|
|
Collars and waist bands still wet at end of cycle
|
The dryness monitor senses that the body of the clothes is dry
|
Choose QUICK DRY or TIMED DRY to dry damp collars and waist bands. In the future, when drying a load with collars and waist bands, choose Max Dry.
|
|
Slight variation inmetallic color
|
This is normal
|
Due to the metallic properties of paint used for this unique product, slight variations of color may occur due to viewing angles and lighting conditions.
|
|
Dryer continues to tumble after display says Complete
|
Wrinkle Care was selected
|
Ensure Wrinkle Care option is not selected.
|